

Recordex SimplicityTouch Quick Reference Manual

Power LED
Remote IR Sensor
PC
Home Screen USB Ports Not Used Power Input Exit Home Settings Vol. - Vol. +
Screen
Press Input to open the on screen input menu. Then tap on any input to select it.
Page #: 1 Trainer Quick Reference Guide - SimplicityTouch
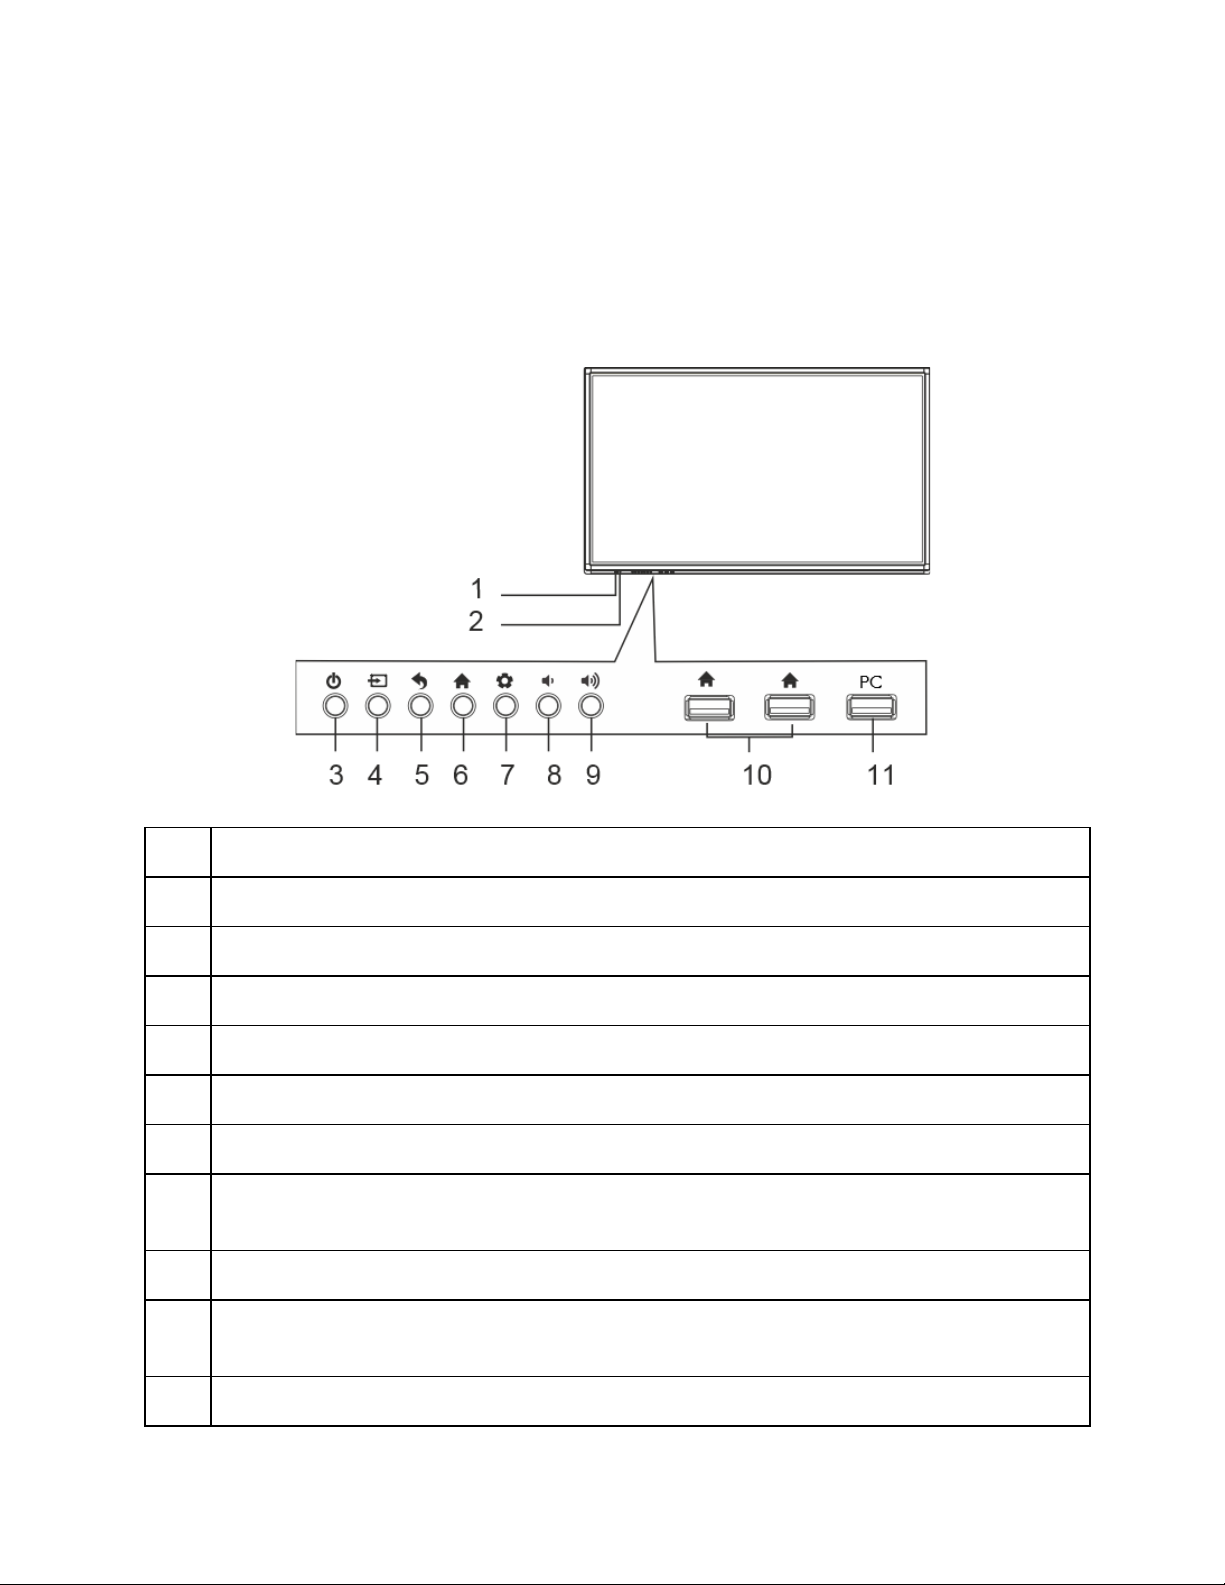
Identifying the Controls
No.
Description
1
Power Indicator LED (red=standby mode; blue=operating mode).
2
Remote Control IR Sensor.
3
Power Button. This toggles the panel between standby and operating mode.
4
Input Button. This brings up the on-screen menu for selecting the display input.
5
Back Button. Use this to exit on-screen menus and navigate the home screen.
6
Home Screen Button. This switches the panel to the internal operating system.
7
Settings Button. This opens TV settings when pressed from an input screen. It
opens wallpaper and widget options when pressed from the home screen.
8/9
Volume Up and Volume Down Button.
10
Home Screen USB 2.0 ports. Use these to connect USB devices to the Home
Screen environment.
11
USB 2.0 Port. This port is not used in your model.
Front Controls
The controls on the front of panel are also included on the remote control. Below is a
brief description of each control.
Version: 17.1.6.0 Page 13


supported commands.
Connecting Your Computer
The SimplcityTouch provides multiple options for connecting your PC to the panel: HDMI,
VGA and Display Port. HDMI is the most common, and preferred connection.
Connecting with HDMI Cable
HDMI is the preferred method for connecting your PC to the SimplicityTouch. Use the
supplied cable to make the connection from your PC to the Panel. Next, you’ll want to
connect your PC to the IR TOUCH 1 port on the panel using the included active USB cable.
Note, using other cables or using wall plates with the USB connection may cause
intermittent or total loss of touch function.
Version: 17.1.6.0 Page 19

Connecting with VGA Cable
If you PC does not have an HDMI port then you can use VGA to connect to the panel.
NOTE: When using VGA cables you may not be able to output at true HD (1920x1080)
resolution. Also, when using a VGA cable you’ll need to additionally connect to your PC
using the PC Audio cable. The VGA cable we supply includes the PC audio cable.
Next, you’ll want to connect your PC to the IR TOUCH 1 port on the panel using the
included active USB cable. Note, using other cables or using wall plates with the USB
connection may cause intermittent or total loss of touch function.
Version: 17.1.6.0 Page 20

Tips Regarding the IR Touch USB Connection
When you connect your PC to the IR TOUCH port you are able to control your PC from
the SimplicityTouch using your finger or a pen.
Touch on Microsoft Windows & Google Chrome OS
PCs running Microsoft Windows and Google Chrome OS do not require a driver to be
pre-installed. Simply make the USB connection and wait for the plug-n-play driver to be
installed. It usually only takes a few minutes and then you will have multi-touch
capability of up to 10 simultaneous points of touch for drawing.
Touch on Apple OS X
Mac’s running Apple OS X will require the pre-installation of a touch screen driver. This is
available from our website and can be located here: XXXXXXXXXXXXXXXXXXXXXXX
After the driver is installed you can operate the Mac with a single point of touch. Some
multi-touch gestures are supported.
Occasionally when using a Mac you will need to calibrate the touch. See this video for
instructions on how to calibrate your SimplicityTouch on a Mac.
Loss of Touch
If you lose touch control follow these troubleshooting steps:
1. Make sure the USB cable is plugged into your PC and the Panel.
2. If you are running OS X make sure the driver is installed.
3. Make sure you are using the cable supplied with the panel.
4. Unplug and re-plug the cable to see if touch is restored.
5. Unplug and try a different USB port on your computer.
6. If the above steps do not work then try a shorter USB cable.
7. If all of the above fail to restore touch then contact tech support: 888-712-0278 or
support@recordexusa.com
Advanced Touch Controls
The SimplicityTouch (Gen3 and later) support dual touch output. This means that you
can have two devices connected at all times and use the onscreen input menu to switch
between devices. For example, you may have a teacher’s PC connected to HDMI 1 and IR
TOUCH 1, and also a wireless collaboration device (i.e. Vivitek NovoPro) connected to
HDMI 2 and IR Touch 2. In this setup you can use the Input to switch between HDMI 1
and 2 and the touch control will also switch between device 1 and device 2. For
instructions on how to setup the panel to support this read this how to guide:
xxxxxxxxxxxxxxxxxxxxxxxxxxxx.
Version: 17.1.6.0 Page 21

On-Screen Quick Annotation
The SimplicityTouch is equipped with a very simple on-screen annotation application that
is integrated into the firmware of the panel. This application allows you to draw over any
image displayed on the screen without installing any software. To activate the on-screen
quick annotation swipe up using two fingers from the bottom middle edge of the screen
as depicted below. This will open the floating menu as shown.
Tap on the icon that appears to open the floating window (note, if the
floating menu appears ‘grayed out’ then swipe up from bottom middle
edge of screen again to re-activate the menu. Tapping on the icon will
open the floating menu tools.
Version: 17.1.6.0 Page 24

Floating Menu Expanded
The expanded floating menu has 6 button. The center button takes you to the
homescreen desktop. The other buttons are described below.
Drawing Menu Expanded
The drawing menu offers the following selections.
Version: 17.1.6.0 Page 25

Bundled Applications
Home Screen
The home screen is where you will access all the applications and features of the
embedded Android operation system that is included with your SimplicityTouch. Pressing
the Home button on your remote control or on the main button bar on the front of the
panel will open the Home Screen.
Image: Home Screen (navigation)
Version: 17.1.6.0 Page 22
 Loading...