

USER MANUAL
www.recordergear.com
RecorderGear™ and respective logos are trademarks of
Teton Webstores LLC ©2017 ALL RIGHTS RESERVED
MID: P600
All RecorderGear™ brand products are backed by our
In order to comply with 18 U.S. Code § 2512 federal law, the
audio recording function is turned o by default on the PB500.
To use this device 100% legally within the USA, you must record
video with audio recording turned o . If you are located in a
country or a part of a government entity where this law does not
apply, you can enable the audio recording function within the
settings menu. RecorderGear products are sold NOT for illegal
use and are sold for their intended legal use only. RecorderGear
will not be held liable for any illegal use of this product.
1 Year Warranty
1 Year Warranty. For full details visit
www.recordergear.com

Table of Contents
1. Charging
2. Insert SD card
3. Power On/O
4. Continuous Video Recording Mode
5. Motion Detection Recording Mode
6. Photo Taking Mode
7. Playback Files
8. Time and Date Stamp Settings
9. Video Resolution Settings
10. Photo Resolution Setting
11. Loop Recording Setting /
Video Interval Setting
12. Power Bank Function
13. Specs Sheet
4
5
6
7
7
8
9
10
11
13
15
17
19
19

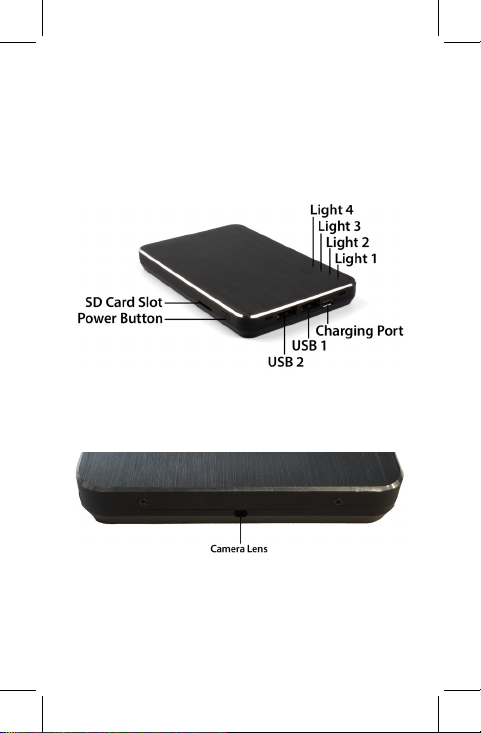
1 Charging
The PB500 takes approximately 3.5hrs to fully
charge. For rst time use, we recommend fully
charging the PB500 for the best results.
To charge the PB500:
A. Connect the PB500 via the micro USB cable to
the USB port of your computer or a wall outlet
with a charging adapter
B. Light 1 will begin to ash and will continue
ashing until fully charged
C. When the PB500 is fully charged, light 1 and 2
will stay on
5

2 Insert SD card
The PB500 supports up to a 32GB micro SD card.
Do not power on the PB500 before inserting a
memory card.
A. Insert a micro SD card into the memory card
slot. We recommend using a brand new class 10
micro SD card
B. You will feel and hear a click when the card
has been inserted correctly
C. To remove the SD card, push the card in until
you hear and feel a spring release; the card will
be ejected when you let go
NOTE:
If no SD card is inserted and you try to record,
the indicator light will ash a number of times,
depending on the mode, and enter back into
standby mode indicated by a solid blue light on
light 4.
6

3 Power On/O
A. To Power On the PB500:
1. Make sure an SD card is inserted
2. Press the power button
3. The PB500 will enter into standby mode indi-
cated by a solid blue light on light 4
B. To Power O the PB500:
1. Hold down the power button until light 4
ashes 4 times
2. The light will shut o indicating the PB500 is
powered o
4 Continuous Video
Recording Mode
Continuous recording mode captures
uninterrupted video.
A. Start Continuous Video Recording:
1. Power on the PB500
2. While the PB500 is in standby mode, press the
power button
3. Light 3 will ash blue two times and turn o
indicating continuous recording has begun
7

NOTE:
Recorded les are saved directly to the SD card
in 5, 10, or 15 minute intervals depending on
your settings.
B. Stop Continuous Video Recording:
1. Press the power button once
2. Light 3 will ash blue twice then enter into
standby mode indicated by a solid blue light on
light 4
5 Motion Detection
Recording Mode
A. Begin Motion Detection Video Recording:
1. Power on the PB500
2. While the PB500 is in standby mode, press and
hold the power button for three seconds
3. Light 3 will ash for approximately 15 seconds
and then shut o
4. Every time motion is detected light 3 will ash
once and the PB500 will begin recording
B. Stop Motion Detection Video Recording:
1. Press the power button once
2. The device enter into standby mode indicated
by a solid blue light on light 4
8

NOTE:
The PB500 will begin detecting motion and
recording 15 seconds after entering into motion
detection mode.
There is a 1 second delay between when the
PB500 detects motion and when it begins
recording.
While in motion detection it records in 5 minute
intervals.
6 Photo Taking Mode
A. Insert a micro SD card
B. Power on the PB500
C. Press the power button twice while in standby
mode, light 3 will ash and return to standby
mode indicating a picture has been taken
9

7 Playback Files
To view your les, use one of two methods:
A. Removing SD Card from PB500:
1. Power o the PB500
2. Push the SD card into the PB500 until you
feel and hear a spring release; the card will eject
when you let it go
3. Insert the SD card into a card reader and then
into a PC
4. Open the disk that appears on your PC
desktop
5. Click on the video folder
B. Connect your PB500 directly to the PC:
1. Power o the PB500 with the micro SD card
still installed
2. Connect your PB500 to your PC via the micro
USB cable
3. Open the disk that appears on your PC
desktop
4. Click on the video folder
10

8 Time and Date
Stamp Settings
This feature allows you to edit the date and time
on your PB500.
To edit the date and time, use one of two
methods:
A. Removing SD Card from PB500:
1. Power o the PB500
2. Push the SD card into the PB500 until you
feel and hear a spring release; the card will be
ejected when you let go
3. Insert the SD card into a card reader and then
into a PC
4. Open the disk that appears on your PC
desktop
5. Create a new text le named “timeset.txt”
6. Enter your desired date and time in the
following format, on the rst line of the text le:
YYYY.MM.DD for the date and HH:MM:SS for the
time. After the date and time, put either Y or
N. Enter Y, if you want the time and date stamp
to display as a watermark on the video. Enter
N if you do not want it displayed (ex. 2017.9.13
12:00:00 Y)
7. Save and close the le titled “timeset.txt”
11

(Save the le onto the SD card)
8. Eject the SD card
9. Insert the SD card into the PB500
10. Power on the PB500 and the changes will
take eect
B. Connect your PB500 Directly to the PC:
1. Power o the PB500
2. Connect your PB500 to your PC via the micro
USB cable
3. Open the disk that appears on your PC
desktop
4. Create a new text le named “timeset.txt”
5. Enter your desired date and time in the
following format, on the rst line of the text le:
YYYY.MM.DD for the date and HH:MM:SS for the
time. After the date and time, put either Y or
N. Enter Y, if you want the time and date stamp
to display as a watermark on the video. Enter
N if you do not want it displayed (ex. 2017.9.13
12:00:00 Y)
6. Save and close the le titled “timeset.txt”
(Save the le onto the PB500)
7. Eject the PB500
8. Power on the PB500 and the changes will take
eect
12

9 Video Resolution
Settings
There are 3 dierent video resolutions that you
can choose from: 1080P, 720P, 480P.
To edit the video resolution, use one of two
methods:
A. Removing SD Card from PB500:
1. Power o the PB500
2. Push the SD card into the PB500 until you
feel and hear a spring release; the card will be
ejected when you let go
3. Insert the SD card into a card reader and then
into a PC
4. Open the disk that appears on your PC
desktop
5. Create a new text le named “vsize.txt”
6. Enter the number 0, 1, or 2 on the rst line of
the text le
NOTE: 0=1920x1080, 1=1280x720, 2 =640x480.
7. Save and close the le titled “vsize.txt” (Save
the le onto the SD card)
8. Eject the SD card
9. Insert the SD card into the PB500
10. Power on the PB500 and the changes will
take eect
13

B. Connect your PB500 Directly to the PC:
1. Power o the PB500
2. Connect your PB500 to your PC via the micro
USB cable
3. Open the disk that appears on your PC
desktop
4. Create a new text le named “vsize.txt”.
5. Enter the number 0, 1, or 2 on the rst line of
the text le
NOTE: 0=1920x1080, 1=1280x720, 2 = 640x480.
6. Save and close the le titled “vsize.txt” (Save
the le onto the PB500)
7. Eject the PB500
8. Power on the PB500 and the changes will take
eect
14

10 Photo Resolution
Settings
There are 4 dierent photo resolutions that
you can choose from: 4032x3024, 2650x1920,
2048x1536, 1280x960
To edit the photo resolution, use one of two
methods:
A. Removing SD Card from PB500:
1. Power o the PB500
2. Push the SD card into the PB500 until you feel
and hear a spring release the card will be ejected
when you let go
3. Insert the SD card into a card reader and then
into a PC
4. Open the disk that appears on your PC
desktop
5. Create a new text le named “psize.txt”
6. Enter the number 0, 1, 2, or 3 on the rst line
of the text le
NOTE: 0 = 4032x3024, 1 = 2650x1920, 2 =
2048x1536, 3 = 1280x960.
7. Save and close the le titled “psize.txt” (Save
the le onto the SD card)
8. Eject the SD card
9. Insert the SD card into the PB500
15

10. Power on the PB500 and the changes will
take eect
B. Connect your PB500 Directly to the PC:
1. Power o the PB500
2. Connect your PB500 to a PC via the micro USB
cable
3. Open the disk that appears on your PC
desktop
4. Create a new text le named “psize.txt”
5. Enter the number 0, 1, 2, or 3 on the rst line
of the text le
NOTE: 0 = 4032x3024, 1 = 2650x1920, 2 =
2048x1536, 3 = 1280x960.
6. Save and close the le titled “psize.txt” (Save
the le onto the PB500)
7. Eject the PB500
8. Power on the PB500 and the changes will take
eect
16

11 Loop Recording Setting
/ Video Interval Setting
To edit loop recording/video interval length,
use one of two methods:
A. Removing SD Card from PB500:
1. Power o the PB500
2. Push the SD card into the PB500 until you
feel and hear a spring release; the card will be
ejected when you let go
3. Insert the SD card into a card reader and then
into a PC
4. Open the disk that appears on your PC
desktop
5. Create a new text le named “vtime.txt”
6. Put two numbers into the text le. Ex 00
NOTE: The rst number is for loop recording
and the second is the setting for video interval
length.
7. Enter 0 for the rst number to deactivate loop
recording or enter 1 to activate loop recording
8. Enter either 0, 1, or 2 for the second number
(note: 0 = 5 min, 1 = 10 min, 2 = 15 min)
9. Save and close the le titled “vtime.txt” (Save
the le onto the SD card)
10. Eject the SD card
11. Insert the SD card into the PB500
17

12. Power on the PB500 and the changes will
take eect
B. Connect your PB500 Directly to the PC:
1. Power o the PB500
2. Connect your PB500 to a PC via the micro USB
cable
3. Open the disk that appears on your PC
desktop
4. Create a new text le named “vtime.txt”
5. Put two numbers into the text le. (ex. 00)
NOTE: The rst number is for loop recording
and the second is the setting for video interval
length.
6. Enter 0 for the rst number to deactivate loop
recording or enter 1 to activate loop recording
7. Enter either 0, 1, or 2 for the second number
(note: 0 = 5 min, 1 = 10 min, 2 = 15 min)
8. Save and close the le titled “vtime.txt” (Save
the le onto the PB500)
9. Eject the PB500
10. Power on the PB500 and the changes will
take eect
18

12 Power Bank Function
Plug in your selected charging cord into the usb
outlet of the PB500, then plug in your device
that you would like to charge.
NOTE:
You can use the power bank function and video
recording function at the same time.
13 Specs Sheet
Recording Modes Continuous, Motion Detection
Video Resolution 1080P, 720P, & 480P
Recording Segments
Time and Date
Stamp
Loop Recording Yes
Memory Support Up to 32Gb
Lense Angle 60 degrees
Video File type MOV
Photo File type JPG
Weight 118
Demensions 13.4mmx 77.8mmx 119.3mm
5 min, 10 min, 15 min
Yes
19

MID: P600
All RecorderGear™ brand products are backed by our
1 Year Warranty
1 Year Warranty. For full details visit
www.recordergear.com
 Loading...