

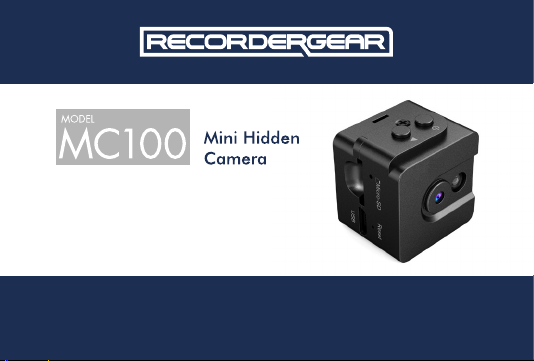
USER
MANUAL
RecorderGear™ and respective logos are trademarks of
Teton Webstores LLC ©2017 ALL RIGHTS RESERVED
www.recordergear.com
MID: Mini-01
All RecorderGear™ brand products are backed by our 1 Year
1 Year Warranty
Warranty. For full details visit
www.recordergear.com
This Device is Compliant with USA
Surveillance Laws
In order to comply with 18 U.S. Code § 2512 federal law, the audio recording function has
been removed from the MC100. You can rest assured that this device is 100% legal to use in the
USA. Please be familiar with your country and state surveillance laws before using this product.
RecorderGear products are sold NOT for illegal use and are sold for their intended legal use only.

Table of Contents
1 Charging
2 Insert Micro SD
3 Power On/Off
4 Continuous Video
Recording Mode
5 Audio detection Video
Recording Mode
6 Infrared Night Vision
7 Playback Files
8 Loop Recording
5
9 Time and Date Stamps
Settings
6
10 Reset
7
11 Specs
8
12 Indicators Lights
9
10
10
12
14
16
16
18

1 Charging
It takes 1 hour for the MC100 to fully charge. Before first time use, we
recommend allowing the MC100 to fully charge. The MC100 can be charged
using the micro USB cable provided to connect it to a wall outlet or PC
NOTE:
During charging, the yellow indicator light stays on and will turn off when
charging is complete.
When the battery is low, the red and blue indicator lights will flash alternatively
for 10 sec and the MC100 will power off.
5

2 Insert Micro SD
The MC100 supports up to a 32GB micro SD card. Do not power on the MC100
before inserting the micro SD card.
A. Insert a micro SD card into the memory card slot. We recommend using a
brand new class 10 micro SD card.
B. To remove the micro SD card, use your nail or the pin provided to slide out
the memory card.
NOTE:
If no micro SD card is inserted, the blue indicator light will blink 10 times and
turn off. Make sure to have a micro SD card inserted before use.
6

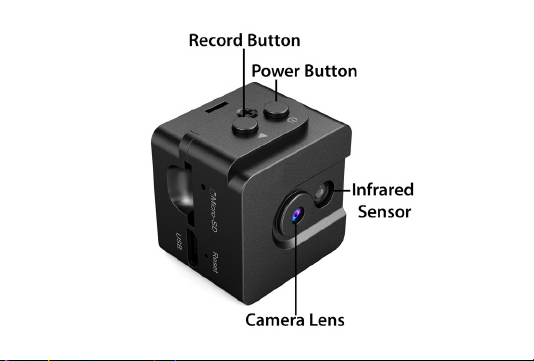
3 Power On/Off
To Power On the MC100:
A. Make sure a micro SD card is inserted.
B. Press the power button.
C. The MC100 will enter standby mode indicated by a solid blue light.
D. If no action is taken after 1 minute of the MC100 entering standby mode, it
will automatically power off to conserve power.
To Power Off the MC100:
Hold down the power button for 3 seconds: a red light will flash with a solid
blue light. The lights will then turn off indicating that the MC100 has powered
off.
7

4 Continuous Video Recording Mode
Continuous recording mode captures uninterrupted video.
To Activate Continuous Recording Mode:
A. Power on the MC100.
B. While the MC100 is in standby mode, press and hold the REC (record) button.
C. The indicator light will flash blue 3 times and turn off, indicating continuous
recording has begun.
D. Press the REC button again to stop recording and return to standby mode.
NOTE:
Recorded files are saved directly to the micro SD card in 5 minutes intervals.
The MC100 is able to record while charging.
8

5 Audio Detection Video
Recording Mode
To Activate Audio Detection Recording Mode:
A. Power on the MC100.
B. While the MC100 is in standby mode, press the power button and a solid red
indicator light will turn on and stay on.
C. The indicator light will flash red 3 times and shut off indicating audio.
detection mode has been activated.
D. To stop audio detection recording press the power again and the MC100 will
power off.
NOTE:
Recorded files are saved in 1 minute intervals.
9

6 Infrared Night Vision
The MC100 automatically activates infrared night vision when recording in
low light.
7Playback Files
The recorded files can be played back in two ways:
1. Removing micro SD Card from MC100:
A. Power off the MC100.
B. Remove the micro SD card.
C. Insert the micro SD card into a card reader then into a PC.
10

D. Open the disk that appears on your PC.
E. Click on the Video Folder.
2. Connect your MC100 Directly to the PC:
A. Power off the MC100.
B. Connect your MC100 to a PC via the micro USB cable.
C. Power on the MC100.
D. The connection will be indicated by a solid blue light and a flashing red light.
E. Open the disk that appears on your PC.
F. Click on the Video Folder.
11

8 Loop Recording
This option allows new recordings to be recorded over older files on the micro
SD card so you aren’t limited by the memory card reaching full capacity.
To activate/deactivate loop recording, use one of two methods:
1. Removing micro SD Card from MC100:
A. Power off the MC100.
B. Remove the micro SD card.
C. Insert the micro SD card into a card reader and then into a PC.
D. Open the disk that appears on your PC.
E. Open the file named “SETTIME.TXT”.
F. Change the last line (2nd line) to YES if you want to activate loop recording
or NO to disable it.
12

G. Save and close the file titled “SETTIME.TXT ”.
H. Eject the micro SD card.
I. Insert the micro SD card into the MC100.
J. Power on the MC100 and the changes will take effect.
2. Connect MC100 Directly to the PC:
A. Power off the MC100 with the micro SD card still installed.
B. Connect your MC100 to a PC via the micro USB cable.
C. Power on the MC100.
D. Open the disk that appears on your PC.
E. Open the file named “SETTIME.TXT”.
F. Change the last line (2nd line) to YES if you want to activate loop recording
or NO to disable it.
G. Save and close the file titled “SETTIME.TXT ”.
H. Eject the disk and power off the MC100.
I. Disconnect the MC100 from the PC.
J. Power on the MC100 and the changes will take effect.
13

9 Time and Date Stamps Settings
This option allows for editing the date and time of the MC100.
To edit the date and time, use one of two methods:
1. Removing micro SD Card from MC100:
A. Power off the MC100.
B. Remove the micro SD card.
C. Insert the micro SD card into a card reader then into a PC.
D. Open the disk that appears on your PC.
E. Open the file named “SETTIME.TXT”.
F. Edit the first line (Date Line) which is in the format YYYY/MM/DD to your current
date and the (time line) which is in the format HH:MM:SS to your current time.
G. Save and close the file titled “SETTIME.TXT ”
14

H. Eject the micro SD card.
I. Insert the micro SD card into the MC100.
J. Power on the MC100 and the changes will take effect.
2. Connect MC100 Directly to the PC:
A. Power off the MC100 with the micro SD card still installed.
B. Connect your MC100 to a PC via the micro USB cable.
C. Power on the MC100.
D. Open the disk that appears on your PC.
E. Open the file named “SETTIME.TXT”.
F. Edit the first line (Date Line) which is in the format YYYY/MM/DD to your current
date and the (time line) which is in the format HH:MM:SS to your current time.
G. Save and close the file titled “SETTIME.TXT ”.
H. Eject the disk and power off the MC100.
I. Disconnect the MC100 from the PC.
J. Power on the MC100 and the changes will take effect.
15

10 Reset
If for any reason your MC100 isn’t responding or recording properly, please
reset your MC100 by inserting a small pin into the reset hole until you
feel a click.
11Specs
Recording modes Continuous/ Audio Detection
Memory support Up to 32GB
Night vision Yes
Loop Recording Optional
16

Video File Format AVI
Resolution/ fps 720P, 30 fps
Video Segments 5 mins Continuous, 1 min Audio Detection
Time/ Dates stamp Yes
Battery full charged 1 hour
Battery life Night vision Continuous
recording Mode
35 min
Camera Angle 75 degrees
Records while charging Yes
Weight 14g
Dimensions 26.1mmx 24.9mmx20.6mm
17

12Indicators Lights
Solid blue Standby mode
Red light flashes 3 times Audio Detection Video recording
Blue light flashes 3 times Continuos Recording mode
Solid Yellow light Charging
Blue and flashing red light Connect to PC
18

19

MID: Mini-01
All RecorderGear™ brand products are backed by our 1 Year
1 Year Warranty
Warranty. For full details visit
www.recordergear.com
 Loading...