

USER MANUAL
www.recordergear.com
RecorderGear™ and respective logos are trademarks of
Teton Webstores LLC ©2016 ALL RIGHTS RESERVED


Table of Contents
1. Charging
2. Insert/Remove Micro SD
A. Insert Micro SD
B. Remove Micro SD
3. Power On/O
A. Power on the BC50
B. Power o the BC50
4. Continuous Video Recording Mode
A. Activating the Continuous Recording mode
5. PIR Motion Detection Video Recording Mode
A. Activating the PIR motion detection Mode
6. Audio Option
7. Infrared Night Vision
8. Loop Recording
A. Activating and Deactivating Loop Recording by
Removing SD Card from your BC50
B. Activating and Deactivating Loop Recording by
Connecting your BC50 directly to the PC
9. Time and Date Stamp Settings
A. Changing Time and Date By removing SD Card
from your BC50
B. Changing Time and Date By Connecting your
BC50 directly to the PC
4
4
5
5
6
6
6
7
8
10. Playback Files
A. Connect your BC50 directly to the PC
B. Removing SD Card from BC50
11. Reset
Specs
9
9
10
1 Charging
It takes 20hrs for the BC50 to be fully charged. For the rst charge, we recommend allowing
the BC50 to charge for the full 20hrs without use. The BC50 can be charged by using the
micro USB cable provided to connect the BC50 via the USB cable slot to a USB power adapter
connected to a wall outlet or into your PC’s USB slot.
NOTE:
During charging, the indicator light stays yellow.
When the battery is full, the yellow light turns o.
When the battery is low, the red and blue light will ash alternatively for 10 sec and the BC50
will power o.
2 Insert/Remove Micro SD
The BC50 records video footage to a micro SD card. It will not function without an SD card. It
supports up to a 32GB micro SD Card; We recommend using a class 10 card. Do not turn on
the BC50 before inserting the memory card.
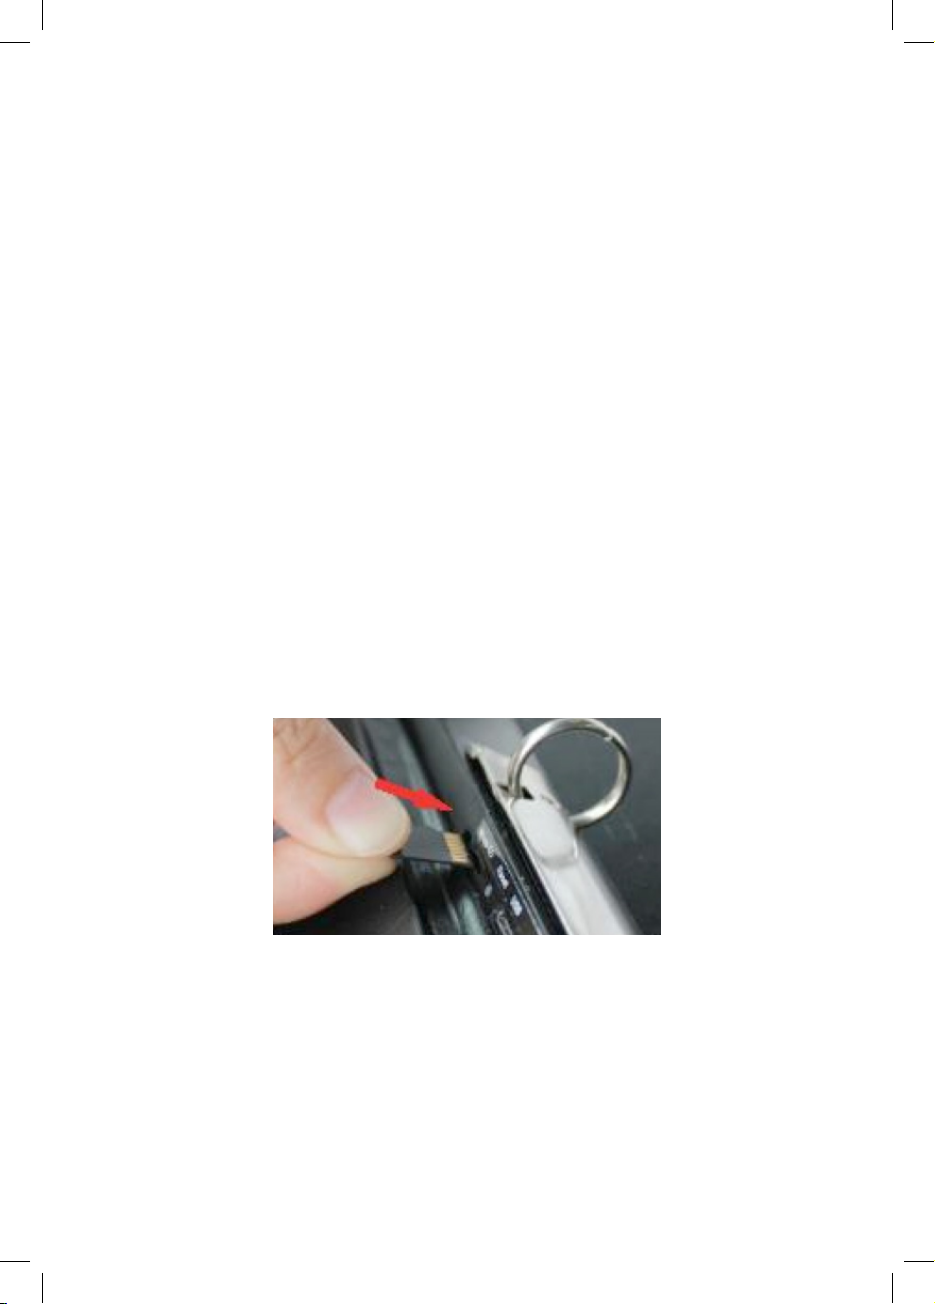
A. Insert Micro SD:
1. Insert a brand new memory card into the memory card slot as shown in the picture.
2. You will feel and hear a click when the card has been inserted correctly.
B. Remove Micro SD:
1. Push the card in until you hear and feel a spring release.
2. Let the card go and it will be ejected from the slot.
NOTE:
If SD card isn’t inserted, the indicator light will blink blue or red for REC or MD modes
respectively for 10 seconds and turn o.
4

3 Power On/O
A. Power on the BC50:
1. Insert Micro SD card
2. Slide the power switch to either REC or MD.
3. The BC50 will begin recording in either the REC mode or the MD mode depending on
which you slide the switch to.
B. Power o the BC50:
1. slide the power switch from either MD or REC mode to the OFF position.
4 Continuous Video Recording Mode
The continuous video recording mode records video continuously.
A. Activating the Continuous Recording mode:
1. Slide the power switch to the REC mark.
2.The indicator light will ash blue 3 times and go o to indicate continuous recording has
been activated.
NOTE:
Video les are saved directly to SD card in 2 minutes intervals.
The battery life supports up to 30hrs of continuous recording.
The battery life supports 9-10hrs of continuous recording when night vision is activated.
Camera view angle is 75 degree.
5

5 PIR Motion Detection Video
Recording Mode
“A passive infrared sensor (PIR sensor) is an electronic sensor that measures infrared (IR) light
radiating from objects in its eld of view” - Wikipedia. This mode will only record when it senses
the presence of any moving object producing enough infrared (heat) like a human.”
A. Activating the PIR detection video recording mode:
1. Slide the power switch to the MD mark.
2. The indicator light will ash alternatively between red and blue once
3. Then it will ash red 3 times and turn o to indicate PIR censoring has been activated.
4. This indicator will repeat itself every time motion is sensed.
NOTE:
Video les are saved in 2 minute intervals.
PIR Battery life (standby time) can last up to 2 years (24 months).
The maximum distance motion can be detected is 16-26 feet.
The motion sensor detection angle is 60 degrees.
Camera view angle is 75 degree.
6 Audio Option
This option allows you to control audio recording in the videos. If you want sound to be
recorded on the video, slide the AUDIO switch to the Audio On position. If you don’t want
sound to be recorded, slide the AUDIO switch to the OFF position.
7 Infrared Night Vision
The BC50 automatically activates infrared night vision when recording in low light for both
Continuous and PIR motion detection recording modes.
6

8 Loop Recording
This option allows new video recordings to be recorded over older video les on the memory
card so recording is never stopped due to a full memory card.
A. Activating and Deactivating Loop Recording by Removing SD Card from BC50:
1. Power o the BC50.
2. Push the SD card into the BC50 until you hear a spring release. The card will be ejected
when you let it go .
3. Insert the SD Card in a card reader.
4. Open the disk that appears on your PC.
5. Open the le named “YW_TIME”.
6. Change the Last line (4th line) to YES if you want Loop recording active or NO if you don’t
want it active and save changes.
7. Close the le titled “YW_TIME”.
8. Eject the SD card.
9. Insert the SD card into the BC50.
10. Slide the power switch to the REC position. The changes you make will be in eect.
B. Activating and Deactivating Loop Recording by Connecting your BC50 directly to a PC:
NOTE:
SD card must be inserted into the BC50 for step 8-B.
1. Power o the BC50.
2. Connect your BC50 to a PC via the micro USB cable.
3. Slide the power switch to the REC position.
4. Open the disk that appears on your PC.
5. Open the le named “YW_TIME”.
6. Change the Last line (4th line) to YES if you want Loop recording active or NO if you don’t
want it active and save changes.
7. Close the le titled “YW_TIME”.
8. Eject the BC50 and slide the power switch from the REC position to the OFF position .
9. Disconnect the BC50 from the PC and Slide the power switch to the REC position. The
changes you make will be in eect.
7

9 Time And Date Stamps Settings
This option allows you to edit the date and time of your BC50.
A. Changing Time and Date By removing SD Card from BC50:
1. Power o the BC50.
2. Push the SD card into the BC50 until you feel and hear a spring release. The card will be
ejected when you let it go.
3. Insert the SD Card in a card reader.
4. Open the disk that appears on your PC.
5. Open the le named “YW_TIME”.
6. Edit the second line (Date Line) which is in the format YYYY/MM/DD to your current date
and the third line (time line) which is the format HH:MM:SS to your current time.
7. Close the le titled “YW_TIME”.
8. Eject the SD card.
9. Insert the SD card into the BC50.
10. Slide the power switch to the REC position. The changes you make will be in eect.
B. Changing Time and Date By Connecting your BC50 directly to the PC:
NOTE:
SD card must be inserted into the BC50 for step 9-B.
1. Power o the BC50.
2. Connect your BC50 to a PC via the micro USB cable.
3. Slide the power switch to the REC position.
4. Open the disk that appears on your PC.
5. Open the le named “YW_TIME”.
6. Edit the second line (Date Line) which is in the format YYYY/MM/DD to your current date
and the third line (time line) which is in the format HH:MM:SS to your current time.
7. Close the le titled “YW_TIME”.
8. Eject the BC50 and slide the power switch from the REC position to the OFF position.
9. Disconnect the BC50 from the PC and Slide the power switch to the REC position. The
changes you make will be in eect.
8

10 Playback Files
The recorded les can be played back in two ways:
A. Connect your BC50 directly to the PC:
NOTE:
SD card must be inserted into the BC50 for step 10-A.
1. Power o the BC50.
2. Connect your BC50 to a PC via the micro USB cable.
3. Slide the power switch to the REC position.
4. Open the disk that appears on your PC.
5. Click on the Video Folder.
B. Removing SD Card from BC50:
1. Power o the BC50.
2. Push the SD card into the BC50 until you feel and hear a spring release. The card will be
ejected when you let it go.
3. Insert the SD Card in a card reader.
4. Insert the card reader to the SD card slot on the PC.
5. Open the disk that appears on your PC.
6. Click on the Video Folder.
11 Reset
If for any reason your BC50 isn’t responding or recording properly, please reset your BC50 by
inserting a small pin into the reset hole until you feel a click.
9

Specs
Size 21x15x4cm
Weight 415g
Battery 10,000Ma
Standby Power Consumption 10uA
PIR Detection Angle 60°
Camera Angle 72°
Resolution 1080P (30fps)
Video Format AVI
Memory (SD Card) Up to 32GB
10

In order to comply with 18 U.S. Code § 2512 federal law, the audio recording
function is turned o by default on the BC50. To use this device 100% legally within the USA, you must record video with audio recording turned o
. If you are located in a country or a part of a government entity where this
law does not apply, you can enable the audio recording function by switching the audio switch to the Audio On position.
Please be familiar with your country and state surveillance laws before using
this product. RecorderGear products are sold NOT for illegal use and are
sold for their intended legal use only. RecorderGear will not be held liable
for any illegal use of this product.
11

1 Year Warranty included with all RecorderGear™
brand products. See our website at www.recordergear.
com for more details.
 Loading...