

Page 1

Outdoor Series Camera
User Manual
Copyright: April 2018
Page 2

1 RECONYX®, Inc.
Table of Contents
I. Table of Contents ................................................................... 1
II. Camera Overview ................................................................... 2
III. HyperFire 2
™
Controls & Part Diagram................................. 3
IV. Batteries & Memory Cards .................................................... 4
V. Setup & Programming ........................................................... 9
VI. Mounting Your Camera ........................................................ 16
VII. Locking & Securing Your Camera ...................................... 17
VIII. Aiming Your Camera ............................................................ 18
IX. Image Data Information ....................................................... 20
X. Additional Camera Options ................................................. 21
XI. Troubleshooting ................................................................... 22
XII. Warranty, FCC, and Safety Information ............................. 25
XIII. Your Information and Camera Warranty Registration ...... 27
XIV. Copyright & Trademark Information ................................... 27
Page 3

www.reconyx.com 2
Camera Overview
Congratulations on purchasing a RECONYX® camera. RECONYX® has been the
leader in digital wildlife cameras since 2002. Your HyperFire 2™ camera is a
state-of-the-art digital camera with a Passive Infrared (PIR) motion detector and
a night time infrared illuminator. All contained in a secure, rugged and weatherresistant case.
Whether you are using the camera for scouting deer or studying wildlife, you will
find that using the HyperFire 2™ camera in conjunction with BuckView™
Advanced software will be one of your most valuable tools in gathering and
analyzing data. This software is available to download for free from our website
at www.reconyx.com/software/buckview.
Thank you for putting your trust in us!
Contents of this package:
• HyperFire 2™ Camera
• Adjustable Webbing Strap for mounting camera
• This instruction manual
Other things you will need:
• Secure Digital® (SD, SDHC or SDXC) Memory Card up to 512GB
• 12 AA Batteries
NOTE: NiMH rechargeable batteries or Energizer® 1.5V AA Ultimate Lithium™ are
the only battery types recommended in RECONYX® Cameras.
NOTE: If you have any questions or concerns relating to the operation or
functionality of your camera, please contact our Technical Service
Department by email at support@reconyx.com or by calling toll free
866-493-6064.
Page 4

3 RECONYX®, Inc.
HyperFire 2™ Controls & Part Diagram
Page 5

www.reconyx.com 4
Batteries & Memory Cards
Accessing Batteries, Memory Card & Camera Controls
To install the batteries and memory card, open the latch on the right side of the
camera by grasping behind the latch and flipping it toward the front. The camera
will open like a book, allowing access to the batteries, memory card and settings.
Step 1
Step 2
Step 3
TIP: Each time you open your camera it’s a good practice to:
• Make sure the main gasket is seated properly and is clear of debris.
• Be sure that the windows on the front of your camera are clean.
• Also be sure the latch is fully seated when closing your camera to ensure a
weather-tight seal.
Page 6

5 RECONYX®, Inc.
Battery Specifications and Installation
The RECONYX® HyperFire 2™ camera uses 12 AA-cell batteries. We highly
recommend using either Energizer® Ultimate Lithium™ batteries or high-quality
NiMH Rechargeable batteries in your camera. Alkaline batteries are not
recommended. They do not provide as much power as Lithium or NiMH batteries
and are adversely affected by both hot and cold weather.
NiMH will operate at temperatures down to 0°F; Lithium batteries to -40°F.
NOTE: We strongly advise that you not attempt to run alkaline batteries in your
RECONYX® cameras as the performance will be very poor. Also, alkali
damage caused by alkaline batteries is not covered under warranty.
NOTE: Be sure to load batteries in the proper orientation (alternating
positive/negative, six in each battery bay).
Warning! Do not mix battery types! Damage to the camera can result and your
warranty will be voided if you mix battery types.
Page 7

www.reconyx.com 6
Battery Performance
Because camera settings, animal activity, individual battery performance and
temperature all vary, there is no way to precisely predict a camera’s run time, the
total number of images that can be taken or the temperature at which the camera
will operate on any given set of batteries. Therefore, the following table shows
approximate values and should be used as a guide in determining what type of
batteries will best suit your needs.
NOTE: The values in the chart below were based on tests using 12 batteries;
taking 50% daytime photos and 50% nighttime photos at 70ºF. Use of
video will greatly affect these estimates.
Battery Type
Operating
Temperature
Number of Images
AA Energizer® Ultimate
Lithium™ (1.5V)
-40º F (-40ºC)
and above
30,000 to 40,000
AA Rechargeable
Nickel-Metal Hydride
(1.2V, 2600MaH)
0º F (-18ºC)
and above
20,000 to 30,000
* High temperatures can reduce run time with NiMH batteries by 50% or more.
TIP: You can purchase 1.5V Lithium batteries as well as RECONYX® certified
NiMH rechargeable batteries and chargers at www.reconyx.com.
Your camera will display the status based upon battery type. Be sure that the
display is showing the same type of battery that you are using. You can change
the battery type in the main menu, including Lithium (LITH) or Nickel-Metal
Hydride (NIMH).
Page 8

7 RECONYX®, Inc.
Secure Digital® (SD, SDHC, SDXC) Card Specifications
A Secure Digital (SD/SDHC/SDXC) card is used to store the pictures your
camera captures. These images may be transferred to your computer using
standard image viewing software or RECONYX® BuckView™ mapping and
image management software.
TIP: Many digital cameras and smartphones can be used to view images taken
by the HyperFire 2™ camera. No need to purchase a special purpose
viewer!
Insertion and Removal of the memory card
Make sure the orientation is correct and that the card is aligned properly. Push
gently on the memory card as shown below until it clicks into place.
Warning! Inserting the memory card upside down or backwards could
damage the camera or the memory card. Damage resulting from inserting
the card incorrectly is not covered under warranty.
To remove memory cards:
1) Press <OK> to disarm the camera (the battery status and number of
pictures taken since last armed will be displayed on the LCD).
2) Switch the power OFF.
3) Press and release the card to partially eject the memory card.
4) The card can then be removed by grasping it with your fingers.
NOTE: Always disarm the camera (by pressing OK) and switch the power off
before removing or inserting the memory card.
Page 9

www.reconyx.com 8
Memory Card - File System Requirements
Secure Digital cards have various speeds and capacities. Larger capacity cards
are capable of storing more images. Your HyperFire 2™ camera can accept
cards up to 512GB, but most users will find 32GB cards to be more than
adequate for normal use.
Cards with higher speed ratings are capable of reading and writing images faster.
This is advantageous when taking RapidFire™ image sequences or videos.
NOTE: A 32 GB memory card will store approximately 80,000 images, or 3
hours of video.
Troubleshooting your memory card
If you have a memory card that does not seem to work or you used the card in
another device, you may have to re-format your memory card. This can be done
with the included BuckView™ software under the “Tools” menu item or with any
Windows® Operating System.
Windows® – Steps to format memory card
Step 1: Insert your memory card into your computer's card reader.
Step 2: You should see your memory card under the list of available drives. Be
sure to check its contents first to make sure that you have the right drive.
Step 3: Right-click on the drive and choose “Format”. (Do not check “Quick
Format”.)
Step 4: Once the process is completed, take the memory card out and insert it
into your Camera.
TIP: We recommend that you purchase two memory cards per camera so that
you can swap cards in the field.
You can purchase RECONYX® certified memory cards at
www.reconyx.com
Page 10

9 RECONYX®, Inc.
Setup & Programming
With the SD card inserted in the camera, turn the camera on using the On/Off
switch.
If this is the first time you’ve used your camera, it will take you through a setup
wizard to help you with initial setup. It will start by asking you to set the date.
Use the up and down buttons to change numbers and the right and left buttons to
scroll through settings for year, month and date. The OK button will take you to
the Set Time screen. Proceed through the setup wizard until setup is complete.
TIP: After the initial setup options are set, your camera is ready to take pictures.
All you need to do is make sure your camera has a card and batteries installed,
mount it, turn it on, close it up, and walk away. The camera will automatically arm
and start taking pictures (with default settings) in two minutes.
Default Settings
NOTE: Throughout this manual, default camera settings are
shown in red letters.
Your RECONYX® HyperFire 2™ camera comes pre-programmed with factory
default settings. By default the camera will run in the Quickset Trail mode, which
takes 3 pictures per trigger with a 1 second pause between pictures and no delay
between triggers.
If you wish to change your camera’s settings you can do so easily in the field at
any time. Changes are easily made using the control buttons and the LCD
display. Once you make selections, they are retained by the camera – even
when the camera is off and the batteries are removed – so that you don’t need to
make selections again unless you want to make any changes.
Page 11

www.reconyx.com 10
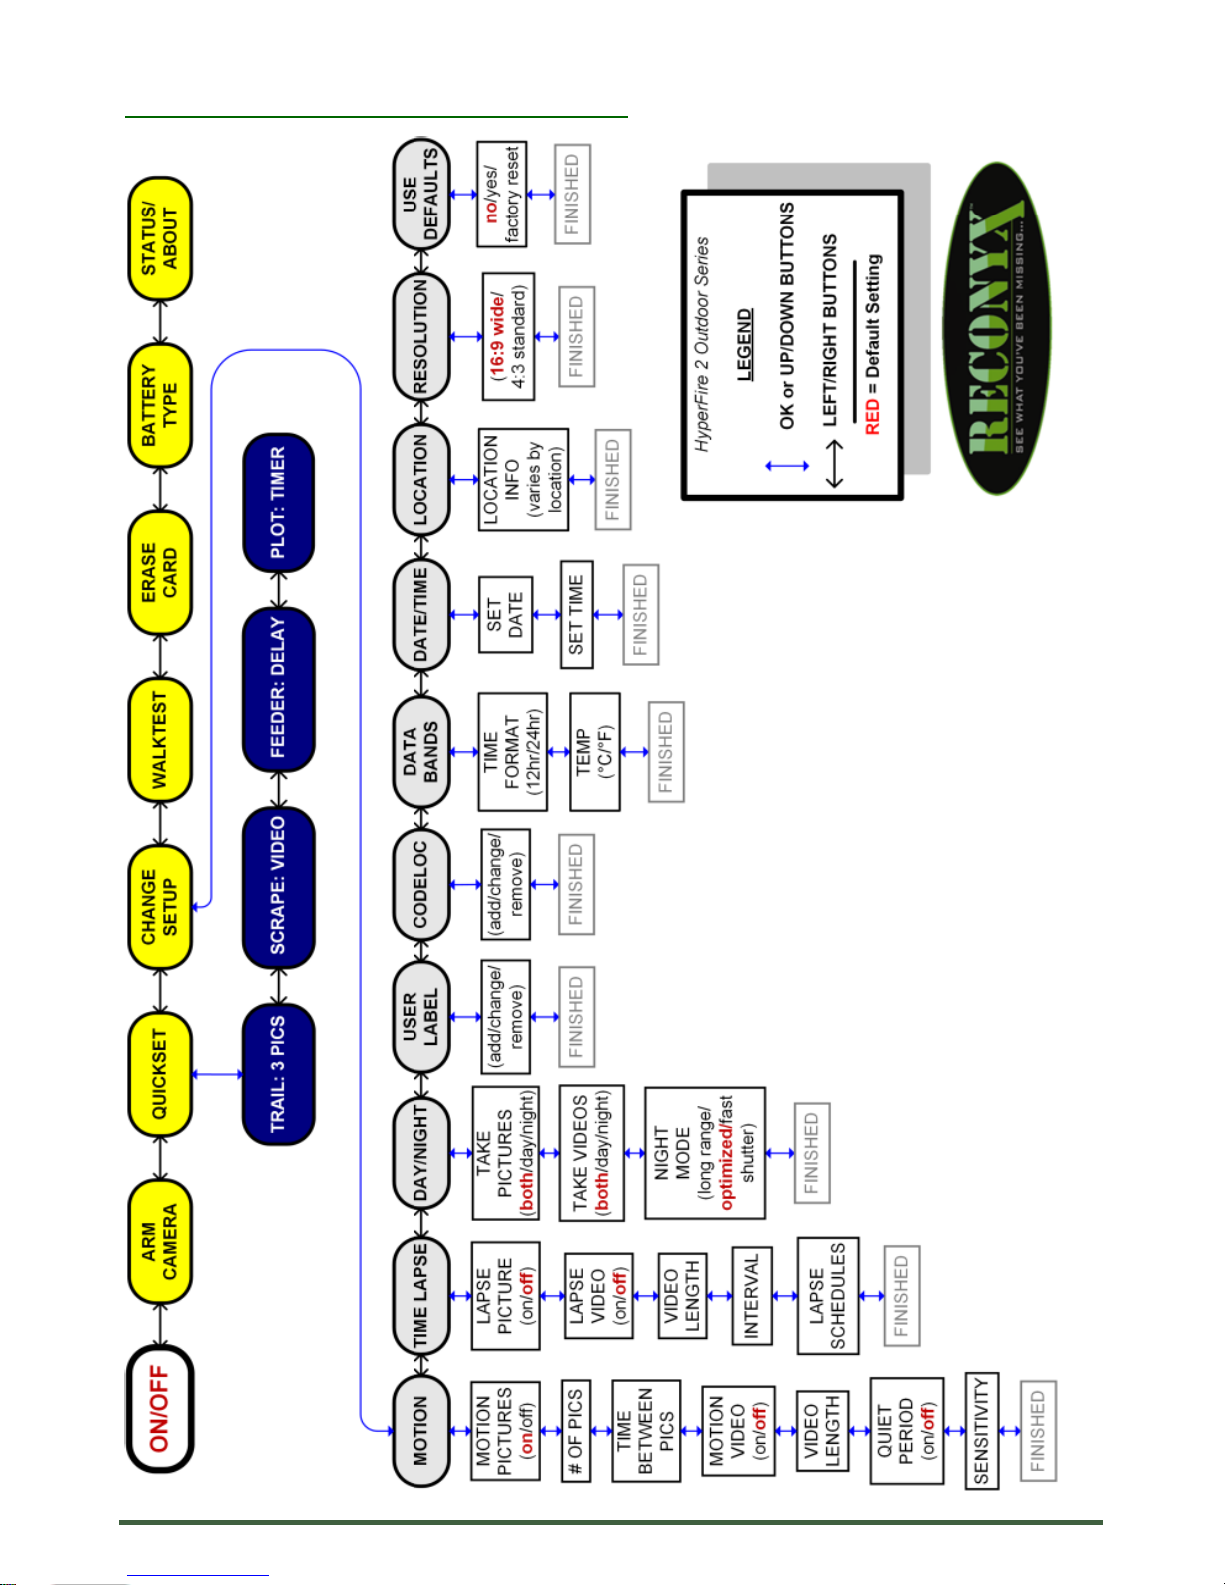
HYPERFIRE 2™ Programming Menu
Your camera includes three main levels of options:
Level 1: Main menu options
Level 2: Quickset settings
Level 3: Advanced settings
The programming menus are set up so that the most commonly used items are
at the top level. Other camera settings that are not as frequently accessed do
not show up every time you are setting up or moving your camera.
NOTE: As with the date and time, you can move through and select any of the
menu options by pressing the directional buttons to scroll and the OK
button when the menu or option you want to select is displayed.
TIP: Use the “Programming Diagram” on the next page for a better
understanding of how the options are accessed on your HyperFire 2™ camera.
The backlit LCD includes two lines
of information. The top line
displays the menu, option or
setting you are currently
accessing. After you make a
selection, it may display additional information. The bottom line displays the
available options/settings. Selections you can choose from are always displayed
between < > brackets on the bottom line.
You can change your camera settings any time you like, either prior to using the
camera or in the field. Likewise, you can switch memory cards as needed and
check the remaining space on your memory card as well as your remaining
battery power.
NOTE: The camera will remember the settings even when shut off, you do not
need to reconfigure the camera unless you want to change its behavior.
Page 12
11 RECONYX®, Inc.
HYPERFIRE 2™ Programming Diagram
Page 13

www.reconyx.com 12
Level 1: Main Menu Items
NOTE: Main Menu Items are shown in Yellow on the Programming Diagram
(Page 11).
Arm Camera – When you select this option, your camera arms in ten seconds.
You can cancel the arm sequence by pressing the “OK” button.
Quickset – Quickset options are available for common situations in which you
use your camera – see details below.
Change Setup – Allows you to change the way your camera functions – see
details below.
WalkTest – When you select this option, your camera flashes an indicator light
so that you can test its aim by walking in front of it. The WalkTest mode shows
you exactly where the camera’s active motion detection zones are located (see
page 18 for more information). The tilt of the camera is critical, as slight changes
are magnified at greater distances from the camera.
TIP: If left in WalkTest mode, the camera will automatically arm itself after 2
minutes with no motion events. This allows you to set the camera up, check
its aim using WalkTest and then just walk away.
Erase Card – When you select this option, your camera wipes your entire
memory card clean, removing all images and other information from the card.
You should not select Erase Card unless you are absolutely certain you want to
remove everything from the card.
Battery Type – Allows you to select what type of batteries you are using to
accurately display the amount of power remaining.
Status/About – When you select this option, your camera displays the number
of pictures, number of videos, time, date, firmware version and serial number of
the camera. The left and right buttons scroll between these items.
NOTE: The battery status shows the level for different types of batteries. If you
change battery types, be sure to change the “Battery Type” setting.
Page 14

13 RECONYX®, Inc.
Level 2: Quickset Options
NOTE: “Quickset Options” are shown in Blue on the “Programming Diagram”.
QUICKSET options allow you to quickly select pre-programmed settings that are
optimized for particular situations. Selecting “Change Setup” takes you to the
advanced settings detailed in level 3.
QuickSet Options
Pics/Vids
per Trigger
Picture
Interval
Quiet
Period
Trail: 3 Pics
3 pictures
1 second
None
Scrape: Video
10 seconds
n/a
None
Feeder: Delay
3 pictures
5 seconds
15 seconds
Plot: Timer (USA Only)
1 picture
5 minutes
n/a
Note: The SmartPlot™ Plot Timer with adaptive time lapse technology
automatically takes Time Lapse photos every 5 minutes during a 2 hour period at
dawn and at dusk. The camera automatically adjusts for sunrise and sunset
through the year based upon your location. The Trail setting is also active when
Plot Timer is chosen, so regardless of time, the camera will trigger on motion
events as well.
Level 3: Change Setup (advanced settings)
NOTE: “Change Setup” options are shown in Grey on the “Programming Diagram”.
MOTION – All settings related to how your camera behaves when motion is
detected are grouped under this menu item.
1) Motion Pictures – ON, off
2) Pictures Per Trigger – 1, 2, 3, 4, 5, 6, 7, 8, 9, 10
3) Picture Interval – RapidFire™, 1, 2, 3, 4, 5, 6, 7, 8, 9, 10 seconds
4) Motion Videos – on, OFF
a) If On, Video Length – 5 sec, 10 SEC, Dynamic Length
5) Quiet Period – NO DELAY, 5s, 10s, 15s, 30s, 1m, 2m, 3m, 5m
6) Sensitivity - low, low/medium, medium, medium/high, HIGH, very high
Page 15

www.reconyx.com 14
TIME LAPSE – All settings related to how your camera behaves related to time
based triggers are grouped under this menu item.
1) Lapse Picture – on, OFF
2) Lapse Video – on, OFF
a) If On, Video Length – 5 sec., 10 SEC.
3) If Picture or Video On, Interval – 1 min, 5 MIN, 15 min, 30 min, 1 hour
4) If Picture or Video On, Lapse Schedules – 24 HOUR, add
If you want to restrict the times when the time lapse photos/videos are
taken, you can do it by adding schedule(s) to the camera. Two
scheduled periods can be added to the camera.
For instance, you can add a morning period and an afternoon period
when you would like Time Lapse pictures and/or videos to be taken.
DAY/NIGHT – Select options relating to the camera’s functionality with regard to
taking photos/videos during day time and night time periods as well as select the
best night time Infrared illumination options for your application.
1) Take Pictures – Day Only, Night Only, both DAY & NIGHT
2) Take Videos - Day Only, Night Only, both DAY & NIGHT
3) Night Mode - Adjust the nighttime exposure
• OPTIMIZED – best combination of shutter speed and flash range
• Fast Shutter - reduced motion blur, reduced flash range
• Long Range – increased range, reduced image quality
USER LABEL - Add a label (up to 16 characters) that will be included in the data
band of all photos and videos taken by your camera. You can also view, change
or clear an existing label.
CODELOC - Use CodeLoc™ to add a four-digit security code to your camera to
prevent unauthorized use of your camera in the event of tampering or theft. You
can also change or remove an existing code.
TIP: Write your four-digit CodeLoc™ code on the last page of this manual.
Page 16

15 RECONYX®, Inc.
DATA BANDS – Set format for how time and temperature will be displayed on
the data bands for photos and videos. Select Time Format (12 or 24 hours) and
Temperature scale (FAHRENHEIT, Celsius).
DATE/TIME – Set the date and time. Up and down buttons change numbers, left
and right buttons move between year, month and date. OK takes you to the time
setting. Use up and down buttons to change numbers. Use left and right buttons
to move between hours and minutes.
LOCATION – USA or Other. Users are asked to enter location information. This
information is required to enable the SmartPlot™ feature to work properly.
RESOLUTION – Select picture and video aspect ratio. (16:9 WIDE) or (4:3
STANDARD).
TIP: The 16:9 Wide setting is ideal for viewing images on widescreen monitors
or HD television sets. The 4:3 Standard setting records full resolution
pictures and videos.
USE DEFAULTS – (NO, Yes, Factory Reset). If you choose Yes, your settings
will be reset to defaults (shown above in RED CAPITAL letters). Defaults will not
reset your date, time, battery type or location information. If you choose Factory
Reset, all of your settings will be reset to factory settings and your camera will reboot as if it were the first time you powered it on.
TIP: You can return to the Main Menu options at any time by simply pushing the
“up” directional arrow button.
Page 17

www.reconyx.com 16
Mounting Your Camera
Your RECONYX® HyperFire 2™ camera can be mounted to a RECONYX®
Universal Camera Mount™ or a camera tripod by utilizing the threaded insert on
the bottom of the camera housing.
The camera can also be mounted to a tree by using the adjustable webbing strap
(shown below). You can secure the camera to a tree and lock it shut at the same
time with a Python™ cable lock by Masterlock®. Simply thread the cable through
the “Lock Tunnel” on the camera and then cinch in place around the tree or post.
Mounting Camera with Adjustable Webbing Strap (included)
We recommend that you mount your camera at the approximate height of your
target animal, and then aim the camera straight out for the best chance of
sensing motion in the active detection zone.
NOTE: It is highly recommended that you use a theft deterrent device such as a
security box and/or a Python Lock™ by Masterlock® to help secure your
camera against possible theft when it is in the field. You can purchase
HyperFire 2™ compatible mounts, theft deterrent cable locks and
security enclosures at www.reconyx.com .
Page 18

17 RECONYX®, Inc.
Locking & Securing Your Camera
There are a number of options to securely mount your camera.
1) A Python™ cable lock by Masterlock® can be used by threading it through
the Lock Tunnel in the camera and securing it to a tree or another object.
This will prevent the camera from being opened or easily removed.
2) For increased security, RECONYX
®
offers a custom fit Security Enclosure for
the HyperFire 2™ camera series. The Security Enclosure can be secured
with either a padlock or the Python™ cable lock by Masterlock®.
HyperFire 2™ Security Enclosure Python™ cable lock by Masterlock®
Page 19

www.reconyx.com 18
Aiming Your Camera
PIR Motion Detector
The Passive Infrared Motion Detector on your HyperFire 2™ camera is aligned
with the camera lens to give you the best chance of capturing subjects that come
into the field of view of the camera, while not triggering on subjects outside the
view of the camera.
The motion detector can detect movement up to 100 feet (30 m) away. However,
the detection range is dependent on the size and temperature of the subject
(relative to ambient temp) as well as the speed at which the subject is moving.
The HyperFire 2™ Motion Detector consists of a horizontal detection band
(shown in red). Camera aim is critical to maximize detection range.
For the camera to trigger two things need to happen:
1) An object with a temperature different from the background temperature
must be present within the field of view of the motion detector (shown in red)
(i.e. something warmer or colder than the ambient temperature).
2) That object (with a temperature differential) must move horizontally within the
active zone approximately 1/8 of the way across the field of view of the
camera.
Page 20

19 RECONYX®, Inc.
Using the “WalkTest” Mode
Learning to use the WalkTest mode is critical to being as successful as possible
with your RECONYX® camera. The WalkTest mode allows you to precisely
determine your camera’s active motion detection zone. This ensures that your
camera is aimed exactly where you want to capture animal activity.
1) Secure the camera to a tree or other object aiming the camera toward where
you want it to capture pictures.
2) Put camera in “WalkTest” mode,
and close the camera.
3) Walk in front of the camera where
you expect to capture pictures.
Every time the red WalkTest light
blinks it indicates that a motion
event has taken place. If the
WalkTest light does not blink
where you expect it to, adjust the
aim or location of the camera.
4) If possible, set up the camera so
that no large trees or objects are
in the main field of view of the
camera, as they can adversely
affect motion detection as well as
night time flash range.
NOTE: All RECONYX® cameras will self-arm from the “WalkTest” mode after a
two minute period during which it does not detect any motion events.
TIP: Be sure to use the “WalkTest” mode to be sure the camera is aimed
correctly.
Page 21

www.reconyx.com 20
Image Data Information
Your RECONYX® HyperFire 2™ camera stores Image Data along with every
picture it takes. Some of this information is displayed in Image Data bands above
and below the image.
• An “M” or “T” in the top data band indicates a “motion” or “time-lapse” event.
A “D” in the top data band indicates a “Dynamic Video” sequence.
• “1/3” indicates the first in a sequence of three pictures for that event.
• Moon Phases displayed include: (new moon), (waxing crescent),
(first quarter), (waxing gibbous), (full moon), (waning gibbous),
(last quarter), and (waning crescent).
• An “Illumination” indicator appears in the Image Data bands, when the
infrared illuminator is used.
Page 22

21 RECONYX®, Inc.
Additional Camera Options
IR Mask
If you need to clean the IR Array window, the IR Mask™ is easily removed by
carefully inserting a small screw driver in one of the small slots and prying it out.
Warning! Be very careful not to scratch the IR Array window!
Step 1
Step 2
The windows covering the IR Array, lens, WalkTest indicator and light meter may
all be cleaned with glass cleaner or water using a soft non-abrasive cloth.
To replace the IR Mask™, carefully line up one side of the IR Mask™ with the IR
Array window. Then gently push on both sides until the IR Mask™ is completely
seated against the window and snaps into both sides.
Page 23

www.reconyx.com 22
Troubleshooting
For answers to questions about your RECONYX® HyperFire 2™ camera that you
cannot find in this User Manual, please check the RECONYX® web site
(www.reconyx.com).
Firmware Updates
You should also periodically check the RECONYX® website for firmware updates
for your camera. We periodically release firmware updates with new features
and/or performance enhancements. Updating firmware on the HyperFire 2™
Series cameras takes just a few seconds and is well worth the effort to ensure
your camera is performing at the highest level possible.
Limited Nighttime Range
If your nighttime range is less than expected, check to be sure you are using only
recommended battery types and that they are new or fully charged.
The physical camera setup is also important in getting good nighttime images. If
you aim the camera out over an open field where there is nothing within range to
reflect the Infrared energy back toward the camera, the images will appear very
dark (like shining a flashlight into outer space). The best nighttime images will be
captured when you have a backdrop of some sort that will reflect energy back
toward the camera (e.g. trees, tall grass, fence, building, hillside, etc).
The other issue you may encounter with setup is that if you have an object near
the camera that reflects a lot of IR energy back to the camera. The camera will
optimize its exposure so as not to over expose this close object. This can result
in what appears to be limited range. The solution to this setup problem is to
either move the camera or remove the close object from the field of view of the
camera.
Focus Problems
If your images appear cloudy or out of focus, first consider whether there was
snow or frost on the camera windows. You may wish to check your camera after
a fresh snowfall to be sure the windows are not covered with snow. Next, check
the windows for dirt and water spots, and gently clean them with a clean soft
cloth and glass cleaner or water. Image clarity can also be adversely affected by
very high temperatures, so it is a good idea to mount your camera where it will
not be getting direct sunlight during the heat of the day.
Page 24

23 RECONYX®, Inc.
False Triggers
If you seem to be getting false triggers (i.e. the camera is taking pictures of
nothing); first put your camera back to the default settings and try your camera
again. This will ensure that you are running with known settings – with the motion
detector ON at HIGH sensitivity and with Time-Lapse OFF.
If after going back to the default settings, you still seem to be getting false
triggers, check the physical setup of your camera. The sun should not be shining
directly on the face of the camera and the camera’s field of view should be
cleared of as much vegetation as possible. False triggers most often occur on
sunny, breezy days. Vegetation will soak up the sun’s energy and it will become
warmer than the ambient air temperature. Then, when the wind moves the
vegetation and warm air around, the camera sees this and cannot distinguish it
from a warm-blooded animal moving in the scene. For this reason, careful
placement and setup of your camera helps prevent false triggers.
Only as a last resort should you turn down your camera’s motion sensitivity. This
reduces your ability to detect movement of warm-blooded animals, especially
during the summer.
Camera Not Triggering on Animals
First, put the camera back to Default settings and try your camera again. This will
ensure that you are running with known settings – it will set the motion detector
ON at HIGH sensitivity. This is important, especially in the warmer months,
because as the background temperature approaches the temperature of the
animals, the strength of the signal decreases and the range goes down
accordingly.
If you are still having trouble, please refer to the “Mounting and Aiming Your
Camera” section for detailed information, as well as using the WalkTest mode.
Keep in mind that most animals are not 6 feet (2 meters) tall, so when you use
the WalkTest mode, do not just walk by the camera in a full upright stance. The
camera may be triggering on your upper torso or head and not on your legs
(where most animals are likely to be).
It is important to keep in mind that there are other factors that can also affect the
ability of your camera to detect motion. Wind can have a detrimental effect.
Body heat from an animal can be quickly dispersed away from the animal on a
breezy day, making it more difficult for the camera to detect the animal. Also
movement directly toward and away from the camera is less likely to trigger the
Page 25

www.reconyx.com 24
camera than side-to-side movement. And finally, if an animal is moving very
slowly, it will sometimes not produce a strong enough signal within the sensor to
trigger the camera.
Memory Card Problems
If your camera won’t start up properly or displays a “card
error, write lock”, first check to be sure your card is not
“Locked”. On most SD cards there is a switch on the side of
the card. If the card is locked, you will not be able to save
any photos. If the card is not locked, but this message
persists, you can attempt to clean the contacts in the card
holder by blowing canned air into the card slot. This will often resolve the issue.
If you have other issues, you may have to try a different brand of memory card.
We have found that some inexpensive memory cards are very slow and do not
always run well (even if they are advertised as fast). RECONYX® certified
memory cards are available at www.reconyx.com
Cold Weather Problems
If your camera shuts down in the cold, it may be too cold for the batteries. Refer
to “Battery Specifications” for recommended battery types.
Extreme cold weather does have an adverse effect on the LCD display. This
does not inhibit the camera’s ability to function, it just makes it hard to read the
display.
Battery Life Less than Expected
NiMH batteries have decreased life in hot weather. They will run the camera, but
they will have decreased run time. It is not unusual to see battery life drop off
50% or more when daytime temperatures are near 90˚ Fahrenheit or higher.
This will not damage your NiMH batteries, their charge just runs down faster.
If you notice that nighttime illumination decreases over time, you should change
your batteries sooner or switch to Lithium batteries.
Other Questions?
Please contact our Technical Support Department at 866-493-6064 or e-mail
at support@reconyx.com.
Page 26

25 RECONYX®, Inc.
Warranty, FCC, and Safety Information
RECONYX® 5 Year Limited Warranty
RECONYX® warrants this product to be free of manufacturer’s defects in materials and
workmanship for a period of 5 years from date of original purchase. If during this period,
through normal use, the product fails due to defects in materials or workmanship,
RECONYX® will either repair or replace the product at our sole discretion. This warranty is
void if a product failure results from “acts of God”, leaking batteries, accident, abuse,
improper use, disassembly, or unauthorized maintenance and repair.
In order to qualify for your 5 year warranty, you must register your camera on our web site
within 90 days of purchase. Go to www.reconyx.com/warranty to register your camera(s).
NOTE: There is a warranty seal on your camera; if this seal is broken or tampered
with, the warranty is void.
RECONYX® Limited Software Warranty
Software products are licensed to the user under the terms of the applicable RECONYX®
software license (contained within installation programs). If the user wishes to review the
software license agreement before purchasing products from RECONYX®, a copy of the
software license is available at our website www.reconyx.com under Software.
Repair or Replacement
Buyer must obtain a Return Authorization (RA) number from RECONYX® before returning
any product(s) for repair or replacement. If RECONYX® concludes that a returned product
is not defective, Buyer will be notified, the product will be returned to Buyer at Buyer’s
expense, and Buyer may be charged for examination and testing of the product.
This limited warranty is the sole warranty for hardware and software products offered by
RECONYX® and RECONYX® shall not be liable for any amounts for said products except
in compliance with this warranty.
FCC Certification
This device complies with part 15 of the FCC Rules. Operation is subject to the following
conditions: (1) This device may not cause harmful interference, and (2) this device must
accept any interference received, including interference that may cause undesired
operation.
Page 27

www.reconyx.com 26
Safety Precautions
Before using the camera, please ensure that you read and understand the following safety
precautions. Always ensure that the camera is operated correctly.
The safety precautions noted in this guide are intended to instruct you in the safe and
correct operation of the camera and its accessories to prevent injuries or damage to
yourself, other persons, and equipment.
Preventing Malfunction
Avoid Strong Magnetic Fields
Never place the camera in close proximity to electric motors or other equipment generating
strong electromagnetic fields. Exposure to strong magnetic fields may cause malfunctions
or corrupt image data.
Avoid Condensation
Moving the camera rapidly between hot and cold temperatures may cause condensation
(water droplets) to form on its external and internal surfaces. You can avoid this by placing
the camera in an airtight, plastic bag and letting it adjust to temperature changes slowly
before removing it from the bag.
If Condensation Forms Inside the Camera
Stop using the camera immediately if you detect condensation inside the camera.
Continued use may damage the camera. Remove the memory card and batteries from the
camera, open the camera in a warm dry environment, and wait until the moisture
evaporates completely before resuming use.
Warnings
• Store this equipment out of the reach of children and infants.
• Do not allow water or other liquids to enter the interior of the camera. The interior has not
been waterproofed. If the exterior comes into contact with liquids or salt air, wipe it dry
with a soft, absorbent cloth. In the event that water or other foreign substances enter the
interior, immediately turn the camera’s power off and remove the camera batteries.
• Use of power sources not expressly recommended for this equipment may lead to
overheating, fire, electrical shock or other hazards.
• Avoid using, placing or storing the equipment in places subject to strong sunlight or high
temperatures, such as the dashboard or trunk (boot) of a car. Exposure to intense
sunlight and heat may cause the batteries to leak, overheat or explode, resulting in fire,
burns or other injuries. High temperatures may also cause deformation of the casing.
• Be sure to check your state/local laws concerning the use of this product.
Page 28

27 RECONYX®, Inc.
Your Information and Camera Warranty Registration
Record Your Information
After you have familiarized yourself with this instruction manual, your
camera, and software, you should record some basic information here so
that you don’t lose it. It is also a good idea to keep your purchase receipt in
case you would need warranty work done on your camera.
Date Purchased:
Place of Purchase:
Camera Model & Serial #:
CodeLocTM Password:
www.reconyx.com Login Info:
Register your Camera
Your new HyperFire 2™ camera is covered by a 5-year warranty. In order
for the warranty to take effect, you must register your camera online within
90 days of purchase at www.reconyx.com/warranty
Copyright & Trademark Information
HyperFire 2TM Instruction Manual Copyright April 2018
Other trademarks and registered trademarks referred to in this document:
• RECONYX
®
HyperFire 2™, BuckView™ and RapidFire™ are trademarks of RECONYX
• Google Maps® is a registered trademark of Google, Inc.
• Secure Digital® (SD and SDHC) are registered trademarks of the SD Association.
• Energizer® is a registered trademark of Energizer Corporation.
• Windows® is a registered trademark of Microsoft Corporation.
• Python Locks™ are a product of Master Lock
All other trademarks and copyrights referred to are the property of their respective owners.
RECONYX, Inc.
3828 Creekside Lane
Holmen, WI 54636
866-493-6064
www.reconyx.com
Manual Version: 20180424v1
 Loading...