

Page 1
Silent Image Fact Sheet – April 2006
Fact Sheet
Copyright RECONYX, LLP – www.silent-image.com
Page 2

Silent Image Fact Sheet – April 2006
Inside This Fact Sheet
Getting Started............................................................................................................................................1
Tour of the Camera ....................................................................................................................................2
The Camera.............................................................................................................................................2
Batteries ..................................................................................................................................................3
CompactFlash® (CF) Cards.....................................................................................................................3
Camera Maintenance and Performance...................................................................................................4
Image Data..............................................................................................................................................7
Changing The Camera Settings.................................................................................................................9
Triggers.................................................................................................................................................10
Time Lapse............................................................................................................................................12
Images...................................................................................................................................................13
CodeLoc................................................................................................................................................14
Viewing and Managing The Images........................................................................................................15
Common “MapView” Tasks.................................................................................................................16
Image Viewer........................................................................................................................................17
Warranty Information..............................................................................................................................19
Satisfaction Guarantee ..........................................................................................................................19
Limited Warranty..................................................................................................................................19
Copyright and Trademark Information.................................................................................................21
Copyright RECONYX, LLP – www.silent-image.com
Page 3
Silent Image Fact Sheet – April 2006
Getting Started
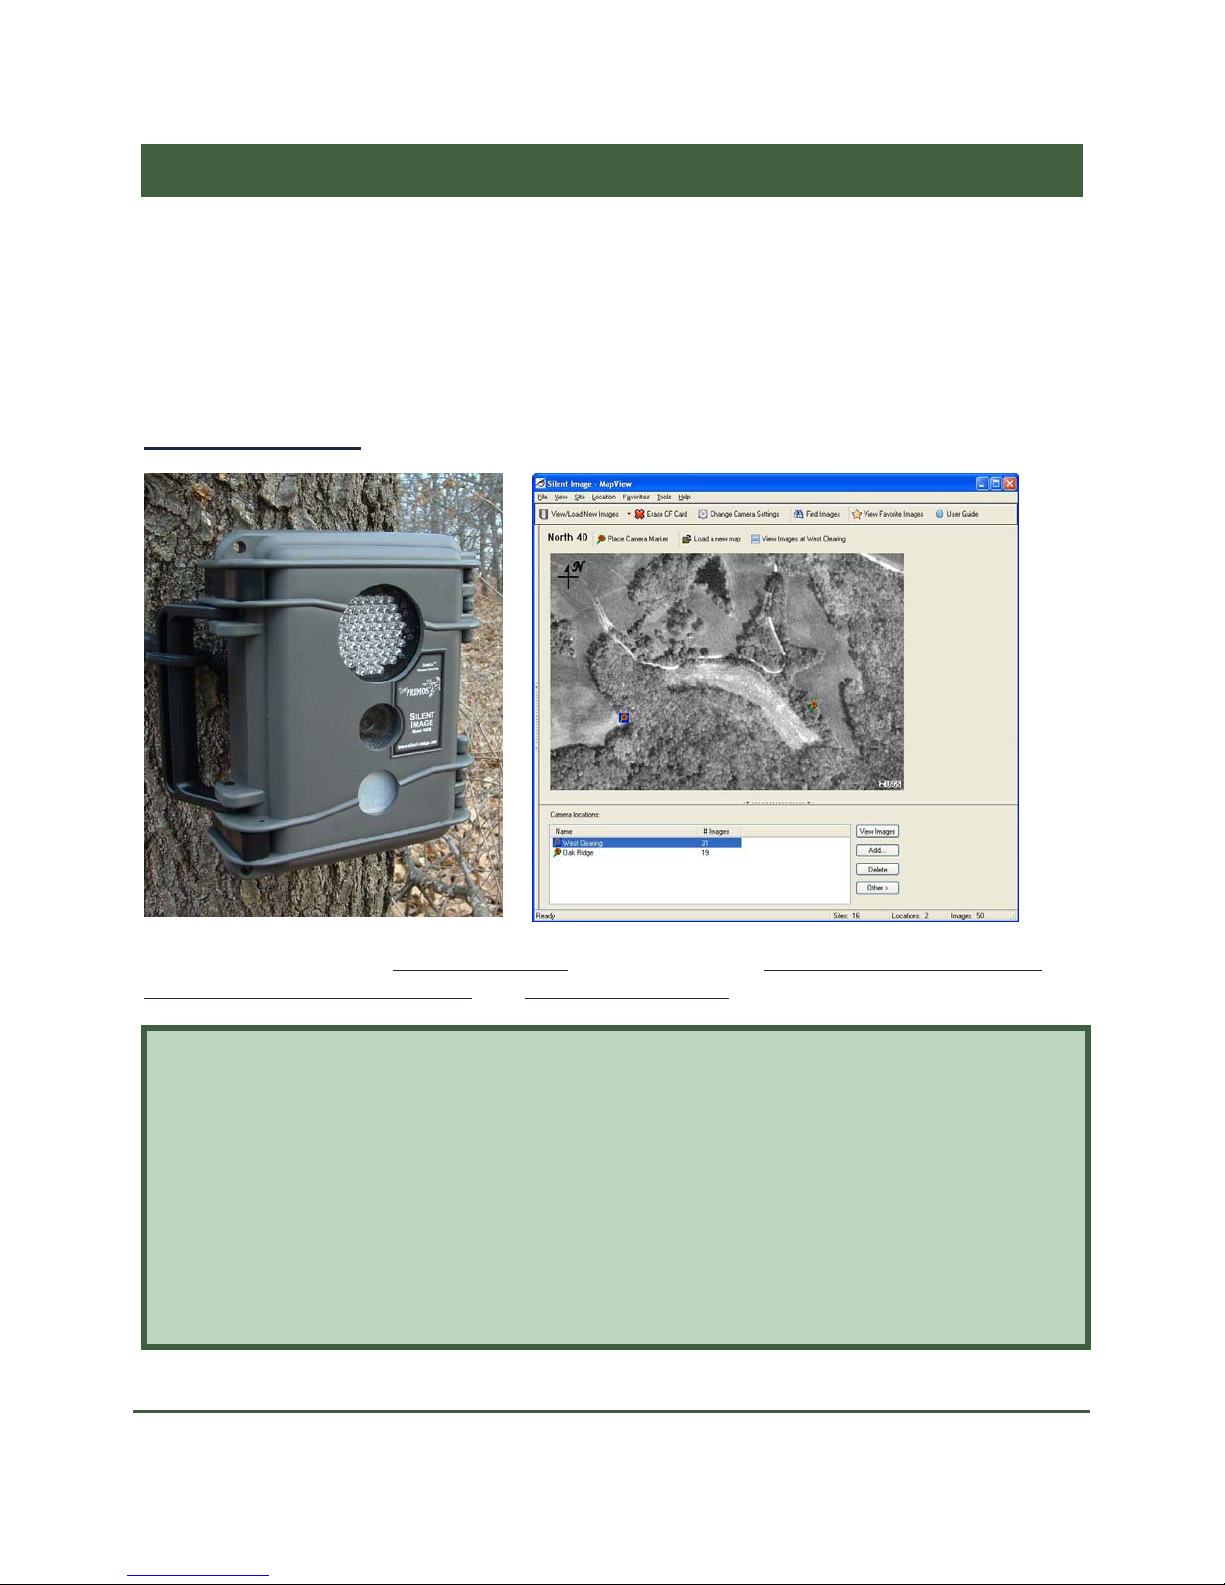
The Silent ImageTM Model RM30 camera is a digital camera, infrared illuminator, and Passive
InfraRed (PIR) motion detector, all contained within a secure, rugged, and weather-resistant
case. Also included with the camera is “MapView” software. The Silent Image camera helps you
get the best possible pictures in the field, and “MapView” offers you the ability to geographically
organize and access the images, as well as selectively tag images with user-defined metadata for
later analysis.
Silent Image Camera
Silent Image – MapView
This fact sheet includes a
tour of the camera and information on changing the camera settings,
viewing and managing the images, and warranty information.
Disclaimer
While every effort has been made to ensure that the information contained in this “Fact
Sheet” is accurate and complete, no liability can be accepted for any errors or omissions.
RECONYX reserves the right to change the specifications of the hardware and software
described herein at any time without prior notice.
RECONYX makes no warranties for damages resulting from corrupted or lost data due to a
mistake in operation or malfunction of the camera, the software, the CompactFlash® (CF)
cards, personal computers, or peripheral devices.
Copyright RECONYX, LLP – www.silent-image.com
- 1 Getting Started
Page 4
Tour of the Camera
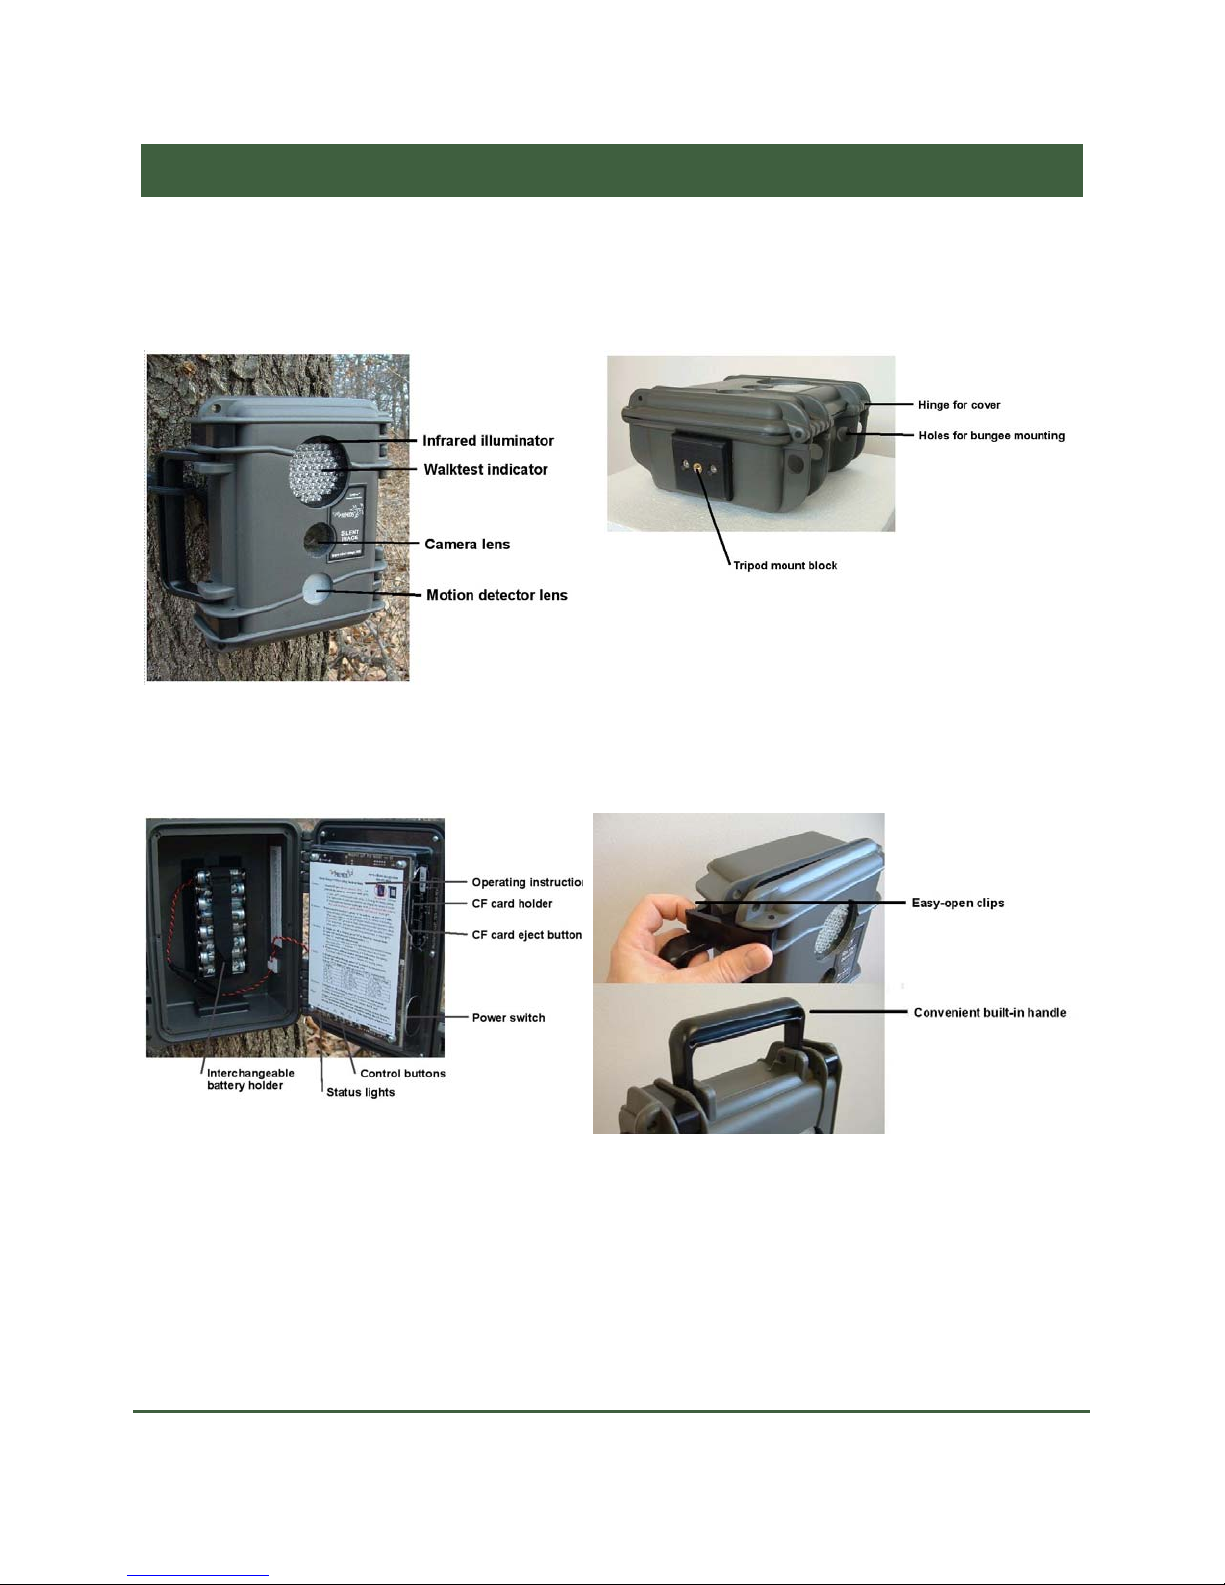
The Camera
Silent Image Fact Sheet – April 2006
Front View
Bottom View
Inside View Carrying and Opening
Copyright RECONYX, LLP – www.silent-image.com Tour of the Camera - 2
Page 5

Silent Image Fact Sheet – April 2006
Batteries
The Silent ImageTM camera comes with an eight-cell AA battery holder. Because camera
settings, animal activity, and temperature all vary, there is no way to precisely predict a camera’s
run time, the total number of images that can be taken, or the temperature at which the camera
will operate on any given set of batteries. Therefore the following table shows approximate
operating temperatures, run times, and number of images that can be taken with alkaline, nickelmetal hydride, and lithium AA batteries, and can be used as a guide in determining what type of
batteries will best suit your needs.
Note: Very high and very low temperatures adversely affect the performance of all types of batteries,
some more than others.
AA Battery Type Operating Temperature Run Time Number of Images
Alkaline
20º F (-7º C) and up 1 – 2 weeks Up to 40,000 or more
(disposable)
Nickel-Metal Hydride
-20º F (-29º C) and up 1 – 2 weeks Up to 40,000 or more
(rechargeable)
Lithium
-40º F (-40º C) and up 3 – 4 weeks Up to 80,000 or more
(non-rechargeable)
Warning! Do not mix battery types! You may run the Silent Image camera on Alkaline, NiMH,
or Lithium batteries – but you should never mix battery types! Damage to the camera can result
and the warranty may be voided if you do so.
C-Cell battery holders and are available from RECONYX if you require more capacity and
longer run times (see
www.silent-image.com to order).
CompactFlash® (CF) Cards
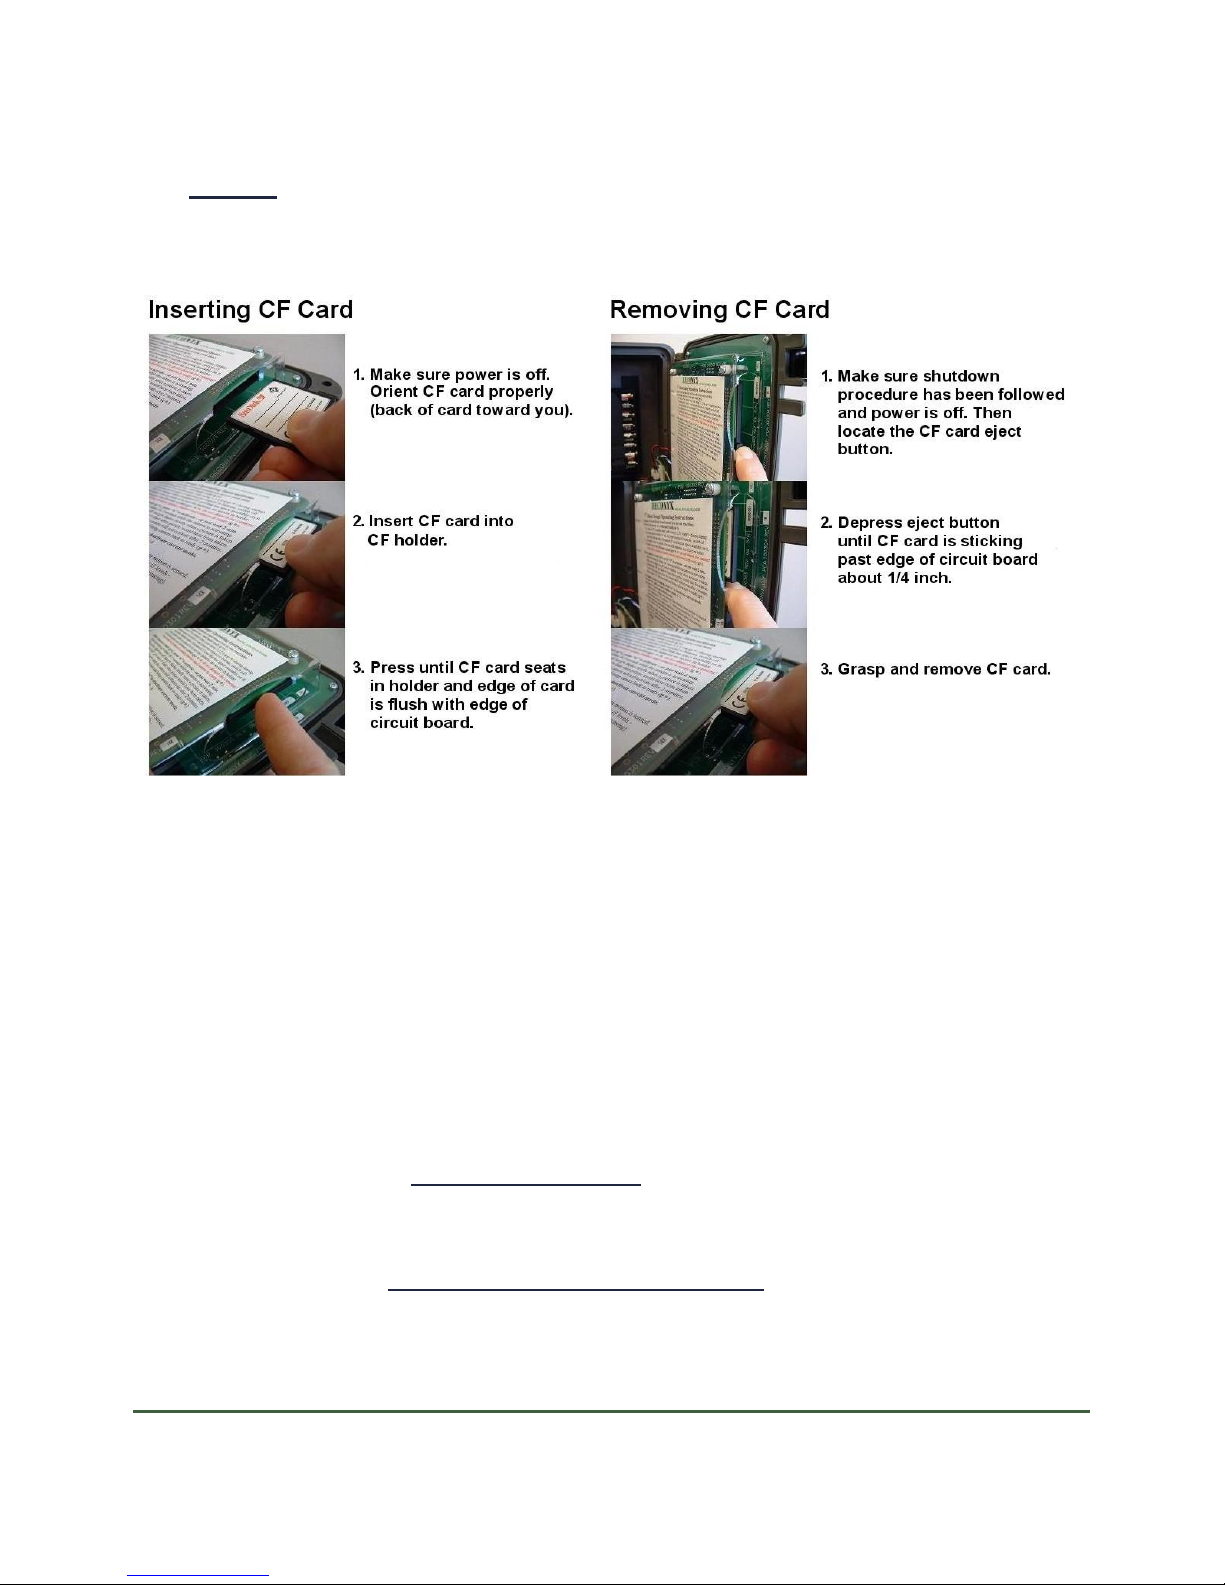
The CompactFlash (CF) card is used to store the pictures the camera captures. These images are
transferred to your PC using MapView. The CF card is also used to change the camera’s settings
(see
Changing The Camera Settings).
CompactFlash cards have various speeds and capacities. Larger capacity cards are capable of
storing more images. In general, a 256 MB card will hold about 5,000 images and a 2 GB card
will hold about 40,000 images. The largest CF card you can use in the Silent Image camera is
2GB. Cards with higher speed ratings are capable of reading and writing (opening and storing)
Copyright RECONYX, LLP – www.silent-image.com Tour of the Camera - 3
Page 6
Silent Image Fact Sheet – April 2006
images faster. This is advantageous when taking Rapid Fire NearVideo
(see
Triggers), as faster cards can store up to five images per second.
TM
Inserting and Removing the CompactFlash® Card (Easy access!)
sequences of images
Camera Maintenance and Performance
Keep the Camera Dry
Never open the camera in the rain! Carefully wipe off any moisture on the outside of the camera
before opening the camera. Whether or not the outside of the camera appears dry, carefully wipe
the small crevice along the edges of the camera – especially the top edge – to prevent any
moisture trapped in this area from getting inside the camera when you open it.
If you are using the Silent Image camera in very humid conditions, you may wish to use a
desiccant pack to absorb moisture that may get trapped inside the camera. You can purchase
desiccant packs online (see
Cleaning the Camera’s Lenses
There are three windows on the front of the Silent Image camera: the infrared illuminator (top),
the camera lens (middle), and the PIR motion detector lens (bottom). All three windows should
be gently cleaned as needed, using a soft cloth and lens cleaner. Be careful not to put too much
pressure on the lenses, and make sure that the cloth you use is clean; the camera lens window is
www.silent-image.com to order).
Copyright RECONYX, LLP – www.silent-image.com Tour of the Camera - 4
Page 7
Silent Image Fact Sheet – April 2006
glass and can crack if too much pressure is applied, and the illuminator and motion detector
windows will scratch if there is grit on the cleaning cloth.
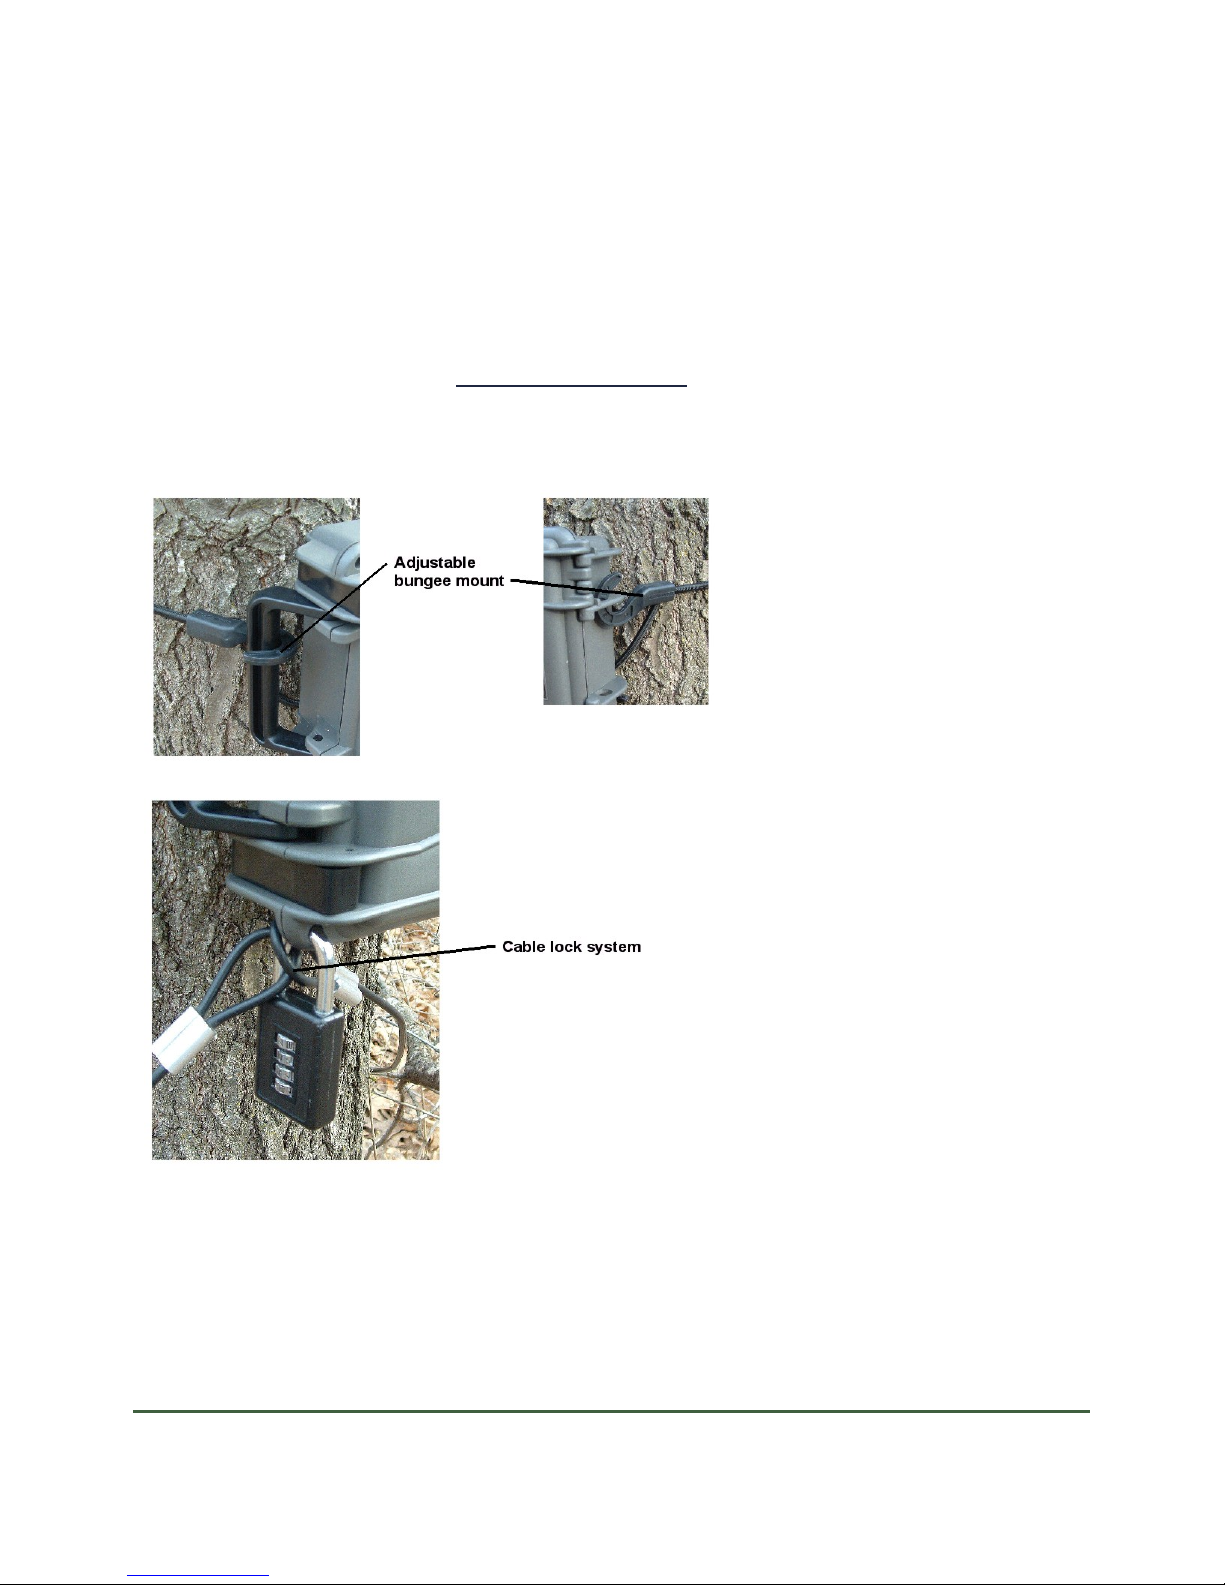
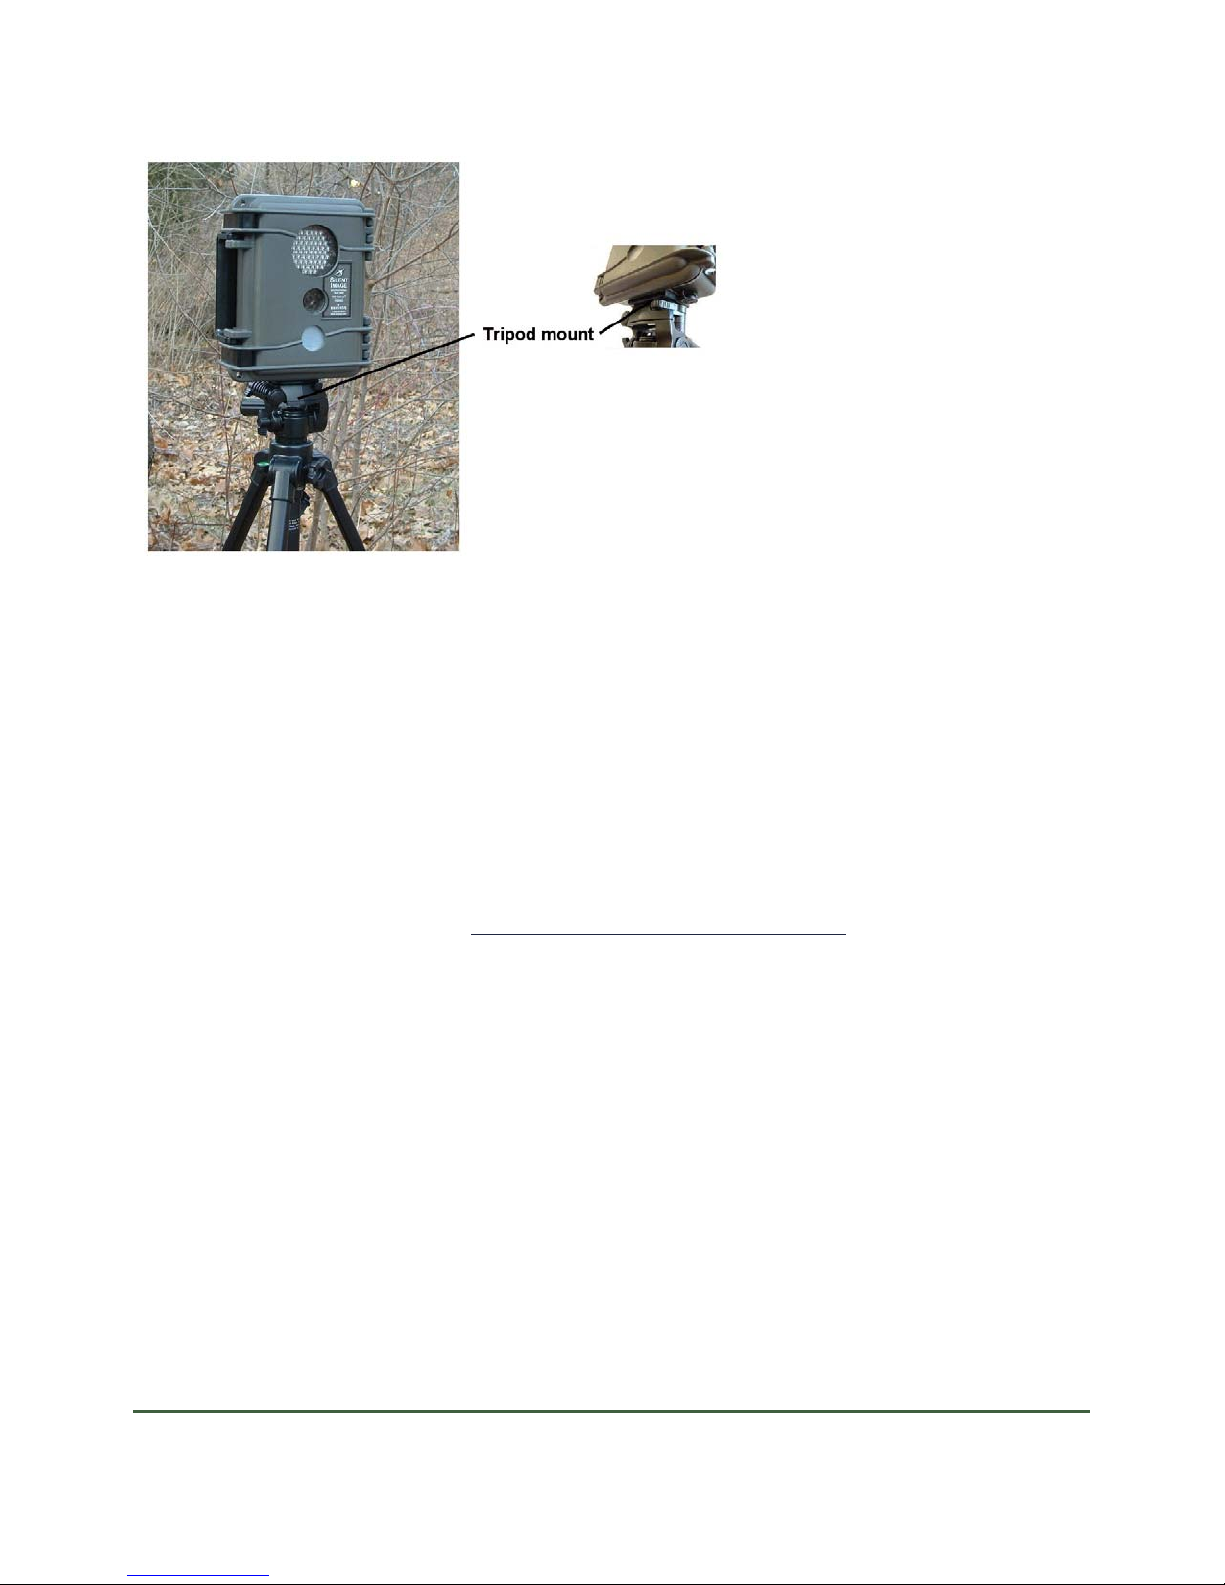
Mounting the Camera
The Silent Image camera can be mounted to a tripod or to a tree by using a bungee cord (as
shown in the following photos). It is highly recommended that you use a cable and lock to secure
the camera against possible theft at all times when it is in the field. Cables and locks are
available from RECONYX (see
Note: Any locking system can be defeated and RECONYX makes no warranty as to whether its
cable lock system will actually stop a motivated thief.
www.silent-image.com to order).
Copyright RECONYX, LLP – www.silent-image.com Tour of the Camera - 5
Page 8
Aiming the Camera
Silent Image Fact Sheet – April 2006
For best results, the Silent Image camera should be placed where the sun is not shinin g directly at
the camera. Photographs taken when the sun is shining into the camera’s lens are often poor in
quality. The performance of the PIR motion detector can also be adversely affected if the sun is
shining directly into the lens, causing an increased number of false triggers.
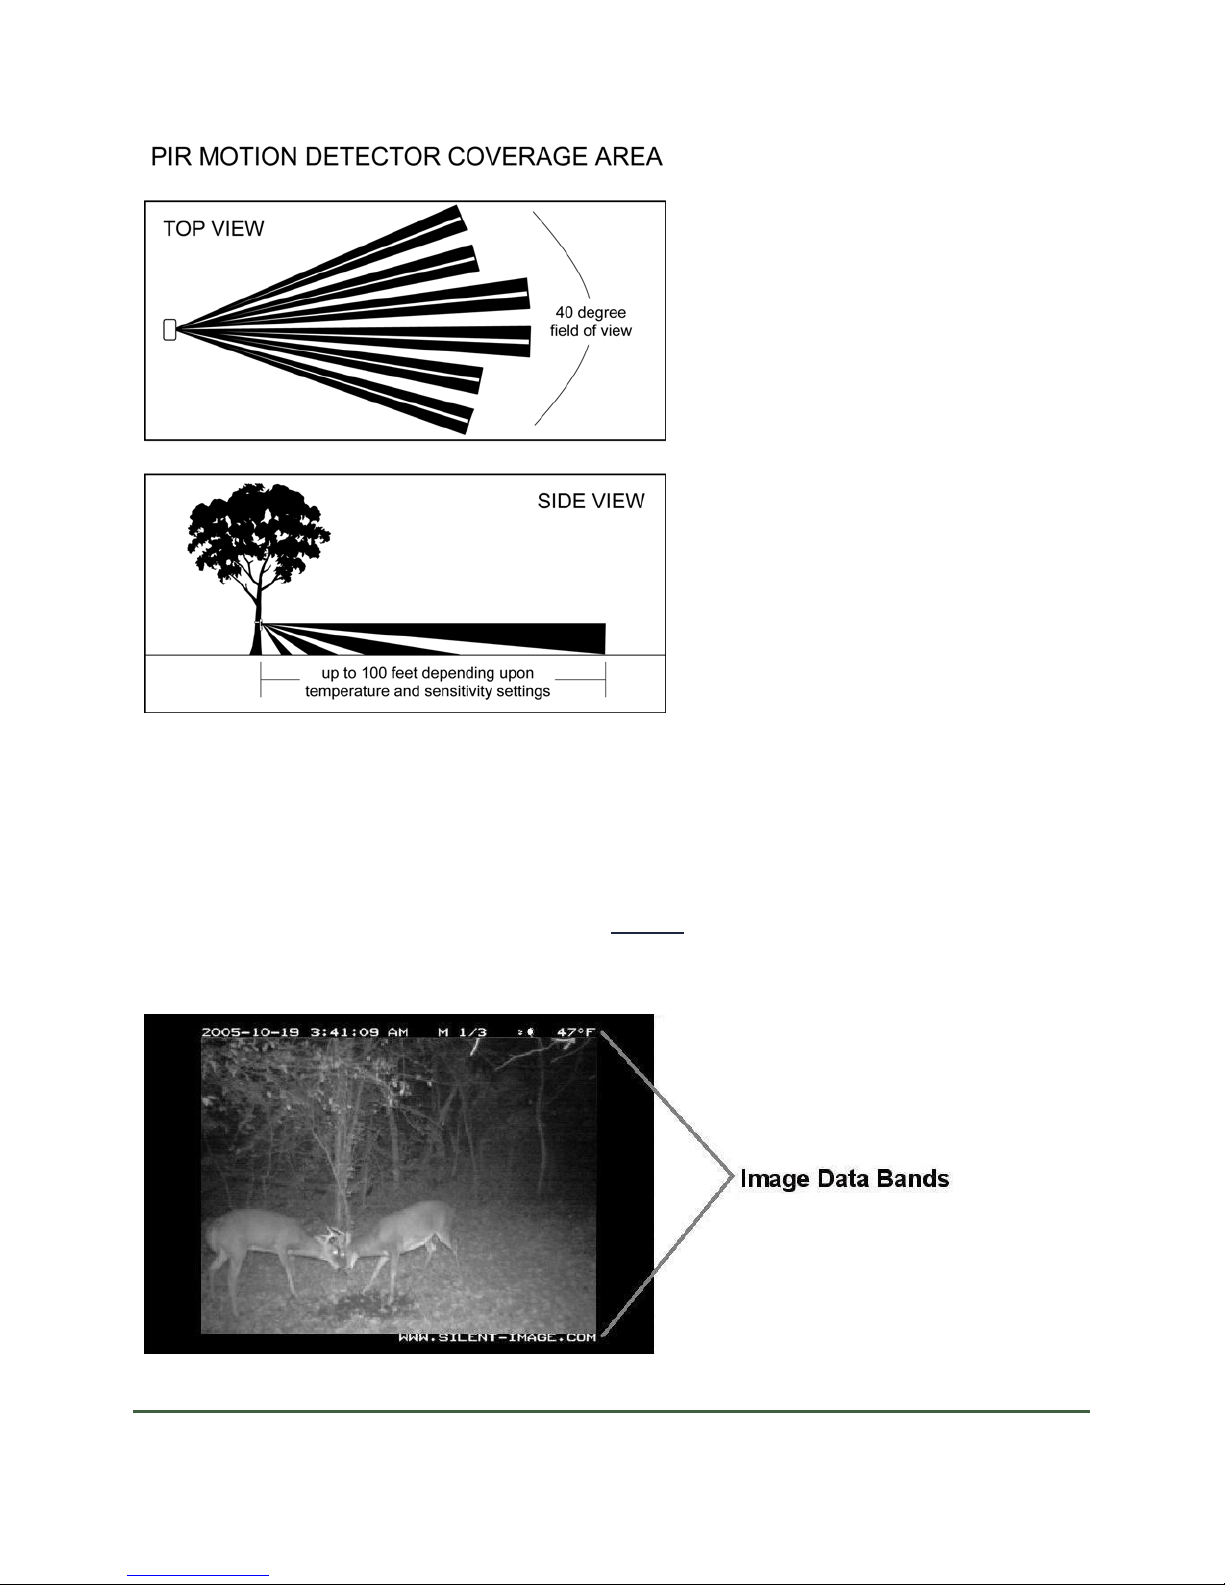
The field of view of the Silent Image camera, infrared illuminator, and PIR motion detector are
all 40 degrees. The camera has a convenient walktest mode for you to make sure that the camera
is set up to detect motion in the area where you want to take pictures. When the camera is in
walktest mode, a red light flashes
in the center of the infrared illuminator each time motion is
detected, allowing you to determine the camera’s precise field of view by walking in front of the
camera, and then adjusting the aim as needed.
Copyright RECONYX, LLP – www.silent-image.com Tour of the Camera - 6
Page 9
Silent Image Fact Sheet – April 2006
Image Data
Silent Image stores Image Data along with every picture it takes. Some of this information,
including date, time, trigger and sequence information, the infrared illuminator “flash” indicator,
moon phase, temperature, and camera label (see Images) is displayed in Image Data bands
above and below the image (the Image Data bands are added to the pictures taken by the camera
and do not cover any portion of the picture).
Copyright RECONYX, LLP – www.silent-image.com Tour of the Camera - 7
Page 10

Silent Image Fact Sheet – April 2006
Phases of the moon displayed in the image bands include: (new moon), (waxing crescent),
(first quarter), (waxing gibbous), (full moon), (waning gibbous), (last quarter),
and
(waning crescent). Any time the infrared illuminator is used, (the infrared illuminator
“flash” indicator) appears in the Image Data bands.
The information displayed in the Image Data bands is only a fraction of the information that’s
stored with each picture. Image Data includes all of the following information: General (trigger,
date, time, and infrared illumination), Settings (contrast, brightness, sharpness, and motion
sensor sensitivity), Environment (temperature, and light and battery levels), and Miscellaneous
(original filename, serial number, hardware number, firmware number, and more.)
In addition to the Image Data that the camera stores within each image, you can add your own
Image Data to the pictures using MapView. You can add user-defined Image Notes (text that
you add to images, up to 5,000 characters for each image). Image Data can be viewed in its
entirety using “MapView.”
All Image Data can be searched, so that you can find exactly what you’re looking for, even in a
large collection of images.
Copyright RECONYX, LLP – www.silent-image.com Tour of the Camera - 8
Page 11
Silent Image Fact Sheet – April 2006
Changing The Camera Settings
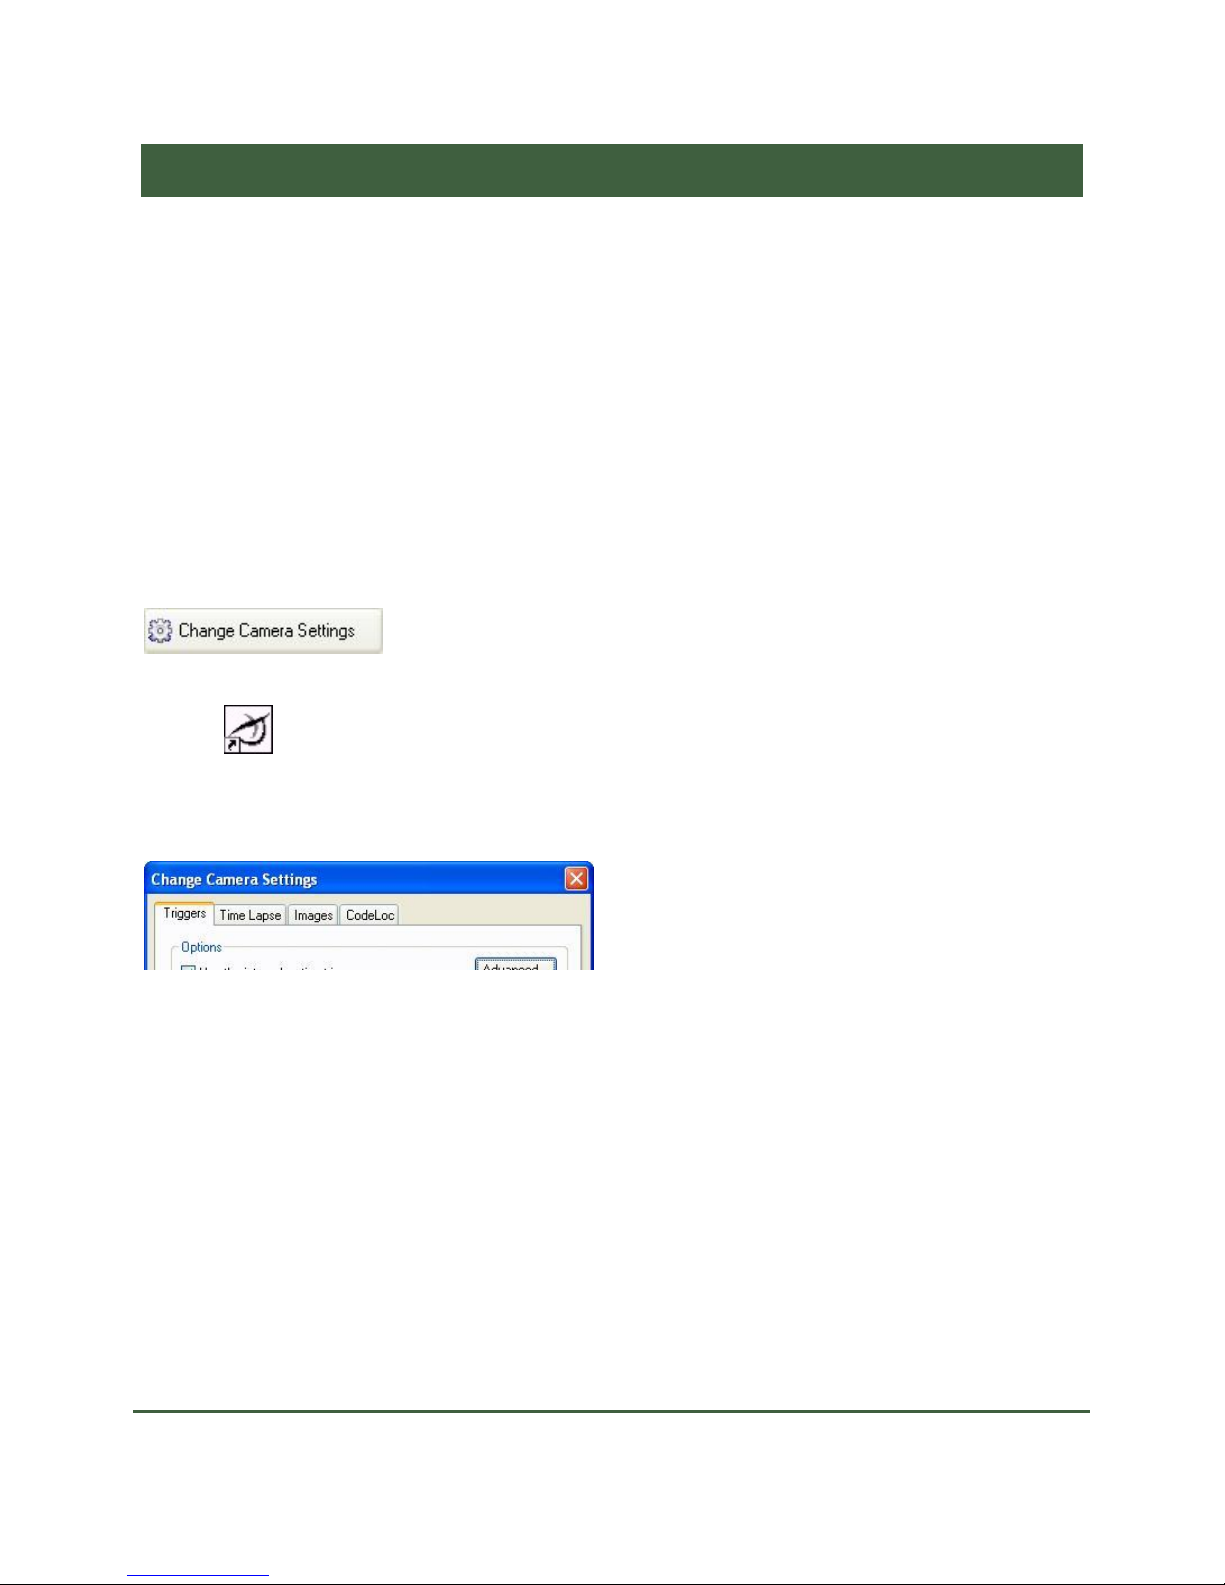
Tbe Silent ImageTM camera’s settings can all be adjusted from the personal computer using the
“Change Camera Settings” feature of “Silent Image – MapView.” All of the camera settings are
stored on the CompactFlash (CF) card and are transferred to the camera as soon as you insert the
CF card in the camera and turn the camera on.
Once the settings are transferred they are retained by the camera – even when the camera is off –
so that you don’t need to use “Change Camera Settings” again unless you want to change the
settings. The settings are also retained on the computer for future use, so that the next time you
select “Change Camera Settings” to adjust the settings, you see the settings you selected instead
of the factory defaults.
To change the camera settings, insert the CF card into the card reader of the computer and click
the Change Camera Settings toolbar button in the upper middle section of “MapView.”
(To start “MapView,” move the mouse cursor over the “Silent Image – MapView” icon on the
desktop
and double-click the left mouse button. Or, from the Microsoft Windows Start
menu, select Programs > RECONYX > Silent Image – MapView.)
“Change Camera Settings” opens, displaying four tabs.
On any tab in “Change Camera Settings,” you can click:
• OK to save changes you’ve made to the settings.
• Cancel to close “Change Camera Settings” without saving changes.
• Set Date & Time to change the camera’s date and time settings.
• Use Factor to restore factory settings to all tabs.
The four tabs within “Change Camera Settings” allow you to set the camera to function exactly
the way you want it to. The tabs are:
Copyright RECONYX, LLP – www.silent-image.com Changing The Camera Settings - 9
Page 12

Silent Image Fact Sheet – April 2006
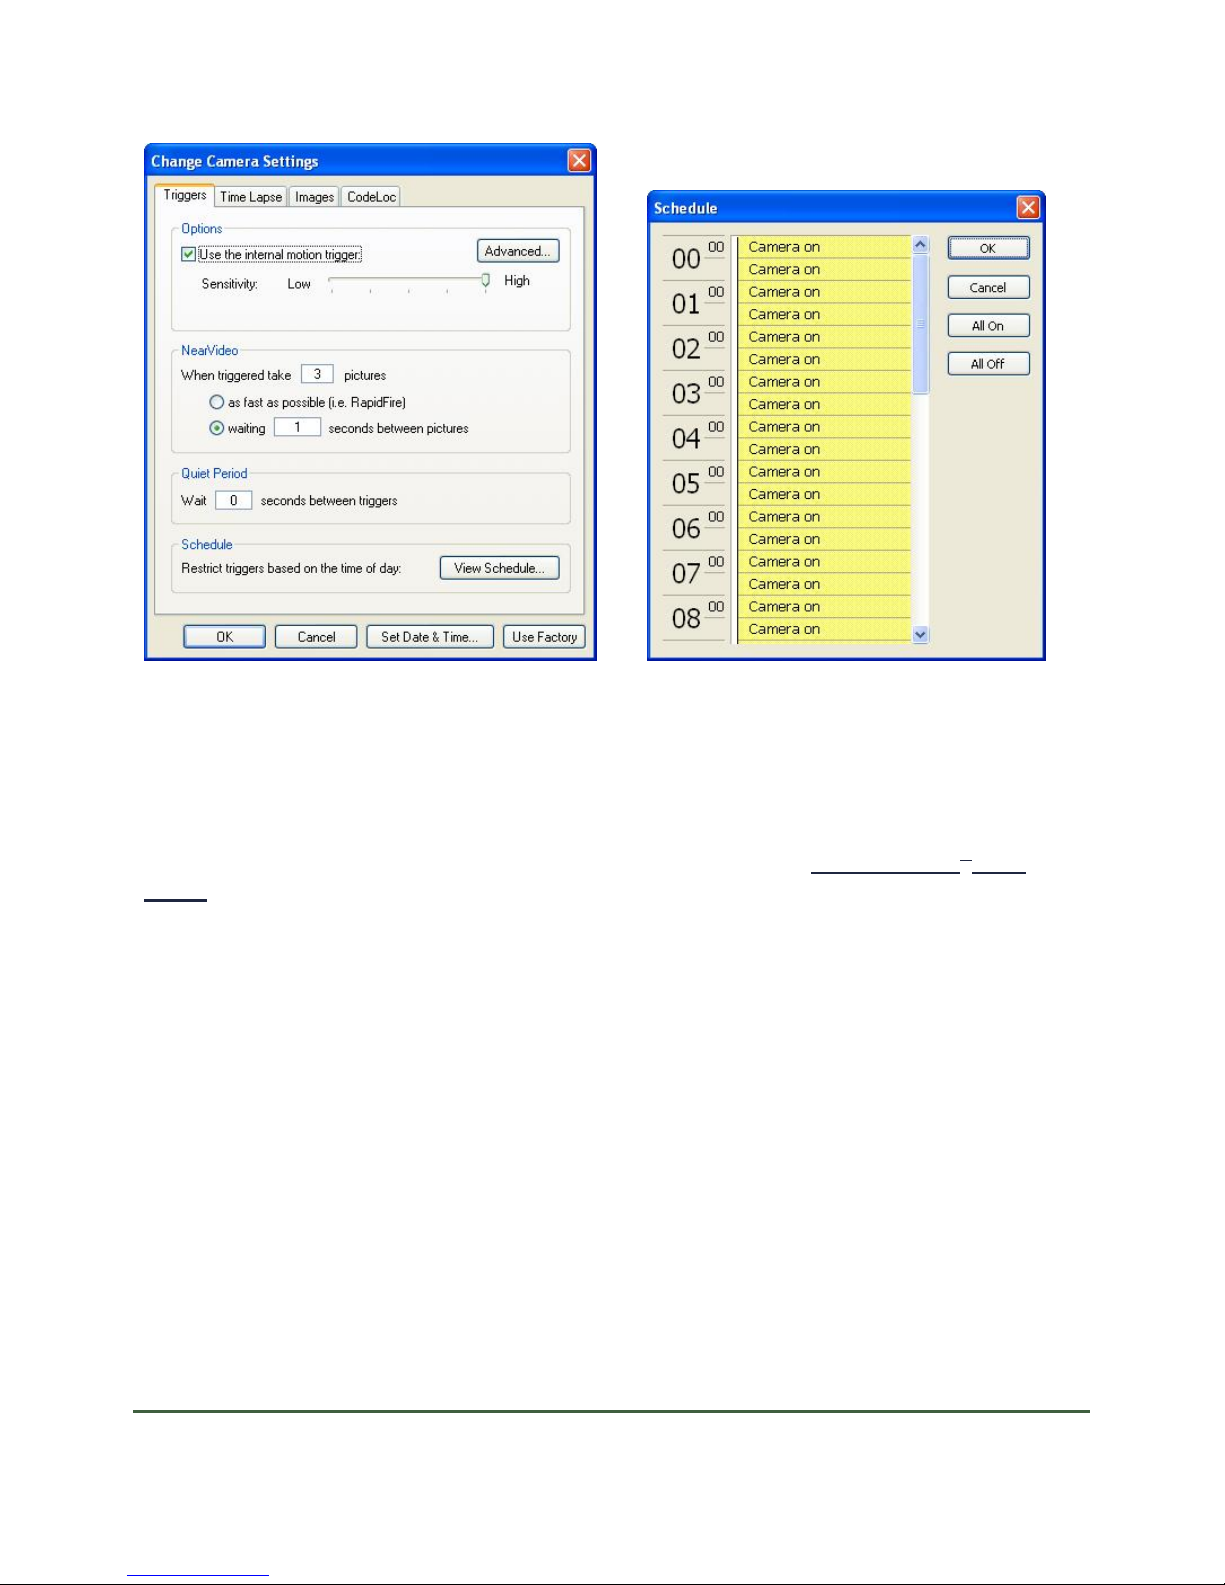
Triggers – Select whether you want to use the camera’s internal motion trigger, adjust the
trigger sensitivity and advanced trigger settings, select the number of pictures you want to take
after a trigger occurs (the NearVideo
TM
sequence of images) and the number of seconds to pause
between pictures, set a quiet period (trigger delay), and set up a schedule specifying on and off
periods during the day/night when the camera will react to triggers.
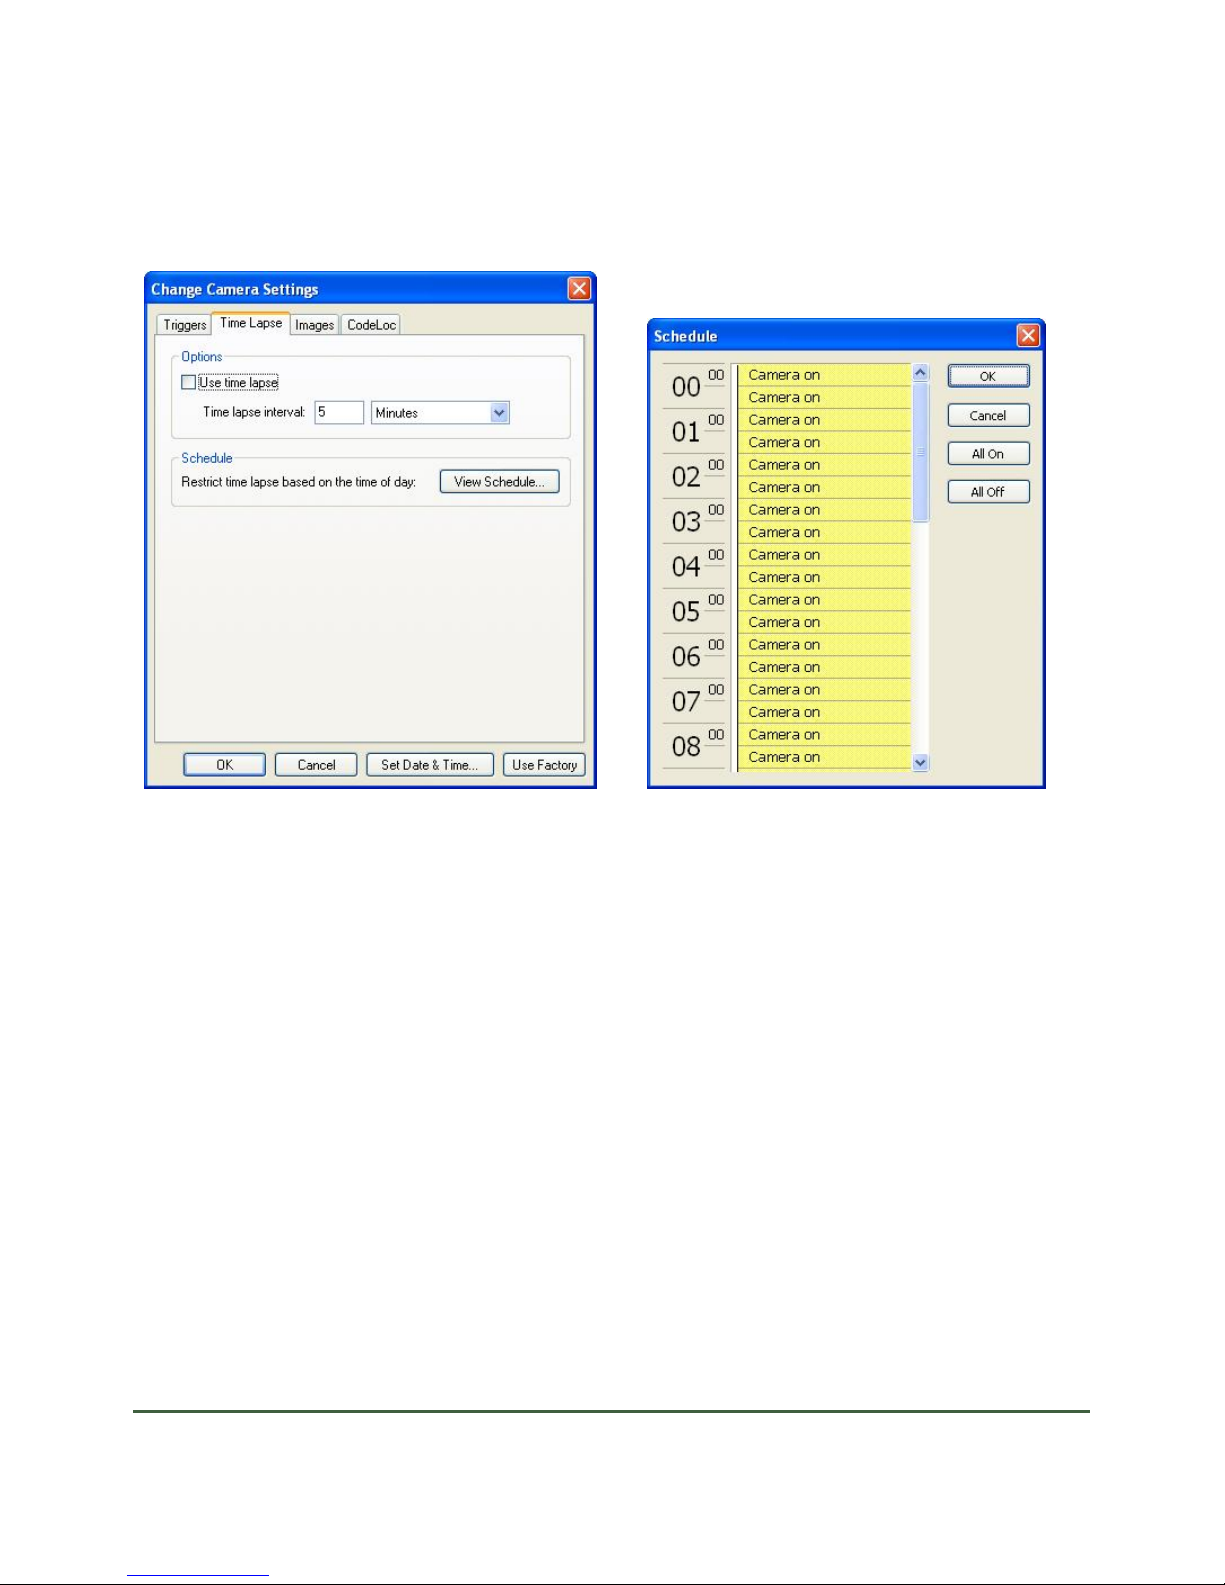
Time Lapse – Select whether you want to take time lapse pictures, the number of minutes to
wait between pictures, and set up a schedule specifying on and off periods during the day/night
when the camera will be taking time-lapse images.
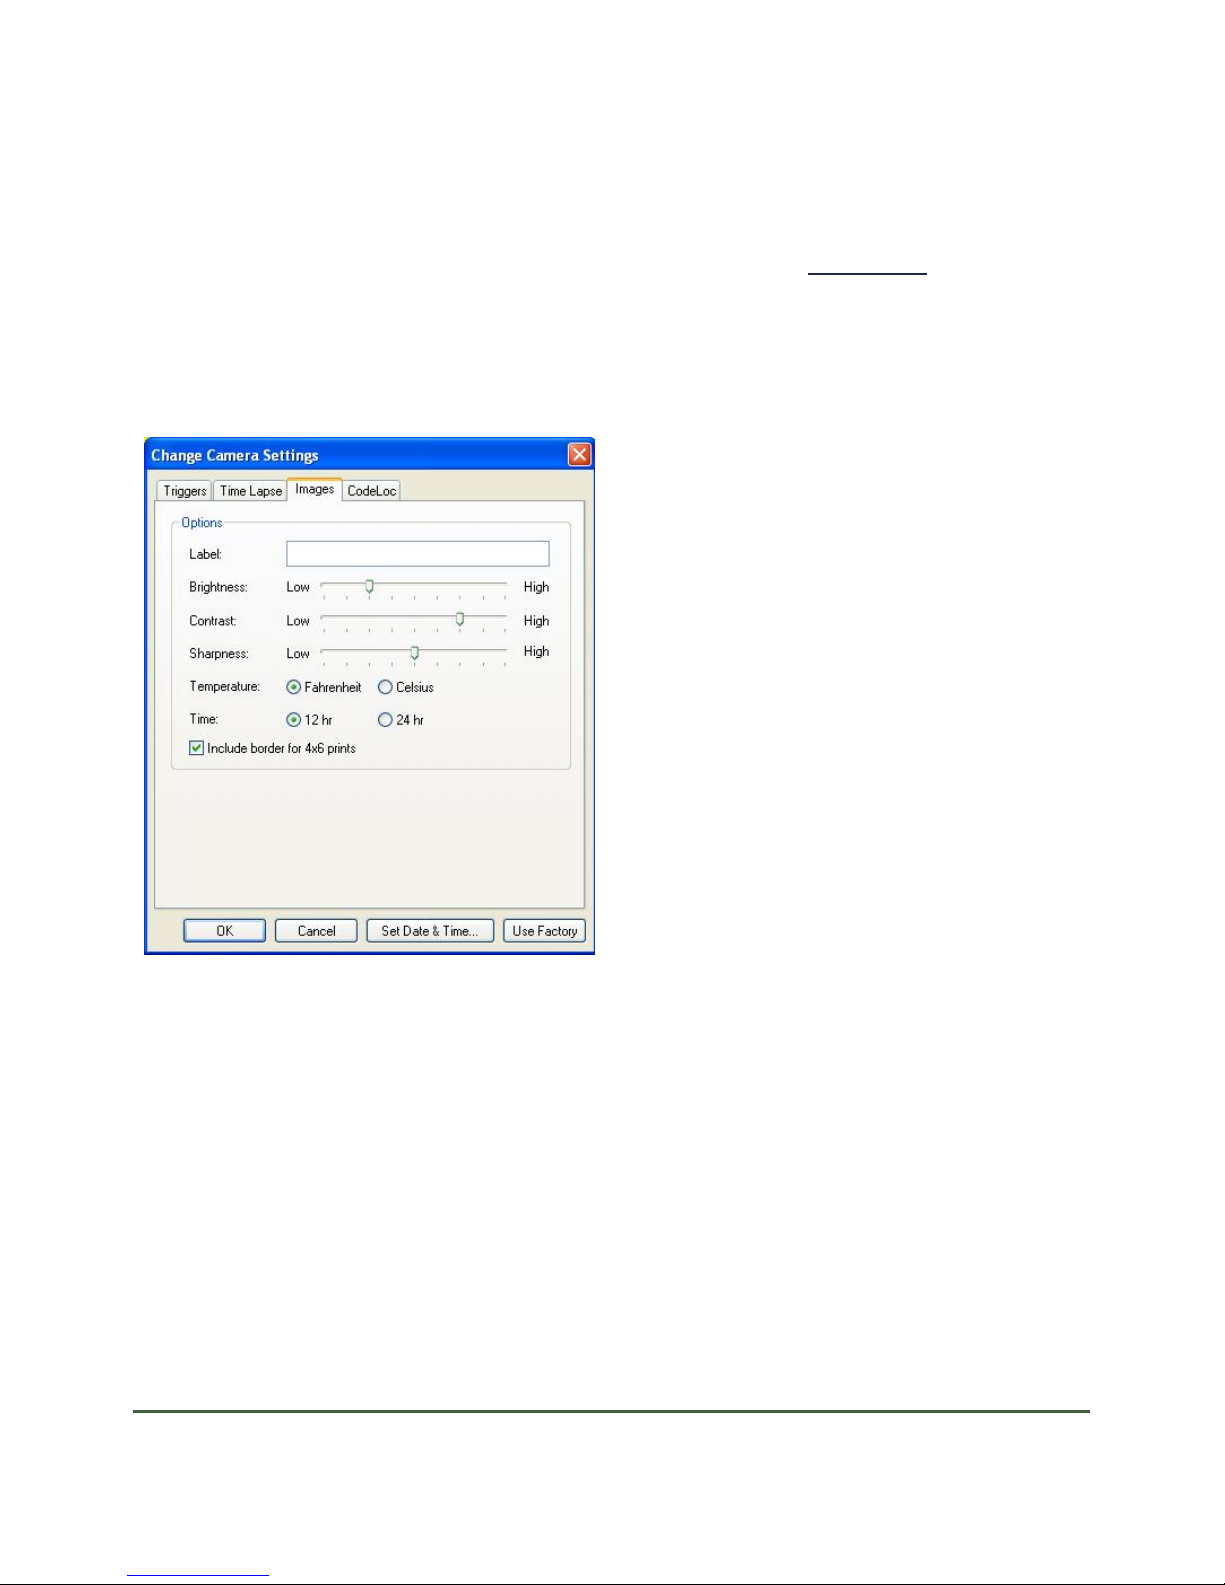
Images – Enter a camera label that will be stored in one of the Image Data bands on each picture
the camera takes, adjust brightness, contrast, and sharpness, and select the temperature scale and
type of hourly display the camera uses.
CodeLoc – Set a four-button CodeLocTM password sequence and specify whether or not it is
required to activate the camera.
Triggers
The Silent Image camera can be set to take pictures as a result of triggered events (motion
detected), via the internal motion sensor. You can also adjust the sensitivity of the internal
motion detector and set an optional trigger delay on this tab.
After the Silent Image camera is activated by a trigger, it takes a NearVideo
TM
sequence of
images. You specify the number of pictures you want to take in a NearVideo sequence, and how
quickly you want the pictures to be taken. The Silent Image camera is capable of taking pictures
at the rate of up to five frames per second continuously (Rapid Fire mode), although the speed at
which the images are saved to the CompactFlash (CF) card may vary depending on the type of
card you’re using (see
CompactFlash® Cards). If you are using a slower CF card, the Rapid
Fire performance may be only two or three frames per second.
The NearVideo feature allows you to see more than just the animal that triggered the camera;
NearVideo sequences lets you see what the animal was doing and determine how long it was in
the camera’s field of view. Although the Silent Image camera can be set to take only one image
per trigger, it is generally advantageous to take three or more pictures per trigger to be sure that
you can clearly see the features of the animal from multiple angles as it moves within the
camera’s
field of view.
Copyright RECONYX, LLP – www.silent-image.com Changing The Camera Settings - 10
Page 13
Silent Image Fact Sheet – April 2006
The default (and minimum recommended) number of pictures to take in a NearVideo sequence is
three, but you can adjust the number of pictures taken after a trigger from 1 to 99.
The default time that the camera waits between pictures is one second, but you can adjust the
time that the camera waits between pictures from 0.2 to 60 seconds. If you select the option to
take RapidFire pictures, the camera will take pictures as fast as it can save them to the CF card
(this speed may vary depending on the type of card you’re using; see
CompactFlash® (CF)
Cards). Fast cards can save up to five frames per second.
There is also a 24 hour trigger schedule that allows you to tell the camera when to “look” for
motion events (Camera on), and when to ignore motion events (Camera off). The schedule is
subdivided into half hour segments.
Copyright RECONYX, LLP – www.silent-image.com Changing The Camera Settings - 11
Page 14
Silent Image Fact Sheet – April 2006
Time Lapse
The Silent Image camera can be set to take time-lapse sequences of images.
The default time to wait between time lapse pictures is 5 minutes, but you can adjust the time to
wait between pictures in either of these ranges: 1-90 minutes or 1-24 hours.
There is also a 24 hour trigger schedule that allows you to tell the camera when to take time
lapse images (Camera on), and when not (Camera off). The schedule is subdivided into half
hour segments.
The time lapse schedule is independent of the trigger schedule (discussed previously). Therefore,
the two schedules can be set up differently.
Copyright RECONYX, LLP – www.silent-image.com Changing The Camera Settings - 12
Page 15
Silent Image Fact Sheet – April 2006
Images
The images automatically display some of the Image Data (information electronically stored with
the pictures) in Image Data bands above and below the pictures (see Image Data). The camera
label, and the temperature and time that the picture was taken, are some of the information that is
displayed in the Image Data bands. You can specify the label, temperature scale (Fahrenheit or
Celsius), type of hourly display (12 hour or 24 hour) that will be used in the Image Data, and
whether or not a border is included for 4x6 prints. You can also adjust the brightness, contrast,
and sharpness of the pictures.
The Label field can be used to identify you as the owner of the camera, or label the caerma if you
are using more than one, or it can be used to automatically record the observation location on
each image captured. The label can be a maximum of 20 characters and is added to the Image
Data in all pictures the camera takes. The label can be changed at any time using “Change
Camera Settings.”
Brightness, Contrast, and Sharpness default to optimal settings for most outdoor photography.
However, you can adjust these levels as needed. For example, you might adjust the brightness
and/or contrast levels in a location where morning sunlight is unavoidably direct.
You can specify whether you want temperature values displayed in Fahrenheit or Celsius. You
can also specify whether you want the hourly display portion of the time stamp to be in 12 hr or
24 hr.
Copyright RECONYX, LLP – www.silent-image.com Changing The Camera Settings - 13
Page 16

Silent Image Fact Sheet – April 2006
CodeLoc
CodeLoc™ is a theft deterrent since the fact that the Silent Image camera includes CodeLoc
password protection is printed on the front of the camera. If CodeLoc is enabled, the camera will
not function until the proper password is entered.
Important! CodeLoc™ does not prevent theft; it only makes a stolen camera useless to the thief.
For this reason, RECONYX strongly recommends using a cable and lock to secure the camera
against possible theft at all times when the camera is in the field.
If the camera is stolen, you should notify us as soon as possible so that we can be on the lookout
for the camera; if the thief contacts us in an effort to get the camera working again, we may be
able to recover the camera and return it to you.
Copyright RECONYX, LLP – www.silent-image.com Changing The Camera Settings - 14
Page 17
Silent Image Fact Sheet – April 2006
Viewing and Managing The Images
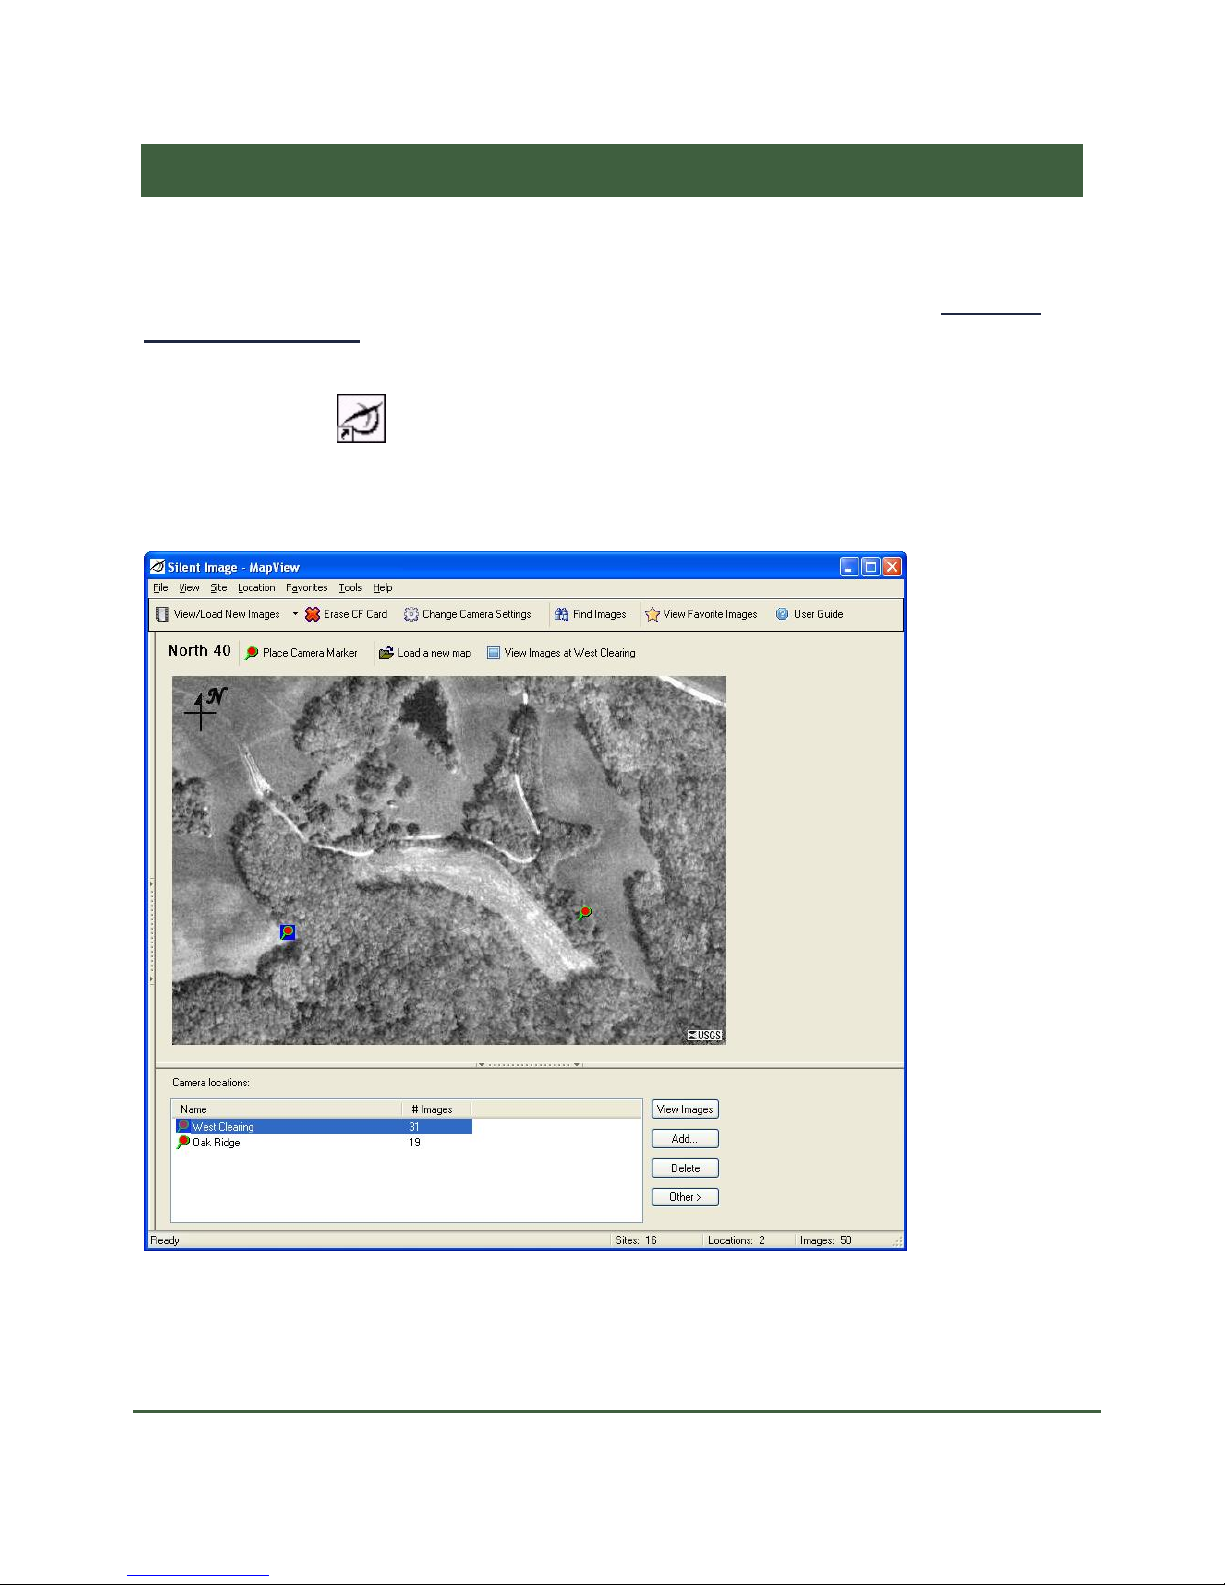
“MapView” is a complete image-handling system for pictures you take with the Silent ImageTM
camera. You can organize (by site and location), view, and search any or all of the images. You
can also erase the CompactFlash
The Camera Settings) from “MapView.”
To view and manage the images, move the mouse cursor over the “Silent Image – MapView”
®
(CF) card and change the camera’s settings (see Changing
icon on the desktop
and double-click the left mouse button. Or, from the Microsoft
Windows Start menu, select Programs > RECONYX > Silent Image – MapView.
“MapView” opens.
“MapView” is divided into sections. The top section includes the Silent Image Site Map. The
bottom section includes camera locations in the current site. Standard drop-down menus appear
across the top, along with “MapView” and site toolbar buttons to quickly perform common tasks
Copyright RECONYX, LLP – www.silent-image.com
Viewing and Managing The Images - 15
Page 18

Silent Image Fact Sheet – April 2006
like loading new images, changing the camera’s settings, viewing favorite images, placing
camera markers on site maps, and viewing images at a site.
Common “MapView” Tasks
Manage Sites – Select a site (property or area where you set up the camera in one or more
locations) to work with, rename and delete sites, search images in a site, add a site map and place
or remove camera markers, and add new sites.
Manage Locations – Select a location (specific spot within a site where you set up the camera)
to work with, rename and delete locations, view images stored in a location, load new images
into a location, create new locations, and place or remove camera markers representing locations
on a site map.
Erase CF Card – Format new CF cards to prepare them for use, and erase used cards to quickly
delete old images.
Check Free Space – Check the CF card for free space.
Load New Images – Load (copy) any or all images from the CF card to the computer. You can
also load images from one folder on the computer into any of the sites and locations. An image
viewer for previewing images before you load them is included in the “Load New Images
Wizard.”
View Images – View images that you’ve loaded onto the computer. You can also copy images to
“Favorites,” save images to another folder, move or copy images from one location to another,
and delete images using the “Viewer.”
Favorites – Add “favorite” images to a folder for easy reference across sites and locations. You
can use “MapView” to open this folder and order prints online, copy images to a CD, e-mail
photos, and more.
Find Images – Find the images you’re looking for by searching the
Image Data of all images in
a site (including all locations in the site), or by searching the Image Data of all images in a
location.
Tag Images and Manage Image Data – Add or edit image notes to Image Data, and view all
Image Data stored with an image.
Create Video – Use any of the images you’ve stored in a location to create a video clip.
Copyright RECONYX, LLP – www.silent-image.com
Viewing and Managing The Images - 16
Page 19
Silent Image Fact Sheet – April 2006
Image Viewer
You can view images that you haven’t loaded from the CompactFlash® (CF) card onto the
computer using the image viewer that’s included in the “Load New Images Wizard.” You can
also view images that you’ve already loaded onto the computer. The Silent Image “Viewer”
behaves similarly to the image viewer that’s included in the “Load New Images Wizard,” but
includes many additional features, such as the ability to print images and create videos from
images, search images, and copy images as favorites.
When you view images, images are displayed from the current site and location. Before
beginning the viewing process, select the site and location you want to view images for.
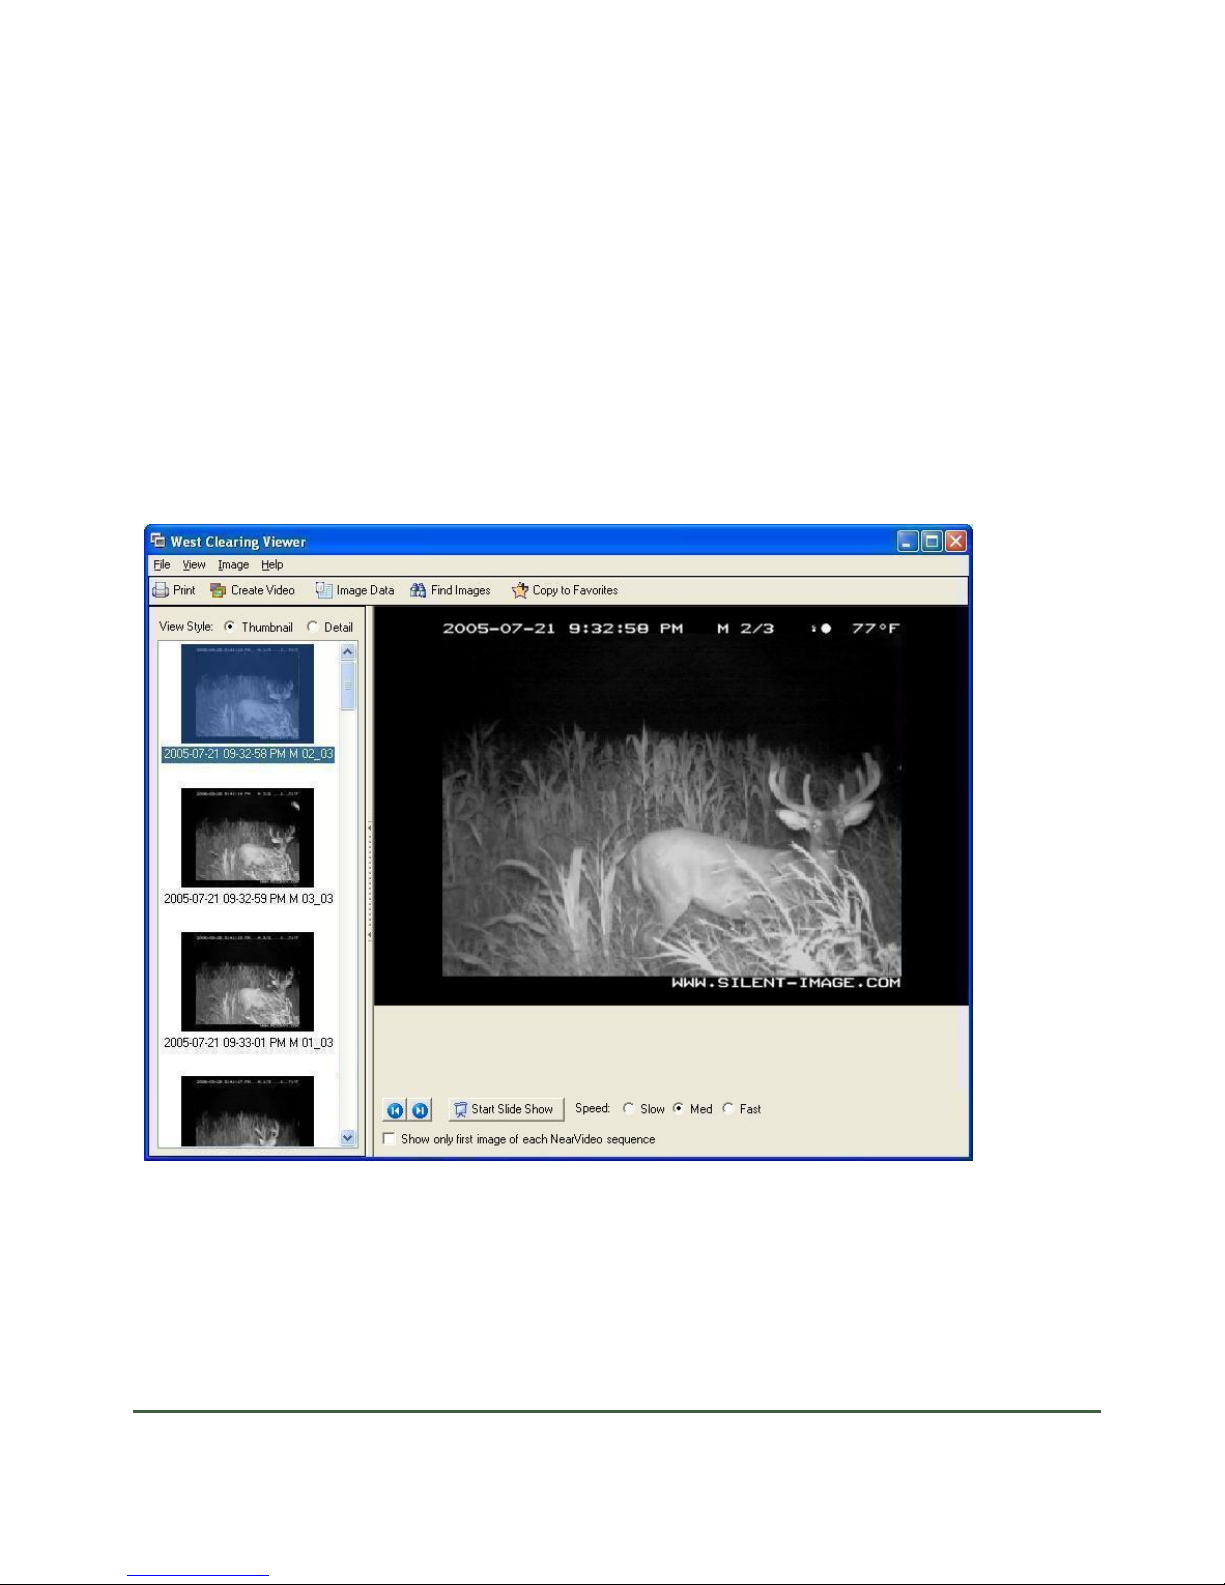
Image viewer:
The viewer is divided into two sections: available images (thumbnail or detail view styles) on the
left, and an enlarged view of the current list on the right. The left section can be hidden or
displayed (hiding this section displays the enlarged image only).
The viewer also allows for running in “Slide Show” mode, accessing Image Data, and searching
for specific images.
Copyright RECONYX, LLP – www.silent-image.com
Viewing and Managing The Images - 17
Page 20
Silent Image Fact Sheet – April 2006
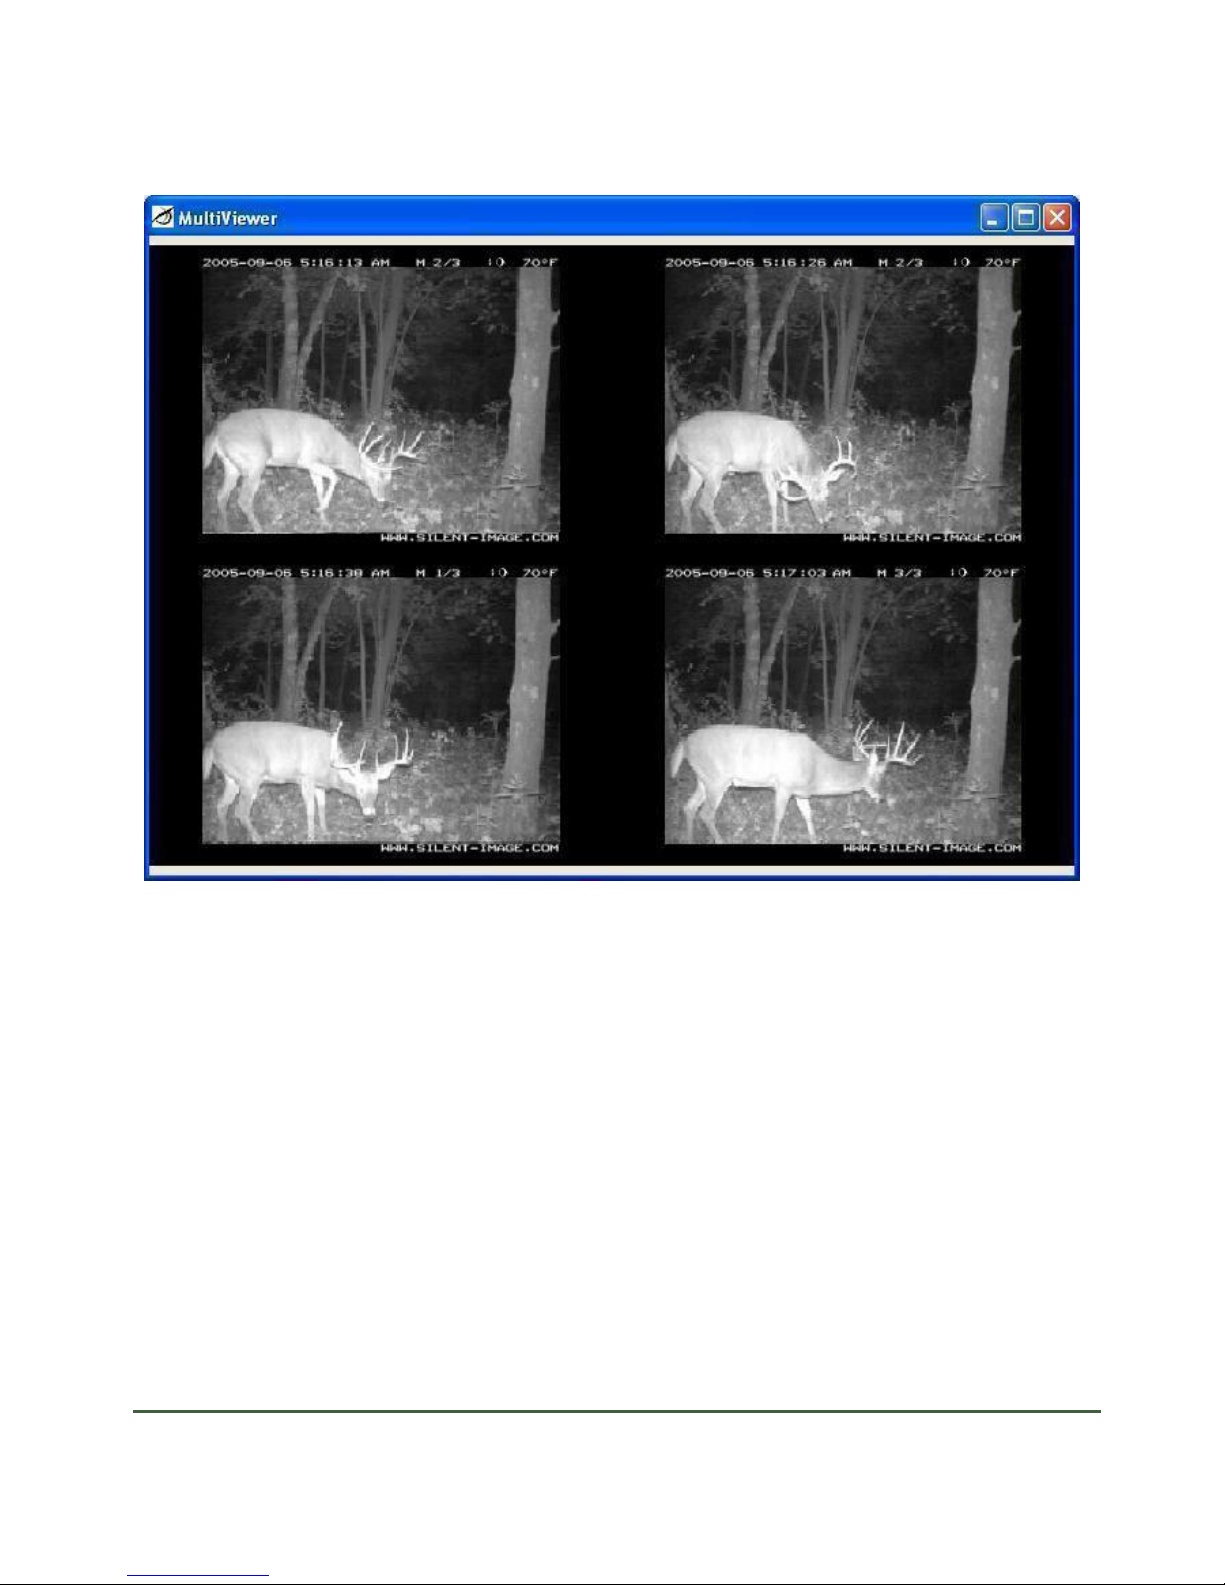
A “MultiViewer” is also available to display two, three, or four images at the same time.
Copyright RECONYX, LLP – www.silent-image.com
Viewing and Managing The Images - 18
Page 21

Silent Image Fact Sheet – April 2006
Warranty Information
Satisfaction Guarantee
RECONYX offers a 30-day satisfaction guarantee for all cameras that are purchased directly
from RECONYX. If, for any reason, you are not completely satisfied with products purchased
from RECONYX, you may return the products within 30 days of purchase for a full refund of the
purchase price and applicable taxes.
This guarantee is subject to the following conditions:
• Hardware products must be returned in the original packaging and must be complete
and in “new” condition. Any damaged or worn products may be subject to a
restocking fee.
• You must obtain a Return Material Authorization (RMA) number for all products
returned under this money-back guarantee (contact RECONYX for an RMA before
returning products).
• You must return the original CDs containing RECONYX software and will be
required to sign an affidavit indicating that all copies of RECONYX software have
been removed from the computers and any physical copies of the software have been
destroyed.
• Shipping charges will not be refunded.
Limited Warranty
RECONYX hardware products are warranted for one (1) year. If during this period, through
normal use, a hardware product becomes defective due to defects in materials or workmanship,
RECONYX will either repair or replace the product. This warranty is void if a product failure
results from accident, abuse, improper use by Buyer, disassembly, or unauthorized maintenance
and repair.
Software products are licensed to Buyer under the terms of the applicable RECONYX software
license (contained within installation programs). If Buyer wishes to review the software license
agreement before purchasing products from RECONYX, a copy of the software license may be
obtained by request.
Buyer must obtain a Return Material Authorization (RMA) number from RECONYX before
returning any product(s) for repair or replacement. If RECONYX concludes that a returned
product is not defective, Buyer will be notified, the product will be returned to Buyer at Buyer’s
expense, and Buyer may be charged for RECONYX’s examination and testing of the product.
Copyright RECONYX, LLP – www.silent-image.com
Troubleshooting and Technical Support - 19
Page 22

Silent Image Fact Sheet – April 2006
This limited warranty is the sole warranty for hardware and software products offered by
RECONYX and RECONYX shall not be liable for any amounts for said products except in
compliance with this warranty.
Copyright RECONYX, LLP – www.silent-image.com
Troubleshooting and Technical Support - 20
Page 23

Copyright and Trademark Information
Silent Image Fact Sheet – April 2006
Silent ImageTM Fact Sheet, April 2006
Copyright
©
2006 by RECONYX
3600 Hwy 157, Suite 205, La Crosse, WI 54601
This Fact Sheet provides detailed instructions for getting started with the Silent Image camera
and software, installing the software, changing the camera settings, and viewing and managing
images.
Silent Image is a trademark of RECONYX.
Other trademarks and registered trademarks referred to in this document:
• CodeLoc, InstaOn, MapView Image Management, and NearVideo are trademarks of
RECONYX.
• CompactFlash is a registered trademark of the CompactFlash Association.
• Microsoft and Windows registered trademarks of Microsoft
®
Corporation.
All other trademarks and copyrights referred to are the property of their respective owners.
Copyright RECONYX, LLP – www.silent-image.com
Copyright and Trademark Information
- 21
 Loading...