

ReconRobotics THROWBOT 2 User Manual
1
WORLD
LEADER IN
TACTICAL
MICRO-ROBOT
SYSTEMS
VERSION 2.0, JUNE 2018

ROBOT AND OCU USER MANUAL
PRODUCT IDENTIFICATION
This User Manual applies to the ReconRobotics®
Throwbot® 2 Robot and Operator Control Unit (OCU).
NOTICE: Any changes or modications, whether to the
physical equipment, software, or rmware, that are not
expressly approved by ReconRobotics, will void the
user’s warranty and license to operate the equipment.
All materials contained in this document are proprietary
and condential. Reproduction and duplication, without
specic written permission, are strictly prohibited.
Failure to adhere to the terms of this manual (User
Manual), or ignoring the safety warnings described on
page 25 through 27, will void the user’s license to
operate the equipment and subject the user to liability.
The "license" or "licenses" means all licenses applicable
to the user, including the FCC License (as dened on
page 31) and any applicable end user license
agreements for the product or accessories ("EULAs").
CORPORATE HEADQUARTERS:
ReconRobotics, Inc.
5251 W 73rd Street, Ste A
Edina, MN 55439 USA
Phone: 1-866-697-6267
952-935-5515
Fax: 952-935-5508
Email: support@reconrobotics.com
Website: www.reconrobotics.com
Place Serial Number Sticker Here
Kit Contents ........................................................................4
Accessories for the Throwbot 2 Robot ...........................5
Throwbot 2 Robot Feature Overview ..............................6
Operator Control Unit (OCU) Feature Overview ............7
Throwbot 2 Robot’s Video Overlay ................................... 8
OCU Audio/Video-Out Capabilities ................................ 9
Operational Specications .............................................. 10
Quick Start Guide .............................................................11
Matching Radio Channels .........................................11
Basic Deployment Instructions ..................................11
Instructions for Use: Setup ..............................................12
Powering on the OCU ................................................12
Powering on the Robot .............................................. 12
Instructions for Use: Charging .........................................13
Robot Charging .......................................................... 13
OCU Charging ............................................................ 14
General Charging Guidelines ...................................14
Regular Maintenance .......................................................15
System Reconguration ..................................................16
Attaching the Picatinny Rail ....................................... 18
Carry and Tow (CT) Conguration ............................18
Rugged XL (RXL) Conguration ................................ 19
Troubleshooting / Frequently Asked Questions .....20–24
Safety Information & Warnings .................................25–27
Warranty and Service .......................................................28
Warranty ......................................................................28
Requesting Service or Repair .................................... 28
Limitations of Liability & Warranty ..................................29
ReconRobotics Throwbot 2 Robot FCC Guidelines
and Logbook ..............................................................30–35
PATENT NOTIFICATION
The devices described
within this User Manual
are protected under US
Patent Numbers D637,217,
D626,577, and 9,061,544
and other patents pending.
©2018 ReconRobotics
4
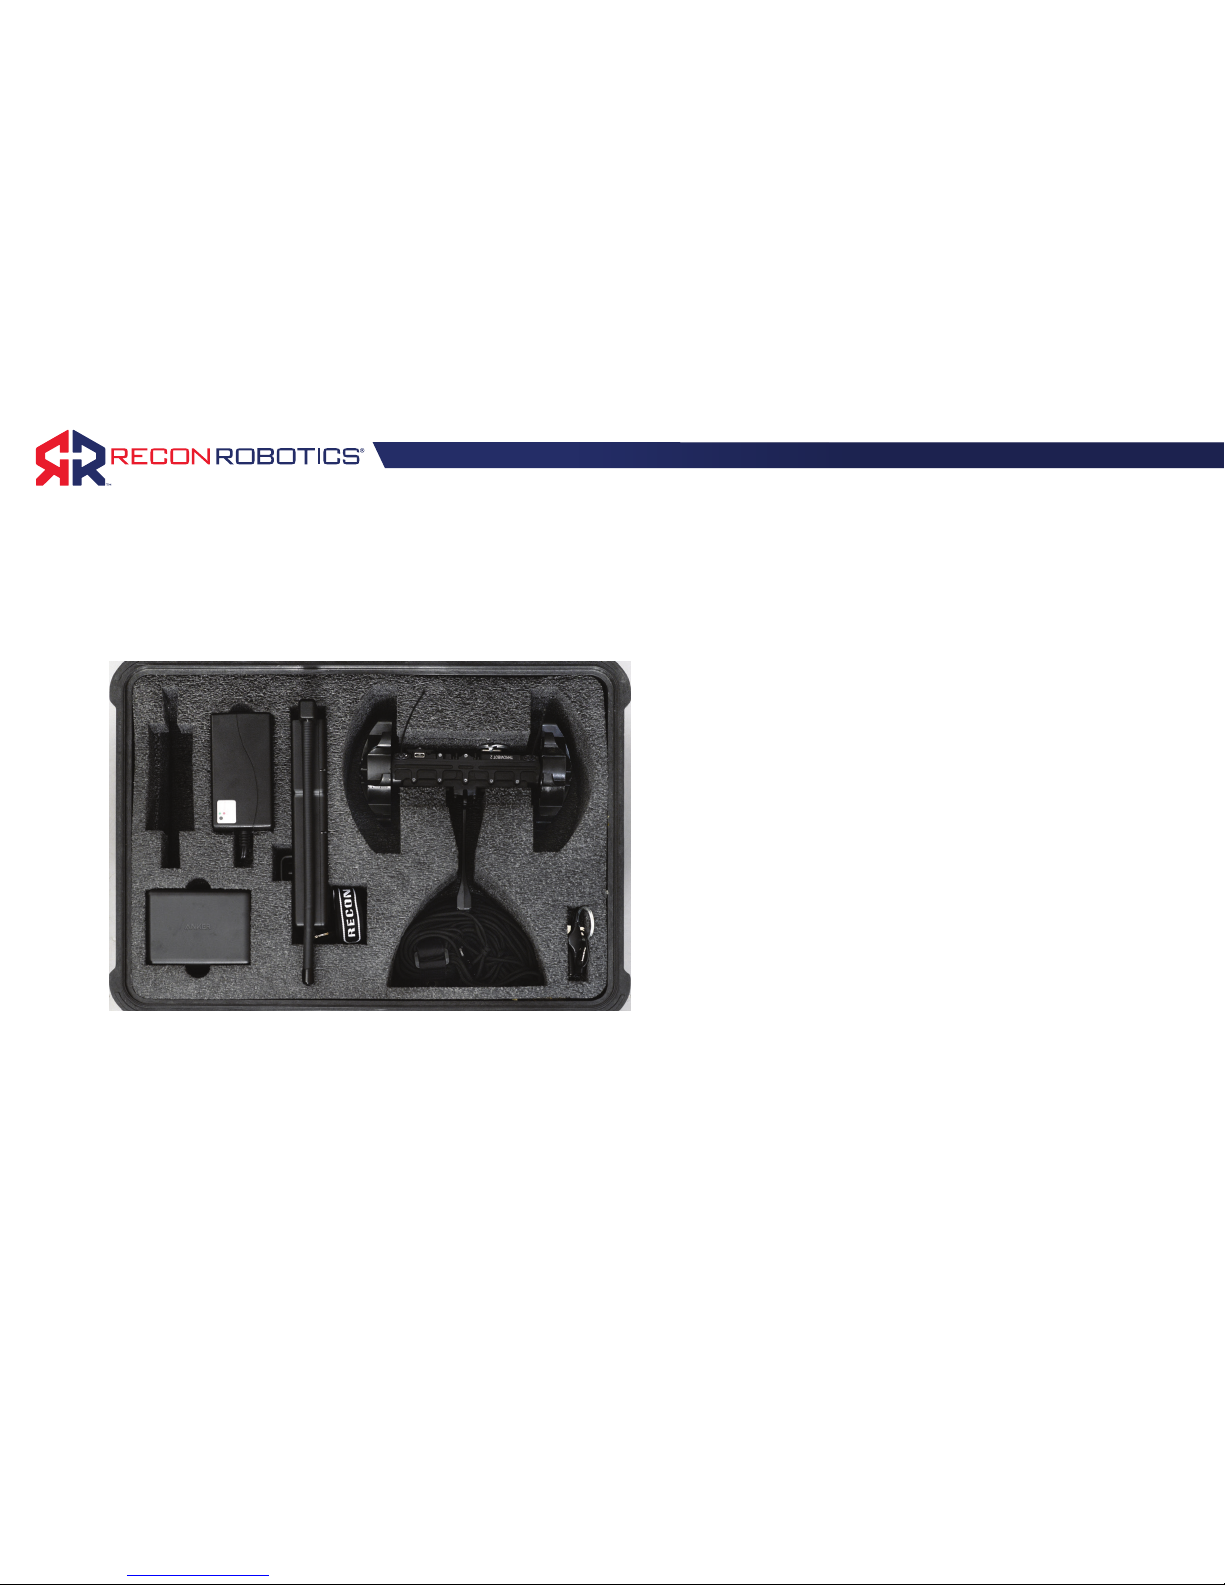
KIT CONTENTS
Kit Contents Included:
• Throwbot 2 Reconnaissance Robot
• Operator Control Unit (OCU) with lanyard
• Throwbot 2 Charger with region specic
power cord
• OCU Charger with region specic
power cord
• Spare Activation Plate
• Tether Kit
• Volume Control Adapter
• Hard Carrying Case
• User Manual
Please inspect the contents of this package to ensure that all materials listed below are present. If any of the materials
are missing, please contact support@reconrobotics.com.

5
ACCESSORIES FOR THE THROWBOT 2 ROBOT
The following accessories are available for the Throwbot
2 robot. Please contact your local ReconRobotics
representative for pricing and availability.
RUGGED XL (RXL) CONVERSION KIT
This kit provides the RXL style wheels and tail necessary
to convert a Throwbot 2 base robot into the Rugged
XL conguration. All necessary tools for performing the
change are included in the kit.
CARRY AND TOW (CT) CONVERSION KIT
This kit provides the Picatinny rail , CT style wheels, and
RXL tail to recongure the Throwbot 2 base robot into
the Carry and Tow conguration. All necessary tools for
performing the change are included in the kit.
DELUXE CONVERSION KIT
This kit provides the contents of both the Rugged XL
Conversion Kit and Carry and Tow Conversion Kit in a
single package.
AUDIO AND VIDEO OUT CABLING PACKAGE
This package allows you to capture video and audio from
the Throwbot 2 robot onto a 3rd party device via the
outputs on the OCU. The cabling package includes RCA
and BNC cables.
RECON SCOUT® SEARCHSTICK™
The Recon Scout SearchStick pole enables tactical and
patrol personnel to instantly convert any Throwbot 2 robot
into a versatile pole camera. The SearchStick pole has a
collapsed length of 20.5" (52cm) and can be extended to
a length of 72" (183cm).
COMMAND MONITORING STATION
The Command Monitoring Station 2.0 (CMS 2.0) enables
a commander to monitor and record video and audio
transmissions from Throwbot 2 robot's operating on
channels A.2, B.2, or C.2 from up to 1,000 feet (305m)
away.
1
While these wheels may look similar to the Recon Scout® XL wheels, they are a new design. They can be utilized on Recon Scout XL or Recon Scout CT with Flex Pack robots, but the Recon
Scout XL wheels from the Recon Scout XL robot or Flex Pack will not afford the same drop ratings as the new wheels and should not be used on a Throwbot 2 robot.
2
While this tail may look similar to the Recon Scout XL or Recon Scout CT tail, the mounting mechanisms are different and they cannot be interchanged.
3
The Throwbot 2 robot’s Picatinny Rail is not interchangeable with the Recon Scout CT's Picatinny Rail.
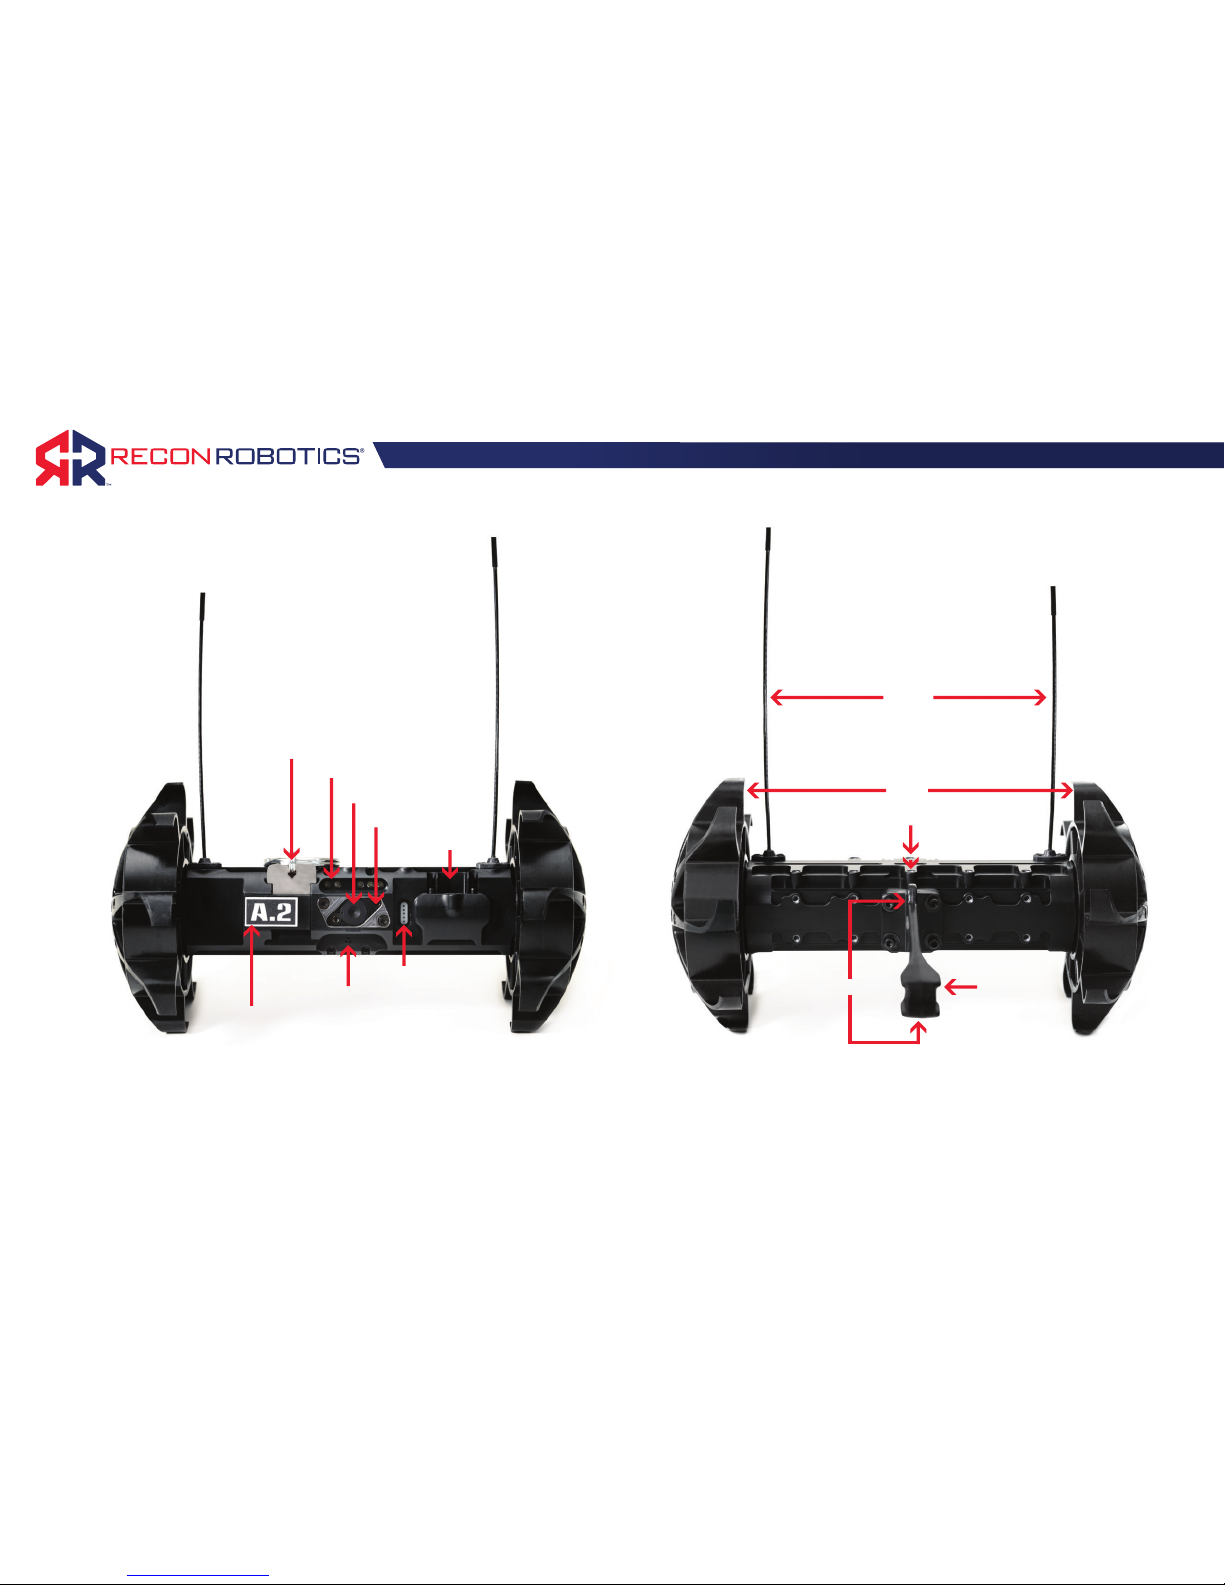
6
Activation Plate
IR Emitters
Camera
Light Sensor
USB / Charge Port
Channel Indicator
Microphone
Charge Indicator
Wheels
Antennas
Picatinny Rail Mount Points
Tether Mount Point
Tail
THROWBOT 2 ROBOT FEATURE OVERVIEW
FRONT VIEW BACK VIEW
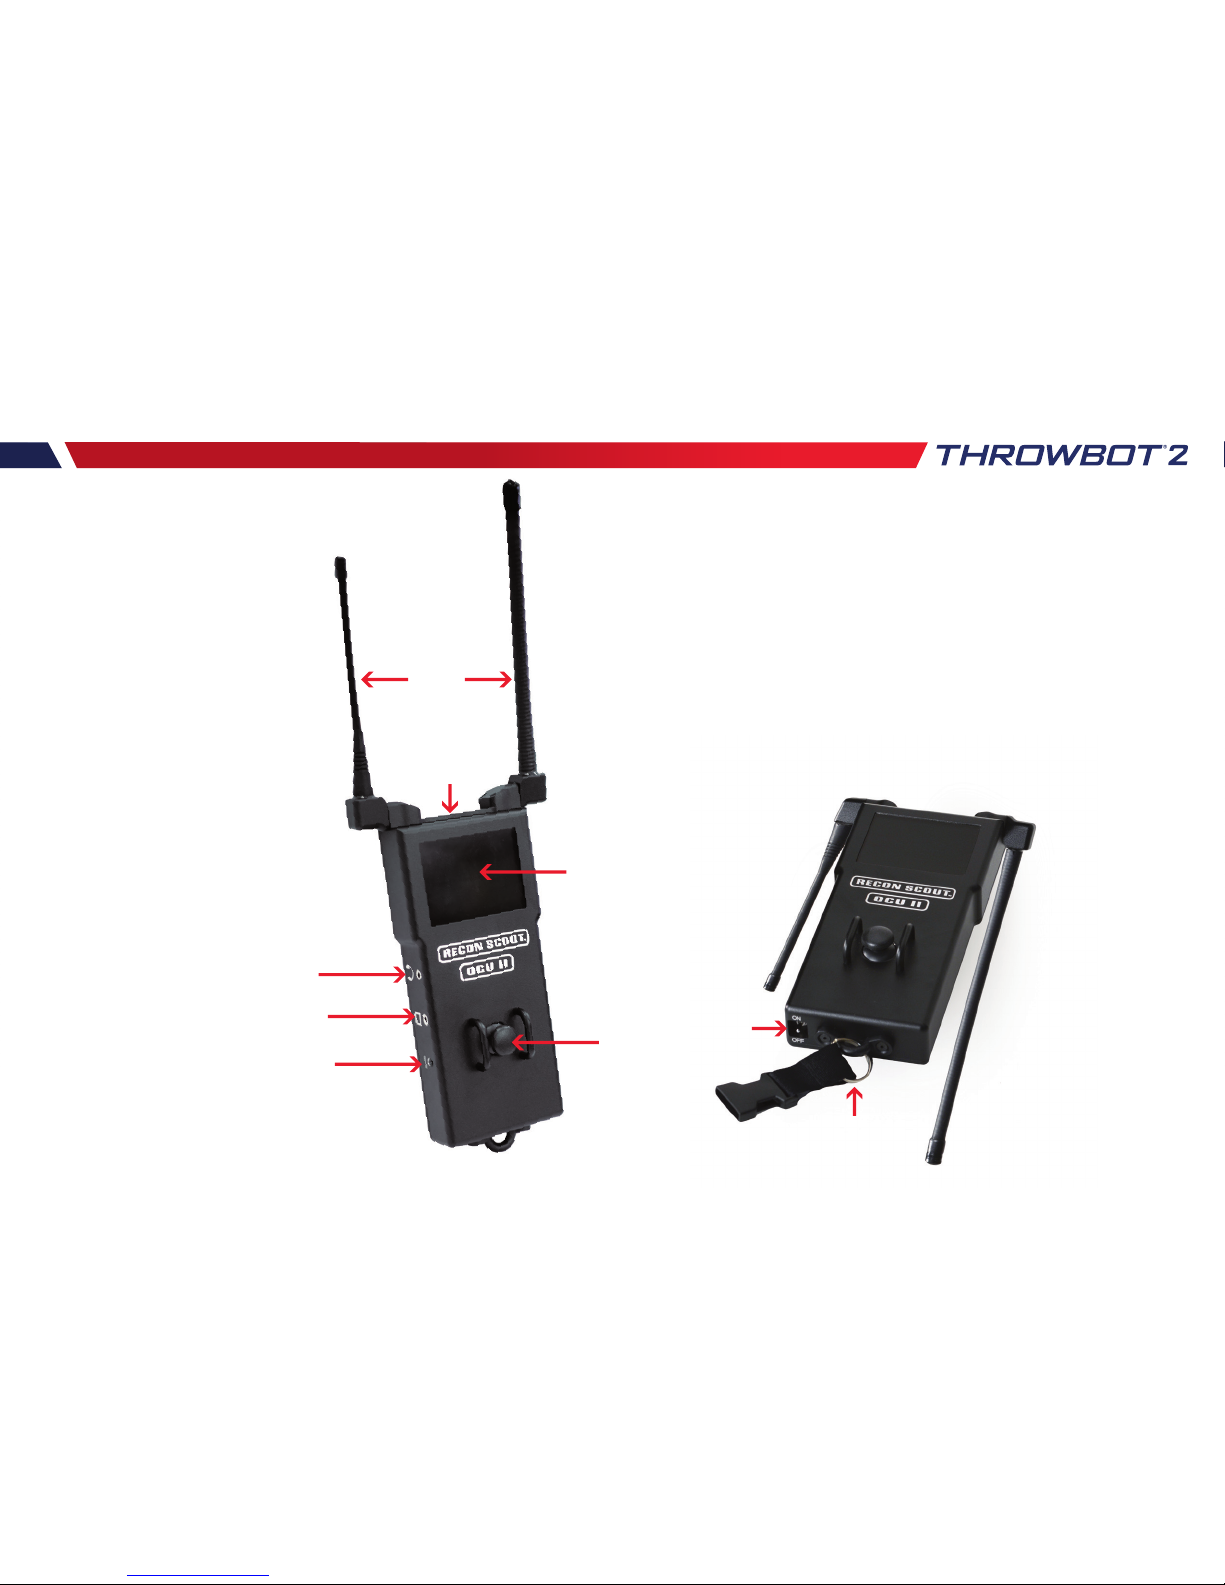
7
Antennas
Channel Indicator
LCD Screen
Joystick
Lanyard Attachment Point
Power Switch
Charge Jack
A/V Out Jack
Headphone Jack
OPERATOR CONTROL UNIT (OCU)
FEATURE OVERVIEW
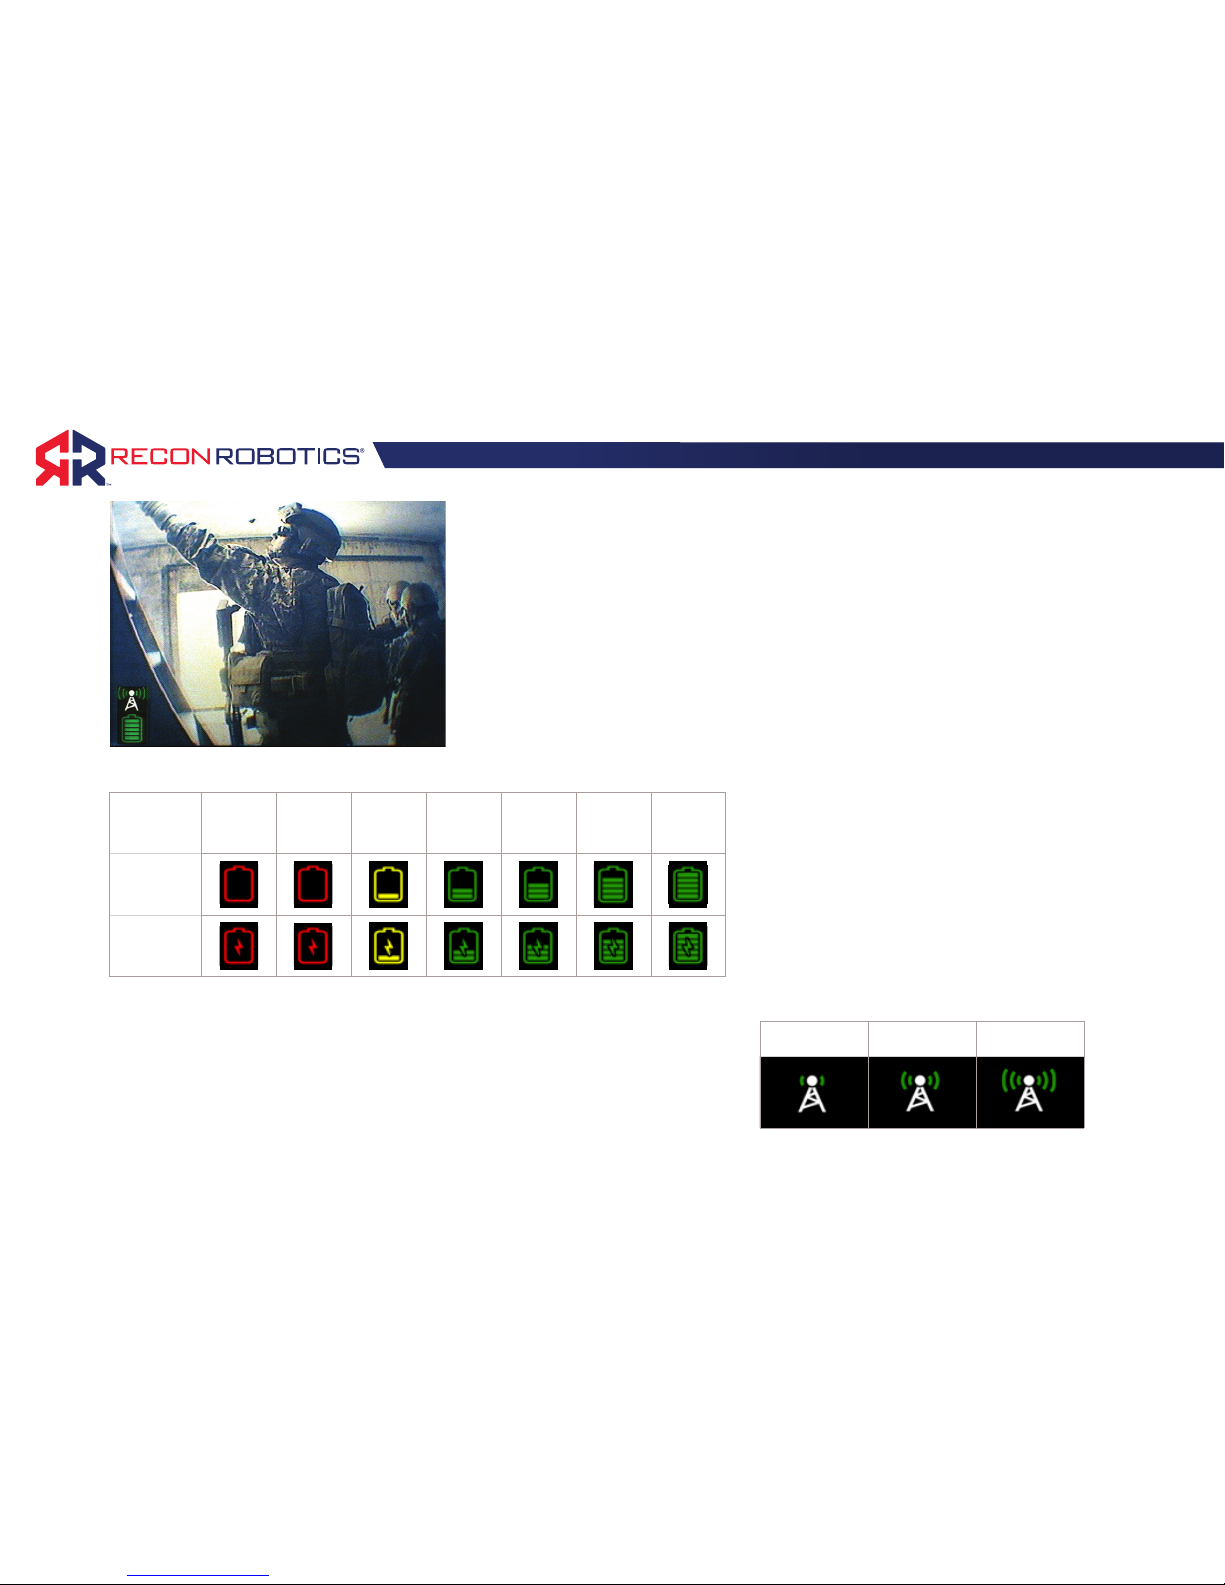
8
THROWBOT 2 ROBOT’S VIDEO OVERLAY
State of
Charge
Empty 10% 20% 40% 60% 80%
Fully
Charged
Battery Icon
Battery Icon
(Charging)
Blinking
The robot’s battery level is shown by an
icon in the lower left corner of the video.
The table at left provides an overview of
this icon and the robot’s state of charge.
Note: There is no indicator for the OCU’s
battery level.
Marginal Fair Good
The robot’s received signal strength is shown by an icon immediately
above the battery level icon. There are three levels (marginal, fair, and
good) for receive signal strength depicted at right. With marginal signal
strength, there is the potential to lose control of the robot.
The Throwbot 2 robot incorporates icons for some useful operational
information into the video signal which will be displayed on the OCU or
Command Monitoring Station (CMS).
Note: Earlier generation robots from ReconRobotics such as the Throwbot XT
and Recon Scout CT do not have this capability and will not transmit the same
information, even if used with the OCU from a Throwbot 2 kit.

9
OCU AUDIO/VIDEO-OUT CAPABILITIES
The OCU is capable of receiving audio transmitted from
the Throwbot 2 robotic system. To listen, plug the provided
volume control adapter into the appropriate jack on the
left-hand side of the OCU. Then plug headphones into the
volume control adapter. Headphones approved for Apple®
or Android™ devices may not work with the provided
volume control adapter.
NOTE: Ensure you are using the volume control adapter or
headphones with in-line volume control. There is no volume
control on the OCU itself. Be careful to test the audio volume
before using.
The ReconRobotics Audio/Video (A/V) Out Cabling Package
(sold separately) can be used to connect the OCU to an
external monitoring / recording device (not included). The
A/V Out jack is located on the left-hand side of the OCU.
Once connected to the OCU, connect the other end of the
A/V Out cable to the appropriate connector on an external
device. Please refer to the instruction card provided with the
A/V Out Cabling Package for more information.
NOTE: The A/V Out cables in the A/V Out Cabling Package
are specically designed to work with the OCU. Though they
may look similar, cables manufactured by a third party may not
work with the OCU.
NOTE: If the OCU is used with older ReconRobotics products
that do not transmit audio, you will still be able to output a
video signal using the appropriate cable.
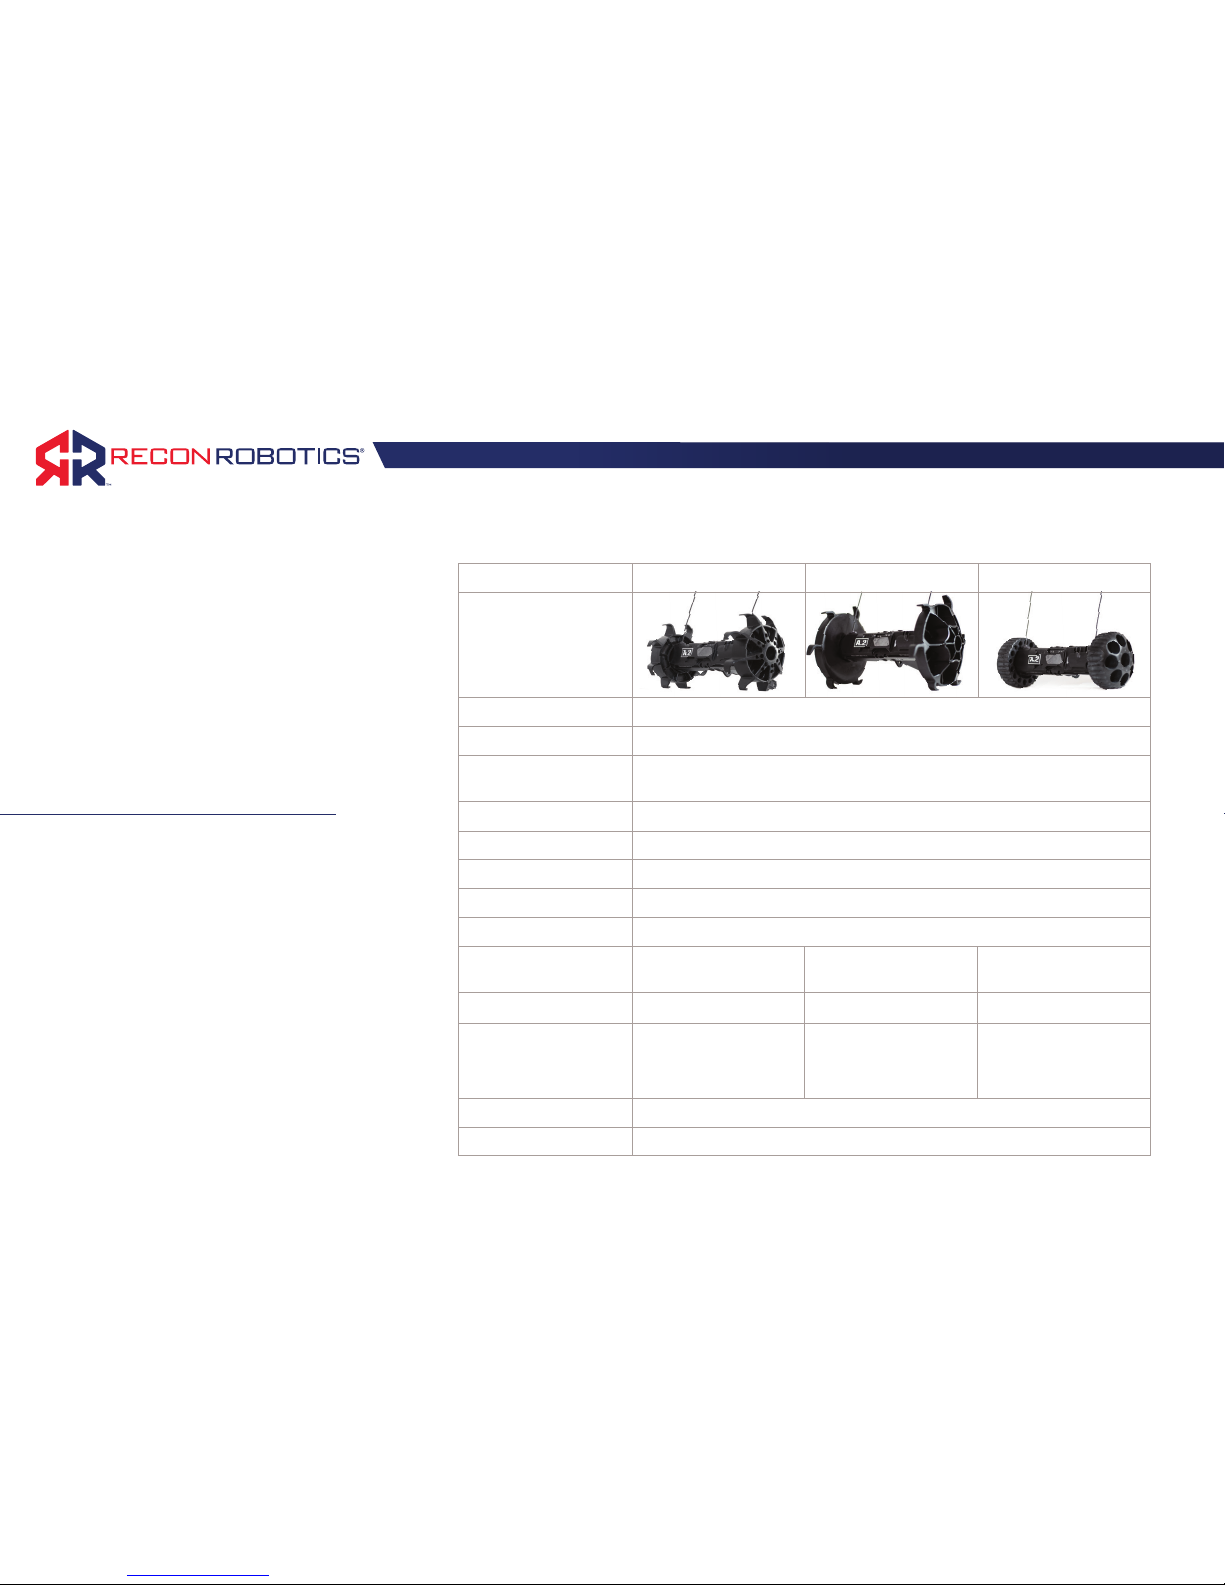
10
OPERATIONAL SPECIFICATIONS
The Throwbot 2 robotic system has
been designed to provide immediate
situational awareness in a variety of
situations. The table at right outlines
performance characteristics in various
congurations. For information
on reconguring the system, see
System Reconguration on page 16.
4
The Throwbot 2 robot and OCU have been
tested to these ranges. Performance may
vary depending upon local environmental
conditions.
5
Typical Runtime is dened as 75% driving,
25% observation on at terrain in a well-lit
area. Towing weight, maneuvering over
terrain, driving with the IR emitters on,
etc. will reduce lifetime. Observation
Mode is dened as remaining stationary
and broadcasting video only. Runtime will be
reduced as the battery ages.
6
Rating does not apply when Picatinny Rail
or other payloads are attached
7
Does not include payloads.
Range
4
Line of Sight (LOS) 450 ft / 137 m
Indoors / Non-Line of
Sight (NLOS)
150 ft / 45 m
RunTime
5
Typical 110 minutes
Observation Mode 160 minutes
Max Drop Height
6
30 ft / 9.1 m
Max Throw Distance
6
120 ft / 36 m
Max Obstacle Climb
6
2" / 5 cm 4" / 10 cm Not rated for climbing
Max Speed
6
1.8 ft/s 0.6 m/s 2.2 ft/s / 0.7 m/s 1.5 ft/s / 0.4 m/s
Tow Capacity None None
Up to 2 lbs / 0.9 kg
mounted on robot.
Up to 2lbs / 0.9kg
towed behind robot
IP Rating7 (Robot) IP66, IP67
IP Rating (OCU) None
Specication Base Conguration Rugged XL (RXL) Carry and Tow (CT)
Image

11
QUICK START GUIDE
MATCHING RADIO CHANNELS
Ensure that both devices are on matching frequencies.
The operating frequency channel is indicated by a sticker
on the robot and OCU. They must match for successful
operation. To deploy multiple robots within the same area
of operation, different channels must be used.
When pairing an OCU and a ReconRobotics robot
for operation, the channel designations must match
identically.
For example, equipment labeled A may not be 100%
compatible with equipment labeled A.2. When operating
multiple systems simultaneously, make sure you are using
two different letters, for instance A.2 and C. Robots on
channel A.2 and on channel A will interfere with each
other and not work well in the same environment (the
same will also occur with B/B.2 and C/C.2).
BASIC DEPLOYMENT INSTRUCTIONS
1. Rotate OCU antennas to an upright position.
2. Switch OCU on.
3. Pull Activation Plate from Robot. Conrm that
the robot is broadcasting video and accepting
command from the OCU before deploying. If the
video is noisy, it’s possible that the OCU’s video
receiver is being overpowered. Try moving the robot
and OCU further apart.
4. Test headphones at a low volume setting.
5. Drop or throw robot into target environment.
6. Wait two seconds after robot lands to allow
gyroscope to stabilize before operating.
 Loading...