

Throwbot® 2 Robot and OCU User Manual
Version 1.1, February 2018
Throwbot® 2 Robot and OCU User Manual
Product Identification
This User Manual applies to the ReconRobotics Throwbot® 2 Robot and Operator Control Unit (OCU).
Notice:
Any changes or modifications, whether to the physical equipment, software, or firmware, that are not
expressly approved by ReconRobotics, will void the user’s warranty and license to operate the
equipment.
All materials contained in this document are proprietary and confidential. Reproduction and
duplication, without specific written permission, are strictly prohibited.
Failure to adhere to the terms of this manual (User Manual), or ignoring the safety warnings described
on page 22 and 23, will void the user’s license to operate the equipment and subject the user to liability.
Patent Notification
Corporate Headquarters:
ReconRobotics, Inc.
5251 W 73
rd
Street, Ste A
Edina, MN 55439 USA
Phone: 1-866-697-6297 or 952-935-5515
Fax: 952-935-5508
Email: support@reconrobotics.com
Website: www.reconrobotics.com
Place Serial Number Sticker Here
The devices described within this User Manual are protected under US Patent Numbers D637,217,
D626,577, and 9,061,544 and other patents pending.
©2018 ReconRobotics
1

Throwbot® 2 Robot and OCU User Manual
Table of Contents
Kit Contents ................................................................................................................................................... 3
Accessories for the Throwbot 2 Robot ......................................................................................................... 4
Throwbot 2 Robot Feature Overview ........................................................................................................... 5
Operator Control Unit (OCU) Feature Overview........................................................................................... 6
Throwbot 2 Robot’s Video Overlay ............................................................................................................... 7
OCU Audio/Video-Out Capabilities ............................................................................................................... 8
Operational Specifications ............................................................................................................................ 9
Quick Start Guide ........................................................................................................................................ 10
Matching Radio Channels ....................................................................................................................... 10
Basic Deployment Instructions ............................................................................................................... 10
Instructions for Use: Setup ......................................................................................................................... 11
Powering the OCU ................................................................................................................................... 11
Powering the Robot ................................................................................................................................ 11
Instructions for Use: Charging .................................................................................................................... 12
Robot Charging ....................................................................................................................................... 12
OCU Charging .......................................................................................................................................... 12
General Charging Guidelines .................................................................................................................. 13
Regular Maintenance .................................................................................................................................. 14
System Reconfiguration .............................................................................................................................. 15
Converting to Different Configurations .................................................................................................. 15
Attaching the Picatinny Rail .................................................................................................................... 16
Carry and Tow (CT) Configuration ........................................................................................................... 17
Rugged XL (RXL) Configuration ............................................................................................................... 17
Troubleshooting / Frequently Asked Questions ......................................................................................... 18
Safety Information & Warnings .................................................................................................................. 22
Warranty and Service .................................................................................................................................. 24
Warranty ................................................................................................................................................. 24
Requesting Service or Repair .................................................................................................................. 24
ReconRobotics Throwbot 2 Robot FCC Guidelines and Logbook ............................................................... 26
2

Throwbot® 2 Robot and OCU User Manual
Item
Base Kit
Deluxe Kit
Throwbot® 2 Reconnaissance Robot
●
●
Operator Control Unit (OCU) with lanyard
●
●
Throwbot 2 Charger with region specific power cord
●
●
OCU Charger with region specific power cord
●
●
Spare Activation Plate
●
●
Tether Kit ● ●
Volume Control Adapter
●
●
Hard Carrying Case
●
●
User Manual
●
●
Set of Rugged XL (RXL) Configuration wheels1
●
Set of Carry and Tow Configuration wheels
●
Tail for Rugged XL (RXL) and Carry and Tow Configuration2
●
Picatinny Rail3
●
Tow Disc Assembly
●
Spare Hex Nuts (2)
●
3/32” Hex Driver
●
5/16” Nut Driver
●
Soft Carrying Case
●
Kit Contents
Two styles of kits are available. See the table below for an overview of the differences. Please inspect
the contents of this package to ensure that all materials are present. If any of the materials are missing,
please contact support@reconrobotics.com.
1
While these wheels may look similar to the Recon Scout® XL wheels in size, they are a new design. They can be
utilized on Recon Scout XL or Recon Scout CT with Flex Pack robots, but the Recon Scout XL wheels from the Recon
Scout XL robot or Flex Pack will not afford the same drop ratings as the new wheels and should not be used on a
Throwbot 2 robot.
2
While this tail may look similar to the Recon Scout XL or Recon Scout CT tail, the mounting mechanisms are
different and they cannot be interchanged.
3
The Throwbot 2 robot’s Picatinny Rail is not interchangeable with the Recon Scout CT.
3
Throwbot® 2 Robot and OCU User Manual
Accessories for the Throwbot 2 Robot
The following accessories are available for the Throwbot 2 robot. Please contact your local
ReconRobotics representative for pricing and availability.
Rugged XL Conversion Kit
This kit provides the RXL style wheels and tail necessary to convert a Throwbot 2 base robot into the
Rugged XL configuration. All necessary tools for performing the change are included in the kit.
Carry and Tow Conversion Kit
This kit provides the Picatinny rail, CT style wheels, and RXL tail to reconfigure the Throwbot 2 base
robot into the Carry and Tow configuration. All necessary tools for performing the change are included
in the kit.
Deluxe Pack
This kit provides the capabilities of both the Rugged XL Conversion Kit and Carry and Tow Conversion Kit
in a single package.
Audio and Video Out Cabling Package
This package allows you to capture video and audio from Throwbot 2 robot onto a 3
the outputs on the OCU. The cabling package includes RCA and BNC cables.
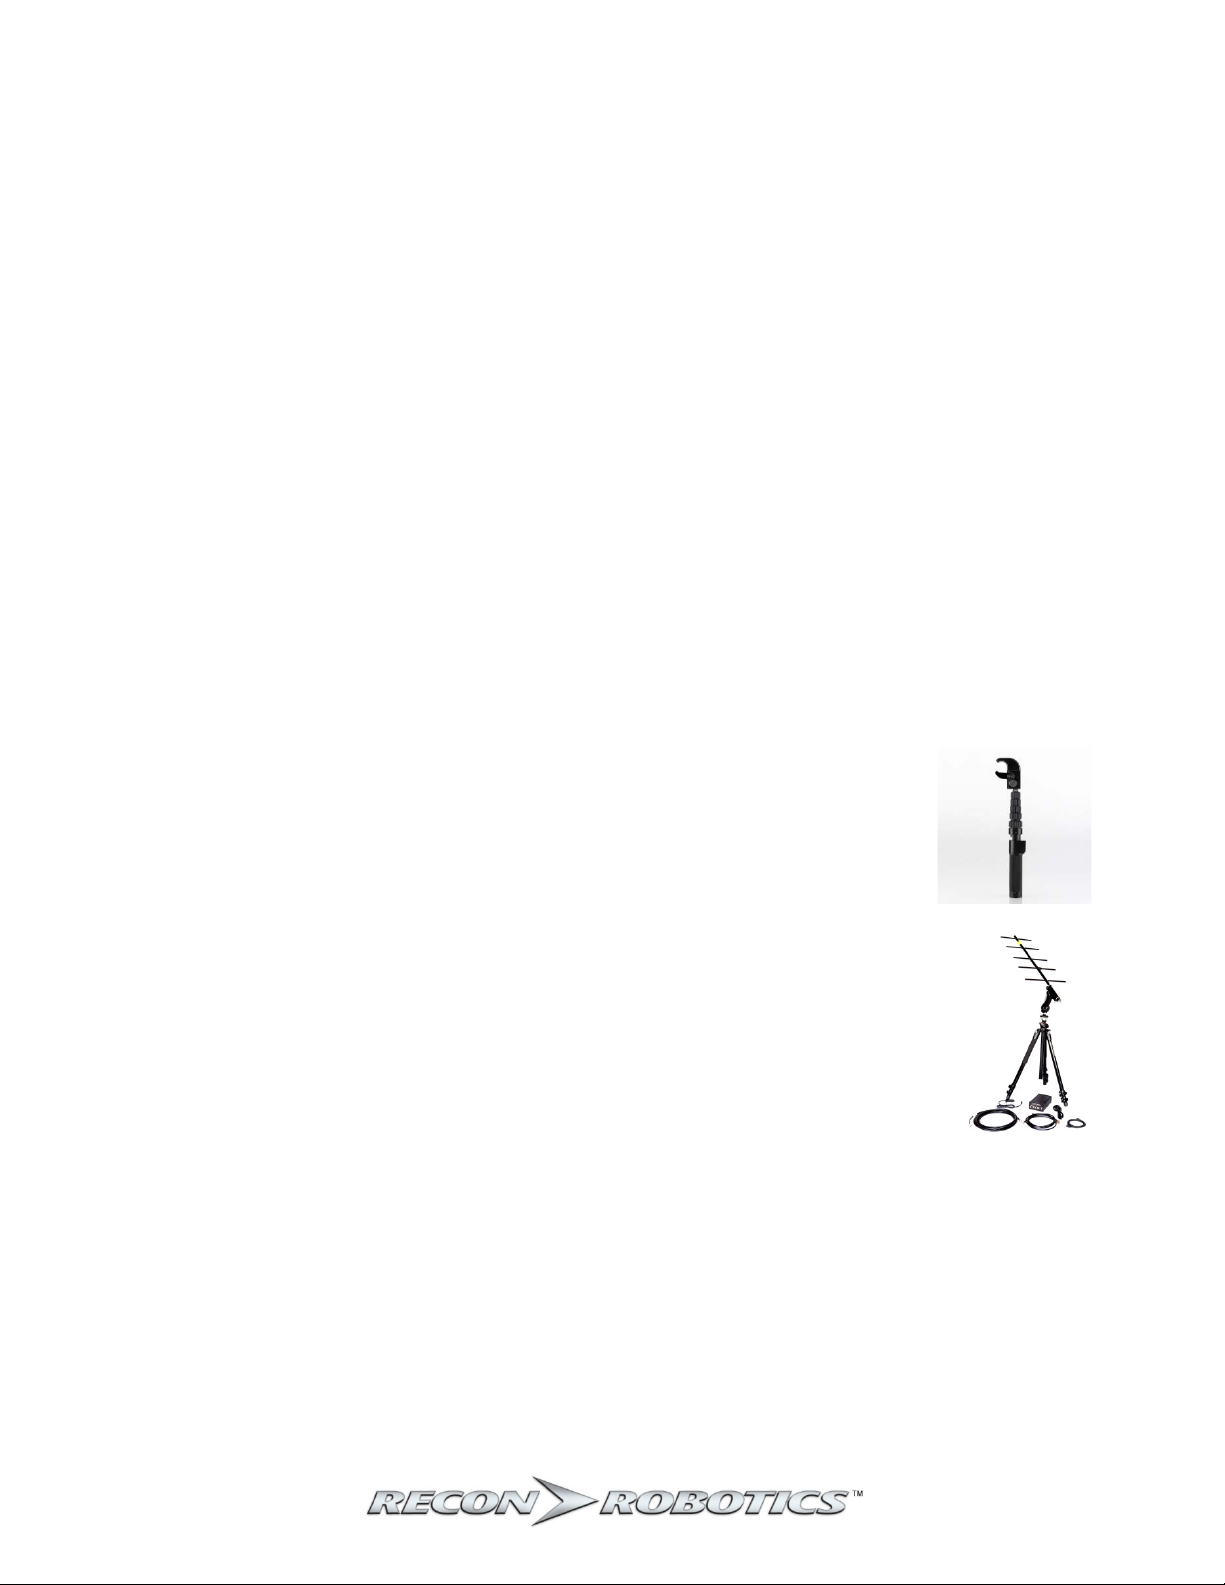
Recon Scout® SearchStick™
The Recon Scout® SearchStick™ device enables tactical and patrol personnel to
instantly convert any Throwbot 2 robot into a versatile pole camera. The SearchStick
pole has a collapsed length of 20.5″ (52cm) and can be extended to a length of 72″
(183cm).
Command Monitoring Station
The Command Monitoring Station 2.0 (CMS 2.0) enables a commander to monitor video
and audio transmissions from Throwbot 2 robots operating on channels A.2, B.2, or C.2
from up to 1,000 feet (305m) away. Software included with the CMS 2.0 allows you to
record the Throwbot 2 robot’s video transmissions.
rd
party device via
4
Throwbot® 2 Robot and OCU User Manual
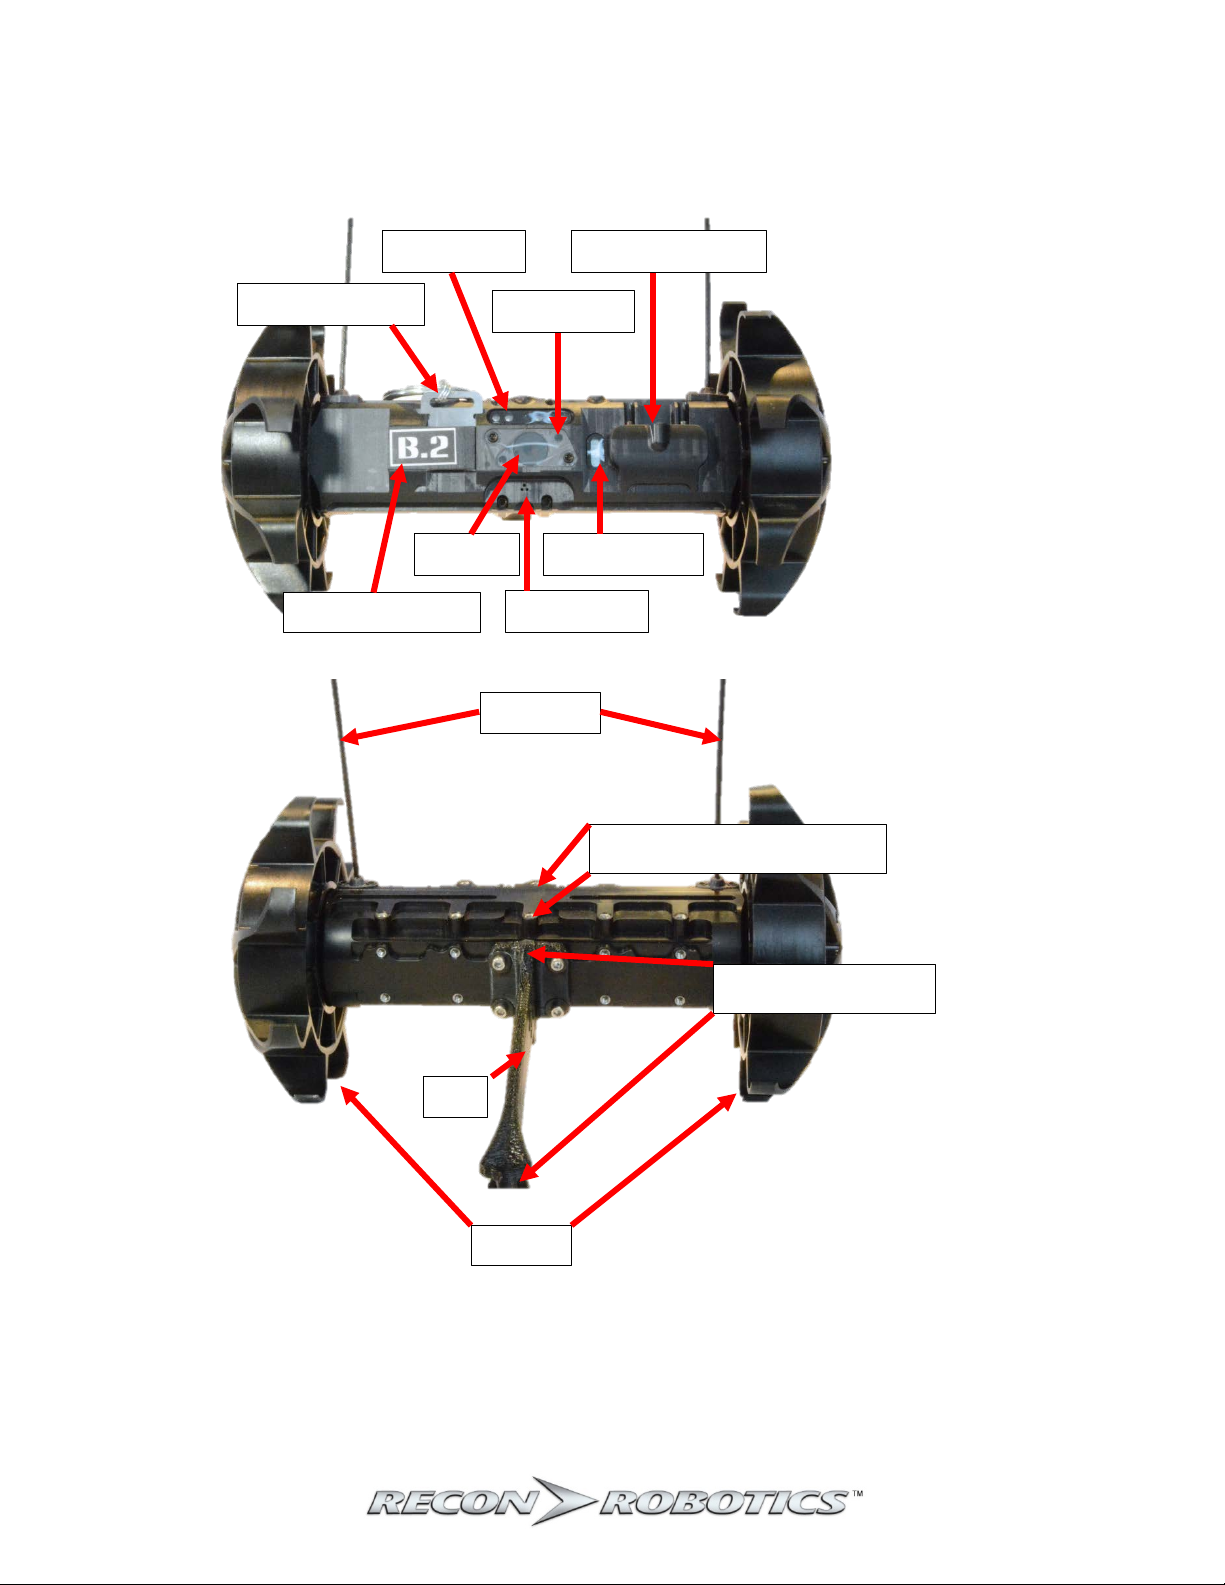
Activation Plate
IR Emitters
E-Ink Display
Microphone
Camera
USB / Charge Port
Channel Indicator
Antennas
Tail
Wheels
Light Sensor
Tether Mount Point
Picatinny Rail Mount Points
Throwbot 2 Robot Feature Overview
5
Throwbot® 2 Robot and OCU User Manual
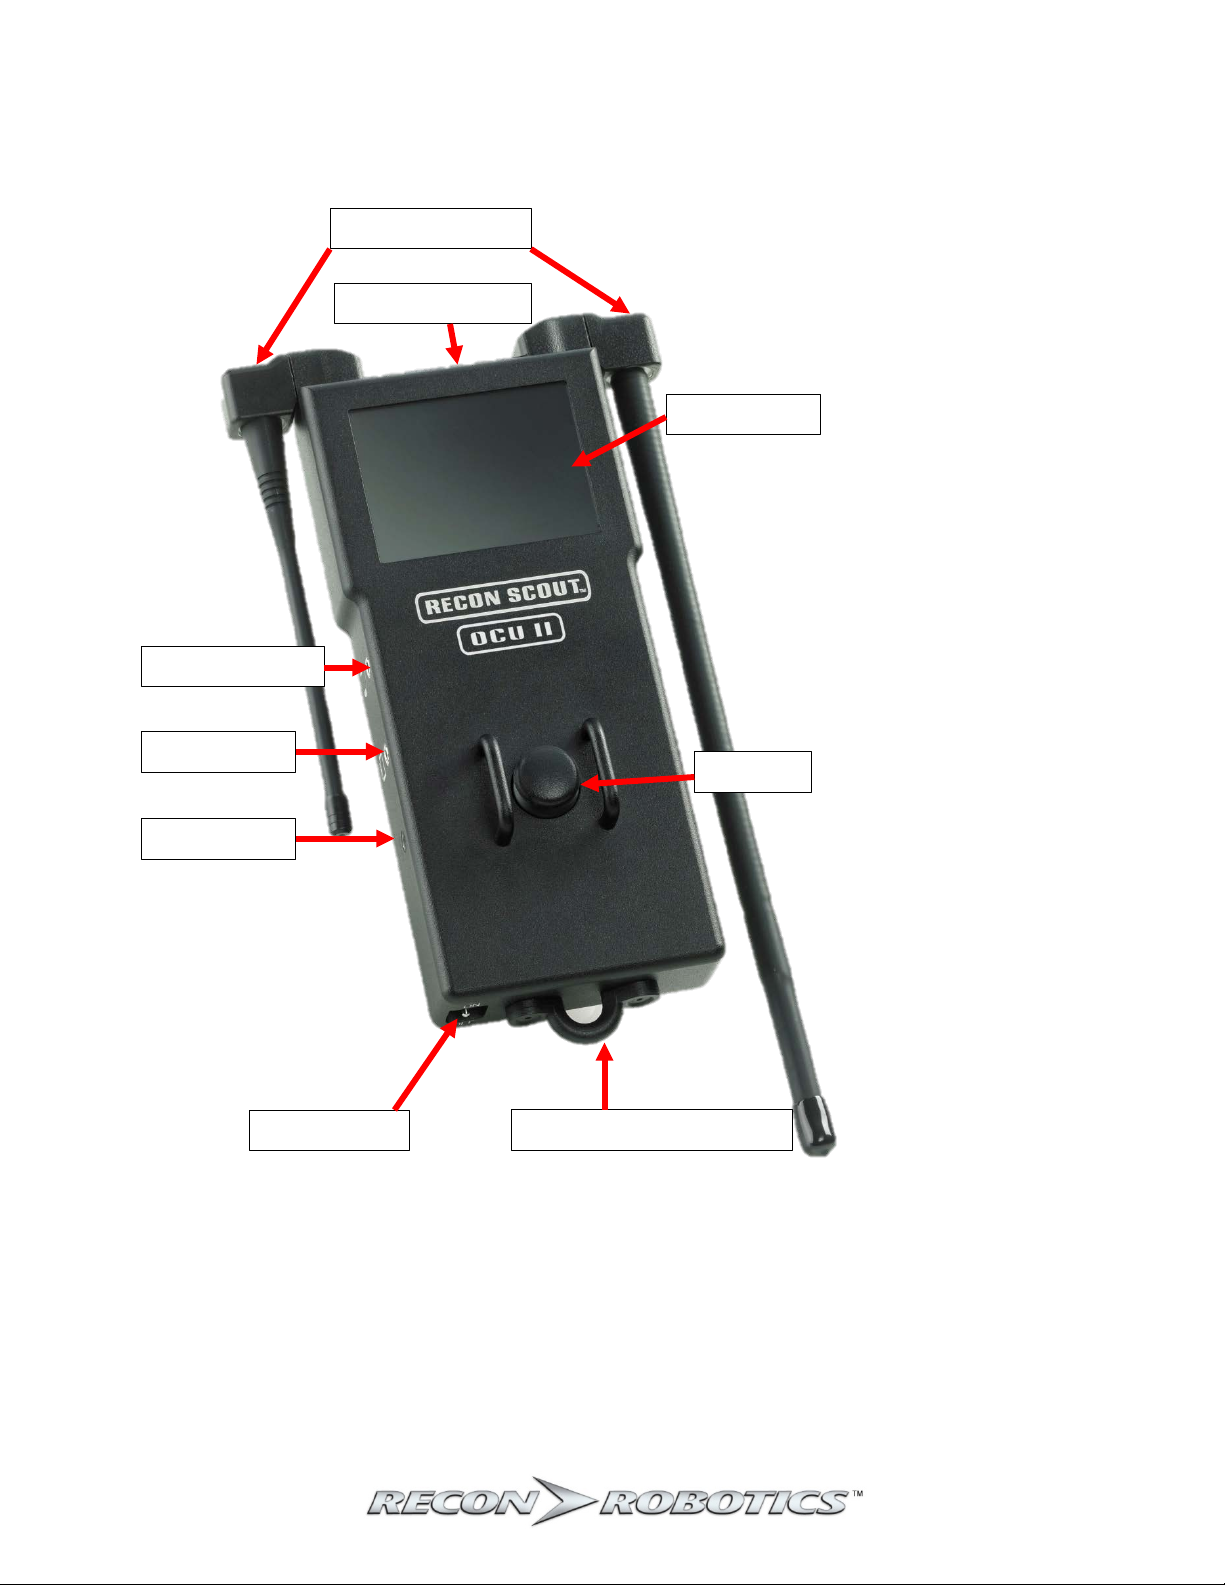
LCD Screen
Joystick
Headphone Jack
A/V Out Jack
Charge Jack
Power Switch
Lanyard Attachment Point
Channel Indicator
Rotating Antennas
Operator Control Unit (OCU) Feature Overview
6
Throwbot® 2 Robot and OCU User Manual
State of
Charge
Empty
10%
20%
40%
60%
80%
Fully
Charged
Battery
BLINKING
Battery
(Charging)
Marginal
Fair
Good
Receive Signal
Robot
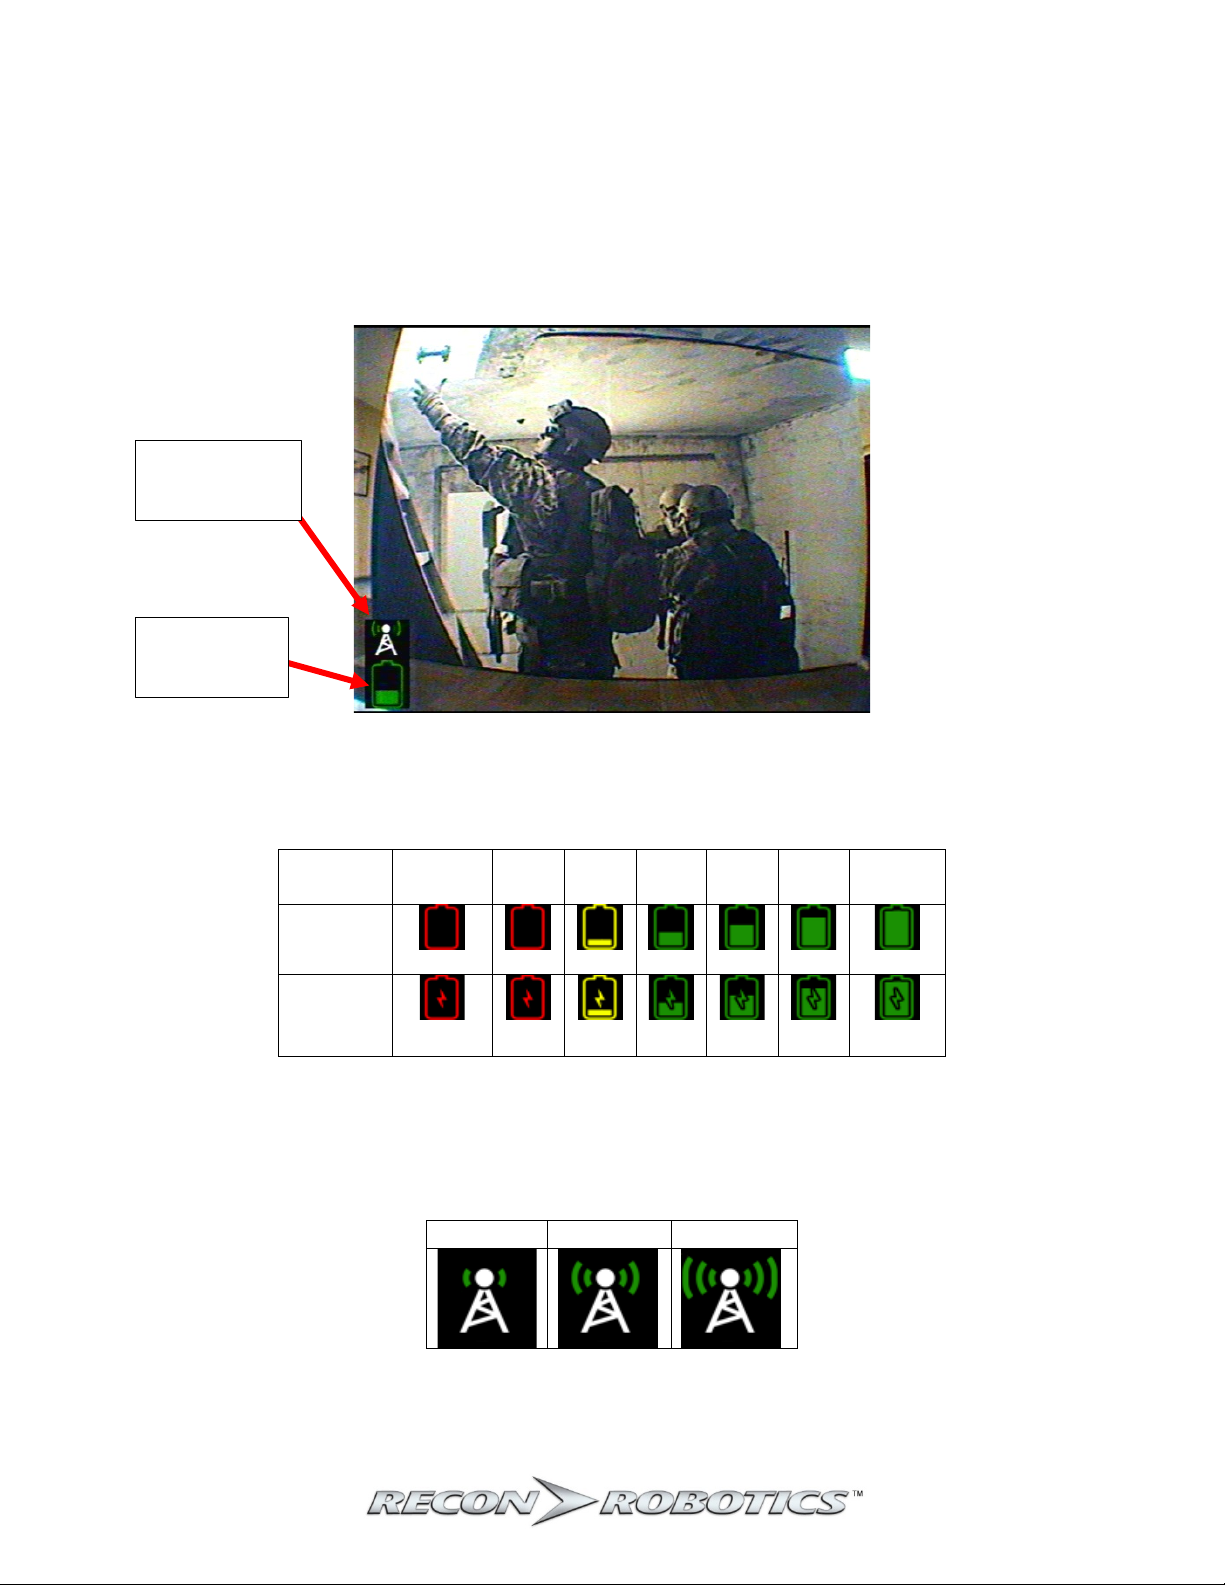
Throwbot 2 Robot’s Video Overlay
The Throwbot® 2 robot incorporates icons for some useful operational information into the video signal
which will be displayed on the OCU or Command Monitoring Station (CMS). Note: Earlier generation
robots from ReconRobotics such as the Throwbot® XT and Recon Scout CT do not have this capability
and will not transmit the same information, even if used with the OCU from a Throwbot 2 kit.
Strength
Battery Level
The robot’s battery level is shown by an icon in the lower left corner of the video. The table below
provides an overview of this icon and the robot’s state of charge. Note: There is no indicator for the
OCU’s battery level.
Icon
Icon
The robot’s received signal strength is shown by an icon immediately above the battery level icon. There
are three levels (marginal, fair, and good) for receive signal strength depicted below. With marginal
signal, there is the potential for loss or interment control of the robot.
7

Throwbot® 2 Robot and OCU User Manual
OCU Audio/Video-Out Capabilities
The OCU is capable of receiving audio transmitted from the Throwbot 2 robotic system. To listen, plug
the provided volume control adapter into the appropriate jack on the left-hand side of the OCU. Then
plug headphones into the volume control adapter. Headphones approved for Apple™ or Android™
devices may not work with the provided volume control adapter.
NOTE: Ensure you are using headphones with in-line volume control. There is no volume control on
the OCU itself. Be careful to test the audio volume before using.
The ReconRobotics Audio/Video (A/V) Out Cabling Package (sold separately) can be used to connect the
OCU to an external monitoring / recording device (not included). The A/V Out jack is located on the lefthand side of the OCU.
Once connected to the OCU, connect the other end of the A/V Out cable to the appropriate connector
on an external device. Please refer to the instruction card provided with the A/V Out Cabling Package
for more information.
NOTE: The A/V Out cables in the A/V Out Cabling Package are specifically designed to work with the
OCU. Though they may look similar, cables manufactured by a third party may not work with the
OCU.
NOTE: If the OCU is used with older ReconRobotics products that do not transmit audio, you will still
be able to output a video signal using the appropriate cable.
8
Throwbot® 2 Robot and OCU User Manual
Specification
Base Configuration
Rugged XL
(RXL)
Carry and Tow
(CT)
Image
Range4
Line of Sight (LOS)
450 ft / 137 m
Indoors / Non-Line
of Sight (NLOS)
150 ft / 45 m
RunTime5
Typical 110 minutes
Observation Mode
160 minutes
Max Drop Height6
30 ft / 9.1 m
Max Throw Distance5
120 ft / 36 m
Max Obstacle Climb5
2” / 5 cm
4” / 10 cm
Not rated for climbing
Max Speed5
1.8 ft/s 0.6 m/s
2.2 ft/s / 0.7 m/s
1.5 ft/s / 0.4 m/s
Payload Capacity
None
None
Up to 2 lbs / 0.9 kg
towed behind robot
IP Rating7 (Robot)
IP66, IP67
IP Rating (OCU)
None
Operational Specifications
The Throwbot 2 robotic system has been designed to provide immediate situational awareness in a
variety of situations. The table below outlines performance characteristics in various configurations.
For information on reconfiguring the system, see System Reconfiguration on page 15.
mounted on robot
Up to 2 lbs / 0.9 kg
4
The Throwbot 2 robot and OCU have been tested to these ranges. Performance may vary depending upon local
environmental conditions.
5
Typical Runtime defined as 75% driving, 25% observation on flat terrain in a well-lit area. Towing weight,
maneuvering over terrain, driving with the IR emitters on, etc. will reduce lifetime. Observation Mode is defined
as remaining stationary and broadcasting video only.
6
Rating does not apply when Picatinny Rail or other payloads are attached
7
Does not include payloads
9

Throwbot® 2 Robot and OCU User Manual
Quick Start Guide
Matching Radio Channels
Ensure that both devices are on matching frequencies. The operating frequency channel is indicated by
a sticker on the robot and OCU. They must match for successful operation. To deploy multiple robots
within the same area of operation, different channels must be used.
When pairing an OCU and a ReconRobotics robot for operation, the channel designations must match
identically. For example, equipment labeled A may not be 100% compatible with equipment labeled
A.2. When operating multiple systems simultaneously, make sure you are using two different letters,
for instance A.2 and C. Robots on channel A.2 and on channel A will interfere with each other and not
work well in the same environment (the same will also occur with B/B.2 and C/C.2).
Basic Deployment Instructions
1. Rotate OCU antennas to an upright position.
2. Switch OCU on.
3. Pull Activation Plate from Robot. Confirm that the robot is broadcasting video and accepting
command from the OCU before deploying. If the video is noisy, it’s possible that the OCU’s video
receiver is being overpowered. Try moving the robot and OCU further apart.
4. Test headphones at a low volume setting.
5. Drop or throw robot into target environment.
6. Wait two seconds after robot lands to allow gyroscope to stabilize before operating.
10

Throwbot® 2 Robot and OCU User Manual
Instructions for Use: Setup
Powering the OCU
Flip the power switch at the base of the controller from the Off to On position. The Screen should light
up indicating the unit is ready to use. If the robot is powered on, video from the robot should appear.
Otherwise, the screen will display static.
NOTE: Some OCUs have an optional dimming feature indicated with the presence of a sticker as
shown below (left). When this feature is enabled, when powered on, the OCU will have as dim a
screen as possible and may appear to be off. To change the brightness, press down and hold the
joystick until a click is heard, then to increase the brightness move the joystick upward, and to
decrease brightness move the joystick downward. Release the joystick to resume normal command
operation.
Rotate antennas from the stored position (center) to an upright position (right) as shown below. The
operator may rotate the antennas up or down as needed during use to receive the maximum range
performance from the robot system while maintaining a comfortable view of the OCU screen.
NOTE: Modification of the antenna system will void your warranty and may violate your FCC
authorization to operate this product.
Powering the Robot
To activate the robot, pull the activation plate. Reinserting the plate will turn the robot off. You will
hear and feel a click when the activation plate is fully seated with the “shoulder” of the plate making
contact with the housing as shown below.
NOTE: When not in use, always ensure the OCU is switched off and the robot activation plate is
inserted.
11

Throwbot® 2 Robot and OCU User Manual
○
○
○
҉
○
●
○
●
○
●
○
●
○
●
○
●
○
●
҉
●
●
●
Video
Video
(Charging)
Fully charged
No Device Plugged in
Charging
No Power
Charger is not working
support@reconrobotics.com
State of
Charge
Empty
10%
20%
30%
40%
50%
60%
70%
80%
90%
Fully
Charged
Instructions for Use: Charging
Your kit includes two chargers, one for the OCU and one for the robot.
Robot Charging
The robot uses USB Type C connectivity for recharging. This enables it to charge from a variety of USBbased power sources. Charge rates will vary based upon the charging source and cable used. For
maximum charge rates, use a USB Type C charger that supports Power Delivery 2.0 (or higher) capable
of providing at least 9V @ 2A. The included charger and cable are rated for this. The Throwbot 2 robot
does not support other charging systems like Quick-Charge.
NOTE: Some generic chargers and cables advertise more capability than they actually provide. This
could result in damage to your equipment. If you have questions about chargers and charge cables,
please contact support@reconrobotics.com
There is an e-ink indicator located on the front face of the robot which is used to display the robot’s
state of charge. When charging with the robot off, the e-ink background will flash. When the robot is
operational and charging, the e-ink will have a solid black background. When the robot is operational,
the state of charge is also visible as an icon located in the lower left hand corner of the video stream.
The table below outlines the current state of charge for the robot.
for a list of tested and approved chargers and cables.
E-Ink
Overlay
Overlay
○
○
Readout
○
BLINKING
○
○
○
○
○
○
○
○
҉
○
○
●
OCU Charging
The OCU comes with a dedicated charger.
NOTE: Only use the supplied OCU charger with the OCU.
OR
○
҉
●
○
●
●
҉
●
●
●
●
●
properly. Please contact
●
●
●
Blinking
●
●
●
12

Throwbot® 2 Robot and OCU User Manual
General Charging Guidelines
1. Ensure the robot and OCU are off before charging.
2. Plug the AC electrical cord into charger and plug charger into the power source before charging.
3. Prior to charging ensure the charge plugs and receptacles are dry, debris free, and not damaged.
If anything appears damaged, contact support@reconrobotics.com
4. Fully insert the appropriate charger cord into the OCU and robot. Do not force a connection.
Ensure connecting plugs are not bent during insertion or removal.
5. Remove robot and OCU from charger when charging is complete or keep everything connected
to trickle charge and maintain a full battery. Charge your robot and OCU at least once per
month to ensure the batteries are kept topped off to be ready for immediate deployment.
6. Always charge in a cool, ventilated, and fire-safe area.
7. Do not leave items charging unattended.
8. After charging, make sure that the Throwbot 2 robot’s charge jack dust cover is in place over the
charge jack.
9. If there is an unusual sound, smoke, or burning odor emitted from any of the components
during charging, discontinue charging, unplug the equipment and contact
support@reconrobotics.com
for assistance.
for assistance.
13

Throwbot® 2 Robot and OCU User Manual
Regular Maintenance
After each deployment, it is important to perform some basic maintenance:
1. Always re-insert the activation plate in the robot and turn the OCU off.
2. Keep the system clean of dust and debris.
3. Ensure the system is fully dry before charging or storing.
4. Inspect the robot for wear on its tail, wheels, and antennas.
a. Wheels – If the wheels are loose, tighten the nut with a 5/16” nut driver. The wheels
should spin freely. Inspect the wheels for wear, rips, or tears.
b. Tail – If the tail is loose, use a 3/32” hex driver to tighten the bolts holding the tail.
Tighten until the tail just begins to deform under the screw pressure. Do not overtighten.
c. Antennas – Visually inspect for scuffing or cracking. If the wire is exposed or if the
antennas have been severely kinked, antennas should to be replaced. The antennas
should stand nearly vertical.
d. If any of the above are missing and/or damaged, please contact
support@reconrobotics.com
5. Inspect the OCU for wear.
a. Antennas – Ensure that the antennas are not bent or kinked and that they are able to be
easily rotated.
b. Joystick Bars – Rarely, (typically if the OCU is dropped or experiences excessive
vibration), the joystick bars can be knocked loose. That loose screw can rattle loose and
cause damage to the electrical systems.
c. Screen – Check for scratches and other damage to the screen.
d. If any of the above are damaged, please contact support@reconrobotics.com
for service.
6. Recharge the robot and OCU as described on page 12.
NOTE: There are no user serviceable parts inside. DO NOT DISASSEMBLE YOUR ROBOT OR OCU.
Service is available from the manufacturer or regional service centers only. Disassembly and/or
modification of the product or its software and firmware will void your warranty and license to use
the robot and OCU.
to order a field maintenance kit or arrange for service.
to arrange
14

Throwbot® 2 Robot and OCU User Manual
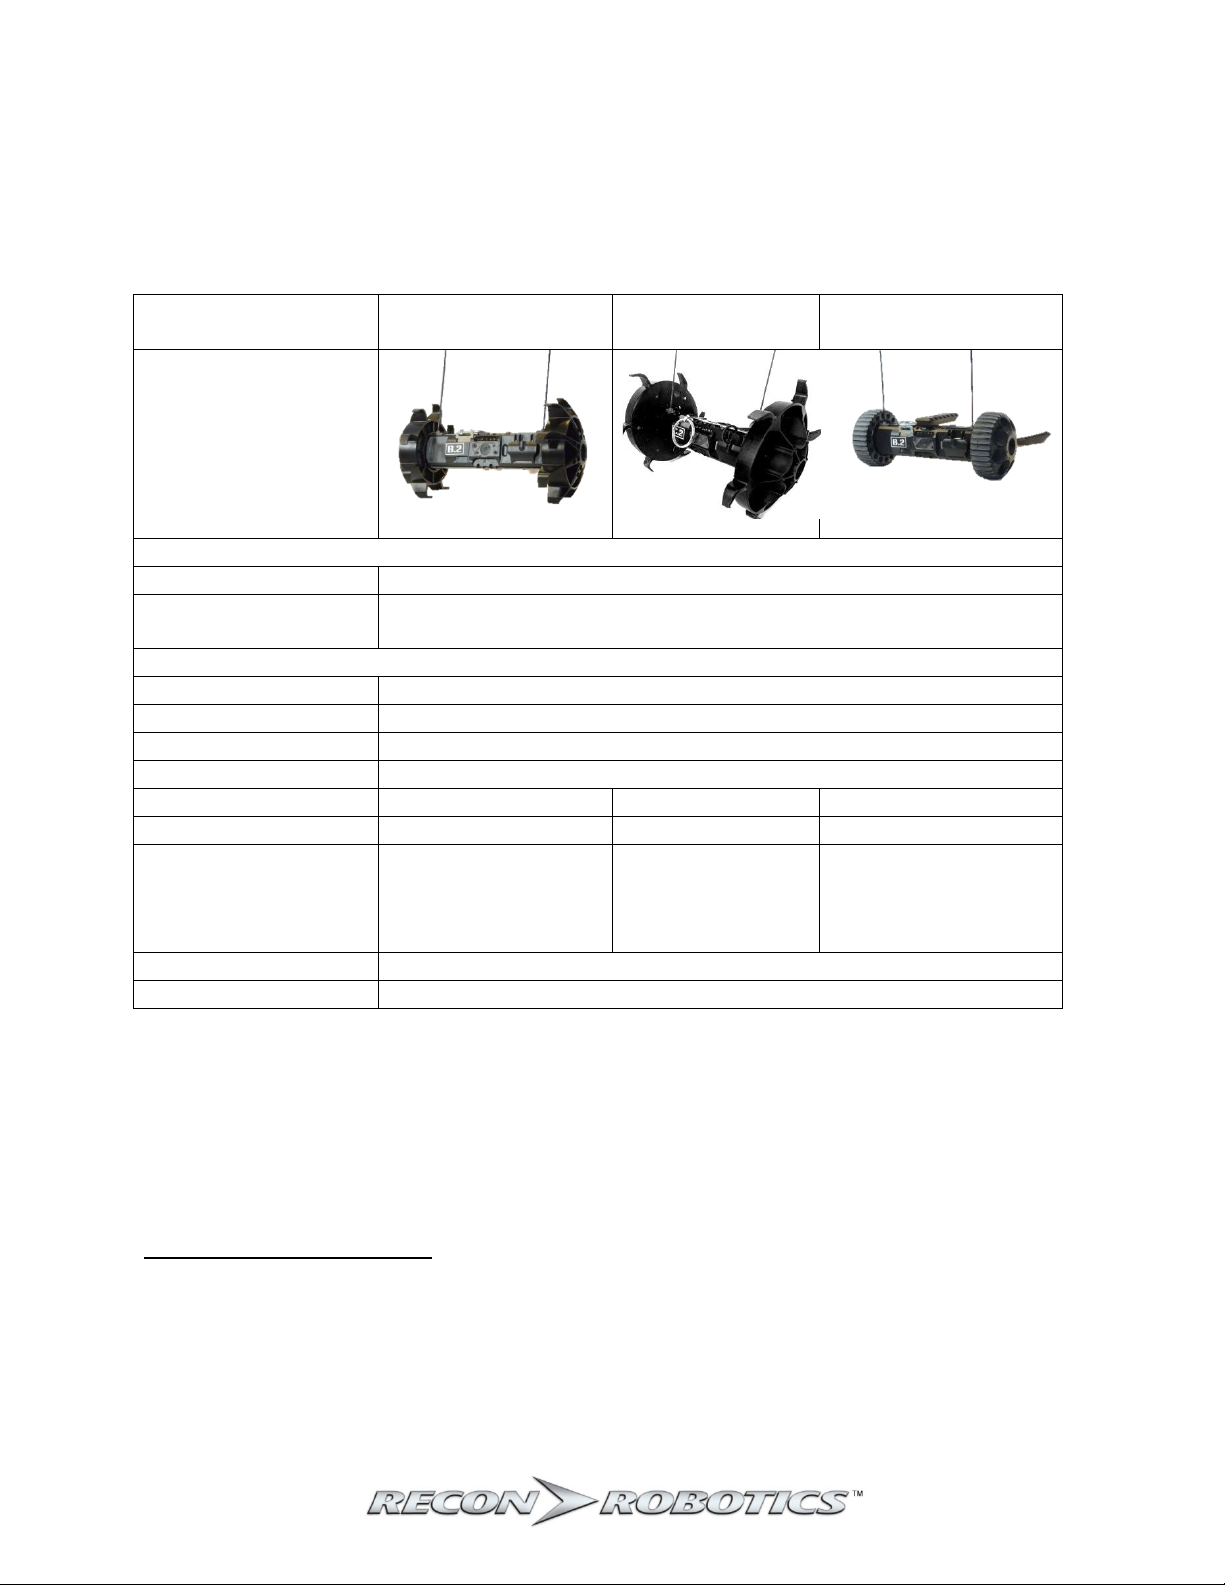
Recommended
Configurations
Base Configuration
Rugged XL
(RXL)
Carry and Tow
(CT)
Image
Components
Base Wheels X
Base Tail X
RXL Wheels X
CT Wheels
X
RXL Tail X
X
Picatinny Rail
Optional
Not recommended
Optional
Tow disc
Not recommended
Not recommended
Optional
Tradeoffs
Recommended
Use Case
General-purpose
Rough terrain
Stealth missions,
payload delivery
Speed
Medium
Fastest
Slowest
Terrain capacity
Medium
Highest
Smooth terrain only
Noise level
Medium
Loudest
Quietest
Video stability
Medium
Shakiest
Smoothest
Ease of driving
Medium
Most difficult
Easiest
Color Band (red or green)
System Reconfiguration
Converting to Different Configurations
The robot can be reconfigured to use various wheel and tail designs. Recommended configurations are
shown below, and detailed specifications are provided in the Operational Specifications on page 9.
To reconfigure the robot, perform the following steps:
1) Remove the existing wheels by removing the hex nuts from both axles using the supplied 5/16”
nut driver.
2) Slide the wheels off the axles.
3) Ensure that the gold-colored thrust washers on each side of the robot are in place before
putting on new wheels.
4) Slide the new wheels onto the axles. If the wheels have colored hubs (red and green), ensure
that the hub color matches the color band on the shaft.
15

Throwbot® 2 Robot and OCU User Manual
Tow Mount Points
5) Replace the hex nuts using the 5/16” nut driver.
6) Remove the tail using the 3/32” hex driver. The captive screws will be retained in the tail. If a
screw becomes detached from the tail, push or screw it back into the hole in the tail until it can
rotate freely.
7) Attach the new tail to the same mounting points using the 3/32” hex driver. If the tail has an
arrow on the side, it should be pointed up for general use, or pointed down if a more groundfacing viewing angle is desired. If the tail does not have an arrow on the side, then it can only be
installed one way; do not try to force it on upside-down.
8) If using the Carry and Tow configuration: Attach the Picatinny Rail (as described below) and the
tow disc (if desired; see notes about the Carry and Tow configuration below). There are two
mount points for the tow disc as shown in the picture below.
NOTE: Do not over tighten the nuts, the wheels should spin freely. Do not under tighten the nuts, it
may cause the wheels to dislodge on impact.
Attaching the Picatinny Rail
The Picatinny Rail accessory comes with a Deluxe Kit or the Carry and Tow Conversion Kit. The Picatinny
Rail can be used with any wheel configuration, but is only recommended for use with the smoother
wheels in the Deluxe Kit.
To attach the Picatinny Rail, align the screws with either of the mounting positions on the top of the
robot as shown in the figure below. Use a 3/32” hex driver to attach it. The screws are captive and will
remain with the Picatinny Rail. Ensure that the long end of the rail points toward the back of the robot
as shown on the left. Installing the rail in the wrong orientation as shown on the right may result in
difficulty balancing a payload, or even cause the robot to tip forward during use.
16

Throwbot® 2 Robot and OCU User Manual
Carry and Tow (CT) Configuration
The carry and tow configuration is designed to allow the system to transport up to 2 lbs (0.9 kg)
mounted on top of the robot while towing up to 2 lbs (0.9 kg) behind. Some weight must be mounted
on top of the robot in order to tow a full 2 lbs (0.9 kg), because wheel traction is increased with carried
weight. When the Picatinny Rail and/or any payload is attached, the robot should not be thrown or
dropped – this can result in damage or in the robot being unable to right itself if it lands upside-down.
See page 9 for more performance differences in this configuration.
The ability to carry and tow payloads is heavily dependent upon terrain and how the payloads are
mounted. User training and experimentation with payloads is essential prior to a real deployment.
Some key usage tips are:
- When training, it is essential to practice driving without looking at the robot (use the OCU video
only). However, occasionally observing the robot motion directly may help the user understand
better how to interpret robot motion when viewing the video feed. Try to balance payload
weights roughly equally between carried (mounted on top of the robot) and towed, or to carry
more weight than is towed. Carried weight improves traction and doesn’t affect speed or
battery life as much as towed weight.
- Ensure that the center of gravity of any payload mounted to the top of the robot is somewhat
behind the wheel axles. Placing the payload too far forward can cause the robot to tip forward.
- When towing, tether the towed payload to the tether point close to the robot’s body (rather
than the tether point at the end of the tail). This makes turning much easier.
- If towing from the tether point at the end of the tail, if a sharp turn needs to be made, the tow
rope can be slackened by backing the robot up approximately 12” (30 cm). Then, the robot can
freely turn.
- When towing, to prevent tangling of the tow rope, do not back the robot up any more than
necessary to make turns.
NOTE: The payload mounting points on the back and top of the Throwbot 2 robot are designed for use
with a standard 4-40 screw.
If the robot is used in Carry and Tow configuration without any payload or the Picatinny rail attached, it
can be thrown. Sometimes, the robot may land with the antennas oriented in a way that makes it
difficult for the robot to right itself. If this happens, rotating the robot and/or moving it backwards for
some distance will push the antennas to a better position and allow the robot to self-right when moving
forward. This is not an issue in the other configurations because the larger wheels give the antennas
more room to bend out of the way.
Everything needed to convert to the Carry and Tow configuration comes with a Throwbot 2 Deluxe kit or
the Carry and Tow Conversion Kit.
Rugged XL (RXL) Configuration
The extra terrain configuration is designed to allow the system to climb over 4” / 10 cm obstacles. See
page 9 for more performance differences in this configuration.
Everything needed to convert to the Rugged XL (RXL) configuration comes with a Throwbot 2 Deluxe kit
or the Rugged XL (RXL) Conversion Kit.
17

Throwbot® 2 Robot and OCU User Manual
Troubleshooting / Frequently Asked Questions
• How long will the robot run on a full charge?
In the default configuration, on a fully charged battery, the robot should operate for 60 minutes in
standard use of driving and observation on flat terrain. Towing payloads, driving on irregular terrain
or up inclines, driving in the dark (with the IR activated) can all affect battery life. See page 9 for
information on other configurations.
• How long will the OCU run on a full charge?
The OCU has a runtime of approximately 120 minutes.
• How many times can the robot and OCU be recharged?
The robot and OCU use Lithium Polymer batteries which are expected to maintain at least 80% of
their runtime after 300 recharge cycles.
• How long does it take to recharge the OCU and robot?
The recharging times for the OCU and robot will vary depending upon usage and charger. A fully
depleted Throwbot 2 robot or OCU will take approximately 2 hours to fully charge using the
provided chargers. Charging a Throwbot 2 robot from a charger that does not support USB Power
Delivery or does not supply the recommended power output may take as long as 10 hours.
• The charge indicator lights do not light up when the OCU is connected to the battery charger.
Refer to page 12 for instructions on the charging.
• The robot or OCU are not holding a full battery charge.
If you feel that your system is not running for a complete battery life on a full charge, try performing
this test before contacting support:
1) Fully charge both devices using the provided chargers. Ensure that the activation plate is
inserted into the robot and the OCU is switched off during charging.
2) Activate both devices and run both devices until
a. The robot stops moving and sending video AND
b. OCU screen goes blank and stops sending commands
Be sure to record the start and stop time. Contact ReconRobotics for service if:
• Robot runtime is under 50 minutes
• OCU runtime is under 120 minutes
• What types of batteries are in my ReconRobotics equipment? Are there any special shipping
concerns?
ReconRobotics uses Lithium Polymer battery packs in the Throwbot 2 robot and OCU. These packs
have been tested to meet the UN/DOT 38.3 shipping requirements. Please contact
support@reconrobotics.com
if you need more information.
18

Throwbot® 2 Robot and OCU User Manual
• I’ve been using the OCU for an extended period of time. Now the screen is black when I power
on, and I cannot control the robot.
The battery is likely drained, you will need to recharge the OCU as described in the ‘Instructions for
Use: Chargers” section (page 12).
• I’ve turned the OCU on and the screen is not displaying a solid video stream.
“Bad” video can have several causes:
• The robot may be out of range. Try decreasing range between the robot and the OCU.
• The robot may be too close and overpowering the OCU. Try to maintain a few feet between the
devices.
• The robot may be low on power or deactivated. Try recharging and/or activating the robot.
• The robot or OCU may be experiencing interference caused by environmental factors (e.g. other
radios in the area, proximity to metal buildings, etc.). Try using the system in another location.
• There may be another robot operating nearby on the same channel, which will cause
interference. For multi-robot operation, refer to page 10.
• I have headphones plugged into my OCU, but all I hear is static.
The OCU will only transmit audio if you are using an active, audio-enabled ReconRobotics robot
system on the same channel.
• When I throw the robot, it does not drive straight when it lands.
The robot has electronic circuitry that self-calibrates after landing. Let it sit for a few seconds before
driving. It will automatically recalibrate itself during this time and should resume driving as
expected.
• The robot’s IR light is not turning on.
In order to conserve battery life, the IR LEDs will not turn on if the light sensor detects sufficient
light. If your robot’s IR LEDs are not activating when the robot is in a state of complete darkness,
there may be an issue with the light sensor.
• The robot’s IR light stays on constantly, even in daylight.
If there is dust or debris present on the light sensor, the sensor may be fooled into thinking it is
darker than it really is. Ensure the light sensor is free of dust or debris by wiping it with a soft towel.
• The video stream loses color from time to time.
As the robot reaches the end of video range or in the presence of other interference, the color from
the video signal may start to disappear. Try moving the OCU closer to the robot to restore the color.
19

Throwbot® 2 Robot and OCU User Manual
• The video stream from the robot is washed out, especially in the dark.
When the robot is close to other objects in the dark, the IR lighting may cause a spot-light effect
causing distortion of the video. This version of the robot will attempt to automatically detect and
lower the IR output in this scenario, however, it still may result in some washing out. To alleviate
this issue, try backing up the robot slightly or turning it slightly to aim the “spotlight” away from the
object of interest.
• I have a Recon Scout XL or Recon Scout CT with a Flex Pack. Can I use those components with my
Throwbot 2 robot instead of getting a Deluxe Pack?
While the larger wheels in the Deluxe Pack may look similar to the Recon Scout XL wheels in size,
they are a new design. They can be utilized on older Recon Scout XL or Recon Scout CT robots, but
the older Recon Scout XL wheels from the Recon Scout XL or Flex Pack will not afford the same drop
ratings as the new wheels and should not be used on a Throwbot 2 robot. Similarly the wider tail on
the Recon Scout XL or Recon Scout CT may look the same, but the mounting mechanisms are
different and they are not interchangeable. Finally, the Picatinny Rail from the Recon Scout CT
cannot mount onto the Throwbot 2 robot.
• Can the robot be operated in wet conditions?
The Throwbot 2 robot system is both IP66 and IP67 rated which means that it can be sprayed with a
hose to clean it off or submerged for up to 30 minutes in 3 feet (1 meter) of water. The OCU is not
rated for exposure to water and should be kept dry. The warranty and Annual Maintenance Plan do
not cover any damage resulting from exposure of the system to water, salt water spray, hazardous
or caustic chemicals, etc.
• The robot has been exposed to blood or other biological hazards. What can I use to clean it?
We recommend cleaning the robot with one of the following:
• Bleach
• Ammonia
• Isopropyl Alcohol
• SaniZide Plus®
• Spray Nine® / Spray Nine® Heavy Duty
• Fantastik® Heavy Duty
• Simple Green®
When cleaning, remember to do the following:
• Spray or wipe down the robot with your preferred cleaner, then rinse under water.
• It is best to dry off the robot as soon as possible; do not soak in a cleaning solution or in
water more than necessary.
• For the deepest clean, remove the wheels and tail and wash them separately.
• Until the robot is completely dry, do not insert the dust cover into the USB connector.
20

Throwbot® 2 Robot and OCU User Manual
Robot: Located on the bottom of the robot near
OCU: Located on the back of the OCU near the
• Are there translations of this User Manual available?
For the most current version of the User Manual, along with all available translations of the User
Manual, please visit our website at www.reconrobotics.com
and conditions of the most recent update/published version of the User Manual.
• How do I request service if I am still experiencing problems with my ReconRobotics equipment?
See page 24 for instructions on returning kits for support.
• Where can I find the serial numbers on my robot or OCU?
. User consents to abide by the terms
the charge port.
lanyard attachment.
21

Throwbot® 2 Robot and OCU User Manual
Safety Information & Warnings
Read these warnings before charging or using your robot or OCU. Failure to read and follow these
instructions may result in fire, personal injury and/or damage to property.
Any negligent or reckless use, intentional misuse, or use of the robot or OCU for any purpose not
authorized in this User Manual, including failure to request service for the Throwbot® 2 upon
discovery of a malfunction, continued use of a Throwbot® 2 after signs of malfunction, or ignoring the
safety warnings below, may terminate your license and the user assumes all risk and liability for
damage, injury or loss that may occur.
Retain these instructions for future reference. To reduce the risk of injury or damage, keep these safety
precautions in mind when setting up, using, and maintaining your equipment.
• To reduce the risk of electric shock, do not open the shell of the robot, Operator Control Unit
(OCU) or the chargers. No user serviceable parts are inside. Refer servicing to qualified
ReconRobotics service personnel.
• Do not attempt to operating the robot or OCU while operating a vehicle.
• Use caution if operating the robot or OCU in bad weather (i.e. strong winds, rain, sand/dusty
storms, etc.)
• Do not attempt to service the robot or OCU yourself. Repairs of the physical equipment,
software, or firmware not conducted by authorized personnel will result in the voiding of
warranty and/or Annual Maintenance Plans.
• Do not attempt to use the robot or OCU with unapproved third party products, including
accessories and third party software.
• Use caution if operating the robot or OCU in environments suffering from interference from
other wireless devices (i.e. transmitter, video-downlink, WI-FI signals, etc.) or increased
electromagnetic interference (i.e. in mining areas or close to radio transmission towers, highvoltage wires, substations, etc.)
• Keep loose clothing and hair away from the robot.
• Considerations for charging:
o Always charge the robot with the activation plate inserted and the OCU turned off.
o Always charge in a cool, ventilated, fire-safe area.
o Always use a proper country-specific AC socket (120-240 VAC) with the battery charger.
Do not force the plug into a socket.
o Ensure the charger plug is not deformed, bent or otherwise damaged before inserting
into the robot or OCU.
• Lithium Polymer batteries are volatile. Only charge the robot and OCU with the appropriate
chargers. Failure to do so may cause fire, which could result in personal injury and/or property
damage. Do not leave system unattended while charging.
• By purchasing a robot kit from ReconRobotics, the buyer assumes all risks associated with
lithium polymer batteries. If you do not agree with these conditions, please return the robot kit
to ReconRobotics.
22

Throwbot® 2 Robot and OCU User Manual
• Do not attempt to disassemble or modify the robot or OCU. This may cause an electric shock,
fire, or system failure.
• Keep the robot and OCU away from children. The robot and OCU contain small, sharp, and
potentially dangerous parts which may be a safety hazard.
• Do not insert any foreign objects inside the robot or OCU. This may cause electric shock, fire or
system failure.
• To reduce the risk of unauthorized use or frequency interference, contact ReconRobotics if the
robot exhibits any signs that unauthorized parties may have accessed the operations frequency;
signs include excessive lag time between commands and mechanical responses or unexplained
mechanical movements.
• Do not immerse the OCU or chargers into water or liquids. If water or any liquid enters the
inside of the OCU, immediately stop use to avoid electric shock, fire, or system failure.
• The following symptoms indicate a device may need technical attention and should not be used:
o After a full charge, the OCU display intermittently turns ON and OFF.
o The OCU or charger has been dropped and is malfunctioning.
o There are exposed wires on a charger cable.
o The robot, OCU, or charger becomes too hot to touch.
o There is an unusual sound, smoke, or burning odor emitted from any of the
components.
• This product emits small amounts of radiation which may cause cancer, birth defects, or other
reproductive harm. It is the user’s responsibility to take the reasonable care described in the
section titled “FCC Radiation Exposure Statement” when using this product.
• This product may contain Formaldehyde or other similar substances or chemicals known to
cause cancer, birth defects, or other reproductive harm. It is the user’s responsibility to take
reasonable care when using this product.
If you have questions or concerns regarding the use or operation of the robot or OCU, discontinue use
and contact ReconRobotics or the vendor from whom you purchased your equipment.
23

Throwbot® 2 Robot and OCU User Manual
Warranty and Service
Warranty
The full Manufacturer’s Warranty documentation is appended to this User Manual/available at the
following web address: www.reconrobotics.com.
Requesting Service or Repair
You can request service by contacting your ReconRobotics sales representative or by emailing
support@reconrobotics.com
information:
• Problem description
• Customer Agency Name and Address
• Point of Contact
• Contact Phone or Email, along with best times to reach you
• Serial number of the product that is experiencing difficulties
• You may also be asked to provide proof of purchase.
. When you contact, please be prepared to provide the following
Our technical staff will attempt to troubleshoot and resolve the problem. If repair service is needed, we
will setup an RMA (Return Material Authorization) and arrange for shipment of your equipment to the
nearest repair facility. Please do not just ship equipment to us without an RMA in place as this will
cause delays in processing.
If your issue cannot be resolved remotely, ReconRobotics may provide loaner equipment during the
repair process.
If your issue is not covered under warranty or by an extended service plan or annual maintenance plan,
we will provide a not-to-exceed (NTE) repair cost estimate for your approval before commencing repair.
After repairs are complete, you will be invoiced for the actual cost of repairs up to the estimate.
Typical turnaround time for a repair is one week after receipt and approval to begin.
When sending equipment in for RMA, please include the entire kit (Robot, OCU, and chargers) to ensure
all problems can be identified and necessary repairs can be completed.
NOTE: If, after remote troubleshooting, the system is sent back for maintenance and no problem can
be identified, a diagnostic fee may be assessed.
Limitations of Liability and Warranty
Your exclusive remedy for the breach of the Manufacturer’s Warranty shall be for ReconRobotics to
repair or replace the product. Under no circumstances will ReconRobotics have liability for user’s
unauthorized used or intentional misuse of the product under this agreement. Unauthorized use
includes use after user activity that voids that user’s license to operate the product.
24

Throwbot® 2 Robot and OCU User Manual
Under no circumstances shall ReconRobotics, its affiliates, suppliers, resellers, or service providers be
liable for any of the following even if informed of their possibility and regardless of whether the claim is
based in contract, warranty, negligence, strict liability, or any other theory of liability: (1) third party
claims for damages; (2) loss, damage, or disclosure of data; (3) special, incidental, punitive, indirect, or
consequential damages. In no case shall the total liability of ReconRobotics, its affiliates, suppliers,
resellers, or service providers for damages from any cause stemming from any theory of liability exceed
the amounts paid by you to ReconRobotics over the prior twelve (12) month period. For any jurisdiction
that limits the limit or exclusion of liability by contract, this provision shall be interpreted to provide the
greatest limitation on liability permitted by law. In no case shall the total liability of ReconRobotics, its
affiliates, suppliers, resellers, or service providers for damages from any cause exceed the amount of
actual direct damages, not to exceed the amount the user paid for the product.
TO THE EXTENT PERMITTED BY LAW, EXCEPT AS EXPRESSLY PROVIDED IN THE MANUFACTURER’S
WARRANTY, RECONROBOTICS DISCLAIMS ALL WARRANTIES OF ANY KIND, WHETHER STATUTORY,
EXPRESS OR IMPLIED, INCLUDING: (A) ANY IMPLIED WARRANTY OF MERCHANTABILITY, FITNESS FOR A
PARTICULAR PURPOSE; AND (B) ANY WARRANTY ARISING OUT OF COURSE OF DEALING, USAGE, OR
TRADE. RECONROBOTICS AND ITS AFFILIATES, SUPPLIERS, RESELLERS, AND SERVICE PROVIDERS DO NOT
WARRANT, EXCEPT AS EXPRESSLY PROVIDED IN ITS MANUFACTURER’S WARRANTY, THAT THE PRODUCT,
PRODUCT ACCESSORIES, OR ANY PORTION OF THE PRODUCT, OR ANY MATERIALS, WILL BE
UNINTERRUPTED, SECURE, OR FREE OF ERRORS, VIRUSES, OR OTHER HARMFUL COMPONENTS.
IF SUCH WARRANTIES CANNOT BE DISCLAIMED, RECONROBOTICS LIMITS THE DURATION AND
REMEDIES OF SUCH WARRANTIES TO THE DURATION OF THIS EXPRESS WARRANTY AND, AT
RECONROBOTIC’S OPTION, THE REPAIR OR REPLACEMENT SERVICES PROVIDED IN THE
MANUFACTURER’S WARRANTY.
25

Throwbot® 2 Robot and OCU User Manual
ReconRobotics Throwbot 2 Robot FCC Guidelines and Logbook
Version 1.4 January 2018
FCC Class B Product Compliance
NOTE: This equipment has been tested and found to comply with the limits for a Class B digital device,
pursuant to Part 15 of the FCC Rules except where waived by waiver DA 10-291. This equipment
generates, uses and can radiate radio frequency energy and, if not installed and used in accordance with
the instruction, may cause harmful interference to radio communication. However, there is no
guarantee that interference will not occur in a particular installation. If this equipment does cause
harmful interference to radio or television reception, which can be determined by turning the
equipment off and on, the user is encouraged to try to correct the interference by one or more of the
following measures:
• Reorient or relocate the receiving antenna.
• Increase the separation between the equipment and receiver.
• Connect the equipment into an outlet on a circuit different from that to which the receiver is
connected.
• Consult the dealer or an experienced radio/TV technician for help.
This device may not interfere with Federal stations operating in the 420-450 MHz band and must
accept any interference received.
Although this transmitter has been approved by the Federal Communications Commission, it must
accept any interference received from Federal or non-federal stations, including interference that may
cause undesired operation.
Operation of the Throwbot® 2 robot by eligible entities will require a separate Commission
authorization. Licensees must maintain a log of all ReconRobotics product use. The log will include date
of operation, start/stop times, location of operation, frequency segment of operation, reason for use,
and point of contact. Licensees must provide this log to the Federal Communications Commission or to
the National Telecommunications and Information Administration upon request of either agency.
When multiple Throwbot 2 robots are available on separate frequencies, the agency deploying them
must deploy a Channel C Throwbot 2 robot first, followed by a Channel A, followed by a Channel B.
Operation of the Recon Scout or Throwbot® 2 robot in an unauthorized manner, or failure to maintain
the log, will subject licensees to Commission enforcement action and license revocation.
Any modifications to the physical equipment, software, or firmware that are not expressly approved
by ReconRobotics will void the user’s warranty and license to operate the equipment. User assumes
all liability for any injury or loss caused by a robot and/or equipment that is modified without express
approval by ReconRobotics, whether or not the unauthorized modifications caused or contributed to
the injury or loss.
FCC RF Radiation Exposure Statements:
To comply with FCC RF exposure compliance requirements, the antenna used for the robot’s transmitter
must maintain a separation distance of at least 20 cm from all persons during use and must not be colocated or operating in conjunction with any other transmitter except in accordance with FCC multitransmitter product procedures.
26

Throwbot® 2 Robot and OCU User Manual
Site
Coordinates (degrees-minutes-seconds)
Beale Air Force Base
39-08-10 N / 121-21-04 W
Cape Cod Air Force Station
41-45-07 N / 70-32-17 W
Clear Air Force Station
64-55-16 N / 143-05-02 W
Cavalier Air Force Station
48-43-12 N / 97-54-00 W
Eglin Air Force Base
30-43-12 N / 86-12-36 W
Site
Coordinates (degrees-minutes-seconds)
Arecibo, Puerto Rico
18-20-37 N / 66-45-11 W
Westford, Massachusetts
42-37-24 N / 71-29-18 W
Poker Flats, Alaska
65-07-47 N / 147-28-14 W
The Operator Control Unit (OCU) complies with FCC radiation exposure limits set forth for an
uncontrolled environment. End users must follow the specific operating instructions for satisfying RF
exposure compliance. This transmitter must not be co-located or operated in conjunction with any other
transmitter except in accordance with FCC multi-transmitter product procedures.
FCC Guidelines
The usage of the Throwbot® 2 robot and related equipment is subject to the following conditions:
Eligibility is limited to state and local police and firefighters eligible for licensing under Section
90.20(a)(1) of the Commission’s Rules, and security personnel in critical infrastructure industries.
The Throwbot® 2 robot may be used only during actual emergencies involving threats to safety of life,
and for necessary training related to such operations. Security personnel in critical infrastructure
industries may operate the Throwbot® 2 robot only in areas that are environmentally hazardous for
entry by human personnel, and for necessary training related to such operations.
Training operations are not permitted within thirty kilometers of the following Federal radiolocation
sites:
The Throwbot® 2 robot will operate on a secondary basis (cannot cause interference and is not
protected from interference) to all Federal users and licensed non-Federal users. This device may not
interfere with Federal stations operating in the 420-450 MHz band and must accept any interference
received.
The operation of the Throwbot® 2 may be impacted in the vicinity of the following radar and ionospheric
research sites:
Any operation, modification or use of the Throwbot® 2 robot and related equipment that violates the
guidelines or usage restrictions in this User Manual, including but not limited to the FCC guidelines
and compliance terms above, will immediately void all warranties, terminate all licenses to use the
Throwbot® 2 and related equipment, and the user will be liable for any consequences and loss that
results from the unauthorized or incorrect use and violations of the terms of this User Manual.
27

Throwbot® 2 Robot and OCU User Manual
Date
Start
Stop
Location
Reason
POC
FCC Logbook
The usage of and license for the Throwbot® 2 robot is expressly subject to maintenance of a logbook.
Please use the following sheet to record the date of operation, the start and stop times, channel
information, the location of usage, a brief reason for usage and a point of contact. This logbook must be
made available upon request of the Federal Communications Commission or the National
Telecommunications and Information Administration.
Refer to your User’s Manual for serial numbers and channel information. The next page may be
photocopied, or additional pages are available from your authorized ReconRobotics dealer.
28

Throwbot® 2 Robot and OCU User Manual
Date
Start
Stop
Location
Reason
POC
29

Throwbot® 2 Robot and OCU User Manual
30
 Loading...