

Page 1
MOD User Guide Draft
Document Type / User Guide
Group / Marketing
Document ID / x
Author / David Lee
Version
#
0.1 David Lee 2011/5/16
0.2 David Lee 2011/6/03 Updated with new MOD GUI
0.3
0.4 David Lee 2011/7/05
0.5 David Lee 2011/8/11
0.6 Minh To 2011/8/26
0..7 David Lee 2011/8/31
0.8 Minh To 2011/09/7
Implemented
By
David Lee 2011/6/20 New graphics and functionality (tabs)
Revision
Date
Approved
By
New product shots, changes based on
Close to final text. Graphics are not
Finishing the manual off for FCC
Include the correct IC statement in the
Approval
Date
Reason
First draft
latest feedback
updated in this version as Kirill will be
doing the graphics in InDesign next
Add standard regulatory page
approval
Regulatory Compliance page.
Page 2

Page 2 of 39
Page 3

TABLE OF CONTENTS
1. MOD at a Glance ........................................................................................................................................................ 4
1.1 Accessories ................................................................................................................................................... 4
1.2 Remote ......................................................................................................................................................... 5
1.3 Status Icons .................................................................................................................................................. 5
2. Getting Started ........................................................................................................................................................... 6
2.1 What You Need ............................................................................................................................................ 6
2.2 Installing MOD in your Recon Ready Goggle ................................................................................................ 6
2.3 Powering On and Off .................................................................................................................................... 8
2.4 Pairing with a new remote ........................................................................................................................... 9
2.5 Connecting to the Remote ........................................................................................................................... 9
2.6 Connection Lost: Remote Search Mode ..................................................................................................... 10
2.7 Connection Lost: Remote Power Save Mode ............................................................................................. 10
2.8 Installing ReconHQ Software ...................................................................................................................... 10
2.9 Connecting to PC/Mac................................................................................................................................ 11
2.10 Disconnecting from PC/Mac ....................................................................................................................... 12
3. The basics ................................................................................................................................................................. 13
3.1 Controlling MOD ........................................................................................................................................ 13
3.3 Charge Time ................................................................................................... Error! Bookmark not defined.
3.4 Battery Life ................................................................................................................................................. 14
3.5 Improving Battery Performance ................................................................................................................. 14
3.6 Pop-Ups ...................................................................................................................................................... 14
3.7 Display Off Mode ........................................................................................................................................ 15
3.8 Memory and Data Storage ......................................................................................................................... 16
3.9 Replacing the Remote Battery ................................................................................................................... 16
4. The Real-time Dashboard ......................................................................................................................................... 17
4.1 Speedometer .............................................................................................................................................. 17
4.2 Chrono/Stopwatch ..................................................................................................................................... 17
4.3 Configurable Feature .................................................................................................................................. 18
5. Stats History ............................................................................................................................................................. 19
6. Jump ......................................................................................................................................................................... 22
7. Chrono/Stopwatch Feature ...................................................................................................................................... 23
8. Preferences .............................................................................................................................................................. 25
8.1 Setting the Brightness ................................................................................................................................ 25
8.2 Resetting Stats ............................................................................................................................................ 27
8.3 Setting the Language .................................................................................................................................. 27
8.4 Setting the Units of Measurement ............................................................................................................. 26
8.5 Setting the Time ......................................................................................................................................... 25
9. Graphical User Interface Overview Map .................................................................................................................. 28
10. Tips and Troubleshooting ......................................................................................................................................... 29
11. Safety, Storage, and Cleaning ................................................................................................................................... 31
11.1 Important Safety Information .................................................................................................................... 32
Comments from Michael ...................................................................................................... Error! Bookmark not defined.
12. Support, Service, and More Information ................................................................................................................. 32
12.1 Firmware Upgrade Information ................................................................................................................. 32
13. Warranty Information .............................................................................................................................................. 33
14. Regulatory Compliance .......................................................................................................................................... 374
15. Technical Specifications ......................................................................................................................................... 385
Page 3 of 39
Page 4
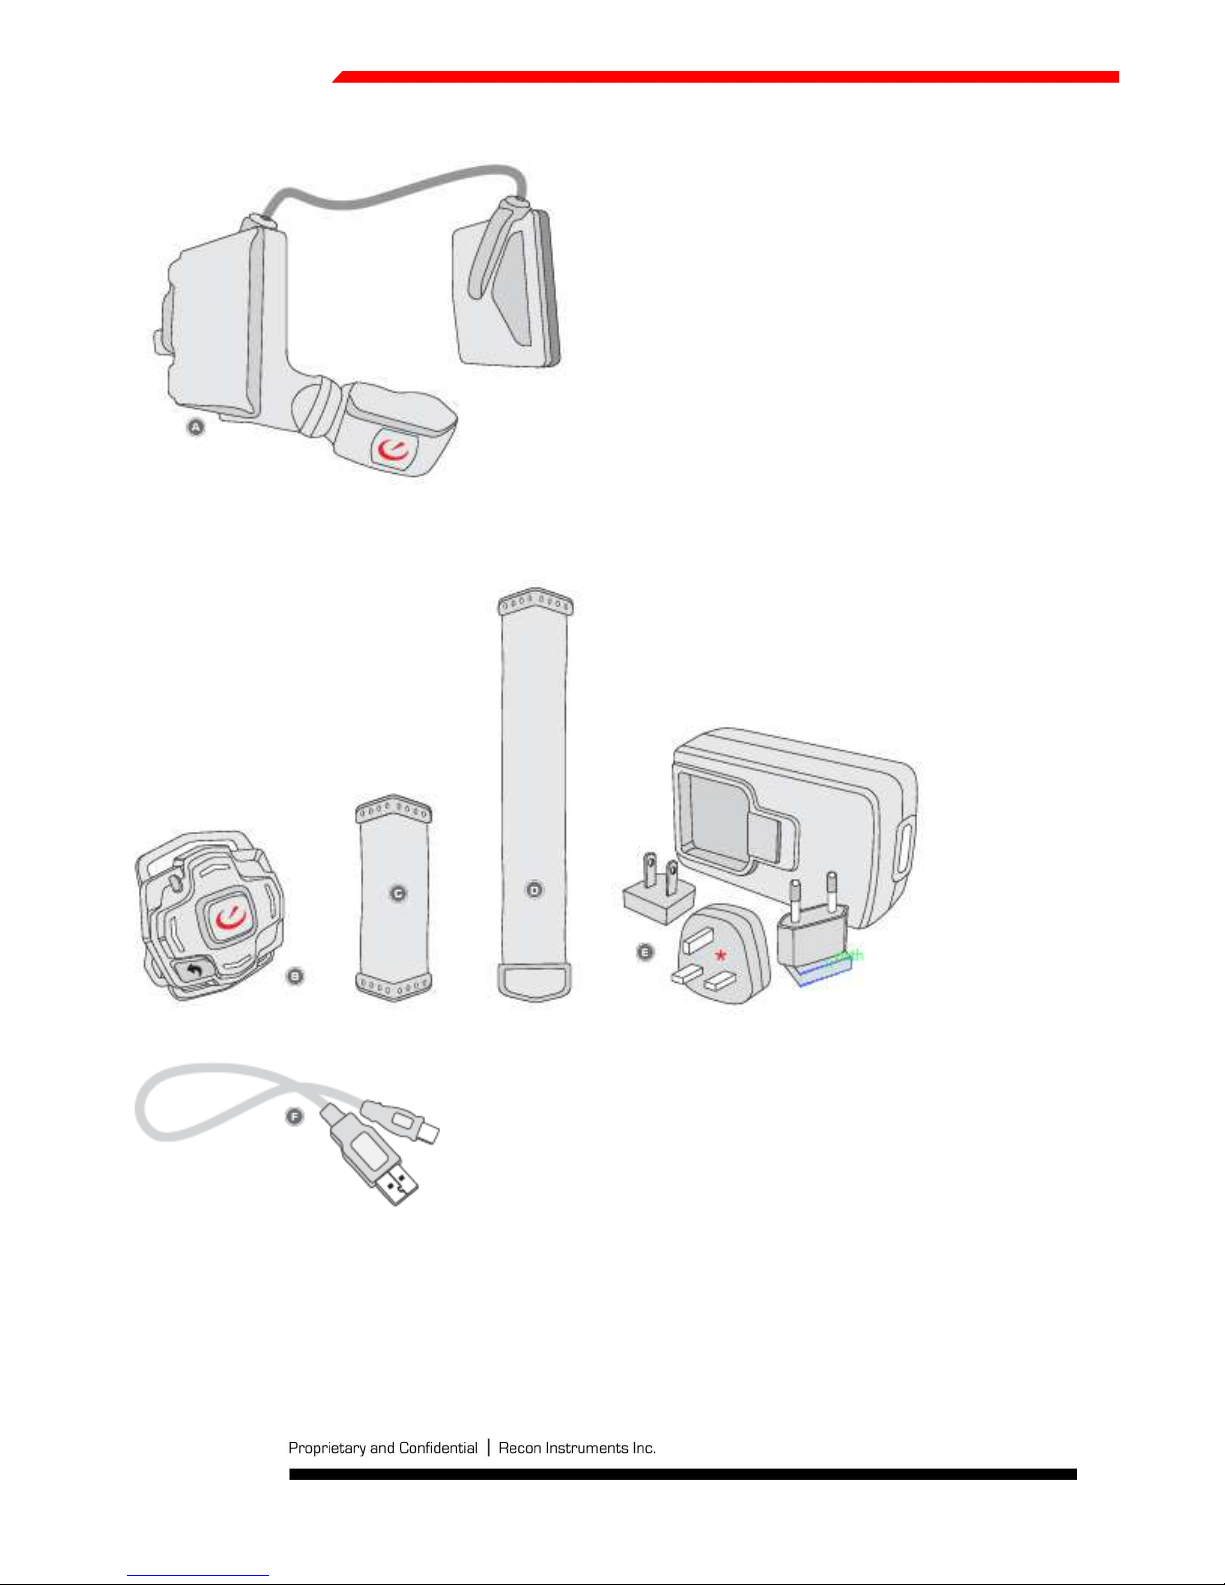
2. MOD at a Glance
A. Micro-Optics Display
2.1 Accessories
B. Recon Ready Remote
C. Goggle mount strap for Remote
D. Wrist/Backpack/Belt Strap for Remote
E. Both NEMA and EU connect AC Adapters
F. Micro USB to USB cable, 1 meter
Page 4 of 39
Page 5
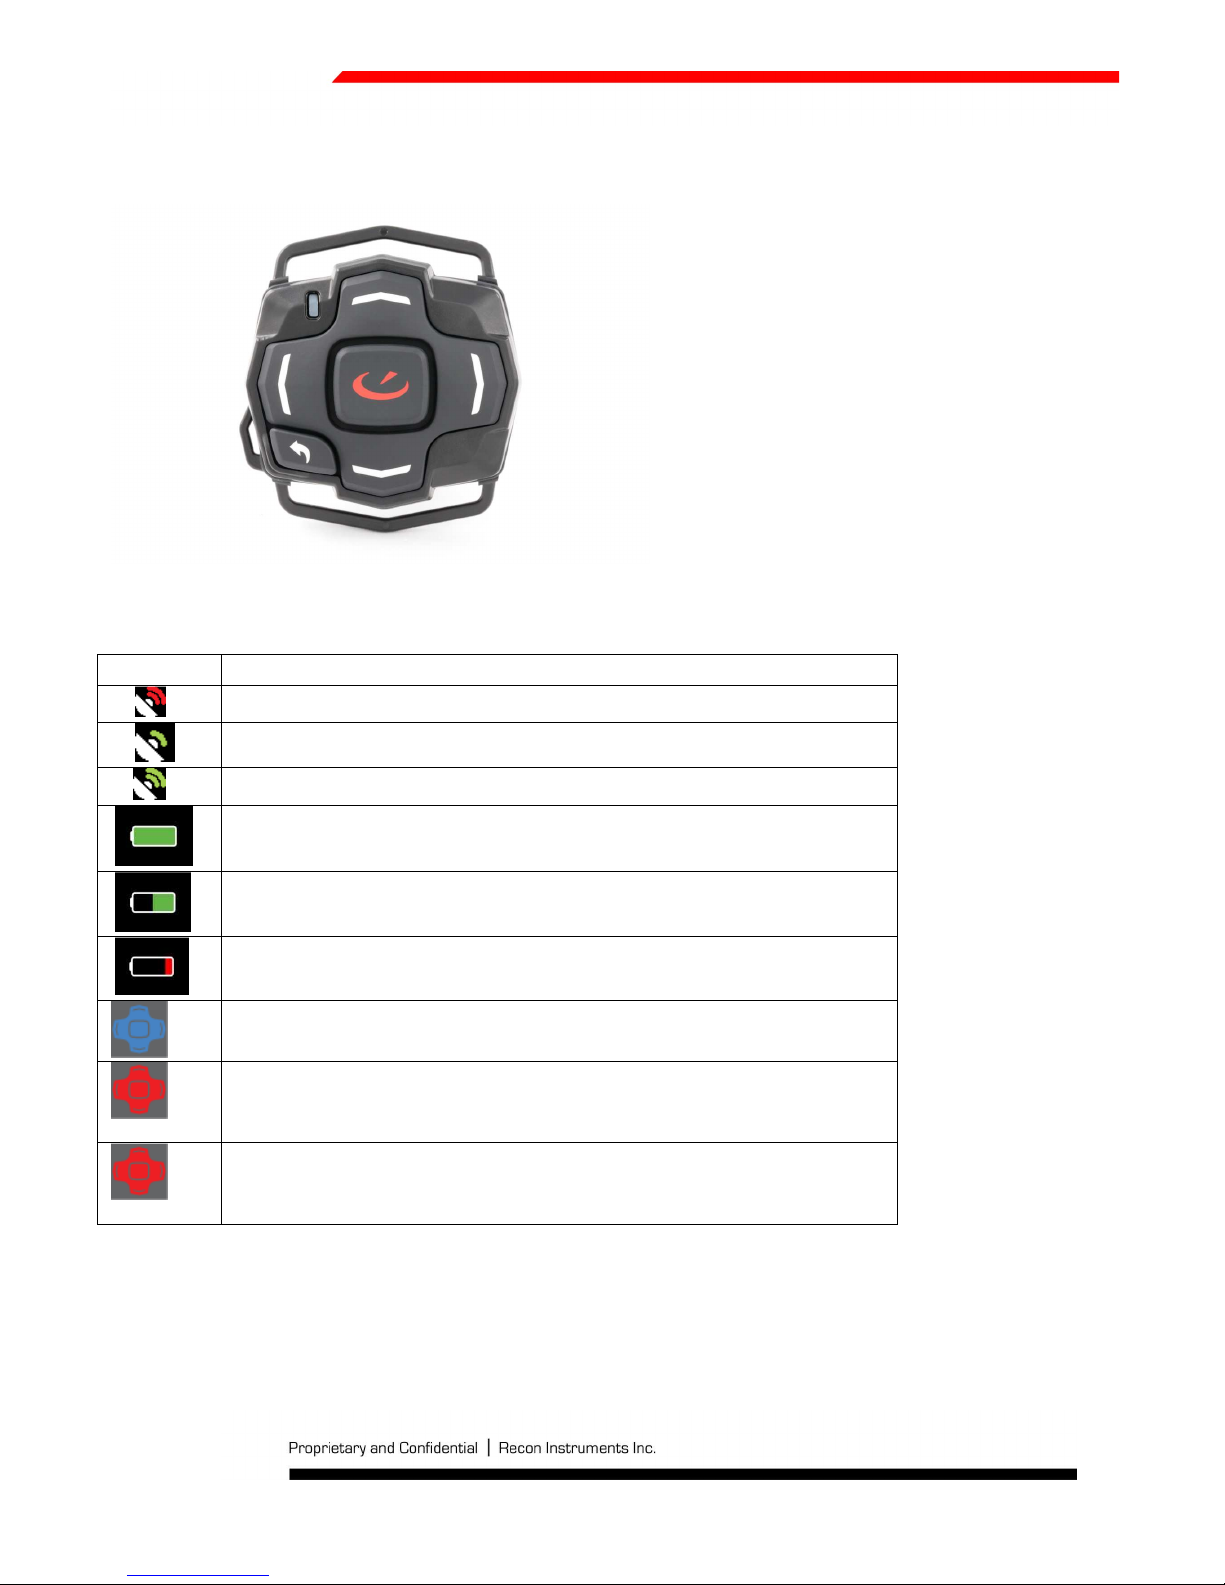
2.2 Remote
2.3 Status Icons
MOD is searching for satellites for a GPS signal
MOD is searching for more satellites for a better GPS signal
MOD has a moderate to strong GPS signal
MOD has full or near-full battery power
MOD has partial battery power
MOD has low-to-no battery power, plug in to computer or AC adapter to
flashing
solid
recharge
Wireless remote is connected
Wireless remote connection lost. Searching for remote.
Wireless remote connection lost. MOD has stopped searching for the remote in
order to save power.
Page 5 of 39
Page 6
3. Getting Started
3.1 What You Need
MOD can be used after charging right out of the package, but to enjoy the full MOD experience you’ll need the following:
• Recon Ready Goggle http://www.ReconReady.com
• A PC or Mac with a USB port and one of the following operating systems:
o Windows PC: Intel Pentium 4 or higher, Windows XP, Vista, 7 or higher
o Mac: Intel Core Duo or higher, Mac OS X v10.6 or later
• Recon Instruments HQ Software, available at www.reconinstruments.com/support
• An Internet Connection
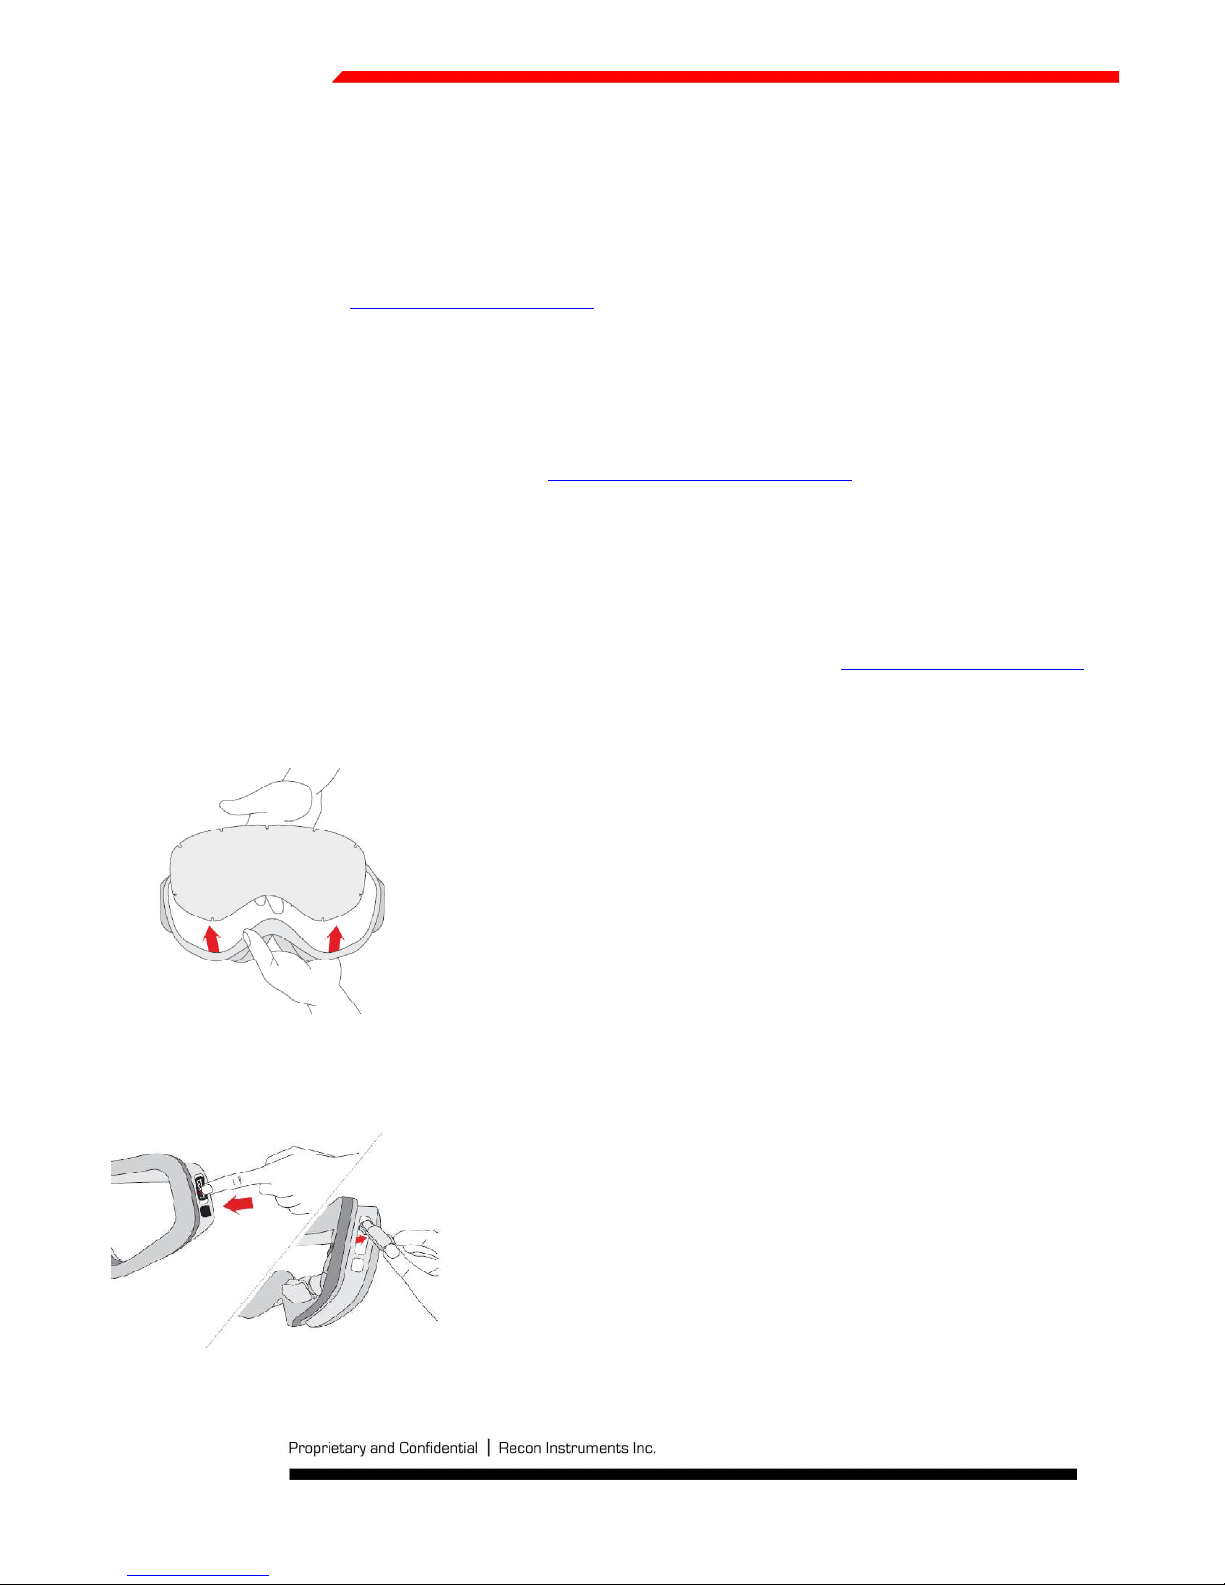
3.2 Installing MOD in your Recon Ready Goggle
MOD is compatible with all Recon Ready products. For a list of Recon Ready products visit http://www.ReconReady.com
1) Remove lens from the Recon-Ready goggle frame (see Recon Ready goggle’s manual for instructions)
2) Push protective badge into Recon-Ready goggles frame and remove
Page 6 of 39
Page 7
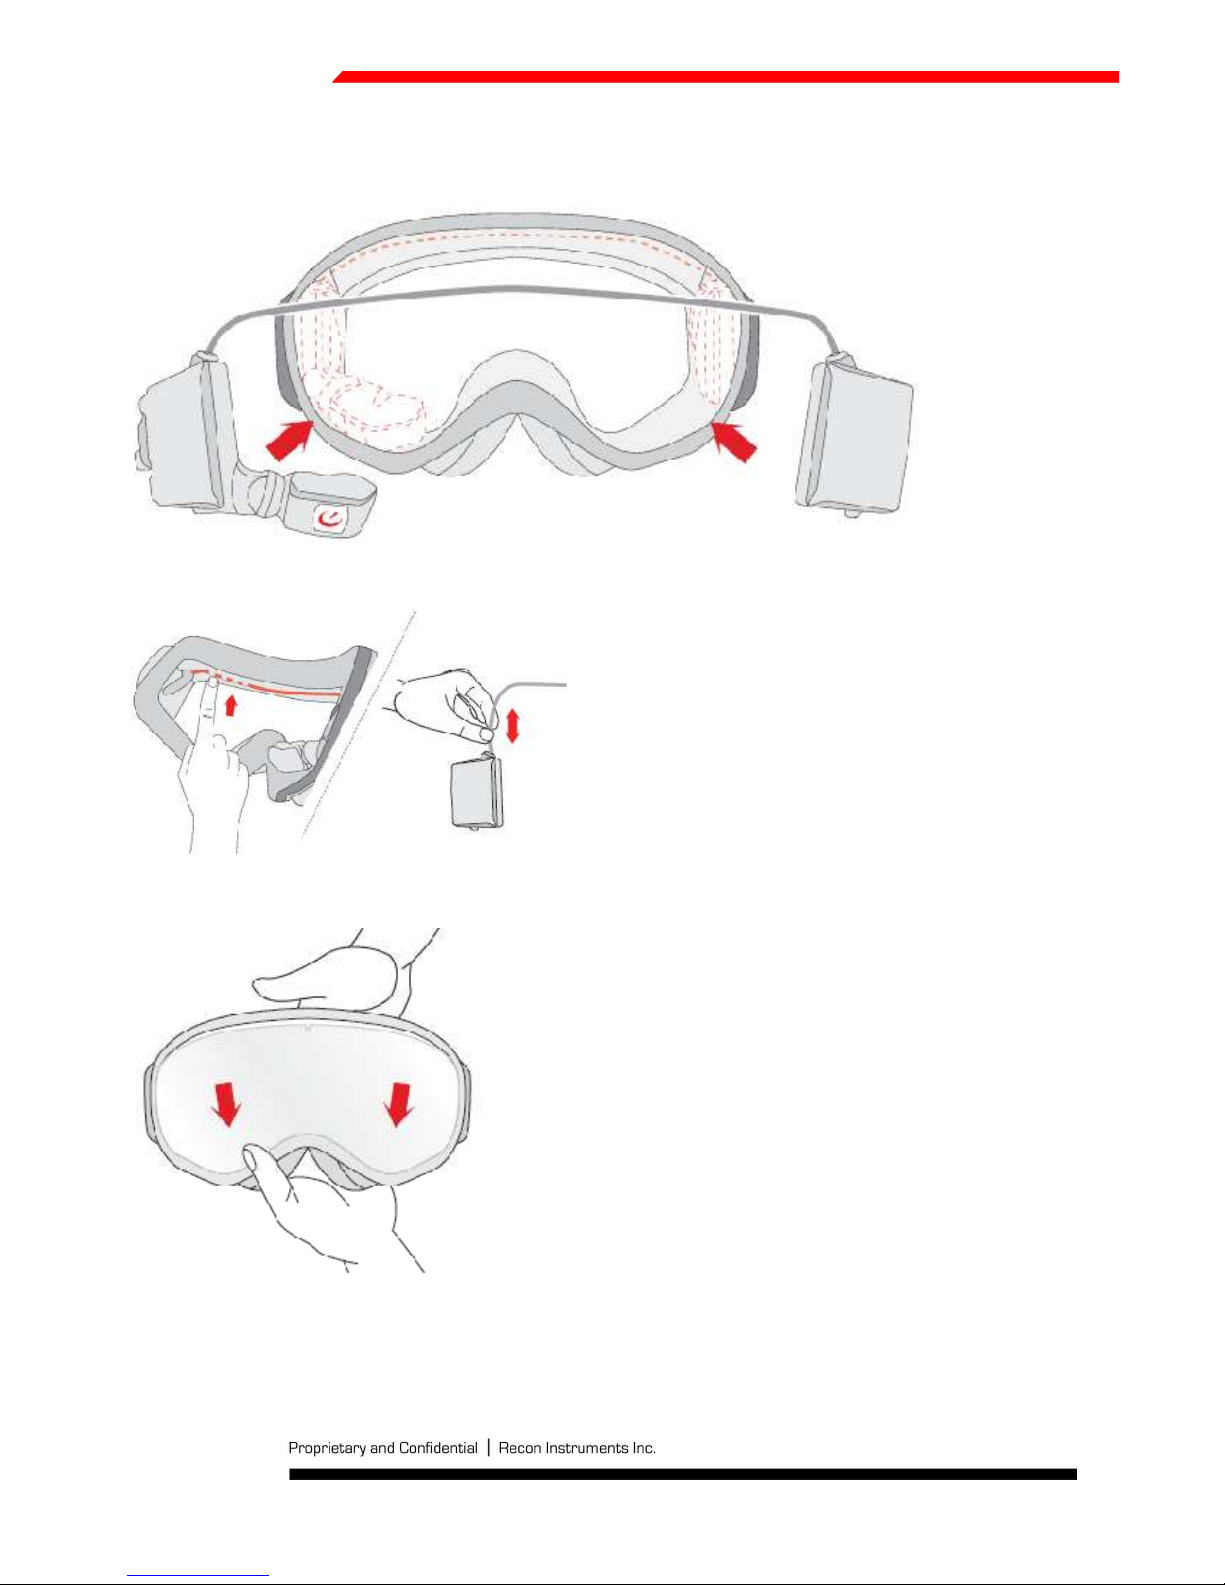
3) From the front of the goggles insert and secure Micro Optics Display into the left side then insert and secure battery
into the right side.
4)If the cable is too long or too short, adjust the length so it fits snugly into the groove inside the top of the frame.
5) Replace lens back into the goggles (see Recon-Ready© goggles manual for instructions)
6) Remove temporary USB cover and fully charge battery with the USB charger until red light on the goggle turns off.
Page 7 of 39
Page 8
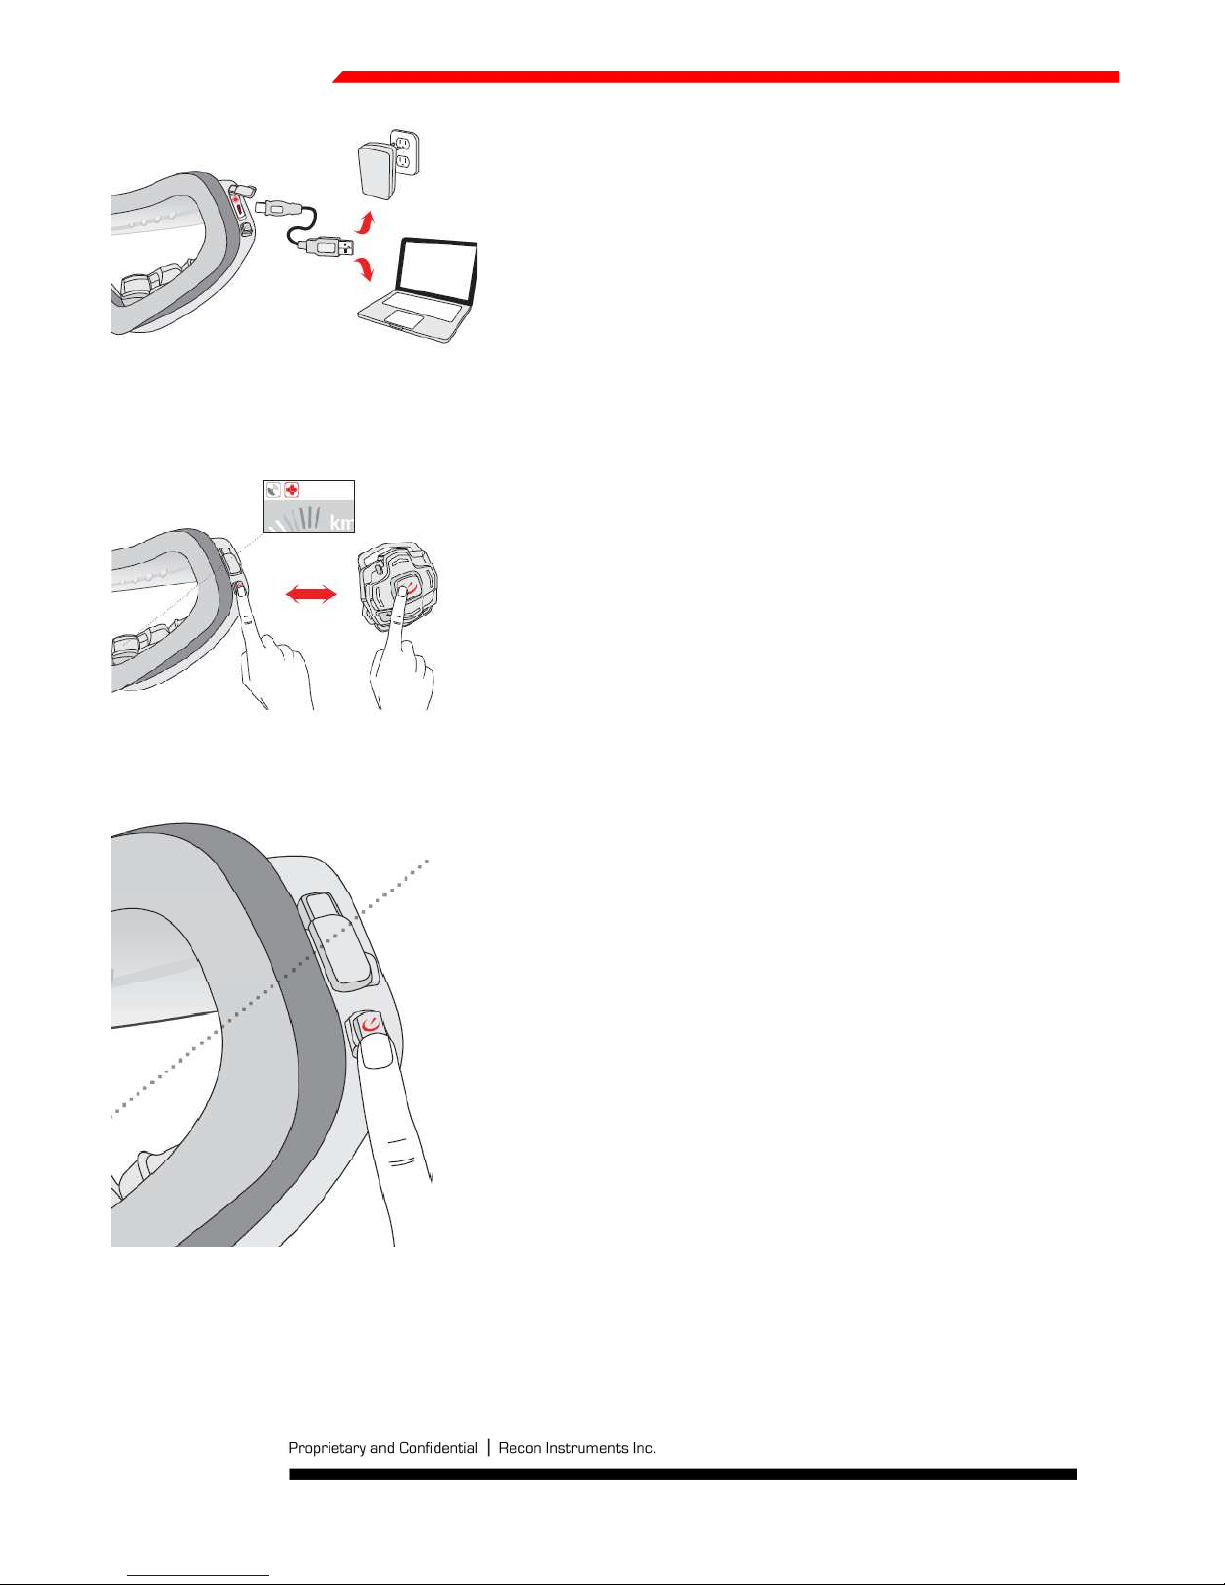
7) Power on then pair MOD with remote by pressing any button on the remote.
3.3 Powering On and Off
To Power on, hold the POWER button for about 2 seconds. You will know the unit is on when the POWER button glows
blue.
To power off MOD hold the POWER button for about 2 seconds.
Page 8 of 39
Page 9
3.4 Pairing with a new remote
Note: The remote and MOD and remote that come packaged together are already paired. To begin using the remote with
your MOD see section “3.5 Connecting to the Remote”.
To pair MOD with a new remote different than the one your MOD was packaged, with follow these instructions:
1. Press and hold the left and right buttons on the remote until you see the LED flash blue and orange. The remote is
now ready to be paired with a new device.
2. Power on MOD and press any button on the new remote within 10 seconds.
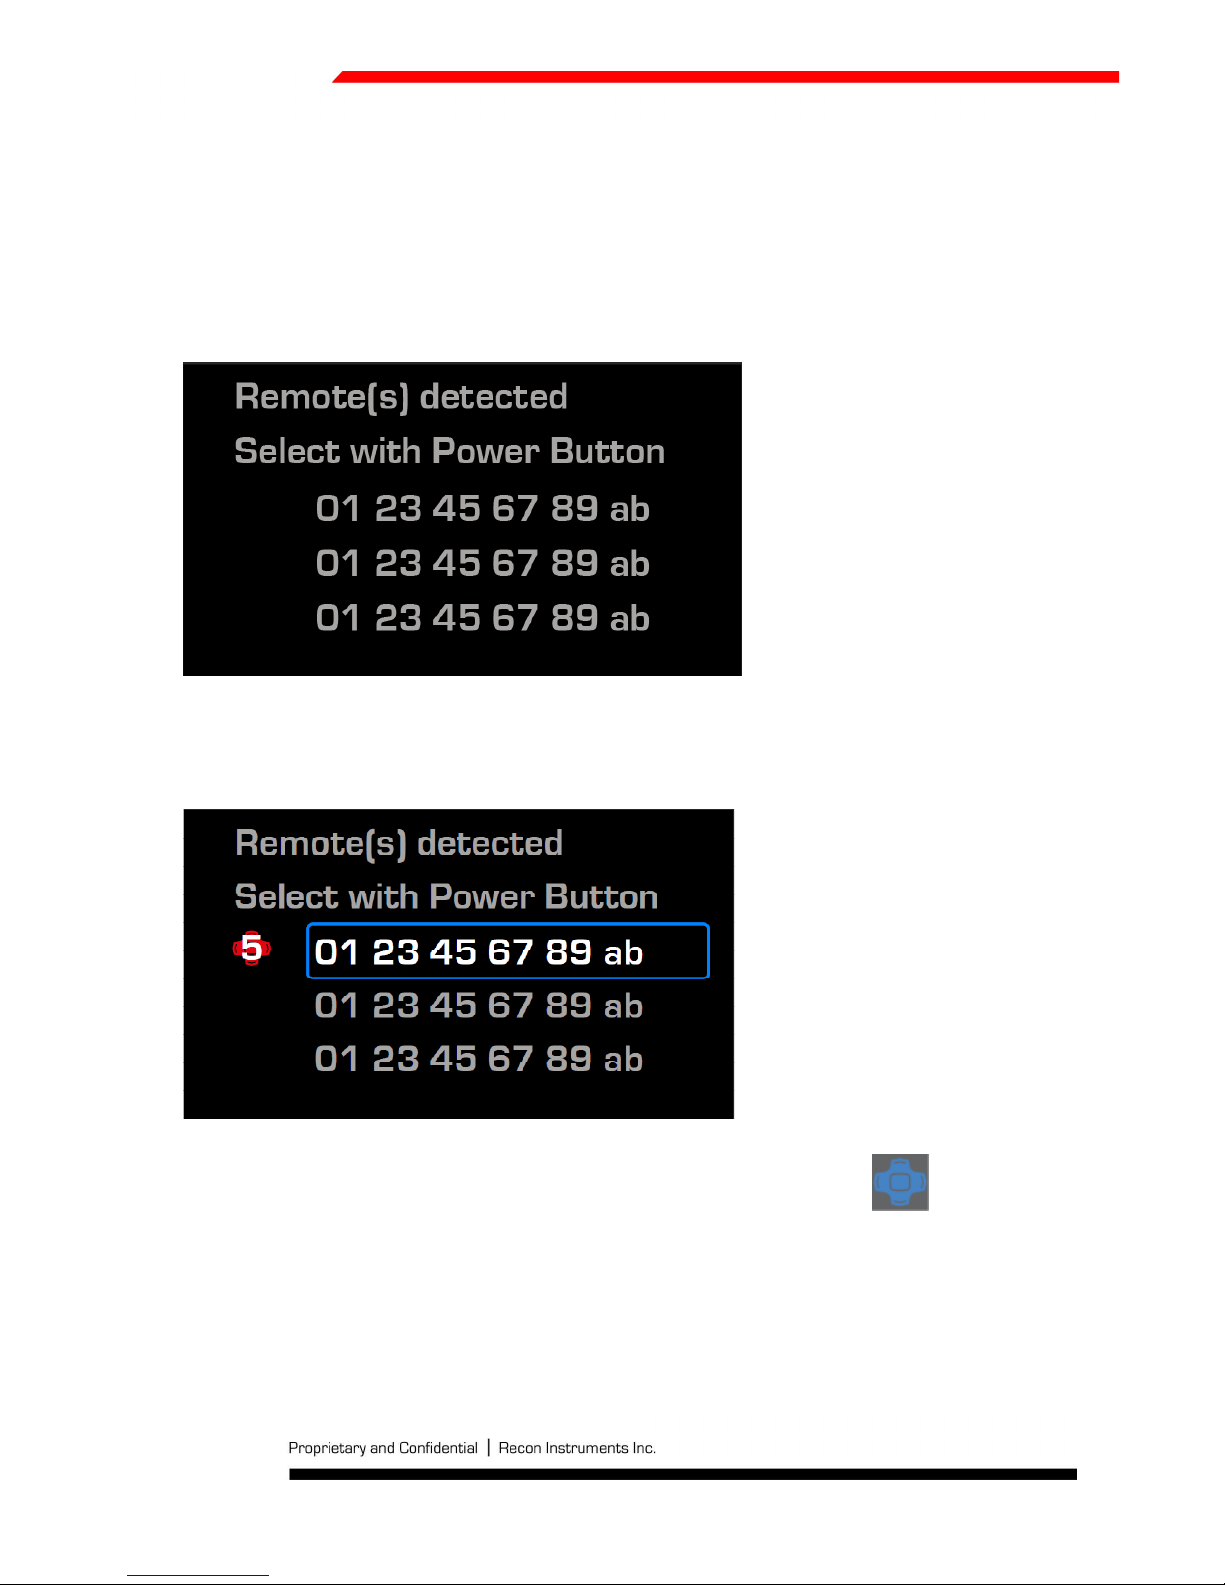
3. If the new remote is detected, the following screen will appear listing the remotes that are currently in range.
The remotes are listed by their MAC address. The MAC address of your remote is written on the back.
4. Use the power button to move the cursor to the remote you want to pair with. Then wait 10 seconds and the
remote will pair.
You will be taken to the dashboard, and the remote icon in the status bar will turn solid blue:
3.5 Connecting to the Remote
Whenever you power on MOD, it will begin searching for a wireless remote. On start-up you will see this screen
Page 9 of 39
Page 10
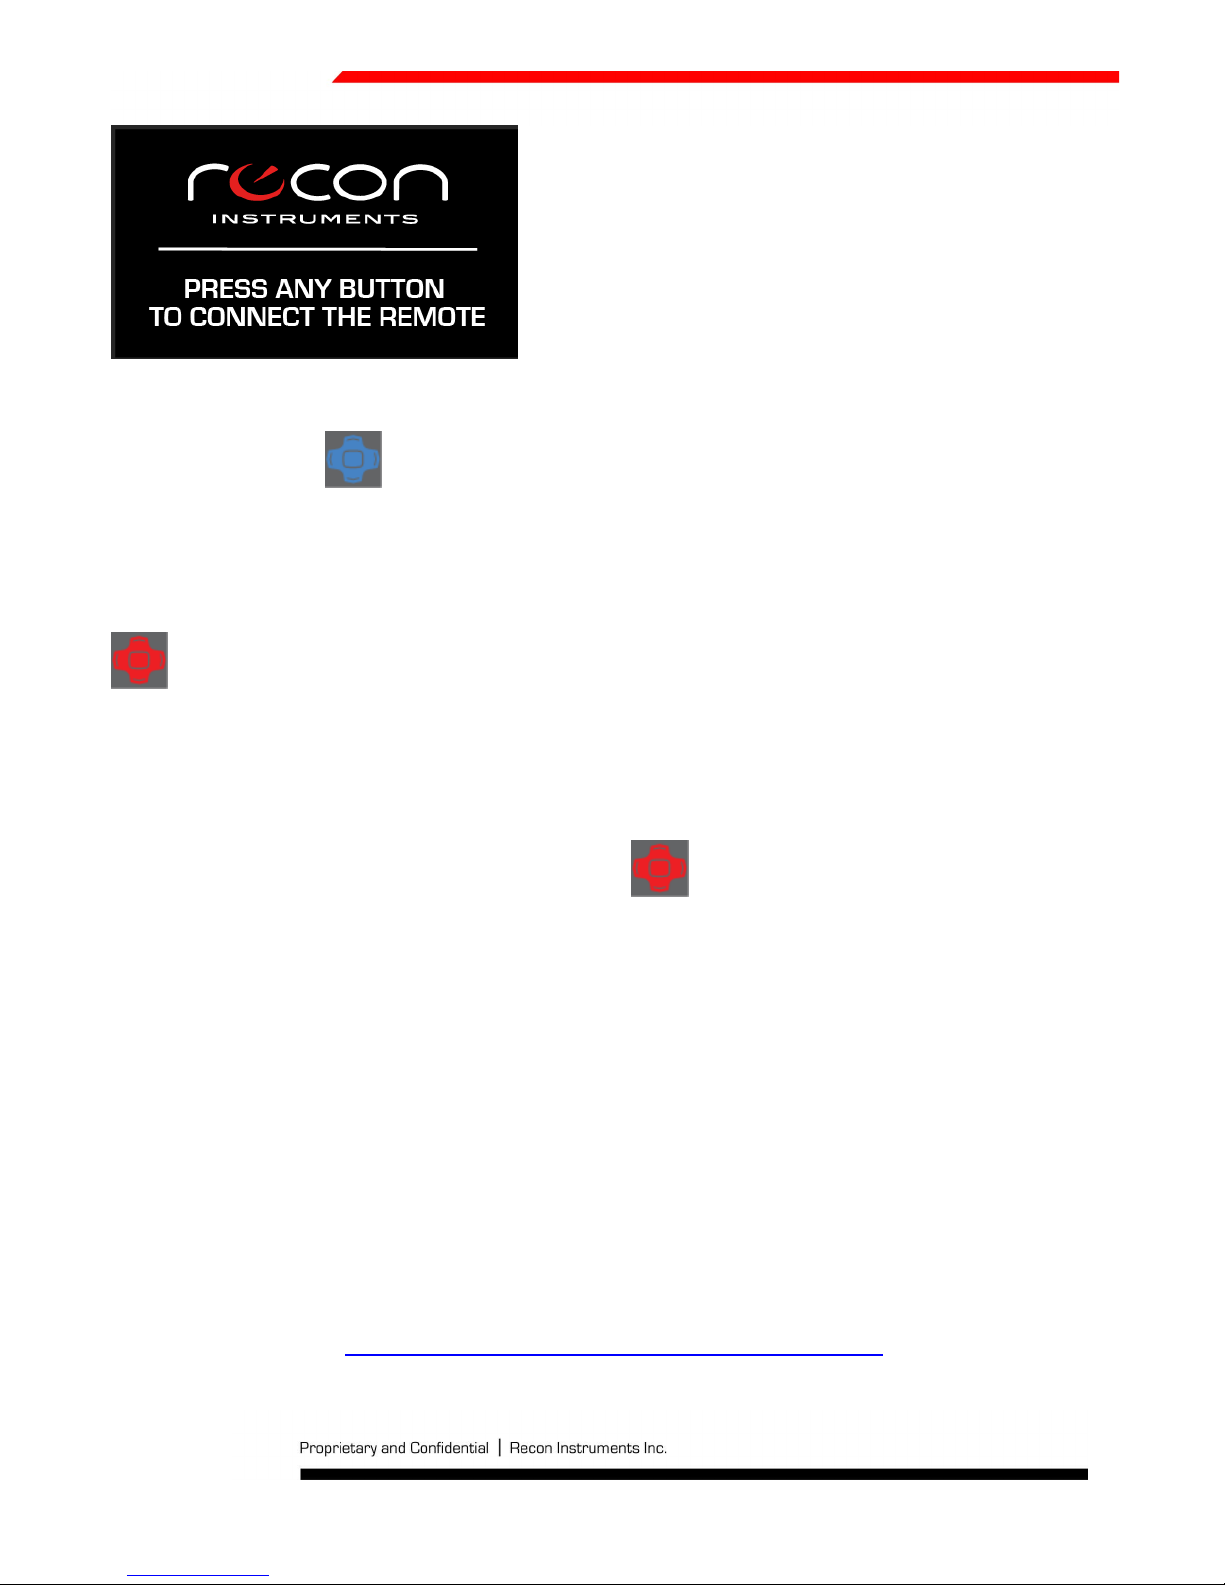
Press any button on the remote to connect it to MOD. When the remote is connected you will see the remote icon in the
status bar turn solid blue:
3.6 Connection Lost: Remote Search Mode
If the remote connection is lost, MOD will begin searching for the remote. This is indicated by the remote icon flashing red:
Press any button on the remote to reconnect it.
3.7 Connection Lost: Remote Power Save Mode
If you do not reconnect the remote within 4 minutes, MOD will stop searching for the remote in order to save power. This is
indicated by the remote icon in the status bar turning solid red: .
To begin searching again press but do not hold the power button. MOD will return to Remote Search Mode for 4 minutes.
Press any button on the remote to reconnect it.
For more detailed information on controlling MOD using the remote see ‘Controlling MOD’ (p___)
3.8 Installing ReconHQ Software
Recon HQ is a free application for your PC or Mac that allows you to view and organize your achievements and statistics
from the mountain or backcountry on your computer. Collect real-time information from your Recon Instruments hardware
to track your trips or entire seasons. Playback those amazing runs or secret trails in real-time with all of your statistics
overlaid on Google maps. Cut highlights of your favourite moments, post to HQ Online and share with Facebook, Twitter
and more.
To download ReconHQ go to http://reconinstruments.com/download-latest-recon-hq-software
System Requirements
Page 10 of 39
Page 11
Windows:
• Intel Pentium 4 or higher processor
• 1GB of RAM
• Screen resolution of 1024x768 or greater
• USB 2.0 port for connection with Recon goggles
• Internet connection for connection with Google Maps
• Windows XP Service Pack 2 or later, Windows Vista, or Windows 7
Mac:
• Intel Core Duo or higher processor
• USB 2.0 port for connection with Recon goggles
• Internet connection for connection with Google Maps
• Mac OS X v10.6 or later
•
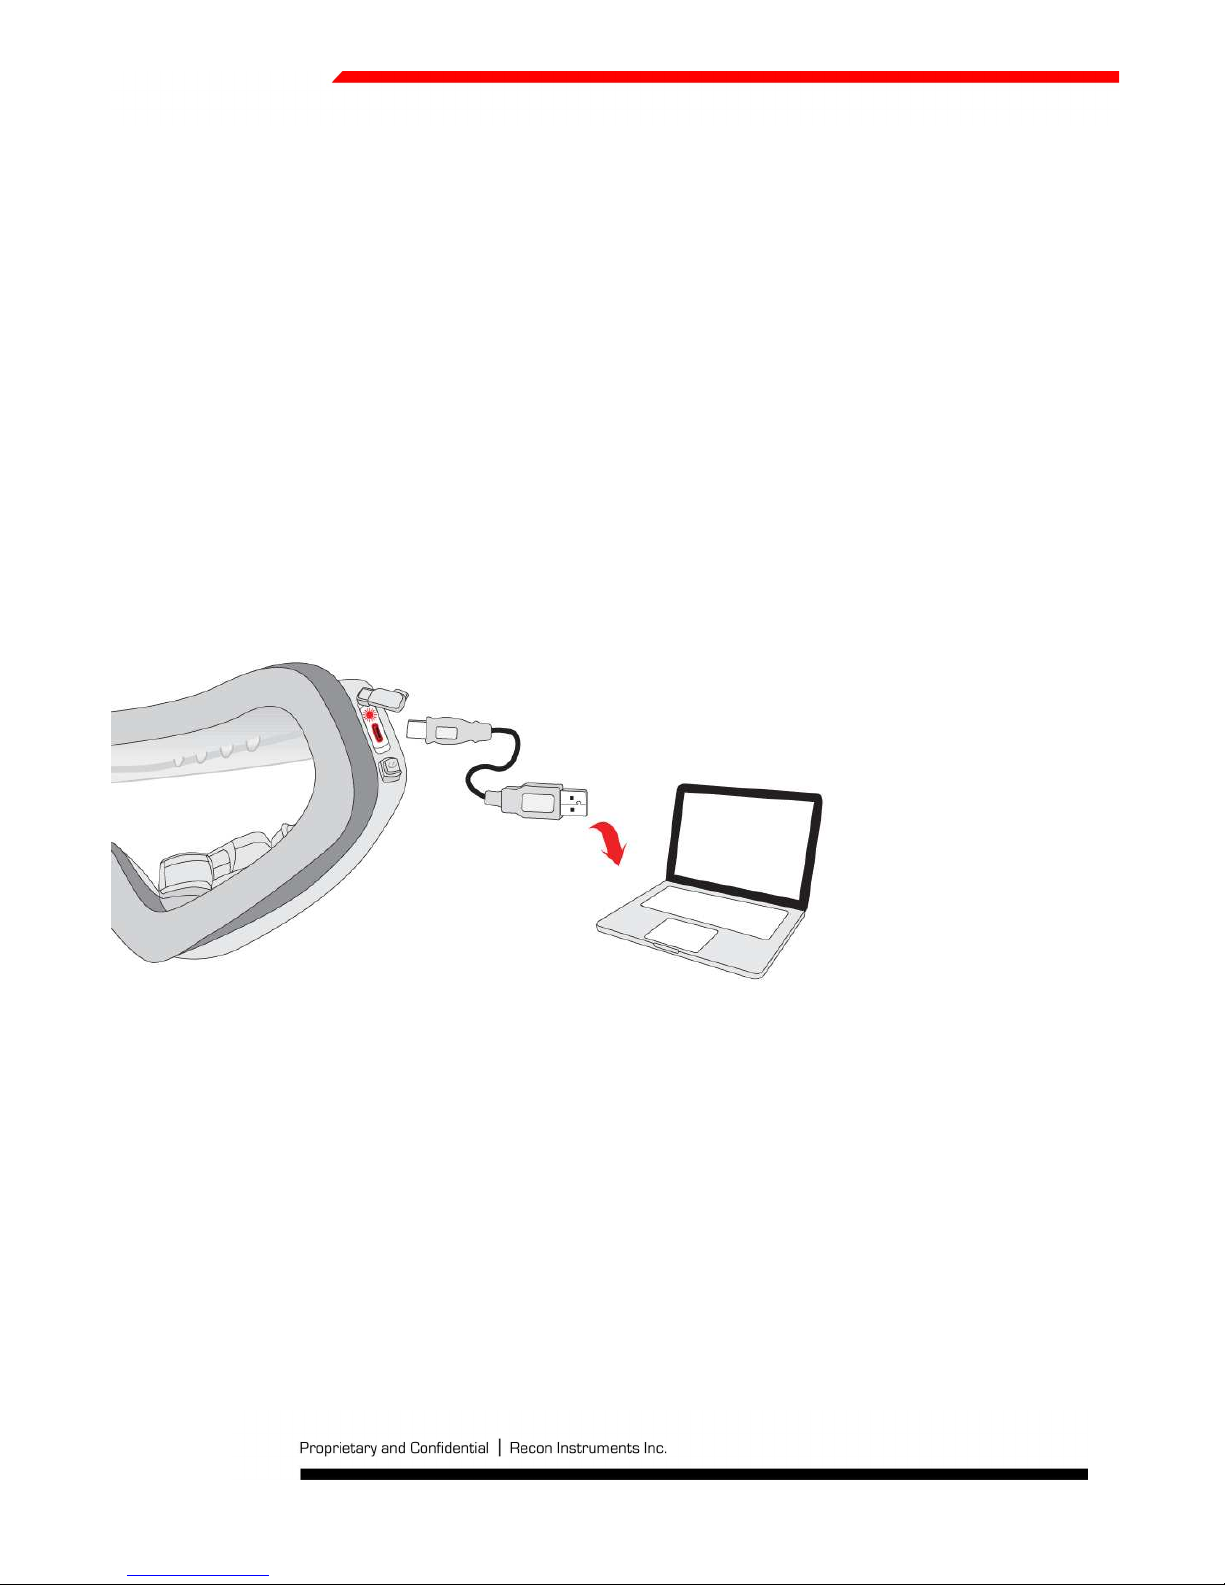
3.9 Connecting to PC/Mac
To ensure best charging and data transfer performance follow these easy steps.
To connect MOD to your PC or Mac to charge, or transfer data:
1. Power on by holding the POWER/SELECT button for 2 seconds
2. Plug the micro USB cable’s smaller end into the micro USB port located under the protective cover on the right
side of the goggles
3. Plug the USB cable’s larger end into the USB port in your PC or Mac
4. If your computer does not recognize MOD try reinserting the USB cable
5. Upon successful connection the micro USB port on MOD will illuminate RED for charging and the Power button will
flash blue.
Page 11 of 39
Page 12

3.10 Disconnecting from PC/Mac
To disconnect MOD from your PC or Mac, navigate to ‘safely remove’ or’ eject’ the hardware through your PC or Mac then
remove the USB cable from MOD. If you disconnect while data is transferring, you may risk losing the data.
Important: Ensure you have sealed the micro USB port completely using the USB port cover. The seal should fit snug so that
no water or snow can get inside.
Page 12 of 39
Page 13

4. The basics
4.1 Controlling MOD
MOD is controlled using the MOD/MOD Live remote.
The remote has 6 buttons: Up, Down, Left, Right, Select, Back.
Use the Up and Down buttons to navigate vertical lists and tabs. Use the Right and Left buttons to navigate horizontal
menus and to scroll through customizable dashboards. The Select button is used to confirm an item selected using the
directional buttons. Use the back button to move from a submenu back to a menu, and from a menu back to the
dashboard. Additionally, the back button acts as a display off toggle when you are on the dashboard.
4.2 Charging
In optimal conditions, MOD can fast charge (battery life reaches 80%) through your computer or AC adapter in 1 hour. You
can attain a 100% full charge in 3 hours. For best charging performance, it is recommended that you use the provided AC
adapter and USB cable for charging.
Important: If you charge MOD while it is powered on, charge time will take longer than 3 hours. Be sure to turn MOD OFF
before charging it.
To charge MOD via PC or Mac:
1. Power on by holding the POWER/SELECT button for 2 seconds
2. Plug the micro USB cable’s smaller end into the micro USB port located under the protective cover on the right
side of the goggles
Page 13 of 39
Page 14

3. Plug the USB cable’s larger end into the USB port in your PC or Mac
4. If your computer does not recognize MOD try reinserting the USB cable
5. Upon successful connection the micro USB port on MOD will illuminate RED for charging and the Power button will
flash blue.
Important: If MOD is connected to a computer that is turned off or in stand-by, it may drain instead of charge the
battery.
To charge MOD via power outlet:
1. Plug the micro USB cable’s smaller end into the micro USB port located under the protective cover on the right
side of the goggles
2. Plug the USB cable’s larger end into either the North American or European AC adapter that was included with
MOD
3. Plug the AC adapter into an appropriate wall outlet
4. Upon successful connection the micro USB port on MOD will illuminate RED for charging
5. When MOD is fully charged the red light will go off
4.3 Battery Life
MOD’s battery will last Up to 8 hours in optimal conditions, the equivalent to your average ski day. Simply recharge at any
time through your computer or AC adapter. See ‘Improving Battery Performance’ below to get the most out of your battery.
If MOD is nearing complete depletion of battery power, this icon will pop Up to Indicate it will shut down to preserve your
data and settings. Plug in to your computer or power outlet to recharge.
4.4 Improving Battery Performance
To maximize MOD’s battery life and performance you can do the following:
• Turn the brightness down from 3 to 2 or 1 (See ‘Setting the Brightness section below)
• Turn the display off when not needed (See Display Off Mode section below)
• Power off MOD during long breaks of non-use
• Do not leave MOD exposed in cold or winter environments when not in use
4.5 Pop-Ups
Page 14 of 39
Page 15

MOD provides real-time updates of important points of data while you perform an activity. These pop-ups alert you in
hands-free fashion so you are aware when something significant or important has occurred. There are five major pop-ups
that can occur while viewing the Dashboard.
1. Altitude: Every time your maximum altitude increases by 500m or 1500ft you will see this popup
2. Vertical Odometer: Every time you accumulate 500m or 1500ft of additional vertical drop you will see this popup
3. Speed: Each time you top your maximum speed for the day you will see this popup
4. Jump: Every time a jump is detected you will see this popup
MOD will also show a pop-Up for system alerts, such as:
5. Battery Critical Shutdown: If the battery is within 2-3% of its total power, MOD will shutdown to ensure your data
is not lost and the unit is not harmed. You will see this pop-up
6. Memory Full: Once you’ve filled up MOD’s memory you will see this pop-up
4.6 Display Off Mode
From the Dashboard, use the back button to access the display off screen.
From this screen press the SELECT button to turn the display off, or press any button to return to the Dashboard.
Display off mode can be used to conserve the battery when the display is not needed. MOD will continue to record your
data and statistics while in display off mode. Simply press any button to re-activate the display and continue where you left
off.
Important: Recon Instruments recommends that users turn the Display Off at any time if it is found too bright, distracting in
any way, or if it interferes with your ability to safely perform any activity. MOD has been designed to be unobtrusive, and
just like the dashboard of any motor vehicle, it is meant not to be continuously focussed on during use, but helpful in offering
important information at momentary glances. Just like a dashboard, it’s brightness may be controlled and even turned off by
your choiceSetting Preferences in MOD
Page 15 of 39
Page 16

4.7 Memory and Data Storage
MOD offers storage of Up to 50 hours of recorded data. At any time you can upload all data from MOD directly to your
Recon HQ software that is provided from http://www.reconinstruments.com/download-latest-recon-hq-software. It is
recommended that you download MOD data after every trip to maintain appropriate available space. To learn more about
Recon HQ see section 2.4
Whenever you power off MOD for longer than 6 hours or you use the RESET STATS feature in preferences, MOD will save
and reset all of your Last Run, Performance, Elevation, and Mountain stats pages. In addition it will reset all Jumps and
Chrono records.
Resetting the stats is not the same as deleting your data. Even though old stats become inaccessible on the MOD display
following a reset, your data is always saved in memory and will not be erased until you connect to ReconHQ for download.
Important: To be sure that no data is compromised while recording, be sure to maintain a strong battery level, and try not
to let MOD’s battery drain completely. To learn more, see ‘About MOD’s Battery’
4.8 Replacing the Remote Battery
The Recon Remote uses one CR2032 (3V) battery. The Remote Batteries should last up to ___ years under normal use.
To replace the battery use a coin or flathead screwdriver to open the back of the remote by turning the cover counterclockwise. Remove the old battery and replace it with a new one. Then return the cover and secure it with the coin or
flathead screwdriver by turning the cover clockwise.
Page 16 of 39
Page 17

5. The Real-time Dashboard
MOD is used in fast-paced environments and as such it is not recommended to cycle through buttons, screens, and menus
during activities that require your full attention. The Dashboard offers pieces of information to aid you in a hands-free
fashion, with real-time statistics every second. There is also a configurable area of the dashboard that allows you to quickly
view your current statistics like Current Altitude, Total Vertical, Total Distance, and Current Temperature.
5.1 Speedometer
The largest piece of information on the Dashboard is the Speedometer represented by the dial highlighted in the above
image. The Speedometer dial lights up clockwise as your speed increases. Once your speed reaches 100km/h the dial will
begin to be lit up red. At this point it is suggested that you adjust your speed appropriately to maintain the safety of
yourself and others. Always perform sporting activities within the boundaries of your personal skill and comfort levels.
The Speedometer also displays real-time speed values in the bold numbers below the dial. When dashes are displayed
instead of speed numbers it means that MOD has not acquired a GPS signal strong enough to supply accurate data. See
‘GPS Signals’ in ‘Tips and Troubleshooting’ to learn more.
5.2 Chrono/Stopwatch
Just beneath the Status Bar, to the right of the Speedometer lies the Chrono/Stopwatch. When not in use, the numbers are
greyed-out as below.
Press SELECT to activate Chrono/Stopwatch mode, the numbers will turn yellow and start counting
Pressing SELECT a second time will stop the chrono and save the results to the Chrono history
Pressing SELECT a third time will reset the counter and grey-out the numbers once again so it is ready for another timed
activity.
Any timed activity will be saved to the memory and can be managed (viewed, flagged, deleted) on the Chrono/Stopwatch
screen. See ‘Chrono/Stopwatch Feature’ to learn more.
Page 17 of 39
Page 18

5.3 Configurable Feature
The Dashboard has four configurations that can be changed quickly by using the Left and Right buttons. Scroll between
these dashboards to view your current Altitude, Total Distance, Total Vertical, and current Temperature. Your choice of
configuration is saved, so when you return to the Dashboard from another menu, or when you power off and power on
MOD you will be presented with the configuration that you last used.
Page 18 of 39
Page 19

6. Stats History
Use the UP or DOWN buttons to navigate to the Stats History page
6.1 Stats History Title Page
The Stats History title page displays a quick preview of the statistics accumulated during your last run.
Last Run statistics include the following features and statistics:
• Maximum Speed: the top speed you’ve achieved during the last run
• Total Vertical: the total accumulated distance travelled vertically downwards during the last run
• Total Distance: Total Distance Travelled across land (Up, down, and sideways) during the last run
From the Stats History title menu, press the select button to view detailed statistic overview screens. These screens are
Performance Stats, Elevation Stats, and Mountain Stats. To return to the Stats History title page from any of these screens,
press the BACK button.
Performance Stats
6.2 From Performance Stats press the UP button to go to Mountain Stats, or press the DOWN button to access Elevation
Stats.
Performance statistics include the following features and statistics:
• Maximum Speed: the top speed you’ve achieved during your trip, or since you last reset your stats
• Average Speed: the average speed you’ve achieved during your trip, or since you last reset your stats
• Longest Chrono/Stopwatch Run: the longest timed activity you’ve recorded using the Chrono/Stopwatch feature
during your trip, or since you last reset your stats
• Shortest Chrono/Stopwatch Run: the shortest timed activity you’ve recorded using the Chrono/Stopwatch feature
during your trip, or since you last reset your stats
• Last Air: the airtime recorded during your most recent jump
• Max Air: the greatest airtime you’ve achieved during your trip, or since you last reset your stats
Page 19 of 39
Page 20

Elevation Stats
6.3 From the Elevation Stats page, press the UP button to access Performance Stats or press the DOWN button to access
Mountain Stats.
Elevation statistics include the following features and statistics:
• Current Altitude: the current altitude that MOD is at in that point in time
• Maximum Altitude: the highest altitude achieved during your trip, or since you last reset your stats
• Total Vertical Distance Travelled: the total accumulated distance travelled vertically downwards during your trip,
or since you last reset your stats
• Total Vertical Runs: the number of vertically downward runs accumulated before travelling Upwards again during
your trip, or since you last reset your stats
• Total Distance Travelled: the total accumulated distance travelled across land during your trip, or since you last
reset your stats
6.3.1 A Note about Altitude statistics
MOD will calibrate altitude automatically when it is in a stationary position. The altitude Value will flash on the Elevation
Stats screen, and 3 dots will flash above the altitude value on the dashboard to indicate that calibration is not yet complete.
Mountain Stats
6.4 From the Mountain Stats page, press the UP button to access Elevation Stats or press the DOWN button to access
Performance Stats.
Mountain statistics include the following features and statistics:
• Current Latitude/Longitude: Your current placement on latitudinal and longitudinal planes according to global
positioning system data
• Current Temperature: the current outside temperature experienced
• Maximum Temperature: the highest temperature achieved during your trip, or since you last reset your stats
• Minimum Temperature: the lowest temperature achieved during your trip, or since you last reset your stats
Page 20 of 39
Page 21

Important: all features’ and statistical data are based on advanced sensors within MOD and are accurate in optimal
conditions, however, several variables in non-optimal and harsh environments may lead to slight inaccuracies in data. For
best performance, use in optimal conditions and learn more below in ‘Tips and Troubleshooting’ and ‘Safety, Storage, and
Cleaning’.
Page 21 of 39
Page 22

7. Jump
The jump stats screens provide statistics for both your Last Jump and Best Jump. Best Jump is determined by the maximum
airtime achieved. Use the Select Button to switch between these two screens.
Note: Every jump that is detected will be saved in memory for download to Recon HQ, but only your Last and Best jump will
be available on the MOD display.
Jump Statistics include the following:
• Air Time: measured from the moment you are no longer touching the ground until the moment that you impact
the ground on landing. Airtime is reported in seconds
• Distance: horizontal distance travelled during the jump
• Height: vertical distance between takeoff and the highest point of the jump
• Drop: vertical distance between the highest point of the jump and the landing
These statistics are illustrated in the following image:
Note: The jump feature uses MOD’s inertial sensors (GPS, Altimeter, Accelerometer) to measure jump statistics. For a jump
to be registered you must achieve an air time of at least 0.6 seconds.
Page 22 of 39
Page 23

8. Chrono/Stopwatch Feature
The Chrono/Stopwatch feature allows you to record any timed activity. Your chrono records can be played back and shared
with HQ Online when you connect MOD to Recon HQ.
To use the Chrono/Stopwatch feature:
1. While on the Dashboard screen, Press SELECT to activate Chrono/Stopwatch mode, the numbers will turn yellow
and start counting
2. Pressing SELECT a second time will stop the chrono and save the results to the Chrono history
3. Pressing SELECT a third time will reset the counter and grey-out the numbers once again so it is ready for another
timed activity.
Any timed activity will be saved to the memory and can then be managed in the Chrono/Stopwatch History screen. Use the
UP or DOWN buttons to navigate to the Chrono/Stopwatch screen.
This screen shows an overview of your most recent record. The number of records is displayed on the left, and the duration
of the most recent record is displayed at the bottom.
Press the select button to enter the Chrono Records
Use the UP and Down buttons to navigate the list of records.
Page 23 of 39
Page 24

You can ‘Flag’ or ‘Delete’ a record by selecting an individual record and then selecting ‘Delete’ or ‘Flag’. Flagging a record
will help you remember a specific record as it will also be recognized as flagged in Recon HQ software. Deleting a run will
clear it from MOD’s memory and it will no longer be displayed in the Chrono/Stopwatch history.
Page 24 of 39
Page 25

9. Preferences
From the Dashboard press the UP button once to view the Preferences screen. This screen provides an overview of your
MOD including the number of trips stored in memory, the start time of your current trip, and the Firmware version.
To enter the preferences menu press the Select button.
9.1 Setting the Brightness
MOD has 3 modes of brightness allowing you to chose the setting that is most comfortable, safe, and easily viewed in your
current environment. The default Brightness is 3:High Brightness.
To set the brightness:
1. Select ‘Brightness’ from the Preferences menu
2. Use the Left and Right buttons to view the different brightness levels, the red triangle indicates the current
brightness setting
3. Press the Select button to confirm your Brightness selection and return to the preferences menu
Press the back button to cancel and return to the preferences menu
9.2 Setting the Time
Page 25 of 39
Page 26

MOD utilizes Coordinated Universal Time (UTC) Upon first strong GPS signal lock. This allows the clock to automatically
calculate the proper Greenwich Mean Time (GMT). However, you may have to set the correct hour based on your time
zone.
To set the time on the clock:
1. SELECT ‘Set Time’ from the ‘Preferences’ menu
2. Use the Left and Right buttons to cycle through which digit (hours or minutes), AM/PM, or 12hr/24 hr mode you
would like to change.
3. Use the UP or DOWN buttons to change the digits, AM/PM, or 12hr/24hr mode
Press the back button to cancel and return to the preferences menu
9.3 Setting the Units of Measurement
MOD’s statistics are available in both Metric and US Imperial units of measurement. The default units of measurement are
Metric.
Following are the units of measurement used on the MOD operating system:
Metric US/Imperial
Abbreviation What it is Abbreviation What it is
m meter ft feet
km/h kilometers per hour mph miles per hour
C Celsius F Fahrenheit
Km Kilometers Mi miles
To change the Units of Measurement:
Page 26 of 39
Page 27

1. SELECT ‘Metric’ from the ‘Preferences’ menu, or if your current setting is ‘Imperial’ SELECT ‘Imperial’
2. SELECT ‘Metric’ or ‘Imperial’
Press the back button to cancel and return to the preferences menu
9.4 Setting the Language
MOD’s display is available in both English and French. The default Language is English.
To choose your Language:
1. SELECT ‘Language; from the ‘Preferences’ menu
2. SELECT ‘English’ or ‘French’
Press the back button to cancel and return to the preferences menu
9.5 Resetting Stats
MOD automatically starts recording data to its internal memory as soon as it receives a strong GPS signal; and will continue
recording as long as it is on and has a GPS signal. This data is saved so that it can be reviewed using on your PC/MAC using
Recon HQ.
In addition, the goggle keeps track of all recent statistics so that you can review them on the fly. These stats will accumulate
until MOD performs a stats reset. Every time you power off MOD for longer than 6 hours, your stats will automatically be
reset. Additionally, you can reset stats manually from the preference menu.
Resetting stats will reset all of your Last Run, Performance, Elevation, and Mountain stats pages. In addition it will reset all
Jumps and Chrono records.
Resetting the stats is not the same as deleting your data. Even though old stats become inaccessible on the MOD display
following a reset, your data is always saved in memory and will not be erased until you connect to ReconHQ for download.
Page 27 of 39
Page 28

To reset your stats:
1. SELECT ‘Reset Stats’ from the ‘Preferences’ menu
2. SELECT ‘Yes’ to confirm you would in fact like to reset your stats
3. Select ‘No’ to or press the Back button to be brought back to the Preferences menu
10. Graphical User Interface Overview Map
Page 28 of 39
Page 29

11. Tips and Troubleshooting
Display is temporarily washed out and hard to read
1. Avoid exposing the display to direct sunlight, this reacts with the liquid crystals momentarily causing that
‘washed out’ appearance
2. Display should become clear again when protected from sunlight, allow it to sit until bright colours return
Display fails to reactivate after selecting “DISPLAY OFF”
1. Hold the Power/Select button to power MOD off, then power back on
GPS Fix takes longer than 10 minutes
GPS technology works best in open spaces with a clear view of the sky. Obstructions such as buildings and
trees can degrade the signal. Additionally MOD will take longer to acquire a GPS fix when it is first powered on
after being off for a long time.
1. If you are having difficulty acquiring a GPS fix try moving to a more open location.
2. If MOD still does not acquire a location fix, hold the Power/Select button to power MOD off, then power back
on
3. Contact Recon Support at http://www.reconinstruments.com/support if the problem persists
MOD fails to charge fully in 4 hours
1. Ensure red light around micro USB port is activated to indicate charging
2. When charging with PC/Mac, use a high-power USB 2.0 port (not a USB port intended for keyboard)
3. MOD may not charge when connected to a PC/Mac that is powered off or in standby mode
4. MOD was designed for use with the provided USB cable and AC adapter. MOD may not charge properly using
3rd party cables or adapters
5. For the fastest and most reliable charging, use the AC adapter instead of PC/Mac and power off MOD before
charging
MOD displays solid RED or GREEN screen when not connected to PC/Mac
1. Hold the Power/Select button to power MOD off, then power back on
Data is not logged properly or MEMORY FULL popup appears
1. MOD can store Up to 50 hours of data in onboard memory. If data is missing when you connect to Recon HQ
and/or you see the MEMORY FULL popup appear on the screen of the goggle, then it is time to empty MOD’s
memory.
2. You can use Recon HQ to clear space on your MOD. Simply check the box “DELETE AFTER DOWNLOAD” when
you download data to your PC/Mac
3. Recon Instruments recommends frequently transferring data to your PC/Mac to maintain the health and
performance of MOD
MOD’s speedometer displays inaccurate speeds
1. MOD uses GPS to determine speed. GPS technology works best in open spaces with a clear view of the sky.
Obstructions such as buildings and trees can degrade the signal. If you observe unusual speeds, try moving to
a more open location.
2. GPS performance is poorest when it is first powered on. GPS reliability should improve as more GPS satellite
are located by MOD
Page 29 of 39
Page 30

View of the display is obstructed on one or more edges
1. MOD’s optical module has been designed to be adjustable to the majority of facial types. If your view of the
screen is obstructed, adjust the optics arm of the MOD to find the ideal viewing position
2. Try tightening the strap to ensure the display is in view and MOD fits properly
MOD’s battery runs out of charge sooner than expected
1. To prolong the battery life, power MOD off when not in use, lower the brightness, or use the DISPLAY OFF
feature.
2. MOD’s battery can last Up to 8 hours at room temperature and Up to 6 hours at -10°C (14°F). Below -20°C (-
4°F) the battery life may be significantly impacted at temperatures lower than this. It is not recommended for
extended use at these lower temperatures
3. Ensure you properly charge the battery before using MOD. See “MOD fails to charge fully in 4 hours” for tips
on charging the battery.
Display frequently flashes white or is solid white
1. Connection from the board to the display may be loose or broken from mishandling or misuse. Contact
www.reconinstruments.com/support for support information.
Temperature displayed in MOD is too high/low
1. Like any thermometer, MOD’s temperature sensor takes some time to adjust to the ambient air temperature.
The thermometer is located inside the wireless remote. For the thermometer to accurately measure the
outside air temperature, wear the remote on the outside of your body, instead of keeping in an inside pocket.
Cleaning the optic lens
1. Do not touch the optic lens with fingers or rough objects.
2. Always clean the optic with a soft cloth, lens cloth or goggle bag
3. Always store the MOD in an approved Recon-Ready goggle or in its original packaging to reduce the chance of
scratches
MOD has GPS fix but still displays “--“ instead of valid speed
1. The dashboard speedometer displays “--"until it can calculate a valid speed from GPS data.
2. If the speedometer still displays “--“ for more than a few minutes after the GPS indicator turns green, hold the
Power/Select button to power MOD off, then power back on
3. If the problem persists, contact www.reconinstruments.com/support for support
MOD is not recognized by my PC/Mac
1. Try unplugging the USB cable and plugging it back in
2. Hold the Power/Select button to power off. Plug MOD into PC/Mac and then hold the Power/Select button to
turn it on
3. Ensure you are using a high-power USB 2.0 port (not a USB port intended for keyboard)
MOD displays unusual or unreasonable statistics
1. Accuracy of statistics is affected by GPS reliability. For best performance, use MOD in open spaces with a clear
view of the sky
2. To reset statistics, navigate to “RESET STATS” in the Preferences menu and choose “YES” when prompted with
“SAVE AND RESET STATS?”
Page 30 of 39
Page 31

Incorrect time on power Up after MOD has been in storage
1. If you have set the clock to local time, MOD will automatically remember the time every time you power it on.
However, if MOD has been in storage for many days without charging, the battery may drain completely and
shut off the internal clock. If this occurs, the clock will not be set properly after charging and powering Up
2. Simply set the time in the “SET TIME” screen under “PREFERENCES” if you encounter this problem
Display does not turn on
1. If the goggle has been powered off and stored in temperatures below -20°C (-4°F), the display may not
activate when powered on. Try warming Up the display by moving indoors, or by wearing MOD for 10 minutes
before turning on.
2. Try charging MOD using the Recon AC adapter for 1 hour, then attempt to power on.
3. Contact www.reconinstruments.com/support if problem persists
Chrono does not start after pressing the Power/Select button
1. The chrono needs to be reset before it can be started again. After you have stopped a chrono, use the
Power/Select button to reset it. The numbers should return to 0:00:00 and be coloured GREY.
2. To start a new chrono, press the Power/Select button again. The numbers will change colour to YELLOW and
the timer will begin counting.
Clock is adjusted automatically
1. MOD uses GPS time to automatically adjust the clock to the nearest time zone. This occurs immediately after
acquiring a GPS fix.
Display is too bright while viewing at night
1. You can adjust the display brightness in the “BRIGHTNESS” menu under “PREFERENCES”. There are 3
brightness options: High, Med, and Low. Additionally, you can use the “DISPLAY OFF” feature to quickly
deactivate the display, while continuing to record to memory.
Altitude inaccuracy
1. MOD calculates altitude using a combination of air pressure and GPS data. When MOD is stationary, it adjusts
the altitude reading obtained from the pressure sensor to match the GPS reading. However air pressure can
change significantly with varying weather. This can cause altitude readings to be different from the actual
altitude.
2. If altitude is inaccurate after you have been in an open area for more than 30 minutes, try turning off the MOD
and turning it back on. The altitude reading should become more accurate within 10 minutes.
3. In general, clear weather will cause an increase in the displayed altitude, and stormy weather will cause a
decrease in the displayed altitude.
12. Safety, Storage, and Cleaning
MOD is a piece of electronics and should be handled safely, cleaned and stored properly. It is advised to handle MOD as if it
were an MP3 player or Smart Phone; protecting and charging in a safe place after use.
Put away dry and protected in a room-temperature location away from sharp and harmful, or magnetic items. Do not store
outside or exposed over night. Do not lay directly in the sun for long periods of time. Do not place items directly on top of
MOD. It is not advised to store or pack MOD for travel with other hardgoods such as skis or snowboards, or inside of ski and
snowboard bags.
Page 31 of 39
Page 32

12.1 Important Safety Information
Recon Instruments’ customized optics platform boasts a virtual image focused 5’ away from the eye, which means eye
strain is not a concern to the majority of users. Testing has shown that eye strain is no different than viewing the flatscreen
television in your home. If at any time you experience nausea or eye strain when using MOD, take a break for several
minutes. If you experience or have a history of any other health issues that would stop you from participating in
recreational alpine activities such as skiing or snowboarding, please consult your physician before using MOD.
It is not suggested to wear eyeglasses along with ski goggles as the two may rub and cause abrasion or injury to the user
and equipment. Please consult your optician before attempting to wear multiple eyewear solutions when skiing.
This device and it's accessories are not toys for small children, and it may be possible to remove small parts and ingest
them. Please keep our product out of reach of small children and used for their intended purposes in a supervised way.
MOD receives signals from GPS satellites, and uses Bluetooth low energy to communicate with the remote. Switch the
device off in restricted areas; for example, in aircraft, near medical equipment, fuel, chemicals, or blasting areas.
MOD can be susceptible to interference which could affect GPS and remote connectivity.
MOD is classified as water resistant. Do not submerge MOD in water. Always store MOD in a warm and dry location.
13. Support, Service, and More Information
For all Support, service information please go to www.reconinstruments.com/support for help in your specific region.
Recon Instruments offers FAQ’s, direct email queries, and a direct phone line for support at any time.
Please read this User Guide thoroughly for answers to general questions before consulting other means of support.
13.1 Firmware Upgrade Information
Recon HQ software will automatically detect if MOD has a Firmware Upgrade available for free download from
reconinstruments.com. Simply plug the unit in to your computer, ensure you have Recon HQ Software downloaded, and
that you have an internet connection.
Upon connection, if there is an available Firmware Upgrade, simply follow the prompts and you will be guided quickly
through the next few steps.
Important: MOD must have sufficient battery power levels to successfully Upgrade firmware. Please ensure there is at least
5-10% of battery remaining before Upgrading firmware.
Page 32 of 39
Page 33

14. Warranty Information
LIMITED WARRANTY FOR
These terms and conditions apply to Your purchase of the GPS-enabled module marketed by Recon Instruments Inc.
("Recon") under the trademark ● (the “Product”). Any reference below to the term "You" refers to the original buyer of any
Product.
1. Statutory Warranties. This Limited Warranty sets out Recon’s responsibilities as to the Product. Nothing in this
Limited Warranty affects any rights You may have as a consumer and does not disclaim any statutory or implied
rights that Recon cannot disclaim.
2. Warranty Terms.
(a) Recon warrants to You that the Product will be free from defects in materials and workmanship under
normal use for one (1) year from the original date of purchase by You (the “Warranty Period”). The
Limited Warranty is not transferable by You. All subsequent purchasers acquire the Product “as is”
without benefit of this Limited Warranty. Where You purchased the Product from Recon’s website, the
date of purchase is the date of the purchase invoice issued to You by Recon.
(b) In the event Recon determines that the Product is defective, RIM may in its absolute and sole discretion:
(i) repair the defective part of the Product free of charge with new or refurbished parts;
(ii) replace the defective Product with a comparable new or refurbished product; or
●●●●
MODULE
(iii) in the event that Recon is unable to repair or replace the Product as provided under (i) or (ii), a
proportionate refund of the purchase price You paid for the Product.
Where the Product is repaired or replaced during the Warranty Period, except as otherwise prohibited by
applicable laws, the warranty for the repaired or replaced Product, as applicable, will expire upon the
expiration of the original Warranty Period. Any warranty service or support under this Limited Warranty is
conditioned upon Your return of the Product to Recon or its authorized service provider. Where there has
been a replacement of the Product, the Product or its parts, as provided pursuant to the Limited
Warranty, becomes Your property and the Product being replaced becomes Recon’s property. Where
there is a refund, You will return the Product to Recon and such Product becomes Recon’s property.
3. Exclusions. The Limited Warranty does not apply:
(a) to normal wear and tear;
(b) if the Product or any its parts is opened, disassembled, or repaired by someone not authorized by Recon;
(c) if the Product was not purchased from Recon or its authorized retailers;
(d) to damages caused by misuse, moisture or liquids, proximity or exposure to heat, accident, abuse,
neglect, misapplication, Your failure to abide by the use, safety, and maintenance instructions contained
in the packaging of the Product, or repairs or modifications made by anyone other than Recon or its
authorized service providers;
(e) to physical damage to the surface of the Product;
Page 33 of 39
Page 34

(f) to any Product where the serial number has been removed or that has been damaged or rendered
defective as a result of misuse, abuse, contamination, improper or inadequate maintenance or
calibration, or other external causes;
(g) to any equipment other than the Product;
(h) to malfunction or defects resulting from the use of the Product in conjunction with accessories, products,
services or ancillary or peripheral equipment not expressly approved or provided by Recon, and where it
is determined by Recon that such malfunction or defect is not the fault of the Product itself; and
(i) to any software, whether or not supplied by Recon.
Please review the instructions contained in the packaging for the Product carefully and take proper care to
maintain the Product. Recon is not responsible for damage that occurs as a result of failure to follow the
instructions intended for the Product. Returns or replacements of parts and/or Products may be subject to
shipping, handling, replacement and/or restocking fees. Recon does not warrant that the operation of the Product
will be uninterrupted or error-free.
4. Returning the Product. Recon is the provider of this Limited Warranty. Recon’s warranty contact information can
be found at ●. [NTD: Please insert contact information with respect to warranty inquiries] You may need to
provide a proof of purchase of the Product, in the form of the purchase invoice sent to You by Recon or an invoice
from an authorized reseller of the Product, to evidence that You are the original purchaser of the Product. In the
event You return the Product to Recon outside of the Warranty Period, Recon’s standard repair terms and charges
may apply. Recon may limit the Limited Warranty to the country where Recon or its reseller sold the Product to
You. You may be responsible for shipping, handling, or other costs if You request warranty services not in the
country of original purchase.
5. Data Recovery. You acknowledge and agree that Recon will not be responsible for any data, software, application,
or information that may be damaged, lost, or destroyed during the course of evaluating, repairing, or replacing the
Product. This Limited Warranty also does not cover backup, recovery, and reinstallation of Your data on the
Product.
6. Exclusive Remedies. Repair or replacement of the Product as provided for in this Limited Warranty is the exclusive
remedy provided to You under this Limited Warranty. To the extent permitted by applicable laws, this Limited
Warranty is in lieu of all other warranties, express or implied, and except as set out in this Limited Warranty, all
representations, warranties, endorsements, and conditions of any kind, express or implied, including, without
limitation, ANY WARRANTIES OF TITLE OR NON-INFRINGEMENT AND ANY IMPLIED REPRESENTATIONS,
WARRANTIES AND CONDITIONS OF FITNESS FOR A PURPOSE, MERCHANTABILITY, MERCHANTABLE QUALITY, NONINFRINGEMENT, SATISFACTORY QUALITY, DURABILITY, OR ARISING FROM A COURSE OF DEALING OR USAGE OF
TRADE ARE HEREBY EXCLUDED.
7. Limitation of Liability.
(a) RECON, ITS OFFICERS, DIRECTORS, AGENTS, EMPLOYEES, LICENSORS, SUPPLIERS, SERVICE PROVIDERS,
RESELLERS, AND DISTRIBUTORS WILL IN NO WAY BE LIABLE TO YOU FOR, AND YOU HEREBY WAIVE YOUR
RIGHT TO RECEIVE, ANY INDIRECT, ECONOMIC, SPECIAL, COMMERCIAL, INCIDENTAL, EXEMPLARY OR
CONSEQUENTIAL DAMAGES (INCLUDING WITHOUT LIMITATION LOST PROFITS, LOSS OF BUSINESS
REVENUE OR EARNINGS, LOST DATA, DAMAGES CAUSED BY DELAYS OR A FAILURE TO REALIZE EXPECTED
SAVINGS AND THE LIKE AND PERSONAL INJURY OR WRONGFUL DEATH DAMAGES) ARISING FROM OR IN
CONNECTION WITH THE USE OR PERFORMANCE OF THE PRODUCT, EVEN IF SUCH PERSON/ENTITIES
IS/ARE AWARE OF THE POSSIBILITY OF SUCH DAMAGES.
Page 34 of 39
Page 35

(b) IN NO EVENT SHALL RECON'S LIABILITY UNDER THIS LIMITED WARRANTY TO YOU OR TO ANY THIRD
PARTY CLAIMING THROUGH YOU OR ON YOUR BEHALF EXCEED THE PURCHASE PRICE OF THE PRODUCT
THAT YOU PURCHASED OR THE COST OF REPAIRING OR REPLACING THE PRODUCT, WHICHEVER IS
GREATER.
(c) THE LIMITATIONS OF LIABILITY SET OUT IN SECTION 7(A) AND 7(B) ABOVE IS INTENDED TO APPLY AND
DOES APPLY TO ANY DAMAGES, LOSSES, OR LIABILITY HOWEVER CAUSED, REGARDLESS OF THE THEORY
OF LIABILITY (CONTRACT, TORT, NEGLIGENCE, OR OTHERWISE) AND EVEN IF RECON OR ITS LICENSORS
HAS BEEN ADVISED OF THE POSSIBILITY OF SUCH DAMAGES, EXCEPT WITH RESPECT TO LIABILITY FOR
DEATH, BODILY INJURY, OR STATUTORY LIABILITY FOR INTENTIONAL AND GROSS NEGLIGENT ACT OR
OMISSIONS, FOR WHICH NO LIMIT APPLIES.
(d) Nothing in this Limited Warranty limits Recon’s liability to You in the event of: (i) death or personal injury
to the extent resulting directly from Recon’s negligence; or (ii) any intentional fraudulent act or
intentional fraudulent omission of Recon.
8. Privacy. Information about You that Recon receives or collects (including, without limitation, Your personal
contact information and financial information such as credit card information) will be used, processed, transferred,
stored, and disclosed in accordance with Recon’s privacy policy (available at
http://www.reconinstruments.com/corporate/legal/privacy-statement) for the purpose of resolving problems with
the Product and to provide and perform the services relating to the warranty described in this Limited Warranty.
9. Dispute Resolution.
(a) Mediation. Any and all disputes, controversy or claims arising out of or in connection with or in
relation to this Limited Warranty or the breach thereof, including any question regarding its existence,
validity, performance or termination and any tort or other common law or statutory claim arising out of
or relating to its negotiation, execution or performance (collectively, the “Dispute”), will be first subject to
non-binding mediation in an effort to resolve any such Dispute by participating in a structured negotiation
conference with a mediator under the Commercial Mediation Rules of the British Columbia International
Commercial Arbitration Centre. The mediation will be held in Vancouver, British Columbia, Canada. You
and Recon agree to use best efforts to conduct any dispute resolution procedures herein as efficiently and
cost effectively as possible. All aspects of the mediation will be treated as confidential. The costs of the
Mediator will be shared equally between You and Recon. The mediation may, at the option of either
party, occur by videoconference transmission. The party electing to participate in the mediation by
videoconference will be responsible for paying the costs of one Mediator who must attend and
participate in the mediation at the videoconference facility selected by the party engaging such person.
(b) Arbitration. If the Dispute cannot be settled within 45 calendar days after the Mediator(s) has (have)
been appointed, or such other period agreed to in writing by You and the Recon, the Dispute will be
referred to and finally resolved by binding arbitration, with the losing party paying all costs of arbitration
(including reasonable legal fees and expenses) to be conducted by a single arbitrator in Vancouver, British
Columbia, pursuant to the provisions of the Commercial Arbitration Act (British Columbia) and any
amendments thereto, and the determination of such arbitrator will be final and binding upon You and
Recon; and if involving court proceedings, will be submitted to and be subject to the jurisdiction of the
courts of the Province of British Columbia, with the losing party responsible for all costs and expenses,
including without limitation, court costs and reasonable legal fees and expenses. A judgment on the
award of the arbitrator may be entered into any court having jurisdiction over the party or parties against
whom an award may be issued and each of You and Recon agrees to and hereby waives any defences
against the enforceability and execution of any such judgment awarded by the arbitrator as hereby
contemplated. Judgment on the award of an arbitrator may be entered by any court having jurisdiction
over the person or property of the person against whom enforcement of the judgment is sought.
Page 35 of 39
Page 36

(c) Any mediator or arbitrator will be appointed, pursuant to Subsection 9(a) and 9(b) above, by agreement
between You and Recon or, in default of agreement, such mediator or arbitrator will be appointed by a
Judge of the Supreme Court of British Columbia sitting in the Courts of Vancouver, upon the application of
either such party.
(d) In any arbitration proceeding between You and Recon, it is agreed that the parties will be entitled to
discovery to the same extent permitted by the Supreme Court of British Columbia as if the matter were
being adjudicated in such Court.
10. Attornment. You waive (a) any right to object to venue or jurisdiction based on inconvenient forum or for any
other reason; and (b) any statutory or other right pursuant to the laws of the jurisdiction in which the You are
resident to have a court case or arbitral hearing relating to this Limited Warranty adjudicated or resolved in that
jurisdiction. Any rule of interpretation, law or regulation that provides that the language of a contract will be
interpreted against the drafter will not apply to this Limited Warranty.
11. Governing Law. This Limited Warranty will be governed by and interpreted in accordance with the laws
(procedural and substantive) of the Province of British Columbia and the federal laws of Canada as if made and
performed by and between parties situate in such province and without regard to the conflict of law rules that
would apply a different body of law.
12. Severability. Each provision of this Limited Warranty is declared to be a separate and distinct promise and to be
separable from all other such separate and distinct promises. If any promise, provision or part thereof is
determined by a court of competent jurisdiction or other constituted legal authority to be void, unenforceable or
unreasonable in whole or in part, it will not be deemed to affect or impair the enforceability or validity of any
other promise or provision in this Limited Warranty or any part thereof and the said court or other constituted
legal authority will have the authority to limit such promise or provision as it deems proper.
13. Waiver. The failure by Recon to insist on strict compliance with any provision of these terms and conditions will
not be deemed to be a waiver of such provision, and a waiver of any provision of these terms and conditions at any
one time or times will not be deemed to be a waiver for any other time. The failure of Recon to assert its rights in a
timely fashion for any of its rights or remedies under these terms and conditions will not be interpreted as a
novation or a waiver of any subsequent or continuing breach and will not serve to modify, alter or restrict the right
of Recon to assert any rights at any time thereafter
14. English Language. Except to the extent prohibited by applicable law, You acknowledge and agree that that this
Limited Warranty and any and all related documents be drawn up in English.
Page 36 of 39
Page 37

15. Regulatory Compliance
FCC Compliance Class B Digital Device
This equipment has been tested and found to comply with the limits for a Class B digital device, pursuant to part 15
of the FCC Rules. These limits are designed to provide reasonable protection against harmful interference in
a residential installation. This equipment generates, uses and can radiate radio frequency energy and, if not
installed and used in accordance with the instructions, may cause harmful interference to radio communications.
However, there is no guarantee that interference will not occur in a particular installation. If this equipment does
cause harmful interference to radio or television reception, which can be determined by turning the equipment off
and on, the user is encouraged to try to correct the interference by one or more of the following measures:
• Reorient or relocate the receiving antenna.
• Increase the separation between the equipment and receiver.
• Connect the equipment into an outlet on a circuit different from that to which the receiver is connected.
• Consult the dealer or an experienced radio/TV technician for help.
Changes or modifications not expressly approved by the party responsible for compliance could void the user’s
authority to operate the equipment.
FCC Declaration of Conformity
MOD (FCC ID: ZW5006) and Recon-Ready Remote (ZW5001) comply with FCC standard CRF 47 Part 15 subpart B
and subpart C – section 15.249. Operation is subject to the following two conditions:
i. This device may not cause harmful interference, and
ii. this device must accept any interference received, including interference that may cause
undesired operation.
Industry Canada Compliance
MOD and Recon-Ready Remote were certified with IC numbers 9717A-006 and 9717A-001, respectively.
These devices comply with Industry Canada licence-exempt RSS standard(s). Operation is subject to the following
two conditions: (1) this device may not cause interference, and (2) this device must accept any interference,
including interference that may cause undesired operation of the device.
Cet appareil est conforme avec les normes de l’Industrie Canada-sans les standards RSS (s). L'utilisation est
soumise aux deux conditions suivantes: (1) cet appareil ne peut pas provoquer d'interférences et (2) cet appareil
doit accepter toute interférence, y compris les interférences qui peuvent causer un mauvais fonctionnement de
l'appareil.
Page 37 of 39
Page 38

16. Technical Specifications
(a) Sensing
• Global Positioning System (GPS) Receiver
• Tri-axial Accelerometer
• Temperature sensor
• Barometric pressure sensor
(b) Processing
ARM-based processor
(c) Capacity
Holds up to 50 hours of recorded sensor data
(d) Environment / Mechanical
Weight of the unit : ~250 Grams (~7.1oz)
Overall Dimensions of the unit : 185mm W x 102mm H x 91mm D (7.3”W x 4.0”H x 3.6“D)
Storage Temperature range : -20°C to 60°C (-4°F to 140°F)
Operating Temperature range : -20°C to 30°C (-4°F to 86°F)
Vibration resistance : 6 g
10 Hz to 2000 Hz
rms
Shock / drop resistance : 100 g, 8 ms, ½ sine (1 m vertical drop)
Enclosure : Water Resistant enclosure, IP65
(e) Environmental Considerations
RoHS compliant
Brominated flame-retardant-free
Mercury-free
(f) Power requirements
Primary sUpply voltage : 3.3 Lithium Rechargeable
Charge Time : 1 hour fast charge to 80% capacity, 3 hours to full
Battery size and life : 1200 mAHr / 6-8 Hours
(g) Display and Virtual Image
Display resolution : WQVGA- 428X240
Display Type : LCD Microdisplay
Virtual image size : 11 ” Diagonal from 5 feet away
Max Horizontal field of view (FOV) : 8° Vertical FOV: 6°Horizontal FOV
Diagonal FOV : 10°
Color Depth : 16 Bit
Brightness & Contrast control : 4 mode brightness, with video chain sleep mode
(h) RF and Antenna
GPS Receiver:
65-Channel Ultra Low Power GPS IC
Cold start of 2-5 minutes in typical outdoor environment
Multipath detection and suppression
(i) Ports and Connectivity
Micro-USB plug for data connection and charging
Page 38 of 39
Page 39

(j) System Requirements
Windows PC: Intel Pentium 4 or higher, Windows XP, Vista, 7 or higher
Mac: Intel Core Duo or higher, Mac OS X v10.6 or later
(k) Languages
English and French
(l) Included Accessories
Recon Ready Remote
Micro USB to USB cable, 1 meter
Both NEMA and EU connect AC Adapters
Wrist/Backpack/Belt Strap for Remote
Goggle mount strap for Remote
Page 39 of 39
 Loading...