

Page 1

RECON Strobe Install
Here I Will Explain How To Install RECON’s 90 Watt Strobe Kit
*Now, There Are Many Ways of Installing Them, Including Wiring
Methods, Wiring Connectors, And Other Variables - In This Install I
Will Show You My Method of Install.
The “How to” Writer Is Not Responsible for the Information Following Instructions. This Guide is Provided Simply
for Concepts and Ideas on How to Install Strobe Lights.
- Go Over The Equipment You Received - Look For Blemishes, or
Missing Parts.
You Should Have:
‐ 4 Strobes
‐ 1 Controller (With Mounting Hardware)
‐ 1 Power Supply
‐ 4 Cables (2 Shot, 2 Long)
‐ 12 Connector Clips (6 Male, 6 Female)
‐ 2 Harness (White/Red/Black & Green/Yellow/Blue)
‐ 1 Data Cable
Page 2
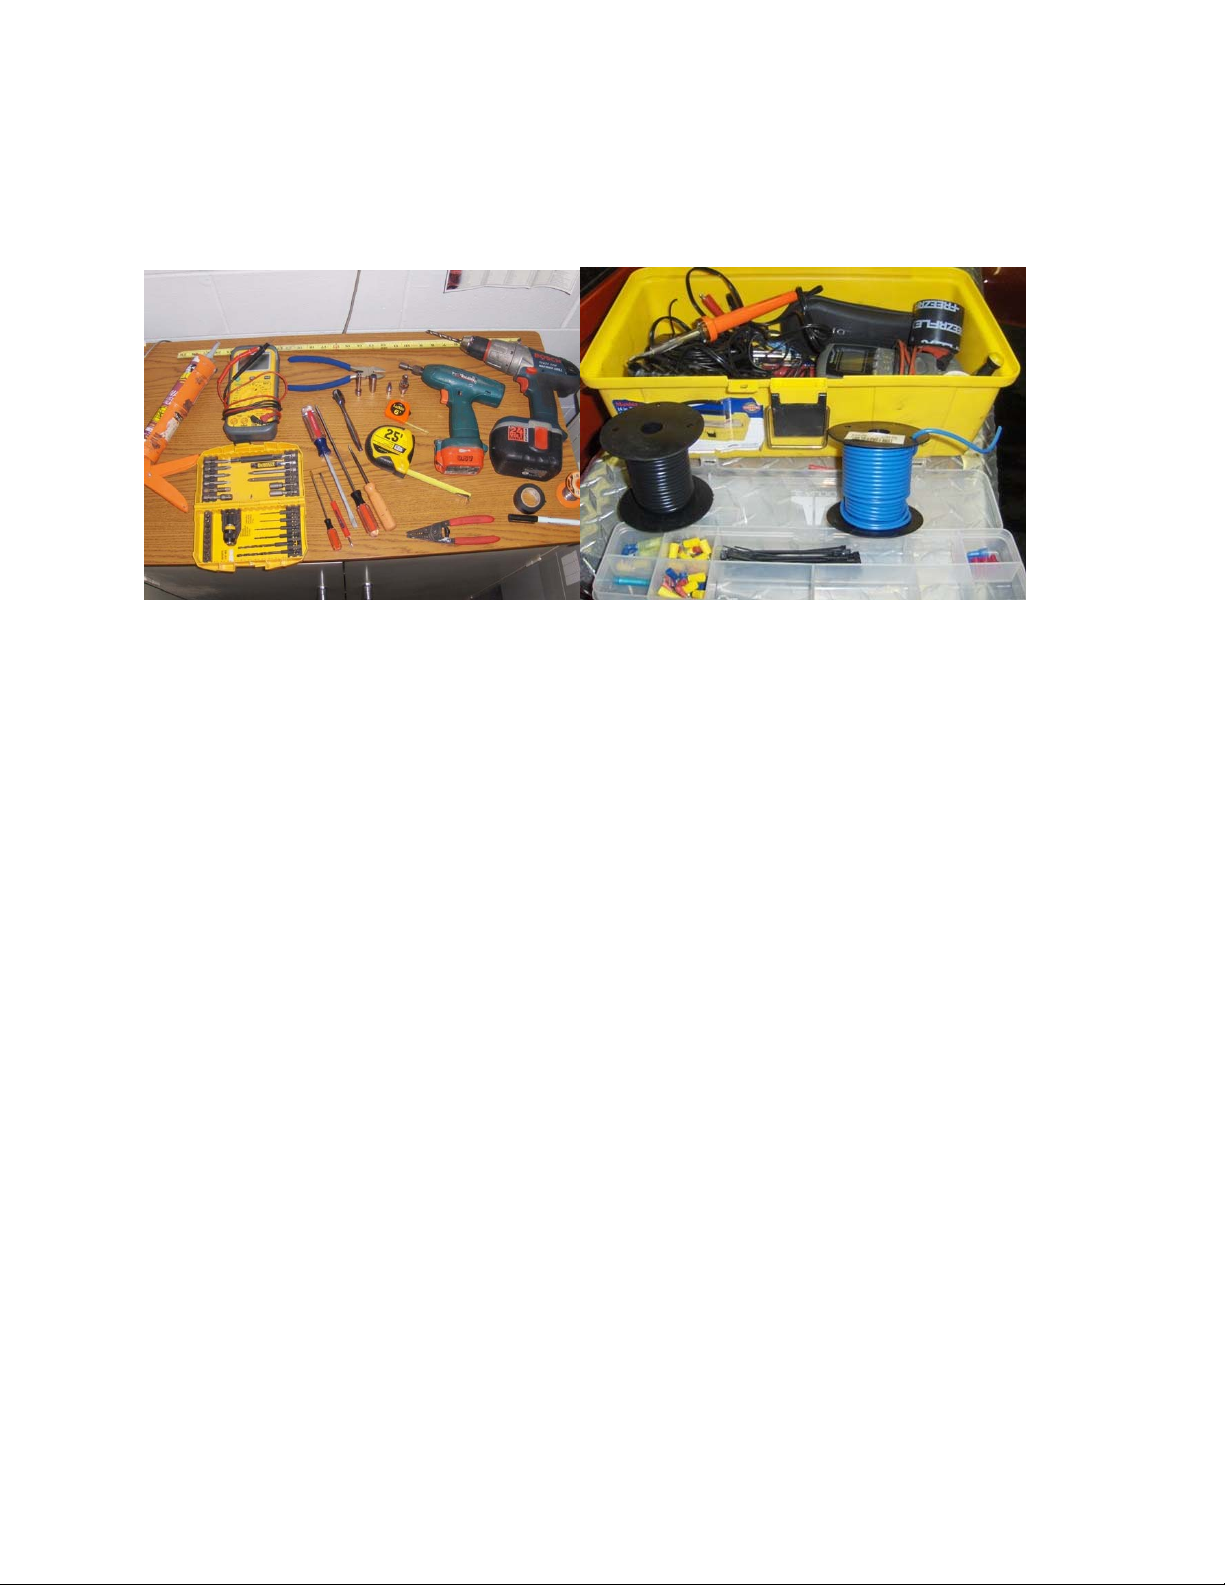
Tools Required:
- A Good Assortment of Hand Tools is Recommended, Required Hand tools
are as Followed:
• Cordless Drill
• 1 Drill Bit Sizes - 1/8"
• 1 Hole Saw (1”)
• Phillips Bit
• Wire Strippers & Crimper's
• Screw Drivers Phillips
• Electrical Tape
• Heat Shrink
• Hot Glue Or Silicone
• Stranded LV Wire (Spec'd At Least At 20 Amp)
• Choice of Connectors +/- Soldering Tools
On To The Tear Down.
• It Is Not Required, but Disconnecting Your Batteries Negative Cable Is
Recommended
Start by Removing The Tail Lamps
‐ Most Applications Will Have 2 Bolts or Screws Found By Lowering The Tailgate
‐ Then Pull Housing Out Of The Snap Locks
‐ Disconnect Bulbs and Set Aside (Be Careful Not To Damage Bulbs)
Place Them On A Workable Surface
Page 3
Find The Best Location To Mount The Strobes
‐ Locate The Area Where You Will Drill The 1” Hole For The Strobe(s)
*** You Are Required To Have At Least 1” of Room Around All Sides Of The
Strobe Element. Failure To Leave Room May Cause Fire or Severe Damage
To Components During Operation. ***
‐ Using A 1” Inch Hole Saw Drill The Whole In The Housing In The
Predetermined Area.
‐ Once Drilled, Be Sure To Removed Plastic Shavings That Have Fallen Into
The Housing.
*** Mishandling Strobe Can and Will Cause Damage To The Element, Be
Sure To Use Care While Working With The Product. ***
‐ Remove 1 Strobe and Hardware Out Of Package.
‐ Place Orange Grommet On The Bulb Side Of The Strobe & Align The 2
Screw Holes.
Page 4

‐ Place The Strobe Inside Drilled 1” Hole.
‐ With The Proper Drill Bit, Pre Drill The Screw Holes Into The Lamp
Housing.
‐ Using The 2 Supplied Screws, Attach The Strobe To The Housing – Check
The Orange Grommet, Make Sure The Face Of The Strobe Is Properly
Sealed To The Housing.
On To The Front
*** I Do Not Recommend Placing The Strobe Inside The High Or Low Beam
Projection Area. This May Cause an Obstruction And Restrict The Lights
Output! If Possible Install In The Turn Signal Area or Away From The
Headlamps. ***
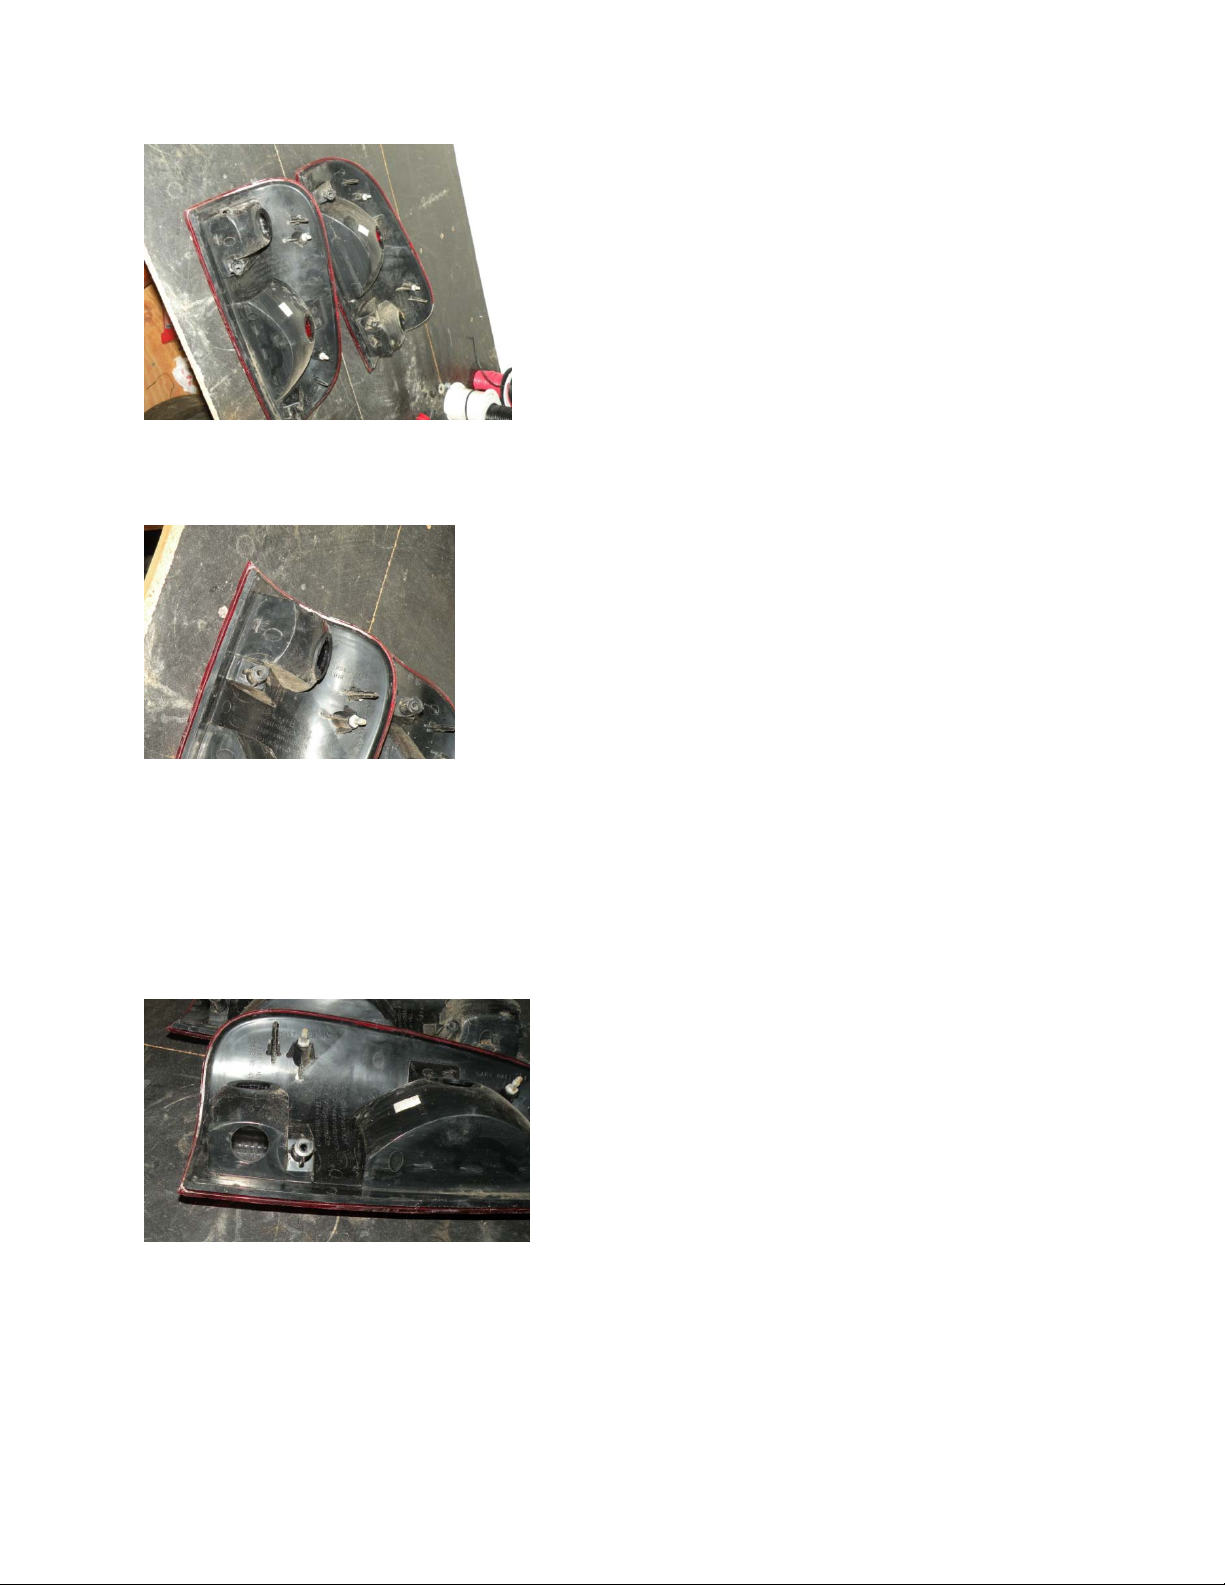
‐ Start by Removing The Housing You Wish To Mount The Strobes. Place On
A Flat Workable Surface For Installation Of Strobe.
Page 5

‐ Find A Location Where Strobe Install Is Desired. The Bulb Should Not Be
Installed Within 1” Of Any Other Plastic Part Around The Strobe Itself.
This Will Cause Damage and Possible Fire Hazard.
*** If Your Vehicle Is Equipped With A 3 or 4 Piece Headlamp, You Will be
Required To Drill Into The Outer Housing Using A Slightly Larger Hole Saw
To Fit The Strobe Face. Then Drill The 1” Hole To Mount The Strobe. After
The Strobe Is Mounted *YOU MUST Seal The Housing Around The Strobe,
Using RTV Or Silicone. Failure To Do So Will Create Moisture In The Lenses
and Cause Damage To The Bulbs & Strobe. ***
(See Images Below)
‐ Using The 1” Hole Saw With A Steady Speed, Drill The 1” Hole For The
Strobe.
‐ Once The Hole Is Drilled, Clean Out and Plastic Shavings That Have
Scattered Into The Housing. This Can Be Done By Using A Vacuum, Shop
Air, or Simply By Shaking The Housing Upside Down Until The Shavings
Are Out.
‐ Remove 1 Strobe Out Of Packaging Along With The Supplied Hardware.
‐ Place The Grommet Over The Face Of The Strobe & Align the 2 Screw
Holes.
‐ Fit The Strobe Inside The 1” Hole Previously Cut.
‐ Using A Drill Bit Pre Drill The Screw Holes For The Screws Supplied In The
Kit.
‐ Using A Phillips Bit, Secure The Strobe To The Housing – Be Sure To
Create A Good Seal With The Grommet.
Page 6

Running The Strobe Cables
*** It Is Recommended To Ground The Bare Strands Inside Cable To Ground ***
‐ Before Running Wires It Is Important To Inspect The Wires. Understand
There Is A Male & Female Side Of The Cable The Male Side Will Connect
To the Power Supply, The Female End Will Connect To The Strobe.
‐ Based on Where the Controller Is Going to be Mounted, Decided Which
Cables To Use In The Rear (Longer or Shorter Cables). Generally The Rear
Will Require The Longer Cable, But Applications Will Vary.
‐ Staring In The Rear, Run The Male End of the Cable Down Through The
Opening In The Body. I Recommend Taping The Wires Together With
Electrical Tape, This Will Prevent Any Hang Ups While Running The
Cables.
‐ Run The Cables Along The Rear Of The Truck To The Desired Point Of
Entry In The Cab. Be Sure To Secure The Cables, So They Do Not Sag or
Contact Any Moving Parts.
‐ With The Female End Of The Cable, Connect The Supplied Wire
Connectors To The Cable. Following This Required Order.
RED: Outside Aligned With The Raised Line on Clip
BLACK: In Middle
WHITE: Outside Away From Raised Line
‐
Page 7

‐ With The Cable Ready, Connect The Strobe To The Clip Matching The
Colors On Each Side.
‐ Using A Sealant, Apply A Liberal Amount To Protect Exposed Connectors
On the Back Side Of EACH Clip. (2 Per Strobe)
‐ Install Tail Lamp Back Into Vehicle.
‐ Following The Same Steps, Install Cables and Strobes In the Front.
Into The Cabin
‐ Locate The Desired Area To Mount & Install The Recon Power Supply.
*** Application Will Vary Per Vehicle. It Is VERY IMPORTANT To Secure Power
Supply To The Body or Frame Of The Vehicle, As It is Crucial To The Performance Of
This Product To Be Grounded.
‐ In This Install We Will be Mounting The Power Supply Under The Driver
Seat. Remove The Front Seat & and Trim Around Space To Expose A
Workable Area.
Page 8

‐ Using Tape or A Washable Marker, Mark Out The Area Where The Seat
Comes In Contact With Floor, Also Observe Any Obstructions That Will
Interfere With Power Supply. That Includes And Wires or Mechanisms
That Moved While Adjusting The Seat.
‐ Once The Desired Location Is Discovered, Run All Cables Through The
Firewall To Area Around Power Supply. Again, Making Sure Not To
Interfere With Seats Function.
‐ Based Off of Chart Below Determine The Size Of Wire Used To Power &
Ground The Power Supply. Be Sure To Install A Fuse (Not Included In this
Kit) Within 1 Foot Of 12V+ Connection To The Battery.
‐ Run The Positive & Negative Wires Through Location In Fire Wall, Leaving
Positive & Negative Wires Disconnected.
Page 9

*** Be Sure To Insulate Wires Where They Enter Firewall, Failure To Do So
May Cause SEVERE Damage To Controller, or To The Vehicles Computer
System. ***
‐ Run Them Up To Location Where The Power Supply Will Be Mounted.
‐ Attach Positive and Negative Wires To Supplied Harness (Red: 12V Power,
Black: Ground (-) Purple: Low Power)
‐ *If Low Power Option Is Not Desired Be Sure To Cut And Cap
Wire. Along With The Second Harness In The Kit (Blue, Yellow, Green)
This Will Not Be Used In This Install.
‐ Find The Desired Location To Mount The Controller Head.
‐ Using The Supplied 2 Screws and 2 Washers Attach Controller.
‐ Using The Data Cable Supplied In the Kit, Run Once End From The
Controller To The Power Supply.
‐ Once All Required Wires Are Ran Mount The Power Supply Using
Conductive Self Tapping Screws (Not Included In Kit). Avoid All Exposed
Wires While Drilling Into Location.
‐ Using The Same Method Of Connection For Connecting The Strobe End of
The Cables, Install Supplied Clips On The Male Ends Of The Cable.
‐ Connect The Cables To The Power Supply, Plug In According To Picture
Displayed On The Power Supply. * Depending On Application &
Preference, Heads 1 & 2 Control The Front, 3,4,5,6 Control The Rear. (If
No Additional Strobes Are Purchased, 5&6 Will Remain Unused At This
Time.)
Page 10

Connecting The Power & Testing.
‐ Connect The 12v+ Wire To Battery
‐ Loom and Secure All Wires Ran Under The Hood & In Cabin
‐ Press The “On/Off” Switch On The Controller. A Single LED Should Light.
‐ Turn Heads 1 & 2 On. The Chosen Strobes For Heads 1& 2 Should Be
Firing. And Led On Controller and Power Supply Should Be Flashing.
‐ Turn Heads 3,4,5&6 On. They Should Be Firing. The Led Should Be
Flashing on Controller & On The Power Supply.
‐ To Change The Flash Pattern, Press The Momentary Switch labeled “Flash
Pattern” Once. This Will Change The Pattern To The Next Pattern In The
Series. Pressing It Again Will Change It To The Next Pattern in The Series.
If This Switch is Not Pressed upon Power Up, The Patterns Will Go
Through All Patterns A Couple Seconds Apart.
At This Point The Install Is Complete. Replace The Seats & Any Trim You Have
Removed During The Install.
• Follow Local Laws And Ordinances.
 Loading...