

Page 1

Pistol Pete’s Truck Bed Lighting w/Recon Lights
PARTS LIST
# Description
1 Four 3/16” X 2” toggle bolts
2 Four Fender washers 1.5” x 3/8” (SS)
3 1” wide x 1/8” thick aluminum stock to make brackets
4 Four 3/16” nuts
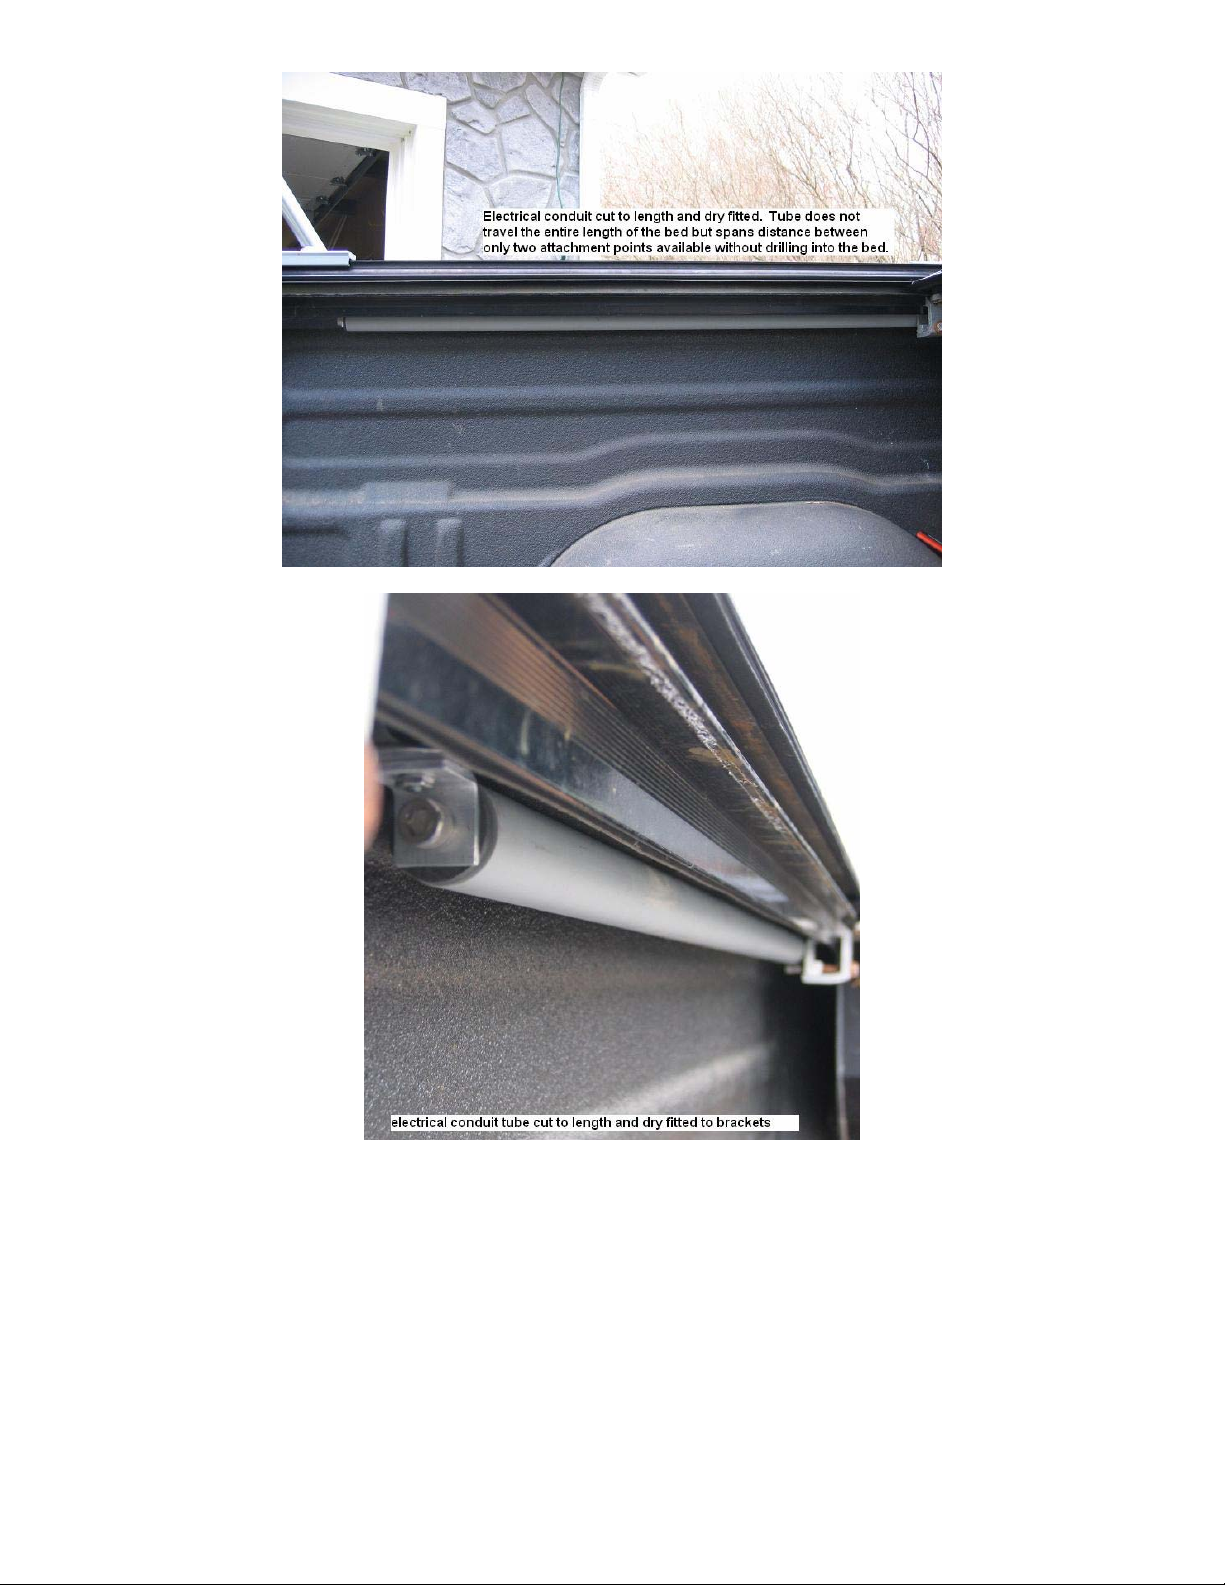
5 One 8ft section of 1.5” PVC electrical conduit
6 Four Allen head machine screws
7 Four 1” expandable well nuts
8 Toggle switch
9 T-tap for power connection to tow hitch socket
10 Zip ties
11 Rustoleum Textured Paint for plastic
(left over from my Ultimate Fly Rod Transporter mod)
12 RECON BED LIGHT KIT
OPTIONAL EQUIPMENT
13 T12 48" Red Fluorescent Safety Sleeves
14 Pipe coupling for making 2-4 friction rings
All components can be obtained from “Evil Orange” (Home Depot) with the exception of
the optional “nightvision” T12 48” Fluorescent Safety Sleeves obtained from
www.creativelightings.com
Locate mounting points for “light bar”. The 2004 Tundra Double Cab has four (4) preexisting holes up underneath the bed rail that allow toggle bolt insertion to hang a bolt
from and allow attachment. All my mods I try NOT to alter the truck so that they are
reversible if someone wishes to sell the truck.
Page 2
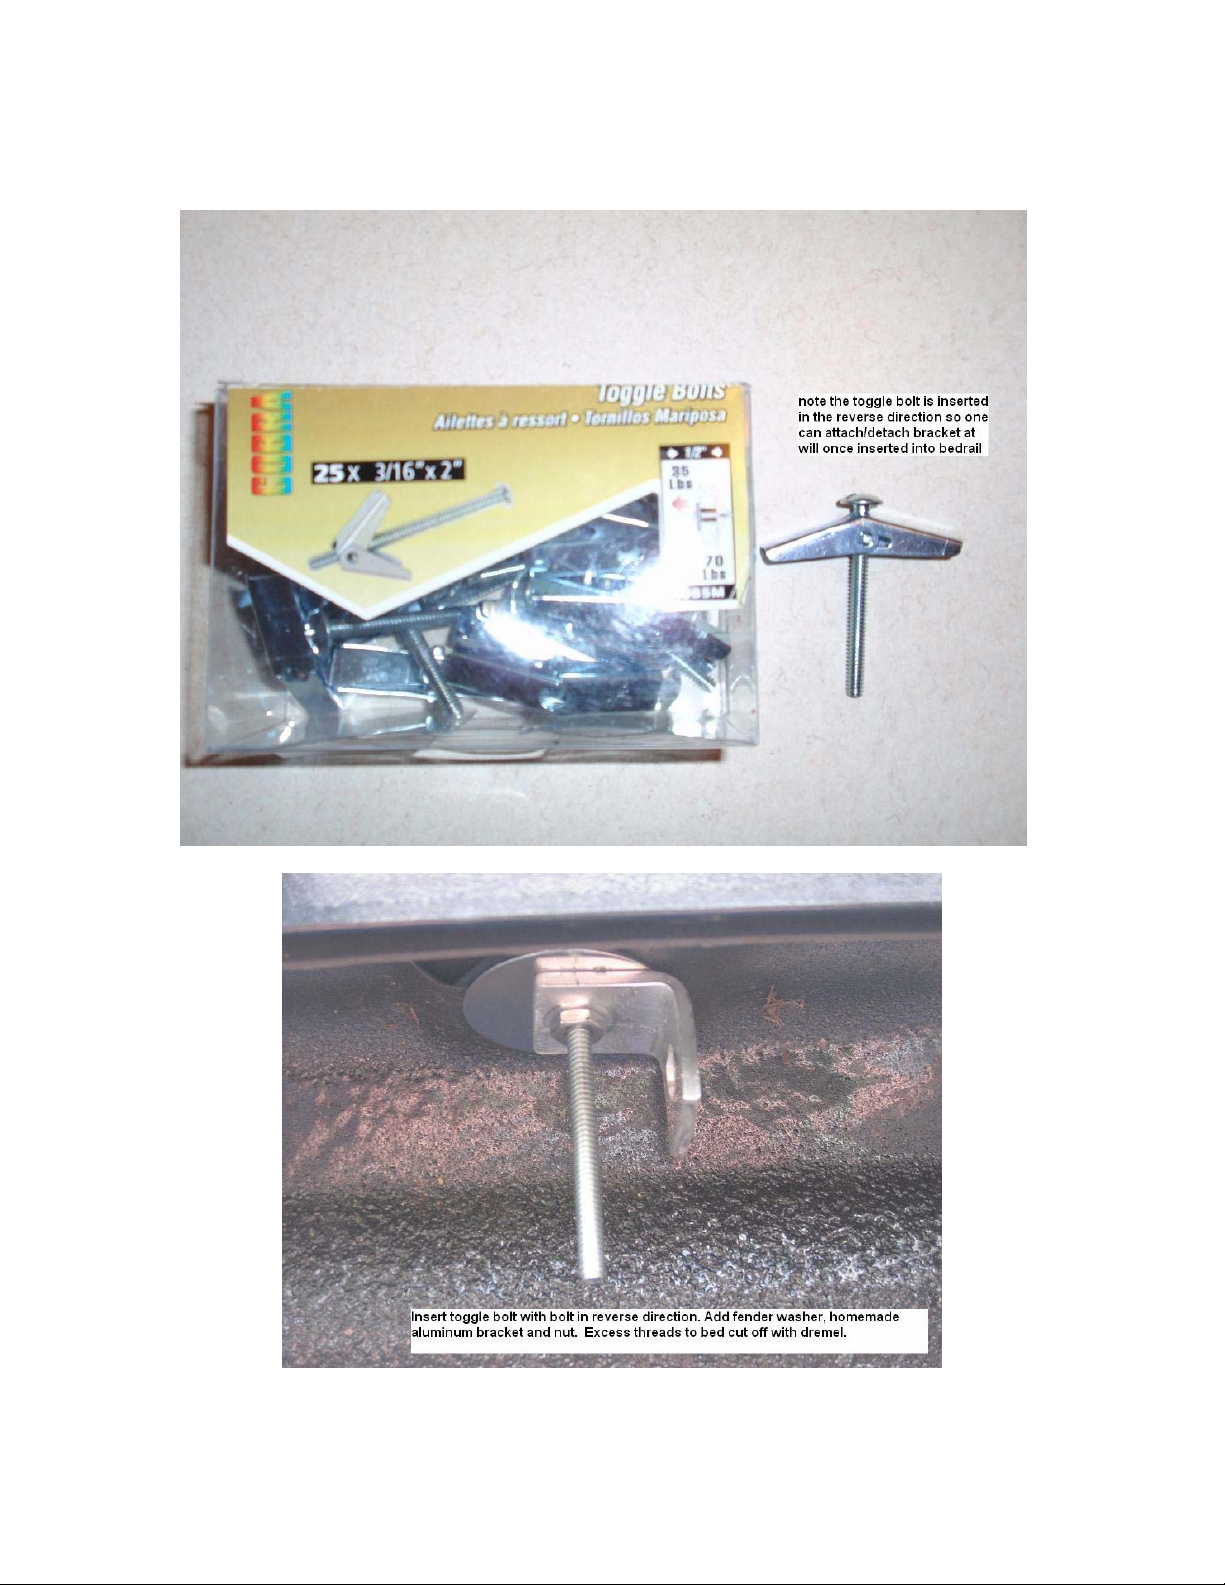
Insert Toggle bolt (with bolt inserted in the reverse direction into wing). This allows one
to attach and detach brackets at any time without the bolt head interference. Add a fender
washer, homemade aluminum bracket and nut to secure in place.
Cut off excess threads. Now you could have inserted the bolt the other way but would
have had to use a double nut process to lock the bolt up inside the bedrail. This way
allows a secure fit that will never come loose.
Page 3
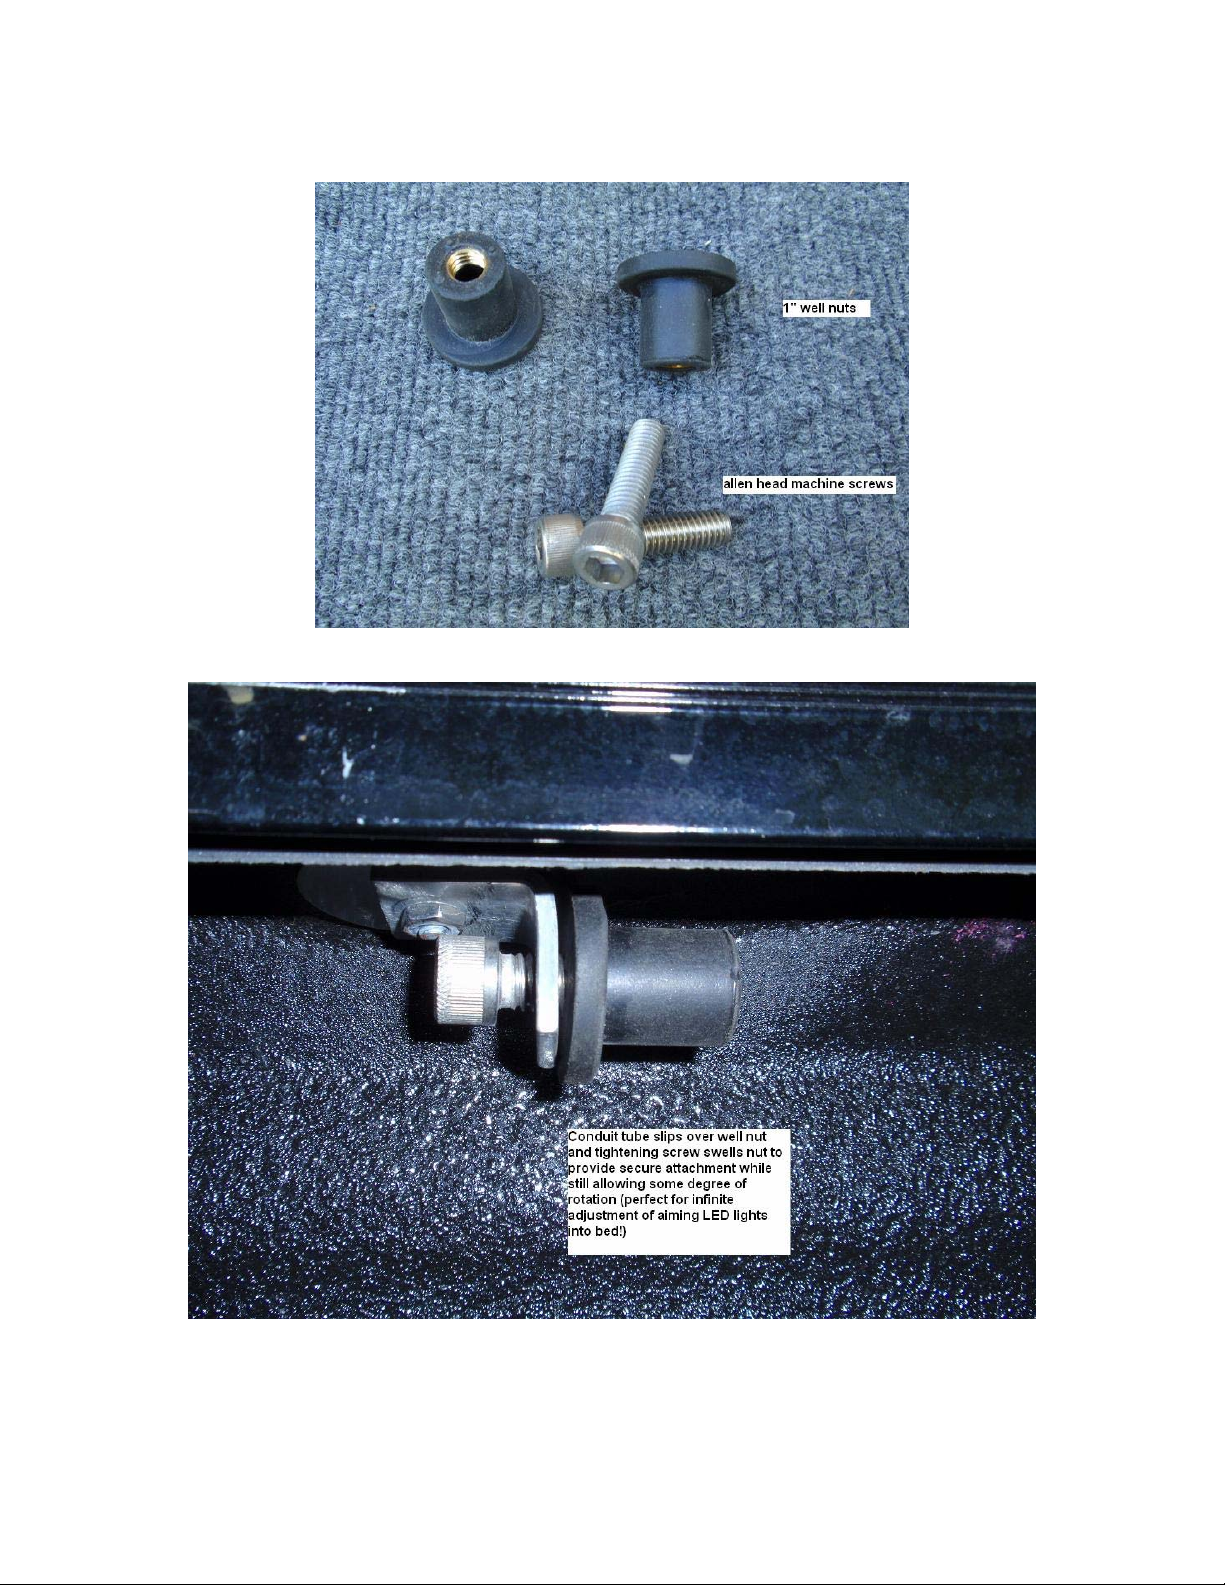
Insert allen head machine bolt through braket and into well nut. Repeat for other bracket
and then measure the distance between well nut ends to determine length of PVC conduit
that is needed. Cut and dry fit before proceeding.
Page 4
Prepare a jig to hold the tube by routing a rabbet in a 2x4 scrap. Tape the tube to the jig
to prevent the tube from rolling and to allow alignment of the holes. Measure and mark
off 4 equidistant holes. I traced one of the Recon light pods onto a piece of cardboard
stock and cut it out to use as a stencil.
Page 5
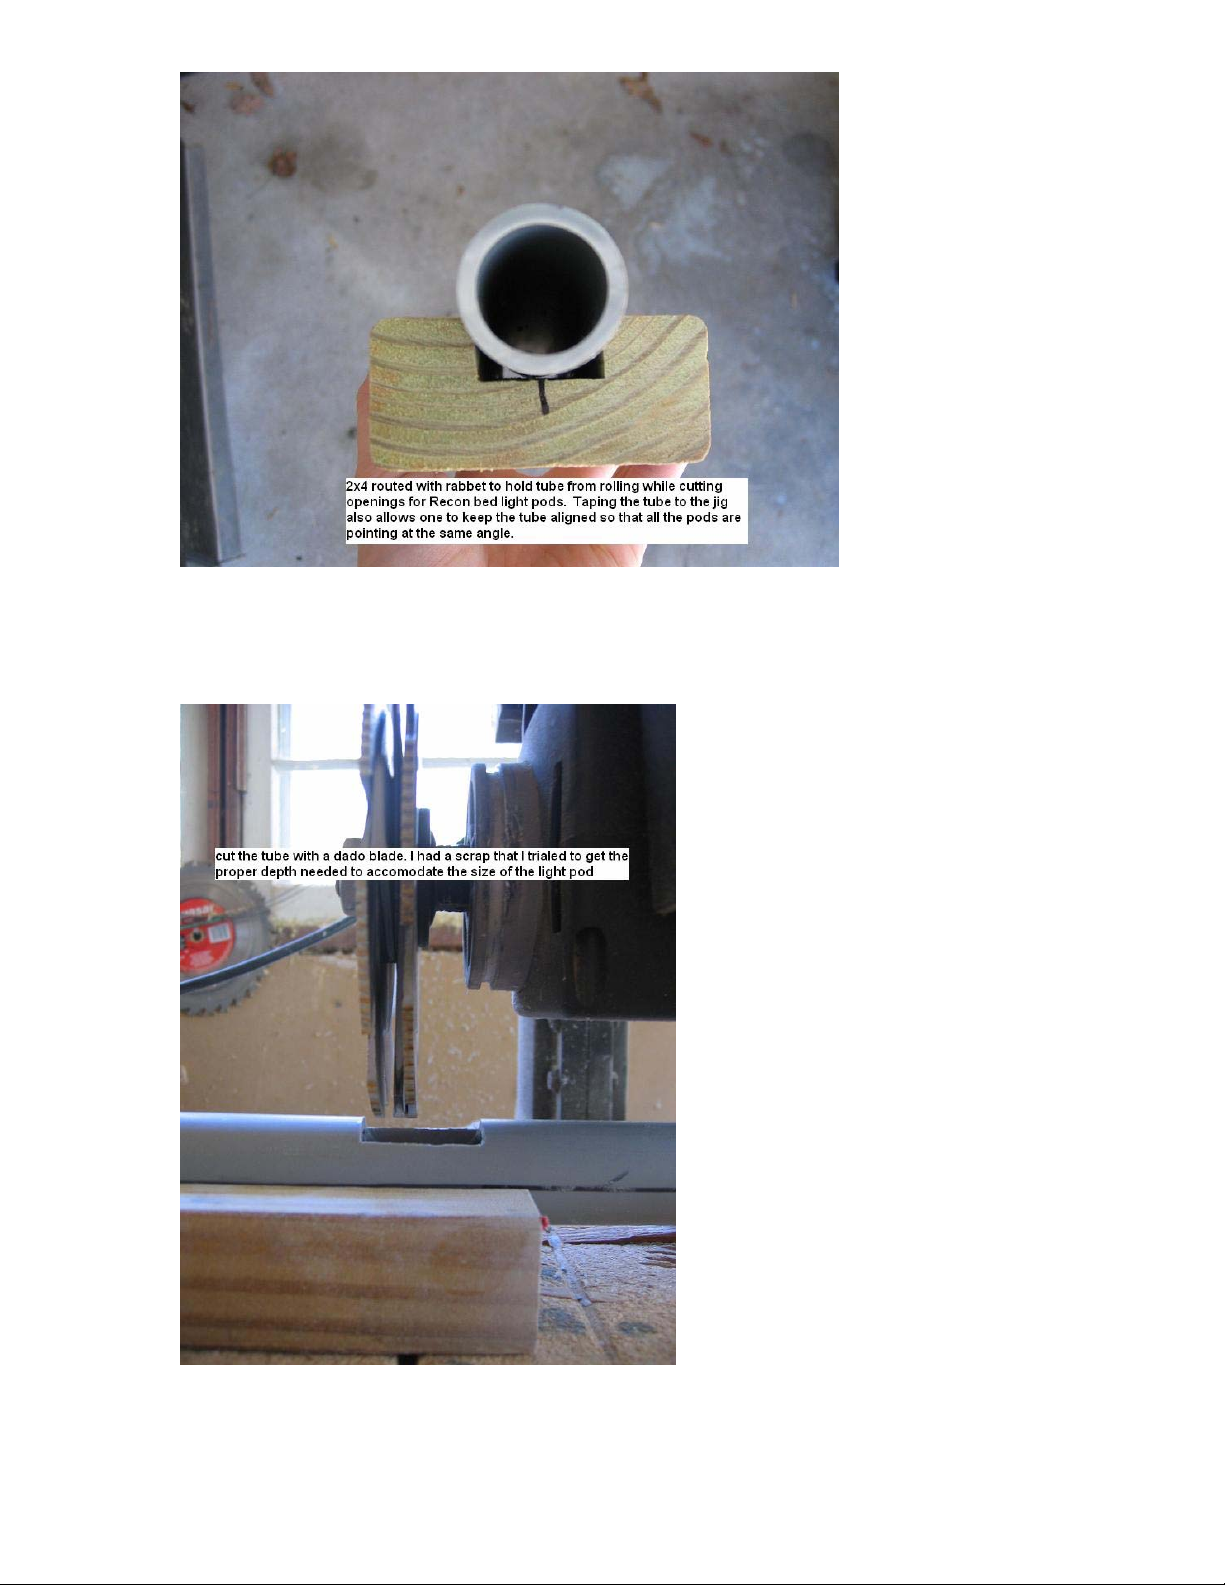
I then placed the tube, taped to the jig, on my radial arm saw equipped with a dado blade
to make the holes for the light pods to stick through. You can cut these holes with a box
knife or coping saw but a dado makes a much cleaner level cut.
After using the dado a small portion of material exists (thickness of the tube wall) that
must be removed for pod to fit. This is the hashed markings in the picture below. These
need to be cut out so walls of tube are flat. And a dremel makes quick work of it.
Page 6

One tube finished with cutting. Make sure you leave room on the ends and don’t put the
holes too close as you need room for the well nuts to be inserted and expand inside the
tube for attachment. You may want to paint the tube at this time. I did it later in the
procedure.
Page 7

Take one string of Recon bed lights and tape the pods to the holes with lights facing
inward. This gives the correct spacing and allows you to fold and zip-tie the excess
wiring for a tidy install.
Insert recon bed lights one at a time until each reaches their respective cut-out. Again if
your careful and cut the holes correctly the pods will fit snug in the opening. I later
drilled small holes opposite each cut-out and drove a machine screw through to contact
the backside of the light pod to prevent it from falling out. Additionally I applied some
epoxy around the cutout contacting the light pod.
Page 8

A small hole was drilled in the aft end of the tube to allow the power cord out since the
ends will be blocked with the well nuts. Insert the tube into the bracketed well nuts and
tighten until tube is snug and does not spin freely. Adjust the angle of the lights so that
they point towards the center of the truck bed (best done at night to get optimal lighting
situation).
ELECTRICAL HOOK-UP
I wanted the lights to be operated ONLY by a toggle switch when keys were in the
ignition and not activated by auxiliary function like the tailgate opening, or the third
brake light. So I tapped off the factory hitch plug. This option allows total control of the
lights. Choose what method you wish. The power cord was run up thru one of the holes
created by the clips in the plastic bed rail cap and run back towards the rear tail light.
Page 9

The wire exits into the tail light cavity and is attached to the toggle switch and a decent
ground
Page 10

FINISHED PRODUCT
Page 11

OPTIONAL “NIGHTVISION” MODIFICATION
To allow one to have both white led’s AND red led’s you can purchase a T12 48” colored
fluorescent safety sleeve like the one below. I obtained mine from
www.creativelightings.com for $2.95/each and you can get whatever color you desire. I
wanted red as I do quite a bit of night fishing and wanted to get into the bed without
ruining my nightvision on the way to the water.
Page 12

Place the protector over the light tube you just made and mark with a Sharpie pen the
areas to be cut out. Then cut these out with a box/utility knife. I found this easier to do if
you insert a large wooden dowel rod or scrap 1.5” PVC pipe to act as a backer. Once the
cutouts are made slide the red covering onto the light bar and mark the ends to be cut just
short of the PVC ends to allow for a sliding action without hitting the well nut brackets.
Option: you can make it such that it is the same length and change settings by twisting
the protector to expose or cover the lights. I however felt that it might not be snug
enough to stay in place thus opting for the slide action route.
Epoxy a “guide ring” inside the protector tube. The tube is actually quite a bit larger than
the 1.5” PVC conduit. Therefore, take a pipe joining fitting and cut four ¼” rings off.
Hand sand the interior of each ring until the rings slidesmoothly with some pressure. DO
NOT OVERSAND as then rings will slide freely and tube will not stay in place!
Page 13

One last operation is to cut a slot on the backside of the cover to allow the tube to slide
around the power cord exiting the back of the tube
FINISHED PRODUCT
Page 14

NOTES:
There are many alternate ways of performing this mod. I choose this way to limit
permanently altering the truck (ie drilling) and to avoid using the packaged cheap clips
with 3M sticky tape that would not allow for altering light direction and would likely fail
after several cleanout of the truck with a hose..
As mentioned, lighting activation can be achieved in many different ways each with its
pros and cons. I achieved it thru the use of a toggle switch tied into the trailer hitch
power source so as to be active ONLY when the key is in the ignition. This prevents
lights from being left on inadvertently and draining the battery. Pin switch in the tailgate
would NOT allow you to drive with the tailgate down and lights off if say you had a long
load in the bed thus burning valuable LED lifespan when not needed.
For those that want even more directional LED control…you could cut the PVC conduit
in between EACH light pod and insert typical pipe couplings allowing each section of
tube containing a light pod to rotate independently allowing alternate lighting options. I
thought this was excessive and unnecessary in my case.
HOPE THIS WAS HELPFUL AND ENJOY!!!
My fishing buddies and I absolutely love it!
PISTOL PETE
 Loading...