


INSTRUCTION MANUAL
ver. 1.3.0718

| USER GUIDE
Table of contents
• Disclaimer of Product and Services .......................................................................................... 3
• Warnings and Precautions ............................................................................................................ 4
• Warranty ............................................................................................................................................... 5
• ADB 100 is a professional audio standard in your Reckeen Studio! ........................... 6
• AUDIO LINK Interface ...................................................................................................................... 10
• Connection .......................................................................................................................................... 13
• Digital Inputs and outputs ............................................................................................................. 18
• Analog inputs and outputs ............................................................................................................ 20
• ADB-100 specication .................................................................................................................... 24
2

USER GUIDE | Disclaimer of Product and Services
Disclaimer of Product and Services
This manual and the software described herein, in whole or in part, may not be reproduced, translated,
or reduced to any machine-readable form without prior written approval. Reckeen provides no warranty
with regard to this manual, the software, or other information contained herein and hereby expressly
disclaims any implied warranties or merchantability or tness for any particular purpose with regard to
this manual, the software, or such other information. In no event shall Reckeen be liable for any incidental,
consequential, or special damages, whether based on tort, contract, or otherwise, arising out of or in
connection with this manual, the software, or other information contained herein or the use thereof. In
the manual, the ™ or ® marks are not specied. Reckeen reserves the right to make any modication to
this manual or the information contained herein at any time without notice. The information provided in
this manual is intended only as guide. All the time, Reckeen will try to give correct, complete and relevant
information. However, Reckeen can’t exclude that some of the information contained in this manual,
from time to time, may not be correct or may be incomplete. This manual may contain omissions,
typographical errors or incorrect information. Reckeen always recommends that you carefully check the
information given in this manual for accuracy before making any purchase decision or using the product.
Reckeen is not responsible for any errors or omissions , or for any subsequent loss or damage resulting
from the use the information contained within this manual. For further guidance on the content of this
manual or on the product contact your local Reckeen Ofce or dealer.
The software described herein is governed by the terms of a separate user license agreement. Reckeen
is not liable and will not compensate for any lost recordings or streamings made to your Reckeen 3D
STUDIO or LITE , external recording media, or recording devices or any relevant losses, including when
recordings are not made due to reasons including your Reckeen 3D STUDIO or LITE failure, or when the
contents of a recording are lost or damaged as a result of your Reckeen 3D STUDIO or LITE failure or
repair undertaken to your Reckeen 3D STUDIO or LITE . Reckeen will not restore, recover, or replicate the
recorded or streamed contents made to your Reckeen 3D STUDIO or LITE , external recording media, or
recording devices under any circumstances.
FCC NOTICE TO USERS
The following statement applies to products: Reckeen 3D Studio, Reckeen LITE, VKey100 , that bear
the FCC logo on the product label. NOTE: This equipment has been tested and found to comply with
the limits for a Class B digital device, pursuant to part 15 of the FCC Rules. These limits are designed to
provide reasonable protection against harmful interference in a residential installation. This equipment
generates, uses and can radiate radio frequency energy and, if not installed and used in accordance
with the instructions, may cause harmful interference to radio communications. However, there is no
guarantee that interference will not occur in a particular installation. If this equipment does cause harmful
interference to radio or television reception, which can be determined by turning the equipment off and
on, the user is encouraged to try to correct the interference by one or more of the following measures:
• Reorient or relocate the receiving antenna.
• Increase the separation between the equipment and receiver.
• Connect the equipment into an outlet on a circuit different from that to which the receiver is
connected.
• Consult the dealer or an experienced radio/TV technician for help.
3

Warnings and Precautions | USER GUIDE
Warnings and Precautions
1. Read carefully all of these warnings and save them for later reference.
2. Follow all warnings and instructions marked on this unit.
3. Unplug this unit from the wall outlet before cleaning. Do not use liquid or aerosol cleaners. Use a
damp cloth for cleaning.
4. Do not place this unit on an unstable cart, stand, or table. The unit may fall, causing serious
damage.
5. Do not use this unit in or near water.
6. Slots and openings on the cabinet top, back, and bottom are provided for ventilation. To ensure
safe and reliable operation of this unit, and to protect it from overheating, do not block or cover
these openings. Do not place this unit on a bed, sofa, rug, or similar surface, as the ventilation
openings on the bottom of the cabinet will be blocked. This unit should never be placed near
or over a heat register or radiator. This unit should not be placed in a built-in installation unless
proper ventilation is provided.
7. This product should only be operated from the type of power source indicated on the marking
label of the AC adapter. If you are not sure of the type of power available, consult your Datavideo
dealer or your local power company.
8. Do not allow anything to rest on the power cord. Do not locate this unit where the power cord will
be walked on, rolled over, or otherwise stressed.
9. If an extension cord must be used with this unit, make sure that the total of the ampere ratings on
the products plugged into the extension cord do not exceed the extension cord’s rating.
10. Make sure that the total amperes of all the units that are plugged into a single wall outlet do not
exceed 15 amperes.
11. Never push objects of any kind into this unit through the cabinet ventilation slots, as they may
touch dangerous voltage points or short out parts that could result in a risk of re or electric
shock. Never spill liquid of any kind onto or into this unit.
12. Except as specically explained elsewhere in this manual, do not attempt to service this product
yourself. Opening or removing covers that are marked “Do Not Remove” may expose you to
dangerous voltage points or other risks, and will void your warranty. Refer all service issues to
qualied service personnel.
13. Unplug this product from the wall outlet and refer to qualied service personnel under the following
conditions:
• When the power cord is damaged or frayed;
• When a liquid has spilled into the unit;
• When the product has been exposed to rain or water;
• When the product does not operate normally under normal operating conditions. Adjust
only those controls that are covered by the operating instructions in this manual; improper
adjustment of other controls may result in damage to the unit and may often require extensive
work by a qualied technician to restore the unit to normal operation;
• When the product has been dropped or the cabinet has been damaged;
• When the product exhibits a distinct change in performance, indicating a need for service.
4

USER GUIDE | Warranty
Warranty
For a period of one year from the original date of purchase of the product, Reckeen equipment
is guaranteed against any manufacturing defects. The original purchase receipt or invoice or other
documentary evidence is required. To obtain warranty service, you must deliver the product, in either its
original packaging or packaging affording an equal degree of protection . You cover all mail , delivery ,
transportation and insurance costs. It is your responsibility to backup any data, software or other materials
you may have stored or preserved on your unit. It is likely that such data, software, or other materials will
be lost or reformatted during service and Reckeen will not be responsible for any such damage or loss.
Our warranty doesn’t cover damage caused by accidents or unauthorized modications, installing any
other software and repairs, misuse, sand, grit or water. All other claims of any nature are not covered
by this warranty. This Warranty is valid only in the country of purchase. REPAIR OR REPLACEMENT
AS PROVIDED UNDER THIS WARRANTY IS THE EXCLUSIVE REMEDY OF THE CONSUMER. RECKEEN
SHALL NOT BE LIABLE FOR ANY INCIDENTAL OR CONSEQUENTIAL DAMAGES FOR BREACH OF ANY
EXPRESS OR IMPLIED WARRANTY ON THIS PRODUCT. EXCEPT TO THE EXTENT PROHIBITED BY
APPLICABLE LAW, ANY IMPLIED WARRANTY OF MERCHANTABILITY OR FITNESS FOR A PARTICULAR
PURPOSE ON THIS PRODUCT IS LIMITED IN DURATION TO THE DURATION OF THIS WARRANTY .
Accessories ,such as the battery or the cable, are excluded from the warranty. These terms do not affect
your statutory rights.
DISPOSAL ELECTRICAL AND ELECTRONIC EQUIPMENT
SYMBOL FOR THE MARKING OF ELECTRICAL AND ELECTRONIC EQUIPMENT INDICATING SEPARATE
COLLECTION: For Customers the countries within the EEA . EEA: European Economic Area, which
comprises the EU member States plus Norway, Iceland and Liechtenstein.
WEEE Directive
The symbol – consists of the crossed-out wheeled bin, as shown above. The symbol
is indicating that electrical and electronic equipment should not be disposed of as
unsorted municipal waste, but segregated for separate collection. For more
information about recycling of the product, please contact Reckeen ofce, the waste
authority, the approved WEEE scheme or the dealer/distributor where you purchased
the product.
5

| USER GUIDE
2
ADB 100 is a professional
audio standard in your
Reckeen Studio!
6

USER GUIDE |
ADB 100 is an additional, external audio module extending functionality of the Reckeen 3D and LITE Virtual
Studio. With its built-in Audio Link interfaces, this device can be installed directly in the studio as well as on
the stage. The use of RJ 45 cable and Audio Link technology enables transferring all inputs and outputs
stream to greater distances (with a single RJ45 cable). This enables you to separate a recording studio
from a closed and acoustically insulated director’s room in which the Reckeen Studio 3D or Lite station
is installed. The sound transferred digitally from ADB 100 device through RJ 45 connector maintains
the highest quality and avoids noise. An advanced but easy-to-manage application integrated with the
Reckeen Virtual 3D Studio & Lite enables precise control over ADB 100 device. Intuitive operation and
signals routing make this preamp extremely flexible and performing well with many types of recordings
ADB 100 module is designed for professional producers, yet it maintains a size of 1U and a price at a
reasonable level. The device is equipped with professional inputs and connections with the highest AES
/ EBU signal quality (AES3), used mainly in studio technology.
ADB 100 works well at home, in the director’s room, in the studio, in the transmission car as well as
on the stage. The richness of various analog and digital interfaces provides maximum flexibility and
supports user productivity in the studio. With ADB 100 your Reckeen Studio is enriched with the highest
professional sound quality without any distortions.
Its main features are:
• Area in a Rack type housing: 1U
• 12V power supply
• 4 x XLR four channels –professional balanced analogue audio two stereo differential output
• 4 x XLR four channels –professional balanced analogue audio two stereo differential input
• High - quality headphones output
• Digital outputs : 2 x AES/EBU, (AES3)
• Digital inputs : 2 x AES/EBU, (AES3)
• Audio Link (using RJ45 cable up to 50 m ) galvanic isolation
• 4 8 V voltage at the microphone input,
• Professional balanced analogue audio stereo differential input ,dynamic and condenser microphone
input ¼”
• Control over signal routing via dedicated software integrated with the Reckeen Studio 3D & Lite
application
• Selectable reference level (-10dBV, or 4dBu)
7

| USER GUIDE
1U
Area in a Rack type
housing: 1U
AUDIO
LINK
Audio Link (using RJ45
cable up to 50m)
galvanic isolation
12V
12V power supply
+ 48V
PHANTOM
48V voltage at the
microphone input,
4 x XLR
OUT
4 x XLR four channels –
professional balanced
analogue audio two
stereo differential
output
HEADPHONES
High-quality
headphones output
4 x XLR
IN
4 x XLR four channels –
professional balanced
analogue audio two
stereo differential input
2 x AES/EBU
OUT
Digital outputs: 2 x
AES/EBU, (AES3)
MIC IN
Professional balanced
analogue audio stereo
differential input,
dynamic and condenser
microphone input ¼"
RECKEEN
3D/LITE
Control over signal
routing via dedicated
software integrated with
the Reckeen Studio 3D &
Lite application
-10dBV
4dBu
Selectable reference
level (-10dBV, or 4dBu)
2 x AES/EBU
IN
Digital inputs: 2 x
AES/EBU, (AES3)
8
USER GUIDE |
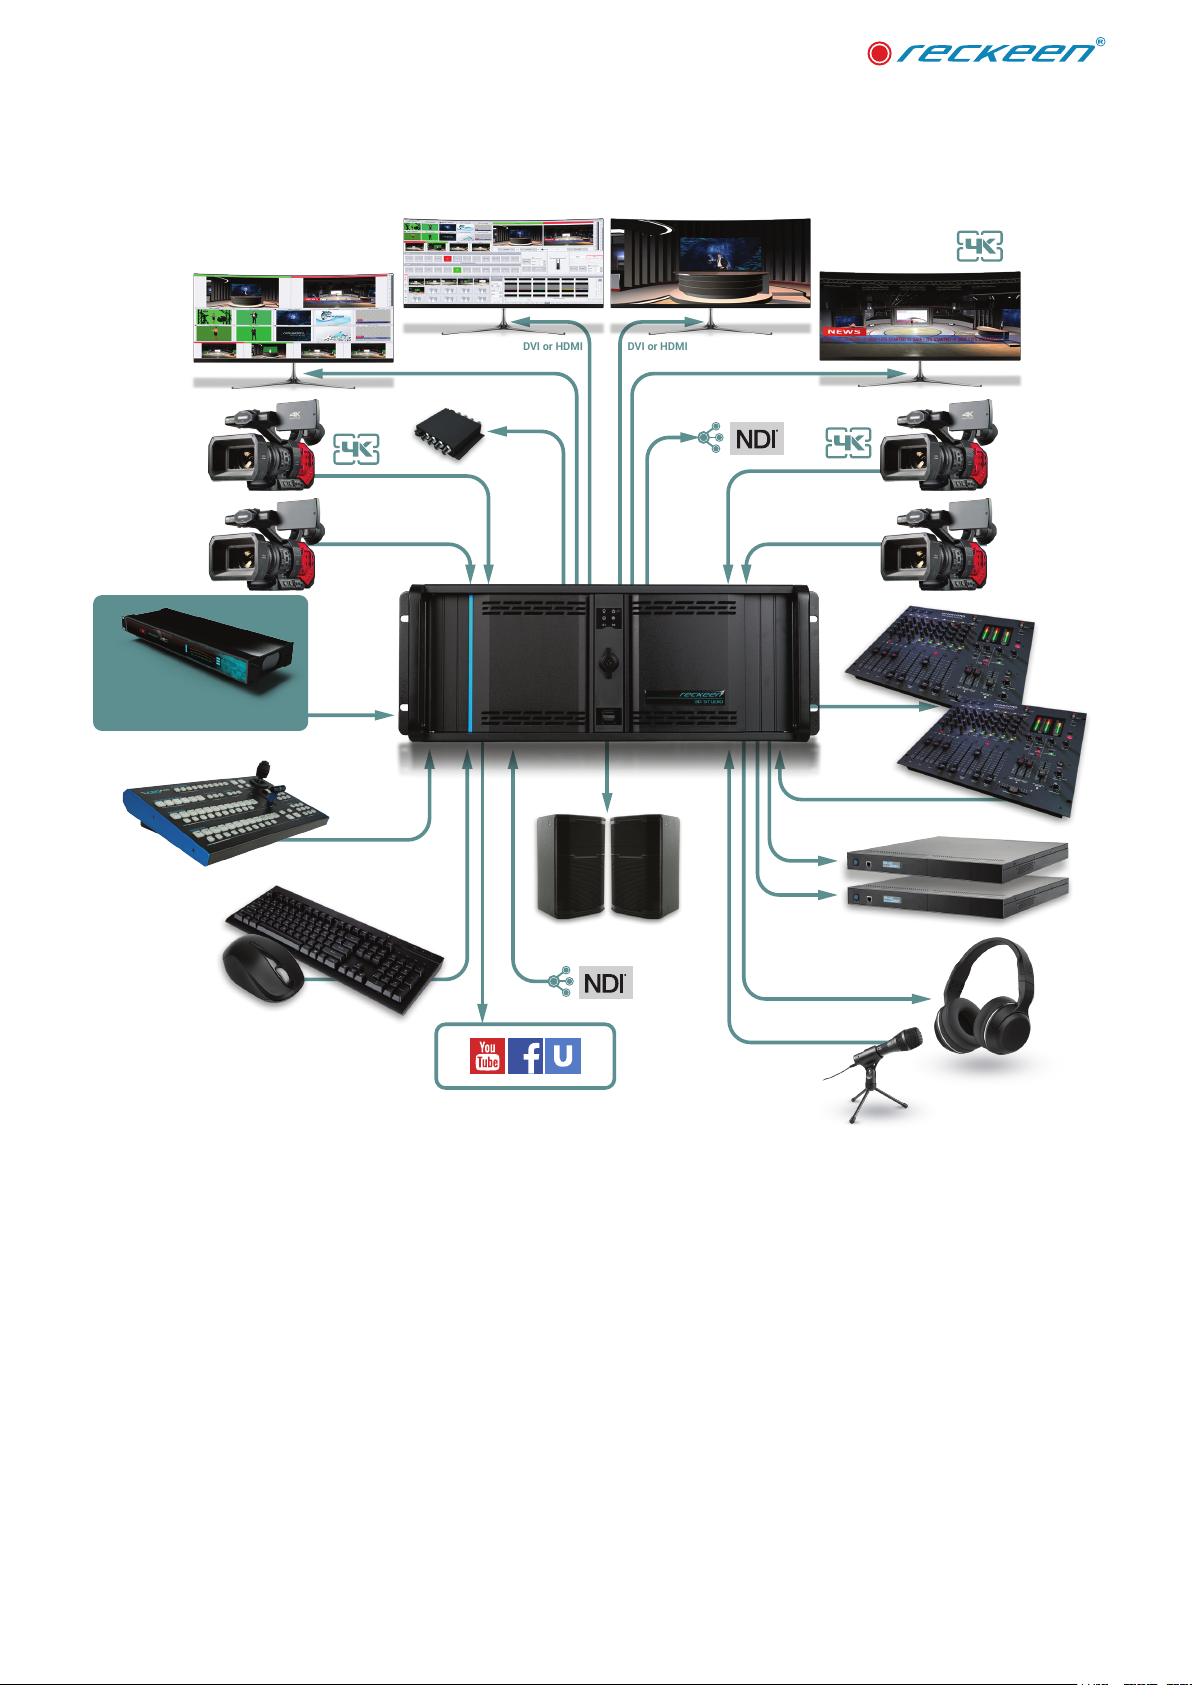
CAM 1
CAM 3
Audio Box
ADB-100
Control Panel
VKey-100
PREVIEW MONITOR
MULTIVIEW
RJ45 AUDIO LINK
PREVIEW MONITOR
PRODUCTION LIVE
DVI or HDMI
or Display Port
DVI or HDMI or Display Port HDMI
TALLYx4
HDMI 4K**
HDMI or SDI*
PREVIEW MONITOR
PROGRAM
DVI or HDMI
or Display Port
6.3 mm Jack
HDMI 4K**
HDMI or SDI*
XLR Line IN 1
or XLR Line IN 2
BIG
SCREEN
CAM 2
CAM 4
AUDIO
MIX
AUDIO
MIX
XLR Master OUT
RS-232
Keyboard and mouse
*SDI connectors only in Reckeen Studio version with HDMI-SDI card
**Virtual LITE studio offers a Full HD resolution.
By purchasing additional License Key, You can upgrade it to 3D Studio &LITE with 4K resolution.
USB
Streaming
HDMI
or SDI*
HDMI
VIDEO RECORDER
Sound System
RJ45 - LAN
6.3 mm Jack
6.3 mm Jack
Headphone
Microphone
9

| USER GUIDE
3
AUDIO LINK Interface
10

USER GUIDE |
With its built-in Audio Link interfaces, this device can be installed directly in the studio as well as on the
stage. The use of RJ 45 cable and Audio Link technology enables transferring all inputs and outputs
stream to greater distances (with a single RJ45 cable). This enables you to separate a recording studio
from a closed and acoustically insulated director’s room in which the Reckeen Studio 3D or Lite station
is installed. The sound transferred digitally from ADB 100 device through RJ 45 connector maintains the
highest quality and avoids noise.
11

| USER GUIDE
If you connect an additional ADB-100 device to Audio Link connector, you can expand the Reckeen
system adding additional inputs and outputs:
• two digital inputs on XLR connector (AB Digital 1, AB Digital 2)
• two analog inputs on XLR connector (AB Analog In 1 stereo, AB Analog In 2 stereo)
• microphone input for dynamic and condenser microphone
• two digital outputs on XLR connector
• two analog outputs on XLR connector (stereo output 1, stereo output 2)
• stereo headphone output
12

USER GUIDE |
4
Connection
13

First connect the power supply plug to the ABD 100 device power socket. Picture below.
| USER GUIDE
Bolt the locking screw. Picture below.
Next connect the power supply unit to the electrical outlet. Picture below.
14

USER GUIDE |
Connect the ADB-100 to the system using Straight-through RJ45 communication cable. Picture below.
15

Plug the end of the cable to the input / output card. Picture below.
| USER GUIDE
Plug the second end of the cable to the Audio Link Connector in ADB 100. Picture below.
To turn the device on, hold the power button for 1 second (turn it off about 3 seconds).Picture below.
16

USER GUIDE |
In case the device is not connected, a ‘ADB-100’ graphics is displayed in the tab along with a message
about a lack of communication with the device below it. Picture below.
When all the cables are correctly connected and a power button on the ADB-100 device is pressed, then
instead of graphics, an audio mixer for this device will be automatically displayed. Picture below.
17

| USER GUIDE
5
Digital Inputs and outputs
18
USER GUIDE |
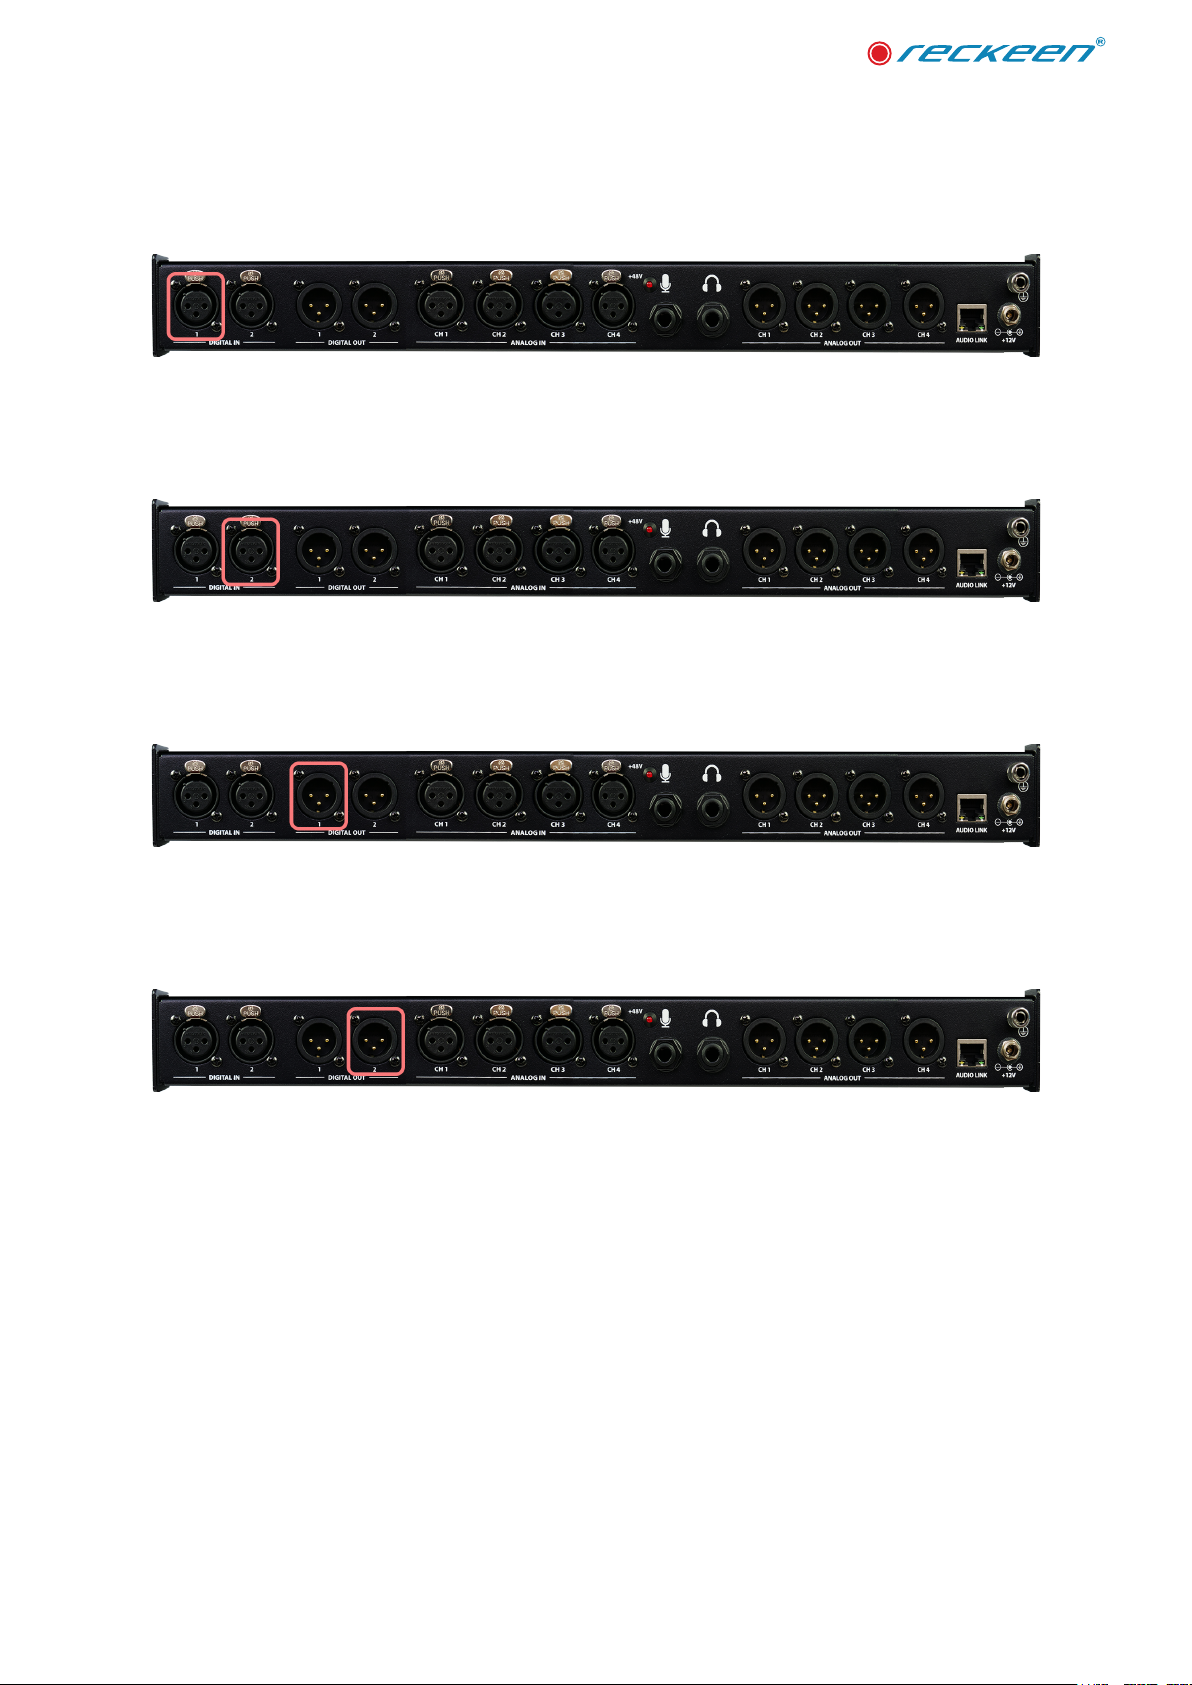
In case of digital inputs and outputs 0 level corresponds to -20dBFs.
Digital In 1 input on the XLR connector. Picture below.
Digital In 2 input on the XLR connector. Picture below.
Digital output 1 on the XLR connector. Picture below.
Digital output 2 on the XLR connector. Picture below.
19

| USER GUIDE
6
Analog inputs and outputs
20

USER GUIDE |
You can adjust the sound in the range of -40 to +10 dB, where the 0 level (Analog In 1, Analog In 2)
corresponds to -10 dBV (-7.8 dBu or 0.316 V RMS) in the case of a consumer level, or 4dBu (1.78 dBV or
=1.23 volts RMS) in the case of a professional level analog inputs/outputs on ADB -100 panel. It depends
on audio level settings in Conguration Window: Audio Tab. Picture below.
Analog In 1 input on the XLR connector (left and right channel).Picture below.
Analog In 2 input on the XLR connector (left and right channel).Picture below.
Analog output 1 on the XLR connector (left and right channel).Picture below.
Analog output 2 on the XLR connector (left and right channel).Picture below.
21
| USER GUIDE
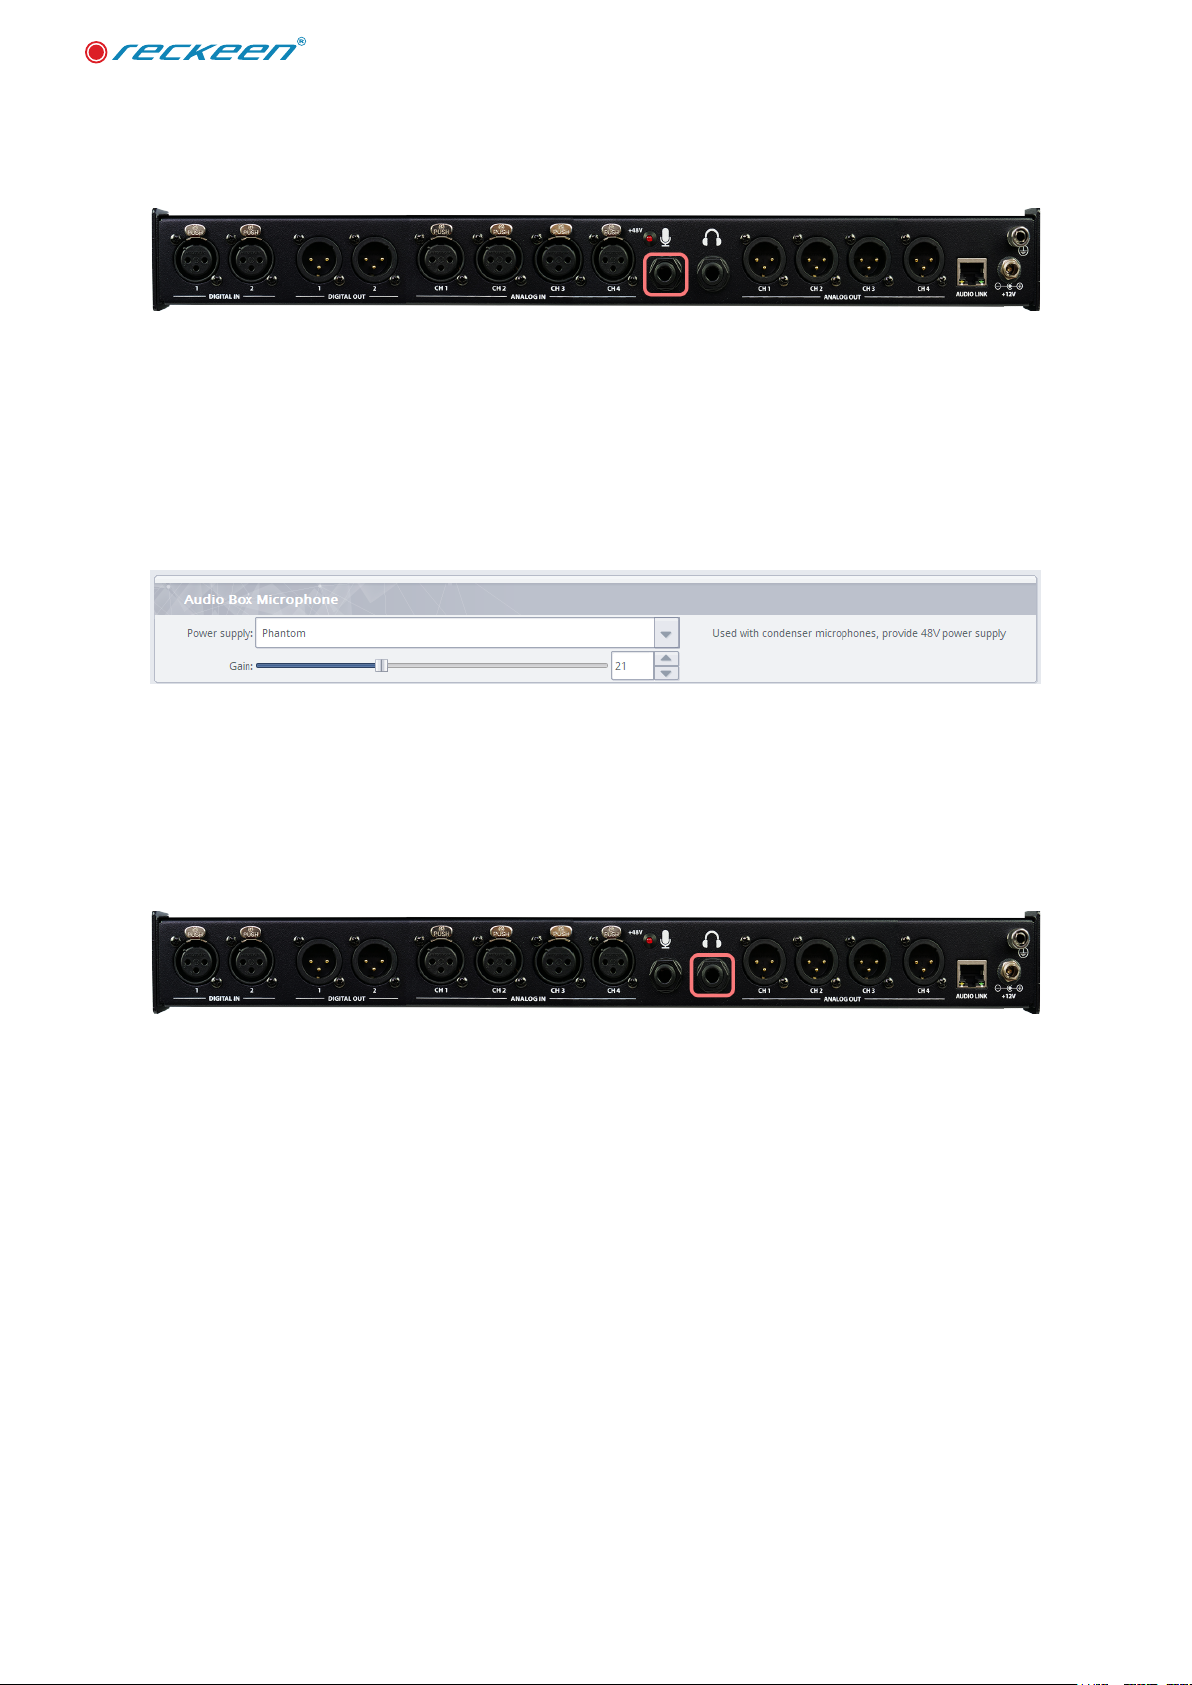
MIC input Jack 6,3 mm stereo. Picture below.
In Conguration Window you can nd Microphone settings for the microphone connected to AUDIO
BOX panel (ADB -100).Picture below. There are two operating modes: a None mode with a dynamic
microphone, for which you can set the Gain value with a slider, and a Phantom mode with a condenser
microphone. When you switch to the Phantom mode, you will be warned that a voltage of 48 V will be
applied to the speech insert. A red LED lights up on the ADB 100.
Warning ! It is recommended not to connect or disconnect a microphone to the ADB-100 during the time
the red LED is lit up. You can safely connect a microphone only in NONE mode.
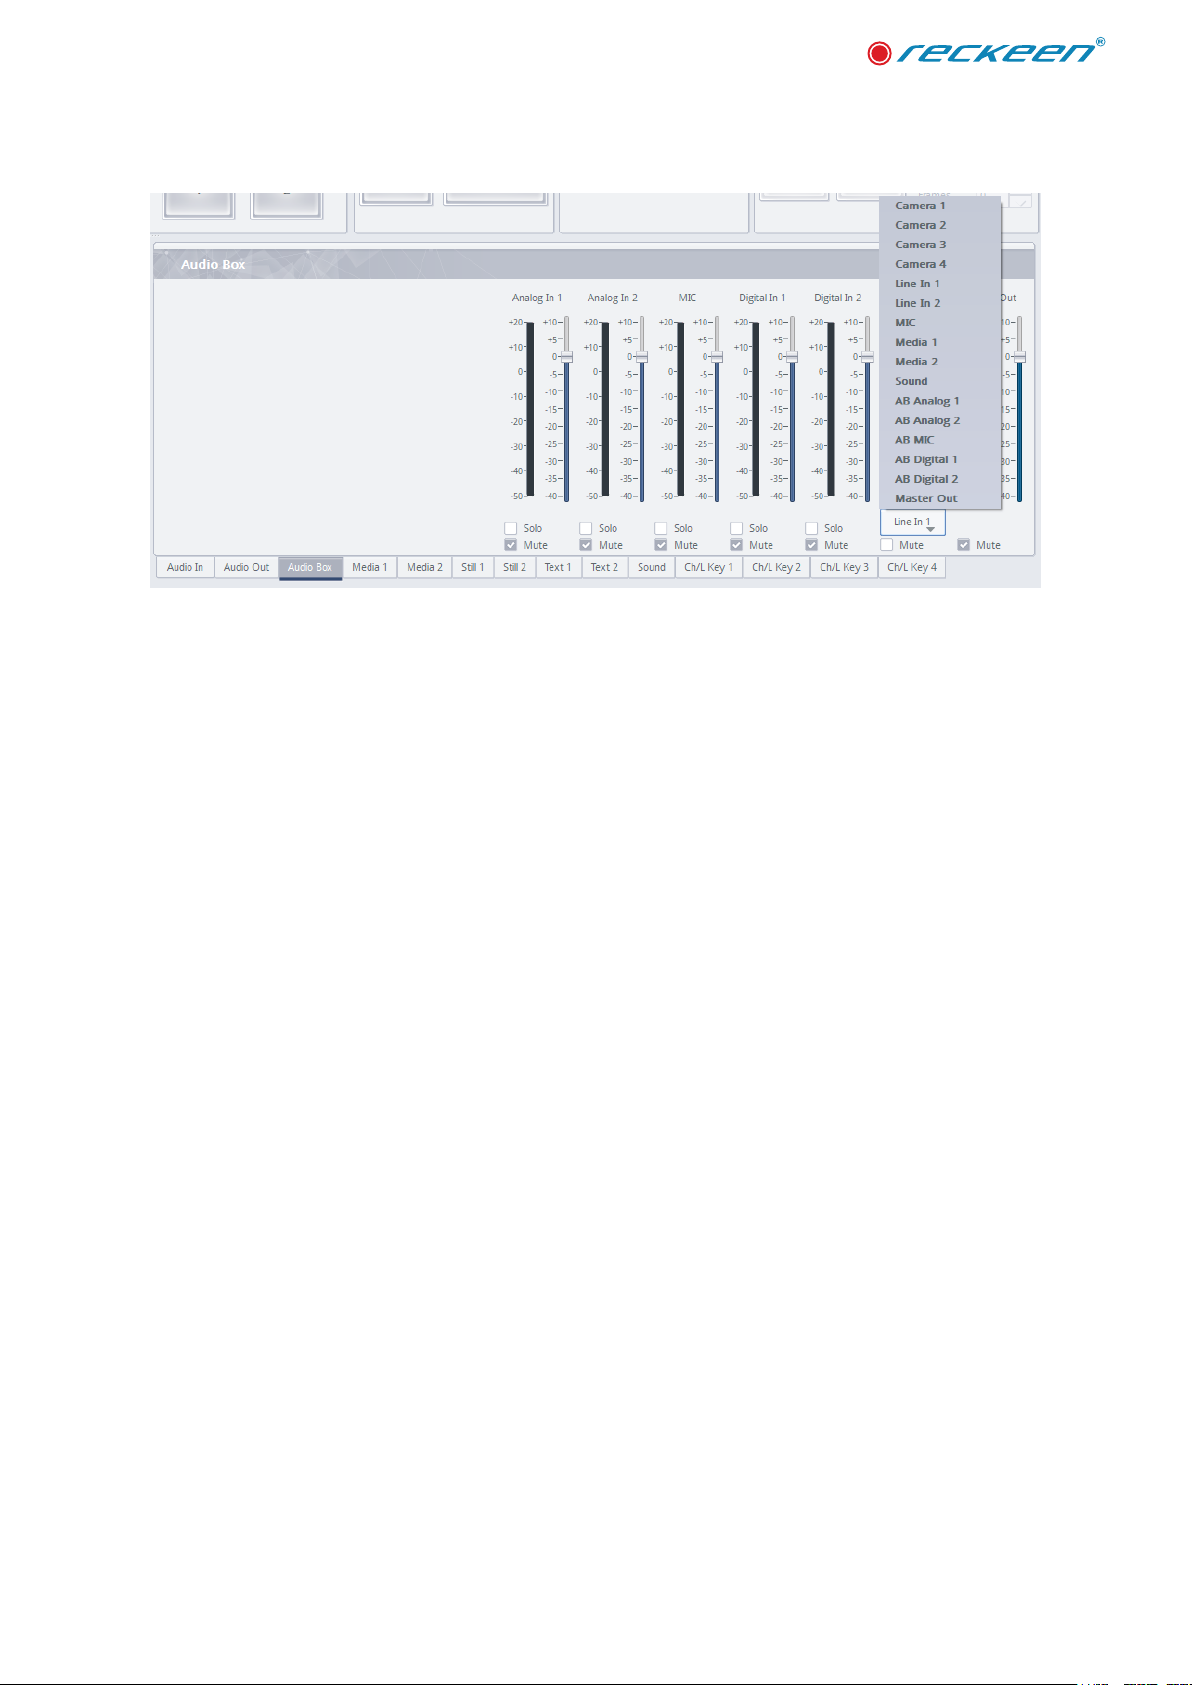
Headphone output Picture below.
Headphone connector is Jack 6,3 mm stereo. The Mute function works for each input source and the
master output. Selected sources are mixed, and create a Master Out signal. On the Headphones you can
hear the signal from any input or Master Out output. In this case, the Mute function will not work for the
Headphones, despite the checkboxes are on . You can listen any channel on the Headphones with Mute
function enabled. Picture below.
22
USER GUIDE |
23

ADB-100 specication | USER GUIDE
7
ADB-100 specication
24

USER GUIDE | ADB-100 specication
150,00
440
50.84
440
44.00
50.83
R 5
44
31.75 44
25
51
25
35
3191
153
2
25

ADB-100 specication | USER GUIDE
Audio Input
• Digital inputs
• 2 x AES/EBU
• Analog
• 4x XLR Four channels – professional balanced analogue audio differential input (-10dBV, or 4dBu)
• Two type of microphones dynamic and condenser with +48V phantom power
Audio Output
• Digital inputs
• 2 x AES/EBU
• Analog
• 4x XLR Four channels – professional balanced analogue audio differential output (-10dBV, or
4dBu)
• 1 Jack 6,3 mm – Stereo Headphone output
Other
• I/0 Port
• Audio Link (using RJ45 up to 50m straight trought cable) galvanic isolation
• General
• Pro level: 4dBu reference
• Frequency response (from 40 Hz to 15 kHz): -0.57, -0.69 dB
• Noise level: -100.5 dB (A)
• Dynamic range: 100.5 dB (A)
• THD: 0.0014 %
• THD + Noise: -90.2 dB (A)
• IMD + Noise: 0.0036
• Stereo crosstalk: -99.4 dB
• IMD at 10 kHz: 0.0047
• Power
• DC12V
• Power Consumption
• 40W
• Working Temperature
• 0 °C ~ +40 °C
• Storage Temperature
• -20 °C ~ +60 °C
26

USER GUIDE | ADB-100 specication
• Relative Humidity
• ≤ 90% (non-condensation)
• Net Weight
• 2,250 kg
• Accessories
• Transmission Cable
• DC In Power Adaptor
ADB100 Accessory List
No Item Qty
1 ADB100 Unit 1
2 DC 12V power adaptor 1
3 USB stick with user manual 1
4 Power cable 1
5 Straight-trought RJ45 communication cable with lenght 1,5m 1
6 Reckeen holder T4K-K1U-03-01 2
7 Fastening screw for the holder M4x6 Imbus, black nish 4
Warning! The ADB100 uses RJ45 cable but does not use the LAN protocol.
27

ADB-100 specication | USER GUIDE
28

© Copyright 2018 Reckeen.
All rights reserved. ‘Reckeen’ is registered trademark.
All other company and product names may be trade marks of their respective
companies with which they are associated.
 Loading...