

Page 1
BA No.: 02.07.135/2017-01
User Manual
GB
Serial Number
Serial Number
®
REBOTEC
PO Box Q541
Queen Victoria Building
NSW 1230
rebotec.com.au
Rehabilitationsmittel GmbH
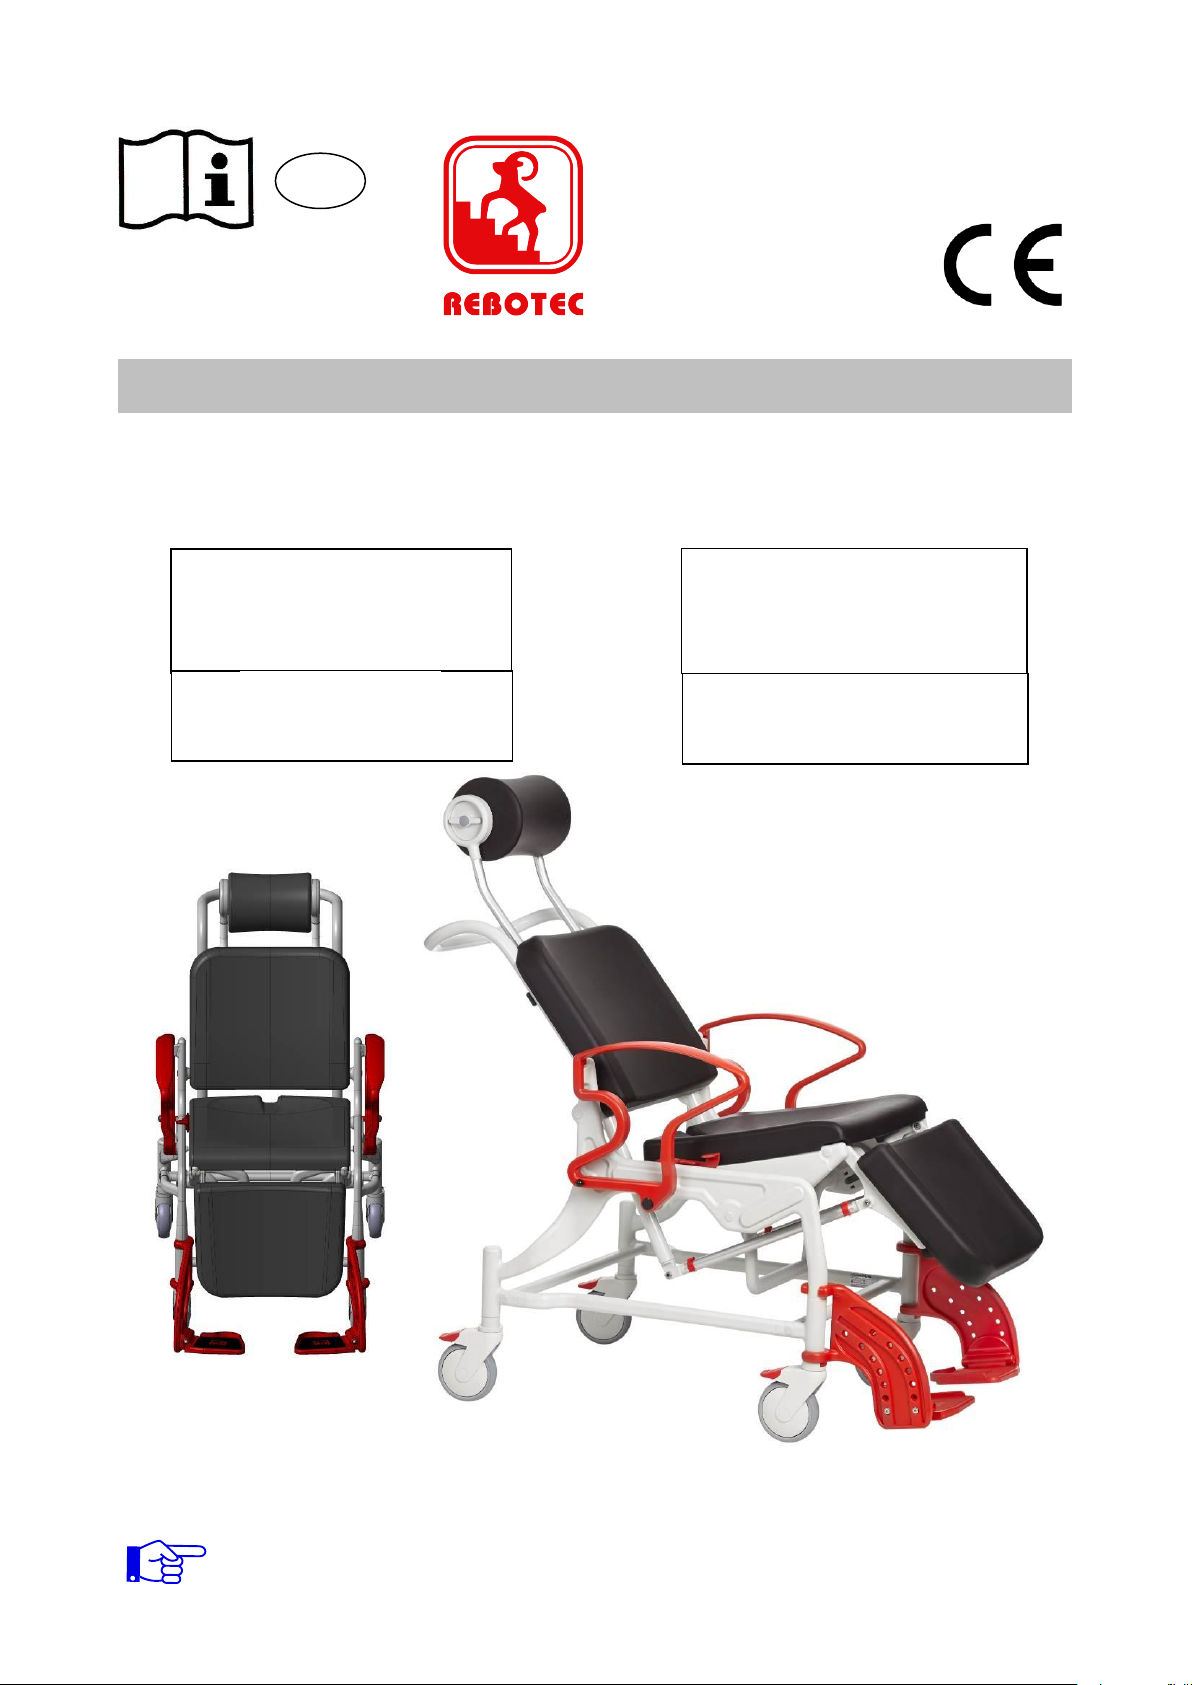
Tilt In Place Shower Chair
Phoenix
Seat with hygiene opening
350.xx.10
Phoenix
Seat without hygiene opening
350.xx.40
Important suggestions!
Read this user manual before first use of the chair and keep it at hand for the user.
Keep this user manual at hand for future use and resale.
The user instructions and the maintenance manual are downloadable on our homepage.
Page 2
REBOTEC / BA-No.: 02.07.135/2017-01 GB
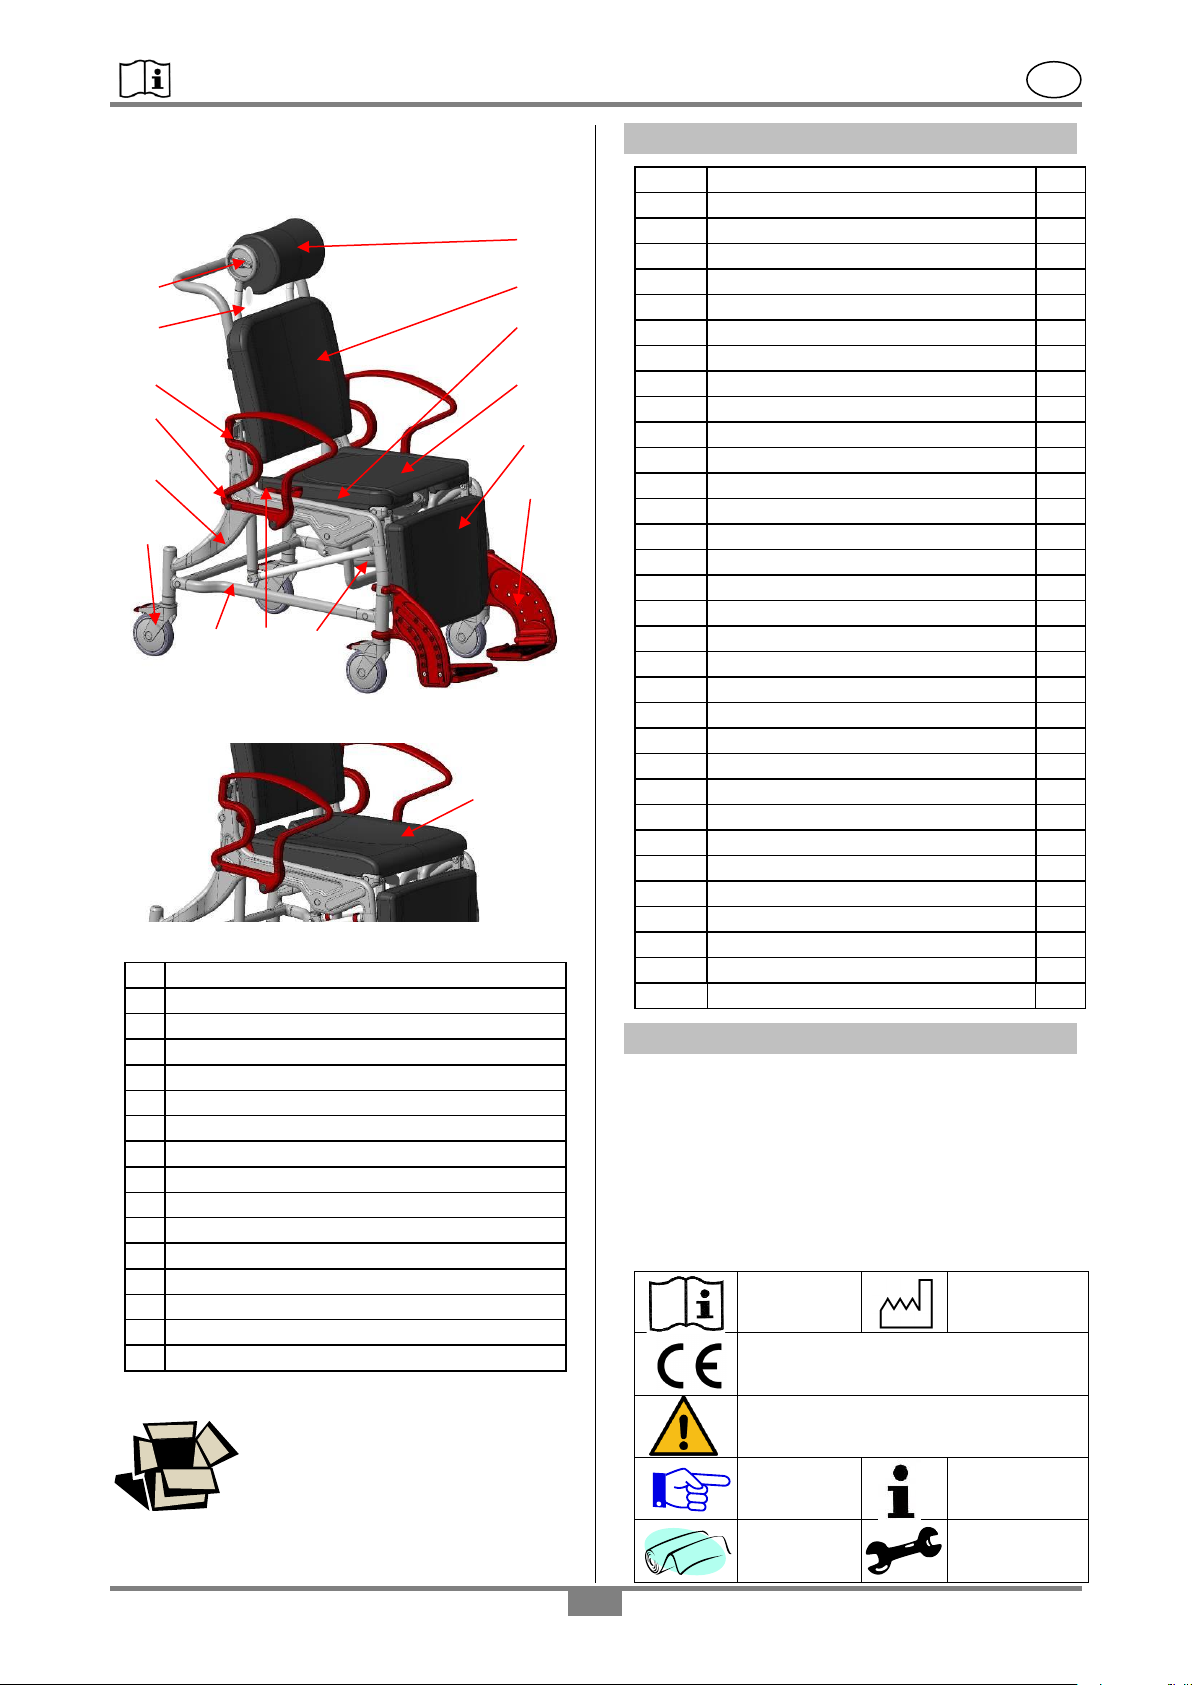
A
Rotation adjustment for PUR headrest
B
Backrest
C
Armrest (swivelling)
D
Locking pins
E
Chair frame with incline adjustment
F
Wheel castor complete with brake
G
PUR headrest (exchangeable)
H
PUR pad back (removable)
I
PUR seat, care opening and pan receptacle
J
PUR seat (removable)
K
PUR leg pad (removable)
L
Footrest with foot-plate (adjustable)
M
Locking lever for pad back incline adjustment
N
Commode pan with lid
O
PUR transport seat (removable)
Z
Name-plate for product
1.
General suggestions
2
1.1
Introduction
2
1.2
Symbols
2
1.3
Intended proper use
3
1.4
Use and storage
3
1.5
Features
3
2.
Warranty
3
3.
Nameplate / order of spare parts
3
4.
Re-use, lifetime
3
5.
Disposal
3
6.
Safety instructions for use
4
7.
Product specifications
4
7.1
Scope of delivery
4
7.2
Technical specifications
4
8.
Spare parts for accessories
5
9.
Setting up the chair for use
5
9.1
Folding away footrests
5
9.2
Adjusting the footplate height
5
9.3
Using the locking brake
6
9.4
Installing/adjusting headrest
6
9.5
Adjusting the pad back incline
6
9.6
Adjusting the headrest angle
6
10.
Using the chair
6
10.1
Sitting down
6
10.2
Getting up
7
10.3
Swivelling the armrests outwards
7
10.4
Folding away footrests
7
10.5
Removing the footrests
7
10.6
Removing the seat
7
10.7
Handling the commode pan
7
11.
Troubleshooting
8
12.
Care
8
13.
Maintenance, Repair
8
Read the
instructions
Year of
Manufacture.
Product complies to the Medical
Products Directive 93/42/EWG
Caution!
Read the safety advisories
Attention!
Advisory
Important
Information!
Care
advisory
Maintenance
advisory
KB D
J
H L I
F
E
A
G
C
O
Z M N
Product description
Phoenix PU
Phoenix PS
Chair picture shows:
Table of contents
Packaging
1. General suggestions
1.1 Introduction
In this manual you will find information on safe and
proper installation, use, operation, maintenance and
care of the chairs.
Read these operating instructions carefully before
using the product. Note in particular the safety
instructions and act accordingly.
1.2 Symbols
We recommend you to keep the
packaging for a later transport. This
will allow a secure packaging for a
return transport.
- 2 -
Page 3
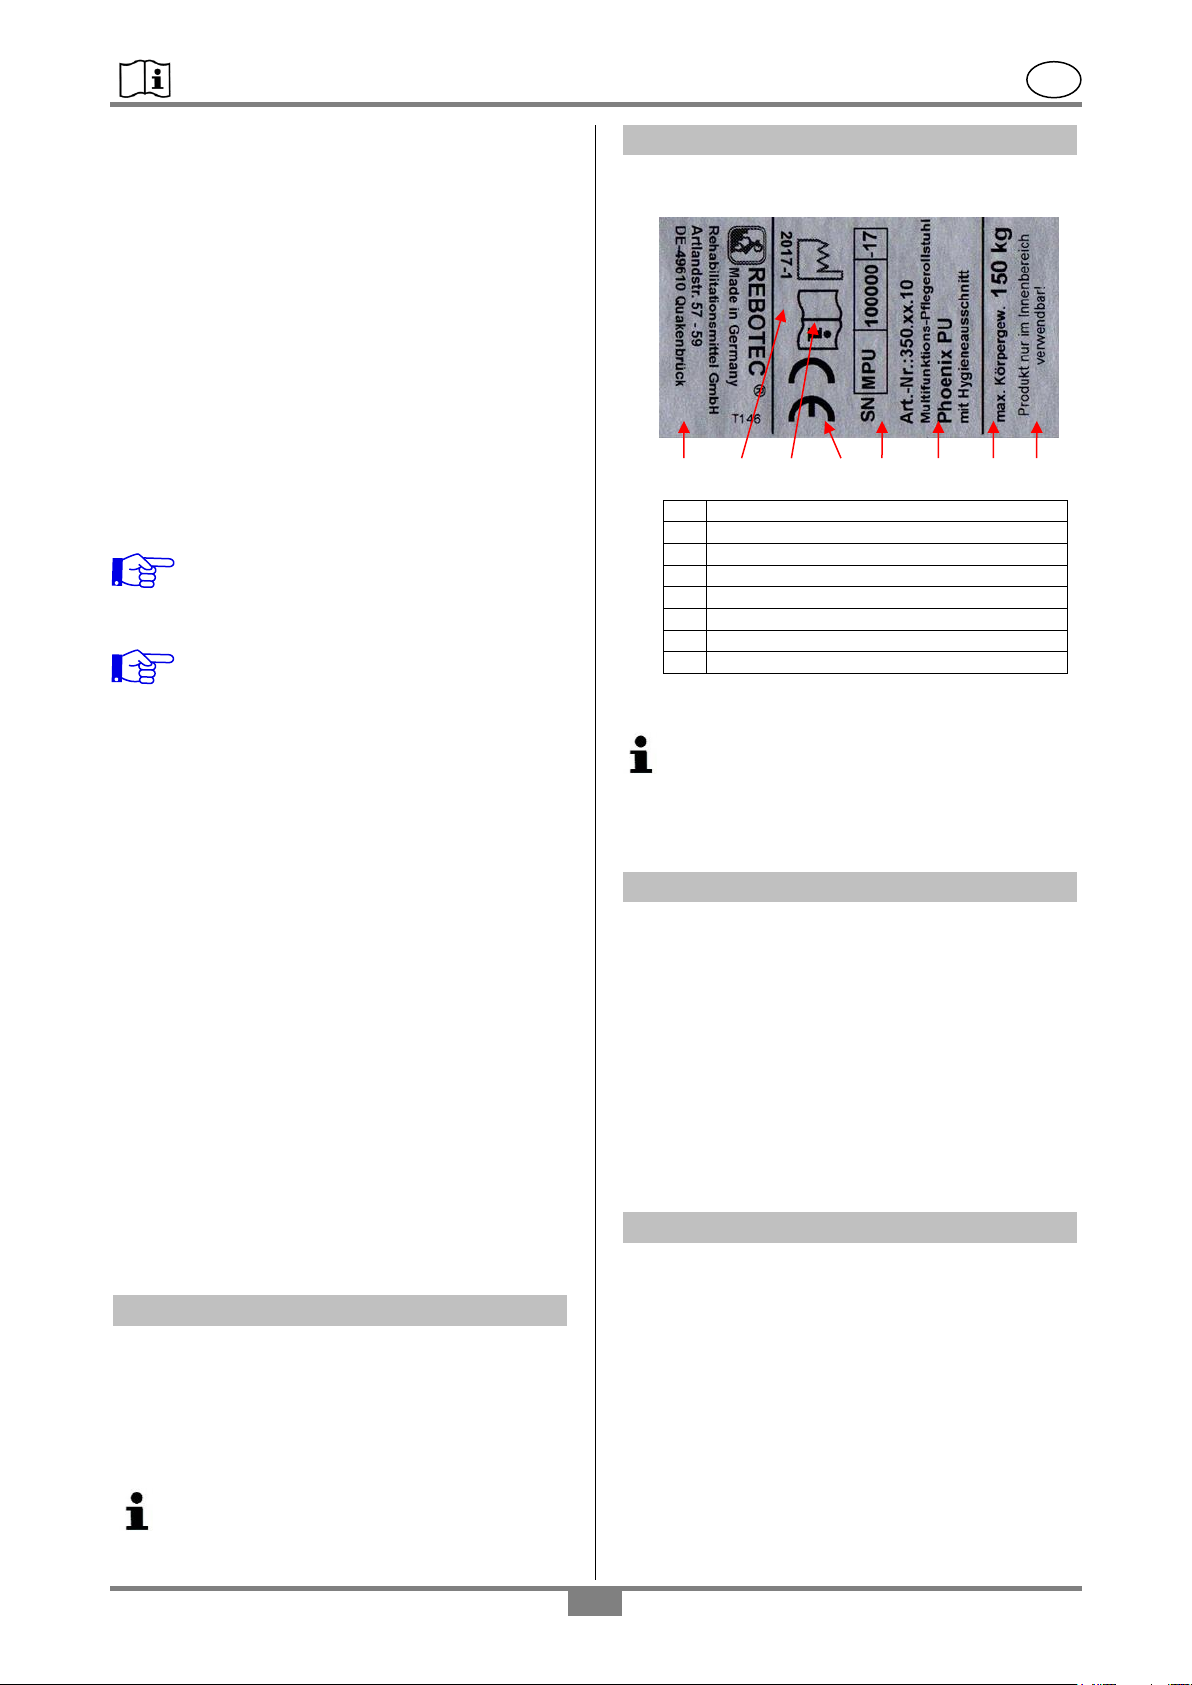
REBOTEC / BA-No.: 02.07.135/2017-01 GB
A
Mark of conformity (CE)
B
Serial number-product
C
Production year
D
Maximum body weight
E
Product name
F
Note (use)
G
Read User Manuel
H
Manufacturer details
B G A D E H F
C
1.3 Intended proper use
The multifunctional wheelchair is for homecare and
out-patient purposes. The chair is to be used
exclusively for assistance during showering or
bathing, using a toilet (only when there is a seat with
a hygiene opening: Model PU) or for transfer of
persons inside buildings.
The chair is not designed for long periods of sitting.
Driving over a toilet is not possible!
The shower cabin must be designed so that the
chair can be rolled into it unhindered.
The chair is not designed for long periods of sitting
and it is not suitable for transporting the patient over
long distances.
Persons with limited perception, injured joints to the
arms and inabaility to sit may not use the chair.
The maximum allowable user weight for
the wheelchair is 150 kg (330.69 lbs).
1.4 Use and storage
Watch out! Risk of damage
The operating temperature of the product should be
between +5° C (41° F) to +40° (104° F). Store the
product in a dry place at a temperature between
0° C (32° F) to +40° C (104° F) and humidity of
30-55%. Outside these conditions, the product may
be used only shortly.
Do not store the product near heat sources. Avoid
direct sunlight on the product.
The chair is not suitable for use in wet areas (e.g.
for saunas, areas with swimming pool-like
conditions), as surface discoloration and adverse
effects on the mechanical strength may result.
1.5 Features
The chair is made of a plastic frame on four 5-inch
castors with locks. The armrests can be swivelled
out and have an armrest lock.
The footrests are height-adjustable and can be
removed or folded. The headrest is height
adjustable and can be rotated. The incline
adjustment of the chair is done by a lever function
for the back rest of the patient.
Depending on the equipment, there is a PUR seat
for transport purposes or a PUR seat with a hygiene
opening (incl. commode pan with lid).
2. Warranty
The product has a warranty of 2 years, when
abiding by our general terms and conditions and the
intended use of the product. Unauthorised changes
made to the product, without the consent of the
manufacturer voids the warranty.
3. Nameplate / ordering of spare parts
On the nameplate you can find the following
important information:
The nameplate is very important for product
identification, and thus must not be removed.
To avoid faulty spare parts orders and to
facilitate the handling of customer complaints,
it is necessary to provide the product name,
serial number (SN) and the product’s year of
manufacture.
4. Re-use, lifetime
The product is suitable for re-use. The number of reoperations depends on the frequency of use and
manner of use of the product. Before re-use, the
product needs to be hygienically prepared and, if
necessary, the technical-functional safety of the
product needs to be re-established.
If the product is used as intended, according to the
safety instructions, the lifetime of the product is 5
years.
The effective lifetime depends on the frequency and
intensity of use, and the general conditions.
5. Disposal
Products that can no longer be used are to be
disposed of separately from regular household
rubbish. This must be done according to the local
and national regulations for environmental
protection and raw material recycling.
Please contact your local disposal company or
officials for further information.
The delivery date written on the REBOTEC-
delivery note applies as the valid start date
of the warranty period.
- 3 -
Page 4
REBOTEC / BA-No.: 02.07.135/2017-01 GB
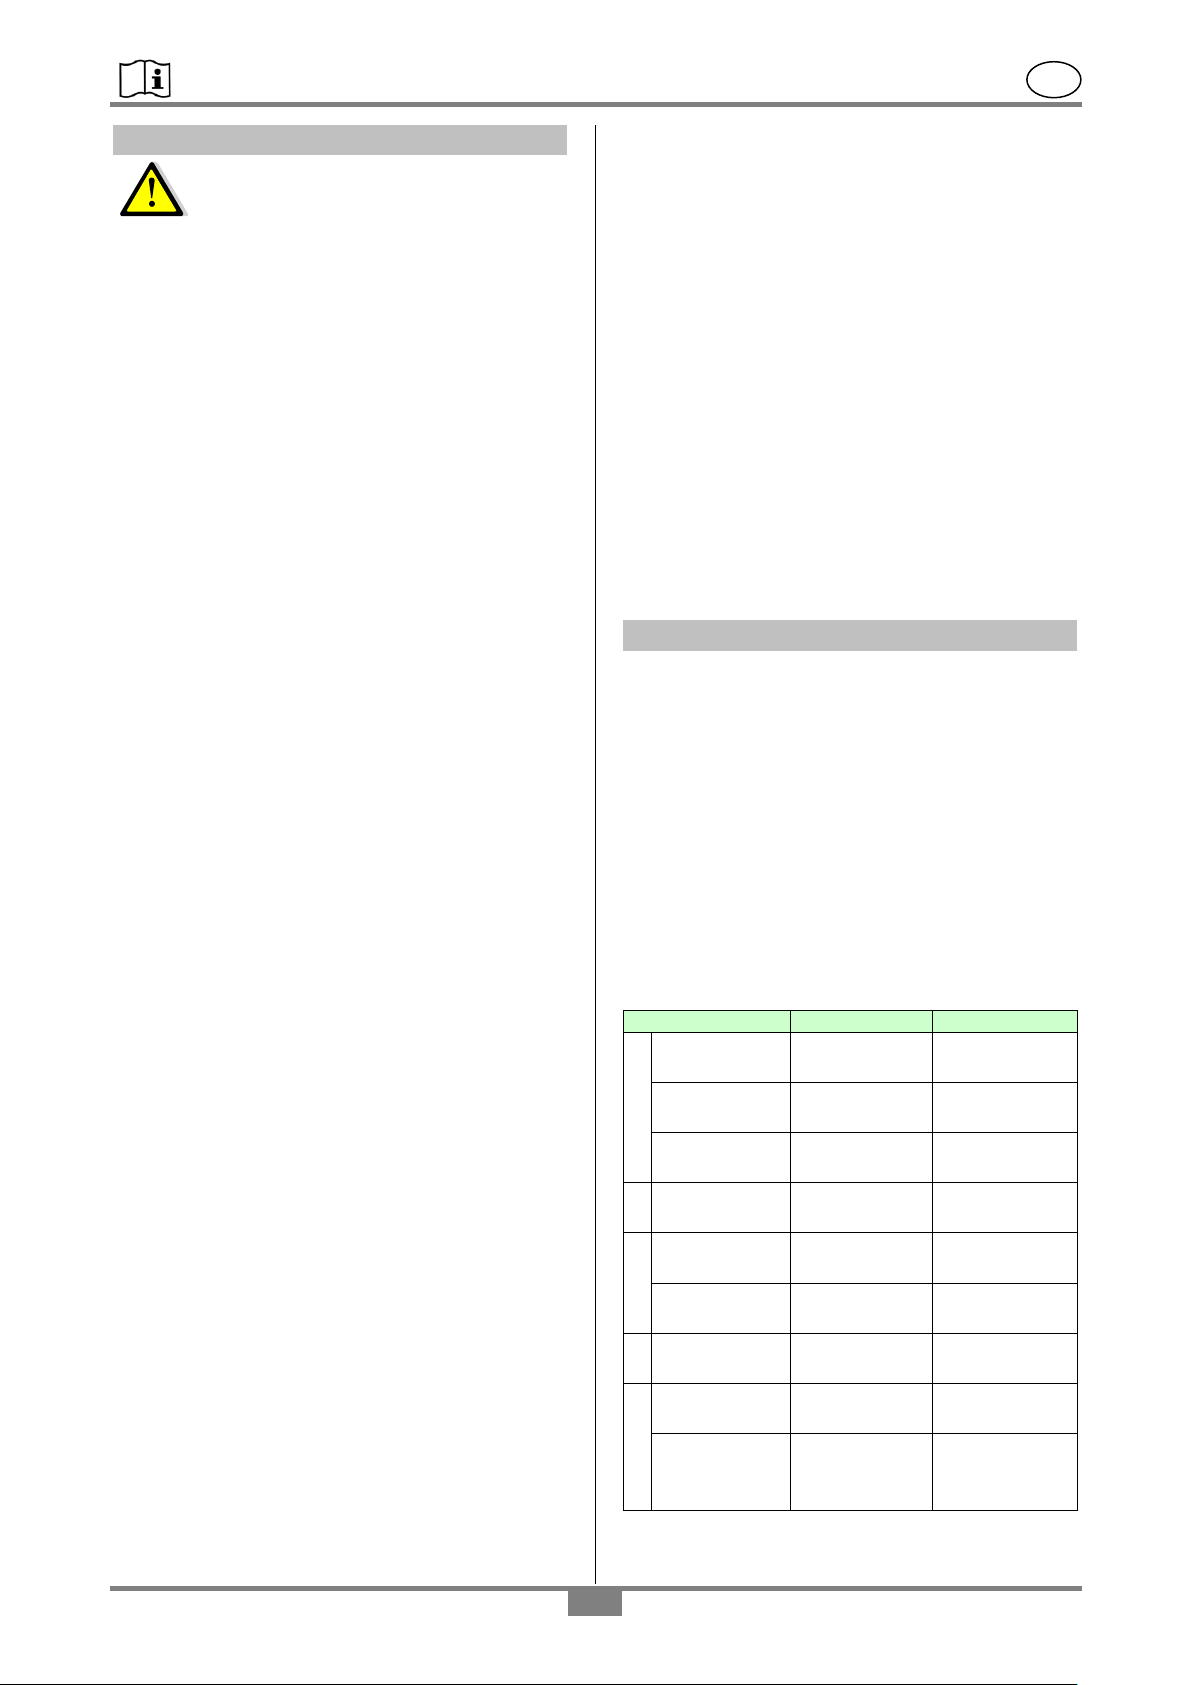
Dimension(ca.)
PU*
PS*
A
1-total height
1200mm
(47.24”)
1200mm
(47.24”)
2-total height
1160mm
(45.67”)
1160mm
(45.67”)
3-push bow
height
1040mm
(40.94”)
1040mm
(40.94”)
B
Total width
650mm
(25.59”)
650mm
(25.59”)
C
1-total depth
1110mm
(43.70”)
1110mm
(43.70”)
2-total depth
1435mm
(56.50”)
1435mm
(56.50”)
D
Seat height
575mm
(22.64”)
565mm
(22.24”)
E
Seat width
450mm
(17.72”)
450mm
(17.72”)
Width
between
armrests
540mm
(21.26”)
540mm
(21.26”)
6. Safety instructions for use
When using the chair, the following
safety instructions must be observed:
Danger of slipping!
Before using, check to be sure the seat is securely
pressed into the seat frame.
Always lock the swivel castors before using the
chair. This is to prevent the chair from rolling
away.
When sitting down into the chair, the user must
not sit on the front edge of the seat or seat
cushion. Be sure the user sits all the way back on
the seat.
Danger of tipping over!
The chair may be used when sitting, travelling and
in the inclined setting only when the armrests are
locked.
The chair may be pushed only using the push bow
(backrest).
The footrests must be swivelled away or folded up
whenever the patient sits down or gets up. The
patient must never attempt to stand on the
footrests!
The chair must not bump into door sills, jambs or
on uneven surfaces.
Use the chair only indoors on solid, even, non-
slippery surfaces.
The chair may be pushed only at a walking speed
or less (with or without the patient).
Do not lean out of the chair (when the chair is still
or in motion). If the swivel castors are swivelled
inwards, then the stability of the chair is
decreased.
Special caution must be exercised when moving
the chair when the back is inclined!
Use of the chair by patients who do not have
complete physical control and normal movement
must not be done unsupervised.
Rolling the chair on any sloped surface may be
done only with the assistance of an attendant.
Danger of breakage!
The chair is suitable only for transporting persons.
Be sure to observe the maximum allowable
patient body weight (specified on the nameplate)!
Never expose the chair to wide temperature
variations. Observe the instructions concerning
the temperature range of use (see: 1.4).
Danger of Injury!
At surface temperatures over 40°C (104°F),
there’s a risk of injury. Therefore do not expose
the chair to any source of heat (exposure to the
sun, storing near a heater, cleaning with hot
water) just before the chair is used. Before using
the chair, allow it to cool down.
7. Product specifications
7.1 Scope of delivery
The product has been carefully inspected in the
factory for freedom of defects and for completeness.
After having received it, carefully check over the
product for possible transport damages and for
completeness.
1 PU or PS shower chair (base model)
1 headrest unit
1 User Manual
7.2. Technical specifications
We reserve the right to make technical
developments and improvements with respect to
the design shown in the User Manual.
Danger of pinching!
To prevent body parts or objects from getting
pinched, never reach into the hinge area when
turning the armrests up or down. Be sure to check
that the hinge areas are unobstructed before
moving the armrests!
To prevent body parts from getting pinched, do
not reach between the seat and the frame when
pressing the seat into the seat frame.
Be sure other parts do not get jammed when
folding and unfolding the footrests.
When adjusting the headrest position, be sure no
parts of the body or objects get jammed.
There’s a risk of pinching soft flesh when pulling
out and pushing in the commode pan. To avoid
injury, the commode pan may be pulled out or
pushed in only when no one is sitting on the chair.
Danger of falling!
Sitting down, standing up and moving the patient
should be supervised by a qualified care-worker,
as to the health condition of the patient.
Before and when inclining the patient in the chair,
the patient should firmly grip the armrests.
- 4 -
Page 5
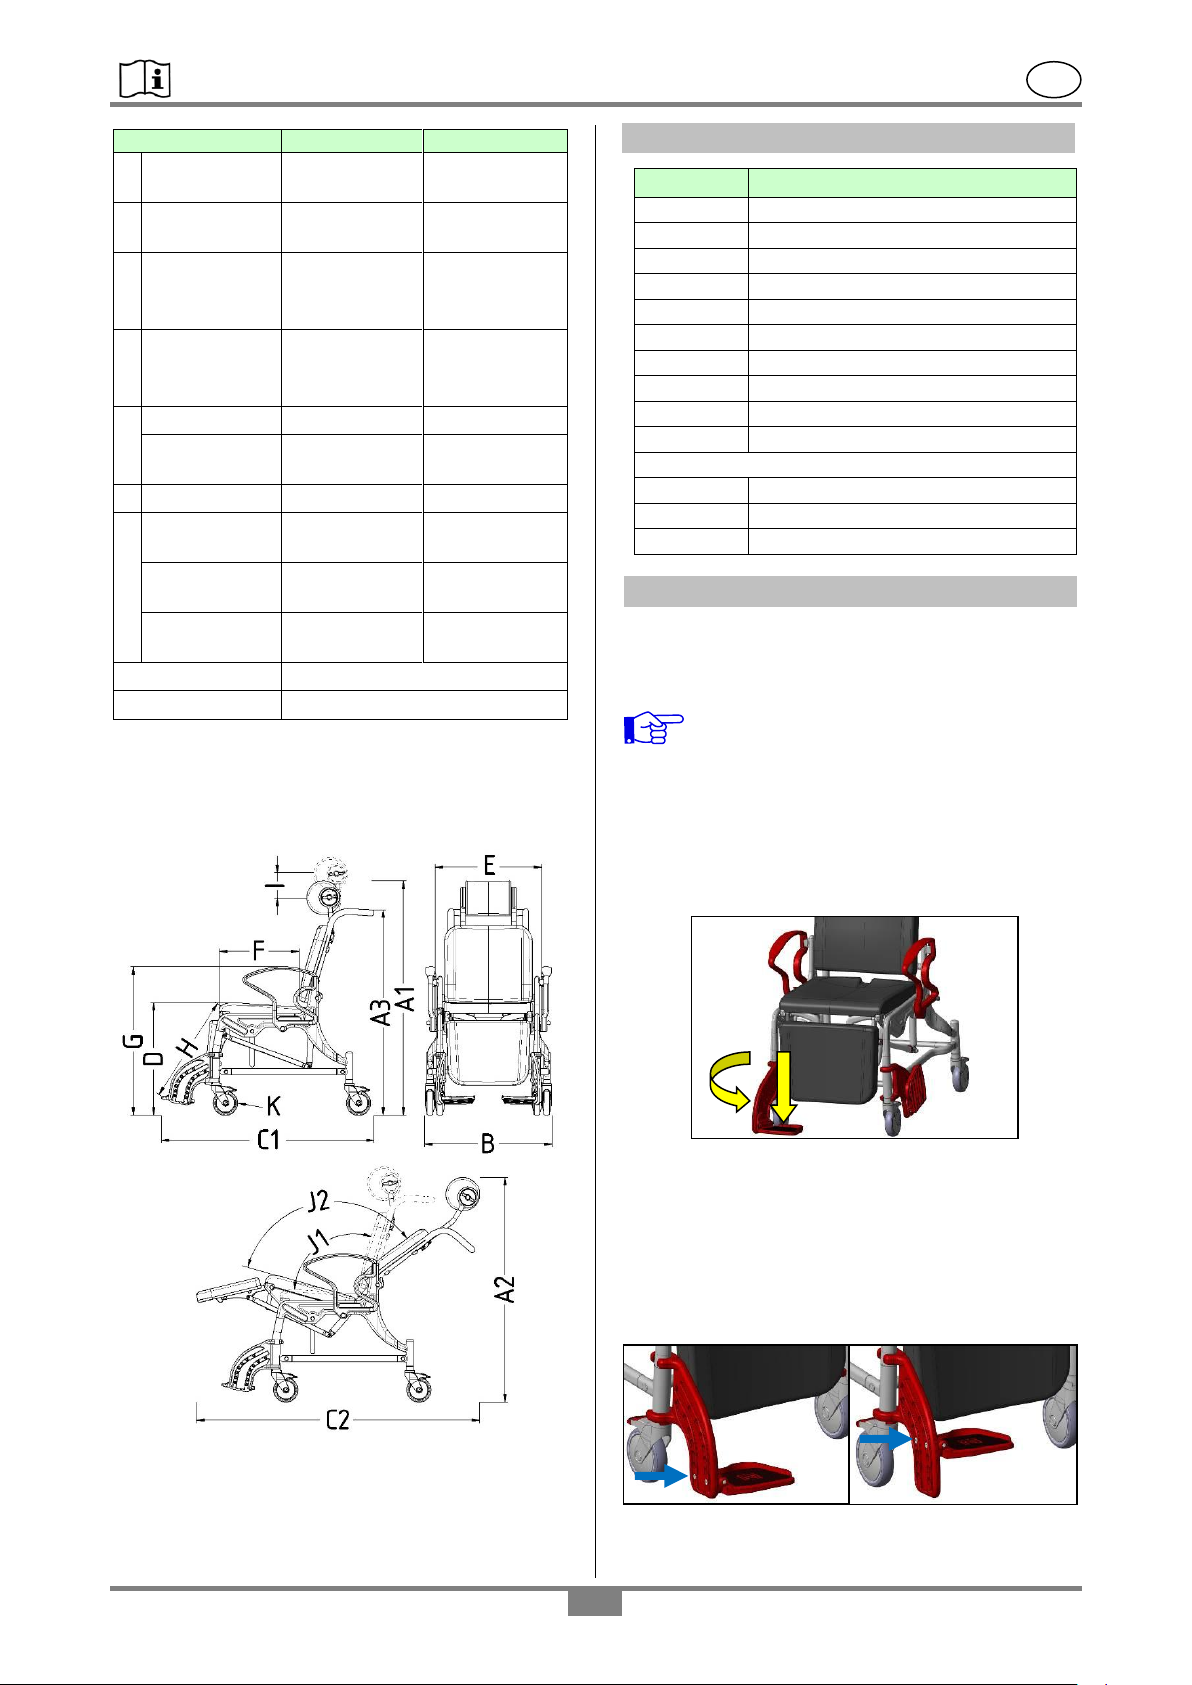
REBOTEC / BA-No.: 02.07.135/2017-01 GB
Article No.
Name
301.xx
Commode pan with lid
309.10
Pan receptacle, black
440.10.62
PUR seat
440.10.14
PUR care seat with care opening
440.10.24
PUR care seat without care opening
450.00.09
PUR back cushion
450.10.17
PUR leg support
450.10.58
PUR headrest roll, Design 1
02.07.135
User Manual-Phoenix
02.10.151
Maintenance Instructions (see 13)
Accessories
450.10.59
PUR headrest roll, Design 2
440.10.32
PUR armrest cushion (1 piece)
440.10.40
PUR splash protection
Dimension(ca.)
PS*
PU
F
Seat depth
(middle)
440mm
(17.32”)
430mm
(16.93”)
G
Armrest
height
760mm
(29.92”)
760mm
(29.92”)
H
Footrest
height
440-520mm
(17.32-
20.47”)
430-510mm
(16.93-
20.08”)
I
Height
extension of
head rest
120mm
(4.72”)
120mm
(4.72”)
J
1-seat angle
103°
103°
2-laying
angle
128°
128°
K
Castors Ø
125mm (5“)
125mm (5“)
Turn radius
1170mm
(46.06”)
1170mm
(46.06”)
Body weight
max. 150kg
(330.69 lbs)
max. 150kg
(330.69 lbs)
Chair weight
29,3kg
(64.60 lbs)
28,8kg (63.49
lbs)
Skin compatibility
As to DIN EN 10993-5
Inflammability
As to DIN EN 1021-2 **
Min
Max
1
2
8. Spare parts, accessories
9. Setting up the chair for use
The product is delivered partially pre-assembled.
The following assembly instructions must be carried
out before first-time use.
* Dimensions for model head rest roller, Design 1
**Flame-retardant: article made of PUR material
Production dimensional tolerances: +/- 5mm (0.2”)
Sketch:
Before the first-time use, all the chair’s
adjustments must be carried out by a
qualified worker.
9.1 Unfolding the footrests
Rotate (1) the footrests forward until they click into
position. Fold down (2) the footrests.
Adjust the footrest support if necessary.
9.2 Adjust the footplate height (see sketch figure I)
The footplate can be placed at 4 different levels.
Remove the screws on the side of the foot plates
with an Allen key (SW 5).
Select the appropriate level (1-4) and firmly screw
the footplates back on. Be sure that the screws are
firmly seated!
- 5 -
Page 6
REBOTEC / BA-No.: 02.07.135/2017-01 GB
B
Inclined
setting
C
down
The setting
for sitting
D
A
A
C
B
D
up
A
A
B
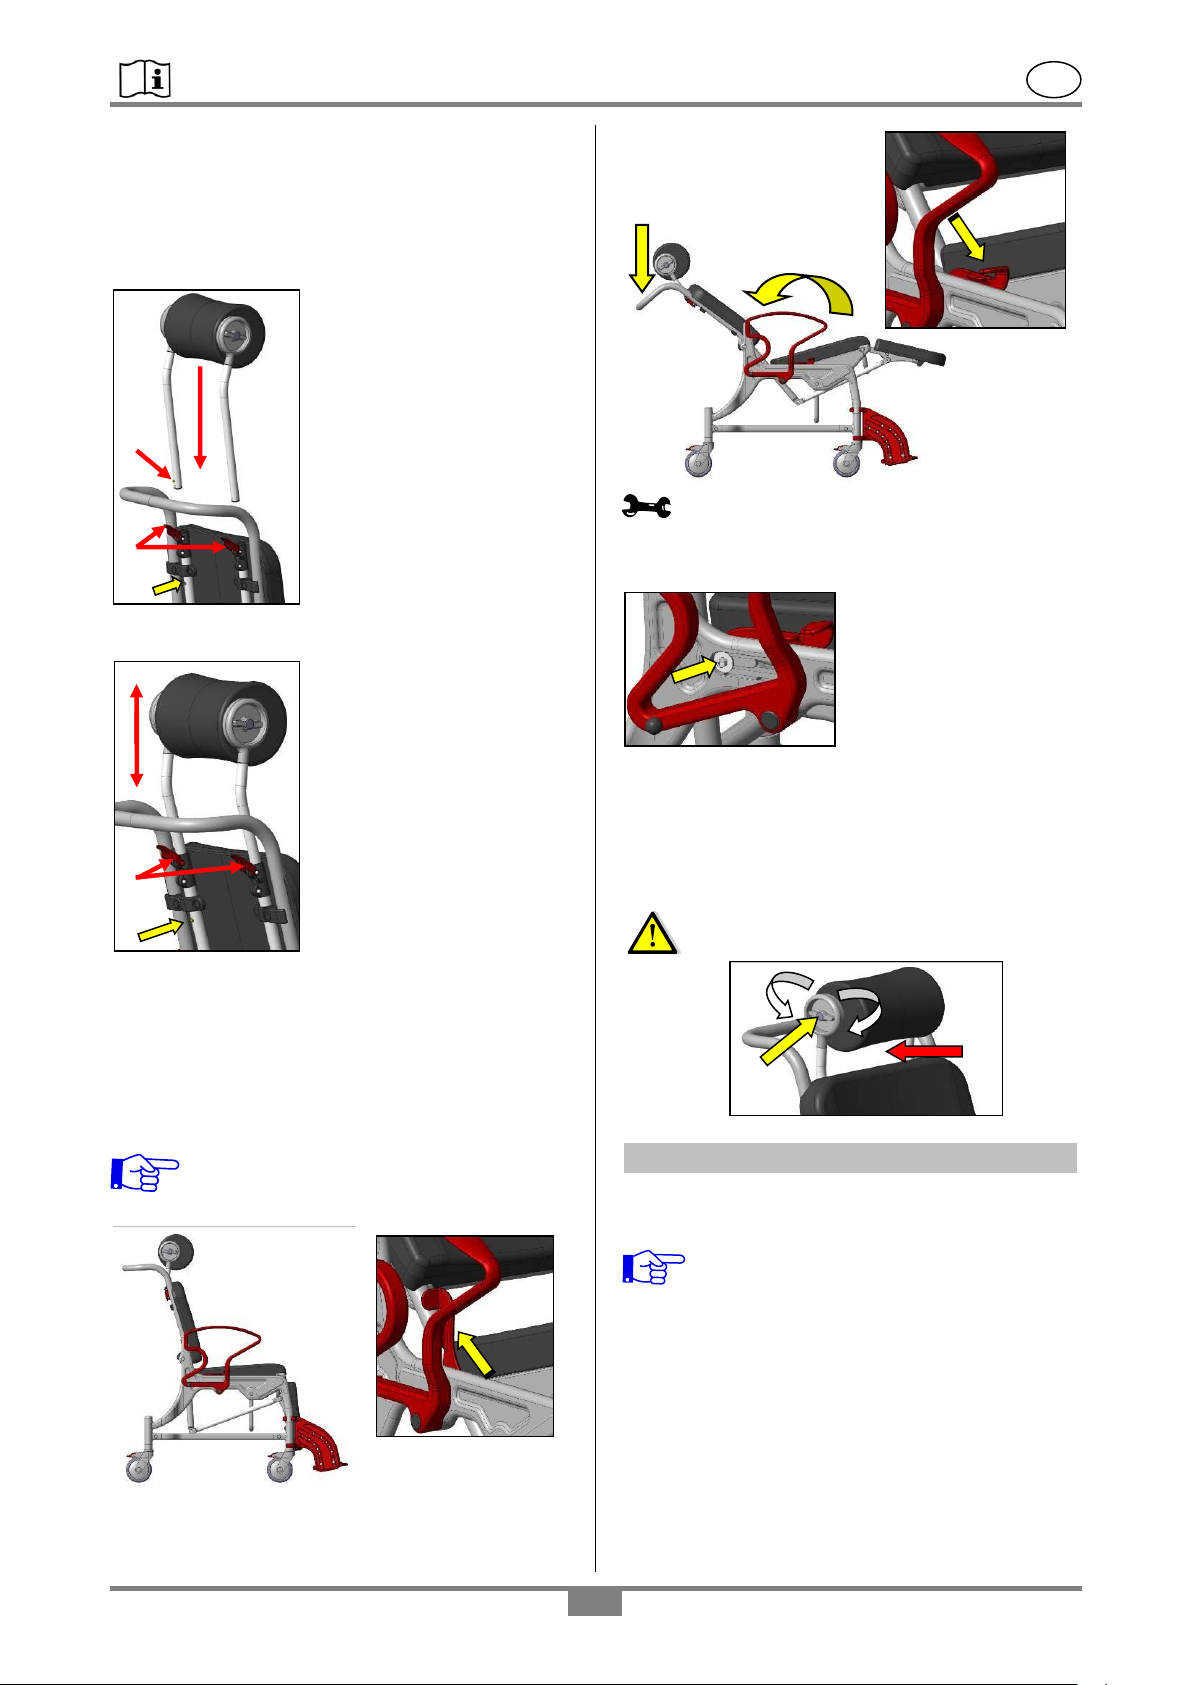
9.3 Using the locking brakes
Using your foot, press the locking brake
downwards. The wheel is now locked. Releasing
the wheel is done by lifting the activation lever with
your foot.
9.4 Installing and adjusting the headrest
Move the levers (A) upwards
and insert the tubes of the
headrest unit into the
openings.
Push the tubes in until the
push-button (C) snaps into
the hole (D).
Next press the push-button
(C) all the way in and push
the tubes in until they hit the
end striker. Then tip the
levers (A) all the way down.
Adjusting the height and depth
To adjust the height of the
headrest, tip both levers (A)
up and push the headrest to
the appropriate height.
The headrest is now
steplessly adjustable
(approx. 120mm, 4.72”) until
the push-button (D) snaps
into the hole (end position).
After adjustment, tip both
levers (A) once again all the
way down.
9.5 Adjusting the pad back incline
The backrest may be steplessly inclined back up to
approx. 37°. Here the seat inclines up to 12°. Next
pull the locking levers (A) vertically upward and
push the backrest (B) downward until the desired
position is reached. Next press the locking levers
(C) all the way down.
When adjusting the incline, be sure that no
parts of the body or objects get jammed and
that the armrests are locked.
Maintenance advisory
If the function of the locking lever is too difficult or
too easy, the clamping effect can be regulated.
Next push the cover cap back on and lock the
armrests back into position.
9.6 Adjusting the headrest angle
By turning the rotary head (A), the angle of the
headrest can be adjusted.
Remove the cover cap.
With an Allen key (SW5),
the clamping effect of the
lever is increased by
turning right. By turning
the Allen key to the left,
the clamping effect is
decreased.
Caution! Danger of pinching between (B)
the headrest and the pad back.
10. Using the chair
When using the chair, the following points must
be adhered to.
Before use it must be assured that the chair
is in a proper condition for safe use. If
necessary, depending on the physical and
strength limitations of the user (patient’s
ability to move and muscle strength), sitting
down and getting up should not be done
without assistance from an attendant.
The chair may not be used for long patient
transport times.
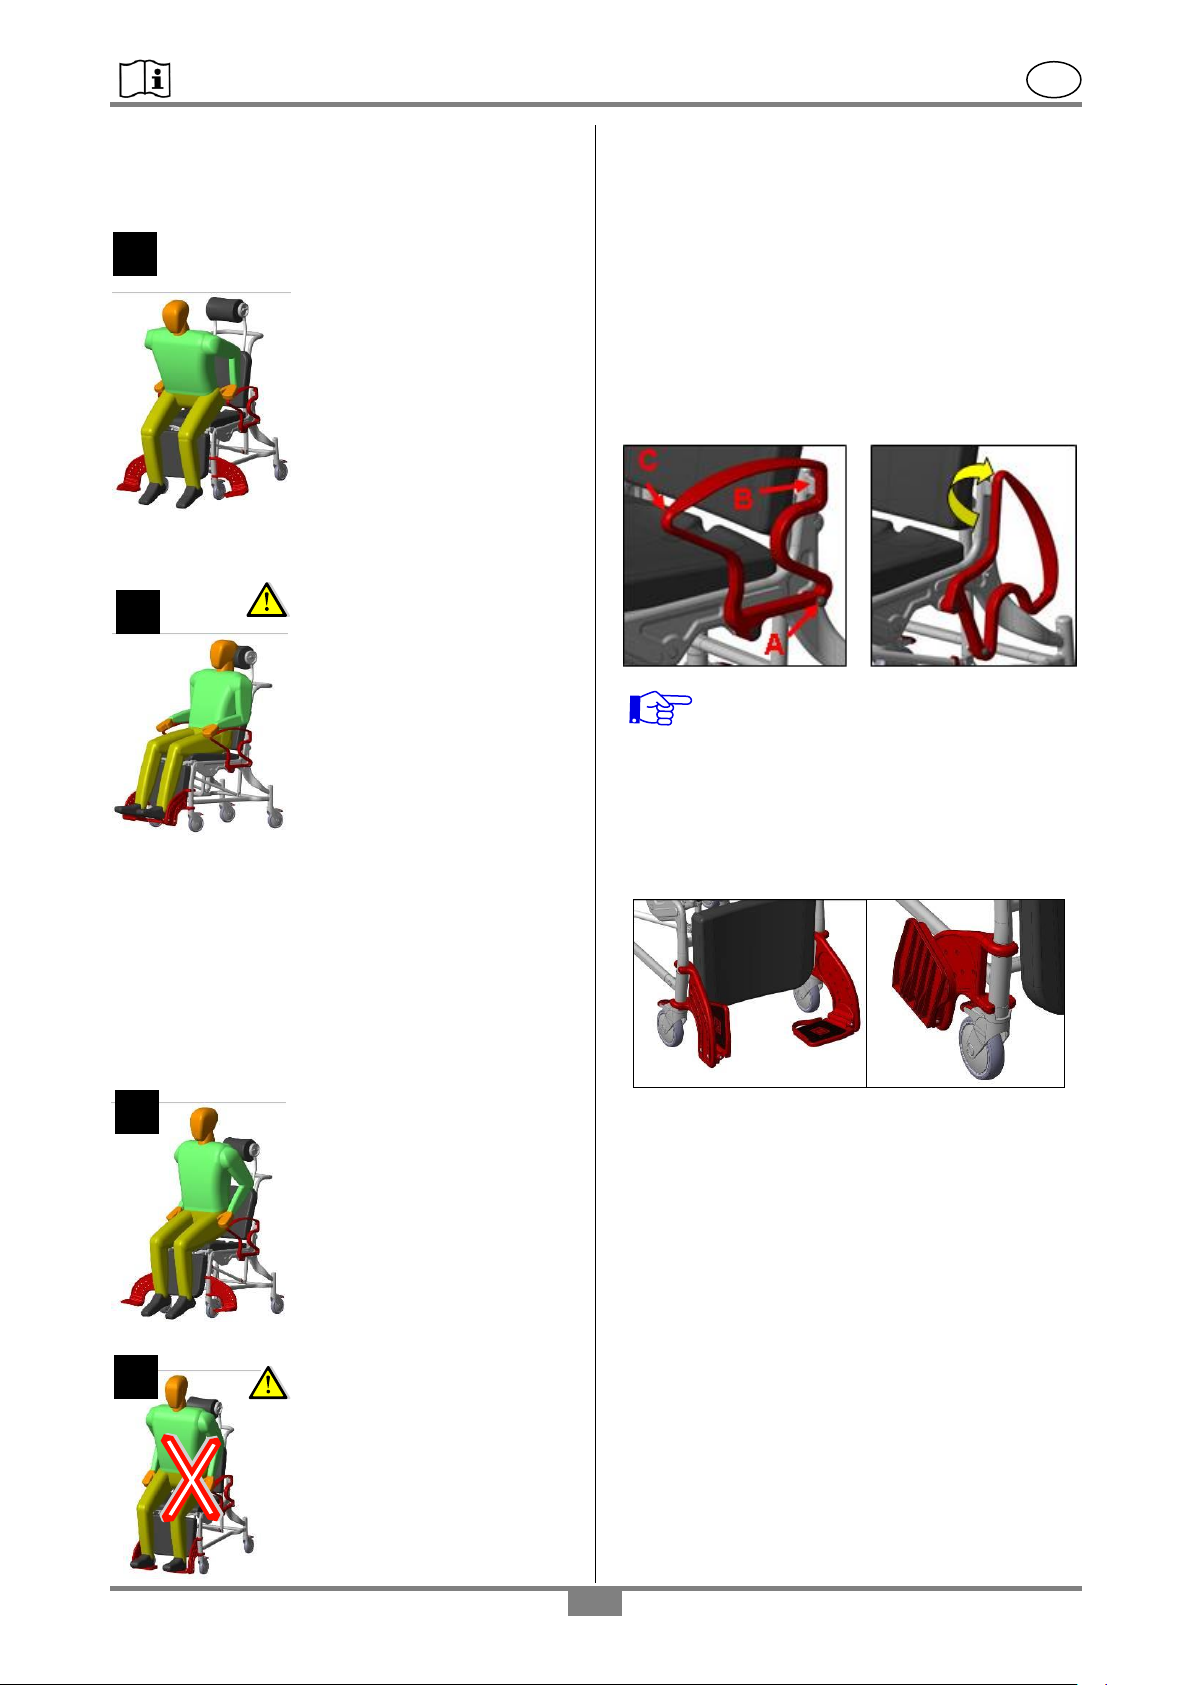
10.1 Sitting down
Before sitting down in the chair, be sure it is secured
against slipping away (see: 9.3) and tipping over.
Be sure that the armrests are locked into position,
- 6 -
Page 7
REBOTEC / BA-No.: 02.07.135/2017-01 GB
1 2 3
4
that the shower/commode seat is properly mounted,
and that the footrests are folded away to the side or
folded up.
The patient must stand as
closely as possible near the
chair. Then he has to sit down
slowly on the whole seat while
supporting himself using both
armrests.
If this is not possible due to his
physical limitations, then a
care-worker must assist him.
If necessary a patient lifter may
have to be used.
Caution – danger of falling!
To prevent the patient from
falling out of the chair, be sure
the patient is seated
completely on the chair, and
not just on the seat’s edge.
For transporting the patient, be
sure he/she is leaned back
against the pad back and be
sure he/she uses the footrests.
10.2 Getting up
Before getting up, be sure the chair is stable and
secured against slipping away (see: 9.3) and tipping
over. Be sure the armrests are locked in position,
and the footrests are folded away to the side or
folded up.
10.8 Swiveling away the armrests
By pulling out the latching pins (A) the locking effect
is disengaged and the armrests may be swiveled
back. Whenever swiveling the armrests back, check
to be sure that they are fully and properly latched in
the mounting mechanism of the backrest (B) and
that the latching pins (A) are engaged. Swiveling the
armrests is done with both hands. Keep the locking
pins (A) pulled out during the entire swivel action,
and move the armrest at point C with the other hand.
While doing so, touch only the outside surfaces and
do not grab into the armrest or through it.
Check the latching mechanism on a regular
basis because possible caking up of
calcium deposits at the latching area can
adversely effect its function and its ability to
move properly.
10.4 Folding away the footrests
Swivel the footplates upwards and lift the footrests.
The footrests can now be swivelled back to the side.
The patient must then move his body forward until
his feet are flat on the floor.
The patient must then place
both hands on the armrests
and slowly lift himself up.
The patient must not lean too
far forwards in order to avoid
falling.
The patient should have the
care-worker assist him when
getting up.
Caution – danger of falling!
The patient must not stand on
the footrests when getting up or
leaving the chair.
10.5 Removing the footrests
Lift up the footrests approx. 100 mm (3.94”) and turn
them outwards 90°. Remove the front cover panel
on the side frame.
Now you can lift the footrests up and remove them.
Install the panel once again!
10.6 Removing the seat
The seat with (I) and without (O) care opening, the
leg pad (K) and the pad back (H) can be removed
from the mounts of the seat frame for cleaning or for
replacement.
(See product description, page 2)
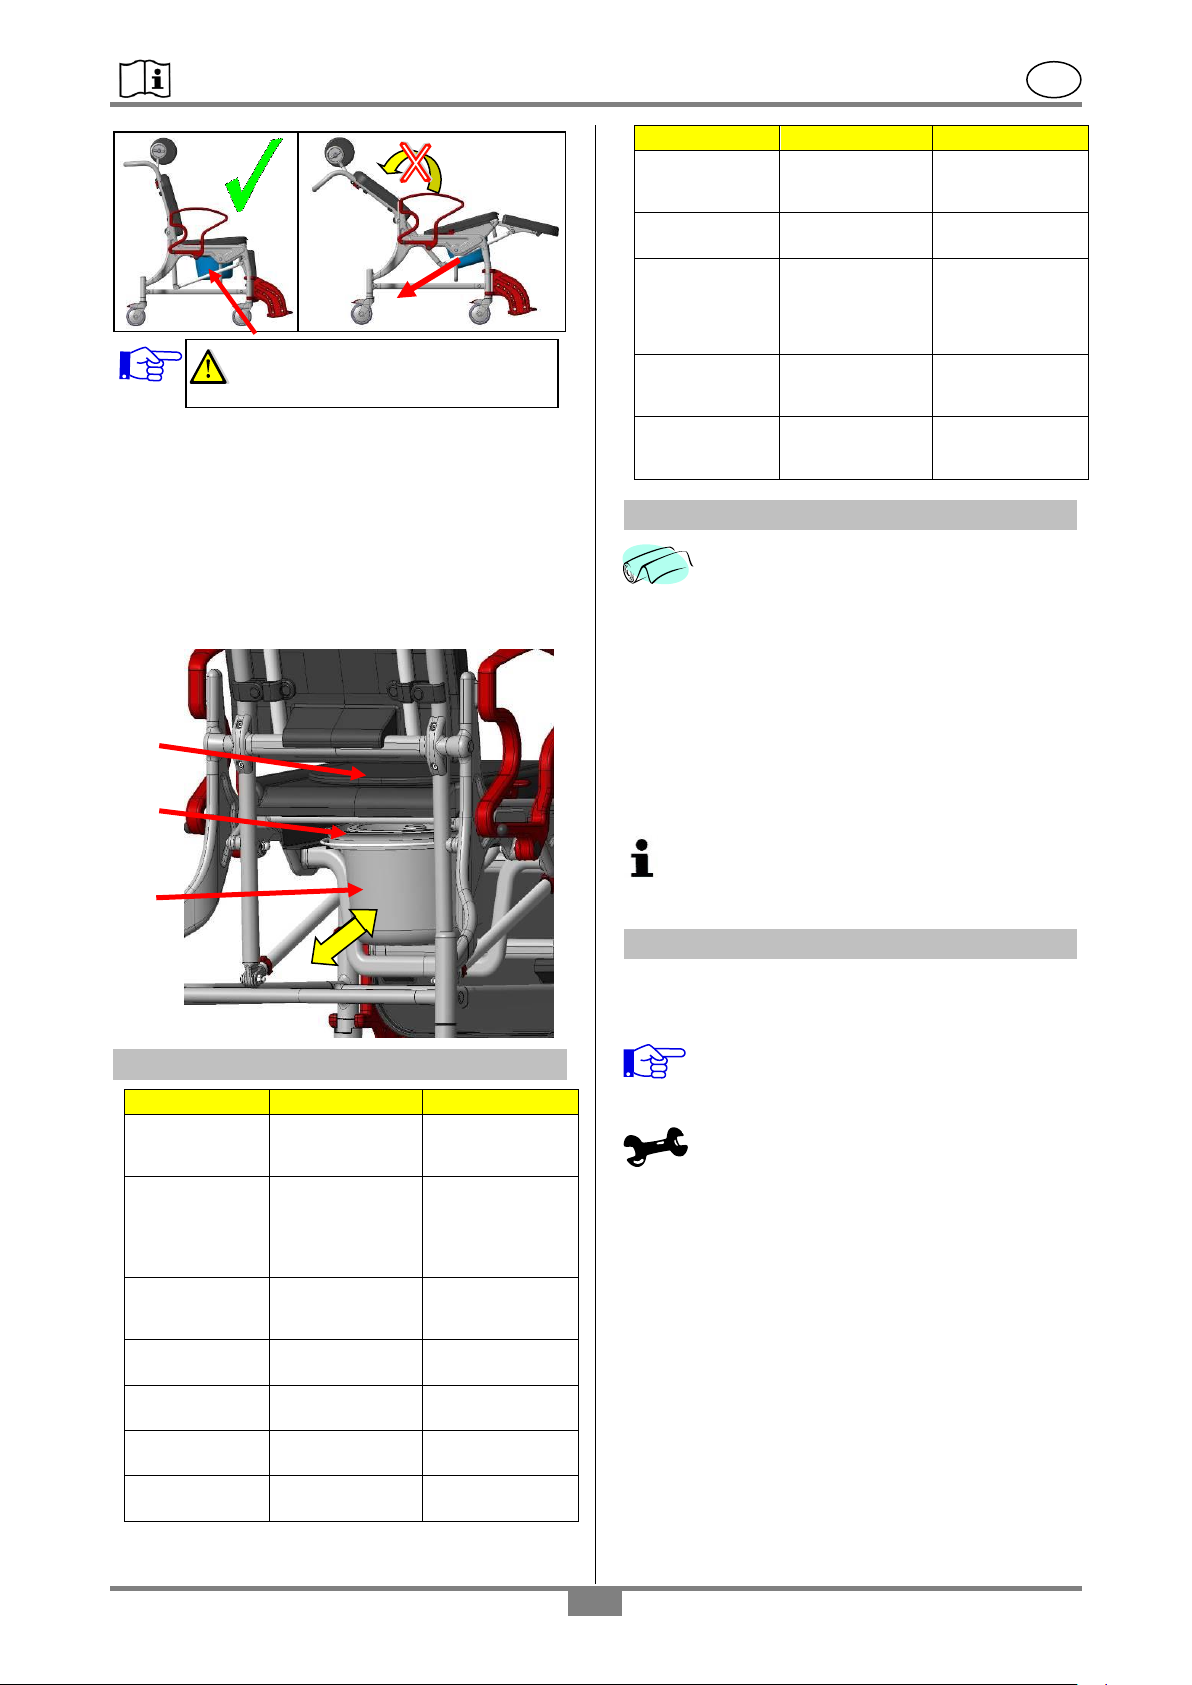
10.7 Using the commode pan with lid
When using the chair with the commode pan (A),
use is only possible when the chair is in the sitting
position (1) and not in the inclined position (2)
because otherwise the commode pan falls out.
Follow the instruction on the sticker on the chair’s
frame side near the armrest.
- 7 -
Page 8
REBOTEC / BA-No.: 02.07.135/2017-01 GB
Fault
Poss. cause
Correction
Armrests do
not swivel
properly
Locking pins are
caked up with
deposits
Clean, check
periodically
Locking pins
cannot be
pulled out
Caked up,
tension spring is
jammed or
defective
Clean,
replace locking
pin
Footrests do
not swivel
properly
Caked up joints,
jamming
Clean,
check screw
connection
Castor locks
do not lock
Generally
defective
See Section
Maintenance!
Wheel turns
with difficulty
Deposits buildup
Clean
Wheel does
not rotate
Generally
defective
See Section
Maintenance
Wheel no
longer round
Wheel unevenly
worn
See section on
Maintenance
Fault
Poss. cause
Correction
Chair frame
too unstable
Screws are
loose
Tighten frame
and castor
screws
Castors are
bent
Bumped into
objects
See Section
Maintenance!
Lever for pad
back incline
adjustment
has no function
Jammed,
broken, scaling,
Screw too loose
or tight
Inspection,
Maintenance
Pad back
incline adjust
has no function
Functional
defect
Inspection,
Maintenance
Headrest
adjustment has
no function
Functional
defect
Inspection,
Maintenance
A
C
B
Attention! Remove the commode
pan before inclining the chair!
Handling
From the back side push the commode pan (A)
under the chair (first remove toilet lid B). To remove
it, slightly lift up the commode pan and pull it
outwards.
12. Care
The armrests must be locked in order to prevent the
patient from falling. Once the commode pan is
removed, the seat (C) must be put back onto the
chair.
11. Troubleshooting
In general the chair can be cleaned using a
mild conventional cleaning and disinfecting
agent. Simply wipe the chair with clean
water and cloth, and then wipe dry with a
clean cloth.
Do not use an abrasive scouring agent or cleaner
(read the product instructions!) that contain
aggressive solvents (acids, thinners). Do not use
stiff cleaning brushes, as these will damage the
plastic surfaces or cause deposits to build up on the
plastic parts and other materials.
Keep the product clean and clean it in regular
intervals. In the sensitive areas hygiene is
very important.
13. Maintenance, Repair
The cause of accidents or damage may be due to
the late detection of wear and/or improper use, as
well as irregular or no maintenance.
For safety reasons and for preventing
accidents, the chair must undergo a
complete maintenance at least once a
year. (Refer to the Medical Products Act).
Maintenance
Periodic safety-related controls are needed:
Check for apparent damage:
(cracks, fractures, loose parts).
All screwed connections for tightness
(especially the castor wheels and the frame).
Function of the armrests and locking pins.
Function of the footrests
(replace defective footrests).
Rolling ability, check function of the wheels
(replace defective wheels).
Headrest function
Pad back incline adjustment function
Check accessories for defects.
- 8 -
Page 9
REBOTEC / BA-No.: 02.07.135/2017-01 GB
Repair
If you have questions concerning maintenance
and repairs to the chair, then contact an
authorized dealer or medical equipment supply
outlet.
When making repairs, use only original spare
parts from REBOTEC. Observe all advisories
concerning guarantee and warranty.
Never make any unauthorised modifications or
conversions to the chair. These will only
adversely affect the safety and function of the
chair.
In such cases REBOTEC assumes no
liability!
Follow all the instructions when ordering spare
parts, re-use and product lifetime of the chair.
After a complete maintenance or repair of the
chair is done, we recommend a complete
cleaning for assuring hygiene. Follow the
cleaning instructions.
For documenting maintenance, REBOTEC
supplies a Maintenance Report – Chairs.
Here you will find information on maintenance
and forms for documentation.
You can order the User Manual and the
maintenance report, or see our website at
www.rebotec.de. It is possible to print out
the information and to read it as needed.
- 9 -
Page 10
REBOTEC / BA-No.: 02.07.135/2017-01 GB
- 10 -
Page 11
REBOTEC / BA-No.: 02.07.135/2017-01 GB
- 11 -
Page 12
REBOTEC / BA-No.: 02.07.135/2017-01 GB
Notice:
We also suppl
Walk ing aids
crutches
Shoulder
Show er stools
Shower and commode chairs
ultifunction-W heel
M
Patient lifting hoists Standing u p aids
Your REBO
y
Chairs
TEC Team
Rollators
- 12 -
 Loading...