

RealWear HMT-1 T1100G User Manual

HMT-1
User Guide (English)
Version : 2
FREE YOUR HANDS™ with HMT-1® from
RealWear® Using WearHF™ and WearML
™
2
Copyright Information
Copyright © 2017 RealWear, Inc.
RealWear and the RealWear logo are trademarks of RealWear, Inc. Other company and product
names may be trademarks or registered trademarks of the respective owners with whom they are
associated.
RealWear may update this guide from time to time. You should ensure you are using the most
current version which can be found at https://realwear.com.
Revision History
Revision Date Description

3
Table of Contents
Copyright © 2017 RealWear, Inc. - - - - - - 2
Safety Usage Warnings - - - - - - 6
Disposal of Old Electrical and Electronic Equipment - - - - - - 6
Disposal of Battery - - - - - - 6
Guideline for Headphone and Earphone - - - - - - 7
General Information - - - - - - 8
Head Mounted Tablet Models Covered - - - - - - 8
Operating Frequency Bands - - - - - - 9
5G Wi-Fi Connection Information - - - - - - 9
RealWear Support Information - - - - - - 9
Safety Guidelines - - - - - - 10
Battery Performance - - - - - - 10
Battery Replacement - - - - - - 10
Avoid Short Circuit - - - - - - 10
Avoid High Temperatures - - - - - - 11
Battery Disposal - - - - - - 11
Child Safety - - - - - - 11
Health and Safety Warnings - - - - - - 11
SAR Information - - - - - - 12
Charger Use Safety Instructions - - - - - - 13
Introduction - - - - - - 15
About the RealWear HMT-1 - - - - - - 15
HMT-1- Parts Representation — Front View and Battery Housing - - - - - - 16
HMT-1 Parts and Functions — Front View and Battery Housing - - - - - - 17
HMT-1 — Parts Representation — Side View with USB Type - C Port - - - - - - 18
HMT-1 — Parts Representation — Side View with Micro USB Port - - - - - - 20
Wearing RealWear HMT-1 - - - - - - 21
Adjusting Display Pod - - - - - - 21

4
Fitting HMT with Optional Accessory Mounts - - - - - - 23
Inserting Rechargeable Battery - - - - - - 23
Charging HMT-1 - - - - - - 24
Inserting and Setting Up MicroSD Card - - - - - - 25
Using Voice Commands - - - - - - 34
Speech Recognition — Say What You See - - - - - - 34
Global Commands - - - - - - 35
Anytime Access Help - - - - - - 35
Alternate Speech Recognition - - - - - - 35
Mute Microphone - - - - - - 37
About Notications - - - - - - 38
Scroll Up and Down - - - - - - 39
Head Gesture - - - - - - 39
Virtual Hands-free Keyboard - - - - - - 41
Alphabet Keyboard - - - - - - 43
Symbol Keyboard - - - - - - 45
Number Keyboard - - - - - - 46
Setting Up HMT-1 - - - - - - 49
Setting Up HMT-1 Using Remote Conguration - - - - - - 49
Using Control Panel - - - - - - 50
HMT-1 Settings - - - - - - 51
Setting Up Screen Lock Using Android Settings - - - - - - 54
Updating HMT-1 Software - - - - - - 60
Warning Messages to Note During Software Update - - - - - - 63
Connecting HMT-1 to Computer - - - - - - 64
Using HMT-1 - - - - - - 65
Switching ON - - - - - - 65
Home Screen - - - - - - 65
Control Buttons in Home Screen - - - - - - 66
Selecting HMT-1 Interface Language - - - - - - 67
Accessing Home Screen - - - - - - 67

5
Accessing Application Launcher - - - - - - 67
Accessing Recent Applications - - - - - - 69
Accessing My Camera - - - - - - 71
Camera Functions - - - - - - 72
Accessing File Browser - - - - - - 73
File Manager Functions - - - - - - 74
Using Media Player - - - - - - 75
Media Player Functions - - - - - - 75
Playing Audio Files - - - - - - 76
Audio Player Functions - - - - - - 77
Using Document Viewer - - - - - - 78
Document Viewer Functions - - - - - - 78
Using Document Viewer — Multi Page Document - - - - - - 79
Deleting Files from File Manager - - - - - - 79
Using Barcode Scanner - - - - - - 81
Supported Barcode Types - - - - - - 82
Limited Warranty and Software License - - - - - - 83
Denitions - - - - - - 83
Software and Documentation - - - - - - 83
Limited Hardware Warranty - - - - - - 84
Exclusion of Certain Damages, Limitation of Liability - - - - - - 87
Regulatory Statements - - - - - - 89
FCC Statement - - - - - - 89
FCC Caution - - - - - - 90
IC Statement — English - - - - - - 90
IC Statement — Français - - - - - - 90
IC Statement — FOR WLAN 5GHZ DEVICE - - - - - - 91
Declaration of Conformity - - - - - - 93
EU Regulatory Conformance - - - - - - 93
Europe Restriction Symbol - - - - - - 93
Declaration of Conformity - - - - - - 94

6
Safety Usage Warnings
• — Do not use HMT-1 while driving.
• — Always wear HMT-1 with eye protection.
• — Always use your dominant eye for comfortable viewing.
Disposal of Old Electrical and Electronic Equipment
The symbol of the crossed-out wheeled bin indicates that within
the countries in the European Union, this product, and any
enhancements marked with this symbol, can not be disposed as
unsorted waste but must be taken to separate collection at their
end-of-life.
Disposal of Battery
Please check local regulations for disposal of batteries. The battery
should never be placed in municipal waste. Use a battery disposal
facility if available.

7
Guideline for Headphone and Earphone
To prevent possible hearing damage, do not listen at high volume
levels for long periods.
A pleine puissance, l’écoute prolongée du baladeur peut
endommager l’oreille de l’utilisateur.

8
General Information
RealWear HMT-1 is designed for skilled technicians and engineers employed in eld service,
equipment inspection, maintenance and complex manufacturing.
Head Mounted Tablet Models Covered
This user guide covers the following RealWear HMT-1 model: T1100G. You can nd the model
name on the HMT-1 device label on the rear side of the tablet.
Model number

9
Operating Frequency Bands
Wi-Fi operating frequency band(s) details are as follows:
• 802.11a
• 802.11b
• 802.11g
• 802.11n HT20 (2.4GHz)
• 802.11n HT40 (2.4GHz)
• 802.11n HT20 (5GHz)
• 802.11n HT40 (5GHz)
• 802.11ac
Bluetooth: 10.55 dBm
5G Wi-Fi Connection Information
Operations in the 5.15 — 5.35GHz band are restricted to indoor use only.
RealWear Support Information
For additional product and support information, use the following information:
• E-mail: support@realwear.com
• Website: http://www.realwear.com
• Postal address: 600 Hatheway Road, Vancouver, WA — 98661
10
Safety Guidelines
Battery Performance
A rechargeable battery powers your device. Always use only the original type of RealWear battery
that came with the device. Use the battery only for its intended purpose. Never use any charger
or battery that is damaged. If the battery is completely discharged, it may take a few minutes
before the charging indicator appears on the display or before the device can be used. The
full performance of a new battery is achieved only after 3 to 4 complete charge and discharge
cycles. The battery can be charged and discharged for multiple cycles but it will eventually wear
out. Unplug the charger from the electrical plug and the device when not in use. Ensure that you
do not leave the fully charged battery connected to the charger. If left unused, a fully charged
battery will lose its charge over time.
There is a risk of explosion while charging if an incorrect battery other than the
specied model is used.
Battery Replacement
If the HMT-1 battery is not charging properly, replace the battery with an original RealWear
battery. If a replacement battery is being used for the rst time or if the battery has not been
used for a prolonged period, it may be necessary to connect the charger and then disconnect and
reconnect it to begin charging the battery.
Avoid Short Circuit
Do not short-circuit the battery. An accidental short-circuit can occur when a metallic object
such as a coin, clip, or pen causes direct connection of the positive (+) and negative (-) terminals
of the battery. This might happen, for example, when you carry a spare battery in your pocket or
toolbox. A short-circuit at the terminals may damage the battery or the connecting object.

11
Avoid High Temperatures
Leaving the battery in hot or cold places, such as in a closed car in summer or winter conditions,
will reduce the capacity and lifetime of the battery. For the best results, try to keep the battery
between -10°C and +50°C (+14°F and 122°F). A device with a hot or cold battery may not work
temporarily, even when the battery is fully charged. Battery performance is particularly limited
in temperatures well below freezing.
Battery Disposal
Do not dispose of batteries in a re as they may explode. Batteries may also explode if damaged.
Dispose of batteries according to local regulations and recycle when possible. Do not dispose as
household waste. Do not dismantle, open or shred cells or batteries. In the event of a battery
leak, do not allow the liquid to come in contact with the skin or eyes. In the event of leak or a
hazard seek medical help immediately.
Child Safety
Do not allow children to play with your device or its accessories. Keep it out of their reach.
They could hurt themselves or others, or could accidentally damage the device or accessories.
Your device and its accessories may contain small parts, which could be detached and create a
choking hazard.
Health and Safety Warnings
Stop using RealWear HMT-1 or its display immediately if you experience a headache, vertigo,
dizziness or nausea. Do not use the HMT-1 display while operating any vehicle. Move the
boom arm completely out of your line of sight when not using the display. Maintain situational
awareness of your surroundings while using the HMT-1.

12
SAR Information
Radiation Exposure Statement — The United States and Canada
This device meets the government’s requirements for exposure to radio waves.
This device is designed and manufactured not to exceed the emission limits for exposure to radio
frequency (RF) energy set by the Federal Communications Commission of the U.S. Government.
The exposure standard for wireless devices employs a unit of measurement known as the Specic
Absorption Rate, or SAR. The SAR limit set by the FCC is 1.6 W/kg. Tests for SAR are conducted
using standard operating positions accepted by the FCC with the device transmitting at its highest
certied power level in all tested frequency bands.
No minimum separation distance needs to be maintained between the user’s body and the
device, including the antenna, during body-worn operation to comply with the RF exposure
requirements in the United States and Canada.
The limit recommended by FCC and IC is 1.6 W/kg averaged over one (1) gram of tissue.
The highest SAR value of the HMT-1 for use:
• By the ear is 0.95 W/kg (1g).
Radiation Exposure Statement — Europe
No minimum separation distance needs to be maintained between the user’s body and the
device, including the antenna, during body-worn operation to comply with the RF exposure
requirements in Europe.
The limit recommended by RED is 2 W/kg averaged over ten (10) gram of tissue.
The highest SAR value of the HMT-1 for use:
• By the ear is 0.267 W/kg (10g).

13
Radiation Exposure Statement — Canada
The product complies with the Canada portable RF exposure limit set forth for an uncontrolled
environment and is safe for intended operation as described in this manual.
Déclaration d’exposition aux radiations
Le produit est conforme aux limites d’exposition pour les appareils portables RF pour les EtatsUnis et le Canada établies pour un environnement non contrôlé. Le produit est sûr pour un
fonctionnement tel que décrit dans ce manuel.
Charger Use Safety Instructions
To use the charger follow these instructions:
• — Make sure that the cable plug is properly connected.
• — Keep the charger away from liquids.
• — In case of any strange smell or noise from the charger, disconnect it and contact
support.
• — Before cleaning the cable or charger, disconnect from power supply.
• — When using an extension cable, check the integrity of the ground conductor.
• — Disconnect the charger from HMT-1, once the battery is fully charged.
• — Do not use this charger in wet areas This charger is for indoor use only.
• — Do not insert or remove the plug with wet hands.

14
• — Do not open the charger. For any issues, contact support.
• — Do not cut, break or bend the cable in a knot.
• — Do not put any objects on the cable that may let it overheat. It may damage the cable
and cause re or electrocution.
• -Do not use any cable other than the original cable as it may cause short circuit or
electrocution.

15
Introduction
This section provides information on using your RealWear HMT-1.
The list of items in the RealWear HMT-1 box are:
• HMT-1
• Rechargeable battery
• USB cable type C
• Overhead strap
About the RealWear HMT-1
RealWear HMT-1 is the rst-generation head mounted rugged tablet. You can operate the tablet
completely hands-free using only voice commands and head gestures This hands-free operation is
done using WearHF™ software, built into every RealWear device. The HMT-1 runs on Android 6.0.

16
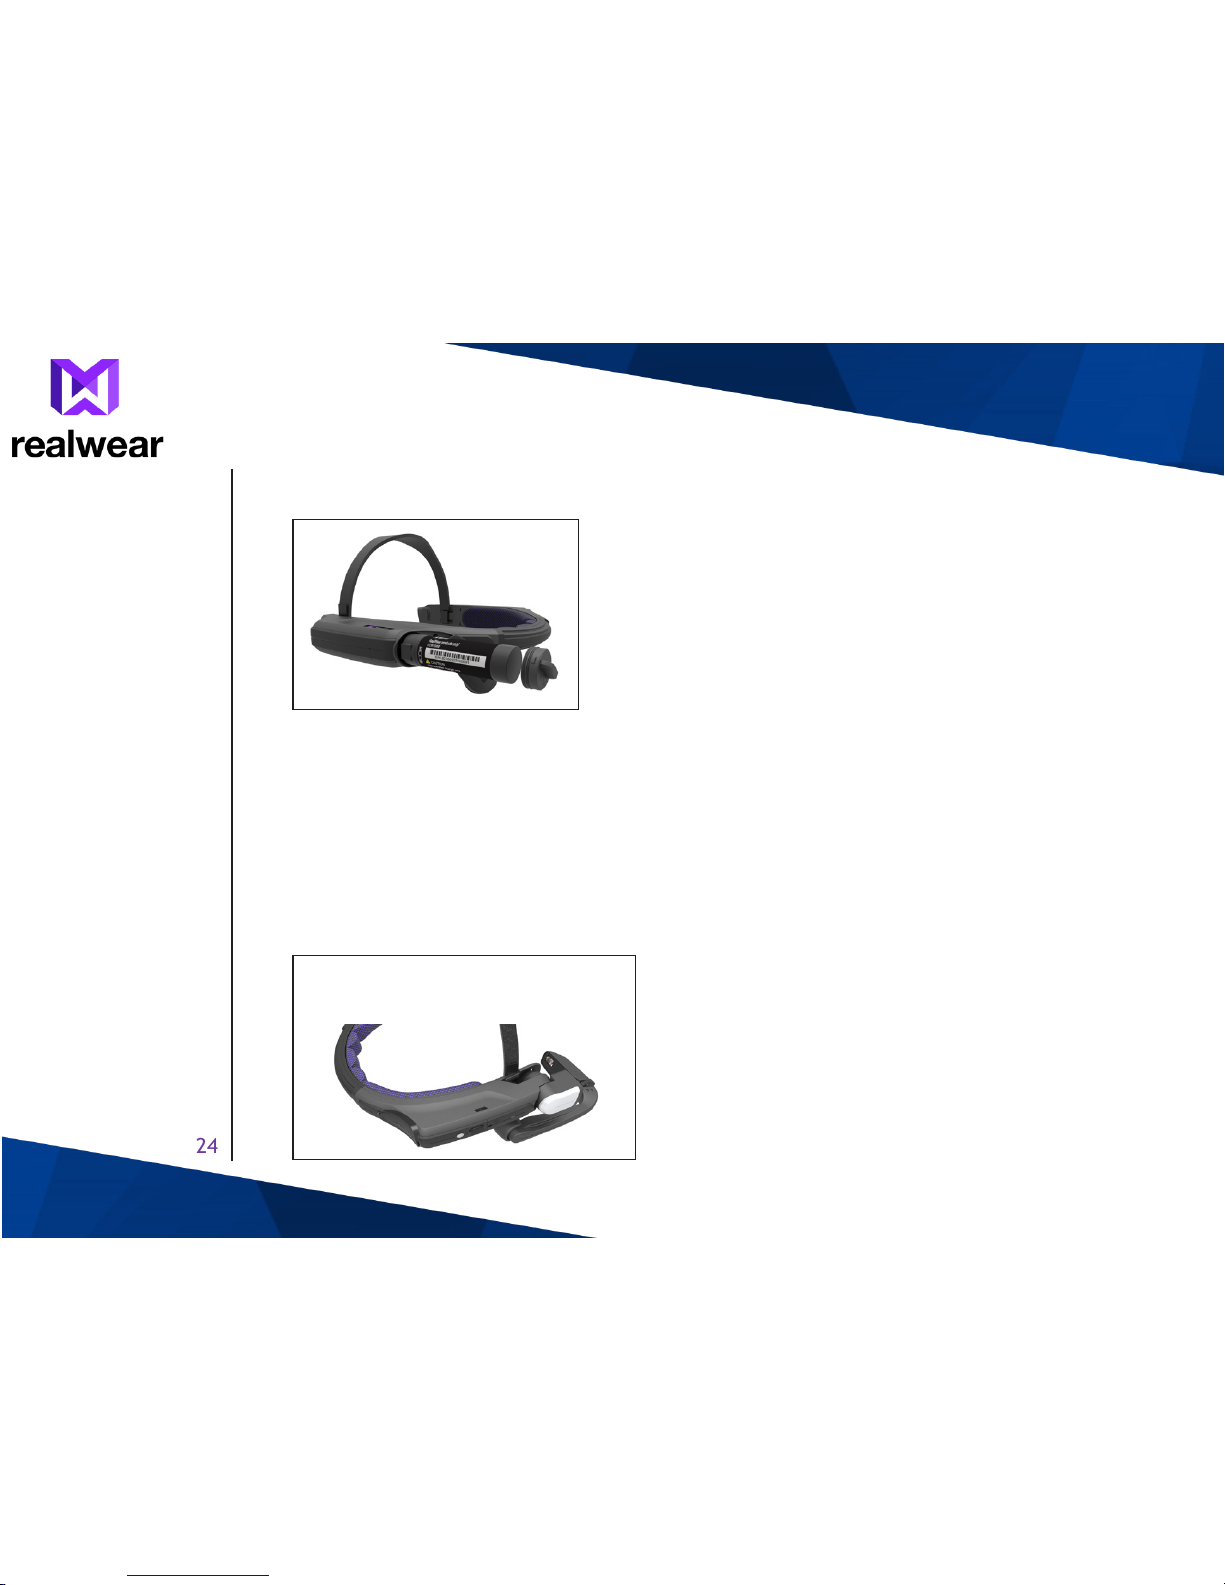
HMT-1- Parts Representation — Front View and Battery Housing
1
2
3
5
6
7
8
9
11
10
4

17
HMT-1 Parts and Functions — Front View and Battery Housing
Part Name Action
1 — Overhead strap Supports HMT-1 on the head.
2 — Camera pod Holds a camera to take photos and videos.
3 — Mic A2 — located on
the upper portion of the
display pod
Auxiliary microphone for voice commands.
4 — Mic A1 — located on
the lower portion of the
display pod
(not visible in the image)
Primary microphone for voice commands.
5 — Wrist joint locking
ring
Supports and helps to reposition the display pod.
6 — Boom arm Supports and helps to reposition the display pod.
7 — Elbow joint Supports and helps to reposition the display pod.
8 — Rear head pad Supports the device on the rear and side of the
head.
9 — Rechargeable battery
housing
Holds rechargeable battery.
10 — Rechargeable
battery
Powers the device and can be recharged when
required.
11 — Battery cap Gives access to the rechargeable battery.

18
HMT-1 — Parts Representation — Side View with USB Type - C Port
Part Name Action
1 — Display pod Holds the main LCD display to operate the HMT-1.
2 — Speaker Outputs audio from the HMT-1.
3 — Micro SD card
slot
Holds the microSD card.
4 — Action button Context-related operations.
1
2
4
6
7
3
5

19
Part Name Action
5 — Power ON
button
Places the device in sleep mode and wakes up the device. When
pressed for a few seconds, this Powers the device on and o.
Functions as Home button to return to the Home screen from any
screen’ should be the description of the “Action Button”.
6 — Audio jack Connects to audio device using 3.5 mm audio jack.
7 — USB Type-C Connects to the USB type C charger.
Regional USB charger shipped in separate box.

20
HMT-1 — Parts Representation — Side View with Micro USB Port
Part Name Action
1 — Micro USB Connects HMT-1 to a computer — for data transfer and ADB interface.
2 — Battery
housing with
rubber lid
Holds rechargeable battery.
2
1

21
Wearing RealWear HMT-1
1. Position the HMT-1 such that main unit is
positioned on the side of the head forming
a Z shape and the display pod is aligned in
front of your left or right eye.
2. Move the head strap in/out and collapse the
hinged main unit inwards, to x the HMT-1
tightly.
Adjust the back strap and the top band
located on the top of the head, to x HMT-1
at a comfortable position.
Adjusting Display Pod
1. After positioning HMT-1, adjust the display pod about 1-2 inches from
the eye.
2. Position the display pod below the line of sight for viewing the display
screen clearly.

22
3. Move the display pod forward or backward, to view the entire display
screen.
When set correctly the screen will be bright and crisp, and you can
even read the smallest text.
Sometimes, to get the complete view of the display pod, you might have to adjust the whole unit
on the head either left or right when part of the screen is not visible on the left or right side.
Position the display pod just below your dominant eye. You can switch the HMT-1
from left-eye to right-eye.
If you wear eye-glasses to operate a computer, or eye protection for your work,
continue to wear the same glasses or eye protection while using HMT-1. While
the HMT-1 is designed to work well with or without eye-glasses or eye protection.
RealWear recommends wearing eye protection while using the HMT-1.

23
Fitting HMT with Optional Accessory Mounts
You can wear your safety goggles and hard hat with the HMT-1.
Bump cap mounting using the tri-band strap (SKU
171033)
Hardhat mounting using optional accessory clips
(check RealWear Website for specic model
availability)
Inserting Rechargeable Battery
The RealWear HMT-1 requires a rechargeable battery to function.
1. Open the rubber lid located on the back of the battery housing and unscrew battery cap by
turning counter-clockwise for approximately 1/8 turn.
2. Align and insert the battery in the compartment, with the contact positioned at the bottom
of the battery compartment.
24
3. Align the battery cap so it slides fully into the compartment, and secure the cap by turning
it clockwise for approximately 1/8 turn.
Charging HMT-1
To recharge the battery:
1. Connect the USB Type-C charging cable to the Type-C USB port located on the rear side of
the main housing, under the rubber lid.
2. Connect the charging cable to the wall charger.
3. Plug the wall charger into an electrical outlet. The power button will be lit throughout the
charging cycle, changing color from red to yellow to green depending on the amount the
battery has charged. Green signies a full charge.
25
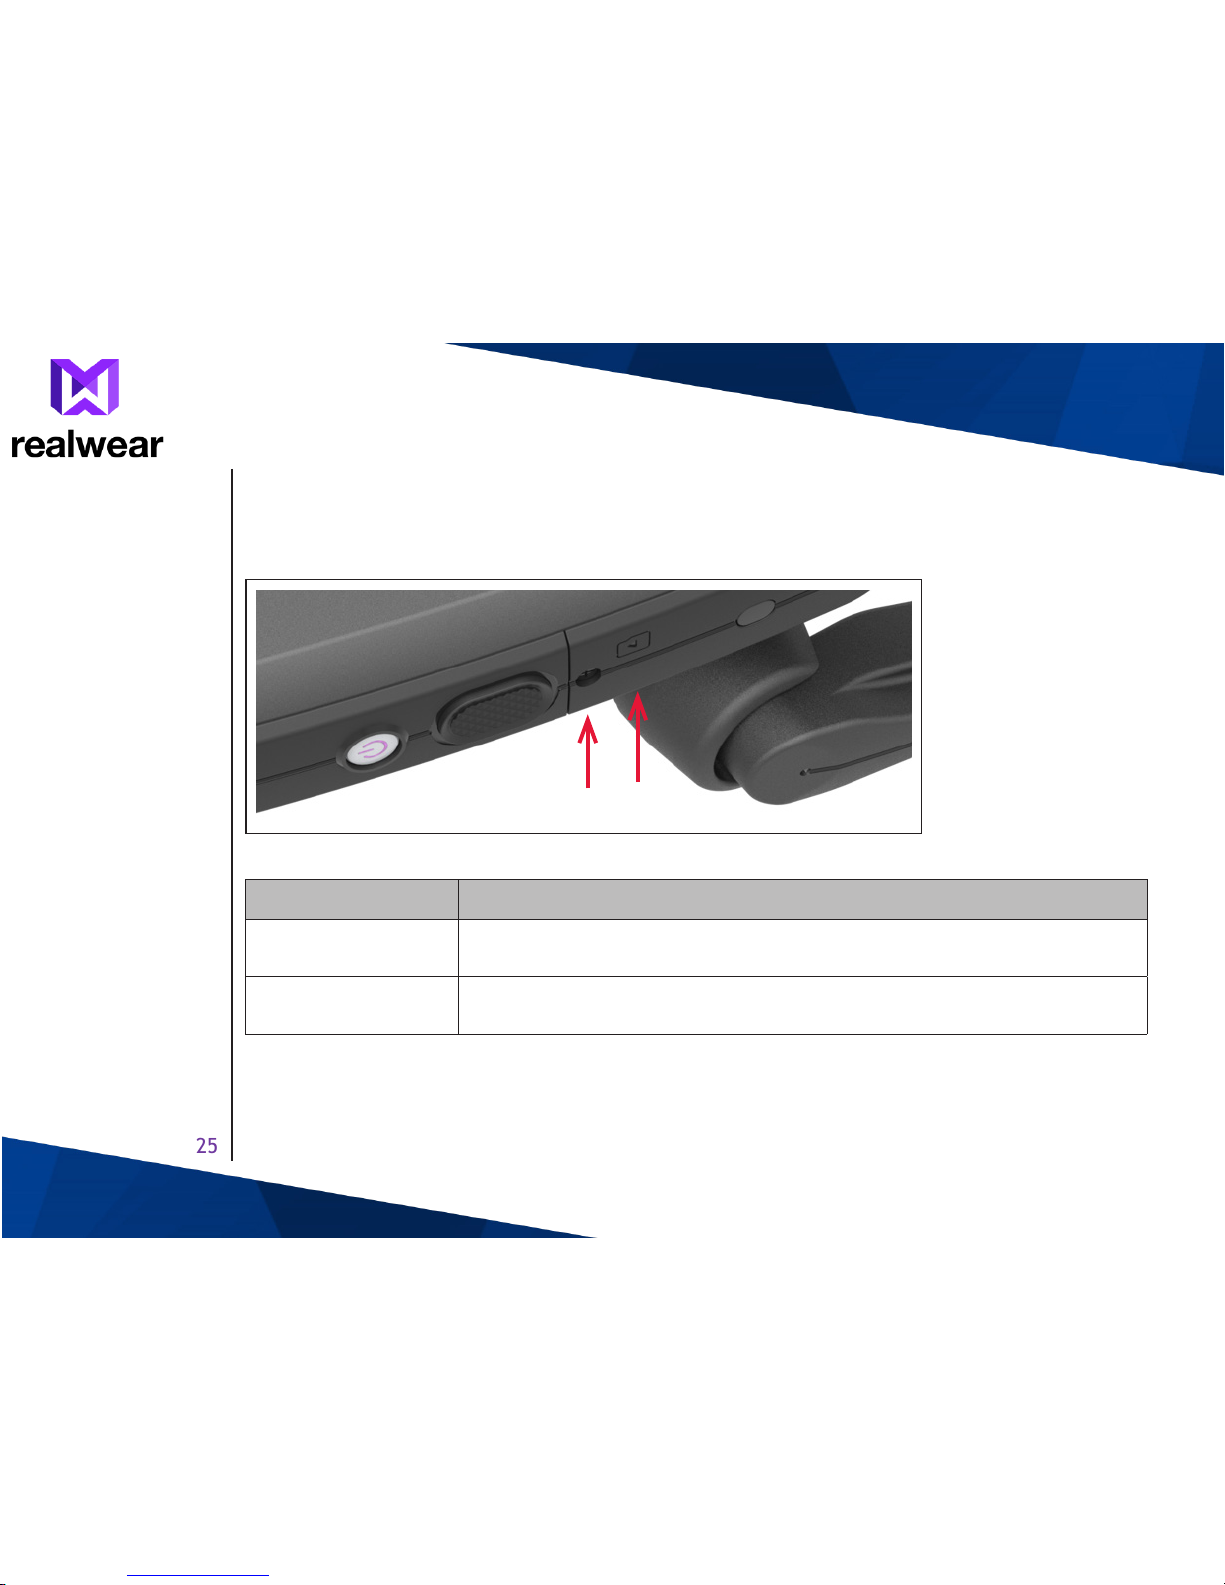
Inserting and Setting Up MicroSD Card
You can insert a microSD card into the specied slot and store media les and documents.
Part Name Action
1 — MicroSD card
slot door
covers the microSD card slot. Open this door to insert/remove the
micro SD card.
2 — Screw to open
microSD card slot
Holds the microSD card slot door. Unscrew to open the door using a
Philips #00 screwdriver.
12

26
1. Unscrew the micro SD card door and pull the edges to open.
2. Insert the micro SD card.
3. Fix the micro SD card door and tighten it with the screw.
When the microSD card is inserted and recognized by HMT-1, a notication is displayed in the top
right corner of the screen.
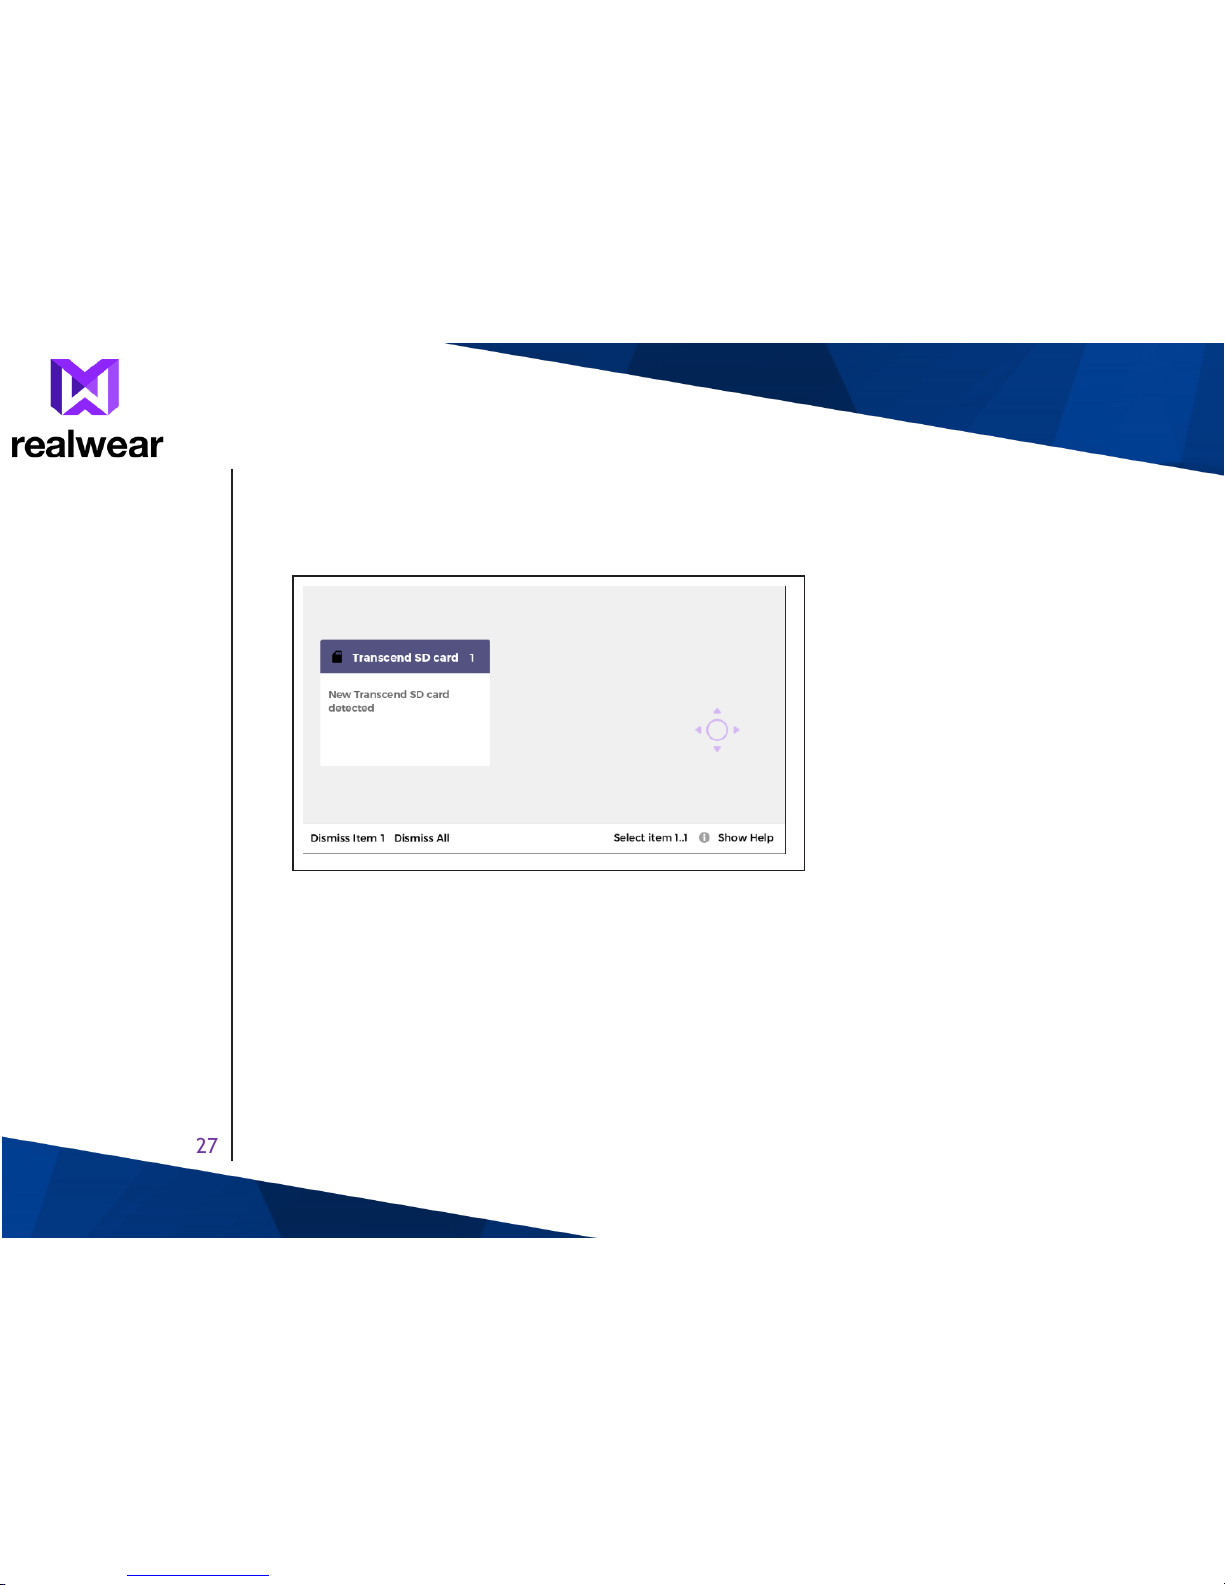
27
Setting Up MicroSD Card
Complete the following procedure to setup the micro SD card.
1. Say My Notication and select SD Card Notication to setup the micro SD card.

28
2. Select the option to format the SD card and set it up as the internal storage.
3. A warning message to format micro SD card is displayed. The OK option is hidden behind
show help, and hence say Select Item 1.

29
The micro SD card formatting progress is displayed.
After micro SD card formatting is completed, you can move your media les and documents
to the micro SD card to use SD card as the internal storage.
 Loading...