


NetStream 2000 Manual 6.6.2000 6/6/00 2:47 PM Page 1
NetStream 2000
The Plug and Play Solution for Interactive MPEG-2 Video

NetStream 2000 Manual 6.6.2000 6/6/00 2:47 PM Page 2
© 2000 Sigma Designs Inc. All Rights Reserved.
June, 2000
P/N 66-000347-02
Information in this manual is subject to change without notice. The software described in this manual is furnished under license and may be used or
copied only in accordance with the license agreement. It is unlawful to copy the software except as specified in the license agreement. No part of
this manual may be reproduced or transmitted in any form or by any means, electronic or mechanical, including photocopying or scanning, for any
purpose, without the express written permission of Sigma Designs, Inc.
REALmagic, REALmagic NetStream 2000, REALOverlay are trademarks of Sigma Designs, Inc. Sigma Designs and the Sigma Designs logo are
registered trademarks of Sigma Designs, Inc. Microsoft, MS and MS-DOS are registered trademarks of Microsoft Corporation. As used in this manual, Windows refers to Microsoft Windows, Microsoft Corporation’s implementation of a windowing system. IBM, DOS, PC and VGAare trademarks of International Business Machines Corporation. All other brand and product names referred to in this manual are trademarks or registered
trademarks of their respective holders.
Please address comments or questions to:
Sigma Designs, Inc. Phone: (408) 957-9866
Customer Service Center Fax: (408) 957-9740
355 Fairview Way Internet: tech_support@sdesigns.com
Milpitas, CA95035-3024 USA World Wide Web: www.sigmadesigns.com
Sigma Designs, Inc., reserves the right to use or distribute any information you supply to its Customer Service Center in any way it deems appropriate without incurring any obligation whatsoever.

NetStream 2000 Manual 6.6.2000 6/6/00 2:47 PM Page 3
FCC Compliance Statement
This equipment has been tested and found to comply with the limits for a Class B digital device, pursuant to Part 15 of the FCC Rules. These limits
are designed to provide reasonable protection against harmful interference in residential installation. This equipment generates, uses, and can radiate radio frequency energy and, if not installed and used in accordance with the instructions, may cause harmful interference to radio communications. However, there is no guarantee that interference will not occur in a particular installation. If this equipment does cause interference to radio
or television reception, which can be determined by turning the equipment off and on, the user is encouraged to try to correct the interference by
one or more of the following measures:
• Reorient or relocate the receiving antenna.
• Increase the separation between the equipment and receiver.
• Connect the equipment into an outlet on a circuit different from that to which the receiver is connected.
• Consult the dealer or an experienced radio/TV technician for help.
Notice
This device complies with Part 15 of the FCC rules. Operation is subject to the following two conditions: (1) this device may not cause harmful
interference, and (2) this device must accept any interference received, including interference that may cause undesired operation.
Shielded cables and I/O cords must be used for this equipment to comply with the relevant FCC regulations.
Changes or modifications not expressly approved in writing by Sigma Designs, Inc., may void the user’s authority to operate this equipment.
This digital apparatus does not exceed the Class B limits for radio noise emissions from digital apparatus set out in the radio interference regulation
of the Canadian Department of Communication.

NetStream 2000 Manual 6.6.2000 6/6/00 2:47 PM Page 4
Table of Contents
Chapter 1. Introduction 1
System Requirements 1
Additional Requirements 1
Technology Overview 2
Supported File Formats 3
Transport and Program Streams 3
Chapter 2. Hardware Installation 4
Handling the Board 4
Installing the Hardware 5
Video Connection 6
Audio Connections 7
TV Connections 8
Advanced Connections 9
Chapter 3. Software Installation 10
Installing Software Under Windows 9x 10
Installing Software Under Windows NT 4.0 11
Border Adjustment and Color Calibration 12
Chapter 4. Using the DVD Station 14
Starting the DVD Station 14
Standard Buttons 16
Custom Button 17
Play List 18
Settings 19
General 20
Audio Output 20
TV 20
DVD 21
Rating Control 21
Default Language 21
Picture Control 22
DVD Navigation Buttons 23
Audio Soundtrack 23
Language Selector 23
Camera Angle 24
Subtitle Selector 24
Menu Selector 25
Title Selector 25
Joystick Controller 25
DVD Playback 25
10-Key Keypad 27
i

NetStream 2000 Manual 6.6.2000 6/6/00 2:47 PM Page 5
Video CD Playback 28
Select Buttons (Video CD 2.0 Only) 28
Playing a Video CD 2.0 29
Audio CD Playback 29
Shortcut Keys 30
Chapter 5.
Windows Media and DirectShow Support 32
Appendix A. Advanced Configuration Options 34
Manual Color Calibration 34
Advanced Color Adjustments 35
Border Adjustments 37
Appendix B. Customer Service 38
Index 40
ii

NetStream 2000 Manual 6.6.2000 6/6/00 2:47 PM Page 6
Chapter 1. Introduction
Congratulations on purchasing your new NetStream 2000. The
NetStream 2000 transforms your computer into a digital video workstation, capable of playing extremely high-quality, MPEG-1 and
MPEG-2 digital video from local disks, DVD movie discs, or across
a network. It’s a perfect choice for entertainment, education, training
and communication.
Please refer to the README.TXT file for important information not
available when this manual was printed. You will find this file in the
REALmagic NetStream program group after software installation.
System Requirements
The NetStream 2000 requires the following:
• 2 megabytes (MB) of free hard disk space
• 16 MB of RAM
• Pentium-based PC (or compatible), 133 MHz or higher
• VGAcard
• PCI 2.1 compliant expansion slot
• Plug and Play BIOS support
• Microsoft™ Windows 9x or NT 4.0
• Amplified stereo speakers (Optional: Dolby Pro Logic amplifier
and speakers may be used for Dolby surround sound)
Additional Requirements
Depending upon your particular video network needs, you may have
additional system requirements, such as:
• Additional RAM and/or faster processor speed
• Client software, such as a web browser equipped with a plug-in
• A video server, for playing video on demand
• An MPEG encoder, for creating MPEG video
• PCI-based 10BaseT, 100BaseT or ATM network adapter
Chapter 1: Introduction 1

NetStream 2000 Manual 6.6.2000 6/6/00 2:47 PM Page 7
Technology Overview
MPEG and MPEG-2
MPEG stands for Moving Picture Experts Group. It refers to a
method of data compression optimized for video and audio data. By
analyzing the changes between video "frames," an MPEG "encoder"
is able to reduce the file size of the compressed video data significantly. This remarkably efficient compression method allows fullscreen and full-motion video, plus CD-quality audio to be stored in a
relatively small size file. Once the data has been compressed, however, it must be "de"-compressed before it can be used.
Your NetStream 2000 incorporates specialized hardware to decompress MPEG data at a very high speed, which allows MPEG
"streams" to play back at a data transfer rate of 500 Kilobits (Kb) to
up to 15 Megabits (Mb) per second. MPEG-2 video has a resolution
of 720 x 480 in 24-bit (16.8 million) colors at 30 frames per second
(fps). MPEG-1 video has a resolution of 352 x 240 in 24-bit (16.8
million) colors at 30 fps. The MPEG standard is a fully open standard and has been embraced by the computer and entertainment
communities as the current standard of digital video on both television and personal computers.
2 Chapter 1: Introduction
DVD
DVD is a revolutionary storage medium that is currently capable of
storing up to 18 gigabytes (GB) of data on a disc the size of a standard CD. This is enough to store an entire movie encoded in the
MPEG-2 format on a single side of the disc.
Dolby Digital Surround Sound
Some MPEG-2 video uses Dolby Digital Surround Sound. Dolby
Digital Surround Sound incorporates six discrete digital audio channels to provide a full immersion surround sound system that is similar to that of a movie theatre. The six channels include left and right
front, left and right back, center, and subwoofer.
The NetStream 2000 can output the six discrete channels of Dolby
Digital audio using the S/PDIF connection. Also, it converts the six
channels into Dolby Pro Logic Surround Sound, which is carried
using a standard 1/8" (3.5mm) stereo connector. This lets you play
the Dolby Digital sound using either standard stereo speakers or
using a Dolby Pro Logic amplifier with surround sound speakers.

NetStream 2000 Manual 6.6.2000 6/6/00 2:47 PM Page 8
Dolby Pro Logic Surround Sound
Dolby Pro Logic Surround Sound uses the standard analog stereo
signal to multiplex surround sound information, and requires a
Dolby Pro Logic receiver/amplifier to decode the signal. Pro Logic
Surround Sound differs from Dolby Digital Surround Sound by
using the same audio signals for both the front and back speakers on
the left and right channels.
Supported File Formats
Your NetStream 2000 supports the following MPEG file formats:
MPG Files
MPG is the extension used for files with MPEG-2 or MPEG-1 compressed full-motion video. For MPEG-2, the video resolution is 720
x 480 at 30 frames per second (fps) with 16.8 million colors (full
CCIR601). For MPEG-1, the video resolution is 16.8 million colors
at 352 x 240, shown at 24, 25, or 30 fps. Both MPEG-2 and MPEG1 files may include MPEG-compressed audio (16-bit, 48kHz stereo
sound). The NetStream 2000 also supports the Half-D1 format of
MPEG-2.
DAT Files (Video CD 1.0 and 2.0)
DAT is the extension for Video CD or Karaoke CD files. The
NetStream 2000 can play both Video CD and Karaoke CD DAT
files.
VBS and ABS Files
VBS and ABS are file extensions used for some MPEG encoded
video-only bit stream and audio-only bit stream files.
Transport and Program Streams
NetStream 2000 supports MPEG-2 files on both transport and program stream formats. It is possible to select the PID’S from a transport stream, in order to choose a different audio or video stream.
Chapter 1: Introduction 3
NetStream 2000 Manual 6.6.2000 6/6/00 2:47 PM Page 9
Chapter 2. Hardware Installation
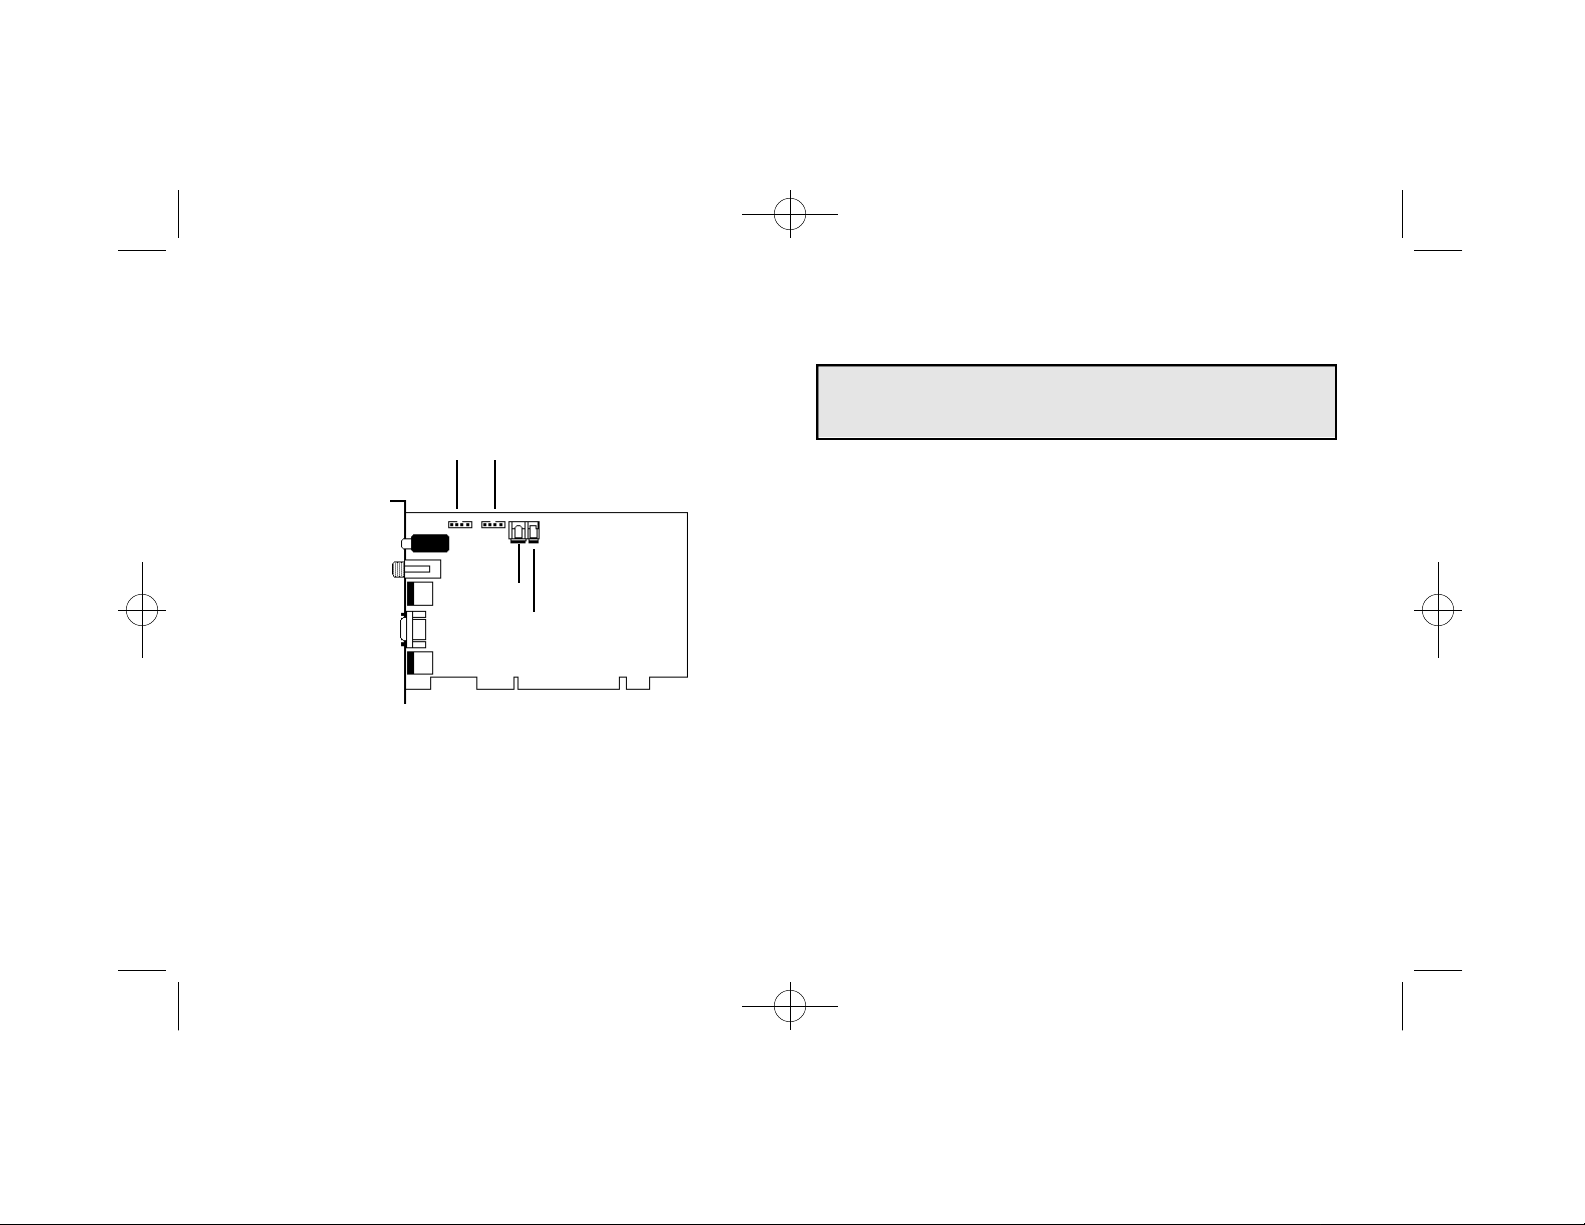
This chapter describes the steps required to install the NetStream
2000 (Figure 1).
CD In (1)
Line Out
Audio Output
S/PDIF Output
TV-Out
VGAOut
VGAIn
* To support audio CD and DTS
audio CD through S/PDIF
Figure 1. NetStream 2000
CD In (2)
CD-S/PDIF *
Handling the Board
Warning: Static electricity can damage your equipment. Do not
take the board out of its static protective bag until you are ready to
work with it.
Follow these precautions when handling the board:
• Before you open the static protective bag, touch it to a metal
expansion slot cover on the back of your computer. This drains
static electricity from the package and from your body.
• Do not touch any exposed printed circuitry after opening the
package.
• Keep other people from touching the board. They might have a
static-electricity buildup.
• Limit your movement. Movement causes a buildup of static
electricity.
4 Chapter 2: Hardware Installation
NetStream 2000 Manual 6.6.2000 6/6/00 2:47 PM Page 10
Installing the Hardware
Follow the steps below to install the NetStream 2000 into your
computer.
1. Turn off the power to the computer and to the VGAmonitor.
Unplug (disconnect) the power cord from the computer.
2. Disconnect the VGAmonitor cable from your PC.
3. Remove the cover from the computer. (Refer to your PC user’s
manual for specific instructions.)
4. Locate an available PCI expansion slot. (The NetStream 2000
will not fit into an ISAslot.)
5. Remove the slot cover screw and slot cover, if applicable.
6. Open the protective sleeve containing the NetStream 2000, grasp
the circuit board by the edge of its mounting bracket, and remove
it from the protective sleeve.
7. Insert the NetStream 2000 into the PCI expansion slot. Press
down gently on the top edges of the board to ensure that all
connecting points are seated securely. Anchor the board’s mounting bracket using the screw removed earlier.
8. Replace the cover of your PC and reconnect the power cord.
Note: If you install a DVD-ROM drive at the same time as the
NetStream 2000, remember to attach the CD-Audio cable from the
DVD-ROM drive to your sound card. Otherwise, you will not be
able to play CD-Audio titles with the DVD-ROM drive. This will
not affect the audio of DVD-ROM titles.
Note: NetStream 2000 requires a bus-mastered PCI slot. Most PCI
slots support PCI bus mastering, but if you experience difficulties
with your NetStream 2000, you may wish to relocate the card to a
different PCI slot.
Chapter 2: Hardware Installation 5
NetStream 2000 Manual 6.6.2000 6/6/00 2:47 PM Page 11
Video Connection
Your NetStream 2000 must be connected to your VGAcard or your
PC’s VGAoutput port in order to display MPEG video on your
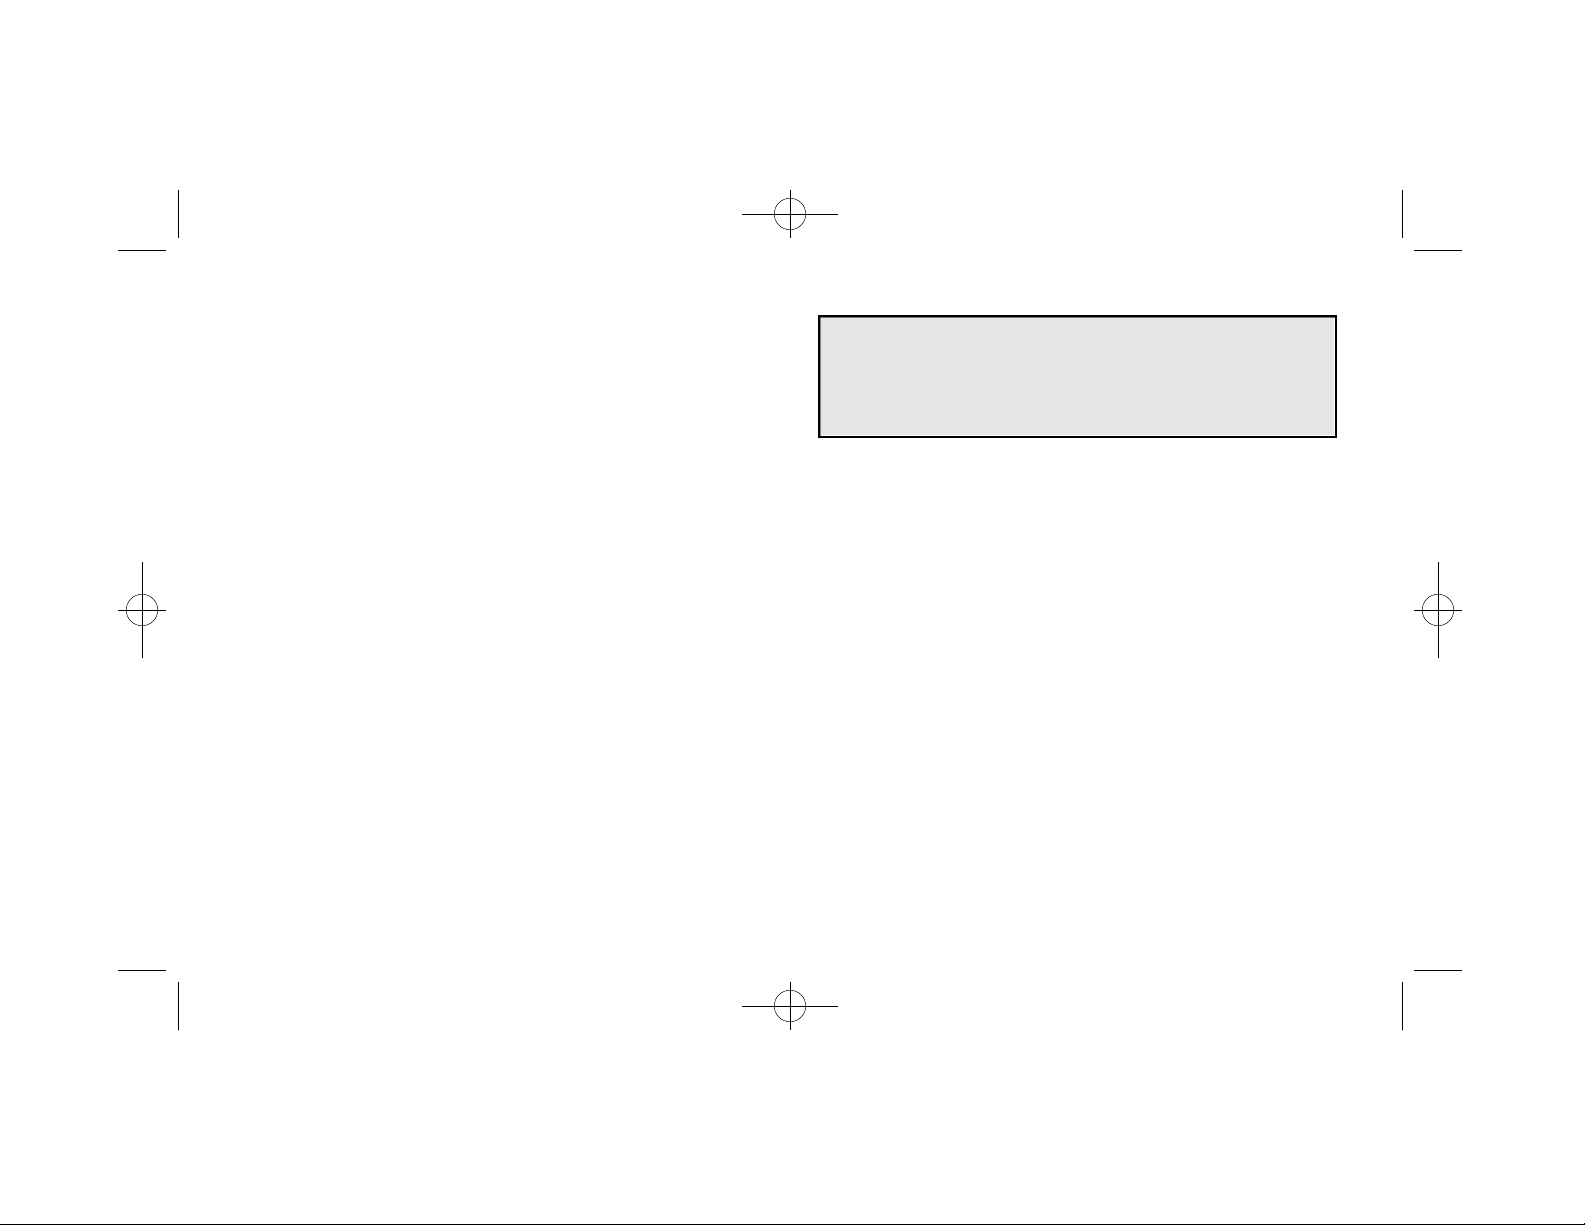
VGAmonitor. (Refer to Figure 1 earlier in this Chapter for reference.) Follow the steps to connect the NetStream 2000 to your VGA
output (see Figure 2).
Connect to VGA
Card or PC Display
Output Port
1. Attach the round 9-pin DIN connector of the provided External
VGAPass-Through Cable to the VGAIN connector at the back
of the NetStream 2000 (refer to Figure1).
2. Attach the other end (15-pin "D" shape) of the cable to the output
port on your VGAcard or your PC’s VGAoutput port.
3. Connect the VGAcable from your VGAmonitor to the VGA
OUT of the NetStream 2000.
6 Chapter 2: Hardware Installation
VGAOutput Port
(Attach your monitor’s
video cable here)
Figure 2. Video Connection
External VGA
Pass Through Cable

NetStream 2000 Manual 6.6.2000 6/6/00 2:47 PM Page 12
Audio Connections
The NetStream 2000 has a standard 1/8-inch (3.5mm) Stereo Output
Port. The Stereo Output Port outputs a standard analog stereo signal
that can be used by virtually any stereo receiver or amplified speakers. It also contains the Pro Logic Surround Sound encoding that
allows you to achieve surround sound by attaching a Pro Logic
receiver.
If your system has a sound card, we recommend attaching the Stereo
Output signal to the LINE-IN port on your sound card, and then
attach your receiver or amplified speakers to the LINE-OUT or
SPEAKER port on your sound card. This will allow you to use one
set of speakers to listen to both MPEG-2 audio as well as other types
of audio from your sound card. It will also allow you to control the
volume by using the mixer program provided with your sound card.
Otherwise, attach this signal directly to your receiver or amplified
speakers.
Figure 3. Audio Connection
1/8” (3.5mm)
Stereo Output
(Connect to your
sound card or
amplified speakers
Chapter 2: Hardware Installation 7
NetStream 2000 Manual 6.6.2000 6/6/00 2:47 PM Page 13
TV Connections
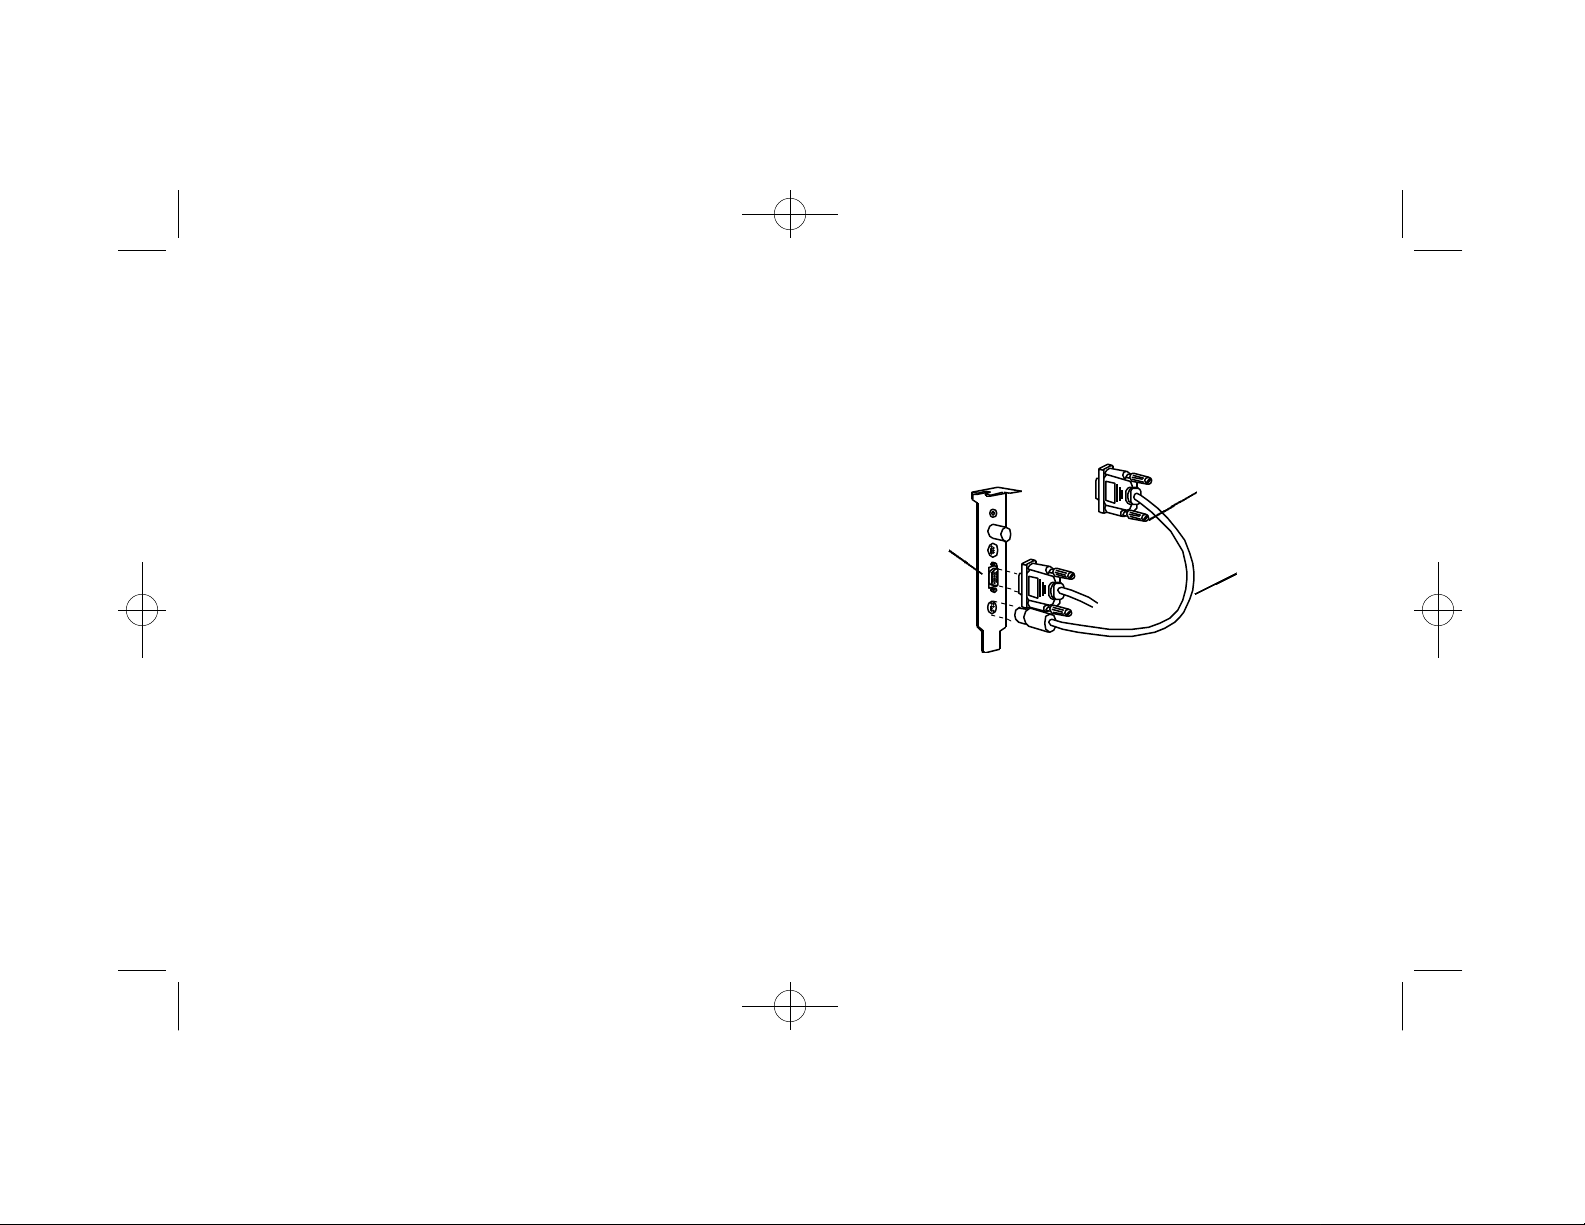
There are two options for connecting your REALmagic NetStream
2000 DVD/MPEG-2 Playback Card to a television: S-Video by
using a standard S-Video cable, or composite video by using an SVideo to Composite cable.
The REALmagic NetStream 2000 DVD/MPEG-2 Playback card can
be connected directly to a TV using a S-Video cable. The S-Video
TV Out connector on the REALmagic NetStream 2000 is a 7-pin
S-Video connector, which can be connected directly to a TV using a
standard 4-pin S-Video cable. If your television set does not have an
S-Video input port, you may connect it to the REALmagic
NetStream 2000 by using an S-Video to Composite adapter cable.
Composite Video is more common and works with most televisions.
The S-Video Out connector provides better picture quality.
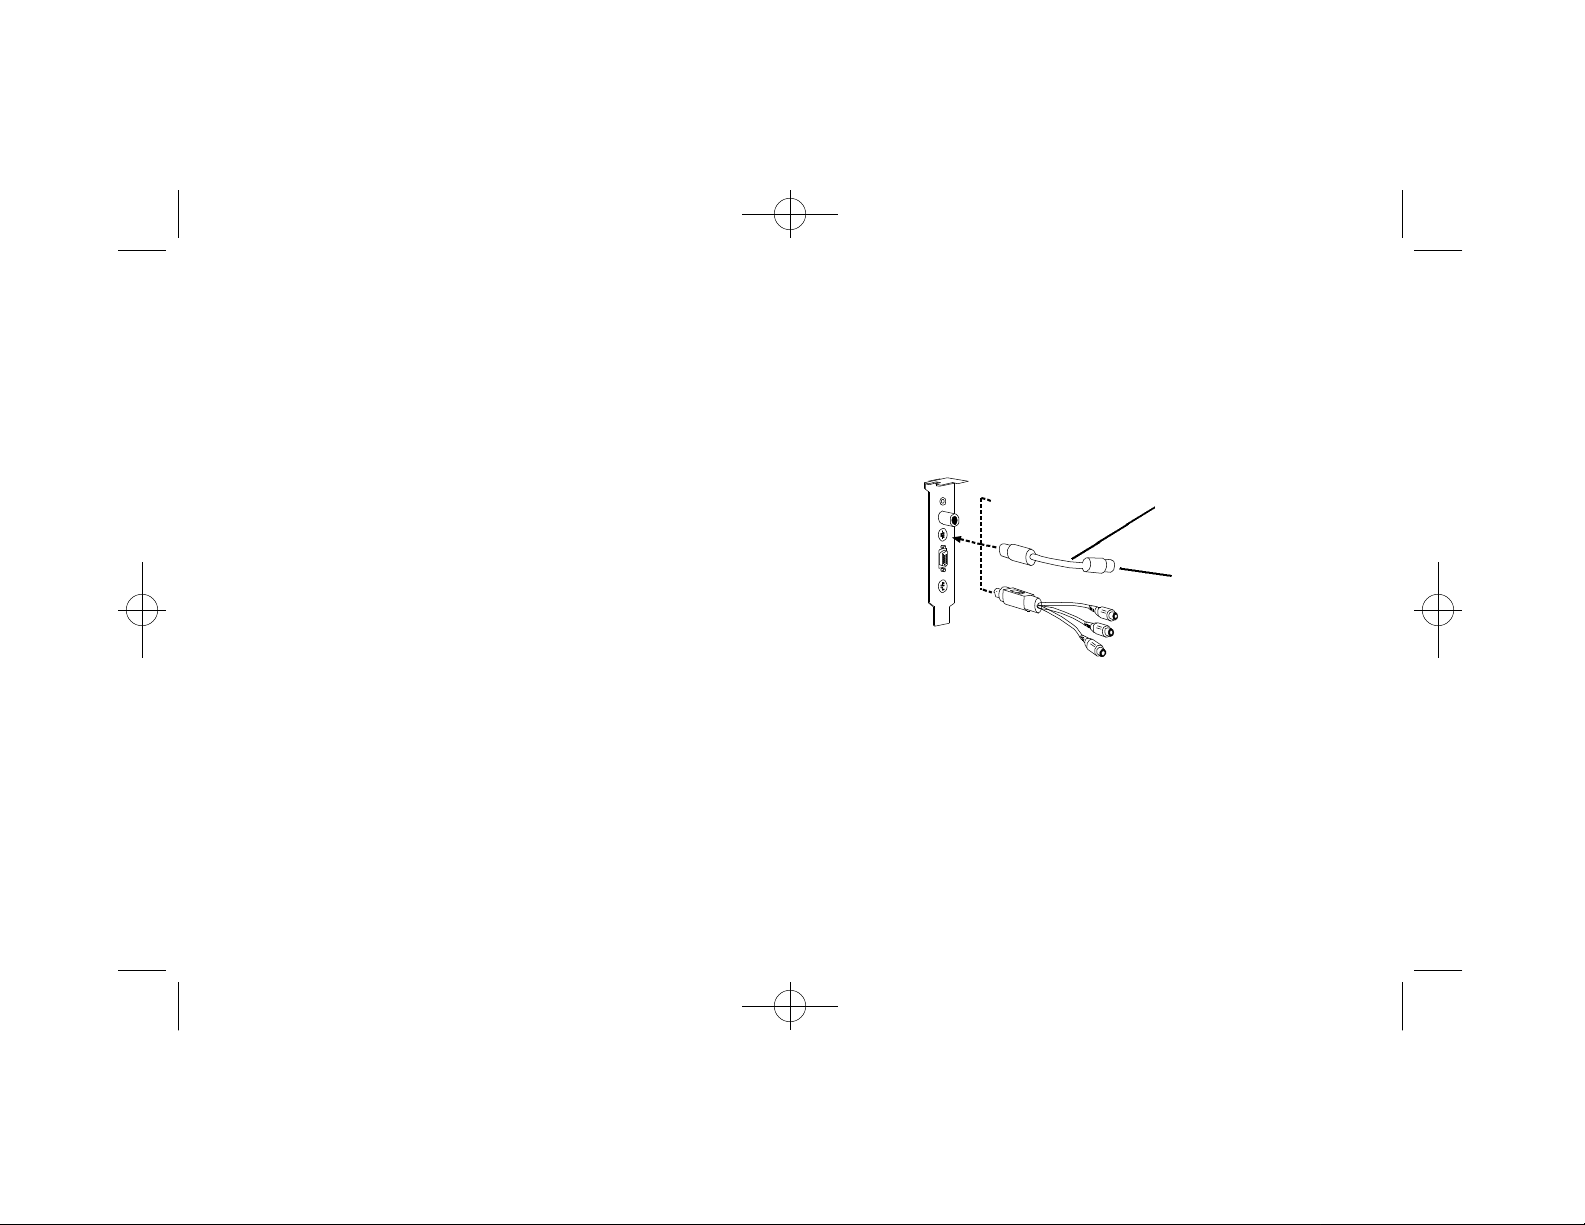
The component video output cable, available separately, can also be
plugged into the S-Video port. With this cable attached, NetStream
2000 can display NTSC and PAL video in the component RGB and
YUV (Y Pb Pr) formats A software utility described in the next
chapter can be used to switch between RGB and YUV modes.
Scart Connector *
RGB Output
S-Video Out
S-Video to Composite
Adapter Cable
Red (Pr)
Green (Y)
Blue (Pb)
Composite Video Out
* Optional
Component Output (YUV )*
Figure 4. TV Connections
Note: This connection will not pass any audio to your TV set.
Check audio connections.
8 Chapter 2: Hardware Installation

NetStream 2000 Manual 6.6.2000 6/6/00 2:47 PM Page 14
Advanced Connections
The NetStream 2000 also includes an internal CD Audio In connector that allows you to pass MPEG audio through to the internal CD
Audio In connector on your sound card. To do this, attach the CD
Audio cable from your CD-ROM or DVD-ROM drive to the
NetStream 2000, then attach another cable from the NetStream
2000’s internal Line Out port the to the CD Audio In connector on
your sound card. Please refer to Figure 1 for the locations of these
internal connectors.
The signal from the Line Out port combines the CD Audio In signal
from the CD-ROM or DVD-ROM drive with the same signal that is
output through the Stereo Output Port on the NetStream 2000. This
solution eliminates the external audio cable that normally goes from
the NetStream 2000 to your sound card.
If you are using this solution, attach your receiver or amplified
speakers to the Line Out port of your sound card to obtain the audio
sound signal.
Note: With this solution, the volume for both CD audio and MPEG
audio will be controlled by the CD Audio portion of your mixer.
Note: For the best playback quality, make sure the NetStream 2000
is connected directly to a TV, not through a VCR.
Macrovision Copyright Notice
This product incorporates copyright protection technology that is
protected by method claims of certain U.S. patents and other intellectual property rights owned by Macrovision Corporation and other
rights owners. Use of this copyright protection technology must be
authorized by Macrovision Corporation, and is intended for home
and other limited viewing uses only, unless otherwise authorized by
Macrovision Corporation. Reverse engineering or disassembly is
prohibited.
Chapter 2: Hardware Installation 9

NetStream 2000 Manual 6.6.2000 6/6/00 2:47 PM Page 15
Chapter 3. Software Installation
This chapter describes the software installation procedure for the
NetStream 2000. Please follow the directions carefully. Skipping
steps may result in improper operation.
Note: Please make sure you have DirectX/DirectShow
installed before installing this software. Otherwise the
video streaming may not be available. (Depending on your
video client software)
Installing Software Under Windows 9x
Turn on the power to your computer. The Plug and Play feature of
the NetStream 2000 will cause Windows 9x to display the message
New Hardware Found with the PCI Multimedia Device signature
during boot-up. Follow the steps below to install the NetStream
2000 software:
1. When the New Hardware Found message appears, click the
option: Driver from disk provided by hardware manufacturer.
2. Click OK.
3. The Install From Disk dialog appears. Insert Disk #1, the
NetStream 2000 Drivers disk, into the floppy disk drive.
4. Make sure the dialog specifies the floppy disk drive letter (for
example, A:\ ) and click OK. This process will copy drivers and
software for the NetStream 2000 onto your hard disk.
5. When the copying is done, the Windows 9x desktop will appear.
Remove Disk #1 from the disk drive. Run Setup from Disk # 2.
6. Now you must reboot your system. Remove the floppy disk from
your PC. Click the Start button, and then click Shut Down.
Click Restart, and then click OK.
7. You must set the Border Adjustment and Color Calibration to
finalize the installation. See the section below, titled "Border
Adjust and Color Calibration."
Note: You need to run setup a second time to set the NetStream
2000 to your region code.
10 Chapter 3: Software Installation

NetStream 2000 Manual 6.6.2000 6/6/00 2:47 PM Page 16
Installing Software Under Windows NT 4.0
If you are running Windows NT 4.0, follow these procedures to
install REALmagic NetStream 2000 software.
Important Note: Some Windows NT systems have plug and play
support installed. If Windows NT auto-detects the NetStream 2000
card during startup and prompts you to install a driver, select the
option titled "Do not install a driver (Windows will not prompt you
again)." Then follow the instructions listed below.
Note: Please make sure you have DirectX/DirectShow
installed before installing this software. Otherwise the
video streaming may not be available. (Depending on your
video client software)
1. Start Windows, if your system does not boot directly into
Windows.
2. Insert the REALmagic NetStream 2000 Windows NT Disk #1.
3. Click Start on the task bar, then click Run.
4. Type A:\SETUP in the dialog box, then click OK (this example
assumes that your floppy disk drive letter is A:).
5. You will see the Welcome screen. Click Next.
6. When prompted to choose the destination location, click Next to
accept the default or Browse to select a location of your choice.
7. At the Folder Selection window, click Next to accept the default,
or enter a name of your choice. The files are copied.
8. Insert REALmagic NetStream 2000 Windows NT Disk #2 when
prompted. Then, click OK.
9. You will be prompted to restart Windows before settings will take
effect. Click OK. You will be returned to the desktop.
10. Remove all floppy disks from the floppy disk drive.
11. Click Start on the task bar, click Shutdown, then click Restart.
12. To complete installation, you must run the REALmagic Border
Adjust utility, as described in the next section.
Chapter 3: Software Installation 11

NetStream 2000 Manual 6.6.2000 6/6/00 2:47 PM Page 17
BorderAdjustment and Color Calibration
You must set the Border Adjustment and Color Calibration to finalize the installation. You need to set the Border Adjustment and Color
Calibration only once for each display setting (resolution, number of
colors, and refresh rate). Follow the steps below to complete the
Border Adjustment and Color Calibration.
1. After rebooting, start the Border Adjust Utility as follows: at the
Start button, click Programs, REALmagic, and BorderAdjust.
You will see the REALmagic Configuration… dialog
(Figure 5).
Figure 5. REALmagic Configuration
2. At the REALMagic Configuration… dialog (Figure 5), click
Adjust border…
3. You will see the BorderAdjust dialog (Figure 6). Use the arrow
keys in the dialog or on the keyboard to align the four corners of
the colored window within the gray outlined pink window. Click
or press the plus (+) key on the keyboard to widen the
colored window. Click or press the minus (-) key on the key
board to make the colored window narrower. When aligned,
click OK.
Figure 6. Border Adjust
12 Chapter 3: Software Installation

NetStream 2000 Manual 6.6.2000 6/6/00 2:47 PM Page 18
4. The Reset Defaults button will reset the color calibration and the
border adjustment values to the factory default settings.
5. From the REALmagic Configuration dialog (refer to Figure 5),
click Auto Calibration, and then click OK. The screen will flicker
as the software automatically calibrates the colors.
6. If the Auto Color Calibration function fails, please reboot your
system and try the Auto Color Calibration function again. If the
Auto Color Calibration function still fails, you will need to perform a manual color calibration. See Appendix A, Advanced
Configuration Options.
Note: If the auto calibration function fails, open the Display Control
Panel and make sure that your monitor’s refresh rate is set to 72 Hz
or lower.
The Auto Color Calibration function may not work with a small
number of VGAcards on the market today.
Chapter 3: Software Installation 13

NetStream 2000 Manual 6.6.2000 6/6/00 2:47 PM Page 19
Chapter 4. Using the DVD Station
The DVD Station is a versatile Windows utility that allows you to
play a variety of DVD, Video CD, and CD formats. This section
describes how to use the DVD Station to play full-length feature films
recorded in the DVD and Video CD formats, and data CDs contain ing MPEG files and also Audio CDs. The DVD Station will automatically detect the format of the disc in your DVD drive and identify the
file type in the Display Panel. The DVD Station can also detect
MPEG files in your CD-ROM and hard drives.
Your DVD drive must be DVD compliant to be able to play DVDVideo and DVD-ROM. Check the owner’s manual for your DVD
drive to make sure your DVD drive meets these requirements before
attempting to play DVD discs.
Starting the DVD Station
Follow the steps below to start the DVD Station:
1. Start Windows, if you have not already done so.
2. Insert a DVD disc, a Video CD, or a CD-ROM containing
MPEG files into your DVD drive.
3. From the task bar, click Start, and then click Programs. Click
REALmagic NetStream 2000 and then click DVD Station.
4. The DVD Station (Figure 7) is displayed on the screen. (DVD
Station looks best if Windows has 256 or more colors.)
5. If the Auto-Play feature in DVD Station is enabled, DVD
Station will begin playing the disc in the DVD-ROM drive as
soon as one is inserted.
Figure 7. DVD Station
14 Chapter 4: Using the DVD Station

NetStream 2000 Manual 6.6.2000 6/6/00 2:47 PM Page 20
The Display Panel (Figure 8) provides specific information about the
current video or audio track, such as its track number, play time, and
aspect ratio. Aprogress bar at the bottom indicates the progression of
the clip as it plays. You can click on the Progress Bar to jump to a particular part of the track being played. Depending on the type of disc
you are playing, additional information may appear.
Type of
Disc
Aspect
Ratio
Play
Track
Play
Time
Figure 8. Display Panel
Aspect
Ratio
Repeat
Mode
The Volume Control (Figure 9) increases or decreases the audio level.
With the mouse, move the lever up and down to adjust the volume.
Click the Mute Sound Button to mute the audio. To un-mute the
audio, click the Mute Sound Button again.
Mute Sound Button
Figure 9. Volume Control
Chapter 4: Using the DVD Station 15

NetStream 2000 Manual 6.6.2000 6/6/00 2:47 PM Page 21
Standard Buttons
DVD Station has controls similar to those of a VCR. See Figure 10.
11223
Figure 10. Standard Buttons
is the Pause and Play button. Click this button to pause
play, to start playing the first track on the DVD or CD, or to
resume play after pausing.
is the Stop button. Click this button to stop play.
is the Eject button. Click this button to operate the ejection
3
mechanism (if supported by your DVD or CD-ROM drive).
is the Rewind button. Click this button to play the current track
backwards at 2x speed, click again for 8x speed, and click again
to resume normal playback.
is the Fast Forward button. Click this button to fast forward the
current playing track at 2x speed, click again for 8x speed, and
4455667
889
click again to resume normal playback.
is the Previous Track button. Click this button to skip to the
previous track on the CD.
7
is the Next Track button. Click this button to skip to the next
track on the CD.
is the Play Mode button. Click this button to select from three
play modes: All, Random, and Play List. The Display Panel
will show which play mode is currently active. The default play
mode is All. To select Play List, you must first create a play
list. (See "Creating a Play List" later in this chapter.) Selecting
Random will cause DVD Station to play the tracks in random
order.
is the Repeat Mode button. Click this button to toggle between
9
Play Once and Continuous Play modes. Click once to repeat the
current chapter, and twice to repeat the title.
16 Chapter 4: Using the DVD Station

NetStream 2000 Manual 6.6.2000 6/6/00 2:47 PM Page 22
Custom Buttons
Custom Buttons (Figure 11) perform additional functions within
DVD Station.
Figure 11. Custom Buttons
Clicking the Counter button displays the playtime of the cur-
rent clip, and the name of the file (or the title & chapter numbers of
a DVD movie in the upper left-hand corner of the VGAviewing
window. Clicking the Counter button again disables this feature.
Clicking the TV Mode button will switch the video out to a
TV. The MPEG window will vanish from the computer monitor and
the DVD/MPEG-2 Playback Card will output the video only on the
TV screen. If the video out is on TV, clicking this button will switch
the video to the computer monitor. In this case, the REALmagic
NetStream 2000 DVD/MPEG-2 Card will display the MPEG video
only on the computer monitor. For details, please see section for TV
Out.
Clicking the Open File button allows you to open and play
MPEG files from your hard disk, DVD-ROM, or CD-ROM drive.
You will see a standard Open Video File dialog window.
Chapter 4: Using the DVD Station 17

NetStream 2000 Manual 6.6.2000 6/6/00 2:47 PM Page 23
Clicking the Options Dialog button brings up the DVD
Station Options window (Figure 12).
Figure 12. Options Dialog
Play List
The Play List feature allows you to create a list of your favorite
MPEG clips for the DVD Station’s Play List mode. In Figure 12,
drive D: is the DVD-ROM and drive E: is the CD-ROM. Since the
DVD/MPEG-2 Playback Card is capable of playing both MPEG-1
and MPEG-2 files, you may choose to play MPEG-1 and MPEG-2
files from the CD-ROM drive or from your hard disk drive.
The Title List window displays the filenames of MPEG clips DVD
Station was able to locate on the hard disk, DVD-ROM, or CD-ROM
drive. The Play List window displays the clips that are currently on
the Play List.
18 Chapter 4: Using the DVD Station

NetStream 2000 Manual 6.6.2000 6/6/00 2:47 PM Page 24
Perform the following steps to create a Play List:
1. Select the clip’s icon that you wish to add to the Play List from
the Title List window and drag it to the Play List window. To
move all of the clips in the Title List to the Play List, click the
Add All button. To clear the Play List, click the Remove All
button.
2. To remove a clip from the Play List, click on the clip’s icon and
drag it to the Title List box. To change a clip’s playing order, drag
and reposition its icon in the Play List box.
3. Click OK when you have finished adding, removing, and/or
changing the order of the clips to the Play List.
4. Click the Play Mode button in the main window (refer to
Figure 10) until the word Play List is highlighted in the Display
Panel. All clips included in the Play List will play in order.
Settings
Click on the Settings tab to display the DVD Station Settings (Figure
13). This section allows you to choose the various DVD Station settings to enable and disable.
Figure 13. DVD Station Settings
Chapter 4: Using the DVD Station 19

NetStream 2000 Manual 6.6.2000 6/6/00 2:47 PM Page 25
General
Feature
Start
Detached:
Tool Tips:
Keep
Aspect
Ratio:
Always on
Top:
AutoPlay:
Explanation
Displays the DVD Station Control detached
from the movie window on startup. Press F2
to toggle this feature.
Enables pop-up Tool Tips that display the
function of each DVD Station button.
Maintains the movie’s correct aspect ratio
(either 4:3 or 16:9) when re-sizing a movie
window. Prevents distortion of the movie.
Press F4 to resize the movie window to the
movie’s standard (non-scaled) resolution.
Displays the movie window on top of all other
windows. With this feature enabled, other
programs will not appear on top of the movie
window.
Allows you to enable and disable the
Windows AutoPlay feature of the DVD Station
Audio Output
The Audio Output allows you to select between analog (surround) or
digital audio output. For digital output, if you just select this audio
button you get the Dolby AC-3 out of S/PDIF port. If the title supports DTS, then clicking on DTS option in the movie menu will output the DTS stream to the S/PDIF output.
TV
The REALmagic NetStream 2000 can output MPEG video to the
computer monitor or to a TV. If you select TV for video output,
check the appropriate box for PALor NTSC.
20 Chapter 4: Using the DVD Station

NetStream 2000 Manual 6.6.2000 6/6/00 2:47 PM Page 26
DVD
Click on the DVD tab to display the DVD Station’s DVD settings.
Figure 14. DVD Settings
Rating Control
Some DVD movie titles support a voluntary movie rating system.
With a rated title, this feature allows you to play an edited version of
the movie, with violent and other objectionable scenes removed. For
instance, a title may come with R, PG-13, and PG-rated versions of
the same movie.
When DVD Station is first installed, the password box is grayed out.
To enable this feature, check the Set box and enter a password. Enter
a password of your choice into the New box and again in the Confirm
box. Click on Apply to enable the password.
Important Note: This feature has no effect on titles that do not support the Parental Lockout feature. Most DVD movie titles do not use
this voluntary rating system. You cannot rely upon this feature to prevent your children from viewing objectionable titles. The only way to
prevent children from playing such movies is to physically keep those
movies out of reach of children.
Default Language
Most DVD movies support multi-lingual audio. You may select the
default language of your choice under the Default Language selection. If the chosen default language is not available on that DVD
movie title, DVD Station will use the default language on that particular DVD movie disc, which may differ depending on the origin of
the disc.
Note: You must restart the movie after changing the Default Language
in order for it to take effect.
Chapter 4: Using the DVD Station 21

NetStream 2000 Manual 6.6.2000 6/6/00 2:47 PM Page 27
Picture Controls
Click the More Controls button (see Figure 15) to toggle the display
of more features.
More Controls
Image Capture
Segment Play
Slow Motion
Contrast
Color Saturation
Brightness
Figure 15. Additional Custom Buttons
• Picture Control sliders
Move the sliders to adjust the Brightness, Contrast, and
Color Saturation of the movie window. These adjustments affect
the movie window only; they are designed so that they will not
affect other VGAgraphics on your computer monitor. Audio
may be muted when using the sliders.
• Image Capture
Click the Image Capture button to save a BMP image of a
movie frame to disk. Note that, because of copyright
restrictions, this feature does not work with DVD Video titles.
• Segment Play (A-B)
This feature lets you loop playback between any two points in a
movie. Click this button on the progress bar once during movie
playback to set the start point. Click the button a second time to
set the end point. The movie will now loop between the two
points until you press another button (for example: Rewind or
Stop).
• Slow Motion Play
Click this button to play back the movie at half speed. Click the
button again to return to normal playback speed. Audio is muted
when Slow Motion is selected.
22 Chapter 4: Using the DVD Station

NetStream 2000 Manual 6.6.2000 6/6/00 2:47 PM Page 28
DVD Navigation Buttons
There are five DVD Navigation buttons and a joystick controller on
the right-hand side of the DVD Station (Figure 16). Use the mouse
to click on the button to activate the desired function.
Figure 16. Navigation Buttons
Audio Soundtrack Language Selector
This operation only functions with a DVD movie disc that contains
multiple language soundtracks. Press the Audio Soundtrack
Language Selector during play. Click and select the language you
want. Figure 17 shows an example where English is the selected
language. The language selected is momentarily displayed in the
upper-right corner of your movie window.
Figure 17. Language Selector
Chapter 4: Using the DVD Station 23

NetStream 2000 Manual 6.6.2000 6/6/00 2:47 PM Page 29
Camera Angle Selector
This operation only functions with a DVD movie disc that contains
multiple camera angles. Press the Camera Angle Selector during
play. Move the mouse UPor DOWN to highlight the camera angle
you wish to view (Figure 18). Click on the angle you wish to view.
The camera angle number is momentarily displayed in the upperright corner of your movie window.
Figure 18. Language Selector
Subtitle Selector
This operation only functions with a DVD disc that contains multiple language subtitles or closed captions. Refer to Figure 19.
Press the Subtitle Selector during play. The language selected is
momentarily displayed in the upper-right corner of your movie window. If the selector is divided (the languages appear more than once,
as shown in Figure 19), the first selection provides normal subtitles
for the selected language. The second language selection identifies
subtitles with extra functions.
Figure 19. Subtitle Selector
24 Chapter 4: Using the DVD Station

NetStream 2000 Manual 6.6.2000 6/6/00 2:47 PM Page 30
Menu Selector
Some DVD discs have a unique menu structure called DVD menu.
For example, some discs allow you to access the multiple language
soundtrack, multiple camera angles, and subtitle options in the DVD
menu.
Title Selector
Some DVD discs, such as movies or Music Videos, have more than
one title and contain a Title menu. If the disc has a Title menu, press
the Title Selector during play to activate the menu. Operate the joystick to highlight the desired title. Click on the Select button or the
Play button to play the title.
Joystick Controller
The joystick controller is a group of five buttons nested together.
The joystick is used to navigate around the possible choices offered
in the DVD menus. Click on the UP, DOWN, LEFT, or RIGHT
arrows to highlight the option you wish to select, and click on the
Select button in the center of the joystick to select the highlighted
item.
DVD Playback
Basic DVD Playback
1. Turn on the PC and press OPEN/CLOSE button on the DVDROM drive to open the disc tray.
2. Insert a DVD disc onto the tray and press the OPEN/CLOSE
button on the DVD-ROM drive to close the disc tray.
3. Start DVD Station by selecting the following from the taskbar:
START - PROGRAMS - DVD – DVD Station.A DVD
control panel and a Video Screen should appear (Figure 20).
4. If the Auto-Play feature of DVD Station is enabled, the DVDVideo will begin to play.
5. Initially, the DVD Station Control panel is detached from the
MPEG Video screen. You can attach the DVD Station to the
MPEG Video screen by pressing the F2 key on the keyboard.
Pressing F2 again will detach the DVD Station Control panel.
6. If the DVD Station Control Panel is behind the MPEG Video
screen and is not visible, click the right mouse button will bring
the Control Panel to the foreground.
Chapter 4: Using the DVD Station 25

NetStream 2000 Manual 6.6.2000 6/6/00 2:47 PM Page 31
Figure 20. DVD Control Panel and Video Screen
7. If a DVD movie disc is in the DVD-ROM drive, and the DVDROM is the first logical drive after the hard disk (for example,
the hard disk is drive C: and the DVD-ROM is drive D: ), click
PLAY on the DVD station. The DVD movie should start.
8. If the DVD-ROM is NOT the first logical drive after the hard
disk, click the Options Button on the DVD Station. In the
Options dialog (Figure 21), select the drive that represents your
DVD-ROM drive. DVD Station will automatically search for all
available DVD files on the selected drive. ADVD information
file "Vts_01_0.ifo" (for a DVD-Video disc) should appear on
the Title List. Click OK to close the dialog.
Figure 21. Options Dialog
9. Click the PLAY button on the DVD station.
26 Chapter 4: Using the DVD Station

NetStream 2000 Manual 6.6.2000 6/6/00 2:47 PM Page 32
10-Key Keypad
If DVD Station detects that a DVD movie disc is in the DVD-ROM
drive, it will display the 10-Key Key Pad button in place of the
Mode button. Clicking on this button will bring up a floating 10-key
keypad that will allow you to interact with some DVD movie titles
that have menu selections and other options. Figure 22 shows the
two 10-key keypads available.
Figure 22. 10-key Keypads
Click on this button to toggle between the two 10-key keypads.
Use this button to make corrections.
This button returns to the previous menu.
Click on this button will execute whatever option you have
chosen.
If the 10-key keypad is hidden by another window, clicking on
the button again will bring it back to the foreground.
During full-screen video playback, use the right mouse button to
hide and unhide the 10-key keypad.
Chapter 4: Using the DVD Station 27

NetStream 2000 Manual 6.6.2000 6/6/00 2:47 PM Page 33
Video CD Playback
1. Press the OPEN/CLOSE button on the DVD-ROM drive or the
CD-ROM drive to open the disc tray.
2. Insert a Video CD 2.0 disc onto the tray and press the
OPEN/CLOSE button on the DVD-ROM drive to close the disc
tray.
3. Initialize DVD Station by selecting the following from the
taskbar: START - PROGRAM - DVD – DVD Station.
4. DVD Station will detect the Video CD in the DVD-ROM drive
or the CD-ROM drive and display the Video CD 2.0 Control
Panel (Figure 23). If the disc is a Video CD 1.0 disc, the 10key pad will not appear and the display will show VCD instead
of VCD2.
Figure 23. Video CD 2.0 Control Panel
Select Buttons (Video CD 2.0 Only)
Video CD 2.0 discs feature embedded playback controls. When you
play a Video CD 2.0 disc, you can experience a whole new level of
interactivity. You may play a disc that prompts you with questions.
For example, you may be asked if you want to play the disc in (1)
English or (2) Japanese. If you are playing a Video CD 2.0 disc,
DVD Station will show a series of number buttons (Figure 24) on
the screen next to the Standard Buttons. Use these buttons to make
your selection.
Figure 24. Menu Key Pad
Click on the number that you want to select. The number will be
displayed in the display panel.
28 Chapter 4: Using the DVD Station

NetStream 2000 Manual 6.6.2000 6/6/00 2:47 PM Page 34
Playing a Video CD 2.0
DVD Station will display a 10-key pad for Video 2.0 CD. To play
the CD, select the Play button on the DVD Station application. For
most Video 2.0 CDs, you will see a menu of songs appear on the
viewing screen. The viewing screen will show only the first half of
the songs on the CD. To select a song from the second half of the
viewing screen, you must click the Next Track button to view the
next set of titles on the screen. Once you have decided on a song,
use the keypad on DVD Station’s control panel to select the song
number and click the Menu Select key on the control panel using
your mouse.
Note: Some Video CDs have different formats and do not require
the Menu Select key. Some formats will work by using the Next
Track button to select the song, followed by clicking the Play
button.
Audio CD Playback
1. Press the OPEN/ CLOSE button on the DVD-ROM drive or the
CD-ROM drive to open the disc tray.
2. Insert an Audio CD disc onto the tray.
3. Start DVD Station by selecting the following from the taskbar:
START - PROGRAM - DVD - DVD Station.
4. DVD Station will detect the Audio CD in the DVD-ROM drive
or the CD-ROM drive and display the Audio CD Control panel
(Figure 25).
Figure 25. Audio CD Control Panel
Chapter 4: Using the DVD Station 29

NetStream 2000 Manual 6.6.2000 6/6/00 2:47 PM Page 35
5. Click the Play button to start playing the Audio CD, or use the
Play List function to choose your own selection. The Open
File feature is not supported for Audio CD.
Note: If you do not hear any music during playback, check to see if
you can hear music with a headphone connected to the headphone
jack in front of the CD-ROM or DVD-ROM drive. If you can hear
music from the headphones, check to see if you have connected the
stereo cable from the DVD-ROM drive to your sound card.
Shortcut Keys
Key: Description:
Double-click on Toggle movie playback between
movie window full-screen and window mode.
Press any key Return from full-screen to window
playback mode
Right-click on Display playback controls (window
movie window playback mode only)
Move mouse to Display mini-controls (fullbottom of screen screen mode only)
F1 Help
F2 Toggle to detach/attach playback
controls to movie window
F3 Display DVD movie information
(window playback mode only)
F4 Size window to the movie’s standard
resolution (without scaling or stretching)
30 Chapter 4: Using the DVD Station

NetStream 2000 Manual 6.6.2000 6/6/00 2:47 PM Page 36
Key: Description:
F5 Switch between VGAand TV mode
Alt-F4 Quit
ctrl+a Activate angle menu
ctrl+c Activate frame capture
ctrl+d Toggle display timer
ctrl+e Eject disk
ctrl+f Fast-forward (cycles from 2x, 8x, then normal)
ctrl+g Segment (A-B) play
ctrl+l Cycle playback mode (All, Random, Play List)
ctrl+m Display DVD menu
ctrl+n Next track or chapter
ctrl+o Open options dialog
ctrl+p Play/pause toggle
ctrl+q Activate closed caption/sub-title menu
ctrl+r Rewind
ctrl+s Stop
ctrl+t Display DVD title menu
ctrl+v Previous track or chapter
ctrl+w Slow motion playback
ctrl+z Zoom to Full Screen
Video CD 2.0 Shortcut Keys:
ctrl+0-9 Select numbers on Video CD 2.0 keypad
ctrl+ Backspace on Video CD 2.0 keypad
ctrl+<Enter> Apply or enter selection on Video CD 2.0
keypad
ctrl+ Play default Video CD 2.0 track
DVD Menu Shortcut Keys:
Select menu option
(active when DVD menu is on-screen)
<Enter> Activate selection
(active when DVD menu is on-screen)
Chapter 4: Using the DVD Station 31

NetStream 2000 Manual 6.6.2000 6/6/00 2:47 PM Page 37
Chapter 5. Windows Media Player &
DirectShow Support
The NetStream 2000 fully supports the Windows Media Player and
DirectShow. The Windows Media Player is an application which can
play a variety of digital video, animation and audio files, including
MPEG-1and MPEG-2 video, by using a mechanism called
DirectShow. The Windows Media Player can run as a standalone
application, or it can be embedded as an ActiveX control, and used
inside of web pages or other Windows programs. Windows Media
Player will automatically select and use the NetStream 2000 to play
back MPEG-1 and -2 files on your computer.
Windows Media Player and DirectShow work in all 32-bit versions
of Windows, including Windows 95, 98, NT 4.0 and 2000. For best
results, you should download and install the newest version of
Windows Media Player from the Microsoft website. To do this, visit
www.microsoft.com, click "Search" and enter the phrase "Windows
Media Player." This will lead you to the download pages, as well as
other pages which describe how to write HTML, Visual Basic and C
programs which can control the Windows Media Player.
Note: Some versions of Windows, such as Windows 95 and NT 4.0,
shipped with an outdated Media Player. For this reason, you should
always download and install the latest version of the Windows
Media Player from the Microsoft website.
DirectShow and the Windows Media Player are used with the
NetStream 2000 to support streaming video playback from video
server products from many companies. For a detailed compatibility
list, please visit us on the web at www.sigmadesigns.com. Each
NetStream 2000 video server product has its own unique client software. This client software is available from the company which
makes the video server.
Streaming MPEG video over a network is accomplished using many
different types of techniques, which have different advantages,
depending upon what goals you are trying to accomplish. The design
of a streaming video server for 10,000 simultaneous users is different than a video server for 50 users. In addition, playing MPEG over
a network can make substantial drains on the network's resources,
which might require upgrading. Because MPEG video consumes 1
to 8 Mbits per second of sustained bandwidth, it is easy to saturate a
100 Mbit/sec (100BaseT) network. Using high quality network
adapters and Ethernet switches is essential for good streaming video.
One technique which reduces the strain on the network is called
"multicasting." Instead of each person on the network watching his
32 Chapter 5: Windows Media Player DirectShow Support

NetStream 2000 Manual 6.6.2000 6/6/00 2:47 PM Page 38
own video stream, every person can watch the same stream, as if it
were a TV broadcast. This reduces the strain on the network considerably, even if 5 or 10 channels are available. This technique can be
used with either stored or live video feeds, and can also be used to
combine live and stored video together, so that MPEG video can be
watched "live" or paused and replayed.
Sigma Designs works with many partner companies to provide highly dependable streaming video solutions of all kinds. These partners
are experts at digital video and network design and can help to create a solution perfectly suited for your needs.
Software development documents are available from Sigma Designs
for programmers wishing to create their own streaming and interactive video products. The Sigma Designs tool kit is based completely
on DirectShow, but uses Sigma-developed filters and special function calls to offer additional functionality not available in the standard Microsoft DirectShow release. For information on purchasing
these software development tool kits, send e-mail to sales@sigmadesigns.com.
Chapter 5: Windows Media Player DirectShow Support 33

NetStream 2000 Manual 6.6.2000 6/6/00 2:47 PM Page 39
Appendix A. Advanced Configuration Options
Manual Color Calibration
If the Auto calibration feature displays an error message, follow the
steps below to manually calibrate the color:
1. From the REALmagic Configuration… dialog (refer to Figure
3), click Advanced >>> and then Manual calibration.
2. From the Dialog (Figure 26), use your mouse to move the bar
(marked R) slowly up or down to a point where the image of the
big box on the right-hand side of the Dialog window appears
similar to the image of the "GOOD" box. You can use the UP or
DOWN arrow keys on the keyboard to make fine adjustments.
Click Next. You must perform this procedure three more times
for the colors red, green, and blue. After the last adjustment,
click OK.
34 Appendix A. Advanced Configuration Options
Figure 26. Dialog

NetStream 2000 Manual 6.6.2000 6/6/00 2:47 PM Page 40
Advanced ColorAdjustments
When you move the mouse or a window on top of the DVD or
MPEG video, the VGAgraphics need to appear on top of the video
window. To do this, the DVD/MPEG-2 Playback Card uses a wellestablished method called chroma key. This method is similar to the
"blue-screen" effect often used in television. A special color is chosen as the "chroma key" color, and video will only display where
the chroma key color appears. For practical reasons, the chroma key
color is usually a rarely used color that is very unlikely to be used
by other Windows programs.
The DVD/MPEG-2 Playback Card software defaults to a dark green
color as the chroma key color.You might prefer to use a different
color if the default color conflicts with one of your application programs. When there is a conflict, you will see MPEG video displayed
"through" an area of you application. There may also be instances
where the default color is not compatible with your VGAdisplay.
Follow the steps below to set your own chroma key color if:
• You want to use a different chroma key color, or
• You are not able to view any MPEG video on your VGAscreen,
or
• If the VGAgraphics seems to "bleed through" the MPEG video
Note: If you are not able to view MPEG video at all, there are
several things you should try before changing the chroma key color:
make sure that the monitor is connected to the DVD/MPEG-2
Playback Card, powering off the computer and try again after
restarting, or double check the Border Adjust and Color Calibration
procedures.
1. Start DVD Station and play an MPEG video. Even if the video
is not visible, you should be able to hear the audio.
2. Click on the Options button, click on the Settings tab, and then
click the Configure button. Next, click the Advance>>> button
and select ColorAdjustment.
3. Select a key color from the Choose key color to set menu.
Appendix A. Advanced Configuration Options 35

NetStream 2000 Manual 6.6.2000 6/6/00 2:47 PM Page 41
4. If you would like to select a key color that is not in the menu,
select Add Custom Color, which is the last item on the menu.
This will bring up a dialog box that allows you to enter the red
(R), green (G), and blue (B) values of the color you want. There
are 256 levels for each color. Enter a value between 0 and 255.
(Figure 27).
border area
Figure 27. Key Color Settings
5. MPEG video should appear in the border surrounding the color
chart. There should also be a "hole" in the color chart where
MPEG video will show through.
6. If MPEG video does not appear in BOTH the border and the
"hole," then you must adjust the R, G, and B values
with the sliders until you can see the video in both regions. Do
this by adjusting the width (W) and length (L) slider bars of
each color to make the video appear both inside and outside
of the color chart.
Normally, adjusting these sliders can easily make a very large
hole in the color chart that displays MPEG video. Once you can
see video in both the inside and the outside area, you should
adjust the sliders to reduce the size of the hole so that it is about
40 x 40 pixels, which is roughly the size of a Windows icon.
Making the hole too small will cause video "jittering" and
"bleeding." Making the hole too large will cause MPEG video to
play "through" areas within a larger range around the chroma
key color.
7. If necessary, click the Reset Key Color Defaults button to reset
the key color back to the factory default value.
8. Click OK to exit the Key Color Settings window.
36 Appendix A. Advanced Configuration Options

NetStream 2000 Manual 6.6.2000 6/6/00 2:47 PM Page 42
BorderAdjustments
Follow the steps below to fine-tune the position and size of the
MPEG video within its display window.
1. From the REALmagic Configuration... dialog (refer to Figure 5)
click Advanced >>> and then BorderAdjust. In the resulting
dialog box, click the Expert button.
2. In the Expert Settings dialog (Figure 27, the four Cropping
region values crop the MPEG video image from the Left, Right,
Top, and Bottom. This allows you to position the video with
greater precision. The In delay value delays the display of the
video pixel on the left-hand side of the MPEG video. The Out
delay value delays the display of the video pixel on the righthand side of the MPEG video. Adjusting these values can reduce
flutter and jitter which may appear with rare display adapter and
resolution combinations.
Figure 27. Expert Settings
Appendix A. Advanced Configuration Options 37

NetStream 2000 Manual 6.6.2000 6/6/00 2:48 PM Page 43
Appendix B. Customer Service
If you encounter problems installing or using your REALmagic
NetStream 2000 MPEG-2 Playback Card, contact your dealer. If you
need additional assistance, Sigma Designs has a full-time Customer
Service staff available to assist you over the telephone, by FAX, or
via the Internet
38 Appendix B: Customer Service Information
Customer Service Hours: 8:00 A.M. to 5:00 P.M. (Pacific Time)
Monday through Friday
Telephone Number: (408) 957-9866
FAX: (408) 957-9740
Email: tech_support@sdesigns.com
World Wide Web: www.sigmadesigns.com

NetStream 2000 Manual 6.6.2000 6/6/00 2:48 PM Page 44
Notes:
Appendix B: Customer Service Information 39

NetStream 2000 Manual 6.6.2000 6/6/00 2:48 PM Page 45
Index
A
ABS 3
Advanced Color Adjustments, 35
Advanced Connections, 9
Audio Connections, 6, 7
Auto Calibration, 13, 34
B
Border Adjustment, 10, 12, 13
C
CD Audio In, 9
Chroma key, 35
Color Calibration, 10, 12, 13, 34, 35
Composite Video Out, 8
Compression, 2
Customer Service Information, 38
D
DAT Files, 3
Data Transfer Rate, 2
Discrete Digital Audio Channels, 2
Dolby Digital Surround Sound, 2, 3
Dolby Pro Logic, 1, 2, 3
DVD, 1, 2, 5, 8, 9, 14, 16, 17, 18, 19, 20, 21, 22, 23
DVD-Video, 14, 26
E
Email, 38
Encoder, 1, 2
Expert Settings, 37
F
File Formats, 3
FPS, 2, 3
Frames Per Second, 2, 3
40 Index

NetStream 2000 Manual 6.6.2000 6/6/00 2:48 PM Page 46
H
Handling the Board, 4
Hardware Installation, 4
I
In Delay, 37
Installing the Hardware, 5
Introduction, 1
K
Karaoke CD, 3
L
LINE-IN, 7
LINE-OUT, 7
M
Macrovision Copyright Notice, 9
Manual Calibration, 34
Moving Picture Experts Group, 2
MPEG, 1, 2, 3, 6, 7, 8, 9, 14, 17, 18, 20, 25, 32, 33, 34, 35, 36, 37
MPEG-2, 1, 2, 3, 7, 8, 17, 18, 32, 35, 38
MPG Files, 3
P
Pass-through Cable, 6
Pro Logic Surround Sound, 2, 3, 7
S
Software Installation, 1, 10
Static Electricity, 4
S-Video Out, 8
System Requirements, 1
T
Table of Contents, i
Technology Overview, 2
TV Connections, 8
Index 41

NetStream 2000 Manual 6.6.2000 6/6/00 2:48 PM Page 47
V
VBS, 3
Video CD, 3, 14, 28, 29, 31
Video Connection, 6
W
Windows 95, 20, 32
World Wide Web, 37
June, 2000
42 Index

NetStream 2000 Manual 6.6.2000 6/6/00 2:48 PM Page 48
Milpitas, CA 95035-3024
Tel:(408) 262-9003 • Fax: (408) 957-9740
Website: www.sigmadesigns.com
355 Fairview Way
 Loading...