

Realistic PRO-37 Owner's Manual
\
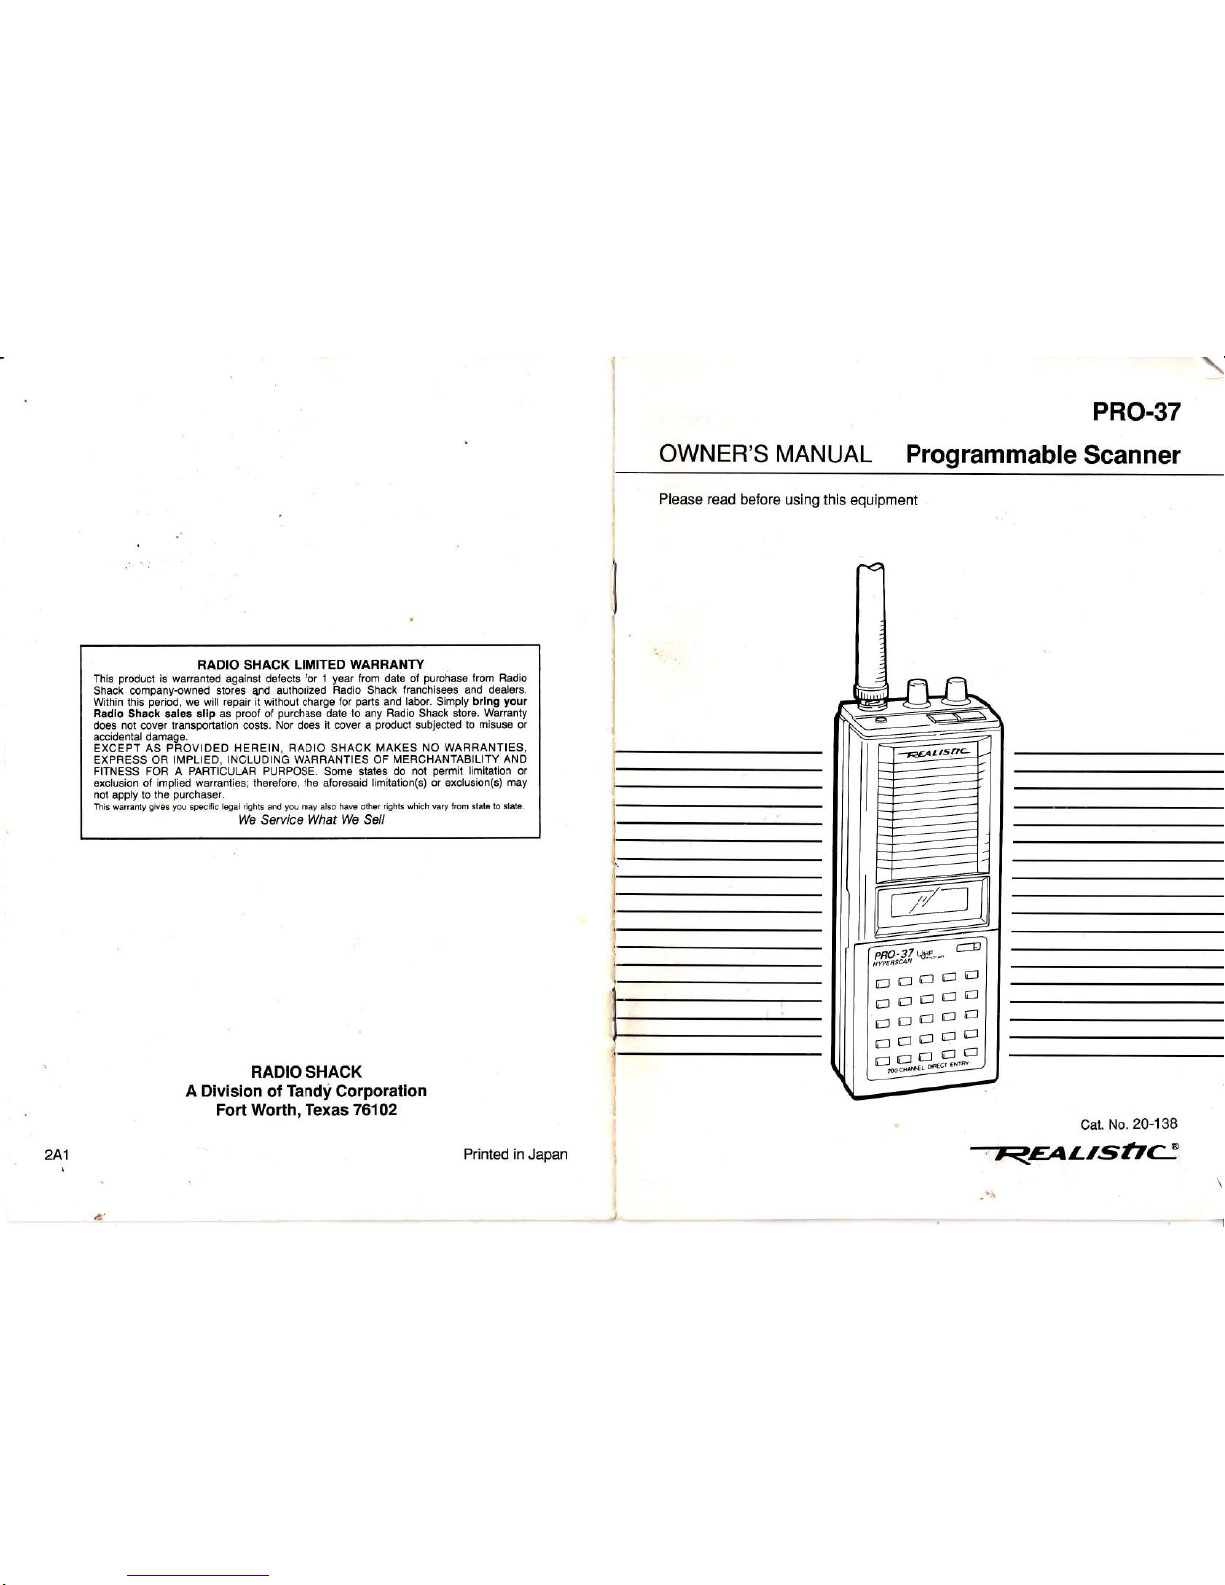
PRO-37
RADIO
SHACK
LIMITED WARRANW
This
product
is warranted against defects
for 1
year
from date of
purchase
lrom Radio
Shack company-owned
stores
and
authorized
Radio
Shack
franchisees and dealsrs.
Within this
period,
we will
repair
it without charge
for
parts
and labor. Simply brlng
your
Radio Shack sales sllp as
proof
of
purchase
date to any
Radio
Shack
store.
Warranty
does not cover transportation costs.
Nor
does
it cover a
product
subjected
to misuse or
accidental damage.
EXCEPT
AS PROVIDED HEREIN, RADIO
SHACK
MAKES NO WARRANTIES,
EXPRESS OB IMPLIED,
INCLUDING WARRANTIES OF
MERCHANTABILITY AND
FITNESS FOR A PARTICULAR
PURPOSE.
Some states
do
not
permit
limitation
or
exclusion of implied warranties; therefore, the aforesaid
limitation(s) or exclusion(s)
may
not
apply
to the
purchaser.
This warranty
giv6s you
specific
legal rights
and
you
may
also
have other
rights
which
vary lrom
stato
to Stata.
We Service What
We
Sell
RADIO
SHACK
Division
of
Tandyi
Corporation
Fort Worth, Texas 76102
OWNER'S MANUAL
Programmable
Scanner
Please
read
before
using this equipment
cat.
No.
20-138
RaLrsfre
A
241
Printed
in
Japan
INTRODUCTION
Your Realistic
PRO-37 Programmable
Scanner
lets
you
in
on all
the action!
This scanner
gives you
direct access
to
over 31,000
frequencies that
in-
clude the
police
department,
fire
de-
partment,
ambulance
service, ama-
teur
radio,
and transportation
ser-
vices. You can store
frequencies
in
your
scanner's
200 channels and
you
can change
your
selections
at any
time.
The
secret to
your
scanner's ability
to
scan so
many
frequencies
is its
custom-designed
microprocessor
-
a
tiny,
built-in computer.
Your
scanner's
microprocessor also
gives your
scan-
ner these special
features:
Hyperscan
-
lets
you
search
through
frequencies at up
to 50 steps
per
sec-
ond or scan stored channels at
25
channels/second.
Ten
Channel-Storage
Banks
-
let
you group your
stored
frequencies so
that
you
can easily
identify calls.
Liquid-Crystal
Display - shows the
selected channel
and
frequency.
Two-Second Scan
Delay
-
lrelpspre-
vent
the
loss of
replies on a channel
while
you
are
scanning
Memory
Backup
-
keeps
the
channel
frequencies stored
in
your
scanner's
memory
for up to
t hour
without the
battery.
Lockout Function
-
makes
your
scanner skip
over specified
channels.
Priority Channel-
helps
keep
you
from missing
important calls
on the
selected
priority
channel.
Monitor
Banks - let
you
save
up to
ten channels
located during a
fre-
quency
search.
Your PRO-37 covers allthese
bands:
.
30-50
MHz
(VHF
Lo)
.
50-54
MHz
(6-Meter
Ham Band)
.
1 0B-136.975
MHz
(Aircraft)
.
137-144
MHz
(Government)
.
144-148
MHz
(2-Meter
Ham
Band)
.
148-174
MHz
(VHF
Hi)
.
380-450
MHz
(Ham
Radio and
Government)
.
450-470
MHz
(UHF
Lo)
.
470-512
MHz
(UHF
TV)
.
806-823.9375
MHz
(UHF
Hi)
.
851.1125-808.9375
MHz
(UHF
Hi)
.
896.1125-960
MHz
(UHF
Hi)
CONTENTS
lntroduction
..............2
Preparation
..............4
Power
Sources
.......................4
Connecting the
Antenna .........7
Connecting an
Earphone ........8
Connecting
an
Extension
Speaker..
..........8
Understanding
Your
Scanner......
...................9
A Look
at the
Disp1ay................. ................9
A Look
at the
Keyboard .............
..............10
Understanding Channel
Storage
Banks
..................... 11
.Operation
...............12
Using the
Reset Button ................ ...........12
Setting the
Volume
and Squelch Controls......
............12
Using
the Key
Lock
..............12
Programming
the Scanner...............
.......13
Searching for Active Frequencies
............14
Moving a Frequency From Monitor Memory
to a
Channel ...............................16
A
General Guide to Scanning
......................19
Birdies
...............19
Reception Notes.......... .........19
Guide to the
Action 8ands......... ..............20
Care and
Maintenance
............-23
Troubleshooting .............
...........24
Specif
ications.................
...........25
Your
scanner
might
cause
radio
or
TV lf
you
cannot eliminate the
interfer-
interference,
even
when it is
operat- ence, the
FCC requires that
you
stop
ing
properly.
To
determine
whether
using
your
scanner.
your
scanner
is
causing
the
interfer-
ence. turn off vour scanner.
lf
the
in-
For
your
important records,
please
re-
- ' -'
'::::,';'::^::"^-',^
cord
your
scanner's serial
number
in
terference
goes
away,
your
scanner
is
;;-^:::^
-^:.i;-^"-
-,
causins the
interrerence. rry
to erimi-
II"- :t'::^t:f
i1t^d'-Il"^::l]'lii[
nate
the
interference
by:
oer ls
locateo
on me
DacK oT tne
scanner.
Moving
your
scanner away
from
the
receiver
Contacting
your
local Radio
Shack
store
for help
@ 1991 Tandy Corporation.
All Rlghts Reserved.
Radio
Shack and Realistic are reglstered
trademarks
used by
Tandy Gorporation.
4
Serial
Number:
PREPARATION
POWER SOURCES
You
can
power your
scanner
from any
of the
following three
sources:
.
lnternal
batteries
.
A
standard
AC
outlet
(using
an
op-
tionalAC
adapter)
.
Your
vehicle's battery
(using
an op-
tional
DC
adapter)
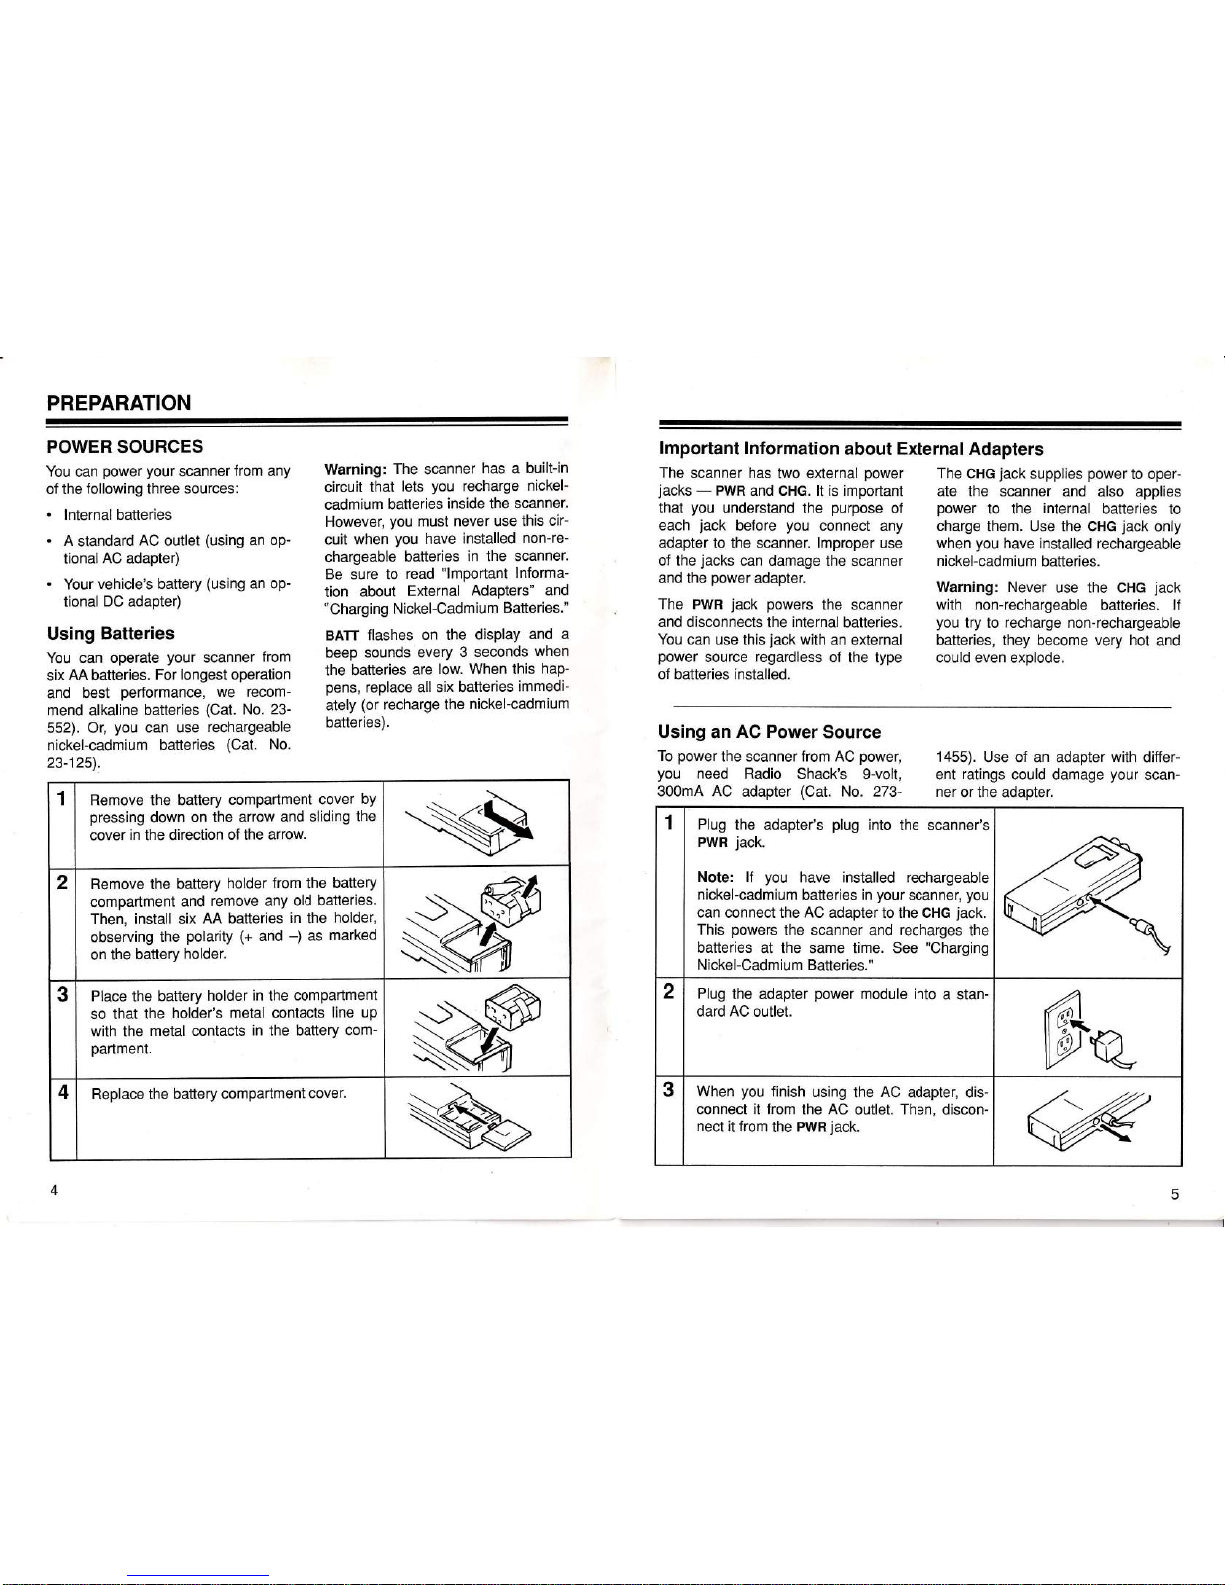
Using
Batteries
You
can
operate
your
scanner
from
six
AA
batteries.
For
longest
operation
and best
performance,
we recom-
mend alkaline
batteries
(Cat.
No.
23-
552). Or,
you
can use
rechargeable
nickel-cadmium
batteries
(Cat.
No.
23-125).
Warning:
The
scanner
has a
built-in
circuit
that
lets
you
recharge
nickel-
cadmium
batteries
inside the scanner.
However,
you
must
never use this
cir-
cuit
when
you
have
installed
non-re-
chargeable
batteries
in the scanner.
Be
sure
to
read
"lmportant
lnforma-
tion
about
External
AdaPters" and
"Charging
Nickel-Cadmium
Batteries."
BATT flashes
on the
display
and a
beep
sounds
every 3 seconds
when
the batteries
are
low. When this
hap-
pens,
replace all
six batteries
immedi-
ately
(or
recharge the
nickel-cadmium
batteries).
Important lnformation
about
External
Adapters
The
scanner has
two external
power
The CHG
jack
supplies
power
to oper-
jacks
-
PWR
and
CHG. lt is important
ate the scanner
and also applies
that
you
understand
the
purpose
of
power
to the
internal
batteries to
each
jack
before
you
connect any charge
them. Use the CHG
jack
only
adapter to the
scanner.
lmproper
use when
you
have
installed rechargeable
of the
jacks
can damage the
scanner
nickel-cadmium
batteries.
and the
power
adapter'
warning: Never
use
the
cHG
jack
The PWR
jack
powers
the
scanner
with non-rechargeable
batteries. lf
and disconnects
the
internal
batteries.
you
try to
recharge
non-rechargeable
You can
use this
jack
with
an
external batteries,
they become
very hot
and
power
source
regardless
of the type could even
explode.
of batteries lnstalled.
Using an
AC Power
Source
To
power
the scanner from AC
power,
you
need
Radio
Shack's
9-volt,
300mA AC
adapter
(Cat.
No. 273-
1455).
Use of an adapter with
differ-
ent
ratings
could
damage
your
scan-
ner
or the adapter.
1
Remove
the
battery
compartment
cover
by
pressing
down
on the arrow
and sliding
the
cover in the direction
of the arrow.
2
Remove the battery
holder
from the
battery
compartment
and
remove any
old batteries.
Then,
install
six
AA
batteries
in
the
holder,
observing
the
polarity
(+
and
-)
as
marked
on
the battery
holder.
3
Place the
battery
holder
in
the
compartmenl
so that
the
holder's
metal contacts
line
up
with
the
metal contacts
in the battery
com-
partment.
4
Replace the battery
compartment
cover.
1 Plug
the
adapter's
plug
into
the scanner's
PWR
jack.
Note: lf
you
have installed rechargeable
nickel-cadmium
batteries
in
your
scanner,
you
can connect the
AC
adapter
to the
cHG
jack.
This
powers
the scanner
and
recharges
the
batteries
at the same time. See "Charging
Nickel-Cadm ium Batteries."
2
Plug
the adapter
power
module
into
a stan-
dard AC outlet.
3
When
you
finish
using
the
AC
adapter, dis-
connect it from
the
AC
outlet. Then,
discon-
nect
it from
the
PWR
jack.
4
Using a
DC Adapter
You
can
power
the
scanner
from
your
vehicle's cigarette
lighter
socket,
pro-
vided the
vehicle
has
a
12-volt, nega-
tive-ground
electrical
system.
To do
so,
you
need Radio Shack's
Universal
DC Adapter
(Cat.
No. 270-1560)
or an
adapter
rated at 9V
minimum 300
mA.
Note:
ln
some
areas,
mobile use of
a
scanner
is
unlawful
or
requires a
per-
mit. Check the
laws in
your
area.
CHARGING
NICKEL.CADMIUM
BATTERIES
Your
scanner
has a built-in circuit that
recharges nickel-cadmium
batteries.
To
charge the batteries, simply con-
nect
an
AC
or
DC
adapter
to
the
CHG
jack
as
explained
in
"Power Sources."
Warning: Do not
connect either
adapter to the
CHG
jack
if
you
have
not installed
rechargeable
batteries.
Non-rechargeable
batteries
can be-
come
hot
and
even
explode
if
you
try
to
recharge
them.
It
takes
10
to
18
hours
to
recharge
batteries
that are
fully
discharged.
You
can operate
the scanner
while
you
charge
the batteries, but the
charging time
is longer.
Charging
Hints:
.
Nickel-cadmium batteries deliver
more
power
if
you
occasionally
let
them
discharge completely.
To
do
this, use the scanner
until
recep-
tion becomes
poor.
Then, fully
charge the batteries.
lf
you
do
not
do this occasionally, they
can tem-
porarily
lose the ability to deliver
fullpower.
.
To
prevent permanent
nickel-cad-
mium battery
power
loss, never
charge
your
batteries
in an area
where the temperature
is
above
about
B0
degrees
Fahrenheit.
Also,
if
you
use an external charger,
do
not
overcharge the batteries.
.
ll
you plan
to use
rechargeable
batteries, do
not
use any
adapter
other than
those specified
in
"Power
Sources."
While
adapters
of
the
same
voltage rating
and at
least the
minimum
current
rating
could
power
the scanner, other
adapters
might not work
properly
with
the charging
circuit
in
your
scanner, and could
permanently
damage
the batteries or
your
scan-
ner.
CONNECTING
THE
ANTENNA
Attach
the
flexible
antenna
to the
ANT
(antenna)
jack
on top of
the scanner.
Slip
the slot
in
the antenna's connec-
tor over the
protrusion
on the
jack.
Then,
press
down
and
rotate
the base
of the antenna until
it locks
into
place.
1 Connect the
adapter's
green
barrel
plug
to
the
adapter's
power
cable
with
the
tip set
to
NEG
(negative).
2
Set
the adapter's
voltage switch
to 9V.
3
lnsert the
adapter's
barrel
plug
into the
scanner's
PWR
jack.
Note:
lf
you
have installed
rechargeable
bat-
teries
in the
scanner,
you
can connect
the
DC adapter
to the
CHG
jack.
This
powers
the
scanner
and
recharges
the
nickel-cadmium
batteries
at the
same time.
See
"Charging
Nickel-Cadm
ium Batteries."
4 Plug the
other end
of the
adapter
into
your
vehicle's cigarette
lighter socket.
Note:
lf
the scanner does
not operate
prop-
erly
when
you
use a
DC
adapter,
unplug the
adapter
from the
lighter
socket
and clean the
socket to
remove ashes and other
debris.
A
?
5
When
you
linish using
the
DC
adapter,
dis-
connect
it from the cigarette
lighter.
Then,
disconnect
it from the
scanner.
UNDERSTANDING
YOUR
SCANNEH
The
antenna
jack
on
your
scanner
makes it
easy to use
your
scanner
with
a
variety
of antennas.
You
can
remove
the supplied antenna,
if
you
want,
and attach a different
one, such
as an external
mobile
antenna,
tele-
scopic antenna, or outdoor base an-
tenna.
Radio Shack stores sell the
antenna connector adapters that
let
you
use these antennas.
Use coaxial cable to connect an out-
door antenna.
Always
use
50-ohm co-
axial
cable. For lengths over 50
feet,
use
RG8 low-loss
dielectric coaxial
cable.
CONNECTING
AN
EARPHONE
For
private
listening,
plug
an ear-
phone
into the
EAR
jack
on top of
your
scanner.
This automatically
dis-
connects
the speaker.
We recom-
mend Radio Shack's earphone
Cat.
No.
33-175.
ln a
noisy environment,
mono
headphones
(Cat.
No. 20-210)
make listening easier.
Always set
volume
to
its minimum
po-
sition before
you
plug
in
earphones or
headphones. Then,
adjust the
volume
to a confortable
listening level.
Warning: Do not listen
at extremely
high volume levels,
especially
when
using an
earphone. Extended
high-
volume listening
can
lead
to
perma-
nent hearing loss.
CONNECTING
AN
EXTENSION SPEAKER
ln
a
noisy
area, an extension
speaker
such as
Radio
Shack Cat.
No. 21-
549,
positioned
in
the
right
place,
might
provide
more comfortable
lis-
tening.
Plug
the speaker cable's
1/8-
inch mini-plug into
the scanner's
EAR
jack.
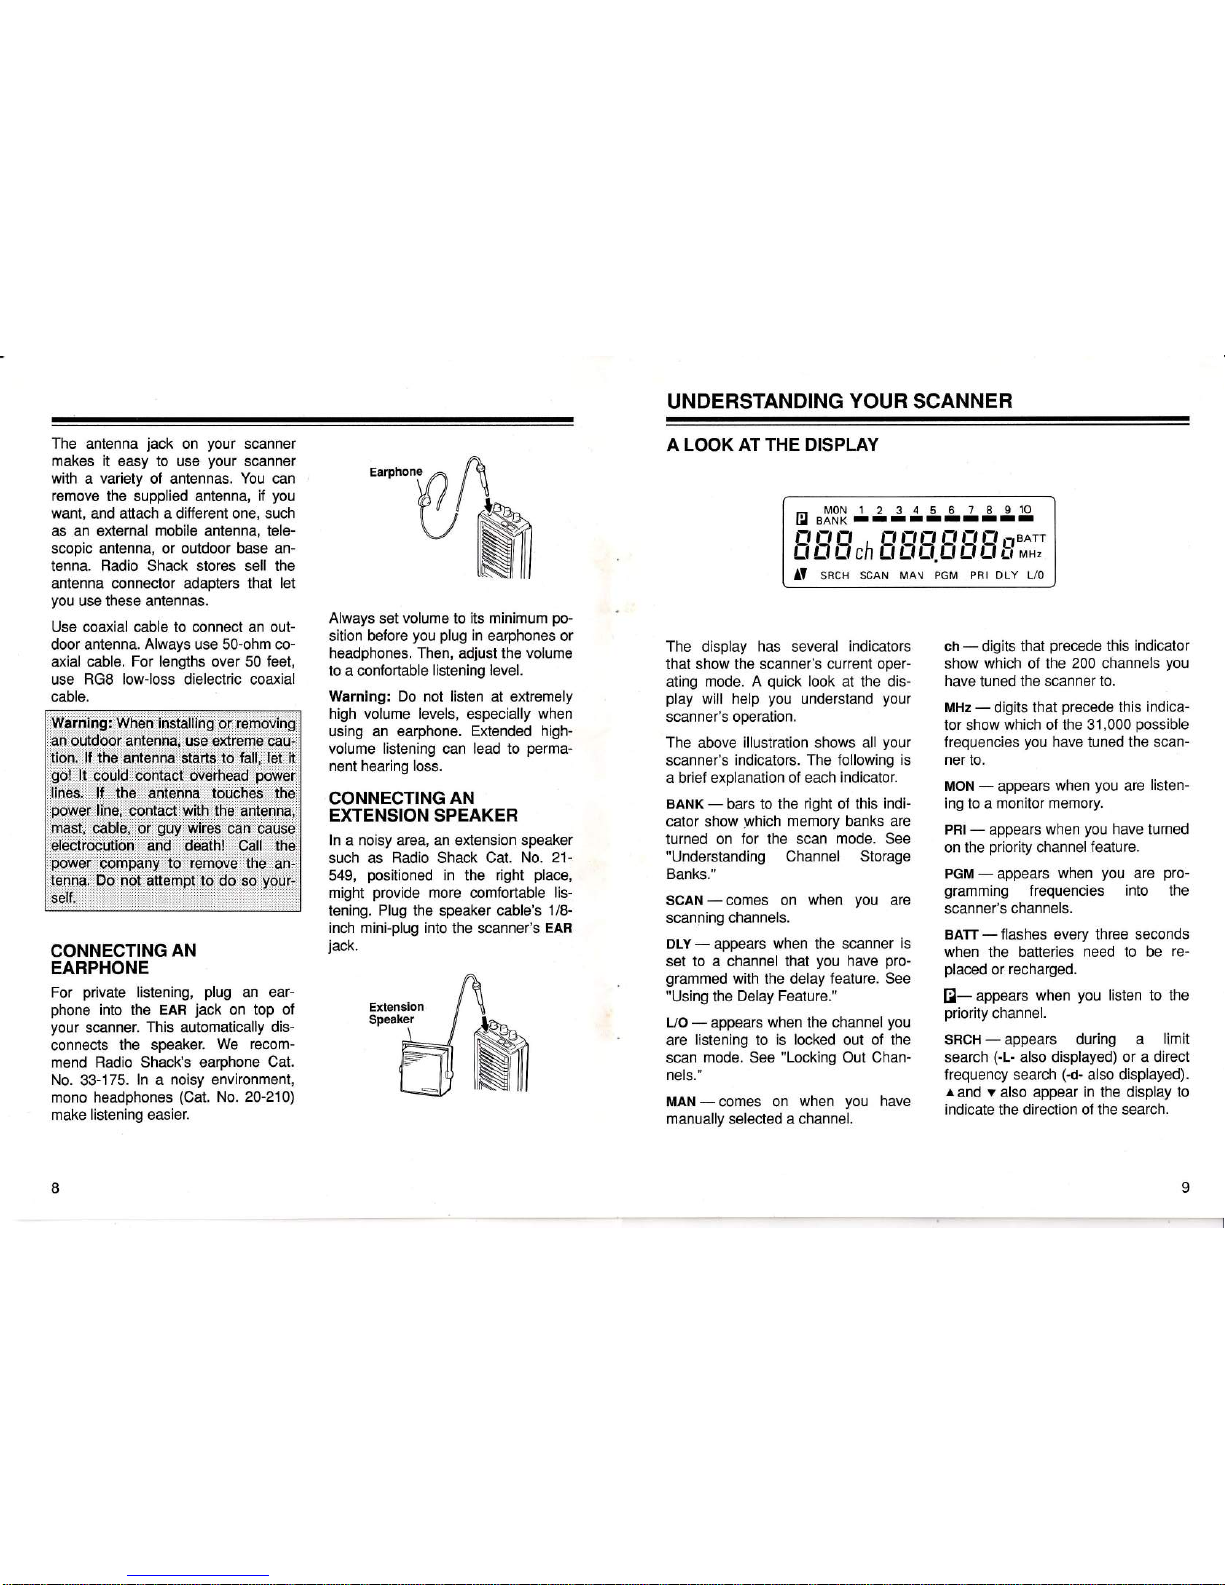
A LOOK
AT THE DISPLAY
The display
has
several
indicators
that show the scanner's
current oper-
ating
mode. A
quick
look
at the dis-
play
will help
you
understand
your
scanner's operation.
The
above
illustration
shows
all
your
scanner's
indicators. The following
is
a brief
explanation of each
indicator.
BANK
-
bars to the
right of this
indi-
cator show
which
memory
banks
are
turned on
for the scan
mode. See
"Understanding Channel Storage
Banks."
SCAN
-
comes on
when
you
are
scanning channels.
DLY
-
appears
when the scanner
is
set to
a channel that
you
have
pro-
grammed
with
the delay
feature. See
"Using
the
Delay Feature."
L/O
-
appears
when
the channel
you
are
listening
to
is locked
out of the
scan
mode. See
"Locking
Out Chan-
nels."
MAN-comes on
when
you
have
manually
selected
a channel.
tr
,x'3[
J3g5gg4gg]g
E rT,-T,r,,-T
fl
,-T
ff E
ff
fl
ii,'.I
AY
sRcH
scAN ,o* ,on PRr
DLY L/o
ch
-
digits that
precede
this
indicator
show
which of the
200 channels
you
have
tuned the
scanner to.
MHz
-
digits that
precede
this
indica-
tor show
which of the 3'1,000
possible
frequencies
you
have
tuned the
scan-
ner
to.
MON
-
appears
when
you
are
listen-
ing to
a
monitor memory.
PRI- appears
when
you
have
turned
on the
priority
channelfeature.
PGM
-
appears
when
you
are
pro-
gramming
frequencies into the
scanner's
channels.
BATT
-
flashes
every
three seconds
when the batteries
need to be
re-
placed
or recharged.
El-
appears
when
you
listen
to
the
priority
channel.
SHCH
-
appears during a
limit
search
(-L-
also displayed)
or a direct
frequency search
(-d-
also displayed).
r
and v also appear
in
the display to
indicate
the
direction of the search.
 Loading...