

Realistic DX-440 User Manual

DX-440
This product is warranted against defects for 90 days from date of purchase from Radio
Shack company-owned stores and authorized Radio Shack franchisees and dealers.
Within this period, we will repairitwithout charge for parts and labor. Simply
Radio Shack sales
does not cover transportation costs. Nor does it cover a product subjectedtomisuse
accidental damage.
EXCEPTASPROVIDED
EXPRESS OR IMPLIED, INCLUDING WARRANTIES OF MERCHANTABILITY AND
FITNESS
exclusion of implied warranties; therefore, the aforesaid limitation(s) or exclusion(s) may
not apply to the purchaser.
This warranty gives you specific legal rights and you may also have olher rights which vary from state to slals.
FOR
RADIO SHACK LIMITED WARRANTY
bring
slip
as proof of purchase datetoany Radio Shack store. Warranty
HEREIN,
A PARTICULAR PURPOSE. Some states do not permit limitation or
We
RADIO
SHACK
Service WhatWeSell
MAKESNOWARRANTIES,
your
OWNER'S
MANUAL
AM/FM DIRECT ENTRY
COMMUNICATIONS RECEIVER
Please
read
before
using
this
equipment
or
12A7
RADIO
SHACK
A DivisionofTandy Corporation
Fort
Worth,
Texas
76102
Printed in Taiwan
------i
II
VOICEOFTHE
WDF!LP
Cat.
No.
20·221A
~)
~EALIShc.:...

CONTENTS
INTRODUCTION
Introduction 3
Features 4
Control Locations 5
Choosing a Power Supply............... 7
Preliminary Settings
Tuning the Radio
Clock Radio Operation
Special Tuning Techniques and Controls
Special SSB/CW Reception Techniques
10
13
23
26
28
Using the Shoulder Strap 33
Choosing
an
Antenna 34
System Grounding 36
Band Allocation 37
The Shortwave Hooby
38
Listening Notes 40
Frequency Conversion
~~~
.............................................•....................................
41
~
Troubleshooting Guide 46
Care and Maintenance 48
Specifications
50
You now have the worldatyour fingertips.Just pressthe buttons of yourDX440 to listen to a variety of voices from
In
around the world.
AM
and
local
you
can now enjoy broadcasts from
FM
addition to your
broadcast stations,
London, Tokyo, Paris, Berlin, and
Moscow.
This entertainment grade, general purpose, communications receiver covers
an
extremely
wide
range
of frequencies
that also include shortwave and special
as
services such
marine and navigation.
If you understand international Morse
in
code, you can listen
and decode a
wide variety of transmissions.
The radio uses the latest solid-state
technology to provide programming,
a large liquid crystal display (LCD),
and a host of other convenient .
features. Because this product
is
so
versatile, please take a few minutes
in
to review the material
this manual
before you proceed. You'll enjoy the
radio much more if you
do.
Welcome to the world of the shortwave listener.
For your own protection, we urge you
to record the serial number of this unit
in
the space provided below. The serial
number
is
located inside ofthe battery
compartment
Serial
Numberr
~
©
1987 Tandy Corporation.
All Rights Reserved.
Realistic is a registered trademark of
Tandy Corporation.
2
3

FEATURES
CONTROL LOCATIONS
• Wide
Tuning
Range_lets
you
receive
more stations from more places than
ever before.
• Fast Response
LCD-shows
you the
frequency you select in large, easyto-read numbers.
• Direct
stantly tune
Acc~ss
Keypad-lets
in
any desired frequency
you in-
from 87.5 to 108 MHz on the
band and from 150 kHz to 29,999
on
the
AM
kHz
• Up
to
9 Storable
band.
Frequencies-give
you instant response for your favorite
stations or transmission sources.
.Multiple
Power Source
Operation-
means you can use it virtually any-
in
where
the world.
FM
• Supplemental
Tuning
Controlsallow adjustment for maximum clarity
of the selected frequency.
• Dual
Function
Mode
Switch-allows
you to display the frequency or the
on
time
• Scanning
the various transmissions
band and lock
the LCD panel.
Control-lets
on
to the chosen
you check
on
a certain
frequency.
• Full Range Tone
Controls-lets
cuStomize the sound for clarity and
listening comfort.
• Stereo Headphones
listentoFM
Stereo
Jack
- lets
programsinfull
stereo.
you
you
1.
lIG
HT Button
2.
TIMER Button
3.
SLEEP Button
4.
SIGNAL Strength Indicators
5.
LCD
Display
6.Telescopic Antenna
7.
FM
STEREO Indicator
8.
POWER
9.
POWER Switch
10.
VOLUME Control
11.
Dual-Function Tuning Control
12.
BALANCE Control
13.
TREBLE Control
14.
BASS Control
15.
RF
16.
BFO PITCH Control
17.
LOCK Switch
On
Indicator
GAIN Control
18.
BFO OUT/IN Switch
19.
FM/(MONO/STEREO)/AM(WIDE/
NARROW) Mode Selector
20. STORE Button
21. RECALL Button
22.
UP
Button
23. DOWN Button
24. SCAN Button
25. MODE Button
26.
EXECUTE Button
27.
Band Selectors
28.
Number Entry Buttons
29.
Time Mode/SEConds Reset button
30.
STEREO headPHONES Jack
(3.5mm)
31.
DCIN9V
Jack
.~ijJr---17
W--l--+---j--l-l--j~+---U
272625
2928
4
2423
f--- rT
IT
2221
20
19 18
5

32.
Folding Stand
33.
EXTernal Antenna'Jack
34.
EXTernal/INTernal Antenna
Selector
35.
Battery Compartment
36.
9k/10kHz Step
(beneath batteries)
37.
Battery Removal Strap
SWitch
CHOOSING A POWER SUPPLY
You can operate the DX-440 using:
• Six alkaline D batteries and two AA
batteries.
that you can lift them easily for
replacement.)
32
33
34
35
36
37
• Household
AC
(withanoptional AC adapter)
• A
12-Volt
(with an optional
INSTALLING BA
1.
Press the latchonthe battery compartment cover
DC
automotive battery
DC
adapter)
TIERIES
in
the direction of the
OPEN label, and lift the cover off.
1
Note: Before installing the next set
of batteries, verify that the frequency
step selector switch is set to the
position correct for your country.
the USA, move the swifch to the 10K
In
position.
other countries, set it to
9K.
'"
In
2.
Insert twoAAalkaline batteries (such
as
Radio ShackCat. No .23-552)
in
the smaller battery chamber within
the main compartment. Position them
as
illustratedonthe back of the
radio.
(Place these batteries and the next
set of batteries
spective battery removal ribbons
6
on
top of their
re-
so
7

3.
Insert six D batteriesinthe main battery compartment. Position them
showninthe illustration on the back
of the radio. For best results, use
alkaline batteries such
Shack® Cat.
No.
23-550.
as
as
Radio
USING HOUSEHOLD AC
You can power the DX-440 from house-
AC
hold
Cat.
nector of the adapter into the
socket
adapter into a standard household
outlet.
Note: When you use AC, the DX-440
automatically disconnects the internal
batteries.
usinganoptionalACadapter,
No.
273-1455.Plugthe small con-
on
the side of the unit. Plug the
DCIN9V
USING
AN
AUTOMOTIVE
BATIERY
You can operate the DX-440ina car,
boat, or recreational vehicle that is
12
Volt
DC,
equipped with a
ground battery. Use a
No.
14-844).
14-844
DC
Adapter
DC
negative
adapter (Cat.
Note: When you connect the adapter,
the DX-440 automatically disconnects
the internal batteries.
Caution:Do not let the adapter's barrel
plug contact any metal parts of the
when
vehicle
the lighter socket of the vehicle but not
yet plugged into the DX-440. A harmful
short can occur that can damage the
adapter or the vehicle's electrical
system.
the adapterisplugged into
4.
Insert the bottom projectionsonthe
edge of the battery compartment
cover inside the lower edge of the
compartment opening. Lower the
cover, and snap the top latch down
until it clicks closed.
=
o
L.....l
L Bottom prOjectionJ
8
L..-
273-1455
AC
Adapter
Insert the adapter plug into the jack
marked
DX-440. Plug the other end of the
adapter into the lighter socket of the
vehicle.
DCIN9V
on
the sideofthe
PHON[
o
OCINg~
o
~
9
PRELIMINARY SETTINGS
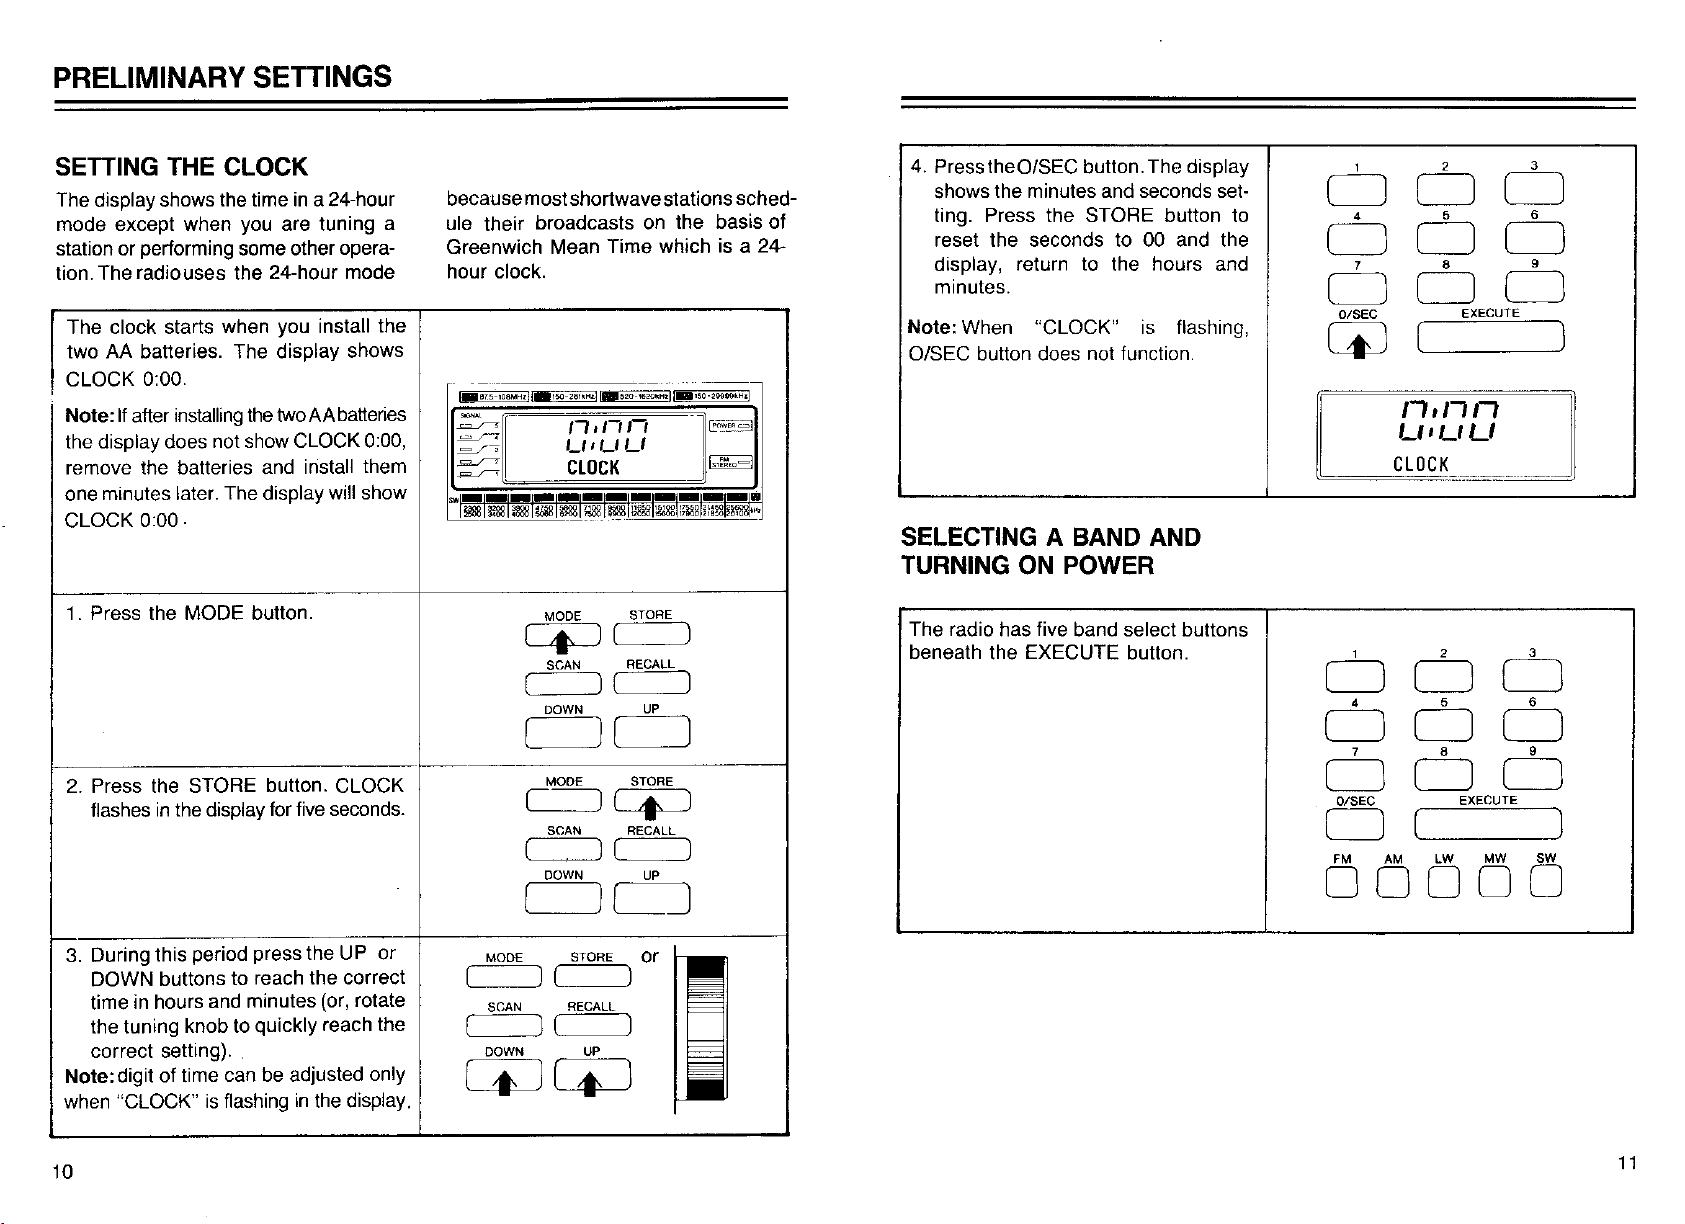
SETTING THE CLOCK
The display shows the timeina 24-hour
mode except when you are tuning a
station or performing some other operation. The radiouses the 24-hour mode
The clock starts when you install the
two AA batteries. The display shows
CLOCK 0:00.
If
after
Note:
the display does not show CLOCK 0:00,
remove the batteries and install them
one minutes later. The display will show
CLOCK 0:00·
1.
Press the MODE button.
2.
Press the STORE button. CLOCK
flashes
installing
in
the display for
the
twoAAbatteries
five
seconds.
becausemostshortwavestationsschedule their broadcasts on the basis of
Greenwich Mean Time which is a 24hour clock.
.
..
I_
8r5-,08MH.i 1.15()-281kH.!
-,
~
-=----r<
-=--..r'
~
~
~
sw
____________
~I~~Ui81~~J~l~~~;~]lil~~~"'
ct=J
n,nn
L/I'_'
CLOCK
MODE
SCAN
DOWN
,_
~2Q-",:m'H,II_
-
LI
STORE
RECALL
) (
UP
--
'50
·~ool){l.H.1
'l
['~"e:;J
Jb"m~1
1IiI
1[
MODE STORE
C~Lf=J
SCAN
RECALL
( ) ( I
DOWN
UP
~)LJ
4.
PresstheO/SEC button.The display
shows the minutes and seconds setting. Press the STORE button to
reset the seconds to 00 and the
display, return to the hours and
minutes.
Note: When
a/SEC
"CLOCK'
button does not function.
IS
flashing,
SELECTING A BAND AND
TURNING ON POWER
The radio has five band select buttons
beneath the EXECUTE button.
1
CJ
4
CJ
7
CJ
O/SEC
CiJ
2
CJ
5
D
8
CJ
[
EXECUTE
!~~~e~--]
DOD
4 5 6
CJ
7 8 9
CJ
O/SEC EXECUTE
CJ
FM
00000
CJ
CJ
( )
AM
LW
MW
3
D
6
CJ
9
CJ
D
CJ
SW
1
3.
During this period press the UP or
DOWN buttons to reach the correct
time in hours and minutes (or, rotate
the tuning knob to qUickly reach the
correct setting).
be
Note:digit of time can
when
"CLOCK"isflashinginthe
10
adjusted only
display.
MODE STORE
,----,I
SCAN
~--')
( I
(~--'
W~
or
RECALL
11

Band
(Button)
FM
AM
LW
MW
Min
87.5
150
150
520
Frequency
29999
Max
MHz
108
kHz Entire AM Band
281
kHz
1620 kHz
Normal
Longwave
Normal
FM
AM
Service
broadcasts
broadcasts
TUNING THE RADIO
ADJUSTING THE ANTENNA
Locate the band to which you want to
listen
in
the following chart. Adjust the
as
antenna
BAND
MW
indicated.
FREQUENCY
RANGE
520 - 1620 kHz Internal - Rotate radio
ANTENNA
for best reception
SW
Note: Each time you select SW, the
radio steps through
band covering
muchas500 kHz. The sub-bands cor-
1. Press
POWER indicator lights. The display
shows the last band and frequency
you selected.
2.
Press the band buttonofyour choice.
The display shows the band you
selected and a random frequency
within that band.
2300 26100
12
sub-bands, each
as
littleas100
the POWER
kHztoas
button.
The
kHz Shortwave
respond to the wavelengths of each
band. Refer to "The Shortwave Hobby"
section for additional information.
I
MINI
I I I I I I I I I IMAX
'*'
CEIIlIIIIlIlIC:
FM AM
0
0
LW
0
in
I
VOLUME
12 sub-bands
POWER
MW
0
0
sw
LW
FM
AM/SWj2300
150 -
87.5- 108 MHz
I
281
kHz Internal - Rotate radio
Telescopic - Extend fUlly
- 26100
kHzTel~scoPiC
for best reception
Swivel for best
reception
- Extend fUlly
Do
not swivel
~
12
13

You can select a frequency using four
tuning methods:
• Direct Tuning
• Manual Tuning
• Scan Tuning
• Memory Tuning
DIRECT
You
the range of the radio by selecting the
band
and then pressing the number buttons
of that frequency.
TUNING
can
"key
in"
any frequency within
in
which that frequency operates
ODD
4 5 6
DOD
7 , 8 9
3.
Press [7], [3], [0],
each button, the
number.
4.
Press the EXECUTE button within
five seconds. The display shows the
frequency and meter band of
SW.
[5J.Asyou press
LCD
shows the
1 2 3
QQ~Q,.
DOD
7 8 9
DOD
~
O/SEC
~
EXECUTE
Dr
0.00
4 5 6
DOD
7 8 9
DOD
o/sec E'XECUTE
o ( zt 1
)
Example: To tune to 7305 kHzonthe
AM
band
1.
Press the POWER buttontoturn
the radio.
2.
Press the
14
AM
band button.
on
DOD
a/SEC EXECUTE
o r )
FM
AM
lW
00000
L
I
MINI
~
FM
0
I I I I I I I I I
'*'
AM
0
I
LW
0
'*'
IMAX
MW
POWER
VOLUME
MW
0
SW
0
SW
5.
Extend
for the best
the
antenna fully stranght
AM
(SW) reception.
up.
15

6.
Adjust the VOLUME and TREBLE/
BASS tone controls for the desired
sound level.
MINI
...
~
~
LO
...
...
~
LO
c:::ElffiIII!ll
I I I I I I I I I
LIIIIIIIIIIIR
I I I I I I I I I11HI
I I I IIII I I I t
lMAX
HI
VOLUME
BALANCE
TREBLE
BASS
CONTINUOUS
If you do not know the exact frequency
of
the station you wantto listen to, you
can check the broadcasts on a band
using the UP/DOWN buttons or the tuning knob.
TUNING
MODE STORE
'-----_)
SCAN RECALL
'------_~)
[L_~
[L_~
OCJ
Note: If you select the
tune to an FM stereo station, move the
FM mode switch to STEREO and ad-
just
the BALANCE control for the best
stereo headphone reproduction.
The builtinspeakerismonaural. For
the best sound result when listening with
the built in speaker, do not forget to
return the BALANCE control to the mid
position.
FM
band and
MONO
~
WIDE
MINI
0DilllI!IIIIlIl
LIIII!111111R
...
~
LOIIIIIIIIIIIH!
c:::ElffiIII!ll
LO
~
,FM,
LAM-J
~
STEREO
NARROW
OUT
I I I I I I I I I
BFO
..
..
I I j IIII I IIIHI
.'.
IN
IMAX
LOCK
..
OUT
IN
VOLUME
BALANCE
TREBLE
BASS
1.
Press the POWER button to turn on
the radio.
2.
Select a band.
3.
a.
Repeatedly press the
button until you reach the frequency you want
you want to listen to. Press and
hold the
rapidly change frequencies.
or
UP
or DOWN buttons to
UPorDOWN
or
reach a station
LIIIIIIIIIIIR
BALANCE
DDllllllIIlIII1
lOlll11111111H1
TREBLE
c:::ElffiIII!ll
LOIIIIIIIIIIIHI
c:::ElffiIII!ll
MINI
I I I I I I I I I
•
IMAX
VOLUME
c:::ElffiIII!ll
FM
AM
LW
00000
MODE STORE
) (
SCAN RECALL
( ) ( )
DOWN
~
[
1[
BASS
POWER
MW
UP
SW
1#
1
16
17
 Loading...