


Instructions for
Real Good Toys’
The
Special Edition Alison, Jr.
Special Edition Kit #SE-JM907
©04/17
Congratulations on your choice of a Real Good Toys product. Your kit has been precision made with meticulous
care by our craftspeople using carefully selected materials. This Dollhouse will last for years, even generations,
if heirloom care and attention is given during assembly. Take your time and read the instructions completely. If
you have questions, ask the experts at your local Dollhouse store or at info@realgoodtoys.com
Before you begin - You have already opened the box and see all the parts organized in boxes and bundles. For
the moment, keep them that way. There are important things to do before you open your glue bottle.
Preview the Overview (page 2) to plan and organize your
build; this helps you proceed with confi dence.
Measure and identify the parts: The kit is
packed in groupings that protect the parts, and that
is how the Parts List is organized. As you measure
and identify the parts, label them with sticky notes
using the names from the parts list, and check
them off the parts list so you know you have everything. Taking the time now to identify and
organize the parts also makes them familiar
so you will understand what the instructions
intend as you read ahead.
• Plan ahead so you know where you are going
• Read ahead so you know how to get there
• Paint ahead so the parts will be ready when
you need them
Prepare your space: This dollhouse will spread
out over a large area while it is being built.
You will need a large fl at tabletop for the house,
several boxes to keep parts organized until they
are needed, and several trays lined with waxed
paper for holding small parts like windows and
railings.
A snap-lid box will keep your tools and sup-
plies handy between building sessions.
Supplies:
Paint: Interior semi-gloss latex paint... Almost everything gets at least one coat before assembly - get the paint now.
Paintbrushes 1” or 2” foam brushes for each color, 3” foam roller for interior painting
Sandpaper: 320 grit, 3-5 sheets
Glue: Aleene’s Tacky Glue for the dollhouse, Solvent-Based panel cement for shingles
Masking tape: ¾” or 1”
Wiring: it’s easiest to install some parts during assembly… order wiring supplies now.
Wallpaper paste: Roman’s “Border” Paste
Real Good Toys 122 Gallison Hill Rd Montpelier VT 05602 802 262-6018 www.realgoodtoys.com
Not suitable for children under 13 years of age
California 93120 compliant for formaldehyde phase 2
www.realgoodtoys.help

Instructions for Special Edition Kit #JM-907 Alison Jr
6803 Banister
& Landing Set
Wallpaper
P2000
HH444
#4017 Stair
and Landing Set
Split Octagonal Shingles
Dye1: Reddish Brown
Dye3: Dark Grey
Turntables, Platform
Turntables, and Turntables with wiring feed
are available
Assembly Notes /Getting Started (A) page 2
Options for building the Alison Jr. Dollhouse
See your local dollhouse shop or www.realgoodtoys.com
Exterior:
Exterior Paint Color:
see www.realgoodtoys.help for suggestions
Accessories:
Gingerbread
Flower Boxes
Foundation Stucco Grit
Octagonal Shingles
Fancy Windows and Doors
Turnposts and Spindles
Interior:
Wiring
Wallpaper
Interior paint color:
Ceilings
Painted walls
Interior trim
Flooring:
Applied wood, tile, or carpet
Banister & Landing Rails
Window and Door trim
Baseboard and Crown
A Doghouse for
your Dollhouse
Split Octagonal Shingles
#6002
Note: I often enlarge an interior door opening to fi t the #6022
Exterior
#6018
Shingle Dye
Doors:
Interior
#6022
Windows: fi t: full-size; working or non-working
#1015
Wallpaper
P2000
HH444
Turntables, Platform
Turntables, and Turntables with wiring feed
are available
Trim and Stripwood
Flute24
Dye1: Reddish Brown
Dye3: Dark Grey
#5042
Real Good Toys’ Best1
Dollhouse Wiring Set
#5041
JM33
See page 20
SW16
RGT8
#4017 Stair
and Landing Set
6803 Banister
& Landing Set

Instructions for Special Edition Kit #JM-907 Alison Jr
Assembly Notes /Getting Started (A) page 3
Overview of the Build:
Details of each step will be expanded along the way, but lots of
folks like to see how it all fi ts together before they start
Identify and label all of the parts
Paint everything one coat
Finish the fl oors
Sand painted surfaces until the paint is smooth, transparent,
and some of the wood is showing through
Optional: Add an Electrifi cation Slot to the Base Floor*
Build the housebody until the Top Floor
Optional: Start the wiring
Mark, paint, and attach theTop Floor
Build and attach the Foundation
Pre-cut wallpaper for the inside of the Roofs
Attach the Roofs (Optional: E-slot the Top Floor)
Optional: Attic wiring
Install the Dividers (but not the Blind Dividers)
Optional: Finish the wiring
Assemble and fi nish painting
Finish the outside
Finish the inside
Wiring? www.realgoodtoys.help
Click the buttons “JM907” and “Wiring” for wiring information specifi c to this house.
(see www.realgoodtoys.help/JM907/painting)
Slideshows, demos, useful links, details, and photos are all at:
www.realgoodtoys.help
Glue the shingles on
it! If the glue says ”water clean-up”, it will curl the wooden shingles. Look carefully at the glue you intend to use to be sure it is
solvent-based, or use hot-melt glue (and watch out for the burns).
I use a “Sub-Floor Adhesive” glue which comes in a caulking-gun
tube at the hardware or building supply store. It says “Caution:
Flammible” on the front, and that’s how I am sure it is solvent
based. Check ingredients and warnings!
If you Wallpaper
collage) or pre-mixed Roman’s “Border” paste.
Brush paste on the wallpaper, then the wall, and fi nally smooth
the wallpaper into position.
Taking things apart: Heat softens glue. If you have to take things
apart, warm the part in the oven at 170
the heat get into the joint where the glue is. Don’t let it get hotter
than you can touch or the paint may scorch. Don’t heat window
panes.
When glue is drying, skip ahead to up-coming assembly steps
and prepare the parts that will be used
Before you begin, read the “Finish the Inside” section on the
last page.
with glue that doesn’t have any water in
, use Yes® craft paste (for bookbinding or
o
for up to a half hour to let
Assembly Tips:
A large, clutter-free, well-lighted work area is helpful
during assembly, but a fl at work surface is essential.
Read the instructions
illustrations. !With the parts in your hands!, think the
assembly through before you proceed.
Test fi t
then you’ll know you have it right.
If more tape or a helper is needed, it’s good to know that
before the parts have glue on them.
each time you are ready to glue a piece in place...
carefully; look at each of the
Don’t be stingy with glue or tape; use generous amounts.
Always wipe off excess glue immediately.
Keep one damp rag and one dry rag handy all the time.
Have weights available
for holding things tight as glue
joints dry (stacks of books, gallons of pure Vermont Maple
Syrup - anything heavy)
Glue the body of your dollhouse together
white, water clean-up glue that dries clear. Do not use
instant-bond (super glue), fast-tack, rubber cement, silicone, or hot melt glues. They are all used in some wood
applications, but they all have some characteristic that
makes them un-desirable for the body of your dollhouse.
Carpenter Glue works well, but glue-smear dries yellow
or tan; many of the things you glue onto the house are prepainted – extra glue will show.
I use Aleene’s Tacky Glue® for housebody assembly.
Make sure everything is straight and fl at as glue dries...
That’s the shape that will be permanent.
with
Q: Can I wallpaper before I assemble the doll house?
A: Yes you can (it’s your house!) Many experienced builders are
advocates of papering before construction - I am not.
My biggest objection to papering fi rst is that you are always too
skimpy with glue so none will squeeze out and get on the paper.
I try to use the amount of glue that fi lls the joint, so some will
squeeze out in every joint and be wiped up. But wiping glue off
of wallpaper leaves a streak, so the temptation is to go skimpy,
and the joints aren’t as strong.
Second, I can always tell a house that was pre-papered because
the corners show a void instead of being continuous (see the
slideshows about how to crowd the papers together in the corner... you can’t do that with pre-papered walls).
Third, I have had to replace paper too often that has gotten
damaged by glue or tape during construction... that wastes time
and paper ($) and can make it so you are left deciding whether
to replace a damaged paper or letting it slide because you don’t
have any more of that pattern and you’ll have to order it and that
takes too much time (running out but then needing another piece
is a distressing moment).
Finally, I don’t fi nd pre-papering to be faster. By the time I have
done all of the extra planning that getting the papers in the right
place requires, I have used up any potential advantage. I have
great big blacksmith’s hands, and papering in a fi nished house is
easy for me.
All that having been said, I do pre-cut the papers used in the
attic before attaching the Roofs and I paper in front of the Blind
Dividers (2
1
/2”) before I glue them in place.
Instructions for Special Edition Kit #JM-907
(1) UE 6411 Base Floor: (
1
/
4
w/ fl ooring) 22 x 11
7
/
8
(1) UE 6412 Middle Floor: (
3
/
8
w/ fl ooring) 22 x 11
7
/
8
, Stair hole
(1) UE 6413 Top Floor: (
3
/
8
w/ fl ooring) 23
7
/
8
x 15
7
/
8
, Stair hole
(1) E 6414 Porch Base Floor: (
1
/
4
) 14 x 3
7
/
8
(1) E 6415 Porch Mid Floor: (
3
/
8
) 14 x 3
7
/
8
(2) E 6416 Side: (
3
/
8
Milled) 18
5
/
8
x 11
3
/
4
, Grooved
(1) E 6417 Right Front: (
3
/
8
Milled) 18
5
/
8
x 14, Cutouts, Grooved
(2) E 6418 Tower Side: (
3
/
8
Milled) 18
5
/
8
x 3
7
/
8
,
Grooved
(1) E 6419 Tower Front: (
3
/
8
Milled) 28 x 7, Windows, Grooved
(1) E 6420 Left Front: (
3
/
8
Milled) 18
5
/
8
x 1
1
/
2
,
Grooved
(1) E 6423 Attic Divider: (
3
/
8
) 9 x 15
5
/
8
, Door
(2) E 3615 Divider: (
3
/
8
) 9 x 11
3
/
4
, Door
(4) E 6424 Blind Divider: (
3
/
8
) 9 x 1
3
/
8
(1) E 6425 Rooftop: (
1
/
4
) 20
5
/
16
x 14
1
/
8
(1) E 6426 R. Front Roof: (
1
/
4
) 14
11
/
16
Base x 9
7
/
32
, Dormer Cutouts
(1) E 6430 Tower Rooftop: (
1
/
4
)
4
1
/
2
x 4
3
/
4
(1) E 6431 Rooftop Extension: (
1
/
4
)
7
7
/
8
x 2
5
/
8
(1) UE 6432 Tower Base Floor: (
1
/
4
w/ fl ooring) 6
1
/
2
x 4
(1) UE 6433 Tower Floor: (
3
/
8
w/ fl ooring) 6
1
/
2
x 4
(1) E 6436 Foundation: (
1
/
2
) 20
5
/
8
x 1
1
/
4
(4) E 6437 Foundation: (
1
/
2
) 14
7
/
8
x 1
1
/
4
(1) E 6438 Foundation: (
1
/
2
) 11
7
/
16
x 1
1
/
4
(1) E 6441 Foundation: (
1
/
2
) 22
5
/
32
x 1
1
/
4
(2) E 9803 Stringer: (
1
/
8)
13
/
16
x
±
10
7
/
8
,
Mitered
(2) E 9801 Bottom Stair Block: 2
1
/
4
(2) E 9802 Top Stair Block: 2
1
/
4
Top Stair Block
Bottom Stair Block
Parts List page 4
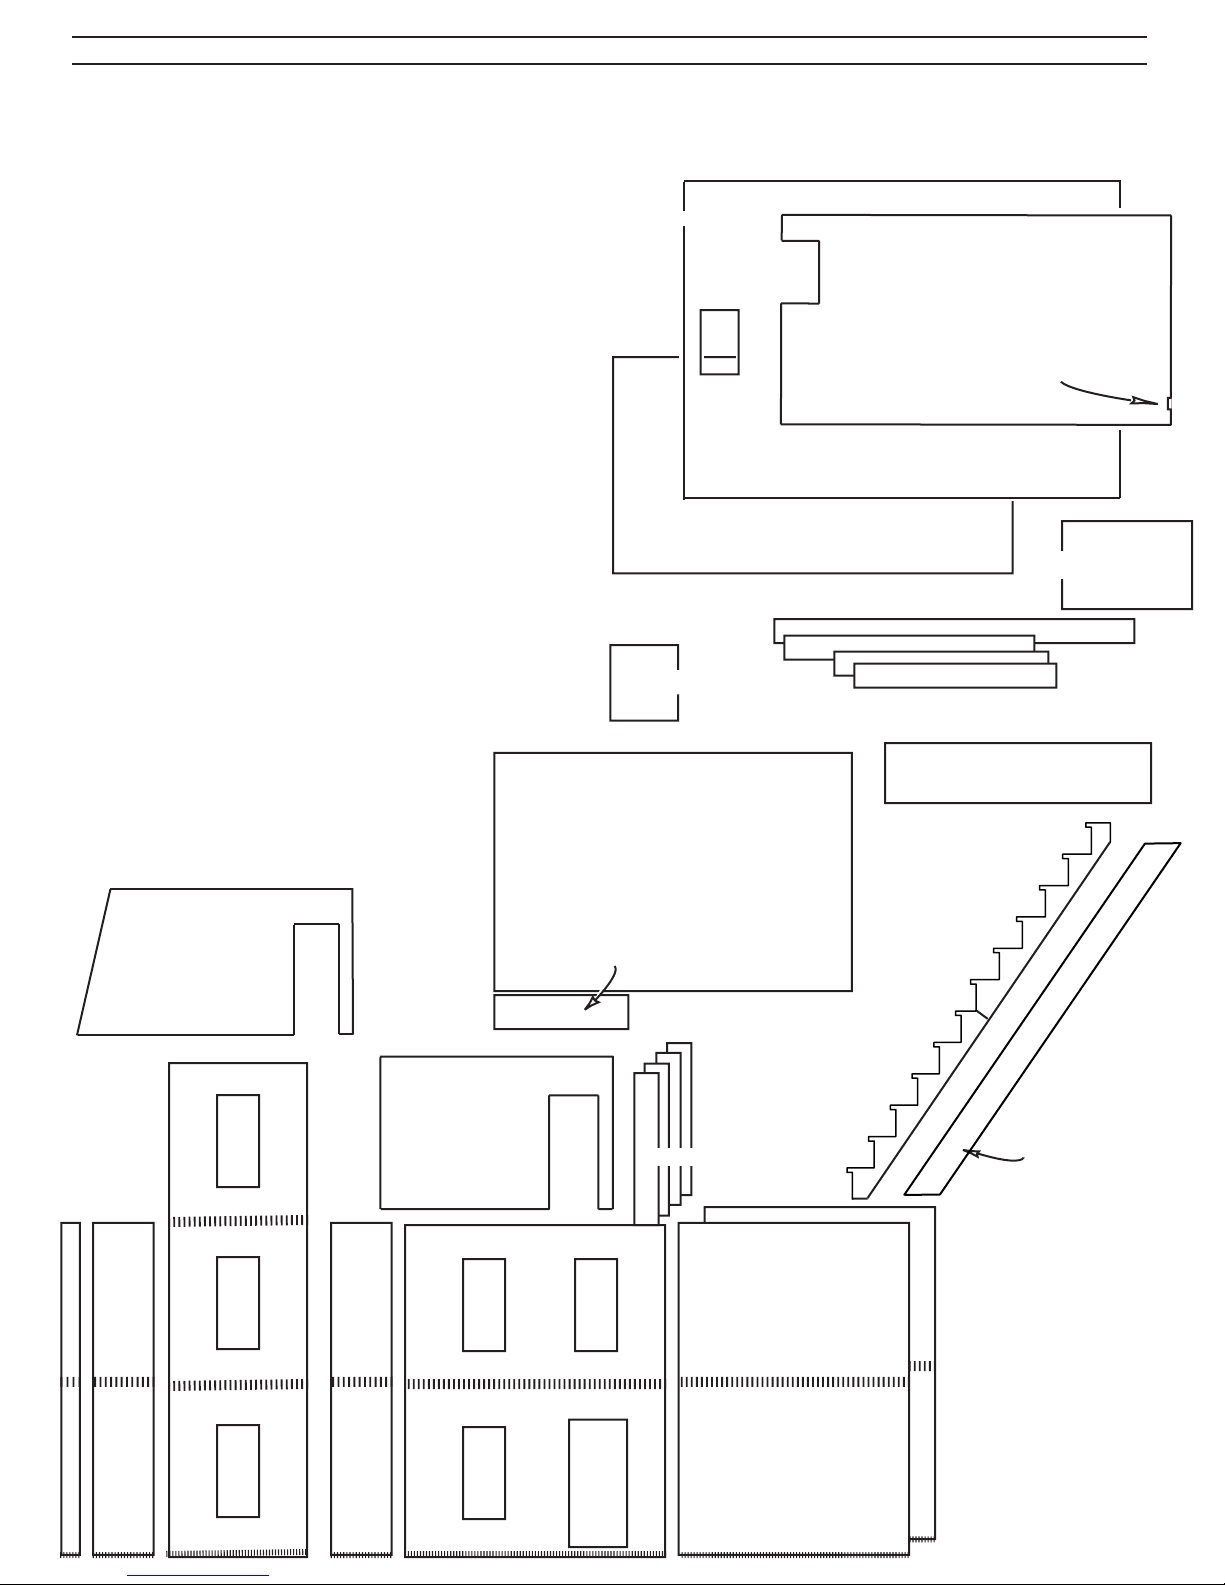
Identify the parts: Open one bundle at-a-time.
Measure each part and fi nd it on the parts list.
Label the parts and, as you preview the instruc-
tions, group them as they will be used
Parts List:
(1) UE 6411 Base Floor: (
(1) UE 6412 Middle Floor: (
(1) UE 6413 Top Floor: (
(1) E 6414 Porch Base Floor: (
(1) E 6415 Porch Mid Floor: (
(2) E 6416 Side: (
(1) E 6417 Right Front: (
(2) E 6418 Tower Side: (
(1) E 6419 Tower Front: (
(1) E 6420 Left Front: (
(1) E 6423 Attic Divider: (
(2) E 3615 Divider: (
(4) E 6424 Blind Divider: (
(1) E 6425 Rooftop: (
(1) E 6426 R. Front Roof: (
(1) E 6430 Tower Rooftop: (
(1) E 6431 Rooftop Extension: (
(1) UE 6432 Tower Base Floor: (
(1) UE 6433 Tower Floor: (
(1) E 6436 Foundation: (
(4) E 6437 Foundation: (
(1) E 6438 Foundation: (
(1) E 6441 Foundation: (
(2) E 9803 Stringer: (
(2) E 9801 Bottom Stair Block: 2
(2) E 9802 Top Stair Block: 2
Measurements are approximate and are for identifi cation purposes only
1
/
4
w/ fl ooring) 22 x 11
3
/
8
w/ fl ooring) 22 x 11
3
/
8
Milled) 18
3
/
8
1
/
1
/
3
/
8
w/ fl ooring) 23
1
/
4
) 14 x 3
3
/
8
) 14 x 3
5
/
8
x 11
3
/
8
3
/
8
3
/
3
/
8
3
) 9 x 11
3
4
) 20
1
/
2
1
/
2
1
/
2
1
/
2
13
8)
Milled) 18
Milled) 18
8
Milled) 28 x 7, Windows, Grooved
Milled) 18
/
8
) 9 x 15
3
/
4
, Door
3
/
8
5
1
/
3
) 20
) 14
) 11
) 22
/
16
) 9 x 1
/
16
x 14
11
4
) 14
1
1
/
4
)
4
/
2
1
/
4
)
1
/
4
/
8
w/ fl ooring) 6
5
/
8
x 1
7
/
8
x 1
7
/
16
x 1
5
/
32
x 1
±
7
x
10
1
/
4
1
/
4
7
/
8
7
/
8
7
/
8
3
/
4
, Grooved
5
/
8
x 14, Cutouts, Grooved
5
7
/
8
x 3
5
1
/
8
x 1
/
5
/
8
1
/
16
x 4
7
7
w/ fl ooring) 6
/
8
/
8
, Door
/
8
Base x 9
3
/
4
5
/
8
x 2
/
1
1
/
4
1
/
4
1
/
4
1
/
4
,
Mitered
7
/
8
7
/
8
, Stair hole
7
x 15
/
8
/
2
8
/
, Stair hole
8
,
Grooved
,
Grooved
7
/
32
, Dormer Cutouts
1
/
2
x 4
2
x 4
Rooftop
The Woodgrain Flooring, Assembled Door, Sawn Shingles, and other
extras make this a “Special Edition” Kit. In any correspondence
include the words “Special Edition” so we can help you properly.
Mid Floor
Electrifi cation Slot - makes running
tapewire from fl oor-to-fl oor easier... if
you do not intend to wire your dollhouse, ignore the Electrifi cation Slot
Top Floor
Base Floor
Tower Rooftop
Long Foundations
Tower Floors
Porch Floors
Left Front
Attic Divider
Tower Side
Tower Front
Tower Side
Divider
Right Front
Rooftop Extension
Blind Dividers
Sides
Top Stair Block
Bottom Stair Block
Stringer

Instructions for Special Edition Kit #JM-907
Parts List page 5
Bevel
Bevel faces out
Left Side Roof
Left Front Roof
7
(10) E 6448
/16 Trimstrip: 3/32 x 185/8 (Exterior)
(2) E 6449 1/2 Ledge Trim: (1/8) x 157/8
(1) E 6450 1/2 Ledge Trim: (1/8) x 14 13/16
(1) E 6451 1/2 Ledge Trim: (1/8) 21/4
Inner Box:
(1) E 6453 Bag of Shingles (850)
(22) E 6443 Bracket:
1
/4
(11) E 6515 3/8 Beads
(11) E 6444 Trimpost: (1/2 Flutepost) 7/8
(1) E 6456 Hanging Front Gingerbread: 11/8
(28) T1020 Window Vertical Frame: 5
5
/16, Mitered
(4) E6455 Dormer Interior Vert. Trim: 5, Miters
(28) T1021 Window Horizontal Frame: 213/16, Mitered
(4) E6454
Dormer Interior Horiz. Trim: 2
1
/2, Miters
(24) E3633 Shutter Panel: (5/64) 3/4 x 17/8
(4) E 6447 Fillstrip: (1/8) 3/8 x 9 (Interior)
(2) E 6452 9/16 Trim: 3/32 x 9
(1) E 3623 Groove Fill: (
1
/8) 3/8 x 4
(4) E 3619 Porch Post: (1/2 Flutepost) 9
(2) T0558 Door Interior Side Trim: 711/16, Miter
(12) E3632 Shutter Core: (
1
/8) 1 x 45/8
(3) E 6445 Assembled Railing: 63/8
(2) E 6446 Assembled Railing: 31/4
(1) 6042 Assembled Door
(8) T1022 Window Pane: 5 x 21/2
(4) E 6459 Porch Front Gingerbread: 63/8
(1) T0559 Door Interior Top Trim: 3
3
/8, Miters
(1) E 6462 Roof Top Cresting, Left: 75/8
(1) E 6463 Roof Top Cresting, Front: 113/16
(1) E 6464 Roof Top Cresting, Right: 123/4
(1) E 6457 Hanging Side Gingerbread: 31/4
(2) E 6458 Porch Side Gingerbread: 3
1
/4
(2) E 6460 Tower Top Cresting: 31/8
(2) E 6461 Tower Top Cresting: 31/4
1
(3) E 6429 Tower Roof: (
(1) E 6427 Left Front Roof: (
/4) 77/8 Tall x 73/8 Base
1
/4) 21/8 Base x 97/32 Tall
(1) E 6421 Left Top Tower Side: (3/8 Milled) 9 Tall x 21/8 T op
(1) E 6422 Right Top Tower Side: (
(1) E 6428R Right Side Roof: (
(1) E 6428L Left Side Roof: (
3
/8 Milled) 9 Tall x 21/8 T op
1
/4) 155/8 Base x 97/32
1
/4) 155/8 Base x 97/32
(4) E 6434 Dormer Side: (1/4) 57/16 Tall x 13/16 Top
(2) E 6435A Dormer Ceiling: (
1
/4) 29/16 x 13/16 Top, Bevel
(2) E 6435B Dormer Roof: (3/4) 15/8 x 31/2, Bevels
(3) E 3626 Flower Box: (1/2) 3/4 x 33/4, Mitered
(2) E 6439 Foundation: (5/8) 11/32 x 11/4
(3) E 6440 Foundation: (
5
/8) 5/8 x 11/4
(1) E 6442 Step: (3/4) 6 x 11/2
Right Front Roof
Interior Door Trim
Shutter Panel
Shutter Core
Dormer Ceiling
Dormer Side
Bevel
Right Side Roof
Tower Roofs
Top Tower Sides
Tower T op Cresting
Dormer Roof

Instructions for the Special Edition #SE-JM907 The Alison, Jr. Assembly notes, A: Getting Started Page 6
Coarse Double-Cut File
Batch Dye Shingles
Utility Knife
A: Getting Started:
Do these things before the house assembly
Square the corners of the window, door, and stair holes with a utility knife - each
cutout has a rounded corner left over from the tool that made it.
each corner from the outside (one from each direction), then cut from each direction on the inside to cut away the rounding in the corner so the window, door, or
stairs will fi t.
A Double-Cut Coarse File is
easier for many people to use
when squaring the corners.
Make several strokes from each
direction in each corner and test
the Window or Door to see how
it fi ts.
Coarse Double-Cut File
Make two cuts in
Stain the Shingles: Our pro uses Real Good Toys’ Shingle Dye
(available through your Real Good Toys miniature dealer) when dying
the shingles for this house. If you stain the shingles, you must use
penetrating oil based stain, not “rubbing”, “Gel” or latex-based. Batch
dye or stain the shingles several days ahead of time so they will be dry
when the time comes to use them (instructions are with the shingle dye).
Utility Knife
Batch Dye Shingles
Foundation
Step 1
7
11
/16”
11/32”
Foundation
Step 3
7
/8”
14
11/32”
7
14
/8”
Pre-Assembly: Assemble the Foundation
Foundation
Step 2
Foundation
Step 4
/8”
7
14
/8”
7
14
5
22
/32” (longest)
5
/8
63/16” spacing
205/8”
63/16” spacing
5
/8
Without glue, line up a fl oor with the edges of the Foun-
dation to hold the Foundation square as the glue dries.
5
/8

Instructions for the Special Edition #SE-JM907 The Alison, Jr. Painting Page 7
nish.
Painting: www.realgoodtoys.help has painting and sanding videos
Paint (fi rst-coat) everything. Don’t try to sand , fi ll, primp, or do much of anything to the wood before the fi rst coat.
The fi rst coat fi lls and reinforces the wood so sanding clips off the fi bers rather than pushing them around. The fi rst-
coat is all about what penetrates and fi lls the wood. There is no expectation that more than a hint of paint will be on the
surface. Don’t ‘double paint’ or try to give it an extra thick fi rst coat as you watch the paint soak in... that is expected and
preferred.
The fi rst benefi t of painting before assembly (one-coat) is that it is the easiest time to do a really thorough job of sand-
ing after painting. The difference between a heirloom-grade fi nish on a dollhouse and a “I-was-in-a-hurry” fi nish is most
often the quality of the sanding, and it’s hard to sand into the little hidden corners of an assembled dollhouse, but it’s easy
to sand the fl at panels layed out on a workbench.
So sand everything now - sand until the paint is smooth and transparent with no scratchiness to it, and with lots of wood
showing through the paint. For the clapboard walls, sand “one clapboard course at-a-time”: fold the sandpaper and hold
it on your fi nger-tips, then sand back-and-forth across one clapboard’s suface 2 or 3 times, then move up to the next clap-
board. “One at a time” is what makes it smooth and “Heirloom-Great”.
Second coat everything after building the housebody up to the top of the Walls (before attaching the Top Floor). The
second coat goes on smooth and creamy, and except for touchup, it may be enough.
First-coat
Sanding one course at a time
Q: How can I prevent glue from seeping onto the fl oor after I clamp (tape) the Sides together?
A: Do not skimp on the glue... a little squeezing out tells you that there’s enough glue in the joint. Clean up the
squeezings with a damp rag followed by a dry rag, and the little bit that remains down in the grooves will shrink back
as it dries, and will not be visible.
This issue is one of the reasons it is important to pre-fi nish the fl oors before assembly. I know, the fi nish tries to bead
up when you fi rst put it on and it is ‘paint-can-runny’, but just keep rubbing it out as it loses it’s excess moisture and
starts to get tacky, and that fi rst coat will eventually behave itself and lay down properly. I like to do the fi rst-coat-
rub-out with a crumple of brown paper bag so I can rub vigorously and ‘de-shine’ the print fl ooring, but other builders
report success with just brushing and brushing until the moisture level gets right. After the fi nish is dry, do a very light
de-shine with a non-woven abrasive pad (like ‘Scotch Brite”, the green pad you use in the kitchen for stainless steel
pots... a used one is just right), and then apply a second coat of fi nish.
fi
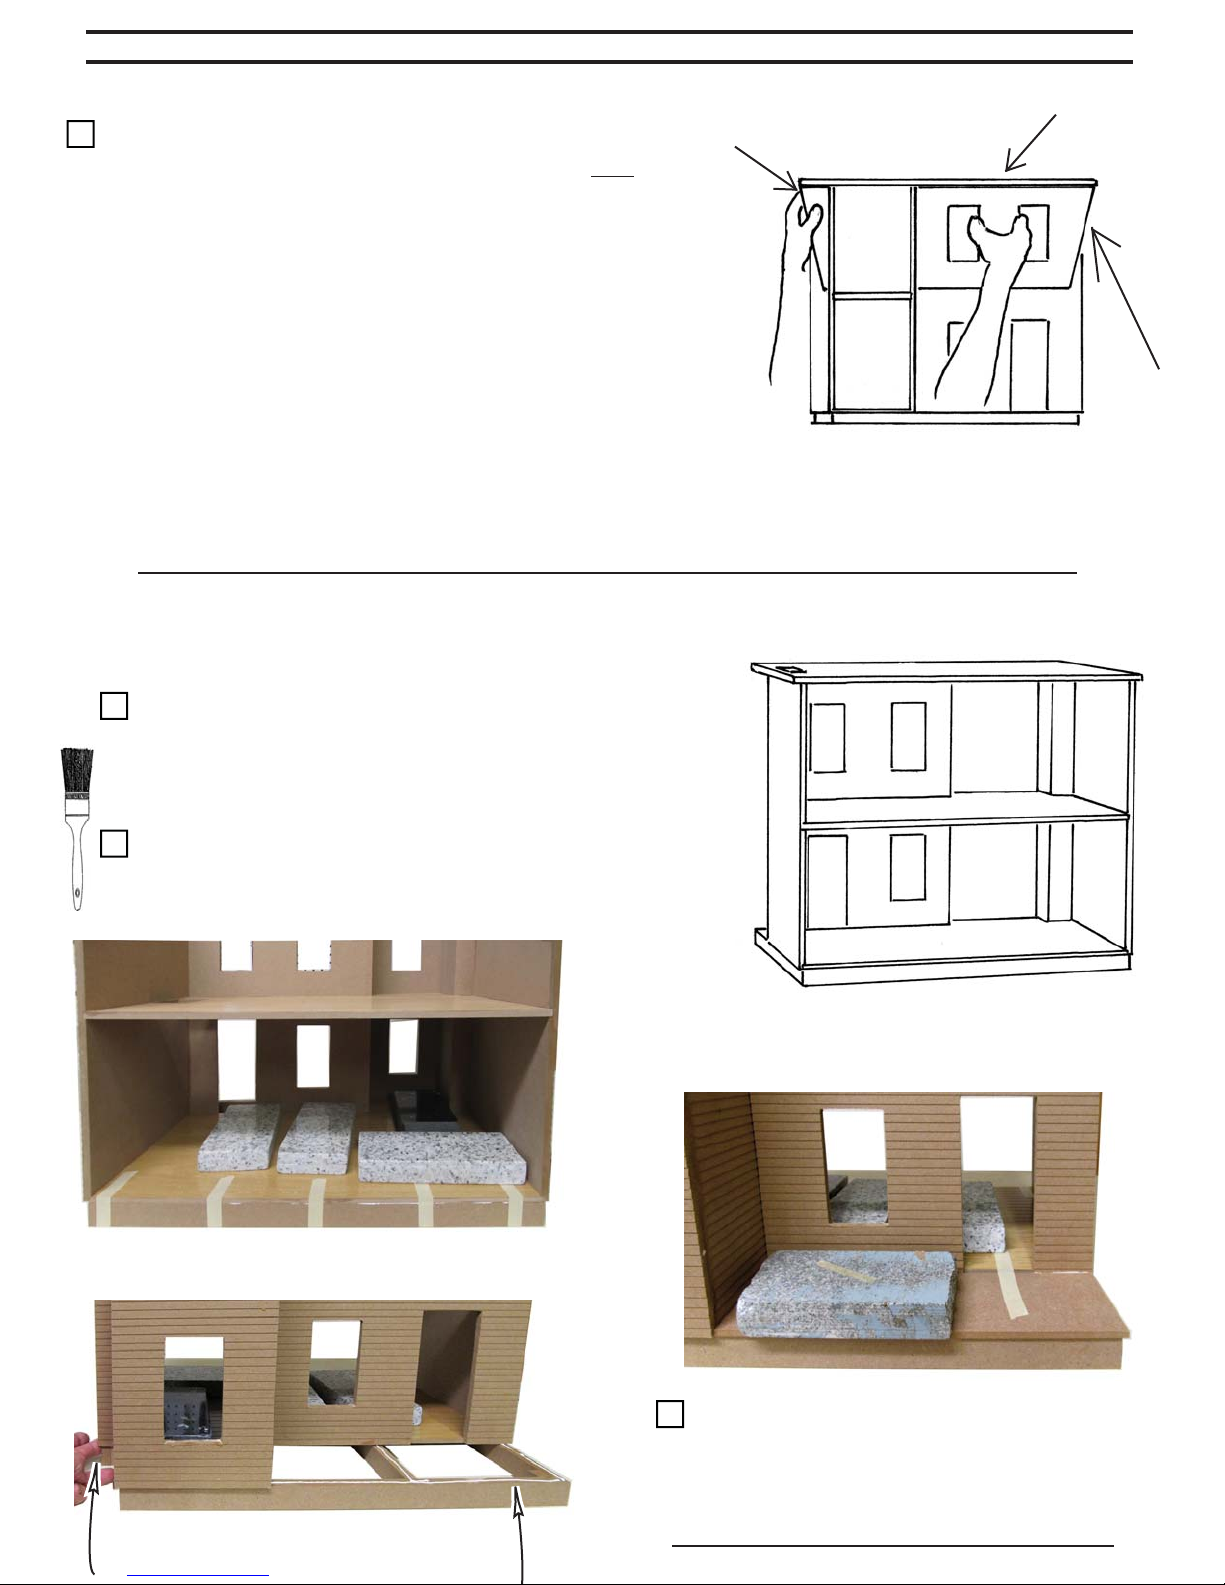
Finish the Floors: The fl oors need fi nishing to protect
them from damage by tape being removed, by paint or
glue, or by normal wear-and-tear during assembly. Wipe
off the fi rst coat and, when it is dry, de-shine the surface
with a non-woven pad (also called “synthetic steel wool”)
or a crumple of brown paper bag; then apply more coats.
Can I do it differently? Yes you can - it’s your house!
The information on these pages is offered as “best practices” advice, and it is what we do when we build this house.
If you are customizing or have something else in mind, test-ahead to make sure your planning includes everything!

Instructions for the Special Edition #SE-JM907 The Alison, Jr. B: HouseBody Page 8
Illustration #3
Spread glue in the grooves
Illustration #4
Install the groove fi ll
The Floor overhangs the front
of the Side panels by
1
/
8
”
Scrape the Floor
Scrape the Groove
Assemble the Housebody:
1. Select the Middle Floor. Without glue, test the Floor panel
along with the Sides to check the fi t - scrape the edges of the
grooves and the under-side of the fl oors where they fi t into the
grooves if necessary.
Scrape the Floor
Look at Illustration #2. The top edge of the Side is the edge without a groove. The top surface of the Middle Floor has the “fl oor-
ing” fi nish, the stair hole is toward the front edge, and the fl oor
sticks out
1
/8” at the front edge.
Complete steps 2 - 9 without stopping
2. Spread glue in the grooves of both Side panels (Illustration
#3). Use plenty of glue and spread it lightly with your fi nger to
keep it from dripping
Now is a great time for an extra pair of hands.
3. Stand the Middle Floor on end (check the orientation
again) in the middle groove of the Side.
Illustration #2
Check the fi t of the Middle
Floor and Side Panels
Scrape the Groove
4. Adjust and check all the parts. The Floor must be fl ush at
the back edge of the Side panel (“fl ush” means ‘forming a con-
tinuous, unbroken surface’). The Floor overhangs the front of
the Side panels by
1
/8”
5. The Base fl oor fi ts into the base fl oor groove. Notice that
the fl oorboards are wider on one edge, and narrower on the other
edge. Set up the Base Floor with the fl oorboard profi le matching
the fl oorboard profi le of the Middle Floor. Set the Base Floor into
the base fl oor groove lined up on the back edge.
6. Set the other Side onto the ends of the fl oors, fl ush at the
back edge. Tape the fl oors to the Sides. Use lots of tape and
stretch it tight for a good glue joint.
7. Install the Groove Fill; tap with a hammer and wood block
for a snug fi t (If the fi t is too tight sand the edges of the Groove
fi ll). The Groove Fill fi lls the fl oor’s groove inside the stair hole,
leaving a smooth wall (Illustration #4).
The Floor overhangs the front
of the Side panels by
Illustration #3
Spread glue in the grooves
Illustration #4
Install the groove fi ll
Base
Floor
1
/
8
”
Top Edge
The Floors stick
out 1/8” in front
If I can’t continue to step 9 for any reason, I still temporarily set the Right
Front on the housebody as in stpe 9, and straighten the house to match the
edges of the Right Front. If the glue dries without straightening the house,
Step 9 is more diffi cult.
Groove Fill

Instructions for the Special Edition #SE-JM907 The Alison, Jr. B: Housebody Page 9
8. Lay the housebody down on its BACK.
Without glue test the Right Front in place on the
house, fl ush with the Right Side at the top, bottom,
and right edge. Remove the fl oor’s tape that gets in
the way.
9. Spread glue in the grooves of the Right Front
panel and on the front edge of the Right Side panel.
Set the Right Front into position on the housebody
(Illustration #5).
Carefully tape in many places along the bottom
edge, making sure the Base Floor is tight to the top
edge of the groove.
Exactly line up the edge of the Front with the face
of the Side, all the way from the bottom to the top
(this is the operation that straightens the house).
Tape the Front securely to the Right Side to hold
everything tight as the glue dries
(Illustration #6).
Review: Make sure all parts are in place and all the
joints are tight.
• Check the position of the stair hole, closer to the
front edge.
• The Base Floor is tight to the groove-top.
• The house is exactly lined up on the right edge.
Illustration #5
Illustration #6
Flush
Right Front
Panel
Base Floor
Side Panel
Flush
Preview: In this section, you will attach the Tower
Sides, Tower Floors, Fillstrips, and Left Front.
10. Glue a Tower Side to the Right Front panel
touching the front edge of the fl oors (Illustration #7).
Glue a Fillstrip to the back edge of the Tower Side
between each fl oor.
Tape the Tower Side and Fillstrip to the Right Front.
Steps 10 and 12
view from the top
Left Front
Fillstrip
Right Front
Illustration #7
Fillstrip
Tower Side
Tower Side

Instructions for the Special Edition #SE-JM907 The Alison, Jr. B: Housebody Page 10
11. Hold the Tower Floors against the House
Floors and check out the fl ooring pattern. When
it is right, the pattern will be a continuous board
width from the back of the house to the front.
Glue and tape the Tower Floors in place, into the
grooves of the Tower Right Side, and against the
housebody’s fl oors (Illustration #8). Make sure
the top surface of the joint is lined up smoothly.
Illustration #8
12. Glue and tape the Tower Left Side and
Fillstrips to the Tower Floors.
13. Glue and tape the housebody’s Left Front
in place (Illustration #9).
14. Lay the housebody down on its back.
Without glue, test the fi t of the Top Floor
on the housebody, centered side-to-side. The Top
Floor overhangs the Tower Sides
1
/8” in the front
and overhangs the house 11/16” on each side.
Lightly trace the perimeter of the house-
body on the bottom of the Top Floor (Illustration
#10). Check to make sure the housebody’s sides
are parallel with the sides of the Top Floor. The
space outside the edges must be
11
/16” on each
side.
Remove the Top Floor and paint the outside
of the tracing now. Make sure your housebody
painting is done as well. Let the paint dry.
You can skip ahead to the section for assembling the Windows, and come back here when
the paint is dry.
Wiring? Now is the best time to prepare for wiring.
See www.realgoodtoys.help
Illustration #10
Trace the Housebody on the
bottom of the Top Floor
Illustration #9
Left Front Panel
1
/8” overhang
Top Floor
11
/16” overhang
11
/16” overhang
Instructions for the Special Edition #SE-JM907 The Alison, Jr. C: Foundation Page 11
15. Glue and tape the Top Floor to the housebody, fl ush at
the back and spaced evenly along the sides. The Top Floor must
overhang the housebody evenly (11/16”) on each side.
Review: all parts are in place and all joints are tight.
• Check the position of the stair hole - on the right when looking
at the house from the front.
• The house is straight - the Sides are straight up-and-down in
back
11
• The Top Floor overhangs the sides by
/16”
• The Top Floor lines up with the Side inside the stair hole
• The Top Floor lines up with the Sides in back
Add weights all around; let the glue dry
Attach the Foundation:
Wiring? The easiest time to prepare for wiring into the
Foundation space for an E247 Jack is now (
www.realgoodtoys.help).
Left Front Roof
Pro Tip: Do a second check for centering the
Top Floor by holding the Front Roofs upsidedown against the bottom of the Top Floor.
Each Roof should reach all the way from the
Tower Side to the end of the Floor.
Illustration #14
Top Floor
Right
Front
Roof
16 - 17. If your Foundation hasn’t been assembled yet, go back to
page 6 and do it now.
Pro Tip: Our Assembly Pro paints the foundation before attaching it to
the house.
18. Glue, tape, and weight the housebody to the foundation set,
lined up at the back edge and spaced evenly side-to-side. Make sure the
Foundation is spaced evenly from back-to-front along each side.
Centered side-to-side, lined up with the fl oor
Foundation lines up with the
rear edge of the Base Floor
Centered side-to-side along the Side walls
19. Glue, tape, and weight the Porch base Floor
(1/4” thick) to the housebody and Foundation
Let the glue dry

Instructions for the Special Edition #SE-JM907 The Alison, Jr. C: Foundation, D: Porch Page 12
Back to the Housebody...
Illustration #15
20. Glue and tape the Tower Front in place fl ush
along the edges (Illustration #15).
Tower Front
Flush
21. Glue and tape the Top Tower Sides to the Tower
Front, lined up at the top (Illustration #16).
Flush
Illustration #16
Tower
Top
Side
9
/16” Trim - 9”
Flush
Illustration #17
Porch Assembly:
The parts used in this section should be painted
ahead of time. If they have not been painted, do so now.
Preview: In this section, you will assemble the Porch.
Lay the housebody on its back. Place two Dividers on
the Right Front Panel, one touching the porch base, and
one touching the bottom of the Top Floor.
22. Glue the Porch Mid Floor to the Front Panel and
the Right Tower Side in the space between the Dividers.
Use Blind Dividers to stabilize the Porch Mid Floor in
position! (Illustration #17).
[the Porch Mid Floor is
23. Glue (2)
Tower, lined up in Front.
3
/8” thick]
9
/16” Trim - 9” to the right side of the
Divider
Temporary use of Dividers and Blind Dividers to
hold the Porch Floors while the glue sets. Remove
the Dividers before installing the Porch Gingerbread
Divider
Porch Mid Floor
Blind Divider

Instructions for the Special Edition #SE-JM907 The Alison, Jr. D: Porch Page 13
Illustration #19
1
/4” Porch Side Gingerbread
3
24. Set up the Rails, Posts and Gingerbread as shown in Illustrations 19 & 20. Use
pairs of shingles if you wish to elevate the
Railing sets above the Porch Floor.
Glue the porch parts in place.
Porch Post
Housebody
1
3
/4” Rail
Porch Floor

Instructions for the Special Edition #SE-JM907 The Alison, Jr. D: Porch Page 14
Illustration #20
3
/8” Porch Front Gingerbread
6
Porch Post
3
6
/8” Rail
Porch Post
Porch Floor

Instructions for the Special Edition #SE-JM907 The Alison, Jr. E: Roof Page 15
One
Shingle
Length
Attic Divider
Side Roof
Side Roof
Step 25
Illustration #21
Shingle Guidelines
Pro Tip: it is far easier to pre-cut wallpaper to fi t the roofs before attaching the roofs to the house.
Wiring? Visit www.realgoodtoys.helo/JM907/wiring for steps to do right now.
Housebody Roof:
Preview: In this section you will draw Shingle guidelines,
and attach the Roof Panels and Roof Tops.
1”
25. Glue and tape the Ledge Trim to the exposed edges
of the Top Floor, fl ush along the bottom edge (the Ledge
Trim sticks up above the Floor).
26. On the outside of the Front and Side Roof Panels
draw guidelines for locating Shingles. The fi rst guideline
should be drawn one Shingle length (
11/4) from the bottom
edge. Draw the rest of the guidelines spaced 1” apart (Illustration #21 and the Guideline Measure at right).
27. Without glue, Test the Roof panels on the house
to see how they fi t. Take the Roofs off, then glue and tape
them to each other, to the Top Floor, and to the Tower Top
Sides (Illustration #22).
Check to make sure the Roofs are fl ush with the edges
of the Tower Top Sides on the inside.
28. Set the Attic Divider inside the attic against the
Front Roof. Make absolutely sure that the Front Roof is
fl ush with the top edge of the Attic Divider and the Tower
Top Sides (Illustration #22). Let the glue dry.
Right
Front Roof
Step 25
Ledge Trim - lined up on the bottom
Left Front
Roof
1”
1”
1”
1”
1”
Side Roof
Attic Divider
Side Roof
Illustration #22
1”
One
Shingle
Length

Instructions for the Special Edition #SE-JM907 The Alison, Jr. F: Roof Top Page 16
29. Without glue, test the Roof Top on the tops of the Roofs and
T ower Walls, fl ush with the back edge of the Roofs, and with an even
overhang all around.
• Make sure the overhang is parallel all along the Side Roofs, make
sure the Roof Top is lined up with the back edges of the Side Roofs.
• Test the Rooftop Extension on top of the Tower, lined up with the
Roof Top on the Left edge.
Trace the outline of the house on the bottom of the Rooftop and
Rooftop Extension.
Remove the Roof Top and Rooftop Extension. Paint the outside
of the tracing. Finish painting the Tower Top Sides. Let the paint
dry.
Glue and tape the Roof Top in place.
Check to make sure the overhang is parallel all along the Side
Roofs, make sure the Roof Top is lined up with the back edges of the
Side Roof; then tape the Roof Top to the back edge of the Side Roofs
(Illustration #23). Add weights as the glue dries for a tight fi t.
30. Glue and tape the Rooftop Extension in position (Illustration
#24).
Roof T op
Tape
Illustration #23
Roof T op Extension
Roof T op
Extension
Roof T op
Review: Check the fi t of all the parts and make sure all the joints are
tight. Make sure the Floors and Roof Top are straight, fl at, and evenly
spaced around the edges. Use tape and weights as necessary to get all
the joints tight as the glue dries.
Let the glue dry
Exterior Painting:
Finish all of the Exterior painting now!
Skip ahead to the proper assembly sections to decide how
you would like each part fi nished:
• Brackets (pg.13)
• Trimstrips (pg.13)
• Windows and Door (pg.14)
• Shutters (pg.14)
• Dormers (pg.15)
• Cresting (pg.16)
• Fluteposts/Beads (pg. 16)
• Flower Boxes (pg.16)
7
/16” Trimstrips:
31. Glue Trimstrips to cover the side edges of the fronts
(Left, Right, Tower). See Illustration #25.
Illustration #25
3
/8”
Fillstrips
Illustration #24
Trimstrips
Cut and carve Trimstrip material to fi t the tower edges
above the ledge (Trimstrip material can be cut with a razor
saw, utility knife with a new, sharp blade, or with scissors)
Cut Trim 9” for the inside corner of the porch.
Carve the Trim for a perfect fi t

Instructions for the Special Edition #SE-JM907 The Alison, Jr. F: Trim, Tower Roof Page 17
Brackets:
32. Paint the Brackets before attaching them.
Turn the house upside-down.
Lay out the Brackets as follows:
• Three pairs across the Tower Front
(Illustration #26)
• Four pairs on each Side of the house (Illutrtation .#27)
The outside pairs touch the Trimstrips. Space the Brack-
1
ets in each pair about
is right (about 3
9
/16” apart. When the Bracket spacing
/16” on the sides and 33/16” on the tower),
remove the Brackets one at a time, and glue that bracket on..
etc. until all the brackets are glued on. Check that all the
spacing is still the way you like it. Let the glue dry.
Tower Roof:
33. A. On the outside of the Tower Roofs, draw guidelines for locating Shingles. The fi rst guideline should be
drawn one Shingle length from the bottom edge. Draw the
rest of the guidelines spaced 1” apart
(Guideline Measure on page 15).
Illustration #26
Illustration #27
Tower Front
3
3
/16”
Space approx. 31/16”
on center
31/16
Brackets
B. Glue and tape the Tower Roofs together with the
Tower Front Roof overlapping the Tower Side Roofs.
Glue the Tower Roof Top in place on the Tower
Roofs, spaced evenly all around. Tape and weight as necessary for a good fi t. Paint the Tower Roof Top.
C. Glue the Tower Roofs to the house Roof Top,
spaced evenly on the front and sides.
Tower Side
Roof
Tower
Front
Roof
Step 33 B
Tower Roof Top
Step 33 A
Tower
shingle
guidelines
step 33 C
Spaced
evenly

Instructions for the Special Edition #SE-JM907 The Alison, Jr. G: Windows & Door Page 18
Illustration #31
Window Assembly:
The parts used in this section should be
painted ahead of time. If they have not been
painted, do so now.
Snips of tape can hold the
corners while putting on a
rubber band - take off the
tape while the glue dries
34. Test assemble (no glue) a window set
Practice holding the frame pieces face-down
on the work surface and putting on the rubber
band (Illustration #31: a scrap of tape at each
corner helps). In the illustrations, the hands are
holding the frame parts down, not squeezing
together. When you can get the rubber band on
every time without pieces fl ying, then you are
ready for glue
35. Glue and rubber band together the
window frames. Glue, tape, and rubberband
together two Dormer Interior Trim frames
(Illustration #32). Make sure the frames are
square as the glue dries (Illustration #33).
36. Check the fi t of the windows in the
openings. Make sure the windows can sit level
with the house. Trim the corners of the openings square if necessary for a good fi t.
37. Paint the Shutter parts on both faces.
Without glue, adjust the spacing of the Shutter
Panels on the Shutter Cores (Illustration #34).
Remove the Shutter Panel, put a scant line of
glue on each edge of the back surface, then
replace the Shutter Panel. Too much glue will
make the panel curl.
38. Glue the windows, the Door, and the
Shuttters in place only after everything (including the Housebody) is painted.
Window Frame is shown face down
Illustration #31
Dormer Window
Illustration #32
Standard Wndow
Interior Window Frame
The hands are holding the frame parts
Down, not squeezing them together
Dormer Exterior Frame
Dormer Interior Frame
Window Plexi
Attach the exterior window frames as part of
the exterior fi nishing. After the interior fi nish-
ing is done (wallpaper, paint, etc.), set the window plexi into the window cutout without glue
and glue the interior window frame in place.
Illustration #33
Exterior Window Frame
Illustration #34

Instructions for the Special Edition #SE-JM907 The Alison, Jr. H: Dormers, Shingles Page 19
The Dormers:
Preview: In this section you will build and
install the Dormers.
Dormer
Side
39. Glue and tape the Dormer Sides to the
Dormer Ceiling, fl ush at the top edges.
(Illustration #35)
Pro Tip: Our Assembly Pro paints and installs the Dormer Sides/Ceiling before shingling, and pre-paints and installs the Dormer
Roofs after the shingling is complete.
40. Glue and tape a Window Frame into the Dormer
body. Glue the Dormers to the Front Roof lined up with
the Dormer holes (Illustration #36). Check to make sure
the Dormers are straight up-and-down. Tape the Dormers to the Roof from the inside.
41. Glue the Dormer Roofs to the tops of the Dormer
bodies centered side-to-side (Illustration #37).
Dormer
Ceiling
Window
Frame
Dormer
Roof
Dormer
Side
Illustration #35
Flush
Illustration #36
Illustration #37
Shingle The Roof:
Glue: Use a thick panel adhesive such as Liquid
Macco
Nails
supply stores. Trim just a little of the end of the tube for
a tiny hole, to give a thin bead of glue. Always use good
ventilation with solvent based adhesives.
42. Apply a thin line of adhesive
lowest guideline all the way across one Side Roof. Press
the top edge of a Shingle into the line of glue, squeezing
out the excess. Hold the fi rst Shingle steady and press
another shingle into the adhesive, tight to the fi rst. Hold
the next Shingle and press in another... etc. all the way
across the roof, cutting the last shingle to fi t. Cut angled
Shingles for the corners before attaching them. The fi rst
row of Shingles is tight to the bottom, the rest line up
with the guidelines. Finish each row (the sides fi rst, then
the front) before starting the next row.
available in a caulking gun tube at building
1
/8” below the
43. Continue up the roof one row at a time around
all the roofs. Start every other row with a half Shingle
so that the seam between Shingles is staggered back and
forth as you go up the roof. Cut the Shingles for the top
row so that each row will have the same reveal.
Where two roofs meet, shingle the side roofs fi rst,
then the front roof.
1” Reveal
1” Reveal
Bead of adhesive
Illustration #38
Overlap covers
the squeezings
Flush
One shingle length
Illustration #39
1” between guidlines
Guideline
1”
1”
1”
www.realgoodtoys.help has shingling demos
1” Reveal
1” Reveal
Bead of adhesive
One shingle length

Instructions for the Special Edition #SE-JM907 The Alison, Jr. I: Gingerbread Page 20
Finish the Outside
Illustration #40
3
/8” Beads
7
/8” Flutepost
Roof Top Cresting:
44. Lay out the Roof Top Cresting set.
Note from the Pro: Paint the Cresting, the
Flutepost, and the Balls before assembly.
45. Assemble the Flutepost/Bead sets
(Illustration #40).
46. Without glue, set up the Cresting set with
Posts at the corners. When the position is the way
you like it, remove one piece at a time, and glue that
piece on..etc.
31/4”
77/8”
31/8”
31/8”
31/4”
123/4”
113/16”
47. Glue the Flower Boxes in place centered
side-to-side below the Tower Windows
(Illustration #41).
48. Install the Left Gingerbread (31/4” Side and
1
1
/8” Front) with a 7/8” Trimpost and Bead (Illustra-
tion #42).
49. Glue the Front Step in place (Photo on pg. 1).
Illustration #42
Left Gingerbread
31/4” Side
Gingerbread
Illustration #41
11/8” Front Gingerbread
7
/8” Trimpost and Bead
Flower Box
Centered
side-to-side

Instructions for the Special Edition #SE-JM907 The Alison, Jr. J: Interior Page 21
Stairs and Stringer:
Line up the Stringer with the pattern, and
mark the cut. Cut the Stringer with a fi ne toothed saw
Glue the Bottom and Top Stair Blocks together (Illustration #43).
Without glue, test the Stair assembly in the stair hole. The stairs
are tight to the wall and the top tread is fl ush with the fl oor.
Wait to permanently install the stairs until fl ooring and wallpa-
pering are done.
Glue the stair assembly in place. Let dry.
Glue the Stringer to the side of the Stair assembly for support.
Dividers
are important supports for the fl oors and roof, but their
position is fl exible. Test your interior furnishings and install Di-
viders where they best serve your interior plan. Blind Dividers are
optional separators front-to-back for the Tower Rooms.
To install a Divider, spread glue on the edges, tip the Divider and
put it almost all the way into the house, set the base and stand the
Divider upright, slide it the rest of the way into position.
Finish the Inside...Plan Ahead!
Interior fi nishing involves so many choices! Will this house be a
play-house or a display for miniatures? What accessories will be
used and where will they go? Wiring? Wallpaper? Tile or carpeting? Every choice makes a difference in the order of fi nishing.
Real Good Toys has provided materials for some basic interior
work, but you may choose to do it differently.
Make your choices
Get your materials
Test your layout
With the pieces in your hands, imagine the steps to get to where
you want to be.
Now you’re ready for your order of interior fi nishing.
Here’s the order that our assembly pro follows for tackling
most custom interior fi nishing:
• Dividers
• Electrical wiring (using “tape” style wiring)
• Ceilings
• Flooring
• Wallpaper
• Interior Window T rim
• Stairs
• Baseboard and crown moldings
Top Stair Block
Illustration #43
Bottom
Stair Block
Stringer
Pattern
Dividers
position is fl exible. Test your interior furnishings and install Di-
viders where they best serve your interior plan. Blind Dividers are
optional separators front-to-back for the Tower Rooms.
To install a Divider, spread glue on the edges, tip the Divider and
put it almost all the way into the house, set the base and stand the
Divider upright, slide it the rest of the way into position.
Stairs and Stringer:
mark the cut. Cut the Stringer with a fi ne toothed saw..
Glue the Bottom and Top Stair Blocks together (Illustration #43).
Without glue, test the Stair assembly in the stair hole. The stairs
are tight to the wall and the top tread is fl ush with the fl oor.
Wait to permanently install the stairs until fl ooring and wallpa-
pering are done.
Glue the stair assembly in place. Let dry.
Glue the Stringer to the side of the Stair assembly for support.
are important supports for the fl oors and roof, but their
Line up the Stringer with the pattern, and
Attic
Divider
Blind
Divider
Cut Off
Divider
Adjust the fi t of all the parts. Everything must be in place as the glue dries
You have fi nished the Dollhouse Assembly part of your project…
ENJOY THE REST

Instructions for the Special Edition #SE-JM907 The Alison, Jr. Options Page 22
The JM907 Alison Jr.
is shown above with the JM33 Addition
added to the left side
(can also be added to the right side).
Options:
A wide variety of materials and accessories are available to help
you achieve your dream house.
The following is a partial list of accessories available through your
dealer from Real Good Toys.
J-FK Interior Finishing kit
JM33 Victorian Style Junior Addition
JM66 Junior Conservatory Addition
Dye-1 Brown Shingle Dye
Dye-3 Grey Shingle Dye
SC Sheet Copper
EL-66 EZ Punch and Electrifi cation Helper Set
(The EZ Punch piercing tool punches holes making nailing, screwing and setting electrical parts easier.)
Visit www.realgoodtoys.com for more information and wiring products.
The JM907 Alison Jr.
is shown above with the JM66 Addition
 Loading...