

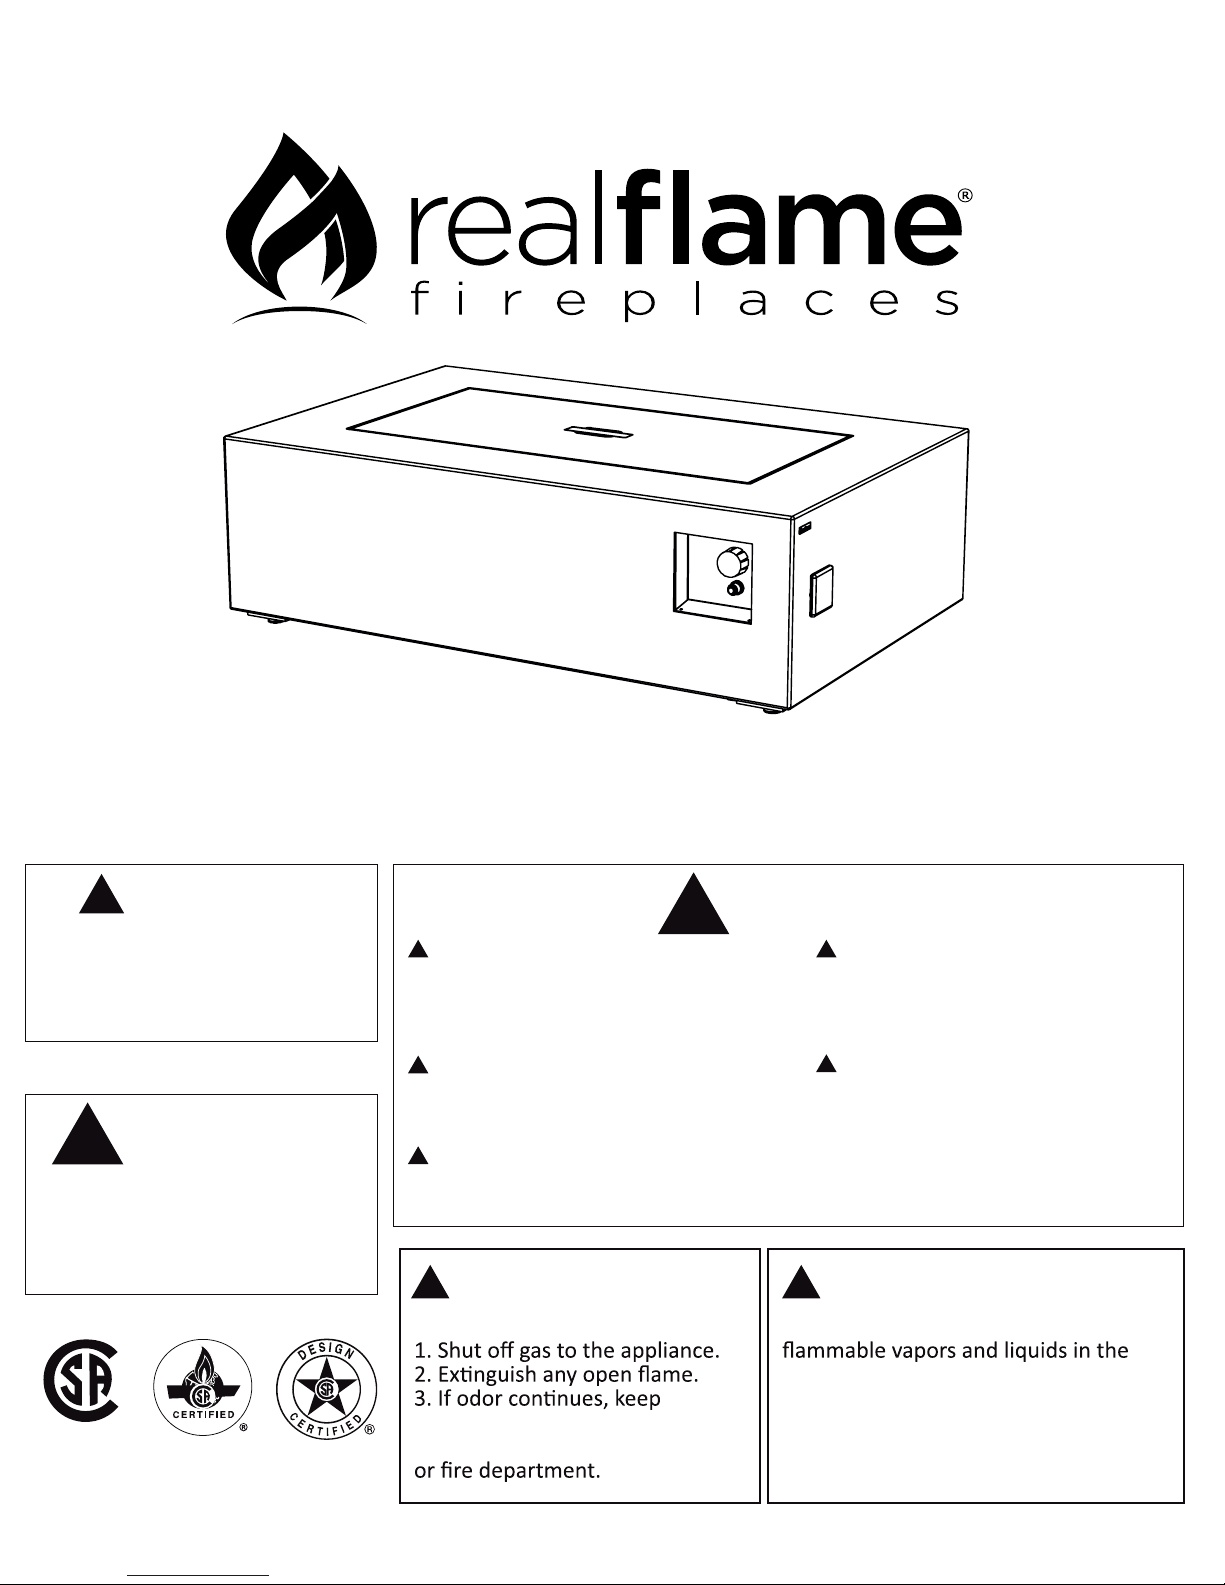
Real Flame T9650 NG Owner's Manual
Lot: _______________
P.O. _______________
Baltic Rectangle Fire Table Owner’s Manual
IMPORTANT
!
SAVE THESE
INSTRUCTIONS
Warning:
!
For outdoor use only
DO NOT use for cooking
DO NOT use under any
overhead enclosure
T9650 NG
Warning:
!
!
If the information in this manual is not
followed exactly, a fire or explosion
may result causing property damage,
personal injury or loss of life.
Installation and service must be
!
performed by a qualified installer,
service agency or gas supplier.
!
Improper installation, adjustment,
alteration, service or maintenance can
cause injury or property damage.
DANGER
!
If you smell gas:
!
Read the installation, operation
and maintenance instructions
thoroughly before installing or
servicing this equipment.
!
Save these instructions for future
reference. If you are assembling
this unit for someone else, give
!
this manual to him or her to read
and save for future reference.
WARNING
!
Do not store or use gasoline or other
USC
Real Flame Customer Service: 1-800-654-1704
away from the appliance and
immediately call your gas supplier
vicinity of this or any other appliance.
This unit not for use with propane.
Use only with Natural gas.
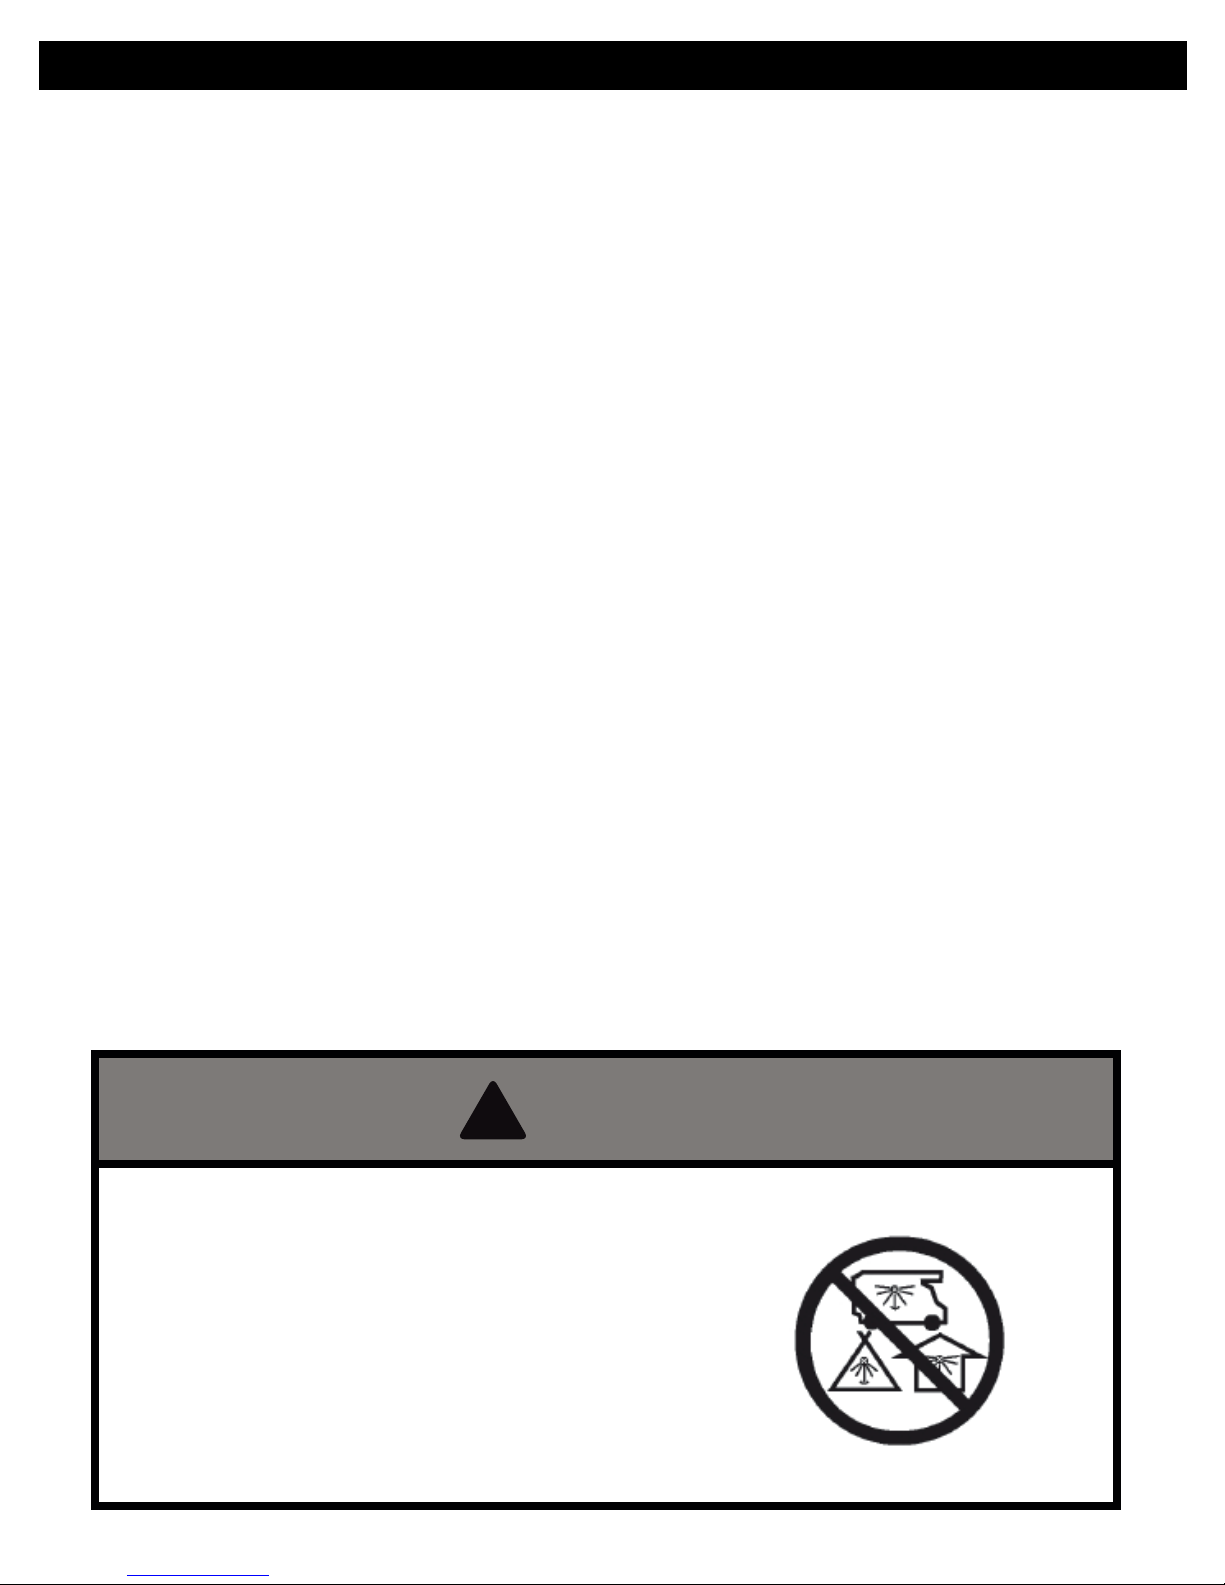
Table of Contents
Important Safety Information
Natural Gas Warnings
Parts List
Assembly Instructions
Pre-Use Instructions
Lighting
Care and Cleaning
Gas Component Connection Checks
Troubleshooting
Covering
3
5
7
8
12
13
14
15
17
19
CARBON MONOXIDE HAZARD
This appliance can produce carbon
monoxide which has no odor.
Using it in an enclosed space can kill you.
Never use this appliance in an enclosed
space such as a camper,tent,car or home.
!
DANGER
2
IMPORTANT SAFETY INFORMATION
WARNING FIRE TABLE IS FOR OUTDOOR USE ONLY
!
!
WARNING NOT FOR USE WITH LIQUID PROPANE
IF YOU SMELL GAS:
• Shut o
• Extinguish any open flame.
• Do not try lighting any appliance.
• Do not touch any electrical switch; do not use any phone in your building.
• Immediately call your gas supplier from a neighbor’s phone.
• Follow the gas supplier’s instructions.
• If you cannot reach your gas supplier, call the fire department.
WARNING
•
socket from the main gas supply when the fire table is not in use.
WARNING Installation and service must be preformed by a qualified installer, service agency or
gas supplier.
• • WARNING
serious bodily injury or death, or in a fire or an explosion causing damage to property.
gas supply to the fire table.
Failure to follow
the dangers, warning and cautions in this manual may result in
• IMPORTANT NOTICE Read and understand all warnings and precautions prior to assembly and
use of your gas fire table. Improper installation, adjustment, alteration, service or maintenance
can cause injury or property damage.
• NOTE The use and installation of this product must conform to local codes. In the absence of
local codes, use the National Fuel Gas Code, ANSI Z21.97. Reference to Natural Gas and Propane
Installation code CSA B149.1 or Propane Storage and Handling code B149.2.
• NOTE When an appliance is for connection to a fixed piping system, the installation must
conform with local codes, or in the absence of local codes with the National Fuel Gas Code,
ANSI Z223.1/NFPA 54, or International Fuel Gas Code.
•Minimum Clearance from Unit to Combustible Materials
72”(182.9cm) from the top; 48” (121.9 cm) from all sides and back. Do not locate this fire table
under any overhead enclosure.
Always use this outdoor fire table on a hard, level non-combustible surface such a concrete,
rock or stone. An asphalt or blacktop surface may not be acceptable for this purpose. Surfaces
such as dirt and grass may prevent the unit from having proper ventilation.
• • T
his gas fire table and its individual shuto valve must be disconnected from the gas supply.
piping system during any pressure testing of that system at test pressures in excess of 1/2 of psi
(3.5 kPa). The appliance must be isolated from the gas supply piping system by closing its
individual manual shuto valve during any pressure testing of the gas supply piping system at
test pressures equal to or less than 1/2 psi (3.5 kPa).
• Keep these instructions for future reference. If you are assembling this unit for someone else,
give this manual to him or her to read and keep for future reference.
• This gas fire table must be used ONLY outdoors in a well-ventilated space and shall NOT be used
inside a building, garage, or any other enclosed area.
• DO NOT use this outdoor gas fire table for indoor heating. TOXIC carbon monoxide fumes can
accumulate and cause asphyxiation.
• NEVER LEAVE this gas firep
• Children should be alerted to the hazards of high surface temperatures and kept at a safe
distance while firepit is in use.
3
it unattended when in use.

IMPORTANT SAFETY INFORMATION
(Continued)
• Do not store or use gasoline or other flammable vapors and liquids within 25 feet (7.62m) of this
or any other appliance.
• Do not store any combustible materials in the base enclosure.
• DO NOT use in an explosive atmosphere. Keep gas fire table area clear and free from
combustible materials, gasoline and other flammable vapors and liquids.
• This outdoor fire table is NOT to be operated by children. Young children should be closely
supervised when in the vicinity of this outdoor fire table.
• This outdoor fire table is not to be installed or used in or on recreation vehicles and/or boats.
• Always use in accordance with all applicable local, state and national codes. Contact your local
fire department for details on outdoor burning.
• Use the same precautions you would with any open fire when using this outdoor fire table.
• DO NOT burn solid fuels such as: wood, charcoal briquettes, lump charcoal, manufactured logs,
driftwood, trash, leaves, paper, cardboard, plywood, painted or stained or pressure treated wood
in this outdoor fire table.
• DO NOT use this outdoor fire table until it is COMPLETELY assembled and all parts are securely
fastened and tightened.
• DO NOT use this outdoor fire table near automobiles, trucks, vans or recreational vehicles.
• DO NOT use this outdoor fire table under any overhead structur
e or near any unprotected
combustible constructions. Avoid using near or under overhanging trees and shrubs.
• The use of alcohol, prescription or non-prescription drugs may impair an individual’s ability to
properly assemble or safely operate this outdoor fire table.
• DO NOT use this outdoor fire table if any part has been under water. Immediately call a qualified
service technician to inspect the fire table and to replace any part or control system and any gas
control which has been under water.
• DO NOT wear flammable or loose clothing when operating this outdoor fire table.
• DO NOT use in windy conditions.
• Keep all electrical cords away from a hot outdoor fire table.
• Certain areas of this outdoor fire table when in use will become too hot to touch. Do not touch
hot surfaces until the unit has cooled unless you are wearing protective gear such as insulated
pot holders or heat resistant gloves or mittens t
o avoid burns.
• DO NOT hang or place clothing or other flammable materials on or near the gas fire table.
• Any guard or other protective device removed for servicing the fire table must be replaced prior
to operating the fire table.
• DO NOT attempt to move or store this outdoor fire table until all parts are cool.
• DO NOT lean over this outdoor fire table when lighting or when in use.
• Use only the natural gas hose and quick dissconnect assembly provided. The replacement
natural gas hose and quick disconnect assembly shall be that specified by the manufacturer.
• DO NOT attempt to disconnect natural gas hose or quick disconnect socket from the main gas
supply or a
• Always shut o
ny gas fitting while the outdoor fire table is in use.
gas supply at the shut-o valve and disconnect the quick disconnect socket
from the main gas supply when the fire table is not in use
• DO NOT sit on the fire table when the unit is in operation.
• DO NOT throw anything onto the fire when the unit is in operation.
• Lava rocks are very hot; please keep children and pets at a safe distance.
• It is essential to keep the outdoor fire table valve compartment, burners, and circulating air
passages clean. Inspect outdoor fire table before each use.
•Prior to each fire table operation, check the hose for evidence of excessive abrasion or wear by
looking through the visual check hole. If the hose is damaged, cracked or cut, it must be replaced
before using the gas fire table. The hose assembly can only be replaced with a hose assembly
specified by the manufacturer. Please call Real Flame at 1-800-654-1704.
4
IMPORTANT SAFETY INFORMATION
•Before each use, remove the lava rocks. Examine the burner and its components. If dirty, clean
with a soft brush and soapy water solution. Also examine the area around the burner. Any dirt or
foreign material, such as spider webs or nests in this area should be removed. If it is evident that
the burner is damaged, the fire table must not be used. The burner assembly can not be
replaced. Please contact Real Flame at 1-800-654-1704 for technical support.
• Place the hose out of the pathways where people may trip over it. Do not place the hose in areas
where it may be subjected to accidental damage.
!
DANGER
This outdoor fire table is for use with Natural Gas only. The conversion to or attempted use
of Liquid Propane in this outdoor fire table is dangerous and could result in serious personal
injury, or property damage.
(Continued)
ATTENTION: Any alteration of the outdoor fire table that is not specifically directed
in the operations manual will void manufacturer warranty.
NATURAL GAS DANGERS AND WARNINGS
Natural gas is flammable and hazardous if handled improperly. Become aware of the
characteristics before using any natural gas product.
Natural Gas Characteristics
• Flammable, explosive under pressure, lighter than air and settles in pools in high areas.
• In its natural state, natural gas has no odor. For your safety, an odorant has been added.
• Contact with natural gas could burn the skin.
• Natural is extremely flammable and hazardous if handled improperly.
Chemicals known to the state of California to cause cancer, birth defects, or other
reproductive harm are created by the combustion of natural gas.
Your natural gas fire pit is designed to operate on natural gas only, at a pressure of seven
inches water column (7" W.C.) Check with your gas utility for local gas pressure, because
in some areas natural gas pressure varies. Also, check with your gas company or with
local building codes for instructions to install gas supply line, or call a licensed and
qualified installer.
It is recommended that an ON/OFF manual shut–o valve be installed at the gas supply
source, outdoors: after the gas line exits outside wall and before quick disconnect or
before gas supply line enters ground, indoors: in the branch gas line in an accessible
location near the gas supply line.
Pipe sealing compound or pipe thread tape of the type resistant to the action of natural
gas must be used on all male pipe threads. Apply compound or tape to at least the first
three to four threads when making a connection.
5
NATURAL GAS DANGERS AND WARNINGS
Never store or use gasoline or other volatile substance in the vicinity of this fire table.
Natural Gas Connection
Connect a manual shuto valve to gas supply line. Apply sealing compound or pipe thread tape of
the type resistant to the action of Natural Gas on all male pipe threads. Connect the end, with the
quick release connector, of the natural gas hose to manual shut-o valve at the gas supply.
Caution:
!
During any high pressure testing of the gas supply piping system at test pressures in excess
of 1/2 psi (3.5 kPa), the appliance and its individual shuto valve must be disconnected
from the gas supply piping system.
The outdoor fire table must be isolated from the gas supply piping system by closing the
individual manual shuto valve during any pressure testing of the gas supply piping system at
least equal to or less than 1/2 psi (3.5 kPa).
(Continued)
(
Warning:
!
Burner valves are pre-tested at the factory to operate on natural gas. Do not attempt to
convert or change.
6
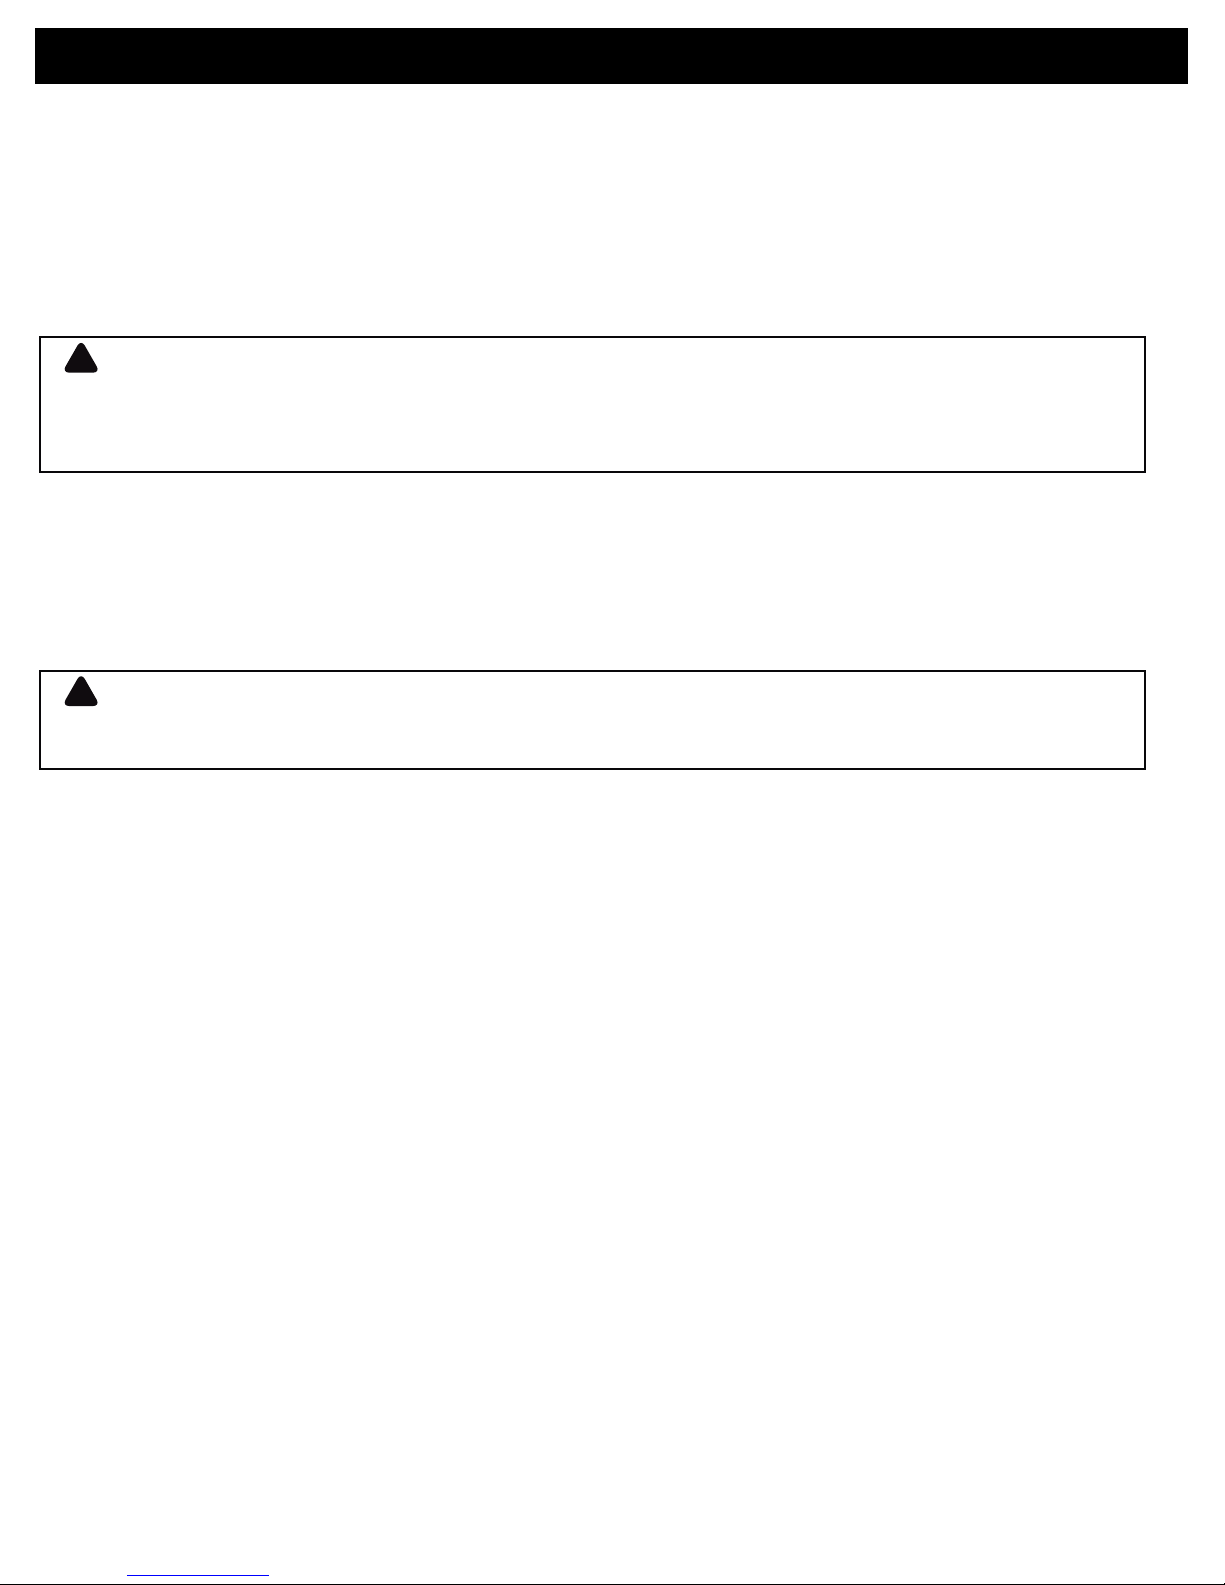
Fire Table Lid 1
1
Parts List
5
Feet 05600006 4
Glacier Grey T96504201
Kodiak Brown T96504501
Adjustable Screw 100050000 4
2
3
Fire Table No Number 1
4
Natural Gas Hose 056NG010 1
and Quick Disconnect
Hose Guide - 100060000
A
x 1 x 2 x 2x 4
B
C
Lava Rock 05603408 1
6
Vinyl Cover 96500109 1
7
8
AAA Battery No Number 1
D
1
6
8
7
2
3
5
7
4
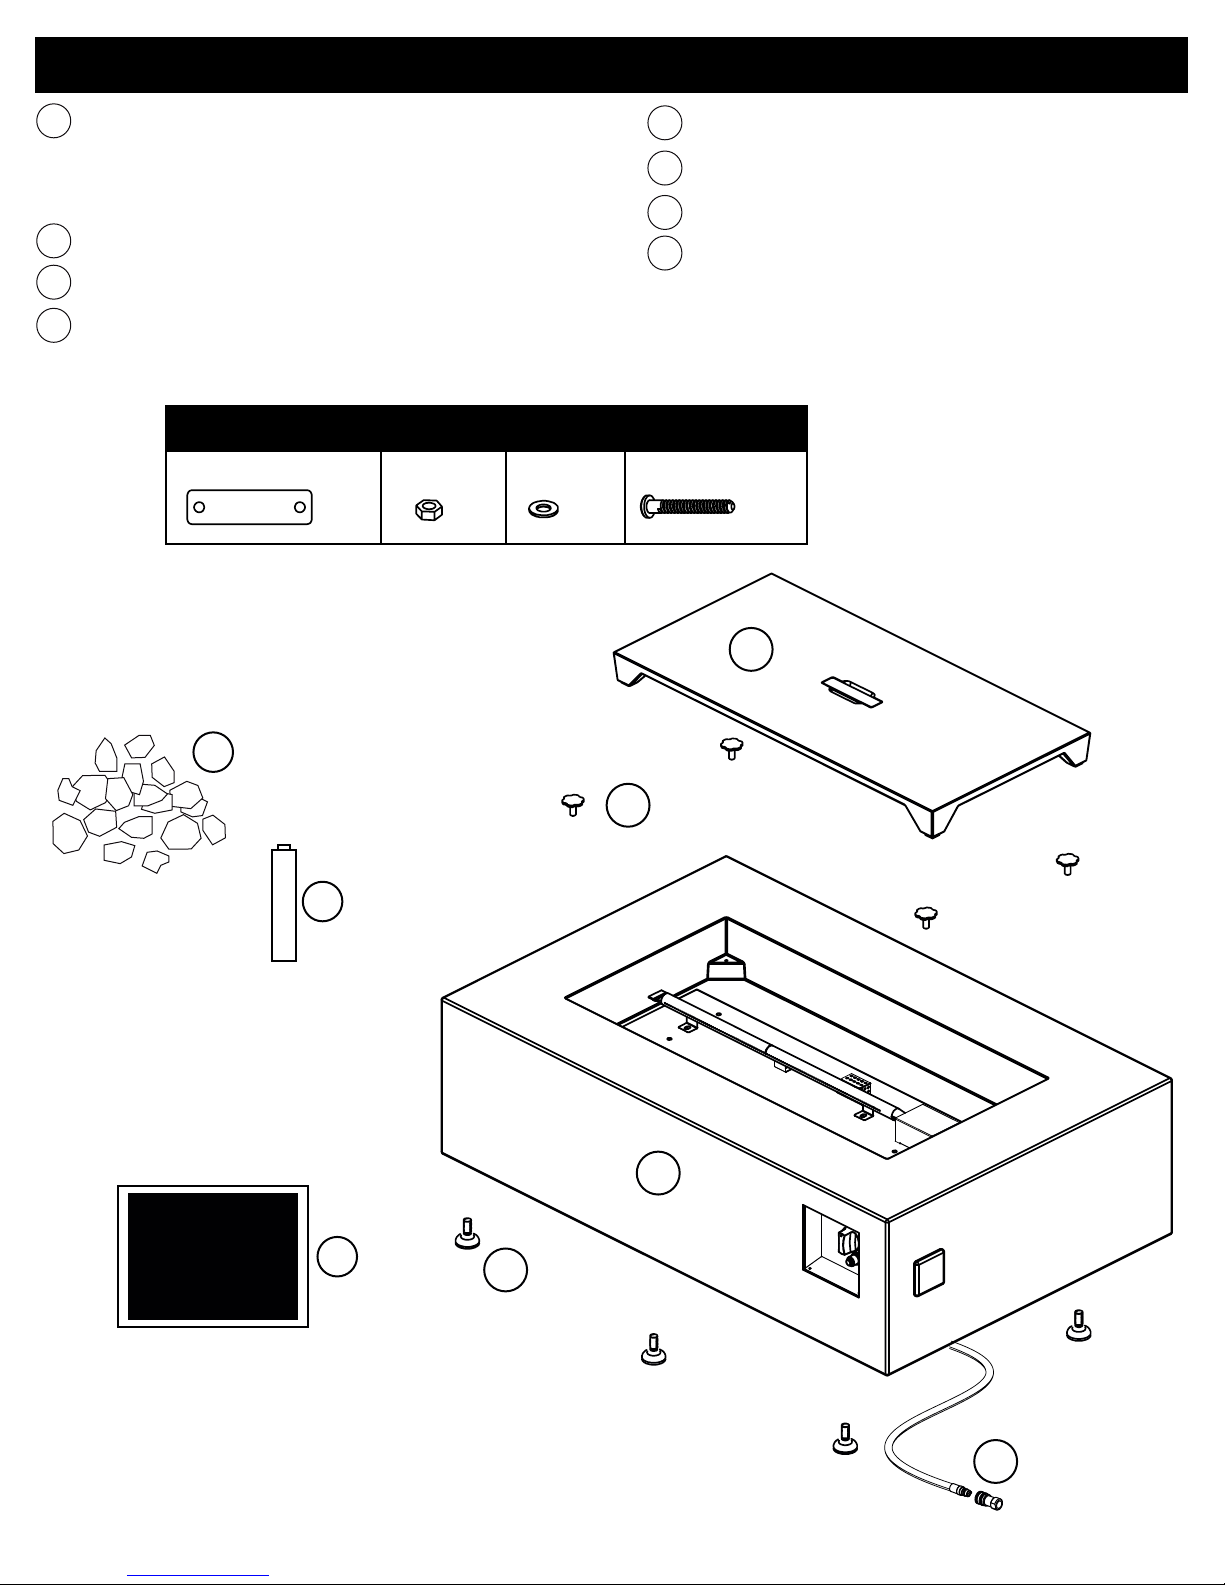
ASSEMBLY INSTRUCTIONS
The fire table is very heavy, make sure that another person is
available to help you when moving it or flipping it over.
With the fire table upside down, install the four feet by
screwing them into the holes located in the corners of the unit.
WARNING
!
Flip the table over with the help of another person. Do not attempt to turn the table
upright by yourself as injury to yourself or damage to the table may occur.
6
1
6
6
3
Install the Hose Guide
1. Carefully unwrap the hose and lay it across the gap in the base.
2. Place the hose guide (A) over the hose and attach using the
provided hardware. Be careful not to damage hose while installing
hose guide.
6
2
C
D
B
C
A
8
3
Install the AAA battery as shown in the diagram below.
Battery not included.
3
-
+
4
4
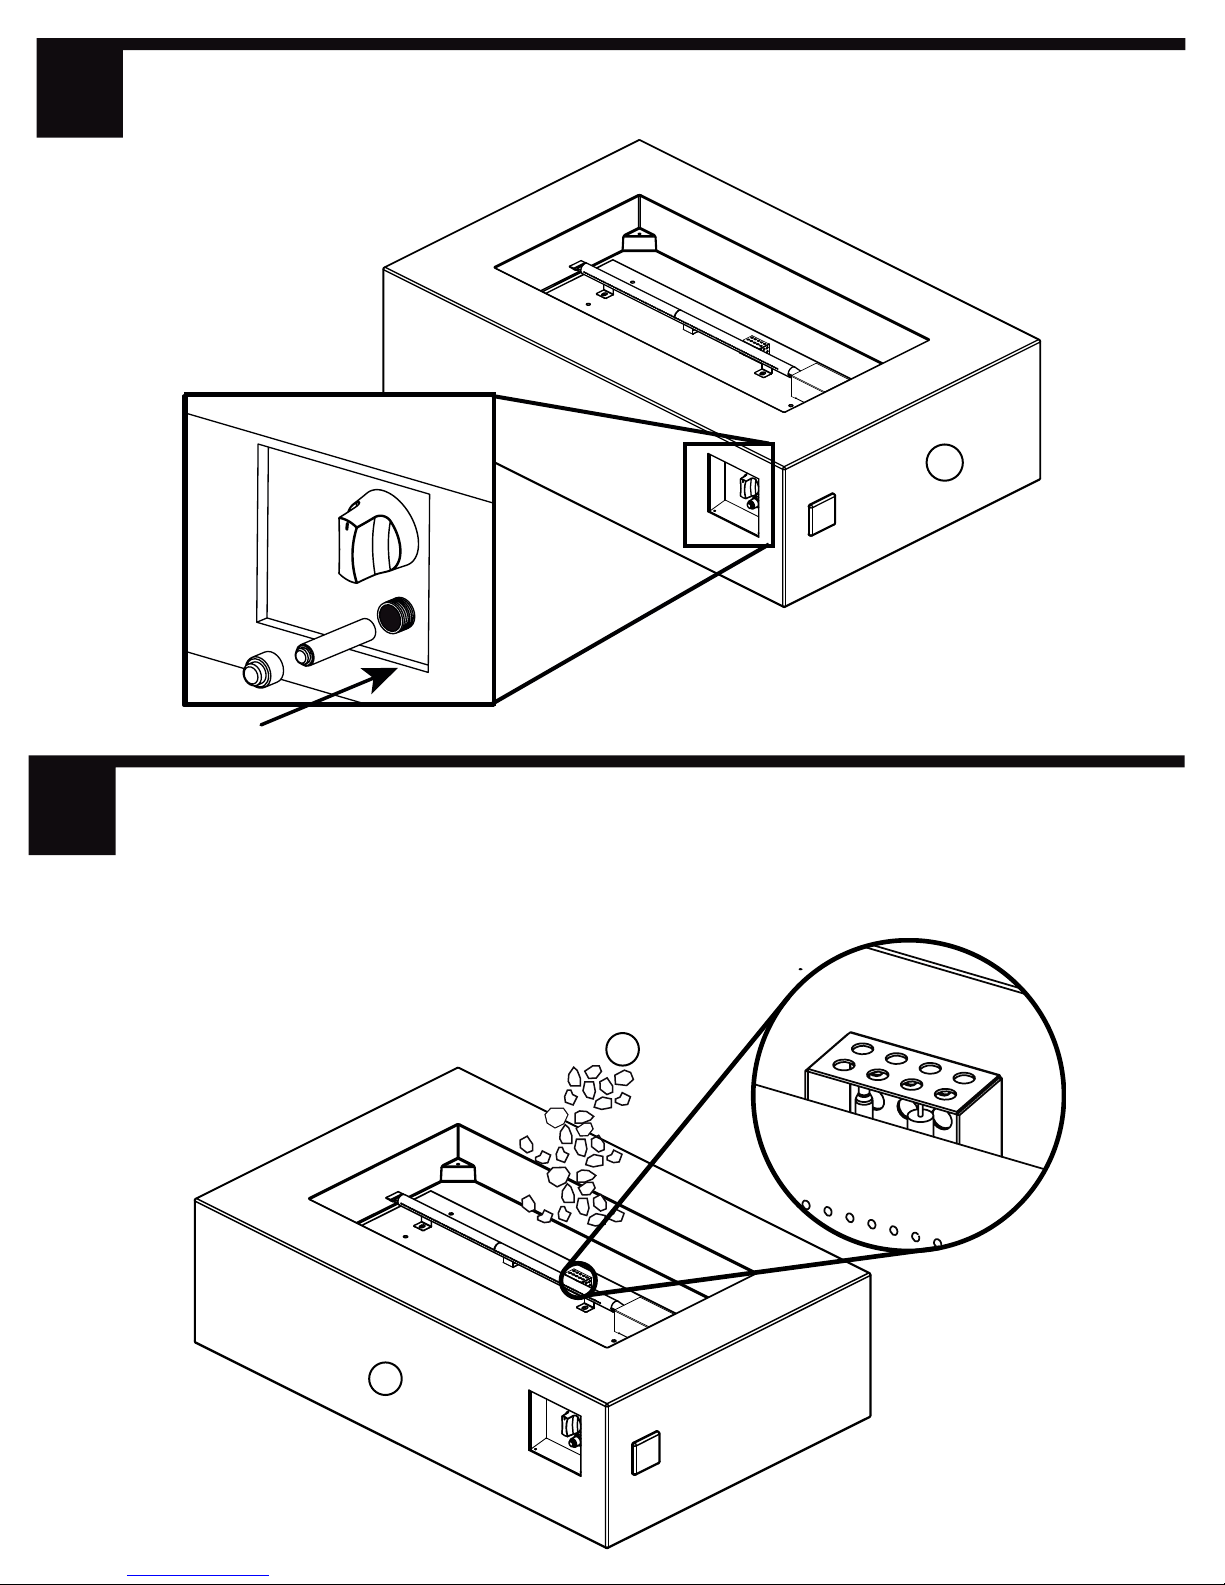
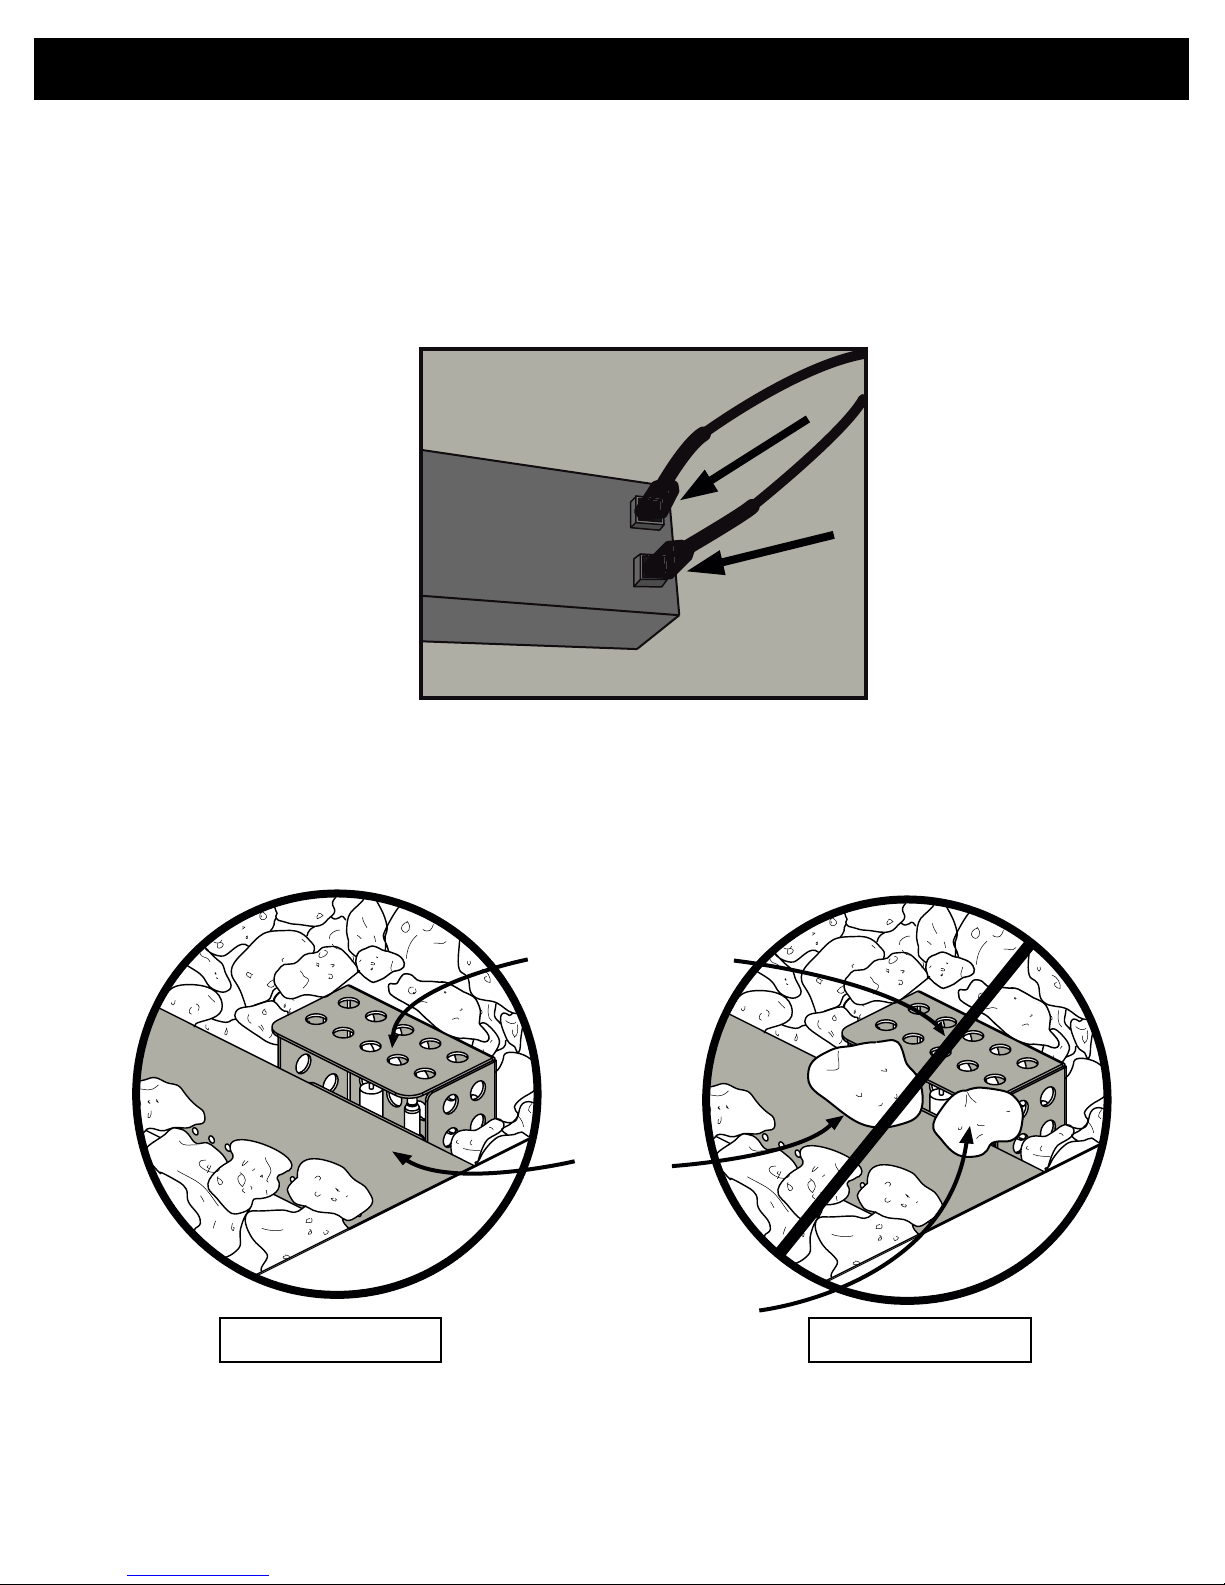
Place lava rock by hand. DO NOT dump bag out into tray to avoid
clogging the burner with dust. Position the lava rock (10kgs) to a level
about 1” above the top of the burner. Make sure that you do not block the
igniter box with lava rock to ensure proper ignition.
8
Igniter box
3
9
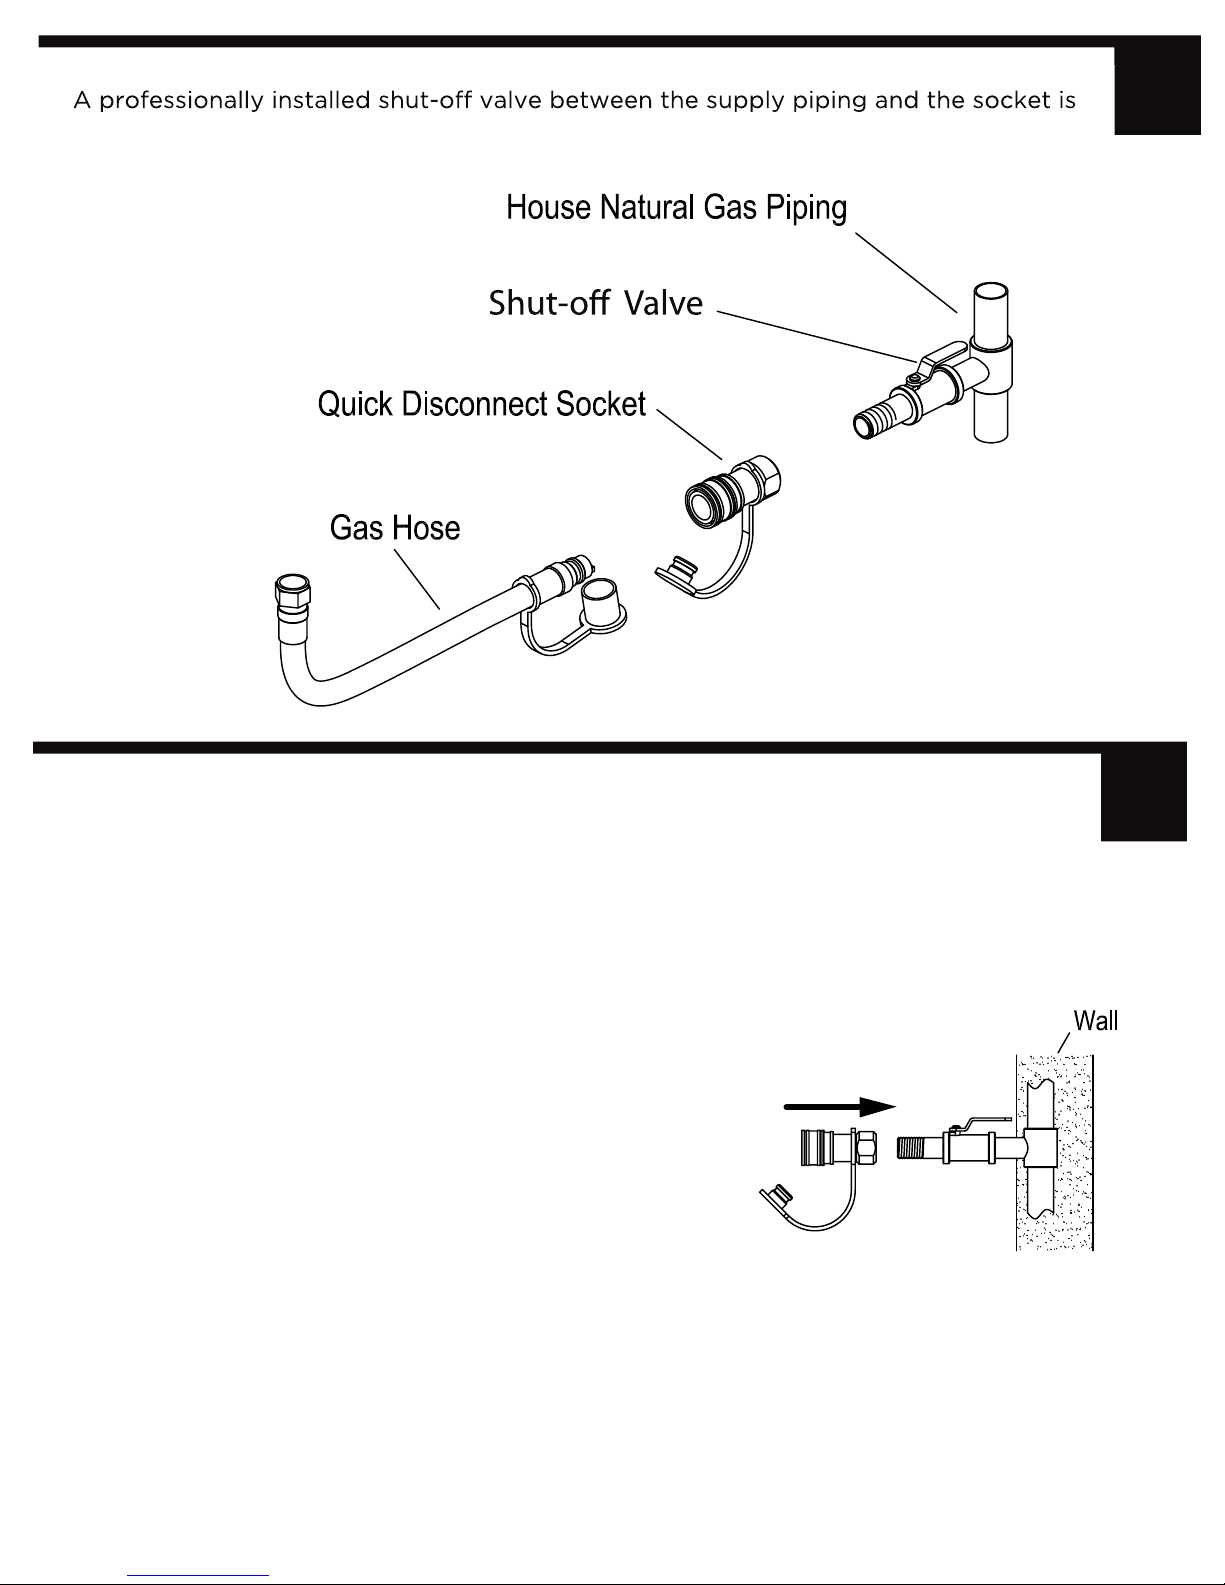
Connecting your fire table to the Natural Gas source
recommended by the National Fuel Gas Code. Socket connection must be made
outdoors.
5
Connecting the Socket
Coat the gas supply pipe nipple with gas
resistant pipe compound or approved teflon tape.
Screw socket onto gas supply pipe (house
gas source) as shown to the right, and wrench
tighten.
The quick disconnect socket should never be
connected to the fire table. Direction of gas flow is
indicated on the socket.
6
10

Using the Quick Connect Socket
7
Pull back the sleeve on the quick disconnect
socket and insert the unattached end of the
gas hose into the socket. Release the sleeve
and continue pushing the hose into the socket
until the sleeve snaps into the locked
position.
After making all connections, perform a leak
test as described on page 12 of this manual.
11
WARNING Before using this outdoor fire table, make
!
sure you have read, understand and are following all
information provided in the Important Safety Information
section of this manual. Failure to follow those instructions
can cause death, serious injury or property damage.
Prior to each gas fire table operation, check the hose and
valve for evidence of excessive abrasion or wear through
the visual check hole on the side of the base. Replace
visual check cap prior to operating fire table.
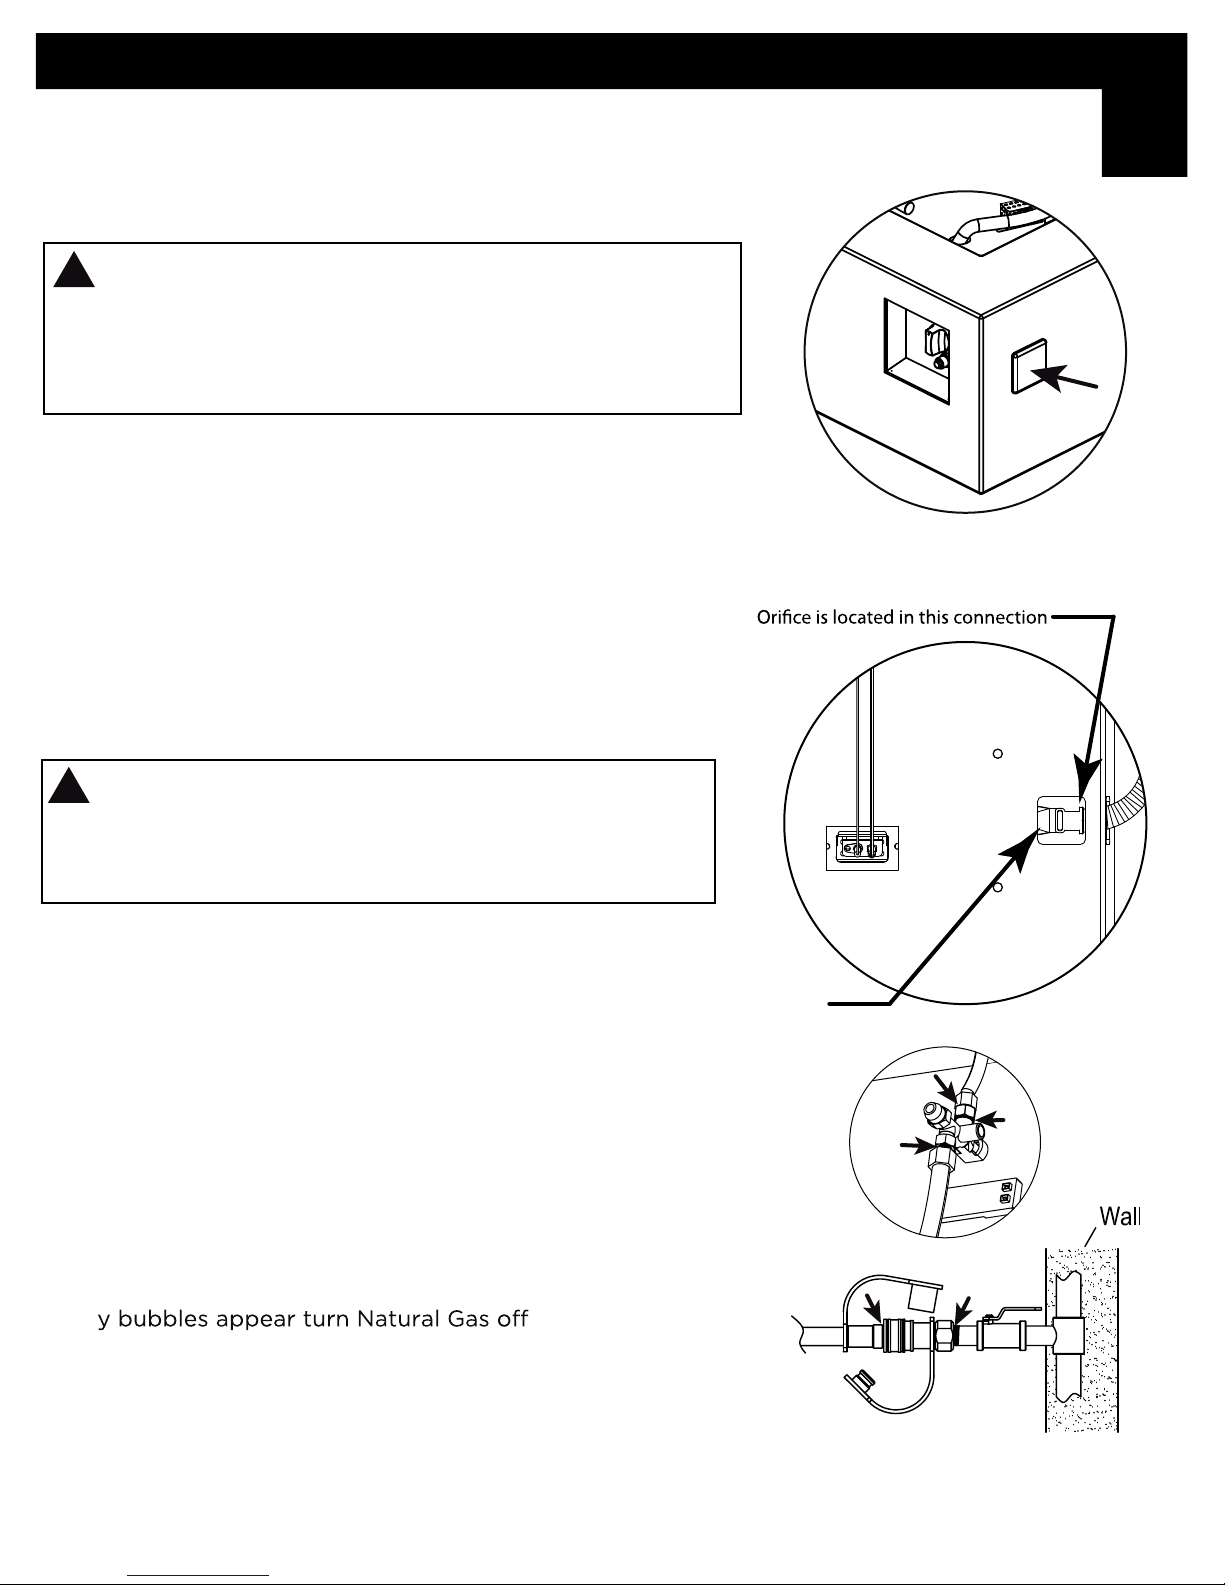
BURNER CONNECTIONS
Make sure the Natural Gas hose and quick disconnect
socket connections are securely fastened to the burner
and the gas supply. If your unit was assembled for you,
visually check the connection between the burner pipe
and orifice. Make sure the burner pipe fits over the
orifice.
Pre-Use Instructions
8
Visual check hole location
!
Warning: Failure to inspect this connection or follow
these instructions could cause a fire or an explosion,
which can cause death, serious bodily injury, or damage
to property.
Please refer to diagram for proper installation.
If the burner pipe does not rest flush to the orifice please
contact Real Flame at 1-800-654-1704 for assistance.
CHECKING FOR LEAKS
Make a leak check solution by mixing 1 part dishwashing
soap with 3 parts water in a spray bottle.
Ma
ke sure control knob is “OFF.” Then, turn Natural Gas
on at its source.
Spray leak solution on valve connections paying particular
attention to the areas indicated by arrows.
If an
re-test. If you continue to see bubbles after
several attempts, disconnect Natural Gas source and
contact Real Flame® at 1-800-654-1704 for assistance.
, reconnect and
Burner Pipe
If no bubbles appear after one minut
wipe
away solution and proceed.
e turn source OF
F,
Check for leaks at these locations
12
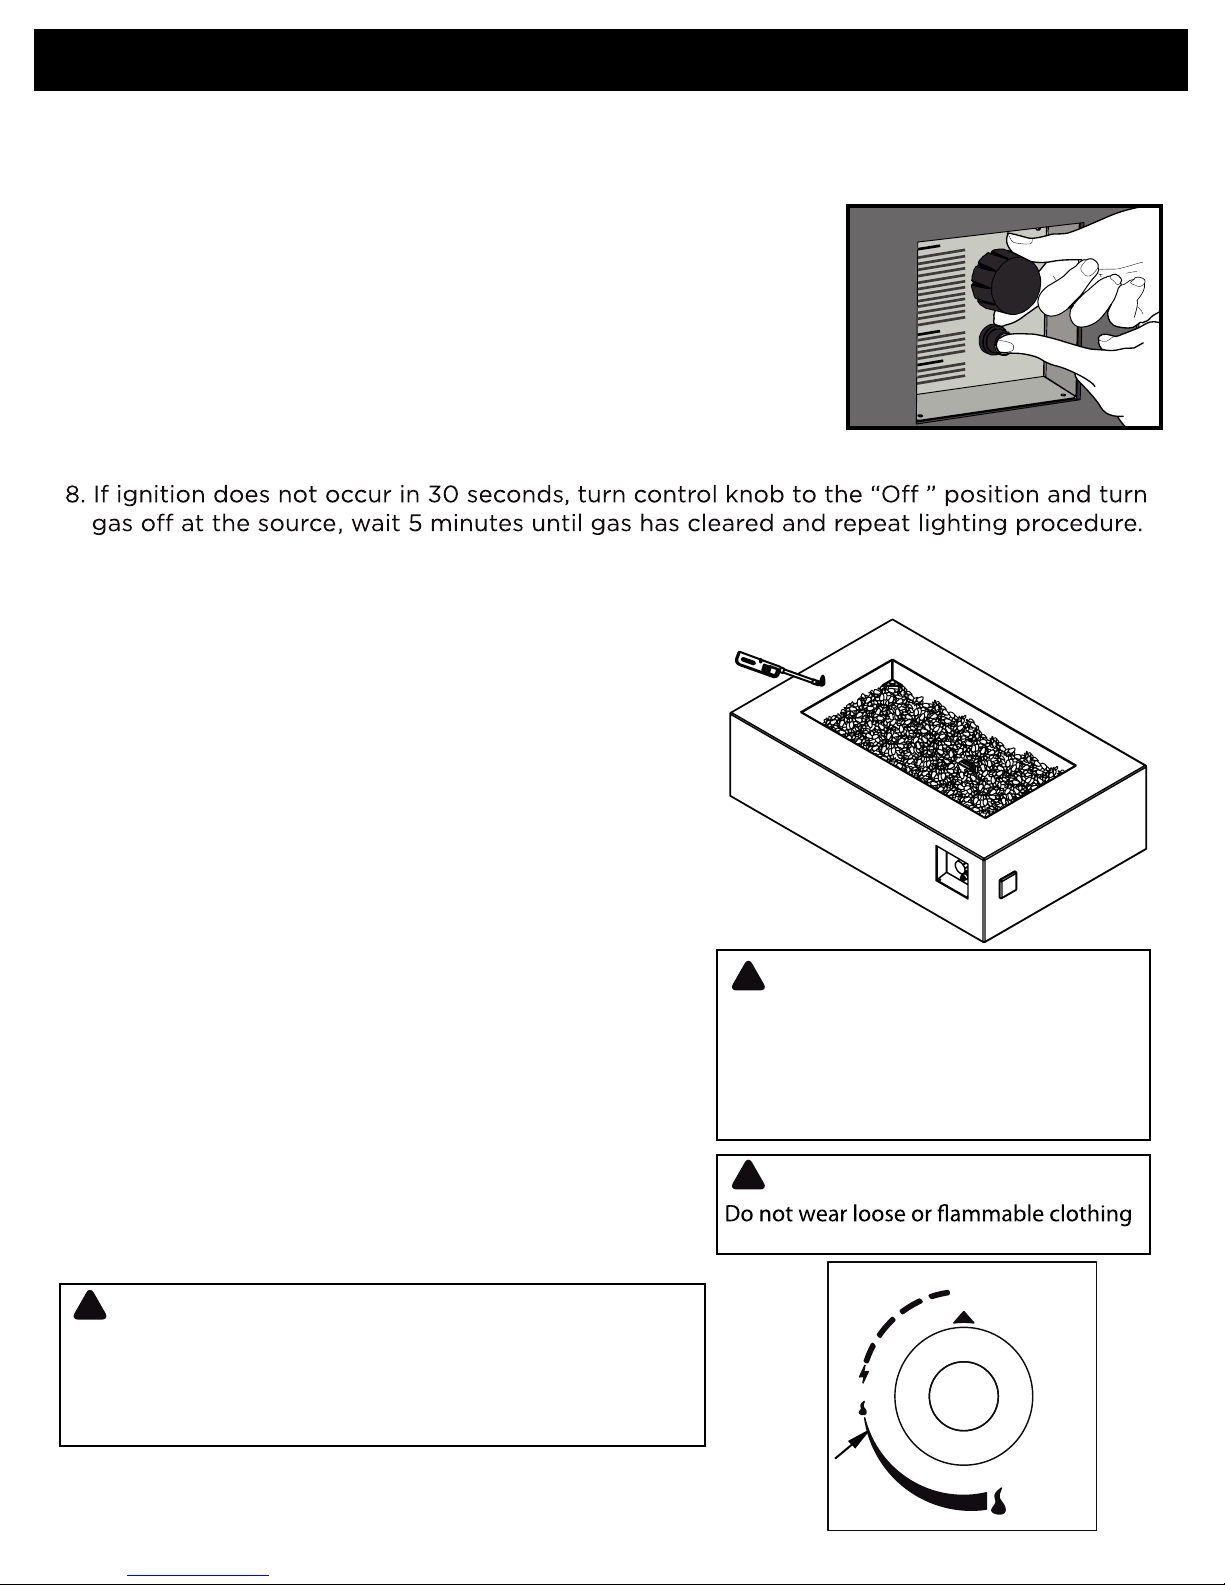
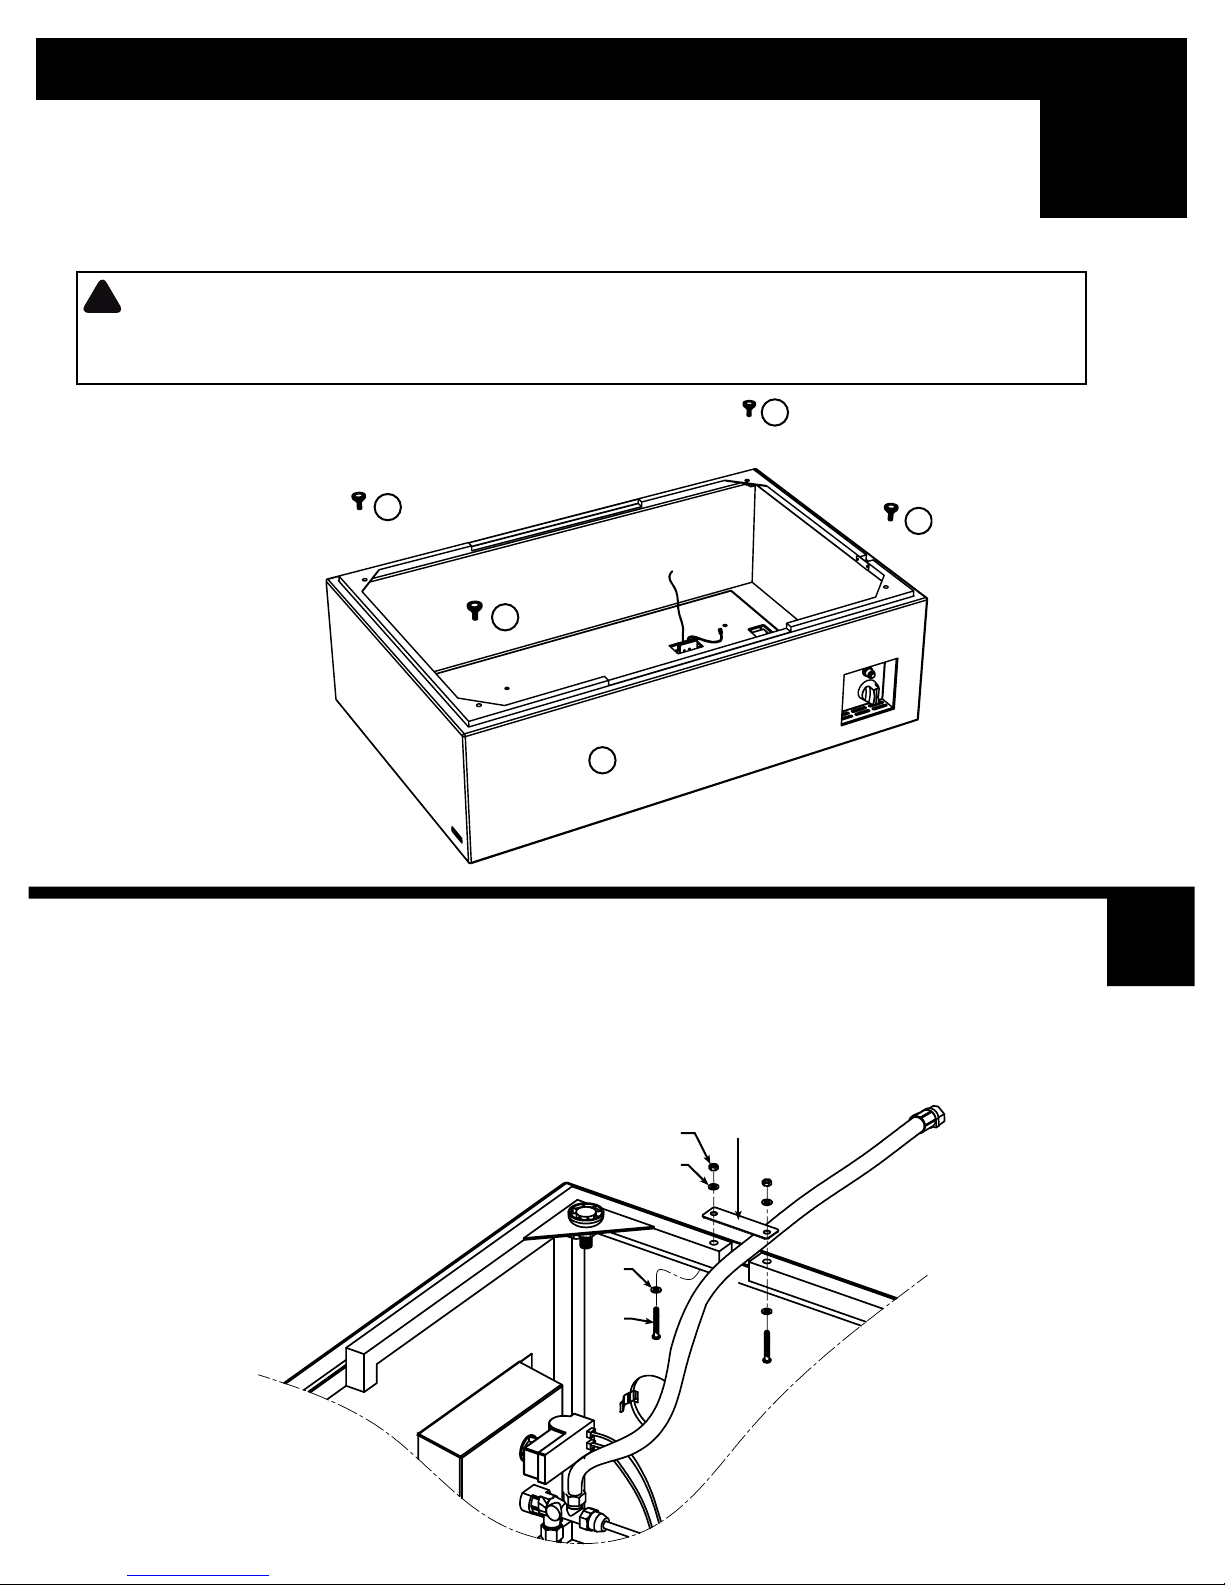
LIGHTING INSTRUCTIONS
Using the Igniter
1. Read and understand all operating instructions before lighting. Ensure that all protective
film has been removed from stainless burn tray prior to lighting.
2. Burner control knob must be in the “OFF” position.
3. Connect Natural Gas source (see above pages).
4. Open the Natural Gas supply to the unit.
5. Push and hold igniter button to create sparks.
6. While holding the igniter button with one hand, use
your other hand to push and turn the control knob
to the “LIGHT” position to light the burner.
7. Keep Burner Control Knob pressed in for 15-30 seconds after ignition.
After lighting, rotate the Burner Control Knob counter clockwise to “Low” setting.
Observe flame, make sure all burner ports are lit. Flame height should be no higher than
13 inches tall.
10. Adjust the flame to the desired height with the
control knob.
Using a
Long Match or Lighter
1. Prior to lighting, use a shovel to move
the lava rocks for access to the burner.
2.
Wearing heat resistant gloves, position
the burning long match or burning butane
lighter near the side of the burner. DO NOT
lean over the firetable while lighting!
3. Turn control knob counter clockwise to “LIGHT”.
4. Remove long match/long butane lighter.
5. After lighting, use a shovel and heat resistant
gloves to carefully move the lava rocks back
into their proper position.
69..
After lighting, rotate the Burner Control Knob
counter clockwise to “Low” setting.
Observe flame, make sure all burner ports are lit.
Flame height should be no higher than
13 inches tall.
7. Adjust the flame to the desired height with the
control knob.
WARNING
!
When using this method to light
your fire table use heat resistant
gloves and follow the step by step
instructions. Failure to do so could
result in severe injury.
WARNING
!
while lig
hting Fire Table.
Control Knob
!
WARNING
If burner flame goes out during operation,
immediately turn the control knob “OFF” and let the
gas clear a minimum of 5 minutes before attempting
to re-light the fire table.
Please refer to the trouble shooting pages for
additional support, beginning on page 17.
13
LIGHT
LOW
PUSH
IN
Care and Cleaning
Inspecting
product life.
WARNING
!
1. Check the burner to make sure it is securely in place.
2. Check the
3. Check all gas connections for leaks.
4. Check ignition system to insure proper sparking.
5. Check components for any signs of damage, rust or excessive wear.
6. If damage to any component is detected, DO NOT operate until the proper repairs have been made.
!
WARNING DO NOT tamper with this appliance. This is DANGEROUS and will void the warranty. Any part found
to be faulty must be replaced with an approved part, conrmed by the manufacturer. For technical support or
replacement parts contact Real Flame at: 1-800-654-1704.
General Care and Cleaning
!
W
ARNING
cool to the touch.
DO NOT use oven cleaner or abrasive cleaners as they will damage this product.
venturi tube to make sure it is clear and free of insects, spider nests and other debris.
DO NOT USE SOLVENTS while in closed spaces or while smoking.
Table
1. Wipe exterior surfaces with a mild dishwashing soap or baking soda, then rinse clean with water.
Stainless Steel
1. For general cleaning use warm water, soap, ammonia, or detergent apply with a soft cloth or sponge.
2.
3. For stubborn stains and discoloration use 3M Stainless Steel Cleaner and Polish, Allchem Concentrated Cleaner,Samae,
Twinkle, Cameo Copper Cleaner, Liquid Nu Steel, Copper’s or Revere Stainless Steel Cleaner, apply using a soft cloth in
the same direction of the polish lines.*
4.
wiping should be done in the direction of polish lines.
* Use of proprietary names is intended only to indicate a type of cleaner and does not constitute an endorsement. Omission of any proprietary cleanser does not
imply its inadequacy. All products should be used in strict accordance with instructions on package.
Storage:
!
WARNING
1.
3.
4. Store in a cool, dry location away from children and pets.
14
GAS COMPONENT CONNECTION CHECKS
If the burner will not light or stay lit, please perform the following checks.
1. Make sure the electrode wire is correctly connected.
Both electrode wires must be fully inserted into the igniter box.
2. Make sure that the pilot housing is unobstructed.
Clear any debris on top of the pilot housing and make sure there is no debris
between the igniter pin, thermocouple and the burner tube.
Pilot Housing
Burner
Tube
Do not block
opening
CORRECT
INCORRECT
15
GAS COMPONENT CONNECTION CHECKS
Thermocouple
5mm
Igniter Pin
3. Make sure that the igniter pin and thermocouple are correctly positioned.
- The igniter pin should be pointed straight to the thermocouple.
- The thermocouple should be positioned 5mm away from the burner tube.
Valve
Thermocouple
Wire
Thermocouple Wire
Wire should
be in line
with valve
Igniter Box
Valve
4. Make sure that the thermocouple wire is correctly positioned. The thermocouple
wire should be in line with the valve.
TROUBLESHOOTING
Problem: Burner will not light using igniter
Possible Cause 1: Electrode and burners are wet.
-Wipe dry with cloth.
Possible Cause 2: Igniter battery is dead or backwards.
-Check that the AAA battery is inserted correctly in the igniter (see page 10) or replace the
battery.
Possible Cause 3: Igniter Pin cracked or broken - sparks at crack.
-Call Real Flame at 1-800-654-1704 for technical support.
Possible Cause 4: Wire loose or disconnected.
-Reference page 16, step 1, reconnect wire. Call Real Flame at 1-800-654-1704.
Possible Cause 5: Wire is shorting (sparking) between igniter and electrode.
-Call Real Flame at 1-800-654-1704 for support.
Possible Cause 6: Igniter Pin not pointing at thermocouple.
-Reference page 17, turn electrode to point at
the thermocouple.
hermocouple
T
Burner
Possible Cause 7: Bad Igniter.
-Call Real Flame at 1-800-654-1704 for
Igniter Pin
(Electrode)
support.
Problem: Burner will not light with match
Possible Cause 1: No Gas Flow.
-Check if the LP gas tank is empty. If empty, replace and refill. If the propane
tank is not empty, refer to “Problem: Sudden drop in gas flow” on the
following page.
Possible Cause 2: Coupling nut and regulator not fully connected.
-Turn the coupling nut about one half to three fourths a turn, until you
feel a solid stop. Do not use tools, tighten by hand only.
Possible Cause 3: Obstruction of gas flow.
- Check for bent or kinked hose.
Possible Cause 4: Spider webs or insect nest in the Venturi.
- Clean the venturi.
Possible Cause 5: Burner ports clogged or blocked.
-Reference “Problem: Irregular flame pattern” on the
following page. Clean the burner ports as described
there.
Burner Pipe
.
Burner Ports
Venturi
Problem: The Fire Table emits a lot of black smoke when in use
Possible Cause 1: Hose from gas fireplace is pinched.
-Make sure the hose is not pinched between the
Burner Ports
fire table and the source of the gas.
Possible Cause 2: Flame is being obstructed at burner ports.
-Make sure that the gas ports on the burner are free
of any lava rocks so that the flame can flow naturally.
For Technical Support Contact Real Flame at: 1-800-654-1704
Troubleshooting
Problem: Sudden drop in gas flow, or a reduced flame height
Possible Cause 1: Out of gas.
-Call your local gas company.
Possible Cause 2: Excess flow safety device may have been activated.
-Turn control knob to “OFF”, wait 30 seconds and light outdoor fire table. If
the control knob and the gas supply. Disconnect the quick disconnect
socket.Turn Burner Control Knob to “HIGH”. Wait 1 minute. Turn Burner
gas supply and perform a leak check at the Natural Gas connection.
Problem: Irregular flame pattern, flame does not run the full length of the burner
Possible Cause: Burner ports are clogged or blocked.
-Clean burner ports. Do this by inserting a
paperclip into each of the burner ports to
ensure they are not clogged. WARNING: Make
urner Ports
time to cool before touching it.
Problem: Flame blow out
Possible Cause 1: High or gusting winds.
-Increase flame to “HIGH” setting.
Possible Cause 2: Low on Natural gas.
-Call your local gas company.
Possible Cause 3: Excess flow valve tripped.
-Refer to “Problem: Sudden drop in gas flow”
If these trouble shooting steps are unable to resolve the problem,
please call the number listed below
For Technical Support Contact Real Flame at: 1-800-654-1704
18
 Loading...