

Real Flame 3750 Assembly Instructions Manual
Model # 3750
Churchill Corner Fireplace
Mantle Assembly Instructions
Lot:_________
3750-Churchill-JW-081511
gel replaces and accessories

2
Dust the mantel periodically as you would with any piece of furniture.
Using a soft cloth and a wood cleaner, wipe the mantel clean in the direction of the grain to minimize the
appearance of scratches and scus in the nish.
Do not use water to clean mantel. Water may cause swelling, warping or stains if allowed to penetrate the
nish of the mantel. Use protective pads or cloths whenever possible.
Avoid placing mantel in rooms with lots of humidity or where humidity could be a problem. This may cause
warping to the mantel.
Avoid direct sunlight if possible to reduce the possibility of fading the nish.
Using your Fireplace
Fireplace is designed to be used indoors, there is no need for ventilation.
Use extreme caution while burning. Some surfaces become extremely hot during use.
Before using replace, be sure you have read and understand the step-by-step instructions and warnings
included with your Gel fuel or electric rebox.
Care and Cleaning
Helpful Tips for Assembly
Before assembly carefully unpack and check for each replace piece and necessary hardware
IF ANY PARTS ARE DAMAGED OR MISSING PLEASE CALL US DIRECTLY AT:
1-800-654-1704
Prep, plan and clear your space. In order to minimize damage while assembling make sure unpacking and
assembly takes place on a carpeted surface.
We recommend to use a power screwdriver for assembly it will greatly reduce your time for assembly. BE SURE
NOT TO OVERTIGHTEN SCREWS. The wood can easily be stripped out if too much force is used.
Use two people for assembly of the mantle. Another set of hands will help tremendously with the assembly
process and will reduce the amount of time spent on assembly. If you do not have a helper, that is ok too, just
take your time and follow the instructions.
Make sure that your mantle has been properly assembled prior to use. Once you have completed assembly
you should not have any extra mantle parts. The piece will be quite sturdy and all pieces will t together
nicely. If you did not achieve ideal results by following the instructions, please contact our customer service
team at 1-800-654-1704 and they will help answer any questions or concerns about the assembly process.
3
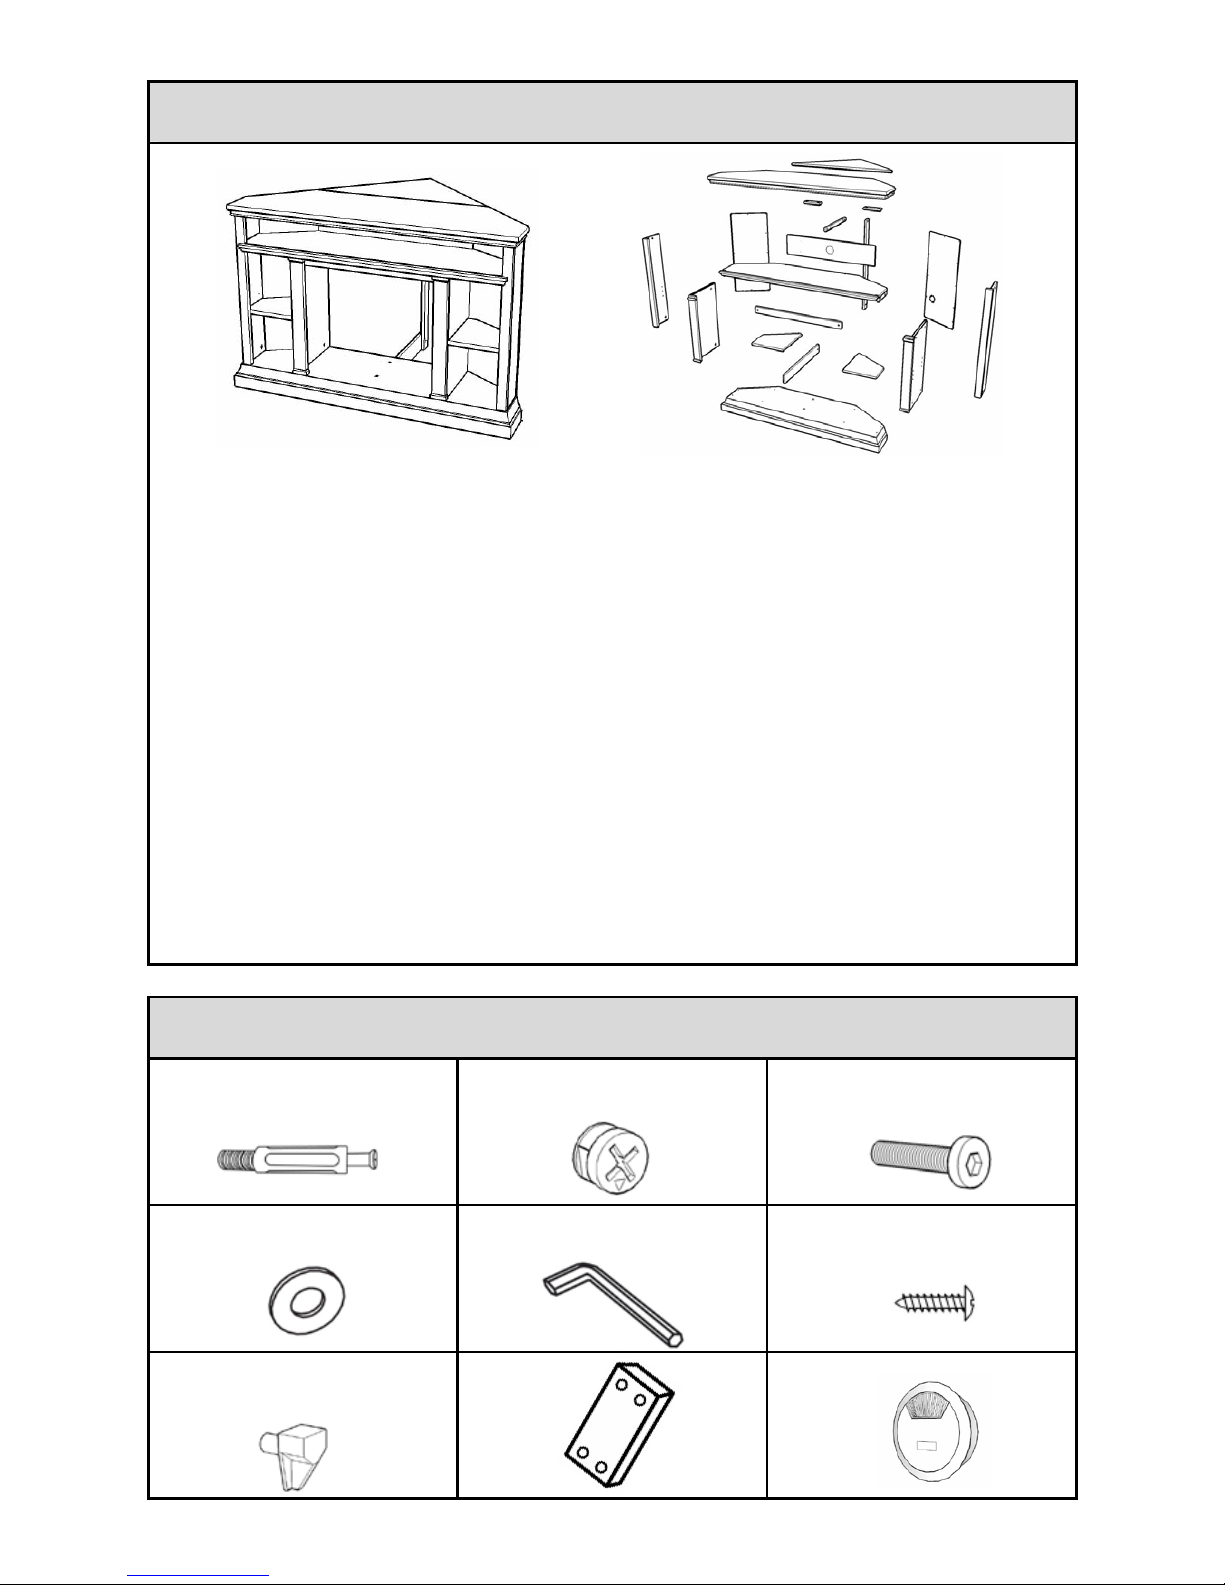
PARTS LIST
HARDWARE KIT - 37500017
A x 16
3 in 1 Bolt
B x 16
Excenter Fitting
C x 22
Long Allen Screw
D x 18
Washer
E x 1
Allen Wrench
F x24
Back Panel Screw
G x 8
Shelf Panel Support
H x 2
MDF Board
I x 1
Hole Cover
1
2
3
4
5
6
7
8
9
10
12
11
13
13
14
16
15
Number Description Dark Espresso Oak Quantity
1 Base Panel 37500301 37500601 1
2 Left Outside Panel 37500302 37500602 1
3 Right Outside Panel 37500303 37500603 1
4 Left Inside Panel 37500304 37500604 1
5 Right Inside Panel 37500305 37500605 1
6 Upper Firebox Trim 37500306 37500606 1
7 Center Shelf Panel 37500307 37500607 1
8 Top Back Panel 37500308 37500608 1
9 Top Front Panel 37500309 37500609 1
10 Top Corner Panel 37500310 37500610 1
11 Right Back Panel 37500311 37500611 1
12 Left Back Panel 37500312 37500612 1
13 Shelf Panel 37500313 37500613 2
14 Base Panel Support 37500014 37500014 1
15 Top Panel Support 37500015 37500015 1
16 Corner Mantel Support 37500016 37500016 1
17 Hardware Kit 37500017 37500017 1

4
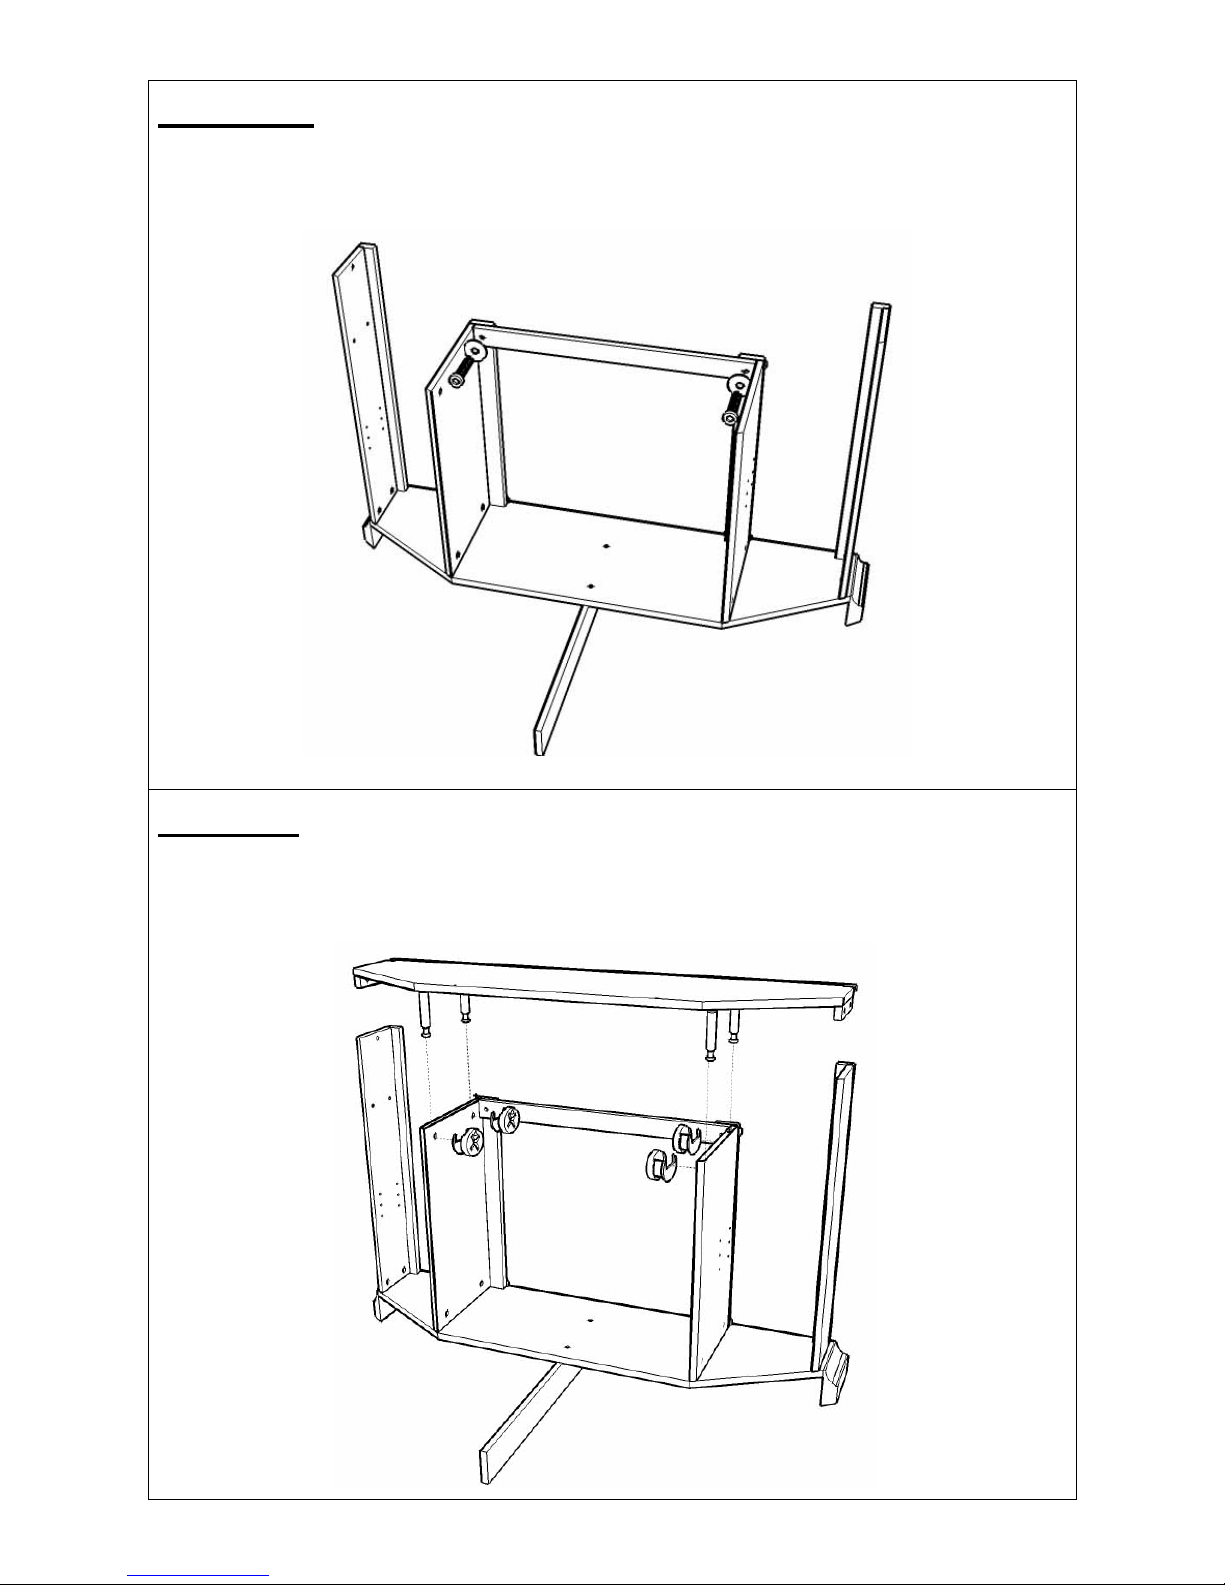
Step One
-Screw eight 3-in-1 bolts to base panel (1).
-Join base panel support (14) with base panel (1) by securing 2 long allen screws.
-Screw four 3-in-1 bolts to center shelf panel (7).
Step Two
-Set base panel (1) on a at surface as shown.
-Join panel (2), (3), (4), (5) by inserting 8 bolts in the holes of the four panels. Using 8 excenter
ttings to lock the bolts.
1
14
7
A
C
A
1
2
4
5
3
B
5
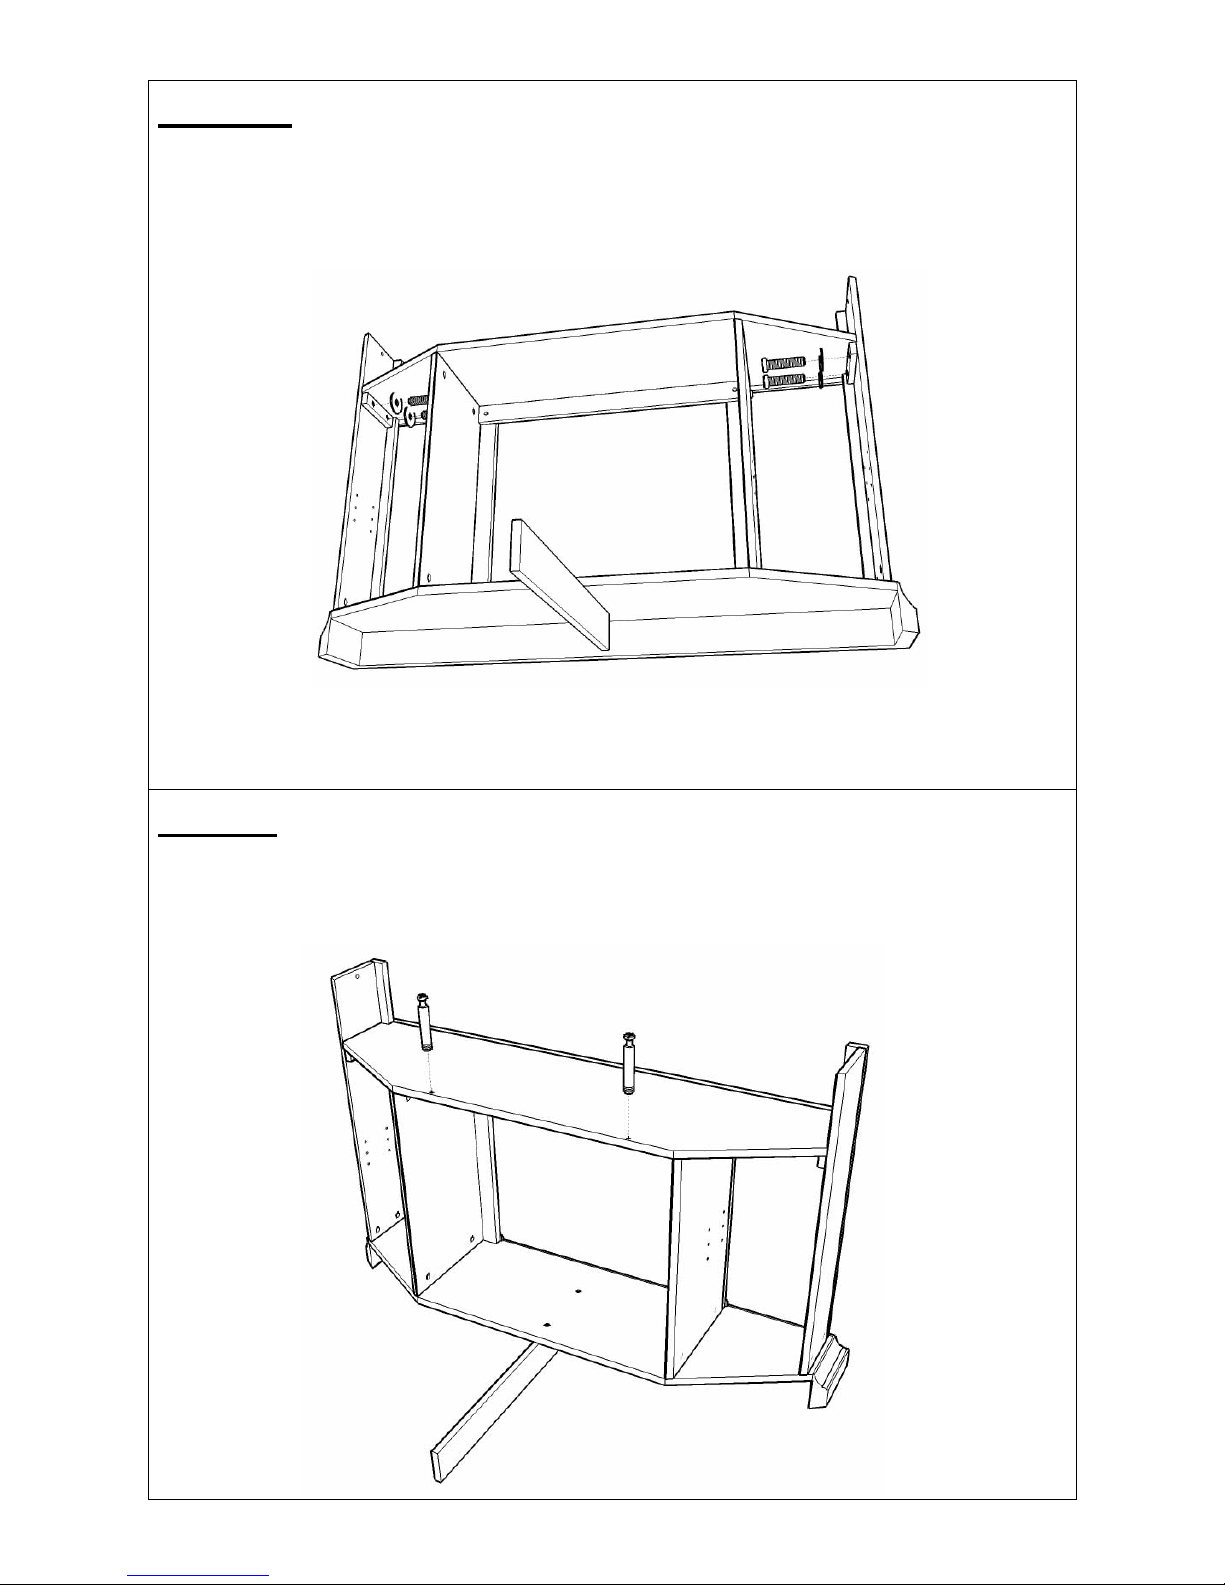
Step Three
-Attach upper rebox trim (6) to inside panel (4) & (5) by securing 2 long allen screws through 2
washers.
Step Four
-Locate center shelf panel (7) to above nished parts.
-Join inside panel (4) & (5) by inserting 4 bolts in the holes of the two panels. Using 4 excenter
ttings to lock the bolts.
6
5
4
C
D
5
4
2
3
7
B
6
Step Five
-Attach center shelf panel (7) to outside panel (2) & (3) by securing 4 long allen screws through 4
washers.
Step Six
-Screw two 3-in-1 bolts to center shelf panel (7).
2
3
7
C
D
7
A
 Loading...