

Page 1

Shogo User Manual
SG 080/SG 081A/SG 081
Copyright
Realease Ltd., 2008
All r ights reserved
This document is published by Realease Ltd., without any warranty. The information in this document may
change without notice due to typographical errors, inaccurate information, or improvement to programs
and/or equipment. Such changes will be incorporated into new editions of this document by Realease Ltd.
Trademar k
SHOGO is a registered trademar k of Realease Ltd. Other product and company mentioned herein maybe
the trademarks of their respective owner s
Page 2

Shogo User Guide
SG 080/SG 081a/SG 081
Table of Content
. Getting to know your
Shogo and Start up
1.1 What’s included in Shogo Package 2
1.2 Shogo overview 3
1.3 Starting up your Shogo 4
1.4 Connecting to the Internet 5
1.5 Registering your Shogo 7
1.6 Update Shogo content 8
2. Viewing pictures from Shogo
2.1 VViewing pictures from memory card 9
and USB-flash drives
2.2 Viewing pictures from the Internet 0
2.3 Previewing of photos 0
2.4 Previewing and managing photos
from Internal Memory
2.5 Slideshow setting and playing 2
3. Playing MP3 Music 3
4. Changing Shogo settings
4.1 Settings / Network 4
4.2 Settings / Update 4
4.3 Settings / Language 4
4.4 Settings / Slideshow 4
4.5 Settings / Screen 5
4.6 Settings / Sound 5
4.7 Settings / Power Management 5
4.8 Settings / Date and time 5
4.9 Settings / Startup 5
4.10 Setting / Systems upgrade 6
4.11 Settings / Support 6
4.12 Settings / USB Slave 6
5. ShogoLive
5.1 Managing ShogoLive Content 7
5.2 Adding new photo albums 8
5.3 Adding Weather channel 20
5.4 Adding Internet Radio Stations 22
5.5 Shogo dashboard 24
5.6 Adding Shogo Authors 25
5.7 Adding Shogo Friends 26
6. Appendix
• Shogo specifications 28
• Safety and maintenance 29
• Limited Warranty 29
• End User License Agreement 30
• Regulatory 32
Page 3

2
. Getting to know your Shogo and Start up
. What’s included in Shogo Package
Shogo User Guide
SG 080/SG 081a/SG 081
Page 4
3
Shogo User Guide
SG 080/SG 081a/SG 081
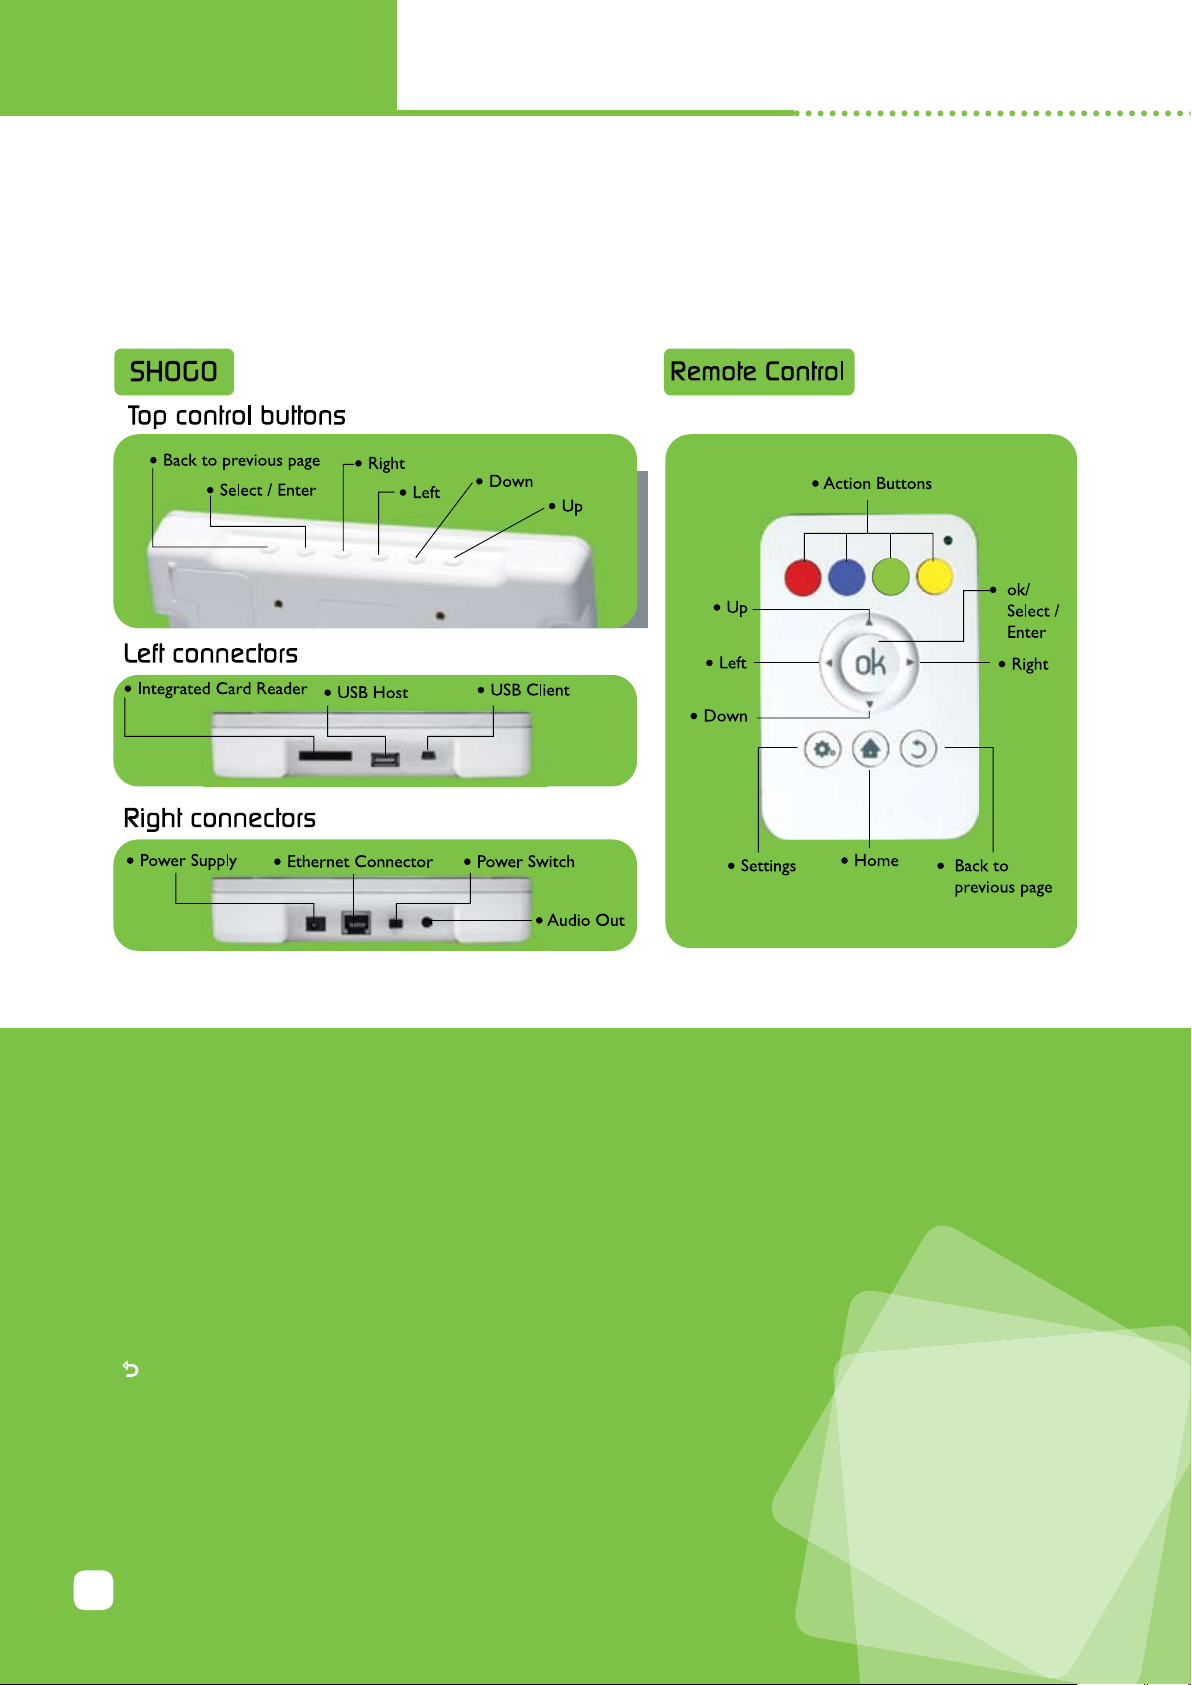
.2 Shogo overview
. Getting to know your Shogo and Start up
Action buttons and touch screen control
In this user manual, all action buttons mentioned are the buttons on the remote control. If you have purchased our
touch screen models (SG 080/SG 081), you can also perform the same action by touching the color action buttons,
up/down and “ok” buttons on screen and/or use top control buttons on Shogo. In touch screen Shogo, the Home
Settings and back buttons are also available at the bottom of the screen.
You can also use the top control buttons to perform p / q / t / u, select “oK” or
“
O” functions. On your touch screen, except in the home page, touch the top icon to
bring you back to the previous menu.
Page 5
4
.3 Start up your Shogo
. Getting to know your Shogo and Start up
Shogo User Guide
SG 080/SG 081a/SG 081
Important note before starting up - SG 080 model comes with a built-in battery, please fully charge the battery
continuously for 12 hours before starting up. To recharge the battery, it normally takes more than an hour.
Page 6

5
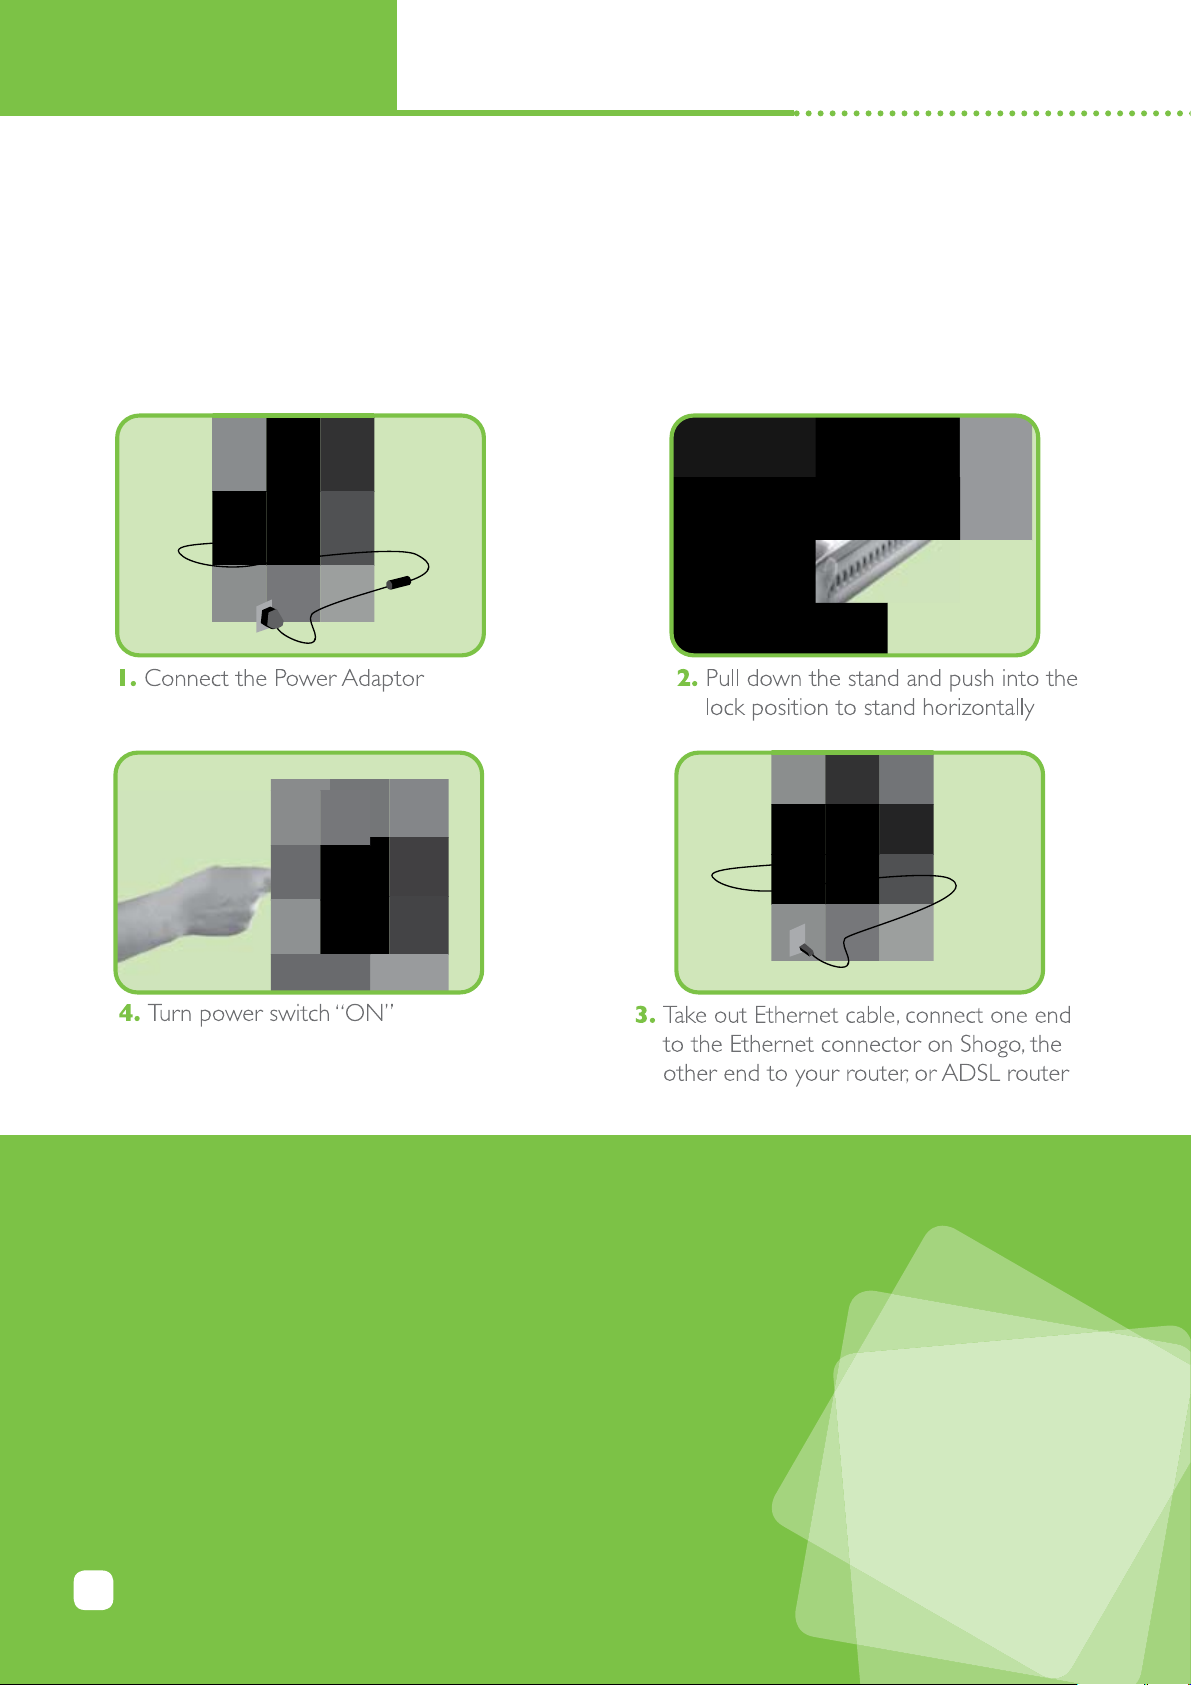
After turning power ON, a self-running
demo will start automatically. Press the
“O” button to start running the setup
process.
To run set up
• Press
for Run Setup
• Select Language
• Accept Software License Agreement
• Press
to Enter the world of Shogo
After Initialization, here you will see the
Home Page of Shogo.
. Getting to know your Shogo and Start up
Shogo User Guide
SG 080/SG 081a/SG 081
At the bottom of the screen, shows the status bar
Status Bar description
Clock – Display real time clock
WiFi Signal Level -
– Full Signal level
– No WiFi Signal
Battery Level –
– Battery fully charged
– Low battery level
– Charging battery
Settings
Home
Back
– Press to go to
Settings page*
– Press to go to
Home page*
– Press to go to
Previous page*
*Navigation button for touch
screen model only
Sleeping mode:
You can turn Shogo into sleeping mode by pressing
to just turn off the screen, press
any button on the frame or remote, or touching the screen to turn screen on again.
Page 7
6
Shogo User Guide
SG 080/SG 081a/SG 081
Note on Encryption standard:
Shogo supports both WPA 1&2 and WEP encryptions for WiFi network. It is always recommended to use WPA router for better security. For WPA
encrypted network, type in your password (case sensitive) based on the instructions described.
However, if you have a WEP encrypted router, Shogo will present a Hexadecimal keyboard (only allow input of 0-9, A-F) for you to enter the password.
There are two type of WEP password, 64 bit requires 10 digits hexadecimal paswword and 128 bit requires 26 digits hexadecimal password.
Shogo will detect the type of router encryption (WPA or WEP) automatically.
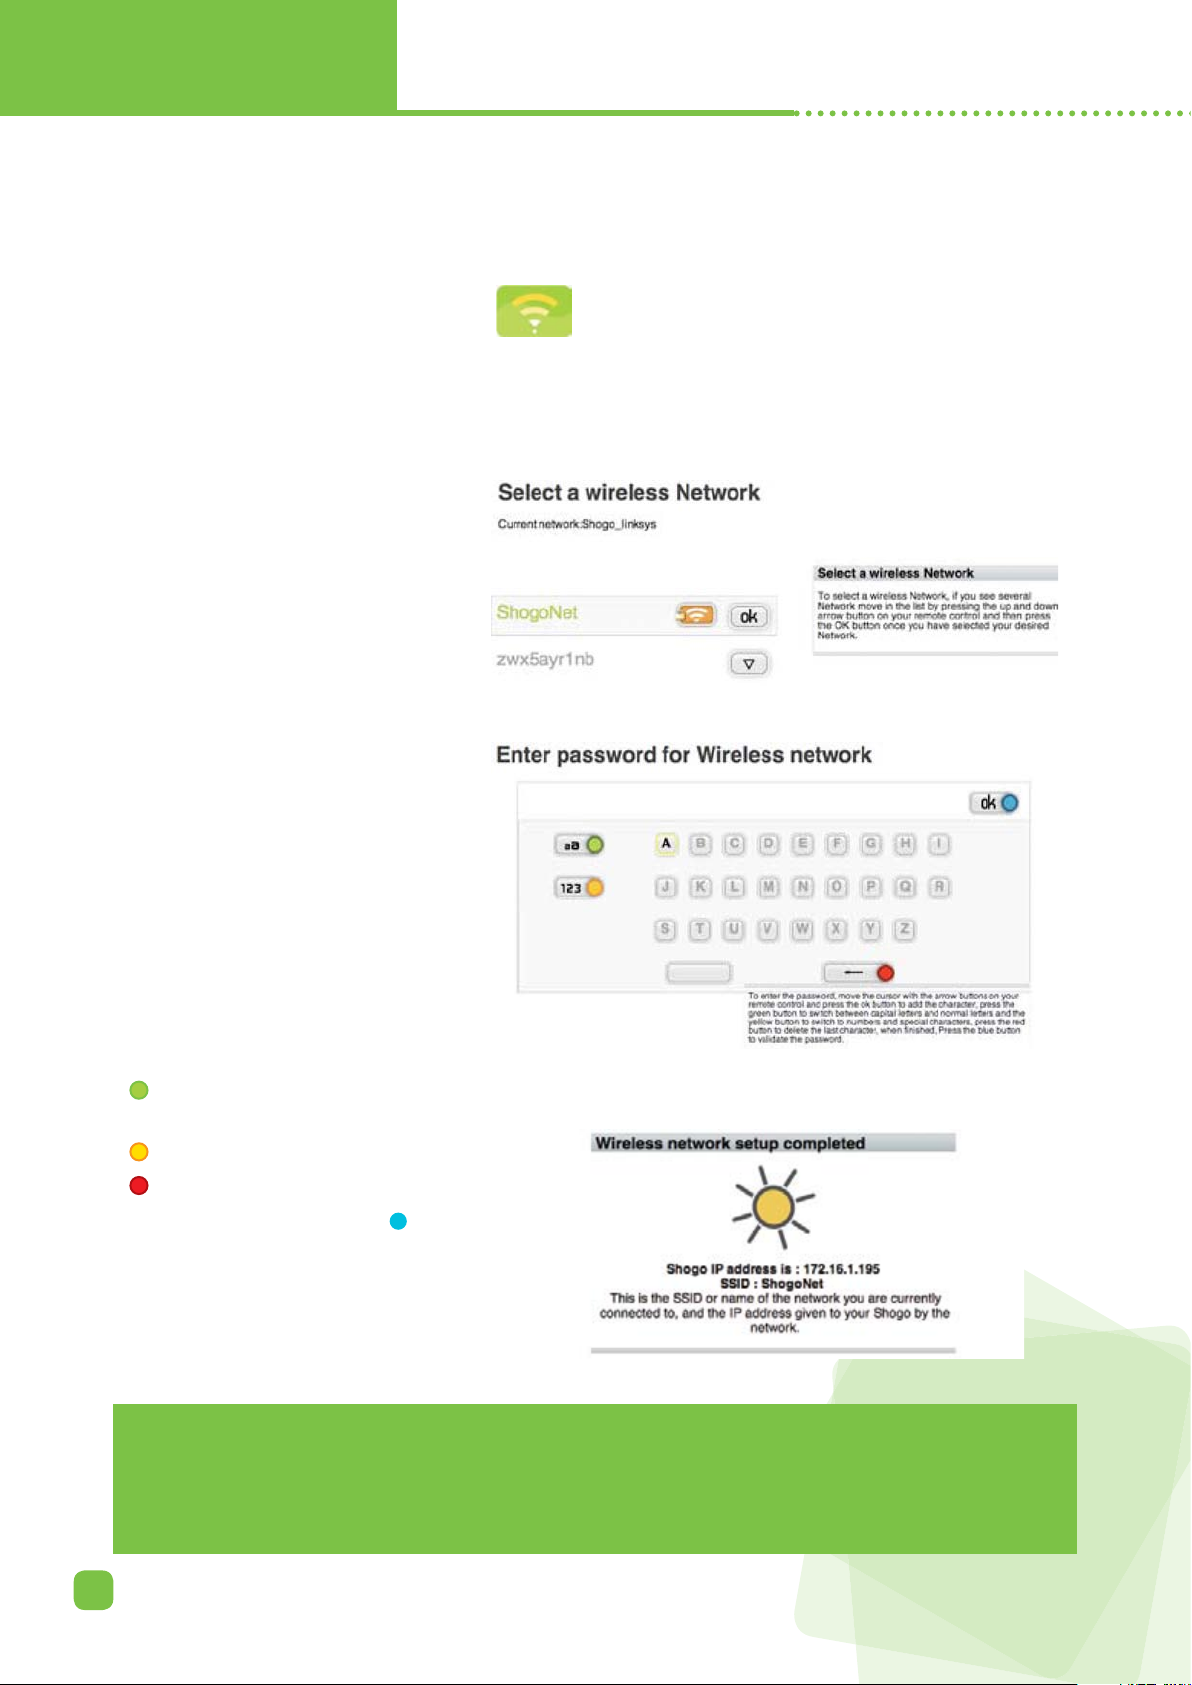
Shogo will confirm successful connection to your WiFi network by showing -
Wireless network setup completed.
Press “Home” on the remote control to continue.
.4 Connecting to the Internet
Connecting to WiFi network
Press “Settings” button on the Remote
Control, Shogo will start scanning
available WiFi networks
Once a wireless network is detected,
the network name will be shown, press
oK to connect to it. If there is more
than one network detected, choose
your own network with p / q then
press oK.
You may also need to enter a password
to access your wireless network, to
enter the password, a virtual keyboard
will be shown. Key in your password
by choosing the letters on screen with
the “arrow” keys of your remote control,
confirm entry of each character by
pressing oK.
•
to switch back and forth to capital
letters if needed
•
to switch to numbers keyboard
•
to delete an entry
After entering the password, press
to
connect to the wireless network.
If you are using a Touch screen model,
simply key in the password from the
keypad on screen and press the color
buttons to perform the above actions.
. Getting to know your Shogo and Start up
You can connect Shogo to the Internet by connecting the Ethernet cable between your Ethernet router and the
Shogo’s Ethernet connector. The connection will be done automatically after starting up the Shogo.
Page 8
7
Shogo User Guide
SG 080/SG 081a/SG 081
.5 Registering your Shogo
To sign up www.myshogo.com as a user:
You need a PC or Mac, open a browser and go to www.myshogo.com. You must first create your myshogo.com
ID, which is a pseudonym for you to login myshogo.com (this is not Network ID nor serial number, just pick
any name, like tom, abc…, etc); a
password that you can remember
and fill in your personal particular
including an email address. Upon
completion of signing up, an email
notification will be sent to your
email account. Check your email
account and confirm the notification.
Now you can log-in www.myshogo.
com with your myshogo.com ID and
password.
The myshogo.com ID will your
personal account to manage your
Shogo and its content, you can
either be an author or administer
(see Chapter 5) for more than one
Shogo using one myshogo.com ID
and password.
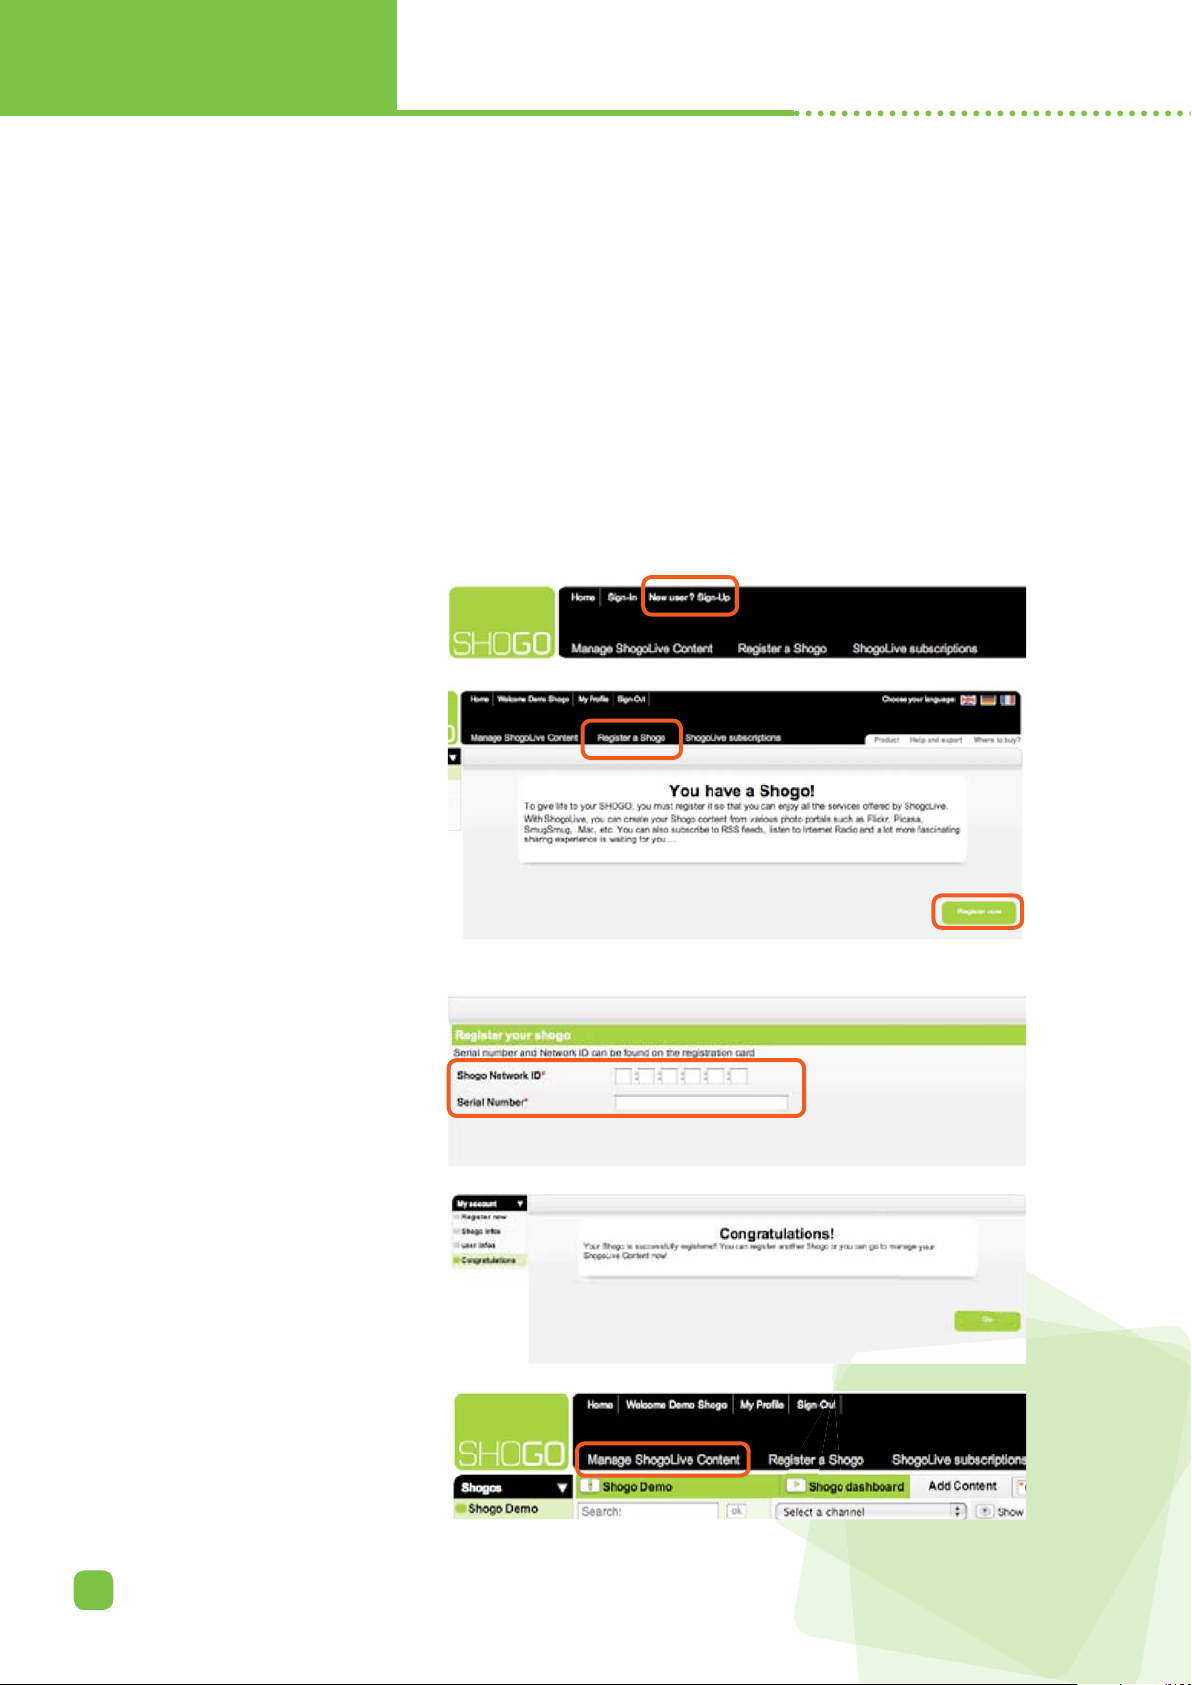
To register your Shogo:
1. Take out the registration card,
there is a serial number and a
Network ID printed on it
2. Get your PC or Mac, open a web
browser and go to www.myshogo.
com.
3. Login with your myshogo.com
ID and password (Make sure you
have created your myshogo.com
ID and password as above)
4. After sign in, click “Register a
Shogo”, then “Register Now”
. Getting to know your Shogo and Start up
(For more details, see ShogoLive on Chapter 5)
To enjoy all features of Shogo, you must register your Shogo in www.myshogo.com and subscribe to our free
ShogoLive Service, the content provisioning service for Shogo. You need to first sign up www.myshogo.com as a
user and then register your Shogo.
Page 9
8
Shogo User Guide
SG 080/SG 081a/SG 081
.6 Updating Shogo Content
After registering your Shogo, conduct a content update to download content from ShogoLive into your Shogo.
After the update, you will receive weather forecast channel, ShogoLive preloaded photo album, your newly created
albums (see Chapter 5 for detail), if any.
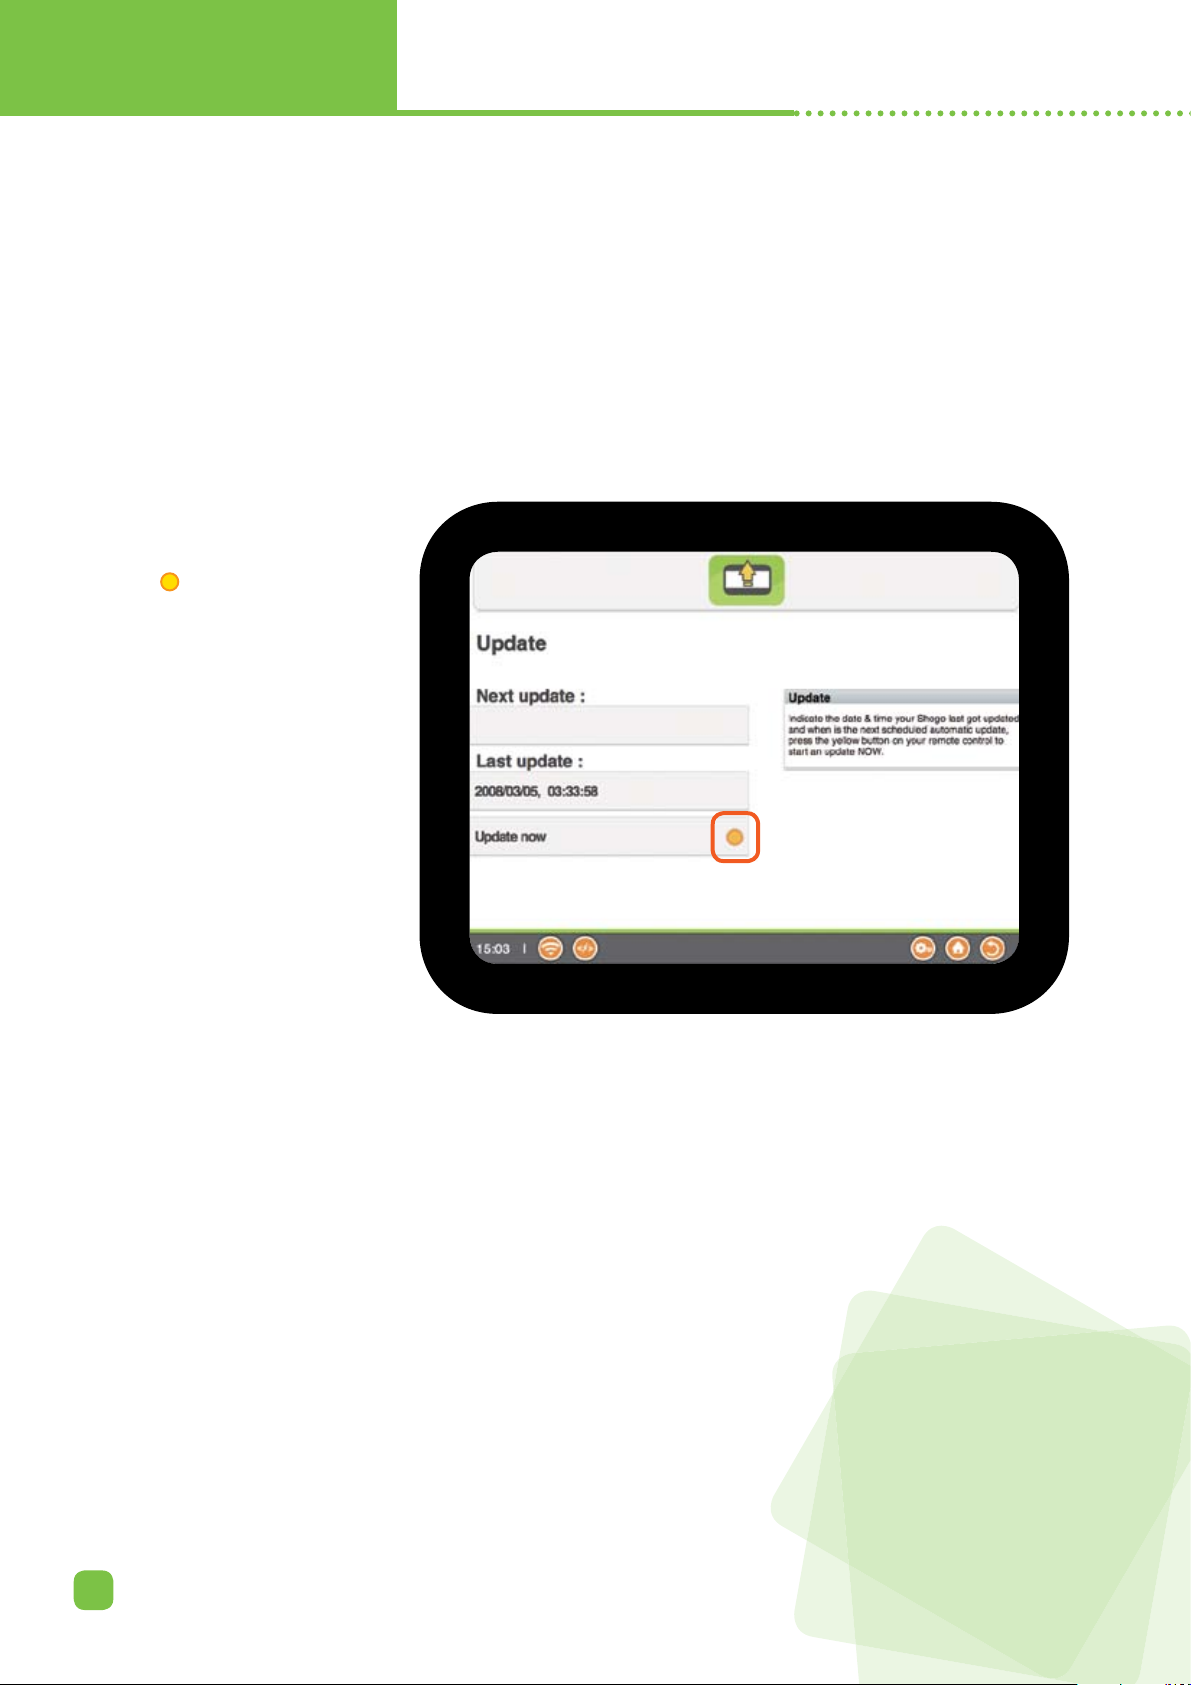
To update Shogo Content, press
Settings, then select Update.
Press
and you will receive
all the new albums and digital
content.
It may take awhile for content
updating, please wait until the
completion of update and the
Settings page will be resumed.
Go back to Home page, now you
can browse all your new photos
albums, your weather forecast
and internet radio stations if your
ShogoLive Content are ready. To
update content from myshogo.com,
please refer to Chapter 5.
Your Shogo will automatically update itself every 24 hours if it is switched on, this will take place in the background
without interrupting your usage although it might slightly slow down the operation if there is a lot of new content
to receive. If your Shogo was turned off, when you turn it on, it will check when was the last update, if it has been
more than 24 hours, it will wait 30 minutes and then start the update automatically in the background. Of course at
any time you can always do an update on-demand manually and get the latest content from myshogo.com
. Getting to know your Shogo and Start up
Page 10
9
Shogo User Guide
SG 080/SG 081a/SG 081
2. Viewing Pictures from Shogo
2. Viewing pictures from USB flash drives and Memory cards
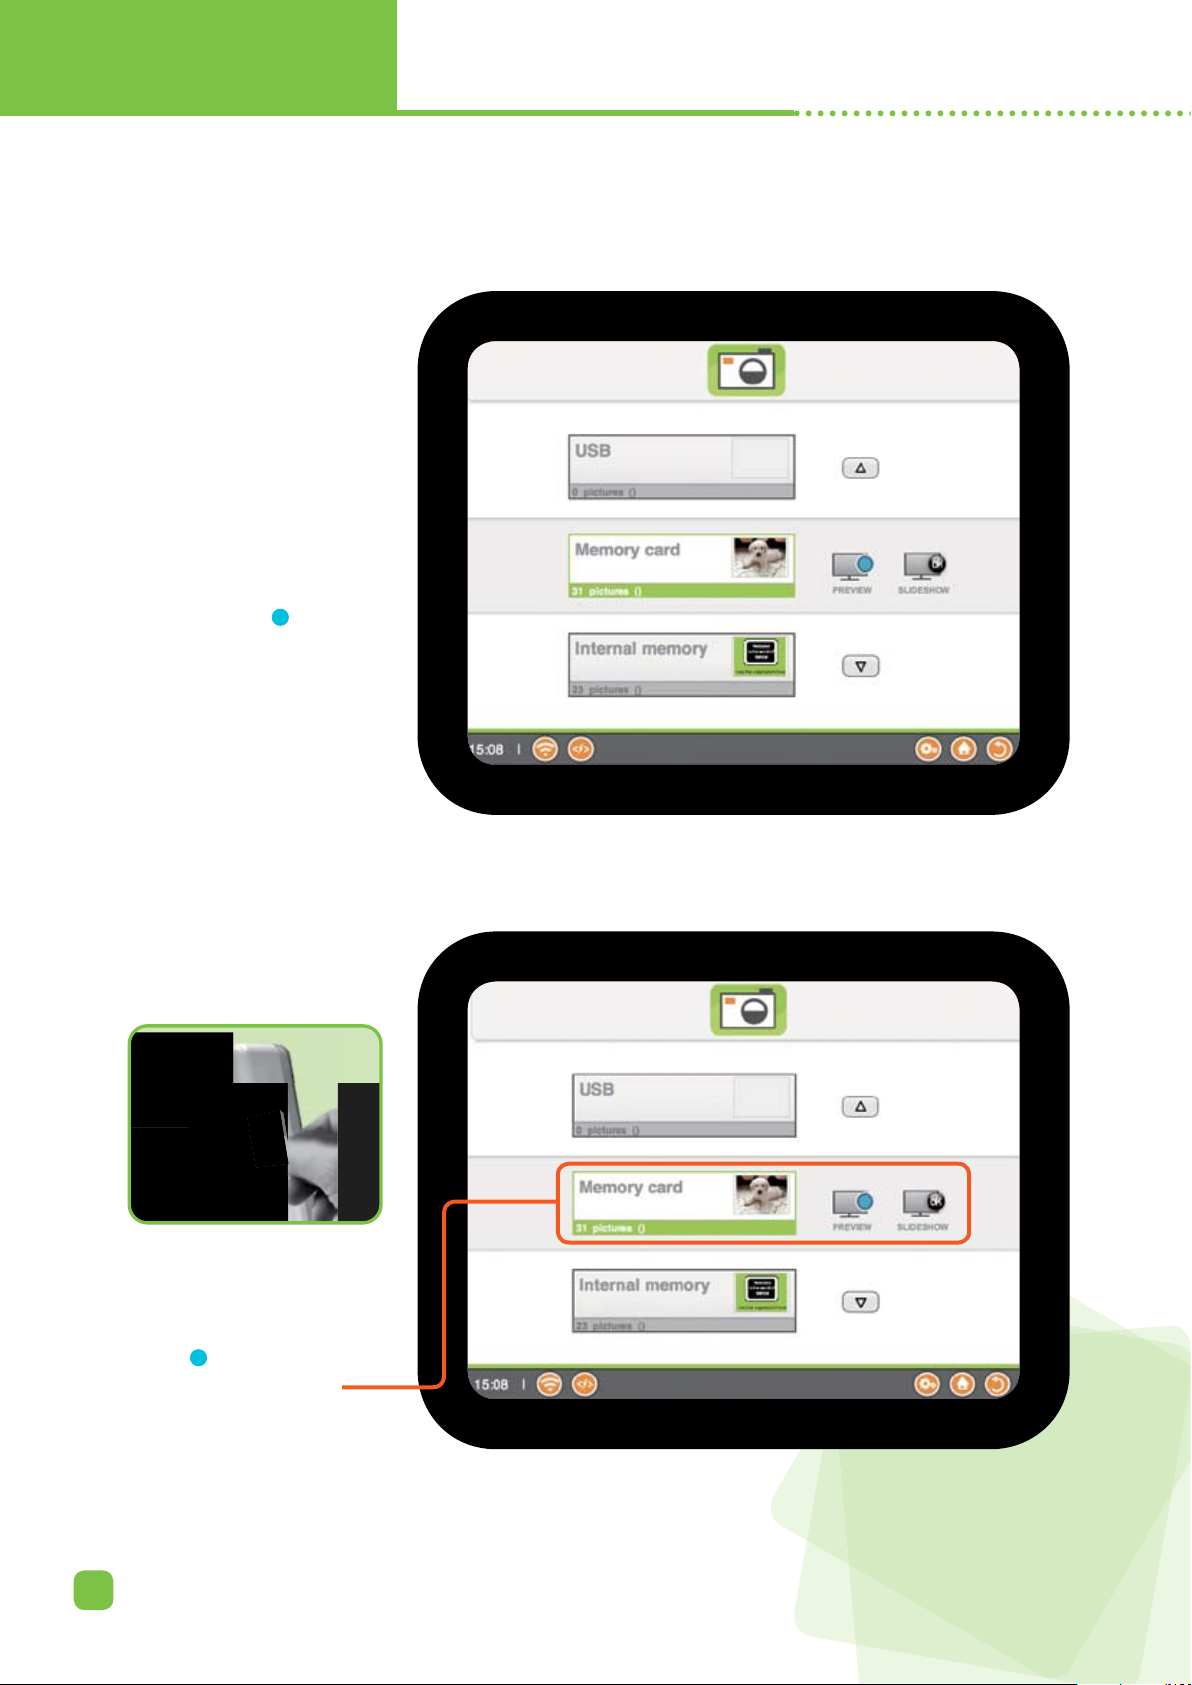
On Shogo Home, select “Photo”,
press oK and you can now
navigate all albums available with
p / q.
Albums shown in your Shogo can
be from local sources (Memory
Card/ USB flash drive) or content
from ShogoLive in the Internet,
myshogo.com. Once you have
selected your album, you can
choose to preview photos inside
the album with the
, or press
oK to play slide show directly
. Insert your memory card to
the Integrated Card Reader
or your USB flash drive to the
USB port
2. Press p / q of the remote
control or touch screen to
select Memory Card or USB
3. Press
to preview, or oK to
play slide show directly
Page 11
0
Shogo User Guide
SG 080/SG 081a/SG 081
2. Viewing Pictures from Shogo
2.2 Viewing pictures from the Internet
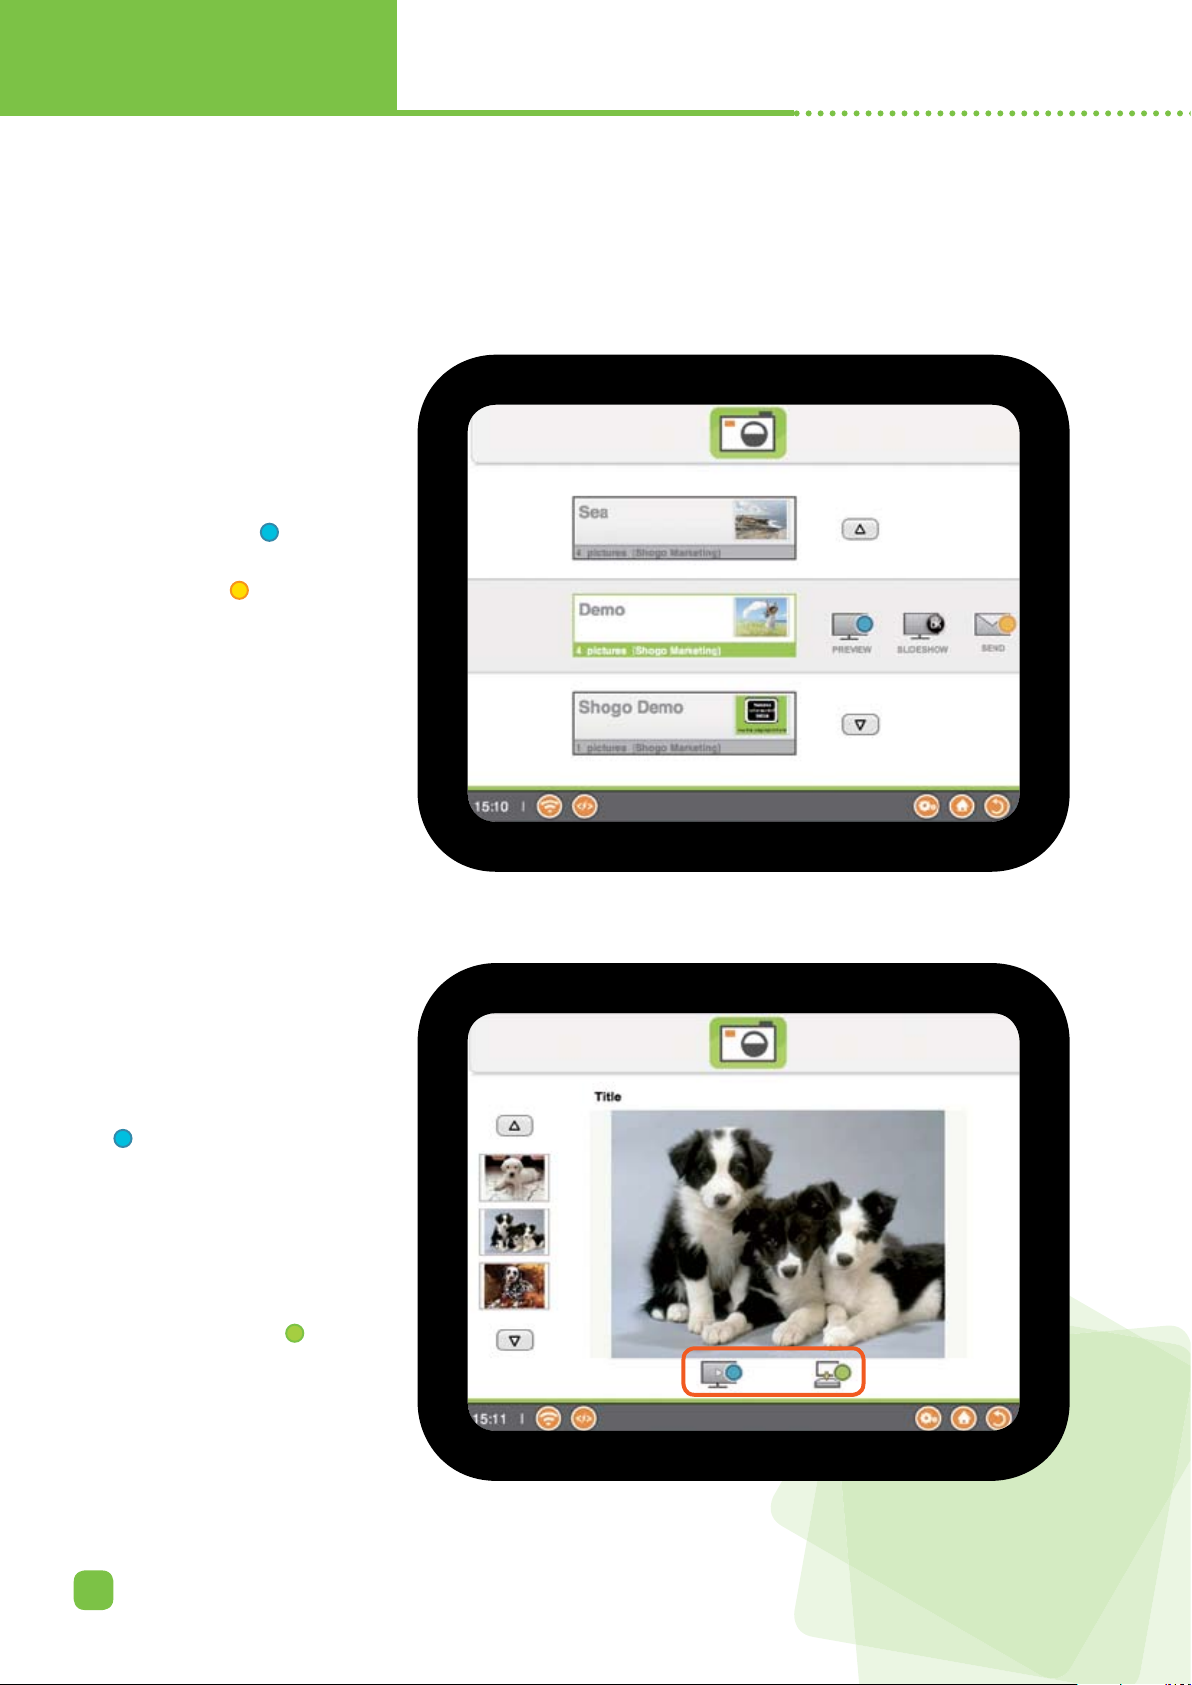
After updating ShogoLive content
from myshogo.com, all albums in
ShogoLive will be automatically
created, use p / q to navigate
the albums, press to preview.
Press oK to play slideshow
directly, press
to send to Shogo
Friend
(see Shogo Friend in Chapter 5.7)
To preview photos from an
album, use p / q of your
remote or touch screen to
navigate individual photo, press
to launch a slideshow on the
current page, or oK to preview
at full screen. Press Back to
return to preview mode. If you
are previewing picture from your
memory card or USB drive, you
can copy your picture to internal
memory by pressing .
2.3 Previewing of photos
Page 12

Shogo User Guide
SG 080/SG 081a/SG 081
2. Viewing Pictures from Shogo
2.4 Previewing and managing picture from Internal Memory
In Shogo, there is an internal
memory system that allows you to
save your pictures from memory
card of USB flash drive into your
Shogo. By performing a copy
function using , pictures from
your local memory can be copied
to Internal Memory.
There are also some preloaded
pictures in the internal memory.
To Preview of picture in internal
memory, simply browse the album
to Internal memory, press blue
action button for preview, or oK
to play slideshow directly.
To delete picture from internal
memory, go to preview mode,
press the
below the picture.
You can also copy your photos
from your PC to Internal
memory or vice versa, when
Shogo operates in USB Slave
Mode, please refer to Chapter 4.12
for detail.
Page 13

2
Shogo User Guide
SG 080/SG 081a/SG 081
2.5 Slideshow setting and playing
2. Viewing Pictures from Shogo
Slideshow settings
You can customize your slideshow
transition effect and interval by
changing slideshow setting.
To change your slideshow setting,
select Settings on main Menu, select
Slideshow, then select Transition
effect
, it will show the options
of different slideshow transition effect
• Fade
• Fusion
• Left to Right/ Right to Left
• Transition Up to down / Down to up
• Transition Inside out /Outside in
• Transition Move right / Move left
• Transition move Up/ Move down
• Transition Random
You can also customize your slideshow
transition interval, select settings on
main Menu, select slideshow, then
select interval
, you will have a
choice of interval from 3 seconds to 1
hour to 1 day.
Slideshow Playing
If you have a touch screen model, touch on the screen
during slideshow, the On Screen Display (OSD) will appear
as follows, the slide will be in “pause” mode and you can
control the playback by pressing these buttons on-screen:
|| / }} - 10 slides backward/ forward
t / u - previous / next slide
90ºQ - rotate photo
∆ - Continue slideshow
O - Back to Home page
One of the unique feature from Shogo is Auto rotate.
With Auto rotate, your frame can be positioned in
either landscape mode or portrait mode. All pictures
orientation will be adjusted automatically to the frame
position during a slideshow (but the menus will only
be displayed in landscape mode). This feature only
applies to photo album slideshow and in preview
mode
Page 14

3
Shogo User Guide
SG 080/SG 081a/SG 081
3. Playing MP3 Musics from Shogo
You can use Shogo to play your MP3 musics that are stored in your memory cards or USB Drive.
To play MP3 music:
1. Insert your memory card to the
Integrated Card Reader or your
USB flash drive to the USB port
2. Go back to home page, select
Music and press oK
3. Select USB or Memory Card and
press oK
4. The number of tracks available
will be shown, press oK to play
music directly,
to stop playing.
5.
to set this music track as
musical slideshow track.
(See Settings/ Slideshow at
Chapter 5.4)
6. Change track by pressing p / q
7. Adjust music volume by pressing
t / u
With USB Slave (Chapter 4.12),
you can also save your MP3
Musics from your PC to Internal
Memory of Shogo.
Page 15
4
Shogo User Guide
SG 080/SG 081a/SG 081
4. Change Shogo Settings
Press “Settings” button on your remote control, you can change the following Shogo settings:
4. Settings / Network
Select Network configuration
There are two ways to connect to the Internet – Ethernet and WiFi. To configure a wireless connection with WiFi,
press the blue button, for Ethernet connection with Ethernet, press the red button. (You must connect the Ethernet
cable between your Shogo and Ethernet router, see Chapter 1.4 for more details)
4.2 Settings / Update
Indicate the date & time your Shogo last got updated, and when is the next scheduled automatic update. To start a
manual update process, press the yellow button on your remote control.
Note: during the Update process, do not power off your Shogo, as it could cause losing of your
Shogo data.
4.3 Settings / Language
You can change the language of all the menus and text in Shogo, just select your preferred language by pressing the
p / q and then press the oK to confirm.
4.4 Settings / Slide show
For slideshow viewing, press on your remote control to modify interval between images, press the to select
transition effects and press to select the display modes.
• Interval
Select the time interval in between pictures, from 3 seconds to 1 day, press the p / q keys on your remote
control to select and press oK button to confirm.
• Transition Effects
Select transition effect in between pictures, left-to-right, fade and so on..., press the p / q keys to select then
press the oK button to confirm
• Musical Slideshow
To play slideshow with background music, select on with the blue action button.
The music track can be selected on Home page/ Music while playing your MP3 Music, press
when playing
the track and it will be set as the musical track for slideshow
Page 16

5
Shogo User Guide
SG 080/SG 081a/SG 081
4. Change Shogo Settings
4.5 Settings / Screen
4.6
Settings / Sound
Adjust volume for MP3 musics and Internet Radio with the t / u buttons of the remote, or “+”. “-” buttons on the
touch screen. Alternatively, you can also press the left/right arrow button of Remote control while playing MP3 or
listening to Internet Radio for volume control.
4.8 Settings / Date and Time
4.7
Settings / Battery Management
Indicate the battery level of your Shogo (for model with rechargeable battery).
Date and Time Format in the setting is:
Press p / q to adjust the entry, t / u to select the entry, press oK to confirm
Date Month Year Hour Minute
Press to modify the screen's orientation settings / to change the brightness settings / to setup display mode
Orientation
Brightness
Display Mode
Press
to enable the Auto-rotate feature, or press
for Portrait, for Landscape as
appropriate
Press “+” / “-” button on screen or t / u arrow on remote / top control buttons to adjust
screen brightness.
Choose to display picture in "full size" to avoid cropping of image or "Cropped" for full screen
Page 17

6
Shogo User Guide
SG 080/SG 081a/SG 081
4.9 Settings / Startup
You can select different mode to start up your Shogo. After switched on, it can be set up to start at the Home page,
or start a slideshow immediately.
Select how you like to start your Shogo.
– start up at the Home page – start up at last album played
– start up on the all album slideshow
– start up with all album random slideshow
4.0 Settings / System Upgrade
Your Shogo software will continue be enhanced with new features and improvements. You will be notified
whenever there is a new version of software released. Upgrading the software is easily done online, simply
connect your Shogo with Ethernet (preferably) or Wifi, make sure the power adaptor is connected, go to Settings/
System Upgrade, press to start the Shogo system upgrade. The process will normally take 3 to 5 minutes. After
completion of upgrade, Shogo will restart automatically and the new software will be applied.
Note: during the Update process, do not power off your Shogo, as it could cause losing of your Shogo data
4. Change Shogo Settings
4. Settings / Support
The Support setting screen provides you with technical information about your Shogo that might be helpful if you
request assistance to the customer service hotline.
Important information for you to refer to our service includes:
• Shogo Name • Serial Number • Network ID
4.2 Settings/ USB Slave
Shogo allows transferring of music and picture files between your PC and Shogo’s Internal memory. To do that,
Shogo need to operate in USB Slave mode.
First, go to Settings, press oK next to USB Slave mode, press to activate USB Slave Mode. Then connect Shogo
with your PC through the Mini USB port (USB Client) from Shogo to the USB port of your PC.
Under USB Slave mode, Shogo will not perform it’s function. It will only be seen as a removable drive called “Shogo”
in your PC, now you can copy your pictures or MP3 files to/from your PC into/ out of Shogo’s Internal Memory.
After the completion of USB Slave, disconnect “Shogo” drive from your PC, remove the USB cable and press to
de-activate USB Slave mode in Shogo. Now Shogo will be back to normal operation.
Picture files copied to Shogo will be available in Home Page/ Picture/ Internal Memory.
Page 18
7
Shogo User Guide
SG 080/SG 081a/SG 081
5. ShogoLive
5. Managing ShogoLive Content
ShogoLive is the backend service
in myshogo.com that keeps your
Shogo Frame as a “living” picture
frame. You can set up your Shogo
content by adding photo albums
from photo portals, such as Flickr,
Picasa, SmugMug, .Mac; listening to
internet radio stations and viewing
weather forecast. These contents
will be updated automatically in the
backend as well as with your Shogo,
which means pictures loaded into
photo accounts like Flickr will be
automatically uploaded and updated
into your Shogo once the setup of
ShogoLive is done.
You also get a new sharing
experience by inviting your friends
to be a Shogo Author that provide
content for your Shogo. In addition,
you can send your album from your
Shogo to your friends who also own Shogos, by making them as Shogo Friend.
All these exciting services are offered in ShogoLive.
To subscribe to ShogoLive, first you must sign-up myshogo.com with a
username, you should have at least one Shogo and register your Shogo (See
Chapter 1.5 – Register Shogo). ShogoLive allows users to register more than
one Shogo such that you can manage the content on behalf of your friend’s
and relative’s. By doing that, your friends/ relatives will not need to administer
its content, you will be doing the job for them as an “administrator”. (This will
be an ideal gift to you mother, she will enjoy viewing all the latest pictures from
Shogo without the need to handle the content management task in myshogo.
com, because you setup ShogoLive for her as an administer!)
As an administrator, you could be managing more than one Shogos, the Shogo
names will be shown under “Shogos”, select the name of the Shogo you want
to start adding content to.
Shogo also offers the access of ShogoLive to your friends/ relatives who can
add their albums to your Shogo by inviting them as Author (see Chapter 5.6).
After being authorized as an Author, he/she can sign-up myshogo.com with
his/her own username and password, then he/she can add content to that
particular Shogo. Again, the author can provide content for more than one
Shogo.
There are three types of content in Shogo, it includes:
- Photo Album
- Weather Forecast
- Internet Radio
You can select the type of content from “Add Content” by clicking on one of
the above icons.
Let’s start with adding Photo Album …
Page 19

8
Shogo User Guide
SG 080/SG 081a/SG 081
1. Start adding new album
Go to Manage ShogoLive Content,
click on
2. Choose the photo portal
Click “Add Sources” , select one
of these photo portals – Flickr,
.Mac, Direct RSS (for photos sites
only), SmugMug, Flickr Tag or
Photobucket. You have to make
sure that you own an account in
one of these portals, otherwise, you
need to first create the account and
put pictures into this account.
(If you are managing more than
one Shogo as an administrator or
offered the right to add content to
your friend’s Shogo as an author,
you can switch to different Shogo
to add content to by clicking on t
(Shogo name) u on the green bar,
select the Shogo that you want to
add content this time)
3. Add Photo Portal’s account to
ShogoLive
If you have selected Flickr, click
“add account” and type in your
Flickr account name. (This is the
same for all other photo portal,
select the relevant portal under
“share what, and then “add
account). Click “Create”, the
account name will be added as a
“Source”.
5. ShogoLive
5.2 Adding new photo album
ShogoLive allows users/ administrators/ authors to download pictures from photo portals such as Flickr or Picasa. Once
you created a new photo portal account in “My Sources”, you will be able to select any albums from that photo account
and add them into ShogoLive. Select the Shogo you want to add content to – under “Shogos” (if you have more than one
Shogo as an administrator, or author)
Page 20

9
Shogo User Guide
SG 080/SG 081a/SG 081
4. After adding the new account,
the name of the account will
then appear under “My Sources”
5. Add photo album from My
Sources
Select an account within “My
Sources”, all albums within that
photo portal account will be
displayed. Click
tto add the
selected album into ShogoLive,
you can continue adding any album
within that account
Sometimes, you may find a Shogo
icon in the top left corner of an
album, that indicates this album is
already in your Shogo.
6. New album added into
ShogoLive
The new album will then be added
to ShogoLive Content, next time
when your Shogo performs an
update (In Shogo, select “Setting”/
“Update” and press the yellow
button), the new album will be
shown in your Shogo.
5. ShogoLive
New Album added
Page 21

20
Shogo User Guide
SG 080/SG 081a/SG 081
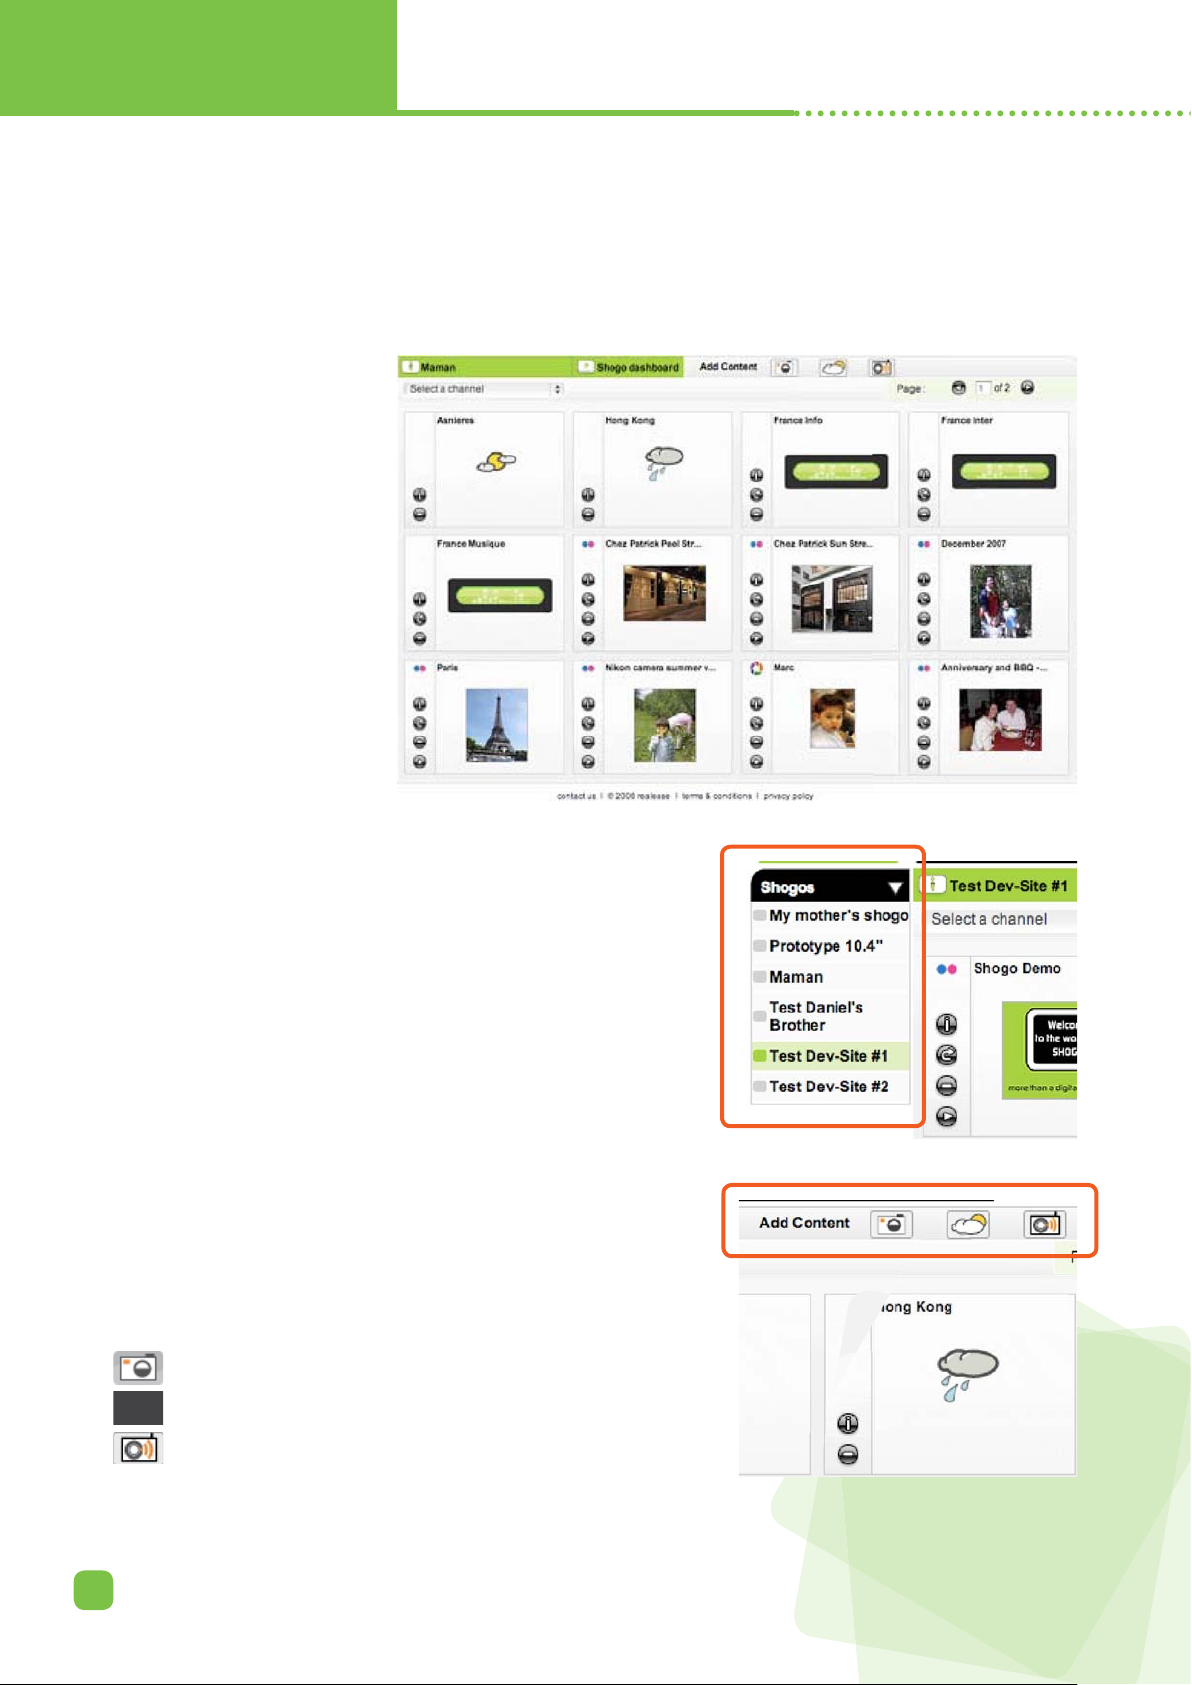
7. Previewing pictures from an album in ShogoLive and deleting an album
Now you can add as photo portal accounts as you can by repeating step 3, and adding new albums by selecting accounts
from “My sources” as in step 5. Meanwhile, you can preview all albums under the folder Manage ShogoLive Content where
it displays the thumbnail view of ShogoLive content with a control panel.
5. ShogoLive
8. Deleting a photo account from
“My Sources”
To delete your photo sources by
clicking add content
, select
the Source account under menu
“My Sources” and delete account
by clicking
“delete account”. Again if you are
deleting content from different
Shogo, select the Shogo from
the green bar – Shogo: with the
arrow buttons.
Control panel commands:
Each screen can display 12 items of content, the page number on the upper right corner shows the total number of pages
and you can browse different pages using the arrow key
, or enter the page number. You can build as many pages
as you want by adding new content to ShogoLive.
Page 22

2
Shogo User Guide
SG 080/SG 081a/SG 081
1. Go to Manage ShogoLive
Content, click on to add
content
2. Give a name to the Weather
forecast (any name you like, such
as Home, Mother’s home, etc),
input the City and Country (e.g.
Paris, France or San Francisco,
US), then click “add”
3. The new weather channel will
be added to your ShogoLive
Content. You can add as many
cities as you want.
4. The new Weather Channel will
then be uploaded to ShogoLive
Content, next time when your
Shogo performs an update, the
new weather forecast will be
shown in your Shogo. To delete
this channel, go back to Manage
ShogoLive and click on the
button.
5.3 Adding Weather channel
Adding new Weather forecast channel from the Internet
5. ShogoLive
Page 23

22
Shogo User Guide
SG 080/SG 081a/SG 081
5. After the updated of Shogo, back
to Home page, and you can now
display the latest forecast by
going to Weather and select oK
6. Select the city you want to
display your latest weather
forecast.
5. ShogoLive
Page 24

23
Shogo User Guide
SG 080/SG 081a/SG 081
5. ShogoLive
1. Go to Manage ShogoLive
Content, click on to add
content
2. There is over 1,000 iRadio
station for selection, you can
browse over different screen
pages on the upper right corner.
Also you may sort the iRadio
station with countries, genres
and languages
3. Click
to select the ones
that you want to add as your
content, you can continue to
add as many channels as you
want. To play the internet radio
on ShogoLive, just click , you
shall be able to play it on your
music player. You can add as
many
iRadio station as you like.
Those stations being added to
ShogoLive will display a Shogo
logo on it.
4. The new Internet Radio Channel
will then be uploaded to
ShogoLive Content, next time
when your Shogo performs an
update, the new channel will be
shown in your Shogo. To delete
this channel, back to Manage
ShogoLive, simply click on the
button.
5.4 Adding Internet Radio Stations
Your Shogo can also be turned into an Internet Radio Receiver, what you need to do is to set the content for Internet
Radio Station and then update your Shogo. Then your Shogo will be set with your favorite internet radio stations for
playing anytime, anywhere, as long as there is an internet connection.
Adding Internet Radio channel from the Internet
Page 25

24
Shogo User Guide
SG 080/SG 081a/SG 081
5. Now back to your Shogo, go to home page and
select Internet Radio, press oK.
6. All the radio channels added in ShogoLive
Content will be displayed, select the one you
want to play by pressing oK next to it.
7. Press oK to play, or
to stop. Again, volume
control can be done by pressing t / u on the
remote control or the control panel on top of
Shogo, now enjoy your favorite Internet Radio
programs. At anytime, press O on the remote
or touch the Internet radio icon on top of the
screen to go back to the previous menu.
5. ShogoLive
Back to previous page
Page 26

25
Shogo User Guide
SG 080/SG 081a/SG 081
5. ShogoLive
5.5 Shogo dashboard
Shogo dashboard helps to monitor activities on your Shogo, it shows the number of content sources that ShogoLive
has established, and the list of Shogo Authors and Shogo Friends, you will be able to add or delete Shogo Author
and Shogo Friend inside the dashboard.
Shogo dashboard displays the name(s) of Shogo the administrator is managing, an administrator can manage more
than one Shogo. To monitor activity of the Shogo, select the respective Shogo name under Control center
Shogo name –
the administrator can change the name of Shogo, click on Modify to make changes.
Channels – shows the content sources of your Shogo, these includes photo sites, weather channels, RSS
feed, Internet Radios
Authors – to invite your friend contribute content to your Shogo, more on Chapter 5.6
Shogo Friends – to add another Shogo users to be your Friends so you can send your favorite album to them,
more on Chapter 5.7
Page 27

26
Shogo User Guide
SG 080/SG 081a/SG 081
To invite an author –
1. Click Add an author on
Shogo Dashboard,
2. To notify the Shogo Author,
enter the author’s myshogo ID, if
he/she is already a myshogo.com
user, or his/her email address.
3. An invitation will be sent by
the system. Once the author
accepted the confirmation,
his/her name will be listed in the
Shogo Author list under Shogo
dashboard.
5.6 Adding Shogo Authors
Shogo Author is a person who has been invited by the Administrator to offer its own ShogoLive content, typically
photo albums, to the Shogo.
5. ShogoLive
By authorizing a Shogo Author, he/she will be asked to sign up myshogo.com, with his/her myshogo.com ID, he/she will
be able to have restricted access to your ShogoLive service. The author can then add content to your Shogo, the next
time you receive update content from ShogoLive, you will get his/her new albums automatically. As an administrator,
you can also delete any Shogo Author any time, simply click “Delete” on Shogo Dashboard/ Authors.
Page 28

27
Shogo User Guide
SG 080/SG 081a/SG 081
To invite an author –
1. Click Add new Shogo
Friend on Shogo Dashboard
2. Enter the serial number of
your friend’s shogo, he/she
will receive an Email to
confirm the invitation
5.7 Adding Shogo Friends
Shogo Friend is another registered Shogo in myshogo.com.
By creating a “Friendship” link between your Shogo and another Shogo, you will then be able to share content
directly from Shogo to Shogo without a computer.
It means when you receive albums into your Shogo, you can immediately share it with a Shogo friend at the click of
a button on the frame itself without the need of a PC. To send album(s) to your friend with a Shogo, you need to
invite that Shogo as a Shogo Friend, then select the album you wish to share and click “send to a Shogo friend” and
then select which Shogo Friend from your list you want to send the album to, that’s it!
5. ShogoLive
Page 29

28
Shogo User Guide
SG 080/SG 081a/SG 081
3. His/her Shogo name will show up in the Shogo Friend
list of Shogo dashboard, once your friend accepted the
invitation, you can share your internet albums with your
Shogo Friends, click Update to check the confirmation or
Delete to take out the name from Shogo Friends List.
After the confirmation of the Shogo Friend, you need
to update your Shogo to get the name of the Friend
registered in your Shogo. To update Shogo, select
settings/update and press
.
5. ShogoLive
To send your album to Shogo
Friend –
1. Browse albums on Photo of
your own Shogo, you can send
your album to your Shogo
Friend by pressing
.
2. A list of Shogo Friends will show
up on screen (make sure you
have updated your Shogo),
choose your Shogo Friend you
want to send this album to and
press oK.
3. Your friend’s Shogo will be
ready to download your album.
The next time when your
Shogo Friend update his/her
Shogo content, whether it is
automatically scheduled update
or on-demand update by
performing the Settings / Update
action, he/she will be able to see
your album in her Shogo!
Page 30

29
Shogo User Guide
SG 080/SG 081a/SG 081
Shogo Specifications
Display
• 8” 800x600 pixels, 4:3 TFT LCD display
• 32,000 colors (16 bit)
• Auto rotate adjust for landscape and portrait viewing
• Touch screen (SG 080/081 only)
• Display backlight: LED
• Contrast ratio: 400
• Effective viewing area: 162(w) x 1215(h) mm
• Lifetime, to 50% brightness: 20,000 hrs
• Brightness: 250cd/m2
Connectivity
• WiFi 802.11 B/G
• USB 1.1 host and slave ports
• Ethernet
• Stereo audio out
Storage Media
• Memory card types: Secure Digital Card (SD), Memory Stick (MS),
Multimedia card (MMC). extreme Digital (XD), SHDC
• Built-in memory capacity: 512Mb for SG 080a and 1Gb for SG 080/081
Regulatory approvals
• CE, FCC, RoHS compliant
Dimensions
• 200x160x32mm
• Weight 0.78 kg
Remote control
• RF
• 23A battery
Rechargeable Battery (SG 080/081)
6. Appendix
Page 31

30
Shogo User Guide
SG 080/SG 081a/SG 081
Safety and Maintenance
Do not disassemble this product, there is no user-serviceable parts inside.
Do not expose your SHOGO to liquid or moisture or humidity
Do not expose your SHOGO to extreme high or low temperature
Do not expose your SHOGO to open flames or lit tobacco products
Always treat your SHOGO with care and keep it in a clean and dust free place
Power Adaptor
Use only the power adaptor that came with your SHOGO
The power adaptor may become very warm during normal use. Always put the
power adaptor directly into a power outlet
Cleaning your SHOGO
When cleaning the outside of your SHOGO, first shut down your SHOGO, unplug
the power adaptor. Then use a damp, soft, lint-free cloth to clean the SHOGO’s
exterior. Avoid getting moisture in any openings. Do not spray liquid directly on
the SHOGO. Do not use aerosol sprays, solvents, or abrasives that might damage
the finish.
6. Appendix
Limited Warranty
Realease Ltd. warrants SHOGO and accessories, excluding batteries, to be free
from malfunctions and defects in both material and workmanship for one (1) year
from the date of purchase. Retain the original dated sales receipt. Proof of the date
of purchase will be required with any request for warranty repair.
Exclusions and Limitations
This Limited Warranty applies only to hardware product manufactured by Realease
Ltd. or for Realease that can be identified by Realease and/or SHOGO trademark,
trade name, or logo affixed to it. This Limited warranty does not apply to any
non SHOGO/Realease Ltd.’s product, even if package or sold with the SHOGO
hardware.
This warranty does not apply: (a) to damage caused by accident, abuse, misuse,
misapplication, or non-SHOGO products. (b) to damage caused by service
performed by anyone other than Realease or SHOGO authorized service partners,
(c) to a product or a part that has been modified without the written permission of
Realease, or (d) if any SHOGO serial number has been removed or defaced
Page 32

3
Shogo User Guide
SG 080/SG 081a/SG 081
End User License Agreement
Single Use License
PLEASE READ THIS SOFTWARE LICENSE AGREEMENT (“LICENSE”) CAREFULLY
BEFORE USING SHOGO SOFTWARE. BY USING SHOGO SOFTWARE
(“SOFTWARE”, YOU ARE AGREEING TO BE BOUND BY THE TERMS OF THIS
LICENSE. IF YOU DO NOT AGREE TO THE TERMS OF THIS LICENSE, CLICK
“DISAGREE/DECLINE”, YOU MUST RETURN THIS ENTIRE SHOGO IN ORDER
TO OUR RESELLER TO GET A REFUND.
1. General. The software, document, and any fonts accompanying this License in
the SHOGO are licensed, not sold , to you by Realease Ltd (“Realease”). For use
only under the terms of this license, and Realeae reserves all rights not expressly
granted to you. The right granted herein are limited to Realease’s intellectual
property rights in the SHOGO Software and do not include any other patents or
intellectual property rights. You own the media on which the Software is recorded
but Realease retain ownership of the Software itself. The terms of this License will
govern any software upgrades provided by Realease that replace/or supplement the
original Software, unless such upgrade is accompanied by a separate license in which
case the terms of that license will govern.
Title, and intellectual property rights in and to any content displayed by or accessed
through the Software belongs to the respective content owner. Such content may
be protected by copyright or other intellectual property laws and treaties, and
may be subjects to the terms of use of the third party providing such content. This
License does not grant you any rights to use such content.
2. Permitted License Uses and Restrictions. You may not copy, decompile,
reverse engineer, disassemble, attempt to derive the source code of, modify, or
create derivative works of the Software, Software updates, or any part thereof.
Any attempt to do so is a violation of the right of Realease on SHOGO Software
and updates. If you breach this restriction, you may be subject to prosecution and
damages. By storing content on your SHOGO you are making digital copy. In some
jurisdictions, it is unlawful to make digital copies without prior permission from
rightholder. The Software and its Updates may be used to reproduce material so
long as such use is limited to reproduction of non-copyrighted materials, materials
in which you own the copyright, or materials you are authorized or legally permitted
to reproduce.
6. Appendix
Page 33

32
Shogo User Guide
SG 080/SG 081a/SG 081
3. Termination. This License is effective until terminated. Your rights under
this License will terminate automatically without notice from Realease if you fall to
comply with any term(s) of this License. Upon termination of this License, you shall
cease all use of the Software.
4. Limited Warranty. Realease warrants the Software preloaded on SHOGO
and delivered with SHOGO under the SHOGO Warranty Agreement Terms and
Conditions in the registration card of the SHOGO package.
5. Limitation of Liability. To the extend not prohibited by law, in no event
shall Realease be liable for personal injury, or any incidental special, indirect or
consequential damages whatsoever, including, without limitation, damages for loss
of profits, loss of data, business interruption or any other commetcial damages or
losses. Arising out of or related to your use or inability to use the Software and
Updates, however caused, regardless of the theory of liability (contract, tort or
otherwise) and even if Realease has been advised the possibility of damages, some
jurisdictions do not allow the limitation of liability of personal injury, or of incidental
or consequential damages. so this limitation may not be apply to you.
6. Controlling Law and Severability. This License will be governed and
construed in accordance with, the laws of Hong Kong SAR. You agree to submit to
the exclusive jurisdiction of the courts of Hong Kong. Nothing in this section shall
limit the right of Advance Idea to take proceedings against you in any other court
of competent jurisdiction, nor shall the taking of proceedings in any one or more
jurisdictions preclude the taking of proceedings in any other jurisdictions, whether
concurrently or not, to the extent permitted by the law of such other jurisdiction.
Page 34

33
Regulatory
RoHS Compliant
This product comply with RoHs requirement
CE Declaration of Conformity
Realease Ltd. declare under our responsibility that the product is in conformity
with the following standards
- EN60950:2000 (Safety requirement of Information Technology Equipment)
- EN55022:1998 (Radio Disturbance requirement of Information Technology
Equipment)
- EN55024:1998 (Immunity requirement of Information Technology Equipment)
- EN61000-3-2:2000 (Limits for Harmonic Current Emission)
- EN61000-3-3:1995 (Limitation of Voltage Fluctuation and Flicker)
following provisions of directives applicable
- 73/23/EEC (Low Voltage Directive)
- 89/336/EEC (EMC Directive)
- 93/68/EEC (Amendment of EMC and Low Voltage Directive)
and is produced by a manufacturing organization on ISO9000 level
FCC Declaration of Conformity
Model Number: SG 08
Trade Name: Shogo
Responsible Party: RealEase Limited
15/F., Morrison Commercial Building, 31 Morrison Hill Road, Wanchai, Hong Kong
Declaration of Conformity for Products Marked with FCC Logo,
United States Only
This device complies with Part 15 of the FCC Rules. Operation is subject to the
following two conditions:
(1) this device may not cause harmful interference, and (2) this device must
accept any interference received, including interference that may cause undesired
operation.
End-of-Life Disposal
Your new product contains materials that can be recycled and reused. Specialized
companies can
recycle your product to increase the amount of reusable materials and to
minimize the amount to be disposed of.
Please find out about the local regulations on how to dispose of your old monitor
from your local Realease dealer.
(For customers in Canada and U.S.A.)
Dispose of in accordance to local-state and federal regulations.
For additional information on recycling contact www.eia.org (Consumer Education
Initiative)
Waste Electronics and Electrical Equipment (WEEE)
This product is labelled with this symbol in accordance with European Directive
2002/96/EG to indicate that it must not be disposed of with your other household
waste. Please check your local city office or waste disposal service for the return
and recycling of this product.
6. Appendix
 Loading...