

ReadyNet AC1200MS User Manual

AC1200MS
User Manual

Table of Contents
1 Preface .......................................................................................................................................................... 1
2 LED Indicators and Connectors .................................................................................................................... 1
2.1
LED Indicators .............................................................................................................................. 1
2.2
Hardware Installation .................................................................................................................... 2
3 Voice Prompt ................................................................................................................................................. 2
4 Configuring Basic Settings ........................................................................................................................... 5
4.1
Two-Level Management ............................................................................................................... 5
4.2
Accessing the User Interface Web Page ........................................................................................ 5
4.2.1
From the LAN Port ............................................................................................................... 5
4.2.2
From the WAN Port .............................................................................................................. 5
4.3
Webpage ........................................................................................................................................ 6
4.4
Setting Up the Time Zone ............................................................................................................. 6
4.5
Setting up the Internet Connection ................................................................................................ 7
4.5.1
Static IP ................................................................................................................................. 7
4.5.2
DHCP .................................................................................................................................... 7
4.5.3
PPPoE ................................................................................................................................... 8
4.6
Setting up the Wireless Connection .............................................................................................. 8
4.6.1
Enable Wireless and Set the SSID ........................................................................................ 8
4.6.2
Encryption ............................................................................................................................. 9
4.7
Register ......................................................................................................................................... 9
4.7.1
Get a SIP Account ................................................................................................................. 9
4.7.2
Connect ................................................................................................................................. 9
4.7.3
Configure SIP from Webpage ............................................................................................... 9
4.7.4
View the Register Status ..................................................................................................... 10
4.8
Make Call .................................................................................................................................... 10
4.8.1
Calling phone or extension numbers ................................................................................... 10
4.8.2
Direct IP calls ...................................................................................................................... 10
4.8.3
Call Hold ............................................................................................................................. 11
4.8.4
Blind Transfer ..................................................................................................................... 11
4.8.5
Attended Transfer ................................................................................................................ 11
4.8.6
Conference .......................................................................................................................... 11
5 Web Configuration ...................................................................................................................................... 12
5.1
Login ........................................................................................................................................... 12
5.2
Configuring the WAN and LAN Ports ........................................................................................ 12
5.2.1
WAN ................................................................................................................................... 13
5.2.2
LAN .................................................................................................................................... 15
5.2.3
DMZ/Port Forward ............................................................................................................. 16
5.2.4
MAC Clone ......................................................................................................................... 17
5.2.5
Multi WAN .......................................................................................................................... 17
5.3
Wireless ....................................................................................................................................... 18
5.3.1
Basic .................................................................................................................................... 18

5.3.2
Wireless Security ................................................................................................................ 18
5.3.3
WMM .................................................................................................................................. 19
5.3.4
WPS .................................................................................................................................... 19
5.3.5
Station list ........................................................................................................................... 20
5.3.6
Advanced ............................................................................................................................ 20
5.3.7
5GHz Access Point ............................................................................................................. 21
5.3.8
Security for 5GHz Access Point .......................................................................................... 22
5.4
SIP Account................................................................................................................................. 23
5.4.1
SIP Settings ......................................................................................................................... 23
5.4.2
Line 1 .................................................................................................................................. 24
5.4.3
VoIP QoS ............................................................................................................................. 25
5.5
Phone .......................................................................................................................................... 25
5.5.1
Preferences .......................................................................................................................... 25
5.5.2
Dial Plan.............................................................................................................................. 26
5.5.3
Call Log .............................................................................................................................. 26
5.6
Security ....................................................................................................................................... 27
5.6.1
Filtering Setting .................................................................................................................. 27
5.6.2
DMZ .................................................................................................................................... 27
5.6.3
MAC Clone ......................................................................................................................... 28
5.6.4
Port Forward ....................................................................................................................... 28
5.6.5
Content Filtering ................................................................................................................. 28
5.7
Administration ............................................................................................................................ 29
5.7.1
Management ........................................................................................................................ 29
5.8
System Log ................................................................................................................................. 29
5.9
Logout ......................................................................................................................................... 30
5.10
Reboot ......................................................................................................................................... 30
6 FCC Statement ............................................................................................................................................ 30

1 Preface
TThhaannkk yyoouu ffoorr cchhoooossiinngg tthhee RReeaaddyyNNeett AACC11220000MMSS wwiirreelleessss rroouutteerr wwiitthh VVooIIPP.. TThhiiss pprroodduucctt wwiillll
aallllooww yyoouu ttoo mmaakkee AATTAA ccaallllss uussiinngg yyoouurr bbrrooaaddbbaanndd ccoonnnneeccttiioonn aanndd pprroovviiddeess WWii--FFii rroouutteerr
ffuunnccttiioonnss..
TThhiiss mmaannuuaall pprroovviiddeess bbaassiicc iinnffoorrmmaattiioonn oonn hhooww ttoo iinnssttaallll aanndd ccoonnnneecctt tthhee RReeaaddyyNNeett
AACC11220000MMSS wwiirreelleessss rroouutteerr wwiitthh VVooIIPP ttoo tthhee IInntteerrnneett.. IItt aallssoo ddiissccuusssseess tthhee rroouutteerr’’ss ffeeaattuurreess
aanndd ffuunnccttiioonnss aanndd hhooww ttoo uussee tthheemm ccoorrrreeccttllyy.. BBeeffoorree yyoouu ccaann ccoonnnneecctt tthhee AACC11220000MMSS ttoo tthhee
IInntteerrnneett aanndd uussee iitt,, yyoouu mmuusstt hhaavvee aa hhiigghh--ssppeeeedd bbrrooaaddbbaanndd ccoonnnneeccttiioonn iinnssttaalllleedd..
TThhee RReeaaddyyNNeett AACC11220000MMSS wwiirreelleessss rroouutteerr wwiitthh VVooIIPP iiss aa ssttaanndd--aalloonnee ddeevviiccee ssoo nnoo ccoommppuutteerr
iiss rreeqquuiirreedd ttoo mmaakkee IInntteerrnneett ccaallllss.. TThhee AACC11220000MMSS pprroovviiddeess cclleeaarr aanndd rreelliiaabbllee vvooiiccee qquuaalliittyy
tthhrroouugghh tthhee IInntteerrnneett,, iiss ffuullllyy ccoommppaattiibbllee wwiitthh SSIIPP iinndduussttrryy ssttaannddaarrddss,, aanndd iiss aabbllee ttoo
iinntteerrooppeerraattee wwiitthh mmaannyy ootthheerr SSIIPP ddeevviicceess aanndd ssooffttwwaarree oonn tthhee mmaarrkkeett..
2 LED Indicators and Connectors
2.1 LED Indicators
Front Panel LED Status Explanation
PPOOWWEERR
WWAANN
LLAANN
11//22//33//44
22..44GG
55GG
UUSSBB
OOnn ((RReedd))
OOffff
OOnn ((GGrreeeenn))
OOffff
BBlliinnkkiinngg ((GGrreeeenn))
OOnn ((GGrreeeenn))
OOffff
BBlliinnkkiinngg ((GGrreeeenn))
On (Green)
Blinking (Green)
OOnn ((GGrreeeenn))
OOffff
TThhee rroouutteerr iiss ppoowweerreedd oonn
aanndd rruunnnniinngg nnoorrmmaallllyy..
TThhee rroouutteerr iiss ppoowweerreedd ooffff..
TThhee ppoorrtt iiss ccoonnnneecctteedd
wwiitthh 110000MMbbppss..
TThhee ppoorrtt iiss ddiissccoonnnneecctteedd..
IItt wwiillll bblliinnkk wwhhiillee
ttrraannssmmiittttiinngg ddaattaa..
TThhee ppoorrtt iiss ccoonnnneecctteedd
wwiitthh 110000MMbbppss..
TThhee ppoorrtt iiss ddiissccoonnnneecctteedd..
TThhee ddaattaa iiss ttrraannssmmiittttiinngg..
Wireless access point is
ready.
It will blink while wireless
traffic goes through.
UUSSBB ddeevviiccee iiss ccoonnnneecctteedd..
NNoo UUSSBB ddeevviiccee
ccoonnnneecctteedd..
Version 1.0 P a g e | 1
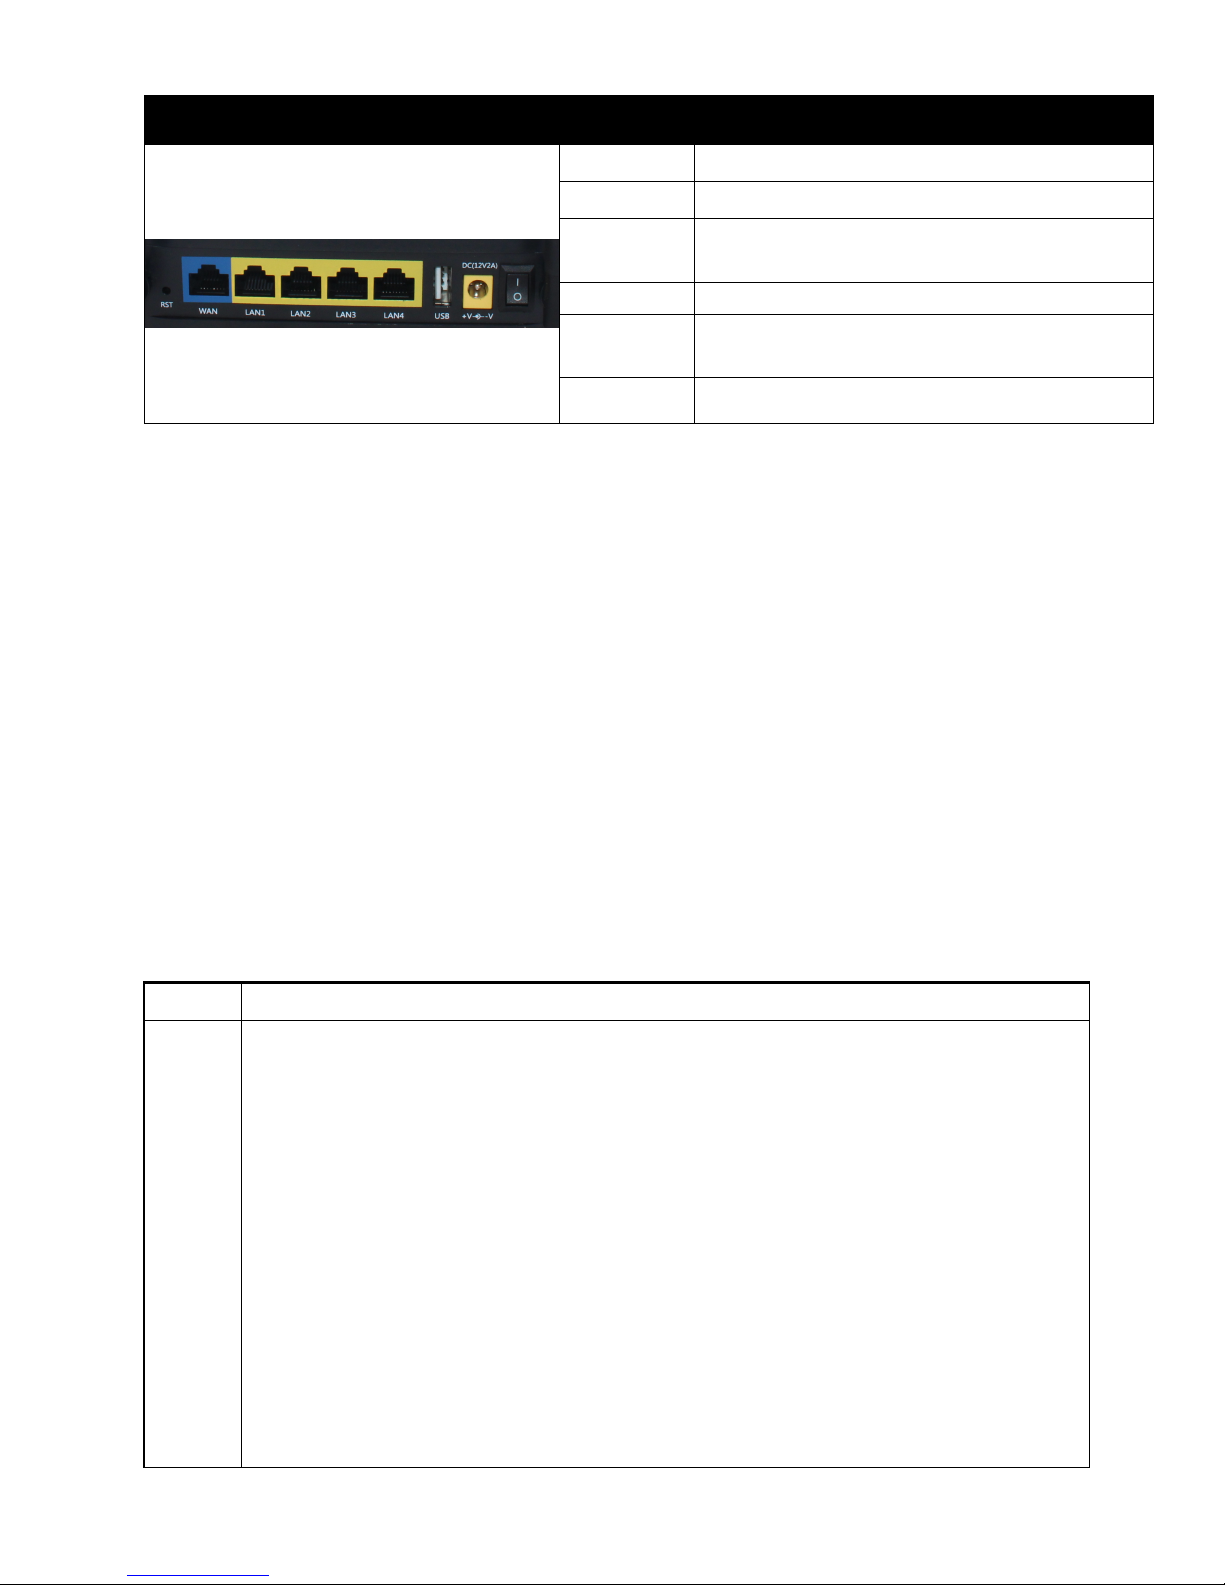
Rear Panel Interface Description
RRSSTT
WWAANN
LLAANN
((11//22//33//44))
UUSSBB
DC
12V/2A
RReesseett ttoo ffaaccttoorryy ddeeffaauulltt sseettttiinnggss
CCoonnnneeccttoorr ffoorr aacccceessssiinngg tthhee IInntteerrnneett..
CCoonnnneeccttoorrss ffoorr llooccaall nneettwwoorrkkeedd ddeevviicceess..
CCoonnnneeccttoorr ffoorr UUSSBB ddeevviiccee..
Connector for a power adapter.
ON/OFF Power Switch.
Hardware Installation
SStteepp 11..CCoonnnneecctt tthhee LLiinnee ppoorrtt ttoo aa llaanndd lliinnee pphhoonnee jjaacckk wwiitthh aann RRJJ--1111 ccaabbllee ((ssttaannddaarrdd pphhoonnee
ccoorrdd))..
SStteepp 22..CCoonnnneecctt tthhee WWAANN ppoorrtt ttoo aann aacccceessss ppooiinntt ssuucchh aass aa mmooddeemm,, sswwiittcchh,, oorr rroouutteerr wwiitthh aann
EEtthheerrnneett ccaabbllee..
SStteepp 33..CCoonnnneecctt oonnee ooff tthhee LLAANN ppoorrttss ttoo yyoouurr ccoommppuutteerr wwiitthh aann EEtthheerrnneett ccaabbllee..
SStteepp 44..CCoonnnneecctt oonnee eenndd ooff tthhee ppoowweerr ccoorrdd ttoo tthhee ppoowweerr ppoorrtt ooff tthhiiss ddeevviiccee.. CCoonnnneecctt tthhee ootthheerr
eenndd ttoo tthhee wwaallll oouuttlleett ooff eelleeccttrriicciittyy..
SStteepp 55..PPuusshh tthhee OONN//OOFFFF sswwiittcchh ttoo ppoowweerr oonn tthhee rroouutteerr..
SStteepp 66..CChheecckk tthhee PPoowweerr,, WWAANN,, aanndd LLAANN LLEEDDss ttoo aassssuurree nneettwwoorrkk ccoonnnneeccttiioonnss..
3 Voice Prompt
Code
1
VVooiiccee MMeennuu SSeettttiinngg OOppttiioonnss
Contents
Step 1. Pick up phone and press “****” to start IVR.
Step 2. Choose “1” and the AC1200MS reports the current WAN port connection type.
Step 3. Prompt "Please enter password”, user needs to input password with end char # if user
wants to configure WAN port connection type.
Password in the IVR is same as the Web login. User can use phone keypad to enter
password directly and the matching table is in Note 4.
For example: WEB login password is “admin”, so password in IVR is “admin” too, user
inputs “23646” to access and then configure theWAN connection port.
Step 4. Report “operation successful” if password is correct.
Step 5. Choose the new WAN port connection type, either 1. DHCP or 2. Static.
Step 6. Report “operation successful”, indicates user successfully made the changes.
AC1200MS will return to sound prompting “please enter your option, one WAN
Port …….”.
If at any time you want to quit, press “**”.
Version 1.0 P a g e | 2

Step 1. Pick up phone and press “****” to start IVR.
sing “*” to replace “.”, user can input 255*255*255*0 to set the new WAN port subnet mask
Step 2. Choose “2”, and the AC1200MS reports current WAN Port IP Address.
Step 3. Input the new WAN port IP address with the end char #.
Using “*” to replace “.”, user can input 192*168*20*168 to set the new IP address
2
3
4
192.168.20.168.
Press # key to indicate you have finished.
Step 4. Report “operation successful” if user operation is correct.
If at any time you want to quit, press “**”.
Step 1. Pick up phone and press “****” to start IVR.
Step 2. Choose “3”, and the AC1200MS reports the current WAN port subnet mask.
Step 3. Input a new WAN port subnet mask with the end char #.
U
255.255.255.0.
Press # key to indicate you have finished.
Step 4. Report “operation successful” if user operation is correct.
If at any time you want to quit, press “**”.
Step 1. Pick up phone and press “****” to start IVR.
Step 2. Choose “4”, and the AC1200MS reports current gateway.
Step 3. Input the new gateway with the end char #.
Using “*” to replace “.”, user can input 192*168*20*1 to set the new gateway 192.168.20.1.
Press # key to indicate you have finished.
Step 4. Report “operation successful” if user operation is correct.
If at any time you want to quit, press “**”.
Step 1. Pick up phone and press “****” to start IVR
Step 2. Choose “5”, and the AC1200MS reports current DNS
Step 3. Input the new DNS with the end char #
Using “*” to replace “.”, user can input 192*168*20*1 to set the new gateway to
5
6
7
192.168.20.1
Press # key to indicate you have finished
Step 4. Report “operation successful” if user operation is correct.
If at any time you want to quit, press “**”.
Step 1. Pick up phone and press “****” to start IVR.
Step 2. Choose “6”, and the AC1200MS reports “Factory Reset”.
Step 3. Prompt "Please enter password", inputting password is the same as in operation 1.
If at any time you want to quit, press “*”.
Step 4. Prompt “operation successful” if the password is correct.
Step 5. Press “7”, reboot to make changes effective.
Step 1. Pick up phone and press “****” to start IVR.
Step 2. Choose “7”, and the AC1200MSs report “Reboot”.
Step 3. Prompt "Please enter password", inputting password is the same as in operation 1.
Step 4. The AC1200MS will reboot if the operation is correct.
Version 1.0 P a g e | 3

Step 1. Pick up phone and press “****” to start IVR.
Step 2. Choose “8”, and the AC1200MS reports “WAN Port Login”.
Step 3. Prompt "Please enter password", inputting password is the same as in operation 1.
If at any time you want to quit, press “*”.
8
Step 4. Report “operation successful” if user operation is correct.
Step 5. Prompt “1enable 2disable”,choose 1 or 2 with confirm char #.
Step 6. Report “operation successful” if user operation is correct.
Step 1. Pick up phone and press “****” to start IVR.
Step 2. Choose “9”, and the AC1200MS reports “ WEB Access Port”.
Step 3. Prompt “Please enter password”, inputting password is the same as in operation 1.
Step 4. Report “operation successful” if user operation is correct.
9
Step 5. Report the current WEB Access Port.
Step 6. Set the new WEB access port with end char #.
Step 7. Report “operation successful” if user operation is correct.
Step 1. Pick up phone and press “****” to start IVR.
0
Step 2. Choose “0”, and the AC1200MS reports the current Firmware version.
NNootteess
WWhheenn uussiinngg VVooiiccee MMeennuu,, pprreessss ““**”” ((ssttaarr)) ttoo rreettuurrnn ttoo tthhee mmaaiinn mmeennuu..
IIff aannyy cchhaannggeess aarree mmaaddee iinn tthhee IIPP aassssiiggnnmmeenntt mmooddee,, pplleeaassee rreebboooott tthhee AACC11220000MMSS ttoo aappppllyy tthhee
cchhaannggeess..
WWhheenn eenntteerriinngg aann IIPP aaddddrreessss oorr ssuubbnneett mmaasskk,, uussee ““**”” ((ssttaarr)) ttoo rreeppllaaccee ““..”” ((ddoott)).. FFoorr eexxaammppllee,, ttoo
eenntteerr tthhee IIPP aaddddrreessss 119922..116688..2200..115599 bbyy kkeeyyppaadd,, pprreessss 119922**116688**2200**115599##,, uussee tthhee ““##”” ((ppoouunndd)) kkeeyy
ttoo iinnddiiccaattee yyoouu hhaavvee ffiinniisshheedd eenntteerriinngg tthhee IIPP aaddddrreessss..
WWhheenn aassssiiggnniinngg aann IIPP aaddddrreessss iinn SSttaattiicc IIPP mmooddee,, yyoouu mmuusstt aallssoo sseett tthhee ssuubbnneett mmaasskk aanndd ddeeffaauulltt
ggaatteewwaayy.. IIff iinn DDHHCCPP mmooddee,, pplleeaassee mmaakkee ssuurree tthhaatt DDHHCCPP SSEERRVVEERR iiss aavvaaiillaabbllee iinn yyoouurr eexxiissttiinngg
bbrrooaaddbbaanndd ccoonnnneeccttiioonn ttoo wwhhiicchh WWAANN ppoorrtt ooff AACC11220000MMSS iiss ccoonnnneecctteedd..
TThhee ddeeffaauulltt LLAANN ppoorrtt IIPP aaddddrreessss ooff AACC11220000MMSS iiss 119922..116688..1111..11 aanndd ddoo nnoott sseett tthhee WWAANN ppoorrtt IIPP
aaddddrreessss ooff AACC11220000MMSS iinn tthhee ssaammee nneettwwoorrkk sseeggmmeenntt ooff LLAANN ppoorrtt ooff AACC11220000MMSS,, ootthheerrwwiissee iitt mmaayy
lleeaadd ttoo tthhee AACC11220000MMSS ffaaiill ttoo wwoorrkk pprrooppeerrllyy..
EEnntteerr tthhee ppaasssswwoorrdd bbyy pphhoonnee kkeeyyppaadd.. TThhee mmaattcchhiinngg ttaabbllee bbeettwweeeenn nnuummbbeerr aanndd lleetttteerrss iiss aass
ffoolllloowwss::
To input: D, E, F, d, e, f -- press ‘3’
To input: G, H, I, g, h, i -- press ‘4’
To input: J, K, L, j, k, l -- press ‘5’
To input: M, N, O, m, n, o -- press ‘6’
To input: P, Q, R, S, p, q, r, s -- press ‘7’
To input: T, U, V, t, u, v -- press ‘8’
To input: W, X, Y, Z, w, x, y, z -- press ‘9’
To input all other characters in the administrator password-----press ‘0’, e.g. password
is ‘admin-admin’, press ‘23646023646’
Version 1.0 P a g e | 4

4 Configuring Basic Settings
4.1 Two-Level Management
TThhee AACC11220000MMSS ssuuppppoorrttss uusseerr mmaannaaggeemmeenntt.. FFoorr uusseerr mmooddee ooppeerraattiioonn,, pplleeaassee lloogg iinn ttoo tthhee
uusseerr iinntteerrffaaccee WWeebb PPaaggee.. TThhee UUsseerrnnaammee iiss ““uusseerr”” aanndd tthhee ddeeffaauulltt PPaasssswwoorrdd iiss tthhee llaasstt 88
lleetttteerrss ooff tthhee LLAANN ppoorrtt MMAACC aaddddrreessss..
TThhiiss sseeccttiioonn aallssoo eexxppllaaiinnss hhooww ttoo sseett uupp aa ppaasssswwoorrdd ffoorr aann aaddmmiinniissttrraattoorr//rroooott uusseerr aanndd hhooww ttoo
aaddjjuusstt bbaassiicc//aaddvvaanncceedd sseettttiinnggss ffoorr ssuucccceessssffuullllyy aacccceessssiinngg tthhee IInntteerrnneett..
4.2 Accessing the User Interface Web Page
4.2.1 From the LAN Port
SStteepp11.. CCoonnnneecctt yyoouurr ccoommppuutteerr ttoo oonnee ooff tthhee rroouutteerr’’ss LLAANN ppoorrttss uussiinngg aann EEtthheerrnneett ccaabbllee..
Notice: You may either simply set up your computer to get IP dynamically from the router or
set up the IP address of the computer to be the same subnet as the default IP address
of the router, which is 192.168.11.1.
SStteepp 22.. OOppeenn aa wweebb bbrroowwsseerr oonn yyoouurr ccoommppuutteerr,, ttyyppee hhttttpp::////119922..116688..1111..11.. TThhee ffoolllloowwiinngg llooggiinn
wwiinnddooww wwiillll ooppeenn..
SStteepp 33.. TToo llooggiinn,, ttyyppee iinn tthhee UUsseerrnnaammee aanndd PPaasssswwoorrdd ffoouunndd oonn tthhee llaabbeell oonn tthhee bboottttoomm ooff tthhee
AACC11220000MMSS aanndd cclliicckk LLooggiinn.. ((TThhee uusseerrnnaammee iiss ““uusseerr”” aanndd tthhee ppaasssswwoorrdd iiss pprriinntteedd oonn tthhee llaabbeell
oonn tthhee bboottttoomm ooff yyoouurr rroouutteerr..))
TThhee wweebb ppaaggee wwiillll lloogg oouutt aafftteerr 55 mmiinnuutteess ooff nnoo aaccttiivviittyy..
4.2.2 From the WAN Port
BByy ddeeffaauulltt,, rreemmoottee wweebb llooggiinn iiss ddiissaabblleedd ssoo uusseerr wwiillll nneeeedd ttoo eennaabbllee rreemmoottee wweebb llooggiinn aanndd
cchhaannggee tthhee ppaasssswwoorrdd tthhrroouugghh tthhee LLAANN ppoorrtt bbeeffoorree aatttteemmppttiinngg ttoo llooggiinn ffrroomm tthhee WWAANN ppoorrtt..
TThhee rreemmoottee llooggiinn ppoorrtt iiss 88008800..
SStteepp 11.. MMaakkee ssuurree yyoouurr PPCC ccaann ccoonnnneecctt ttoo tthhee rroouutteerr’’ss WWAANN ppoorrtt..
SStteepp 22.. GGeett tthhee IIPP aaddddrreessss ooff tthhee WWAANN ppoorrtt uussiinngg VVooiiccee PPrroommpptt..
Version 1.0 P a g e | 5
SStteepp 33..OOppeenn aa wweebb bbrroowwsseerr oonn yyoouurr ccoommppuutteerr aanndd ttyyppee hhttttpp::////tthhee IIPP aaddddrreessss ooff WWAANN ppoorrtt::
88008800.. TThhee ffoolllloowwiinngg llooggiinn wwiinnddooww wwiillll ooppeenn..
SStteepp 44..TToo llooggiinn,, ttyyppee iinn tthhee UUsseerrnnaammee aanndd PPaasssswwoorrdd ffoouunndd oonn tthhee llaabbeell oonn tthhee bboottttoomm ooff tthhee
AACC11220000MMSS aanndd cclliicckk LLooggiinn.. ((TThhee uusseerrnnaammee iiss ““uusseerr”” aanndd tthhee ppaasssswwoorrdd iiss tthhee llaasstt 88
cchhaarraacctteerrss ooff tthhee LLAANN MMAACC aaddddrreessss..))
TThhee wweebb ppaaggee wwiillll lloogg oouutt aafftteerr 55 mmiinnuutteess ooff nnoo aaccttiivviittyy..
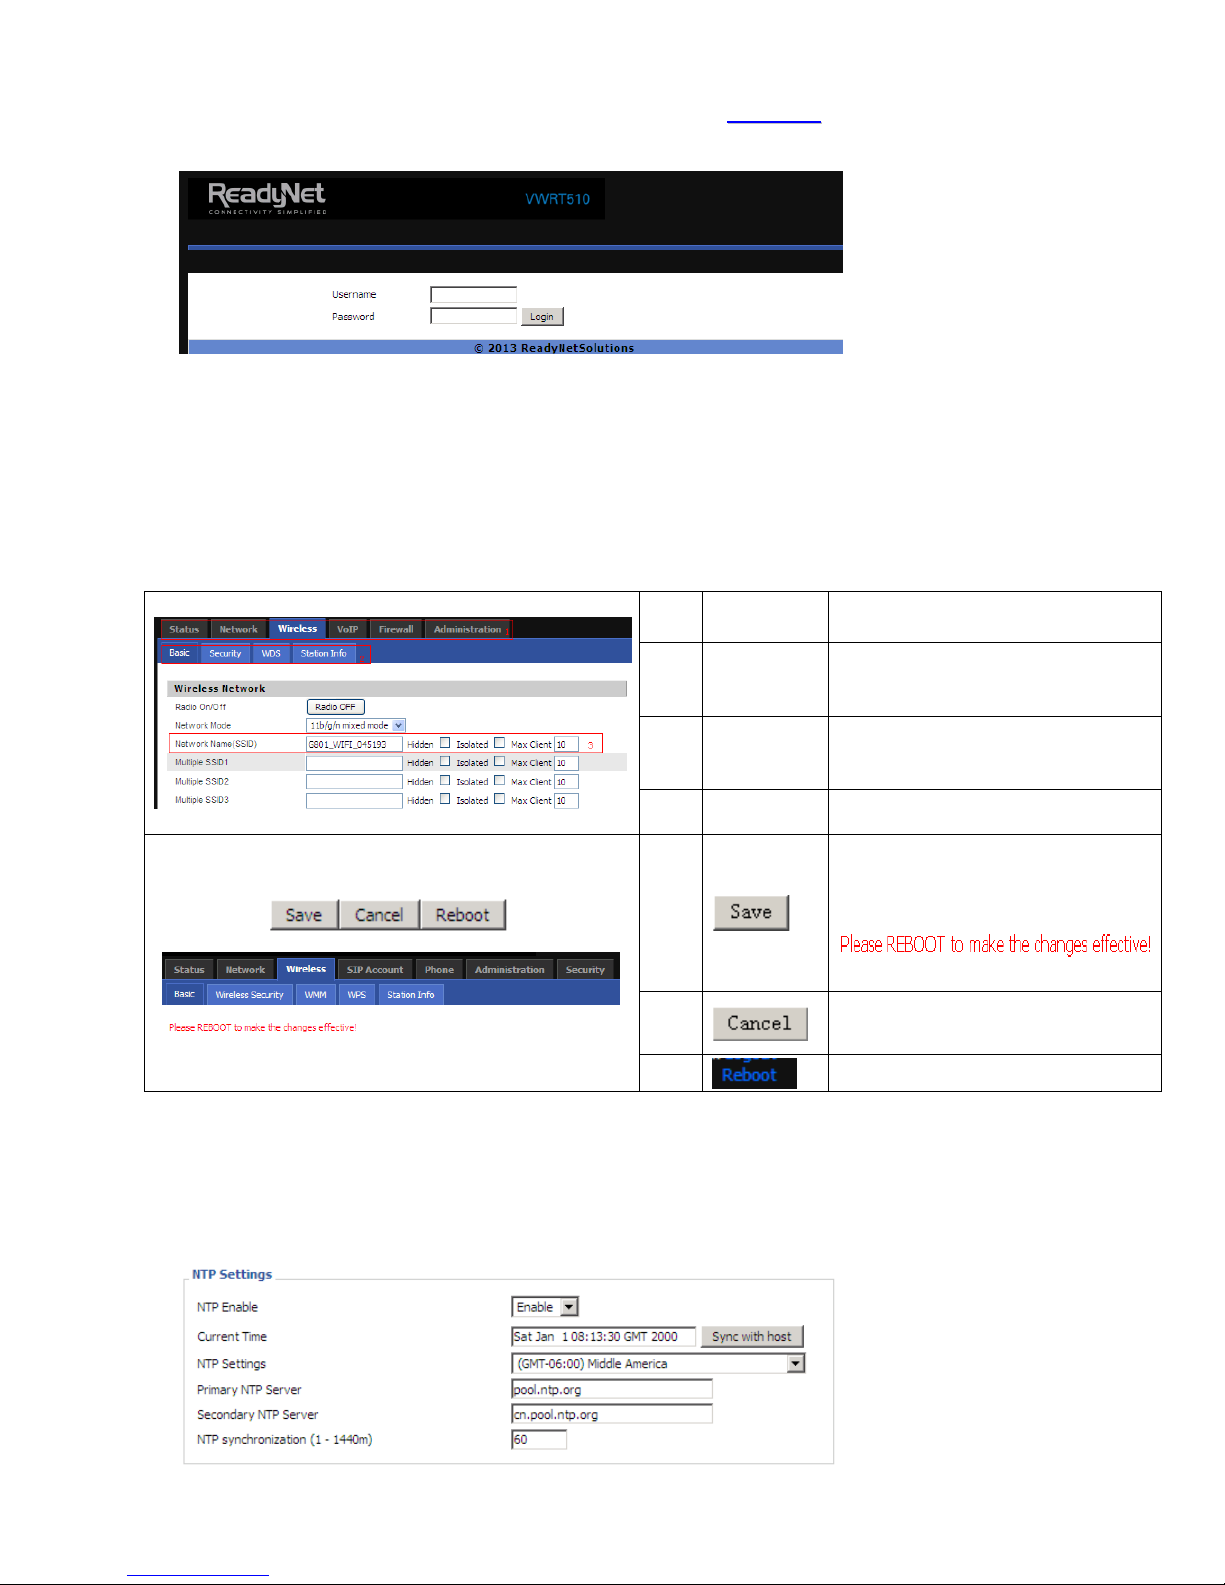
4.3 Webpage
NNaammee DDeessccrriippttiioonn
NNoo..
1
2 Title
3 Parameter To configure the parameters.
Navigation
bar
Click navigation bar, sub-navigation
bars will appear on the second line.
Click on the sub-navigation bars to
choose a configuration page.
After every change, click this button to
apply the change.
After clicking Save, the red
4.4 Setting Up the Time Zone
OOppeenn AAddmmiinniissttrraattiioonn//MMaannaaggeemmeenntt wweebbppaaggee aass sshhoowwnn bbeellooww,, sseelleecctt tthhee TTiimmee ZZoonnee,,
ssppeecciiffyy tthhee NNTTPP sseerrvveerr aanndd sseett tthhee uuppddaattee iinntteerrvvaall iinn NNTTPP ssyynncchhrroonniizzaattiioonn..
Version 1.0 P a g e | 6
will appear.
Click to cancel changes.
Click to reboot the router.
4.5 Setting up the Internet Connection
OOppeenn tthhee NNeettwwoorrkk//WWAANN wweebbppaaggee aass sshhoowwnn bbeellooww aanndd sseelleecctt tthhee aapppprroopprriiaattee IIPP MMooddee
aaccccoorrddiinngg ttoo tthhee iinnffoorrmmaattiioonn ffrroomm yyoouurr IISSPP.. TThheerree aarree tthhrreeee ttyyppeess ooffffeerreedd –– SSttaattiicc,, DDHHCCPP aanndd
PPPPPPooEE..
4.5.1 Static IP
YYoouu wwiillll rreecceeiivvee aa ffiixxeedd ppuubblliicc IIPP aaddddrreessss oorr aa ppuubblliicc ssuubbnneett ((mmuullttiippllee ppuubblliicc IIPP aaddddrreesssseess))
ffrroomm yyoouurr DDSSLL oorr CCaabbllee IISSPP sseerrvviiccee pprroovviiddeerrss.. IInn mmoosstt ccaasseess,, aa CCaabbllee sseerrvviiccee pprroovviiddeerr wwiillll
ooffffeerr aa ffiixxeedd ppuubblliicc IIPP wwhhiillee aa DDSSLL sseerrvviiccee pprroovviiddeerr wwiillll ooffffeerr aa ppuubblliicc ssuubbnneett.. IIff yyoouu hhaavvee aa
ppuubblliicc ssuubbnneett,, yyoouu ccaann aassssiiggnn aann IIPP aaddddrreessss ttoo tthhee WWAANN iinntteerrffaaccee..
IP Address
Type the IP address.
Subnet Mask
Gateway IP
Address
Primary DNS
Server
Secondary
DNS Server
Type the subnet mask.
Type the gateway IP address.
Type in the primary IP
address for the route.
Type in secondary IP address
for necessity in the future.
4.5.2 DHCP
IItt iiss nnoott nneecceessssaarryy ffoorr yyoouu ttoo ttyyppee aannyy IIPP aaddddrreessss mmaannuuaallllyy.. SSiimmppllyy cchhoooossee tthhiiss ttyyppee aanndd tthhee
ssyysstteemm wwiillll oobbttaaiinn tthhee IIPP aaddddrreessss aauuttoommaattiiccaallllyy ffrroomm tthhee DDHHCCPP sseerrvveerr..
Set the DNS Mode to Auto or Manual. If
DNS Mode
Primary DNS
Server
user chooses Manual, fill in the primary
and secondary DNS addresses.
Type in the primary IP address for the
route.
Version 1.0 P a g e | 7
Secondary
DNS Server
Type in secondary IP address for
necessity in the future.
 Loading...