

Page 1

IP101 VoIP Phone
User Manual
Page 2

VoIP Phone User Manual
2
1 Introduction.........................................................................................................3
1.1 Hardware Overview ..................................................................................3
1.2 Software Overview....................................................................................4
2 Setup the IP Phone system by using keypad.........................................................4
2.1 Keypad Description...................................................................................4
2.2 Keypad Function and Setting List..............................................................6
3 Setup the IP Phone system by using Web Browser.............................................10
3.1 Login ......................................................................................................10
3.2 System Information .................................................................................11
3.3 Phone Book............................................................................................. 11
3.4 Phone Setting ..........................................................................................13
3.5 Network ..................................................................................................18
3.6 SIP Settings.............................................................................................21
3.7 NAT Trans...............................................................................................25
3.8 Other.......................................................................................................25
3.9 System Auth............................................................................................26
3.10 Save Change ...........................................................................................26
3.11 Update.....................................................................................................27
3.12 Reboot.....................................................................................................28
Page 3

VoIP Phone User Manual
3
Telephone function:
1、Protocol support: SIP(RFC2543,RFC3261);
2、Display and store 64 groups of incoming calls;
3、Display and store 64 groups of outgoing calls;
4、Phone Book with 140 groups memory
5、Hand-free dialing functions, count time of calling automatically;
6、Review, delete, redial Incoming calls/outgoing calls;
7、Do Not Disturb function;
8、Roaming function;
9、Check local number;
10、Pre-dial function;
11、Display date and time;
12、Music on Hold;
13、PPPoE;
14、Dynamic and static IP address;
15、Support voice codec: G.711A/U, G.723.1, G.729A/B, G.726; VAD/CNG
16、User authentication;
17、TCP/IP(ARP/RARP 、IP/ICMP、UDP/TCP/IP、RTP/RTCP);
18、TFTP and Console function;
19、IEEE 802.1P/802.1Q/ToS u 10 Base T/100Base TX;
20、DNS;
21、Call Transfer function;
22、Three-way conversation;
23、Call waiting function;
24、Call forward function;
25、DDNS function
26、Remote software updates/upgrades;
27、Hand-free;
Main technology parameter:
1. AC/DC adaptor---------Input: AC 240/100V;Output: 9V DC, 1000mA
2. Support DHCP client and static IP address
3. Support PPPoE (for ADSL, Cable Modem)
4. Upgradeable software
5. Support voice codec: G.711A/U, G.723.1, G.729A/B, G.726
6. Voice activity detection, Comfortable noise generator, Adaptive jitter buffer
7. G.165 16ms echo cancellation
8. Signaling tone of ITU-T standard, DTMF
9. Support dialing standard base on E.164 code
1 Introduction
This user manual is for IP101 IP phone. Before using the IP Phone, some configurations are
required to make the IP Phone work properly. The manual will illustrate how to configure the ip
phone via keypad, web page and console.
1.1 Hardware Overview
Two RJ-45 Networking interfaces support 10/100Mps Fast Ethernet. User can connect one of
them to ADSL or Switch, the other one to PC computer. By default, WAN is a DHCP client.
Page 4

VoIP Phone User Manual
4
LAN’s ip is 192.168.123.1 and can provide DHCP service.
Passed FCC, CE authentication
Wide-range power adaptor(From 100V to 240V)
1.2 Software Overview
Network Protocol
Tone
Ring Tone
Ring Back Tone
Dial Tone
Busy Tone
Programming Tone
SIP v1 (RFC2543), v2(RFC3261)
IP/TCP/UDP/RTP/RTCP
IP/ICMP/ARP/RARP/SNTP
TFTP Client/DHCP Client/ PPPoE Client
Telnet/HTTP Server
DNS Client
Phone Function
Codec
Volume Adjustment
Speed dial key
Phonebook
Flash
Hand-free function
IP Assignment
G.711: 64k bit/s (PCM)
G.723.1: 6.3k / 5.3k bit/s
G.726: 16k / 24k / 32k / 40k bit/s (ADPCM)
G.729A: 8k bit/s (CS-ACELP)
G.729B: adds VAD & CNG to G.729
Voice Quality
IP(Static IP)
DHCP
PPPoE
Security
HTTP 1.1 basic/digest authentication for Web setup
MD5 for SIP authentication (RFC2069/ RFC 2617)
VAD: Voice activity detection
CNG: Comfortable noise generator
LEC: Line echo canceller
Packet Loss Compensation
Adaptive Jitter Buffer
QoS
Call Function
ToS field
NAT Traversal
STUN
Call Hold
Call Waiting
Call Forward
Caller ID
3-way conference
Configuration
DTMF
Web Browser
Console/Telnet
Keypad
In-Band DTMF
RFC 2833 DTMF
SIP Info
SIP Server
Firmware Upgrade
Registrar Server (three SIP account)
Outbound Proxy
TFTP
Console
HTTP
FTP
2 Setup the IP Phone system by using keypad
2.1 Keypad Description
Key Name
Description
Note
1
“1”, “-“, “٫”, “!”, “?”
Page 5

VoIP Phone User Manual
5
2
“2”, “a”, “b”, “c”, “A”, “B”, “C”
3
“3”, “d”, “e”, ”f”, “D”, “E”, “F”
4
“4”, “g”, “h”, “I”, “G”, “H”, “I”
5
“5”, “j”, “k”, “l”, “J”, “K”, “L”
6
“6”, “m”, “n”, “o”, “M”, “N”, “O”
7
“7”, “p”, “q”, “r”, “s”, “P”, “Q”, “R”, ‘S”
8
“8”, “t”, “u”, “v”, “T”, “U”, “V”
9
“9”, “w”, “x”, “y”, “z”, “W”, “X”, “Y”, “Z”
0
“0”, “space”
*
“*”, “•”, “:”, “@”
#
Start dialing process
PHONEBOOK
Phonebook
CID
Incoming call list
Out
Out going call list
ENTER
“OK”, accept setting
MENU
“Menu” key to set the IP Phone
UP/DOWN
Up↑ and Down↓ key
LEFT/RIGHT
Left← and Right→ key
Volume -/+
Volume control
FLASH
Flash key
DEL
“Delete”, delete word or phone number
REDIAL
“REDIAL” the same number again
H-F
Hand Free
M1~M4
4 speed dial numbers
Line1~Line2
the Line1 to Line2
HOLD
“HOLD” function
CONF
Three way conference
FWD
Forward key
DND
Do Not Disturb
2.1.1 Outgoing calls
Press “OUT” button, LCD will display the outgoing. Press “UP” or “DOWN” to review all
outgoing call numbers and conversation time.
2.1.2 Caller ID function
Press “CID” key, LCD will show incoming call numbers and conversation time, using “UP”
or “DOWN” to review all incoming calls number.
2.1.3 Talking volume control
During conversation, press “VOL+” or “VOL-” to adjust volume.
Page 6

VoIP Phone User Manual
6
2.1.4 Phone-Book function(Total 140 groups of numbers)
1) Press “PHONBOOK” key to enter into display mode, LCD shows the total groups
you have stored. If nothing stored, LCD will display “P-Book is empty”.
2) In display mode, input the name of your stored number, press “ENTER”, LCD will
display the number. Then press “H-F” or pick up the handset, the present number will
be dialed out automatically.
3) In display mode, press “ENTER” button to enter into name check status, using “UP”
or “DOWN” to review.
4) In display mode, press “ENTER” button to enter into name check status, press
“ENTER” key again to enter into modify mode. Use keypad to modify name. Press
“ENTER” one more time to modify call numbers. After finishing, press “ENTER” to
confirm.
5) In display mode, press “ENTER” key to enter into name check status, using “UP” or
“DOWN” to review. At this time, press “DEL” to delete the present call number.
2.1.5 DND function
Press “DND” button, LCD will display “#DND#”. The ip phone will refuse all of incoming
calls. Press “DND” again to quit DND.
2.1.6 Hold with music
1) When you are receiving a call on LINE1, there is an incoming call from LINE2. Now
press “HOLD” button to hold on the line1, and press “Line2” to start conversation
with LINE2.
2) Press “Line1” to quit holding status.
2.1.7 Call forward
After setting forward number, press FWD key to enter into forward mode. LCD display “#
Forward #”, press FWD key again to quit. The forward number must be a speed dial number.
2.1.8 Three-way conference
During conversation on Line1, press “HOLD”, and then press LINE2 to dial another
number. After connecting though with Line2, press “CONF” to start three-way conference.
2.1.9 Speed dial function
After setting speed dial number, the M1~M4 button stands for 0-3 speed dial number. Press
“0~9” and “#” button to dial out the corresponding speed dial number.
2.1.10 Transfer between LINE1 and LINE2
1) When you are receiving a call, there is another incoming call. The LCD will show
you which line the incoming call comes from. Press HOLD and LINE1 or LINE2 (the
line that the latter incoming call comes from), then you can answer the latter call.
Press LINE2 or LINE1, which the former call is on, you will return to the former call.
2) When you are receiving a call, there is another incoming call. The LCD will show
you which line the incoming call comes from. Press HOLD and LINE1 or LINE2 (the
line that the latter incoming call comes from), then you can answer the latter call.
Press CONF to start three-way conference.
2.2 Keypad Function and Setting List
A. Press “MENU” button to enter into setting list. Press “UP” or “DOWN” to choose items,
then press “ENTER” to enter into submenu of the item. Move cursor through “LEFT/RIGHT” and
modify content by keypad. After finishing setting, press ENTER to confirm and return to the
Page 7

VoIP Phone User Manual
7
parent menu. Press MENU to return to parent menu without confirm.
B、Menu list:
1、 Phone Book
2、 Call history
3、 Phone setting
4、 Network
5、 SIP Settings
6、 NAT transversal
7、 Administrate
C、All configuration will be effective after reboot.
2.2.1 Phone Book
1) Search: Search Phone Book.
2) Add entry: Add new phone number to phone book.
3) Speed dial: Add speed dial phone number to speed dial list.
4) Erase all: Erase all phone number from Phone Book.
2.2.2 Call history
1) Incoming calls: Show all incoming call.
2) Dialed numbers: Show all dialed call.
3) Erase record: Delete call history.
All: Delete all call history.
Incoming: Delete all incoming call.
Dialed: Delete all dialed call.
2.2.3 Phone setting
2.2.3.1 Call forward
2.2.3.1.1 All Forward.
1. Activation
2. Number:
2.2.3.1.2 Busy Forward.
1. Activation
2. Number:
2.2.3.1.3 No Answer Forward.
1. Activation
2. Number
2.2.3.1.4 Ring Timeout: set call transfer time. For example, if you input 3 here, incoming call
will be forwarded after 3 rings.
2.2.3.2 Do Not Disturb Setting
1) Allways
2) By period
3) Period time
2.2.3.3 Alarm setting
1) Activation
2) Alarm time
Page 8

VoIP Phone User Manual
8
2.2.3.4 Date/Time setting
2.2.3.4.1 Date & Time: Set the IP Phone Date and Time.
2.2.3.4.2 SNTP
1) SNTP: Enabled/Disable SNTP.
2) Primary SNTP
3) Secondary SNTP
4) Time zone
5) Adjustment Time
2.2.3.5 Volume&Gain
1) Handset volume: Set Handset volume from 0 to 15.
2) Speaker volume: Set Speaker phone volume from 0 to 15.
3) Handset Gain Set handset gain from 0 to 15.
4) Speaker Gain: Set speaker gain from 0 to 15.
2.2.3.6 Ringer
1) Ringer volume: from 0 to 10.
2) Ringer type: Ringer type selection from 1 to 4.
2.2.3.7 Auto Dial(3sec—9sec)
After auto dial time, the number will be sent out without dialing #. Default is 5
seconds.
2.2.4 Network
2.2.4.1 WAN Setup
2.2.4.1.1 IP Type
1) Fixed IP
2) DHCP client
3) PPPoE client
2.2.4.1.2 Fixed IP setting
1) Host IP
2) Network mask:
3) Gateway IP
4) MAC address
2.2.4.1.3 PPPoE
1) User name
2) Password
2.2.4.2 LAN Setup
1) Bridge
2) NAT
2.2.4.3 DNS
1) Primary DNS
2) Secondary DNS
2.2.4.4 VLAN
1) Activation: enable/disable VLAN
2) VID: 2~4094
3) Priority: 0~7
Page 9

VoIP Phone User Manual
9
4) CFI: 0 or 1
2.2.4.5 Status: show the ip and mac addresses of the ip phone.
2.2.5 SIP Settings
2.2.5.1 Service domain
2.2.5.1.1 First realm:
1) Activation
2) User name
3) Display name
4) Register name
5) Register password
6) Proxy server:
7) Domain server
8) Outbound proxy
2.2.5.1.2 Second realm:
1) Activation
2) User name
3) Display name
4) Register name
5) Register password
6) Proxy server
7) Domain server
8) Outbound proxy
2.2.5.1.3 Third realm:
1) Activation:
2) User name
3) Display name
4) Register name
5) Register password
6) Proxy server
7) Domain server
8) Outbound proxy
2.2.5.2 Codec
2.2.5.2.1 Codec type:
1) G.711 uLaw
2) G.711 aLaw
3) G.723
4) G.729
5) G.726-16
6) G.726-24
7) G.726-32
8) G.726-40
2.2.5.2.2 VAD: Voice Activity Detection
Page 10

VoIP Phone User Manual
10
2.2.5.3 RTP setting
2.2.5.3.1 Outband DTMF
2.2.5.3.2 Duplicate RTP
1) No duplicate
2) One duplicate
3) Two duplicate
2.2.5.4 RPort Setting: Enable/Disable RPort
2.2.5.5 Hold by RFC
2.2.5.6 Status:
1) First Realm
2) Second Realm
3) Third Realm
2.2.6 NAT Transversal
2.2.6.1 STUN setting
1) STUN: enable/disable STUN
2) STUN server
2.2.7 Administrate
2.2.7.1 Auto Config:
1) Config mode
2) TFTP server
3) FTP server
4) FTP Login Name
5) FTP Password
2.2.7.2 Upgrade system
1) Upgrade Now
2) Status
3) Reset time
2.2.7.3 Default setting:
1) Load default:
2) Abort
2.2.7.4 System Authentication: if you want to configure SIP settings by keypad, you have to
input password here.
2.2.7.5 Version
2.2.7.6 Watch dog: enable/disable Watch dog.
2.2.7.7 Restart
3 Setup the IP Phone system by using Web Browser
You can use Web browser to configure the IP Phone. First input the IP address in the Web
browser. In the end of IP address, please add the port number “:9999”. Ex:
http://192.168.123.1.:9999. By default, NAT is on, LAN’s IP address is 192.168.123.1,WAN is
DHCP client. In order to configure the IP Phone, your PC must be in the same subnet as the IP
Phone. Go to NETWORK menu to check the WAN’s IP.
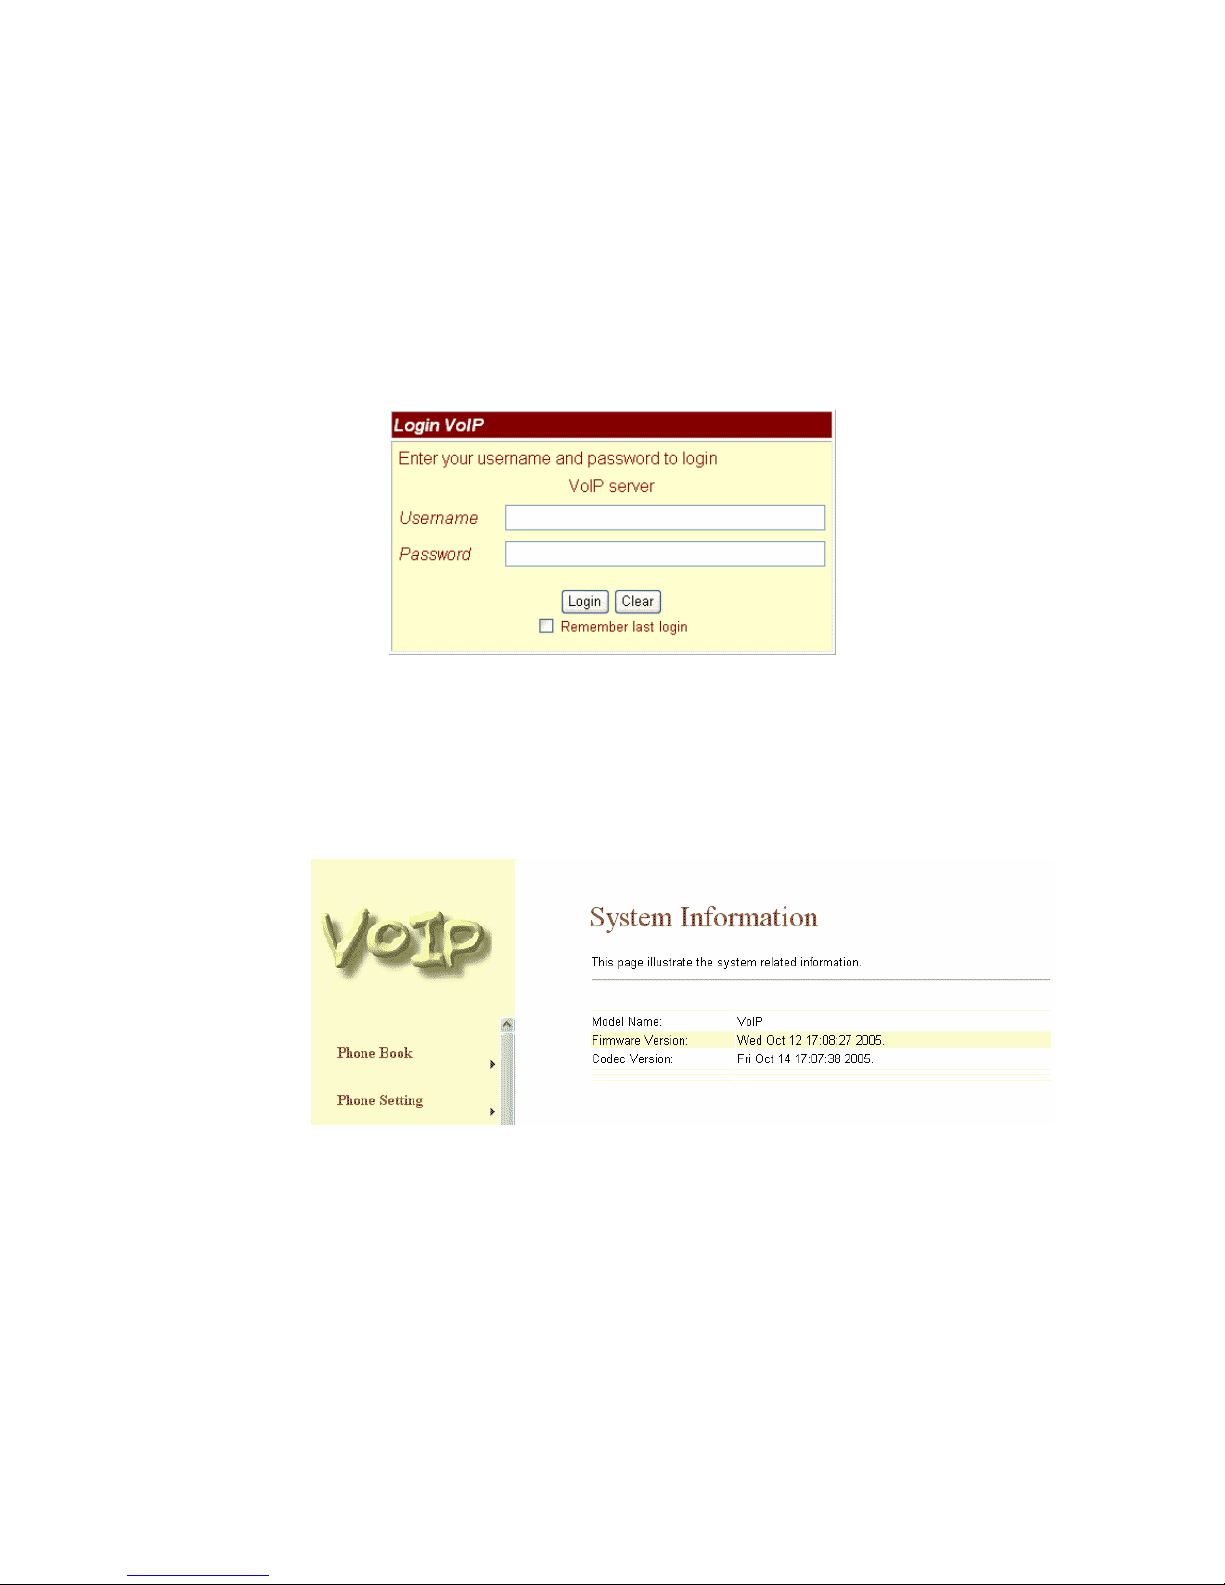
3.1 Login
Please input the username and password into the blank field. The default setting is:
Page 11
VoIP Phone User Manual
11
1) For Administrator, the username is: root; and the password is: test. If you use the
account login, you can configure all the setting.
2) For normal user, the username is: user; and the password is: test. If you use the account
login, you cannot configure the SIP setting.
Click the “Login” button to go to configuration web page.
Note: If you change the setting in a web page, please do remember to click the “Submit”
button in that page. After finishing setting, click the “Save change” function in the left side, and
then click the Save Button. The IP Phone will reboot automatically, and the new configuration
will be effective after reboot.
3.2 System Information
After login the web page, you can see the system information like firmware version, model
name and so on in this page.
In addition, you can see the function list in the left side. You can use mouse to click the
function you want to set up.
3.3 Phone Book
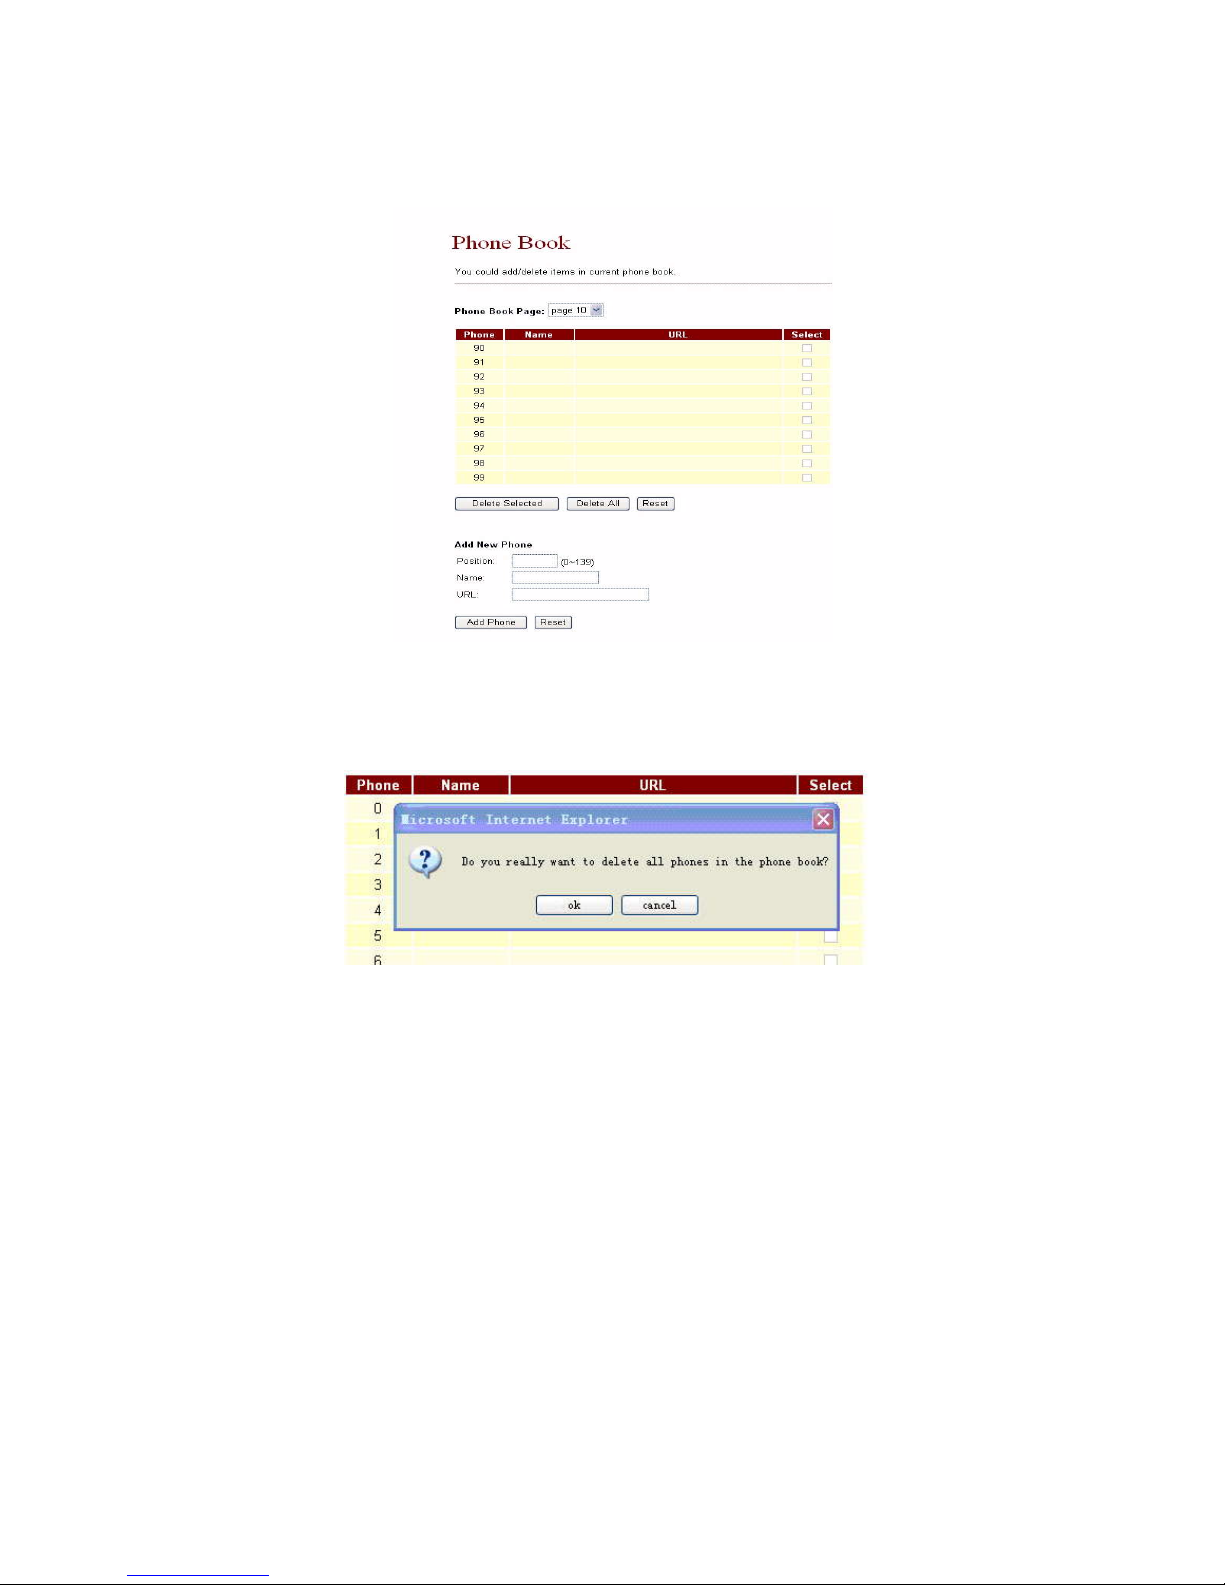
In Phone Book function, you can setup the Phone Book and Speed Dial setting. The phone
book can store up to 140 groups of number. The speed dial can have 10 entries. Press any one of
0~9, the corresponding number will dial out.
Page 12
VoIP Phone User Manual
12
3.3.1 In phone book, you can add/delete phone number.
3.3.1.1 If you want to add phone number in Phone Book, you need input position, name, URL
(ie. Phone number). After input, please click “Add Phone” button.
3.3.1.2 To delete a group of number, first select the number, and then click “Delete Selected”
button to delete selected number.
3.3.1.3 To delete all number, click “Delete All” button, a dialogue window will show up. Click
OK button to delete all numbers.
Page 13
VoIP Phone User Manual
13
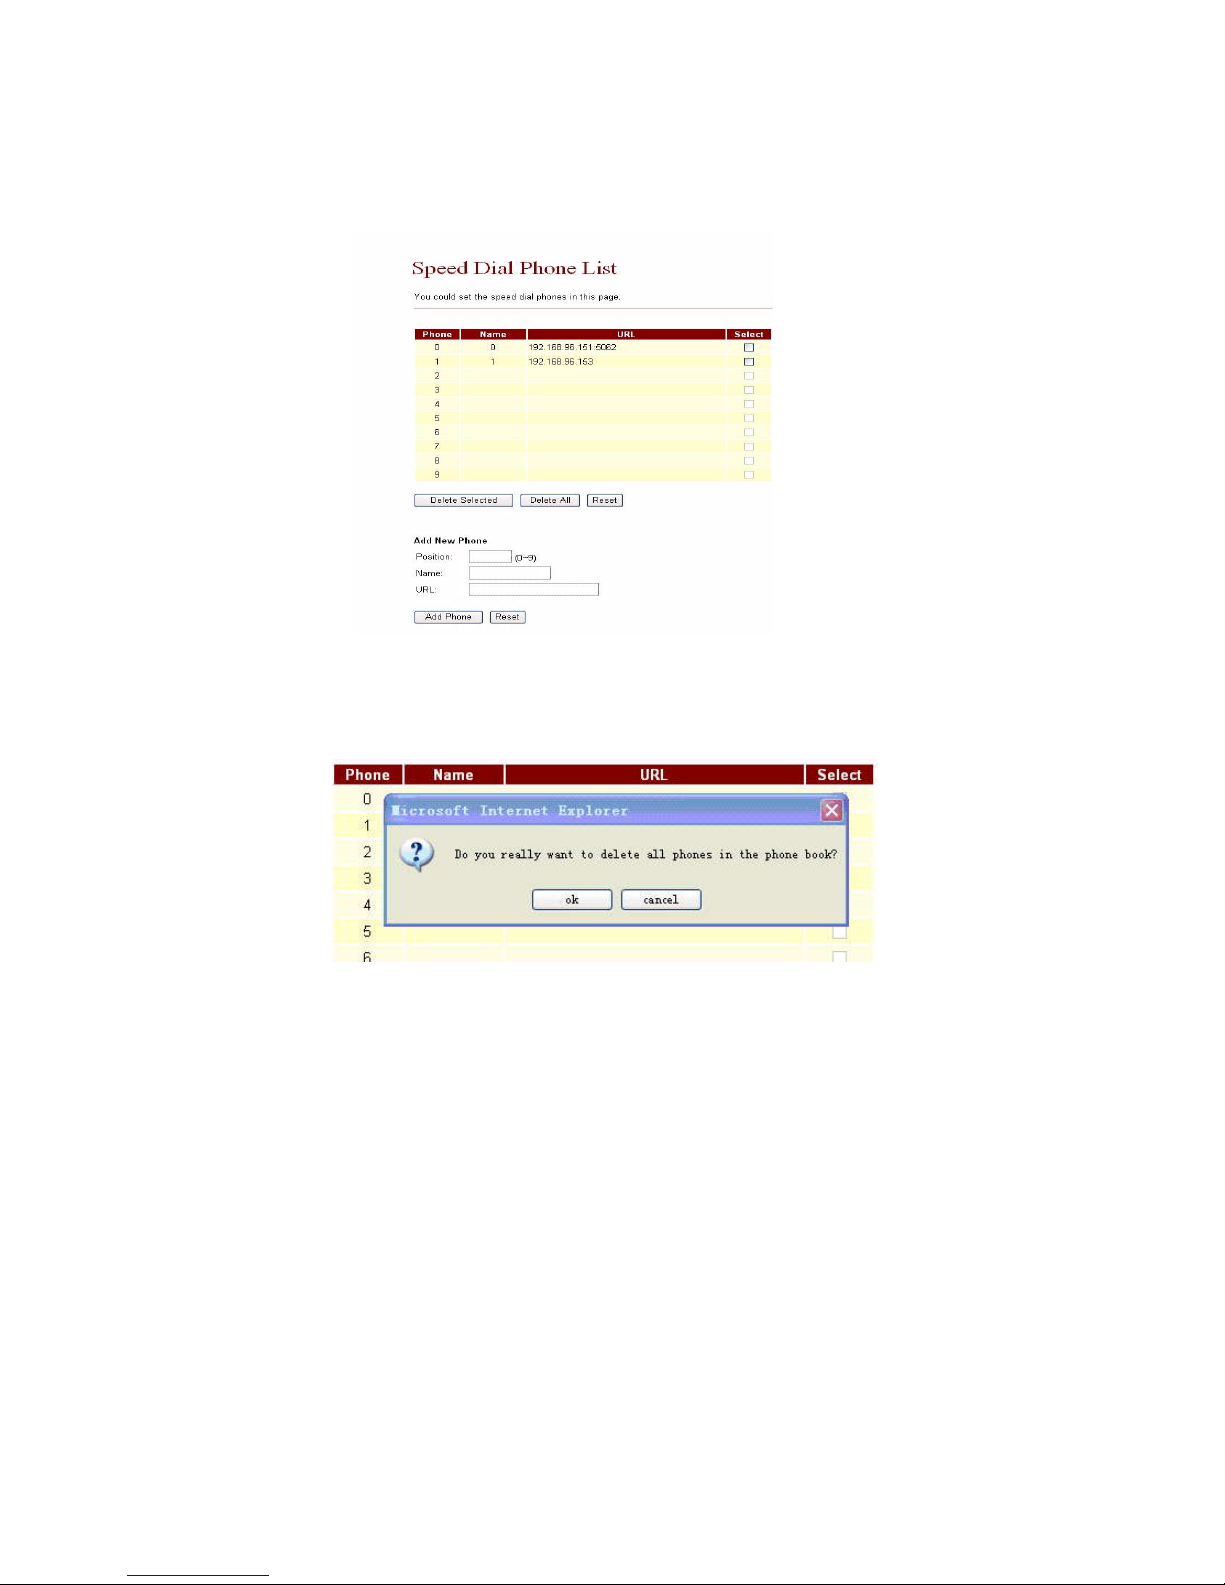
3.3.2 In Speed Dial setting function, you can add/delete Speed Dial number. You can input
maximum 10 entries into speed dial list.
3.3.2.1 To add a phone number into the Speed Dial list, you need input position, name, and
URL. After finishing input, click “Add Phone” button.
3.3.2.2 To delete a group of number, first select the number, and then click “Delete Selected”
button to delete selected number.
3.3.2.3 To delete all number, click “Delete All” button, a dialogue window will show up. Click
OK button to delete all numbers.
3.4 Phone Setting
Phone Setting contains Call Forward, SNTP Settings, Volume Settings, Ringer Setting,
DND Setting, Dial Plan, Call Waiting.
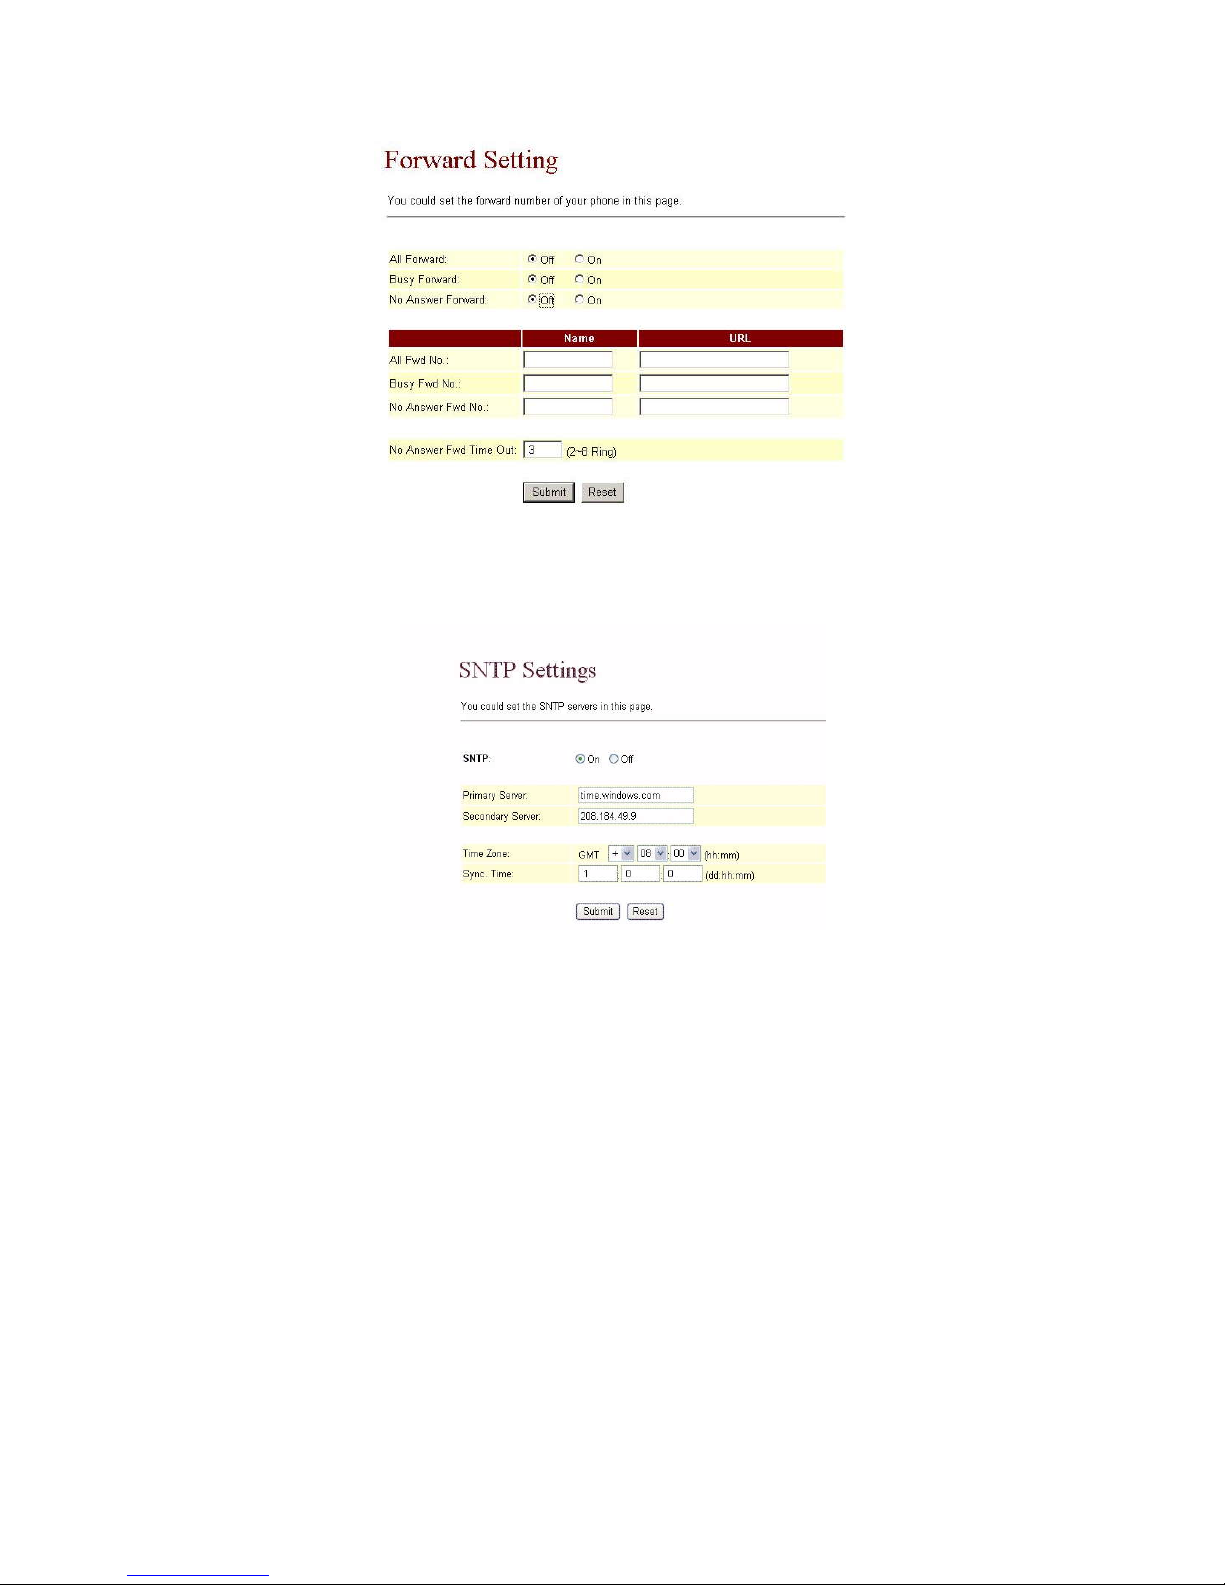
3.4.1 Call Forward function: you can setup the phone number you want to forward in this page.
There are three type of Forward mode. You can choose between All Forward, Busy
Forward, and No Answer Forward.
3.4.1.1 All Forward: All incoming call will forward to the number you choosed. You can input
the name and the phone number in URL field.
3.4.1.2 Busy Forward: If you are on the phone, the new incoming call will forward to the
number you choosed.
3.4.1.3 No Answer Forward: If you can not answer the phone, the incoming call will forward to
the number you choosed. Also you have to set the Time Out time for system to start
forwarding the call to the number you choosed.
After finishing the setting, please click the Submit button.
Page 14
VoIP Phone User Manual
14
3.4.2 SNTP settings: you can set primary and secondary SNTP server to get date/time
information. You also need set Time Zone and Sync Time. After finishing the setting,
please click the Submit button.
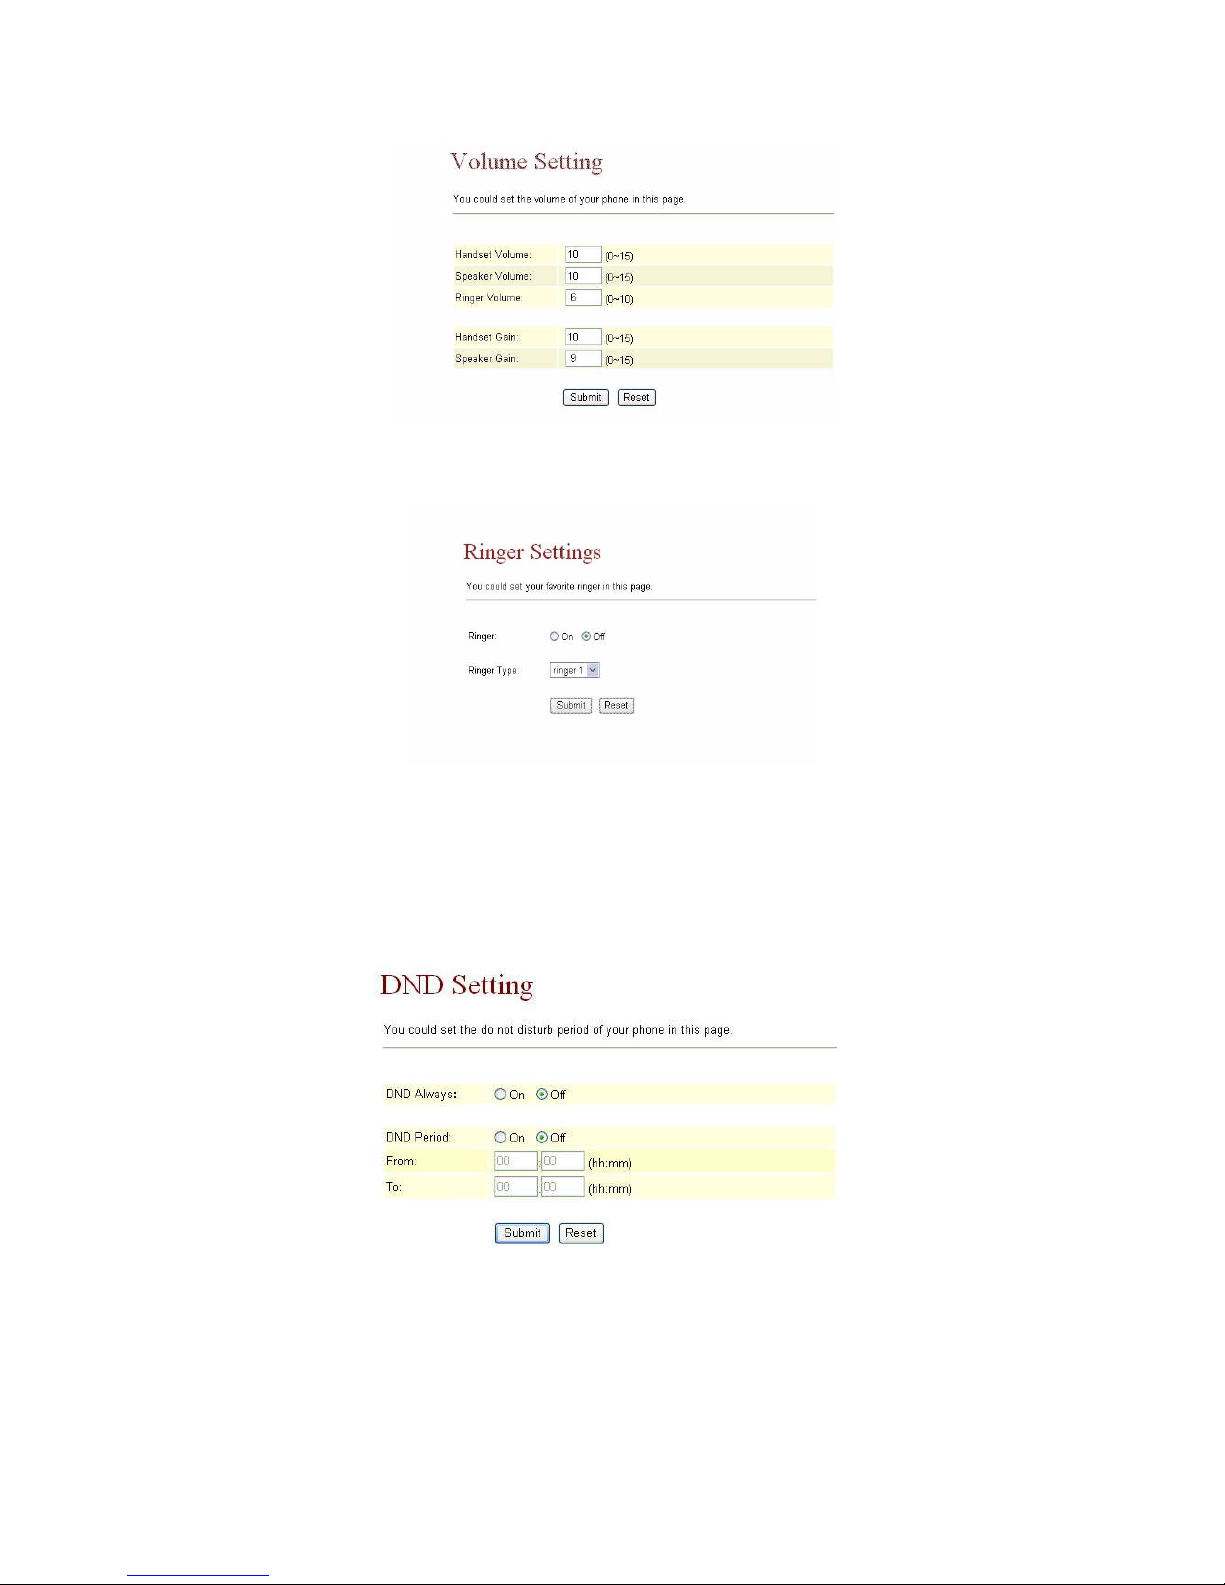
3.4.3 Volume Setting: you can setup Handset Volume, Speaker Volume, Ringer Volume
Handset Gain and Speaker Gain. When you finished the setting, please click the Submit
button.
1) Handset Volume:(0—15)
2) Speaker Volume:(0—15)
3) Ringer Volume:(0—10)
4) Handset Gain:(0—15)
5) Speaker Gain:(0—15)
Page 15
VoIP Phone User Manual
15
3.4.4 Ringer setting: you can select a ringer for incoming call. (total 4 types). When you
finished the setting, please click the Submit button.
3.4.5 DND Setting function: you can setup the DND Setting to keep the phone slience. You can
choose DND Always or DND period.
3.4.5.1 DND Always: All incoming call will be blocked until disable this feature.
3.4.5.2 DND Period: Set a time period and the phone will be blocked during the time period. If
the “From” time is larger than the “To” time, the “To” time will be regarded as next day’s
time.
When you finished the setting, please click the Submit button.
Page 16
VoIP Phone User Manual
16
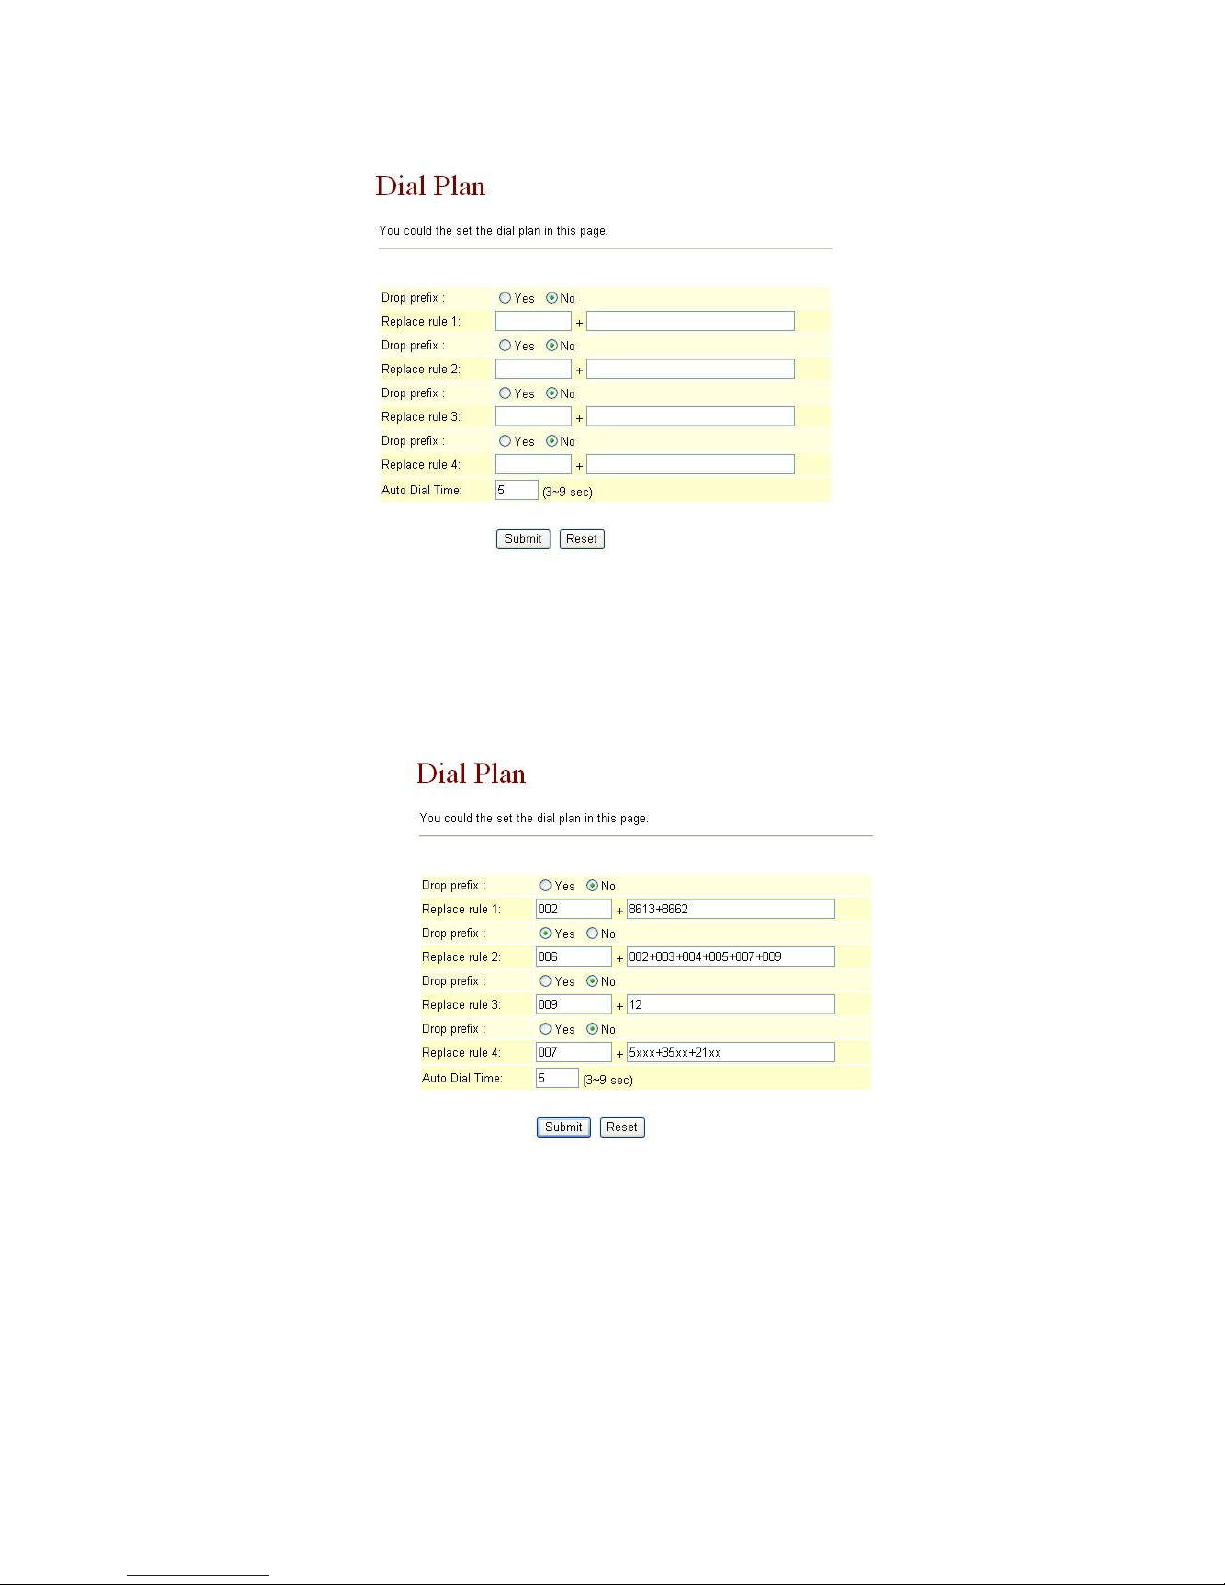
3.4.6 Dial Plan: This function provides basic dial number replacement rule.
Drop prefix: If No, when the number you dialed beginns with the number in right blank,
the number in left blank will be added automatically before your dialed number. If Yes,
when the number you dialed beginns with the number in right blank, the number will be
replaced with the number in left blank.
Auto Dial Time: the number you dialed will be sent out automatically after the time you
set here.
Example 1: Drop prefix: No; Replace rule 1: 002, 8613+8662
When your dialed number beginns with 8613 or 8662, 002 will be added to the beginning
of your dialed number.
Example 2: Drop prefix: Yes, Replace rule 2: 006, 002+003+004+005+007+009
When your dialed number beginns with 002 or 003, 004, 005, 007, 009, 002 or 003, 004,
005, 007, 009 will be replaced with 006.
Example 3: Drop prefix: No; Replace rule 4: 007, 5xxx+35xx+21xx
When your dialed number beginns with 5 or 35, 21, and is 4 digits, 007 will be added to
Page 17
VoIP Phone User Manual
17
the beginning of your dialed number.
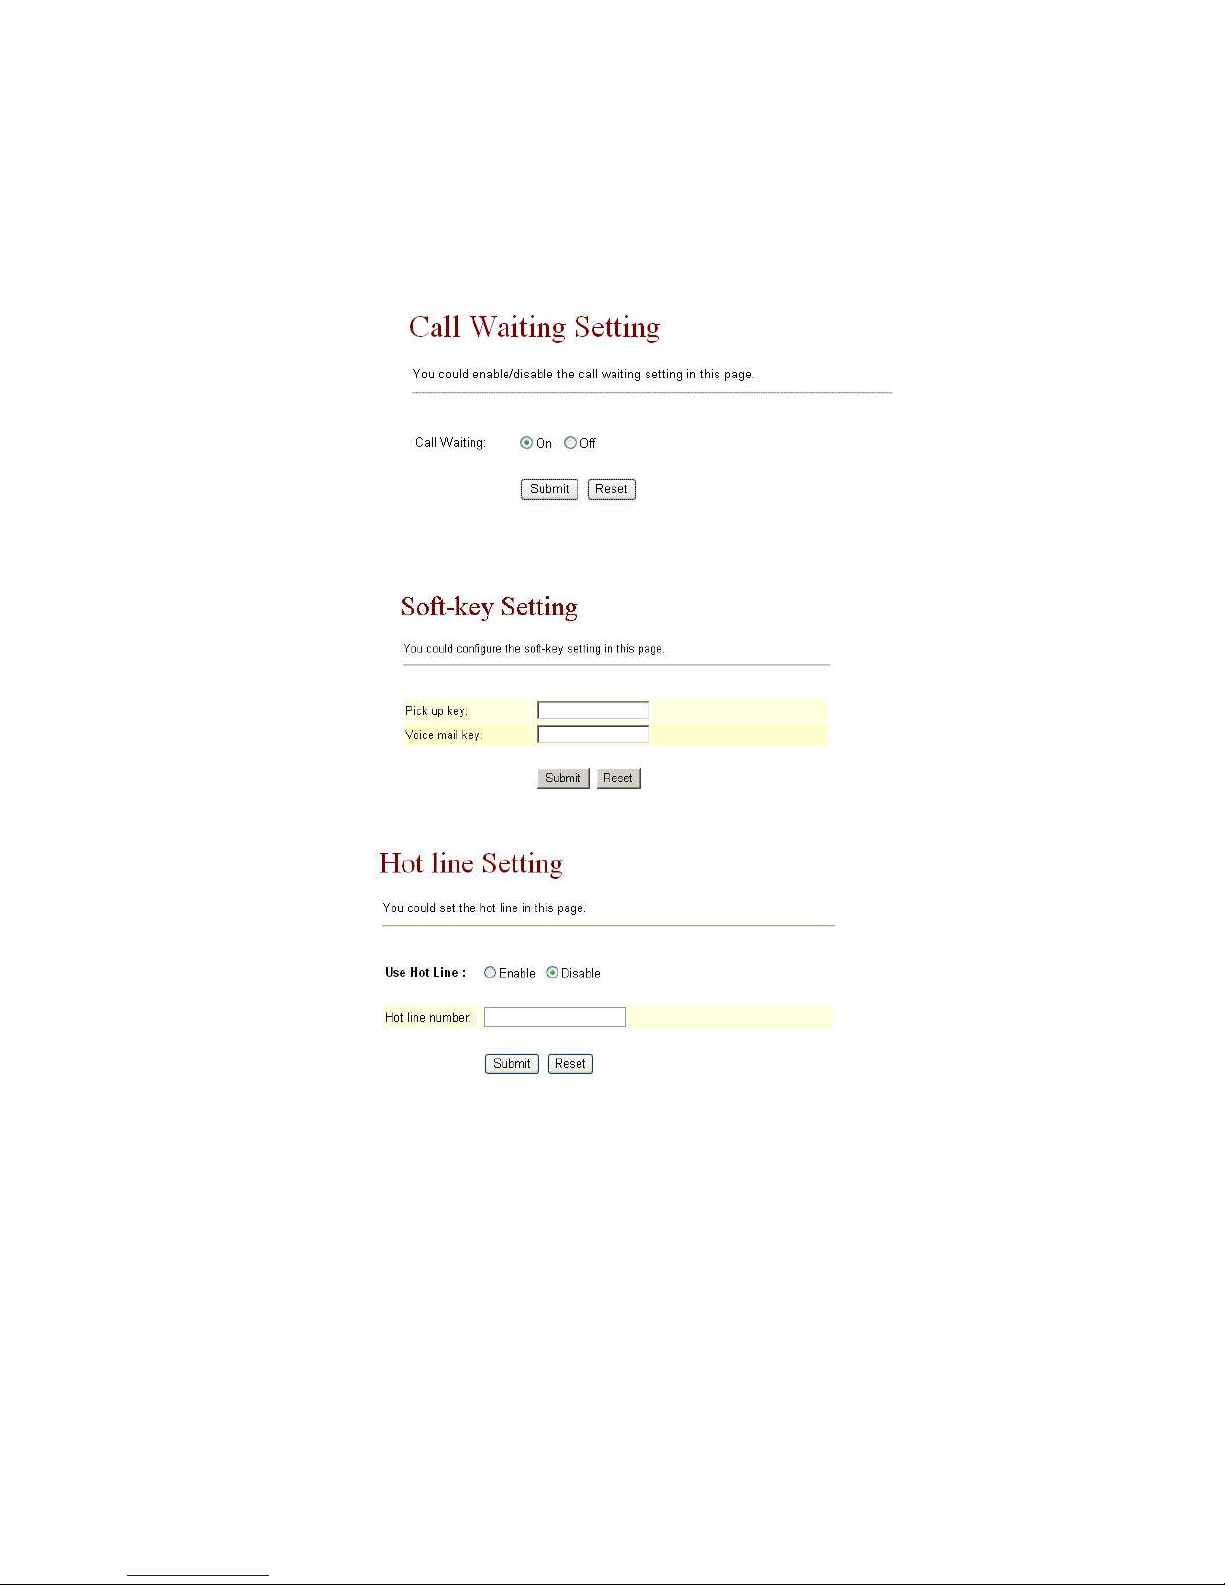
3.4.7 Call Waiting Setting function: You can Enable/Disable the Call Waiting function, When
you are talking with someone, there is a new incoming call, you will hear the call waiting
tone.
3.4.8 Soft-key Setting: you can set Pick up key and Voice mail key here.
3.4.9 Hot line setting
If enabled, when you lift handset, the hot line number will be dialed out automatically.
Page 18
VoIP Phone User Manual
18
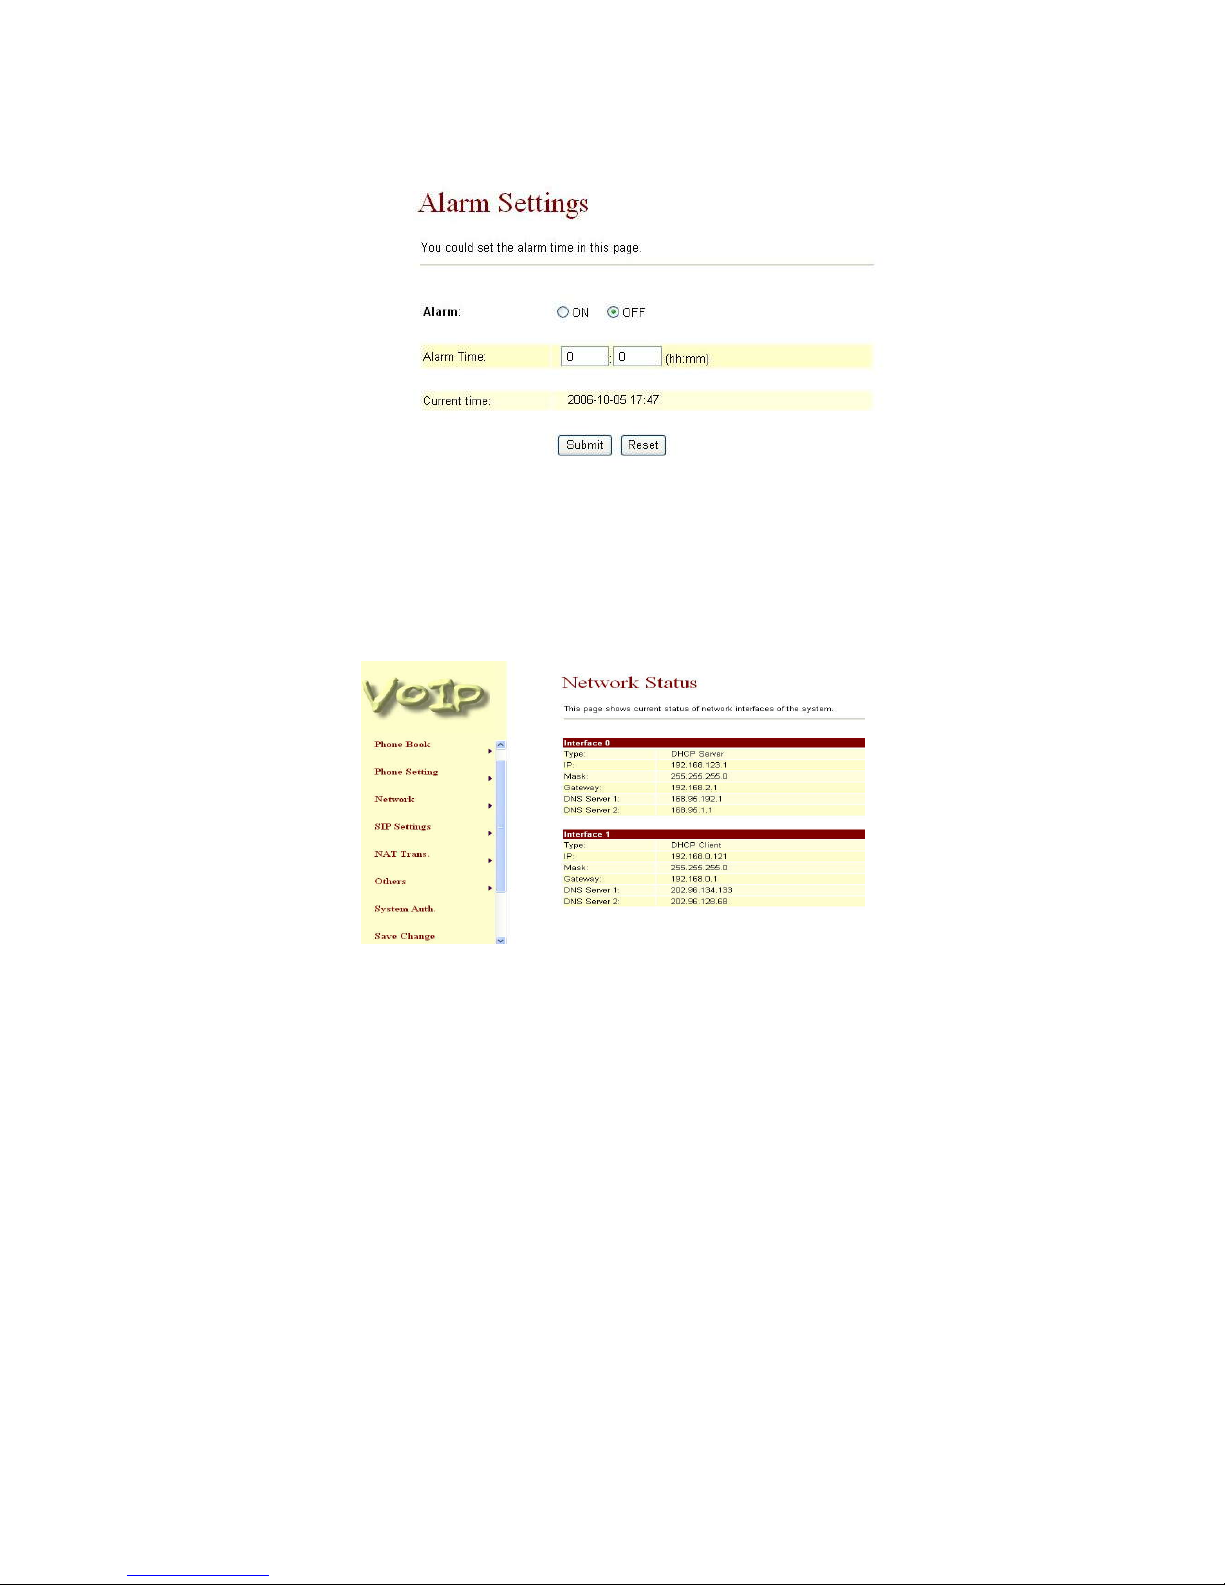
3.4.10 Alarm setting
If On, the phone will alarm at alarm time.
3.5 Network
In Network you can check the Network status, configure the Network Settings, DDNS
settings and VLAN settings.
3.5.1 Network Status:in this page you can check thecurrent network setting.
3.5.2 WAN Settings
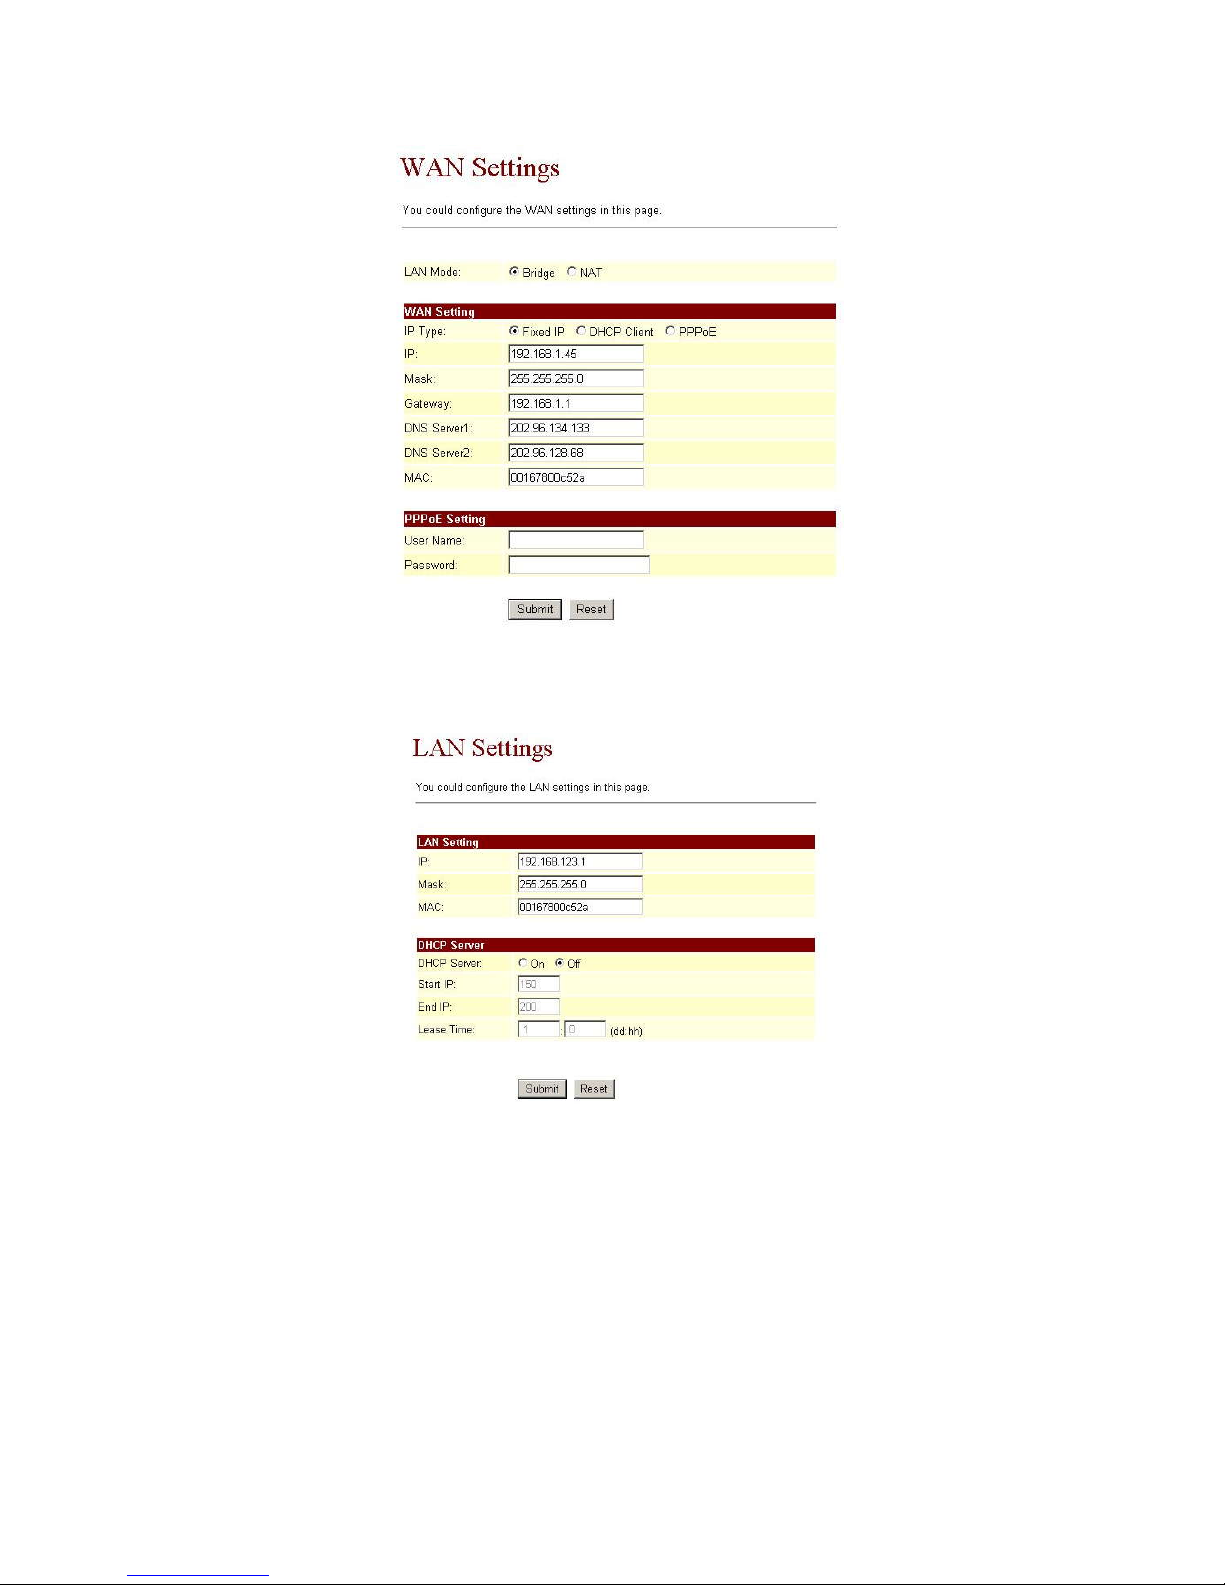
3.5.2.1 Bridge settings: Enable/disable bridge mode. If you set the Bridge On, then the two Fast
Ethernet ports will be transparent
3.5.2.2 WAN Settings: Set network parameters for WAN. WAN can obtain IP address through 3
methods: fixed IP, DHCP client, PPPoE. You may refer to your current network
environment to configure the IP Phone properly.
3.5.2.3 The PPPoE Setting: Set PPPoE Username and Password. If you have the PPPoE
account from your Service Provider, please input the Username and the Password correctly.
When you finished the setting, please click the Submit button.
Page 19
VoIP Phone User Manual
19
3.5.3 LAN Settings: Set network parameters for LAN.You may refer to your current network
environment to configure the IP Phone properly. When you finished the setting, please
click the Submit button.
Page 20
VoIP Phone User Manual
20
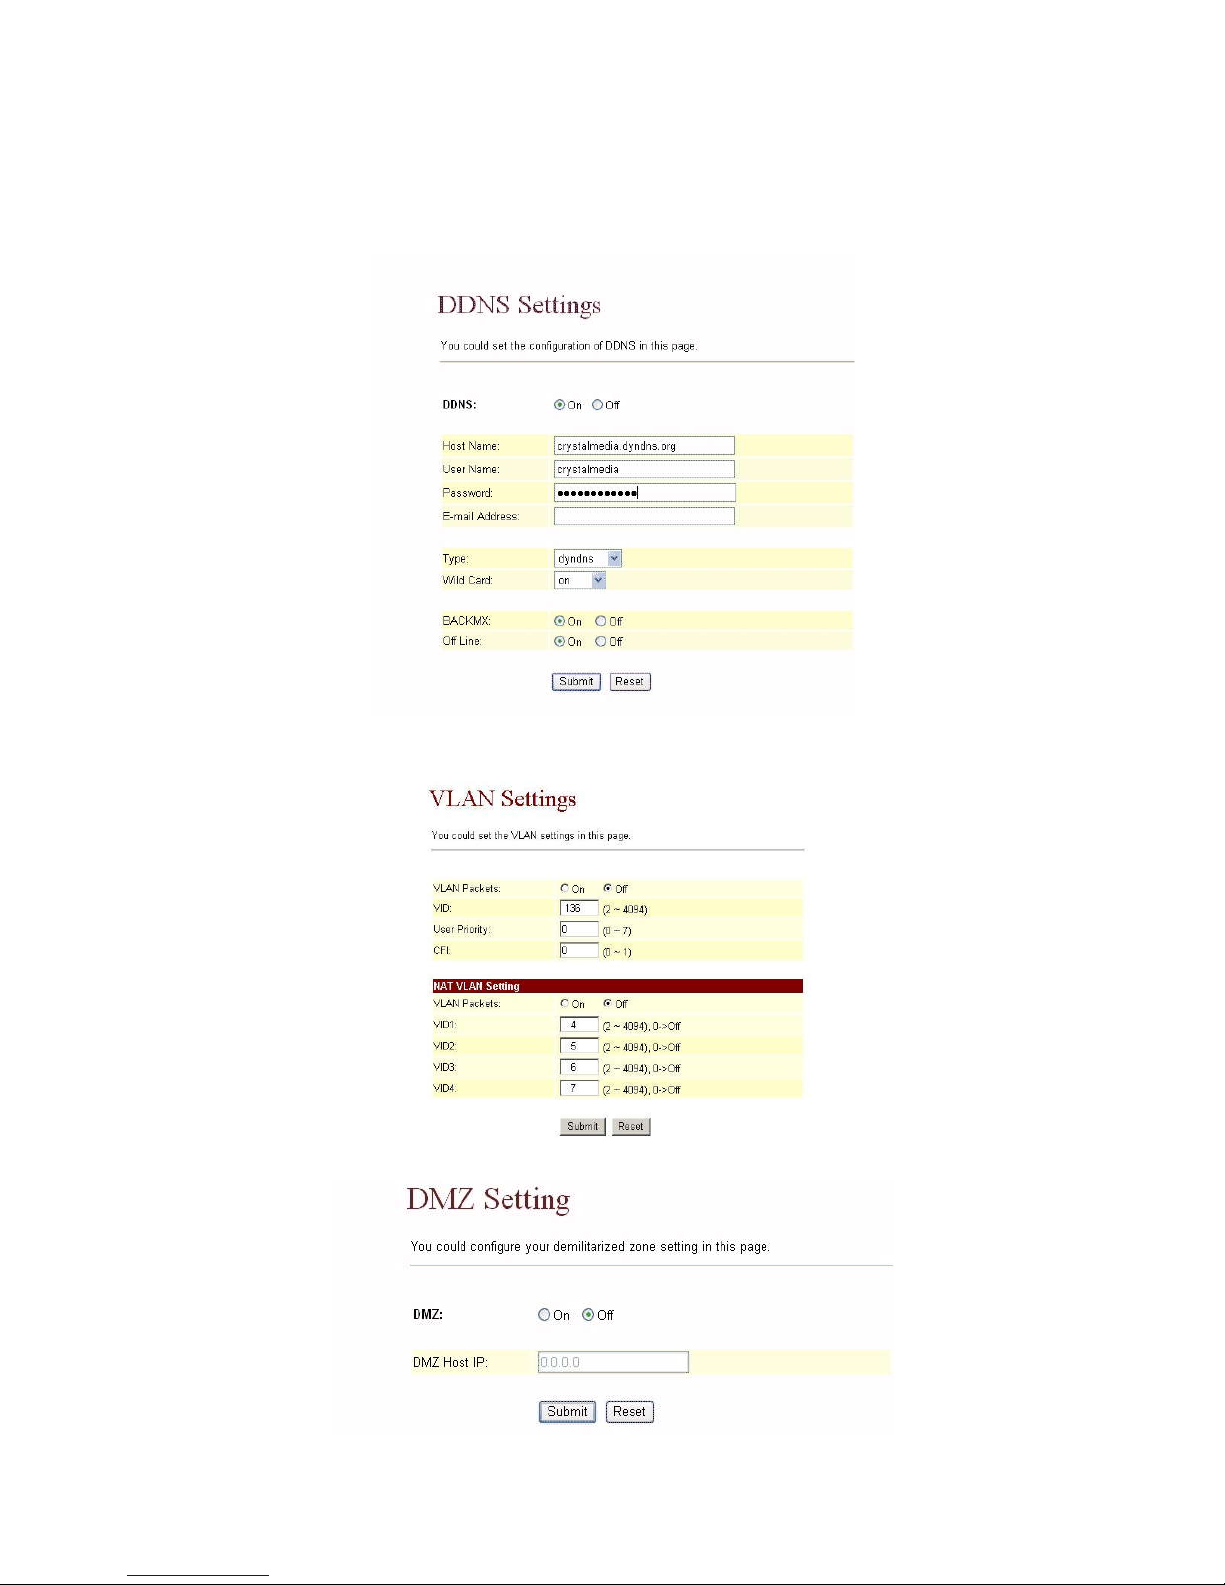
3.5.4 DDNS Setting: You can configure the DDNS setting in this page. You need to have the
DDNS account and input the informations properly. If you have a DDNS account with a
public IP address, others can call you via the DDNS account. But now most of the VoIP
applications work with a SIP Proxy Server. When you finished the setting, please click the
Submit button.
3.5.5 VLAN Settings
3.5.6 DMZ setting
Page 21
VoIP Phone User Manual
21
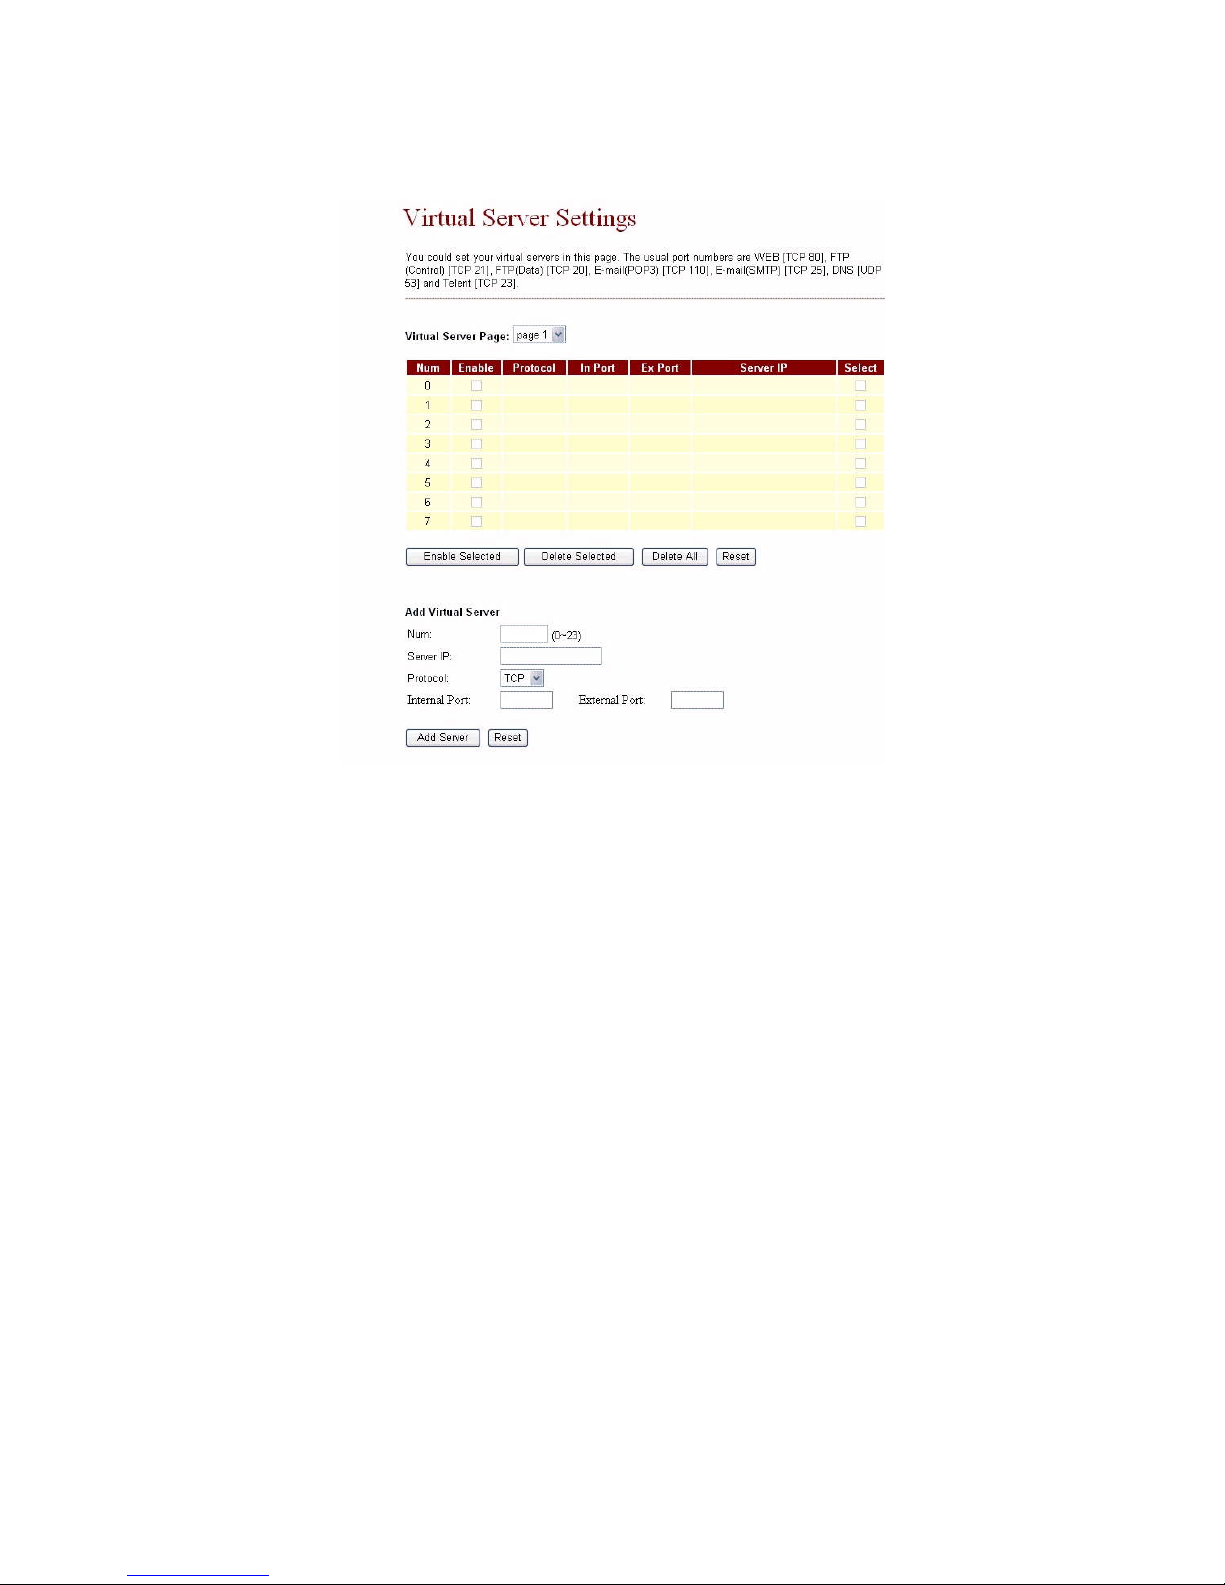
3.5.7 Virtual Server
3.6 SIP Settings
In SIP Settings you can setup the Service Domain, Port Settings, Codec Settings, Codec
ID Setting, DTMF Setting, RPort Setting and Other Settings. If the VoIP service is provided
by ISP, you have to setup the related information correctly so that you can register to the SIP
Proxy Server successfully.
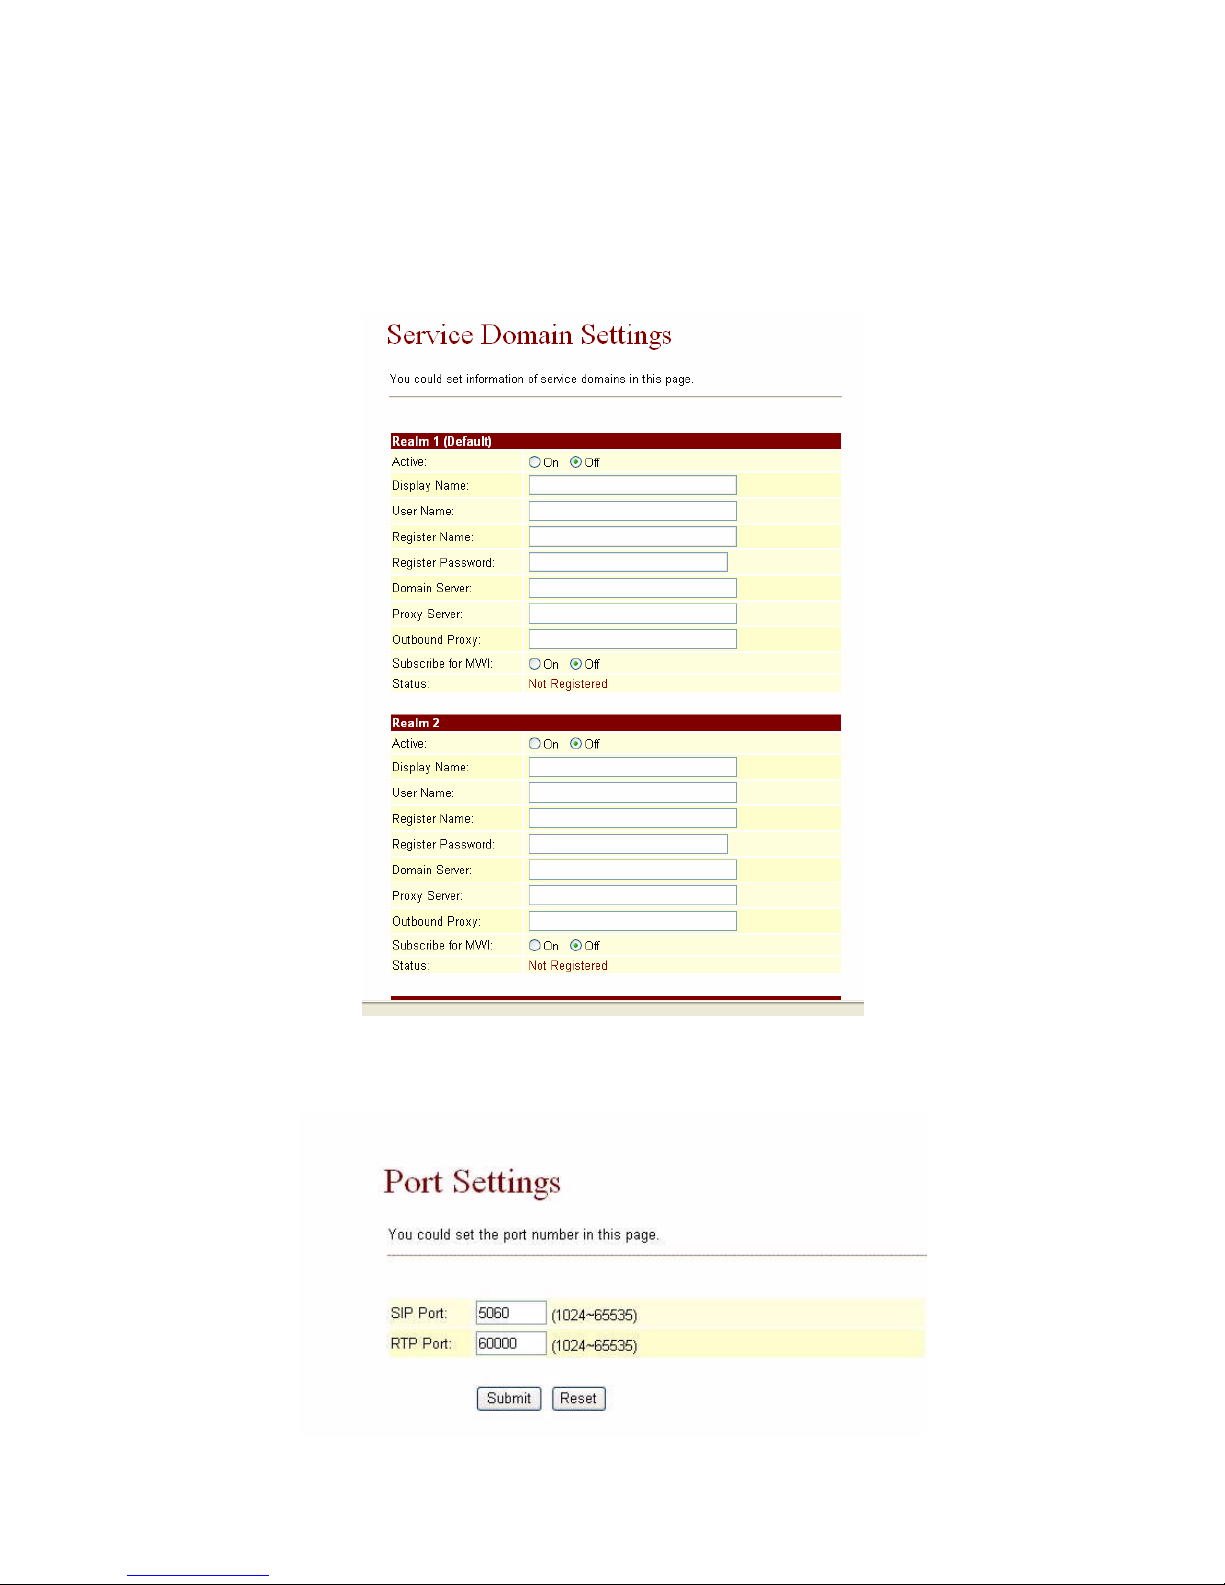
3.6.1 In Service Domain Function you need to input the account and the related informations in
this page. Please refer to your ISP provider. You can register three SIP accounts in the IP
Phone. You can dial the VoIP phone to your friends via first enabled SIP account and
receive the phone from these three SIP accounts.
First, you need click Active to enable the Service Domain, and then you can input the
following items:
Display Name: you can input the name you want to display.
User Name: you need to input the User Name got from your ISP.
Register Name: you need to input the Register Name got from your ISP.
Register Password: you need to input the Register Password got from your ISP.
Domain Server: you need to input the Domain Server got from your ISP.
Proxy Server: you need to input the Proxy Server got from your ISP.
Outbound Proxy: you need to input the Outbound Proxy got from your ISP. If your ISP
does not provide the information, you can skip this item.
Subscribe for MWI: When set to “On” a Subscribe for Message Waiting Indication will
Page 22
VoIP Phone User Manual
22
be sent periodically.
Status: You can see the Register Status in the Status item. If the item shows “Registered”,
then your IP Phone register to the ISP, you can make a phone call now.
If you have more than one SIP account, you can follow the steps to register to the other
ISP.
When you finished the setting, please click the Submit button.
3.6.2 Port Settings: you can setup the SIP and RTP port number in this page. Each ISP provider
will have different SIP/RTPport setting, please refer to the ISP to setup the port number
correctly. When you finished the setting, please click the Submit button.
Page 23
VoIP Phone User Manual
23
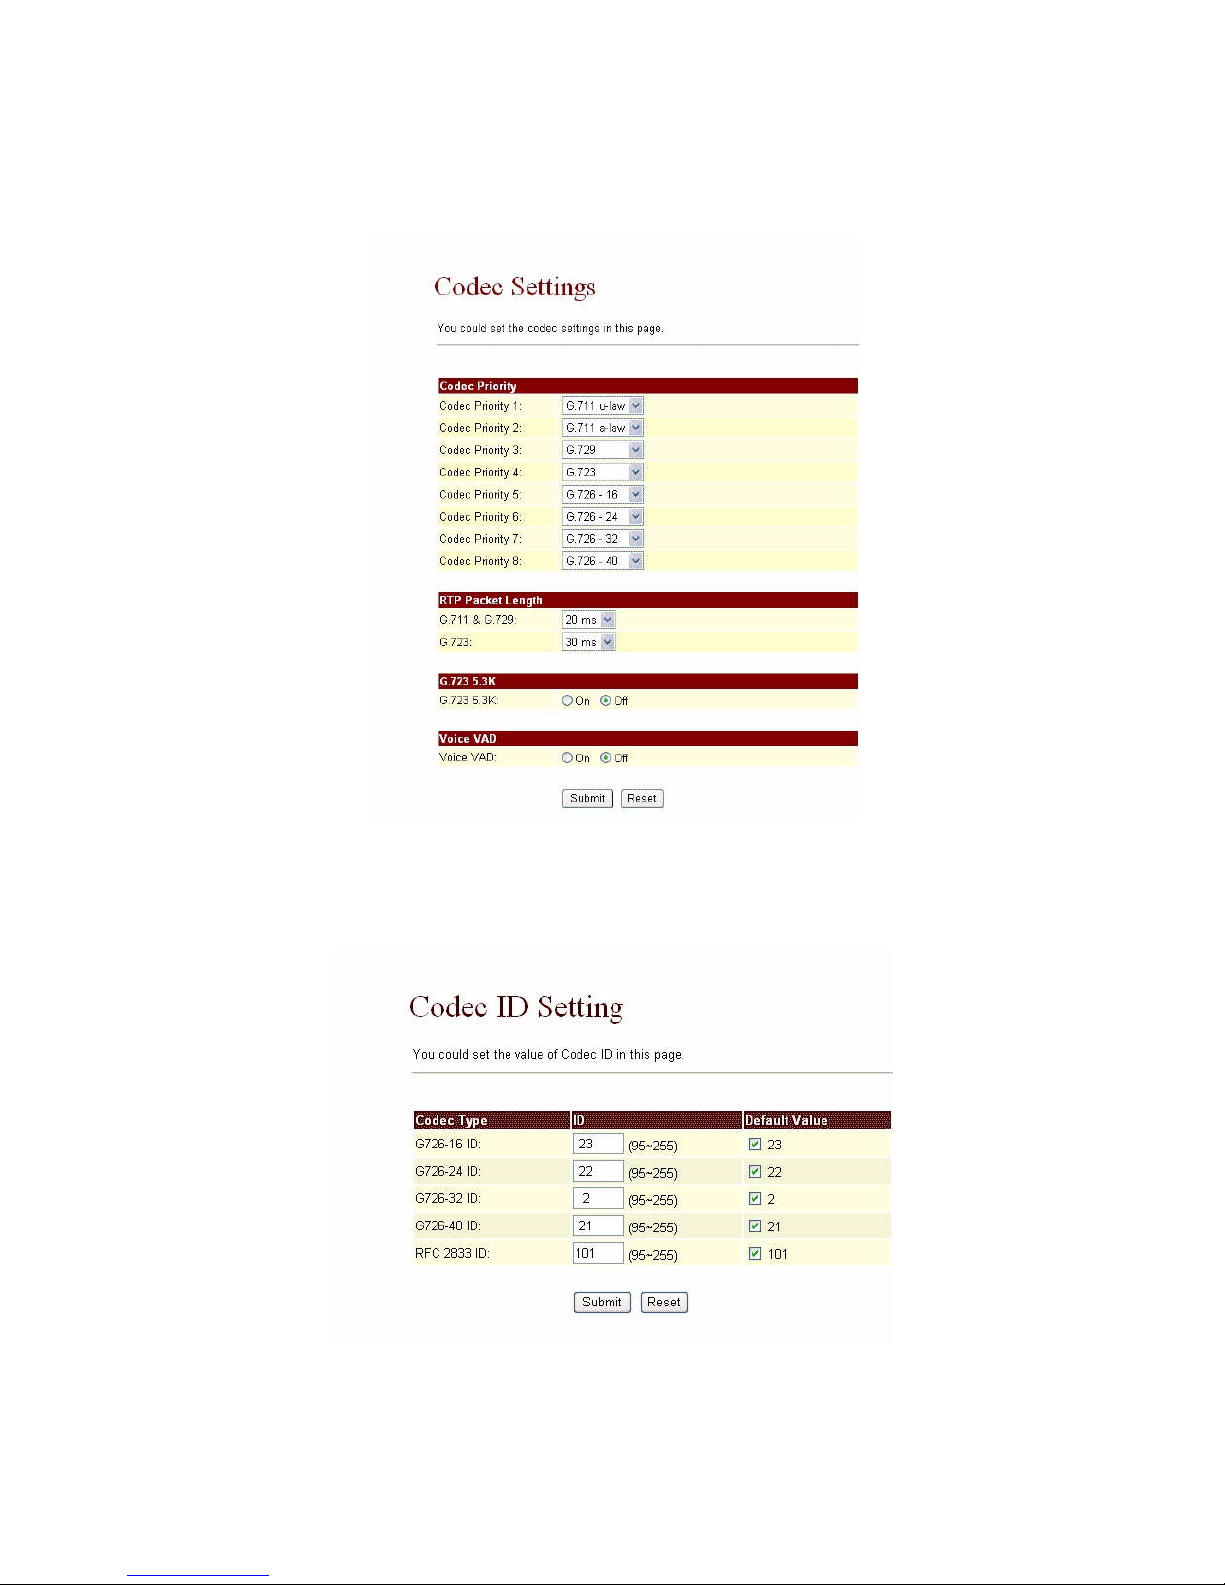
3.6.3 Codec Settings: you can setup the Codec priority, RTP packet length, and VAD function
in this page. You need to follow the ISP suggestion to setup these items. When you
finished the setting, please click the Submit button.
3.6.4 Codec ID Setting: Sometimes 2 VoIP devices with different Codec ID will cause some
problems. If there are some problems when you are talking with others, you may ask the
other one what Codec ID he is useing, and change your Codec ID to the same as his.
When you finished the setting, please click the Submit button.
Page 24
VoIP Phone User Manual
24
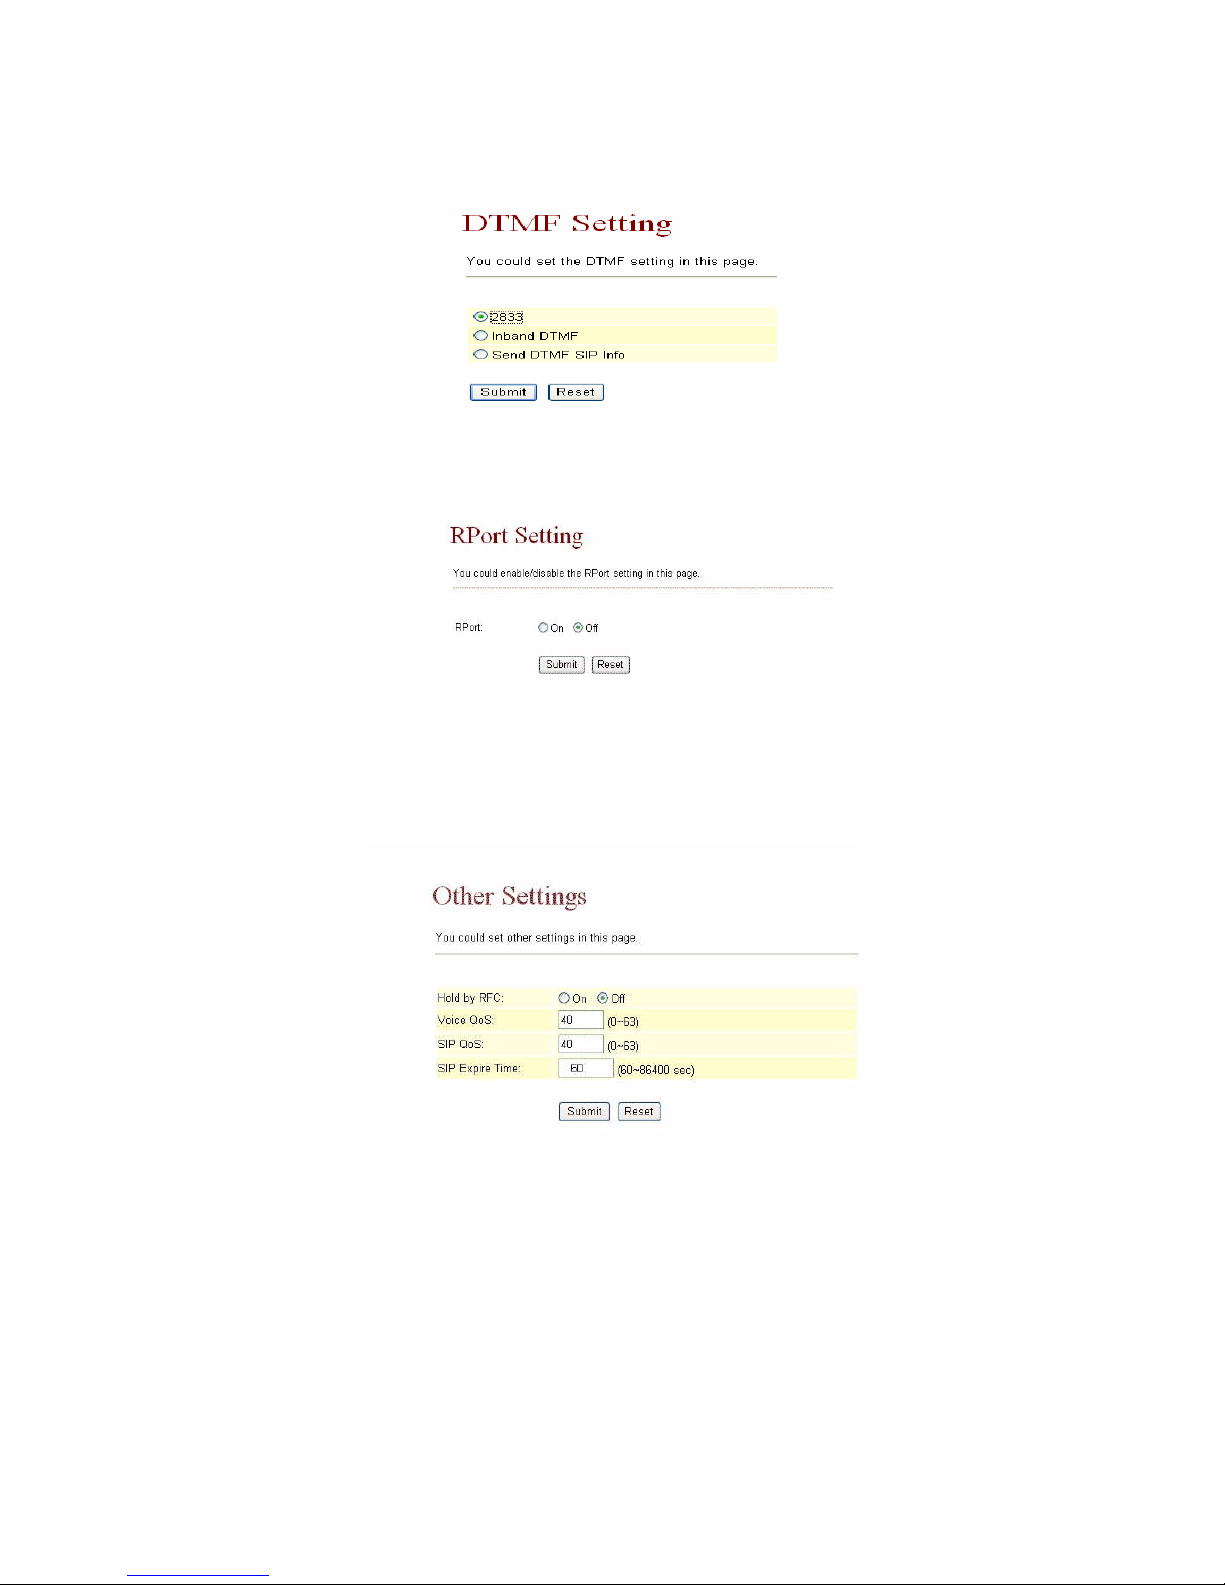
3.6.5 DTMF Setting: Choose between 2833, Inband DTMF and Send DTMF SIP Info. Please
refer to your ISP for correct setting. When you finished the setting, please click the
Submit button.
3.6.6 RPort Setting: Enable/Disable RPort. To change this setting, please following your ISP’s
information. When you finished the setting, please click the Submit button.
3.6.7 Other Settings: you can setup the Hold by RFC, Voice/SIP QoS and SIP expire time in
this page. To change these settings please following your ISP’s information. The QoS
setting is to set the voice packets’ priority. If you set the value higher, the voice packets
will get higher priority. But the QoS function still need to cooperate with the others
Internet devices. When you finished the setting, please click the Submit button.
Page 25
VoIP Phone User Manual
25
3.7 NAT Trans
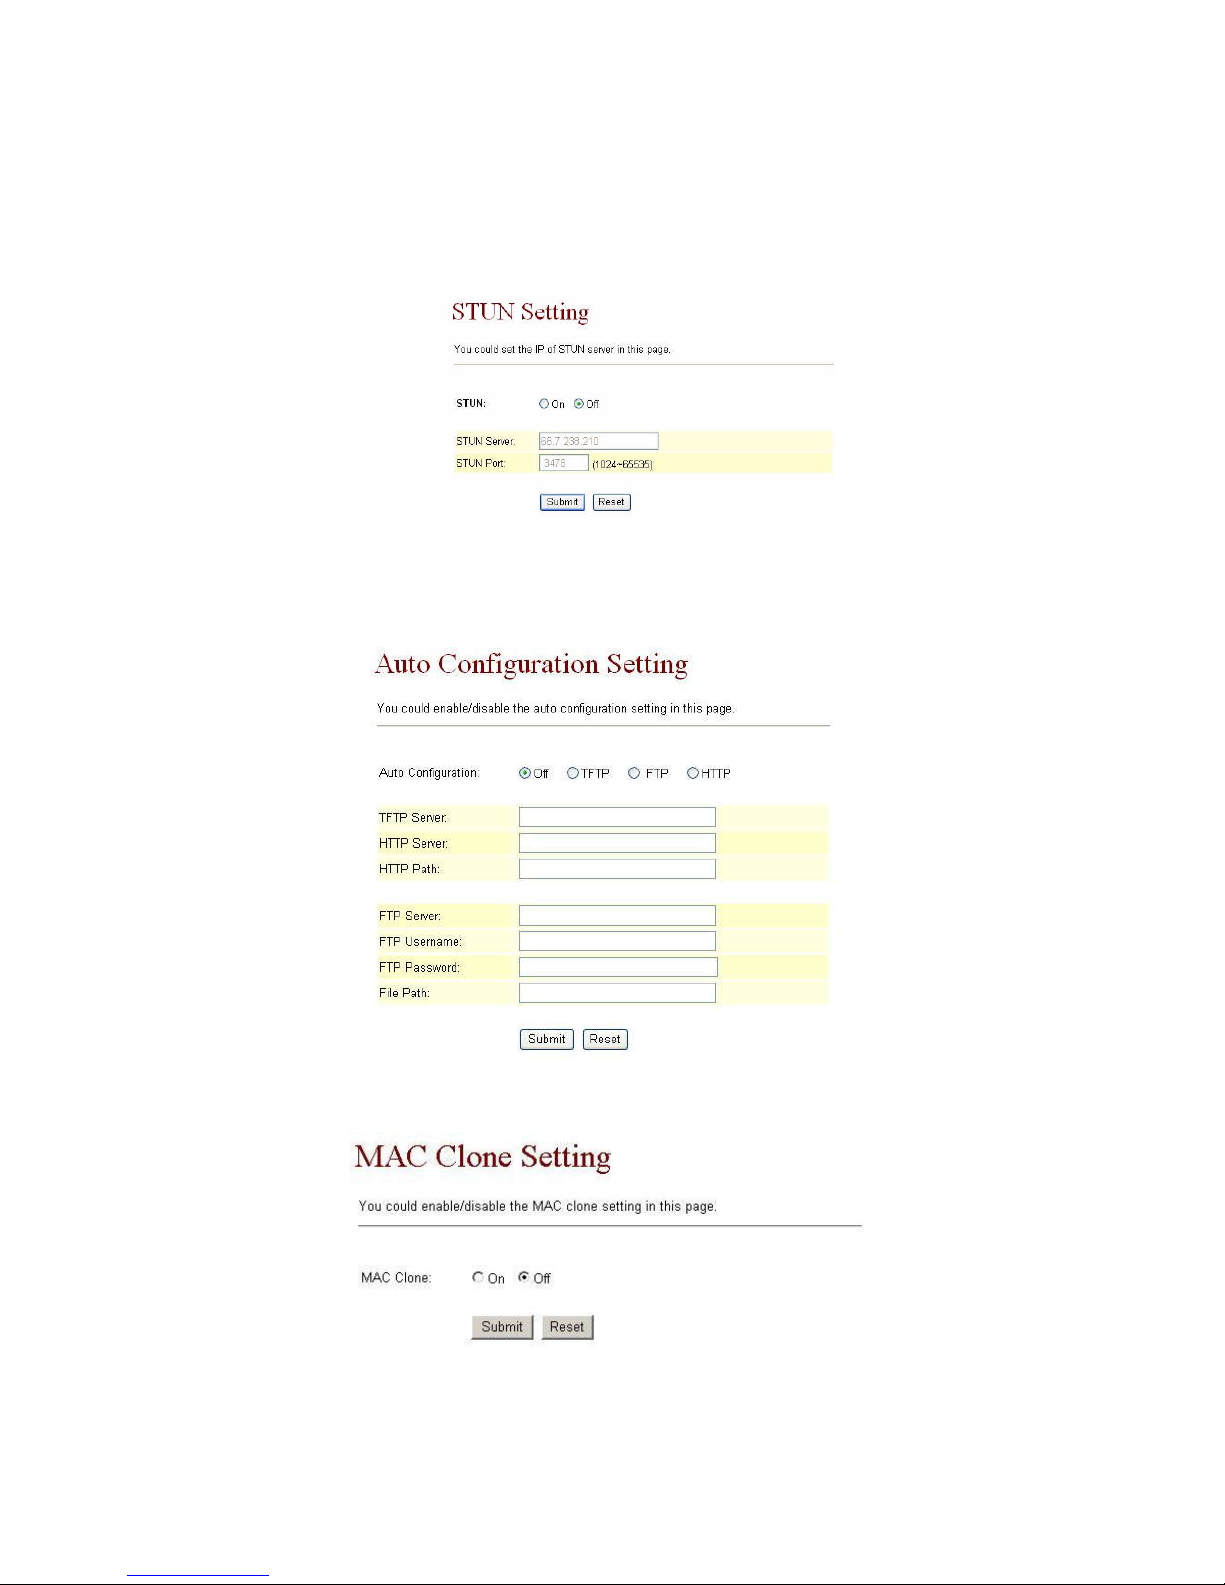
3.7.1 STUN Setting: you can setup the STUN Enable/Disable and STUN Server IP address in
this page. This function can help your IP Phone working properly behind NAT. To change
these settings please following your ISP information. When you finished the setting,
please click the Submit button.
3.8 Other
This page is for “Auto Config” and “ICMP Setting” configuration.
3.8.1 Auto Config: Please set these according to your need. When you finished the setting,
please click the Submit button.
3.8.2 MAC Clone Setting: Enable/disable MAC Clone.
Page 26
VoIP Phone User Manual
26
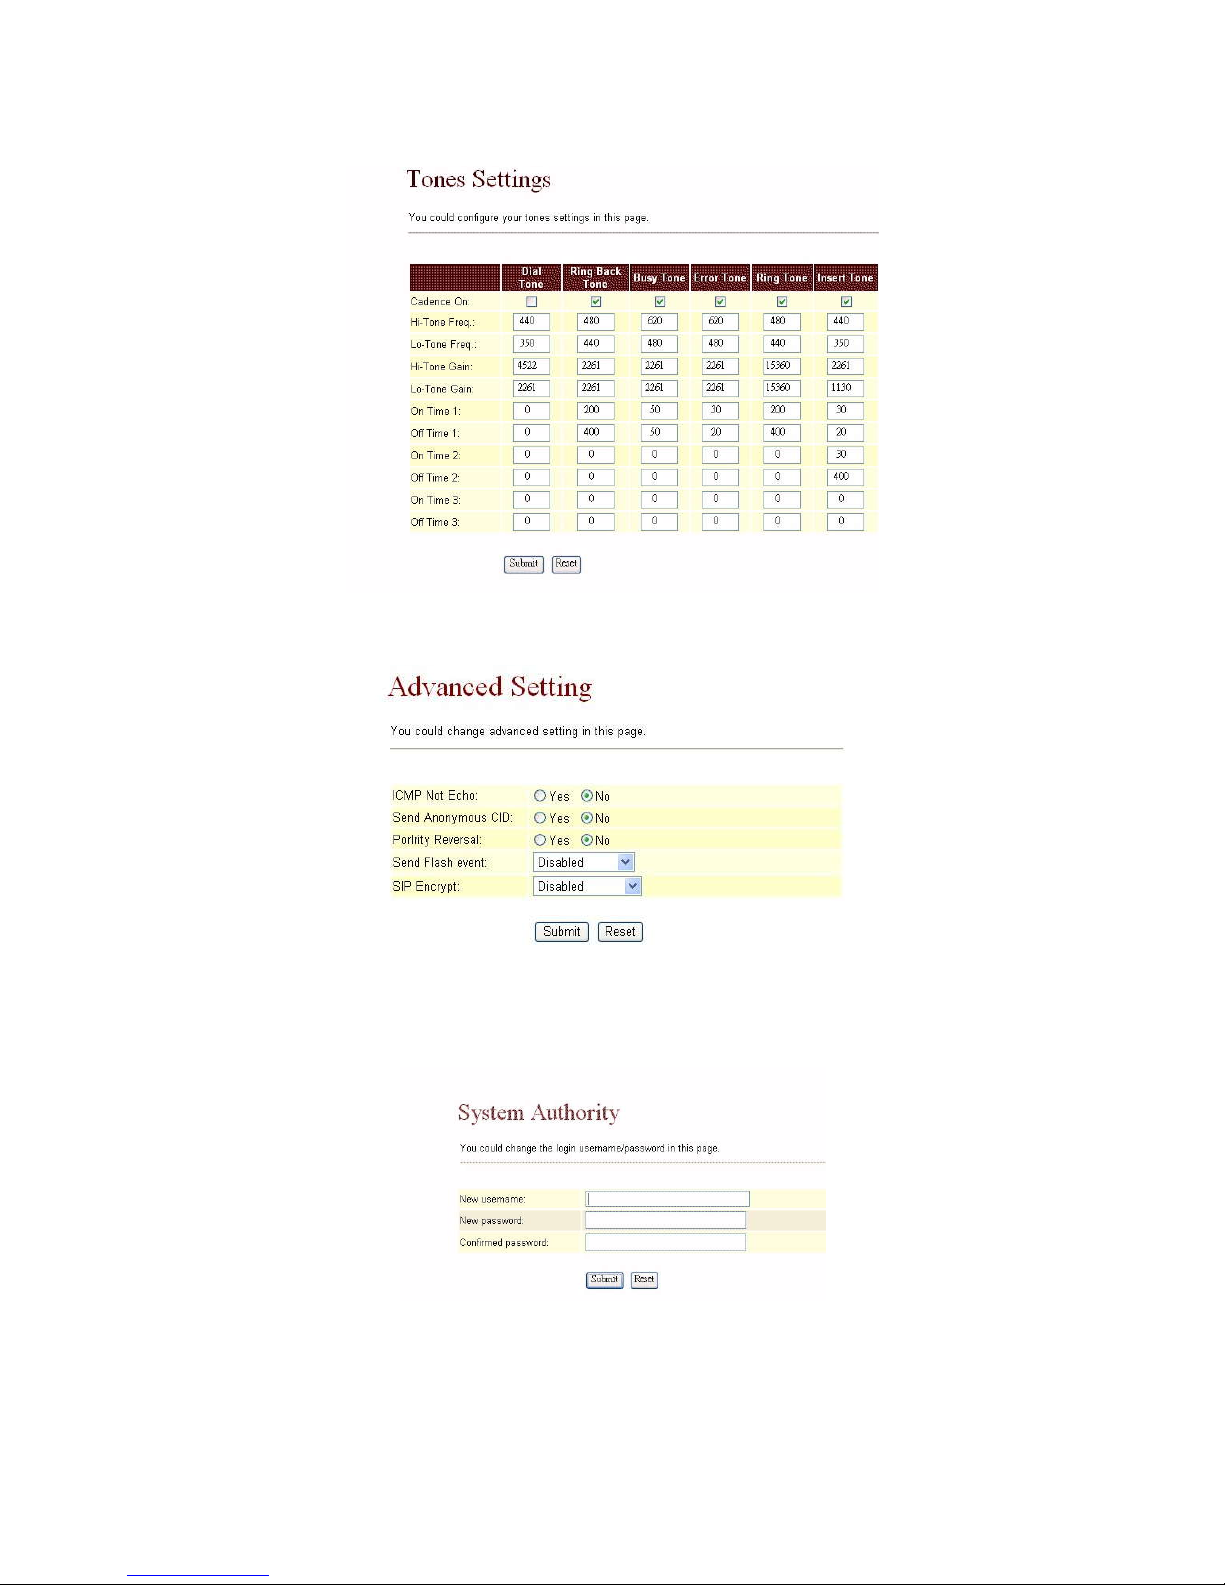
3.8.3 Tones Settings
3.8.4 Advanced Settings
3.9 System Auth.
In System Authority you can change your login name and password.
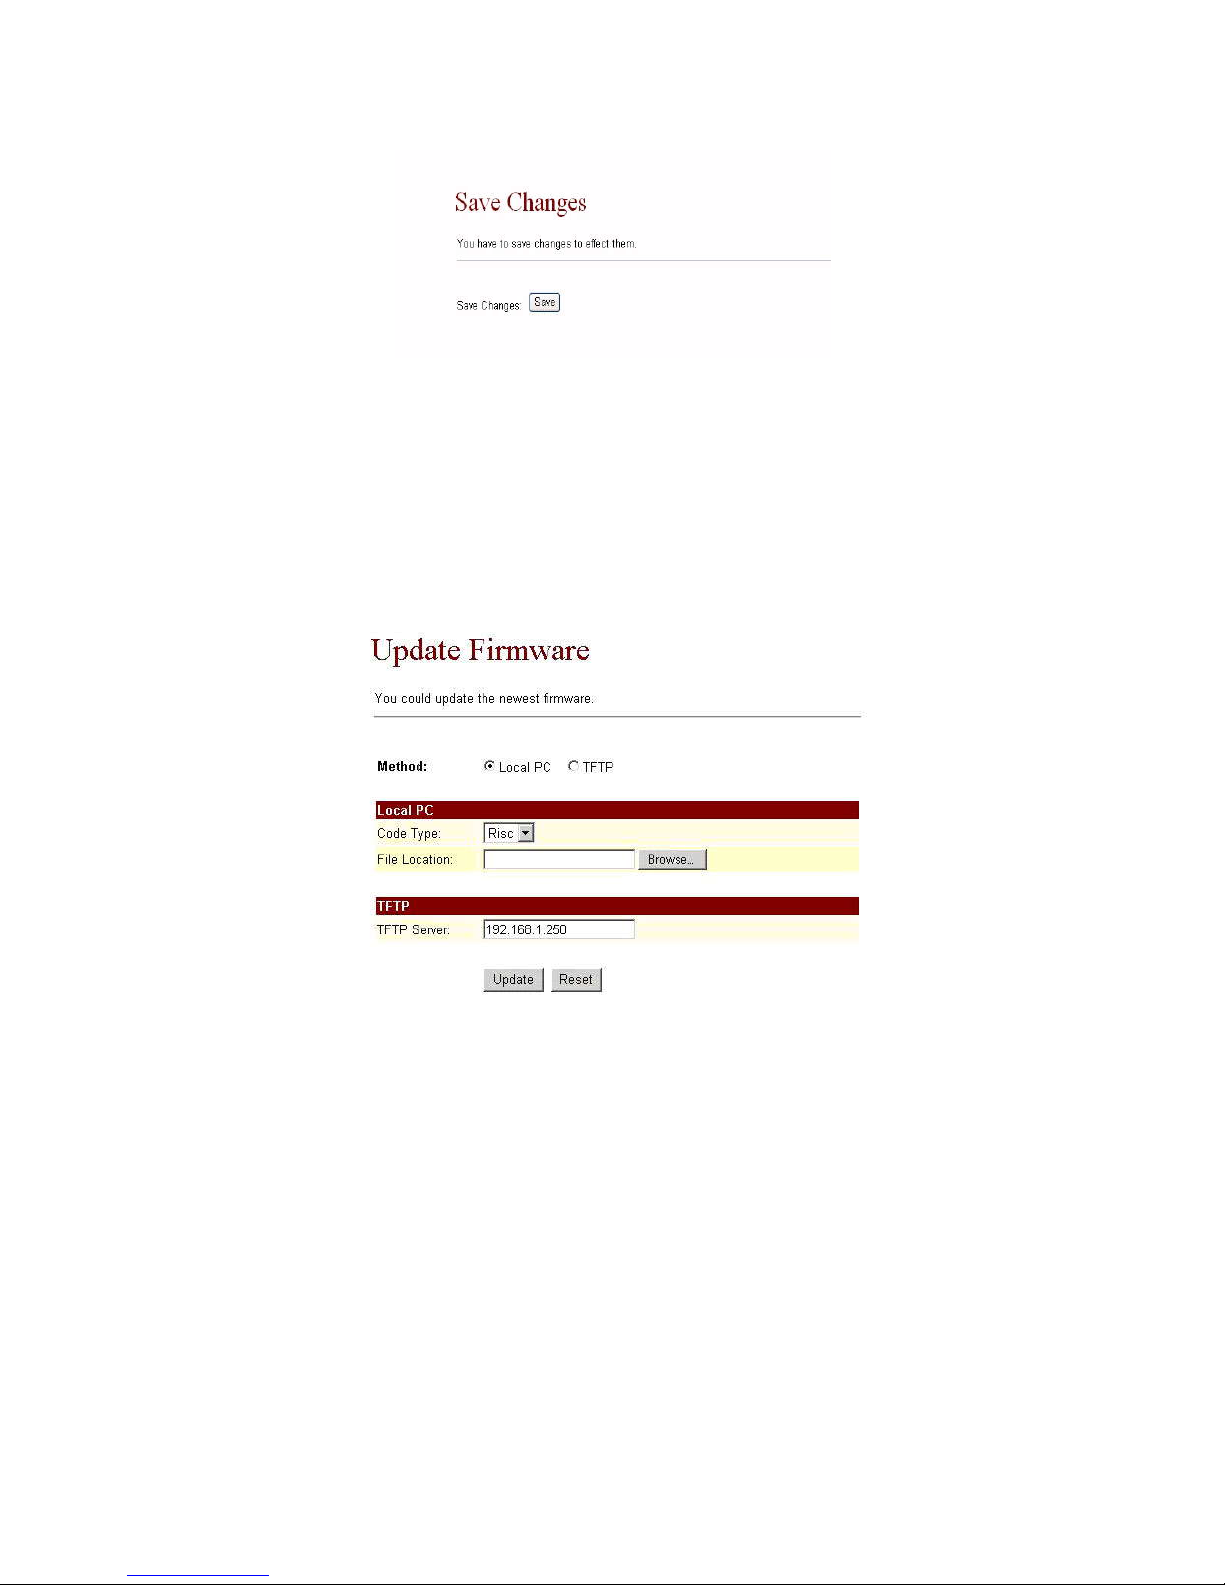
3.10 Save Change
In Save Change you can save the changes you have made. If you want to make new setting
into effect, you have to click the Save button. After you click the Save button, the IP Phone will
automatically restart and the new setting will take effect.
Page 27
VoIP Phone User Manual
27
3.11 Update
In Update you can update the IP Phone’s firmware to the latest or restore the factory setting.
3.11.1 In New Firmware function you can update new firmware via Local PC/TFTP in this page.
You can ugrade the firmware by the following steps:
1) Select the firmware code type, Risc or DSP code.
2) Click the “Browse” button in the right side of the File Location, or you can
type the correct path and the filename in File Location blank.
3) Select the correct file you want to download to the IP Phone then click the
Update button.
Page 28
VoIP Phone User Manual
28
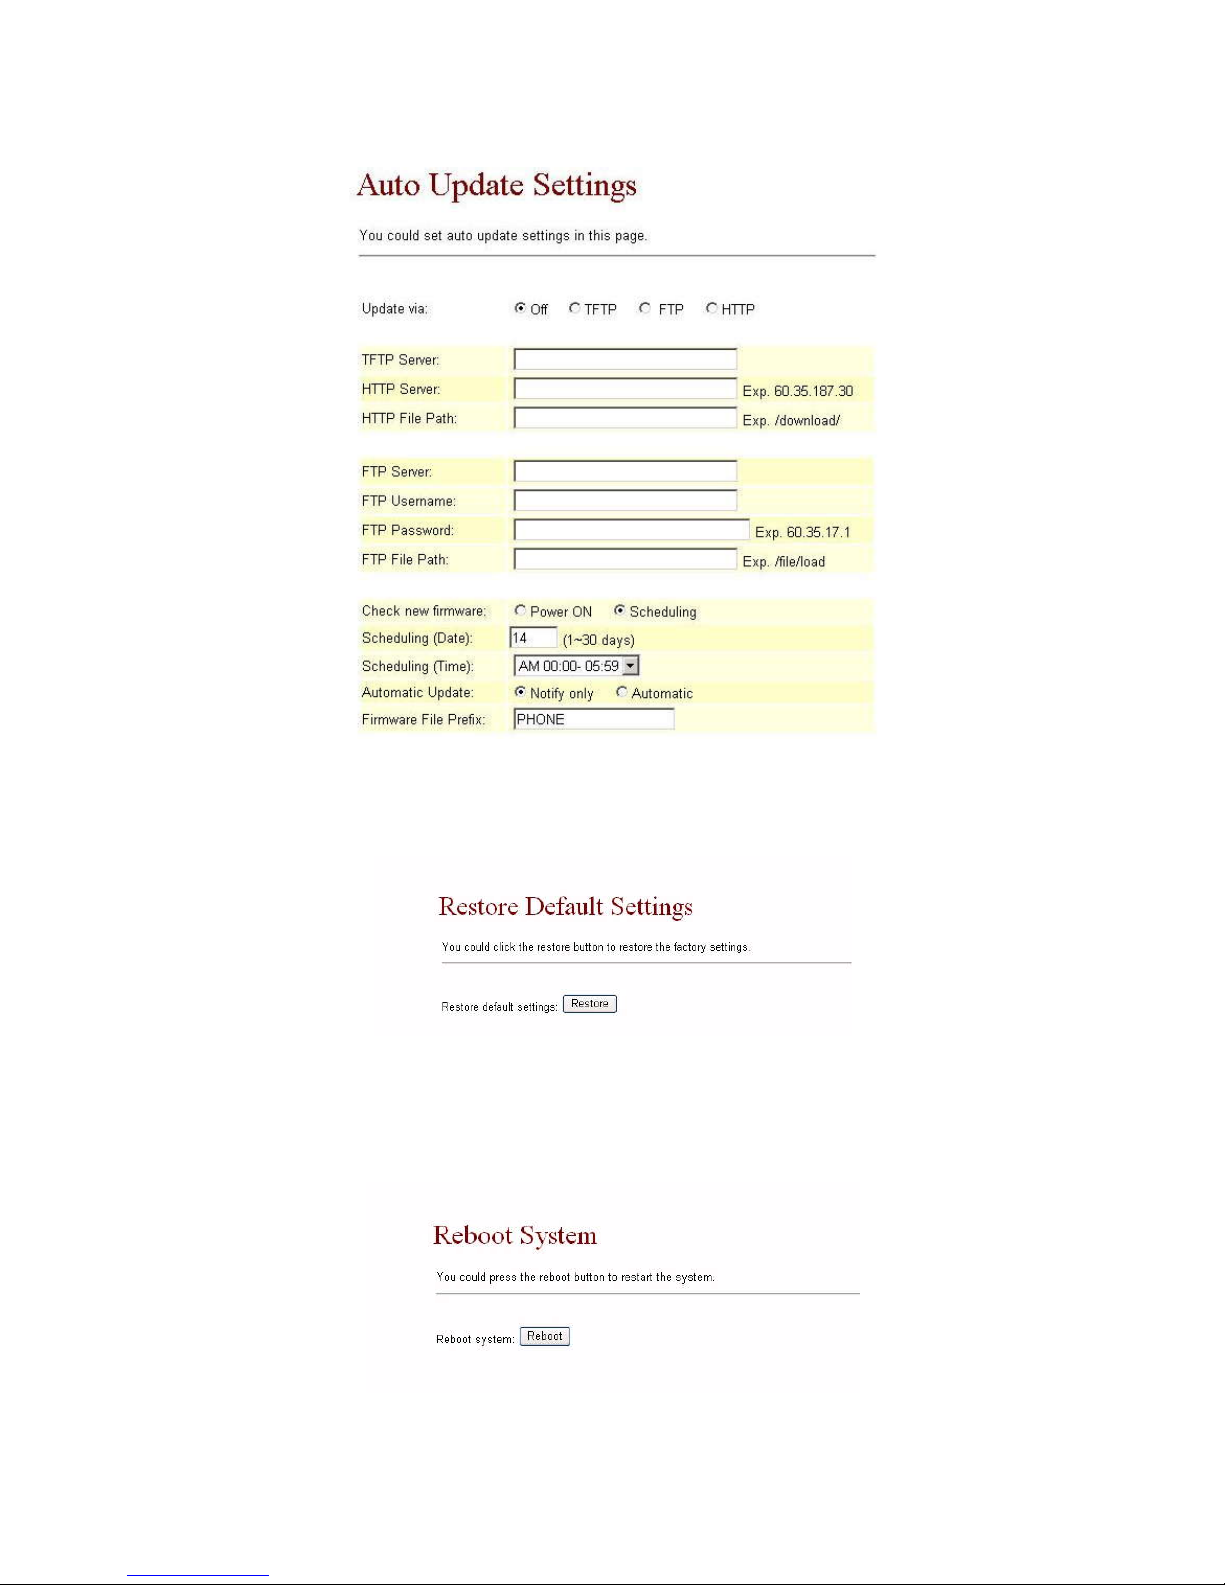
3.11.2 Auto Update
3.11.3 In Default Setting you can restore the VoIP Phone to factory default in this page. You can
just click the Restore button, and then the VoIP Phone will restore to default and
automatically restart.
3.12 Reboot
If you want to restart the VoIP Phone, you can just click the Reboot button, then the VoIP
Phone will reboot automatically.
 Loading...