


Reach All-In-One Server
------ DSS-R-CL Series
User Manual

Reach All-In-One Server User Guide
Confidential
Shenzhen Reach Software Technology Co., Ltd Page 2 of 24
Contents
Chapter 1 Introduction to the User Manual .............................................................................4
1.1 Introduction.........................................................................................................................4
1.2 Purpose................................................................................................................................4
1.3 Declaration..........................................................................................................................4
Chapter 2 Product Overview......................................................................................................5
2.1 Product Introduction ...........................................................................................................5
2.2 Feature and Specification Description................................................................................5
Chapter 3 Installation and Configuration..................................................................................6
3.1 Panel Layout .......................................................................................................................6
3.2 Power on and Running........................................................................................................7
3.3 Configuration Instruction.................................................................................................... 7
Chapter 4 Use Instruction ........................................................................................................10
4.1 System Logon ...................................................................................................................10
4.1.1 System logon page.............................................................................................10
4.1.2 logout/relog-on the system................................................................................11
4.1.3 Plug-in installation ..............................................................................................11
4.1.4 Interface layout ...................................................................................................12
4.2 Parameters Setting.............................................................................................................13
4.2.1 Video parameters setting ..................................................................................13
4.2.2 DVI Parameters Setting.....................................................................................14
4.2.3 Audio parameters setting...................................................................................14
4.2.4 Layout setting......................................................................................................15
4.3 Recording..........................................................................................................................15
4.3.1 WEB recording mode.........................................................................................15
4.3.2 LCD panel quick recording................................................................................16
4.4 File Management/Play on Demand/Download.................................................................16
4.4.1 File list ..................................................................................................................16
4.4.2 View/modify file information ..............................................................................17
4.4.3 Play on demand/download file: ........................................................................17
4.4.4 Delete file.............................................................................................................18
4.5 System Information...........................................................................................................18
4.6 System Setting...................................................................................................................18
4.6.1 Language.............................................................................................................19
4.6.2 Multicast Switch..................................................................................................19
4.6.4 Update System ...................................................................................................20
4.6.5 Upload Logo picture ...........................................................................................20
4.6.7 IP Address Modification .....................................................................................21
4.7 User Management (Optional Function).............................................................................21
4.7.1 Change password: .............................................................................................21
4.7.2 Add new user ......................................................................................................21
4.7.3 User authorities...................................................................................................22

Reach All-In-One Server User Guide
Confidential
Shenzhen Reach Software Technology Co., Ltd Page 3 of 24
4.7.4 Delete user ..........................................................................................................22
4.7.5 Other user login ..................................................................................................23
4.8 Guest User.........................................................................................................................23

Reach All-In-One Server User Guide
Confidential
Shenzhen Reach Software Technology Co., Ltd Page 4 of 24
Chapter 1 Introduction to the User Manual
Thank you for purchasing Reach’s All-In-One Server. We will provide you the best
service.
1.1 Introduction
This operation manual is complied to ensure easy installation and configuration of the
product. Please read the manual carefully before using so as to make best use of all
its functions.
1.2 Purpose
This manual is to help you get familiar with and properly use the All-In-One Server.
1.3 Declaration
Any part of this document, including the text, image and graph, is the property of
Shenzhen Reach Software Technology Co., Ltd. No one shall copy any part of this
document in any way without the prior written consent of Shenzhen Reach Software
Technology Co., Ltd. Shenzhen Reach Software Technology Co., Ltd reserves the
right to revise this document without notifying any person or group.
Shenzhen Reach Software only provides warranty of limited liabilities for the software
and hardware product. For any loss of the users caused by the design defect of the
software and hardware, our company will compensate the user with the amount up to
the price specified in the product purchase contract.
Right of trademark: Reach, Reach Software, DSS-R, DSS-ENC, and DSS-DEC are
the trademarks of Shenzhen Reach Software Technology Co., Ltd. Windows,
Windows 95, Windows 98, Windows NT, Windows 2000 and WindowsXP are the
trademarks of Microsoft. Other trademarks are the properties of their respective
companies.
This manual is subject to update without prior notice. If you come across any problem
that cannot be solved according to the manual, please contact our technical
department for solutions. Thank you.

Reach All-In-One Server User Guide
Confidential
Shenzhen Reach Software Technology Co., Ltd Page 5 of 24
Chapter 2 Product Overview
2.1 Product Introduction
As new generation visual information recording and transmission equipment, REACH
All-In-One Server is developed by Shenzhen Reach Software Technology Co., Ltd.
Characterized by compact size and portability, it integrates the input interfaces of
video, audio and DVI signals, supporting random combined recording of one-way HD
DVI (HD video or VGA signal), one-way SD video and one-way HD audio signal. The
recorded file is saved in single-flow mode. It supports the synchronous recording of
the video, audio and computer screen signals, thus satisfying the users’ needs of
recording and playing the visual information in meeting, training and teaching.
2.2 Feature and Specification Description
2.2.1 Hardware Parameters
Outline dimensions: L x W x H = 350mm x 270mm x 53mm
Weight: 5kg
2.2.2 Environmental Parameters
Storage temperature: -20~600C
Relative humidity: 5%~95%
Working temperature: 0~45
0
C
2.2.3Electrical Specifications
Input voltage: AC 100~240V 50~60Hz
Power consumption: 100W
2.2.3Network interface
LAN: LAN interface connected to Intranet

Reach All-In-One Server User Guide
Confidential
Shenzhen Reach Software Technology Co., Ltd Page 6 of 24
Chapter 3 Installation and Configuration
3.1 Panel Layout
3.1.1 Front panel
3.1.2 LED
Name Description
PWR Power LED, It will be ON during normal power-on.
RUN Run LED, flashes slowly and rhythmically when the system is
running.
LAN The LED will be ON when there is network connection.
LCD LCD panel. It will display the operating status and relevant
information during operation.
3.1.3 Rear panel

Reach All-In-One Server User Guide
Confidential
Shenzhen Reach Software Technology Co., Ltd Page 7 of 24
As shown in the rear view of the integrated All-In-One Server, you only need to
connect the signal cables to the corresponding ports.
3.2 Power on and Running
In normal situation, power on the equipment after connecting the power cable to the
corresponding port at the rear panel, the LCD panel will display “Starting…”. Wait for 1
minute, when the All-In-One Server starts up automatically, the LCD panel will display
the current input definition, serial number, IP address, recording status and other
relevant information.
3.3 Configuration Instruction
3.3.1 Environment for software and hardware installation
√ Make sure that the server is on a stable flat surface.
√ Make sure the IP network connection is available. 100Mbps network or above. (1000M network
recommended).
√ Please install the Server according to the physical and electrical environment equipment
mentioned above.
√ Suggested configuration of the PC for the installation of RecPlayer:
z CPU: Dual Core Processor 2.2Ghz or above
z DISPLAY:1024*768 resolution or above
z Video card: 512M Independent graphics or above
Reach All-In-One Server User Guide
Confidential
Shenzhen Reach Software Technology Co., Ltd Page 8 of 24
z Memory: 1G or above
z HDD: 1GB or above
z OS: Win2000/XP/Win 7
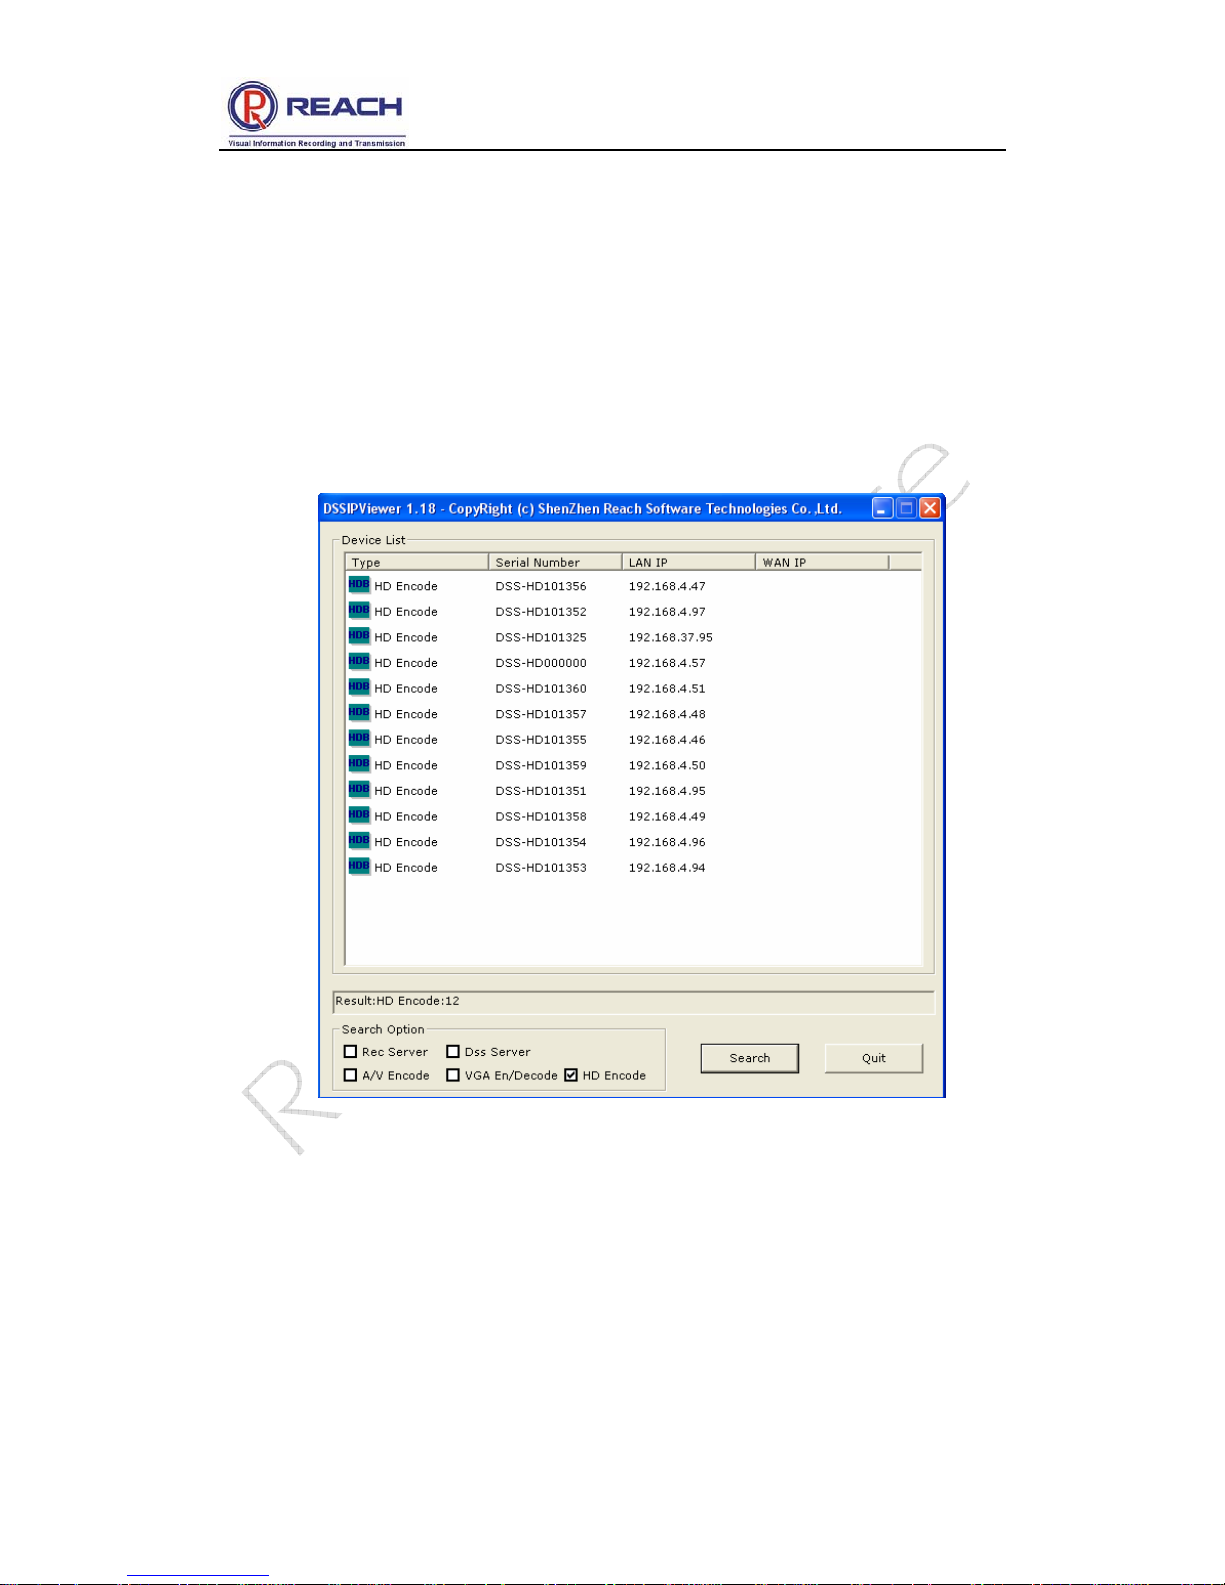
3.3.2 Search for the query encoder IP address
Use the DSSIpViewer.exe in the CD delivered together with the product for searching
the server IP address. Double click this program and then click [Search] button to find
the list of all the existing All-In-One Servers in the network, as shown in the following
figure:
Note for the search result:
All-In-One Server: it will search for all All-In-One Servers in the network and list the
name(s) and IP(s).
Note:
(1) When using the DSSIpViewer to search the equipments, the All-In-One Server and
the computer running DSSIpViewer.exe must be within the same physical network
(the IP address segment may be different), otherwise the DSSIpViewer can not find

Reach All-In-One Server User Guide
Confidential
Shenzhen Reach Software Technology Co., Ltd Page 9 of 24
the equipments.
(2) The search may also fail if the network is set with a VLAN, route, three-layer switch
or special firewall between the equipments and the computer running DSSIpViewer.
Besides, you may also view the IP address of the current All-In-One Server at the
rolling information display field of the LCD panel.

Reach All-In-One Server User Guide
Confidential
Shenzhen Reach Software Technology Co., Ltd Page 10 of 24
Chapter 4 Use Instruction
4.1 System Logon
4.1.1 System logon page
Open IE browser, type in the IP address of the All-In-One Server in the address field,
and then press Enter. The following interface will appear.
Please enter a correct user name and password in the authentication box and logon to
the management interface of the All-In-One Server. The default user’s name and
password are both [admin].

Reach All-In-One Server User Guide
Confidential
Shenzhen Reach Software Technology Co., Ltd Page 11 of 24
4.1.2 logout/relog-on the system
Logout: After you logon to the system, if you click the bottom
on the page, you
will be logged out of the system management or client interface. And your logout will
not affect the operation of the server, and the current working information of the server
will be provided as soon as you logon to the system next time.
Re-logon: if you click the bottom
at the top of the page, you will be brought back
to the system logon interface and logon to the system with another user name.
4.1.3 Plug-in installation
If you have never installed this monitoring software to your computer, the system will
prompt you to install it after you logon to the All-In-One Server interface. As shown in
the following figure:
Reach All-In-One Server User Guide
Confidential
Shenzhen Reach Software Technology Co., Ltd Page 12 of 24
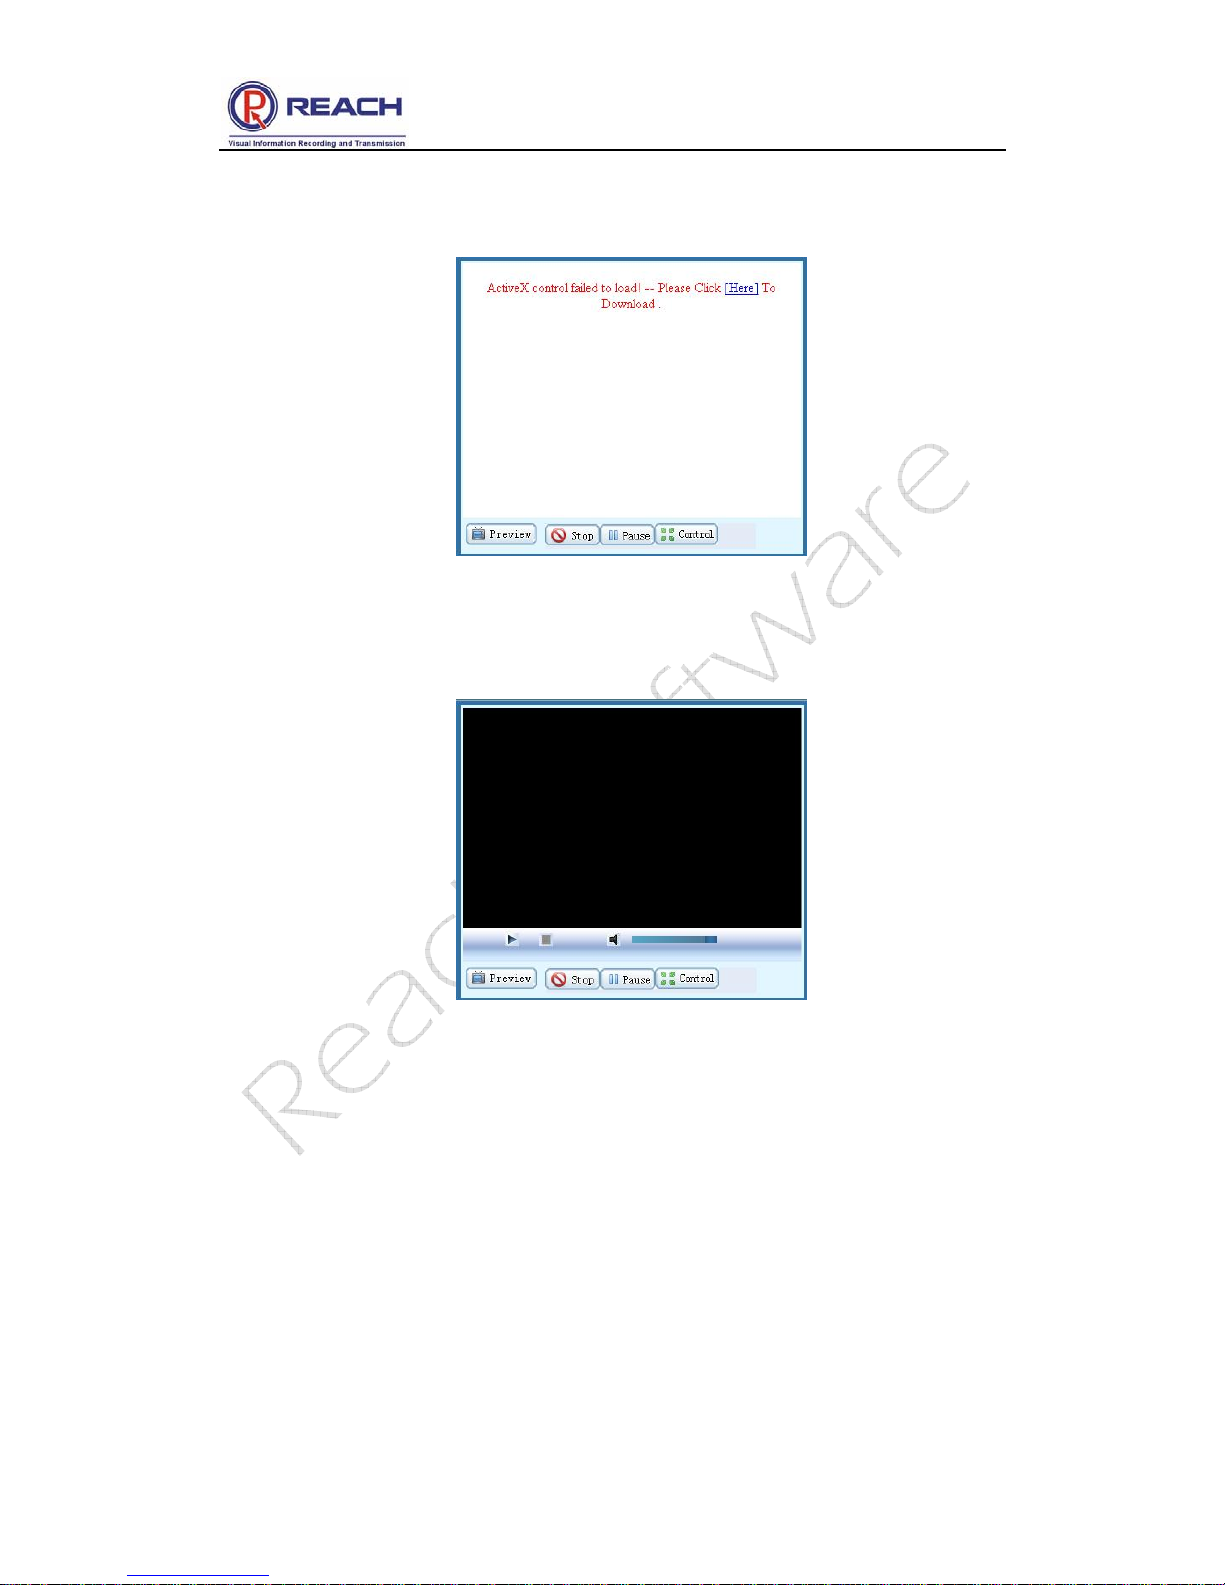
If the above prompt does not appear on some computers, the left upper corner of the
video window will display as the following figure:
Click [Here] to install the software, and then the video window will be like this after the
installation.
4.1.4 Interface layout
The default interface of the All-In-One Server will be displayed after installation of the
plug-in software. The left upper section is the video play control field. The right upper
section is the file list play and download field. The bottom section is the parameter
view and setting field.
Reach All-In-One Server User Guide
Confidential
Shenzhen Reach Software Technology Co., Ltd Page 13 of 24
4.2 Parameters Setting
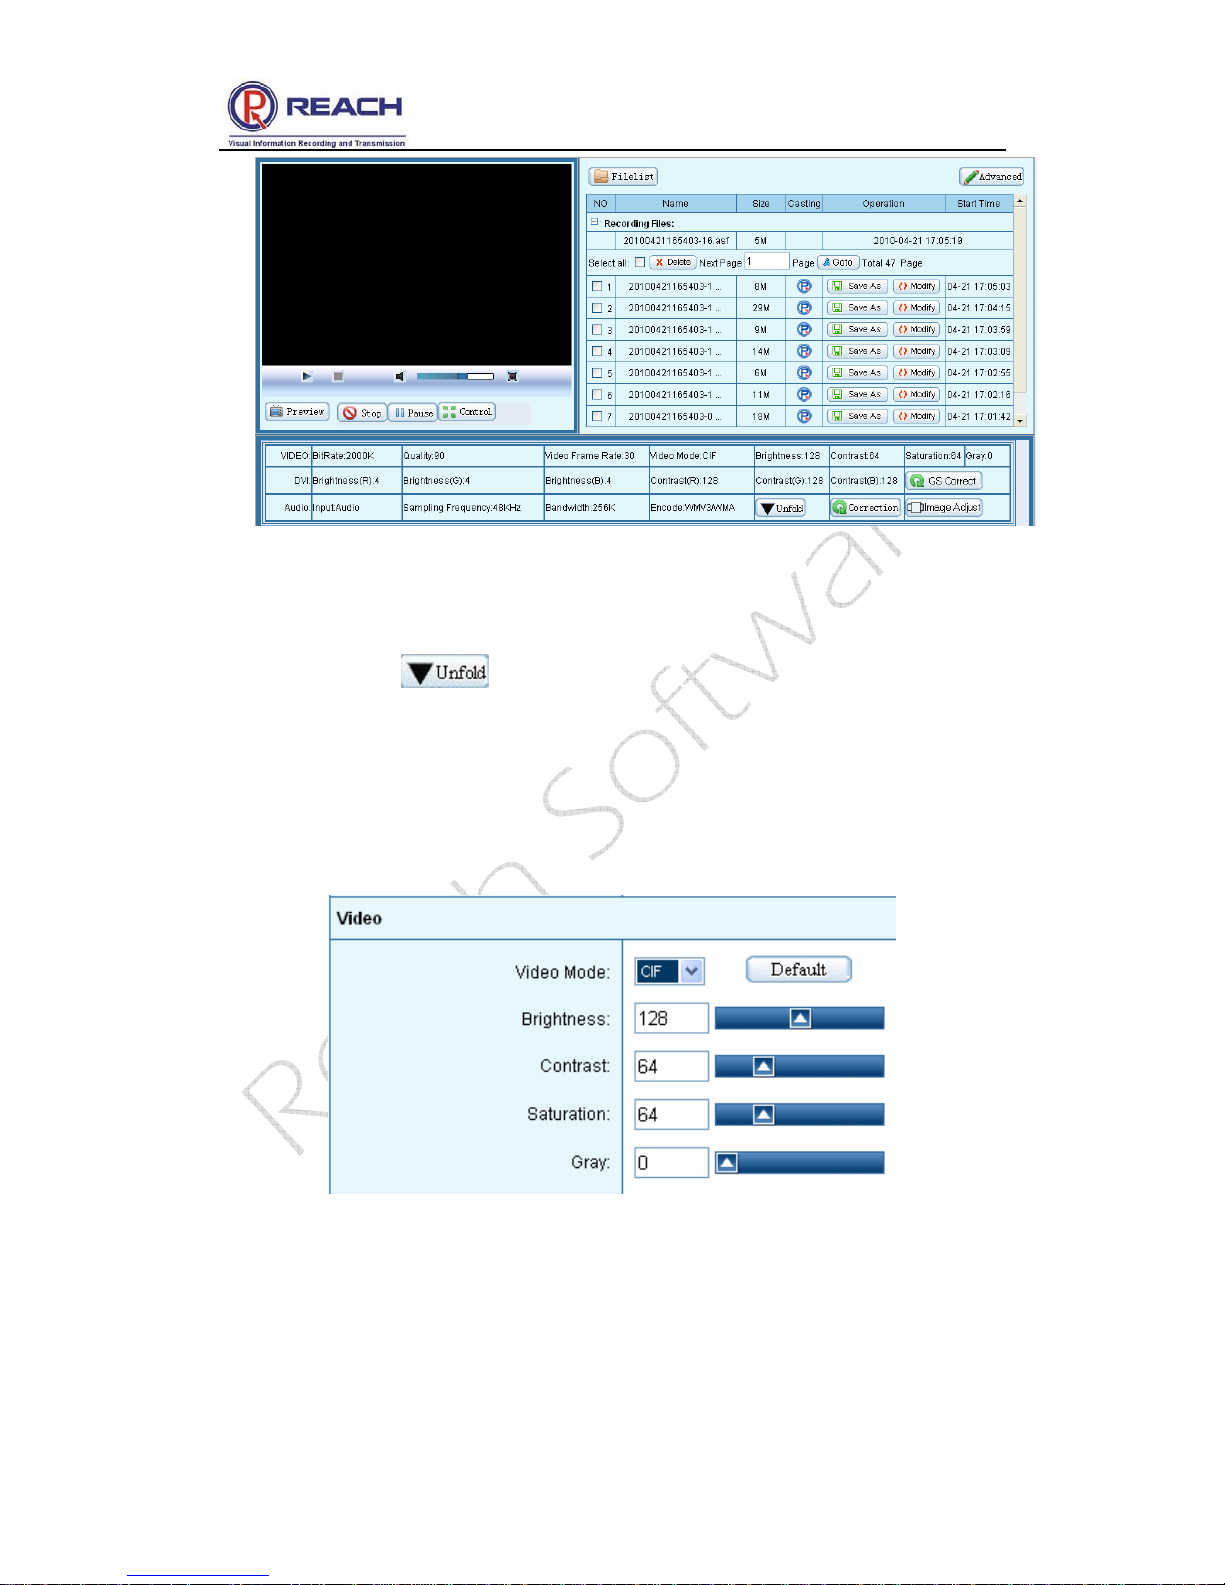
Click the button in the parameter view and setting field.
4.2.1 Video parameters setting
Then the current video parameter setting information will appear under the button, as
shown in the following figure:
Video Mode: D1/CIF/QCIF
Brightness: adjust the brightness of video;
Contrast: adjust the contrast of the video;
Saturation: adjust the saturation of the video;

Reach All-In-One Server User Guide
Confidential
Shenzhen Reach Software Technology Co., Ltd Page 14 of 24
Gray: adjust the gray of the video;
Default: recover the configured parameters back to the default setting.
4.2.2 DVI Parameters Setting
Display the current DVI parameter setting information, as shown in the following
figure:
Brightness(R): adjust the red brightness of the input signal;
Brightness(G): adjust the green brightness of the input signal;
Brightness(B): adjust the blue brightness of the input signal;
Contrast(R): adjust the red contrast of the input signal;
Contrast(G): adjust the green contrast of the input signal;
Contrast(B): adjust the blue contrast of the input signal;
DVI Default: recover the configured parameters back to the default DVI setting;
VGA Default: recover the configured parameters back to the default VGA setting.
Note: it does not support the parameters adjustment of digital signals like
brightness and contrast.
4.2.3 Audio parameters setting
Display the current audio parameter setting information, as shown in the following

Reach All-In-One Server User Guide
Confidential
Shenzhen Reach Software Technology Co., Ltd Page 15 of 24
figure:
Input mode settings: Line / Mic;
Encoding Mode: WMV3/WMA, H264/AAC (Files recorded with WMV3/WMA can be
play directly with Microsoft Media Player.)
Sampling Frequency: 44.1KHZ/48KHZ optional;
Bandwidth: to adjust the audio, 32 ~ 256Kbps optional;
Left: adjust the volume of the left channel;
Right: adjust the volume of the right channel;
4.2.4 Layout setting
Display the current image layout setting information, as shown in the following figure:
Users can select the appropriate layout based on demand.
Note: if the signal source input is 1080i, small video window display mode is not
supported! (PIP and POP mode settings are invalid)
4.3 Recording
4.3.1 WEB recording mode

Reach All-In-One Server User Guide
Confidential
Shenzhen Reach Software Technology Co., Ltd Page 16 of 24
Click , then the current state of recorded documents will display at the
right of the page.
Click
when recording, you can pause or stop recording. After the
recording is stopped, the file will be immediately generated and be played on demand
online.
4.3.2 LCD panel quick recording
As shown in the figure , press the [Record] button on the front
panel of the All-In-One Server and the unit begins recording. If you want to stop it,
press the [Stop] button. This function is very convenient, for it can record easily even
if the All-In-One Server is not connected to the network..
4.4 File Management/Play on Demand/Download
4.4.1 File list
All the file lists are displayed in the upper right of the main interface. In this dialog box,
you can view the file information and perform such operations as renaming files,
playing on demand files, downloading files, and deleting files, as shown in the
following figure:

Reach All-In-One Server User Guide
Confidential
Shenzhen Reach Software Technology Co., Ltd Page 17 of 24
4.4.2 View/modify file information
For all the file lists, file names and file sizes stored in the All-In-One Server, to modify
the file name or the description information of the file, just click the [Modify] button
and then modify the related information in the prompted modification dialog box
(including the modified file names and file details, etc.), as shown in the following
figure:
4.4.3 Play on demand/download file:
To online play on demand the files stored in the server, click the button . The
system will automatically call the player to play the file. If you need to download the file
stored in the server, click the [Save as] button, and then select the local disk path and
the file name in the “File saved as…” dialog box.

Reach All-In-One Server User Guide
Confidential
Shenzhen Reach Software Technology Co., Ltd Page 18 of 24
4.4.4 Delete file
To delete the file stored in the server, please select the file in the list, click
button, and then click [OK] in the prompted confirmation dialog box.
4.5 System Information
Click the [Advanced] button on the home page, and then the server's system
information can be viewed on the prompted new page.
4.6 System Setting
Click [Configuration] the server's system settings can be viewed.

Reach All-In-One Server User Guide
Confidential
Shenzhen Reach Software Technology Co., Ltd Page 19 of 24
4.6.1 Language
Set the language display interface of system WEB
4.6.2 Multicast Switch
Turn On / Turn Off the multicast function.

Reach All-In-One Server User Guide
Confidential
Shenzhen Reach Software Technology Co., Ltd Page 20 of 24
4.6.3 PTZ Protocol Upgrade
Upload PTZ protocol witch match customer’s PTZ camera, so that customer can
remote control the camera
4.6.4 Update System
The system software version’s upgrade operation
4.6.5 Upload Logo picture
After uploading LOGO file image (JPG format), the uploaded Logo image can be seen
in the POP display mode.
4.6.6 FTP Configuration
Type in FTP server’s IP address, port, username and password, and choose allow to
upload. After you active this function, All-In-One Server will transmit the recorded file
automatically to FTP server, as soon as the recording completed.
NOTE: Modification will take effect after restart All-In-One Server

Reach All-In-One Server User Guide
Confidential
Shenzhen Reach Software Technology Co., Ltd Page 21 of 24
4.6.7 IP Address Modification
After entering valid IP address, subnet mask and default gateway, click [Restart]. The
new IP address will take effect after the server restarts.
4.7 User Management (Optional Function)
Click the [User] , server's system settings can be seen.
4.7.1 Change password:
Designated user’s system login password can be easily changed by clicking [Modify]
button.
4.7.2 Add new user
Click [Add new user], enter the user’s name and password, and then click [Save].

Reach All-In-One Server User Guide
Confidential
Shenzhen Reach Software Technology Co., Ltd Page 22 of 24
4.7.3 User authorities
The administrator may authorize the common user to play on demand or download
files at any time. Click [Detail] button to view all the files stored in the server, and
select and set the related play on demand / download authorities in the list.
4.7.4 Delete user
In the user list dialog box, click the corresponding user and select [Delete] button, and

Reach All-In-One Server User Guide
Confidential
Shenzhen Reach Software Technology Co., Ltd Page 23 of 24
then click [OK] in the prompted confirmation dialog box.
Note: The default super administrator “admin” user cannot be deleted.
4.7.5 Other user login
Common user can only receive unicast and multicast after logon (started by the
administrator), as well as authorized file play on demand and download, as shown in
the following figure:
4.8 Guest User
Enter WEB interface of the All-In-One Server. The User Name: guest, and no
password. Click [login].

Reach All-In-One Server User Guide
Confidential
Shenzhen Reach Software Technology Co., Ltd Page 24 of 24
Click [Multicast], and the real time multicast data image can be seen.
Note: Guest user can only receive multicast! And only after administrator turn on
Multicast function can guest user receive it normally!
 Loading...