

Page 1

P a g e | 1 Bee8 User’s Manual Reach/BTX
Bee8
Capture, Live Streaming,
Distribution Appliance
USER’S MANUAL
VERSION V1.1 (US)
DATE OF ISSUE 01.03.2017
Page 2

P a g e | 2 Bee8 User’s Manual Reach/BTX
Table of Contents
Section 1.1 Overview .......................................................................................................................................................... 4
Section 1.2 Controls and Connections ................................................................................................................................ 4
Front Panel Detail ........................................................................................................................................................... 4
Section 2 Connection Example............................................................................................................................................ 5
Section 3 Initial Set-up ........................................................................................................................................................ 6
User Controls ...................................................................................................................................................................... 9
Bee8 Playback ..................................................................................................................................................................... 9
USB Download and Redundant Record Capability.............................................................................................................. 9
Section 4 The Bee8 Web Interface .................................................................................................................................... 10
The Record Page ............................................................................................................................................................... 10
Files Page ........................................................................................................................................................................... 12
Settings Page ..................................................................................................................................................................... 14
Setting Page Video Settings Tab (3 input options) ........................................................................................................ 14
Setting Page Video Settings Tab (2 input options) ........................................................................................................ 16
Settings Page Audio Settings Tab .................................................................................................................................. 17
Settings Page Media Streams Tab ................................................................................................................................. 18
Settings Page, Camera Control Tab ............................................................................................................................... 20
Settings Page Image Adjustment Tab ........................................................................................................................... 22
Settings Page Title/Logo Tab ......................................................................................................................................... 23
Settings Page Disk Management Tab ............................................................................................................................ 24
Settings Page PPT Switch Tab ....................................................................................................................................... 25
System Config Page ........................................................................................................................................................... 26
System Config Page Users Tab ...................................................................................................................................... 26
System Config Device Name Tab .................................................................................................................................. 27
System Config Platform Tab with Media Center chosen .............................................................................................. 28
System Config Platform Tab with FTP option chosen ................................................................................................... 29
System Config Page Maintenance Tab .......................................................................................................................... 30
System Config USB Tab ................................................................................................................................................. 32
System Config PPT Push Tab ......................................................................................................................................... 33
System Config Page Control Tab ................................................................................................................................... 34
System Info Page ............................................................................................................................................................... 35
Section 5 External Control ................................................................................................................................................ 35
Page 3

P a g e | 3 Bee8 User’s Manual Reach/BTX
Telnet Control considerations ....................................................................................................................................... 35
Serial Control Considerations........................................................................................................................................ 36
Unified Command Table ............................................................................................................................................... 37
BTX is the importer of Reach products and solutions in North America.
Contact: BTX Technologies
5 Skyline Drive
Hawthorne, NY 10532
800.666.0996
www.reachAVIP.us
Reach, REACH, , Reach Software are the trademarks of SZ REACH TECH CO., LTD. Windows, Windows 7,
Windows 8, and Windows 10 are trademarks of Microsoft Corporation. Other trademarks are the properties of their
respective owners.
Note: This user manual is compiled to ensure easy installation and configuration of the product. Please read this
manual carefully before using the product, so that you can make best use of all its functions.
This manual is subject to update from time to time without prior notice. Updated versions are available at
www.reachAVIP.us/products/Bee7.
Copyright © SZ REACH TECH CO., LTD. 2017. All rights reserved.
Page 4
P a g e | 4 Bee8 User’s Manual Reach/BTX
Section 1.1 Overview
The Bee8 is a high performance all in one AV over IP appliance. Utilizing the latest revision DaVinci 8168 video processing
architecture, the Bee8 provides amazing flexibility with respect to source inputs. Any signal from a composite video signal over
coax, to full HD over DVI-I or HDMI can be input and configured to produce beautiful streamed content as well as full screen
local display preview. The Bee8 utilizes an MP4 high profile CODEC, so the encoded content can be viewed on virtually any
device. It’s convenient USB 2.0 port allows users to download files immediately after recording, as well as redundantly record
content on a flash drive, or USB hard drive.
The Bee8 can be controlled by serial or Telnet command strings, as well as a free “Reach Video” app available on the iTunes
app store and by a free application included with the Bee8 called Manager Lite. All Bee8 operating parameters are set through
its simple and intuitive integrated Web Interface.
Out of the box, the Bee8 can be integrated into a multi-media system as a stand-alone capture, record, streaming, and
distribution solution. The Bee8 can stream live and VOD content to up to five concurrent users. It also can concurrently live
stream RTSP and RTMP streams, so users can connect to a CDN service like YouTube or Wowza to view a live event. The Bee8
can also upload recorded content to an FTP server transparently and in the background. Where the Bee8 really shines is when
its integrated into a complete AV over IP solution by leveraging the awesome power of the Reach Media Center Content
Management Server. When deployed as this solution, all files are immediately uploaded to Media Center, transcoded to
HTML5 and Flash 19 or above, and made available to users who have permissions to view specific content.
Section 1.2 Controls and Connections
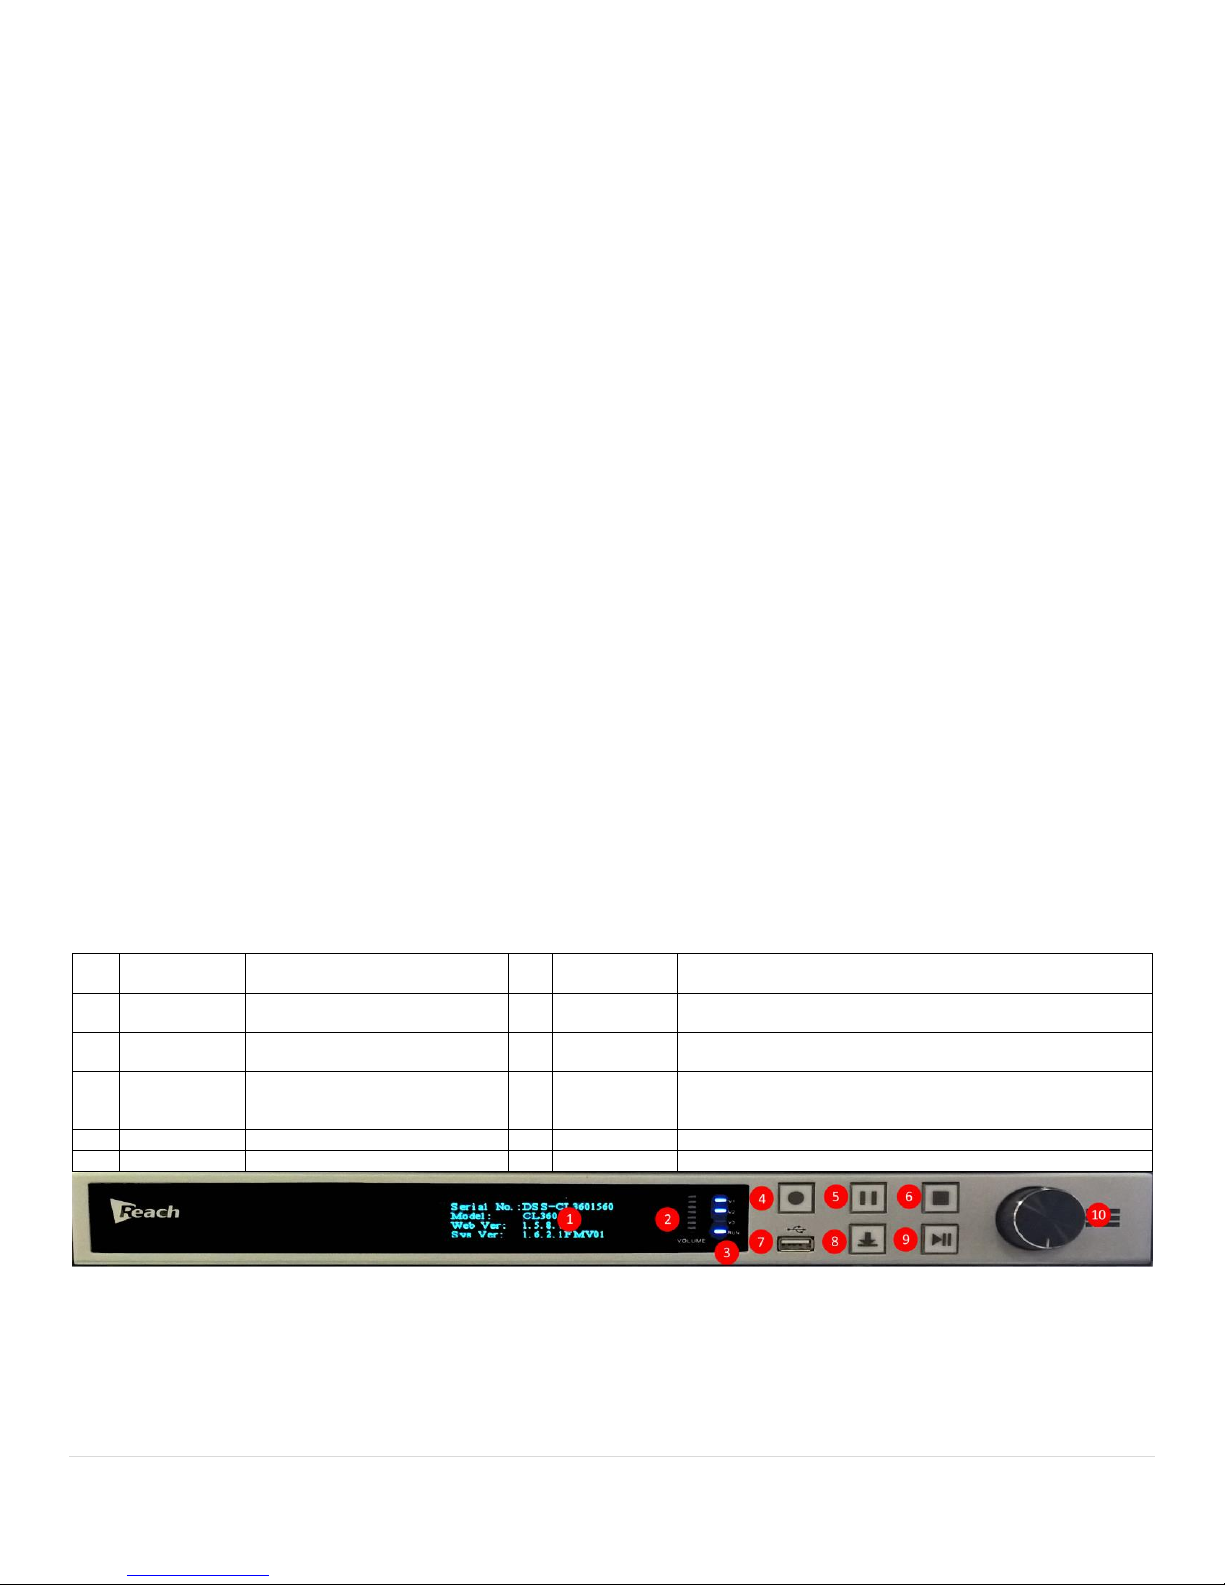
Front Panel Detail
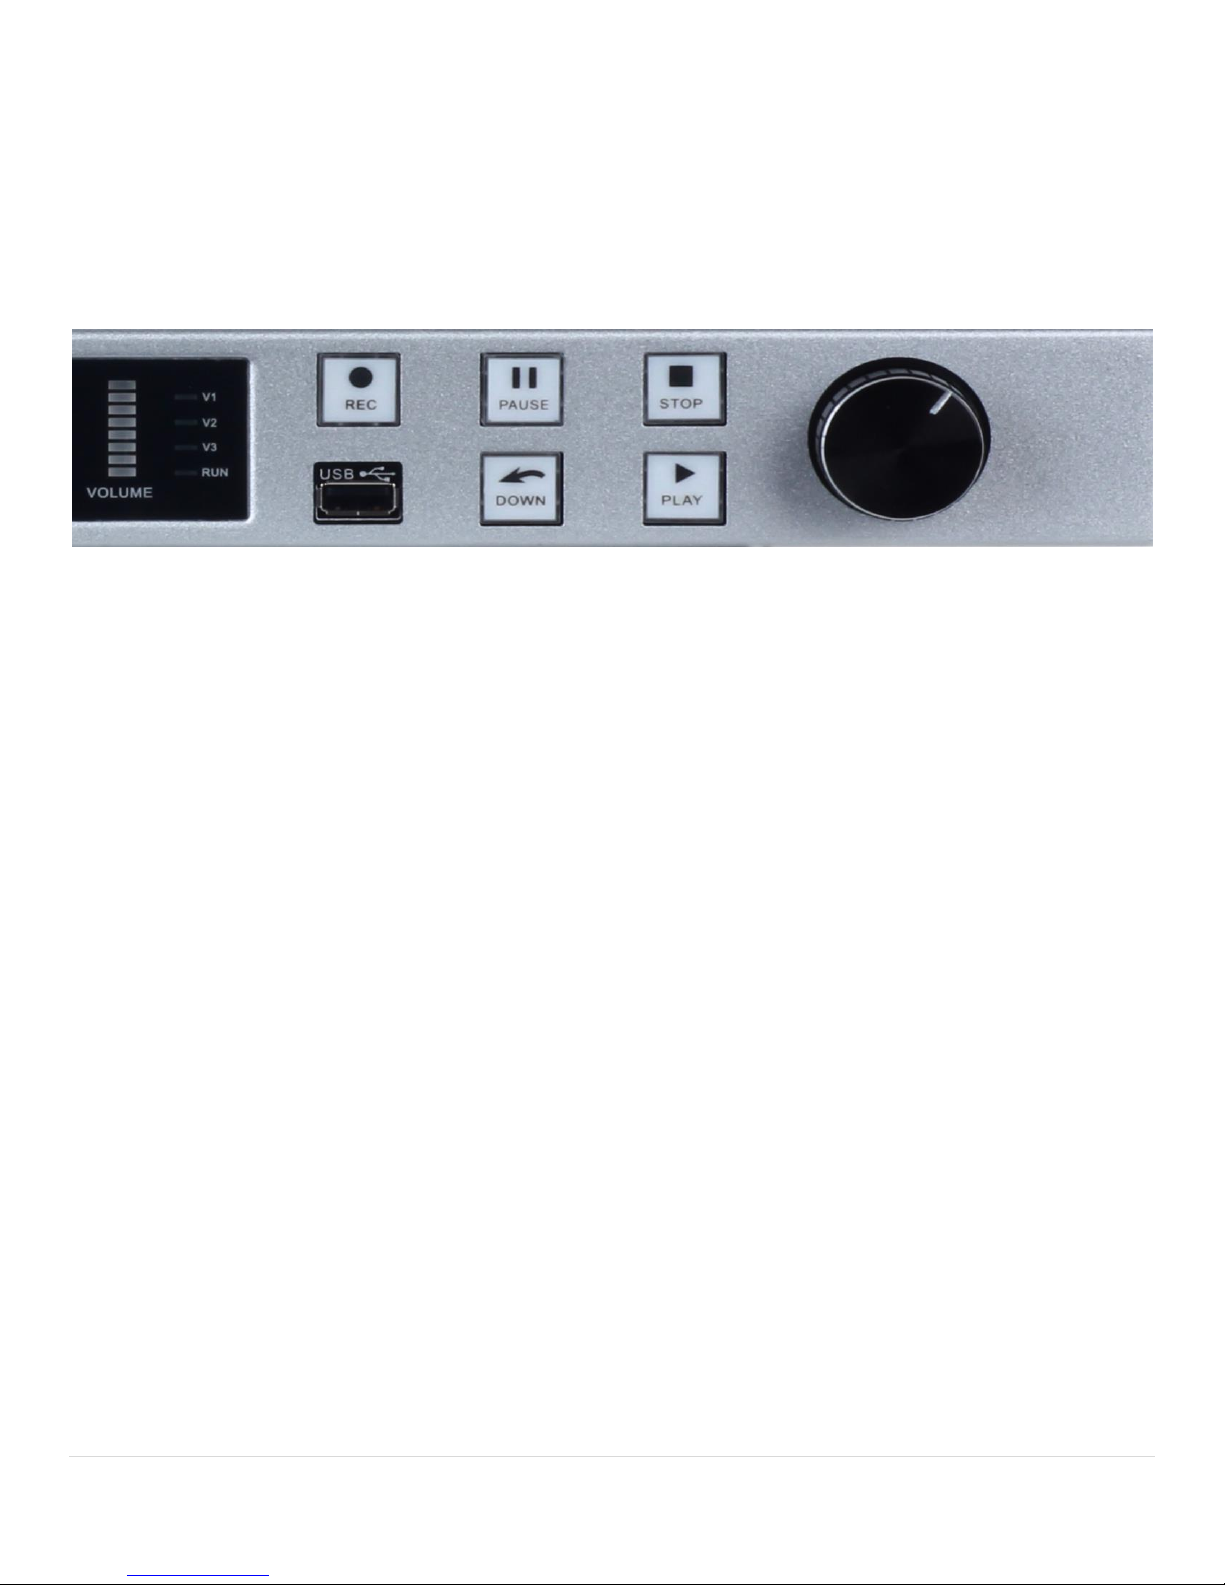
The Bee8 is very simple to integrate. It comes with all the adapters you need to connect any source, from analog
composite signals to full HD 1080P. The illustrations below provide detail about all the controls and connections used on a
Bee8. Before integrating it into your system, take a minute to familiarize yourself with the connections you will be using in
your system, and what controls you will need to use to realize the content you are envisioning.
Files larger than 4GB are not supported by FAT 32.
No
.
Component
Description
N
o.
Component
Description
1
LCD
Display system info, IP
address, status, etc.
6
Stop
Stop record or stop playback
2
Volume
Status
Display dynamic audio
volume level
7
USB 2.0 I/O
Connect USB devices
3
Input and
Status
indicator
Signal Present and System
Status LED
8
Download
Download files to USB devices
4
Record
Start record
9
Playback
Local playback of VOD content
5
Pause
Pause record
10
Knob
Rotate dial to select file and press to confirm choice
Page 5
P a g e | 5 Bee8 User’s Manual Reach/BTX
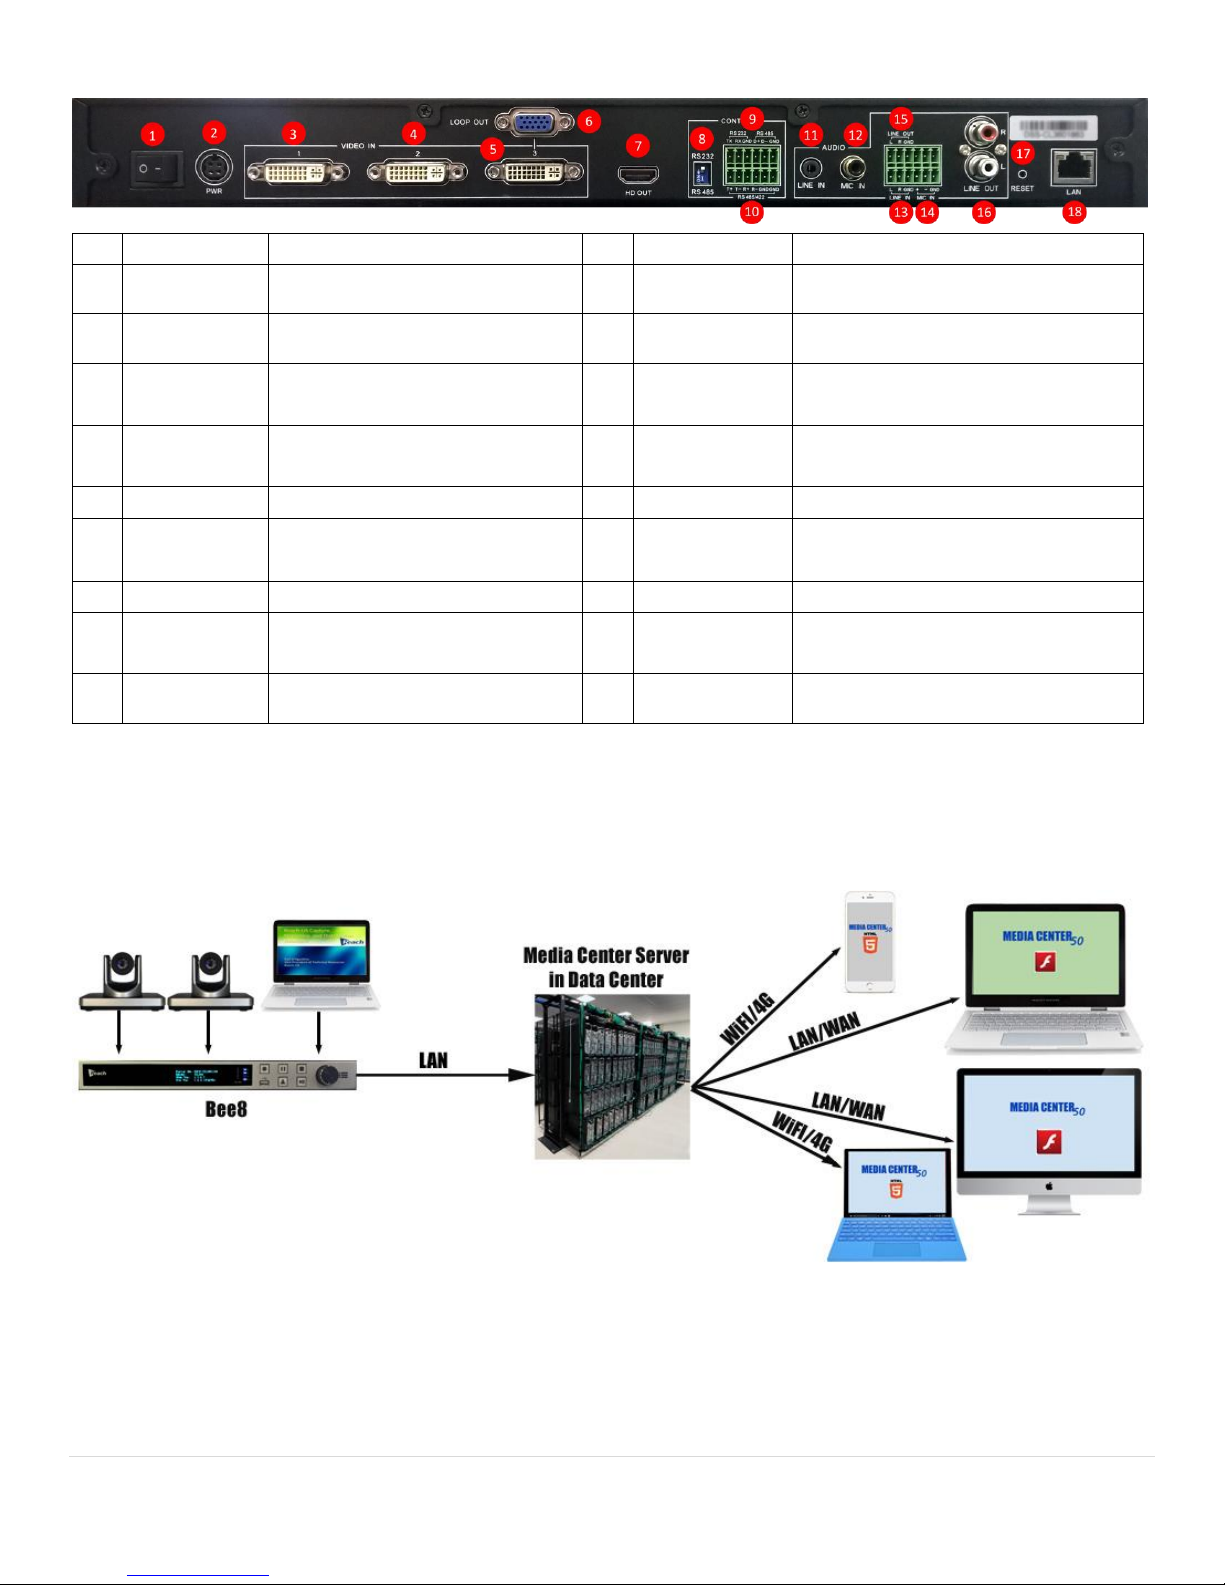
Section 2 Connection Example
Figure 1. Conceptual Flow
No.
Connector
Description
No.
Connector
Description
1
Power Switch
Power on & power off
10
RS422/RS485
RS422/RS485 External control
connection (phoenix connector)
2
Power Input
120-240 VAC to DC Brick 12V/10A
power input
11
Line In 1
2 channel 3.5mm TRS line in
3
DVI In 1
Video signal input 1
12
Mic In 1
(Unbalanced)
Unbalanced microphone input (Hi-Z)
4
DVI In 2
Video signal input 2
13
Line In 2
2 channel line in, unbalanced (phoenix
connector) (Hi-Z)
5
DVI In 3
Video signal input 3
14
Line Out 1
Line in loop out (phoenix connector)
6
VGA Loop
Analog VGA signal loop for DVI In 3
15
Mic In 2
(Balanced)
Balanced microphone input (phoenix
connector) (Low-Z)
7
HDMI Out
Local Display
16
Line Out 2
Playback Line Out
8
RS232/485
Switch
RS232/RS485 switch for camera
PTZ control
17
Reset
Reset to factory default momentary
switch
9
RS232/RS485
RS232 or RS485 camera PTZ control
connection (phoenix connector)
18
RJ-45
Ethernet network connector
Page 6
P a g e | 6 Bee8 User’s Manual Reach/BTX
Section 3 Initial Set-up
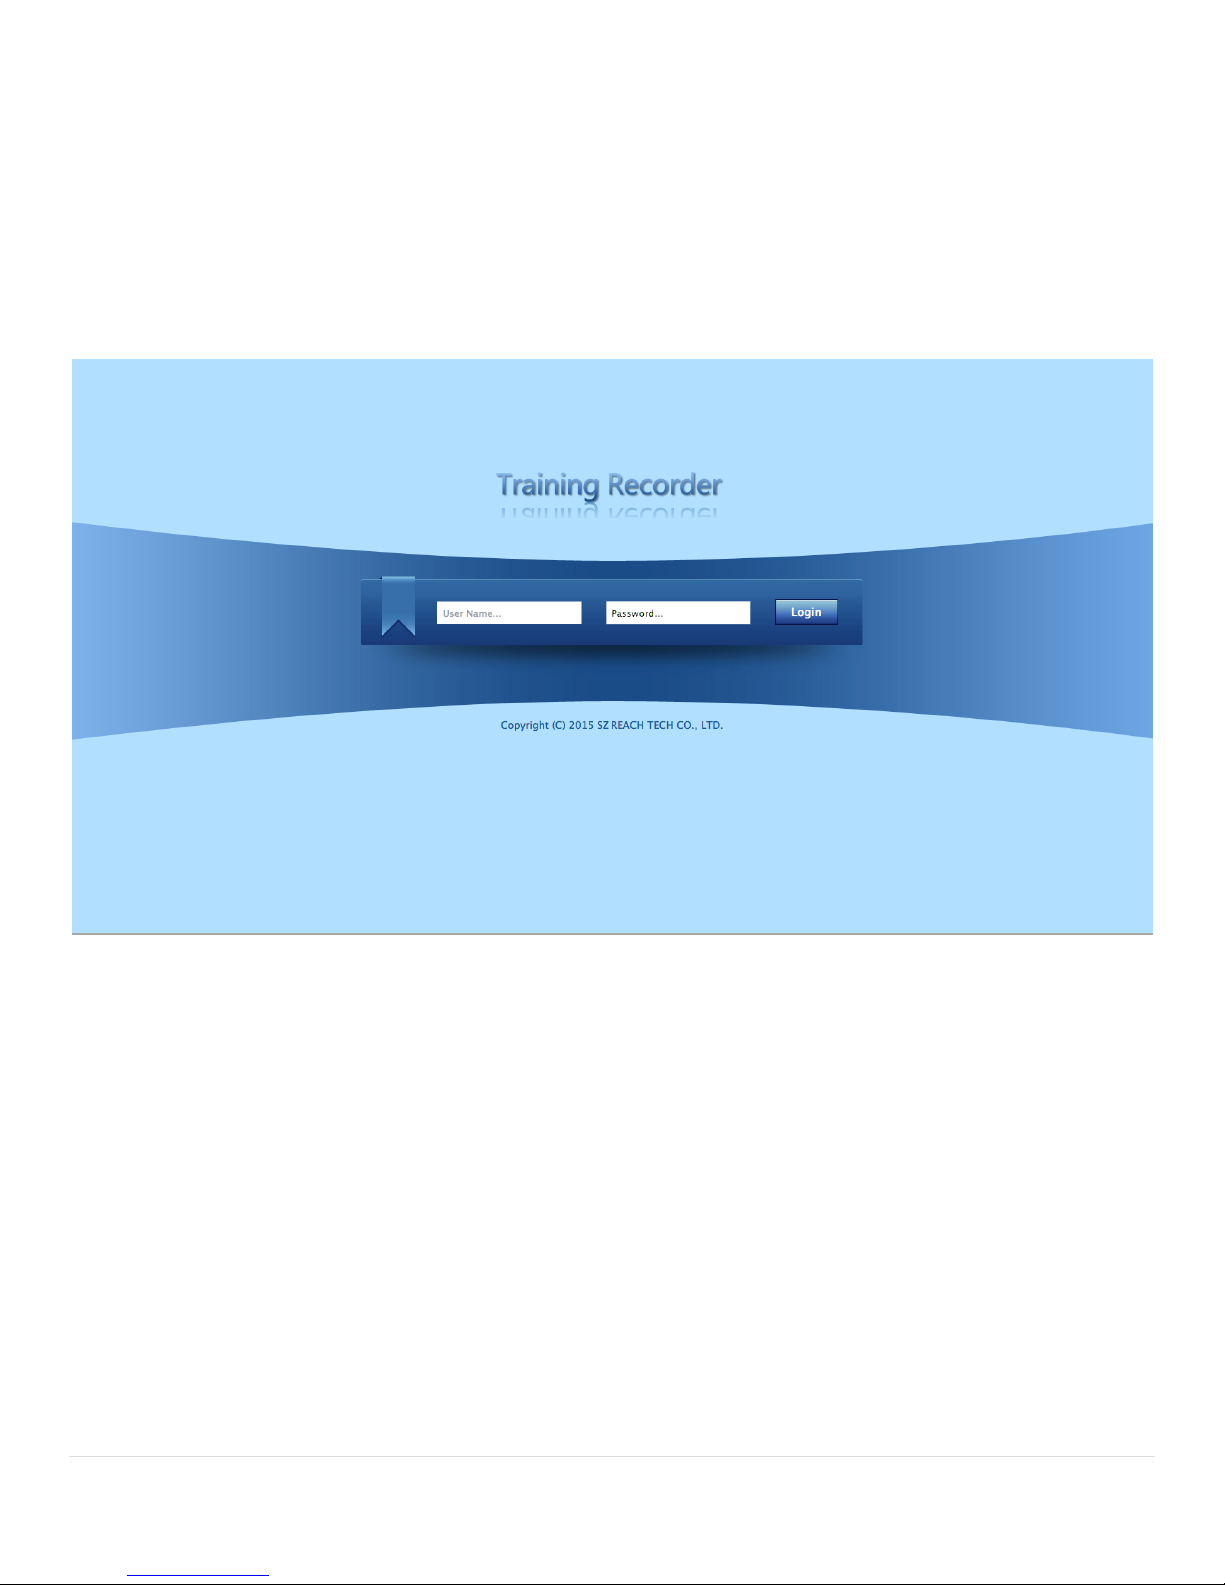
The Bee8 is configured with a test and configuration IP address from the factory. The first step in integrating it into the
resident IT ecosystem is to connect to it while in its IP Range. To accomplish this, first apply power to the Bee8, and record the
IP address of the front panel of the Bee8, then change the IP address of your computer to the same Range, subnet, and
gateway. Once you have temporarily changed your computer to be on the same “network” as the Bee8, connect an Ethernet
cable between your computer and the Bee8 and type in the IP address of the Bee8 in the address bar of your browser. You
will be presented with the landing page of the Bee8 web interface.
Figure 2. Login Page
Enter admin as the user name, and admin as the password and click the Login button. Once these credentials are accepted
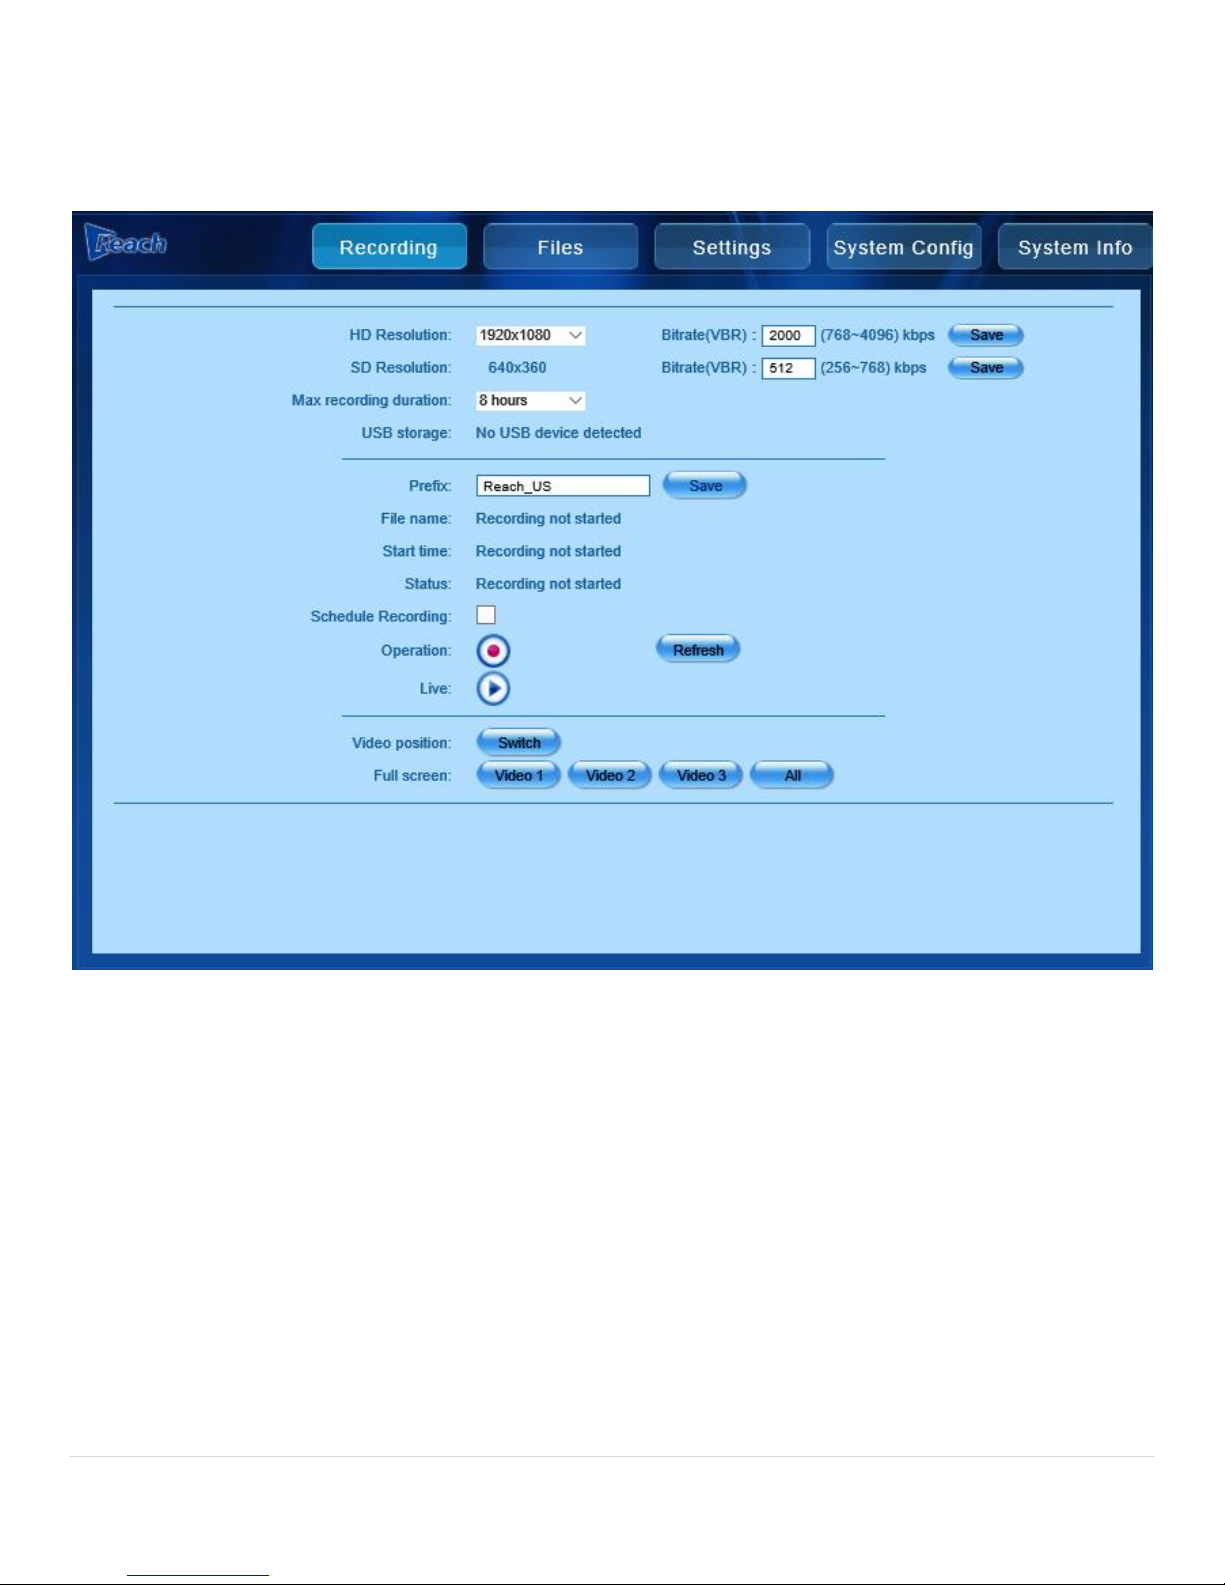
you will be presented with the web interface RECORD page. We will return to this page to explain it further shortly, but for
Page 7
P a g e | 7 Bee8 User’s Manual Reach/BTX
now we will continue to localize the Bee8 to the local area network. Select the System Config button (highlighted in red) to
access the network administration section of the web interface.
Figure 3. Record Page
Page 8
P a g e | 8 Bee8 User’s Manual Reach/BTX
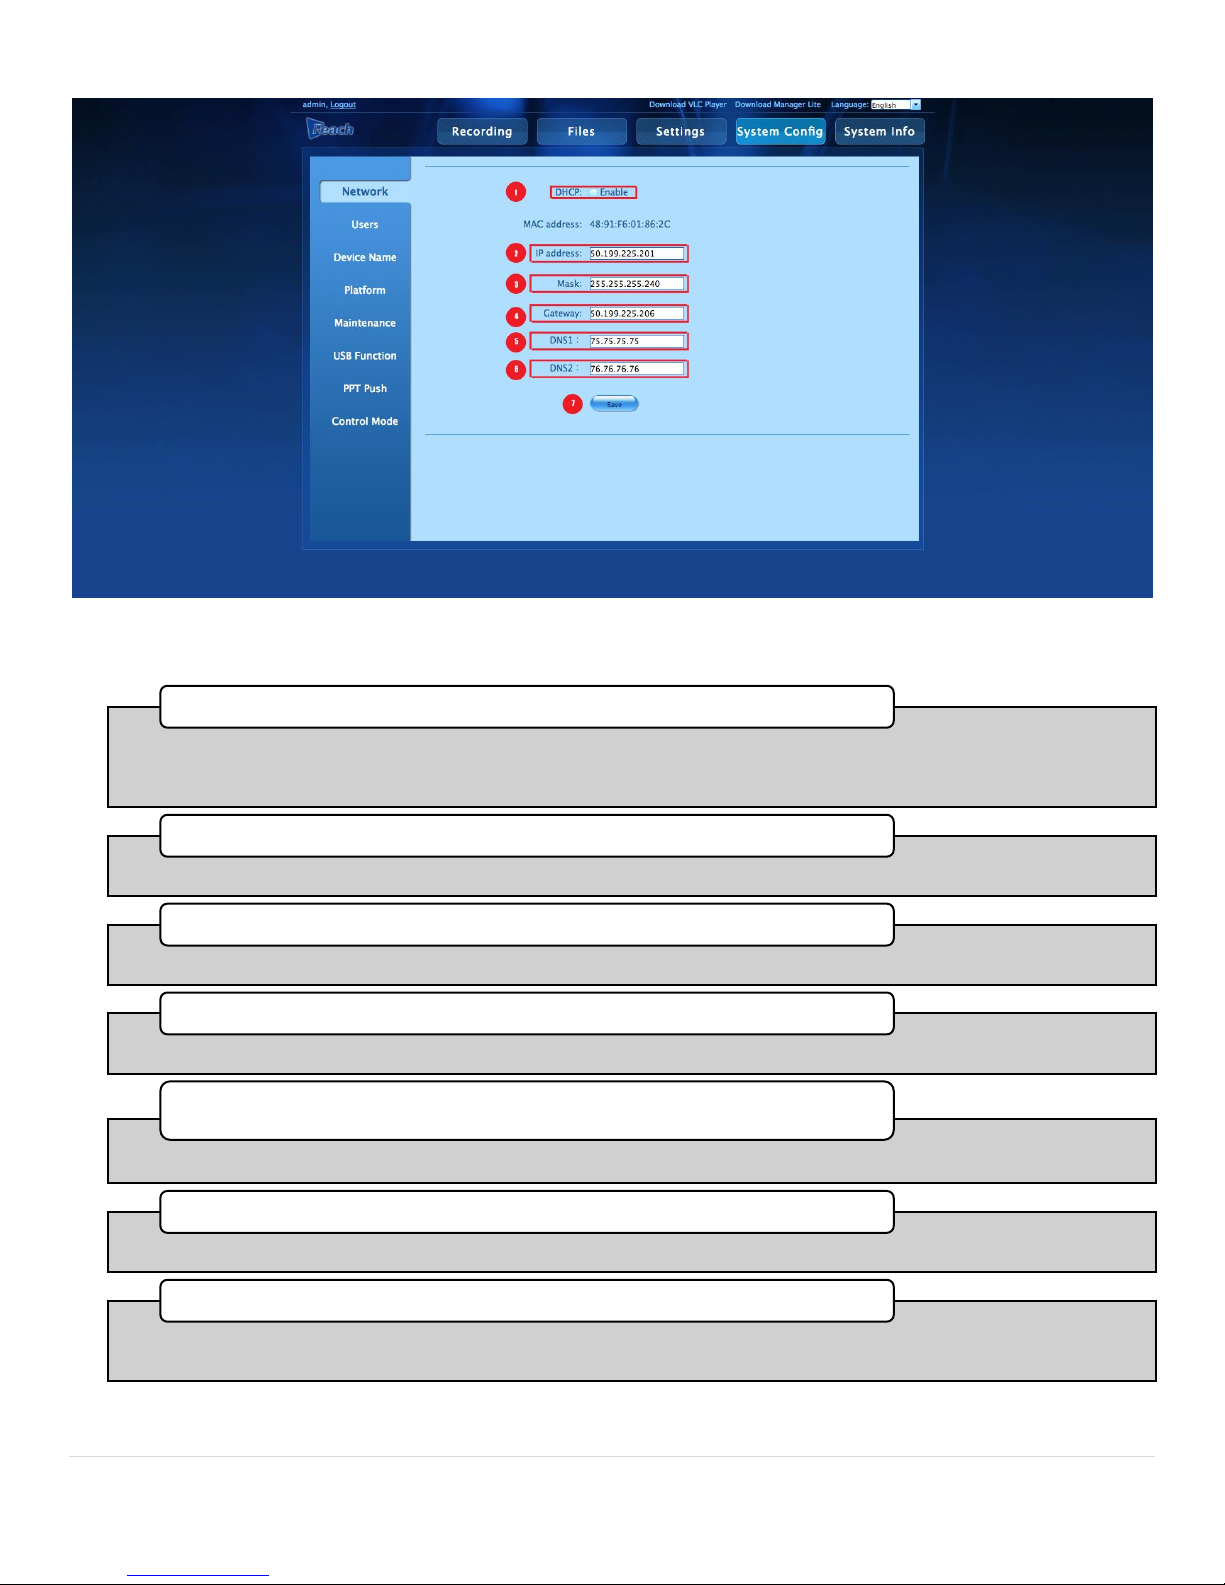
Figure 4. System Config Page-Network Tab
•Select this if your network infrastructure is based on Dynamic Host Configuration Protocol. Be aware that with any
lease release/renewals the IP address may change, and cause a loss of communications between the Bee8 and other IP
devices.
1. DHCP Enable
•Type in the IP address you have chosen for the Bee8 here
2. Static IP text box
•Enter the LAN Subnet Mask for the network
3. Mask text box
•Enter to IP address of the LAN gateway
4. Gateway text box
•Enter the IP address of the first Domain Name Server here (If applicable)
5. DNS1 text box
•Enter the IP iadress of the second Domain Name Server here (If applicable)
6. DNS2 text box
•Once you have entered all the appropriate information, click the save buton to commit the changes. Note: after
network changes have been made, the Bee8 will automatically restart!)
7. Save Button
Page 9
P a g e | 9 Bee8 User’s Manual Reach/BTX
When the Bee8 finishes restarting, it may be integrated into the existing IT infrastructure. Please confirm your settings on
the front panel of the Bee8 that the IP address, Subnet, and Gateway information is correct.
You may choose to continue with the physical integration of the system at this point, or go back and configure the rest of
the operating parameters.
User Controls
Bee8 Playback
The Bee8 has the ability to playback content, and control that playback by the front panel controls pictured above.
To playback a file on the Bee8
1. Press the Play button.
2. Use the scroll knob to find the file you wish to playback.
3. When you find the file, press the scroll knob. The content will start playing back.
4. The Pause and Stop buttons are active when playback is engaged so users can pause content or stop while
playing back.
USB Download and Redundant Record Capability
The Bee8 can perform redundant recording when a USB flash drive is plugged into the USB 2.0 port on the front panel.
When the Bee8 is recording, the file is built both on the internal 1TB hard drive and the USB storage device.
Alternatively, when a recorded file is completed, A user may insert a USB device into the USB 2.0 port, press the
Download button and a copy of the file will be downloaded onto the device.
After the USB flash disk or USB mobile HD is inserted in the USB connector, Bee8 will make self-check on the USB flash disk or
USB mobile HD. In case that the available storage space is smaller than 1G, the text “USB” will flash on the LCD Display.
Recording will not be started. However, recorded files may be downloaded to the USB flash disk or USB mobile HD. If the USB
device has multiple partitions, a prompt will be displayed on the LCD Screen for partition selection. When downloading video
files, if the available space is equal to or less than 50MB during the downloading, a prompt will be displayed on the LCD
Display and the downloading will stop. USB download is disabled when Bee8 is recording, however redundant recording is
possible. (Supported Formats: EXT3, NTFS, FAT32). This USB port does not provide power to an external disk drive powered by
USB!
Page 10
P a g e | 10 Bee8 User’s Manual Reach/BTX
Section 4 The Bee8 Web Interface
As you have already logged in to the Bee8 in Section 3, repeat this process to log back in. As mentioned earlier, after you
are logged in you land on the Record Page. This Page allows users to control the record function, schedule a record event,
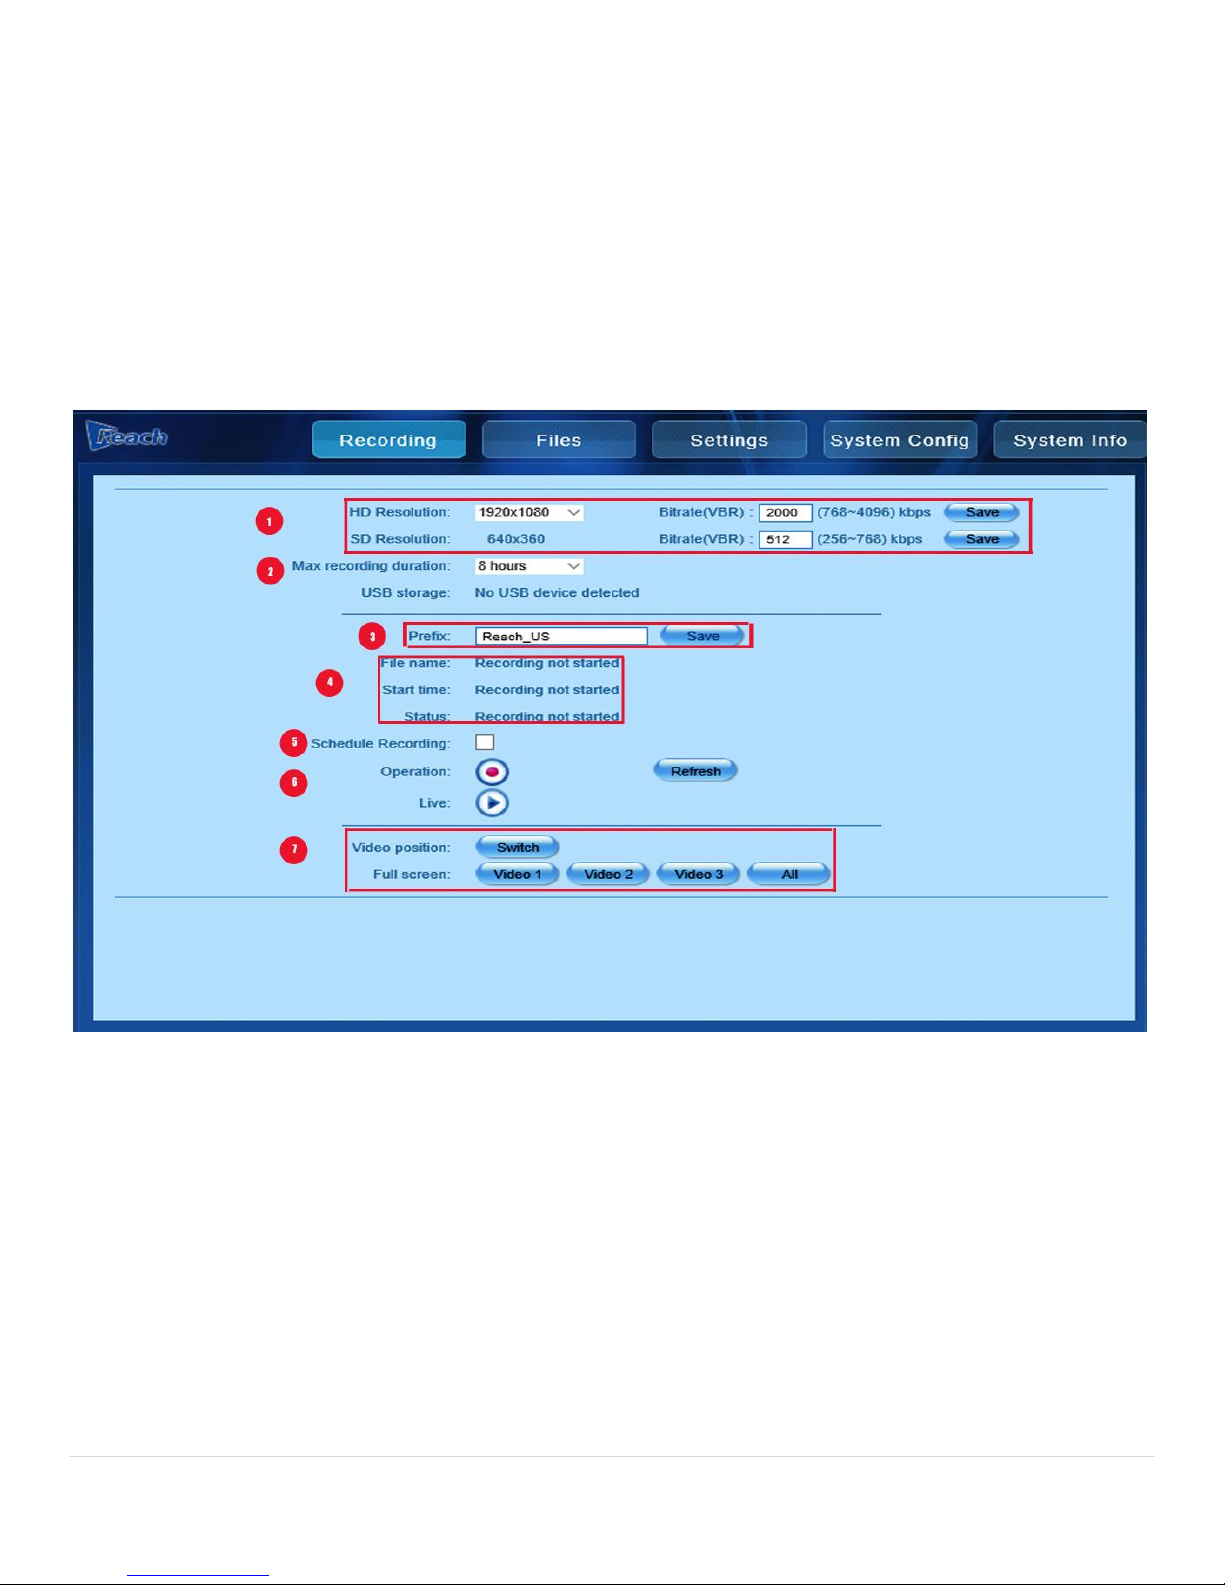
and change the way the content is presented. Please review the picture and legend ( below to familiarize with the
functions available.
The Record Page
Figure 5, Record Page Detail
Page 11
P a g e | 11 Bee8 User’s Manual Reach/BTX
•You can set HD Resolution here. The pull down menu provides you with the following choices: 1920X1080
(1080P Default) 1280X720 (720P), 704X576 (480P EU ONLY), and 720X480 (480P). You can also set the
Variable Bitrate of the recording here for both HD and SD sources. The range for HD recording is 768-4096
kbps, and for SD sources 256-768 kbps. The higher the kbps, the better the recording quality will be. Press
the save button for any parameter you have changed.
1. Setting the resolution of the recording (HD only)
•This pull down menu will limit the recording time from the system maximum of 8 hours down to 1 hour, in
one hour increments. If there is a USB device connected (Flash Drive or USB Hard Drive), it will be indicated
here.
2. Maximum Recording Time
•A prefix to the recording name may be added here to help easily identify recorded content later. Press the
save button after you have edited the prefix text.
3. Prefix
•This set of three indicators gives live status of the Bee8 current record condition.
4. Recording Status Feedback
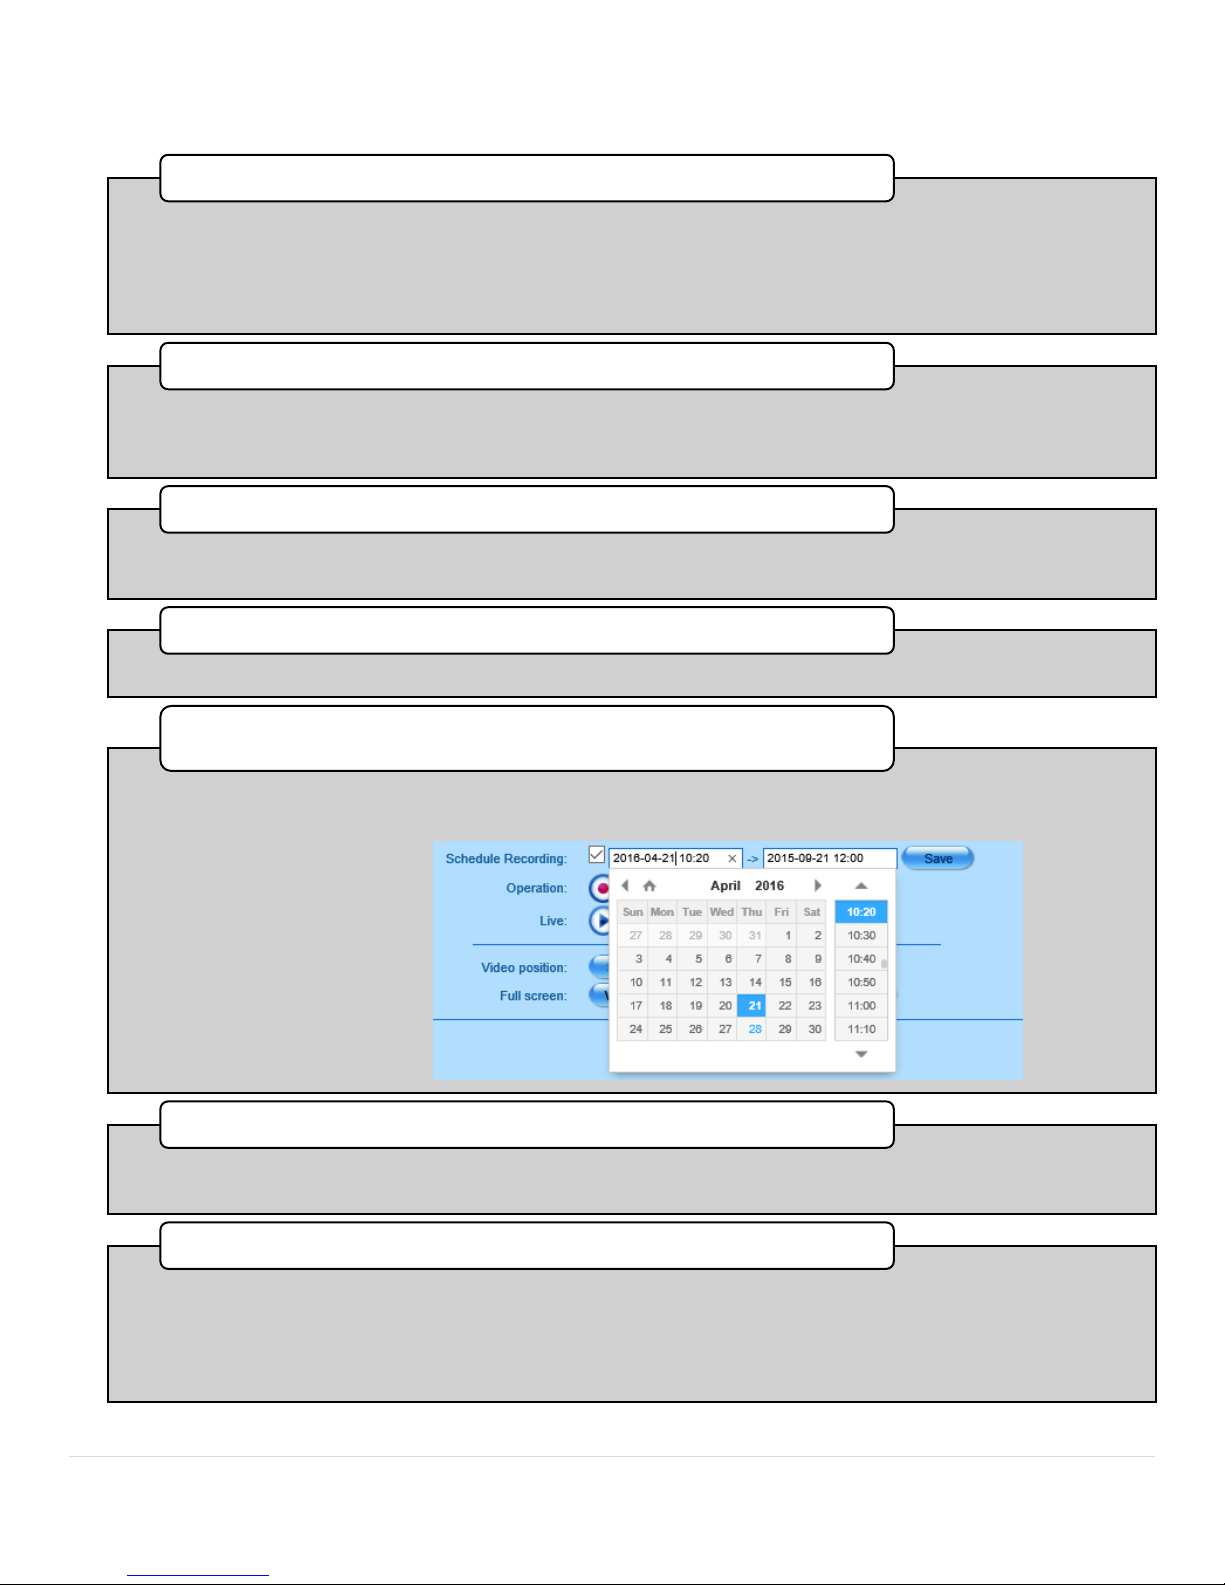
•Check this box to schedule a recording event in the future.
•Press the Save button when you have entered the start and stop time of the recording. Time increments
are at ten minute intervals.
5.Schedule Recording Checkbox
•To start a new recording on the fly, press the record button. (NOTE:The play button is a feature for the
Chinese Domestic Market only, and does not function on US Domestic Bee8 appliances.)
6. Operation Buttons
•These buttons help you select which source video arrangement will provide the most meaningful content.
The switch button cycles the sources in a counterclockwise direction, so you can choose which source will
have the largest display in the recording. You can also choose to toggle any of the 3 inputs full screen, then
return to the two or three source display by pressing the Switch button again. NOTE: This function works
both when the Bee8 is recording and streaming, or just streaming.
7. Video Position/Full Screen Selection Buttons.
Page 12
P a g e | 12 Bee8 User’s Manual Reach/BTX
Files Page
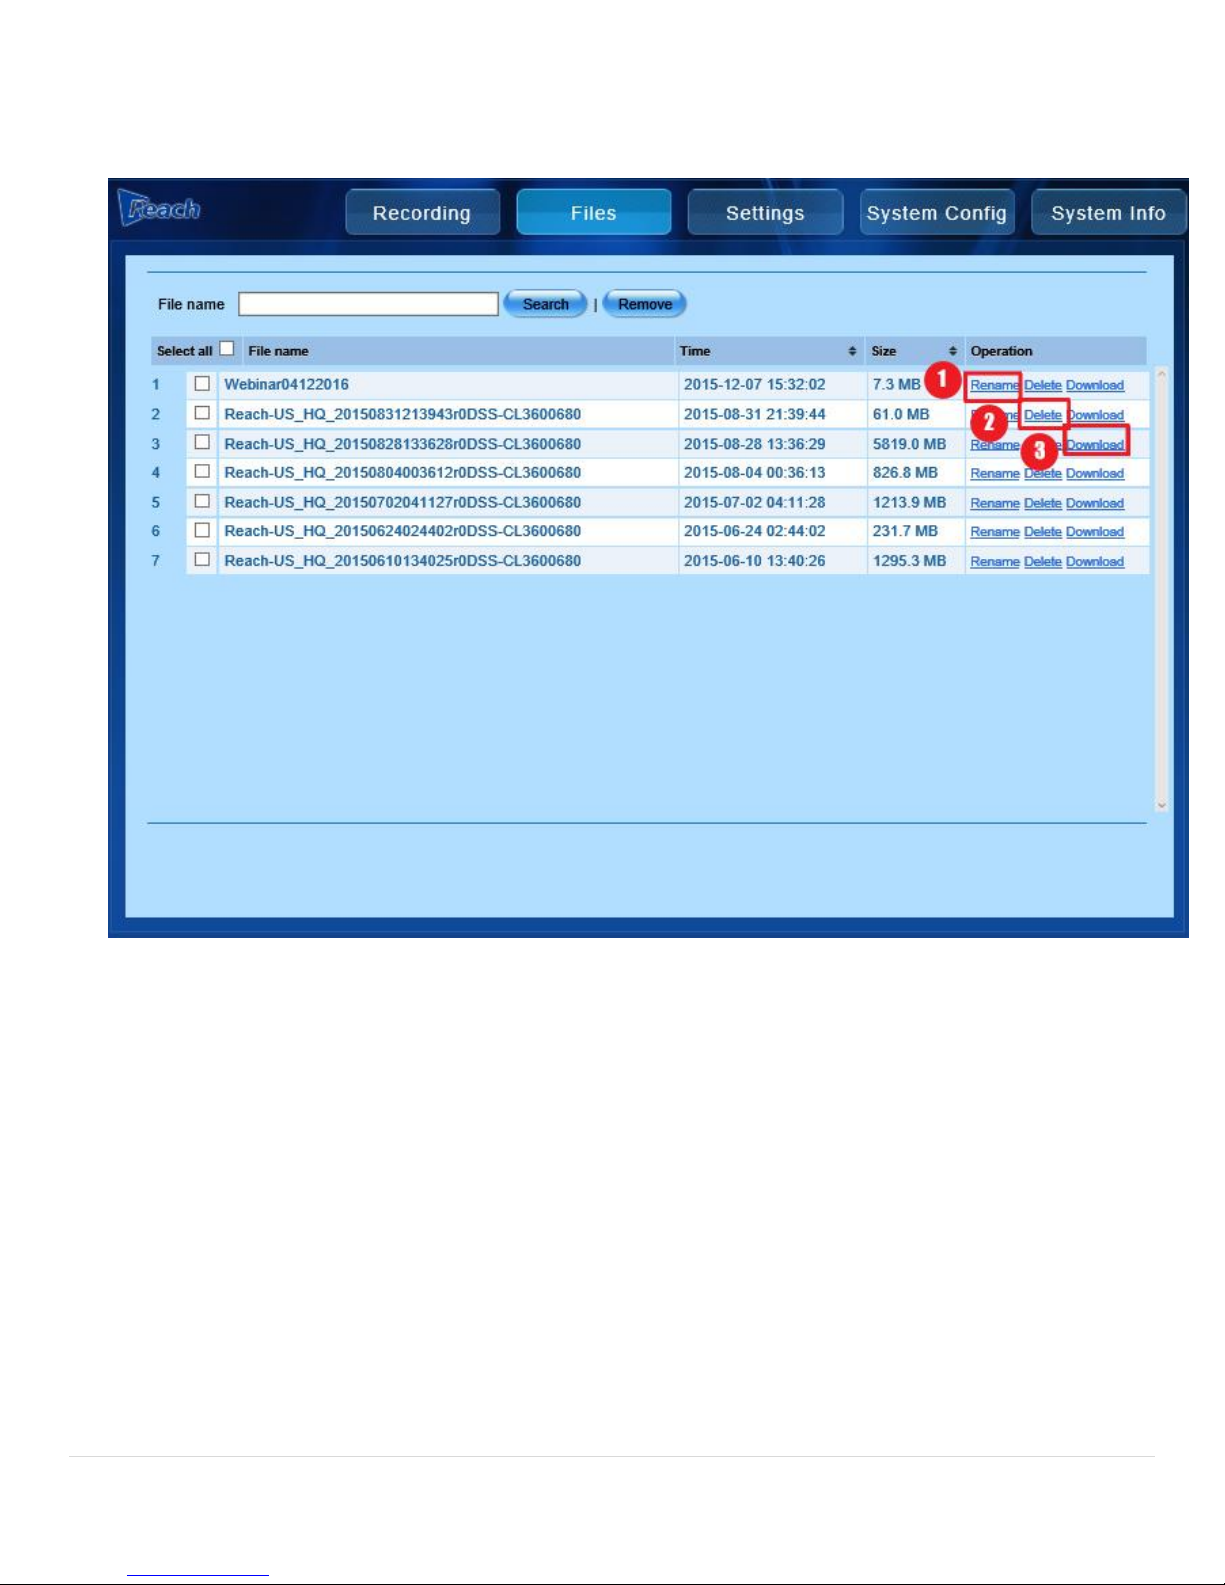
Figure 6. Files Page
The Files Page displays any files that are resident on the Bee8. These files are available for local playback, or VOD from
this page. As you can see, the Prefix that was fixed on the previous page is now a part of the file name. This display
shows when the file was recorded, its physical size and the options for what you can do with each file.
Page 13
P a g e | 13 Bee8 User’s Manual Reach/BTX
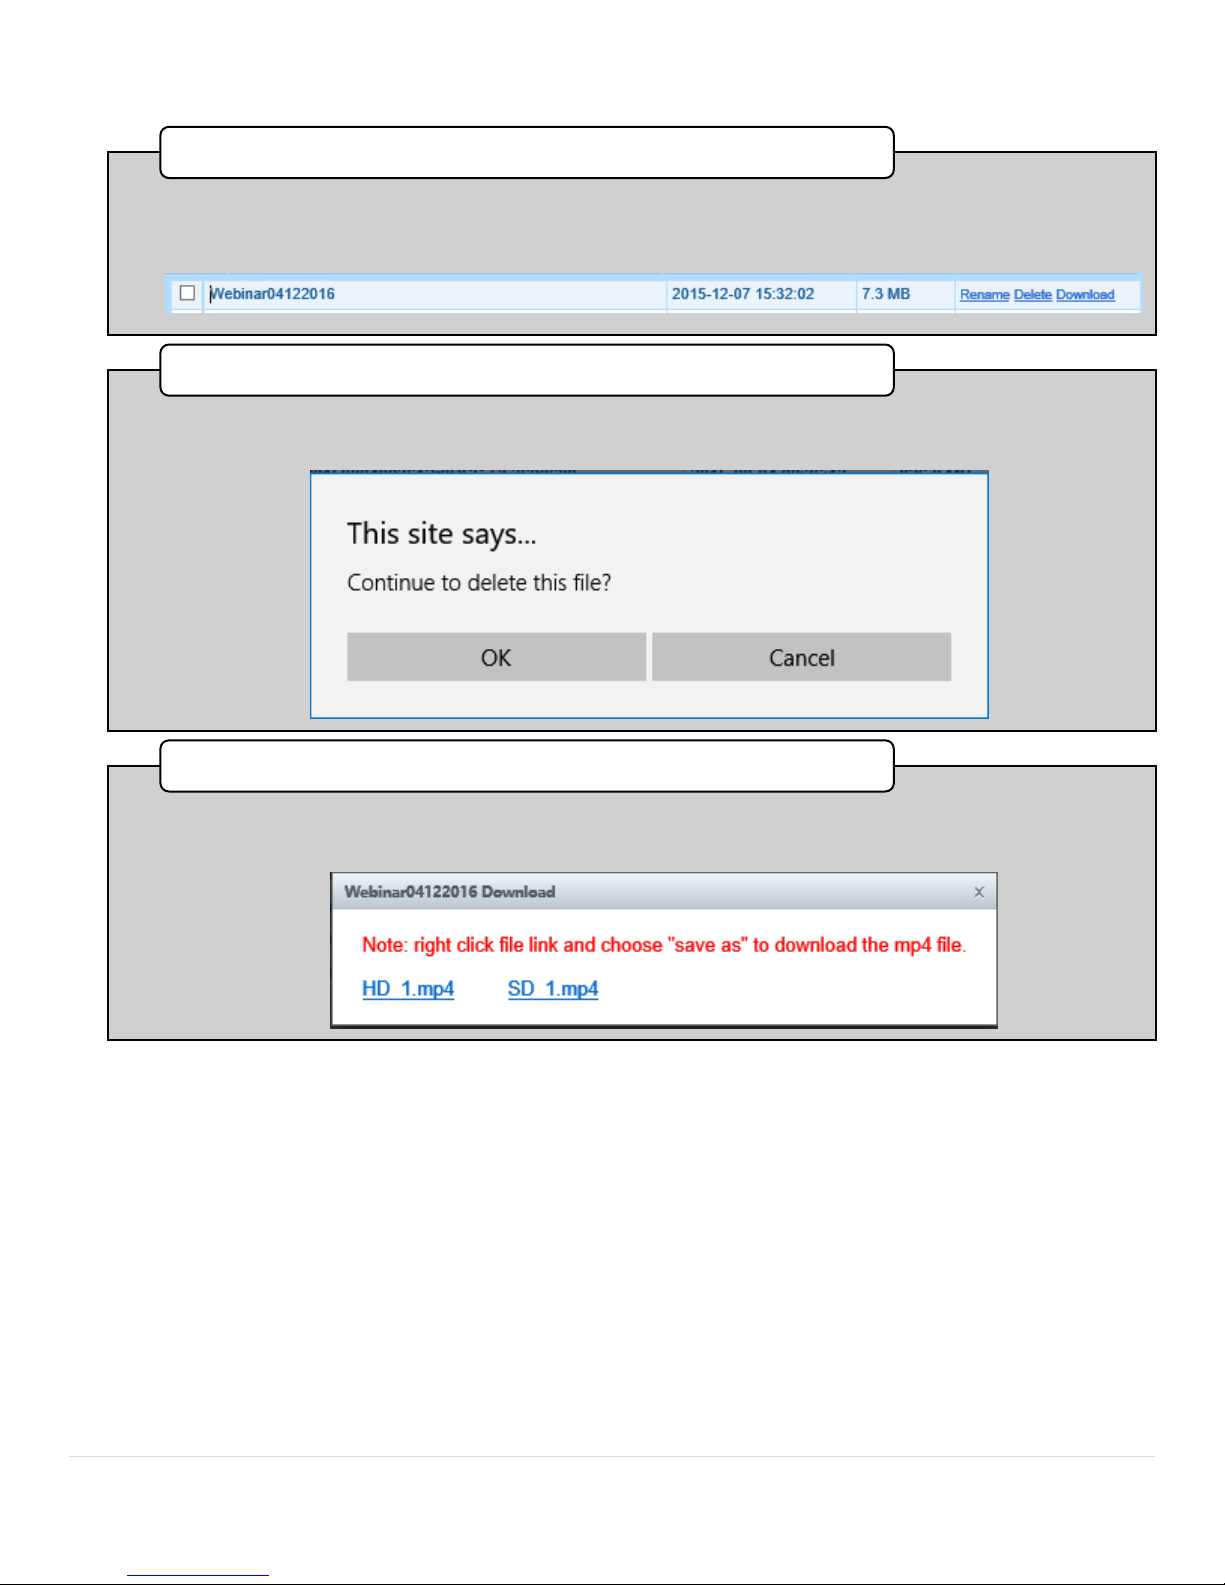
•Press Rename to change the name of the file to something more memorable. The textbox will
become editable for you to change the name. Click anywhere on the page to commit the name
change.
1. Rename Function
•Press Delete to permanently delete a file. When you press delete, a dialog box will appear to
confirm that you want to commit this action. When you click OK the file will be permanently
deleted.
2. Delete Function
•Press Download to directly download the file to a USB sturage device plugged into the front
panel. Simply follow the prompts.The downloaded content will be an MP4 file.
3. Download
Page 14
P a g e | 14 Bee8 User’s Manual Reach/BTX
Settings Page
This page includes almost everything you will use to commission the Bee8 into a system. This section will be divided into
each of the functional tabs:
Video Setting
Audio Setting
Media Streams
Image Adjust
Title/Logo
Disk Manage
PPT Switch
Setting Page Video Settings Tab (3 input options)
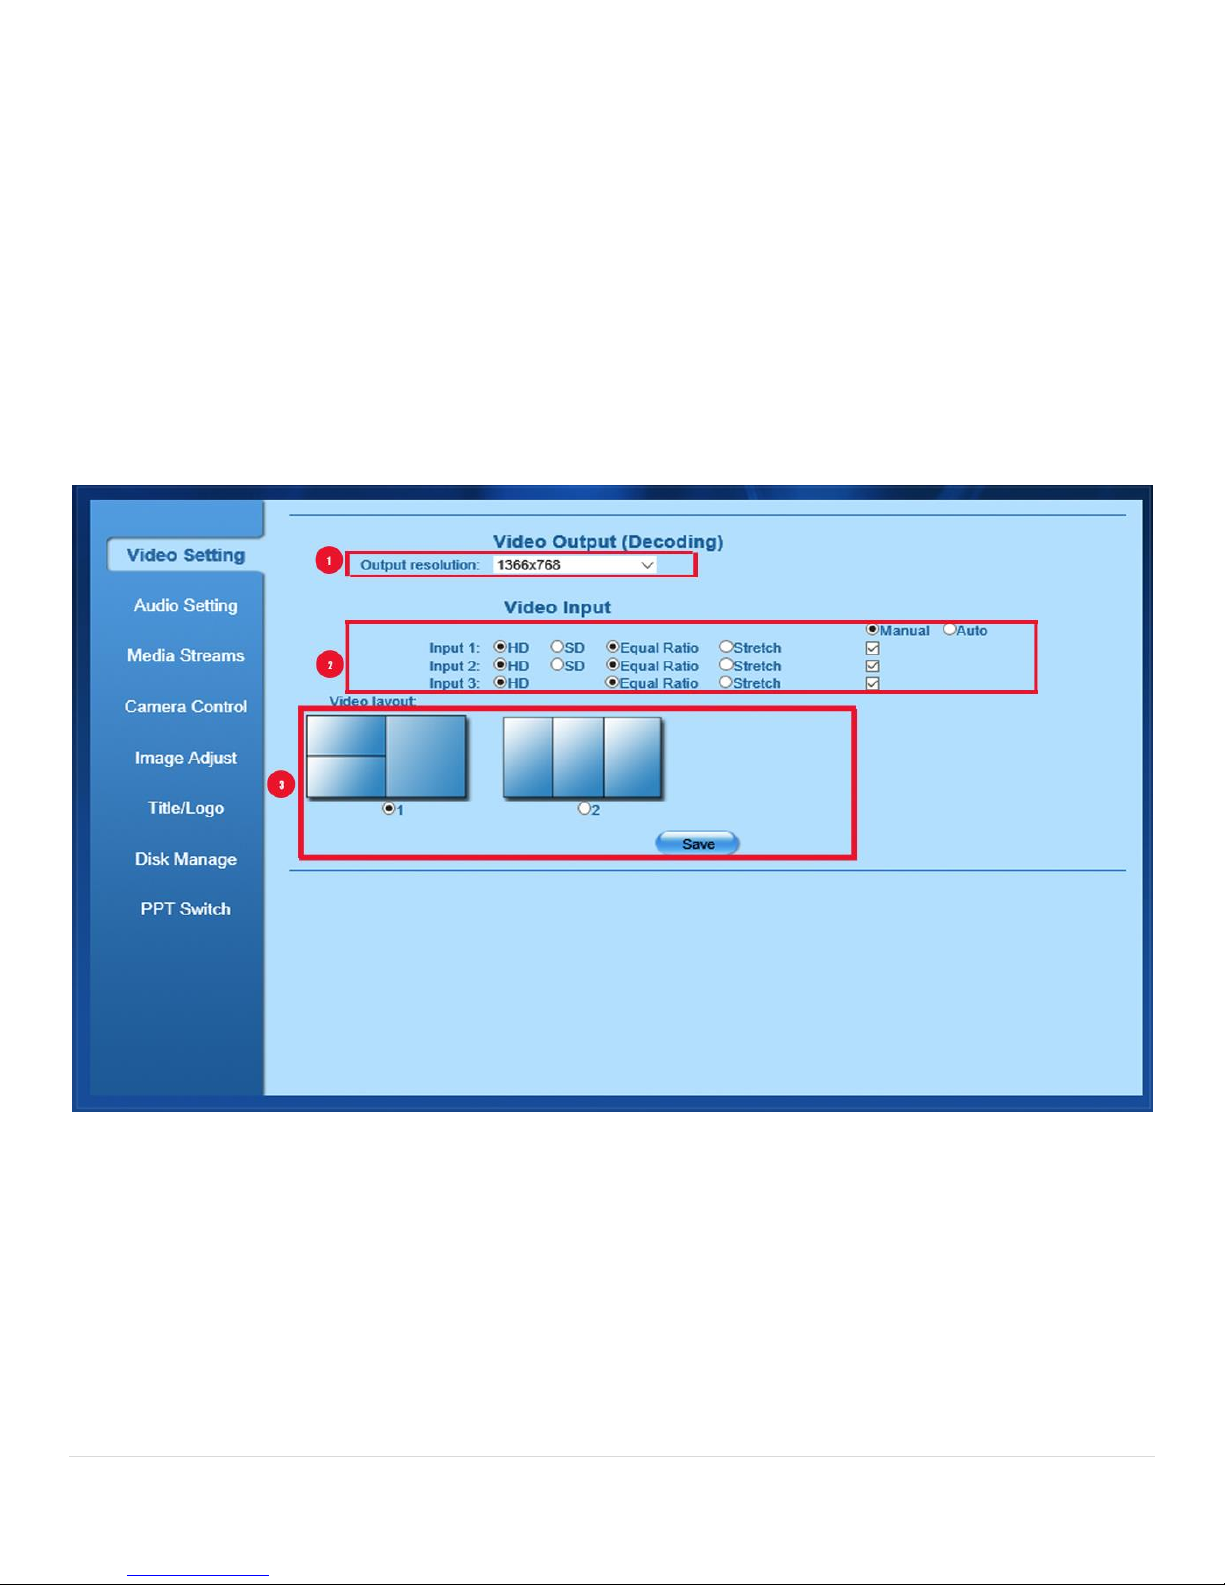
Figure 7. Video Setting Tab
Page 15
P a g e | 15 Bee8 User’s Manual Reach/BTX
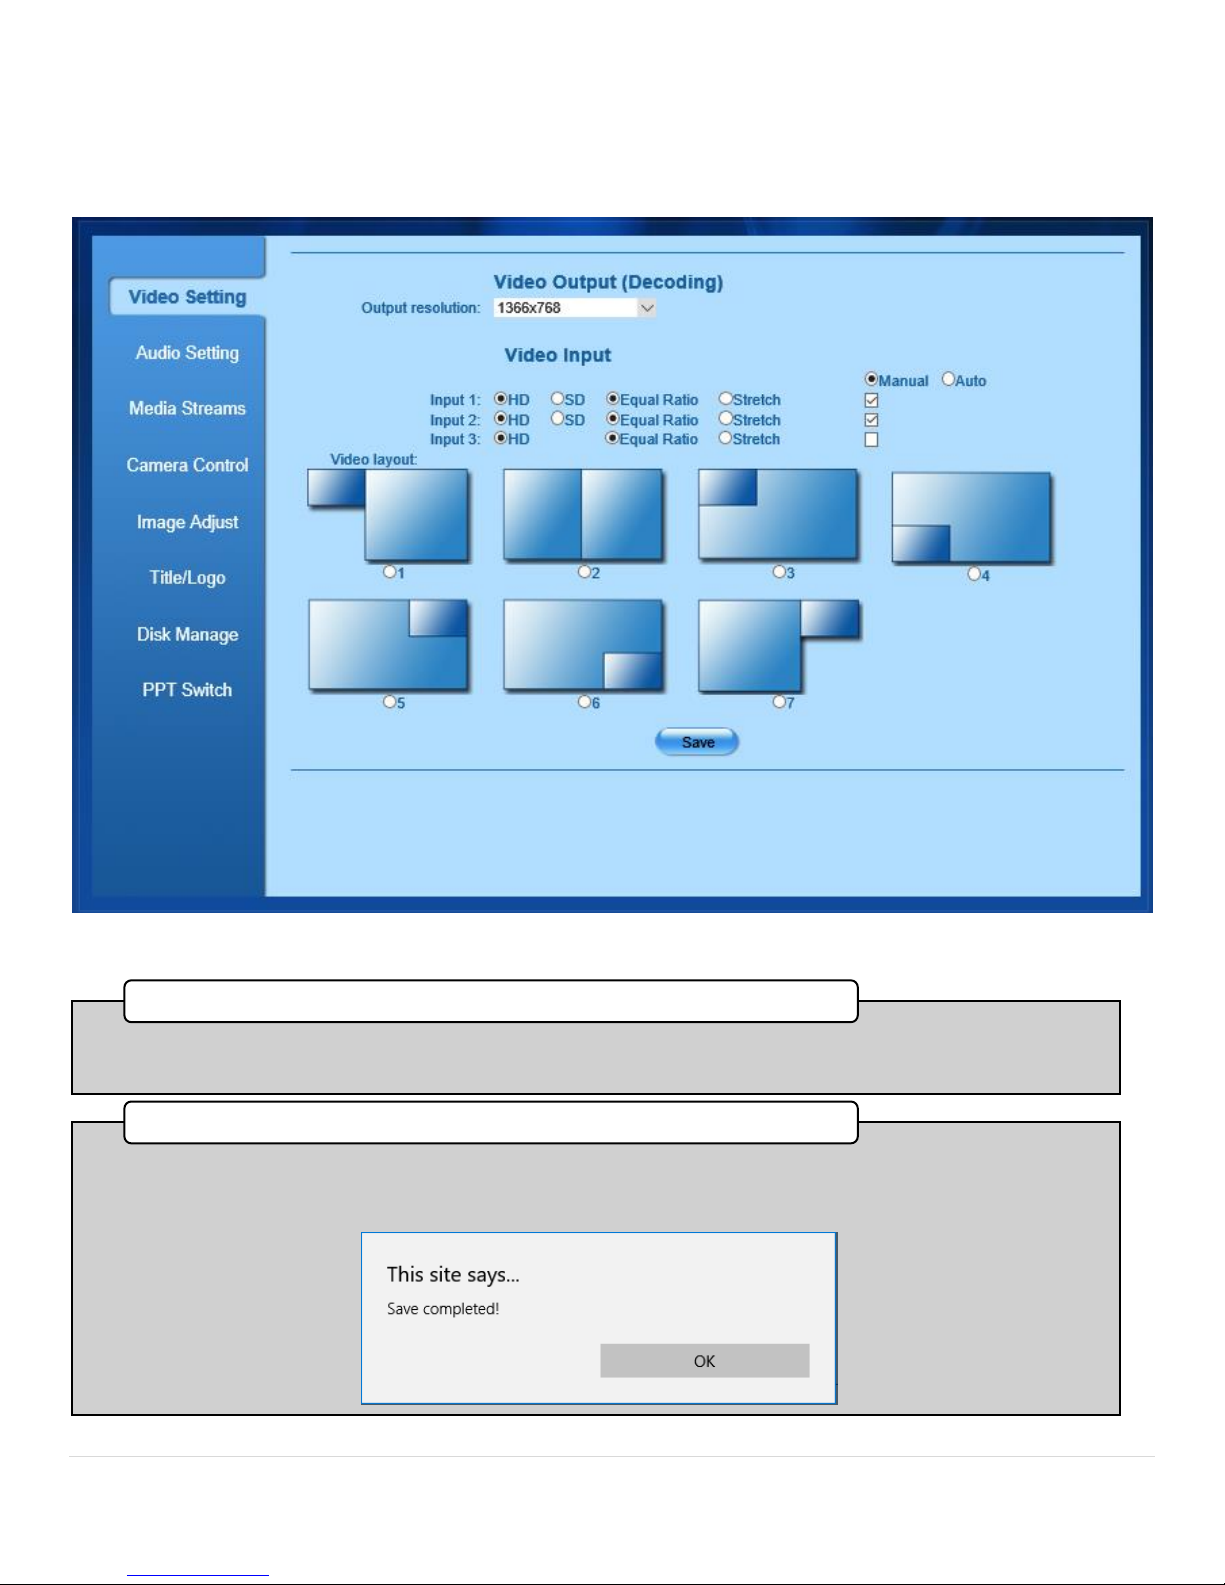
•This pull-down list contains all the display options the Bee8 can accomodate. The Choices are 1920X1080, 1440X1050,
1440X900, 1366X768, 1280X1024, 1280X800, 1024X769, 1280X720
1. Output Resolution (3 live inputs)
•The source input panel allows you to select which inputs are active on the Bee8 when the panel is in Manual mode.
The Picture above shows the panel in manual mode, with all 3 inputs selected, and all sources being High Definition.
When in three source mode, the layout choices are montage, or three in line.
2. Source Input Panel
•Video Layout defines the arrangement of the sources as displayed, recorded, an streamed. As mentioned above, when
3 sources are selected, the layout choices are montage or three in line. Please see the picture below to for a similar
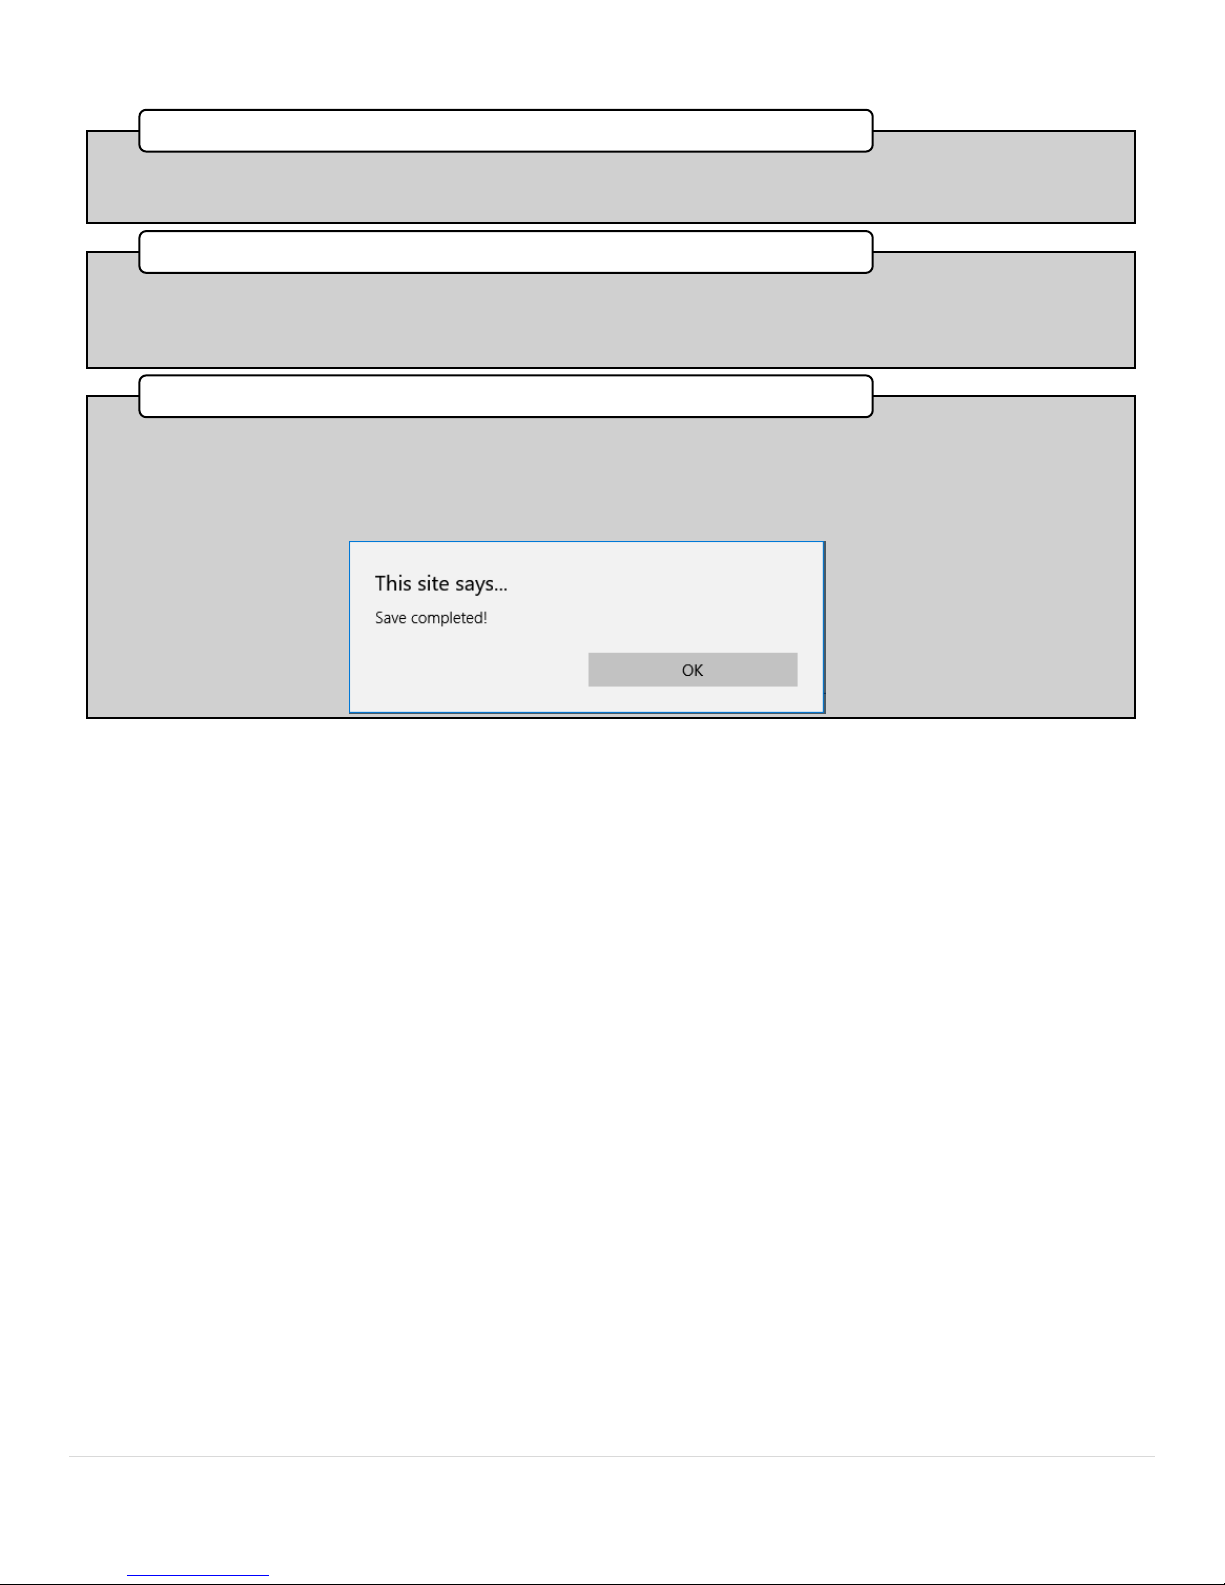
explanation for two input mode. These layout arrangements are changeable while recoding and streaming. After each
change, press save to commit the action. A dialog box will confirm the setting change.
3. Video Layout
Page 16
P a g e | 16 Bee8 User’s Manual Reach/BTX
Setting Page Video Settings Tab (2 input options)
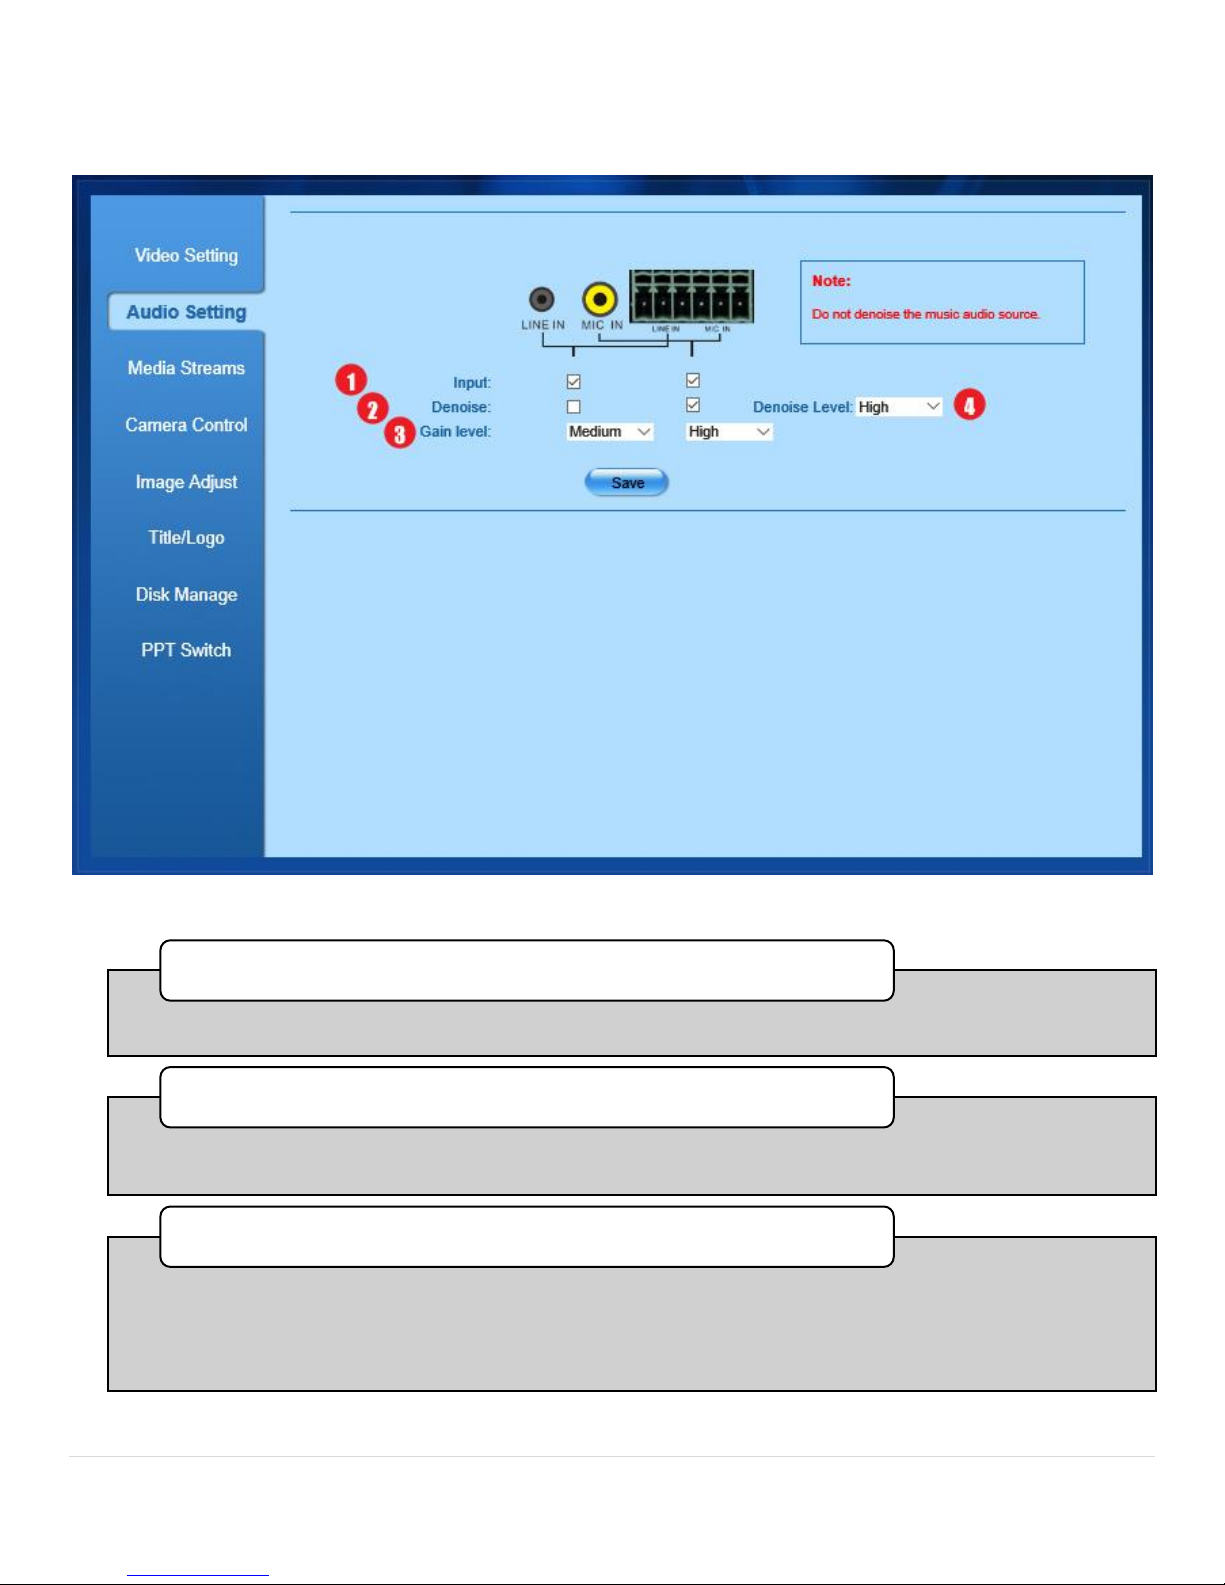
Figure 8. Settings Page, Video Settings Tab, Two Sources
•This image of the source input panel shows 2 live video inputs on the Bee8. When only two inputs are connected, the
variety of layouts provides more options.
2. Source Input Panel (2 Video Inputs Live)
•When two inputs are connected, several layouts become available with four picture-in picture options, and three sideby-side options. These layout arrangements are changeable while recoding and streaming. After each change, press
save to commit the action. A dialog box will confirm the setting change.
3. Video Layout
Page 17
P a g e | 17 Bee8 User’s Manual Reach/BTX
Settings Page Audio Settings Tab
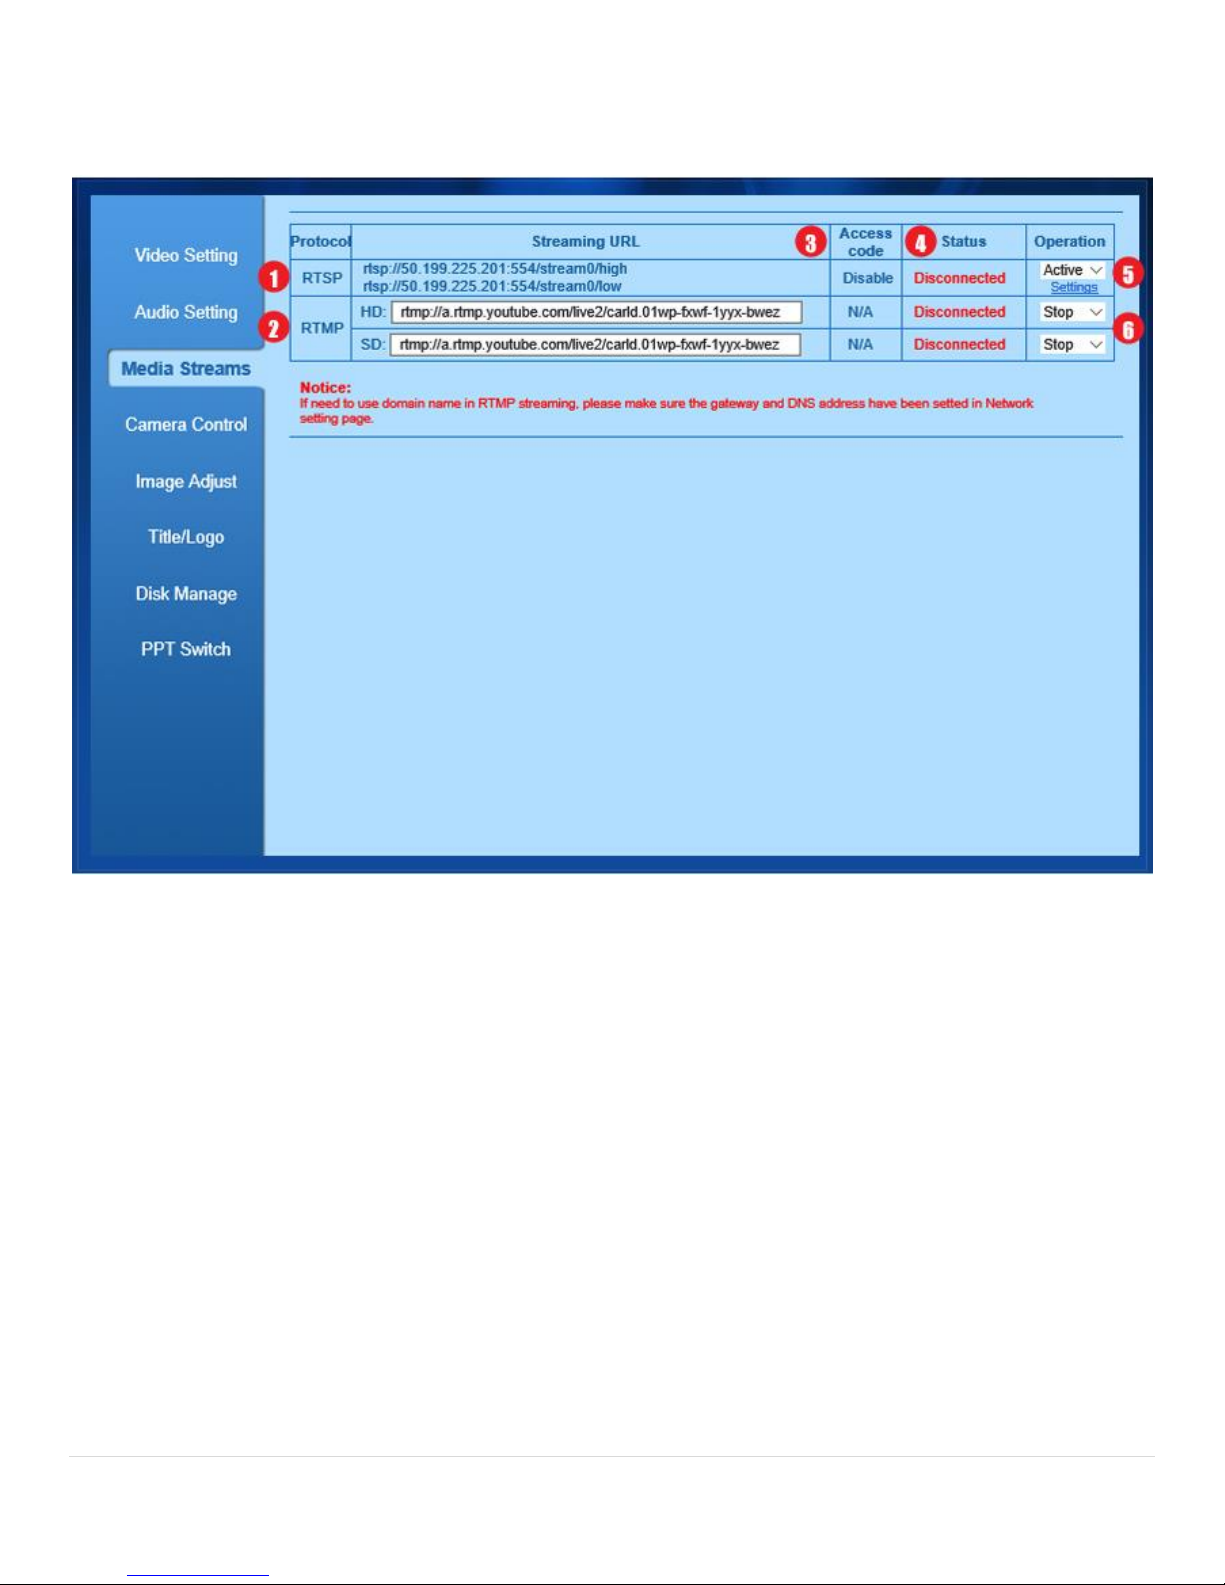
Figure 9. Settings Page, Audio Tab
•Check each box for audio signals you have input to the Bee8.
1. Input Select Checkboxes
•Check each box to apply a denoise filter for the appropriate input. In most cases, filtering will not be
required.
2. Denoise
•VSelect the amount of gain needed for each input to achieve high quality audio recording. The pull-down
menu choices are low (typically for line level inputs from a mixer or DSP), medium (typically for sources
where audio was recorded low previously) or high (typically for microphones with low sensitivity). Press the
save button after you have made your selections to commit the changes.
3. Gain Level
Page 18
P a g e | 18 Bee8 User’s Manual Reach/BTX
Settings Page Media Streams Tab
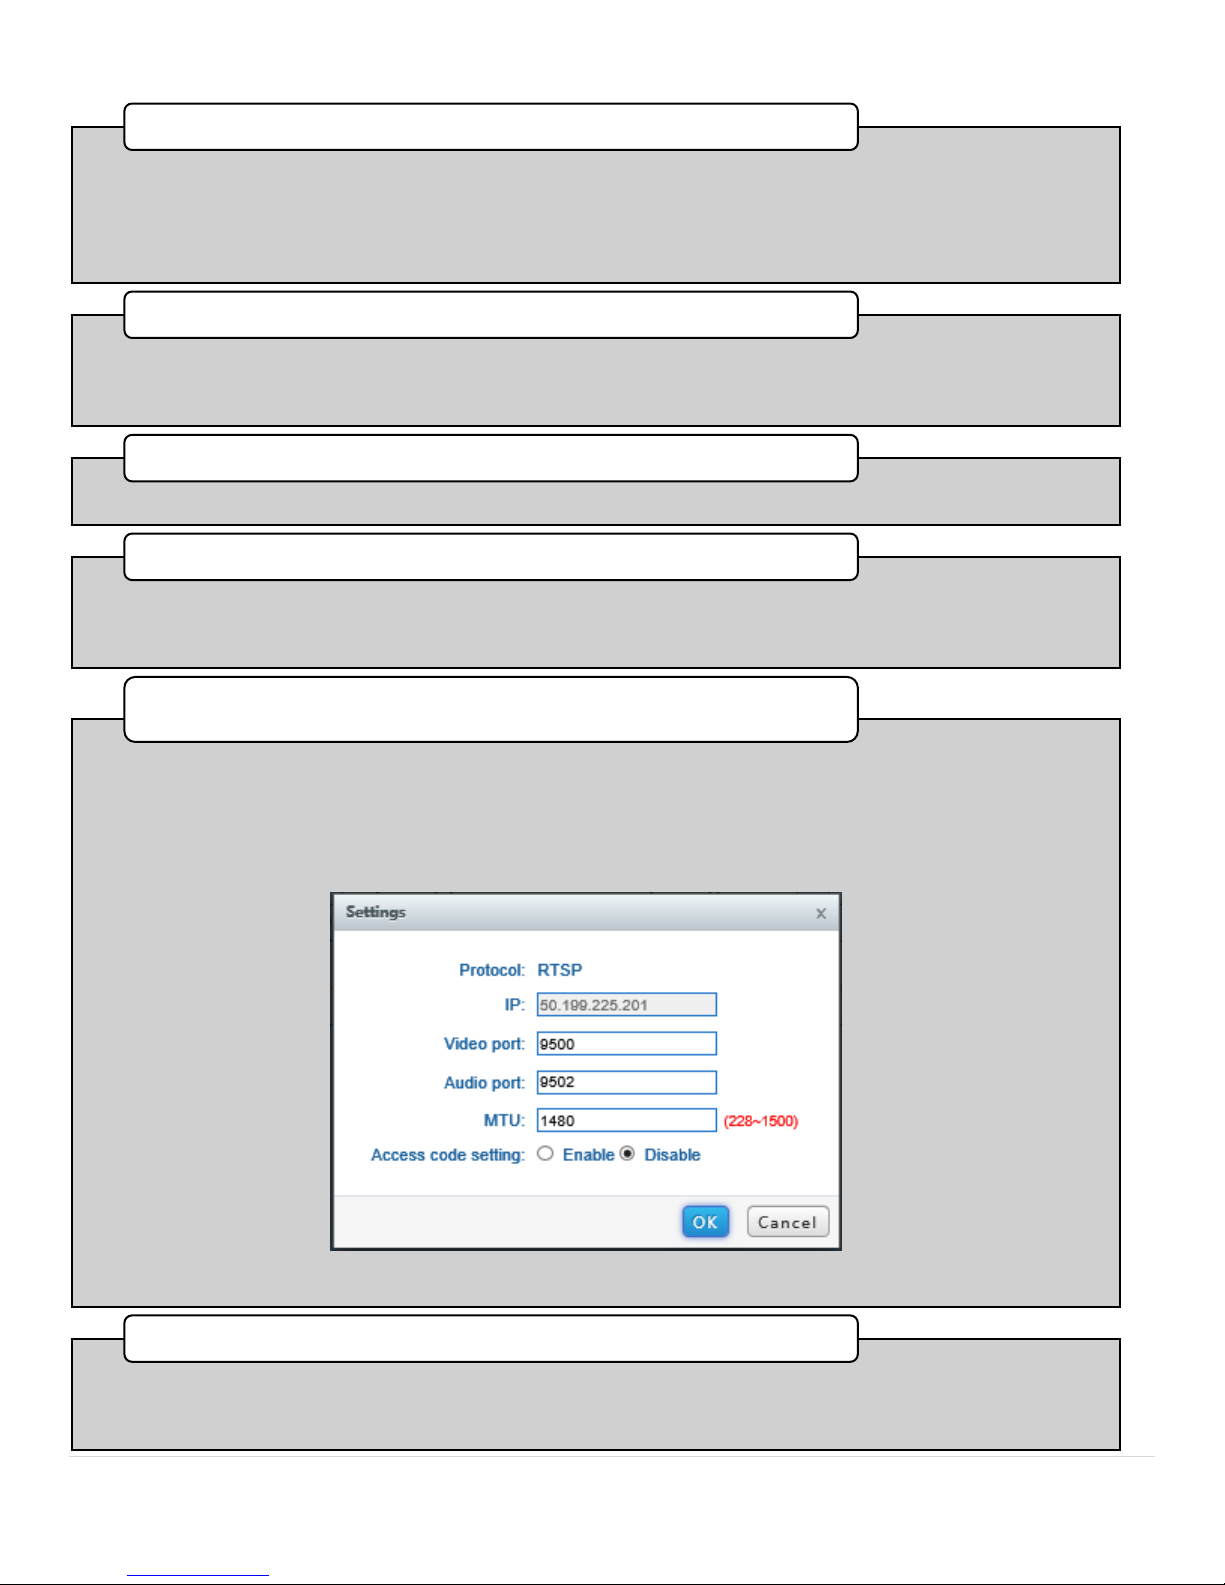
Figure 10. Settings Page, Media Streams Tab
Page 19
P a g e | 19 Bee8 User’s Manual Reach/BTX
•This part of the Media Streams Tab guides users to the self designated IP address of the Real Time
Streaming Protocol Live Streams. By coping and pasting the IP address into a media Player like Flash Player
or VLC Player, a user can view the live streaming directly from the Bee8. The High stream is a high
bandwidth stream, the low is a low bandwidth stream. RTSP has the capability of negotiating with the client
to determine which stream is most appropriate, based on available bandwidth of a users connection.
1. RTSP Streams IP Address
•This user entered IP address is the server at a Content Delivery Network (CDN) where the live streams from
the Bee8 are pulled to and served to subscibers. In this illustration, this Bee8 is providing live streaming
content to YouTube to engage subscribers on the Reach-US YouTube channel .
2. RTMP Streams Destination IP
•This function is not utilized in the US market.
3. Access Code
•This indicator gives the live status of the Bee8. If a user was connected and viewing live streams derectly
from the Bee8 The status would change to "connected". This function is not commonly used in the US
market.
4. Live Streaming Status
•This pull down provides users with live streaming control. Streams are only propagated when the mode is
set to Active. When set to Stop recording is possible, but live streaming is suspended. Note also there is a
Settings link to bring you to a Dialog box, where you may customize the ports and Maximum Transmission
Unit (MTU) settings from their defaults. It is strongly recommended that you not change these settings
unless you are a network specialist and are intimate with the network's design and architecture.
Operation Mode (RTSP Only)
•This pull down provides users with live streaming control for RTMP streams. Streams are only propagated
when the mode is set to Active. When set to Stop, recording is still possible, but all interaction with the
CDN is suspended.
6. Operation Mode (RTMP Only)
Page 20
P a g e | 20 Bee8 User’s Manual Reach/BTX
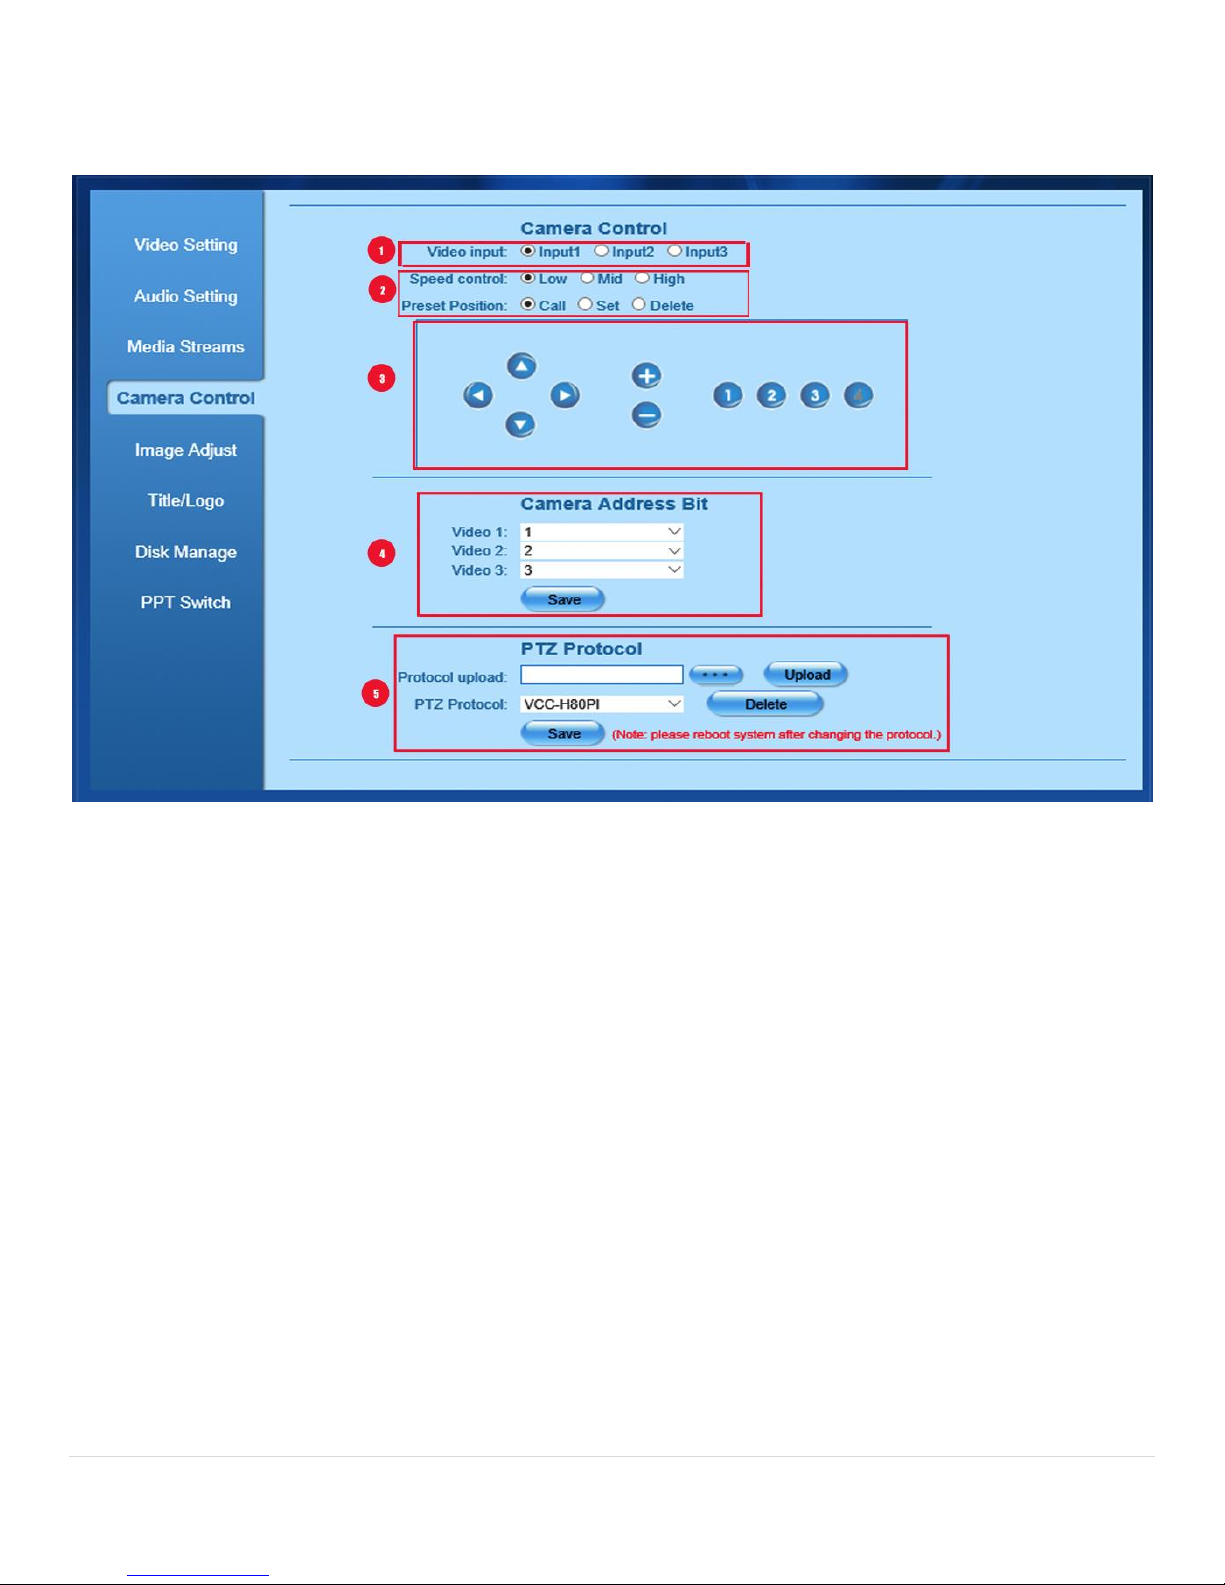
Settings Page, Camera Control Tab
Figure 11. Camera Control Tab
Page 21
P a g e | 21 Bee8 User’s Manual Reach/BTX
•Select the camera and input you either wish to control, wish to set a preset for, or wish to upload
protocol for.
1. Video Input Selector
•The Speed Control sets the speed at wisch the PTZ motors move the camera and Lens. For most
applications Mid is the best choice, however Low is useful when panning tilting and Zooming
between two subject in close proximity, and High is useful when you need to go from a tight shot
to a wide shot quickly. NOTE: High is very fast!
•Preset position Controls allow users to program a new preset position, recall a previously set
preset position, or delete a preset. To program a new preset, use the pan tilt and zoom controls
to move the camera to the desired shot, select Set. then press one of the 3 preset buttons. To call
a preset, first press one of the preset buttons, then press Call.
2. Speed Control and Preset Position Control
•Use the arrow buttons to control the movement of the camera where the left and right arrows
control the pan movements, the up and down arrows control the tilt movements, the plus button
zooms in, and the minus button zooms out.
3. Pan Tilt and Zoom Controls
•Use these pull down menus to set the camera address bit to match what you have set your
camera for when integrating them. This control is only applicable when multiple cameras are
connected to the RS-232 or RS-485 camera control port of the Bee8.
4. Camera Address Bit
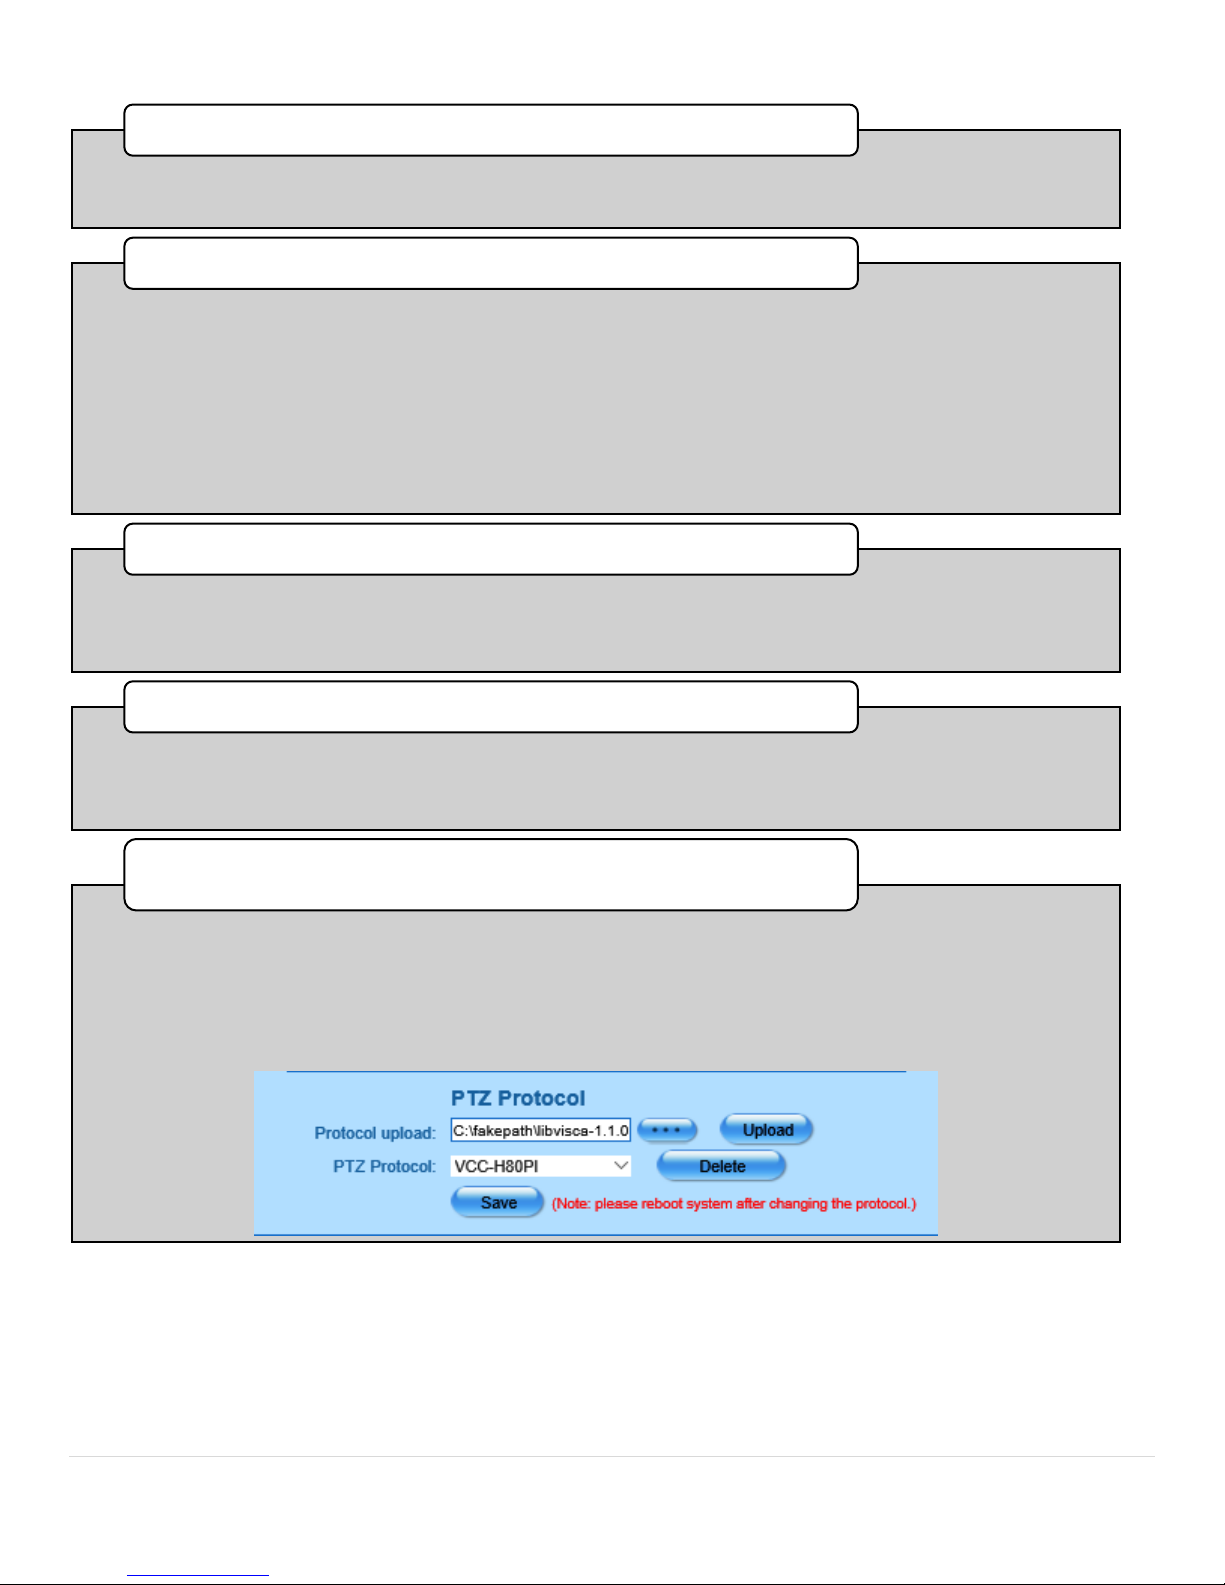
•This section allows users to upload protocol to the Bee8 in the rare and unlikely event that the
standard protocol set included with the Bee8 will not control a connected camera. To upload
camera control protocol software to the Bee8, click the 3 dot button to search your computer for
the software and select it. when the file name appears in the text box, press the upload button.
Note: The Bee8 must be restarted after successfully uploading camera control protocol
software. Also note that this software must be linux compatible.
PTZ Protocol
Page 22
P a g e | 22 Bee8 User’s Manual Reach/BTX
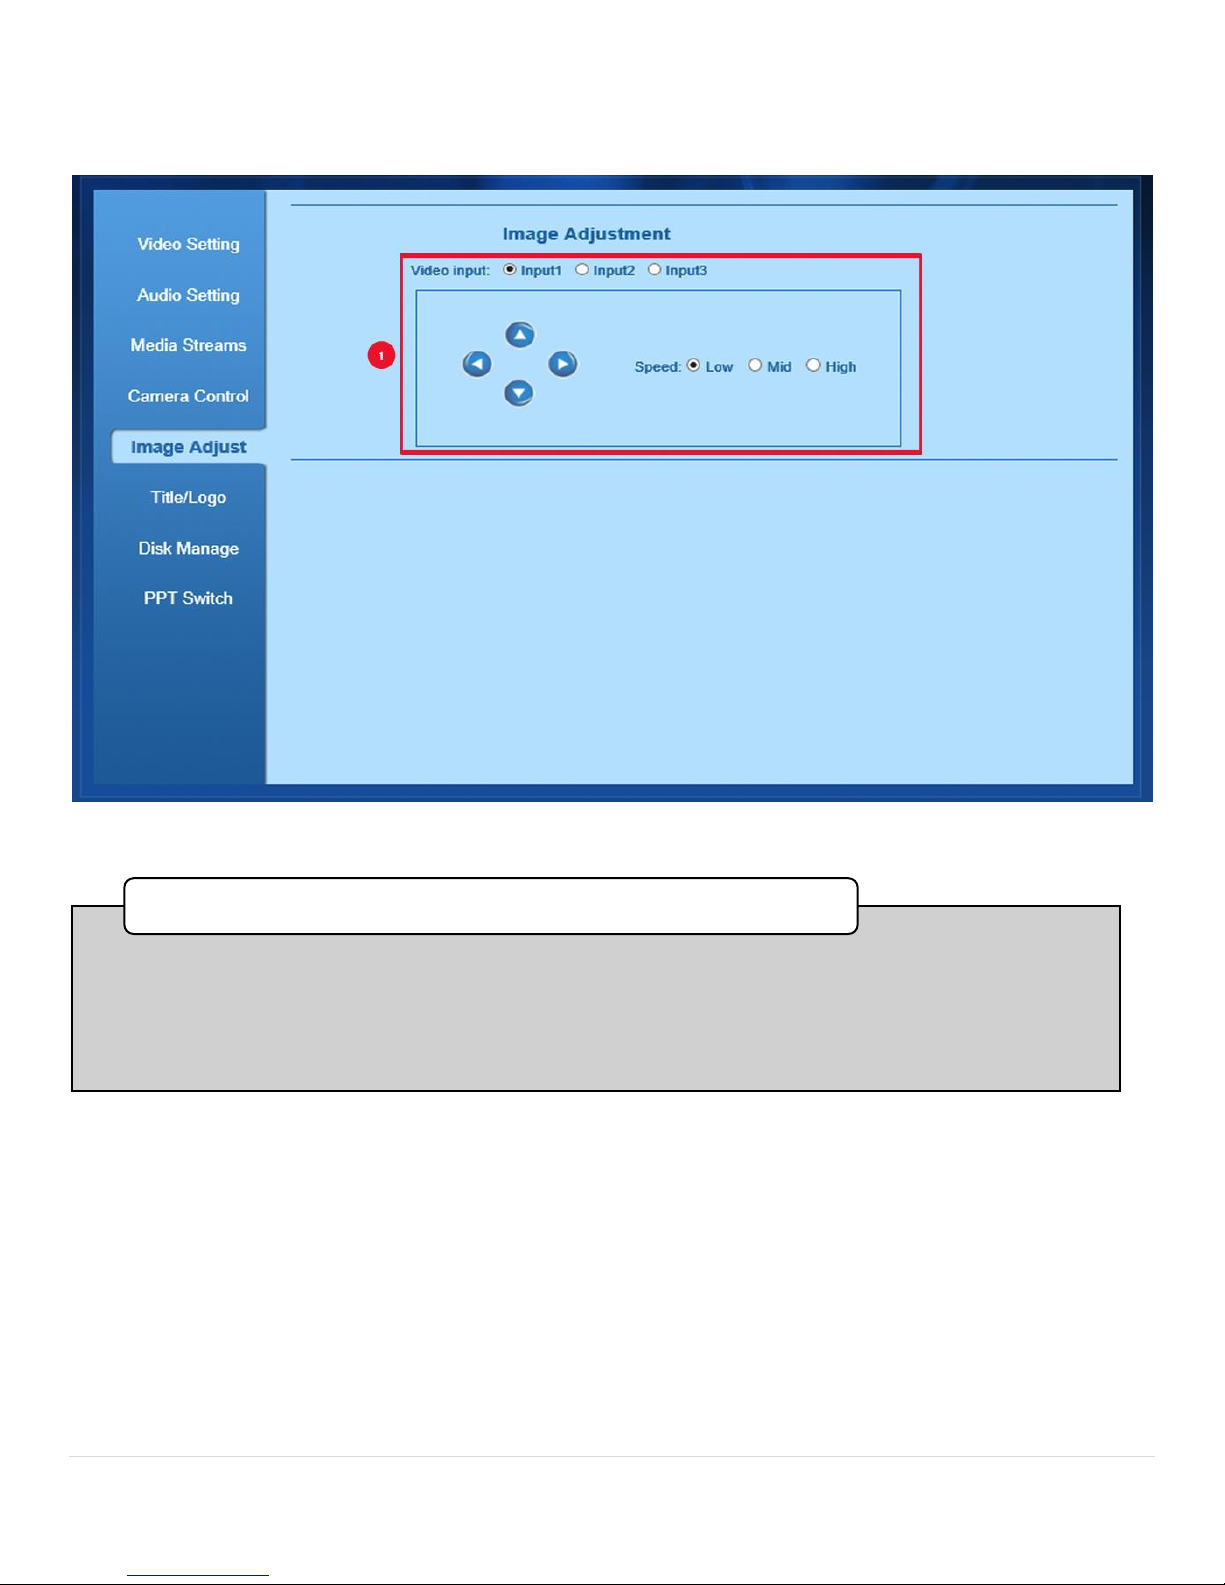
Settings Page Image Adjustment Tab
Figure 12. Image Adjustment Tab
• Select which input is not properly centered, and use the arrow buttons to center the
content as desired. The speed controls affect how quikly the image moves within the
frame. NOTE: This control works only with analog signals such as VGA or composite SD
video. Digital signal video phase is not adjustable, nor should it be.
1. Image Adjustment
Page 23
P a g e | 23 Bee8 User’s Manual Reach/BTX
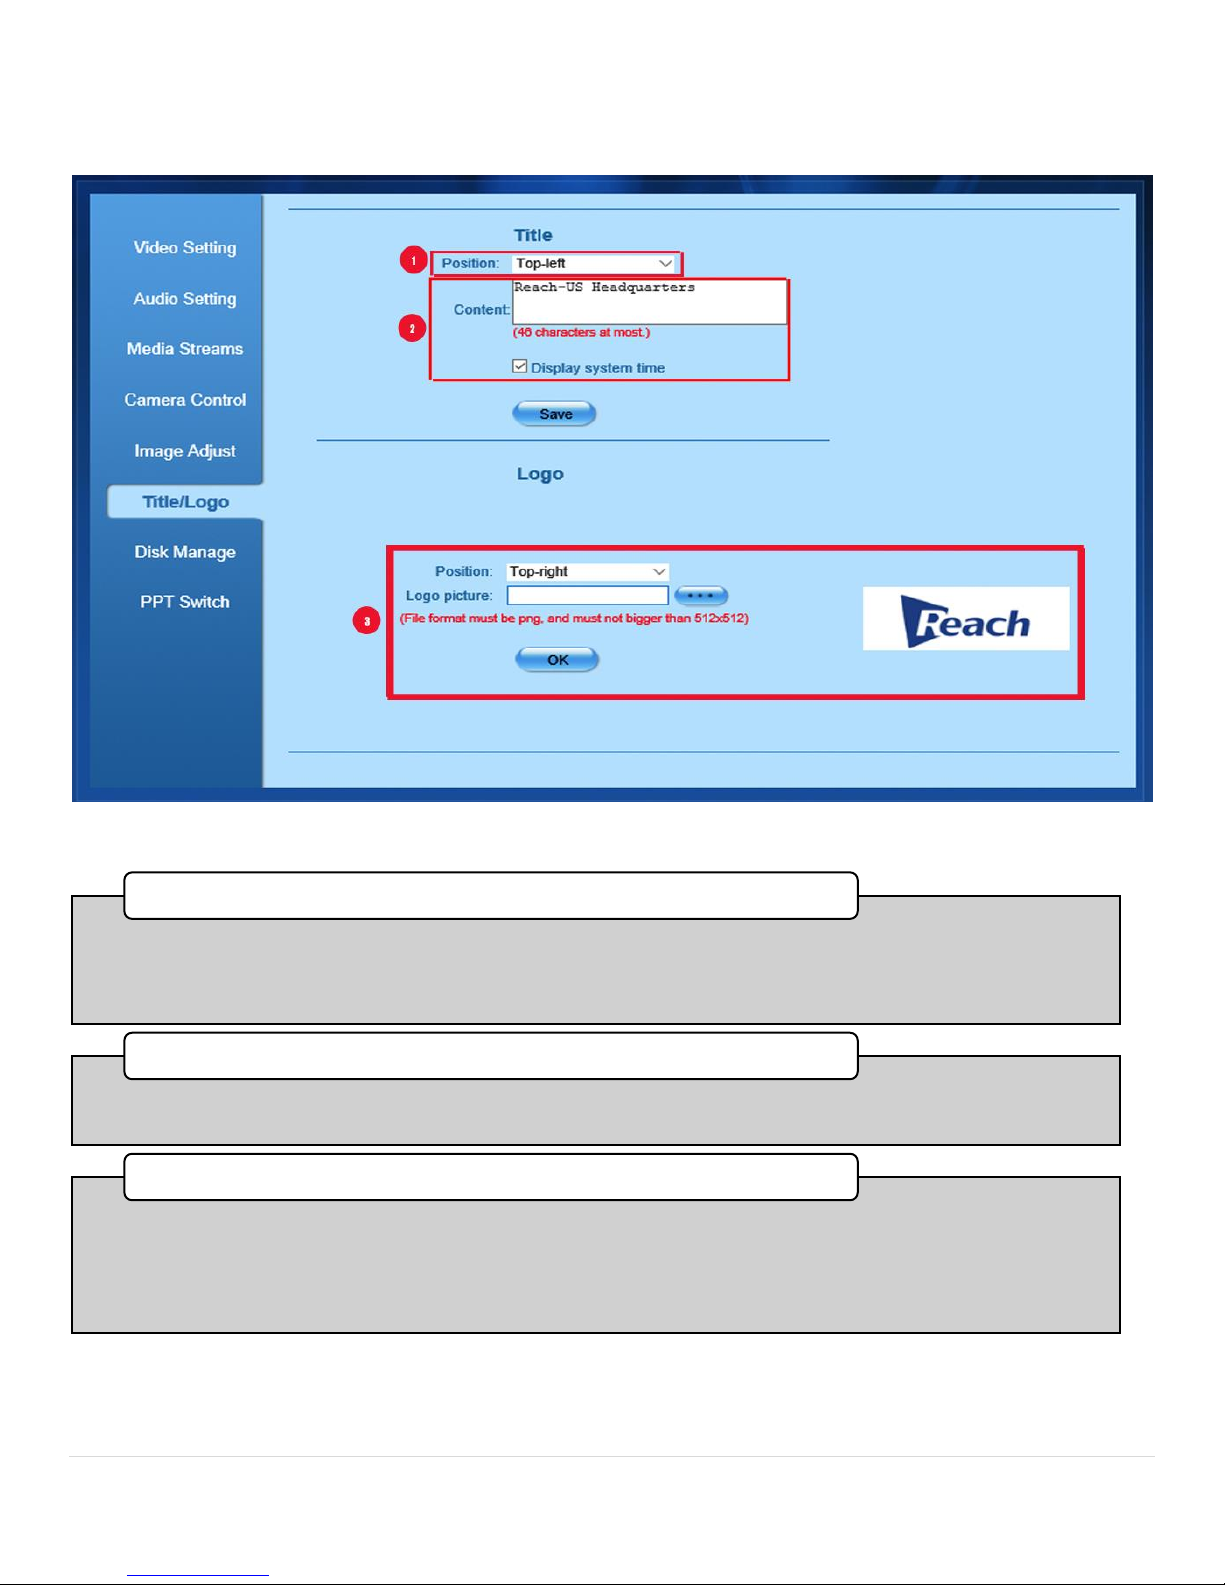
Settings Page Title/Logo Tab
Figure 13. Title-Logo Tab
•This pull down menu gives you the option of placing a title in the Top Left, Top Right, Bottom Left, or
Bottom Right of the display.After you have completed any changes in this section press Save to commit
them.
1. Title Position
•Enter the content of the title here. You can also decide to display the System Time by checking the box
below.After you have completed any changes in this section press Save to commit them.
2. Content Text Box
•Position the logo. This pull down menu gives you the option of placing a title in the Top Left, Top Right,
Bottom Left, or Bottom Right of the display. Logo Picture. Press the button with three dots to locate the
file you wish to use as a logo. This file MUST be in PNG file format, no larger than 5132 X 512 pixels.After
you have completed any changes in this section press OK to commit them. A preview of the file will appear
to the right.
3. Logo Placement
Page 24
P a g e | 24 Bee8 User’s Manual Reach/BTX
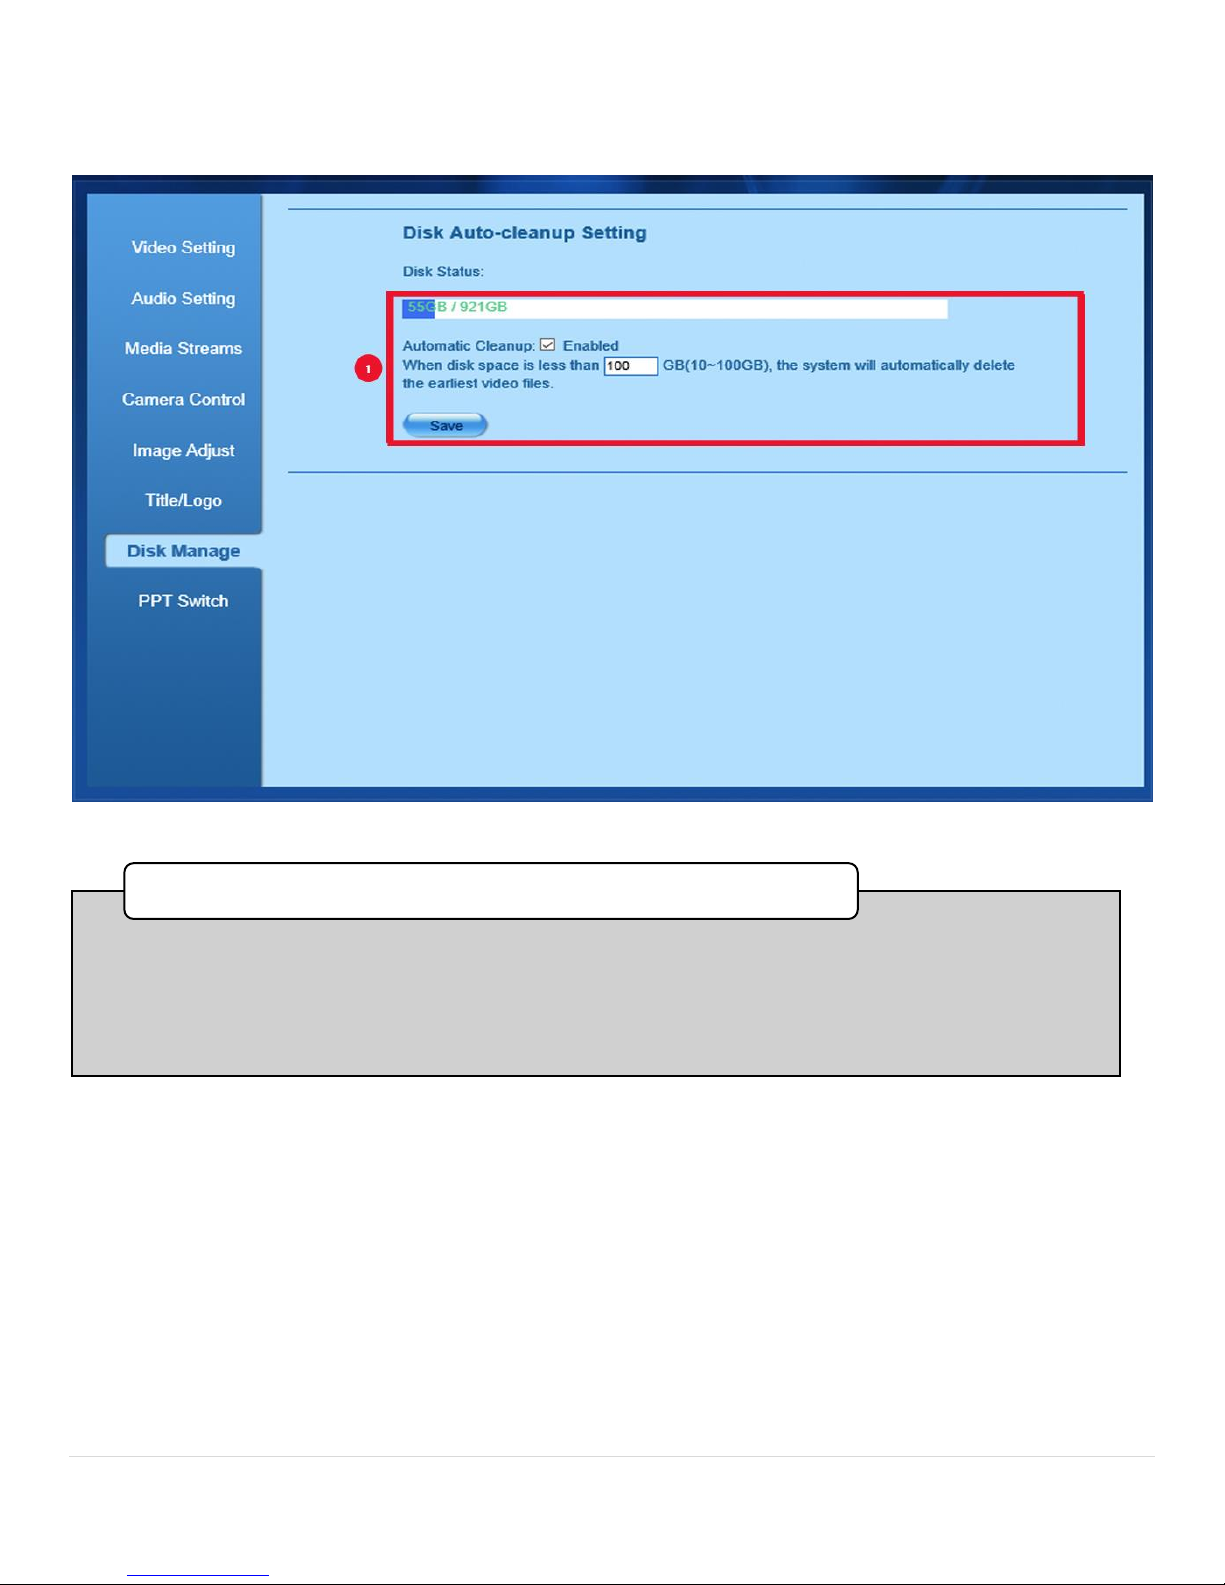
Settings Page Disk Management Tab
Figure 14. Disk Management Tab
• This control allows user to allow Bee8 to self-manage the 1TB internal hard drive wen
Automatic Cleanup is checked. Users may specify when to delete files based on age by
specifying a minimum remianing disk space parameter (selectable range is 10-100GB).
When this parameter is reached, the oldest file(s) will be deleted.
1. Disk Management
Page 25
P a g e | 25 Bee8 User’s Manual Reach/BTX
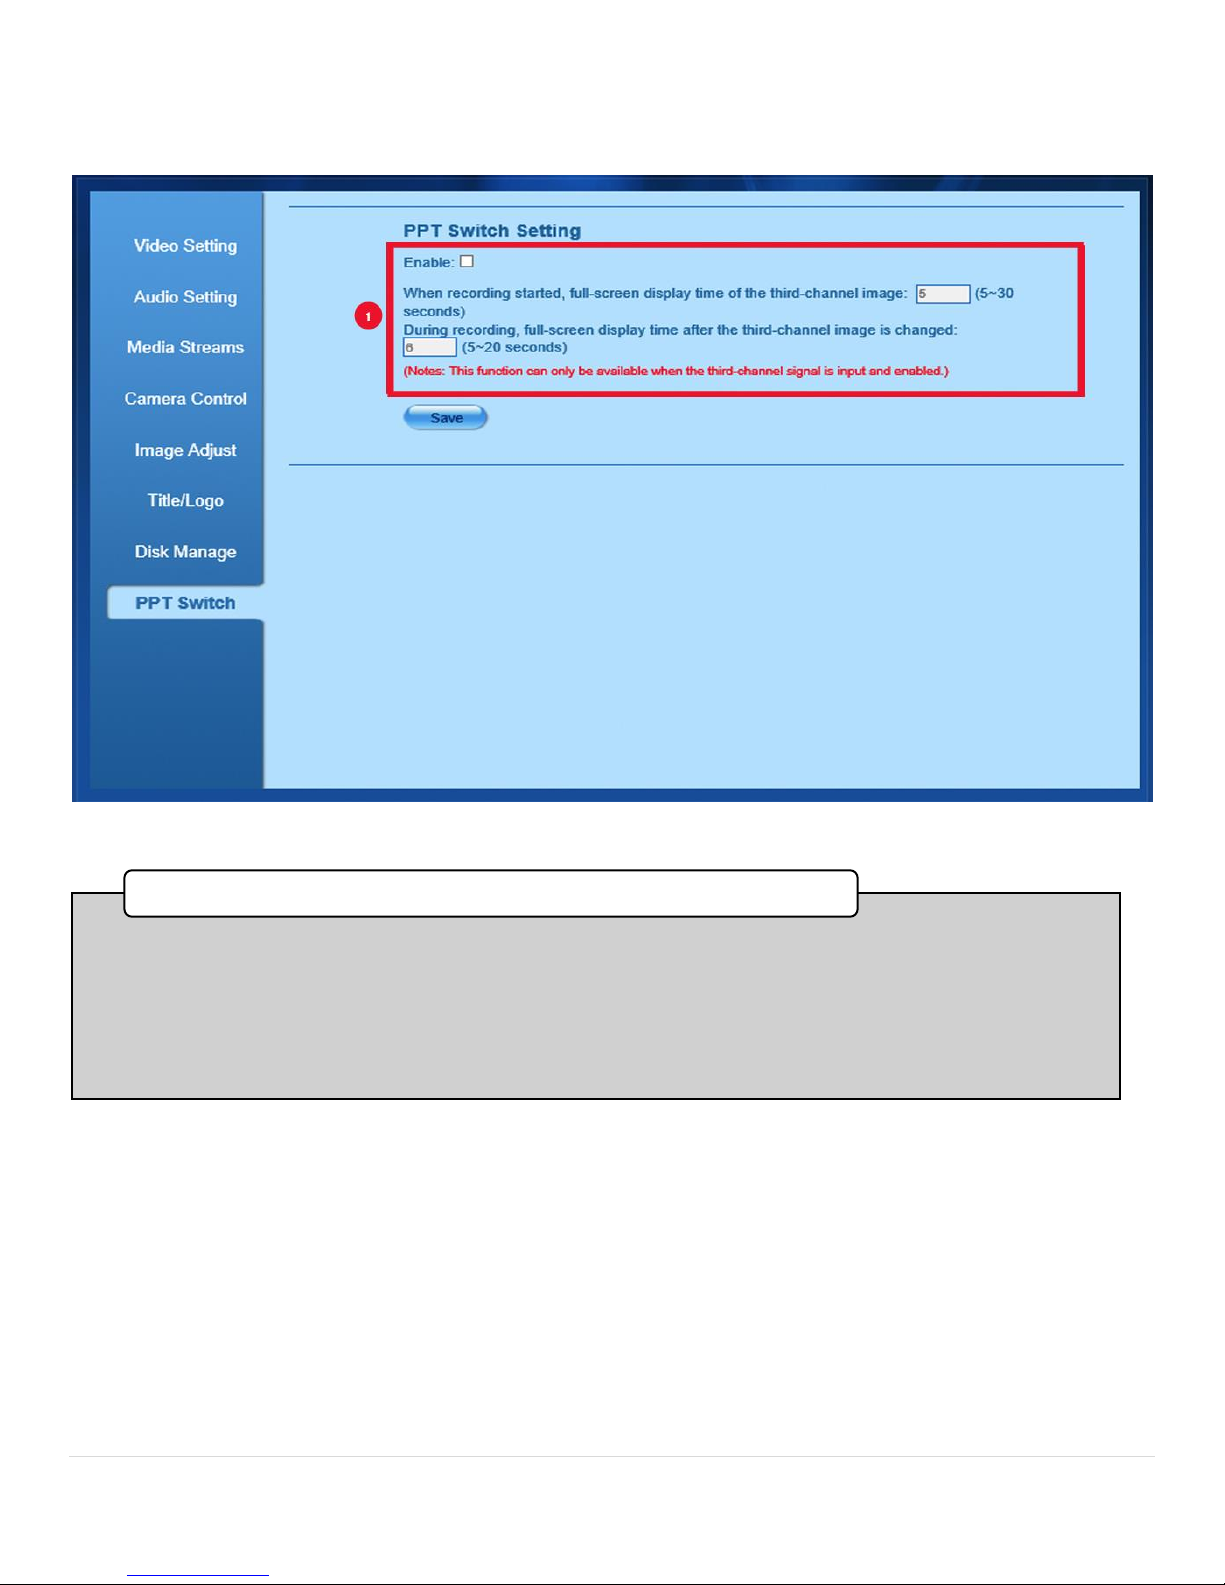
Settings Page PPT Switch Tab
Figure 15. PPT Switch Tab
•PowerPoint Switch is an automated feature of the Bee Series appliances which automatically presents the
Title slide for a user specified duration when the recording is started, then presents each slide full screen
for a user specified duration, whenever a slide change is made. To enable this feature, check the enable
box. Set the duration for the Title slide, and each subsequent slide changes in the appropriate text box.
Range for the title slide is 5-30 seconds and subsequent slide changes is from 5-20 seconds. Commit the
changes you made by pressing the save button.
1. PowerPoint Switch
Page 26
P a g e | 26 Bee8 User’s Manual Reach/BTX
System Config Page
The System Configuration Page is an engineering page. Much of the functionality that can be engaged on this page is
part of the initial set-up, and will not need to be changed ever again. This section is also broken down by the 8 tabs that
present on this page. In Section 3 the Network Tab was set up. This section will continue to the next tab.
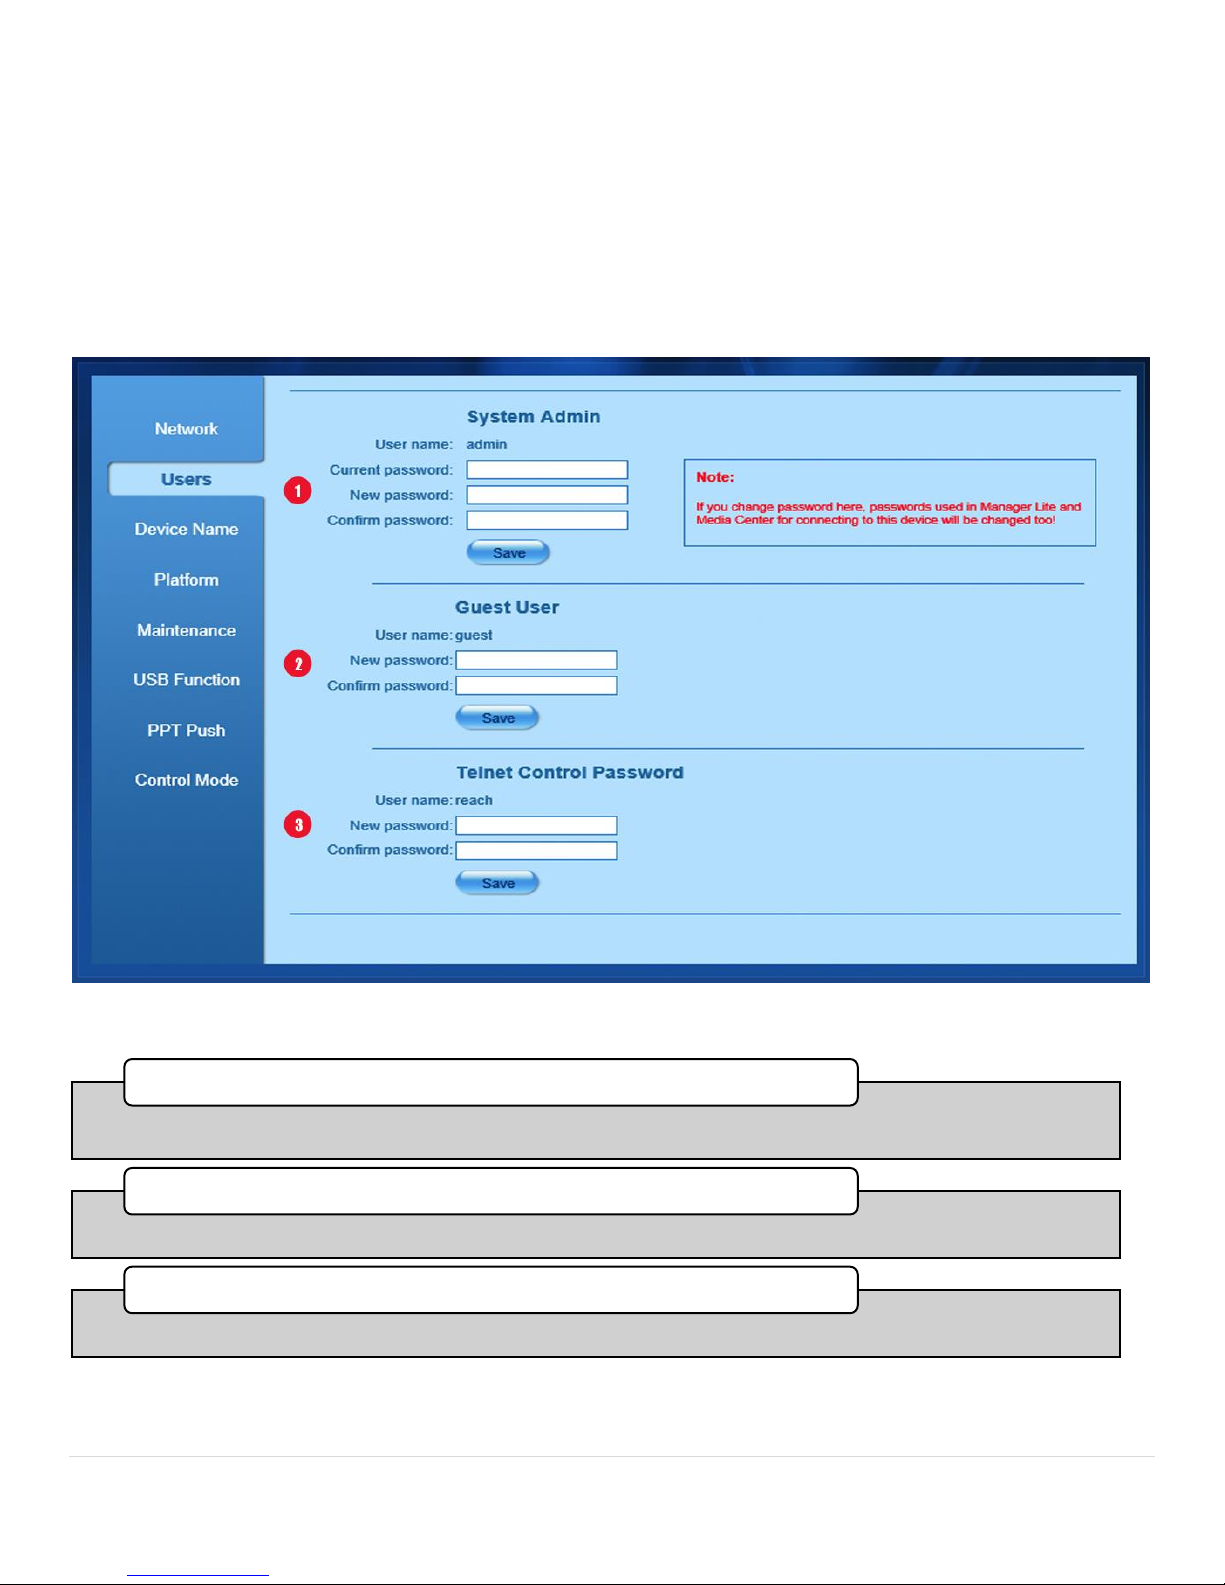
System Config Page Users Tab
Figure 16. User Tab
•You can change the administrator password here. The default password from the factory is admin.
1. Admin
•You can change the guest password here. The default password from the factory is guest.
2. guest
•You can change the telnet password here. The default password from the factory is szreach.
3. Telnet Control Password
Page 27
P a g e | 27 Bee8 User’s Manual Reach/BTX
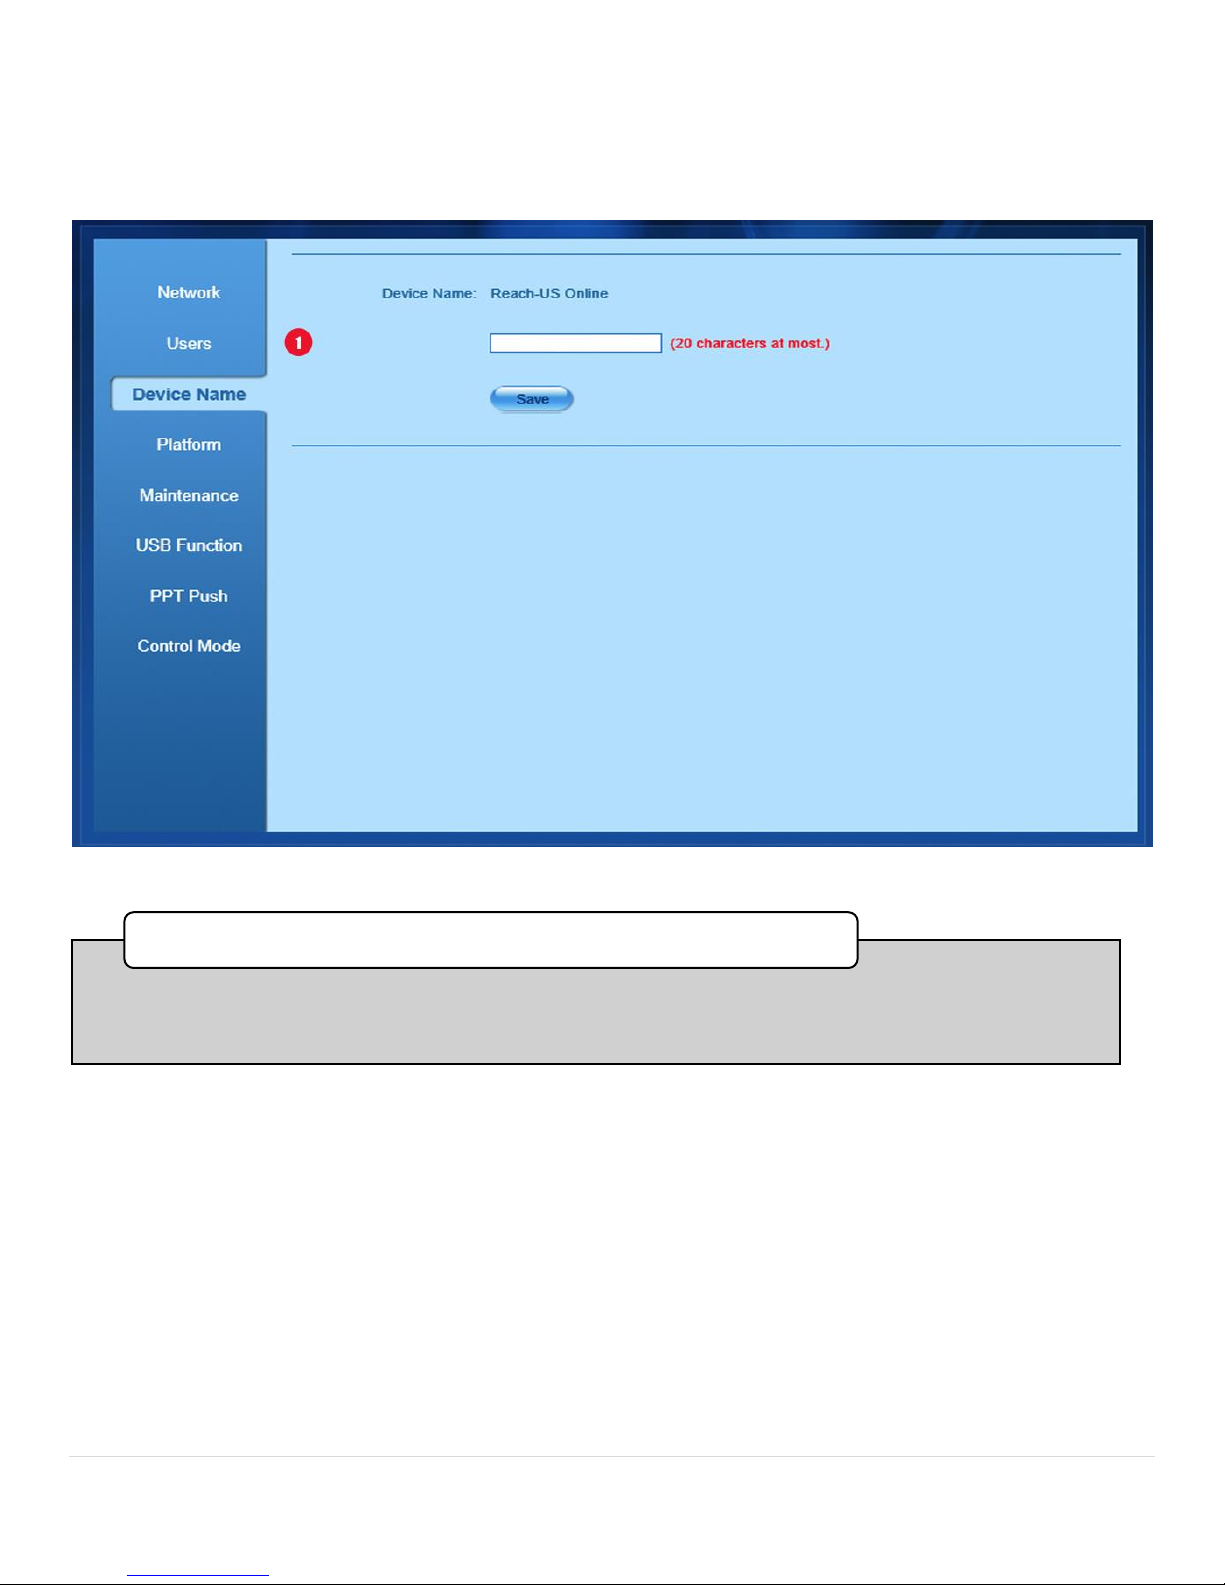
System Config Device Name Tab
Figure 17. Device Name Tab
• You can enter a user name for this device to assist in quickly locating it when connected
to a Media Center Server.
1. Device Name
Page 28
P a g e | 28 Bee8 User’s Manual Reach/BTX
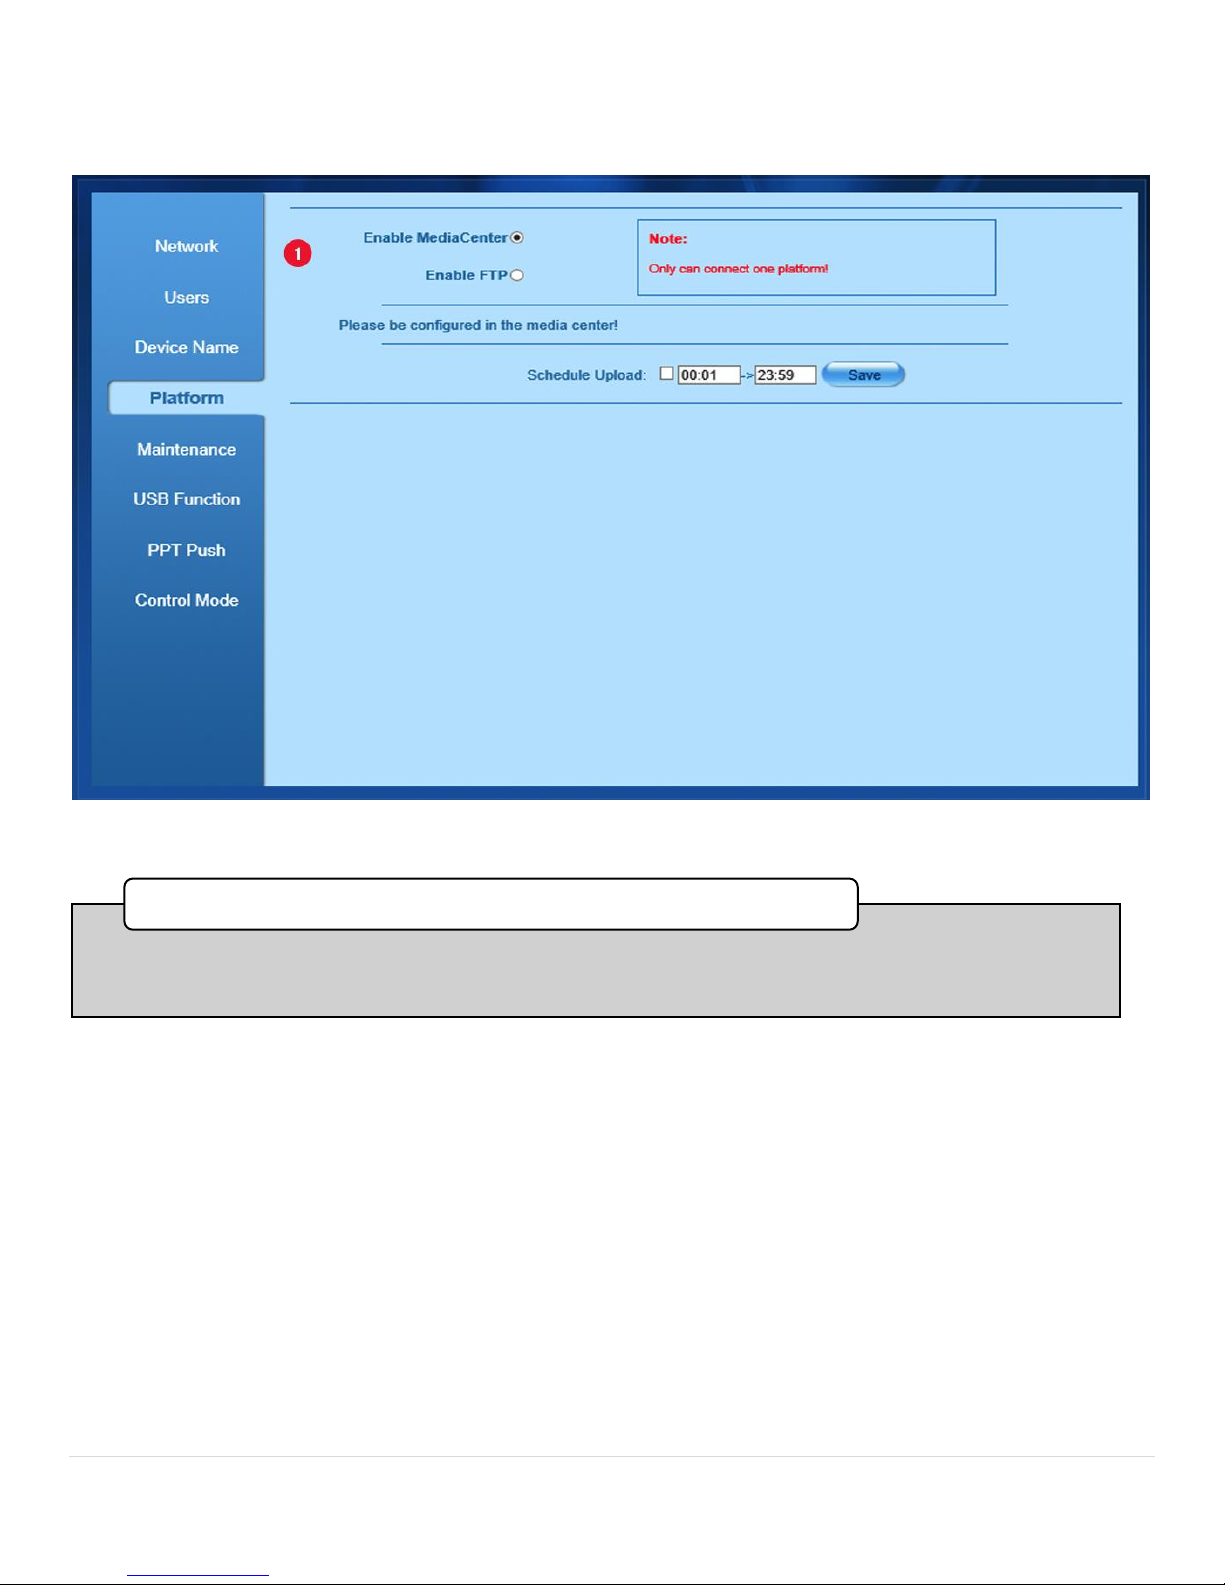
System Config Platform Tab with Media Center chosen
Figure 18. Device Platform Media Center Tab
•You can choose which platform you are interfacing with here. The default is Media Center and
the option is FTP. If you choose FTP an additional set of text boxes will appear.
1. Platform
Page 29
P a g e | 29 Bee8 User’s Manual Reach/BTX
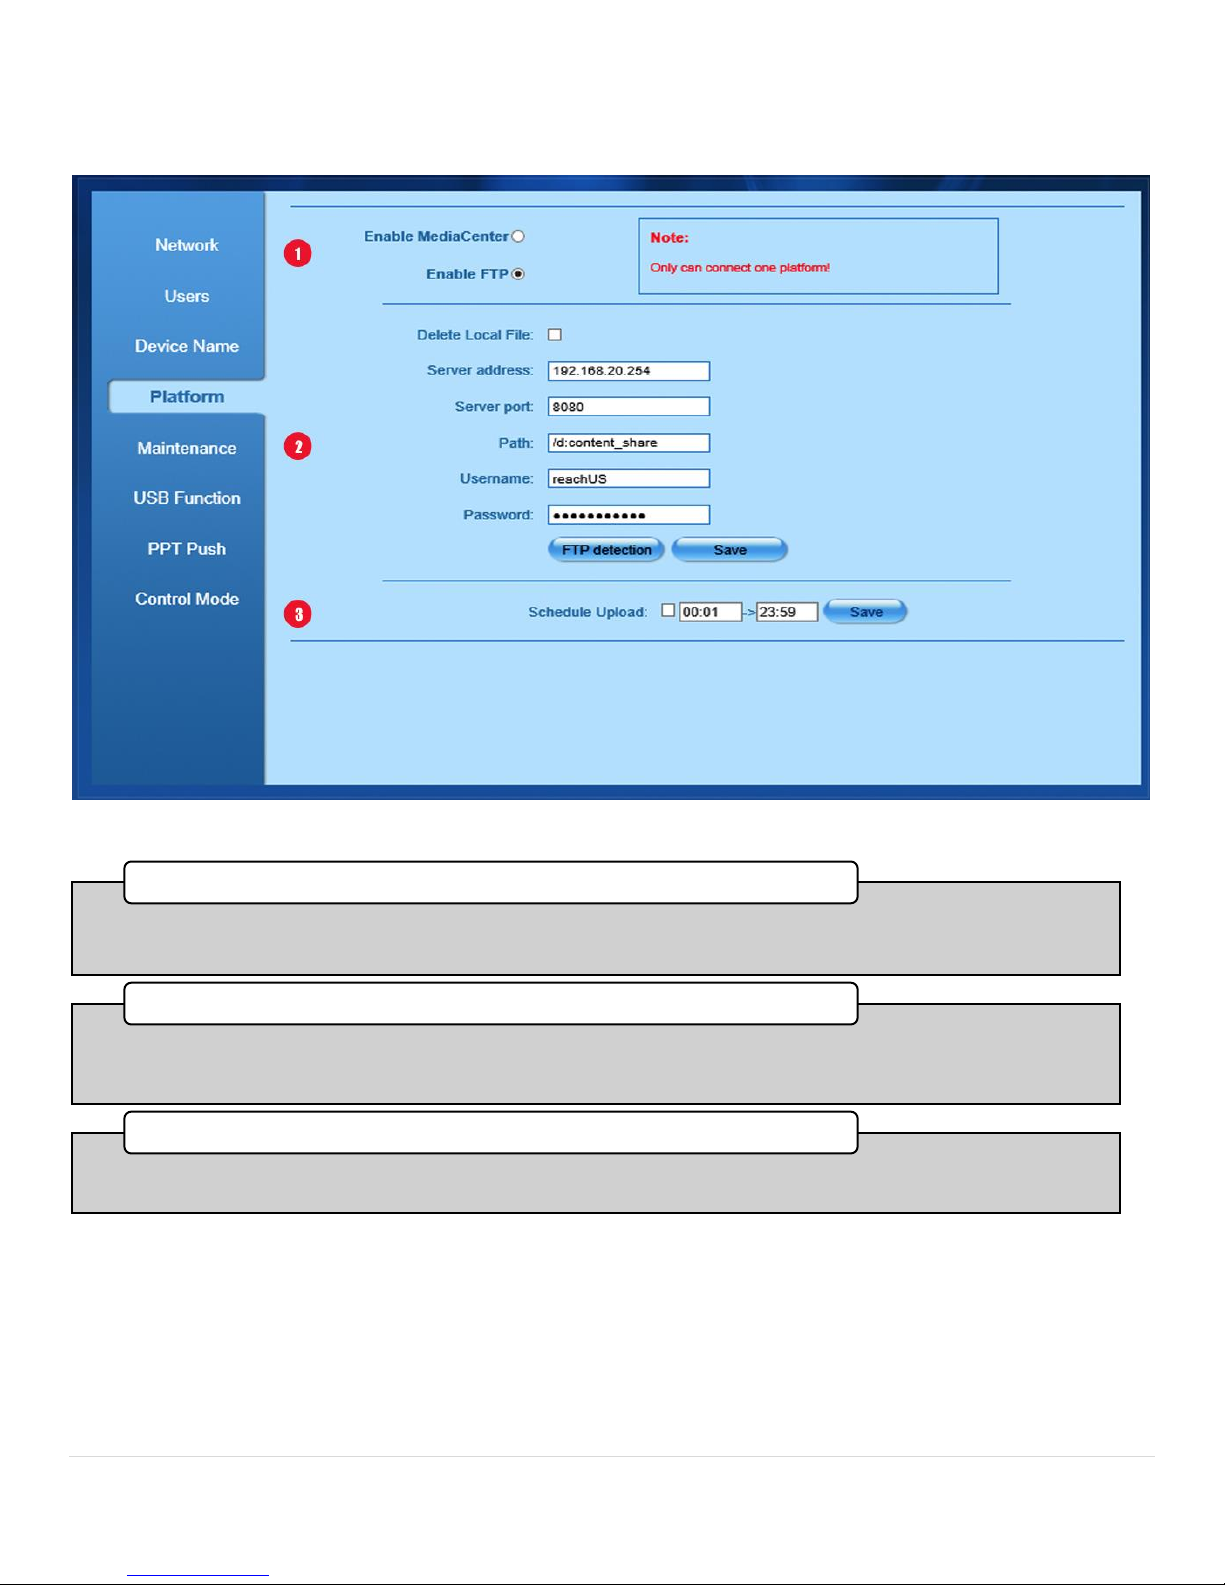
System Config Platform Tab with FTP option chosen
Figure 19. Platform Tab FTP Server Tab
•Press the FTP radio button to choose an FTP server as your file distribution point. A dialog box will appear confirming
your selection, and you will be presented with the following textboxes to route the content to the FTP Server.
1. Choose FTP
•Enter the FTP Server IP address, Port, and the directory where the content is to be stored for distribution. After you
have entered this information, click save to commit the changes. You can test your connection by pressing the FTP
Detection button.
2. FTP Server Network Credentials
•By entering times here, you can conveniently set a period during low network activity to upload the content from the
Bee8 to either the Media Center or the FTP server.
3. Schedule Upload
Page 30
P a g e | 30 Bee8 User’s Manual Reach/BTX
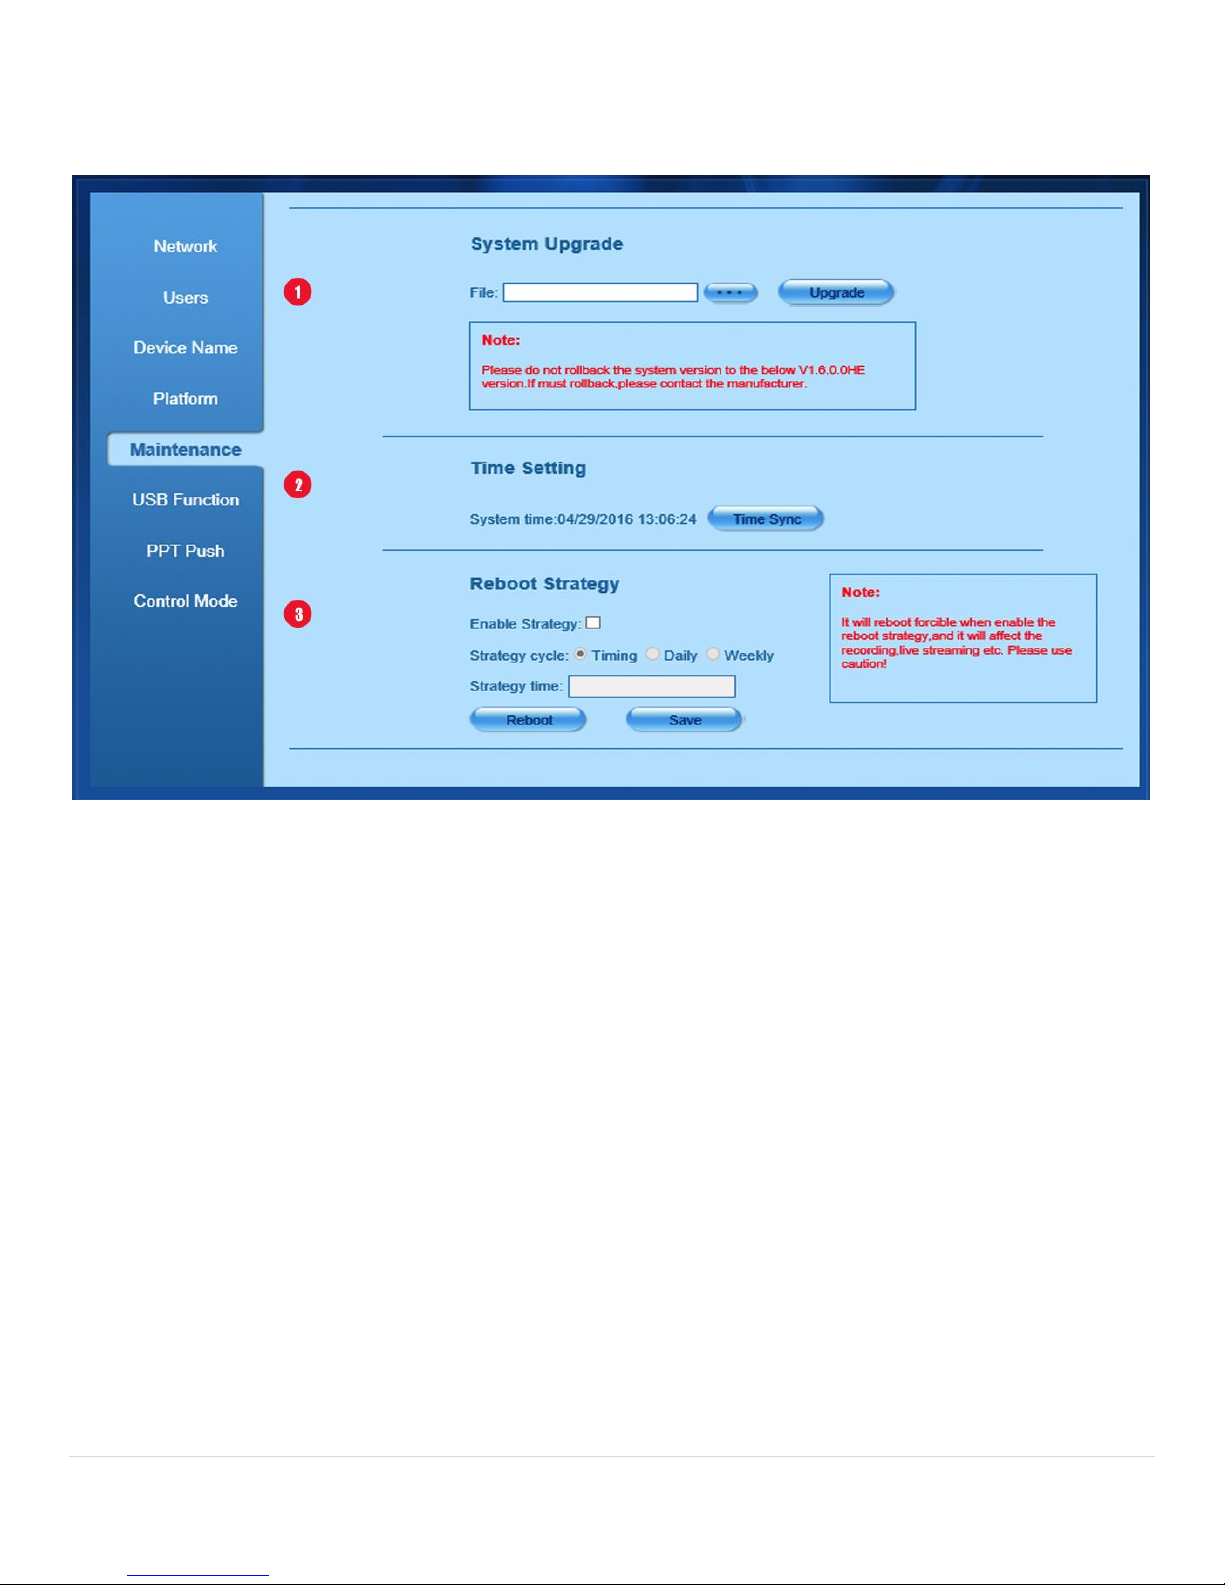
System Config Page Maintenance Tab
Figure 20. Maintenance Tab
Page 31
P a g e | 31 Bee8 User’s Manual Reach/BTX
•When Reach-US creates an update to its firmware for the Bee8, you can download it from our website (www.reachus.net/downloads). Press the 3 dot button and locate the file you downloaded, then press the Upgrade button. Note:
the update process may take up to ten minutes, and when its finished, the Bee8 will restart. BE PATIENT! Never cycle
the power while the Bee8 is installing as it may corrupt the operating system.
1. System Upgrade
•If the Bee8 system time does not match server time, press the Time Sync button.
2. Time Setting
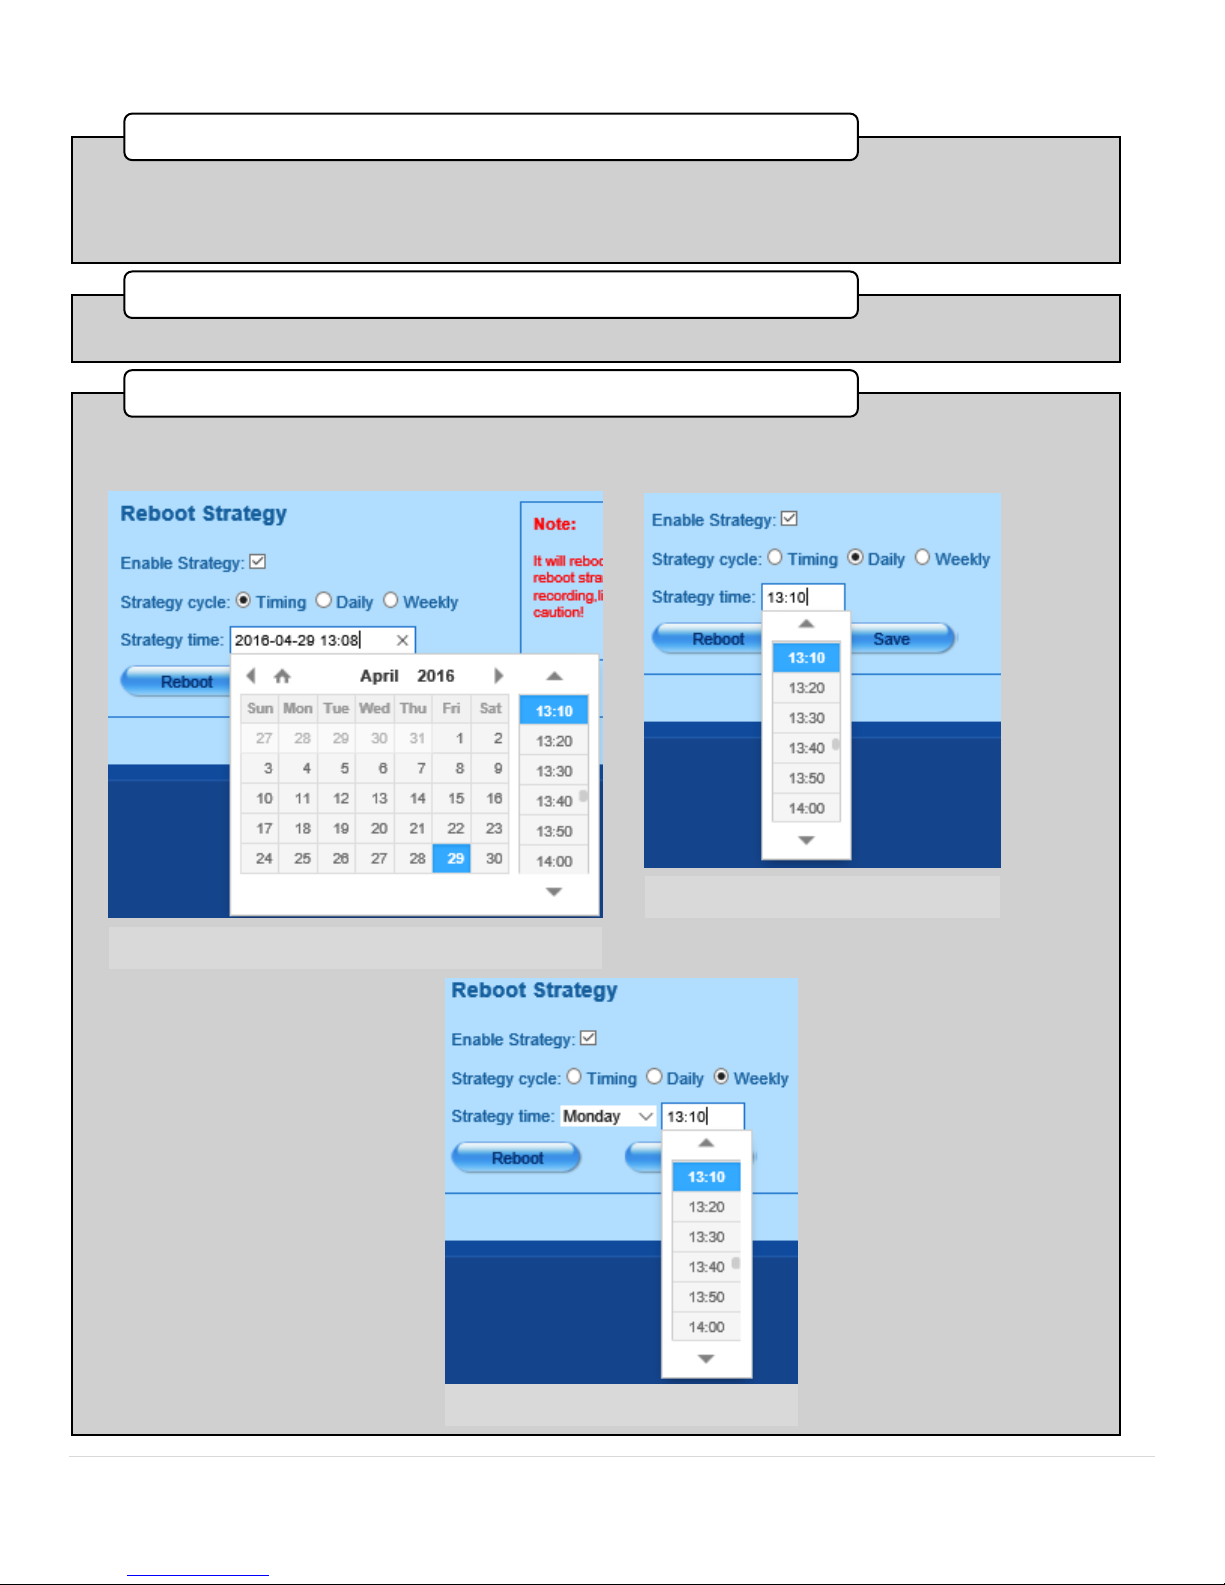
•In this set of controls, you can restart the Bee8, or schedule a reboot when the Bee8 is idle. To do this, first check the
Enable Strategy box, then choose the option you desire; either a one time reboot event, a daily strategy, or a weekly
strategy. Alternately you can press the Rebbot button to restart the Bee8 now.
3. Reboot Strategy
Figure 17 One-time reboot strategy
Figure 18 Daily Reboot Strategy
Figure 20. Weekly Reboot Strategy
Page 32
P a g e | 32 Bee8 User’s Manual Reach/BTX
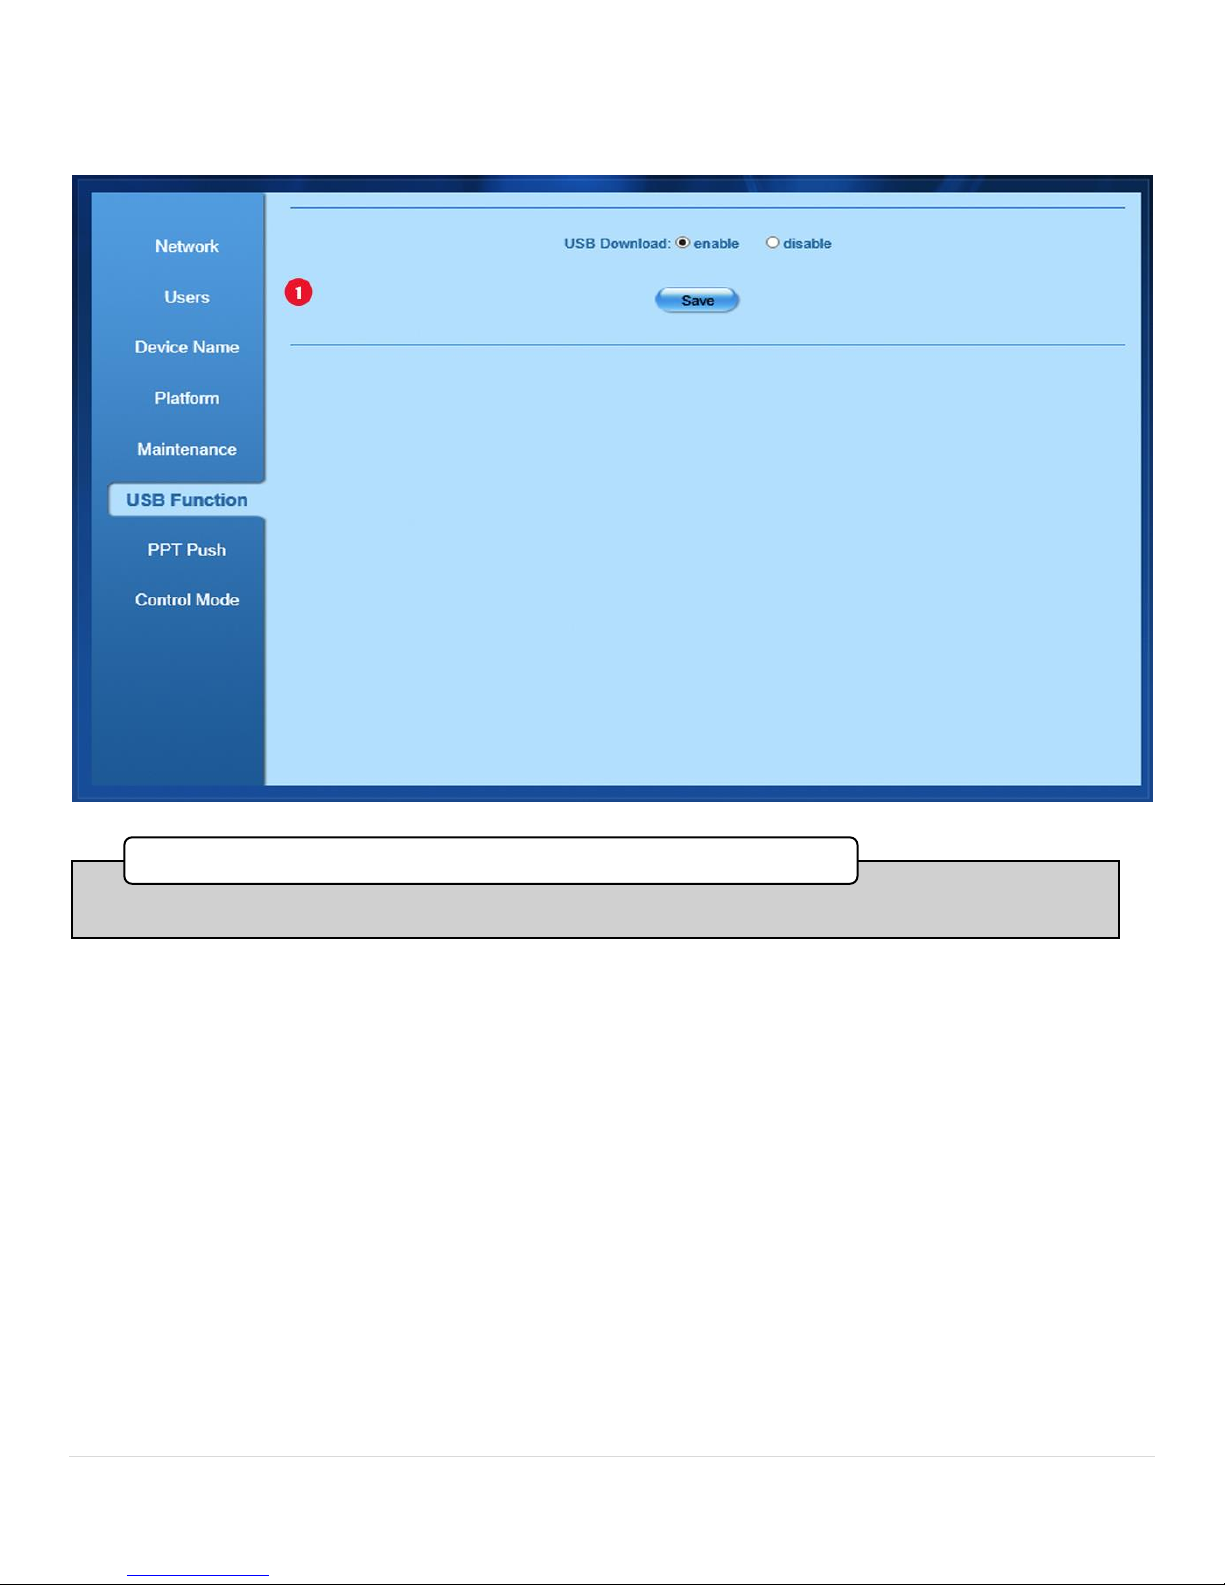
System Config USB Tab
•Press the enable radio button to allow users to either redundantly record, or download recorded files.
1. USB Download
Page 33
P a g e | 33 Bee8 User’s Manual Reach/BTX
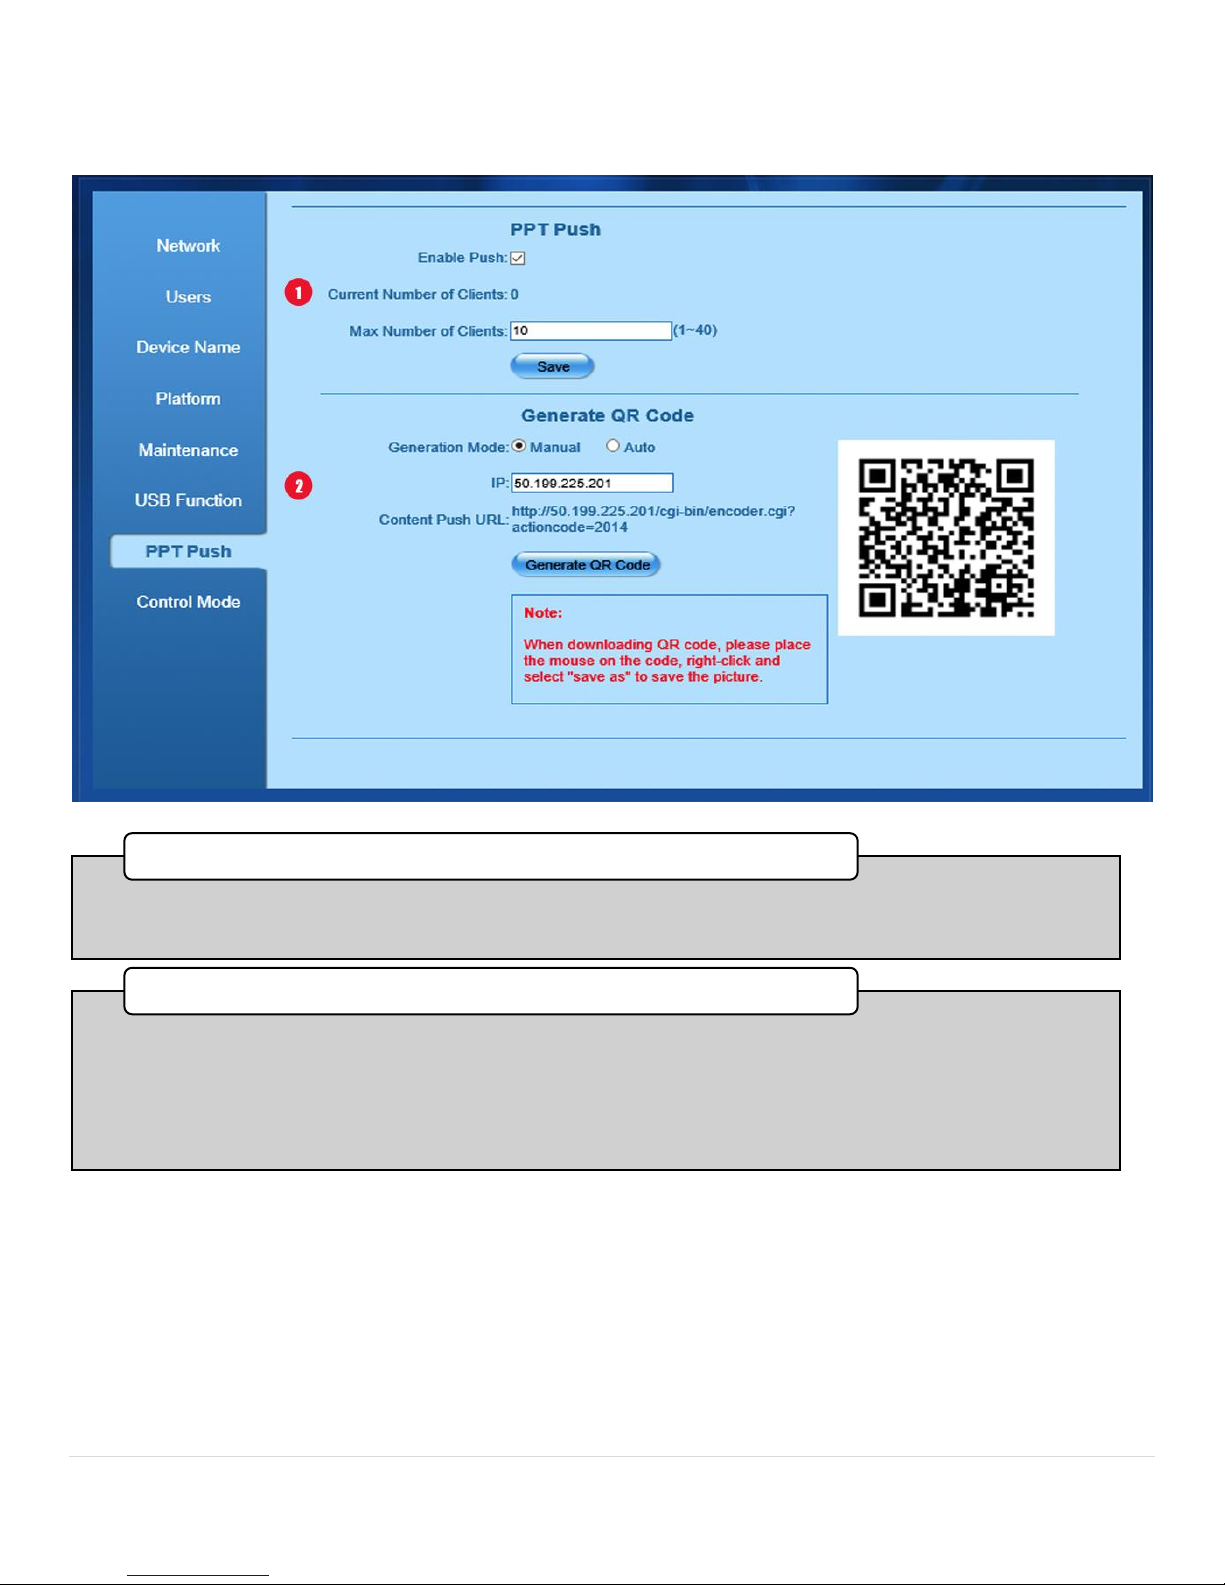
System Config PPT Push Tab
•To enable PowerPoint Puch check the Enable Push box. Below you can enter the maximum amount of
users that can connect to the Bee8 content microstreams. (Range is 1 to 40)
1. PPT Push
•A QR Code is generated for the IP address of the Bee8 and the redirect to the microstream; in this case
http//50.199.225.201/cgi-bin/encoder cgi? actioncode-2014. If Auto is selected the Bee8 will create the QR
Code for you, in Manual you can enter the IP address yourself, and the Bee8 will supplement it with the
redirect code. Th download the generated QR Code, right click on it and save it to your computer. Print The
QR Code and locate it somewhere in the Room where users may scan it to view the presentation content
on their handheld devices full screen.
Generate QR Code
Page 34
P a g e | 34 Bee8 User’s Manual Reach/BTX
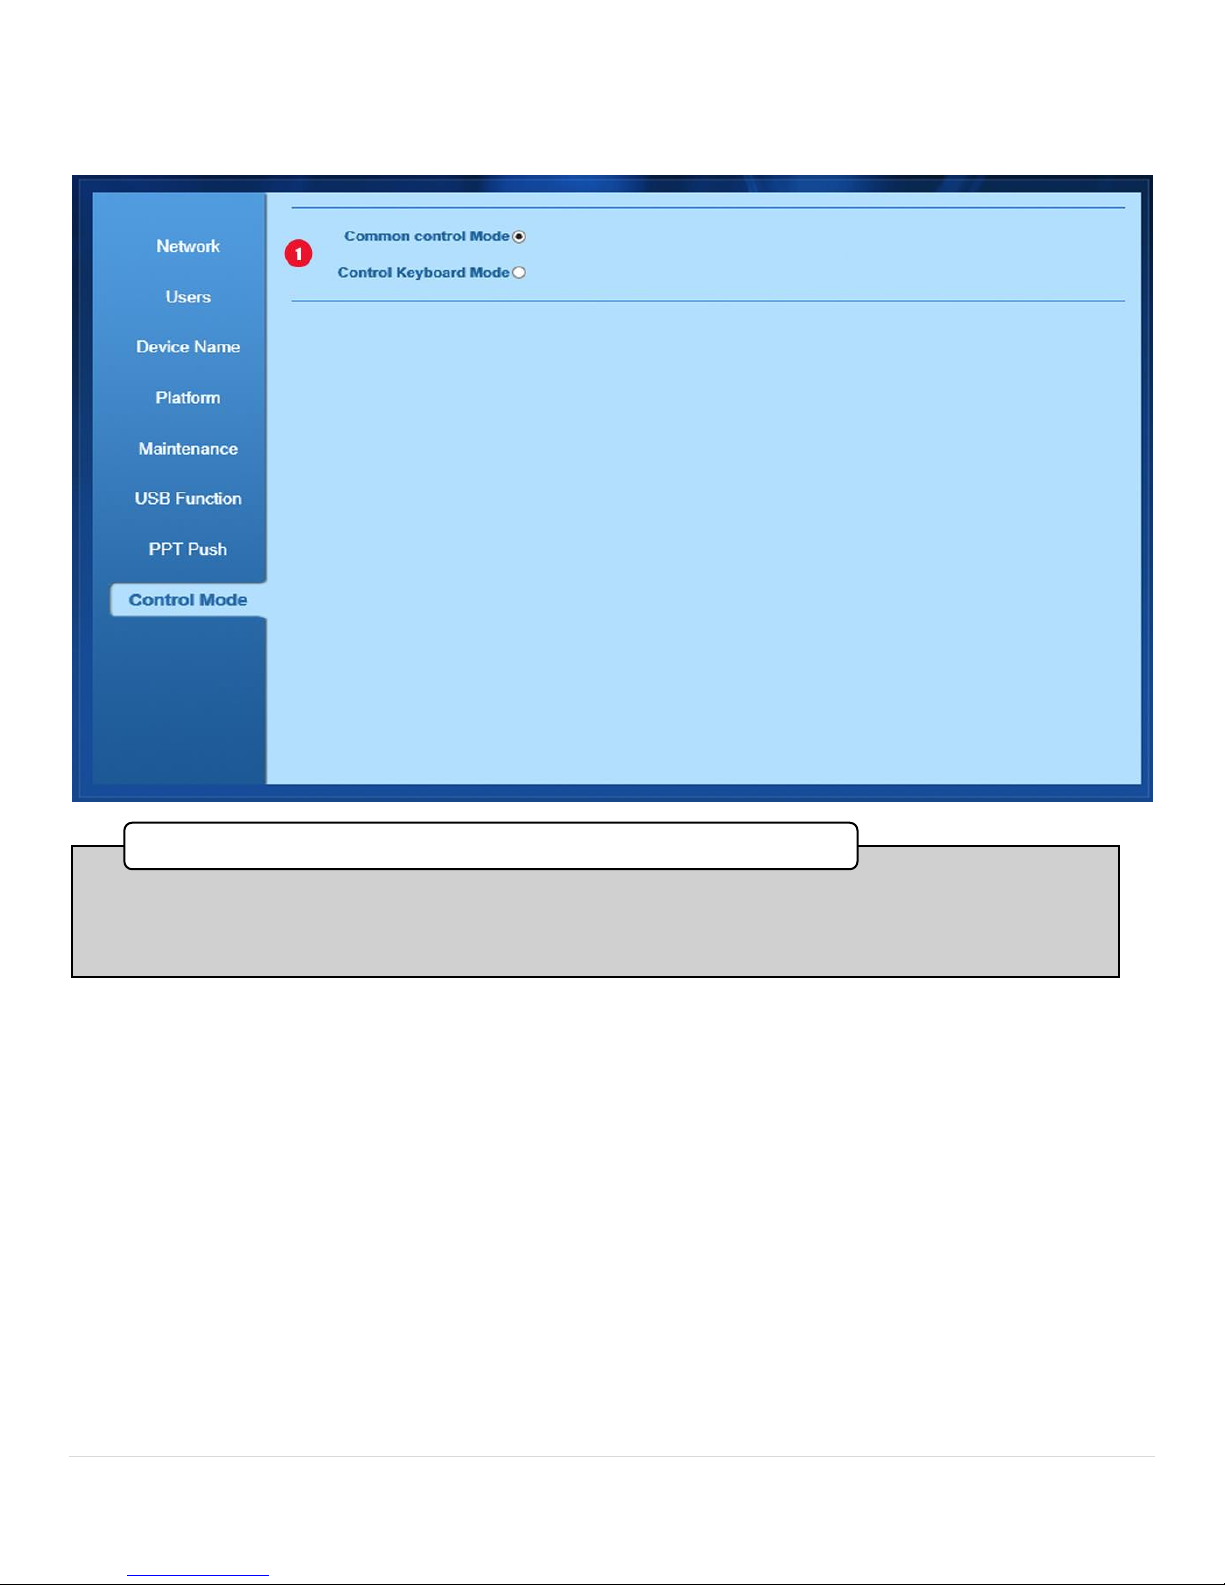
System Config Page Control Tab
•In this section, by selecting Common Control Mode, the Bee8 will respond to external control commands
from a Crestron controller or other control device, either by Telnet or serial command strings.
•Control Keyboard Mode enables the serial port only, for use with the Reach P001 remote control keyboard.
1. Common Control/Keyboard Mode Select
Page 35
P a g e | 35 Bee8 User’s Manual Reach/BTX
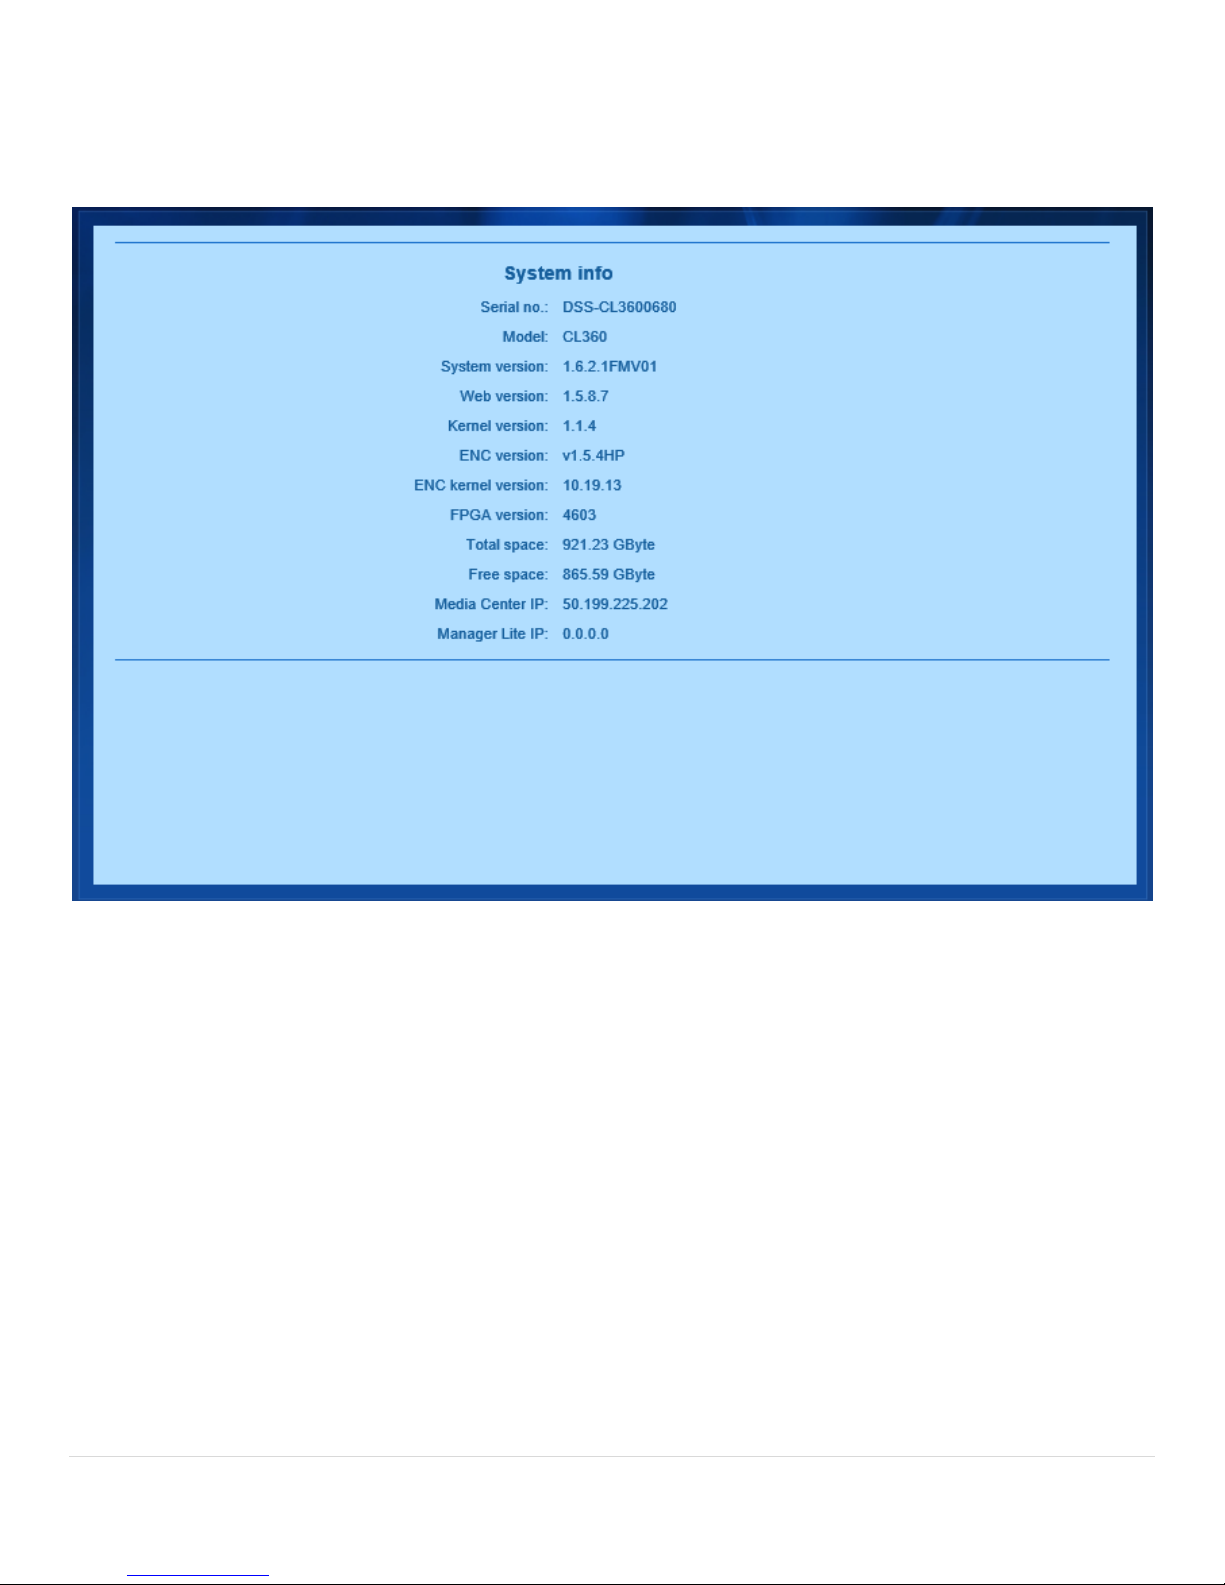
System Info Page
The System Info page displays all the working verions of the internal software, the Bee8 Serial Number, Drive utilization,
and what server the Bee8 is connected to, as well as if the unit is under control of the Manager Lite App.
Section 5 External Control
Telnet Control considerations
Reach Engineers have strived to make the Bee8 an easily and comprehensively controllable device. This manual provides
the Record Function commands for both Telnet and serial communication. A separate manual provides the entire list of
commands utilized for both Telnet and serial communications
To establish communications with the Bee8, point the control device at the Bee8 IP address followed by the Telnet port
(15555). Example 192.168.1.1:15555
When controlling the Bee8, each command, or set of commands is a unique Telnet session. It is necessary, therefore, to
send a login string with each command set sent to the Bee8. The default Telnet user name is reach, and the default
password is szreach.
Every control system is different, but for the most part, commands need only be sent once in each session. In less
capable control systems, commands may need to be sent twice in order for the Bee8 to respond appropriately.
Page 36
P a g e | 36 Bee8 User’s Manual Reach/BTX
A string example to start a recording session is:
reach&h0dszreach&h0dtnrc record brecord:1&h0d where:
reach is the user name
szreach is the password
tnrc record brecord:1 is the record command string
&h0d is a carriage return
Please also note that Bee8 will return acknowledgements to all commands, and the feedback can be used to trigger
other commands in the control structure of your code. The Quick Start commands listed below detail the feedback
possibilities the Bee8 will respond.
Serial Control Considerations
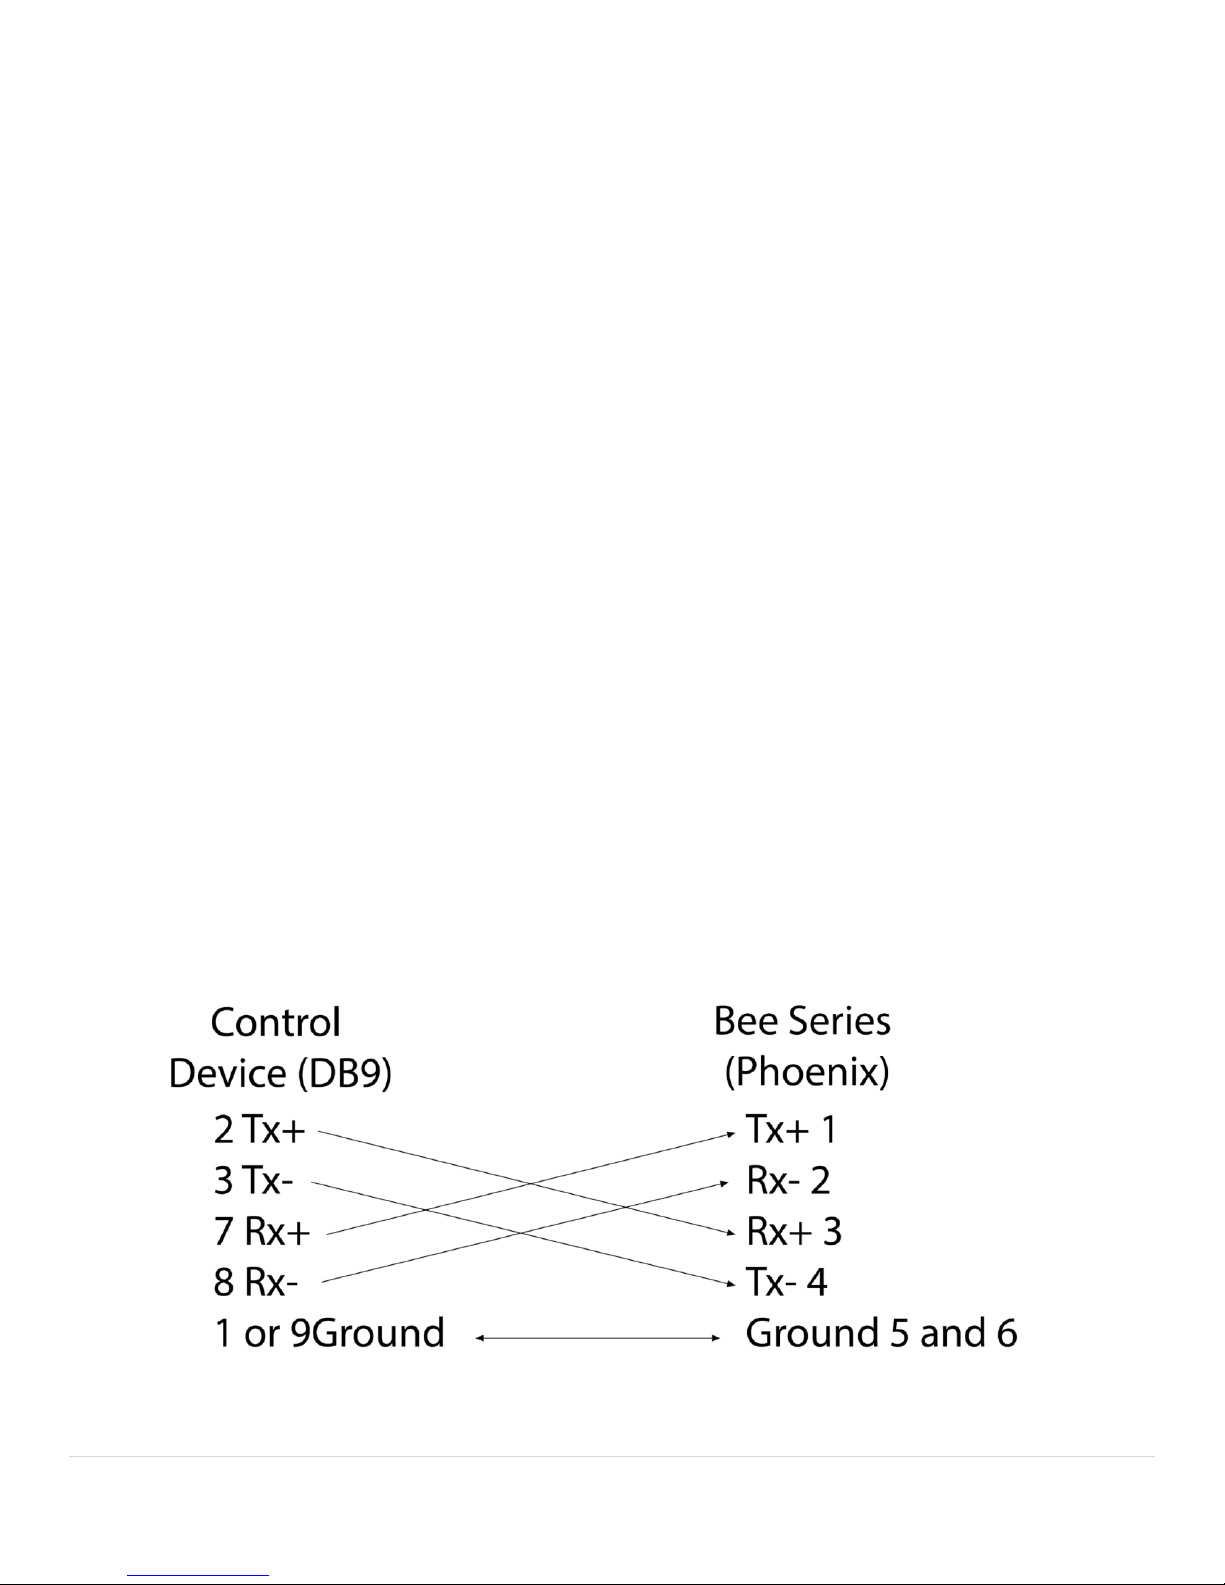
Serial commands are sent to the bee8 over an RS-422 or RS-485 connection, as the Bee8 will be returning feedback to
every command sent. The communications, therefore are required to be full duplex. The serial communication
parameters are:
Baud Rate 9600 bps
Word size 8 bit
Parity None
Stop Bit 1
Command Structure Hexadecmal
A string example to start a recording session is:
3c 3c c2 80 00 01 3e 3e where:
3c 3c is the prefix
80 is the record command
00 01 is the start command
3e 3e is the suffix
Please also note that Bee8 will only return acknowledgements when a command is successfully executed in serial
command mode. All commands listed below detail the acknowledgement feedback the Bee8 will respond.
Page 37

P a g e | 37 Bee8 User’s Manual Reach/BTX
Unified Command Table
Command
Name
Telnet Command String/Returned
Feedback
Serial Command String
Record Start
tnrc record bRecord:1
operate success
3c 3c c2 80 00 01 3e 3e
3c 3c c2 80 0f 6f 70 65 72 61 74 65 20 73 75 63 63 65 73 73 3e 3e
ERROR: already record
Record Pause
tnrc record bRecord:2
operate success
3c 3c c2 80 00 02 3e 3e
3c 3c c2 80 0f 6f 70 65 72 61 74 65 20 73 75 63 63 65 73 73 3e 3e
ERROR: already pause” pause
Record Stop
tnrc record bRecord:0
operate success
3c 3c c2 80 00 00 3e 3e
3c 3c c2 80 0f 6f 70 65 72 61 74 65 20 73 75 63 63 65 73 73 3e 3e
ERROR: already stop
BTX is the importer of Reach products and solutions in North America.
Contact: BTX Technologies
5 Skyline Drive
Hawthorne, NY 10532
800.666.0996
www.reachAVIP.us
 Loading...