


Regulation
Regolazione
PC 300 Plus
Control Panel
UC 300-M/MHE, UC 360-MHE, UC 500-MVHE Electronic Controller
Centralina Elettronica UC 300-M/MHE, UC 360-MHE, UC 500-MVHE
USER MANUAL
MANUALE UTENTE

DISPOSAL - SMALTIMENTO
In accordance with the provisions of the following
European directives 2011/65/EU, 2012/19/EU
and 2003/108/EC, regarding reducing the use of
hazardous substances in electrical and electronic
equipment, in addition to waste disposal.
The crossed out wheelie bins symbol on the equipment indicates
that, at the end of its useful life, the product must be collected
separately from general waste.
Therefore, at the end of its useful life, the user must take the
equipment to a designated electrical and electronic waste
collection point , or return it to the dealer that, against the purchase
of an equivalent appliance, it is obliged to collect the product for
disposal free of charge.
Appropriate differentiated waste collection for subsequent
recycling, treatment and environment-friendly disposal of
the discarded equipment helps preventing possible negative
environmental and health eects and encourages recycling of the
component materials of the equipment.
Illegal disposal of the product by the user entails the application
of sanctions provided by the regulations in force.
In base a quanto previsto dalle seguenti direttive
europee 2011/65/UE, 2012/19/UE e 2003/108/
CE, relative alla riduzione dell’uso di sostanze
pericolose nelle apparecchiature elettriche ed
elettroniche, nonché allo smaltimento dei riuti.
Il simbolo del cassonetto barrato riportato sull’apparecchiatura
indica che il prodotto alla ne della propria vita utile deve essere
raccolto separatamente dagli altri riuti.
L’utente dovrà, pertanto, conferire l’apparecchiatura giunta
a ne vita agli idonei centri di raccolta dierenziata dei riuti
elettronici ed elettrotecnici, oppure riconsegnarla al rivenditore
che, a fronte di acquisto di apparecchio equivalente, è tenuto
al ritiro gratuito del prodotto da smaltire.
L’adeguata raccolta differenziata per l’avvio successivo
dell’apparecchiatura dismessa al riciclaggio, al trattamento e allo
smaltimento ambientale compatibile contribuisce ad evitare
possibili eetti negativi sull’ambiente e sulla salute e favorisce
il riciclo dei materiali di cui è composta l’apparecchiatura.
Lo smaltimento abusivo del prodotto da parte dell’utente
comporta l’applicazione delle sanzioni previste dalla vigente
normativa in materia.

INDEX - INDICE
Description Descrizione Pag.
Disposal Smaltimento 3
1 Description Descrizione 4
1.1 Display description Descrizione display 4
1.2 Description and features of the keys Descrizione e funzionalità tasti 6
1.3 Operating menu icons Icone menu funzionamento 7
2 Function menu Menu funzionamento 8
2.1 On - O Accensione e spegnimento 8
2.2 Function mode Modalità di funzionamento 9
2.3 Alarms Allarmi 10
3 Main menu Menu principale 10
3.1 Main screenshot overview Riepilogo maschere menu principale 11
3.2 Temperature detected in the room Temperatura rilevata in ambiente 13
3.3 Humidity detected in the room Umidità rilevata in ambiente 13
3.4 Manual temperature setpoint Setpoint manuale di temperatura 14
3.5 Manual humidity setpoint Setpoint manuale di umidità 15
3.6 Setpoint of calculated temperature Setpoint di temperatura calcolato 16
3.7 Setpoint of calculated Humidity Setpoint di umidità calcolato 16
3.8 Outdoor temperature detected Temperatura esterna rilevata 17
3.9 Room Air quality detected Qualità dell’ aria ambiente rilevata 17
3.10 Room Air quality Set Set Qualità dell’ aria ambiente 18
4 Conguration menu Menu congurazione 19
4.1 Contrast Contrasto 20
4.2 Date Data 21
4.3 Hour Ora 22
4.4 Season Setting Set Stagione 23
4.5 Summer air supply temperature set Set temperatura mandata aria estiva 24
4.6 Winter air supply temperature set Set temperatura mandata aria invernale 25
4.7 Supply air ow set Set portata aria di immissione 26
4.8 Other readings Altre letture 27
5 Programming Programmazione 28
5.1 Activation for temperature programming Attivazione programmazione temperatura 30
5.2 Activation for humidity programming Attivazione programmazione umidità 31
5.3 Temperature programming Programmazione temperatura 32
5.4 Humidity programming Programmazione umidità 34
5.5 Renewal programming Programmazione Rinnovo 36
5.6 Economy programming Programmazione Economy 38
6 Alarms Allarmi 40
3

1 DESCRIPTION - DESCRIZIONE
Programmable electronic controller used to manage UC
300-M/MHE, UC 360-MHE, UC 500-MVHE units. It is equipped
with temperature/humidity sensor to manage temperature,
dehumidication, and winter/summer renewal and integration
functions.
On the display you can set all the parameters of the unit or check
the function status. PC 300 PLUS makes is possible to manage the
air handling unit autonomously.
Moreover, if you connect the optional external sensor, the system
can manage Summer/Winter FREE-COOLING and FREE-HEATING
functions .
Embedded installation into a 3-module box.
1.1 DISPLAY DESCRIPTION DESCRIZIONE DISPLAY
The display main page shows the following information:
Main Menu shows the room temperature and humidity detected
by the probe (always visible); it shows the temperature and
humidity setpoints (humidity in Summer season only), as well as
the outside temperature (if the external probe is connected) and
air quality setting+reading (if AQ probe is connected). It also allows
the user to manually edit the temperature and humidity setpoints
(humidity in Summer season only) (see Main Menu chapter)
Operation Menu (Key pressing
modication of the ON_OFF status; it also shows the MANUALAUTOMATIC op eration and the presence of any alarms (the symbol
can be displayed only if the alarm is active);
see chapter Operation Menu Symbols, Operation Menu and
Alarms
): it shows and enables the
Centralina elettronica programmabile atta alla gestione delle
unità UC 300-M/MHE, UC 360-MHE, UC 500-MVHE. Provvista
di sonda di temperatura e umidità per il controllo della
funzionalità di temperatura, deumidicazione,integrazione
e rinnovo estivo ed invernale.
Tramite il display è possibile impostare tutti i parametri della
macchina e visualizzare lo stato di funzionamento.
Grazie all’utilizzo della centralina PC 300 PLUS è possibile
gestire l’unità di trattamento aria in modo autonomo.
Inoltre, prevedendo una sonda esterna opzionale, il sistema
potrà garantire anche la funzionalità FREE-COOLING Estivo/
Invernale e FREE-HEATING.
L’installazione su frutto a 3 moduli.
Dalla maschera principale del display è possibile visualizzare le
seguenti informazioni:
Menu Principale: visualizzazione della temperatura e
dell’umidità ambiente rilevate dalla sonda (sempre visibili),
visualizzazione dei setpoint temperatura e umidità (umidità
solo in stagione Estiva), rilevazione temperatura esterna (con
sonda esterna congurata), rilevazione e set della qualità aria
(con sonda QA congurata). Possibilità di editare manualmente
i setpoint di temperatura e umidità ( umidità solo in stagione
Estiva ) (vedi capitolo menu principale).
Menu Funzionamento (Pressione del tasto
visualizzazione e modica dello stato ON-OFF, indicazione del
tipo di funzionamento MANUALE-AUTOMATICA e indicazione
presenza allarmi (icona visualizzabile solo se allarme attivo) vedi
capitoli Icone menu funzionamento, Menu funzionamento
e Allarmi
):
Moreover, by pressing the side keys (individually or together), one
can display the Conguration Menu, the ExtraCong. Menu and
the PortCong. Menu (see the corresponding chapters).
DISPLAY KEY
BA
E
Tramite la pressione dei tasti laterali (singolarmente o in
combinazione fra loro) si possono inoltre visualizzare il Menu
Congurazione , il Menu ExtraCong. e il Menu PortCong.
(vedi capitoli relativi)
LEGENDA DISPLAY
C D
F
G
H L M N O
I
4

B
5 2 4
5 2 4
D
E
F
G
H
M
O
ICON DESCRIPTION - DESCRIZIONE ICONE
A
Icons Colors Legend
Legenda Colori Icone
2 Green - Verde 5 Light Blue - Celeste
3 Orange - Arancione 6 Blue - Blu
System operating in WINTER mode - Funzionamento modalità INVERNALE
System operating in SUMMER mode - Funzionamento modalità ESTATE
1 White - Bianco 4 Red - Rosso
1 1
Description Descrizione
- Day and Hour visualization Visualizzazione Giorno e Orario
C
-
2
2
Indication of system OFF Funzionamento impianto OFF
Indication of system ON Funzionamento impianto ON
Day Temperature Programm.
Programm. Giornaliera Temperatura
- Main Field Campo Principale
- Visualizzazione Temperatura in Ambiente Visualizzazione Temperatura in Ambiente
- Visualizzazione Umidità in Ambiente Visualizzazione Umidità in Ambiente
4
3
I
3 5
5
1
5
L
2
6
2
2
2
2
2
N
1
2
Alarm icon (active only if there are errors) Icona allarme (attiva solo in presenza di errori)
Temperature request Chiamata di temperatura
Temperature request +
Integration request
Chiamata di temperatura +
Chiamata di integrazione
SYNOPTIC ON (blinking) SINOTTICO Attivo (lampeggiante)
Active Dehumidication operating mode Modalità di funzionamento Deumidicazione attiva
Active Remote Dehumidication operating mode
Active Dehumidication + Active Remote
Dehumidication operating mode
Modalità di funzionamento Deumidicazione attiva +
Modalità di funzionamento
Deumidicazione Remota attiva
Deumidicazione Remota attiva
Active Ventilation operating mode Modalità di funzionamento Ventilazione attiva
Active Renewal operating mode Modalità di funzionamento Rinnovo attiva
Active Boost operating mode Modalità di funzionamento Boost attiva
Active Free Cooling operating mode Modalità di funzionamento Free Cooling attiva
Active Free Heating operating mode Modalità di funzionamento Free Heating attiva
Active Comfort operating mode Modalità di funzionamento Comfort attiva
Active Economy operating mode Modalità di funzionamento ECO attiva
Manuale mode operating mode Modalità di funzionamento Manuale
N.B.
In L, M, N fiels, if symbols are red, it means lack of
communication with the air handling unit.
4
5
1
Temperature programming on Programmazione della temperatura attiva
Dehumidication programming on Programmazione della deumidicazione attiva
Temperature programming on +
Dehumidication programming on
Programmazione della temperatura attiva +
Programmazione della deumidicazione attiva
N.B.
Nei campi
L, M, N
se le icone visualizzate sono di colore
Rosso indica comunicazione assente con la macchina.
5

1.2 DESCRIPTION AND FEATURES OF THE KEYS DESCRIZIONE E FUNZIONALITA’ TASTI
Key - Tasto Description - Descrizione
Press the key briey:
- To conrm the edited values (Enter)
- To access submenus
• It browses through the 2 icons of the operating menu
and display the number of alarms (if any)
• On the chrono page, you can:
SET
ESC
UP
SU
DOWN
GIÙ
+
+
(*) After the last operation, the password remains stored in the
device for 30 minutes
- copy parameters on the next day
- browse through the 3 setpoint levels
If the key is pressed and held down (> 5 sec):
From the main menu, one can access the Conguration
Menu.
Press the key briey:
- To exit editing (Reset)
- To go back to the upper menu
• From the main menu, you can edit parameters in the
operating menu.
Press the key briey:
• To scroll up the elds in the menu being displayed
• To increase the value of the eld being edited
• In the operating menu, with flashing icons on the
display, you can select the desired mode.
• In the alarm page, alarm reset request.
Press the key briey:
• To scroll down the elds in the menu being displayed
• To decrease the value of the eld being edited
• In the operating menu, with flashing icons on the
display, you can select the desired mode.
• In the alarm page, alarms scrolling.
If the keys are pressed and held down (> 5 sec):
Access to the password page to enter the ExtraCong
Menu (*)
If the keys are pressed and held down (> 5 sec):
Access to the password page to enter the PortCong
Menu (*)
Pressione breve del tasto:
- Per confermare i valori in modica (Enter)
- Per accedere ai sottomenu
• Permette la navigazione fra le 2 icone del menu
funzionamento e la visualizzazione del numero di
allarmi (se presente)
• Dalla maschera crono, permette:
- la copia dei parametri al giorno successivo
- la navigazione fra i 3 livelli di set
Pressione prolungata del tasto (> 5 sec):
Dal menu principale, si ha l’accesso al Menu
Congurazione.
Pressione breve del tasto:
- Per uscire dalle operazioni in modica (Reset)
- Per ritornare al menu superiore
• Dal menu principale permette l’ accesso alla modica
dei parametri nel menu funzionamento.
Pressione breve del tasto:
• Scorrimento verso l’alto dei campi presenti nel menu in
visualizzazione
• Incremento del valore del campo in modica
• Nel menu funzionamento, con icone lampeggianti sul
display, permette la scelta della modalità desiderata
• Nella pagina allarme, richiesta reset allarme
Pressione breve del tasto:
• Scorrimento verso il basso dei campi presenti nel menu
in visualizzazione
• Decremento del valore del campo in modica
• Nel menu funzionamento, con icone lampeggianti sul
display, permette la scelta della modalità desiderata
• Nella pagina allarme, scorrimento allarmi
Pressione prolungata dei tasti (> 5 sec):
Si accede alla pagina password per entrare nel Menu
ExtraCong (*)
Pressione prolungata dei tasti (> 5 sec):
Si accede alla pagina password per entrare nel Menu
PortCong (*)
(*) Dopo l’ ultima operazione, la password rimane memorizzata
nel dispositivo per 30 minuti.
6

1.3 OPERATING MENU ICONS ICONE MENU FUNZIONAMENTO
OPERATING MENU - MENU FUNZIONAMENTO
Icon - Icona Description Descrizione
Indication of system ON Indicazione funzionamento impianto in modalità ON.
Indication of system OFF Indicazione funzionamento impianto in modalità OFF.
Operation in MANUAL mode Indicazione funzionamento in modalità MANUALE
Operation in AUTOMATIC mode (*) Indicazione funzionamento in modalità AUTOMATICA (*)
Presence of alarm (the symbols can be displayed only if the
alarm is active or if it has not been reset).
During the editing stage, these icons are ashing.
(*) The colour of the symbol referring to the Automatic Mode
identies the type of setting that is currently active:
Red: Temperature, Blue: Dehumidication, White: both ON.
Indicazione presenza allarme (icona visualizzabile solo
se allarme attivo o non azzerato)
In fase di modica le icone risulteranno a luce lampeggiante.
(*) Il colore dell’icona modalità Automatica identifica il
tipo di programmazione attiva: Rossa: Temperatura, Blu:
Deumidicazione, Bianco: attive entrambe.
7

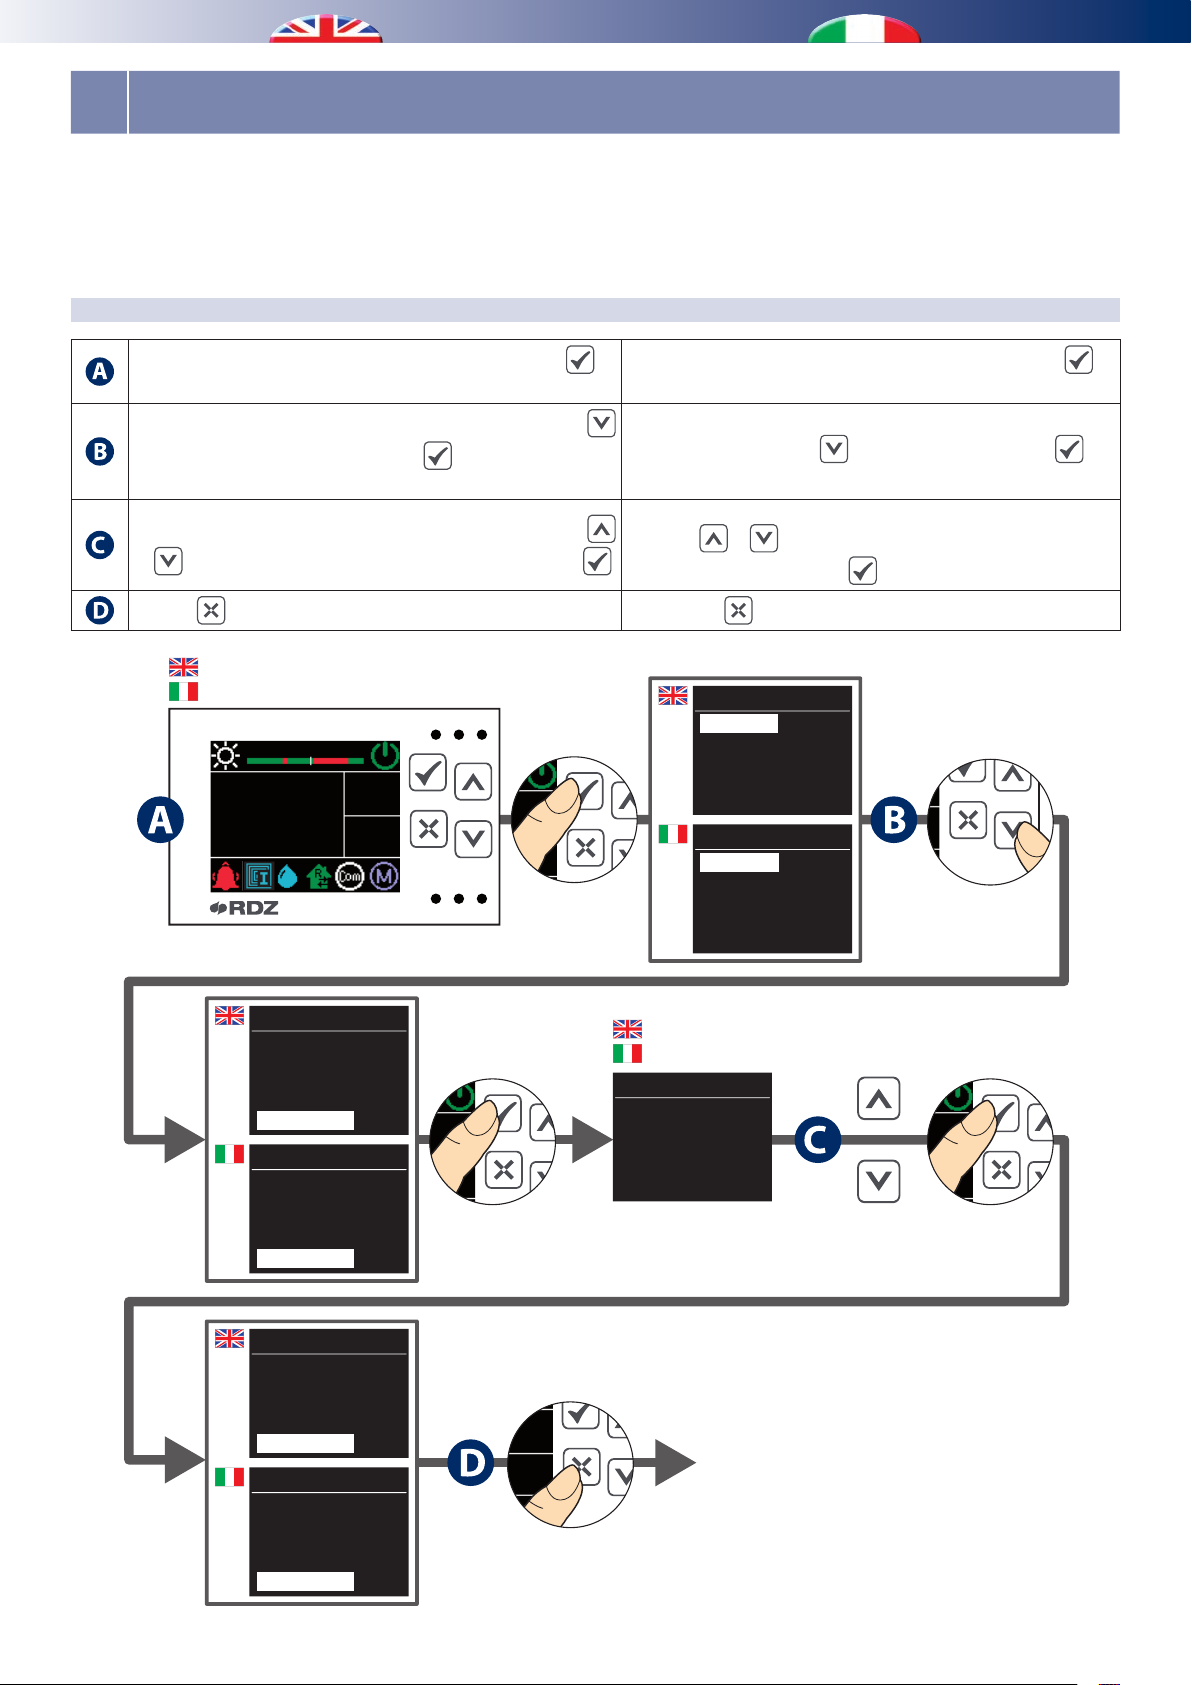
2 FUNCTION MENU - MENU FUNZIONAMENTO
25.0
The main menu displays the system operating status, while in the
operating menu it is possible to edit the settings:
STANDARD PROCEDURE FOR CHANGING PARAMETERS PROCEDURA STANDARD PER LA MODIFICA PARAMETRI
On the main screenshot the user can entering the function
menu by shortly pressing the key
Press the key until you reach the desired ashing icon.
Use keys and to change the set values and select the
desired one.
By using the key you can conrm your selection and go
back to main menu.
.
Nel menu principale viene riportato lo stato di funzionamento
del sistema, mentre nel menu funzionamento è possibile
modicare le impostazioni:
Dalla schermata principale accedere al menu funzionamento
tramite una pressione breve del tasto .
Premere il tasto fino al raggiungimento dell’icona
lampeggiante desiderata
Usare i tasti e per cambiare il valore impostato e
selezionare quello desiderato.
Con il tasto si conferma la scelta e si ritorna al menu
principale.
2.1 ON / OFF ACCENSIONE E SPEGNIMENTO
In ON mode, the whole system is on and will follow the selected
setpoint values (manual or auto)
In OFF mode, the whole system is o (only the antifreeze function
is active)
Temp Set
Set Temp
Ven. 13:46
Set Temp
22.1
Dispositivo spento
Temp
25.0
Umid
54.5
Device o
Short press
Pressione breve
(x 1)
Short press
Pressione breve
Ven. 13:46
In modalità ON l’intero sistema risulterà acceso e seguirà i set
impostati (manuale o auto)
In modalità OFF l’intero sistema risulterà spento (resterà attiva
la sola funzione antigelo)
Press briey the key until you reach
the desired ashing icon
Pressioni no al raggiungimento dell’icona
Short press
Pressione breve
lampeggiante desiderata
Ven. 13:46
Temp
25.0
OFF
Umid
54.5
(x 1)
Device on
Short press
Pressione breve
Dispositivo acceso
Ven. 13:46
(x 1)
ON
Temp
25.0
Umid
54.5
Set Temp
22.1
Temp
25.0
Umid
54.5
(x 1)
8

Press briey the key until you reach
5
5
2.2 FUNCTION MODE MODALITA’ DI FUNZIONAMENTO
TEMPERATURE AND HUMIDITY
Temperature and Humidity can be controlled in two dierent ways,
depending on the activation of the relevant programming.
The device can operate in:
• Manual Mode, Automatic Mode, Manual + Automatic Mode
according to the activation status for the Temperature schedule
(En Prg T) and for the Humidity one (En Prg H).
- MANUAL Mode:
En Prg T =0.0(OFF) , En Prg H =0.0 (OFF)
Identied by the symbol “M”
The temperature and humidity setpoint values depend on the
parameters set manually by the operator in the main menu (Temp
Set / Humid Set).
- AUTOMATIC Mode:
En Prg T =1.0 (ON) , En Prg H =1.0 (ON)
Identied by the symbol “A” in White colour
In Automatic mode, the status of the controller will be the same as
the temperature and humidity settings of the chrono mode (Temp
Prog / Humid Prog) and the calculated temperature and humidity
setpoint values will be the ones of the respective chrono modes.
- MANUAL + AUTOMATIC Mode:
En Prg T =1.0 (ON) , En Prg H =0.0 (OFF)
Identied by the symbol “A” in Red colour
En Prg T =0.0 (OFF) , En Prg H =1.0 (ON)
Identied by the symbol “A” in Blu colour
If the controller is set in Manual mode, the programming of the
temperature and/or humidity can always be activated separately
(see paragraphs 5.1 e 5.2).
TEMPERATURA E UMIDITA’
La gestione della Temperatura e dell’Umidità sono in funzione
dell’attivazione o meno delle rispettive programmazioni.
Il dispositivo può funzionare in modalità:
• Manuale, Automatica, Manuale + Automatica
a seconda dello stato di attivazione della programmazione di
Temperatura (On Prg T) e Umidità (On Prg U).
- Modalità MANUALE:
On Prg T =0.0 (OFF) , ON Prg U =0.0 (OFF), Icona “M”
I set di temperatura e di umidità sono in funzione dei parametri
impostati manualmente dall’operatore nel menu principale
(Set Temp / Set Umid).
- Modalità AUTOMATICA:
On Prg T =1.0 (ON) , ON Prg U =1.0 (ON)
Icona “A” di colore bianco.
In modalità Automatica lo stato della centralina seguirà lo stato
del crono della Temperatura e dell’ Umidità (Prg Temp / Prg
Umid) e i set calcolati di temperatura e umidità saranno quelli
dei rispettivi crono.
- Modalità MANUALE + AUTOMATICA:
On Prg T =1.0 (ON) , ON Prg U =0.0 (OFF)
Icona “A” di colore Rosso
On Prg T =0.0 (OFF) , ON Prg U =1.0 (ON)
Icona “A” di colore Blu.
Nel caso si imposti la centralina in modalità Manuale è sempre
possibile attivare singolarmente la programmazione della
temperatura e/o dell’umidità (vedi paragra 5.1 e 5.2).
Temp Set
Set Temp
Ven. 13:46
Set Temp
22.1
Short press
Pressione breve
(x 1)
Device on
Dispositivo acceso
Temp
25.0
Umid
54.5
Ven. 13:46
Auto.
Short press
Pressione breve
(x 1)
Temp
25.0
Umid
54.5
the desired ashing icon
Pressioni no al raggiungimento dell’icona
Short press
Pressione breve
lampeggiante desiderata
Ven. 13:46
Man.
(x 1)
Automatic Mode
Short press
Pressione breve
Modalità Automatica
Ven. 13:46
Auto.
(x 1)
Temp
25.0
Umid
54.5
Temp
25.0
Umid
54.5
9

2.3 ALARMS ALLARMI
If an alarm is detected (or not been reset), the display will show
this icon .
For further information and details about alarms, see Chapter 6.
3 MAIN MENU - MENU PRINCIPALE
The main menu reports the main operating information.
The screens are dynamically displayed only if the functions
associated to them are active. “Calc Temp” and “Calc Humid” are
displayed only if the Temperature “En Prg T“ and Humidity “En
Prg H“ settings are active and the manual settings “Temp Set”
and “Humid Set” will be hidden.
The humidity windows will be displayed in Summer season only,
while the ones of the external probe and the QA-A sensor will be
displayed only if the relevant sensors are connected.
The and keys allow to browse through the menu. The
most recent information displayed will remain active until one of
the two scroll keys is pressed again.
In the main menu it is possible to set the temperature and humidity
setpoint values in manual mode.
Solo in caso di presenza allarme attivo (o non azzerato) verrà
visualizzata questa icona
Per informazioni e dettagli sugli allarmi fare riferimento al
capitolo dedicato (Capitolo 6).
Nel menu principale vengono riportate le informazioni
principali di funzionamento.
Le schermate vengono visualizzate in maniera dinamica
solo se le funzioni ad esse associate sono attive. “Temp Calc”
e “Umid Calc” vengono visualizzate solo se sono attive le
programmazioni di Temperatura “On Prg T“ e Umidità “On
Prg U“ e verranno nascoste quelle di set manuale “Set Temp”
e “Set Umid”.
Le maschere dell’umidità vengono visualizzate solo in stagione
Estiva, mentre quelle della sonda esterna e della sonda QA-A
solo se sono congurati i relativi sensori.
Attraverso i tasti
menu. L’ultima informazione visualizzata resterà attiva no a
quando non verrà nuovamente premuto uno dei due tasti di
scorrimento.
All’interno del menu principale è possibile impostare il set di
temperatura e umidità in modalità manuale
e è possibile scorrere all’ interno del
nel display.
MAIN MENU MENU PRINCIPALE
Label Description Etichetta Descrizione
Temp Set
Calc Temp
Humid Set
Calc Humid
Ext Temp
Room AQ
Set AQ
Manual temperature setpoint value
Setpoint of calculated temperature (°C)
Automatic Mode En Prg T = 1.0
Manual humidity setpoint value
Setpoint of calculated humidity (%)
Automatic Mode En Prg H = 1.0
Outdoor temperature detected by the probe
(if connected)
Air quality detected by the room sensor
(if congured) (%)
Air quality set by the user
(if probe congured) (%)
Set Temp
Temp Calc
Set Umid
Umid Calc
Temp Est
QA Ambiente
QA Set
Setpoint manuale di temperatura
Setpoint di temperatura calcolato (°C)
In modalità Automatica On Prg T = 1.0
Setpoint manuale di umidità
Setpoint di umidità calcolato (%)
In modalità Automatica On Prg U = 1.0
Temperatura Esterna rilevata dalla sonda
(se collegata)
Qualità dell’ aria rilevata dalla sonda
ambiente
(se congurata) (%)
Qualità dell’ aria impostata dall’utente
(se sonda congurata) (%)
10

Manual Temperature Setpoint (°C)
Manual Humidity Setpoint (%)
3.1 MAIN SCREENSHOT OVERVIEW RIEPILOGO MASCHERE MENU PRINCIPALE
MANUAL MODE MAIN SCREENSHOT OVERVIEW
On the main screenshot, by shortly pressing keys
can check the setpoint values and the ones referring to temperature
and humidity detected in the room.
Setpoint Manuale di Temperatura (°C)
Temp Set
Set Temp
Ven. 13:46
Set Temp
22.1
Temp
25.0
Umid
54.5
or , you
Pressione breve
RIEPILOGO CON MODALITA’ MANUALE
Dalla schermata principale, tramite pressioni brevi del tasto
o , è possibile visualizzare i setpoint e i valori rilevati di
temperatura e umidità.
Setpoint Manuale di Umidità (%)
Short press
Ven. 13:46
Set Umid
50.0
Temp
25.0
Umid
54.5
(x n°)
Humid Set
Set Umid
Outside Temp. detected by the probe (°C)
Temp. Esterna rilevata dalla sonda (°C)
Ven. 13:46
Temp Est
16.8
Ext Temp
Temp Est
Air Quality set by the user (%)
Qualità dell’ aria impostata dall’utente (%)
Ven. 13:46
Temp
25.0
Umid
54.5
Short press
Pressione breve
(x n°)
Short press
Pressione breve
Air quality detected by the room sensor (%)
Qualità dell’ aria rilevata dalla sonda amb.te (%)
Ven. 13:46
QA Ambiente
48.0
Room AQ
QA Ambiente
Back to main page
Ritorno alla maschera principale
Ven. 13:46
Temp
25.0
Umid
54.5
QA Set
50.0
Set AQ
QA Set
Temp
25.0
Umid
54.5
(x n°)
11
Set Temp
22.1
Temp Set
Set Temp
Temp
25.0
Umid
54.5

SetPoint of calculated temperature (°C)
SetPoint of calculated Humidity (%)
AUTOMATIC MODE MAIN SCREENSHOT OVERVIEW
RIEPILOGO CON MODALITA’ AUTOMATICA
The screens are dynamically displayed only if the functions
associated to them are active.
“Calc Temp” and “Calc Humid” are displayed only if the
Temperature “En Prg T“ and Humidity “En Prg H“ settings are
active and the manual settings “Temp Set” and “Humid Set” will
be hidden.
SetPoint di Temperatura calcolato (°C)
Ven. 13:46
Temp Calc
21.7
Calc Temp
Temp Calc
Temp
25.0
Umid
54.5
Pressione breve
Le schermate vengono visualizzate in maniera dinamica solo
se le funzioni ad esse associate sono attive.
“Temp Calc” e “Umid Calc” vengono visualizzate solo se sono
attive le programmazioni di Temperatura “O n Prg T“ e Umidità
“On Prg U“ e verranno nascoste quelle di set manuale “Set
Temp” e “ Set Umid”.
SetPoint di Umidità calcolato (%)
Short press
Ven. 13:46
Umid Calc
54.0
Temp
25.0
Umid
54.5
(x n°)
Calc Humid
Umid Calc
Outside Temp. detected by the probe (°C)
Temp. Esterna rilevata dalla sonda (°C)
Ven. 13:46
Temp Est
16.8
Ext Temp
Temp Est
Air Quality set by the user (%)
Qualità dell’ aria impostata dall’utente (%)
Ven. 13:46
Temp
25.0
Umid
54.5
Short press
Pressione breve
(x n°)
Short press
Pressione breve
Air quality detected by the room sensor (%)
Qualità dell’ aria rilevata dalla sonda amb.te (%)
Ven. 13:46
QA Ambiente
48.0
Room AQ
QA Ambiente
Back to main page
Ritorno alla maschera principale
Ven. 13:46
Temp
25.0
Umid
54.5
QA Set
50.0
Set AQ
QA Set
Temp
25.0
Umid
54.5
(x n°)
12
Temp Calc
21.7
Calc Temp
Temp Calc
Temp
25.0
Umid
54.5

3.2 TEMPERATURE DETECTED IN THE ROOM TEMPERATURA RILEVATA IN AMBIENTE
DISPLAY OF ROOM TEMPERATURE °C
From the main screen you can always view the temperature value
in the room.
Label: Temp
Ven. 13:46
Set Temp
22.1
VISUALIZZAZIONE TEMPERATURA INTERNA °C
Dalla schermata principale è sempre possibile visualizzare il
valore di temperatura rilevata in ambiente.
Etichetta: Temp
Temp
25.0
Umid
54.5
3.3 HUMIDITY DETECTED IN THE ROOM UMIDITA’ RILEVATA IN AMBIENTE
DISPLAY OF ROOM HUMIDITY %
From the main screen you can always view the humidity value in
the room.
Label: Humid
Ven. 13:46
Set Temp
22.1
VISUALIZZAZIONE UMIDITÀ INTERNA %
Dalla schermata principale è sempre possibile visualizzare il
valore di umidità rilevata in ambiente.
Etichetta: Umid
Temp
25.0
Umid
54.5
13

3.4 MANUAL TEMPERATURE SETPOINT SETPOINT MANUALE DI TEMPERATURA
DISPLAY OF TEMPERATURE SETTING °C
On the main screenshot, shortly press the key
manual temperature setpoint value (with non-active temperature
programming En Prg T=0.0)
Label: Temp Set
to display the
Ven. 13:46
Set Temp
22.1
Temp Set
Set Temp
CHANGE OF TEMPERATURE SETTING °C MODIFICA DEL SET TEMPERATURA °C
To edit the selected eld briey press ; the value selected
shall turn to green to notify the modication.
VISUALIZZAZIONE DEL SET TEMPERATURA °C
Dalla schermata principale, eseguire pressioni brevi del tasto
per visualizzare il valore di setpoint manuale di temperatura
(con programmazione temperatura non attiva On Prg T=0.0)
Etichetta: Set Temp
Temp
25.0
Umid
54.5
Per accedere alla modica del campo eseguire una pressione
breve del tasto il valore selezionato si colora di verde per
noticare l’ attivazione della fase di modica.
Use and to change the set value and select the desired
one.
is used to conrm the change (Enter) and go back to the
home page.
If instead you want to go back to the previous page without
making any changes (Reset), press
Temp Set
Set Temp
Ven. 13:46
Set Temp
22.1
Schermata Principale
Temp
25.0
Umid
54.5
.
Main Page
Short press
Pressione breve
(x 1)
Usare i tasti e per cambiare il valore impostato e
selezionare quello desiderato.
Con il tasto si conferma la modica (Enter) e si ritorna
alla schermata principale.
Se invece si desidera tornare alla schermata precedente
senza eseguire nessuna modica (Reset) premere il tasto .
Green Color (modify mode)
Colore Verde (modica)
Ven. 13:46
Set Temp
22.1
Temp
25.0
Umid
54.5
30.0
29.9
29.8
....
....
12.2
12.1
12.0
Ven. 13:46
Set Temp
24.5
Temp
25.0
Umid
54.5
Short press
Pressione breve
(x 1)
14
Ven. 13:46
Set Temp
24.5
Temp
25.0
Umid
54.5

3.5 MANUAL HUMIDITY SETPOINT SETPOINT MANUALE DI UMIDITA’
DISPLAY OF HUMIDITY SETTING %
On the main screenshot, shortly press the key
manual setpoint humidity value. Label: Humid Set
N.B. : The value is visible only if the device is set in Summer mode
and with non-active humidity programming En Prg H=0.0.
Ven. 13:46
Set Temp
22.1
Temp
25.0
Umid
54.5
to display the
Short press
Pressione breve
(x n°)
Temp Set
Set Temp
CHANGE OF HUMIDITY SETTING % MODIFICA DEL SET UMIDITÀ %
To edit the selected eld briey press ; the value selected
shall turn to green to notify the modication.
VISUALIZZAZIONE DEL SET UMIDITÀ %
Dalla schermata principale, eseguire pressioni brevi del tasto
per visualizzare il valore di setpoint manuale di umidità
impostato. Etichetta: Set Umid
N.B. : Valore visibile solo con dispositivo impostato in stagione
Estate e Programmazione Umidità non attiva On Prg U=0.0)
Ven. 13:46
Set Umid
50.0
Humid Set
Set Umid
Per accedere alla modica del campo eseguire una pressione
breve del tasto il valore selezionato si colora di verde per
noticare l’ attivazione della fase di modica.
Temp
25.0
Umid
54.5
Use and to change the set value and select the desired
one.
is used to conrm the change (Enter) and go back to the
home page.
If instead you want to go back to the previous page without
making any changes (Reset), press
Humid Set
Set Umid
Ven. 13:46
Set Umid
64.0
Temp
25.0
Umid
54.5
.
Short press
Pressione breve
(x 1)
Short press
Ven. 13:46
Pressione breve
Usare i tasti e per cambiare il valore impostato e
selezionare quello desiderato.
Con il tasto si conferma la modica (Enter) e si ritorna
alla schermata principale.
Se invece si desidera tornare alla schermata precedente
senza eseguire nessuna modica (Reset) premere il tasto .
Green Color (modify mode)
Colore Verde (modica)
Ven. 13:46
Set Umid
64.0
Ven. 13:46
Temp
25.0
Umid
54.5
80.0
79.9
79.8
....
....
40.2
40.1
40.0
Set Umid
55.0
Temp
25.0
Umid
54.5
(x 1)
15
Set Umid
55.0
Temp
25.0
Umid
54.5

3.6 SETPOINT OF CALCULATED TEMPERATURE SETPOINT DI TEMPERATURA CALCOLATO
DISPLAY SETPOINT OF TEMPERATURE CALCULATED °C
On the main screenshot, shortly press the key
setpoint of calculated temperature.
Label: Calc Temp
N.B. : The value is visible only if with active temperature
programming (En Prg T=1.0)
to display the
Temp Calc
21.7
Calc Temp
Temp Calc
VISUALIZZAZIONE SETPOINT DI TEMPERATURA °C
Dalla schermata principale, eseguire pressioni brevi del tasto
per visualizzare il valore di setpoint di temperatura calcolato.
Etichetta: Temp Calc
N.B. : Valore visibile solo con programmazione temperatura
attiva (parametro On Prg T = 1.0)
Ven. 13:46
Temp
25.0
Umid
54.5
3.7 SETPOINT OF CALCULATED HUMIDITY SETPOINT DI UMIDITÀ CALCOLATO
DISPLAY SETPOINT OF HUMIDITY CALCULATED %
On the main screenshot, shortly press the key
setpoint of calculated humidity.
Label: Calc Humid
N.B. : The value is visible only if if the device is set in Summer mode
and with active humidity programming (En Prg H=1.0)
Ven. 13:46
Temp Calc
21.7
Temp
25.0
Umid
54.5
to display the
Pressione breve
VISUALIZZAZIONE SETPOINT DELL’ UMIDITÀ %
Dalla schermata principale, eseguire pressioni brevi del tasto
per visualizzare il valore di setpoint di umidità calcolato.
Etichetta: Umid Calc
N.B. : Valore visibile solo con dispositivo impostato in stagione
Estate e con programmazione umidità attiva (On Prg U = 1.0)
Short press
Ven. 13:46
Umid Calc
54.0
(x n°)
Temp
25.0
Umid
54.5
Calc Temp
Temp Calc
Calc Humid
Umid Calc
16

3.8 OUTDOOR TEMPERATURE DETECTED TEMPERATURA ESTERNA RILEVATA
* DISPLAY OF THE VALUE°C
On the main screenshot, shortly press the key
outdoor temperature detected by the sensor.
Label: Ext Temp
(*) The value is visible only with congured external probe.
In the case of external temperature sensor in alarm the display will
show the following values:
• -5 °C in WINTER
• 30 °C in SUMMER
Ven. 13:46
Set Temp
22.1
Temp
25.0
Umid
54.5
to display the
Pressione breve
* VISUALIZZAZIONE DEL VALORE °C
Dalla schermata principale, eseguire pressioni brevi del tasto
per visualizzare il valore di temperatura esterna rilevata
dalla sonda.
Etichetta: Temp Est
(*) Valore visibile solo con sonda congurata.
Nel caso di sonda temperatura esterna in allarme verranno
visualizzati i seguenti valori:
• -5 °C nella stagione INVERNO
• 30 °C nella stagione ESTATE
Short press
Ven. 13:46
Temp Est
16.8
Temp
25.0
Umid
54.5
(x n°)
Temp Set
Set Temp
Ext Temp
Temp Est
3.9 ROOM AIR QUALITY DETECTED QUALITA’ DELL’ ARIA AMBIENTE RILEVATA
* DISPLAY OF THE VALUE %
On the main screenshot, shortly press the key
temperature detected by the delivery probe.
Measuring range: 0% (clean air) ÷ 100% (polluted air)
Label: Room AQ
(*) The value is visible only with congured air quality probe.
Ven. 13:46
Set Temp
22.1
Temp
25.0
Umid
54.5
to display the
Pressione breve
* VISUALIZZAZIONE DEL VALORE %
Dalla schermata principale, eseguire pressioni brevi del tasto
per visualizzare il valore in percentuale della qualità dell’aria
rilevata dalla sonda.
Campo di lavoro: 0% (aria pulita) ÷ 100% (aria inquinata)
Etichetta: QA Ambiente
(*) Valore visibile solo con sonda congurata.
Short press
Ven. 13:46
QA Ambiente
32.0
Temp
25.0
Umid
54.5
Temp Set
Set Temp
(x n°)
Room AQ
QA Ambiente
17

3.10 ROOM AIR QUALITY SET SET QUALITA’ DELL’ ARIA AMBIENTE
* DISPLAY OF AIR QUALITY SETTING %
On the main screenshot, shortly press the key
air quality setpoint value.
Label: Set AQ
(*) The value is visible only with congured air quality probe.
Ven. 13:46
Set Temp
22.1
Temp Set
Set Temp
To edit the selected eld briey press ; the value selected
shall turn to green to notify the modication.
Temp
25.0
Umid
54.5
CHANGE OF AIR QUALITY SETTING % MODIFICA DEL SET DI QUALITÀ %
to display the
* VISUALIZZAZIONE DEL SET QUALITA ARIA %
Dalla schermata principale, eseguire pressioni brevi del tasto
per visualizzare il valore di setpoint di qualità dell’aria
impostato.
Etichetta: QA Set
(*) Valore visibile solo con sonda congurata.
Short press
Pressione breve
(x n°)
Per accedere alla modica del campo eseguire una pressione
breve del tasto il valore selezionato si colora di verde per
noticare l’ attivazione della fase di modica.
Ven. 13:46
QA Set
30.0
Set AQ
QA Set
Temp
25.0
Umid
54.5
Use and to change the set value and select the desired
one.
is used to conrm the change (Enter) and go back to the
home page.
If instead you want to go back to the previous page without
making any changes (Reset), press
Set AQ
QA Set
Ven. 13:46
QA Set
30.0
Temp
25.0
Umid
54.5
.
Short press
Pressione breve
(x 1)
Short press
Ven. 13:46
Pressione breve
Usare i tasti e per cambiare il valore impostato e
selezionare quello desiderato.
Campo di lavoro: 0% (aria pulita) ÷ 100% (aria inquinata)
Con il tasto si conferma la modica (Enter) e si ritorna
alla schermata principale.
Se invece si desidera tornare alla schermata precedente
senza eseguire nessuna modica (Reset) premere il tasto .
Green Color (modify mode)
Colore Verde (modica)
Ven. 13:46
QA Set
30.0
Ven. 13:46
Temp
25.0
Umid
54.5
90.0
89.0
88.0
....
....
12.0
11.0
10.0
QA Set
28.0
Temp
25.0
Umid
54.5
(x 1)
18
QA Set
28.0
Temp
25.0
Umid
54.5

4 CONFIGURATION MENU - MENU CONFIGURAZIONE
CONFIGURATION MENU MENU CONFIGURAZIONE
Label Description Etichetta Descrizione
Contrast
Tmp_Prog
Hum_Prog
Rin_Prog
Eco_Prog
Date
Hour
Season
En Prg T
En Prg H
Model
SW Version
SumInFlowT
WinInFlowT
AirFlowRoom
MachineError
MachineAlarm
AirDelivery
Tmp
Water Temp
Conden Temp
Evapor Temp
RpmFAN1
RpmFAN2
It changes the display contrast
Changing the programming that controls
the temperature setpoint
Changing the programming that controls
the humidity setpoint
It manages renewal/recirculation on-o
It manages ECO or COMFORT functionality
It changes the date on the device
It changes the time on the device
It changes the season on the device
This makes it possible to activate the
temperature programming only
This makes it possible activate the
humidity programming (only if the device
is set in Summer mode).
Dehumidier model
10.0 model UC 300-M, 11.0 model UC
300-MHE, 13.0 model UC360-MHE, 12.0
model UC 500-MVHE
Software version installed
This makes it possible to set the air supply
temperature for the summer season
This makes it possible to set the air supply
temperature for the winter season
This makes it possible to set the percentage
for air ow rate to be sent into the room
Code for fail error in the unit
Code for alarm error in the unit
Inow air temperature detected by the
unit (°C)
Inflow water temperature detected by
the unit (°C)
Gas condensation temperature in the
refrigerant circuit (°C)
Gas evaporation temperature in the
refrigerant circuit (°C)
Speed of the inow fan detected by the
unit (Rpm)
Speed of the expulsion fan detected by
the unit (Rpm)
Contrasto
Prg_Temp
Prg_Umid
Prog_Rinn
Prog_Eco
Data
Ora
Stagione
On Prg T
On Prg U
Modello
Versione SW
TempMandEst
TempMandInv
PortataAmb
ErrMacchina
AllMacchina
Temp Man Ar
Temp Acqua
Temp Conde
Temp Evapor
RpmFAN1
RpmFAN2
Permette di variare il contrasto del display
Modifica della programmazione che
gestisce il set della temperatura
Modifica della programmazione che
gestisce il set dell’ umidità
Gestisce la chiamata al rinnovo/ricircolo
Gestisce la funzionalità ECO o COMFORT
Permette di modificare la data del
dispositivo
Permette di modicare l’ora del dispositivo
Permette di modificare la stagione del
dispositivo
Permette di attivare la sola programmazione
della temperatura
Permette di attivare la sola
programmazione dell umidità (solo con
dispositivo impostato in stagione Estate).
Modello del deumidicatore
10.0 macchina UC 300-M, 11.0 macchina
UC 300-MHE, 13.0 macchina UC360-MHE,
12.0 macchina UC 500-MVHE
Versione del software installata
Imposta la temperatura di mandata
dell’aria per la stagione estiva
Imposta la temperatura di mandata
dell’aria per la stagione invernale
Imposta in percentuale la portata d’aria da
immettere in ambiente
Codice errore guasti macchina
Codice errore allarmi macchina
Temperatura dell’ aria di mandata rilevata
dalla macchina (°C)
Temperatura dell’ acqua rilevata in ingresso
dalla macchina (°C)
Temperatura rilevata di condensazione del
gas nel circuito frigorifero (°C)
Temperatura rilevata di evaporazione del
gas nel circuito frigorifero (°C)
Velocità di rotazione del ventilatore di
immissione rilevata dalla macchina (Rpm)
Velocità di rotazione del ventilatore di
espulsione rilevata dalla macchina (Rpm)
19

4.1 CONTRAST CONTRASTO
CHANGE OF DISPLAY CONTRAST MODIFICA CONTRASTO DISPLAY
E’ possibile aumentare e diminuire il contrasto del display.You can increase and decrease the contrast on the display.
On the main screenshot, long press the key (> 5 sec.) to
enter the conguration menu.
The eld Contrast will appear as the rst item of the menu;
conrm it by pressing the key
or to change it.
You can increase or decrease the contrast value by shortly
pressing the keys
the key
By using the key you can go back to the main page. Con il tasto si ritorna alla schermata principale.
Temp Set
Set Temp
.
Ven. 13:46
Set Temp
22.1
or , then conrm by shortly pressing
Schermata Principale
Temp
25.0
Umid
54.5
to display the present value
Main Page
Long press
Pressione lunga
(> 5 sec.)
Dalla schermata principale, premere a lungo il tasto (>
5 sec.) per entrare nel menu congurazione.
Il campo Contrasto comparirà come prima voce del menu,
confermare con il tasto per visualizzare il valore corrente
e accedere alla fase di modica.
Incrementare o diminuire il valore di contrasto tramite
pressioni brevi dei tasti
successivamente con una pressione breve del tasto
Conguration
Contrasto
Contrast
Tmp_Prog
Hum_Prog
Rin_Prog
Eco_Prog
Congurazione
Contrasto
Contrasto
Prg_Temp
Prg_Umid
Prog_Rinn
Prog_Eco
o e confermare
Short press
Pressione breve
(x 1)
.
Contrast
Contrasto
Contrasto
8
10
Pressione breve
9
8
...
...
3
2
1
Short press
(x 1)
Short press
Pressione breve
Back to
Main Page
Ritorno alla
Schermata Principale
(x 1)
20

Main Page
Temp Set
Data
Data
4.2 DATE DATA
DATE SETTING IMPOSTAZIONE DELLA DATA
Starting from the main screenshot, long press the key (>
5 sec.) to enter the conguration menu.
Reach the eld Data by shortly pressing the key (5 times)
, then conrm with the key .
CHANGE DAY: Increase or decrease the values by shortly
pressing keys
the next parameter, use the key
CHANGE MONTH: Increase or decrease the values by shortly
pressing keys
next parameter, use the key
CHANGE YEAR: Increase or decrease the values by shortly
pressing keys
The key allows the user to go back to the main page. Con il tasto si ritorna alla schermata principale.
Set Temp
Ven. 13:46
Set Temp
or . If you want to conrm or shift to
.
or . If you want to conrm or shift to the
.
or .
Schermata Principale
Temp
Long press
Pressione lunga
25.0
22.1
Umid
54.5
(> 5 sec.)
Dalla schermata principale, premere a lungo il tasto (>
5 sec.) per entrare nel menu congurazione.
Raggiungere il campo Data mediante pressioni brevi (5
volte) del tasto
MODIFICA GIORNO: Incrementare o diminuire i valori tramite
pressioni brevi dei tasti
al parametro successivo usare il tasto
MODIFICA MESE: Incrementare o diminuire i valori tramite
pressioni brevi dei tasti
al parametro successivo usare il tasto
MODIFICA ANNO: Incrementare o diminuire i valori tramite
pressioni brevi dei tasti o .
Conguration
Contrasto
Contrast
Tmp_Prog
Hum_Prog
Rin_Prog
Eco_Prog
Congurazione
Contrasto
Contrasto
Prg_Temp
Prg_Umid
Prog_Rinn
Prog_Eco
e confermare con il tasto .
o . Per confermare e spostarsi
o . Per confermare e spostarsi
.
.
Short press
Pressione breve
(x 5)
Conguration
Tmp_Prog
Hum_Prog
Rin_Prog
Eco_Prog
Date
Date
Congurazione
Prg_Temp
Prg_Umid
Prog_Rinn
Prog_Eco
Data
Data
Data
21-05-16
Date
Short press
Pressione breve
(x 1)
12
11
10
...
...
03
02
01
Short press
Pressione breve
(x 1)
Date
Data
Data
21-05-16
Data
21-05-16
Date
12
11
10
...
...
03
02
01
31
Pressione breve
30
29
...
...
03
02
01
Short press
(x 1)
Short press
Pressione breve
(x 2)
21

Main Page
Temp Set
(x 2)
4.3 HOUR ORA
CLOCK CHANGING MODIFICA ORARIO DISPOSITIVO
Starting from the main screenshot, long press the key (>
5 sec.) to enter the conguration menu.
Reach the eld Hour by shortly pressing (6 times) the key
then conrm by using the key
CHANGE HOUR: Increase or decrease the values by shortly
pressing keys
the next parameter, use the key
CHANGE MINUTES: Increase or decrease the values by shortly
pressing keys
The key allows the user to go back to the main page. Con il tasto si ritorna alla schermata principale.
Set Temp
Ven. 13:46
Set Temp
or . If you want to conrm or shift to
or .
Schermata Principale
Temp
.
.
Long press
Pressione lunga
25.0
22.1
Umid
54.5
(> 5 sec.)
Dalla schermata principale, premere a lungo il tasto (>
5 sec.) per entrare nel menu congurazione.
Raggiungere il campo Ora mediante pressioni brevi (6
volte) del tasto
MODIFICA ORA: Incrementare o diminuire i valori tramite
pressioni brevi dei tasti
al parametro successivo usare il tasto
MODIFICA MINUTI: Incrementare o diminuire i valori tramite
pressioni brevi dei tasti o .
Conguration
Contrasto
Contrast
Tmp_Prog
Hum_Prog
Rin_Prog
Eco_Prog
Congurazione
Contrasto
Contrasto
Prg_Temp
Prg_Umid
Prog_Rinn
Prog_Eco
e confermare con il tasto .
o . Per confermare e spostarsi
.
Short press
Pressione breve
(x 6)
Conguration
Hum_Prog
Rin_Prog
Eco_Prog
Date
Hour
Hour
Congurazione
Prg_Umid
Prog_Rinn
Prog_Eco
Data
Ora
Ora
Hour
Ora
Ora
18-48
Short press
Pressione breve
(x 1)
59
58
57
....
....
03
02
01
Hour
Ora
Ora
16-48
Short press
Pressione breve
23
22
21
....
....
02
01
00
Short press
Pressione breve
(x 1)
Back to main page
Ritorno alla
Schermata principale
22

4.4 SEASON SETTING SET STAGIONE
This function makes it possible to set the desired season mode of
the device (Summer/Winter).
PROCEDURE FOR THE PARAMETER MODIFICATION PROCEDURA PER LA MODIFICA DEL PARAMETRO
Starting from the main screenshot, long press the key (>
5 sec.) to enter the conguration menu.
Reach the eld Season by shortly pressing the key 7
times and conrm it with the key
to check the present value
and enable any changes .
The desired season can be selected by using keys or .
With a short press of the key
or the key allows the user
to conrming and go back to the previous screenshot.
The key allows the user to go back to the main page. Con il tasto si ritorna alla schermata principale.
Temp Set
Set Temp
Ven. 13:46
Set Temp
22.1
Schermata Principale
Main Page
Long press
Pressione lunga
Temp
25.0
Umid
54.5
(> 5 sec.)
Permette di impostare la modalità di funzionamento stagionale
desiderata del dispositivo (Estate / Inverno).
Dalla schermata principale, premere a lungo il tasto (>
5 sec.) per entrare nel menu congurazione.
Raggiungere il campo Stagione mediante pressioni
brevi (7 volte) del tasto
e confermare con il tasto per
visualizzare il valore corrente e accedere alla fase di modica.
Impostare la stagione desiderata mediante l’uso dei tasti
o . Eseguire una pressione breve del tasto o del
tasto per confermare.
Conguration
Contrasto
Contrast
Temp_Prog
Humid_Prog
Date
Hour
Congurazione
Contrasto
Contrasto
Prog_Temp
Prog_Umid
Data
Ora
Short press
Pressione breve
(x 7)
Conguration
Rin_Prog
Eco_Prog
Date
Hour
Season
Congurazione
Prog_Rinn
Prog_Eco
Data
Ora
Stagione
Conguration
Temp_Prog
Humid_Prog
Date
Hour
Season
Congurazione
Prog_Temp
Prog_Umid
Data
Ora
Stagione
Short press
Pressione breve
(x 1)
Short press
Pressione breve
(x 1)
Season
Stagione
Stagione
Inverno
Back to Main Page
Ritorno alla Schermata Principale
Summer
Estate
Winter
Inverno
Short press
Pressione breve
(x 1)
If you want to switch from cooling running into heating running,
you can follow the same procedure as the one you use.
N.B .: In the case of unit set in Slave mode, the season can not be
changed (it is sent by the Master).
Per passare da impianto modalità Estate a impianto modalità
Inverno eseguire la stessa procedura.
n.b.: Nel caso di centralina impostata in modalità Slave la
stagione non è modicabile (viene inviata dalla Master).
23

4.5 SUMMER AIR SUPPLY TEMPERATURE SET SET TEMPERATURA MANDATA ARIA ESTIVA
This function makes it possible to set the air supply temperature
for the summer season.
PROCEDURE FOR THE PARAMETER MODIFICATION PROCEDURA PER LA MODIFICA DEL PARAMETRO
Starting from the main screenshot, long press the key (>
5 sec.) to enter the conguration menu.
Reach the eld SumInFlowT by shortly pressing the key
12 times and conrm it with the key
value and enable any changes .
The desired value can be selected by using keys or . With
a short press of the key
conrming and go back to the previous screenshot.
The key allows the user to go back to the main page. Con il tasto si ritorna alla schermata principale.
Temp Set
Set Temp
Ven. 13:46
Schermata Principale
Set Temp
or the key allows the user to
Main Page
Temp
to check the present
Long press
Pressione lunga
25.0
22.1
Umid
54.5
(> 5 sec.)
Permette di impostare la temperatura di mandata dell’aria per
la stagione estiva.
Dalla schermata principale, premere a lungo il tasto (>
5 sec.) per entrare nel menu congurazione.
Raggiungere il campo TempMandEst mediante pressioni
brevi (12 volte) del tasto
visualizzare il valore corrente e accedere alla fase di modica.
Impostare il valore desiderato mediante l’uso dei tasti
. Eseguire una pressione breve del tasto o del tasto
per confermare.
Conguration
Contrasto
Contrast
Temp_Prog
Humid_Prog
Date
Hour
Congurazione
Contrasto
Contrasto
Prog_Temp
Prog_Umid
Data
Ora
e confermare con il tasto per
o
Short press
Pressione breve
(x 12)
Conguration
En Prg T
En Prg H
Model
SW Version
SumInFlowT
Congurazione
On Prg T
On Prg U
Modello
Versione SW
TempMandEst
Conguration
En Prg T
En Prg H
Model
SW Version
SumInFlowT
Congurazione
On Prg T
On Prg U
Modello
Versione SW
TempMandEst
Short press
Pressione breve
(x 1)
Short press
Pressione breve
(x 1)
SumInFlowT
TempMandEst
TempMandEst
25.0
Back to Main Page
Ritorno alla Schermata Principale
28.0
27.0
21.0
20.0
Short press
Pressione breve
(x 1)
24

4.6 WINTER AIR SUPPLY TEMPERATURE SET SET TEMPERATURA MANDATA ARIA INVERNALE
This function makes it possible to set the air supply temperature
for the winter season.
PROCEDURE FOR THE PARAMETER MODIFICATION PROCEDURA PER LA MODIFICA DEL PARAMETRO
Starting from the main screenshot, long press the key (>
5 sec.) to enter the conguration menu.
Reach the eld WinInFlowT by shortly pressing the key
13 times and conrm it with the key
value and enable any changes .
The desired value can be selected by using keys or . With
a short press of the key
conrming and go back to the previous screenshot.
The key allows the user to go back to the main page. Con il tasto si ritorna alla schermata principale.
Temp Set
Set Temp
Ven. 13:46
Schermata Principale
Set Temp
or the key allows the user to
Main Page
Temp
to check the present
Long press
Pressione lunga
25.0
22.1
Umid
54.5
(> 5 sec.)
Permette di impostare la temperatura di mandata dell’aria per
la stagione invernale.
Dalla schermata principale, premere a lungo il tasto (>
5 sec.) per entrare nel menu congurazione.
Raggiungere il campo TempMandInv mediante pressioni
brevi (13 volte) del tasto
visualizzare il valore corrente e accedere alla fase di modica.
Impostare il valore desiderato mediante l’uso dei tasti
. Eseguire una pressione breve del tasto o del tasto
per confermare.
Conguration
Contrasto
Contrast
Temp_Prog
Humid_Prog
Date
Hour
Congurazione
Contrasto
Contrasto
Prog_Temp
Prog_Umid
Data
Ora
e confermare con il tasto per
o
Short press
Pressione breve
(x 13)
Conguration
En Prg H
Model
SW Version
SumInFlowT
WinInFlowT
Congurazione
On Prg U
Modello
Versione SW
TempMandEst
TempMandInv
Conguration
En Prg H
Model
SW Version
SumInFlowT
WinInFlowT
Congurazione
On Prg U
Modello
Versione SW
TempMandEst
TempMandInv
Short press
Pressione breve
(x 1)
Short press
Pressione breve
(x 1)
WinInFlowT
TempMandInv
TempMandInv
21.0
Back to Main Page
Ritorno alla Schermata Principale
23.0
22.0
19.0
18.0
Short press
Pressione breve
(x 1)
25

4.7 SUPPLY AIR FLOW SET SET PORTATA ARIA DI IMMISSIONE
This function makes it possible to set the percentage for air ow
rate to be sent into the room.
PROCEDURE FOR THE PARAMETER MODIFICATION PROCEDURA PER LA MODIFICA DEL PARAMETRO
Starting from the main screenshot, long press the key (>
5 sec.) to enter the conguration menu.
Reach the eld AirFlowRoom by shortly pressing the key
14 times and conrm it with the key to check the present
value and enable any changes .
The desired value can be selected by using keys or . With
a short press of the key
conrming and go back to the previous screenshot.
The key allows the user to go back to the main page. Con il tasto si ritorna alla schermata principale.
Temp Set
Set Temp
Ven. 13:46
Schermata Principale
Set Temp
or the key allows the user to
Main Page
Long press
Pressione lunga
Temp
25.0
22.1
Umid
54.5
(> 5 sec.)
Permette di impostare in percentuale la portata d’aria da
immettere in ambiente.
Dalla schermata principale, premere a lungo il tasto (>
5 sec.) per entrare nel menu congurazione.
Raggiungere il campo PortataAmb mediante pressioni
brevi (14 volte) del tasto e confermare con il tasto per
visualizzare il valore corrente e accedere alla fase di modica.
Impostare il valore desiderato mediante l’uso dei tasti
. Eseguire una pressione breve del tasto o del tasto
per confermare.
Conguration
Contrasto
Contrast
Temp_Prog
Humid_Prog
Date
Hour
Congurazione
Contrasto
Contrasto
Prog_Temp
Prog_Umid
Data
Ora
Short press
Pressione breve
(x 14)
o
Conguration
Model
SW Version
SumInFlowT
WinInFlowT
AirFlowRoom
Congurazione
Modello
Versione SW
TempMandEst
TempMandInv
PortataAmb
Conguration
Model
SW Version
SumInFlowT
WinInFlowT
AirFlowRoom
Congurazione
Modello
Versione SW
TempMandEst
TempMandInv
PortataAmb
Short press
Pressione breve
(x 1)
Short press
Pressione breve
(x 1)
AirFlowRoom
PortataAmb
PortataAmb
40.0
100.0
99.0
01.0
Short press
Pressione breve
(x 1)
00.0
Back to Main Page
Ritorno alla Schermata Principale
26

see table - vedi tabella
4.8 OTHER READINGS ALTRE LETTURE
PROCEDURE FOR THE VALUE READING PROCEDURA PER LA LETTURA DEI VALORI
On the main screenshot, long press the key (> 5 sec.) to
enter the conguration menu.
Reach the desired eld by shortly pressing the key (see
table below) and conrm it with the key
value and enable any changes .
By using the key you can go back to the main page. Con il tasto si ritorna alla schermata principale.
Temp Set
Set Temp
Set Temp
Schermata Principale
Ven. 13:46
Temp
Main Page
to check the present
Pressione lunga
25.0
22.1
Umid
54.5
Dalla schermata principale, premere a lungo il tasto (>
5 sec.) per entrare nel menu congurazione.
Raggiungere il campo desiderato mediante pressioni brevi
(vedi tabella) del tasto
visualizzare il valore corrente.
Long press
(> 5 sec.)
e confermare con il tasto per
Conguration
Contrasto
Contrast
Tmp_Prog
Hum_Prog
Rin_Prog
Eco_Prog
Congurazione
Contrasto
Contrasto
Prg_Temp
Prg_Umid
Prog_Rinn
Prog_Eco
Short press
Pressione breve
Label
Etichetta
Etichetta
Short press
Pressione breve
Back to
Main Page
VALORE
Ritorno alla
Schermata Principale
(x n°)
x n° Label Description x n° Etichetta Descrizione
MachineError
15
MachineAlarm
16
AirDelivery Tmp
17
18
19
20
21
22
Water Temp
Conden Temp
Evapor Temp
RpmFAN1
RpmFAN2
Code for fail error in the unit (*) 15
Code for alarm error in the unit (*) 16
Inow air temperature detected
by the unit (°C)
Inflow water temperature
detected by the unit (°C)
Gas condensation temperature in
the refrigerant circuit (°C)
Gas evaporation temperature in
the refrigerant circuit (°C)
Speed of the inow fan detected
by the unit (Rpm)
Speed of the expulsion fan
detected by the unit (Rpm)
ErrMacchina
AllMacchina
Temp Man Ar
17
Temp Acqua
18
Temp Conde
19
Temp Evapor
20
21
22
RpmFAN1
RpmFAN2
(x 1)
Codice errore guasti macchina (*)
Codice errore allarmi macchina (*)
Temperatura dell’ aria di mandata
rilevata dalla macchina (°C)
Temperatura dell’ acqua rilevata in
ingresso dalla macchina (°C)
Temperatura rilevata di
condensazione del gas nel circuito
frigorifero (°C)
Temperatura rilevata di evaporazione
del gas nel circuito frigorifero (°C)
Velocità di rotazione del ventilatore
di immissione rilevata dalla macchina
(Rpm)
Velocità di rotazione del ventilatore
di espulsione rilevata dalla macchina
(Rpm)
(*) N.B .: for details please see Alarm chapter
(*) N.B.: Per dettagli vedi capitolo Allarmi
27

5 PROGRAMMING - PROGRAMMAZIONE
Congurazione
Conguration
PROGRAMMING PROCEDURE
From the main menu it is possible to access the chrono page by
pressing and holding the
Contrasto
Contrast
Tmp_Prog
Hum_Prog
Rin_Prog
Eco_Prog
key:
Use and to to browse through the menu.
Selection:
• Tmp_Prog to set the Temperature
• Hum_Prog to set the Humidity
• Rin_Prog to set the air Renewal
• Eco_Prog to set the Economy mode
Press
to conrm your choice and access the programming
page .
In particular it is possible to:
• Set the various level for each time slot in all the days of the week
• Copy the settings of the day shown and paste it into the following
day
• Change the parameter of the editable level (as on the following
table)
PROCEDURA DI PROGRAMMAZIONE
Dal menu principale è possibile accedere alla maschera crono
mediante la pressione prolungata del tasto
Contrasto
Contrasto
Prog_Temp
Prog_Umid
Prog_Rinn
Prog_Eco
:
Per spostarsi all’interno del menu utilizzare i tasti e .
Selezionare:
• Prg_Temp per impostare la Temperatura
• Prg_Umid per impostare l’ Umidità
• Prog_Rinn per impostare il Rinnovo
• Prog_Eco per impostare l’Economy
Premere il tasto
per confermare la scelta ed entrare nella
maschera di programmazione
Nello specico è possibile:
• Impostare i livelli per ciascuna fascia oraria nei vari giorni
della settimana
• Copiare la congurazione del giorno visualizzato e applicarla
al giorno successivo
• Modificare i parametri dei livelli editabili (vedi tabella
seguente)
If instead you want to go back to the previous page without making
any changes (Reset), press
WINTER / INVERNO
SUMMER / ESTATE
PARAMETER LIST OF THE LEVELS - LISTA PARAMETRI DEI LIVELLI
Winter Level 1
1.0
Invern. Livello 1
Winter Level 2
2.0
Invern. Livello 2
Winter Level 3
3.0
Invern. Livello 3
Summer Level 1
1.0
Estate Livello 1
Summer Level 2
2.0
Estate Livello 2
Summer Level 3
3.0
Estate Livello 3
Se invece si desidera tornare alla schermata precedente senza
.
Tmp_Prog
Prg_Temp
Min Max Def.
eseguire nessuna modica (Reset) premere il tasto
Hum_Prog
Prg_Umid
Rin_Prog
Prog_Rinn
Eco_Prog
Prog_Eco
Value - Valore Value - Valore
.
12.0 30.0 12.0 Rin OFF 100 % (Eco OFF)
Not used
12.0 30.0 18.0 Rin ON 75 % (Eco ON)
Non utilizzato
12.0 30.0 22.0 Rin ON 50 % (Eco ON)
Tmp_Prog
Prg_Temp
Hum_Prog
Prg_Umid
Rin_Prog
Prog_Rinn
Eco_Prog
Prog_Eco
Min Max Def. Min Max Def. Value - Valore Value - Valore
12.0 30.0 30.0 40.0 80.0 65.0 Rin OFF 100 % (Eco OFF)
12.0 30.0 27.0 40.0 80.0 60.0 Rin ON 75 % (Eco ON)
12.0 30.0 25.0 40.0 80.0 55.0 Rin ON 50 % (Eco ON)
28

DISPLAY MASCHERA CRONOCHRONO PAGE DISPLAY
5
Edit Chrono
TZ1 07:00 Liv3
TZ2 07:00 Liv2
TZ3 07:00 Liv3
TZ4 07:00 Liv1
Edit Copy Lev
1 2 3
4
5
EditaProgramma
F1 07:00 Liv3
F2 07:00 Liv2
F3 07:00 Liv3
F4 07:00 Liv1
Edita Copia Liv
1 2 3
4
Num Description Descrizione
You can access the page to change the time slots in the desired
1
days.
It means it is possible to copy the conguration of the day
2
displayed and apply it to the next day.
The values of the 6 available levels are displayed (3 Winter and
3
3 Summer), with the option of editing them
4 The parameters being edited are displayed Vengono visualizzati i parametri in fase di modica
Display of a brief description of the selected eld or display of
5
the day being edited
Si accede alla modica delle fasce orarie nei giorni desiderati
Indica la possibilità di copiare la congurazione del giorno
visualizzato e applicarla al giorno successivo
Vengono visualizzati i valori dei 6 livelli disponibili (3
Invernali e 3 Estivi) con la possibilità di modicarne il valore
Visualizzazione di una breve descrizione del campo
selezionato o del giorno in fase di modica
From the chrono page displayed, it is possible to scroll through the
various entries of the menu using
choice by briey pressing
Main operations:
Edit:
With the highlighted control, briey press
time and level for each time slot in the various days of the week.
Copy:
With the highlighted control, briey press
the settings of the time slots from the current day to the next one.
Lev.:
With the highlighted control, briey press
menu. With and , it is possible to increase and decrease the
value of the level. To switch between levels, use
N.B: The starting time of the time slot corresponds to the time
closing the previous band.
and , conrming one’s
.
to change starting
to copy and move all
to access the level
.
SCHEMA COMANDI MASCHERA CRONOCHRONO PAGE CONTROLS DIAGRAM
Dalla maschera crono visualizzata è possibile spostarsi fra le
varie voci del menu usando i tasti
scelta con una pressione breve del tasto
Operazioni principali:
Edita:
Da comando evidenziato, eseguire una pressione breve del
tasto
fascia oraria nei vari giorni della settimana.
Copia:
Da comando evidenziato, eseguire una pressione breve del
tasto
fasce orarie dal giorno corrente a quello successivo
Liv.:
Da comando evidenziato, eseguire una pressione breve del
tasto
Per passare da un livello all’ altro usare il tasto
N.B.: L’ orario di inizio della fascia oraria corrisponde all’ orario
di ne della fascia precedente.
per cambiare orario di inizio e il livello per ciascuna
per copiare e trasferire tutte le impostazioni delle
per entrare nel menu dei livelli. Usando i tasti e
è possibile incrementare e decrementare il valore del livello.
e , confermando la
.
29
ACTIVATION FOR TEMPERATURE PROGRAMMING
5.1
ATTIVAZIONE PROGRAMMAZIONE TEMPERATURA
It is possible to switch the programmation of the temperature
on or o individually by changing the parameter En Prg T. In
particular:
0.0 means the programming is OFF
1.0 means the programming is ON.
PROCEDURE FOR THE PARAMETER MODIFICATION PROCEDURA PER LA MODIFICA DEL PARAMETRO
Starting from the main screenshot, long press the key (>
5 sec.) to enter the conguration menu.
Reach the eld En Prg H by shortly pressing the key
(8 times) and conrm it with the key
to check the present
value and enable any changes.
Programming can be enabled or disabled by using keys
or and then conrming with a short press of the key .
The key allows the user to go back to the main page. Con il tasto si ritorna alla schermata principale.
Temp Set
Set Temp
Ven. 13:46
Set Temp
22.1
Schermata Principale
Main Page
Long press
Pressione lunga
Temp
25.0
Umid
54.5
(> 5 sec.)
E’ possibile attivare o disattivare singolarmente la
programmazione della temperatura tramite la modica del
parametro On Prg T. Nello specico con il valore:
0.0 indica programmazione NON ATTIVA
1.0 indica programmazione ATTIVA.
Dalla schermata principale, premere a lungo il tasto (>
5 sec.) per entrare nel menu congurazione.
Raggiungere il campo On Prg U mediante pressioni
brevi (8 volte) del tasto
e confermare con il tasto per
visualizzare il valore corrente e accedere alla fase di modica.
Attivare o disattivare la programmazione mediante l’uso
dei tasti
pressione breve del tasto
o e confermare successivamente con una
.
Conguration
Contrasto
Contrast
Temp_Prog
Humid_Prog
Date
Hour
Congurazione
Contrasto
Contrasto
Prog_Temp
Prog_Umid
Data
Ora
Short press
Pressione breve
(x 8)
Conguration
Eco_Prog
Date
Hour
Season
EnPrgT
En Prg T
Congurazione
Prog_Eco
Data
Ora
Stagione
On Prg T
OnPrgT
Conguration
Eco_Prog
Date
Hour
Season
EnPrgT
En Prg T
Congurazione
Prog_Eco
Data
Ora
Stagione
OnPrgT
On Prg T
Short press
Pressione breve
(x 1)
Short press
Pressione breve
(x 1)
En Prg T
On Prg T
On Prg T
0.0
(ON)
1.0
0.0
Short press
Pressione breve
(x 1)
(OFF)
Back to Main Page
Ritorno alla Schermata Principale
30

ACTIVATION FOR HUMIDITY PROGRAMMING
5.2
ATTIVAZIONE PROGRAMMAZIONE UMIDITÀ
It is possible to switch (with device set in Summer mode) the
programmation of the humidity on or o individually by changing
the parameter En Prg H. In particular:
0.0 means the programming is OFF
1.0 means the programming is ON.
PROCEDURE FOR THE PARAMETER MODIFICATION PROCEDURA PER LA MODIFICA DEL PARAMETRO
Starting from the main screenshot, long press the key (>
5 sec.) to enter the conguration menu.
Reach the eld En Prg H by shortly pressing the key
(9 times) and conrm it with the key
to check the present
value and enable any changes.
Programming can be enabled or disabled by using keys
or and then conrming with a short press of the key .
The key allows the user to go back to the main page. Con il tasto si ritorna alla schermata principale.
Temp Set
Set Temp
Ven. 13:46
Set Temp
22.1
Schermata Principale
Main Page
Long press
Pressione lunga
Temp
25.0
Umid
54.5
(> 5 sec.)
E’ possibile (con dispositivo impostato in stagione Estate)
attivare o disattivare singolarmente la programmazione dell’
umidità tramite la modica del parametro On Prg U. Nello
specico con il valore:
0.0 indica programmazione NON ATTIVA
1.0 indica programmazione ATTIVA.
Dalla schermata principale, premere a lungo il tasto (>
5 sec.) per entrare nel menu congurazione.
Raggiungere il campo On Prg U mediante pressioni
brevi (9 volte) del tasto
e confermare con il tasto per
visualizzare il valore corrente e accedere alla fase di modica.
Attivare o disattivare la programmazione mediante l’uso
dei tasti
pressione breve del tasto
o e confermare successivamente con una
.
Conguration
Contrasto
Contrast
Temp_Prog
Humid_Prog
Date
Hour
Congurazione
Contrasto
Contrasto
Prog_Temp
Prog_Umid
Data
Ora
Short press
Pressione breve
(x 9)
Conguration
Date
Hour
Season
En Prg T
EnPrgH
En Prg H
Congurazione
Data
Ora
Stagione
OnPrg T
On Prg U
OnPrgU
Conguration
Date
Hour
Season
En Prg T
EnPrgH
En Prg H
Congurazione
Data
Ora
Stagione
OnPrg T
OnPrgU
On Prg U
Short press
Pressione breve
(x 1)
Pressione breve
Short press
(x 1)
En Prg H
On Prg U
On Prg U
0.0
(ON)
1.0
0.0
Short press
Pressione breve
(x 1)
(OFF)
Back to Main Page
Ritorno alla Schermata Principale
31

5.3 TEMPERATURE PROGRAMMING PROGRAMMAZIONE TEMPERATURA
Main Page
Schermata Principale
Ven. 13:46
Set Temp
22.1
Temp Set
Set Temp
Conguration
Contrast
Tmp_Prog
Temp_Prog
Hum_Prog
Rin_Prog
Eco_Prog
Temp
25.0
Umid
54.5
Short press
Pressione breve
Long press
Pressione lunga
(> 5 sec.)
EditChrono
F1 07:00 Liv3
F2 07:00 Liv2
F3 07:00 Liv3
F4 07:00 Liv1
Edit Copy Lev
Conguration
Contrasto
Contrast
Tmp_Prog
Hum_Prog
Rin_Prog
Eco_Prog
Congurazione
Contrasto
Contrasto
Prg_Temp
Prg_Umid
Prog_Rinn
Prog_Eco
Short press
Pressione breve
Short press
Pressione breve
(x 1)
Monday
F1 07:00 Liv3
F2 07:00 Liv2
F3 07:00 Liv3
F4 07:00 Liv1
Edit Copy Lev
Congurazione
Contrasto
Prog_Temp
Prg_Temp
Prg_Umid
Prog_Rinn
Prog_Eco
SETTING TIME SLOT
IMPOSTAZIONE FASCIA
TimeZone1
Hour: 07
Minute: 00
Lev: 02
Fascia1
Ore: 07
Minuti: 00
Liv:02
(x 1)
23
22
....
....
01
00
EditaProgramma
Edita Copia Liv
TimeZone1
Hour: 07
Minute: 00
Lev: 02
Fascia1
Ore: 07
Minuti: 00
Liv:02
F1 07:00 Liv3
F2 07:00 Liv2
F3 07:00 Liv3
F4 07:00 Liv1
Each short press means
to shift the timezone onward
Ad ogni pressione breve
si passa alla fascia successiva
60
59
....
....
01
00
(x 1)
TimeZone1
Hour: 07
Minute: 00
Lev: 02
Fascia1
Ore: 07
Minuti: 00
Liv: 02
Lunedi
F1 07:00 Liv3
F2 07:00 Liv2
F3 07:00 Liv3
F4 07:00 Liv1
Edita Copia Liv
Liv. 03
Liv. 02
....
....
....
Liv. 01
32

CopyDay: Sun.
F1 07:00 Liv3
F2 07:00 Liv2
F3 07:00 Liv3
F4 07:00 Liv1
Edit Copy Lev
CopiaGiorno: Dom.
F1 07:00 Liv3
F2 07:00 Liv2
F3 07:00 Liv3
F4 07:00 Liv1
Edita Copia Liv
Each short press copies
the settings from the previous day
Ad ogni pressione breve vengono copiate
le impostazioni visualizzate sul giorno successivo
Edit Levels
F1 07:00 Liv3
F2 07:00 Liv2
F3 07:00 Liv3
F4 07:00 Liv1
Edit Copy Lev
Cambia Livelli
F1 07:00 Liv3
F2 07:00 Liv2
F3 07:00 Liv3
F4 07:00 Liv1
Edita Copia Liv
TIME SLOT COPY
COPIA FASCIA
SETTING LEVELS
IMPOSTAZIONE LIVELLI
Winter Level 1
12.0
Inver. Livello 1
12.0
Summer Level 1
30.0
30.0
29.5
....
....
12.5
12.0
30.0
29.5
....
Winter Level 2
18.0
Inver. Livello 2
18.0
Summer Level 2
27.0
30.0
29.5
....
....
12.5
12.0
30.0
29.5
....
Winter Level 3
22.0
Inver. Livello 3
22.0
Summer Level 3
25.0
30.0
29.5
....
....
12.5
12.0
30.0
29.5
....
Estate Livello 1
30.0
....
12.5
12.0
Estate Livello 2
27.0
33
....
12.5
12.0
Estate Livello 3
25.0
....
12.5
12.0

5.4 HUMIDITY PROGRAMMING PROGRAMMAZIONE UMIDITA’
Main Page
Schermata Principale
Ven. 13:46
Set Temp
22.1
Temp Set
Set Temp
Conguration
Contrast
Tmp_Prog
Humid_Prog
Hum_Prog
Rin_Prog
Eco_Prog
Temp
25.0
Umid
54.5
Short press
Pressione breve
Long press
Pressione lunga
(> 5 sec.)
EditChrono
F1 07:00 Liv3
F2 07:00 Liv2
F3 07:00 Liv3
F4 07:00 Liv1
Edit Copy Lev
Conguration
Contrasto
Contrast
Tmp_Prog
Hum_Prog
Rin_Prog
Eco_Prog
Congurazione
Contrasto
Contrasto
Prg_Temp
Prg_Umid
Prog_Rinn
Prog_Eco
Short press
Pressione breve
Short press
Pressione breve
(x 2)
Monday
F1 07:00 Liv3
F2 07:00 Liv2
F3 07:00 Liv3
F4 07:00 Liv1
Edit Copy Lev
Congurazione
Contrasto
Prg_Temp
Prog_Umid
Prg_Umid
Prog_Rinn
Prog_Eco
SETTING TIME SLOT
IMPOSTAZIONE FASCIA
TimeZone1
Hour: 07
Minute: 00
Lev: 02
Fascia1
Ore: 07
Minuti: 00
Liv:02
(x 1)
23
22
....
....
01
00
EditaProgramma
Edita Copia Liv
TimeZone1
Hour: 07
Minute: 00
Lev: 02
Fascia1
Ore: 07
Minuti: 00
Liv:02
F1 07:00 Liv3
F2 07:00 Liv2
F3 07:00 Liv3
F4 07:00 Liv1
Each short press means
to shift the timezone onward
Ad ogni pressione breve
si passa alla fascia successiva
60
59
....
....
01
00
(x 1)
TimeZone1
Hour: 07
Minute: 00
Lev: 02
Fascia1
Ore: 07
Minuti: 00
Liv: 02
Lunedi
F1 07:00 Liv3
F2 07:00 Liv2
F3 07:00 Liv3
F4 07:00 Liv1
Edita Copia Liv
Liv. 03
Liv. 02
....
....
....
Liv. 01
34

CopyDay: Sun.
F1 07:00 Liv3
F2 07:00 Liv2
F3 07:00 Liv3
F4 07:00 Liv1
Edit Copy Lev
CopiaGiorno: Dom.
F1 07:00 Liv3
F2 07:00 Liv2
F3 07:00 Liv3
F4 07:00 Liv1
Edita Copia Liv
Each short press copies
the settings from the previous day
Ad ogni pressione breve vengono copiate
le impostazioni visualizzate sul giorno successivo
Edit Levels
F1 07:00 Liv3
F2 07:00 Liv2
F3 07:00 Liv3
F4 07:00 Liv1
Edit Copy Lev
Cambia Livelli
F1 07:00 Liv3
F2 07:00 Liv2
F3 07:00 Liv3
F4 07:00 Liv1
Edita Copia Liv
TIME SLOT COPY
COPIA FASCIA
SETTING LEVELS
IMPOSTAZIONE LIVELLI
Winter Level 1
40.0
Inver. Livello 1
40.0
Summer Level 1
65.0
80.0
79.5
....
....
40.5
40.0
80.0
79.5
....
Winter Level 2
60.0
Inver. Livello 2
60.0
Summer Level 2
60.0
80.0
79.5
....
....
40.5
40.0
80.0
79.5
....
Winter Level 3
80.0
Inver. Livello 3
80.0
Summer Level 3
55.0
80.0
79.5
....
....
40.5
40.0
80.0
79.5
....
Estate Livello 1
65.0
....
40.5
40.0
Estate Livello 2
60.0
35
....
40.5
40.0
Estate Livello 3
55.0
....
40.5
40.0

5.5 RENEWAL PROGRAMMING PROGRAMMAZIONE RINNOVO
Main Page
Schermata Principale
Ven. 13:46
Set Temp
22.1
Temp Set
Set Temp
Conguration
Contrast
Tmp_Prog
Hum_Prog
Rin_Prog
Rin_Prog
Eco_Prog
Temp
25.0
Umid
54.5
Short press
Pressione breve
Long press
Pressione lunga
(> 5 sec.)
EditChrono
F1 07:00 Liv3
F2 07:00 Liv2
F3 07:00 Liv3
F4 07:00 Liv1
Edit Copy Lev
Conguration
Contrasto
Contrast
Tmp_Prog
Hum_Prog
Rin_Prog
Eco_Prog
Congurazione
Contrasto
Contrasto
Prg_Temp
Prg_Umid
Prog_Rinn
Prog_Eco
Short press
Pressione breve
Short press
Pressione breve
(x 3)
Monday
F1 07:00 Liv3
F2 07:00 Liv2
F3 07:00 Liv3
F4 07:00 Liv1
Edit Copy Lev
Congurazione
Contrasto
Prg_Temp
Prg_Umid
Prog_Rinn
Prog_Rinn
Prog_Eco
SETTING TIME SLOT
IMPOSTAZIONE FASCIA
TimeZone1
Hour: 07
Minute: 00
Lev: 02
Fascia1
Ore: 07
Minuti: 00
Liv:02
(x 1)
23
22
....
....
01
00
EditaProgramma
Edita Copia Liv
TimeZone1
Hour: 07
Minute: 00
Lev: 02
Fascia1
Ore: 07
Minuti: 00
Liv:02
F1 07:00 Liv3
F2 07:00 Liv2
F3 07:00 Liv3
F4 07:00 Liv1
Each short press means
to shift the timezone onward
Ad ogni pressione breve
si passa alla fascia successiva
60
59
....
....
01
00
(x 1)
TimeZone1
Hour: 07
Minute: 00
Lev: 02
Fascia1
Ore: 07
Minuti: 00
Liv: 02
Lunedi
F1 07:00 Liv3
F2 07:00 Liv2
F3 07:00 Liv3
F4 07:00 Liv1
Edita Copia Liv
Liv. 03
Liv. 02
....
....
....
Liv. 01
36

CopyDay: Sun.
F1 07:00 Liv3
F2 07:00 Liv2
F3 07:00 Liv3
F4 07:00 Liv1
Edit Copy Lev
CopiaGiorno: Dom.
F1 07:00 Liv3
F2 07:00 Liv2
F3 07:00 Liv3
F4 07:00 Liv1
Edita Copia Liv
Each short press copies
the settings from the previous day
Ad ogni pressione breve vengono copiate
le impostazioni visualizzate sul giorno successivo
Edit Levels
F1 07:00 Liv3
F2 07:00 Liv2
F3 07:00 Liv3
F4 07:00 Liv1
Edit Copy Lev
Cambia Livelli
F1 07:00 Liv3
F2 07:00 Liv2
F3 07:00 Liv3
F4 07:00 Liv1
Edita Copia Liv
TIME SLOT COPY
COPIA FASCIA
SETTING LEVELS
IMPOSTAZIONE LIVELLI
Winter Level 1
0.0
Inver. Livello 1
0.0
Summer Level 1
0.0
(ON)
1.0
0.0
(OFF)
(ON)
1.0
Winter Level 2
1.0
Inver. Livello 2
1.0
Summer Level 2
1.0
(ON)
1.0
0.0
(OFF)
(ON)
1.0
Winter Level 3
1.0
Inver. Livello 3
1.0
Summer Level 3
1.0
(ON)
1.0
0.0
(OFF)
(ON)
1.0
Estate Livello 1
0.0
0.0
(OFF)
Estate Livello 2
1.0
37
0.0
(OFF)
Estate Livello 3
1.0
0.0
(OFF)

5.6 ECONOMY PROGRAMMING PROGRAMMAZIONE ECONOMY
Main Page
Schermata Principale
Ven. 13:46
Set Temp
22.1
Temp Set
Set Temp
Conguration
Contrast
Tmp_Prog
Hum_Prog
Rin_Prog
Eco_Prog
Eco_Prog
Temp
25.0
Umid
54.5
Short press
Pressione breve
Long press
Pressione lunga
(> 5 sec.)
EditChrono
F1 07:00 Liv3
F2 07:00 Liv2
F3 07:00 Liv3
F4 07:00 Liv1
Edit Copy Lev
Conguration
Contrasto
Contrast
Tmp_Prog
Hum_Prog
Rin_Prog
Eco_Prog
Congurazione
Contrasto
Contrasto
Prg_Temp
Prg_Umid
Prog_Rinn
Prog_Eco
Short press
Pressione breve
Short press
Pressione breve
(x 4)
Monday
F1 07:00 Liv3
F2 07:00 Liv2
F3 07:00 Liv3
F4 07:00 Liv1
Edit Copy Lev
Congurazione
Contrasto
Prg_Temp
Prg_Umid
Prog_Rinn
Prog_Eco
Prog_Eco
SETTING TIME SLOT
IMPOSTAZIONE FASCIA
TimeZone1
Hour: 07
Minute: 00
Lev: 02
Fascia1
Ore: 07
Minuti: 00
Liv:02
(x 1)
23
22
....
....
01
00
EditaProgramma
Edita Copia Liv
TimeZone1
Hour: 07
Minute: 00
Lev: 02
Fascia1
Ore: 07
Minuti: 00
Liv:02
F1 07:00 Liv3
F2 07:00 Liv2
F3 07:00 Liv3
F4 07:00 Liv1
Each short press means
to shift the timezone onward
Ad ogni pressione breve
si passa alla fascia successiva
60
59
....
....
01
00
(x 1)
TimeZone1
Hour: 07
Minute: 00
Lev: 02
Fascia1
Ore: 07
Minuti: 00
Liv: 02
Lunedi
F1 07:00 Liv3
F2 07:00 Liv2
F3 07:00 Liv3
F4 07:00 Liv1
Edita Copia Liv
Liv. 03
Liv. 02
....
....
....
Liv. 01
38

CopyDay: Sun.
F1 07:00 Liv3
F2 07:00 Liv2
F3 07:00 Liv3
F4 07:00 Liv1
Edit Copy Lev
CopiaGiorno: Dom.
F1 07:00 Liv3
F2 07:00 Liv2
F3 07:00 Liv3
F4 07:00 Liv1
Edita Copia Liv
Each short press copies
the settings from the previous day
Ad ogni pressione breve vengono copiate
le impostazioni visualizzate sul giorno successivo
Edit Levels
F1 07:00 Liv3
F2 07:00 Liv2
F3 07:00 Liv3
F4 07:00 Liv1
Edit Copy Lev
Cambia Livelli
F1 07:00 Liv3
F2 07:00 Liv2
F3 07:00 Liv3
F4 07:00 Liv1
Edita Copia Liv
TIME SLOT COPY
COPIA FASCIA
SETTING LEVELS
IMPOSTAZIONE LIVELLI
Winter Level 1
100.0
Inver. Livello 1
100.0
Summer Level 1
100.0
(OFF)
100.0
99.0
....
....
51.0
50.0
(ON)
(OFF)
100.0
99.0
....
Winter Level 2
75.0
Inver. Livello 2
75.0
Summer Level 2
75.0
(OFF)
100.0
99.0
....
....
51.0
50.0
(ON)
(OFF)
100.0
99.0
....
Winter Level 3
50.0
Inver. Livello 3
50.0
Summer Level 3
50.0
(OFF)
100.0
99.0
....
....
51.0
50.0
(ON)
(OFF)
100.0
99.0
....
Estate Livello 1
100.0
....
51.0
50.0
(ON)
Estate Livello 2
75.0
39
....
51.0
50.0
(ON)
Estate Livello 3
50.0
....
51.0
50.0
(ON)

6 ALARMS - ALLARMI
Press briey the key until you reach
(x 1)
The presence of alarms is notied by the symbol
.
If you wish to check the alarms, enter the operation menu:
From the home page, shortly press key
through key
until you reach the alarm window (ashing
, scroll the screen
symbol ).
In case of more than one alarm, you can use the key to scroll
them and reset them - if required - by pressing
+ .
If you press the Key you can go back to the main menu.
N.B.: If there are any alarms, the screen is always ON (economy
mode is disabled) until the user checks them by following the
above-mentioned procedure.
Temp Set
Set Temp
Schermata Principale
Main Page
Short press
Ven. 13:46
Set Temp
Temp
Pressione breve
25.0
22.1
Umid
54.5
La presenza di allarmi viene noticata dall’icona .
Per visualizzare gli allarmi accedere al menu funzionamento:
dalla schermata principale, eseguire una pressione breve del
tasto
, scorrere le schermate con il tasto no ad arrivare
a quella degli allarmi (Icona lampeggiante).
In presenza di più allarmi con il tasto
se necessario resettarli con la sequenza
è possibile scorrerli, e
+ .
Con il tasto si ritorna al menu principale.
N.B.: In presenza di allarmi il display rimane sempre attivo (non
entra in modalità di risparmio energetico) no a quando non
vengono visualizzati tramite la procedura sopra descritta.
the desired ashing icon
Short press
Pressione breve
Pressioni no al raggiungimento
dell’icona lampeggiante desiderata
Ven. 13:46
1/2
12:00 01-01-16
Cod.:8
Temp
25.0
Umid
54.5
Pressioni brevi del tasto per visualizzare
Alm. Code
Codice All.
(x 1)
Press briey the key
to display any more alerts
Pressione breve del tasto per visualizzare
eventuali allarmi ulteriori
Ven. 13:46
2/2
12:00 01-01-16
Cod.:16
Description Descrizione
Temp
25.0
Umid
54.5
(x n°)
Press briey the key
to display Reset request
la richiesta di Reset
Ven. 13:46
1/2
OK=reset
12:00 01-01-16
Cod.:8
Temp
25.0
Umid
54.5
1 Temperature sensor out of order Sonda di Temperatura guasta
2 Humidity sensor out of order Sonda di Umidità guasta
4 External sensor out of order Sonda esterna guasta
8 Air quality QA-A sensor out of order Sonda QA-A guasta
16 No communication - BUS error Mancanza di comunicazione - Errore BUS
32 Active faults on the unit Guasti attivi su macchina
64 Active alarms on the unit Allarmi attivi su macchina
Alarm
Allarme
Short press
Pressione breve
40

MACHINE FAULTS - ERRORI MACCHINA
PROCEDURE FOR THE VALUE READING PROCEDURA PER LA LETTURA DEI VALORI
On the main screenshot, long press the key (> 5 sec.) to
enter the conguration menu.
Reach the desired eld by shortly pressing the key (15
times) and conrm it with the key
and enable any changes .
By using the key you can go back to the main page. Con il tasto si ritorna alla schermata principale.
Temp Set
Set Temp
Ven. 13:46
Set Temp
22.1
Schermata Principale
Temp
25.0
Umid
54.5
Short press
Pressione breve
to check the present value
Main Page
Pressione lunga
Label
Etichetta
Etichetta
Dalla schermata principale, premere a lungo il tasto (>
5 sec.) per entrare nel menu congurazione.
Raggiungere il campo desiderato mediante pressioni brevi
(15 volte) del tasto
visualizzare il valore corrente.
Long press
(> 5 sec.)
Short press
Pressione breve
e confermare con il tasto per
Conguration
Contrasto
Contrast
Tmp_Prog
Hum_Prog
Rin_Prog
Eco_Prog
Congurazione
Contrasto
Contrasto
Prg_Temp
Prg_Umid
Prog_Rinn
Prog_Eco
Back to
Main Page
VALORE
Ritorno alla
Schermata Principale
(x 15)
WARNING
In the event of multiple failures, the alarm code resulting from the
sum of the active faults will be displayed.
Example: Fault code (40)
Overheating probe fault (8) + Water temperature probe fault (32)
the fault code displayed will be 8+32 = 40
Fault
Guasto
16 Undercooling probe A fault Guasto sonda sottorareddamento C1 NTC5 32 Water temperature probe fault Guasto sonda temperatura acqua NTC7 64 Compressor temperature probe fault Guasto sonda temperatura compressore NTC3 -
128 Outdoor temperature probe fault Guasto sonda temperatura esterna NTC8 -
256 Coolant pressure transducer fault Guasto trasduttore pressione refrigerante
512 Pressure transducer A fault Guasto trasduttore di pressione A -
1024 Pressure transducer B fault Guasto trasduttore di pressione B -
Description Descrizione
1 Delivery probe fault Guasto sonda di mandata NTC1 2 Evaporator probe fault Guasto sonda evaporante NTC2 -
4 Undercooling probe B fault Guasto sonda sottorareddamento C2 NTC6 8 Overheating probe fault Guasto sonda surriscaldamento NTC4 -
AVVERTENZA
In caso di guasti multipli verrà indicato il codice di allarme dato
dalla somma dei guasti attivi.
Esempio: Codice guasto (40)
Guasto sonda surriscaldamento (8) + Guasto sonda temperatura
acqua (32)
avremo un codice guasto visualizzato 8+32 = 40
41
(x 1)
Sensor
Sensore
Manual re-arming
Riarmo manuale
Stop
Blocco

MACHINE ALARMS - ALLARMI MACCHINA
PROCEDURE FOR THE VALUE READING PROCEDURA PER LA LETTURA DEI VALORI
On the main screenshot, long press the key (> 5 sec.) to
enter the conguration menu.
Reach the desired eld by shortly pressing the key (16
times) and conrm it with the key
and enable any changes .
By using the key you can go back to the main page. Con il tasto si ritorna alla schermata principale.
Temp Set
Set Temp
Set Temp
22.1
Schermata Principale
Ven. 13:46
Temp
25.0
Umid
54.5
Short press
Pressione breve
to check the present value
Main Page
Label
Etichetta
Etichetta
Dalla schermata principale, premere a lungo il tasto (>
5 sec.) per entrare nel menu congurazione.
Raggiungere il campo desiderato mediante pressioni brevi
(16 volte) del tasto
visualizzare il valore corrente.
Long press
Pressione lunga
(> 5 sec.)
Short press
Pressione breve
e confermare con il tasto per
Conguration
Contrasto
Contrast
Tmp_Prog
Hum_Prog
Rin_Prog
Eco_Prog
Congurazione
Contrasto
Contrasto
Prg_Temp
Prg_Umid
Prog_Rinn
Prog_Eco
Back to
Main Page
VALORE
Ritorno alla
Schermata Principale
(x 16)
WARNING
In the event of multiple alarms, the alarm code resulting from the
sum of the active alarms will be displayed.
Example: Alarm code (10)
Refrigeration circuit high pressure alarm (2) + BUS communication
alarm (8)
the alarm code displayed will be 2+8 = 10
Alarm
Allarme
1 Refrigeration circuit low pressure alarm Allarme bassa pressione circuito frigo
2 Refrigeration circuit high pressure alarm Allarme alta pressione circuito frigo
4 Compressor high temperature alarm Allarme alta temperatura compressore
8 BUS communication alarm Allarme comunicazione BUS
32 Water temperature alarm Allarme temperatura acqua
64
128
Description Descrizione
Alarm Fan 1
(still fan or failing tachymetry)
Alarm Fan 2
(still fan or failing tachymetry)
Allarme ventilatore 1
(ventilatore fermo o tachimetrica guasta)
Allarme ventilatore 2
(ventilatore fermo o tachimetrica guasta)
AVVERTENZA
In caso di allarmi multipli verrà indicato il codice di allarme dato
dalla somma degli allarmi attivi.
Esempio: Codice allarme (10)
Allarme alta pressione circuito frigo (2) + Allarme comunicazione
BUS (8)
avremo un codice allarme visualizzato 2+8 = 10
42
(x 1)
Stop
Blocco
Manual re-arming
Riarmo manuale
Manual re-arming
Riarmo manuale
Manual re-arming
Riarmo manuale
Automatic re-arming
Riarmo automatico
Automatic re-arming
Riarmo automatico
Automatic re-arming
Riarmo automatico
Automatic re-arming
Riarmo automatico


bit.ly/rdzwebsite
FAE0CD000AB.01
11/2018
 Loading...