

Page 1
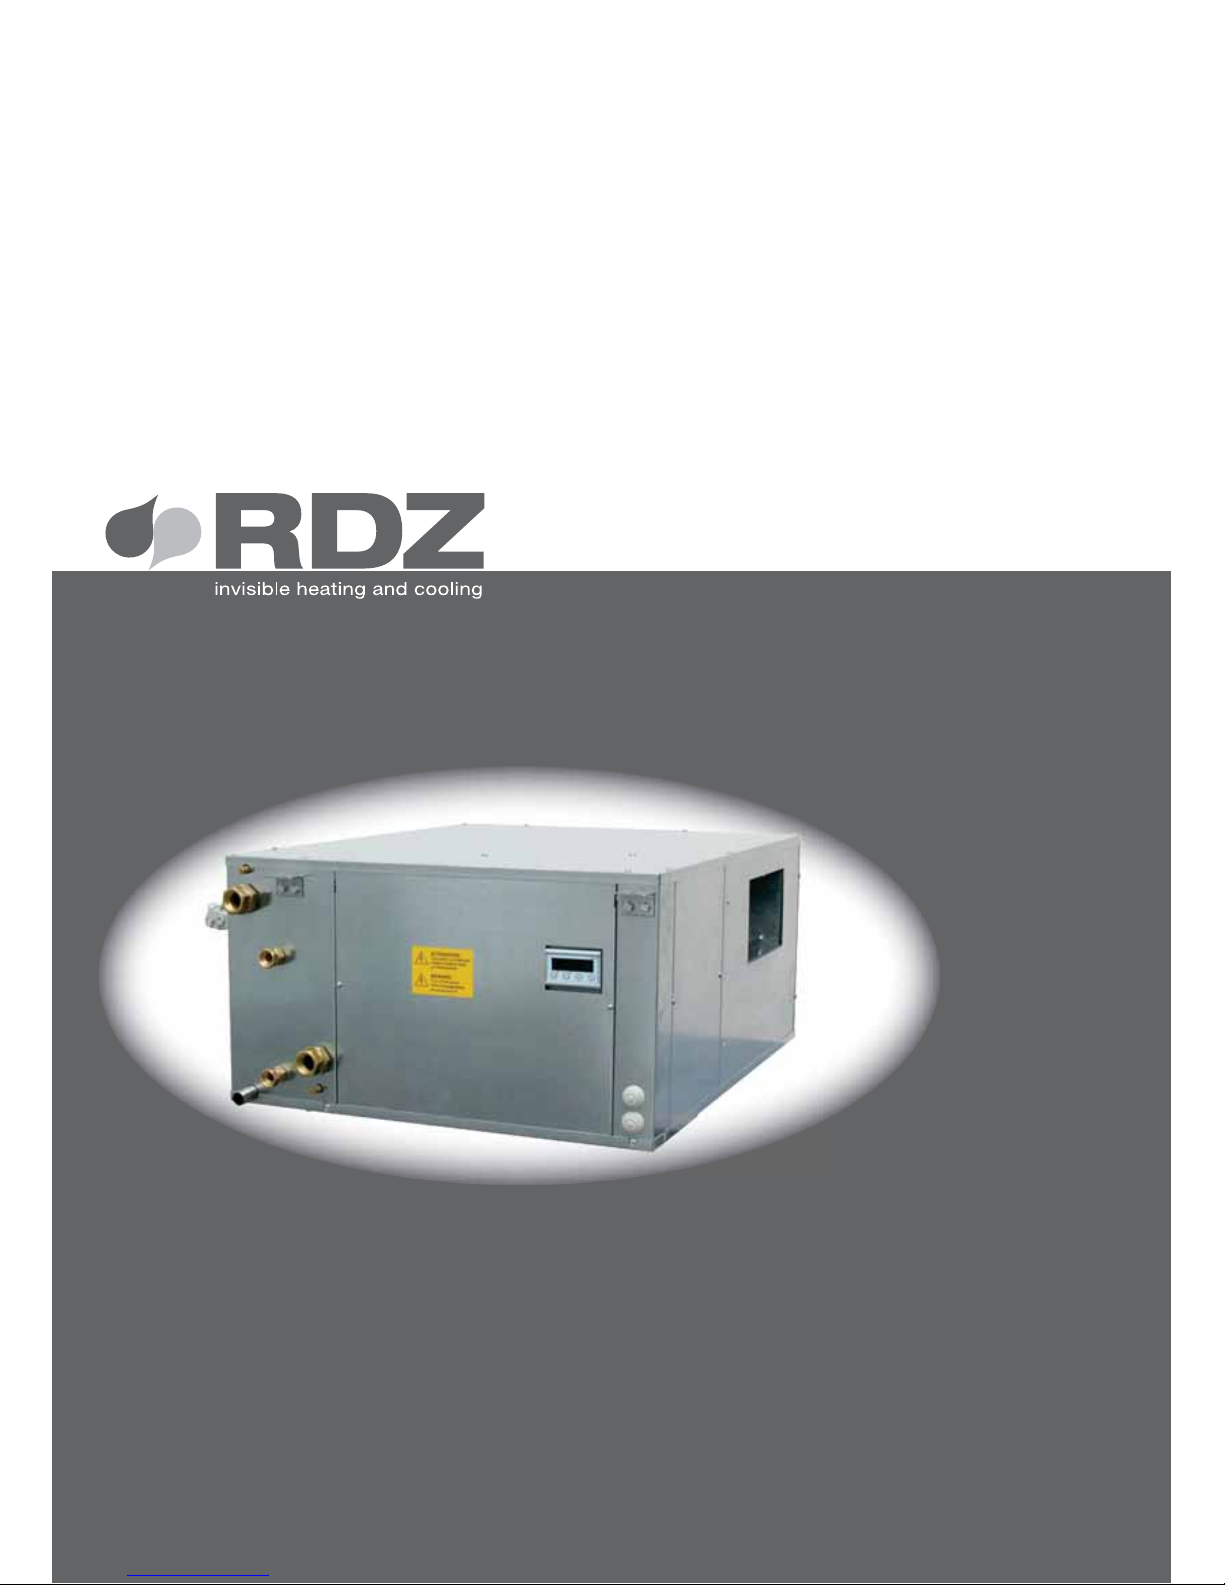
DA 1000
INSTALLATION, USE and MAINTENANCE
INSTALLAZIONE, USO e MANUTENZIONE
Dehumidier
Horizontal ceiling mounted
Deumidicatore
orizzontale a sotto
Page 2

Page 3
3
i - INFO
AVVERTENZE PER LA SICUREZZA
Leggere con attenzione questo libretto prima
dell’installazione e/o dell’uso dell’apparecchiatura e
conservarlo in un luogo accessibile.
La presente apparecchiatura costituisce un componente che
fa parte di installazioni complesse: è compito dell’impiantista
elettrico redigere lo schema generale dell’impianto e dei
collegamenti elettrici esterni all’apparecchiatura.
L’ufficio tecnico del Costruttore si rende disponibile
ai numeri indicati sul retro del presente libretto per
consulenze o richieste tecniche particolari.
•
ATTENZIONE
L’installazione e la manutenzione vanno eseguiti solo da
personale qualicato.
Gli impianti idraulici, elettrici ed i locali di installazione
delle apparecchiature devono rispondere alle norme di
sicurezza, antinfortunistiche e antincendio in vigore nel
Paese di utilizzo.
• E’ indispensabile collegare l’apparecchiatura ad un ecace
impianto di terra e includerla in un sistema equipotenziale la
cui ecacia deve ottemperare alle norme in vigore.
• Prima di eseguire il collegamento elettrico, accertarsi che la
tensione e la frequenza riportate sulla targhetta caratteristiche
corrispondano a quelle dell’impianto d’alimentazione.
• Prima di eettuare qualsiasi intervento sull’unità, assicurarsi
di aver tolto l’alimentazione elettrica.
• Non alterare o manomettere i dispositivi di sicurezza.
• Non dirigere spruzzi d’acqua sulle parti elettriche o
sull’involucro dell’apparecchio.
• Questo apparecchio è inadatto all’utilizzo in atmosfere
esplosive o potenzialmente esplosive.
• All’atto dell’installazione o quando si debba intervenire
sull’apparecchiatura, è necessario attenersi scrupolosamente
alle norme riportate su questo manuale, osservare le
indicazioni a bordo unità e comunque applicare tutte le
precauzioni del caso.
• Le pressioni presenti nel circuito frigorifero ed i componenti
elettrici presenti possono creare situazioni rischiose durante
gli interventi di installazione e manutenzione.
AVVERTENZE GENERALI
• Questa macchina è prevista per il controllo estivo
dell’umidità ambiente in abbinamento con impianti di
rarescamento radiante. Il suo utilizzo è raccomandato,
entro i limiti di funzionamento, in ambienti civili e/o del
settore terziario (uci, ...), per climatizzazione nalizzata
al comfort ambientale. Ogni altra applicazione diversa
DEVE essere preventivamente concordata con l’Ucio
tecnico RDZ.
• Se dopo aver disimballato l’apparecchiatura si nota una
qualsiasi anomalia non utilizzare l’apparecchiatura e rivolgersi
ad un Centro di Assistenza autorizzato dal Costruttore.
• Alla ne dell’installazione smaltire gli imballi secondo quanto
previsto dalle normative in vigore nel Paese di utilizzo.
• Esigere solo ricambi originali: la mancata osservazione di
questa norma fa decadere la garanzia.
SAFETY WARNINGS
Read this manual carefully before installing and/or using the
equipment and keep it in an accessible place.
This equipment constitutes a component which is part of
complex installations: it is the responsibility of the electrical
installer to draw up the general diagram of the system and
the electrical connections outside the equipment.
The manufacturer’s technical oce can be contacted on the
numbers shown on the back of this manual for queries or
special technical requests.
•
CAUTION
Installation and maintenance must only be carried out by
qualied personnel.
The hydraulic and electrical systems and the places where
the equipment is to be installed must comply with the safety,
accident prevention and re prevention standards in force
in the country of use.
• It is essential to connect the equipment to an effective
earthing system and include it in an equipotential system
whose eectiveness.
• Before making the electrical connection, ensure that the
voltage and frequency shown on the data plate correspond
to those of the power supply system.
• Before performing any intervention on the unit, ensure that
the electrical power supply has been disconnected.
• Do not alter or tamper with the safety devices.
• Do not direct jets of water onto the electrical parts or onto
the equipment packaging.
• This appliance is not suitable for use in explosive or potentially
explosive atmospheres.
• During installation or when it is necessary to intervene on the
equipment, it is necessary to follow the rules shown in this
manual very carefully, respect the information on board the
unit and alwayss take all the appropriate precautions.
• The pressure of the refrigerating circuit and the electrical
components may create dangerous situations during
installation and maintenance interventions.
GENERAL WARNINGS
• This unit is used to control room humidity in summer
in combination with radiant cooling systems. Use is
recommended within the operation limits in residential
applications and/or commercial ones (e.g. offices). Any
other dierent use MUST be agreed in advance with RDZ
technical department.
• If, after having unpacked the equipment, any anomaly is noted,
do not use the equipment and contact an Assistance Centre
authorised by the manufacturer.
• After installation, dispose of the packaging in accordance with
the provisions of the regulations in force in the country of use.
• Use original spare parts only: disregarding this rule invalidates
the warranty.
Page 4
4
• Il Costruttore declina ogni responsabilità e non ritiene valida
la garanzia nei casi seguenti:
- Non vengano rispettate le avvertenze e le norme di
sicurezza sopra indicate, comprese quelle vigenti nei paesi
di installazione.
- Mancata osservanza delle indicazioni segnalate nel presente
manuale.
- Danni a persone, animali o cose, derivanti da una errata
installazione e/o uso improprio di prodotti e attrezzature.
- Inesattezze o errori di stampa e trascrizione contenuti nel
presente manuale.
• Il Costruttore, inoltre, si riserva il diritto di cessare la produzione
in qualsiasi momento e di apportare tutte le modiche che
riterrà utili o necessarie senza obbligo di preavviso.
SMALTIMENTO
In base a quanto previsto dalle seguenti
direttive europee 2002/95/CE, 2002/96/CE e
2003/108/CE, relative alla riduzione dell’uso
di sostanze pericolose nelle apparecchiature
elettriche ed elettroniche, nonché allo
smaltimento dei riuti.
Il simbolo del cassonetto barrato riportato sull’apparecchiatura
indica che il prodotto alla ne della propria vita utile deve essere
raccolto separatamente dagli altri riuti.
Al termine del ciclo di vita dell’unità, in previsione di una sua
rimozione, andranno seguiti una serie di accorgimenti:
Il gas refrigerante in essa contenuto va recuperato da parte di
personale specializzato ed inviato ai centri di raccolta;
L’olio di lubricazione dei compressori va anch’esso recuperato
ed inviato ai centri di raccolta;
La struttura ed i vari componenti, se inutilizzabili, vanno
demoliti e suddivisi a seconda del loro genere merceologico: ciò
vale in particolare per il rame e l’alluminio presenti in discreta
quantità nella macchina.
Tutto ciò per agevolare i centri di raccolta, smaltimento e
riciclaggio e per ridurre al minimo l’impatto ambientale che
tale operazione richiede.
L’adeguata raccolta differenziata per l’avvio successivo
dell’apparecchiatura dismessa al riciclaggio, al trattamento e allo
smaltimento ambientale compatibile contribuisce ad evitare
possibili eetti negativi sull’ambiente e sulla salute e favorisce
il riciclo dei materiali di cui è composta l’apparecchiatura.
Lo smaltimento abusivo del prodotto da parte dell’utente
comporta l’applicazione delle sanzioni previste dalla vigente
normativa in materia.
• The manufacturer declines all responsibility and considers the
warranty invalid in the following cases:
- The aforementioned warnings and safety regulations, including
those in force in the country of installation, are not respected.
- The information given in this manual is disregarded.
- There is damage or injury to people, animals or objects, resulting
from incorrect installation and/or improper use of the products
and equipment..
- Inaccuracies or printing and transcription errors are contained
in this manual.
• The manufacturer also reserves the right to cease production at
any time and to make all the modications which it considers
useful or necessary without any obligation to give notice.
DISPOSAL
In accordance with the provisions of the
following European directives, 2002/95/EC,
2002/96/EC 2003/108/EC, regarding reducing
the use of hazardous substances in electrical
and electronic equipment, in addition to waste
disposal.
The crossed-out rubbish bin symbol shown on the equipment
indicates that, at the end of its useful life, the product must be
collected separately from other waste.
At the end of the life cycle of the unit, before its removal, the
following precautions must be taken:
The refrigerating gas contained within it must be recovered
separately by specialised personnel and sent to collection centres;
The lubrication oil for the compressors must also be recovered and
sent to collection centres;
The structure and the various components, if they can no longer
be used, must be demolished and divided up according to the
type of product: this is particularly important for the copper and
aluminium components, which are included in the machine in
moderate quantities.
All this helps collection, disposal and recycling centres reduce the
environmental impact this operation requires.
Appropriate separate waste collection for subsequent sending of
the disused equipment for recycling, treatment and compatible
environmental disposal contributes to preventing possible
negative eects on the environment and favours recycling of the
materials of which the equipment is composed.
The abusive disposal of the product by the user leads to the
application of the penalties envisaged by current regulations
regarding the matter.
Page 5
5
i - INFO
INDEX INDEX
Description
Descrizione
Page
Pag.
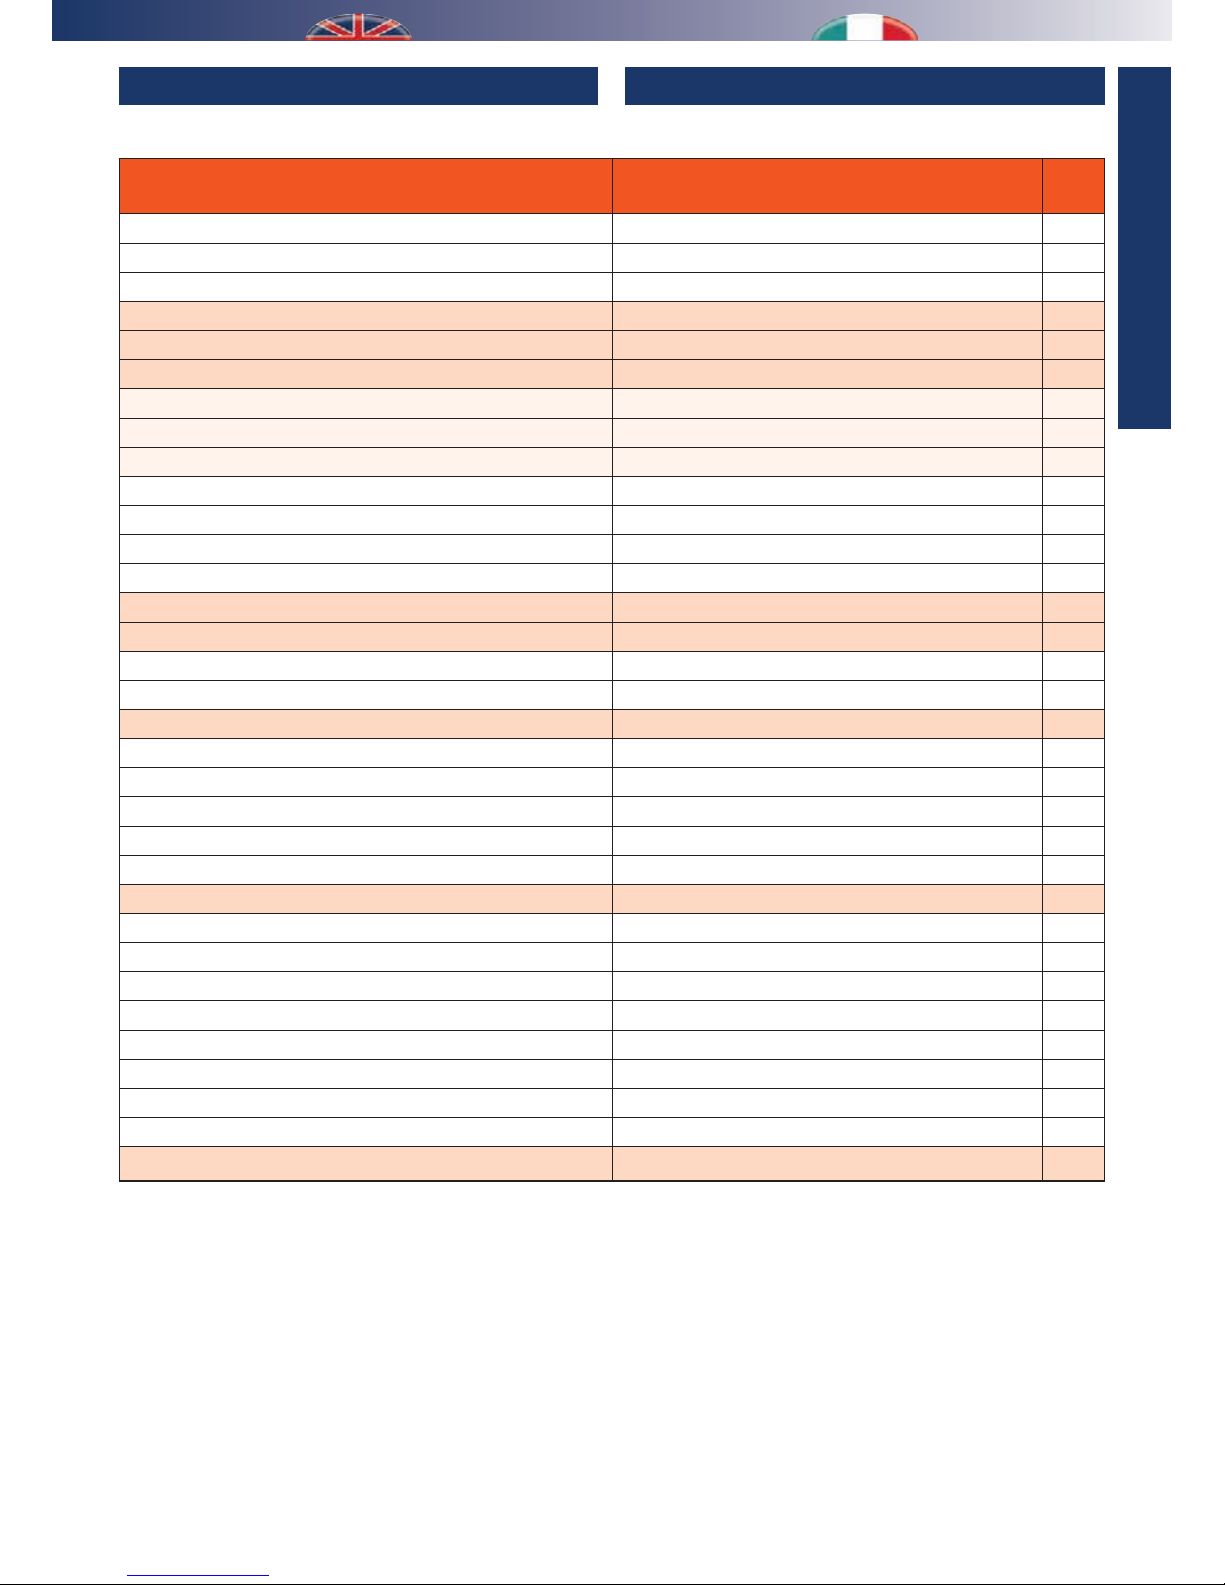
SAFETY WARNINGS AVVERTENZE PER LA SICUREZZA 3
GENERAL WARNINGS AVVERTENZE GENERALI 3
DISPOSAL SMALTIMENTO 4
PRELIMINARY OPERATIONS OPERAZIONI PRELIMINARI 6
DESCRIPTION OF THE EQUIPMENT DESCRIZIONE APPARECCHIATURA 7
INSTALLATION INSTALLAZIONE 8
1 - Positioning and xing to the ceiling 1 - Posizionamento e ssaggio a sotto 9
2 - Hydraulic connections 2 - Collegamenti idraulici 10
3 - Electrical connections 3 - Collegamenti elettrici 12
Door opening Apertura sportello 12
Power supply Alimentazione 13
Unit consents Consensi dell’unità 13
Choosing the fan speed Scelta della velocità del ventilatore 15
START-UP, TESTING and USE AVVIAMENTO, COLLAUDO e USO 16
MAINTENANCE MANUTENZIONE 19
Regular maintenance - cleaning the lter Manutenzione ordinaria - pulizia ltro 19
Extraordinary maintenance - removing the fan Manutenzione straordinaria - rimozione ventilatore 20
CONTROL UNIT CENTRALINA 21
Display Display 21
Button description Descrizione tasti 22
Main menu for controller and set point Menu principale centralina e set point 22
DAT menu Menu DAT 23
Alarms Allarmi 23
TECHNICAL DATA AND PERFORMANCE DATI TECNICI E PRESTAZIONI 24
Safety controls Controlli di sicurezza 25
Components Componenti 25
Acoustical characteristics Caratteristiche acustiche 26
Functional limits Limiti di funzionamento 26
Performance Prestazioni 27
Operation in ventilation mode only Funzionamento in sola ventilazione 27
Pressure loss of the hydraulic circuit Perdita di carico circuito idraulico 28
Avaiable pressure to the intake outlet Prevalenze utili alla bocchetta di immissione 29
WIRING DIAGRAMS SCHEMI ELETTRICI 30
Page 6
6
1
5
OK!
RDZ
6
2a 2b
3b
3a
4
entro 8 giorni
within 8 days
OK!
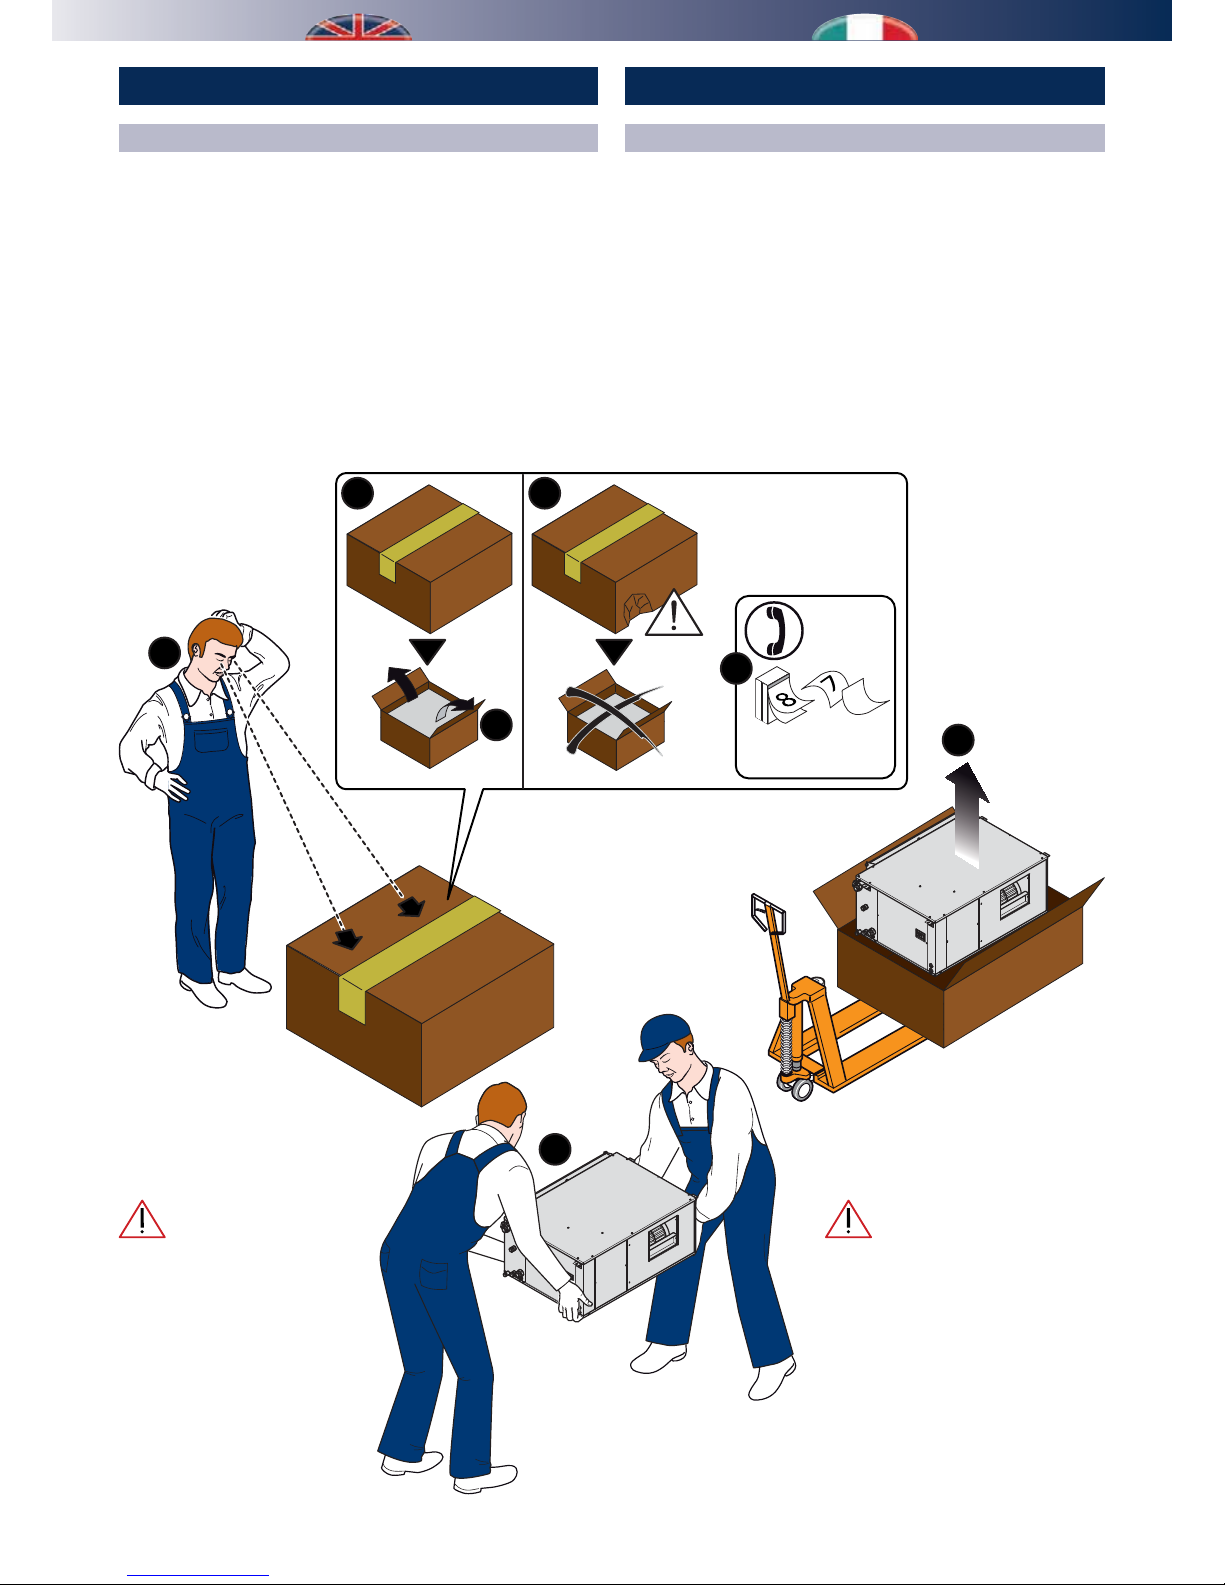
ISPEZIONE, TRASPORTO E DISIMBALLO
All’atto del ricevimento vericare immediatamente l’integrità
dell’imballo: la macchina ha lasciato la fabbrica in perfetto stato,
eventuali danni dovranno essere immediatamente contestati
al trasportatore ed annotati sul Foglio di Consegna prima di
contrormarlo.
Il Cliente, entro 8 giorni, deve avvisare il Costruttore sull’entità
e la tipologia dei danni rilevati compilando un rapporto scritto:
riportare sempre anche il numero di matricola rilevabile dalla
targhetta posta a bordo macchina.
L’imballo dell’unità deve essere
rimosso con cura evitando di arrecare
possibili danni alla macchina.
I materiali che costituiscono l’imballo
sono di natura diversa: legno,
cartone, nylon, ecc.
Conservarli separatamente e
consegnarli per lo smaltimento o
l’eventuale riciclaggio, alle aziende
preposte allo scopo e ridurne così
l’impatto ambientale.
The unit packaging must be
removed with care, ensuring that
the machine is not damaged.
The materials which make up the
packaging are different: wood,
cardboard, nylon etc.
Store them separately and deliver
them for disposal or, where
appropriate, recycling, to the
relevant companies, thus reducing
the environmental impact.
TESTING, TRANSPORT AND UNPACAKGING
Upon receipt, check immediately that the packaging is intact:
the machine has left the factory in perfect working order and any
damage must be notied to the carrier immediately and noted on
the Delivery Sheet before it is countersigned.
Within 8 days, the customer must notify the manufacturer of the
extent and type of the damage noted, making a written report:
always take note of the serial number which can be found on the
plate axed to the machine.
PRELIMINARY OPERATIONS OPERAZIONI PRELIMINARI
Page 7
7
i - INFO
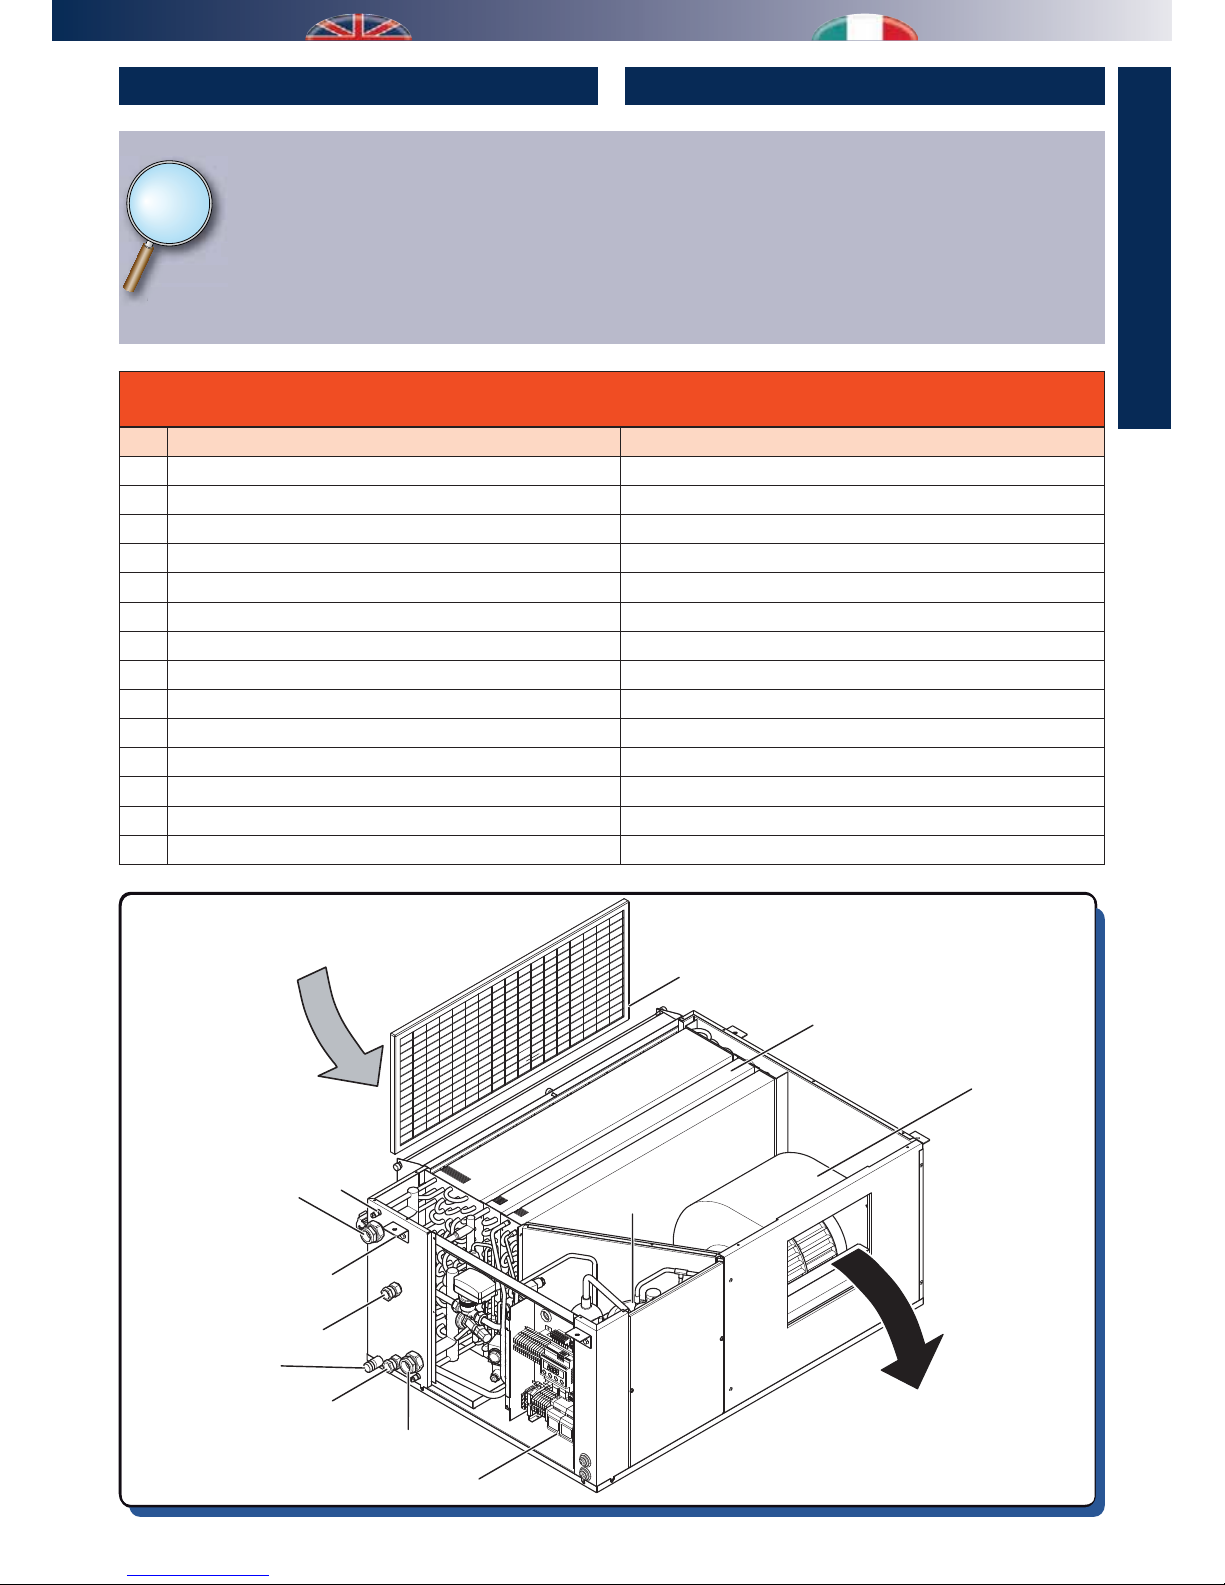
Table A - Machine Components
Tabella A - Componenti apparecchiatura
Rif. Descriptions Descrizione
A Pre-treat. water outlet (3/4”F) Uscita acqua pre-trattamento (3/4”F)
B Pre-treat. water inlet (3/4”F) Ingresso acqua batteria pre-trattamento (3/4”F)
C Condenser water outlet (1/2”F) Uscita acqua condensatore (1/2”F)
D Condenser water inlet (1/2”F) Ingresso acqua condensatore (1/2”F)
E Filter Filtro
F Fan Ventilatore
G Compressor Compressore
H Exchangers Scambiatori
I ø 8mm hole xing brackets Stae di ssaggio foro ø 8mm
L Air inlet Ingresso aria
M Dehumidied air outlet Uscita aria deumidicata
N Vent Sato
O ø20 mm condensation drain Scarico ø20 mm per condensa
P Electrical panel Quadro elettrico
Le macchine DA 1000 sono costruite per effettuare il
trattamento dell’aria introdotta in ambiente, sia essa di ricircolo
oppure primaria. Il funzionamento estivo è in abbinamento con
un impianto di rarescamento radiante, o comunque con un
impianto ad acqua refrigerata a 15°C.
Deumidicatore DA 1000 atto al controllo dell’umidità relativa
nei sistemi di rarescamento radiante a pavimento/sotto/
parete utilizzati in ambienti ad uso terziario.
DA 1000 units are used to handle the air in the
room, both primary or recirculated one. Its
summer functioning is combined with a radiant
cooling system, or any other system with cooled
water at 15°C.
DA 1000 dehumidier is used to control relative humidity with
radiant cooling systems for oor/ceiling/wall in commercial
applications.
DESCRIPTION OF THE EQUIPMENT
DESCRIZIONE APPARECCHIATURA
L
E
A
N
I
C
O
B
P
D
M
F
H
G
w
DA 1000
d
radiant co
o
Page 8
8
MAX 95%
MAX 30°C
OK!
min.
5 cm
min.
40 cm
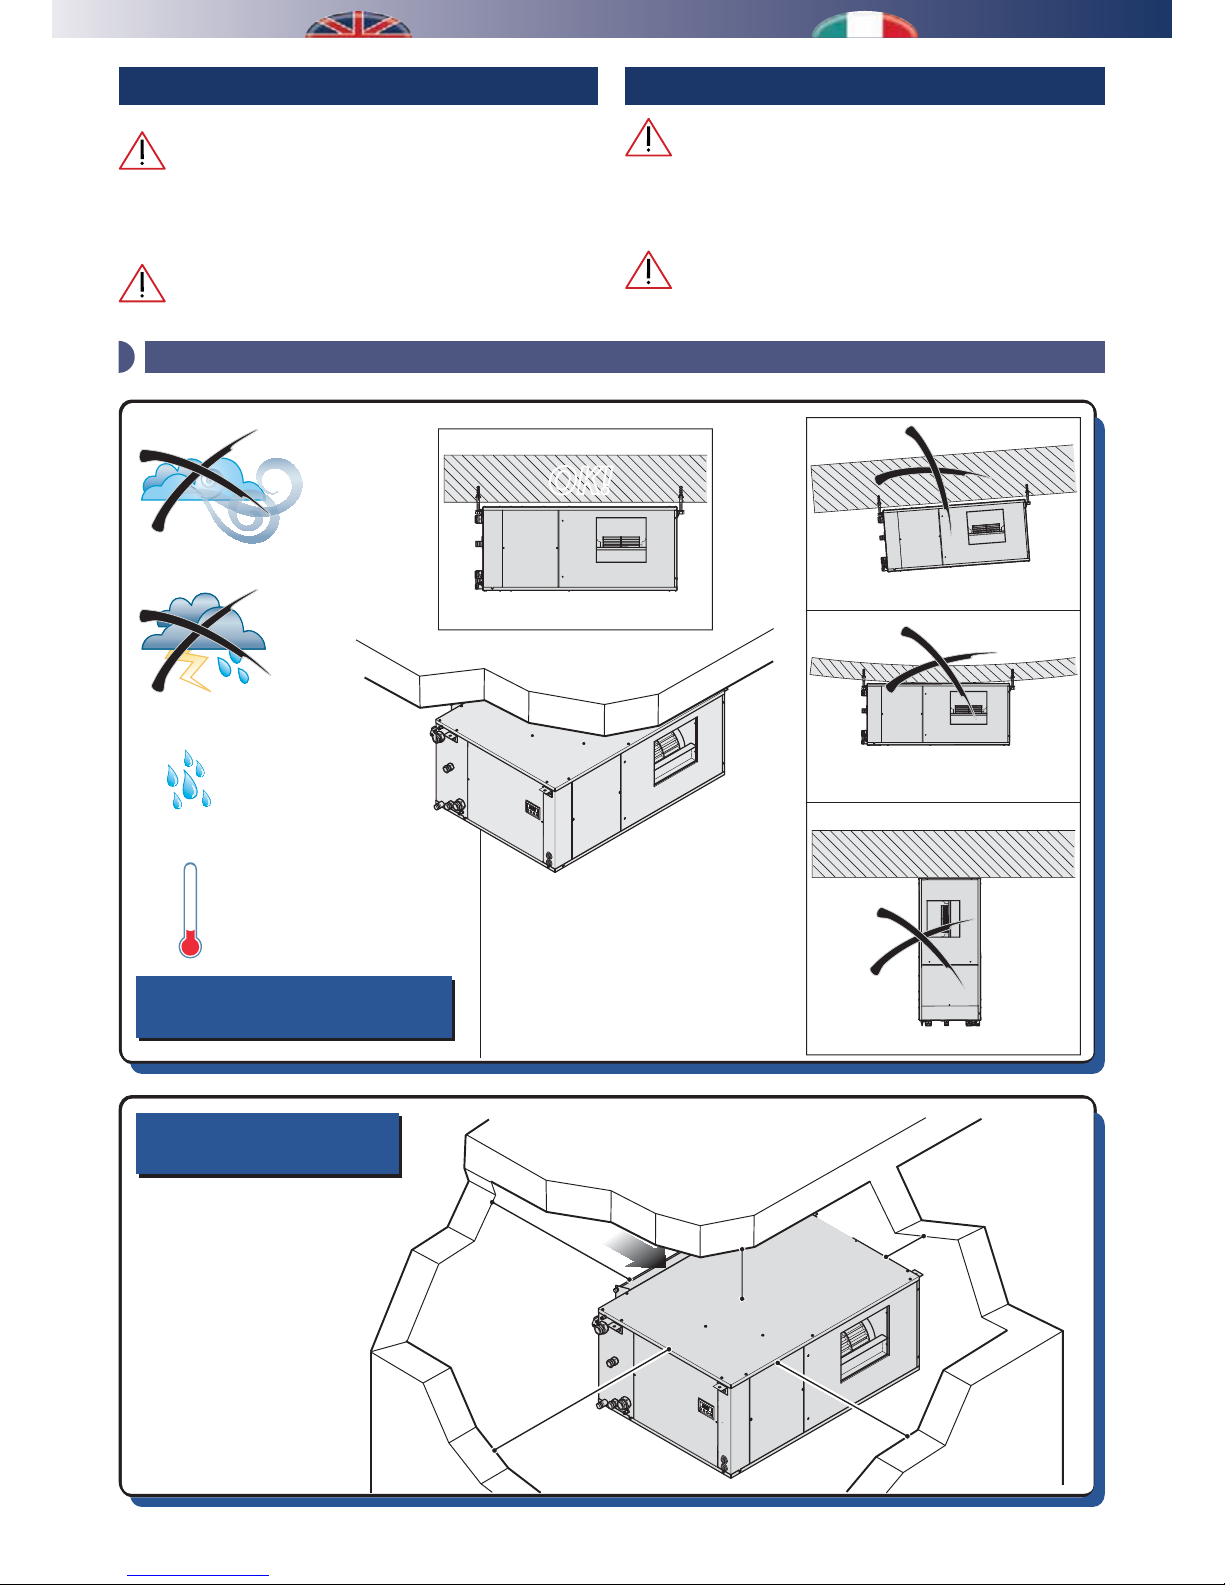
Positioning indications
Indicazioni di posizionamento
Minimum space allowanceses
Distanze minime di rispetto
no constraint
nessun vincolo
min.
20 cm
min.
60 cm
CAUTION
Installation and maintenance must be carried out by qualied
personnel only. Throughout installation, make sure that the
equipment is not connected to the electrical mains.
It shall be installed only inside the building.
ATTENZIONE
L’installazione e la manutenzione vanno eseguiti solo
da personale qualicato. Durante tutte le procedure di
installazione, assicurarsi che l’apparecchiatura non sia
collegata alla rete elettrica.
L’installazione deve essere eettuata solo all’interno
degli edici
INSTALLATION INSTALLAZIONE
1 - POSITIONING AND FIXING TO THE CEILING / POSIZIONAMENTO E FISSAGGIO A SOFFITTO
Page 9
9
INSTALLATION
INSTALLAZIONE
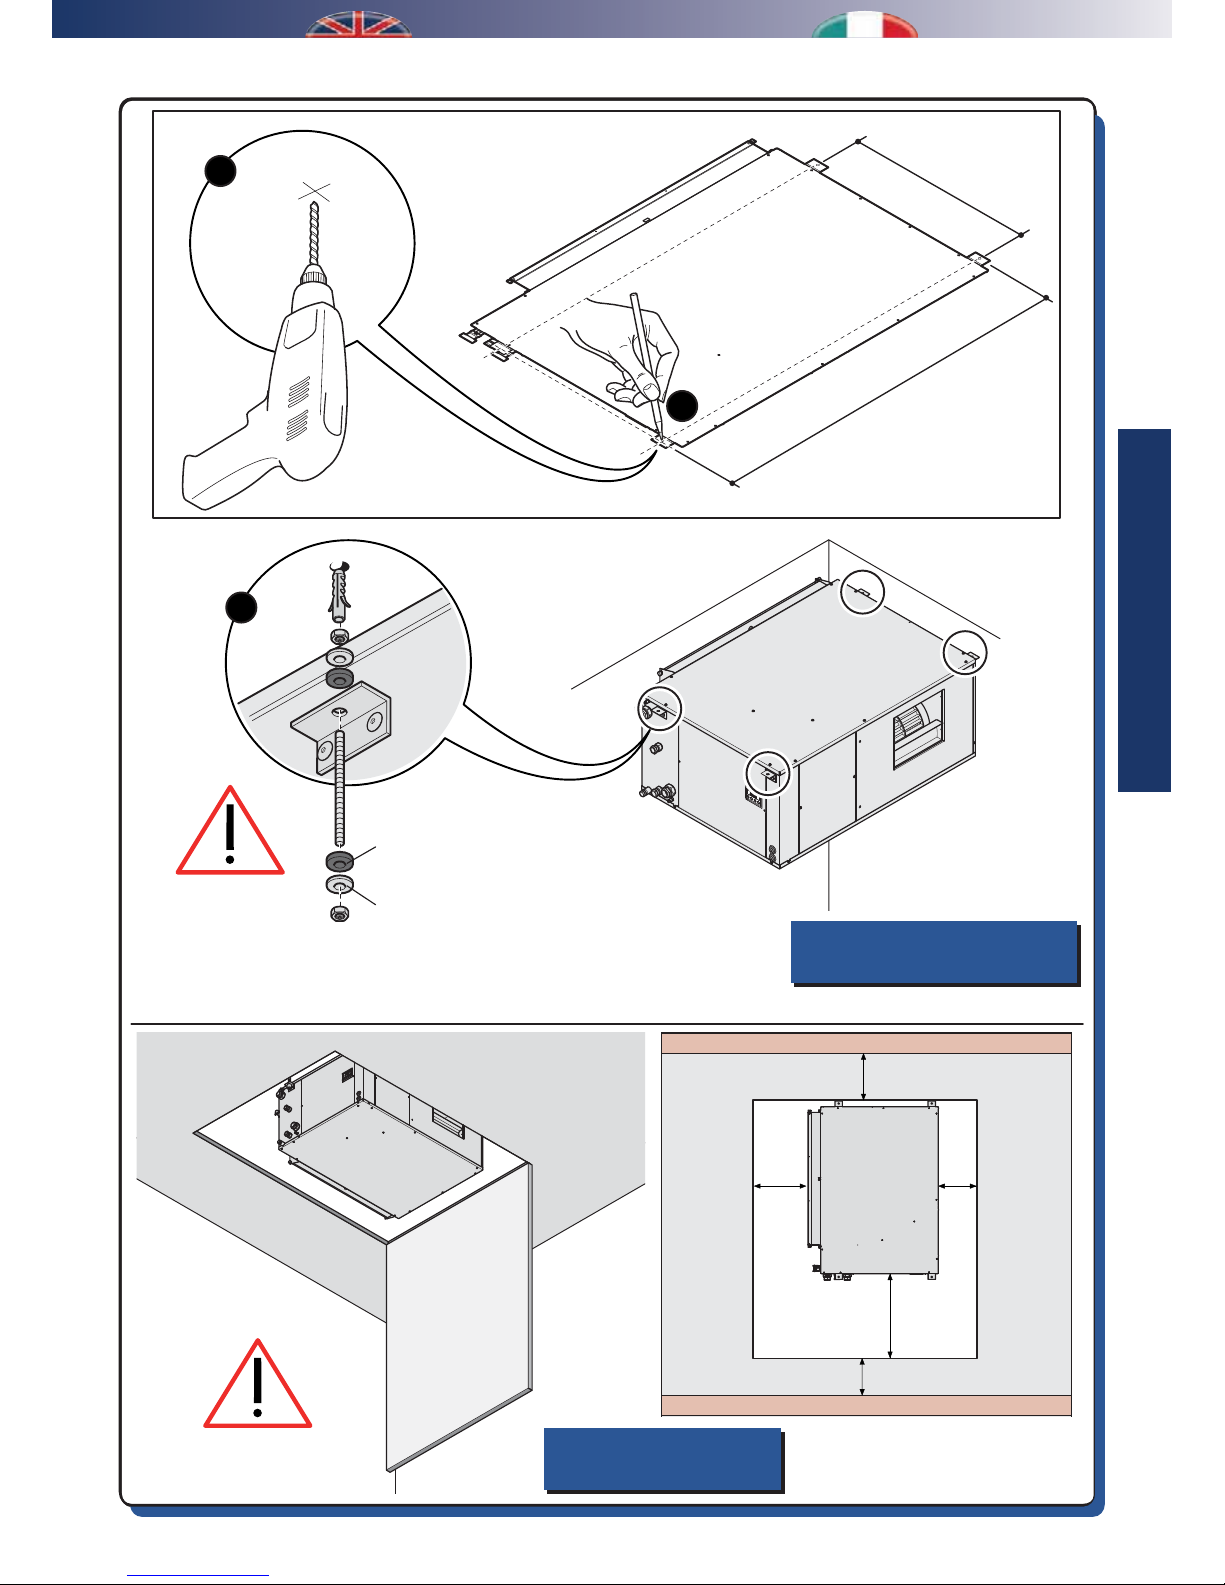
[mm]
ø8mm
2
476
811
Fixing to ceiling
Fissaggio a sotto
min.
40 cm
min.
20 cm
min.
60 cm
X
X
Trap door
Botola d’ispezione
1
3
Washer
Rondella
Rubber mounts
Gommino antivibrante
Page 10
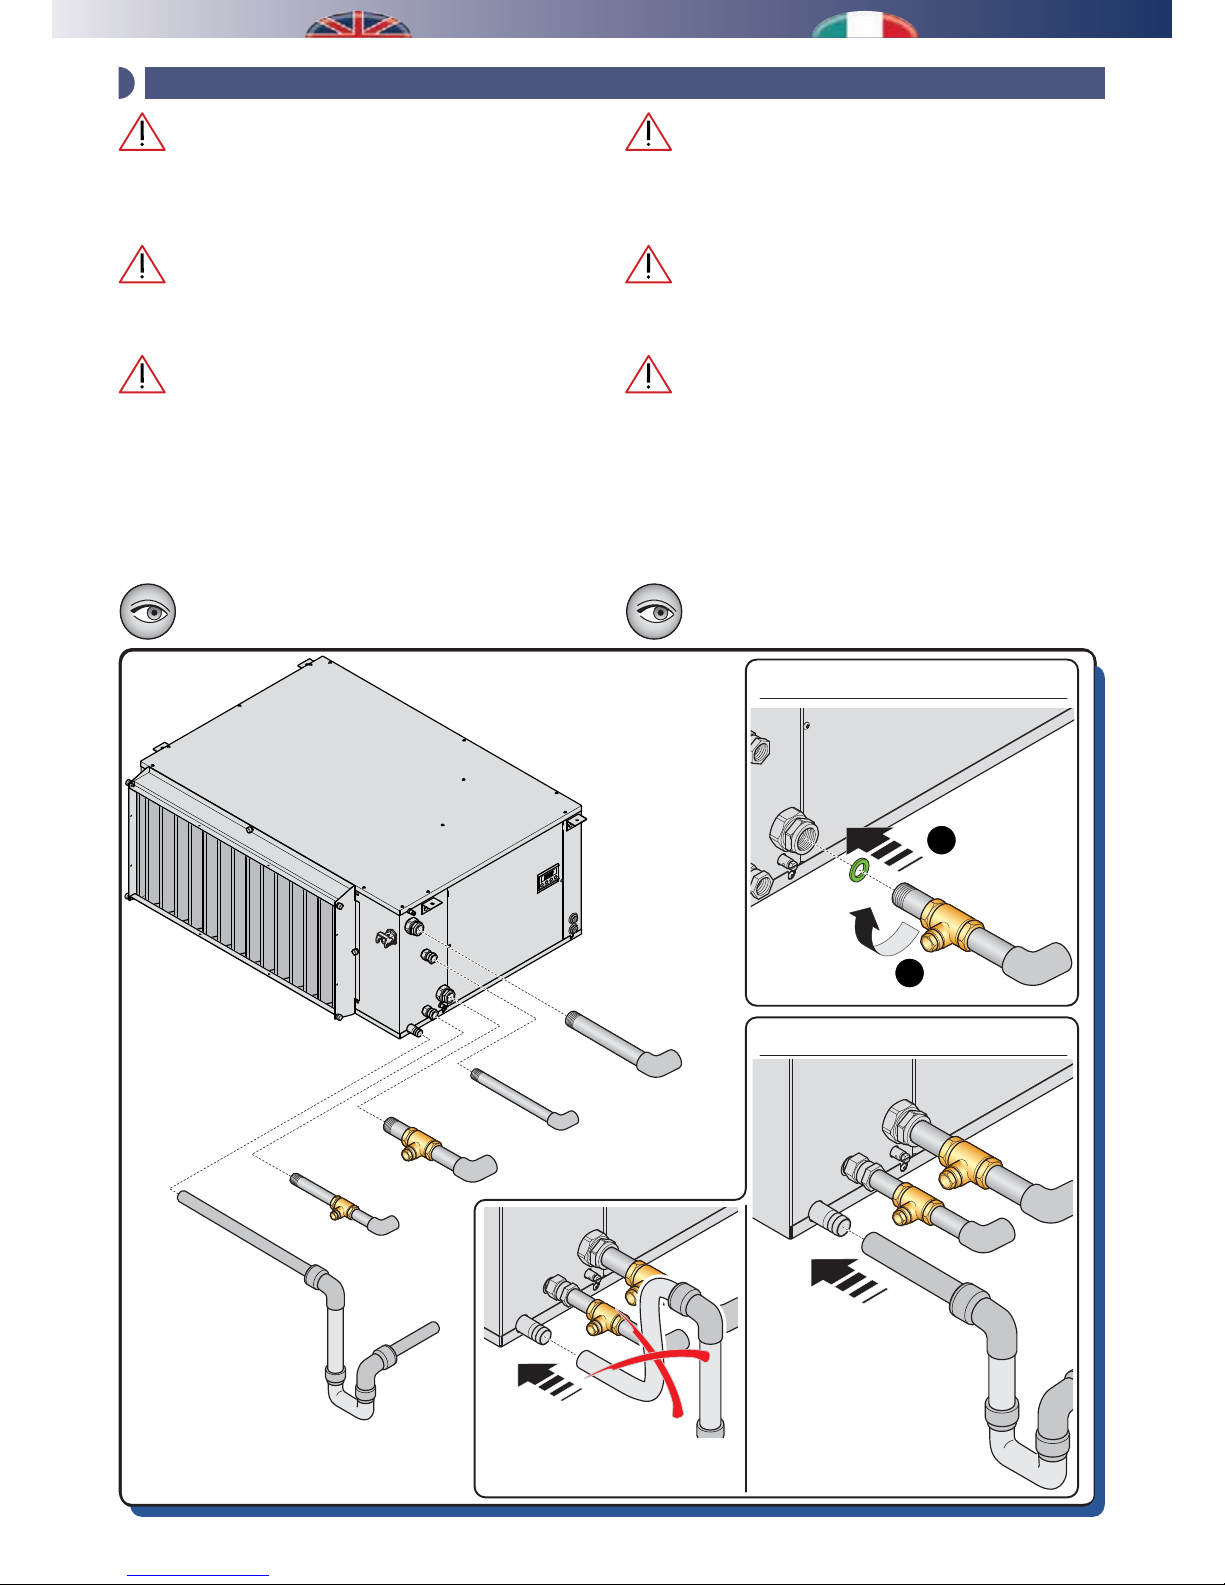
10
E
B
C
A
A - B - C - D
D
E
1
2
Scarico NON in salita!
Discharge NOT in ascent!
2 - HYDRAULIC CONNECTIONS / COLLEGAMENTI IDRAULICI
L’allacciamento idraulico ad un gruppo frigo in grado
di fornire acqua refrigerata risulta indispensabile.
In tale caso il deumidicatore potrà operare senza variare la
temperatura dell’aria trattata con un sensibile incremento
di resa.
È necessario realizzare un sifone sulla linea di scarico,
dimensionato per una portata di 15 l/h e avente una
pendeza minima del 3%, per evitare il risucchio di aria dal
tubo di scarico.
Dopo aver riempito d’acqua l’impianto si raccomanda
di verificare attentamente la tenuta non solo dei
collegamenti ma anche del circuito idraulico della
macchina, che potrebbe essersi danneggiato nel trasporto
o in cantiere durante l’installazione; a tale proposito
il costruttore risponderà esclusivamente dei difetti “di
fabbrica” del deumidicatore e in ogni caso non si assume
nessuna responsabilità per danni indiretti.
Lo scarico condensa e le tubazioni di ingresso e
uscita devono rispondere alle norme e leggi vigenti
nel paese di utilizzo.
Hydraulic connection to a refrigerating unit capable
of supplying chilled water is indispensable. In this case, the
dehumidier can operate without varying the temperature of
the air treated with a considerable increase in yield.
It is necessary to create a drain-trap on the drain line,
considering a owrate of 15 l/h and minimum inclination of
3%, to avoid any air suck from the drain pipe.
After lling the system with water, it is advisable to
check that not only the connections but also the machine
hydraulic circuit are watertight, as these could be damaged
during transportation or on site during installation; on this
topic, the manufacturer will only be responsible for factory
defects on the dehumidifier and under no circumstances
accepts responsibility for indirect damage.
The condensation drain and the inlet and outlet pipes
must comply with the standards and laws in force in
the country of use.
Page 11
11
INSTALLATION
INSTALLAZIONE
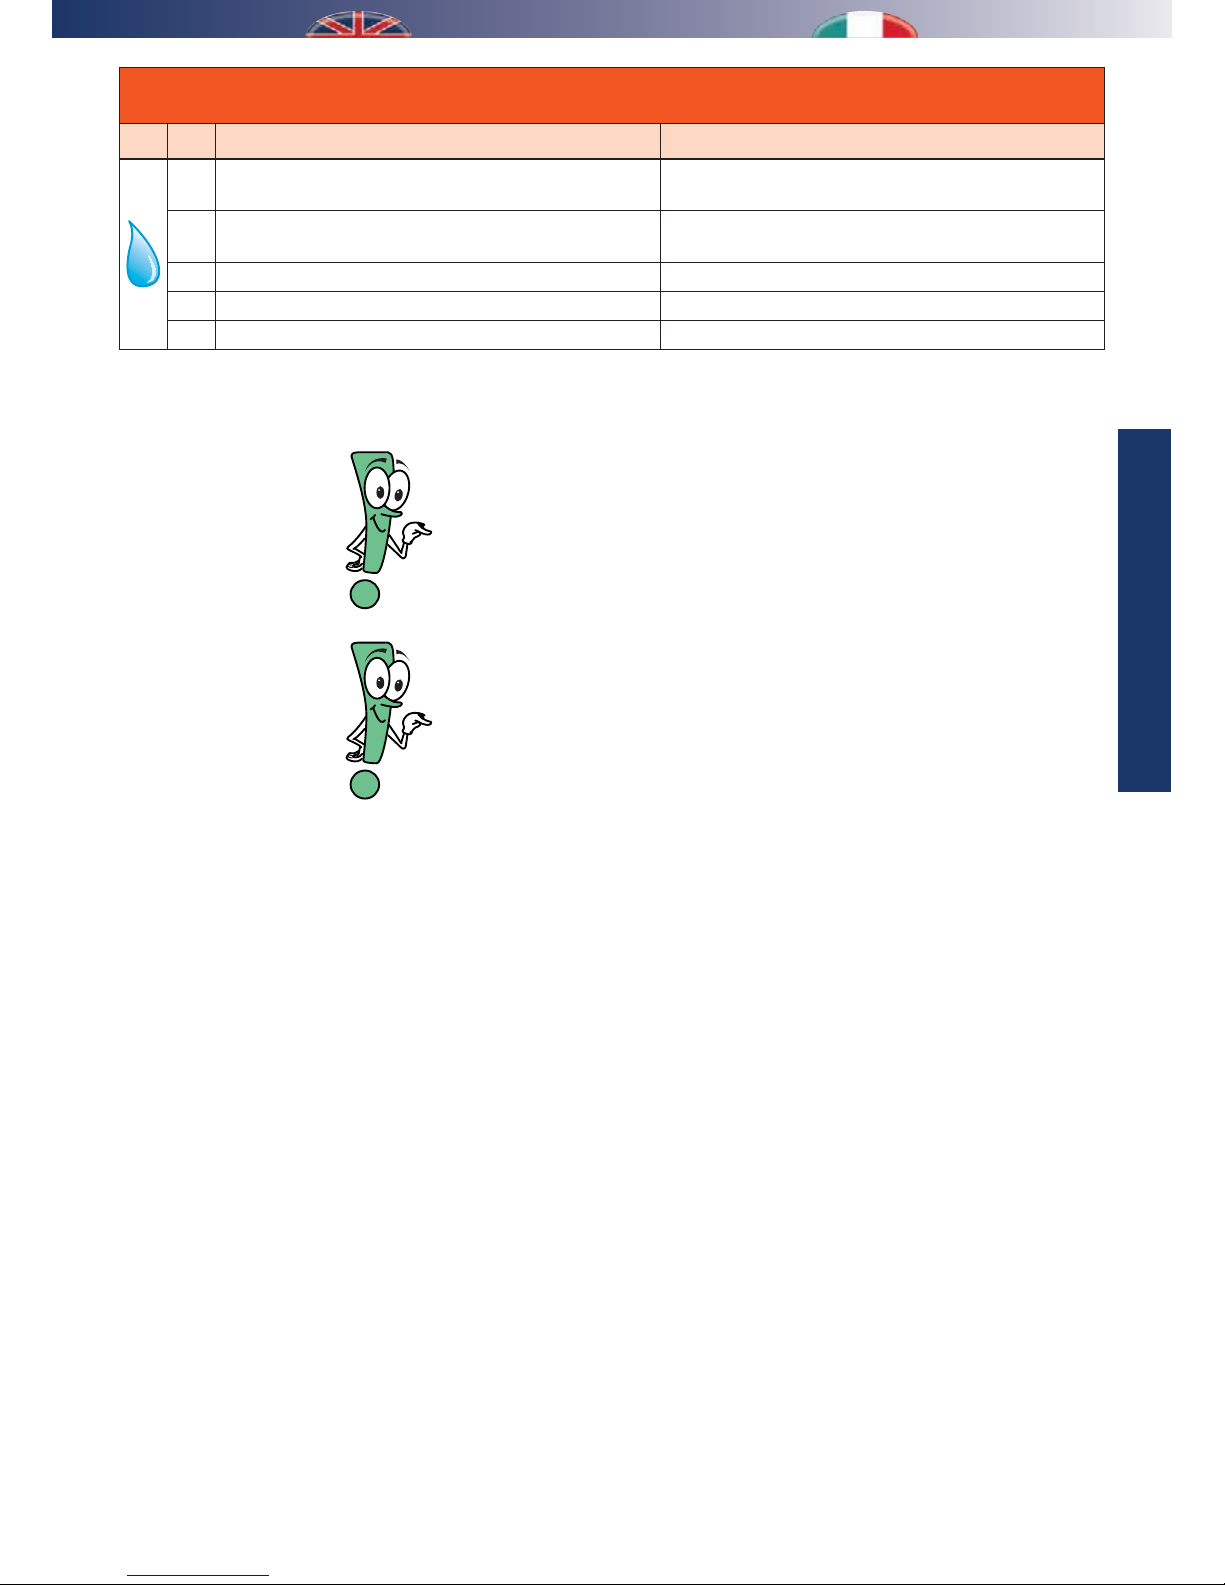
Use piping whose sizes are appropriate for the ow rate required.
Utilizzare tubazioni di misura adeguata in funzione delle
portate desiderate.
Table B - Hydraulic connections to eect
Tabella B - Collegamenti idraulici da eettuare
Rif. Description Descrizione
A
Pre-treat. water outlet (3/4”F) with shut-o valve to adjust
ow rate
Uscita acqua pre-trattam. (3/4”F) con valvola di
intercettazione per regolazione portata
B
Pre-treat. water inlet (3/4”F) with flow rate adjustment
lockshield valve
Ingresso acqua pre-trattam. (3/4”F) con detentore di
regolazione portata
C Condenser water outlet (1/2”F) Uscita acqua condensatore (1/2”F)
D Condenser water inlet (1/2”F) Ingresso acqua condensatore (1/2”F)
E ø20 mm condensation rubber drain Scarico in gomma ø20 mm per condensa
It is better to install on-o valves for the sectioning of the supply
pipe of cold water.
Si consiglia di predisporre delle valvole di intercettazione
per il sezionamento delle linee di alimentazione dell’acqua
refrigerata.
Page 12
12
3 - ELECTRICAL CONNECTIONS / COLLEGAMENTI ELETTRICI
Il deumidificatore deve essere collegato ad una
presa di corrente sezionata provvista di terra. L’impianto
elettrico di alimentazione deve essere protetto contro i
sovraccarichi, i cortocircuiti, i contatti diretti ed indiretti,
conformemente alle leggi e norme vigenti nel paese di
utilizzo. Gli interventi elettrici devono essere eettuati da
personale qualicato.
La linea elettrica di alimentazione deve essere
protetta da un interruttore dierenziale magnetotermico.
Verificare che la tensione di alimentazione
corrisponda ai dati nominali dell’unità (tensione, numero
di fasi, frequenza) riportati in questo manuale e sulla
targhetta a bordo macchina. L’allacciamento di potenza
avviene tramite cavo bipolare più terra. La tensione di
alimentazione non deve subire variazioni superiori a ±5%.
Il funzionamento deve avvenire entro i valori sopra
citati: in caso contrario la garanzia viene a decadere
immediatamente e ci sono rischi elettrici per le persone e
il prodotto.
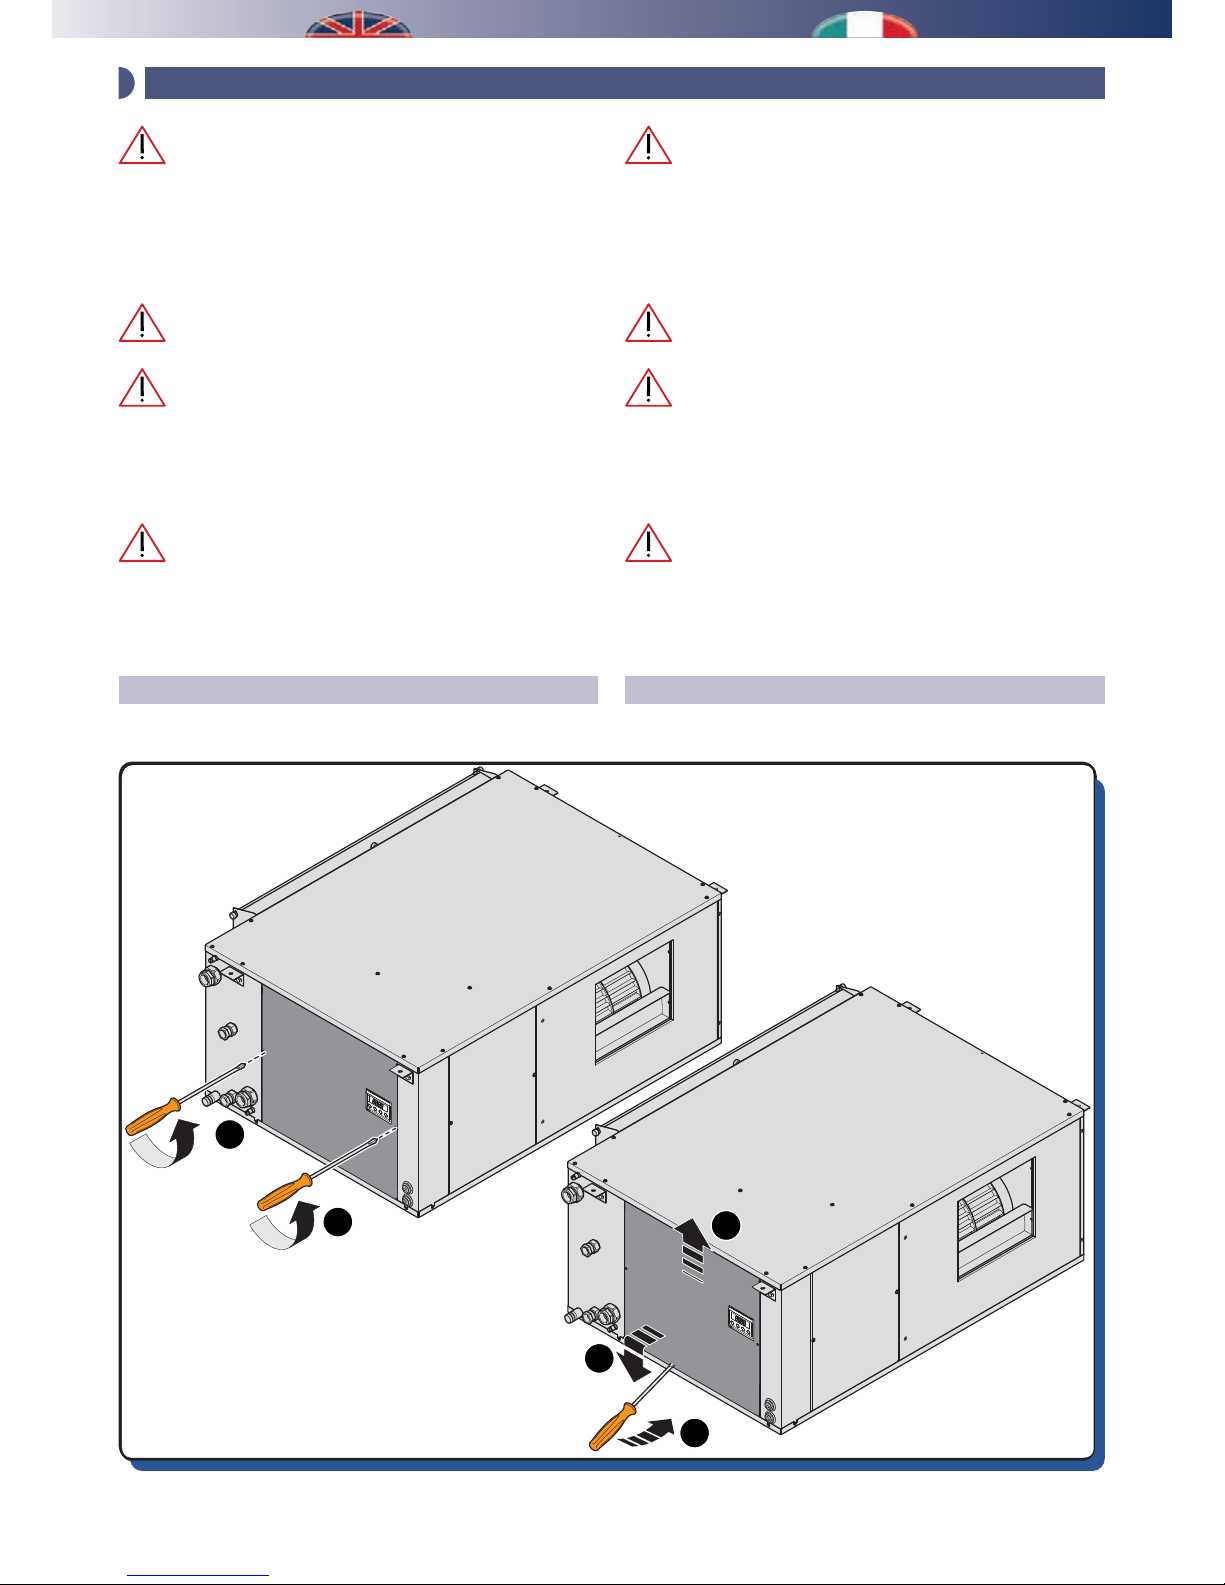
APERTURA SPORTELLO
The dehumidier must be connected to a disconnected,
earthed power socket. The electrical system must be protected
against overloads, short circuits and direct and indirect
contacts and comply with the laws and regulations in force in
the country of use. Electrical interventions must be performed
by qualied personnel.
The electrical power line must be protected by a residual
current device.
Check that the power supply voltage corresponds to
the rated unit data (voltage, number of phases, frequency)
shown on this manual and on the plate on the machine. The
power connection takes place through a bipolar cable plus
earth. The power supply voltage is not subject to variations
greater than ±5%.
Operation must take place within the aforementioned
values: if this is not the case, the warranty is invalidated
immediately, and there are electrical risks for people and
for the product.
DOOR OPENING
2
1
1
4
3
Page 13
13
INSTALLATION
INSTALLAZIONE
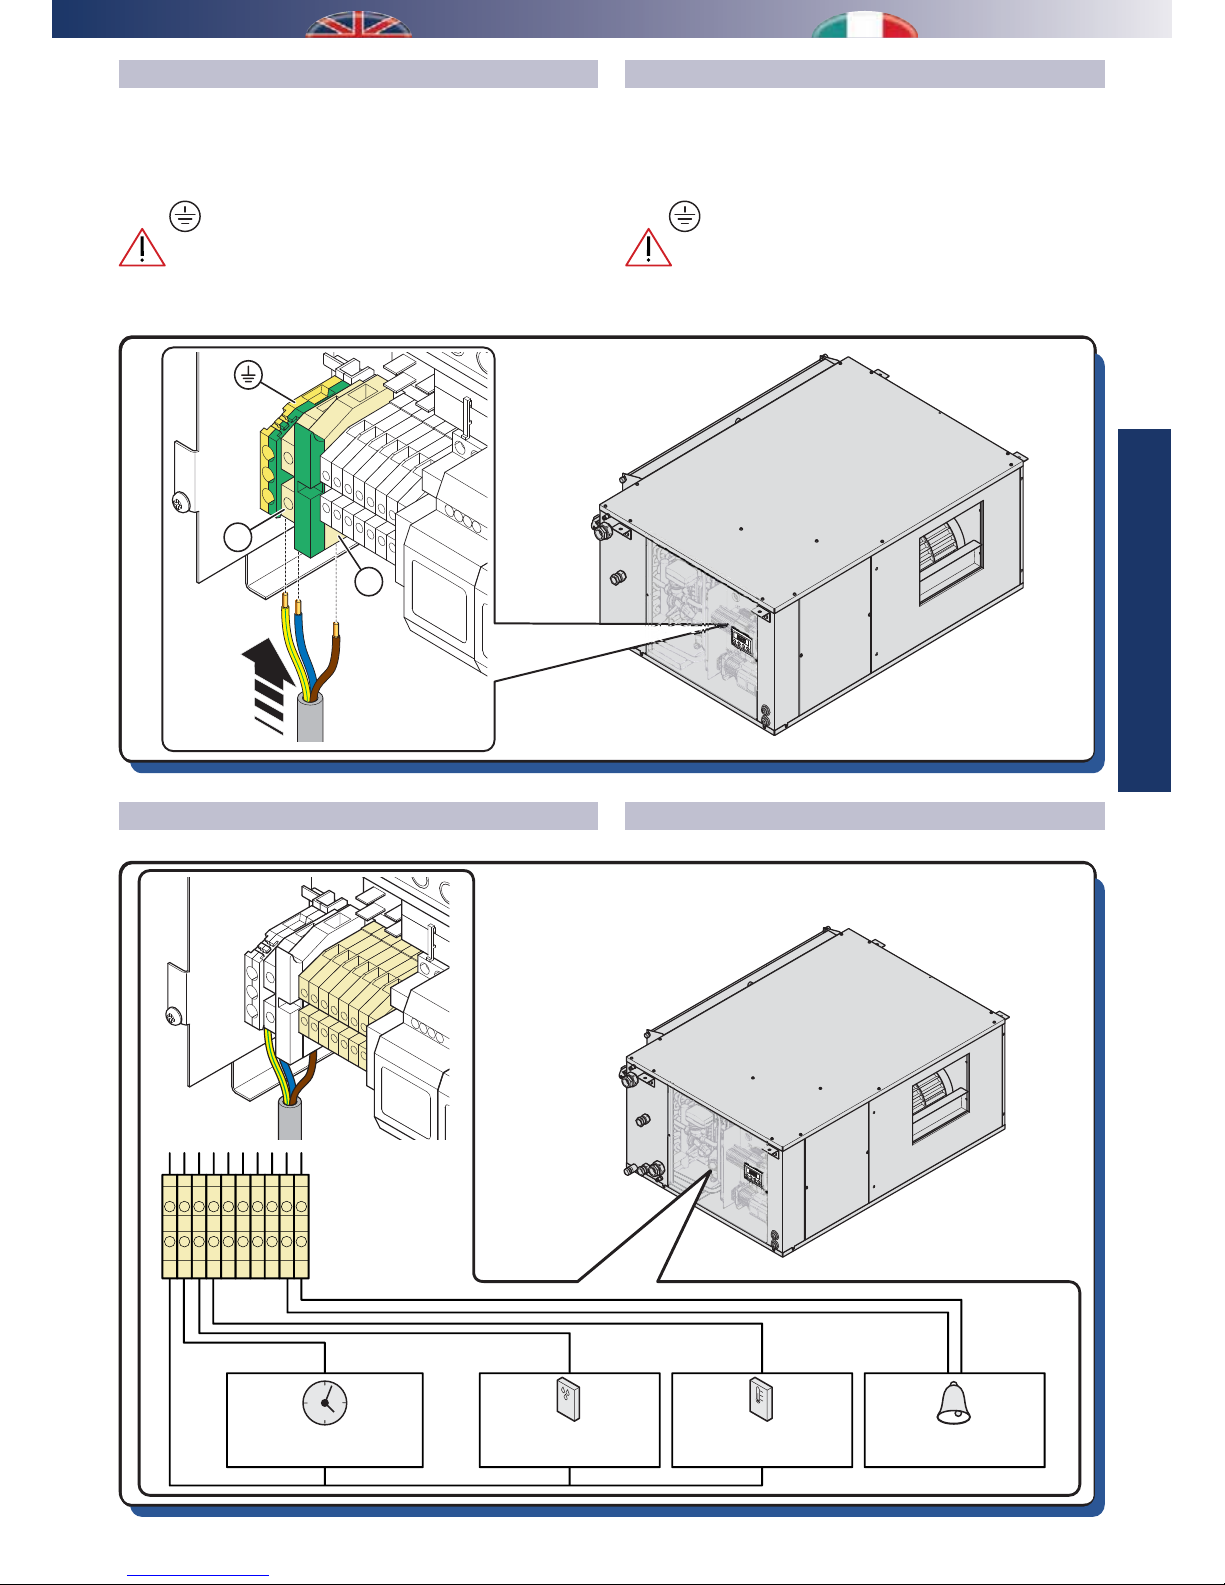
N
L
ALIMENTAZIONE
Portare e collegare con cavo 3x1.5mmq (3x4 mmq in caso di
accoppiamento con SR 1000) i 3 morsetti:
fase (F)
neutro (N)
terra
Il morsetto di linea dell’alimentazione elettrica è
dotato di fusibile da 16 A, in caso di non avviamento della
macchina ma presenza di tensione vericare il fusibile.
POWER SUPPLY
Connect the 3 terminals with 3x1.5mm³ cable (3x4 mm² in case of
combination with SR 1000):
phase (F)
neutral (N)
earth
The terminal of the tension line is provided with 16 A
fuse; if the unit does not start even though it is energized,
check this fuse.
CONSENSI DELL’UNITÀUNIT CONSENTS
0
1
2
3
4
5
6
Consenso integrazione
Integration consent
1234 66 70 5 7
Consenso ventilazione
Ventilation consent
Consenso deumidicazione
Dehumidication consent
U %
° C
Allarme
Alarm
Page 14

14
VENTILATION CONSENT
Two terminals are available on the dehumidier circuit board
which allow the unit to be operated in ventilation mode only.
The closure of the “ventilation consent” activates the fan.
Information about the main electrical connections which
must be made by the installer is shown on the back of the
electrical panel cover.
DEHUMIDIFICATION CONSENT
Dehumidication may only be started up if the remote consent
connections (e.g. humidistat, remote microprocessor control etc.)
have been made correctly.
On this topic, follow the information shown on the wiring diagram
very carefully. If no remote consent is available, jumper the relative
terminals.
INTEGRATION CONSENT
Integration can be activated only if remote consent connections
have been carried out properly (e.g. thermostat with microprocessor,
etc.). Please, follow the instructions reported on the electric
diagram. In case no remote consent is available, use a jumper
between the relevant terminals.
Output air temperature is set at 17°C, and it can be changed by
using the controller (see chapter “CONTROLLER”)
ALARM OUTLET
Alarm relay is usually open, in case of any anomaly the contact
closes. It is possible to keep the contact close by removing the
wire either from NC or from NO on the circuit of the board.
CONSENSO VENTILAZIONE
Sono disponibili sulla scheda elettronica di controllo del
deumidicatore due morsetti che permettono di far funzionare
l’unità nella modalità di sola ventilazione.
La chiusura del “consenso ventilazione” attiva il ventilatore.
Le indicazioni sui principali collegamenti elettrici che
devono essere eettuati da parte dell’installatore sono
riportati sul dorso del coperchio del quadro elettrico.
CONSENSO DEUMIDIFICAZIONE
La deumidicazione potrà essere avviata solo se saranno stati
eettuati correttamente i collegamenti del consenso remoto
(ad es. umidostato, controllo remoto a microprocessore, ecc.).
A tale riguardo attenersi scrupolosamente a quanto riportato
nello schema elettrico. Nel caso non fosse disponibile alcun
consenso remoto ponticellare i relativi morsetti.
CONSENSO INTEGRAZIONE
L’integrazione potrà essere avviata solo se saranno stati
eettuati correttamente i collegamenti del consenso remoto
(ad es. termostato, controllo remoto a microprocessore, ecc.).
A tale riguardo attenersi scrupolosamente a quanto riportato
nello schema elettrico. Nel caso non fosse disponibile alcun
consenso remoto ponticellare i relativi morsetti.
La temperatura di uscita dell’aria è preimpostata a 17°C e può
essere modicata tramite impostazione della centralina (ved.
capitolo “CENTRALINA”)
USCITA ALLARME
Il relé di allarme è normalmente aperto, in caso di anomalia il
contatto si chiude. E’ possibile rendere il contatto normalmente
chiuso togliendo il ponticello denominato NC/NO sul circuito
stampato della scheda.
Page 15
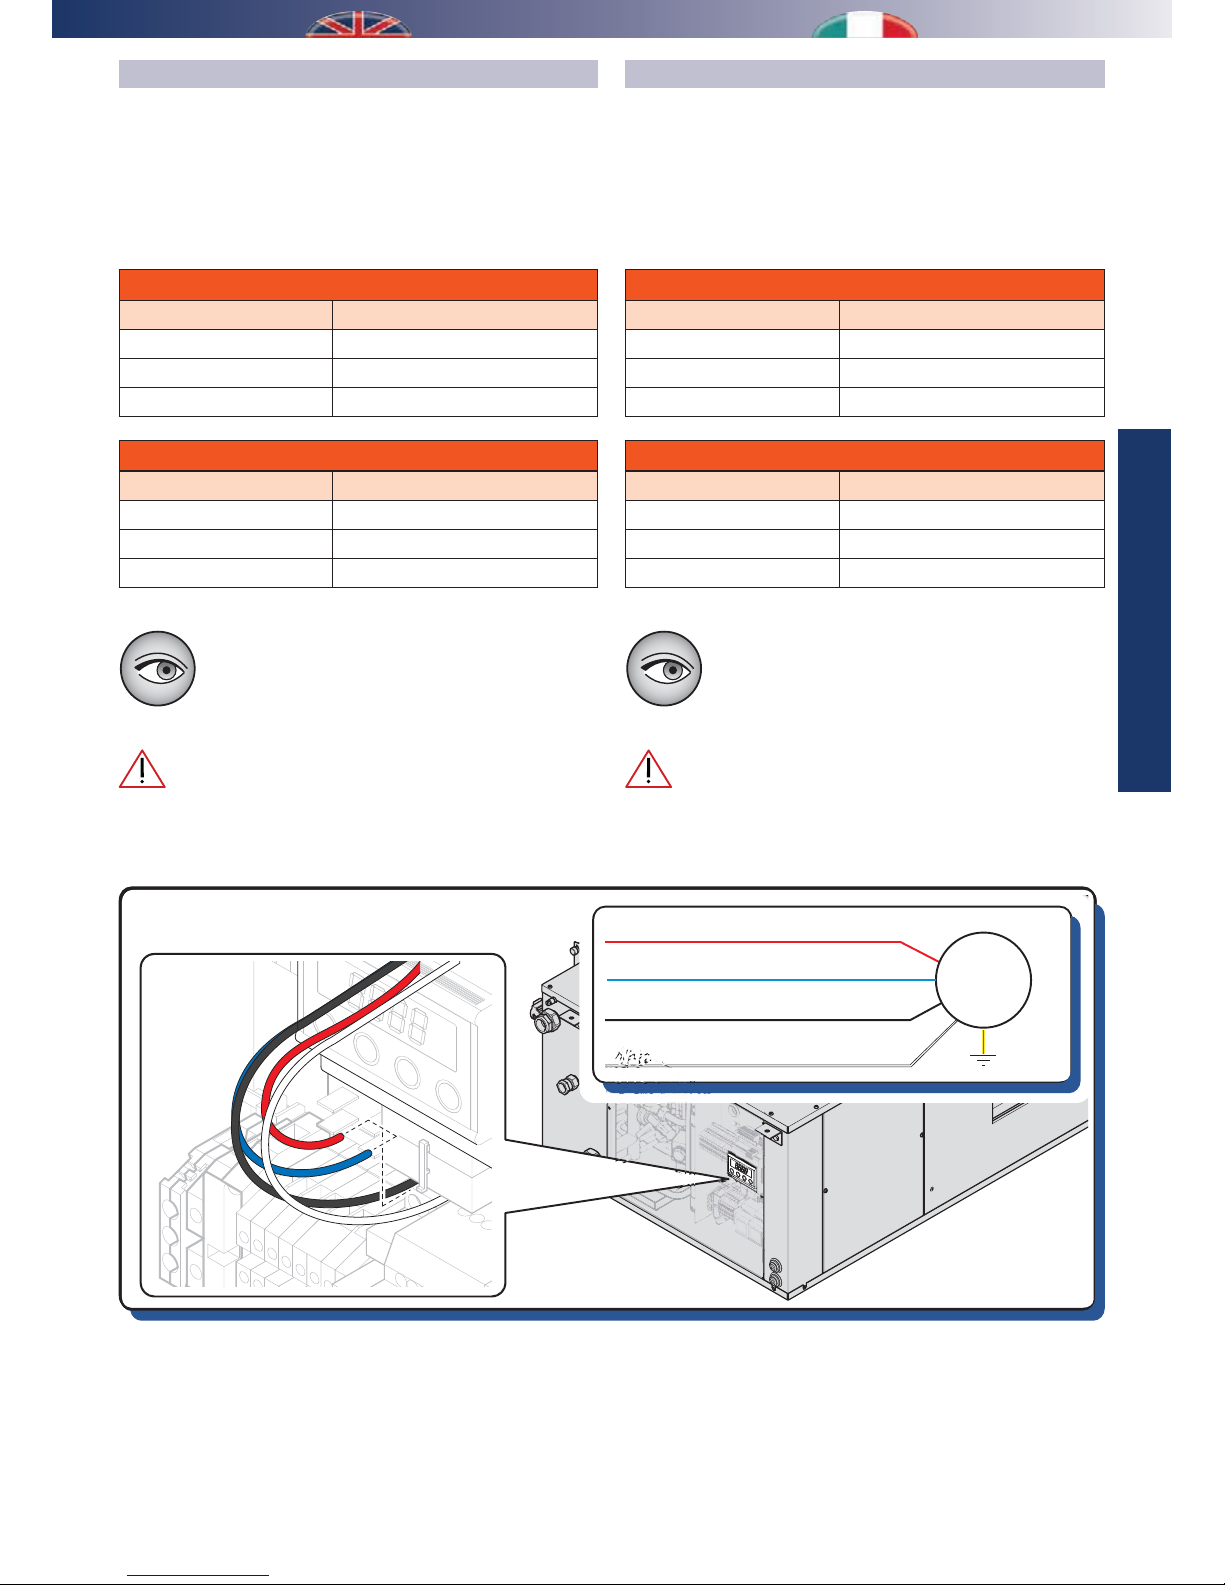
15
INSTALLATION
INSTALLAZIONE
M
Red - MIN speed / Rosso - Vel. MIN
Fan / Ventilatore
Blue - MED speed /
Blu- Vel. MED
Black - MAX speed / Nero - Vel. MAX
White common / Bianco comune
SCELTA DELLA VELOCITÀ DEL VENTILATORE
La macchina viene normalmente fornita con il collegamento
sulla velocità “MAX” - massima (lo nero + lo bianco) che
garantisce i 1000 mc/h con una prevalenza di circa 116 Pa.
Le altre velocità si ottengono utilizzando assieme al comune (lo
bianco) il lo blu oppure quello rosso secondo quanto indicato
nella Tabella “C” sottostante:
Tabella C1 - Modica velocità ventilatore 50 Hz
Fili Portata aria
nero + bianco (comune) 1000 mc/h - prevalenza 116 Pa
blu + bianco 900 mc/h - prevalenza 72 Pa
rosso + bianco 800 mc/h - prevalenza 60 Pa
Tabella C2 - Modica velocità ventilatore 60 Hz
Fili Portata aria
nero + bianco (comune) 1000 mc/h - prevalenza 155 Pa
blu + bianco 800 mc/h - prevalenza 58 Pa
rosso + bianco Non utilizzabile
Utilizzare la macchina con portate maggiori alla
nominale non comporta alcun vizio funzionale ma
cambiano le condizioni dell’aria in uscita rispetto a
quelle dichiarate.
Non scendere a portate inferiori a 800 mc/h d’aria
in quanto la macchina potrebbe lavorare a temperature
troppo elevate.
CHOOSING THE FAN SPEED
The machine is normally supplied with the connection on
the “MAX” - maximum speed (black wire + white wire) which
guarantees 1000 m³/h with head of approximately 116 Pa.
The other speeds can be obtained using the blue or red wires
together with the common wire (white wire) as shown in Table
“C” below:
Table C1 - 50 Hz Fan speed change
Wires Air Flow Rate
black + white (common) 1000 m³/h - head 116 Pa
blue + white 900 m³/h - head 72 Pa
red + white 800 m³/h - head 60 Pa
Table C2 - 60 Hz Fan speed change
Wires Air Flow Rate
black + white (common) 1000 m³/h - head 155 Pa
blue + white 800 m³/h - head 58 Pa
red + white Unused
Using the machine with ow rates which exceed the
rated ow rate does not lead to any operating defect
but the outlet air conditions change compared to the
declared ones.
Do not use air ow rates lower than 800 m³/h as the
machine could work at temperatures which are too high.
Page 16
16
1
2
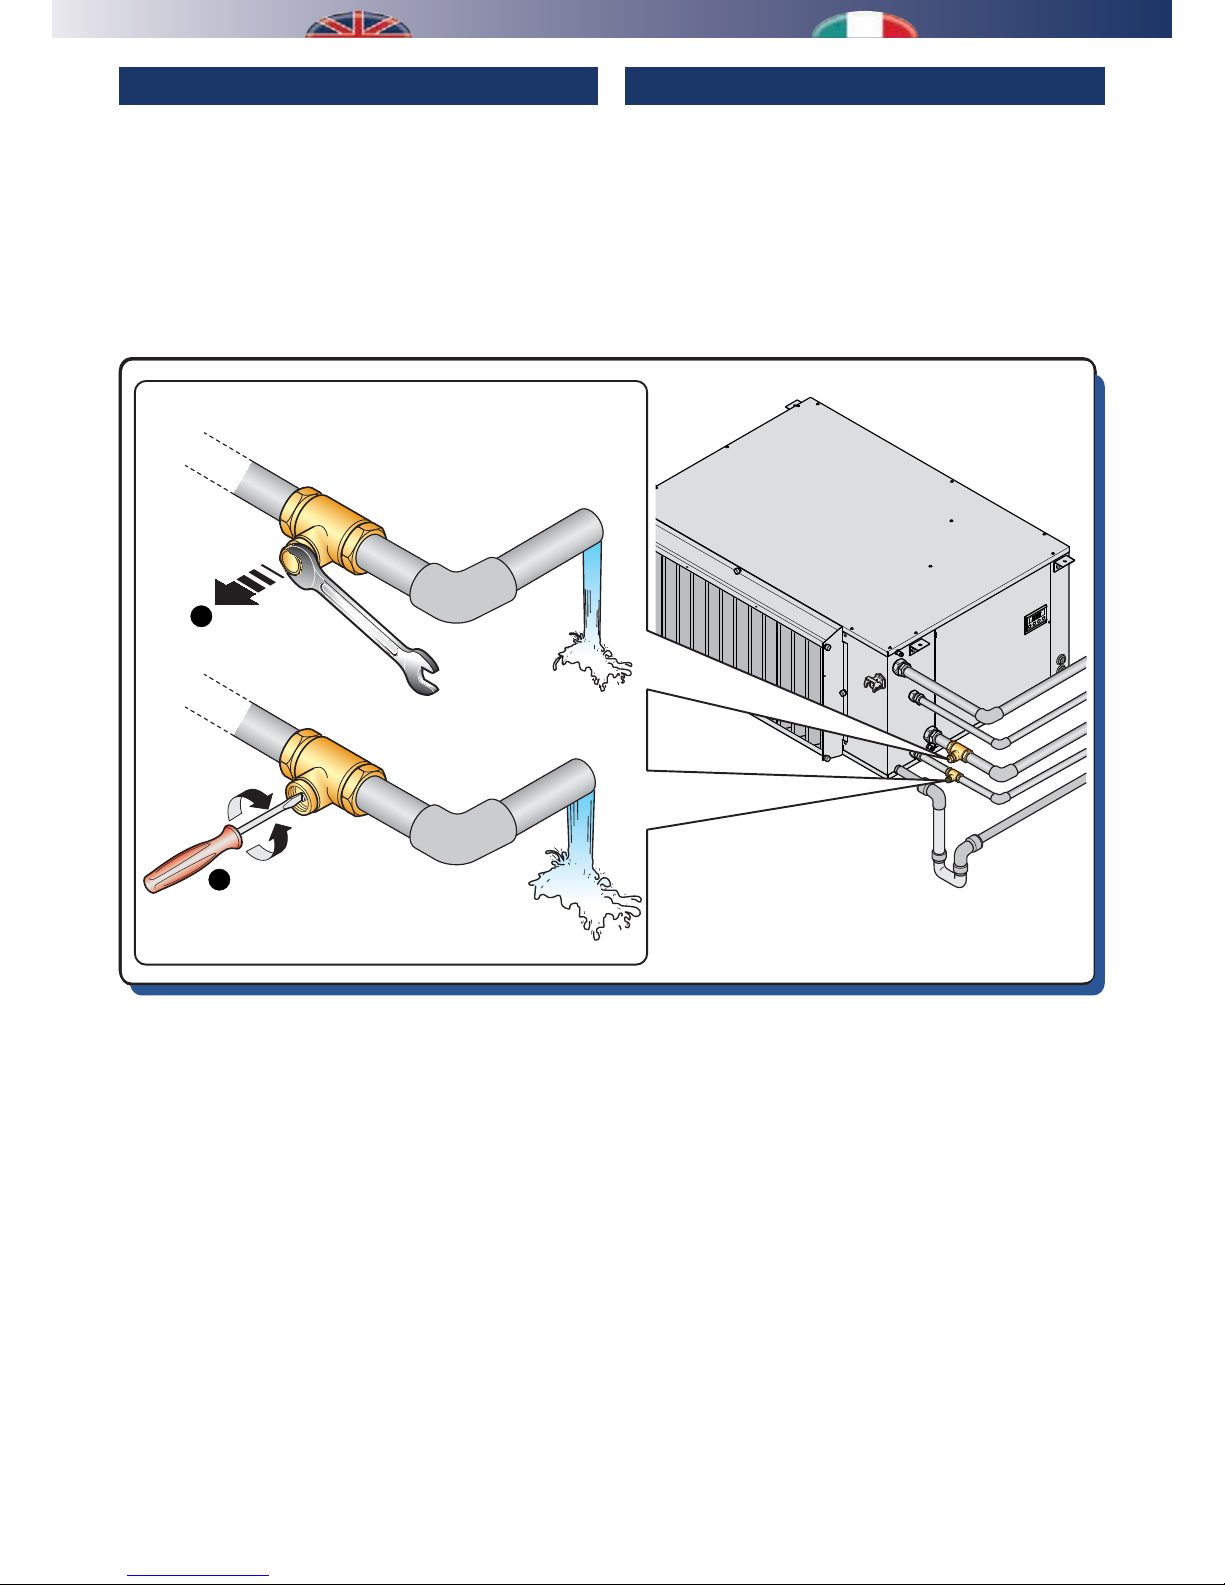
Il collaudo del deumidificatore andrebbe effettuato
contestualmente a quello dell’impianto a pannelli in
funzionamento estivo; la principale verifica da effettuare
riguarda la portata dell’acqua di rareddamento che dovrebbe
essere di circa 1000 l/h per la batteria di PRE e 130 l/h per la
batteria di POST quando la temperatura dell’acqua è di circa
15 °C. Con temperature dell’acqua più basse, anche le portate
devovono essere inferiori.
The dehumidier must be tested together with the panel system
in summer operating mode; the main check which must be
performed regards the cooling water ow rate which must be
approximately 1000 l/h for pre-treatment coil and 130 l/h for posttreatment coil when the water temperature is approximately 15 °C.
By using lower temperatures, water ow rates will be inferior too.
START-UP, TESTING AND USE AVVIAMENTO, COLLAUDO E USO
Page 17
17
USE
UTILIZZO
USE
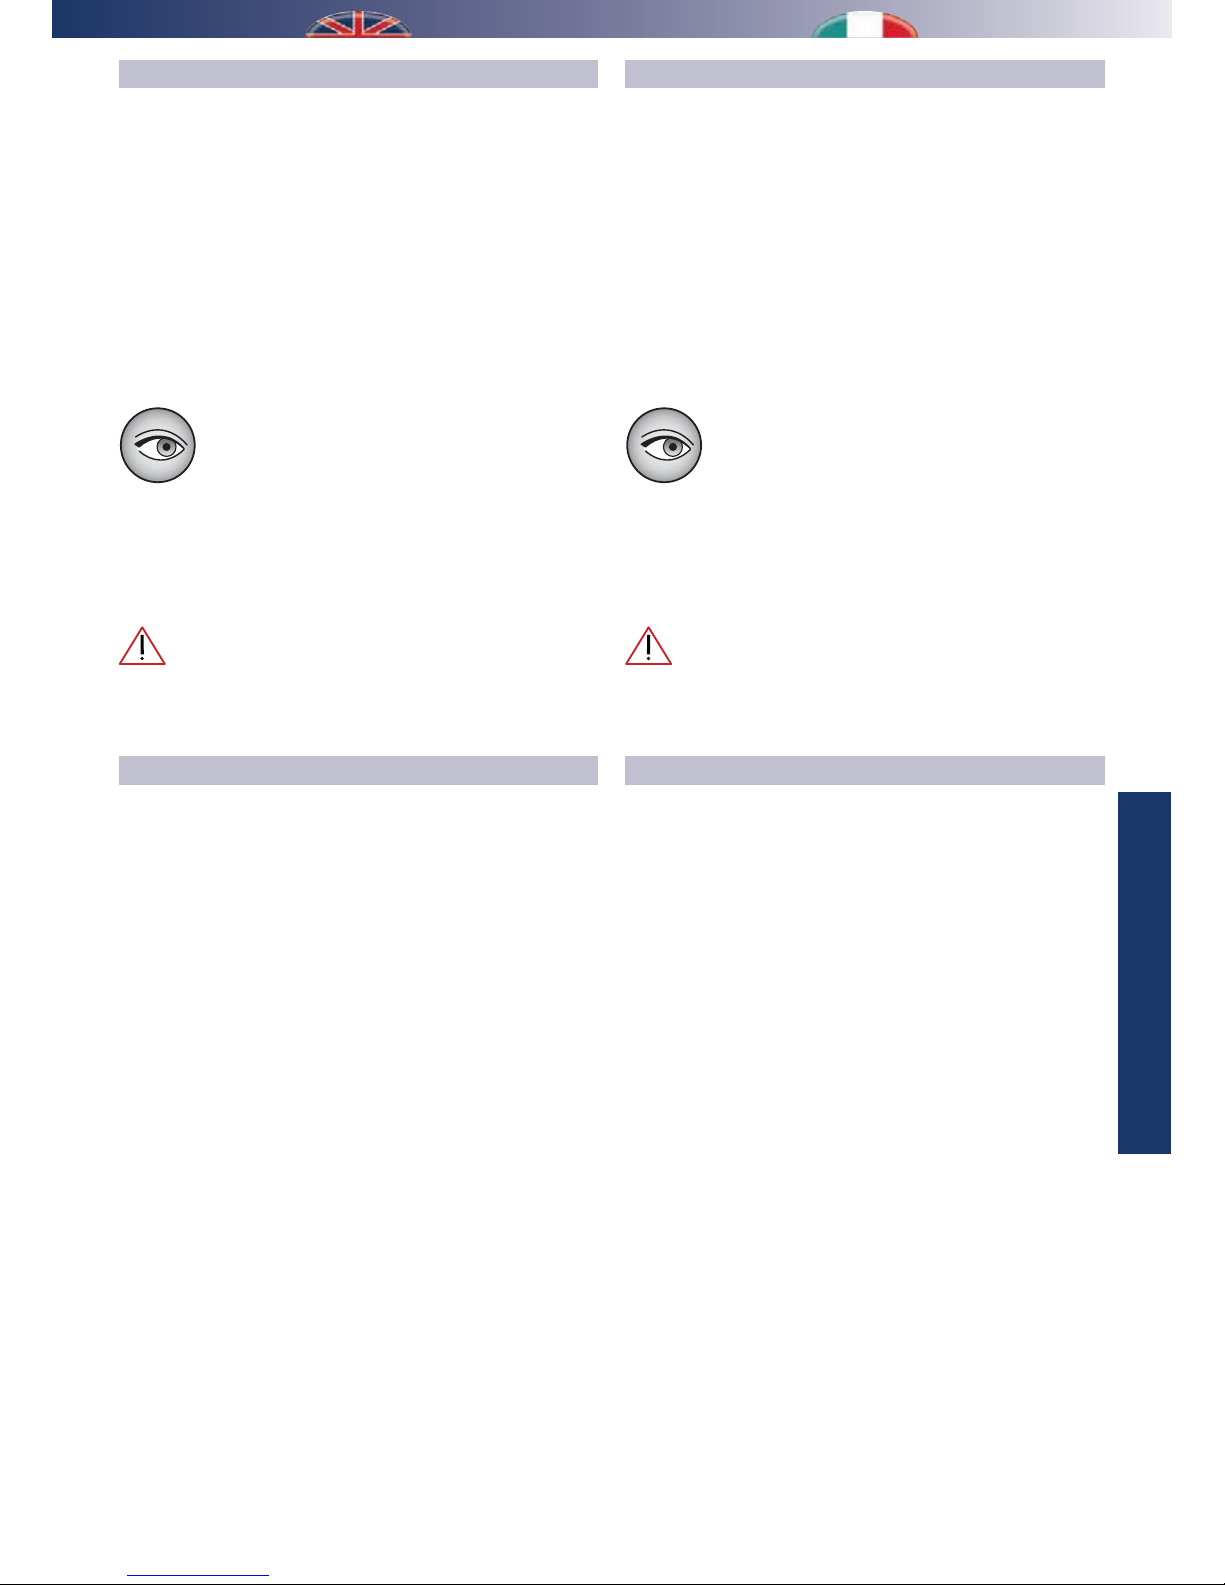
The machine is operational when it is powered and the
dehumidication consent is closed (see chapter “3 - Electrical
connections”).
Each time it is started up, the fan starts rst and after a set time,
the compressor starts.
It is also possible to use the ventilation mode only, using the special
consent (see chapter “3 - Electrical connections”).
In winter operating mode, this condition may be combined with
the circulation of hot water, allowing the machine to heat the air:
in this case, it is not possible to dehumidify and, in any case, the
compressor is excluded if the pre-treatment water exceeds 30°C.
If the room temperature is fairly low and/or the relative
humidity is high, it is possible that ice may form on the
evaporator (cold exchanger). This phenomenon is
normal but causes the machine to change operation,
introducing a refrigerating compressor stop at regular intervals
(approximately 40 minutes as the factory setting) in order to allow
the frost to melt and this condensation to be evacuated.
Do not use the dehumidier without the chilled water:
this may damage the machine itself!
FUNCTIONING
There are 2 main types of operation:
- Dehumidication
- Integration
Dehumidication starts when the dehumidication contact is
closed (see chapter “3 - Wiring connection”). The unit starts to
dehumidify keeping the same output temperature as input one.
Temperature is set at 26 °C and it can be changed (see chapter
“Controller”).
Integration starts when the integration contact is closed (see
chapter “3 - Wiring connection”). The unit starts to dehumidify
and supply sensible energy into the room. Input air temperature
can be changed (see chapter “Controller”).
USO
La macchina è in funzione quando viene data tensione
all’alimentazione ed il consenso deumidicazione o il consenso
integrazione è chiuso (vedere cap. “3 - Collegamenti elettrici”).
Ad ogni avviamento viene prima fatto partire il ventilatore e
solo dopo un certo ritardo parte il compressore.
È consentita anche la sola ventilazione utilizzando l’apposito
consenso (vedere cap. “3 - Collegamenti elettrici”).
Nel caso invernale questa condizione può essere abbinata
alla circolazione dell’acqua calda consentendo alla macchina
di riscaldare l’aria: in tal caso non è possibile deumidicare
e, in ogni caso, il compressore viene escluso se l’acqua del
pretrattamento supera i 30°C.
Se la temperatura ambiente è piuttosto bassa e/o
l’umidità relativa è elevata c’è la possibilità che si
formi del ghiaccio sull’evaporatore (scambiatore
freddo), tale fenomeno è normale ma porta la
macchina a cambiare il suo funzionamento introducendo uno
stop del compressore frigorifero ad intervalli regolari (40 minuti
circa come impostazione di fabbrica) per consentire lo
scioglimento della brina e la conseguente evacuazione di
questa condensa.
Non utilizzare il deumidificatore senza l’acqua
refrigerata: questo può portare al danneggiamento della
macchina stessa!
FUNZIONAMENTO
Sono previsti 2 tipi di funzionamento principali:
- Deumidicazione
- Integrazione
La Deumidicazione entra in funzione quando viene chiuso il
contatto di deumidicazione (vedere cap. “3 - Collegamenti
elettrici”). L’unità inizierà a deumidicare, mantenendo una
temperatura di uscita neutra rispetto a quella in ingresso. La
temperatura è impostata a 26 °C ed è comunque modicabile
da parametro (vedere cap. “Centralina”)
L’Integrazione entra in funzione quando viene chiuso il contatto
di integrazione (vedere cap. “3 - Collegamenti elettrici”).
L’unità inizierà a deumidicare, inserendo in ambiente una certa
quantità di energia sensibile . La temperatura di immissione in
ambiente è comunque impostabile da parametro (vedere cap.
“Centralina”)
Page 18
18
Page 19
19
USE
UTILIZZO
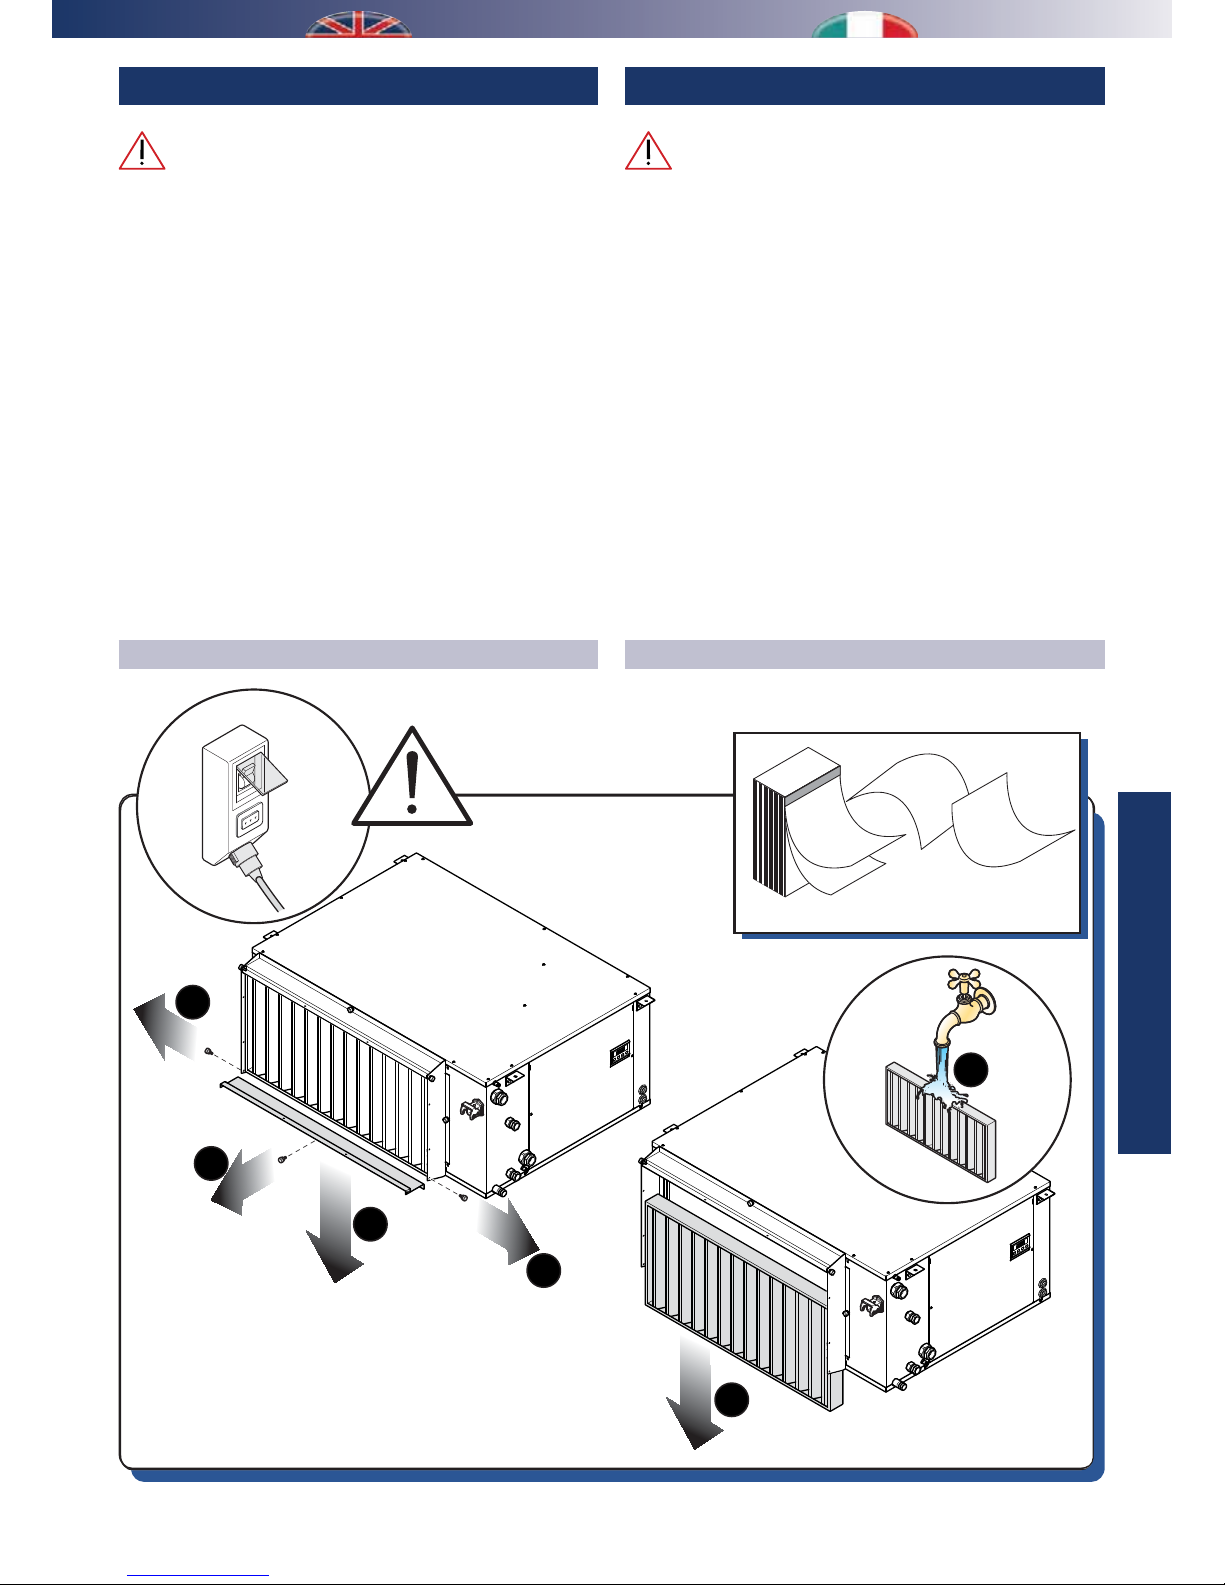
every 30 days
ogni 30 giorni
OFF!
Spento!
28
30
29
3
1
1
2
1
4
Tutte le operazioni di manutenzione straordinaria
descritte in questo capitolo DEVONO ESSERE SEMPRE
ESEGUITE DA PERSONALE QUALIFICATO.
• Prima di effettuare qualsiasi intervento sull’unità o
prima di accedere a parti interne, assicurarsi di aver tolto
l’alimentazione elettrica.
• All’interno dell’unità sono presenti degli organi in
movimento. Prestare particolare attenzione quando
si operi nelle loro vicinanze anche ad alimentazione
elettrica disconnessa.
• Una parte dell’involucro del compressore e la tubazione
di mandata si trovano a temperatura elevata. Prestare
particolare attenzione quando si operi nelle loro
vicinanze.
• Prestare particolare attenzione quando si operi in
prossimità delle batterie alettate in quanto le alette di
alluminio risultano particolarmente taglienti.
• Dopo le operazioni di manutenzione richiudere sempre
l’unità tramite le apposite pannellature, ssandole con
le viti di serraggio.
All the extraordinary maintenance operations
described in this chapter MUST ALWAYS BE CARRIED OUT BY
QUALIFIED PERSONNEL.
• Before performing any intervention on the unit or before
accessing internal parts, ensure that the electrical power
supply has been disconnected.
• There are moving components inside the unit. Take
particular care when operating in their vicinity, even when
the electrical power supply is disconnected.
• One part of the compressor casing and the delivery piping
are at a high temperature. Take particular care when
operating in their vicinity.
• Take particular care when operating in proximity to the
nned coils as the aluminium ns are particularly sharp.
• After maintenance operations, always close the unit using
the special panelling, securing it using xing screws.
ORDINARY MAINTENANCE CLEANING THE FILTER MANUTENZIONE ORDINARIA PULIZIA FILTRO
MAINTENANCE MANUTENZIONE
Caution! The lter may be removed from any of the four
sides by removing the corresponding guide.
Attenzione! Il ltro può essere rimosso da qualunque
dei quattro lati rimuovendo la guida corrispondente.
Page 20
20
1
2
3
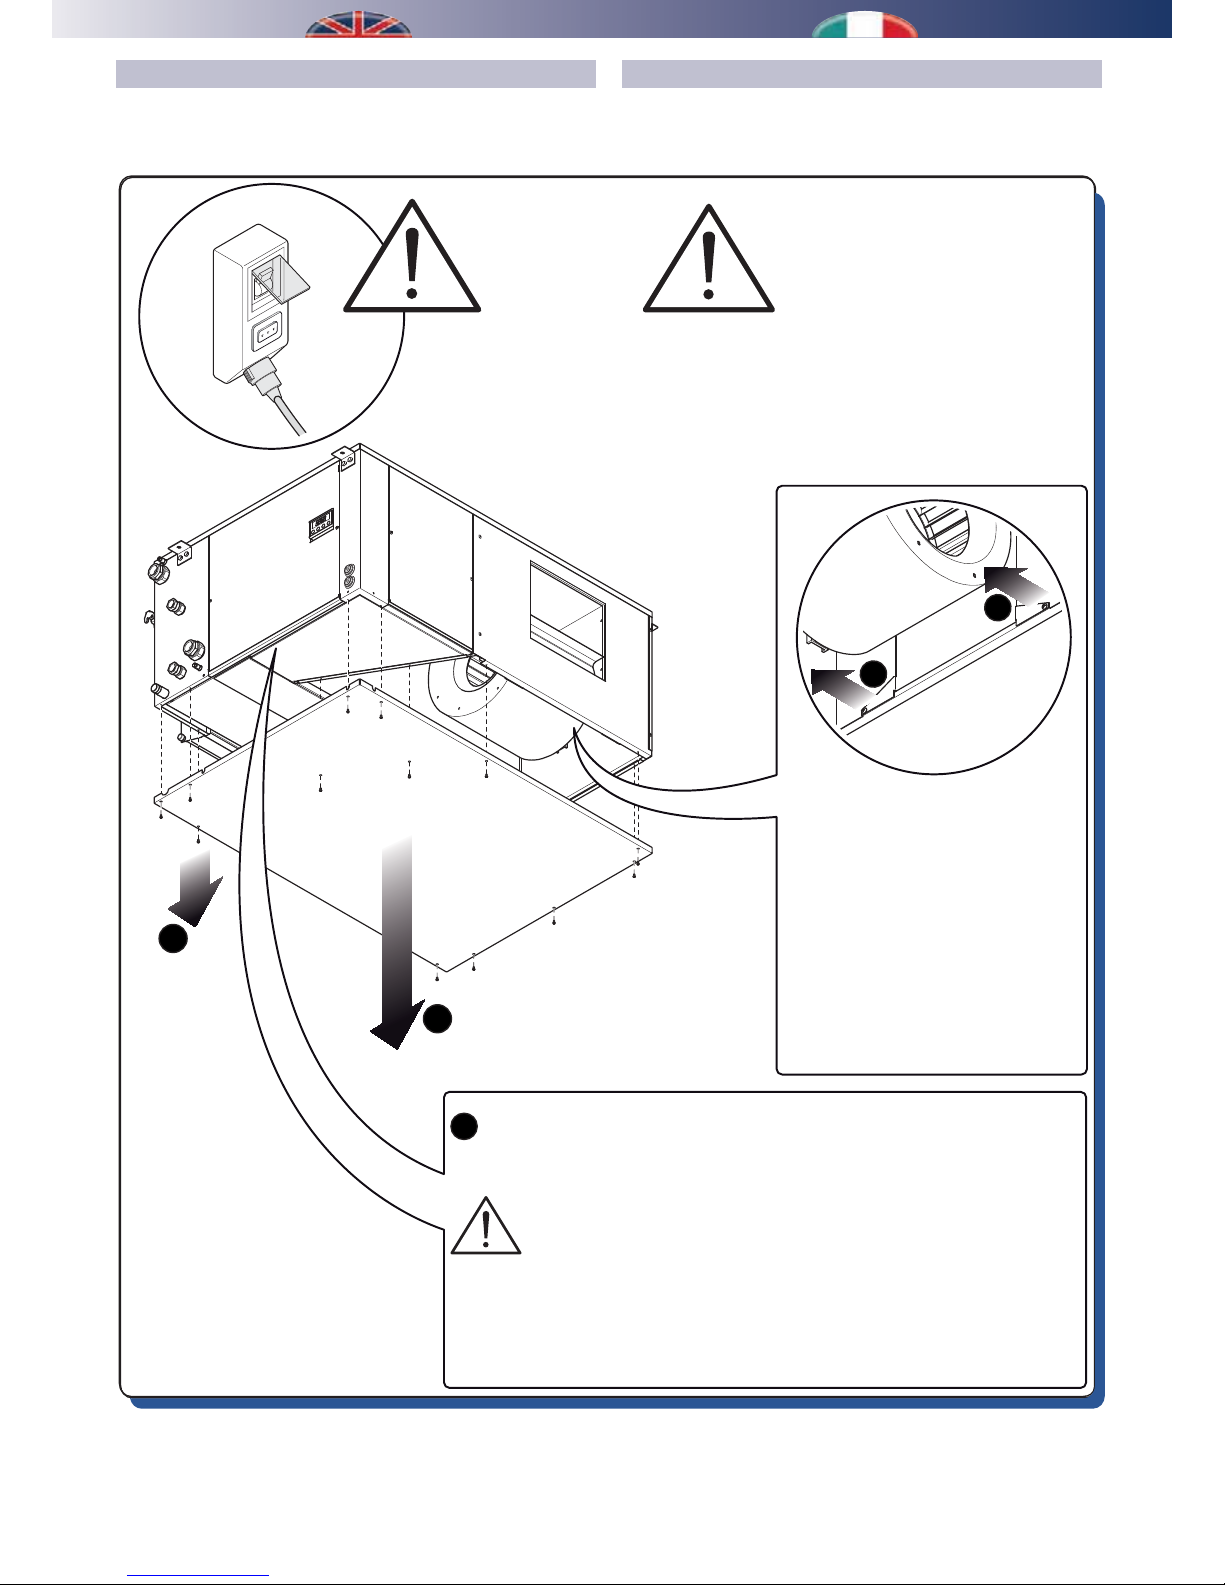
Remove the fan power cable.
Rimuovere il cavo di alimentazione del ventilatore.
Finally remove the two screws (2)
which block the sides of the fan
case, lift it up slightly and slide it
out of the opening on the side of
the machine.
Rimuovere inne le due viti(2)
che bloccano lateralmente la
cassa del ventilatore, sollevarlo
leggermente e slarlo
dall’apertura presente sul anco
della macchina.
If operating from the bottom, it will not be possible to access the
whole path of the electrical cable, when it is removed, use a probe
to reposition the electrical cable of the new fan.
Se si opera dal basso verrà a mancare l’accesso all’intero
percorso del cavo elettrico, quindi quando viene slato prevedere una sonda per riposizionare il cavo elettrico del ventilatore nuovo.
In order to replace the electric
fan condenser (at the side of
the motor), it is not necessary
to remove the fan.
Per la sostituzione del condensatore elettrico del ventilatore
(si trova a anco del motore)
non è necessario rimuovere il
ventilatore.
OFF!
Spento!
4
4
MANUTENZIONE STRAORDINARIA RIMOZIONE VENTILATORE
Atttenzione! La sostituzione del ventilatore avviene rimuovendo
il pannello inferiore del deumifìdicatore.
EXTRAORDINARY MAINTENANCE REMOVING THE FAN
Caution! To replace the fan you must remove the lower dehumidier
panel.
Page 21
21
USE
UTILIZZO
DISPLAY
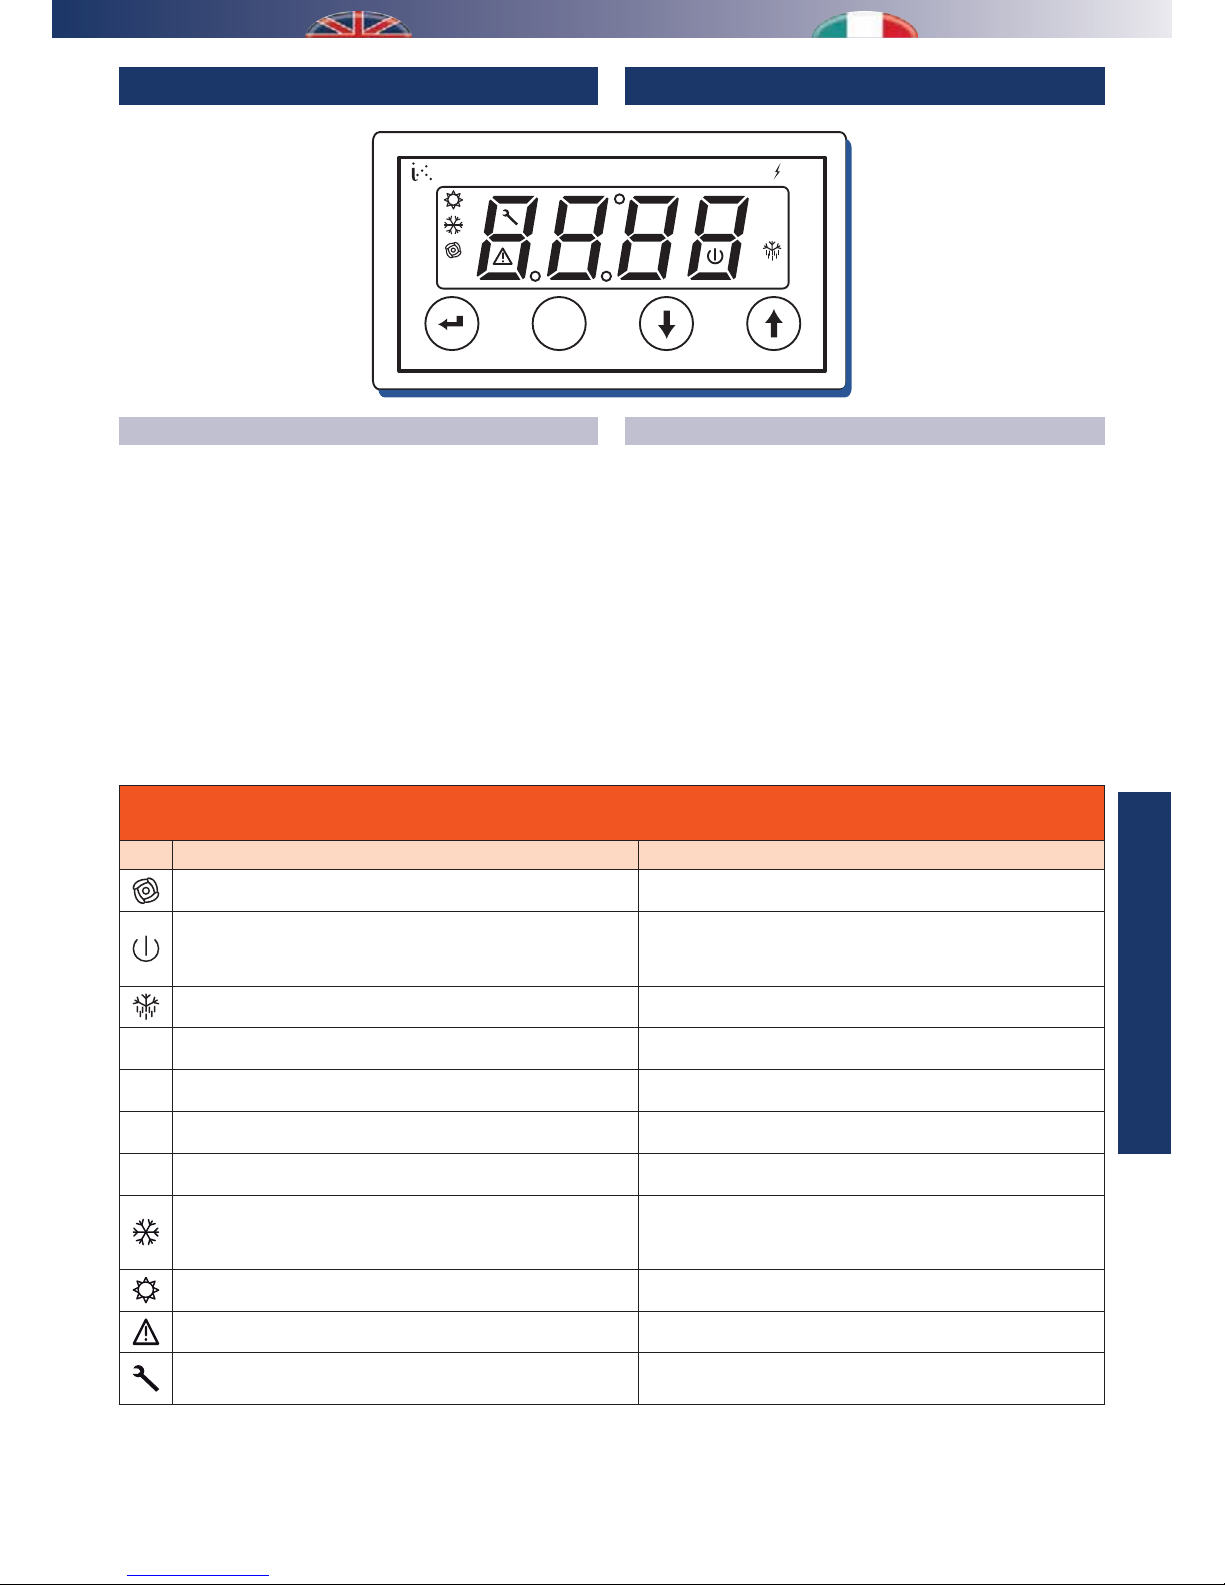
By using the controller screen it is possible:
- To change the parameter;
- To read the status of inlets and outlets at any moment;
- To detect the alarm type in case of anomaly or malfunctioning.
Each symbol on the screen is associated with a device which can
be activated (symbol on) or stand-by (ashing symbol)
In the main screenshot dierent symbols for operations can be
displayed, and it is possible to read the output air temperature
from the relevant outlet.
DISPLAY
Tramite il display del controllore è possibile:
- eettuare la modica dei parametri;
- sapere in ogni momento lo stato degli ingressi e delle uscite;
- il tipo di allarme, in caso di anomalia o malfunzionamento.
Ogni simbolo del display è associato ad un dispositivo che
può essere attivato (simbolo acceso oppure in attesa (simbolo
lampeggiante)
Nella maschera principale, oltre a visualizzare le icone dei
vari funzionamenti, è possibile leggere la temperatura di
uscita dell’aria dalla bocchetta di immissione.
esc
13
°C
24
Power
CONTROL UNIT CENTRALINA
Table D: display icons description
Tabella D: descrizione icone del display
Ico. Description Descrizione
it means that the fan operates indica il ventilatore attivato
it means that the compressor operates; if it ashes it means
that the fan is going to start (e.g. at the beginning or in case
of defrosting)
indica il compressore attivato, se lampeggia è in attesa
di attivarsi (ad esempio all’avviamento oppure in fase di
sbrinamento)
defrosting è attiva la fase di sbrinamento
1
not used non usato
2
integration consent activated consenso integrazione attivo
3
dehumidication consent activated consenso deumidicazione attivo
4
selection of the set temperature 0-5V signal selezione segnale di temperatura 0-5V impostato
cooling solenoid valve operates; if it ashes, it means that the
valve is aected by the pressure of the cooling gas
è attiva la valvola a solenoide di raffreddamento; se
lampeggia signica che è inibita dalla pressione del gas
refrigerante
heating solenoid valve operates è attiva la valvola a solenoide di riscaldamento
alarm signal, technical switching-o is necessary segnale di allarme presente, richiede spegnimento elettrico
Alarm for maximum pressure, technical switching-o and
checking are necessary
allarme di massima pressione, richiede spegnimento
elettrico e verica tecnica
Page 22
22
MENU PRINCIPALE CENTRALINA E SET POINT
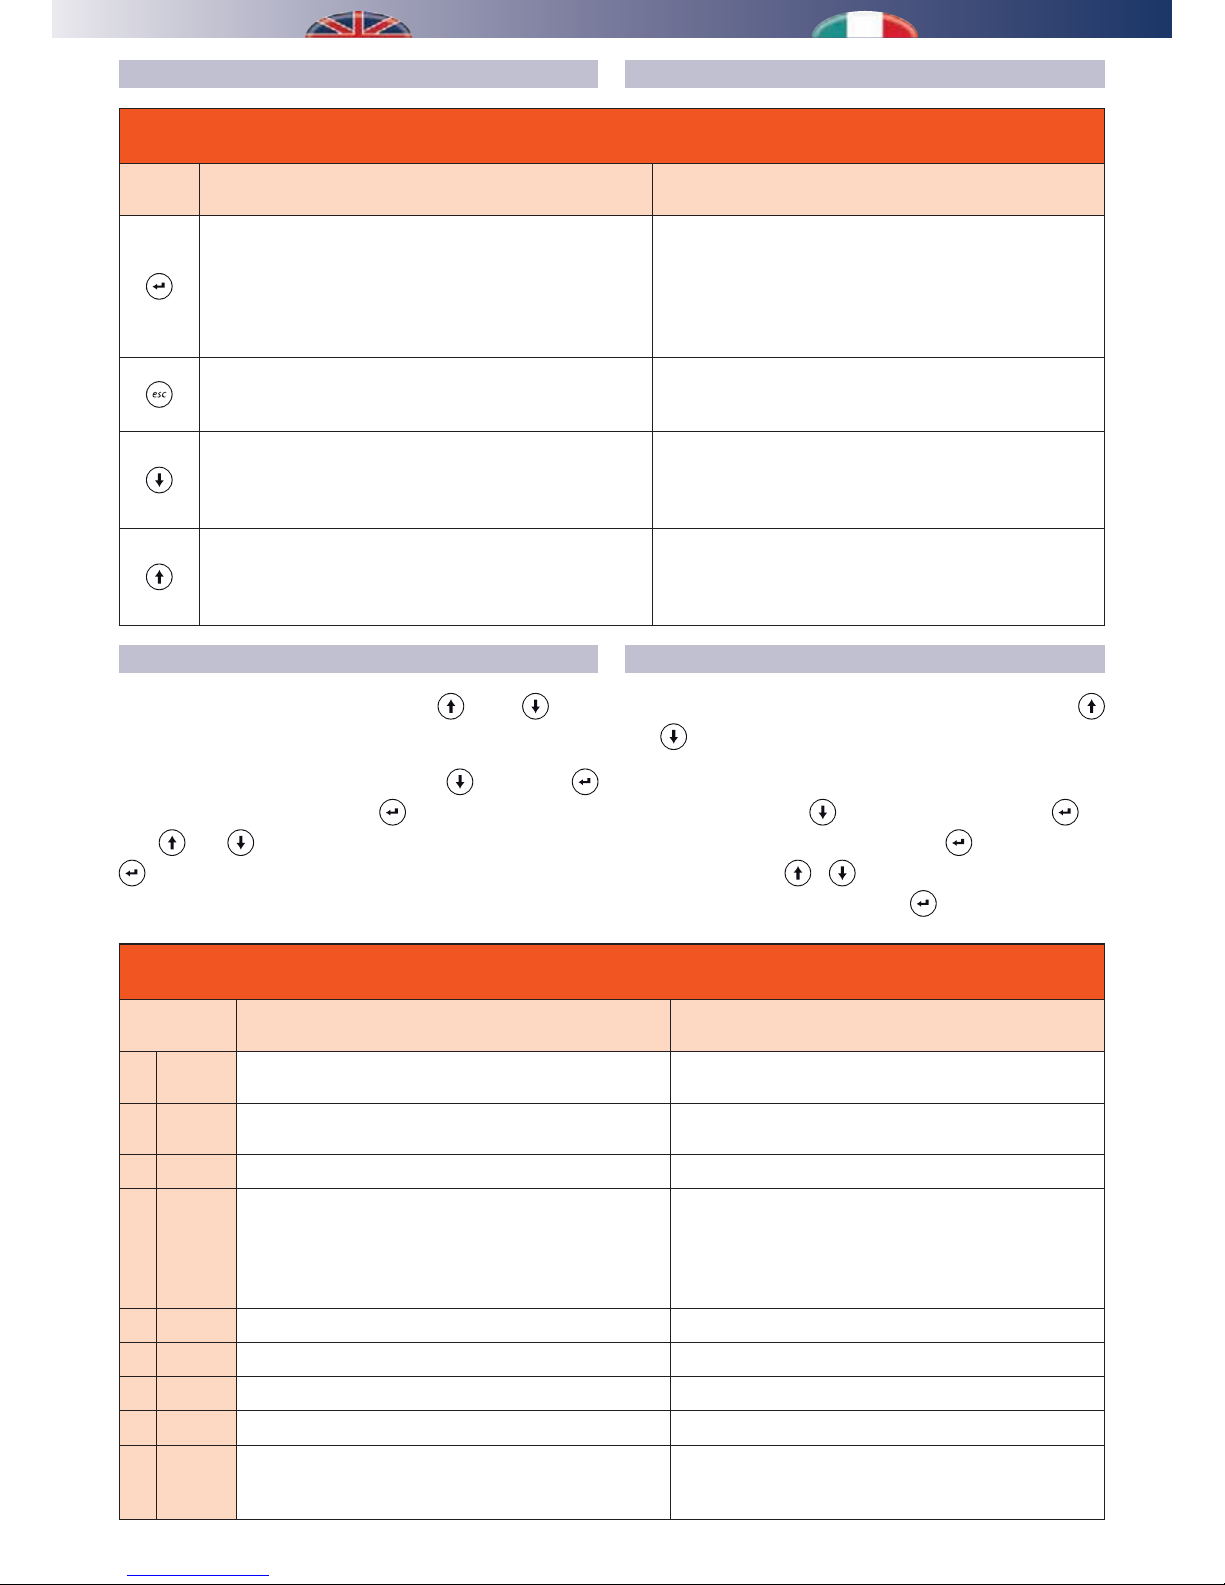
Per scorrere il menu, è suciente la pressione dei pulsanti
su e
giù.
Per modicare un parametro, ad esempio “t02”, è necessario
selezionarlo con il tasto
, successivamente premere per
visualizzarne il valore, premere di nuovo
per modicare il
valore tramite i tasti
e ; per salvare il valore ottenuto è
suciente premere di nuovo il tasto
.
MAIN MENU FOR CONTROLLER AND SET POINT
To scroll down the menu, just press the keys
up and down.
If you want to change a parameter, for example “t02”, it
is necessary to select it thorugh the key
, then press
to display its value, press again
to change the value by
keys
and ; to save the result value just press the key
again.
DESCRIZIONE TASTIBUTTONS DESCRIPTION
Table E: buttons description
Tabella E: descrizione tasti
Button
Tasto
Description Descrizione
From the operational parameters menu, the SET key allows
you to:
• access to the menu sub-folders
• access to the value of any parameter of one of the menu
sub-folders
• conrm the parameter and/or output value
All’interno dei menù dei parametri funzionali, il tasto SET
permette:
• l’accesso alle sottocartelle del menù
• l’accesso al valore di un qualsiasi parametro di una delle
sottocartelle del menù
• la conferma del valore del parametro e/o uscita
Exit menus, list of parameters and parameter value (without
saving the value) and go back to the previous level
Si ottiene l’uscita da menù, da elenco parametri, da valore
parametro (senza salvataggio valore) e ritorno a livello
precedente
• Scrolling the folders and parameters display downwards
• Parameter value decrease (if in parameter value
modication mode)
• Scorrimento verso il basso della visualizzazione delle
cartelle e dei parametri
• Decremento del valore del parametro (se in modica
valore parametro)
• Scrolling the folders and parameters display upwards
• Parameter value increase (if in parameter value
modication mode)
• Scorrimento verso l’alto della visualizzazione delle
cartelle e dei parametri
• Incremento del valore del parametro (se in modica
valore parametro)
Table F: control unit main menu
Tabella F: menu principale centralina
Screenshot
Maschera
Description Descrizione
1
W
output air temperature for dehumidication (presetting
is 26 °C)
Set di temperatura di immissione dell’aria per la
deumidicazione (26 °C di fabbrica)
2
W
output air temperature for integration (presetting is 17 °C)
Set di temperatura di immissione dell’aria per
l’integrazione (17 °C di fabbrica)
3
W
unused Non usato
4
VHO
selection of the output temperature set:
0 - through parameters t03 and t02
1 - through analogue input 0-5V (t01 and t02 are not taken
into consideration)
Set di selezione del tipo di set della temperatura di
immissione:
0 - tramite parametri t03 e t02
1 - tramite ingresso analogico 0-5V (t01 e t02 vengono
ignorati)
5
DOO
alarm menu menu allarmi
6
GDW
sensor reading menu menu letture sonde
7
SDU
access is not allowed non acessibile
8
VYY
sofware release versione software
9
6RQG
duct sensor reading:
0 - there is not any sensor
1- there is a sensor
Lettura presenza sonda canale:
0 - sonda assente
1- sonda presente
Page 23
23
USE
UTILIZZO
DAT MENU
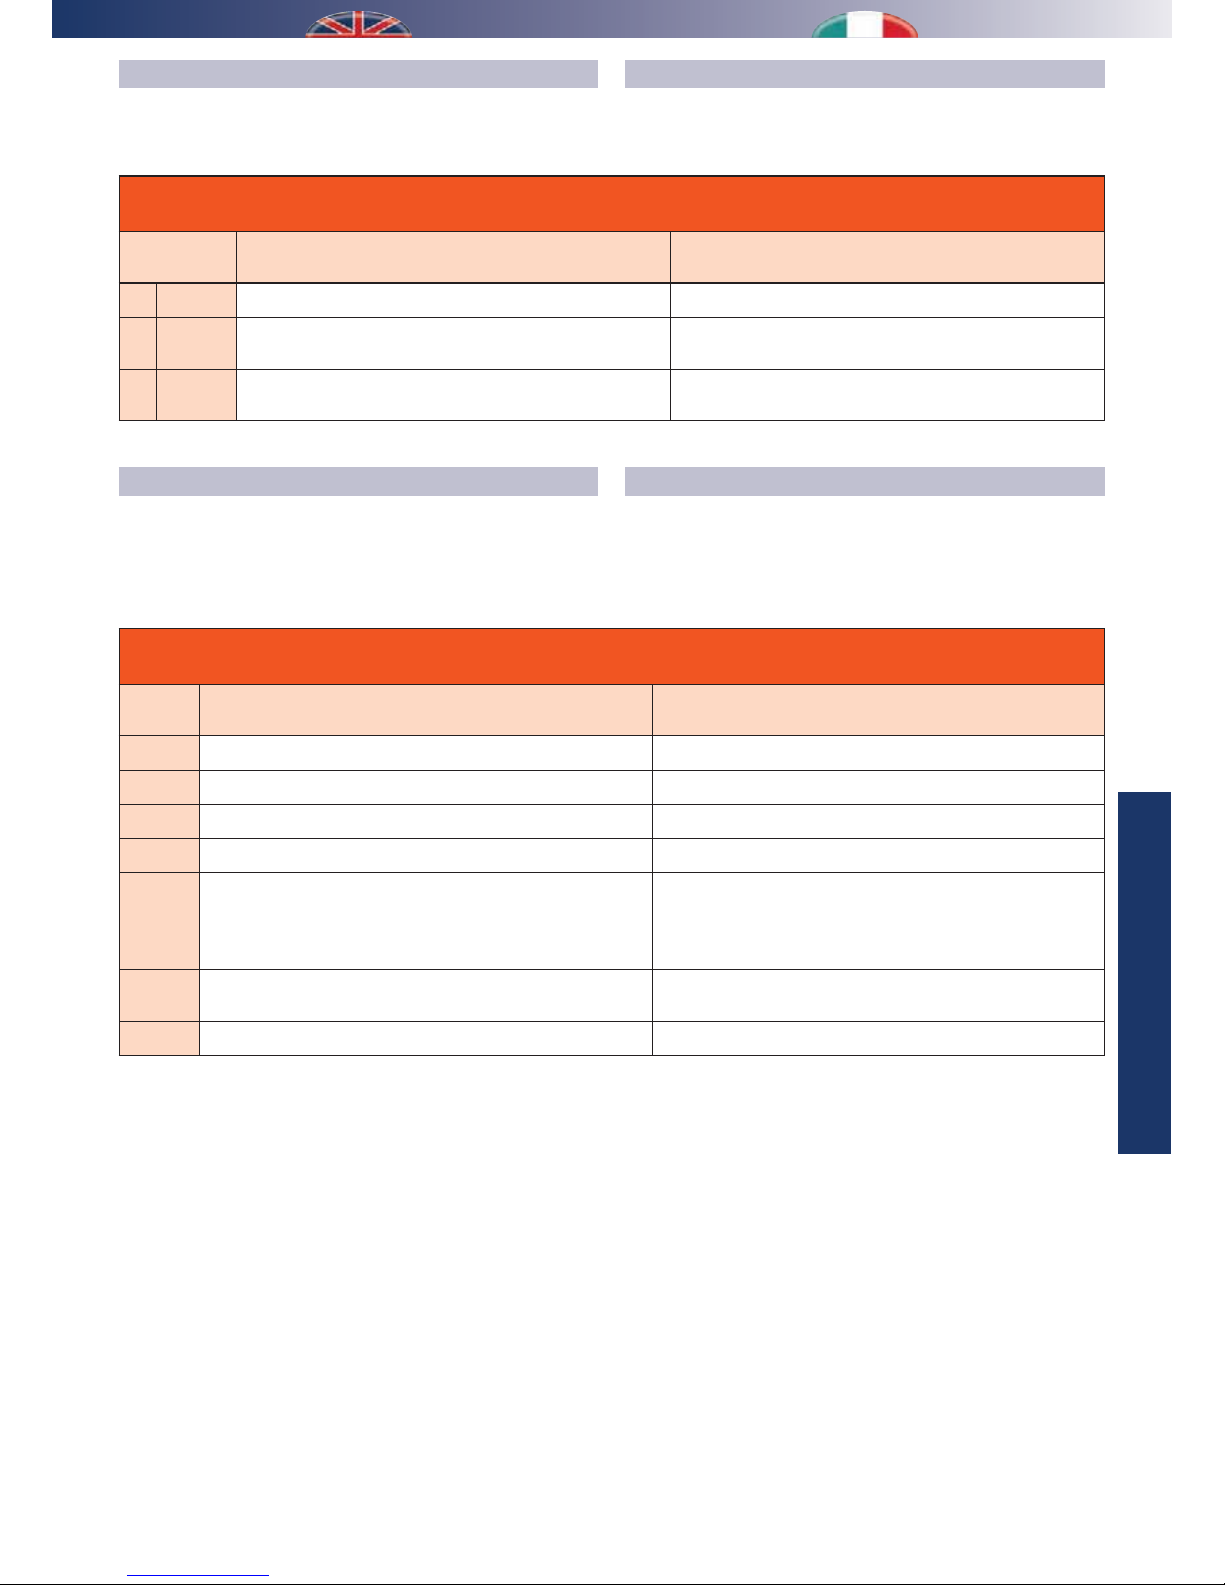
It is possible to read the following functioning values through the
this menu
MENU DAT
E’ possibile leggere, tramite questo menu, i seguenti valori di
funzionamento
Table G: DAT menu
Tabella G: menu DAT
Screenshot
Maschera
Description Descrizione
1
SUHV
Condensation pressure detected by the refrigerant gas Pressione di condensazione rilevata del gas refrigerante
2
WH
Air temperature detected after the evaporating coil
Temperatura dell’aria rilevata dopo la batteria
evaporante
3
WVHW
Air temperature detected after the output fan
Temperatura dell’aria rilevata dopo il ventilatore di
immissione
ALARMS
In case of malfunctioning the screen of the unit shows an alarm
symbol and from “all” menu you can see the alarm code. Codes
are described in the following chart.
ALLARMI
In caso di problemi di funzionamento sul display della macchina
compare l’icona di allarme e dal menu ”all” sarà possibile
visualizzare il codice del tipo di allarme. I codici vengono
descritti nella tabella successiva.
Table H: control unit main menu
Tabella H: menu principale centralina
Alarm
Allarme
Description Descrizione
(
no trouble nessun guasto presente
(
damage on the temperature sensor of the evaporator guasto alla sonda di temperatura evaporatore
(
damage on the pressure sensor of the cooling gas guasto al sensore di pressione del gas refrigerante
(
damage on the inow air temperature sensor guasto alla sonda di temperatura di mandata dell’aria
(
max. cooling pressure switch. In this case, the signal is
continuous; it is necessary to cut off the tension to the
controller for resetting
intervento del pressostato di massima pressione
refrigerante. In tale caso la segnalazione è persistente, per
cui è necessario togliere l’alimentazione al controllore per
permettere il reset
H
low pressure alarm for the evaporator or circuit overloading
allarme di bassa pressione evaporatore o sovraccarico
al circuito
(
low temperature alarm for the evaporator allarme di bassa temperatura evaporatore
Page 24
24
[mm]
716
327
903
393
939
705
635
504
TECHNICAL DATA AND PERFORMANCE
DATI TECNICI E PRESTAZIONI
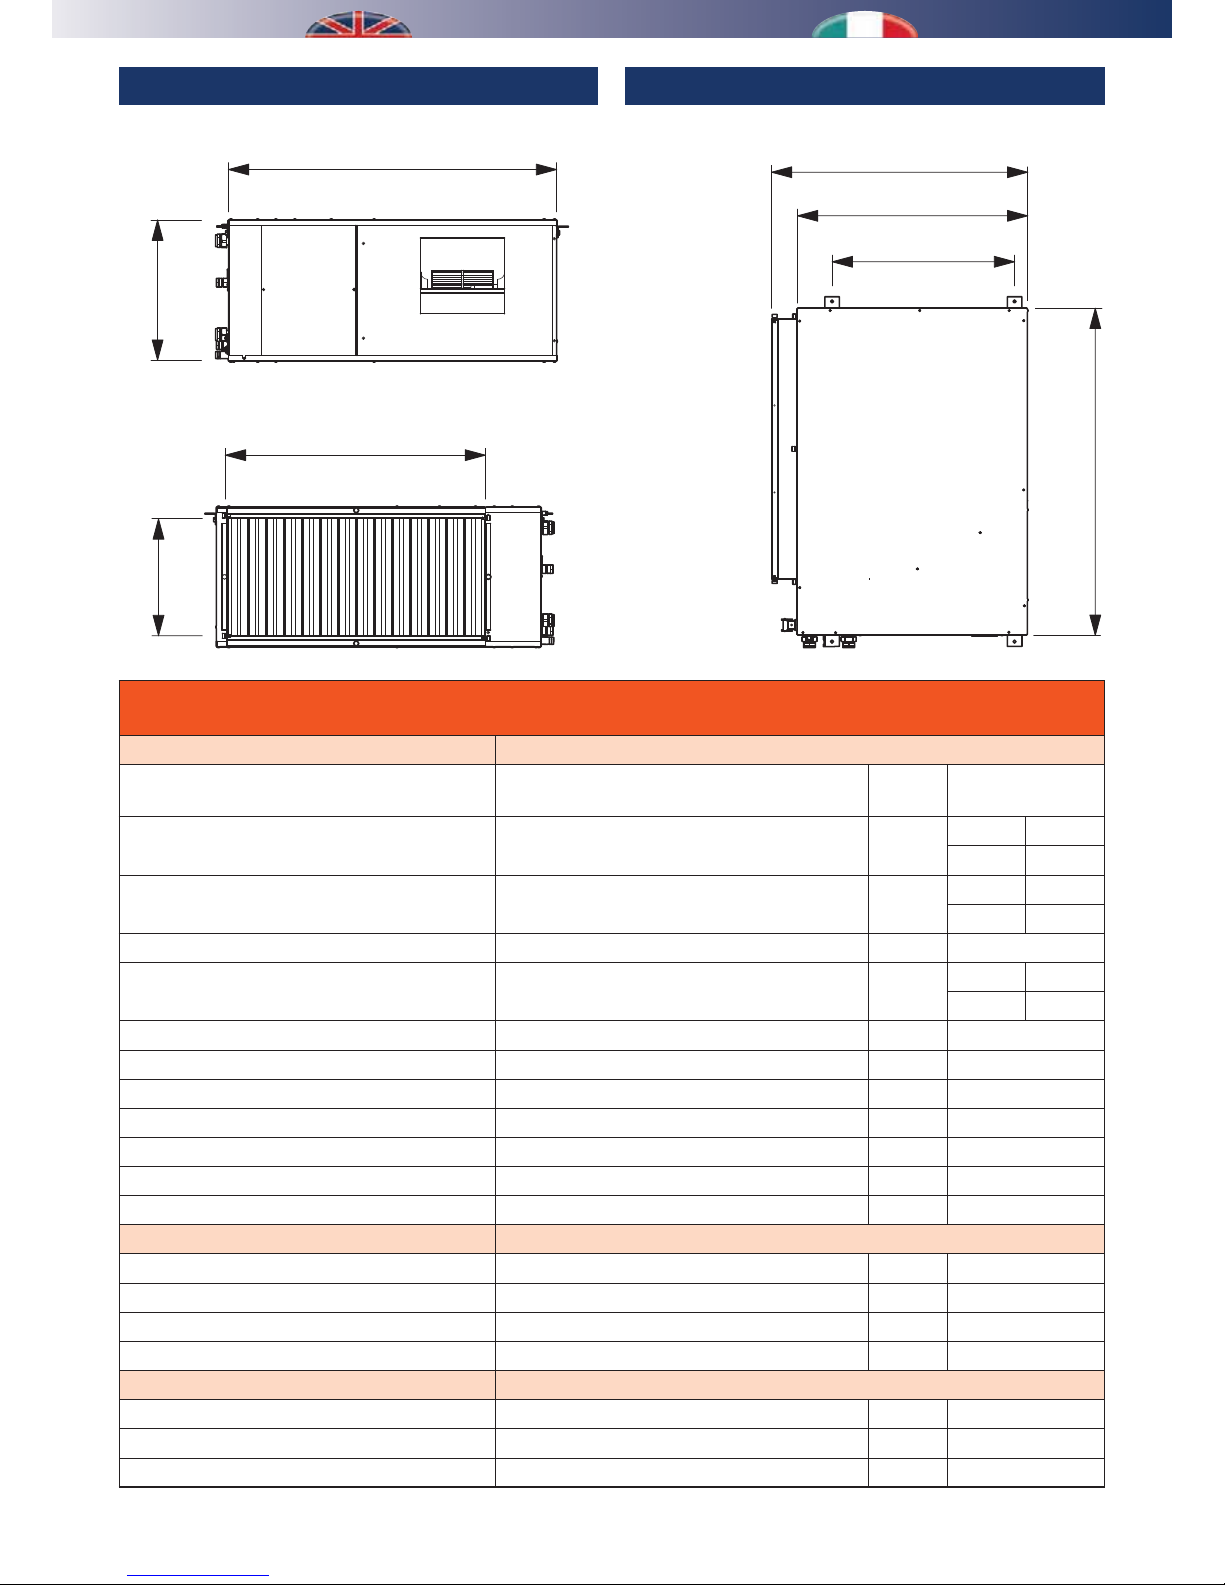
Table I – technical characteristics
Tabella I - Caratteristiche tecniche
Technical specications Speciche tecniche
Condensation (26° - 65%) Umidità condensata (26° - 65%)
l/day
l/giorno
127,5
Standard voltage Corrente elettrica nominale A
50 Hz 5,4
60 Hz 6,5
Total max. power consumption of the fan Corrente elettrica max. assorbita dal ventilatore A
50 Hz 1,4
60 Hz 1,8
Nominal air ow rate Portata aria nominale m/h 1000
Available head Prevalenza disponibile Pa
50 Hz 116
60 Hz 155
Pre-cooling water ow rate Portata acqua pre-rareddamento l/h 1000
Pre-cooling water outlets Attacchi acqua pre-rareddamento 3/4” F
Condensation water ow rate Portata acqua condensazione l/h 130
Condensation water outlets Attacchi acqua condensazione 1/2” F
Pre-cooling water head loss Perdita di carico acqua pre-rareddamento kPa 24
Refrigerant (R410A) Refrigerante (R410A) gr 1250
Maximum operating pressure Pressione massima di esercizio Bar 39
Overall machine dimensions Ingombri della macchina
Height Altezza mm 393
Width (without hidraulic connection) Larghezza (senza attacchi idraulici) mm 905
Depth Profondità mm 705
Weight Peso kg 70
Machine packaging Imballi macchina
Height Altezza mm 455
Width Larghezza mm 1055
Depth Profondità mm 765
Page 25
25
TECHNICAL DATA
DATI TECNICI
CONTROLLI DI SICUREZZA
Tutti i dispositivi di controllo sono collaudati in fabbrica prima
della spedizione dell’apparecchiatura. La loro funzionalità viene
descritta nei paragra successivi.
I controlli di sicurezza vengono eetuati dalla centralina tramite
i valori rilevati dalle sonde:
- trasduttore di pressione
- sonda temperatura vano ventilatore
- sonda temperatura evaporatore
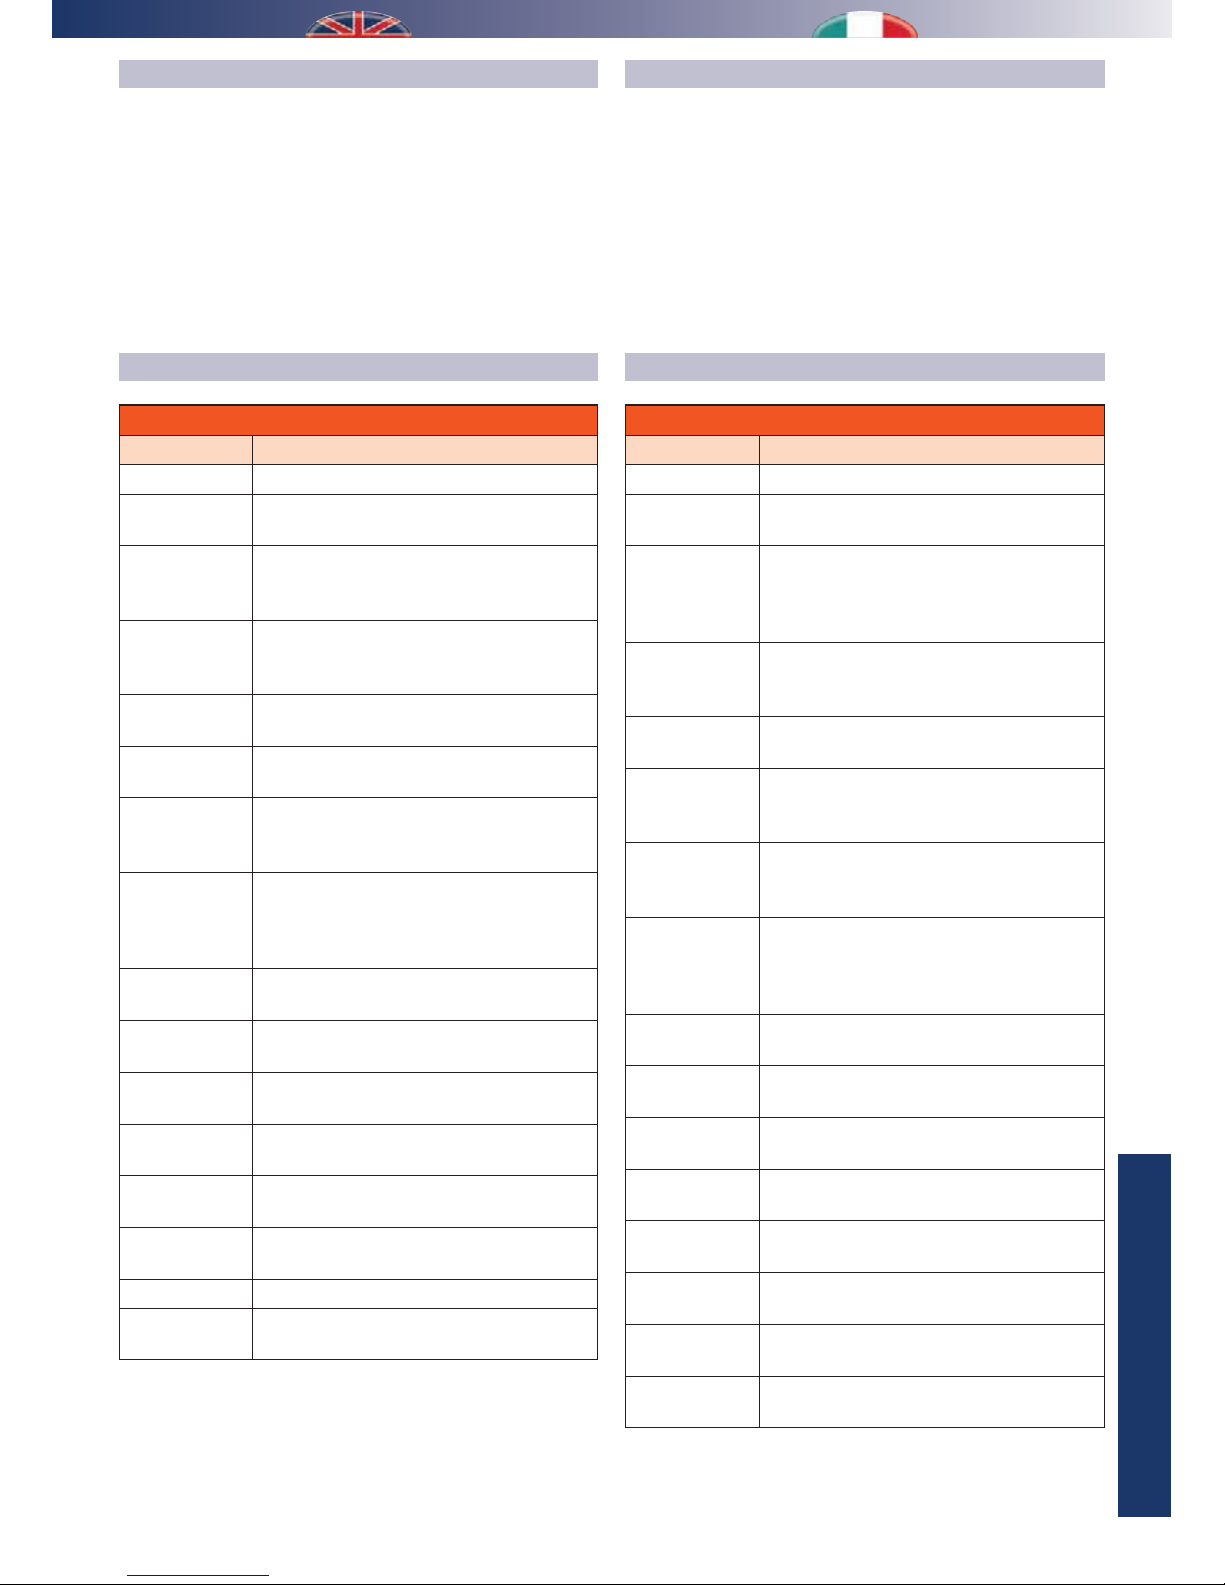
COMPONENTI
Tabella J - Componenti
Componente Descrizione
Compressore Di tipo rotativo
Trasduttore di
pressione
Sensore che rileva la pressione del gas
condensante
Sonda di
temperatura
vano
ventilatore
Sensore NTC che rileva la temperatura
dell’aria dopo il ventilatore di immissione
Sonda di
temperatura
evaporatore
Sensore NTC che rileva la temperatura
dell’aria dopo l’evaporatore
Fusibili - 250 V - 15 A
- 250 V - 5 A
Elettrovalvole
di carico e
scarico
Valvole ON-OF per la gestione del usso
condensate del circuito frigo
Valvola
modulante
acqua
Valvola modulante per la regolazione del
usso d’acqua sul scambiatore a piastre
Scambiatore a
piastre
Scambiatore a piastre saldobrasate in
acciaio inossidabile AISI 316, utilizzato per
la condensazione del circuito frigo, in caso
di richiesta di integrazione
Centralina Centralina per il controllo delle temperature
e la gestione dei dispositivi elettrici
Ventilatore Di tipo centrifugo a doppia aspirazione con
motore direttamente accoppiato
Filtro Filtro con materiale ltrante in bra sintetica,
classe G3 (EN 779:2002)
Batteria pretrattamento
Tubi in rame e alette in alluminio con
trattamento “idrolico”
Batteria
evaporante
Tubi in rame e alette in alluminio con
trattamento “idrolico”
Batteria
condensante
Tubi in rame e alette in alluminio
Batteria
serbatoio
Tubi in rame e alette in alluminio
Gas
refrigernate
R 410A
SAFETY CHECKS
All the control devices are tested in the factory before the equipment
is shipped. Their operation is described in the following paragraphs.
Safety check is carried out by the control unit through the values
measured by the probes:
- pressure trasducer
- temperature sensor in the fan box
- evaporator temperature probe
COMPONENTS
Tabella J - Components
Component Description
Compressor Rotative
Pressure
trasducer
Sensor detecting the pressure of the
condensing gas
temperature
sensor
in the fan box
NTC sensor which measures the temperature
of the air after the output fan
Evaporator
temperature
probe
NTC sensor which measures the temperature
of the air after the condenser
Fuses - 250 V - 15 A
- 250 V - 5 A
Electrovalve for
ll and drain
ON-OFF valves to control the condensing ow
of the refrigerating circuit
Water
modulating
valve
Modulating valve to control the water ow on
the plate exchanger
Plate
exchanger
Braze-welded plate exchanger made
of stainless steel AISI 316, used for the
condensation of the refrigerating circuit in
case of integration
Controller Controller to manage temperatures and
electrical devices
Fan Centrifugal type with double suction with
direct combined motor
Filter Filter with synthetic fibre, class G3 (EN
779:2002)
Pre-treatment
coil
Copper pipe and aluminium fins with
hydrophilic treatment
Evaporating
coil
Copper pipe and aluminium fins with
hydrophilic treatment
Condensing
coil
Copper pipe and aluminium ns
Tank coil Copper pipe and aluminium ns
Refrigerant R 410A
Page 26
26
CARATTERISTICHE ACUSTICHE
La presenza della canalizzazione e/o plenum riduce
ulteriormente il valore del livello di pressione
sonora rilevato. I rilievi dei livelli potenza sonora
dell’apparecchiatura sono stati effettuati in camera
riverberante con il deumidificatore a bocca libera senza
plenum.
ACOUSTIC CHARACTERISTICS
The presence of canalisation and/or plenums further reduces
the sound pressure level measured. The sound pressure levels
of the equipment were measured in a reverberation chamber
with the dehumidier fully open without plenum.
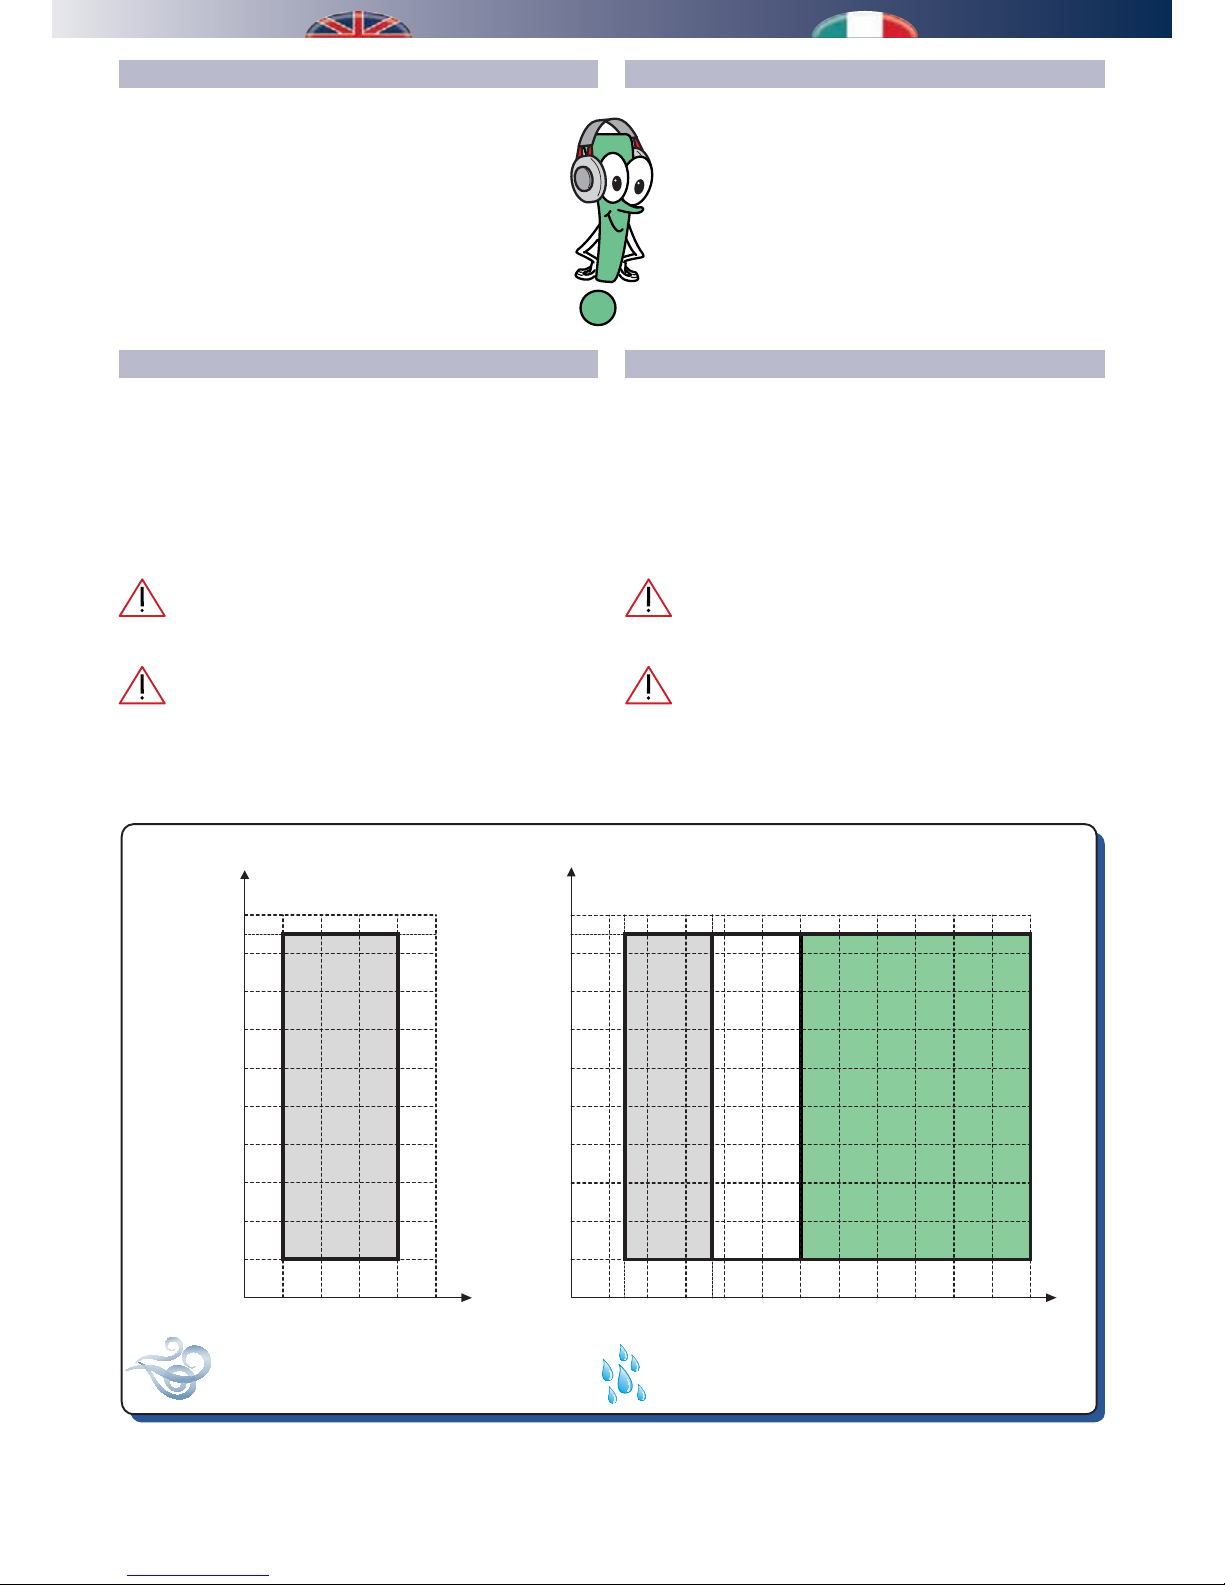
LIMITI DI FUNZIONAMENTO
I graci sottoriportati descrivono il campo operativo dell’unità. La
massima temperatura dell’acqua ammessa nel funzionamento
estivo è di 18 °C.
Al di sopra di 30°C, il compressore viene escluso, lasciando
in funzione solamente il ventilatore. Tra i 30 e 60 °C è
possibile attivare la sola ventilazione per un uso invernale
dell’apparecchio.
Con temperature dell’acqua superiori a 60°C
l’apparecchio potrebbe danneggiarsi.
è importante fare in modo che le unità operino nei
limiti riportati. Al di fuori di tali limiti non sono garantiti
né il normale funzionamento né tantomeno l’adabilità
e l’integrità delle unità (per applicazioni particolari
contattare l’ucio tecnico del Costruttore).
OPERATING LIMITS
The graphs shown below describe the operating range of the unit.
The maximum permitted temperature of the water for operation
in summer mode is 18 °C.
Above 30°C, the compressor is excluded, leaving only the fan
running.
Between 30 and 60 °C it is possible to activate the ventilation mode
only for use of the appliance in winter.
With water temperatures higher than 60°C, the
appliance could be damaged.
It is important to ensure that the units operate within
the limits shown. Beyond these limits, normal operation is
not guaranteed, nor is the reliability and integrity of the
units (for special applications, contact the manufacturerís
technical oce).
15 20 25 30 35
10
20
30
40
50
60
70
80
90
95
100
Air intake temperature [°C ]
Umidità relativa
Relative humidity
Water intake temperature [°C ]
Temperatura ingresso aria [°C ]
Temperatura ingresso acqua [°C ]
Dehumidication only
Sola deumidicazione
7
Umidità relativa
Relative humidity
53010 15 20 3525 40 45 50 55 60
10
20
30
40
50
60
70
80
90
95
100
Dehumidication only
Sola deumidicazione
Heating only
Solo riscaldamento
18
Page 27
27
TECHNICAL DATA
DATI TECNICI
PRESTAZIONI
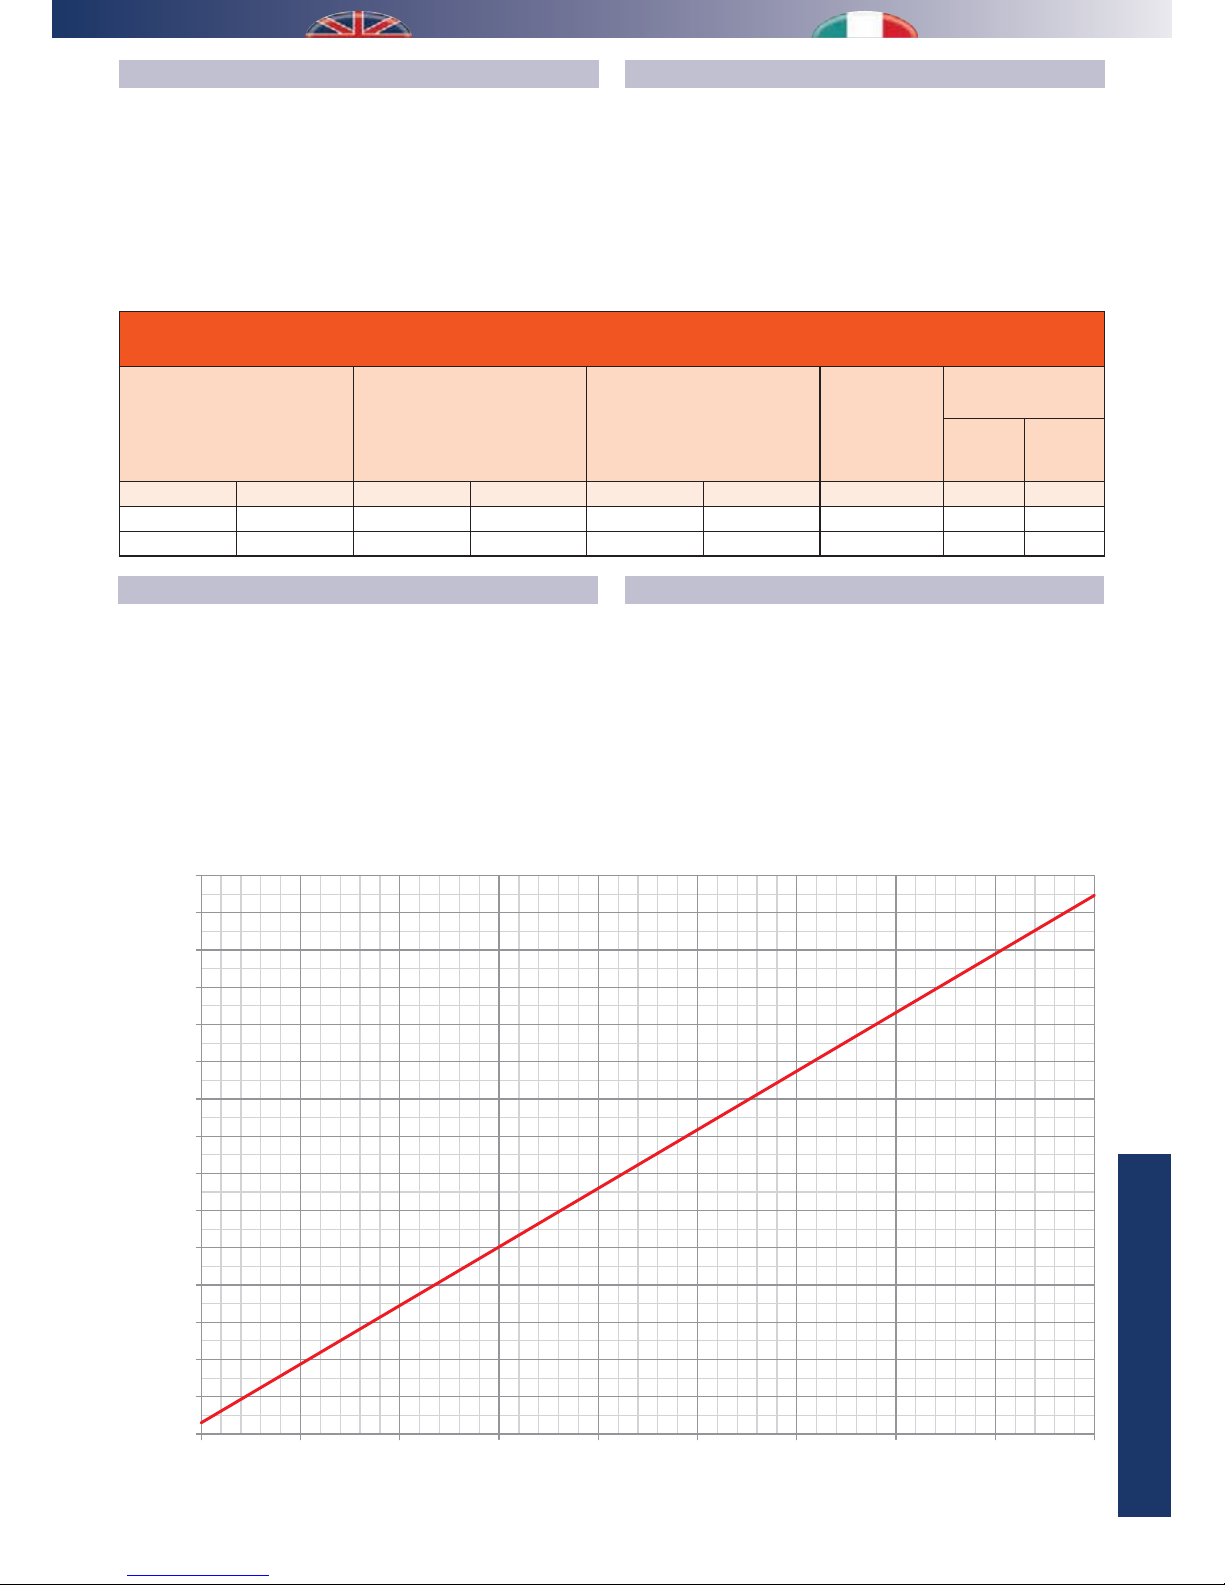
Resa in deumidificazione, in funzione della temperatura
ambiente, umidita’ relativa e temperatura dell’acqua refrigerata.
La potenza frigorifera da fornire al deumidicatore attraverso
le batterie con acqua refrigerata (per neutralizzare il calore
sensibile ed immettere in ambiente aria neutra) è mediamente
di 4942 W, mentre la potenza da fornire alle baterie per
permettere l’integrazione con il valore di set impostato di
fabbrica è mediamente di 8100 W.
PERFORMANCE
Performance in dehumidication mode, according to the room
temperature, relative humidity and temperature of the chilled
water.
The refrigerating power to be supplied to the dehumidier through
the coils with chilled water (to neutralise the sensible heat and send
neutral air into the room) is 4942 W on average, while the power
to be supplied to the coils for integration with the pre-set value is
8100 W on average.
FUNZIONAMENTO IN SOLA VENTILAZIONE
Se viene attivata l’opzione di ventilazione mantenendo la
circolazione di acqua refrigerata utilizzata nel funzionamento in
deumidicazione, il deumidicatore può introdurre in ambiente
una quota di calore sensibile.
Lo stesso accade alimentando la macchina con acqua calda
nel periodo invernale, in tale situazione la funzionalità di
deumidicazione viene automaticamente esclusa.
N.B. La potenza da fornire alle batterie è di circa 300 W
inferiore alla potenza resa in ambiente
OPERATION IN VENTILATION MODE ONLY
If the ventilation option is activated, keeping the circulation of the
chilled water used in dehumidication, the dehumidier can emit
a considerable amount of heat into the room.
The same happens by feeding the machine with hot water in the
winter period. In this situation, the dehumidication function is
automatically excluded.
N.B. The necessary power for coils is about 300 W inferior to
the power emitted into the room.
Table L- Performance in dehumidication and integration mode
Tabella L- Resa in deumidicazione e integrazione
Inlet air
Aria in ingresso
Outlet air
Aria in uscita
Latent cooling power
Pot. frig. latente
Min. inow
air temp
Minima
temp. aria di
mandata
Sensible output
Potenza immessa
Max Set 17 °C
° C % UR ° C % UR W l/g ° C W W
26,0 55 26 42,5 2262 78,1 14,2 4498 3150
26,0 65 26 44,9 3692 127,5 14,0 4218 3150
0 5 10 15 20 25 30 35 40 45
Twater inlet - Troom [°C]
Tacqua mandata - Tambiente [°C]
Heating power [W]
Potenza riscaldamento [W]
1
2
3
4
5
6
7
8
9
10
11
12
13
14
15
0
Page 28
28
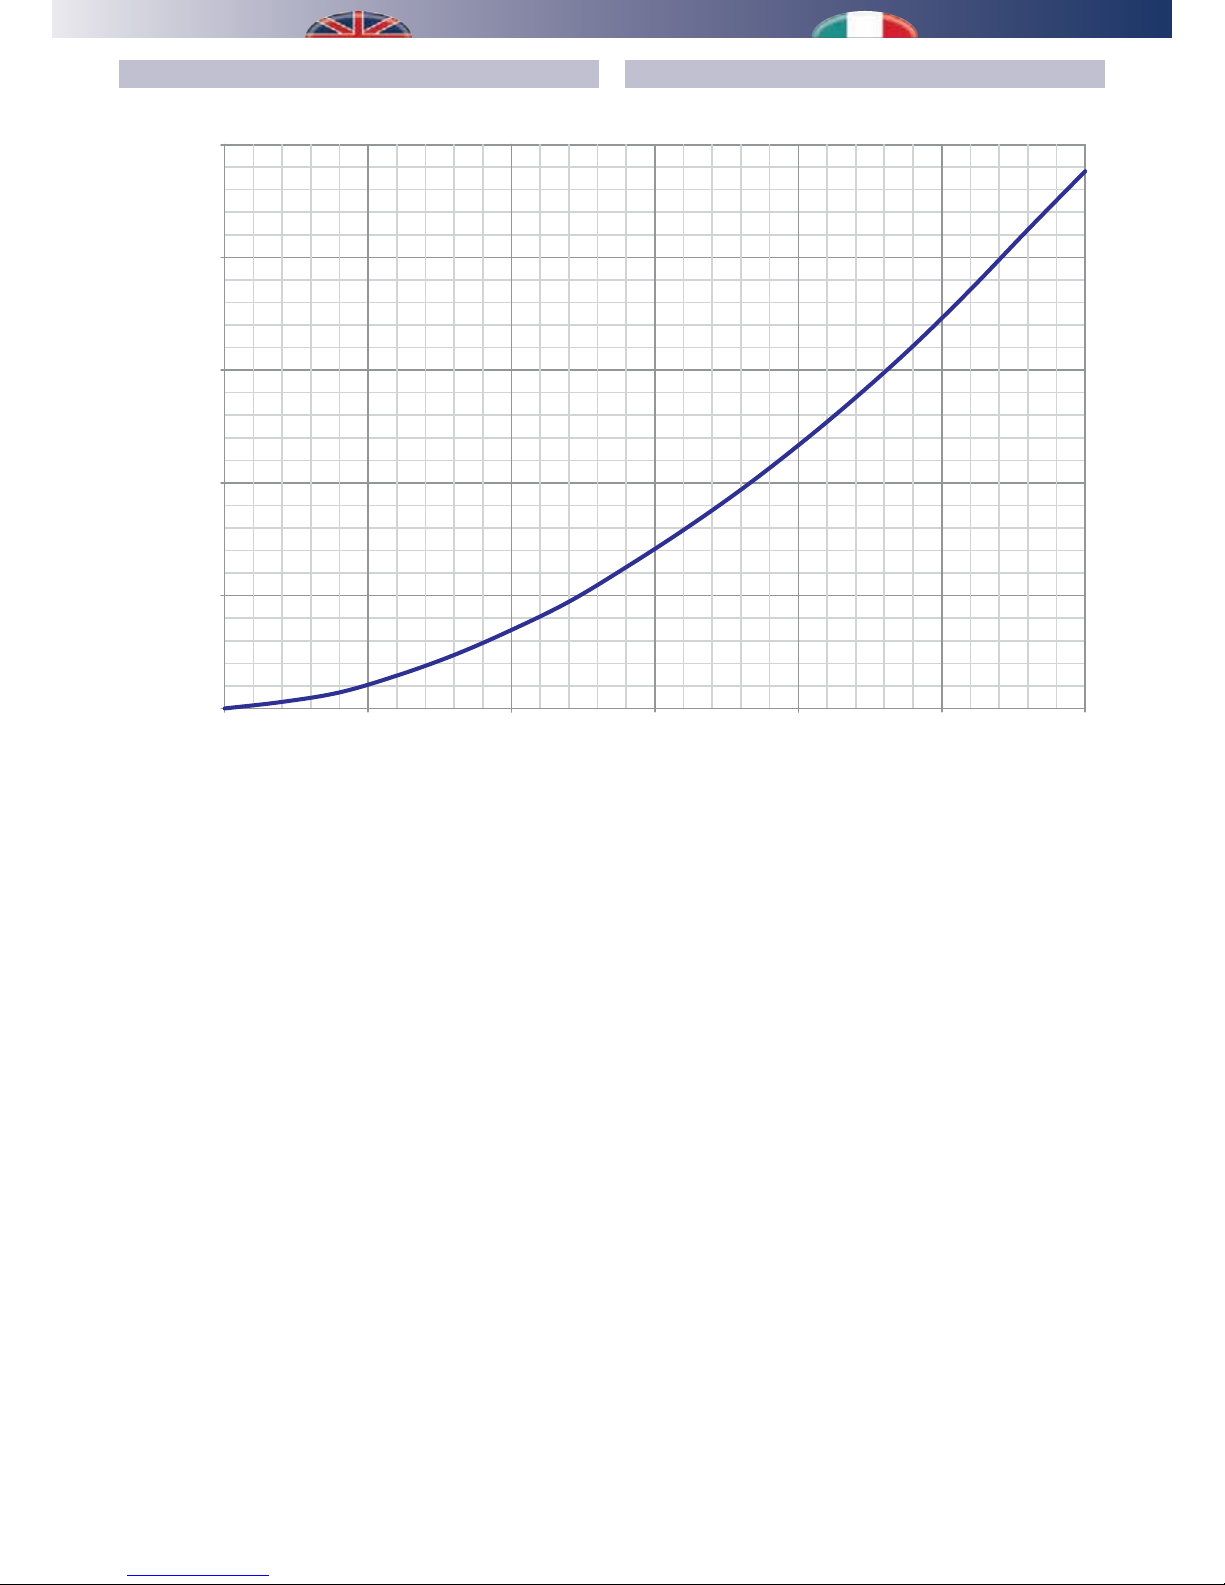
PERDITA DI CARICO CIRCUITO IDRAULICOPRESSURE LOSS OF THE HYDRAULIC CIRCUIT
0
1000
2000
3000
4000
5000
0 250 500 750 1000 1250 1500
Water ow rate [l/h]
Portata acqua [l/h]
Head loss [DaPa]
Perdita di carico [DaPa]
Page 29
29
TECHNICAL DATA
DATI TECNICI
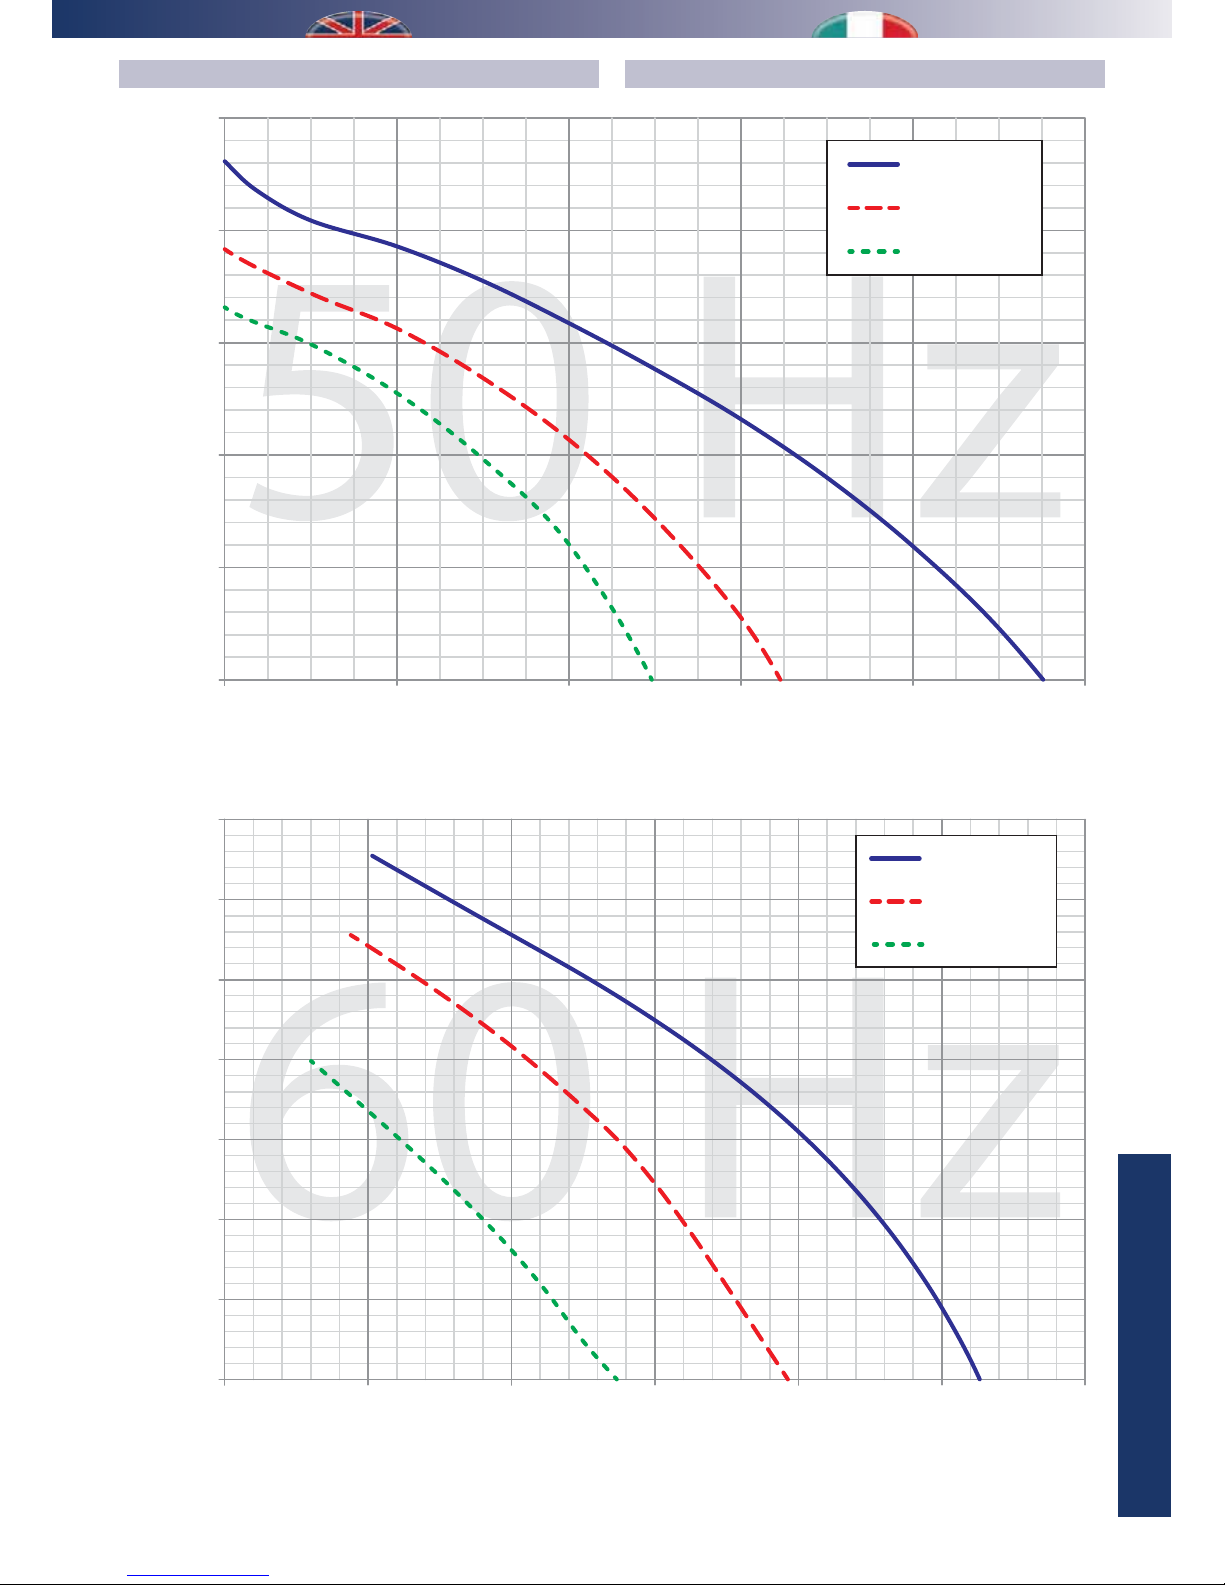
PREVALENZE UTILI ALLA BOCCHETTA DI IMMISSIONEAVAILABLE PRESSURES TO THE INTAKE OUTLET
0
50
100
150
200
250
400 600 800 1000 1200 1400
Air ow rate [m3/h]
Portata aria [m
3
/h]
Performance [Pa]
Prevalenza utile [Pa]
MAX speed
Velocità MAX
MIN speed
Velocità MIN
MED speed
Velocità MED
0
50
100
150
200
250
300
400 600 800 1000 120
01400200
Air ow rate [m3/h]
Portata aria [m
3
/h]
Performance [Pa]
Prevalenza utile [Pa]
MAX speed
Velocità MAX
MIN speed
Velocità MIN
MED speed
Velocità MED
350
Page 30
30
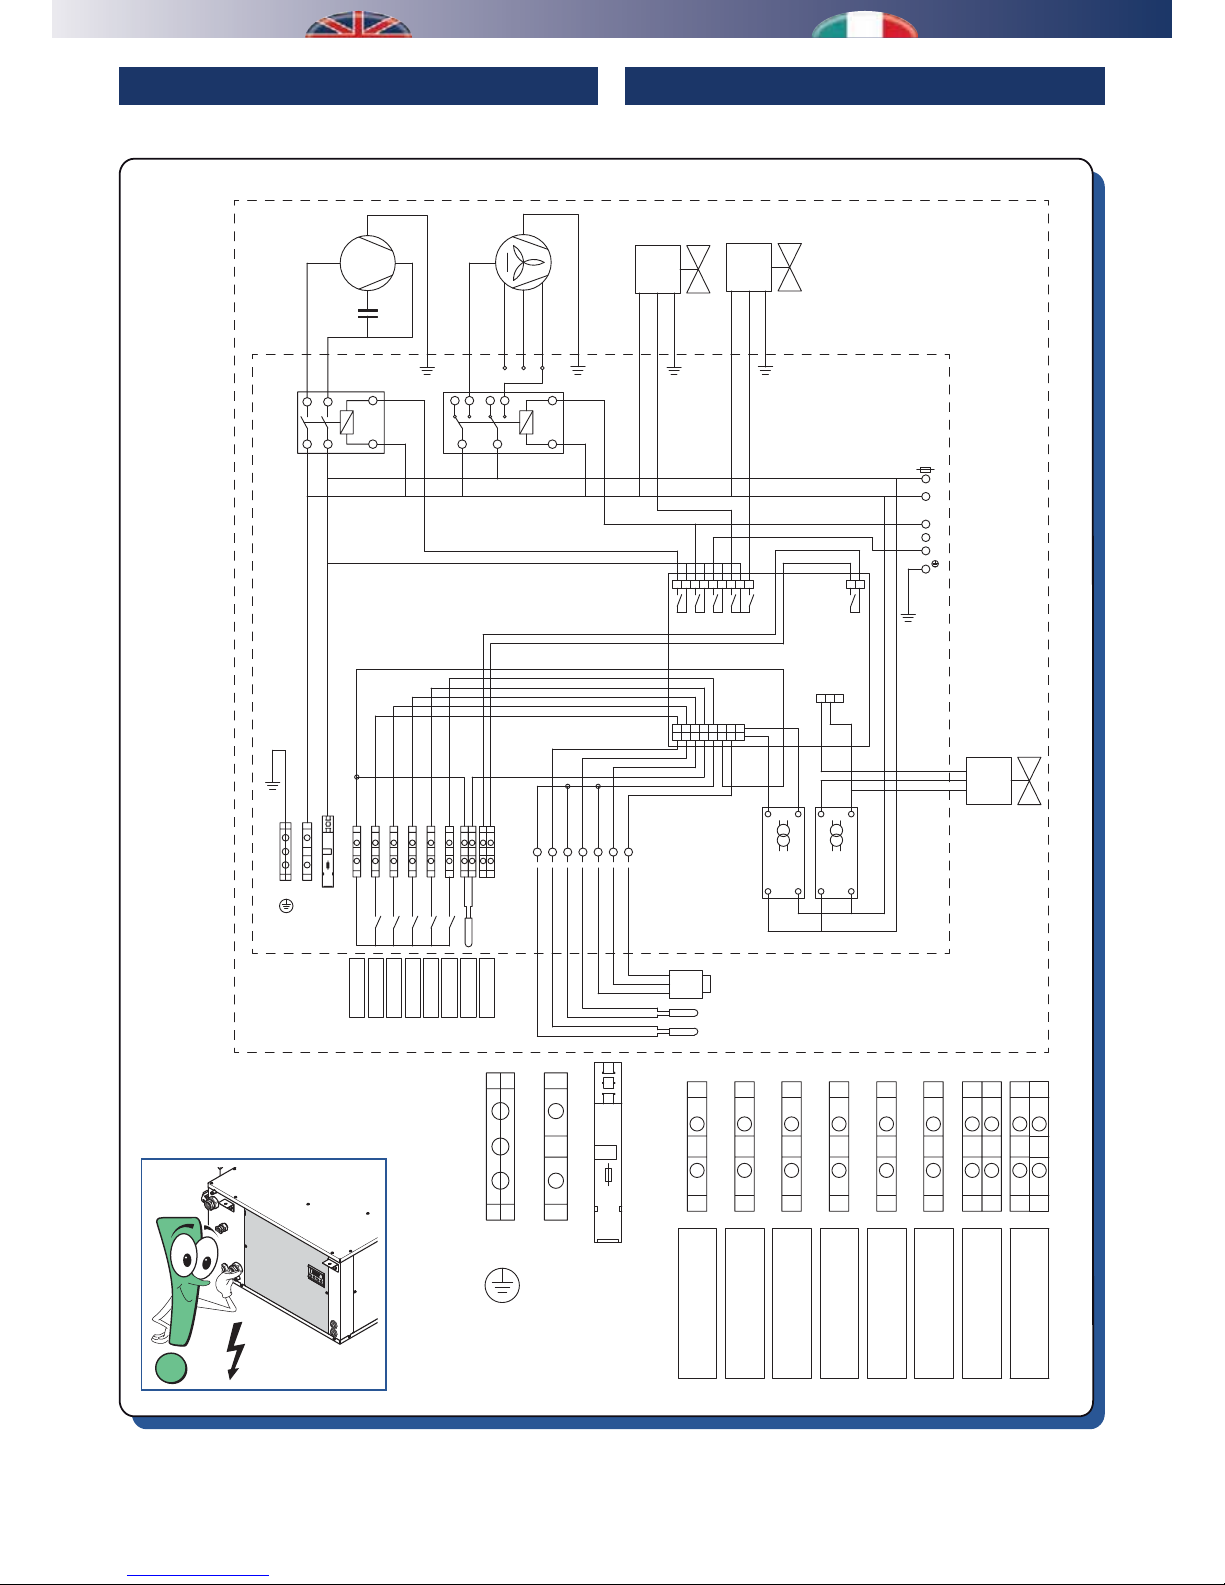
WIRING DIAGRAM SCHEMI ELETTRICI
DA 1000 - Rev 03
1 2 3 4 5 6 7 8 9 11 12
1 2 3
12345678
910111213141516
C-PRO MICRO
TR2
24Vac
TR1
12Vac
DO1
DO2
DO3
DO4
DO5
AO2
AO3GND
Power supply
220V 50Hz
N
L
1234 66
COMP
VENT
RINN
EVC
EVS
DI1
DI2
DI3
DI4
DI5
GND
0
NOT
USED
NOT
USED
5 7
EVS
R
S
C
N
L
C
Kc
22
24
21
A2
A1
11
A1
A2
14
24
21
Kv
12
14
NC
NO
COM
11
M
N
L
FAN
VENTILATORE
COMPRESSOR
COMPRESSORE
ATTUATORE VALVOLA ACQUA
max.3A
max.3A
max.3A
max.3A
EVC
DO6
max.3A
L
N
V
R
NC
NO
COM
1
2
3
4
5
BLUE
VIOLET
BLUE
PINK
YELLOW
WHITE
BLUE
BROWN
V1 V2 V3
GREY
RED
BLACK
5
8
1
4
1
4
8
5
7
ELECTRICAL SWITCHBOARD
YELLOW
GREY
5A
WATER VALVE ACTUATOR
BLUE
RED
WHITE
BLACK
ELETTROVALVOLA
DI CARICO
CIRCUITO FRIGO
ELETTROVALVOLA
DI SCARICO
CIRCUITO FRIGO
CHARGE ELECRTIC VALVE
DISCHARGE ELECRTIC VALVE
GND
AI4
AI3
AI2
AI1
+5V
PRESSURE TRASDUCER
FAN PROBE
SONDA EVAPORATORE
+5V
120110100
BLACK
WHITE
RED
TRASDUTTORE DI PRESSIONE
EVAPORATOR PROBE
SONDA VENTILATORE
DI3-Integration consent
DI2-Dehumif. consent
DI1-Ventilation consent
AI4-External probe
DO6-Alarm
DI5-Renewal consent
GND-COMMON DI/AI
DI4-T1 consent
COMUNE DI/AI
Consenso ventilaz.
Consenso deumidif.
Consenso integraz.
Consenso T1
Consenso rinnovo
Allarme
Sonda esterna
Power supply
220V 50/60Hz
N
L
DI3-Integration consent
DI2-Dehumif. consent
DI1-Ventilation consent
AI4-External probe
DO6-Alarm
1234 66
DI5-Renewal consent
0
GND-COMMON DI/AI
5
DI4-T1 consent
7 7
COMUNE DI/AI
Consenso ventilaz.
Consenso deumidif.
Consenso integraz.
Consenso T1
Consenso rinnovo
Allarme
Sonda esterna
15A
RECUPERATOR
TERMINAL STRIP
MORSETTIERA
RECUPERATORE
Page 31

Page 32
cod. 9100257.02 - 02/2013
 Loading...