

Page 1
HD-MA35U
INSTALLATION AND OPERATION
INTRODUCTION
Congratulations on your selection of an RDL HD-Series Ultra-High-Efficiency commercial mixer amplifier. The HD-MA35U is part of the world’s first full-featured environmentally conscious
“green” mixer amplifier series for commercial installations. This product includes studio quality microphone input stages, line-level transformer isolation, equalization, remote control capability
and integral analog compression coupled to sonically pleasing analog-filtered high efficiency Class D output stages. An internal low-power-consumption processor monitors usage demands
to completely shut down internal circuitry for maximum power conservation and extremely low long-term operating cost. The HD-Series mixer amplifiers are designed and manufactured in the
U.S.A. using the most advanced automated manufacturing and testing processes for years of reliable high performance and cost savings.
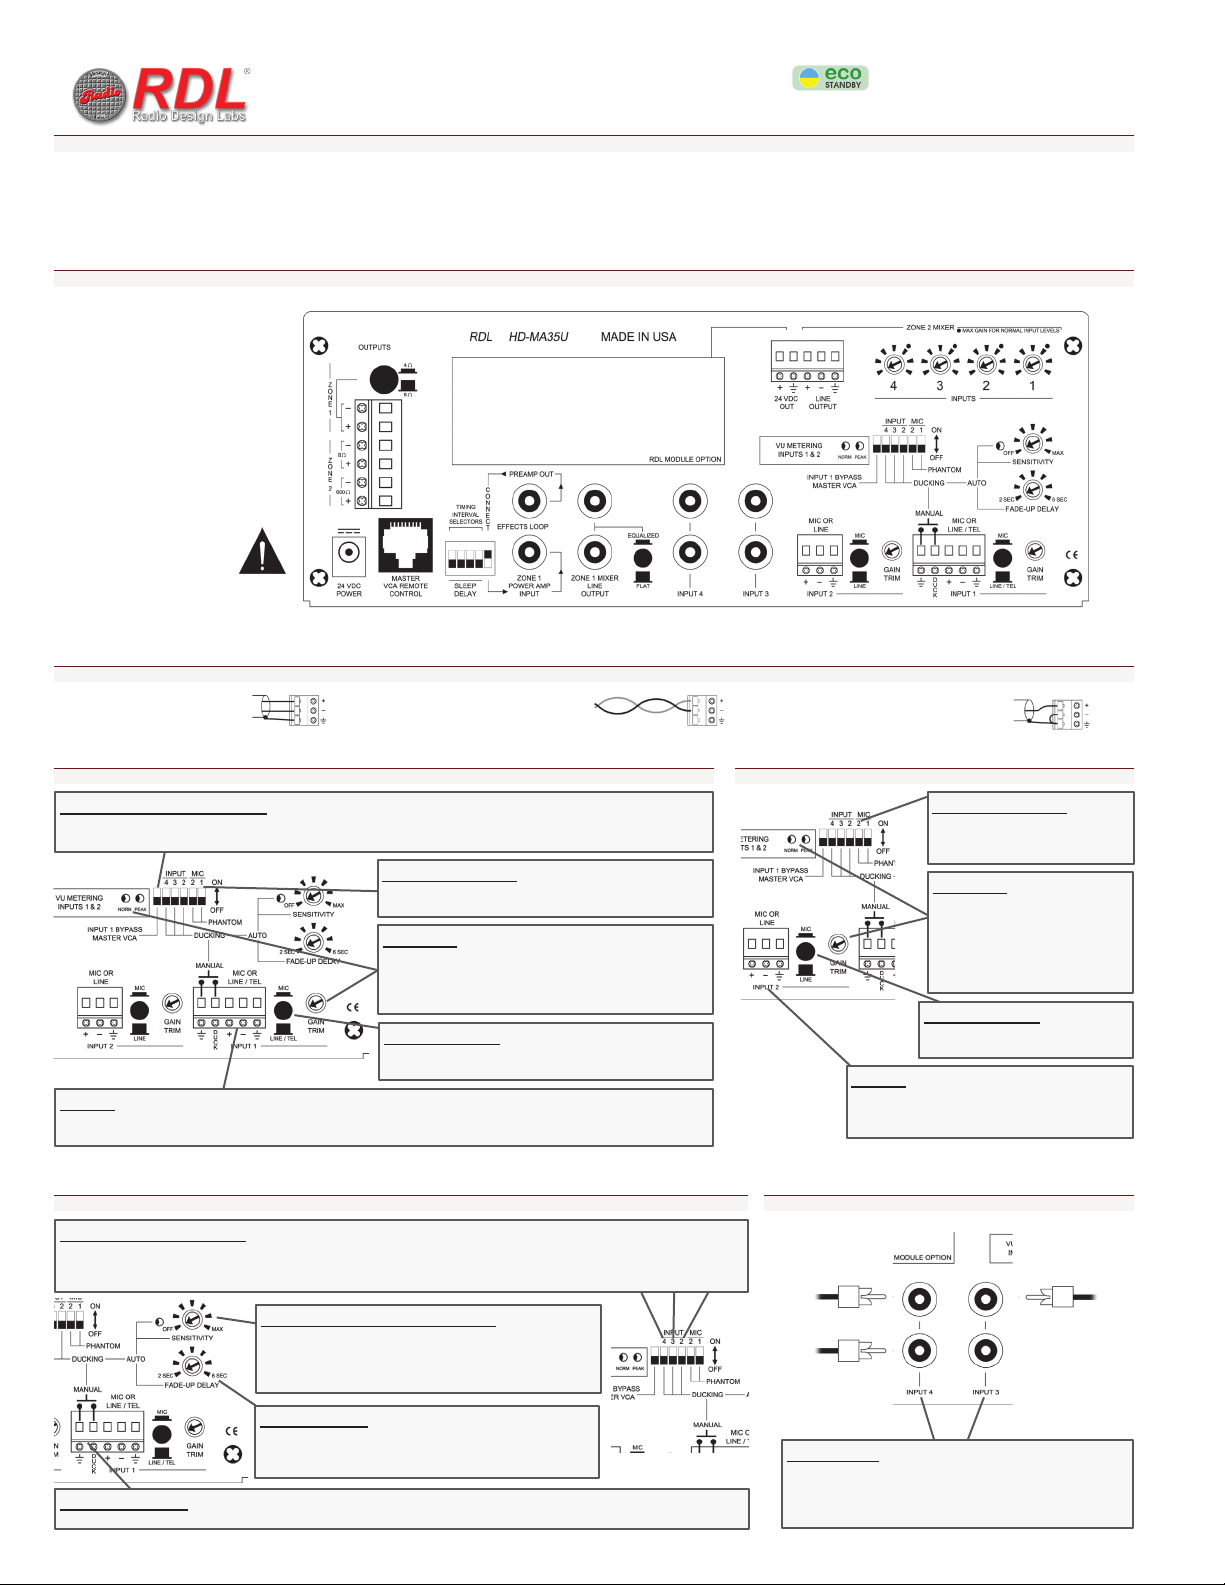
CONNECTIONS
USE ONLY THE POWER SUPPLY
SUPPLIED WITH THE MODULE.
HD-MA35U 4Ω/8Ω
Connections are made on the rear panel. All connections are on detachable terminal blocks or connectors. The Zone 2 mixer, Inputs 1 and 2 gain trimmers and VU-meter, ducking controls and
assignments, phantom voltage selectors and sleep mode delay timer settings are also provided on the rear panel. The Zone 1 mixer, tone controls, indicators and power button are on the front panel.
INPUT WIRING
Balanced MIC or LINE source connected
using a single-pair shielded audio cable
Balanced LINE signal from phone
PBX or audio transformer
Unbalanced MIC or LINE source connected using
a single-conductor shielded audio cable
Four inputs may be connected. Each input is available on the primary Zone 1 front-panel mixer and on the Zone 2 rear-panel mixer. If used, the paging source is usually connected to Input 1.
INPUT 1 INPUT 2
INPUT 1 BYPASS MASTER VCA
If the INPUT 1 (paging) level is to be controlled by a master VCA remote control, set the switch OFF (down). If a remote control
not
intended to adjust INPUT 1, set the switch ON (up). In BYPASS, pages are heard even if the master is off.
is
PHANTOM VOLTAGE
If a condenser mic may be connected to INPUT 1, set the
phantom voltage ON (switch up).
GAIN TRIM
Feed a normal signal level into INPUT 1 and adjust the GAIN
TRIM for maximum brightness of the NORM green LED with
occasional flashing of the red PEAK LED. (Disconnect INPUT 2
during this adjustment.)
MIC or LINE Gain
Set the Input Gain to MIC or LINE/TEL according to the input
signal connected.
INPUT 1
Connect a MIC or LINE source. This is normally a paging mic or the line-level paging output from a phone PBX. The line-level
input is transformer balanced (providing galvanic isolation) and may be connected balanced or unbalanced.
INPUT 2
Connect a MIC or LINE source. The line-level input is
active balanced and may be connected balanced or
unbalanced.
PHANTOM VOLTAGE
If a condenser mic may be connected
to INPUT 2, set the phantom voltage
ON (switch up).
GAIN TRIM
Feed a normal signal level into
INPUT 2 and adjust the GAIN TRIM
for maximum brightness of the NORM
green LED with occasional flashing
of the red PEAK LED. (Disconnect
INPUT 1 during this adjustment.)
MIC or LINE Gain
Set the Input Gain to MIC or LINE
according to the input signal connected.
The front-end preamplifier stages for Inputs 1 and 2 are each equipped with a gain trimmer. The dual-LED VU meter displays the signal level for Inputs 1 and 2 following the preamplifiers. This
allows each input gain trimmer to be set properly for the optimum signal-to-noise ratio, avoiding the possibility of input clipping common to mixers with unmetered input stages.
PRIORITY PAGING
INPUTS 3 & 4
INPUT DUCKING SELECTOR
Select any or all inputs (2, 3 and/or 4) to be ducked when a paging priority is detected (VOX activated by audio signal on INPUT 1, or
MANUAL activation by an external switch. Selected inputs are ducked only in Zone 1 (the primary amplified output). Set the switch
ON (switch up) to duck the input in Zone 1; set the switch OFF to prevent ducking. Inputs are not ducked in Zone 2.
LEFT
VOX (VOICE-ACTIVATED PRIORITY)
If a paging signal is to automatically “duck” (fade down) other
audio inputs, feed a normal paging signal into INPUT 1 and adjust
the SENSITIVITY trimmer until the LED flashes regularly. Set the
SENSITIVITY trimmer fully CCW to disable the VOX function.
FADE-UP DELAY
Adjust the FADE-UP DELAY trimmer to delay the start of the
audio fade-up following the release of an external manual priority
switch and/or VOX priority detection.
MANUAL PRIORITY
If a swich (such as a paging mic push-to-talk switch) should “duck” (fade down) other audio inputs, connect the switch to the DUCK and Ground terminals.
STEREO SOURCE MONO SOURCE
RIGHT
INPUTS 3 & 4
Connect a mono or stereo standard unbalanced -10 dBV audio
source to INPUTs 3 and/or 4. The two input jacks associated with
each input provide active summing of the left and right channels,
thereby preserving the stereo separation of the audio source.
Page 2
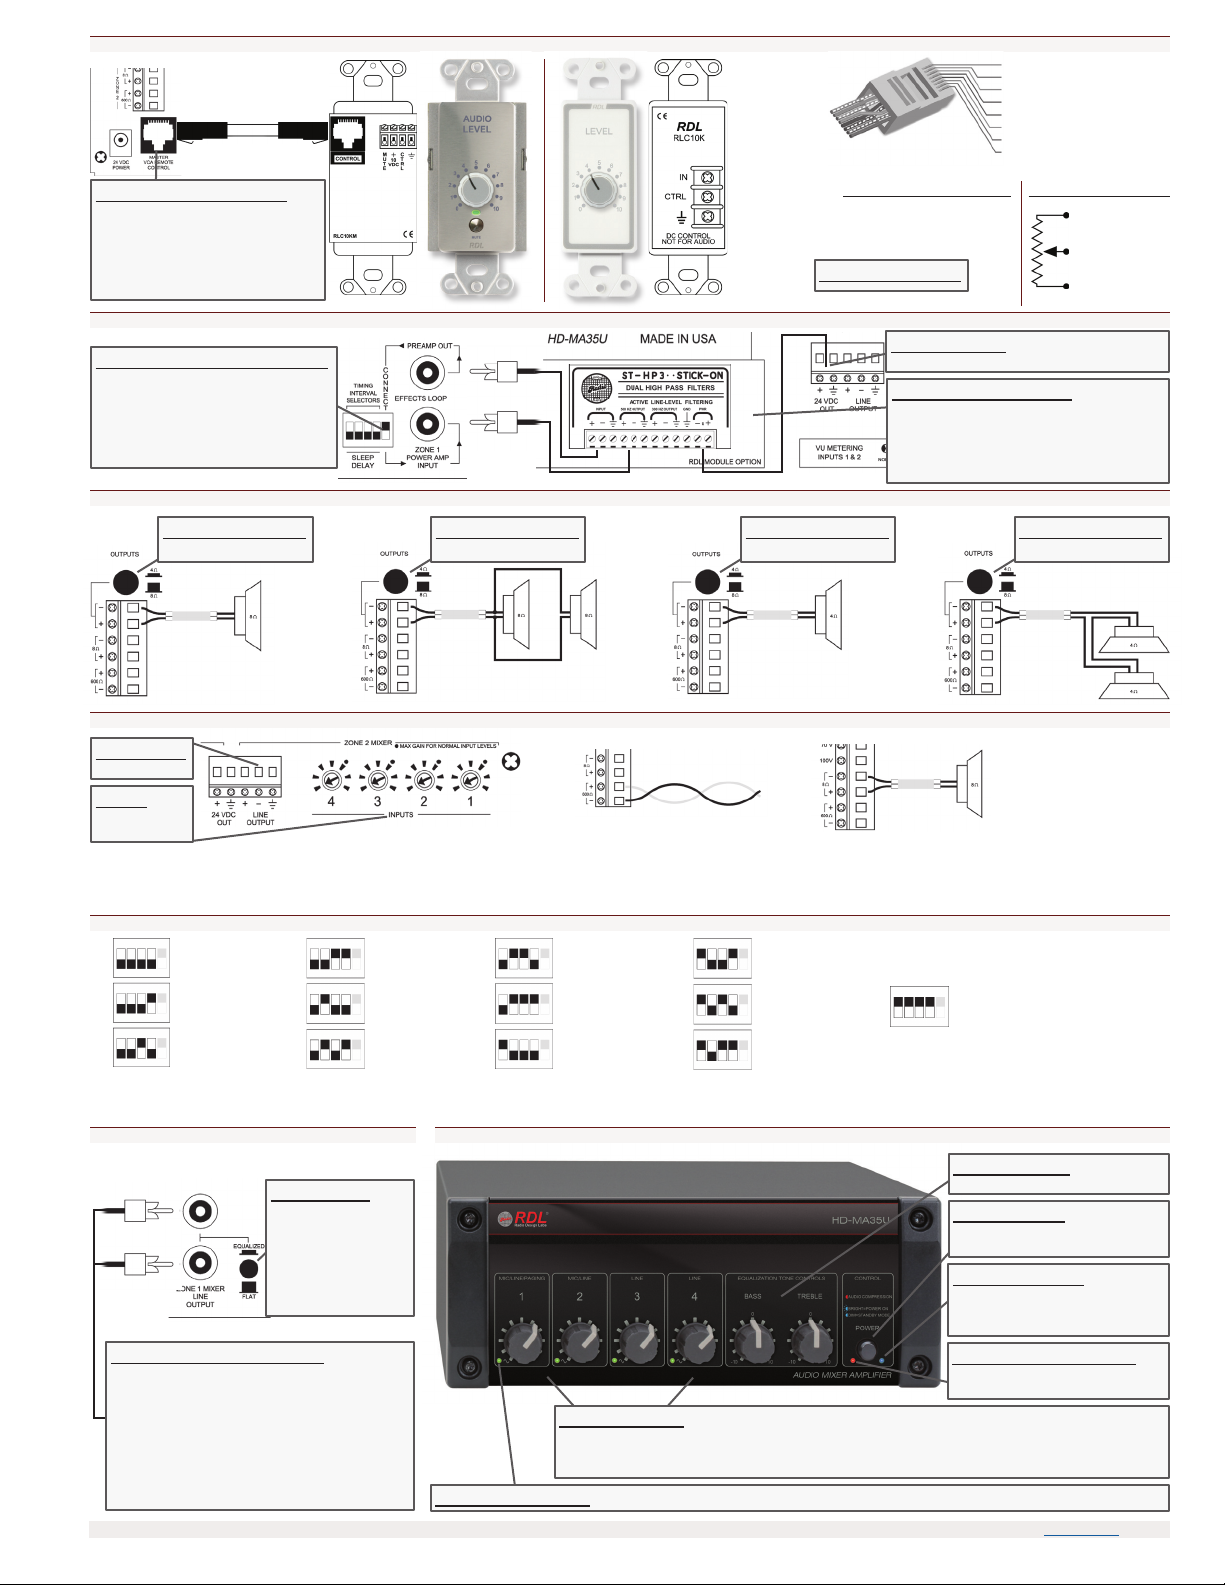
REMOTE CONTROL FOR ZONE 1 AMPLIFIER OUTPUT
MASTER VCA REMOTE CTRL
Connect this RJ45 jack directly to an RDL
remote control. (Examples: RLC10KM or
RLC10KMS) The RJ45 wiring may be
“broken out” for connection to external
OEM 0 to 10 Vdc control, RDL remote
controls (see RLC10K) or 10k Ohm pot.
EFFECTS LOOP
EFFECTS LOOP CONNECT SWITCH
This switch is normally left in the ON (up)
position when the effects loop is not used.
The switch connects the preamp output from
the Zone 1 mixer directly to the input of the
Zone power amp stage. Set this switch OFF
(down) to insert external processing.
ZONE 1 OUTPUT CONNECTIONS
IMPEDANCE SWITCH
Set to 8 Ohms (switch out)
IMPEDANCE SWITCH
Set to 4 Ohms (switch in)
PIN 7, +10 Vdc
PIN 1, VCA control
PIN 8, Ground Ref.
WIRING “Break-out”
IMPEDANCE SWITCH
Set to 4 Ohms (switch in)
PIN 1, VCA control
PIN 2
PIN 3
PIN 4
PIN 5
PIN 6
RJ45 Control Wiring
External 0 to 10 V Control
Pin 1 0 to 10 V
PIN 7, +10 Vdc
PIN 8, Ground Ref.
External 10k Ohm Pot.
CW
Pin 8 Ground Reference
CCW
MODULE POWER
24 Vdc, 100 mA is available to power external modules.
MODULE MOUNTING AREA
This area is reserved for mounting RDL STICK-ON
or TX-Series modules. This example shows a
high-pass filter to protect horn loudspeakers from
bass overload. Other effects possibilities include
equalizers, mixers, crossovers or processors.
IMPEDANCE SWITCH
Set to 8 Ohms (switch out)
PIN 7, +10 Vdc
PIN 1, VCA control
PIN 8, Ground Ref.
Two 4 Ohm
Single 8 Ohm speaker Single 4 Ohm speakerTwo 8 Ohm speakers
ZONE 2
LINE OUTPUT
Active balanced
INPUTS
Adjust for desired
output level
Balanced LINE signal feeds phone PBX
The Zone 2 mixer operates from the same 4 inputs as the front-panel Zone 1 mixer. Ducking assignments do not affect the signals in Zone 2. Each input source should be adjusted to the
desired output level. Turn down unused inputs to remove them from the mix. Three Zone 2 outputs are provided. The LINE OUTPUT is balanced and may be used to feed the input of an other
power amplifier. The 600 Ohm output is transformer isolated (providing galvanic isolation) to drive a phone PBX paging input. The 8 Ohm output drives an 8 Ohm speaker with up to 4 W RMS.
AUTOMATIC SLEEP MODE
speakers
Connect an 8 Ohm speaker or multiple
speakers configured to present an 8 Ohm
load to the amplifier.
10 Minutes 40 Minutes 70 Minutes 100 Minutes
20 Minutes 50 Minutes 80 Minutes 110 Minutes
Disable (mixer-amplifier remains
ON, does not enter standy mode)
30 Minutes 60 Minutes 90 Minutes 120 Minutes
Upon loss of audio at all inputs, a timer starts. At the completion of the timing interval, the mixer amplifier enters the standby mode. All circuits not needed to detect audio presence are shut
off. When audio is detected, all circuits turn on and wait for a loss of audio to restart the timing interval. The timer may be disabled if required by system specifications.
ADDING ZONES OPERATION
TONE CONTROLS
EQUALIZATION
Set the switch to
EQUALIZED (in) if the
front-panel tone controls
should affect the line
output; Set to FLAT (out)
if the tone controls should
not affect the line output.
ADDITIONAL ZONE AMPLIFIERS
Connect the LINE OUTPUT to the line input of one or
multiple additional RDL amplifiers to permit the Zone
1 mixer to feed other zones. The LINE OUTPUT is not
controlled by the master VCA remote control so each
additional zone may have its own master level control.
The LINE OUTPUT may be set to provide “flat” audio or
to allow equalization by the front-panel tone controls.
The LINE OUTPUT may also be used to feed recording
equipment or an audio distribution amplifier.
RDL• 659 6th Street • Prescott, AZ • USA 86301 • Sales: 800-281-2683 • 928-443-9391 • Tech Support: 800-933-1780 • 928-778-3554 • RDL Europe Sales & Support: (31) 20-6238-983 • www.rdlnet.com
891-3335A
Copyright © 2011 Radio Design Labs, Inc. RDL, Radio Design Labs and the RDL logo are registered trademarks of Radio Design Labs, Inc. Data reflects product at publication time, subject to change without notice. “Made in USA” applies to all HD products except power supplies. Other trademarks, if any, are the property of their respective owners.
SIGNAL PRESENT 1 - 4
MIXER LEVEL 1 - 4
Adjust each level control for the desired output level. If a master remote control is connected, it will adjust the final
mixer output level. (Note: If the INPUT 1 VCA Bypass is enabled (See INPUT 1 Settings), a connected remote control
will NOT adjust the paging signal on INPUT 1. It will be controlled only by the front panel INPUT 1 level control.)
The green LED glows when audio is present at the input. The indication is not affected by the setting of the mixer level control.
Adjust BASS and TREBLE as desired.
POWER BUTTON
Momentary pushbutton toggles the
amplifier between ON and STANDBY.
POWER INDICATOR
Glows dimly when unit is powered in
standby (sleep) mode; glows bright when
amplifier is on; flashes during power-up.
COMPRESSION INDICATOR
LED flashes when audio compressor is
acting on the amplified audio.
Page 3

659 6th Street • Prescott • Arizona • 86301 • USA www.rdlnet.com
Safety Instructions
Do not remove the cover or rear panel. This unit contains no user serviceable
parts inside.
1) Read these instructions before operating the unit.
2) Keep these instructions.
3) Heed all warnings.
4) Follow all instructions.
5) Do not use this apparatus near water or moisture.
6) Clean only with dry cloth.
7) Do not block any ventilation openings. Install in accordance with the manufacturer’s instructions.
8) Do not install near any heat sources such as radiators, heat registers, stoves, or other apparatus
(including amplifiers) that produce heat.
9) Only use attachments/accessories specified by the manufacturer.
10) Unplug this apparatus during lightning storms or when unused for long periods of time.
11) Refer all servicing to qualified service personnel. Servicing is required when the apparatus has been
damaged in any way, such as if the power-supply or plug is damaged, liquid has been
spilled or objects have fallen into the apparatus, the apparatus has been exposed to rain or moisture,
does not operate normally, or has been dropped.
12) To completely disconnect this apparatus from the AC mains, disconnect the power supply plug from the
AC receptacle.
13) WARNING – To reduce the risk of fire or electric shock, do not expose this apparatus to rain or moisture.
14) Do not expose this equipment to dripping or splashing and ensure that no objects filled with liquids,
such as vases, are placed on the equipment.
15) Warning labels may be attached to any surface (including the bottom) of the apparatus.
The exclamation point within an equilateral triangle is intended to alert the user to the
presence of important operating and maintenance (servicing) instructions in the literature
accompanying the product.
The lightning flash with arrowhead symbol, within an equilateral triangle, is intended to
alert the user to the presence of uninsulated “dangerous voltage” within the product’s
enclosure that may be of sufficient magnitude to constitute a risk of electric shock to
persons.
Consignes de sécurité
N’ôtez pas le couvercle ni le panneau arrière du boîtier. Cet appareil ne contient
aucune pièce remplaçable par l’utilisateur.
1) Lisez ces instructions avant d’utiliser l’appareil.
2) Conservez ces instructions.
3) Respectez toutes les mises en garde.
4) Suivez toutes les instructions.
5) N’utilisez pas cet appareil près d’une source liquide ou dans un lieu humide.
6) Nettoyez-le uniquement avec un chiffon sec.
7) Ne bloquez pas aucune ouverture de ventilation. Installez l’appareil en suivant les instructions du
fabricant.
8) Ne l’installez pas à proximité d’une source de chaleur, comme un radiateur, un four ou tout autre
appareil (amplificateurs y compris) qui produisent la chaleur.
9) Utilisez uniquement les fixations/accessoires agréés par le fabricant.
10) Déconnectez l’appareil pendant les orages ou lors de périodes d’inutilisation prolongées.
11) Confiez toutes les réparations à un technicien qualifié. Vous devez faire contrôler cet appareil s’il a été
endommagé de quelque façon que ce soit, comme lorsque l’alimentation ou les fiches sont
endommagés, qu’un liquide ou des objets se sont infiltrés dans l’appareil, qu’il a été exposé
à la pluie ou l’humidité, qu’il a subi un choc ou qu’il ne fonctionne pas normalement.
12) Pour déconnecter entièrement l’appareil du secteur, déconnectez la fiche de l’alimentation de la prise.
13) MISE EN GARDE – Pour réduire les risques d’incendie ou d’électrocution, n’exposez pas cet appareil
aux intempéries ou à l’humidité.
14) N’exposez pas cet appareil à l’humidité ou aux projections liquides. Ne posez pas de récipient rempli de
liquide, tel qu’un vase, sur cet appareil.
15) Des étiquettes d’avertissement peuvent être attachées à n’importe quelle surface (y compris le fond) de
l’appareil.
Le point d’exclamation au centre d’un triangle équilatéral prévient l’utilisateur de la
présence d’instructions importantes dans le mode d’emploi concernant la mise en
oeuvre et l’entretien de l’appareil.
L’éclair de foudre fléché au centre d’un triangle équilatéral prévient l’utilisateur
de la présence de courants élevés dans l’appareil, pouvant constituer un risque
d’électrocution en cas de mise en contact avec les composants internes.
Instrucciones de seguridad
No quitar la tapa ni la parte posterior del chasis. Dentro del aparato no hay
piezas susceptibles de ser reparadas por el usuario.
1) Lea estas instrucciones antes de comenzar a usar la unidad.
2) Conserve estas instrucciones.
3) Atienda todas las advertencias.
4) Siga todas las instrucciones.
5) No use este aparato cerca del agua o en lugares húmedos.
6) Limpie sólo con un paño seco.
7) No bloquee ningún orificio de ventilación. Instale de acuerdo con las instrucciones del fabricante.
8) No lo instale cerca de ninguna fuente de calor, como radiadores, registros de calefacción, estufas u
otros aparatos (incluidos los amplificadores) que produzcan calor.
9) Use únicamente aditamentos o accesorios especificados por el fabricante.
10) Desenchufe este aparato durante las tormentas eléctricas o cuando no se use durante períodos
prolongados de tiempo.
11) Refiera todo el servicio a personal cualificado. Se requiere servicio cuando el aparato se ha dañado de
cualquier forma, como si se dañan el cable de alimentación o la clavija, si se ha vertido un líquido
o han caído objetos al interior del aparato, si el aparato ha estado expuesto a la lluvia o la humedad, no
funciona normalmente o ha caído.
12) Para desconectar completamente este aparato de la red de CA, desconecte el alimentación eléctrica del
receptáculo de CA.
13) ADVERTENCIA – Para reducir el riesgo de incendio o descarga eléctrica, no exponga este aparato a la
lluvia o la humedad.
14) No exponga este equipo a escurrimientos o salpicaduras, y asegúrese de que no se coloquen objetos
llenos de líquido, como jarrones, sobre el equipo.
15) Las etiquetas de advertencia se pueden sujetar a cualquier superficie (parte inferior incluyendo) del
aparato.
El signo de exclamación dentro de un triángulo equilátero alerta al usuario de la existencia
de importantes instrucciones sobre funcionamiento y mantenimiento (asistencia) en el
manual que acompa~na al equipo.
Sicherheitsvorkehrungen
Um die Gefahr eines Stromschlags zu verringern, sollten Sie weder Deckel noch
Rückwand des Geräts entfernen. Im Innern befinden sich keine Teile, die vom
Anwender gewartet werden können.
1) Lesen Sie diese Anweisungen bevor Sie das Gerät in Betrieb nehmen.
2) Bewahren Sie diese Anweisungen auf.
3) Beachten Sie alle Warnhinweise.
4) Befolgen Sie alle Anweisungen.
5) Benutzen Sie die Vorrichtung nie in der Nähe von Wasser oder Feuchtigkeit.
6) Nur mit trockenem Tuch reinigen.
7) Belüftungsöffnungen nicht blockieren. Den Anweisungen des Herstellers entsprechend installieren.
8) Installieren Sie die Vorrichtung nicht in der Nähe von Wärmequellen wie Radiatoren, Heizkörpern,
Herden oder anderen Geräten (insbesondere Verstärkern), die Wärme erzeugen.
9) Verwenden Sie nur vom Hersteller zugelassenes Zubehör.
10) Ziehen Sie bei Gewittern oder bei längeren Stillstandzeiten den Netzstecker des Geräts.
11) Überlassen Sie alle Wartungsarbeiten qualifiziertem Personal. Ein Service wird erforderlich, wenn das
Gerät in irgendeiner Weise beschädigt wurde, beispielsweise bei Beschädigung des Netzteils oder des
Netzkabels, wenn Flüssigkeiten über das Gerät vergossen wurden oder Gegenstände in das Gerät
gefallen sind, das Gerät Regen oder Feuchtigkeit ausgesetzt war, nicht ordnungsgemäß funktioniert oder
fallen gelassen wurde.
12) Ziehen Sie den Netzstecker aus der Steckdose, um das Gerät vollständig vom Wechselstromnetz zu
trennen.
13) WARNHINWEIS: Um die Gefahr vom Feuer oder Stromschlag zu vermeiden, darf das Gerät nicht Regen
oder Feuchtigkeit ausgesetzt werden.
14) Lassen Sie nicht zu, dass Flüssigkeiten auf das Gerät tropfen oder gespritzt werden können, und achten
Sie darauf, dass keine mit Wasser gefüllten Gegenstände wie Vasen auf das Gerät gestellt werden.
15) Warnaufkleber können sich an belieber Stelle (inklusive Unterseite) am Gehause des Apparates
befinden.
Das Ausrufezeichen im gleichseitigen Dreieck soll den Anwender auf wichtige
Bedienungs- und Wartungsanleitungen aufmerksam machen, die im mitgelieferten
Informationsmaterial näher beschrieben werden.
S001
El símbolo del relámpago con punta de flecha, dentro de un triángulo equilátero, alerta al
usuario de la presencia de un “voltaje peligroso” sin aislar en el interior del producto, que
puede ser de la suficiente magnitud como para constituir un riesgo de descarga eléctrica
para las personas.
Der Blitz mit Pfeilspitze im gleichseitigen Dreieck soll den Anwender vor nichtisolierter
“gefährlicher Spannung” im Geräteinnern warnen. Diese Spannung kann so hoch sein,
dass die Gefahr eines Stromschlags besteht.
 Loading...