

Page 1

WIFI REMOTE
CONNECTION CRADLE
USER’S GUIDE
ACCWIFI1
Version 1.0
ENGLISH
FRANÇAIS
ESPAÑOL
www.lorextechnology.com
Page 2

Safety Precautions
•Adult assembly is required. Keep small
parts away from children when assembling.
•This product is not a toy. Do not allow
children or infants to play with it.
•Keep the cords out of reach from children
and infants.
•Only use the chargers and power adapters
provided. Do not use other chargers or
power adapters as this may damage the
device and battery pack.
•Do not cover the product with a towel or
blanket.
•Do not use the product near water.
•Do not install the product near a heat
source.
•Do not touch the plug contacts with sharp or
metal objects.
•Keep this user’s guide for future reference.
To Avoid Injury to
Children & Infants:
•MAKE SURE to keep the product and all
power cords are least 3ft / 1m away from
cribs and out of reach of your child.
3ft / 1m
Page 3

ENGLISH
Table of Contents:
Product Includes ..............................2
Cradle Overview .............................2
Supported Mobile Devices ...............2
Getting Started ...............................3
iPhone®/iPad® Ethernet Setup ........4
iPhone/iPad WiFi Setup ...................5
Using the iPhone®/iPad® App ........7
Live View ...............................................7
Zooming in Live View ..............................7
Changing the Cradle Password ................. 8
Changing the Video Quality ..................... 9
Android Ethernet Setup .................10
Android Wi-Fi Setup ......................12
Using the Android App ..................15
Live View .............................................15
Zooming in Live View ............................15
Viewing and Sharing Snapshots ..............16
Changing the Cradle Password ............... 17
Changing the Video Quality ................... 18
Technical Specifications .................20
Cradle ...........................................20
Troubleshooting ............................21
Need Help? ...................................21
1
Page 4

Product Includes
x1
x1
WiFi Cradle
Power Adapter
Handheld monitor and camera(s) are sold
separately.
Ethernet Cable
x1
Cradle Overview
Power/network connector
Stand-up guides
Antenna
Service Only
Ethernet Port
Power Port
Supported Mobile Devices
2
Page 5

ENGLISH
Getting Started
Connect the cradle power adapter to the
1
cradle. Connect the other end to a power
outlet.
Connect the cradle to your router using an
3
Ethernet cable (included).
INTERNET
NOTE: Ensure the switch on the back is set to
INTERNET mode. DIRECT mode is for service use
only.
Place the monitor onto the power/network
2
connector on the cradle. Use the stand-up
guides to help place the monitor.
Power/network
connector
On your smartphone or tablet, download
4
Lorex Care for free from the App StoreSM
(iPhone®/iPad®) or the Google Play Store
(Android™).
The monitor will charge when connected
to the cradle.
The next steps in the setup depend if you are
connecting to the cradle using an iPhone®/
iPad® or Android™ device.
For iPhone®/iPad®:
go to page 4
For Android™:
go to page 10
3
Page 6

iPhone®/iPad® Ethernet Setup
Touch the Lorex Care icon to
1
launch the app.
Enter the ID code for the cradle in
2
one of the following ways:
B
C
A. Tap QRCode and scan the QR code on the side
of the cradle using your device’s camera.
B. Tap Add and manually enter the UID printed on
the back of the cradle. You may need to do this if
your device does not have a camera (for example, 1st
generation iPads).
C. If your device is on the same network as the cradle,
it will detect the cradle UID. Tap the UID to enter.
A
FPO
3
Enter a name for
your monitor
Enter the default
password 000000
4
5
Tap Save
••••••
The monitor will show up in your device
list with an Online status.
Tap the monitor
to connect
4
Page 7

ENGLISH
The app will connect to your monitor and stream
live video from your cameras.
To connect the cradle to your Wi-Fi
network, see below.
iPhone/iPad WiFi Setup
Open the Camera List screen in Lorex
1
Care. Press Back if you are currently
connected to a camera.
2
Tap next to
the Wi-Fi cradle
3
Tap Advanced
Setting
4
Tap WiFi
The cradle will scan for available Wi-Fi
5
networks.
Select your Wi-Fi
network
5
Page 8
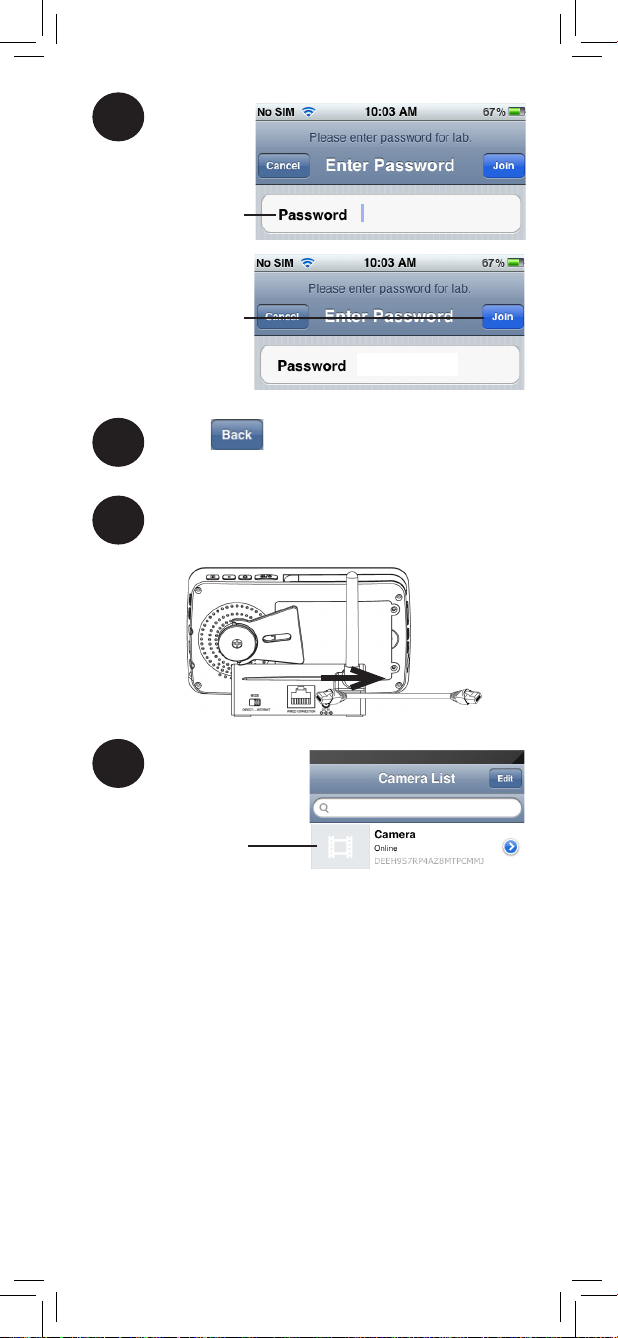
6
Enter the password
for your Wi-Fi
network
Tap Join
Press 3 times to return to the
7
Camera List.
Remove the Ethernet cable from the
8
cradle.
••••••
9
Tap the monitor
to connect
Congratulations! You have successfully connected
the cradle to your Wi-Fi network. You can now
place the cradle in any location with good signal
to your Wi-Fi network.
NOTE: The Wi-Fi cradle must be connected to
power and the monitor must be on the cradle to
connect to the camera on your phone or tablet.
6
Page 9

ENGLISH
Using the iPhone®/iPad® App
Live View
You can view your camera in either portrait or
landscape mode.
Return to
Camera List
Take
snapshot
View/share
snapshots
Mute
audio
Listen to
camera
Talk to
camera
Select
channel
NOTE: The controls above are only shown in
portrait mode.
Zooming in Live View
You can zoom in on the video in landscape or
portrait mode.
Pinch open to zoom in
Pinch close to zoom out
When zoomed in, press
and drag to move the
zoom area
Touch Gesture icons are attributed to the Wikimedia Foundation
according to the Creative Commons Licence
7
Page 10

Changing the Cradle Password
The default password is 000000. It is
recommended to create your own password to
ensure that no one may access your video.
To change the password:
Open the Camera List screen in Lorex
1
Care. Press if you are currently
connected to a camera.
2
Tap next to
the cradle
3
Tap Advanced
Setting
4
Tap Security
Code
5
Enter old password
Enter new password
Confirm new
password
Tap OK. Press twice times to return
6
to the Camera List.
7
Tap the monitor
to connect
8
Page 11

ENGLISH
Changing the Video Quality
The video quality can be increased for fast
Internet connections or decreased to improve the
video performance.
If the video is choppy or slow, it is recommended
to reduce the video quality setting.
To change the video quality:
Open the Camera List screen in Lorex
1
Care. Press if you are currently
connected to a camera.
2
Tap next to
the cradle
3
Tap Advanced
Setting
4
Tap Video
Quality
5
Select the desired
video quality
Tap three times to return to Camera
6
List.
9
Page 12

Android Ethernet Setup
Touch the Lorex Care icon to
1
launch the app.
FPO
2
FPO
Tap Click here
to add camera.
3
FPO
Tap Scan
Notes
• If your device does not have a camera, you must
enter the UID printed on the back of the cradle under
UID. Then, skip to step 7.
• You may be prompted to select the app that will be
used to scan the QR code. Select Google and press
Always to continue.
Select Google
Press Always
Line up the QR code on the top of the
4
cradle using the camera on your mobile
device.
Line up the QR
code using the
device’s camera
10
Page 13

ENGLISH
Under Password, enter the default
5
password 000000.
Under Name, enter a name for your
6
monitor.
7
FPO
Tap OK
The monitor will show up in your device
8
list with an Online status.
FPO
The app will connect to your monitor and stream
live video from your cameras.
To connect the cradle to your Wi-Fi
network, see the next page.
11
Tap the monitor
to connect
Page 14

Android Wi-Fi Setup
You must connect the cradle to the Internet
1
using an Ethernet cable before you can
connect it to your Wi-Fi network. Complete
the Ethernet setup as described in “Android
Ethernet Setup” on page 10.
Open the Camera List screen in Lorex
2
Care. Press if you are currently
connected to a camera.
3
Tap next to the
FPO
Wi-Fi cradle
4
Tap Edit Camera
5
FPO
Tap Advanced
6
FPO
Tap Manage
Wi-Fi networks
The cradle scans for available Wi-Fi networks.
12
Page 15

ENGLISH
The cradle scans for available Wi-Fi
6
networks.
Tap
Then, select your
Wi-Fi network
7
Enter your Wi-Fi
network’s password
Tap OK
The cradle will connect to your Wi-Fi network. Once
connected, it will say Connected below the network
name.
FPO
Connected
13
Page 16

Tap OK twice to return to the Camera List.
8
Remove the Ethernet cable from the
9
cradle.
10
Tap to connect
to the cradle
Congratulations! You have successfully connected
the cradle to your Wi-Fi network. You can now
place the cradle in any location with good signal
to your Wi-Fi network.
NOTE: The Wi-Fi cradle must be connected to
power and the monitor must be on the cradle to
connect to the camera on your phone or tablet.
14
Page 17

ENGLISH
Using the Android App
Live View
You can view your camera in either portrait or
landscape mode.
FPO
Take
snapshot
View/share
snapshots
Exit live view
Zooming in Live View
You can zoom in on the video in landscape or
portrait mode.
Mute audio
Change channel
Pinch open to zoom in
Pinch close to zoom out
When zoomed in, press
and drag to move the
zoom area
Touch Gesture icons are attributed to the Wikimedia Foundation
according to the Creative Commons Licence
15
Page 18

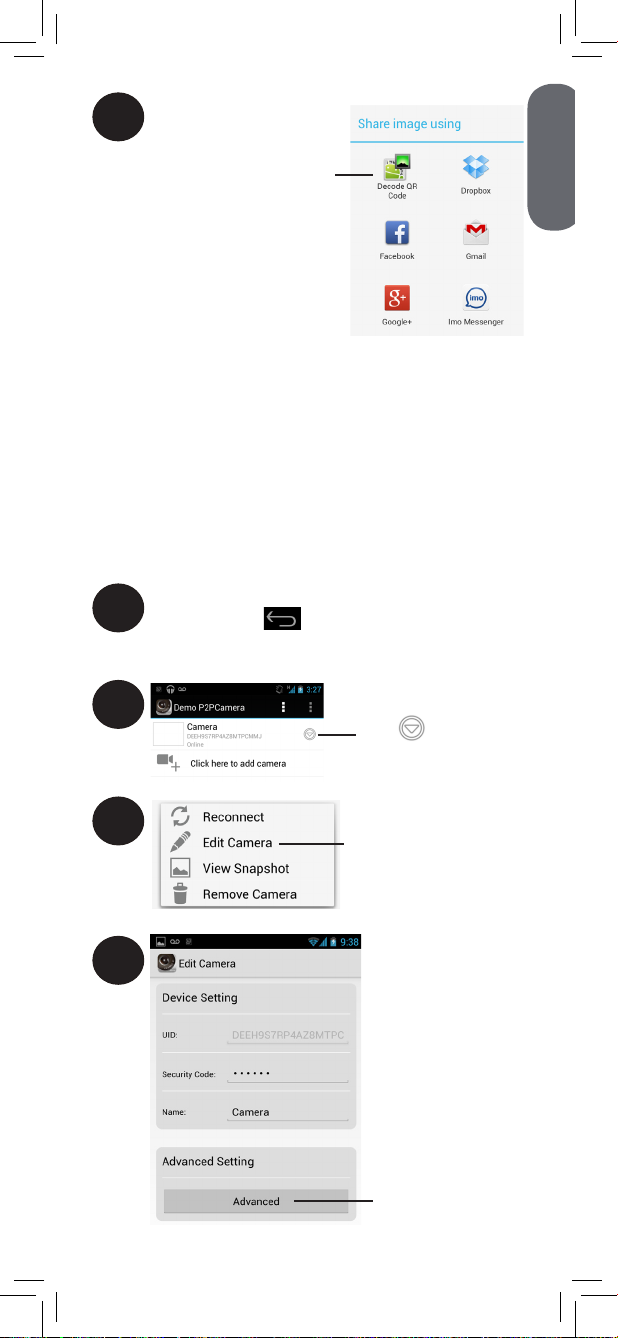
Viewing and Sharing Snapshots
You can take snapshots of live video from your
cameras by pressing . You can view or
share snapshots using the app.
Snapshots are saved in .jpg format. They are
saved to the /DCIM/P2PIPCAM/Snapshot
folder on your device’s memory.
To view snapshots:
1
In live view, tap to view
snapshots
2
Tap to open snapshot
To share snapshots:
1
Then tap Share
Tap
16
Page 19
ENGLISH
2
Select the app you would like
to share the snapshot with and
use the app to share the file
Lorex does not provide support for apps
not published by Lorex.
Changing the Cradle Password
The default password is 000000. It is
recommended to create your own password to
ensure that no one may access your video.
To change the password:
Open the Camera List screen in Lorex
1
Care. Press if you are currently
connected to a camera.
2
Tap next to the
FPO
Wi-Fi cradle
3
Tap Edit Camera
4
FPO
Tap Advanced
17
Page 20

5
Tap Modify Security
Code
6
Enter old password
Enter new password
Confirm new password
Tap OK
Tap OK twice to return to Camera List.
7
8
Tap to connect
to the cradle
Changing the Video Quality
The video quality can be increased for fast
Internet connections or decreased to improve the
video performance.
If the video is choppy or slow, it is recommended
to reduce the video quality setting.
To change the video quality:
Open the Camera List screen in Lorex
1
Care. Press if you are currently
connected to a camera.
2
FPO
18
Tap next to the
cradle
Page 21

ENGLISH
3
4
5
Tap OK to return to Camera List.
Tap Edit Camera
Tap, then select
the desired
video quality
Tap OK
19
Page 22

Technical Specifications
Cradle
Compatible Lorex
Products
Wi-Fi IEEE 802.11 b / g / n
Wi-Fi Encryption WEP / WPA / WPA2 / WPA2 PSK
Wi-Fi Frequency 2.4GHz
Ethernet 10/100M Ethernet port
DHCP DHCP Client / Server
Mobile Apps iOS (v. X.X and higher)
Power Adapter 5.0V DC 1500mA
Weight 0.2lbs / 0.1kg
Operation
Temperature
3.5in
88mm
BB4300 / BB3500 Series
LW3400 Series
Android (v. X.X and higher)
32 ~ 104°F / 0 ~ 40°C
2.6in
65mm
20
3.2in
82mm
Page 23
ENGLISH
Troubleshooting
Problem Solution
Cannot connect to
the monitor on my
smartphone or tablet
I have forgotten the
password to the cradle
I do not see Live Video
controls on the screen in
the iPhone®/iPad® app
The video is slow or
choppy
• Monitor is not placed on the
cradle. The monitor must be
on the cradle to enable remote
connectivity.
• Cradle is not connected to
power. Connect the power
adapter to the Wi-Fi cradle.
• Ethernet cable not connected
or Wi-Fi network not set up.
Connect an Ethernet cable to
the cradle and connect the
other end to your router. For
details, see “iPhone®/iPad®
Ethernet Setup” on page 4
or “Android Ethernet Setup” on
page 10.
• Ensure the switch on the back
of the cradle is set to INTERNET
mode. DIRECT mode is for
service use only.
• The default password is
000000.
• Press and hold the Reset button
on the cradle with a paper
clip or other thin object for
X seconds to reset the cradle
to default settings. This will
cause the cradle to forget any
configured Wi-Fi networks.
• Controls are only shown when
the device is held in portrait
mode
• This can occur if the Internet
connection to the cradle is
slow. Turn down the Video
Quality settings to improve the
performance.
Need Help?
Product Support is available 24/7 including product
information, user guides, quick start guides, and FAQ’s
at www.lorextechnology.com/support
21
Page 24

CLEANING
Clean the product with a slightly damp cloth or an anti-static cloth.
Never use cleaning agents or abrasive solvents.
• Do not clean any part of the product with cleaners with thinners or
other solvents and chemicals. This may cause permanent damage
to the product, which is not covered by the Warranty. When
necessary, clean it with a damp cloth.
• Keep your product away from hot, humid areas or strong sunlight,
and do not get it wet.
• Every effort has been made to ensure high standards of reliability
for your product. However, if something does go wrong, please do
not try to repair it yourself. Contact Customer Service for assistance.
DISPOSAL OF THE DEVICE
At the end of the product life cycle, you should not
dispose of this product with normal household waste,
but take the product to a collection point for the
recycling of electrical and electronic equipment. The
symbol on the product, user’s guide, and/or box
indicates this.
Some of the product materials can be re-used if you take them to a
recycling point. By reusing some parts or raw materials from used
products you make an important contribution to the protection of the
environment.
Please contact your local authorities in case you need more information
on the collection points in your area. Dispose of the battery pack in an
environmentally-friendly manner according to your local regulations.
NOTICES
WARNING: Any changes or modifications not expressly approved
by the grantee of this device could void the user’s authority to operate
the device.
FCC NOTICE
This device complies with Part 15, subpart C, of the FCC Rules.
Operation is subject to the following two conditions: (1) this device
may not cause harmful interference, and (2) this device must accept
any interference received, including interference that may cause
undesired operation.
The manufacturer is not responsible for any radio or TV interference
caused by unauthorized modifications to this equipment. Such
modifications could void the user’s authority to operate the equipment.
However, it is imperative that the user follows the guidelines in this
manual to avoid improper usage which may result in damage to the
unit, electrical shock and fire hazard injury.
CAUTION: To maintain compliance with the FCC’s RF exposure
guidelines, place the product at least 20cm (7.87in) from nearby
persons.
CANADA/IC NOTICE
This device complies with Industry Canada licence-exempt RSS
standard(s). Operation is subject to the following two conditions: (1)
this device may not cause interference, and (2) this device must accept
any interference, including interference that may cause undesired
operation of the device.
22
Page 25

USER’S GUIDE
ACCWIFI1
Version 1.0
www.lorextechnology.com
Copyright © Lorex Technology Inc. 2013
 Loading...