

Page 1
Overview
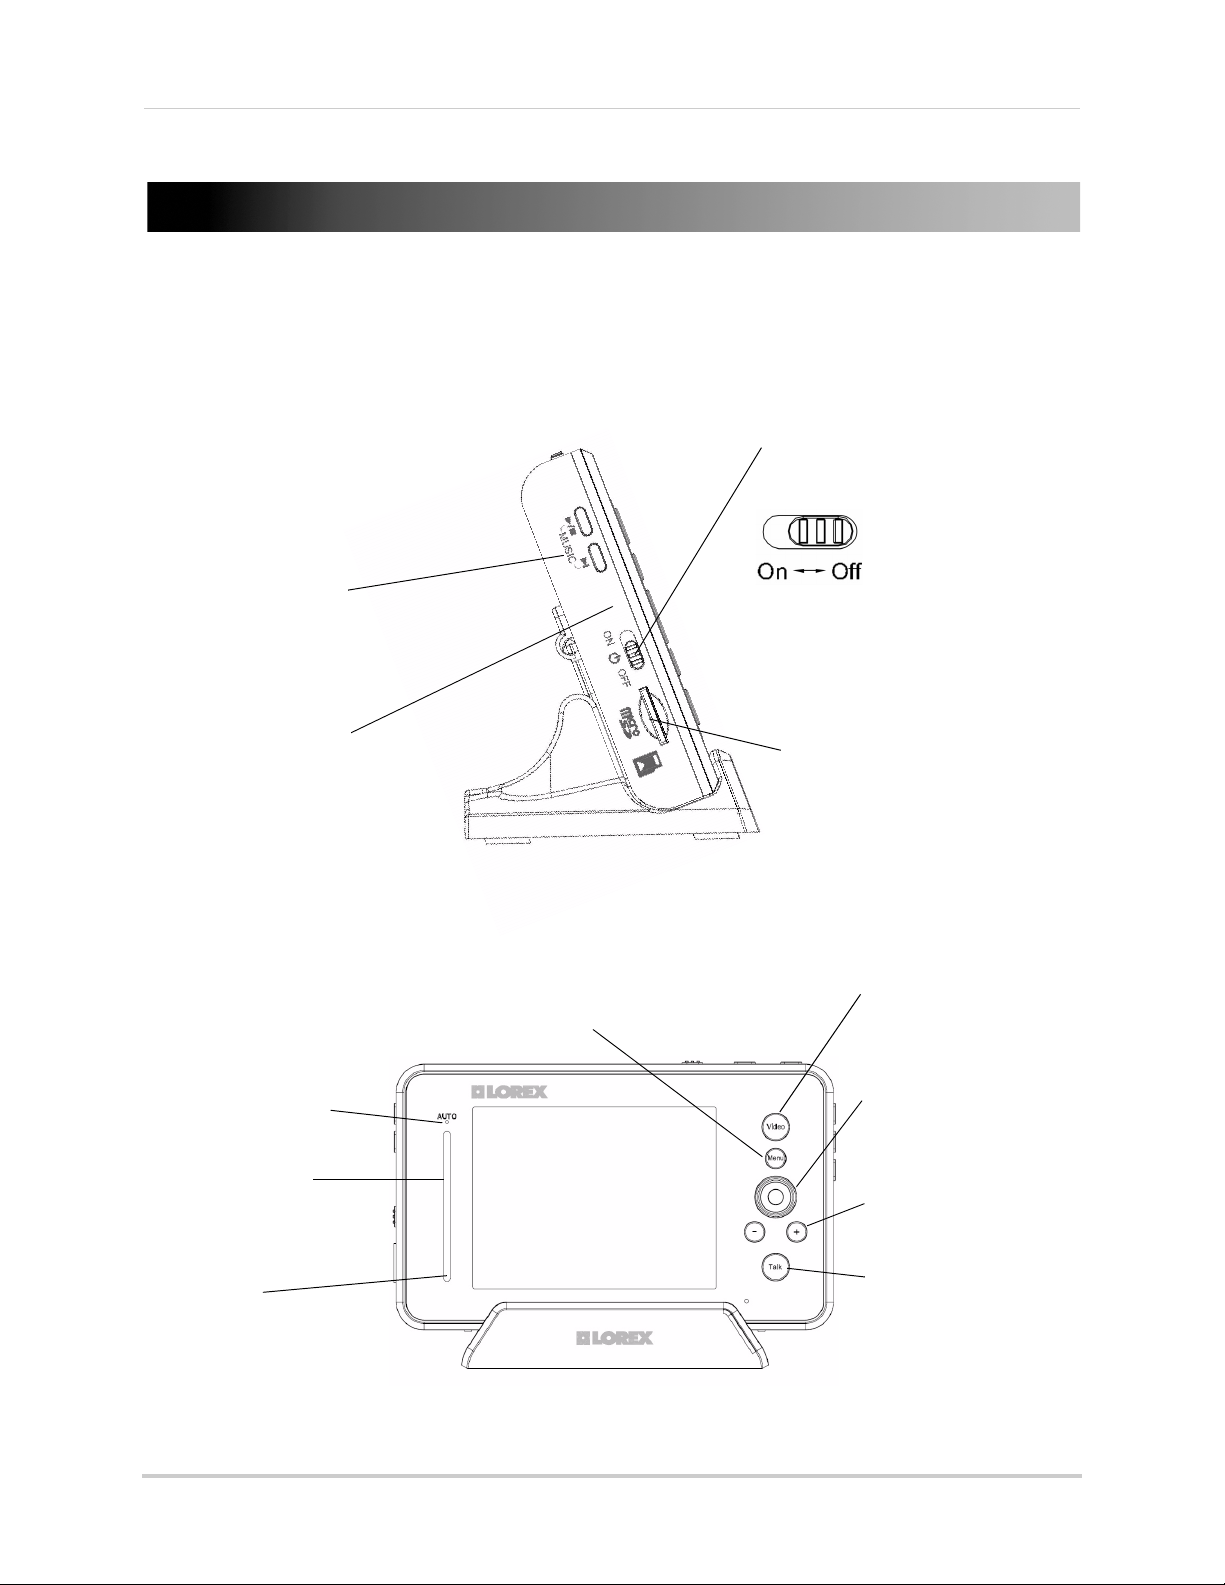
Video Button
Press the Video button to
turn off the monitor. The
speakers will remain on.
Press the menu button to
access the monitor menu
options.
Joystick
Use the joystick to navigate
system menus. Press down
on the joystick to confirm a
selection.
Volume Control
Press + / - to control the
volume.
Audio Level Indicator
Displays the level of sound
detected by the camera.
Menu Button
Talk Button
Hold the talk button to
enable two-way
communication between the
video monitor and camera.
AUTO LED
Glows blue when
auto-record is enabled.
Press the Next button to
change lullaby.
ON/OFF Switch
Slide the power switch to the
ON position to turn the video
monitor on.
Lullaby Button
Press the Lullaby button
once to begin playing a
lullaby song. Press the
Lullaby button again to stop
the song.
Music Buttons
microSD Card Slot
Insert a microSD card to
record video.
Power LED
Glows green to indicate unit
is powered on.
Video Monitor
Overview
1
Page 2
Overview
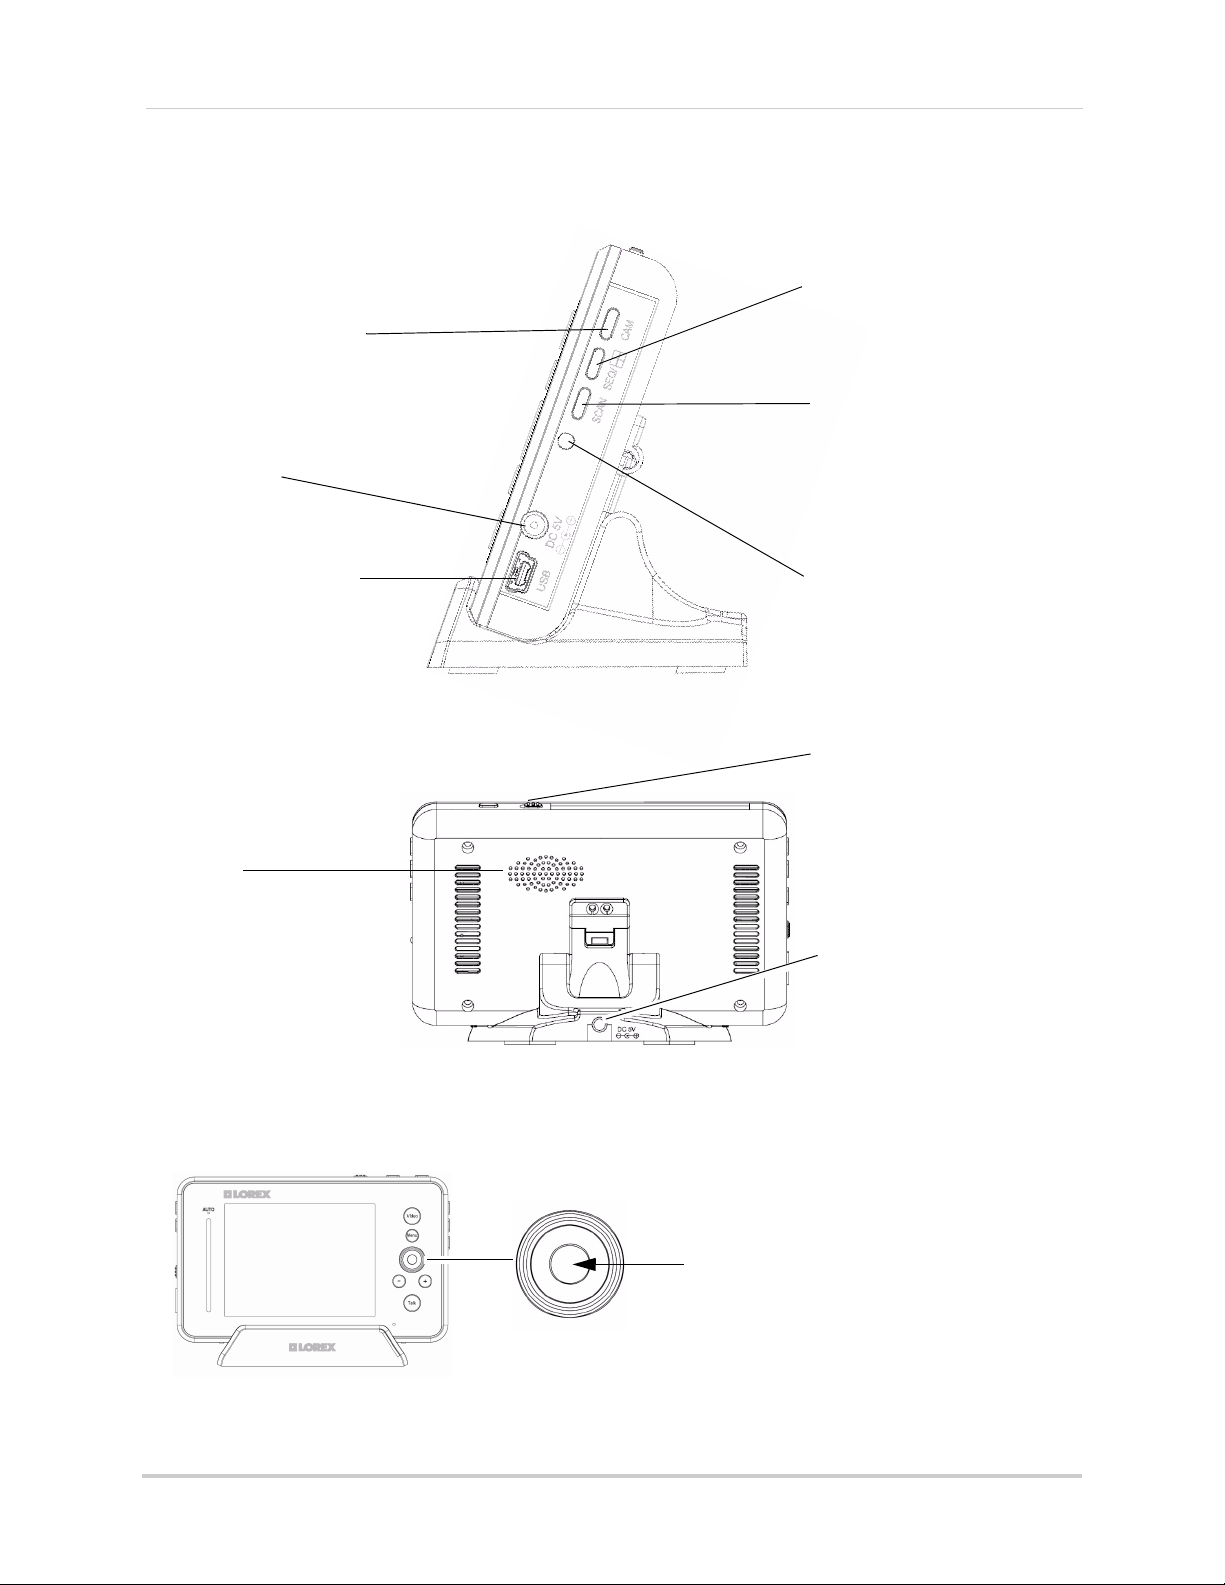
Sequence/ Quad Button
Press the Sequence/Quad button
to view video in quad mode (4
screen split view), or in sequence
view.
Scan Button
Scans for cameras that
detect sudden noises.
Charging LED Indicator
Glows red to indicate video
monitor is charging.
Cam Button
Press the Cam button to
switch between channels 1-4.
Power Port
Connect the power adapter
labeled "For Monitor" into
the power port.
Micro USB
Connect a micro USB cable
(included) between the video
monitor and a computer to
view video from your PC or
remotely (setup required)
Speaker
Outputs sound received
from the camera.
Power Port (DC5V)
Connect the power adapter
labeled "For Monitor" to the
charging cradle.
Antenna Switch
Slide the Antenna Switch
towards the unlock position
to reveal the antenna.
OK Button
Press down on the joystick to confirm a selection.
Press up, down,
left, or right to
navigate through
the menus.
Video Monitor (continued)
How to use the joystick in menus
The joystick allows you to navigate through the video monitor menus.
2
Page 3
Camera Overview
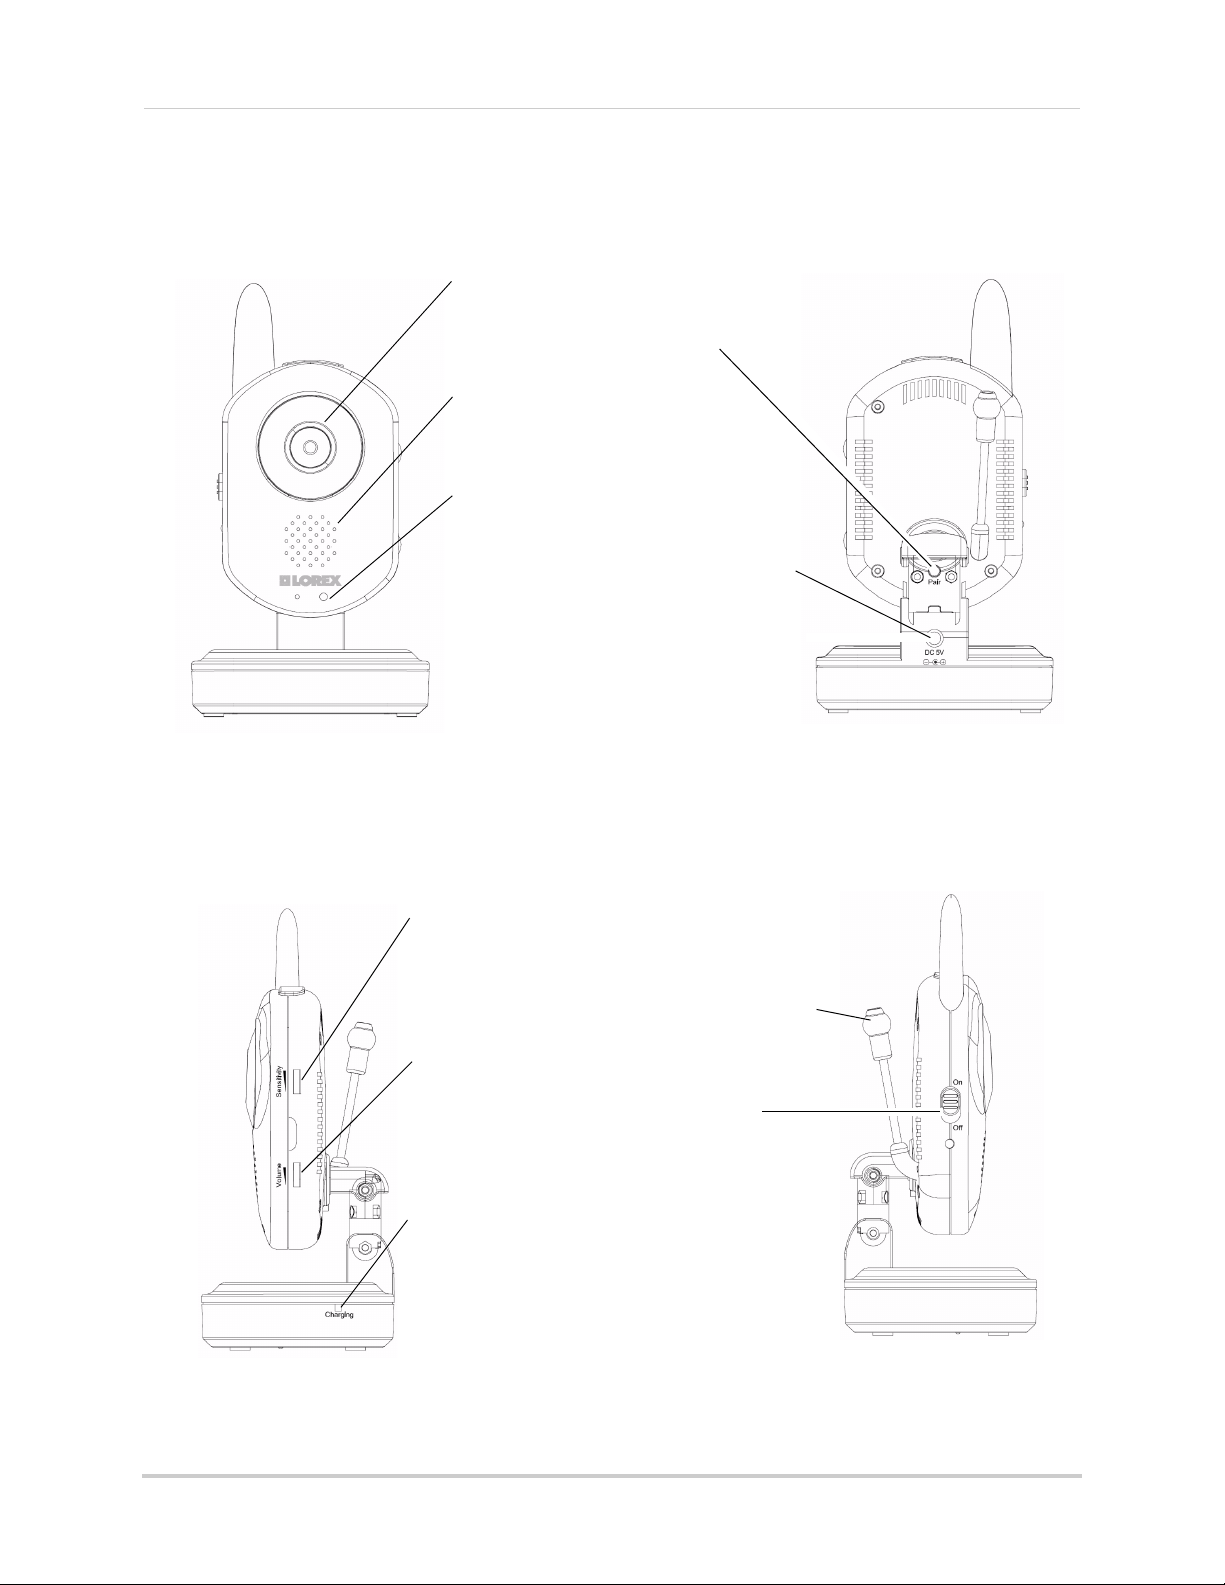
LED
The camera has infrared
(IR) LEDs that allow you to
see in the dark.
Sensitivity Dial
Adjust the level of
audio-detection sensitivity
of the camera to trigger an
alert.
Volume Dial
Adjusts the speaker volume.
Battery Charging Indicator
Glows to indicate battery is charging.
This requires rechargable batteries
(not included, part # XXXXX)
Power Switch
Turns the camera on and off.
Speaker
The speaker allows you to
hear the person speaking
into the video monitor.
Power Port (DC5V)
Plug in the connector
from the power adapter
labeled "To Camera" to
power the camera.
Microphone
The microphone allows you
to speak to the person
through the video monitor.
Pair Button
Press the Pair button
during the pairing
process with the video
monitor.
Temperature Sensor
Detects the room’s ambient
temperature.
Overview
3
Page 4
Overview
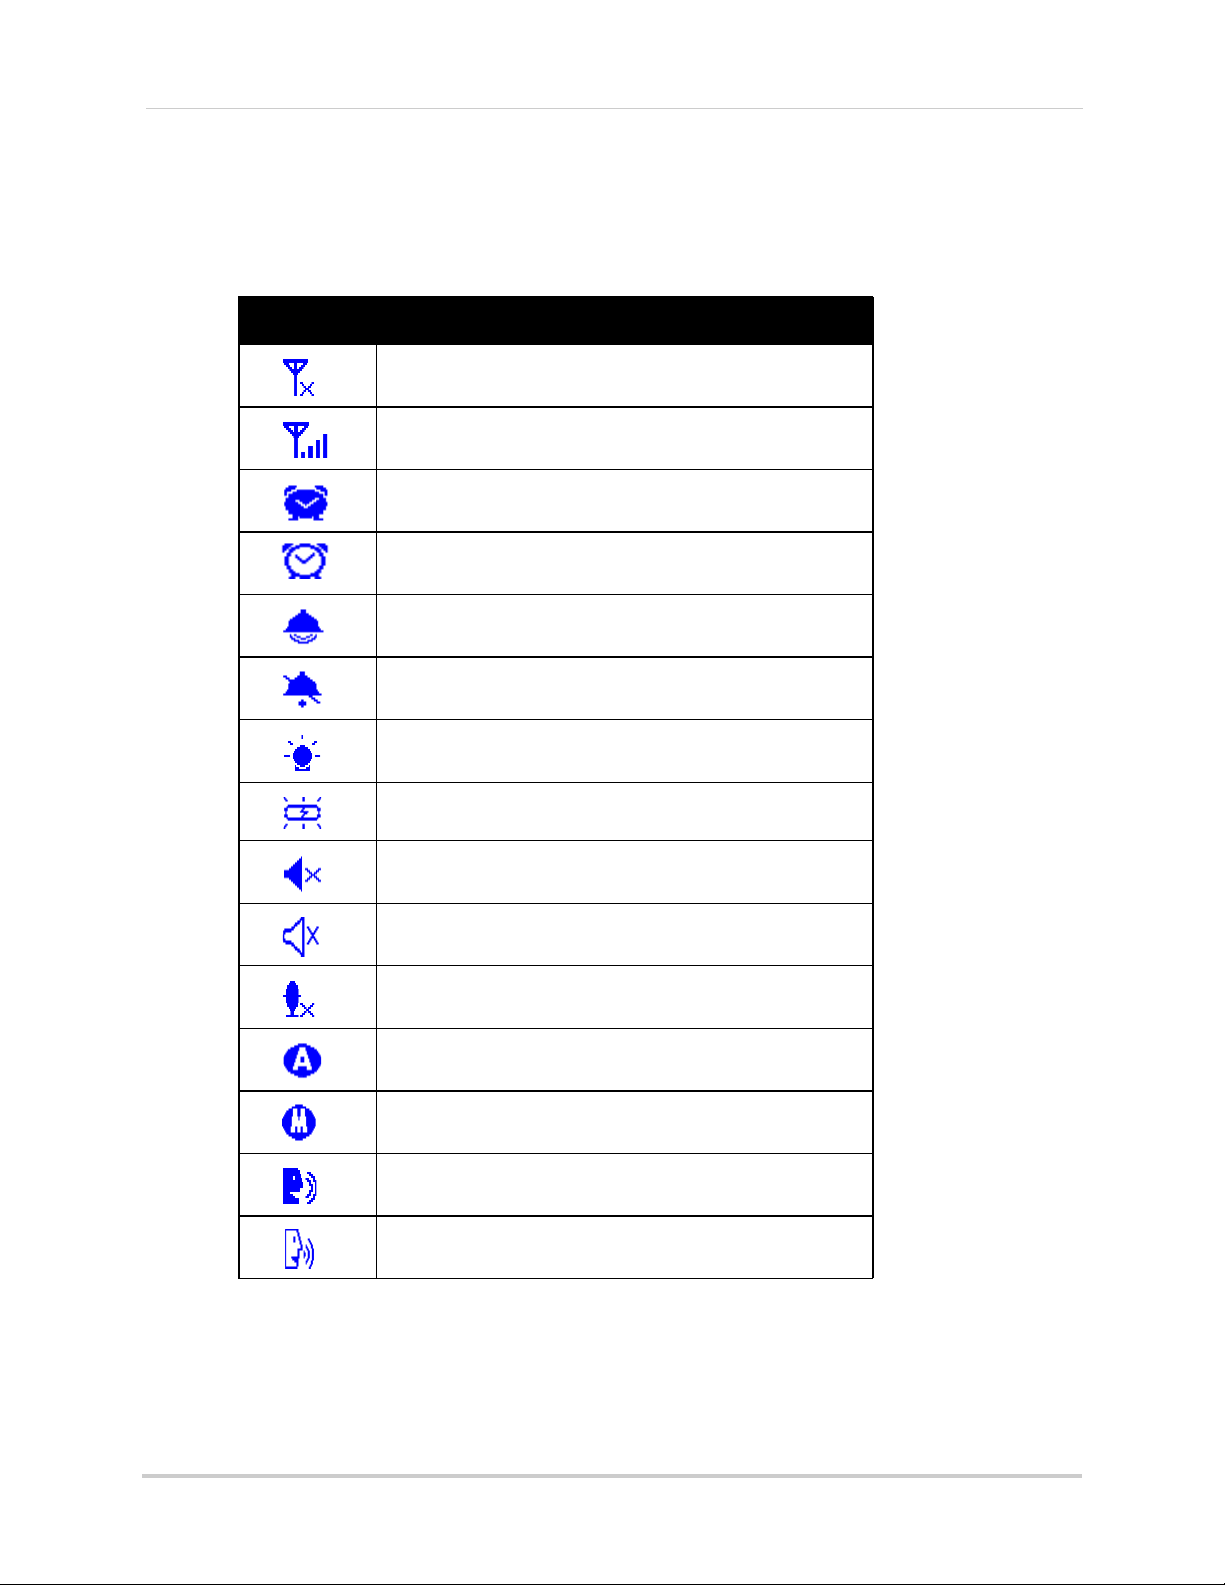
OSD overview
The video monitor displays the following icons during normal use. The table below
summarizes the video monitor icons, and what they mean.
Icon Meaning
No signal between the camera and video monitor.
Full signal between the camera and video monitor.
The camera night light is currently on.
The video monitor battery is low.
Auto recording is enabled.
Manual recording is enabled.
Two-way talk is enabled. You can now speak into the video
monitor.
Have factory confirm which icons will be included,
and what each icon means.
4
Page 5

Basic Setup
line art of cable clip from vince
- diagram with cable setup around baby
crib
Using the cable clips
Included are a bag of cable clips that allow you to manage the wires from the power
adapters. It is highly recommended that you use the cable clips keep the power cords out
of reach from young children and infants.
To use the cable clips, slide the wires in between the clips, then peel the protective film
behind the clip. Stick the clip along the wall /table leg so that it is out of reach.
Basic Setup
Safety percautions?
5
Page 6
Basic Setup
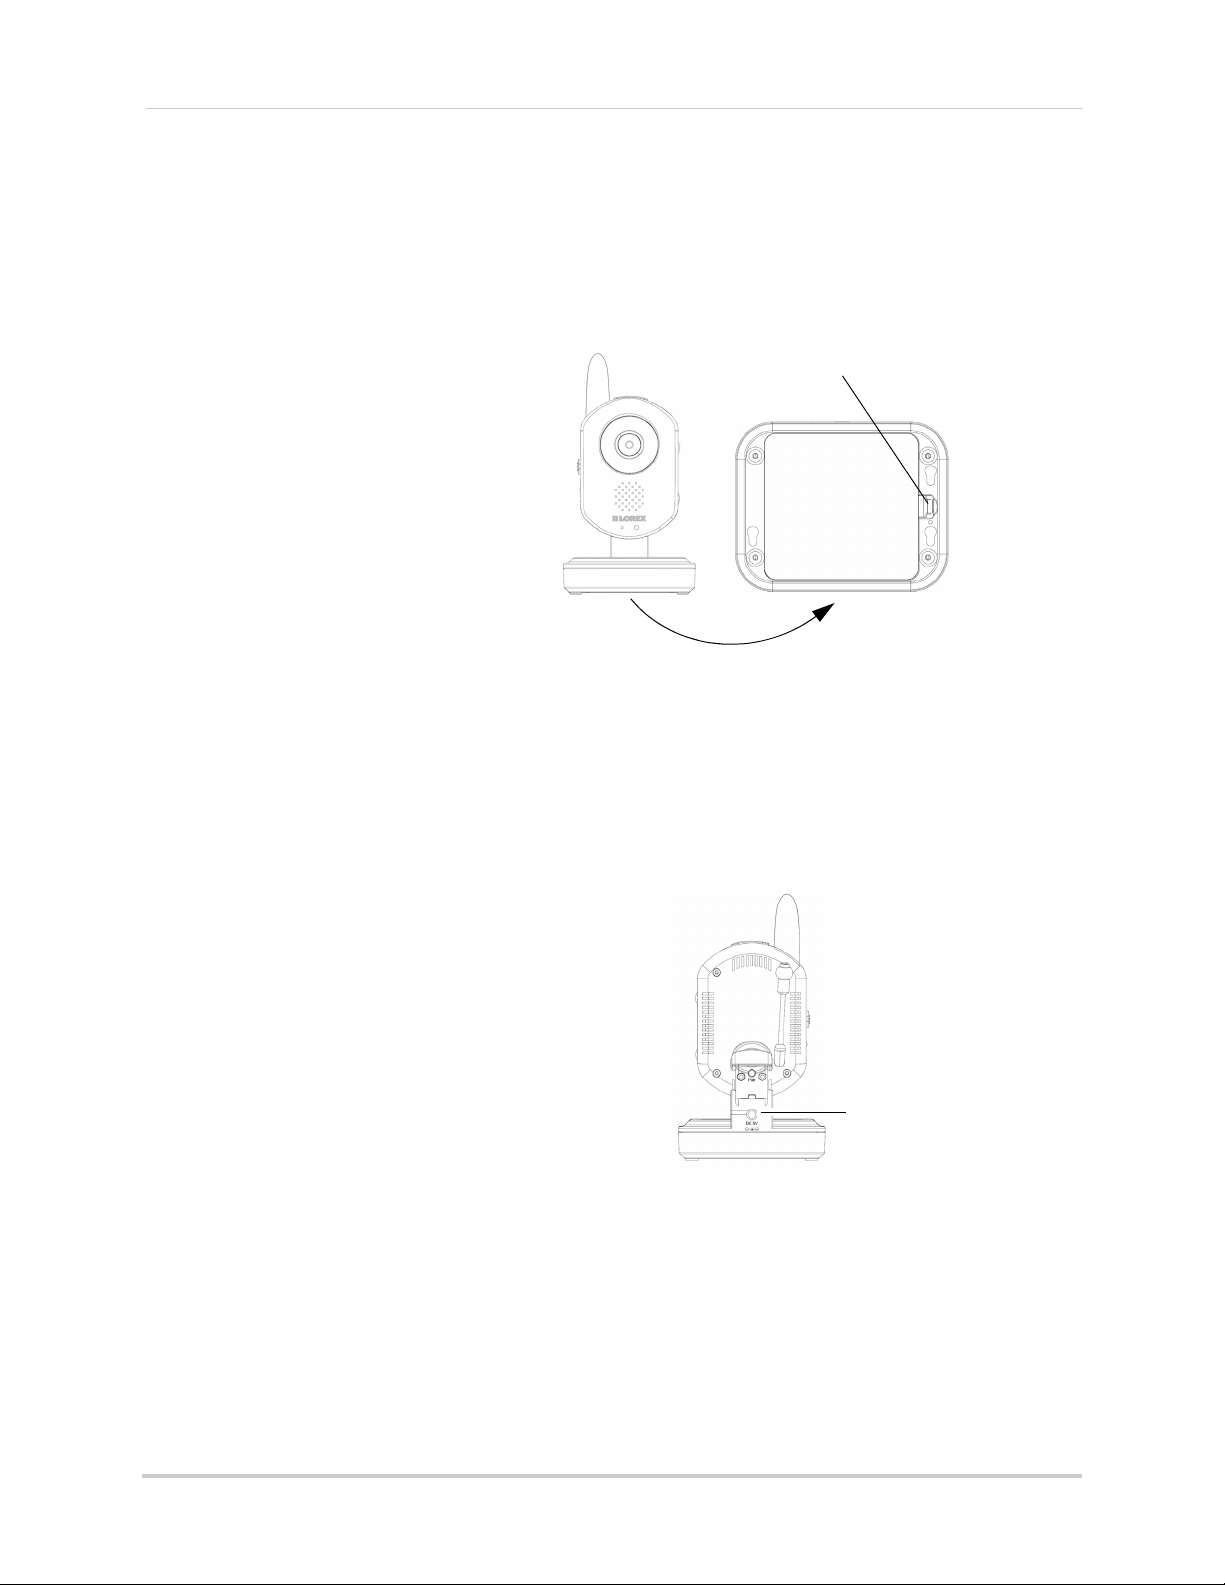
Remove battery cover from camera base.
Connect the power adapter
into the DC5V port
Optional: Charging the camera
The camera base has a built-in battery compartment where you can install three AA
batteries. This may be useful if you want to temporarily monitor an area with no power
outlets.
To install batteries in the camera:
1 Unplug the power cord from the base
of the camera.
2 Remove the battery cover.
3 Insert three AA batteries into the
battery compartment and replace the
battery cover.
NOTE: You can insert rechargable
batteries into the camera base.
Connect the power adapter into
the camera base to charge the batteries. Charge the batteries for 4.5 hours for a
full charge.
NOTE: To order rechargable batteries, contact Lorex customer support at XXXXXXX and
inquire about part number XXXXXX.
.
To charge the camera battery:
1 Insert 3 AA batteries into the battery
compartment.
2 Plug the power adapter labeled "For Camera"
into a power outlet.
3 Connect the end of the power adapter into the
port labeled DC5V.
6
Page 7
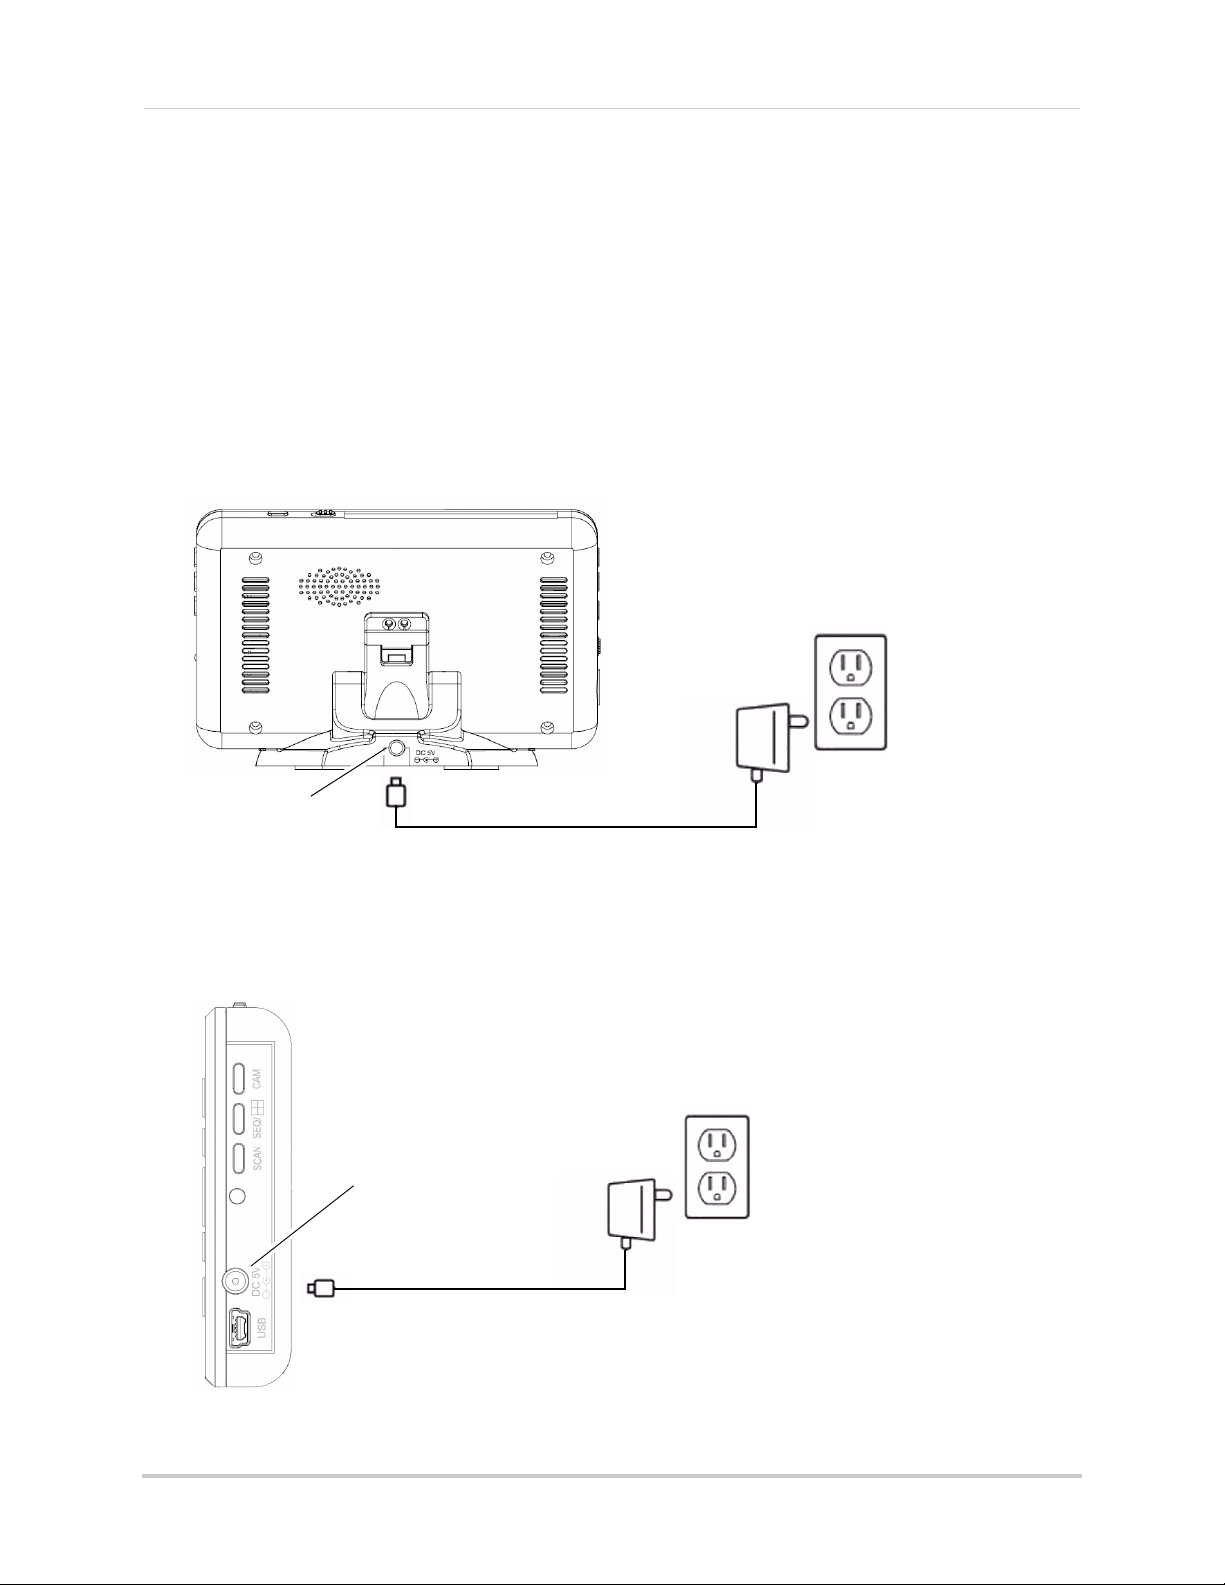
Charging the video monitor
DC5V port
DC5V port
The video monitor can be charged using the cradle, or directly through the DC5V port on
the side of the video monitor. The batteries stop charging once it is full. You will
not"over-charge" the batteries. A full charge requires 4.5 hours.
To charge the video monitor using the cradle:
1 Connect the power adapter labeled "To Monitor" to a power outlet.
2 Connect the end of the power adapter into the charging cradle.
3 Rest the video monitor on the charging cradle, ensuring the metal contacts touch.
Basic Setup
To charge the video monitor without the cradle:
1 Connect the power adapter labeled "To Monitor" to a power outlet.
2 Connect the end of the power adapter into the DC5V port on the video monitor.
7
Page 8
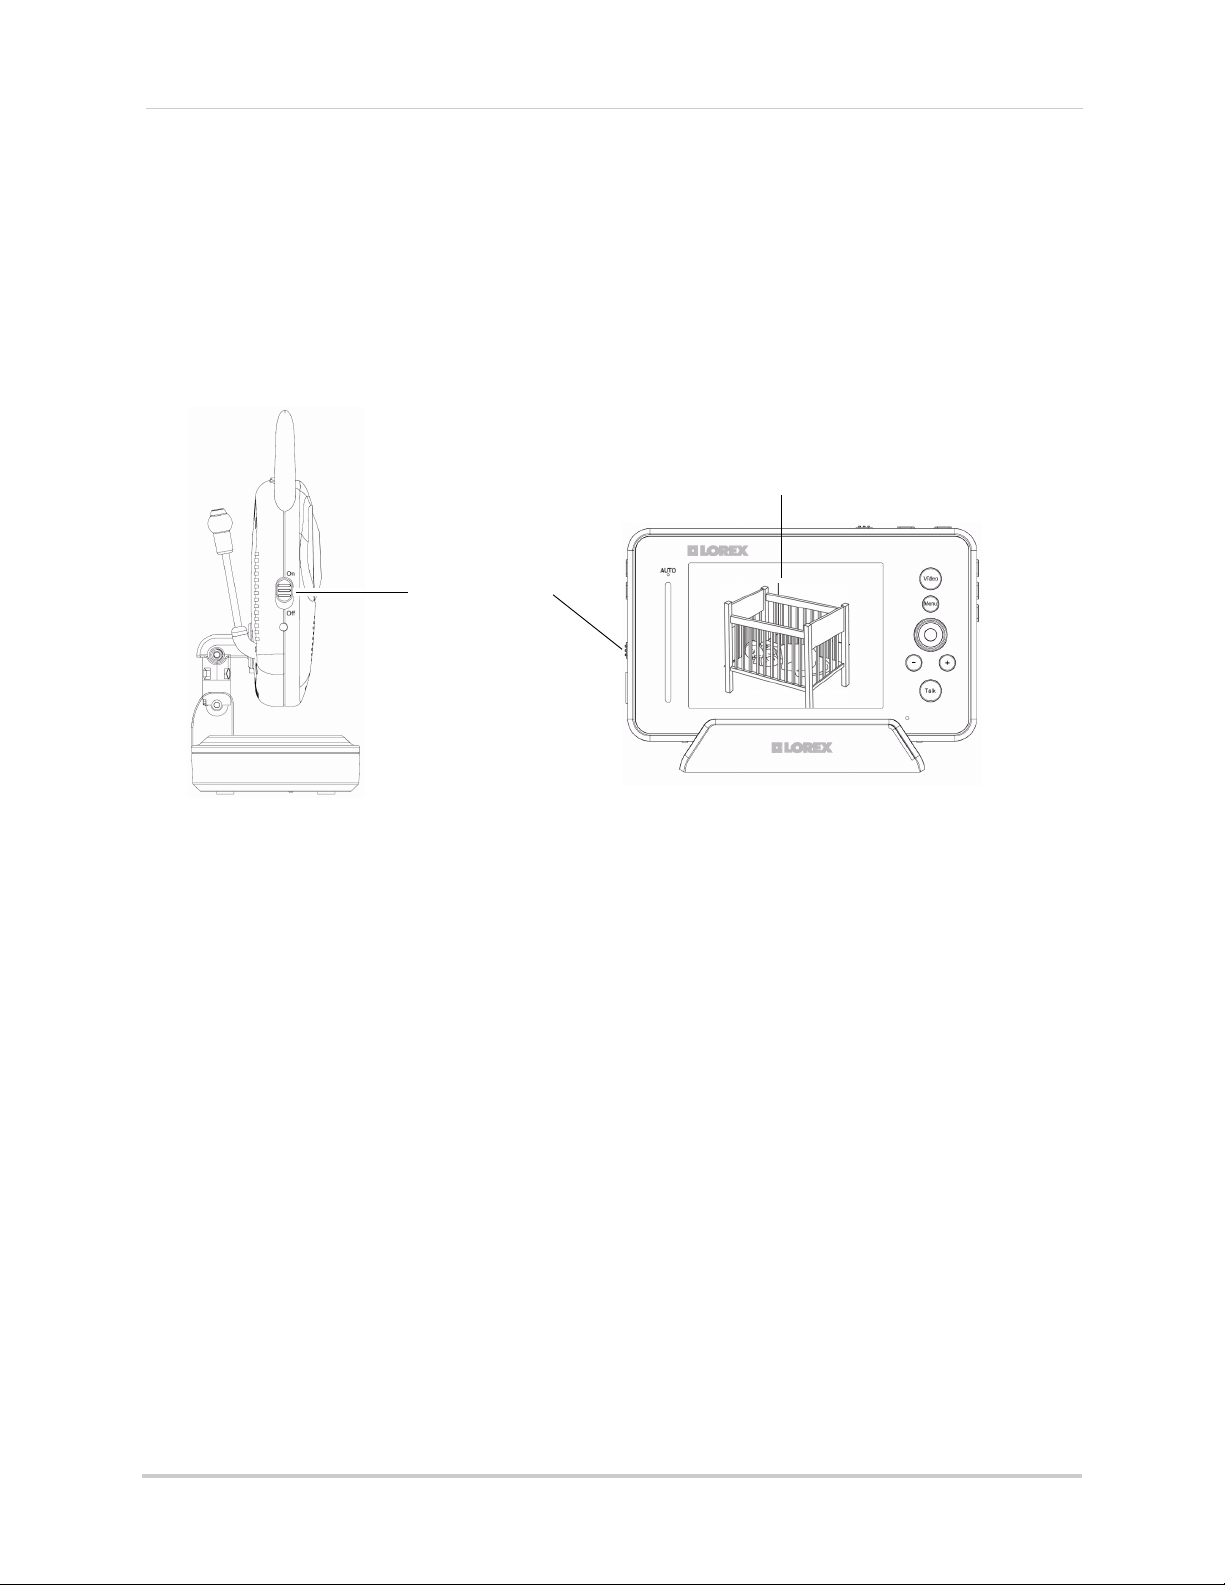
Basic Setup
Slide power switch
to the ON position
Camera image appears on monitor
Viewing your camera
To view your camera:
1 Connect the camera and video monitor to a power source.
NOTE: The power adapters are labeled "For Camera" and "For Monitor"
2 Slide the power switch to the ON position on the camera and video monitor. The video monitor
will automatically scan for cameras in range.
Testing your setup
It is recommended that you test your camera setup so that you get the best picture and
sound quality from your video monitor.
Test the camera and video monitor reception:
1 Place the camera and video monitor in two different rooms.
2 Have one person monitor the signal strength on the video monitor.
3 Have a second person move the camera in different locations of the room. The person holding
the video monitor can direct the person holding the camera, if the signal strength is low or
high.
Test the camera volume level:
1 Place the camera and video monitor in two different rooms. Have a person in each room.
2 Have a person with the video monitor press and hold the TALK button to confirm the volume
level from the camera. Adjust the volume dial on the camera as required.
3 The person holding the video monitor can determine if the camera needs to move to a
different location of the room for better sound quality.
8
Page 9
Camera Setup
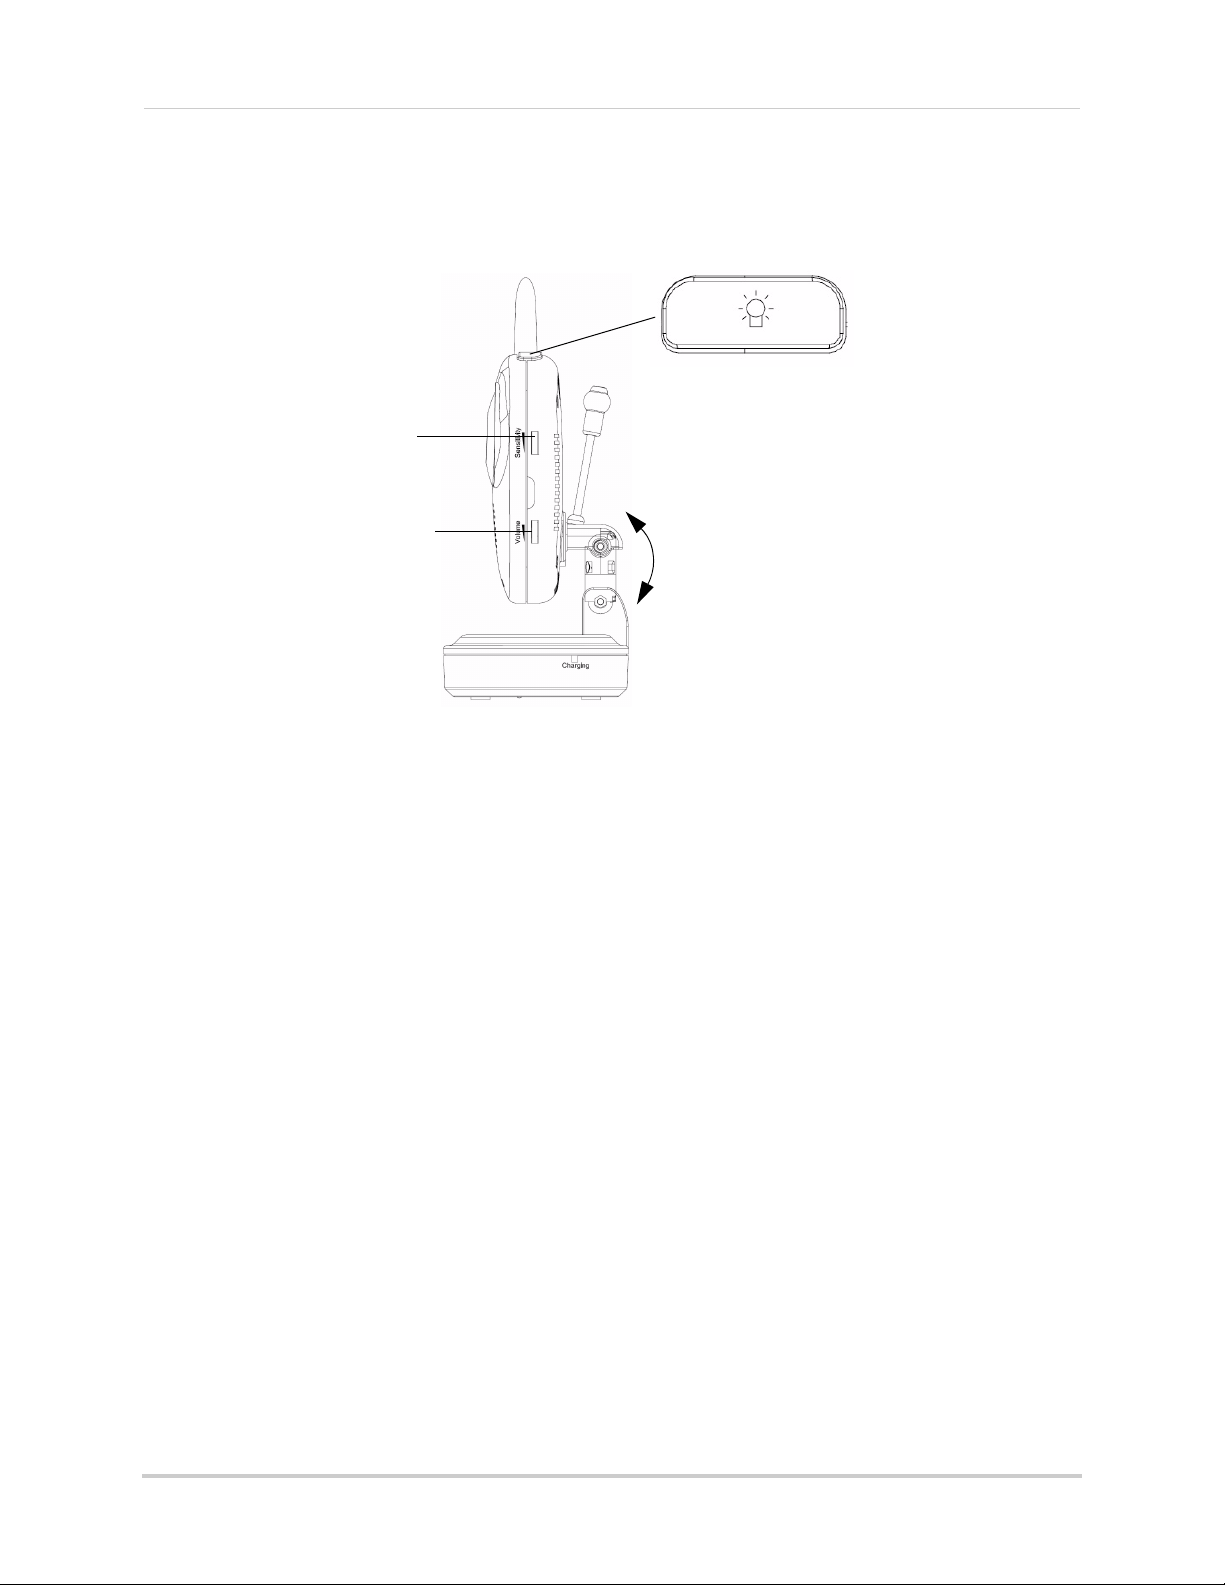
Night Light Button
Press the Night Light button
to turn on or off the camera
night light.
Adjust the camera volume
Adjust the Volume dial to the
desired level.
Adjust the camera angle
Tilt the camera to the desired
camera position.
Adjust the camera sensitivity
Adjust the sensitivity dial to the
desired level.
Basic Setup
Adjusting the camera sensitivity
The camera’s Sensitivity dial allows you to adjust how sensitive the camera is in detecting
ambient sounds. For example, if the camera detects the sound of a baby crying, the video
monitor beeps.
To adjust the camera’s sensitivity level:
• Scroll the Sensitivity dial on the side of the camera towards the + symbol for increased
sensitivity. Scroll the dial towards the
Adjusting the camera volume
The camera’s speaker volume can be adjusted to the desired level. Scroll the dial towards
+ symbol to increase the volume. Scroll the dial towards the - symbol to reduce the
the
volume.
Turning on the camera night light
• Press the night light button on the top of the camera to turn the night light on or off. The night
light button glows when the night light is on.
- symbol for reduced sensitivity.
9
Page 10
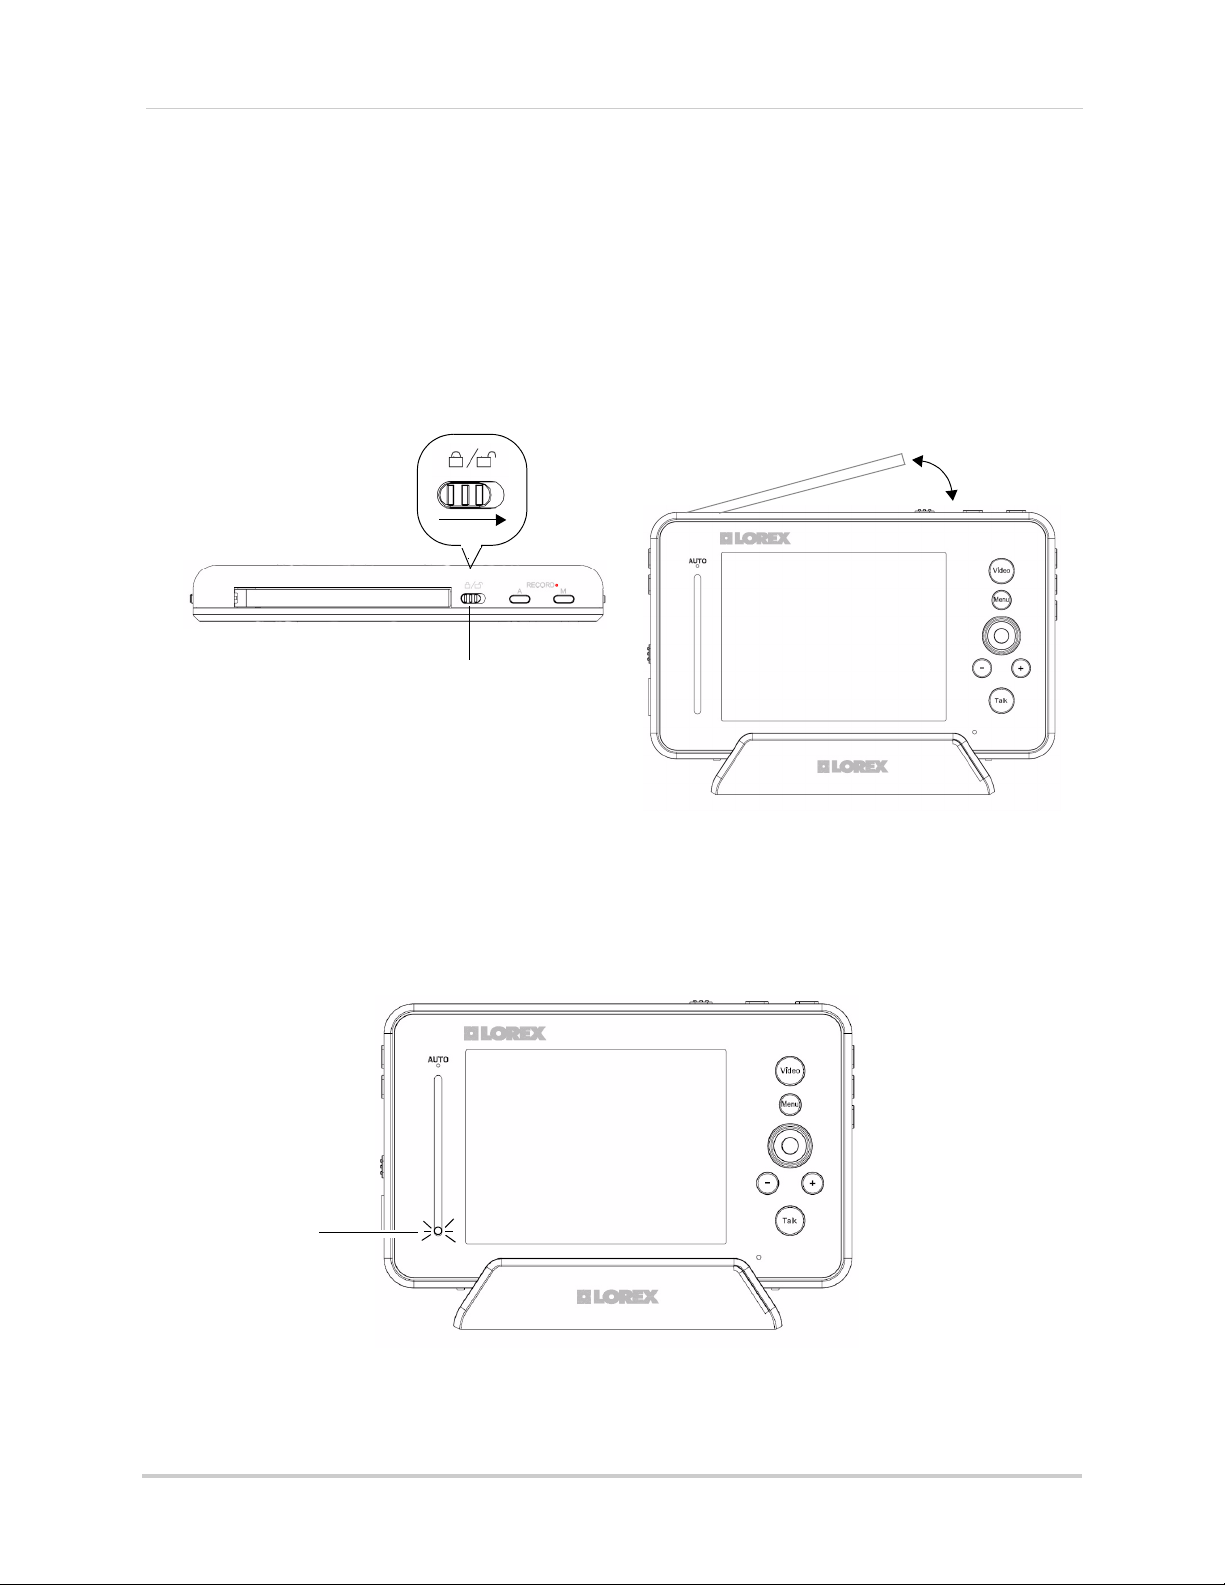
Basic Setup
Slide the Lock button to the
right to release the antenna
Power LED
Monitor Setup
Unlocking the monitor antenna
The monitor has a built-in antenna that improves signal range. It is recommended that you
extend antenna for optimal performance.
To unlock the monitor antenna:
• Slide the lock button to the right.
Reading the power indicator LED
The power indicator LED glows green when the monitor is powered on. When the monitor
is turned off, or is out of batteries, the power indicator LED turns off.
10
Page 11

Pairing one camera
Pair button
The camera included with the monitor has already been paired up with the video monitor.
If for any reason your monitor and camera are not paired up, follow the directions below.
To pair a camera to the video monitor:
1 Place the camera and video monitor 12
inches apart. Turn on the camera and the
video monitor.
2 Press the Menu button on the monitor,
then select Pairing and press the OK
button.
3 Select Camera 1, and press the OK button.
4 Press the Pair button behind the camera
within 30 seconds.
Basic Setup
Pairing multiple cameras
You can add a maximum of four (4) wireless cameras to a video monitor (model # LW2401
AC1, LW2451 AC1).
To pair multiple wireless cameras to the video monitor:
1 Press the Menu button on the video
monitor.
2 Select Pairing and then press the OK
button.
3 Select the desired channel number you
wish to pair (i.e. Channel 2) and press the
OK button.
NOTE: Each camera must be assigned to a
different channel.
4 Turn on the camera you wish to add, and
then press the Pair button behind the
camera within 30 seconds.
5 Repeat for the remaining cameras,
selecting a different channel number (i.e.
Channel 3) in the Pairing menu.
11
Page 12

Basic Setup
SEQ/Quad button
Video monitor displays 4 video images
(quad view)
Viewing Multiple Cameras
You can view all of the connected cameras in quad view or sequence view. The video
monitor supports a maximum of four cameras.
To view multiple cameras in quad view:
• Press the SEQ/Quad button on the video monitor.
To exit quad view:
• Press the SEQ/Quad button repeatedly to exit Quad mode.
Sequence View
In sequence view, the monitor switches between the four channels every six seconds. For
example, the monitor displays channel 1 for six seconds, then channel 2 for six seconds
etc.
To enable Sequence view:
1
12
Page 13

Using the talk function
Hello
Hello
Talk and listen
(Two-way co mmunicat ion)
Lullaby button
Next button
The talk function allows you to speak into the video monitor, while the camera outputs your
voice. The camera also has a built-in mic, which allows the person to speak into the
camera.
To use the talk function:
1 Adjust the Volume dial on the camera and video monitor to the desired level.
Basic Setup
2 Press and hold the Talk button on the video monitor and begin speaking. Release the Talk
button when you are finished.
NOTE: You must release the Talk button on the video monitor in order to listen to the audio
from the camera.
Lullaby
The Lullaby feature allows the camera
to play musical tunes.
To configure the lullaby feature:
• Press the Lullaby button to begin
playing a lullaby on the camera.
• Press the Next button to change the
tune.
• Press the Lullaby button to stop the
lullaby.
13
Page 14

Basic Setup
Scan button
Using the Scan feature
The Scan feature temporarily turns off the video monitor, and waits for a camera to detect
noise. Once a noise triggers the camera, the video monitor automatically turns on, and
beeps to notify you.
To enable the Scan feature:
• Press the Scan button.
14
Page 15

Recording
microSD Card Capacity Recording Time (Hour:Minute:Second)
512 MB 1:20:22
1 GB 2:32:05
2GB 5:02:47
4GB 10:15:24
8GB 17:58:28
16 GB 34:54:25
32 GB 60:10:13
NOTE: Estimated recording times based on tests using Kingston brand SD cards.
There may be a slight variatino when using different brands of memory.
microSD slot
Orient the microSD card
as shown, then insert it
into the microSD slot.
This system is capable of recording video on a microSD card. A microSD card is included
so you can begin recording right away.
Use the table below to help you estimate recording times on various sizes of SD cards.
Times are shown in hours, minutes, and seconds.
Recording
Manual Recording & Auto Recording
Prerequisite:
• Insert a microSD card into the microSD slot in the video monitor.
NOTE: The video monitor supports microSD cards up to 32 GB (gigabytes).
15
Page 16

Recording
Manual Recording
Manual recording allows you to record video by pressing the record button on the video
monitor. Manual recording may be useful if you want to quickly record an event to your
video monitor while you are watching it.
To start manual recording:
1 Press the M button on top of the video monitor. The video monitor begins recording.
2 Press the M button again to stop recording.
• The file is saved and a icon appears to indicate the recording has been saved.
Auto Recording
Auto Recording allows the video monitor to record only when the camera detects a sound.
For example, if you are monitoring a sleeping baby, the video monitor will not record until
the baby’s cry triggers the camera.
Prerequisites:
• Adjust the sensitivity level on the Camera to the desired level.
The greater the sensitivity, the more sensitive the camera is to noise. This means that the
slightest sound will cause the video monitor to record.
To enable Auto Recording:
• Press the A button on top of the video monitor. The video monitor turns off, and the AUTO
LED glows blue. When the camera detects a sound, the video monitor begins to record.
NOTE: By default, the video monitor records for X seconds after it detects sounds.
- how long does the video monitor record for after a noise? 5~30 seconds as set from the
"Trigger Record" menu?
-max recording durnig auto recording is 10 consecutive minutes (if there is constant
sound).
16
Page 17

Recording
VIDEO
110204
• Press right on the joystick repeatedly to increase
playback speed.
• Press left on the joystick to reduce playback speed.
..
102904_1
1MB
Video Playback Controls
Fast forward
Rewind
Viewing recorded files on the microSD memory card
There are two ways that you can view the recorded video files on the microSD memory
card: through the video monitor, or on your computer.
To view video files through the video monitor:
1 Press the OK button on the video monitor (press down on the joystick). The File List menu
opens.
2 Press OK to open the VIDEO folder.
3 Select the desired folder and press the OK button.
NOTE: The folders are named by the year, month, and date. For example, a folder named
110204 means that the folder was created in 2011, February (02), on the 4th.
4 Select the desired video file you wish to view, and press the OK button to begin playback.
17
Page 18

Recording
Push the microSD
card to eject
To view video files on your computer:
1 Press down on the microSD card with a small rigid object (i.e. finger nails) to remove the
memory card.
2 Insert the microSD card into a memory card reader (not included).
NOTE: If required, use the included SD card adapters to convert the microSD card to
SD/HCSD.
3 When the AutoPlay menu appears, click on "Browse Folders.."
4 Double-click the VIDEO folder, then select the desired sub-folder you want to open.
NOTE: The folders are named by the year, month, and date. For example, a folder named
110204 means that the folder was created in 2011, February (02), on the 4th.
5 Double-click the desired video file to begin playback.
18
Page 19

Configuring your video monitor
Configuring your video monitor
Enabling the Auto Mute feature
The Auto Mute feature eliminates white noise when monitoring a room. The Auto Mute
feature works by muting the video monitor when the camera detects silence. Once the
camera detects a sound, the video monitor begins to play sound again.
To enable Auto Mute:
1 Press the Menu button on the video monitor.
2 Select Auto Mute ( ) and press OK.
3 Select ON to enable auto mute.
4 Press the OK button to save your settings.
Enabling the Overwrite Feature
The Overwrite feature allows the video monitor to continuously record on the microSD
card. When the microSD card is full, the video recordings begin to overwrite the first video
entry (first in first out).
To enable the overwrite:
1 Press the Menu button on the video monitor.
2 Select Record ( ) and press OK.
3 Select File Overwrite and press OK.
4 Select Yes and press the OK button to save
your settings.
19
Page 20

Configuring your video monitor
2011-02-14
09:54:30
Changing the date and time
To adjust the video monitor’s date and time:
1 Press the Menu button on the video monitor.
2 Select Settings ( ) and then press the OK
button.
3 Select Date & Time and then press the OK
button.
4 Use the joystick to configure the Year, Month,
and Date.
• Press up/down on the joystick to adjust the
values.
• Press left/right to move between the year,
month, and date.
5 Press the OK button to save your changes.
Adjusting the alarm volume
The video amonitor ’beeps’when the camera
detects motion (?) . You can adjust the alarm
volume.
To change the video alarm volume:
1 Press the Menu button on the video monitor.
2 Select Settings ( ) and then press the OK
button.
3 Select Alarm Volume and then press the OK
button.
4 Press left and right on the joystick to adjust the
alarm volume.
5 Press the OK button to save your settings.
20
Page 21

Adjusting the screen brightness
Screenshot of timer screen
To adjust screen brightness:
1 Press the Menu button on the video monitor.
2 Select Settings ( ) and then press the OK
button.
3 Select Brightness and then press the OK button.
4 Press left and right on the joystick to adjust the
screen brightness.
5 Press the OK button to save your settings.
Configuring your video monitor
Adjusting the Timer settings
The timer feature allows the video monitor to beep after a set duration as a reminder tool.
To enable the Timer:
1 Press the Menu button on the video monitor.
2 Select Settings ( ) and then press the OK
button.
3 Select Timer and then press the OK button.
4 Select ON and then press the OK button.
5 Select Repeat Interval and press the OK button.
6 Enter the desired time that you want the set the
timer at using the joystick. Press left / right to
navigate the values. Press up/down to adjust the
values.
7 Press the OK button to save your settings.
21
Page 22

Configuring your video monitor
Configuring the temperature alert range
The camera has a built-in temperature sensor.
You can configure the video monitor to alert you
through beeps, when the temperature falls
above, or below a temperature range.
To configure the temperature alert range:
1 Press the Menu button on the video monitor.
2 Select Settings ( ) and then press the OK
button.
3 Select Temp. Alert Range and then press the
OK button.
4 Using the Joystick, press Up/Down to change
selection, left/right to adjust the values:
• Beside Low Temperature, enter the lowest
room temperature the camera should detect.
• Beside High Temperature, enter the highest
room temperature the camera should detect.
5 Select the ON button and then press the OK
button on the joystick.
Adjusting the temperature unit of measurement
You can change the video monitor to display
temperature in Fahrenheit (F) or Celsius (C).
To change the unit of measurement:
1 Press the Menu button on the video monitor.
2 Select Settings ( ) and press the OK
button.
3 Select Temp. Display and press the OK
button.
4 Select either C for Celsius or F for
Fahrenheit.
5 Press the OK button to save your settings.
22
Page 23

Erasing the memory card
Once you erase the memory card, the video
will be deleted permanently.
To erase the memory card:
1 Press the Menu button on the video
monitor.
2 Select Settings ( ) and then press the
OK button.
3 Select Format memory and then press the
OK button.
4 Select Yes and then press the OK button to
erase the memory card.
• The message "Format OK" appears to
confirm that the card has been erased.
Configuring your video monitor
Restoring default settings
Restoring your video monitor settings
reverts the settings you made
settings.
To restore the video monitor factory
defaults:
1 Press the Menu button on the video
monitor.
2 Select Settings ( ) and then press the
OK button.
3 Select Factory Reset and then press the
OK button.
4 Select Yes, and then press the OK button.
to the factory
23
Page 24

Viewing your cameras using Skype
Skype server
How it works
The laptop connects to the Skype server. The Skype server is
connected to your computer. Your computer connects to the video
monitor, which captures video from the camera.
Viewing your cameras using Skype
Connecting to your video monitor through Skype is a convenient method to view your
cameras from anywhere with an internet connection.
Prerequisites
• A PC (Macs currently not supported)
• High speed internet connection
Step 1 of 3: Installing the camera drivers
You will need to install the camera drivers located on the software CD (included).
To install the camera drivers:
1 Insert the software CD into the computer, and browse the contents on the CD.
2 Double-click the USB Driver folder, then double-click the USB Driver icon ( ).
3 Follow the on-screen instructions to install the camera drivers.
26
Page 25

Viewing your cameras using Skype
Join Skype
Create Account
I Agree - Continue
Step 2 of 3: Creating a Skype account
A Skype account allows you to connect to your camera through using the Skype service.
Skype is a service that allows users to make voice calls and video calls to anywhere in the
world.
To create a Skype account:
1 Go to
www.skype.com
, and click on Join Skype.
2 Click Create Account. Fill in the appropriate fields.
3 Click the I Agree - Continue button.
27
Page 26

Viewing your cameras using Skype
Mini USB cable
4 Follow the on-screen instructions to download and install Skype on your computer.
5 Repeat the process to make a second account. You will need two accounts --- one for the
camera, and one for yourself.
Step 3 of 3: Connecting to your camera
Once you have created two Skype accounts, you are ready to connect to your camera.
Step 1: Connecting the video monitor to your computer
1 Connect the mini USB cable (included) to your video monitor and into the computer’s USB
port.
2 Turn on the video monitor and camera. The video monitor displays the following: "USB PC
CAMERA MODE"
28
Page 27

Viewing your cameras using Skype
Step 2: Log in and configure your Skype account
1 Log in to your Skype account (for your camera) from the computer that is connected to your
video monitor,
2 Click on Tools>Options.
3 Click the Calls button ( ).
4 Select the "Answer incoming calls automatically" checkbox and the "Start my video
automatically when I am in a call" check box.
5 Click Save.
29
Page 28

Viewing your cameras using Skype
Enter the camera
account name here
Step 3: Add your camera as a friend
This step requires you to log in to your personal Skype account from a different computer.
1 Log in to Skype using your personal account (this is differenet from your camera’s account).
2 Click on Contacts>Add a Contact.
3 Beside the Skype Name field, enter the account name for your camera.
4 Click the Add button.
Step 4: Connect to your camera
After you have added your camera as a contact, you can connect to your camera.
To connect to your camera:
• From the contact list, right-click on your camera’s account name, and click Call.
• The video call begins automatically.
30
Page 29

Viewing your cameras using Skype
Press right on the
joystick to change
cameras.
Cam 2
USB PC CAMERA MODE
Changing the camera view
If you have more than one camera connected to your video monitor, you can specify which
camera you want to connect to using Skype. You can only view one camera at a time.
Viewing through Skype does not allow you to change cameras.
To change the camera view:
1 From your video monitor, press right on the joystick to change the camera number.
• The camera number changes from "CAM 1" to "CAM 2".
31
Page 30

Troubleshooting
Troubleshooting
Improving reception
No picture or sound on Monitor
Sound but no picture on monitor
picture but no sound
picture not clear
squealing
- get questions from summer infant handout
Tips on improving connection
32
Page 31

FCC NOTE:
This equipment has been tested and found to comply with the limits for a Class B digital
device, pursuant to Part 15 of the FCC Rules. These limits are designed to provide reasonable
protection against harmful interference in a residential installation. This equipment generates,
uses and can radiate radio frequency energy and, if not installed and used in accordance with
the instructions, may cause harmful interference to radio communications. However, there is
no guarantee that interference will not occur in a particular installation. If this equipment does
cause harmful interference to radio or television reception, which can be determined by
turning the equipment off and on, the user is encouraged to try to correct the interference by
one or more of the following measures:
-- Reorient or relocate the receiving antenna
-- Increase the separation between the equipment and receiver.
-- Connect the equipment into an outlet on a circuit different
from that to which the receiver is connected.
-- Consult the dealer or an experienced radio/TV technician for help.
This device complies with Part 15 of the FCC Rules. Operation is subject to the following two
conditions: (1) this device may not cause harmful interference, and (2) this device must accept
any interference received, including interference that may cause undesired operation.
The manufacturer is not responsible for any radio or TV interference caused by unauthorized
modifications to this equipment. Such modifications could void the user's authority to operate
the equipment.
The antenna used for this transmitter must be installed to provide a separation distance of at least
20 cm from all persons and must not be co-located or operated in conjunction with any other
antenna or transmitter
IC NOTE:
This device complies with Industry Canada licence-exampt RSS standard(s):Operation is
subject to the following two conditions: (1) this device may not cause interference, and (2)
this device must accept any interference, including interference that may cause undesired
operation of the device."
This Class [B] digital apparatus complies with Canadian ICES-003.
 Loading...