

Page 1

Digital Wireless Camera CA531
Digital Wireless Monitor M723
User Manual
Page 2

Features
• 7’’ portable LCD monitor
• Pan-Tile camera
• Record video to SD card
• Crystal clear pictures with higher frame rate
• 2-way talkback function
•Remote activated night light
• Room temperature display and alerts
• Audio only function
•3 different baby lullabies
• Single, two-channel or quad display
• Night vision 20ft
• Digital zoom function for a closer look
• Rechargeable Lithium battery for up to 2.5 hours for portable use
• Extended battery life with power save mode
• Secure, long-range digital signal up to 800 ft
• Table top, wall or ceiling signal up to 800ft
• Expandable up to 4 cameras
Getting Started
The system comes with the following components
Check your package to confirm that you have received the complete system, including all components
shown above.
1
Page 3

Wireless Receiver
1. SCAN Button – When the SCAN button is
pressed, the screen is turned off. Durning this time
the parent unit will continuously scan the camera
( or multiple cameras). When a sound is detected,
the parent unit will become active. The screen is
turned back, now you can see what happen in the
baby room. You can adjust the sound sensitivity
for this detection in VOX. After the monitor has
detected sound it will take about 5 seconds to
switch back to the scan mode. Except when the sound is continuously detected. In that case the monitor
will be activated for another 5 seconds. There are 2 reasons to use the scan button:1- to prevent you
from being disturbed by bright LCD screen, or 2- save energy. Press the scan button to deactivate the
scan mode.
2.Video ON/OFF Button— Press the video button to switch to the sound only mode. In this mode the
screen is turned off. Press the button again to return from the sound only mode to the sound and video
mode
3. Volome down(-) —Press (-) to decrease the volume
4 Volume up(+)— Press(+) to increase the volume
5 T alk button — Press th is button to speak through the baby unit. The icon
screen. When multiple cameras are used, you will speak through the unit currently being display on the
screen.
will then be display on
Front Touch Button Control
6. Sound bar-. The green/red LEDs indicate the
volume level (from low to high)
7. Power Led- The green LED indicates the
receiver power is ON or OFF
8. Play/Stop-Press this button to start or stop the
baby unit playing a lullaby
9. Next button- Play the next lullaby. There are
three different lullabies available
10 Manual Recording- press this button to
recording,
screen. Press this button again to return the normal mode.
11.Cam button-1) press this button to change from one camera to another,
2
is displayed at the top of the
Page 4

2) while all the connected cameras have been displayed, press again to enter Quad
mode,
3)In Quad mode, press once again to enter Auto sequency mode, then press again to
exit the Auto sequency mode
12. Zoom- The video can be set at normal or double size by pressing the zoom button. When the video
is in double size mode, navigating the joystick button
parent unit screen. Press the zoom button again to return to normal size. In the double size mode
displayed at the top of the screen.
13.Light button- press this button to turn on the LED light on camera, press again to turn off the light
14 Menu button- press this button to enter the main menu. Press menu again to exit the menu
15 Joystick button- allows movement to navigate through the menu. Pressing the joystick in will allow
you to select the menu option. In live view :1) press the joystick right/ left/up/ down to activate the pan-tile
function of the camera; 2) press the joystick in to enter the recording file list menu
can be used to view the parts outside the
Side and back button control
16.Power On/off - Slide the switch to ON or OFF position to switch
on/off the receiver.
17. DC jack 5V- Connect the included DC 5V power adaptor to power
the receiver and/or charge the receiver battery
18 SD Card Insert- the SD card will be inserted into this area to record
and save footage
19 Antenna- receives the video and sound from the
baby monitor
20 Battery compartment- this compartment allows the
battery to be replaced. Only use original batteries.
21 Speaker- produces the sound from the baby unite
22 Receiver stander- enables you to position the parent
unit on a flat surface
3
Page 5
Wireless Receiver Installation
1. Place the receiver in a place that will have clear reception with your camera(s).
2. Plug the AC adaptor power output cable into the 5V POWER input of the cradle or receiver. Plug the
power plug into a wall outlet or surge protector.
3. Leave the receiver to charge for several hours prior to first time use so the built-in rechargeable
receiver battery is fully charged. DO NOT remove the power cable from the receiver / from the cradle
during initial charge process. After initial charge, charge the receiver as required.
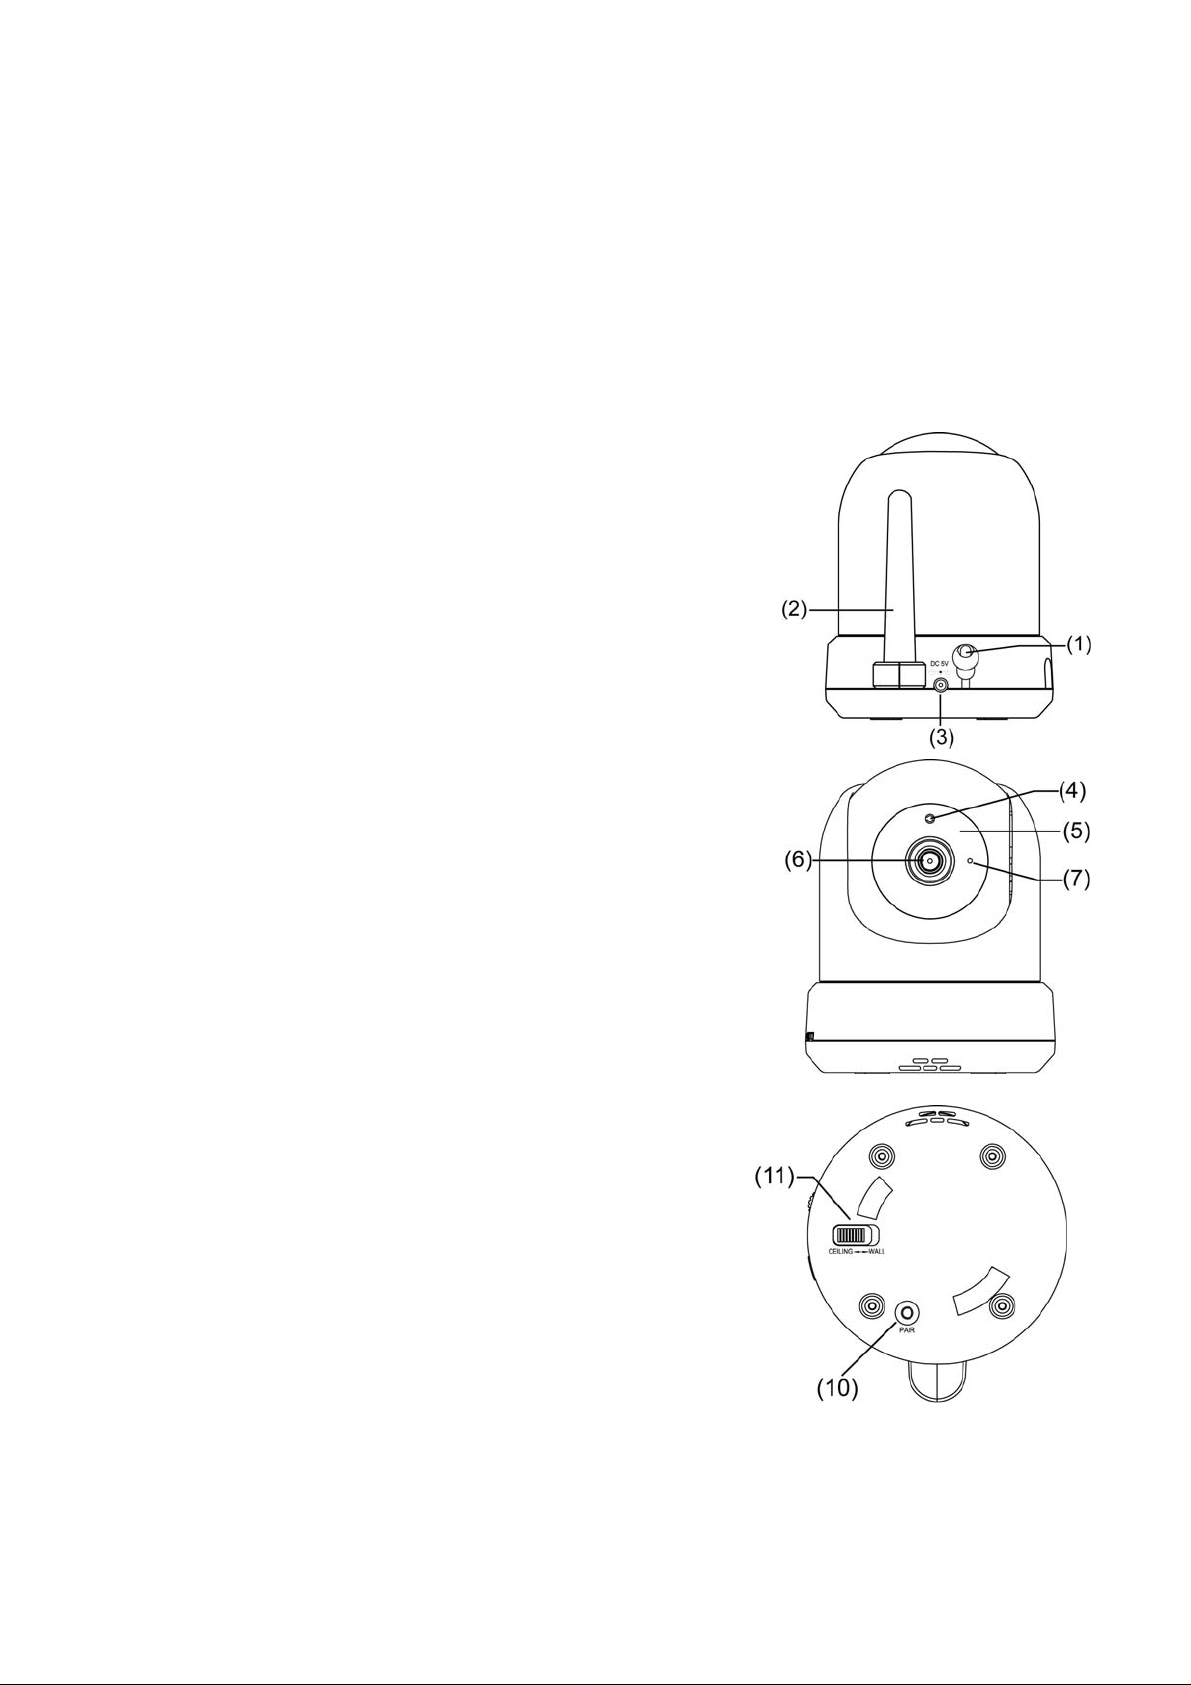
Wireless Camera
1. Temperature sensor- Measure the temperature
2 Camera Antenna – Sends & receives signals to or from the
receiver.
3 DC 5V Power – Connect the DC 5V power adaptor to the camera
4 Light sensor- measures light intensity on the camera side
5 Infrared leds – Infrared LEDs provide viewing in no/low light
conditions
6 Lens- camera lens
7 Microphone – Receives sounds for the area near the camera, and
transmits sound from the camera to the receiver.
8 power On/Off - Slide the switch to ON or OFF position to switch
on/off the camera.
9 Volume Control- Silde the switch to increase or decrease the
sound volume
10 Pair Button – The pair button is located on the back of the
camera behind the stand mount.
11 Ceiling mounting switch- For ceiling mounting, use the ceiling
mounting switch to invert the video image
4
Page 6

Night Vision
This camera has built-in IR LEDs, which provides the camera with the ability to view images in no/low
light conditions. It is important to use the provided power adaptor (and not the batteries) when using the
camera for prolonged periods in low light conditions, as the built-in IR LEDs will drain the battery more
quickly than regular daytime use.
Camera Installation
Before you install the camera, carefully plan where and how it will be positioned, and where you will
route the cable that connects the camera to the power adaptor.
Before starting permanent installation, verify its performance by observing the image on the receiver
when camera is positioned in the same location/position where it will be permanently installed and the
receiver is placed in the location where it will be used most of the time.
1. Carefully unpack the camera.
NOTE: If you are installing cameras that did not come with the system, please see the pairing camera
section of this manual for details on installation.
2. Mount the camera to the wall or put it on a cabinet, table or shelf. To mount the camera on the wall,
Mark the position of the 2 screw holes on the wall, and drill holes and insert the included plugs and
screws, Firmly attach the camera to the wall by placing the base over the installed screws and pushing
the base downwards.
3. Pointed the camera of the baby unit towards the area you want to monitor. The camera can be tilted
and swiveled to point it at the baby. For good sensitivity it is recommended to place the camera no more
than 3 meter away from the baby
NOTE: You can install additional cameras (maximum of 4 cameras). When adding cameras that were
not included in the original box, you will need to pair up the cameras with the receiver. Refer to the
camera pairing section of this manual.
Installation Warnings
Aim the camera(s) to best optimize the viewing area: Select a location for the camera that provides a
clear view of the area you want to monitor, which is free from dust, and is not in line-of-sight to a strong
light source or direct sunlight.
Avoid installing the cameras where there are thick walls, or obstructions between the Cameras and the
Receiver.
Do not install camera in those area which is easy for baby to touch; Make sure the camera is installed
stable and not fall down.
5
Page 7

Viewing Mode
1. Signal Indicator – The signal indicator shows the strength of the signal being received from the
camera. The number of bars in the signal indicator shows the strength of the signal – One or No Bars
indicates the signal is poor, and 4 bars indicate a very strong signal.
Signal Indicators:
2. Channel Indicator – Displays the current channel number. Press the cam button on the receiver to
switch between available cameras.
3. SD Card indicator- This graphic displays if an SD card is inserted into the monitor.
If blue, recording space is available.
If red, the SD card is full.
4 Room temperature indicator- the room temperature indicator indicates the temperature measured by
the baby unit. Make sure temperature sensor of the baby unite is pointed away
from the camera to enable more accurate measurements.
5 Talk indicator- this icon appears when the talk button is pressed. You can now talk through the
baby unit
6 Manual Recording indicator- While in manual recording, this icon
6
will display on the screen .
Page 8

7 Zoom indicator- it displays on the screen while the video is setted in doub le size
8 Overwritten indicator- displays if the SD card is allowed to overwrite files when it is full.
9 New recording indicator- new recordings are saved on the SD card.
10 Battery Indicator- indicates the monitor battery’s life
11 Sound indicator- when the volume has been decrease to mute, the mute icon will be displays on
the screen. Use the “+” button to increase the volume
12 Nightlight indicator- The nightlight indicator is displayed when the nightlight on the camera is
turned on
13 Time/date- display the time & date
Low Signal / No Signal Warnings
When the camera is positioned too far from the receiver, warning messages “Out of Range” will be
displayed, and there will be one beeps sound alert every one minute to remind you the no signal
Adjusting the Receiver Volume
The receiver volume can be adjusted by using the touch button
VOL-/VOL+ when viewing a camera.
Press the touch button VOL- to decrease the volume, and
press the touch button VOL + arrow to increase the volume.
When the volume is set to one bar (lowest setting), the volume
is muted.
The volume adjustment icon will be displayed during volume
changes, and will disappear 3 seconds of inactivity.
Accessing Menu System
Press the MENU button on the receiver to enter menu system. Navigate the joystick button
up/down/left/right in the menu to select a setting, and press in the button to confirm the setting.
7
Page 9

Main Menu
The Main Menu contains five submenus
1. Alert
In scan mode, Press the joystick button left or right to decrease
or Increase the volume of the buzzer when motion or Vox is
detected by the camera(s). If you want to turn off the buzzer or
button sounds, turn the alert volume to the minimum
setting(Default 0)
2.
Camera
Use the menu to add camera(s) to the receiver, adjust the
camera on/off, adjust the brightness for camera.
1) Pairing
The system comes with camera(s) that have already been
paired. These cameras will communicate with the receiver once powered on.
The pairing function assigns each camera to a different channel on the wireless receiver (up to 4
cameras), and is necessary for configuring additional cameras.
NOTE: It is highly recommended to pair the cameras to the receiver before permanently mounting the
cameras.
a) Switch the camera on
b) Swith the monitor on
c) Press the menu button on the receiver. Navigate the joystick button to select pairing . Press in to
enter pairing menu
d) Select a channel using the joystick up/ down. Press in to accept the
channel
8
Page 10

e) A message will be display on the screen. The screen will count down from 30 to 0. You have to briefly
press the pair button on the baby unit within this
f) Press the Pair button on the back of the camera.
Once the camera has been paired, it will be immediately viewable on the
receiver monitor.
When the camera and monitor have been paired, the video from the camera will
be directly displayed on the screen of the monitor
2) Camera on /off
Select a camera by navigating the joystick button, then press in to
confirm camera on or off.
3) Brightness
The brightness of the screen can be adjusted by joystick button.
Navigating left makes the screen darker and navigating right
makes the screen lighter
3 . SETTING – In this submenu you can set Date/ Time, format
SD card, reset the receiver to factory defaults, choose language,
Temp.alert, Temp.display,
1) Date/Time- you can display the time on the screen by setting it in
this submenu. The date and time have the following value
YY/MM/DD HH: MM
9
Page 11

2) Format SD Card- select Yes to format the micro SD card.
Formatting will delete all the data stored on the micro SD card
3) Default Setting- select Yes to reset the parent unit to factory
default setting. All menu settings will then be reset
4) Language setting- select the language( English, S panish, French)
as per your interest
5) Temperature unit- select the temperature unit you want to use. Y ou
can choose between degrees celcius or degree Fahrenheit
6) Temperature Alert- you can use this menu to set the temperature range
of the temperature alert. When the temperature is outside this range, a
warning sound will be emitted
move the joystick left/ right to select the minimum and maximum
temperature, then move the joystick up/ down to set the temperature value. After successfully setting
the temperature range, select on and then press OK to confirm the settings
10
Page 12

Select OFF to disable the temperature alert
4 Vox
set the vox sensitivity ( high, medium, low, off ) by joystick button,
and press in to confirm setting
5 Overwrite
Decide whether to record over earlier recorded files when the memory of
the Micro SD card is full
Troubleshooting
If you have problems with the system, there is often a quick and simple solution. Please try the following:
Problem Solution
1. Check all connections to the camera. Make sure the adaptor is
plugged in.
No picture from a camera
The picture is dropping
Audio problems
2. Make sure that the cameras and receiver are both ON.
3. Make sure that the camera is in range of the receiver.
4. If using the battery adaptor, try replacing the batteries
1. Move the camera closer to the receiver.
2. Try repositioning the camera, receiver or both to improve the
reception.
3. Adjust the monitor antenna to vertical position.
1. Ensure that the volume on the monitor is on.
2. Make sure that there is sound within range of the camera
microphone
3. If the unit emits a loud screeching noise (feedback), move the
camera or receiver farther apart.
11
Page 13

The picture may become choppy when experiencing a lower frame
The picture is or has become
choppy
rate (i.e. 10 frames per second vs. a higher 20 frames per second).
1. Try moving the camera closer to the receiver.
2. Remove obstructions between the receiver and camera.
3. Adjust the monitor antenna to vertical position.
Specifications
Lcd monitor
Receiving Frequency Range 2400Mhz~2483.5Mhz
Data Rate 4 Mbps
Receiving Sensitivity -81dBm
Modulation Type GFSK with FHSS
Lcd Panel size 7 Inch
Lcd Resolution 800 RGB (H) x 480 (V)
View Angle H: 140° V: 110°
Power Requirement 5V DC 2A ±5%
Power Consumption 1.03A
Operating Temperature 14°F ~ 104°F (-10°C ~ 40°C)
Operating Humidity 0% ~ 85%
Camera(s)
Transmit Frequency Range 2400Mhz~2483.5Mhz
Data Rate 4 Mbps
Transmitting Power 16dBm (TYP)
Modulation Type GFSK with FHSS
Transmitting Distance 150m (Line of Sight)
Image Sensor Type 1/4” Color CMOS Image Sensor
Effective Pixels H: 640 V: 480
Image Processing MPEG 4
Cam x 2 : VGAx2 @ 30 fps
Image Resolution / Frame Rate
Lens TBD
Viewing Angle (Diagonal) TBD
Minimum Illumination <5 Lux (IR On), >30 Lux IR Off
IR LED / Night Vision Range 8 Leds / 850nm, 5m (with IR Led)
Power Requirement 5V DC 1A ±5%
Power Consumption
Operating Temperature 14°F ~ 104°F (-10°C ~ 40°C)
Operating Humidity 0% ~ 85%
Cam x 4 : QVGAx4 @ 30 fps/VGA x 4 @ 10
fps
350mA
600Ma with IR on
12
Page 14

FCC NOTICE:
This device complies with Part 15 of the FCC Rules. Operation is subject to the following two conditions:
(1) this device may not cause harmful interference, and (2) this device must ac
received, including interference that may cause undesired operation.
Any Changes or modifications not expressly approved by the party responsible for compliance could
void the user's authority to operate the equipment.
cept any interference
FCC NOTE: The manufacture is not responsible for any radio or TV interference caused by
unauthorized modifications to this equipment. Such modifications could void the user’s authority to
operate the equipment.
This radio transmitter (identify the device by certification number or model number if
Category II) has been approved by Industry Canada to operate with the antenna types
listed below with the maximum permissible gain indicated. Antenna types not
included in this list, having a gain greater than the maximum gain indicated for that
type, are strictly prohibited for use with this device.
13
 Loading...