

Page 1
PORTABLE DIGITAL WIRELESS PAN/TILT
CAMERA AND LCD MONITOR SYSTEM
INSTRUCTION MANUAL
MODEL: CMD5237M
CAMERA MODEL: CA520M
MONITOR MODEL:M370M
Page 2
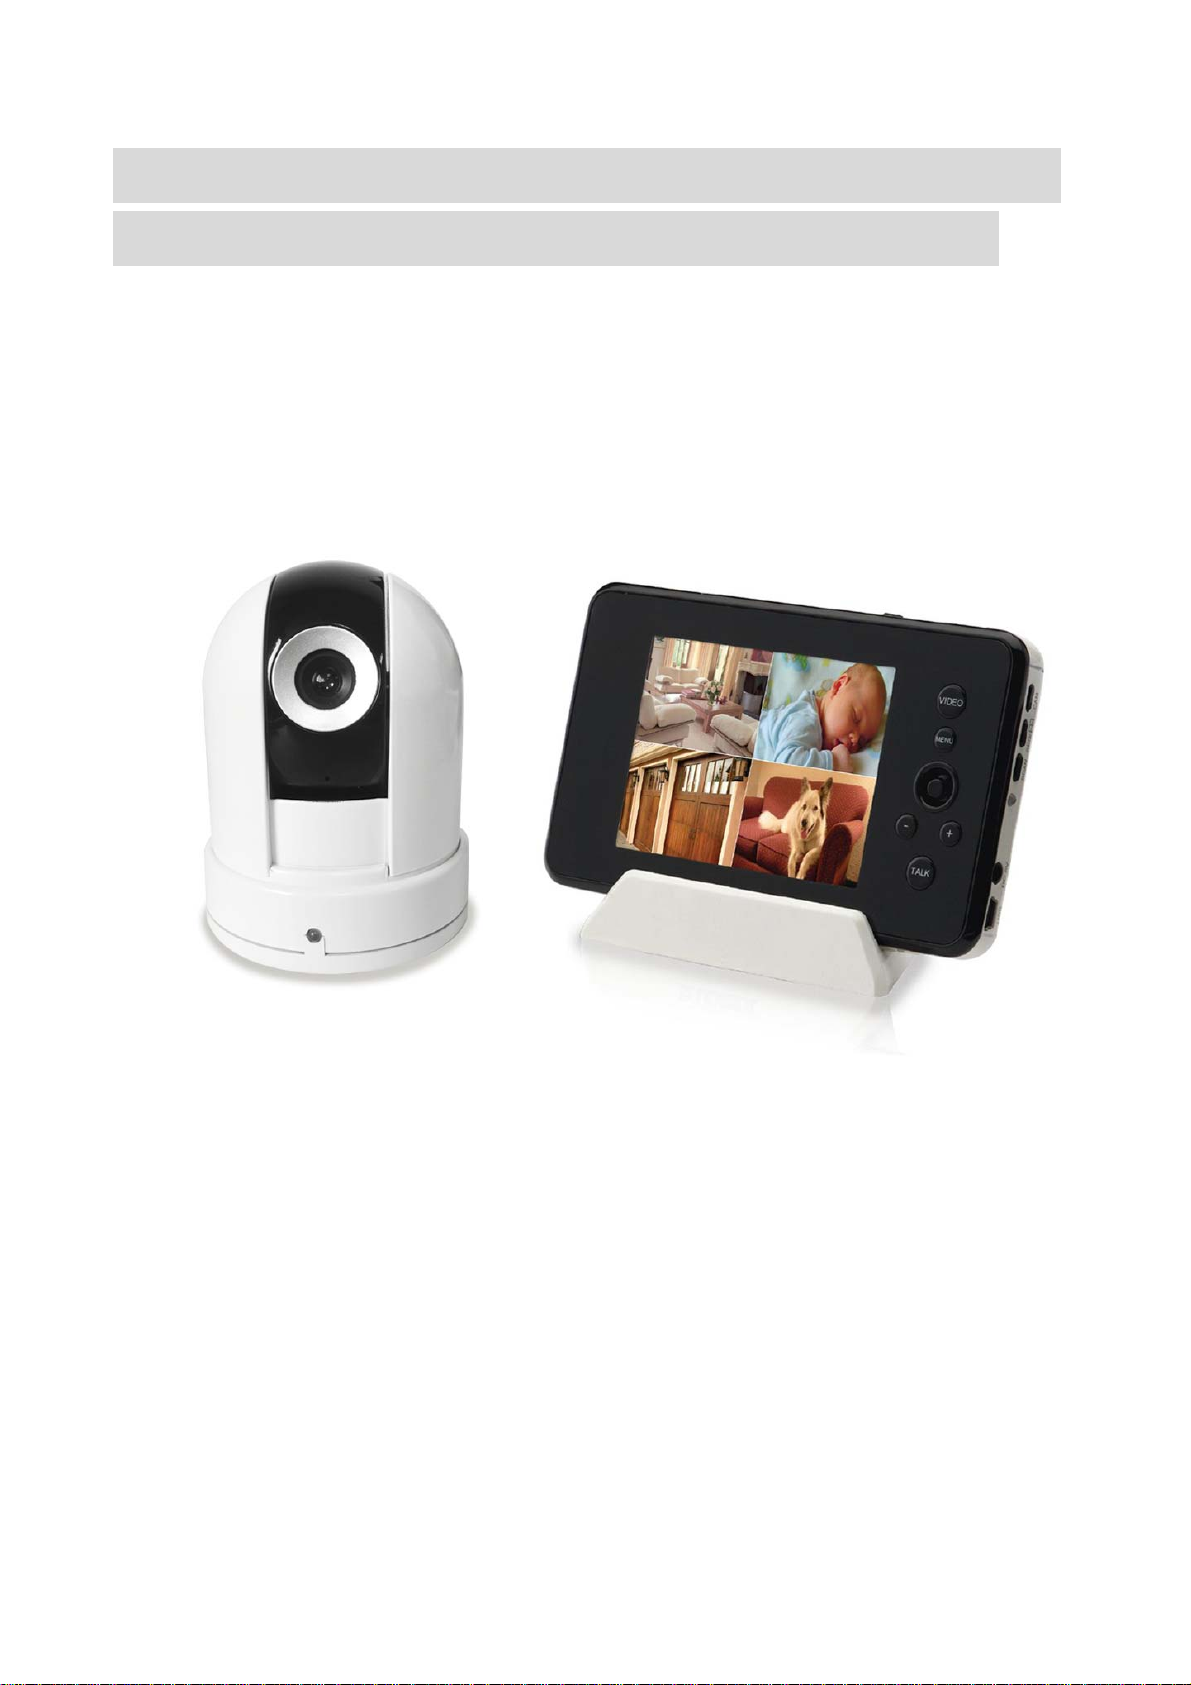
Welcome!
Thank you for purchasing the wireless video monitor. Before you start, make sure you have the contents
listed below.
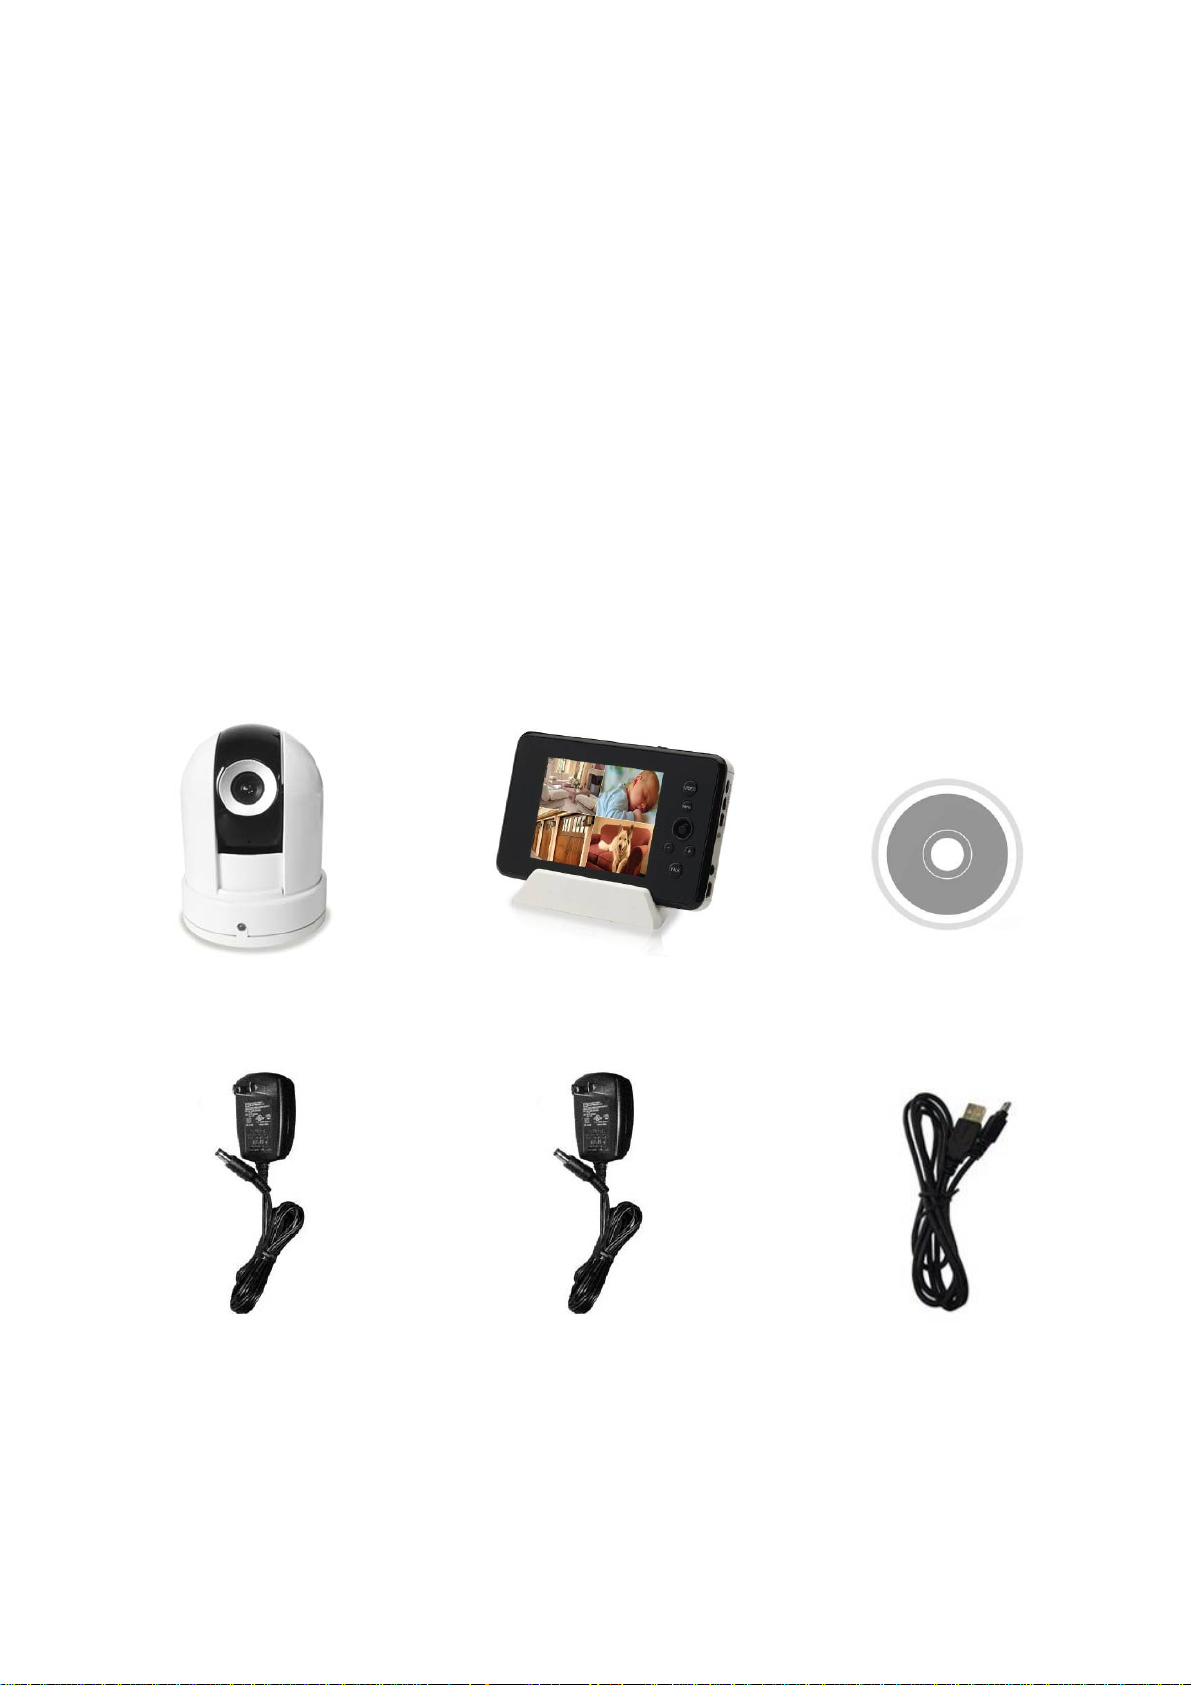
Contents
The system comes with the following components:
• Camera X1
• Video Monitor X1
• Charging cradle for video monitor X1
• Driver CD X1
• Power adapter for camera X1
• Power adapter for video monitor X1
• Mini USB cable X1
• User’s manual X1
• Hardware kit X1
Camera Video Monitor with Charging Cradle Driver CD
Power Adaptor for Camera* Power Adaptor for Video Monitor* Mini USB Cable
* The shape of power adaptor may not be exactly as shown
Check your package to confirm that you have received the complete system, including all components
shown above.
1
Page 3

Features
• Digital wireless technology provides excellent image quality and clarity
• Interference free, secure and private signal
②
①
• Up to 450ft wireless transmission range
• Listen in with exceptional sound clarity
• Two-way audio communication
• Safety warning feature notifies you when out of range
• System expandable up to 4 cameras
• Micro SD card recording
• Timer Function
• USB output for monitoring on PC
①
Maximum open space transmission range. The actual range is dependent upon building
materials and other obstructions in path of wireless signal.
②
Additional cameras sold separately.
Camera Features
• Pan & tilt camera for wider viewing angle.
• Night vision allows for low light viewing up to 15 feet / 4.5 meters
• Built-in microphone and speaker
• Two-way controlled lullabies
• Adjustable audio alarm volume for sound trigger.
• Adjustable sensitivity for audio alarm
③
IR illumination range of 15ft./4.5m under ideal conditions. Objects at or beyond this range
may be partially or completely obscured, depending on the camera application.
Receiver Features
• 3.5” color LCD monitor/receiver with superior image quality
• Rechargeable lithium polymer battery for true portability
• Convenient receiver cradle included
• Audio level indicator and alarm
• Temperature display on LCD screen
③
2
Page 4
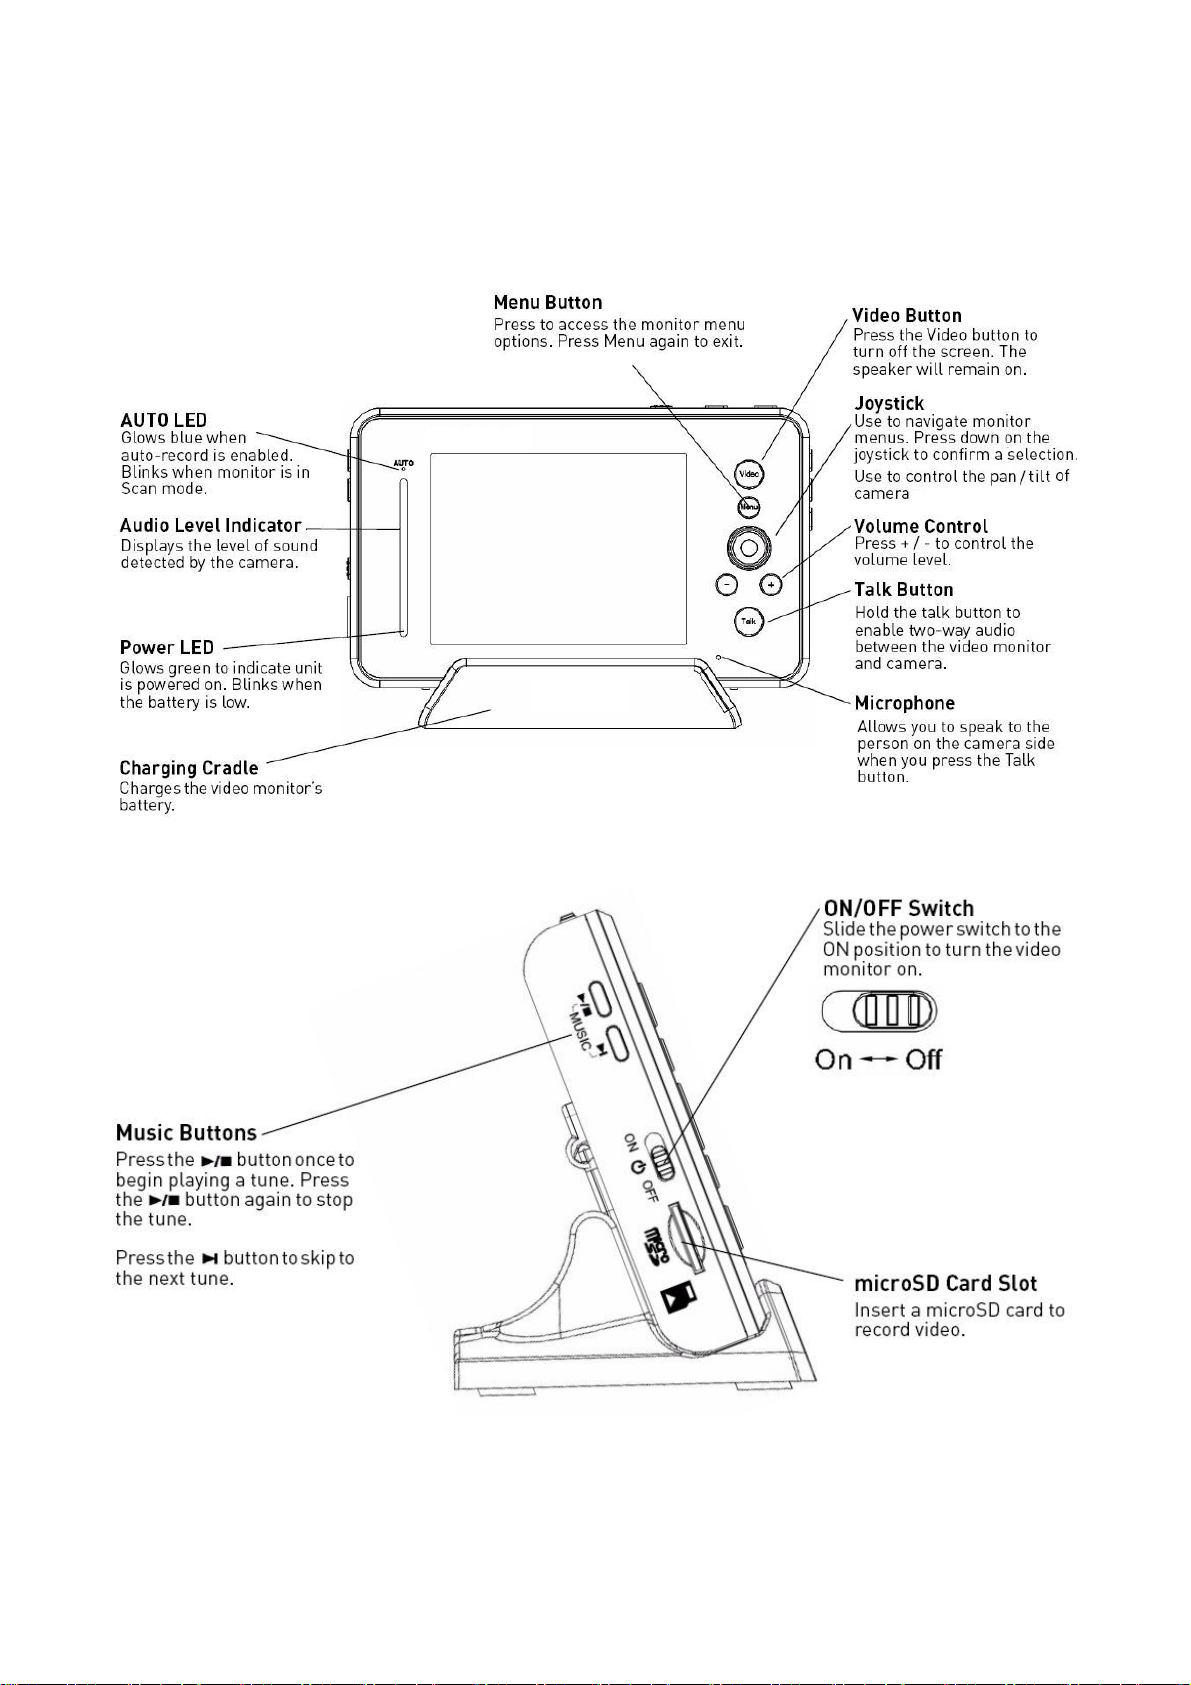
Overview
Video Monitor Overview
3
Page 5

Using the joystick to navigate menus
The joystick allows you to navigate through the video monitor menus.
4
Page 6
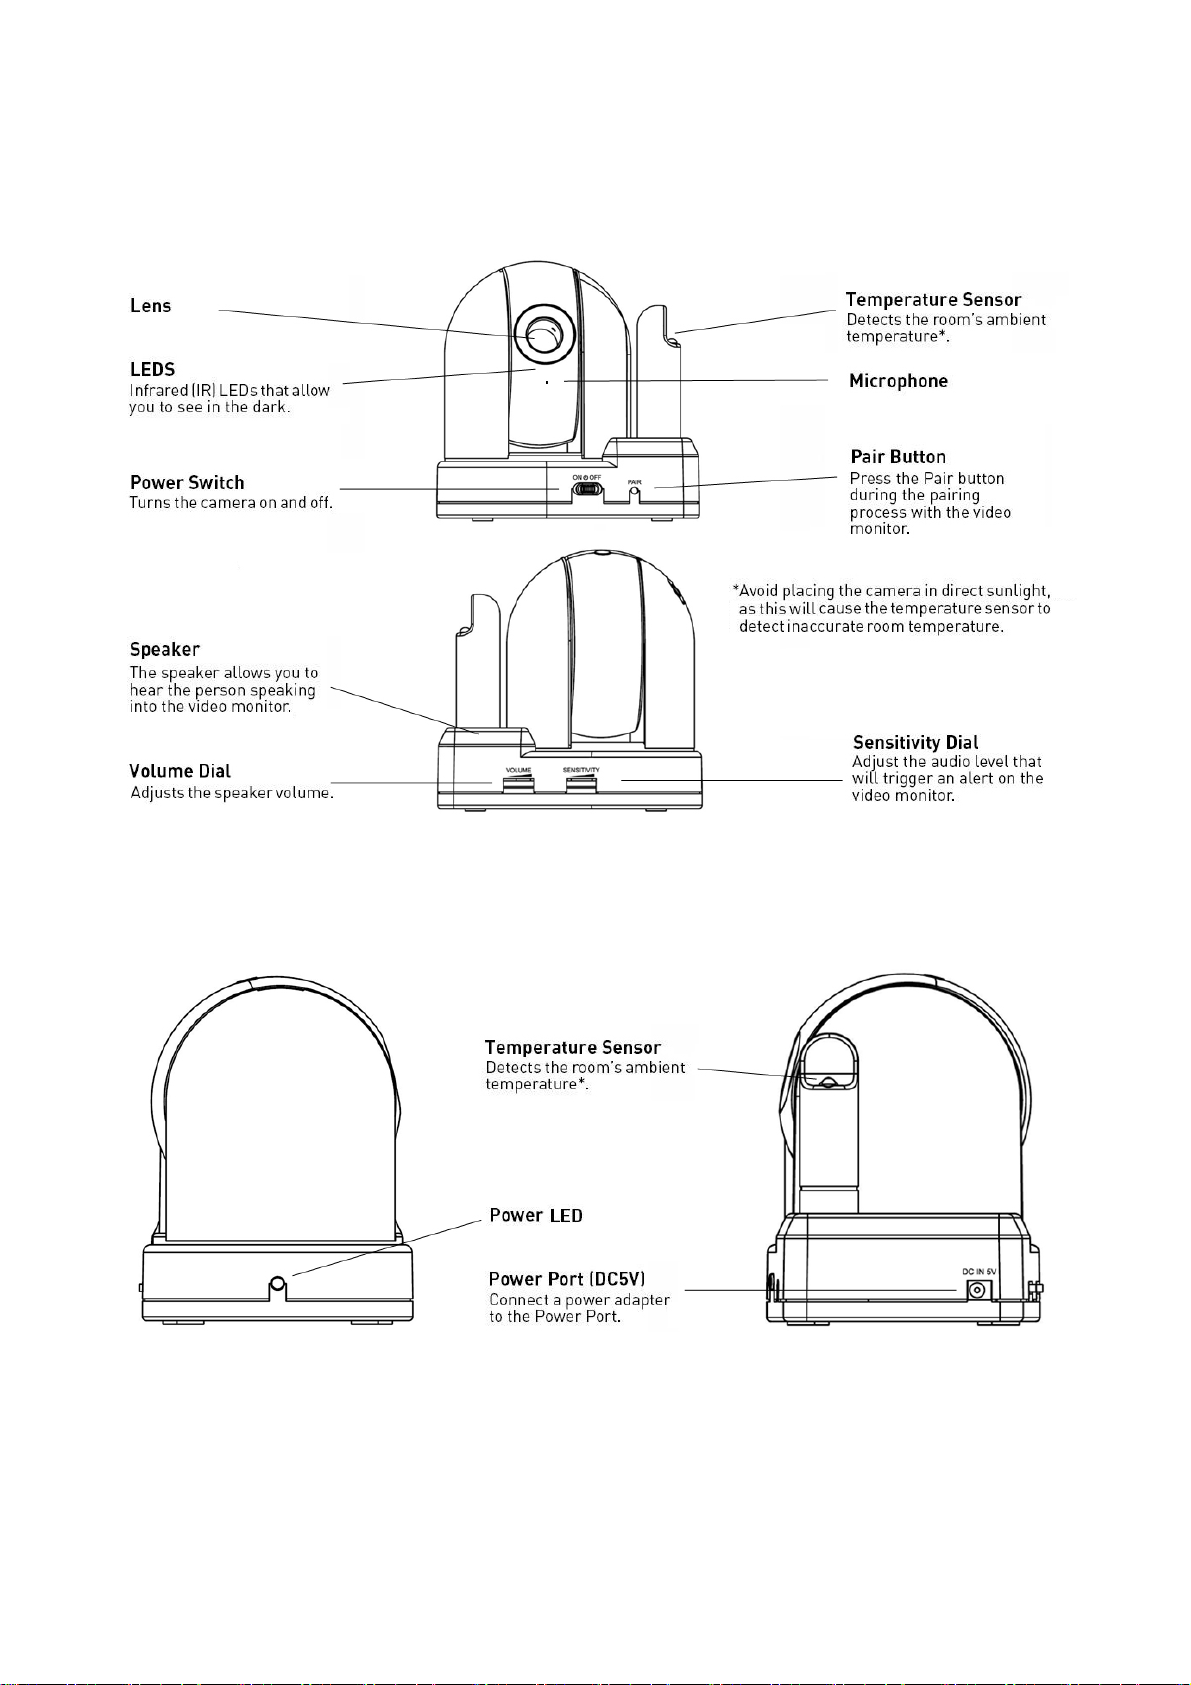
Camera Overview
Side controls
Front / Back Controls
5
Page 7
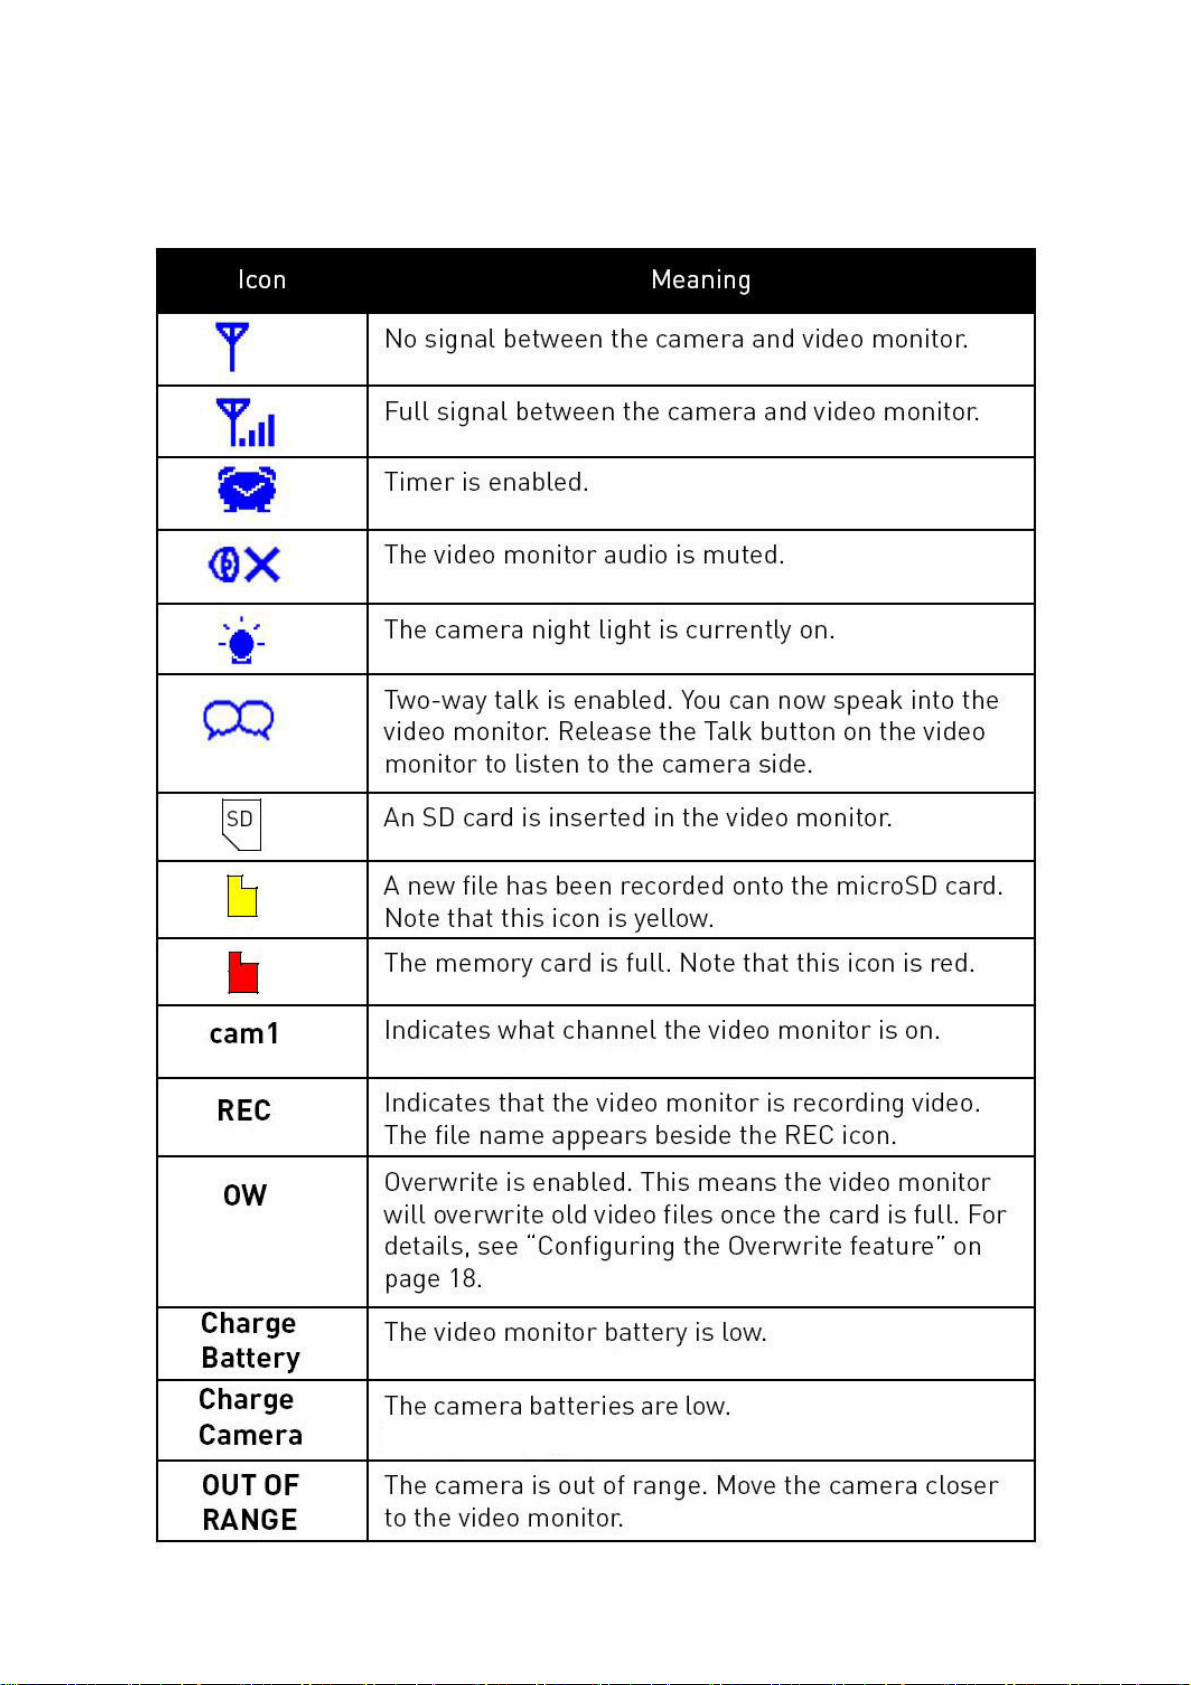
OSD Overview
The video monitor displays the following icons during normal use. The table below summarizes the video
monitor icons, and what they mean.
6
Page 8
Basic Setup
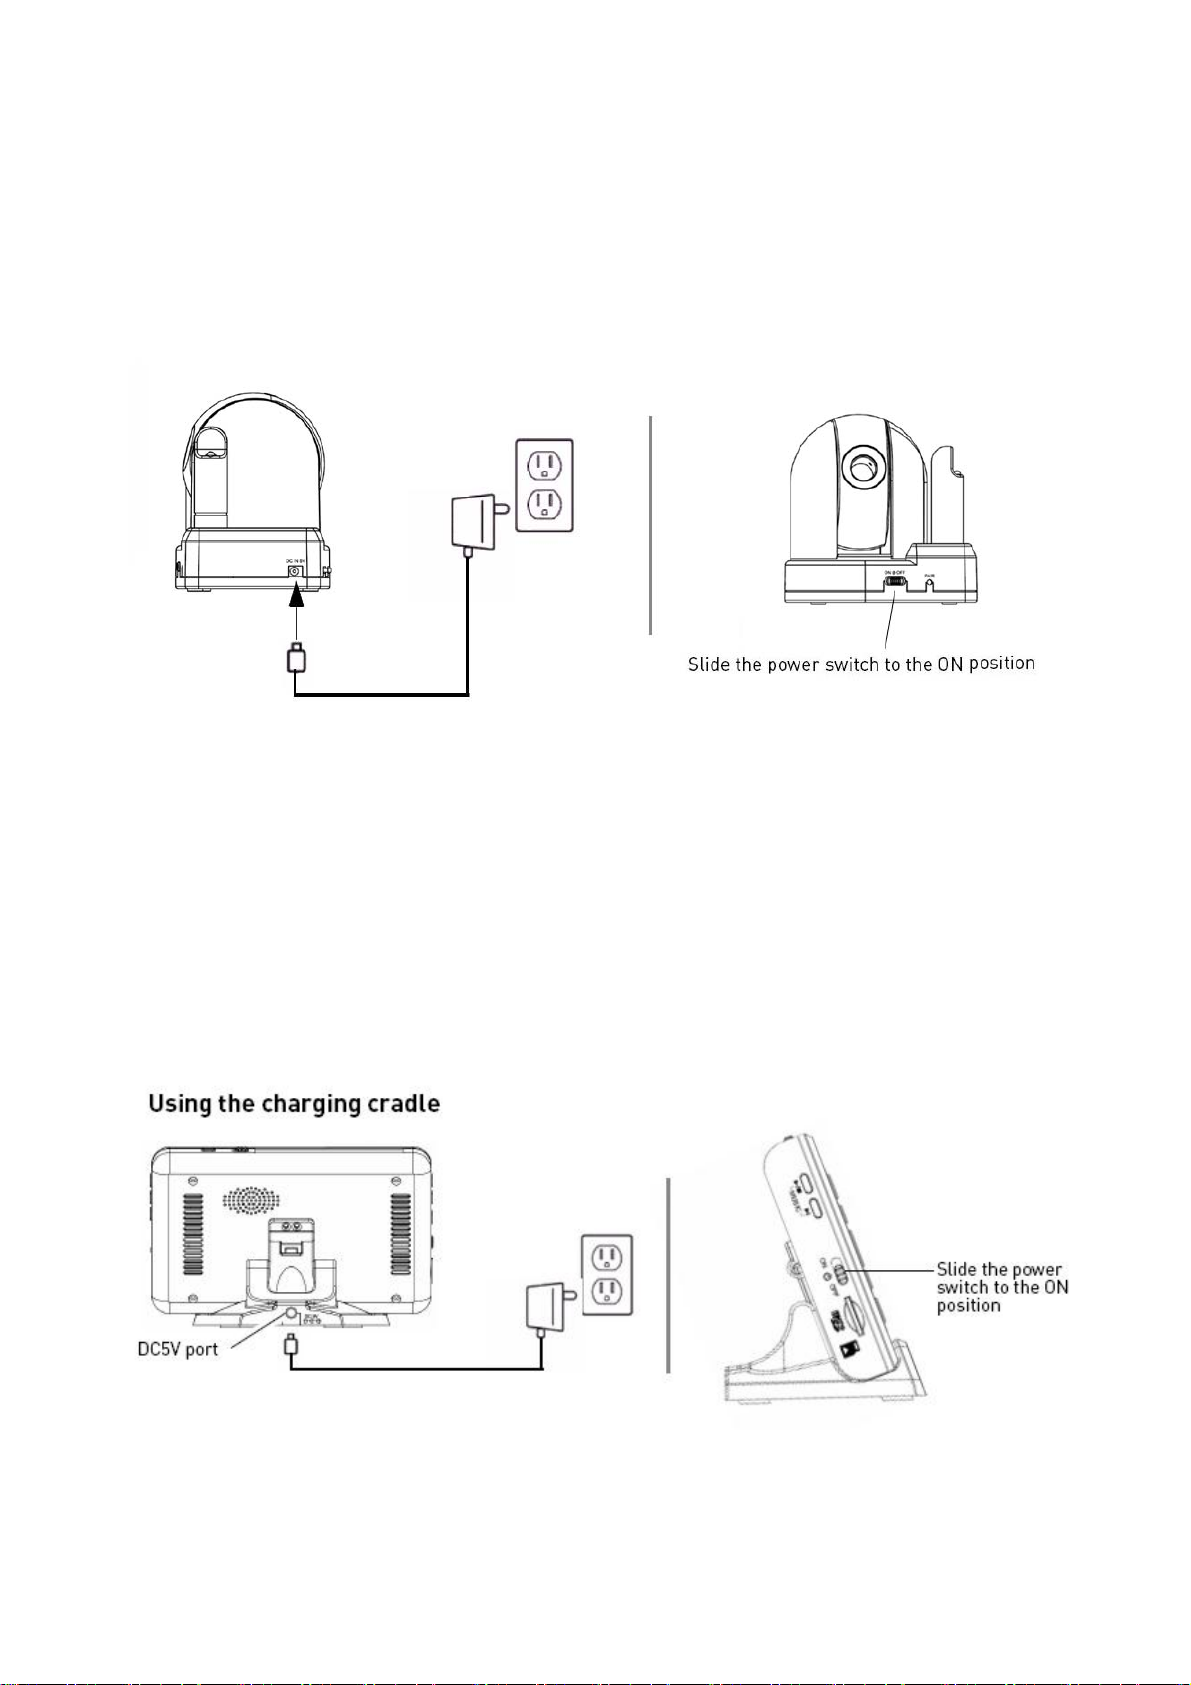
Step 1 of 2: Powering on the camera
1. Connect the power adapter to a power outlet and to the camera.
2. Slide the power switch to the ON position.
Step 2 of 2: Powering on the Video Monitor
1. Connect the power adapter to a power outlet, and to the video monitor directly or charging cradle
(ensure the video monitor firmly rests on the cradle). The video monitor’s charging LED indicator glows
red to indicate charging is in progress.
NOTE: It requires 6 hours to fully charge the rechargeable batteries.
2. Slide the power switch to ON position. The video monitor will automatically scan for cameras in range.
7
Page 9

Testing your setup
It is recommended that you test your camera setup before permanent installation so that you get the best
picture and sound quality from your video monitor.
Test the camera and video monitor reception:
1. Place the camera and video monitor in two different rooms.
2. Have one person monitor the signal strength on the video monitor.
3. If the signal strength is low, have a second person move the camera to different locations of the room
to find the optimal placement location.
Test the camera volume level:
1. Have a person with the video monitor press and hold the TALK button to confirm the volume level
from the camera. Have the other person adjust the volume dial on the camera as required.
2. The person holding the video monitor can determine if the camera needs to move to a different
location of the room for better sound clarity.
Positioning your camera
1. Determine the camera position that will give you the best view. Ensure the power cable is long enough
to power the camera.
NOTE: Keep cables and wires at least 3 feet (1 meter) away from infants or young children.
2. Connect the power adapter to the camera.
3. Connect the power adaptor to the power outlet.
4. Adjust the camera head with the monitor as shown on Adjusting camera view (page 8).
Adjusting camera view
When the monitor is in LIVE VIEW mode, adjust the camera head with the monitor to achieve the
optimal viewing position.
The maximum vertical rotating angle is 150º, and the maximum horizontal rotating angle is 270º.
8
Page 10

Camera Setup
Adjusting the camera sensitivity
The camera’s sensitivity dial allows you to adjust the sensitivity level for triggering an alert on the video
monitor.
To adjust the camera’s sensitivity level:
• Scroll the sensitivity dial on the side of the camera towards the maximum position for increased
sensitivity (i.e. softer noises trigger the camera).
• Scroll the sensitivity dial on the side of the camera towards the minimum position for reduced sensitivity
(i.e. louder noises trigger the camera).
Adjusting the camera volume
The camera’s speaker volume can be adjusted to the desired level.
• Scroll the volume dial on the side of camera towards the maximum position to increase the volume.
• Scroll the volume dial towards the minimum position to reduce the volume.
Adjusting the camera view
The camera’s viewing angle can be adjusted on the monitor side. To adjust the camera view,
refer to the part Adjusting camera view (page 8).
9
Page 11

Video Monitor Setup
Unlocking the video monitor antenna
The video monitor has a built-in antenna that improves signal range. It is recommended that you extend
antenna for optimal performance.
To unlock the monitor antenna:
• Slide the lock button to the right.
Reading the power indicator LED
The power indicator LED glows green when the monitor is powered on. When the battery is low, the
power LED blinks.
10
Page 12

Pairing Cameras
The camera included with the video monitor has already been paired up with the video monitor. If for any
reason your monitor and camera are not paired up, or you wish to add additional cameras, follow the
directions below.
To pair a camera to the video monitor:
1. Place the camera and video monitor 12 inches apart. Turn on the camera first and then the video
monitor.
2. Press the Menu button on the monitor, then select Pairing and
press the OK button.
3. Select an available channel, and press the OK button.
NOTE: By default, the camera included with the system is paired to
channel 1.
4. Press the Pair button with supplied stick on the camera within 30
seconds.
• You should immediately see video from the camera on the video
monitor.
5. OPTIONAL: To pair multiple cameras, repeat steps 2~4, selecting a different channel in the pairing
menu.
NOTE: You can add a maximum of 4 wireless cameras to the video monitor.
11
Page 13

Sequence View
In sequence view, the monitor switches between up to four cameras every 6 seconds. For example, the
monitor displays channel 1 for 6 seconds, then channel 2 for 6 seconds and so on. The monitor only
switches to the channels that are paired with a camera.
To enable Sequence view:
• Press the SEQ/Quad button once to enter sequence mode.
To exit Sequence view:
• Press the SEQ/Quad button.
Quad View
You can view all of the paired cameras in quad view. The video monitor supports a maximum of four
cameras.
To view multiple cameras in quad view:
• Press the SEQ/Quad button twice on the video monitor.
To exit quad view:
• Press the SEQ/Quad button repeatedly to exit quad mode.
12
Page 14

Using the talk function
This system has the feature of two-way audio communication. The talk function allows you to speak into
the video monitor, while the camera outputs your voice. The camera also has a built-in microphone,
which allows the person to speak into the camera.
To use the talk function:
1 Adjust the volume on the camera and video monitor to the desired level.
2 Press and hold the Talk button on the video monitor and begin speaking. Release the Talk button
when you are finished.
NOTE: You must release the Talk button on the video monitor in order to listen to the audio from the
camera.
Music
The Music feature allows the camera to play
preloaded tunes.
To use the tune feature:
• Press the ►/■ button to begin playing a tune on
the camera and video monitor.
• Press the ►/■ button again to stop the tune.
• Press the ►▎button to skip to the next tune. The
song title appears on-screen.
13
Page 15

Using the Scan feature
The Scan feature temporarily turns off the video monitor, and waits for a camera to detect a noise. Once
one of the cameras detects sounds, the video monitor automatically turns on, and beeps to notify you.
This feature is especially useful if you have multiple cameras, and only want to view the camera that
detects a sound (i.e. infant crying).
To enable the Scan feature:
• Press the Scan button.
To disable the Scan feature:
• Press the Scan button to turn off the Scan feature.
NOTE: The first camera to detect a sound will trigger the video monitor to turn on. After several seconds,
the monitor turns off, and begins monitoring the cameras again.
Turning the video monitor screen on/off
Turning off the video monitor screen allows you to listen to audio from the camera, while the video
monitor screen is off. For example, if you want to monitor a baby’s room at night while you sleep, you can
turn off the video monitor screen to conserve power, and at the same time listen to the camera audio.
To turn the video monitor screen on/off:
• Press the Video button to turn the screen off.
• Press the Video button again to turn the screen on.
14
Page 16

Recording
This system is capable of recording video on a microSD card (not included). The video monitor supports
microSD cards up to 32GB (gigabytes).
Manual Recording
Manual recording allows you to record video by pressing the record button on the video monitor. Manual
recording may be useful if you want to quickly record an event to your video monitor while you are
watching it.
NOTE: It is recommended to set the date and time before using the recording function (page 19)
To start manual recording:
1. Press the M button on top of the video monitor. The REC icon, followed by the file name (i.e.
113711-1.AVI) appears on the screen to indicate recording is in progress.
2. Press the M button again to stop recording. The yellow file icon
recording is ready for viewing.
appears to indicate a new
Auto Recording
Auto Recording allows the video monitor to record only when the camera detects a sound. For example,
if you are monitoring a sleeping baby, the video monitor will not record until the baby cries (ensure you
set the appropriate sensitivity level).
Prerequisites:
• Adjust the sensitivity level on the camera to the desired level.
The greater the sensitivity, the more sensitive the camera is to noise. This means that the slightest
sound will cause the video monitor to record.
To enable Auto Recording:
• Press the A button on top of the video monitor. The AUTO LED glows blue. When the camera detects a
sound, the video monitor begins to record. The REC icon, followed by the file name (i.e. 113711-1.AVI)
appears on screen to indicate a new recording. The yellow file icon appears to indicate a new
recording is ready for viewing.
NOTE: The recording time after the camera triggers the video monitor, is between 5~30 seconds. The
duration of the recording can be set in the Trigger menu (Main MenuÆRecordÆTrigger Record, page
18).
NOTE: The maximum recording time during auto recording is 10 consecutive minutes. For example, if
there is constant noise, the video monitor will record a maximum of 10 minutes.
15
Page 17

Viewing recorded files on the video monitor
There are two ways that you can view the recorded video files on the microSD memory card: through the
video monitor, or on your computer.
To view video files through the video monitor:
1. In the mode of live video, press the OK button on the video monitor (press down on the joystick). The
File List menu opens.
2. Press OK to open the VIDEO folder.
3. Select the desired folder and press the OK button.
NOTE: The folders are named by the year/month/date. For example, a folder named 110204 means that
the folder was created in 2011, February (02), on the 4th.
4. Select the desired video file you wish to view, and press the OK button to begin playback.
16
Page 18

Viewing video files on a PC
1. Remove the memory card from the video monitor.
.
2. Insert the microSD card into a memory card reader (not included).
NOTE: If required, use a SD card adapter (not included) to convert the microSD card to SD/HCSD
memory card format.
3. When the AutoPlay menu appears, click on Open folder to view files.
4. Double-click the VIDEO folder, and then select the desired sub-folder you want to open.
NOTE: The folders are named by the year/month/date. For example, a folder named 110204 means that
the folder was created in 2011, February (02), on the 4th.
5. Double-click the desired video file to begin playback.
Viewing video files on a Mac
1. Insert the microSD card into a memory card reader. If required, use a SD card adapter (not included).
2. The memory card automatically appears on the desktop.
3. Double-click the USB icon on your desktop to view the microSD contents.
4. Double-click the VIDEO folder, and then select the desired sub-folder you want to open.
17
Page 19
Configuring your video monitor
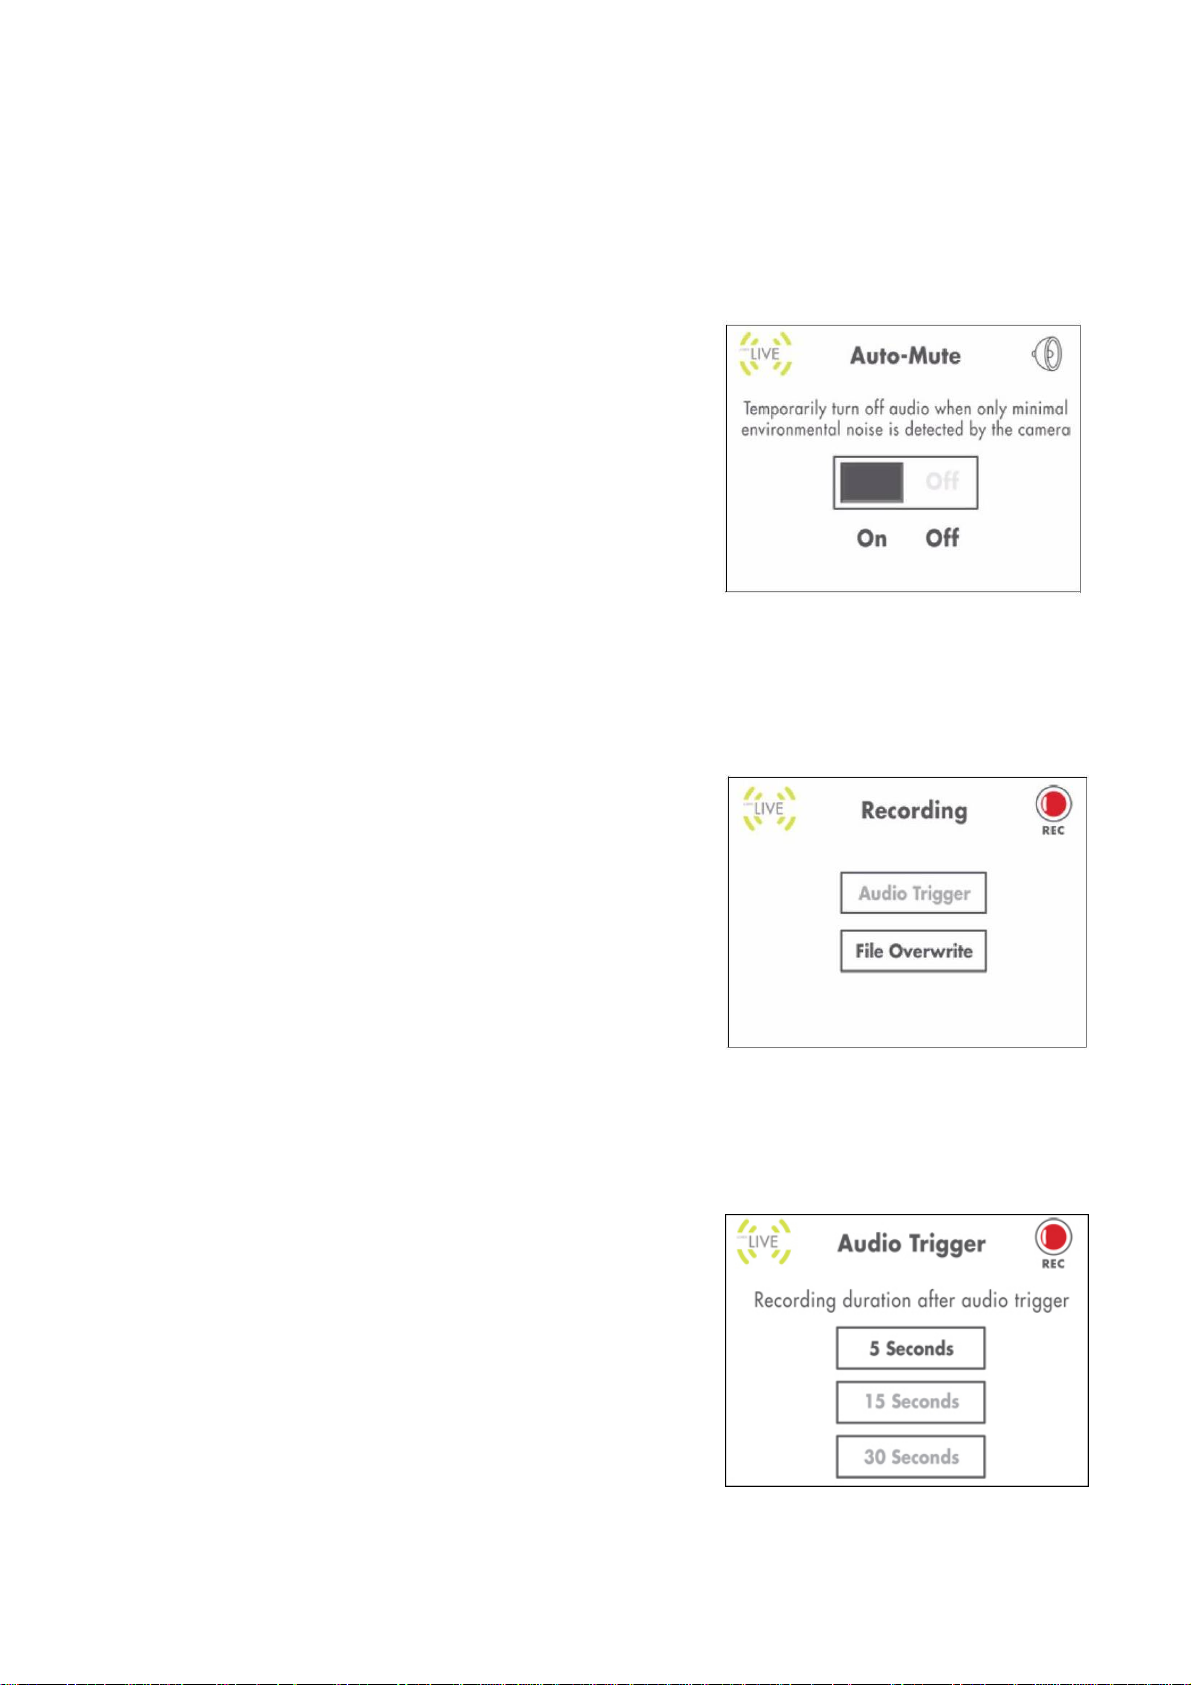
Enabling the Auto Mute feature
The Auto Mute feature eliminates white noise when monitoring a room. The Auto Mute feature works by
muting the video monitor when the camera detects no audible noise. Once the camera detects a sound,
the video monitor unmutes.
To enable Auto Mute:
1. Press the Menu button on the video monitor.
2. Select Auto-Mute and press OK.
3. Select ON to enable auto mute.
4. Press the OK button to save your settings.
Configuring the Overwrite feature
The Overwrite feature allows the video monitor to continuously record on the microSD card. When the
microSD card is full, the video recordings begin to overwrite the first recorded video entry (first in first
out).
To configure the overwrite feature:
1. Press the Menu button on the video monitor.
2. Select Record and press OK.
3. Select File Overwrite and press OK.
4. Select Yes to enable the overwrite feature, select No to
disable the overwrite feature.
5. Press the OK button to save your settings.
Configuring the recording time for auto recording
The recording time for auto recording can be set to 5s (default), 15s or 30s.
To configure the recording time:
1. Press the Menu button on the video monitor.
2. Select Record and press OK.
3. Select Audio Trigger and press OK.
4. Select the desired recording time: 5s, 15s or 30s.
5. Press the OK button to save your settings.
18
Page 20

Changing the date and time
1. Press the Menu button on the video monitor.
2. Select Settings and then press the OK button.
3. Select Date & Time and then press the OK button.
4. Use the joystick to configure the Year/Month/Date/Time.
• Press up/down on the joystick to adjust the values.
• Press left/right to move between the year, month, date and
time.
5. Press the OK button to save your changes.
Adjusting the alarm volume
The video monitor ’beeps’ when the camera detects audio triggers (i.e. a loud noise). You can adjust how
loud the video monitor beeps when the camera detects an audio trigger.
This is useful if you want to monitor activity in a room, but cannot keep your eyes on the video monitor.
To change the video alarm volume:
1. Press the Menu button on the video monitor.
2. Select Settings and then press the OK button.
3. Select Alarm Volume and then press the OK button.
4. Press left and right on the joystick to adjust the alarm volume.
5. Press the OK button to save your settings.
Adjusting the screen brightness
To adjust screen brightness:
1. Press the Menu button on the video monitor.
2. Select Settings and then press the OK button.
3. Select Brightness and then press the OK button.
4. Press left and right on the joystick to adjust the screen
brightness.
5. Press the OK button to save your settings.
19
Page 21
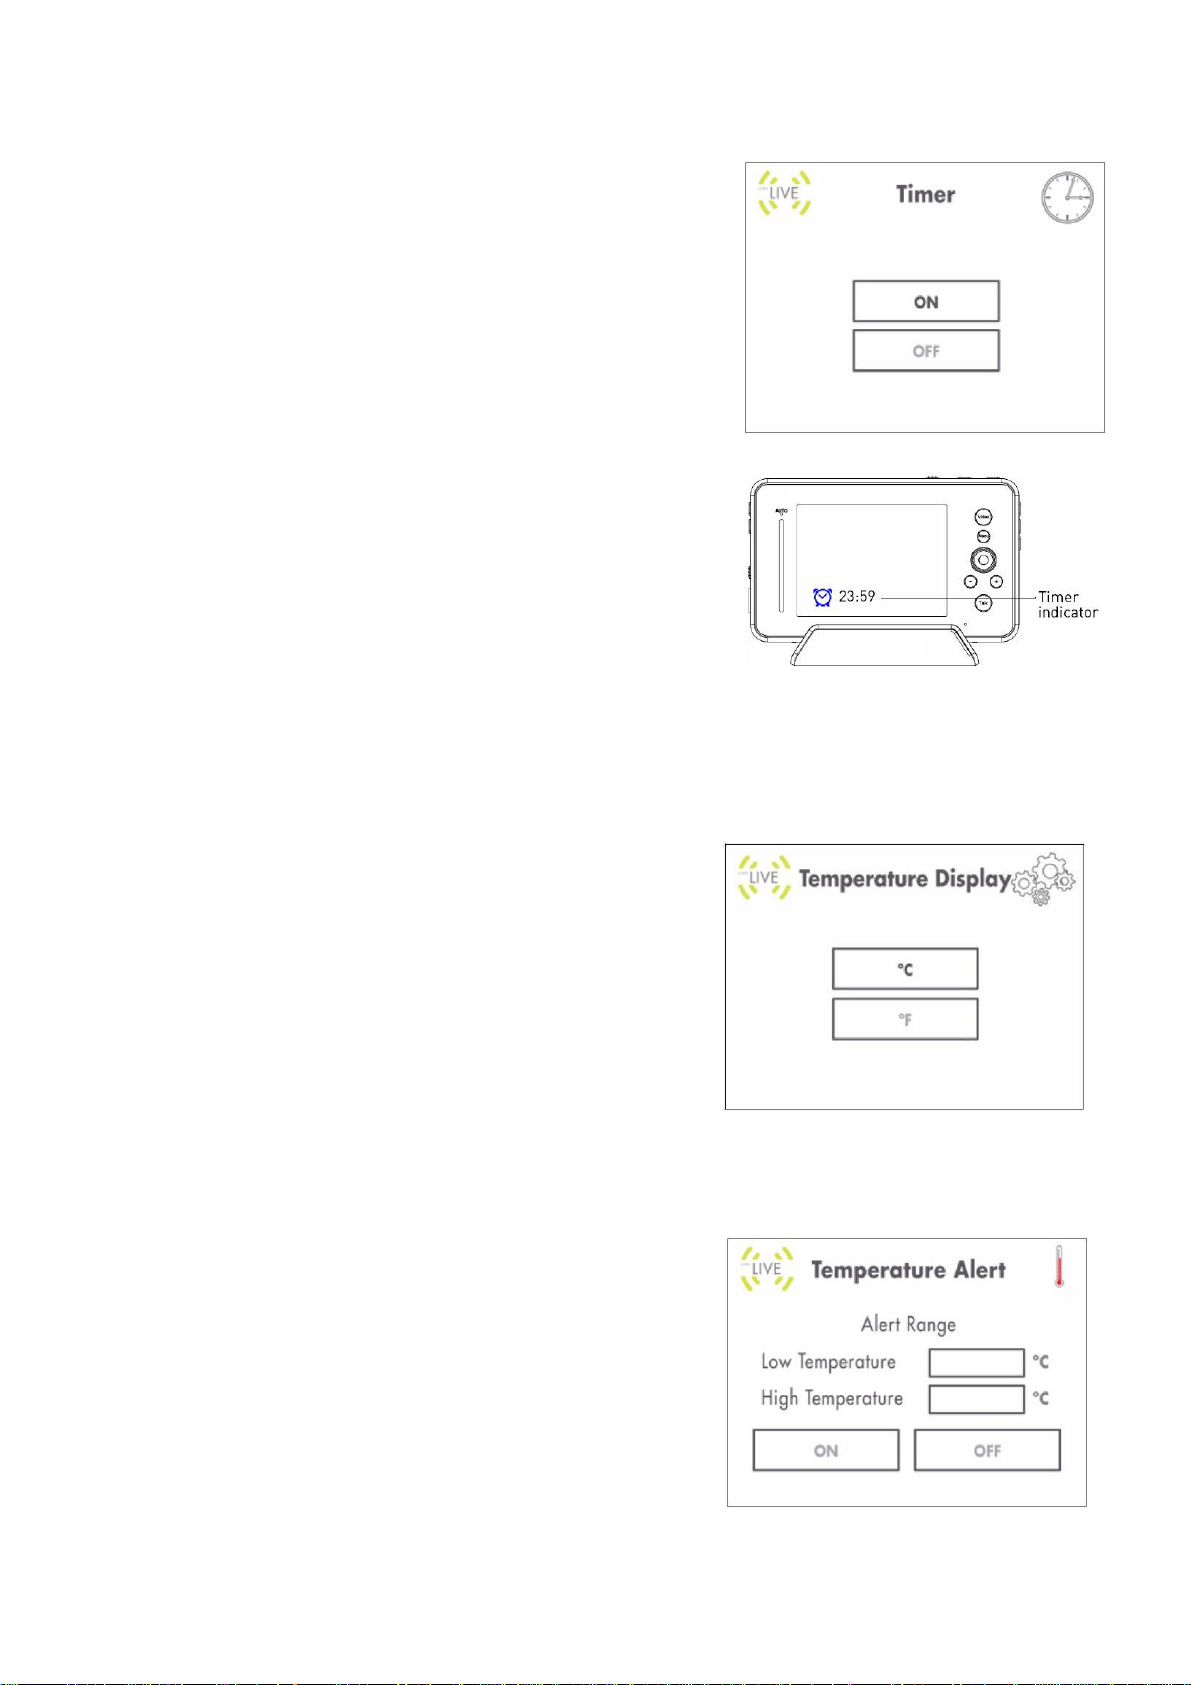
Adjusting the Timer settings
The timer feature allows the video monitor to beep after a set
duration as a reminder tool. If the monitor is used as a baby
monitor, the Timer tool is useful as a baby feeding timer.
To enable the Timer:
1. Press the Menu button on the video monitor.
2. Select Settings and then press the OK button.
3. Select Timer and then press the OK button.
4. Enter the desired time that you want the set the timer at using
the joystick. Press left / right to navigate the values. Press
up/down to adjust the values.
5. Press the OK button to save your settings.
6. Select ON and then press the OK button.
7. Press the OK button to save your settings.
Adjusting the temperature unit of measurement
The camera has a built-in temperature sensor. You can change the video monitor to display temperature
in Fahrenheit (F) or Celsius (C).
To change the unit of measurement:
1. Press the Menu button on the video monitor.
2. Select Settings and press the OK button.
3. Select Temp. Display and press the OK button.
4. Select either C for Celsius or F for Fahrenheit.
5. Press the OK button to save your settings.
Configuring the temperature alert range
You can configure the video monitor to alert you through alarm
beeps, when the temperature falls above or below the set
temperature range.
To configure the temperature alert range:
1. Press the Menu button on the video monitor.
2. Select Settings and then press the OK button.
3. Select Temp. Alert and then press the OK button.
20
Page 22

4. Using the Joystick, press Up/Down to change selection, left/right to adjust the values:
• Beside Low Temperature, enter the lowest room temperature threshold.
• Beside High Temperature, enter the highest room temperature threshold.
5. Select the ON button and then press the OK button on the joystick.
Erasing the memory card
Once you erase the memory card, the video will be deleted permanently.
To erase the memory card:
1. Press the Menu button on the video monitor.
2. Select Settings and then press the OK button.
3. Select Format memory and then press the OK button.
4. Select Yes and then press the OK button to erase the
memory card.
• The message "Format OK" appears to confirm that the card
has been erased.
Restoring default settings
Restoring your video monitor settings reverts the settings you’ve
made to the factory settings.
To restore the video monitor factory defaults:
1. Press the Menu button on the video monitor.
2. Select Settings and then press the OK button.
3. Select Factory Reset and then press the OK button.
4. Select Yes and then press the OK button.
21
Page 23

Trouble Shooting
22
Page 24

Specifications
Receiving Frequency Range 2400 ~ 2483.5MHz
Display Size 3.5” TFT LCD
Resolution H:320 V:240
Power Requirement 5V DC 1A
Receiver
Power Consumption
Battery Voltage 3.7V Li-Polymer Battery (built-in)
Battery Lift 4.5 hours
Dimension 128mmL x 22mmD x 76mmH
Operating Temp Range 14°F ~ 104°F (-10° ~ 40° C)
Operating Humidity 0 ~ 85% RH
420mA max without charging
850mA max with charging
Camera(s)
Transmit Frequency Range 2400 ~ 2483.5MHz
Transmitting Range 450 ft outdoor / 150 ft indoor line of sight
Image Sensor Type 1/5” Color CMOS Image Sensor
Image Processing Motion JPEG
Image Resolution H: 320, V: 240 @ 20fps
Lens 4.5mm, F2.8
Viewing Angle 36 degree
IR LED / Night Vision Range 8 LEDs / 5m
Power Requirement 5V DC 1A
Power Consumption
Dimension 91mmL x 70mmW x 102mmH
Operating Temperature 14°F ~ 104°F (-10°C ~ 40°C)
Operating Humidity 0% ~ 85%
450mA Max with IR LED
350mA Max without IR LED
23
Page 25

Notices
FCC Note:
This device complies with Part 15 of the FCC Rules. Operation is subject to the following two conditions:
(1) this device may not cause harmful interference, and (2) this device must accept any interference
received, including interference that may cause undesired operation.
The antenna used for this transmitter must be installed to provide a separation distance of at least 20 cm
from all persons and must not be co-located or operated in conjunction with any other antenna or
transmitter.
The manufacturer is not responsible for any radio or TV interference caused by unauthorized
modifications to this equipment. Such modifications could void the user's authority to operate the
equipment.
IC Note
This device complies with Industry Canada license-exempt RSS standard(s). Operation is subject to the
following two conditions: (1) this device may not cause interference, and (2) this device must accept any
interference, including interference that may cause undesired operation of the device.
Under Industry Canada regulations, this radio transmitter may only operate using an antenna of a type
and maximum (or lesser) gain approved for the transmitter by Industry Canada. To reduce potential radio
interference to other users, the antenna type and its gain should be so chosen that the equivalent
isotropically radiated power (e.i.r.p.) is not more than that necessary for successful communication.
24
 Loading...