

Page 1

Personal Security
Indoor/Outdoor Wireless
Alarm with Remote
User Manual
A
D
m
r
m
r
a
s
i
Do not use in wet locations
Page 2

Table of Contents
Introduction 3
Installing Batteries 6
Low Battery Indicator Light 7
Linking the Alarm 8
Installation 11
Arming the Alarm 14
Disarming the Alarm 15
Care and Maintenance 16
Battery warnings 17
FCC Warning 17
Page 3

Wireless Alarm with Remote
Before installing or operating the Indoor/
Outdoor Wireless Alarm with Remote, please
read these instructions carefully and save this
manual for future reference.
Important Safeguards
Pre Cautions
1. Do not attempt to disassemble the Keychain
Remote or the Alarm unless described
in the user’s manual. There are no user
serviceable parts.
2. Handle with Care – Avoid striking or shaking.
Improper use or storage could damage the
Keychain Remote or the Alarm. Modifying or
tampering with either device or the internal
components can cause a malfunction and
void the warranty.
3. If you feel the Keychain Remote or any
part of the Alarm system is not operating
correctly or as described, please
contact Technical Support for assistance
(1-800-654-8483),
- For use indoor or outdoors.
- Works in weather down to 0° F.
Page 4

Introduction
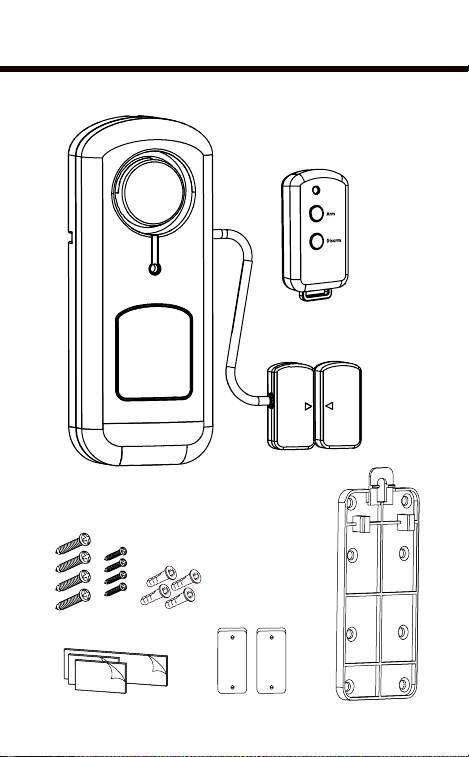
The Indoor/Outdoor Wireless Alarm with
Keychain Remote allows you to add protection
or monitor areas in and around your home.
Use on gates, sheds, garages, cabinets, tool
boxes and personal truck boxes.
Please note below:
Remote:
1. The Keychain Remote will transmit up to 30ft from the
Alarm. However, like all wireless devices, this distance
is subject to conditions of the Alarm’s location;
the number of walls and appliances between the
Keychain Remote and the Alarm can reduce the signal
transmission distance.
2. After either button is pressed, the remote will transmit
for approx two seconds. There is a two second delay
before the remote can transmit a new command
(pressing another button).
Magnet Content:
When the magnet and wired contact are separated
(door or lid opened), the red indicator on the front of the
Alarm will begin flashing indicating the Alarm has been
activated. The Alarm’s siren will begin sounding within 1
second or 5 seconds (depending on the delay entry time
setting). The Alarm will continue to sound until disarmed
by a linked remote.
4
Page 5
5
m
r
A
m
r
a
s
i
D
Page 6
Adjustable
Wired
Contact
Cable
Battery
Compartment
Screws (2)
Battery
Compartment
6
Learn Button
Page 7

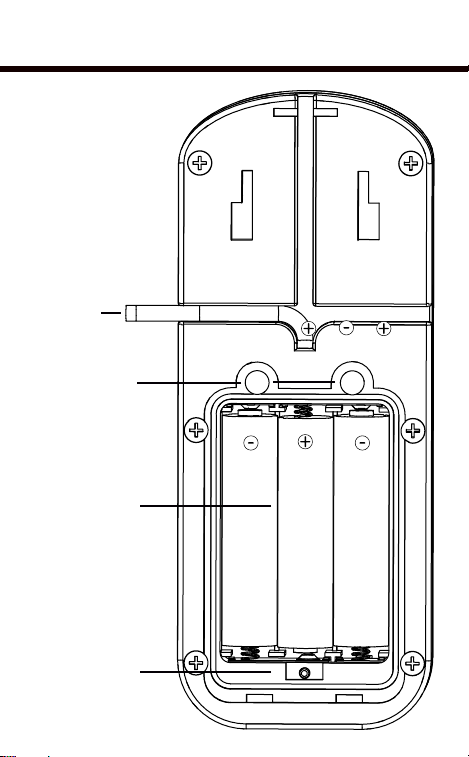
Installing Batteries
The battery compartment is located on the
back of the Alarm and Keychain Remote
Alarm
Insert 3-AAA
batteries (not
included). Please
note the polarity
diagram inside
the battery
compartment.
Keychain Remote
Insert 1-2 3A battery
(included). Please note
the polarity diagram
inside the battery
compartment.
1. Replace the cover by first inserting TABS at
base and secure screws.
7
Page 8

Low Battery Indicator Light
The Indoor/Outdoor Wireless Alarm has a low
battery indicator light. When the batteries
need to be replaced, the indicator will flash
slowly. Note: Average battery life for typical
usage is up to one year.
Linking the remote to the Alarm
Make sure you have installed the batteries in
the Alarm and Keychain Remote.
Locate the learn
button on the inside
of the battery
compartment .
2. Press the learn
button in the battery compartment as seen
above. The Indicator light will start to flash
on the Keychain Remote.
3. Now press the Arm button
on the Keychain remote. The
Alarm will sound a single
short tone, and the light will
m
r
stop flashing to confirm the
A
remote has been linked to
the Alarm.
8
Page 9

Note: additional remotes can be added to the
system by following the same programing
procedure.
4. Replace cover to the battery compartment
by first inserting tabs of battery
compartment cover and secure screws.
Delayed Entry Time
The Alarm defaults delay is one second. This is
the amount of time the Alarm will delay once
triggered. (i.e. door opened when Alarm is set).
There is an alternate delay setting of 5
seconds.
Changing the delayed entry time length
1. The Alarm must not be armed.
2. Press and hold the Disarm button on the
Keychain Remote approx. three seconds
and you will hear a short beep. Release
the Disarm button. This indicates you have
now changed the delay entry time. Follow
the same steps to change back to the one
second setting.
9
Page 10

Installing the Alarm
1. The unit is designed to be used indoor or
outdoors. It can be mounted in toolboxes,
inside personal truck boxes or on gates,
sheds, and doors etc.
10
Anchored
screws
mounting
The mounting surface will determine whether to use
the double-sided tape or mounting screws. DO NOT USE
screws if mounting surface is less than two inches thick.
Double
sided
mounting
tape
2. Selecting the best location will depend
on the intended use. Below are some
suggested mounting options. Regardless of
location, the gap between the wired Contact
and the Magnet must not be greater than
3/4” in the closed position.
Page 11

Tool boxes or Personal truck boxes
Inside of truck boxes or toolboxes - use the two sided
installation tape included
11
Page 12

Cabinets, Slidiing Doors and Doors
12
Inside of doors
- use the two
sided installation
tape included or
if the mounting
surface is over
two inches thick
Use the anchors
and screws
provided.
Page 13

13
Gates
Inside of gates
- use the two sided installation tape included or if wood is
over two inches thick use screws included.
The Alarm is weather resistant so it can be
mounted outside. The preferred location is to
mount the Alarm and wired Contact on the
gate and the Magnet to the fixed post or wall.
When mounting to a wood or porous surface,
you can use the extra mounting plates. These
can be securely mounted to the surface,
and the wired contact and magnet can be
attached using the double sided tape.
Page 14

14
Remove
Mounting plate
will snap to lock in
place.
Note: To remove
the Alarm, push
locking TAB, lide the
Alarm upwards off
the mounting plate.
Attach
up to 3/4" space
between magents
Use the provided doublesided stick tape, to mount to
most sur faces. For porous
surfaces use optional
mounting plates.
Line up
arrows
Aligning the Wired Contact & Magnetic Contact
After the Alarm is mounted on mounting bracket
the Magnetic Contacts need to be aligned.
See above.
Page 15

15
Arming the Alarm
After either Arm or Disarm button is pressed, the
Keychain Remote will transmit for approx two
seconds. There is a two second delay before the
remote can transmit a new command (pressing
another button).
1. Locate arm/disarm button on the front of
the remote.
2. The wireless remote will operate the
Alarm up to 30 ft. The wireless range will
vary depending on the number of walls,
appliances or obstructions between
the Alarm and remote. In addition, the
thickness of materials may also reduce
reception. If mounting the Alarm inside
metal construction such as a metal storage
shed or tool cabinet or even a metal
personal truck box, the distance will also
vary. Be sure to test the range at several
distances in order to determine maximum
optimum range.
3. Once you determine the optimum range.
Press the arm button on the remote,
the Alarm will sound a short tone and
the red indicator light on the front will
begin flashing.
Page 16

4. When the magnet and wired contact are
separated (door or lid opened), the red
indicator on the front of the Alarm will
begin flashing indicating the Alarm has
been activated. The Alarm’s siren will begin
sounding within 1 second or 5 seconds
(depending on the delay entry time setting).
The Alarm will continue to sound until
disarmed by a linked remote.
Disarming the Alarm:
1. If the Alarm has been activated, press the
disarm button to disarm the Alarm.
2. Prior to triggering the Alarm (opening the
door, gate, window etc) button to deactivate
the Alarm. If the remote control with the
correct security code is not used once the
Alarm is triggered, the Alarm will sound.
If the Alarm has been triggered, the red
indicator light on the front of the Alarm will
flash. Use the remote control at any time to
deactivate the Alarm.
16
Page 17

Note: to test, a cloth can be used to cover the
Alarm to reduce risk of hearing damage.
Care and Maintenance
To clean the unit housing, use a soft cloth
slightly dampened with water and wipe dry. Do
not use chemical agents as this may damage
and discolor the unit.
17
Page 18

18
WARNING
Limita tions of Alarm Pr oducts
This pr oduct shoul d be tested pe riodically t o make sure it is wo rking proper ly.
The pro duct, if use d properly, may re duce the risk o f burglary, rob bery, or
other a dverse event s. However, JASCO i s not an insurer, thi s product is
neith er insurance n or a guarantee t hat such an event w ill be prevent ed, and
users s hould protec t themselve s with prope r insurance. JA SCO makes no
representation that this product cannot be compromised or circumvented,
that it w ill provide an a dequate war ning, or tha t it will prevent a ny personal
injur ies, proper ty damage, o r other losse s. Like any Alar m product, i ncluding
expen sive commerci al systems , it may be bypas sed, it is subj ect to
compro mise, and it ma y fail to warn for a va riety of reas ons, includi ng, but
not limited to: improper installation or positioning; improper maintenance;
tampering; dead or improperly installed batteries; sensing limitations;
compo nent failures ; receivers; fo r infrared pro ducts, int rusions may b e outside
of a produ ct’s desig ned range and ce rtain envir onmental con ditions may
impact performance and audible Alarm signals may be outside of hearing
range, m uted by doors , walls, and flo ors, unhear d by deep sleep ers or the
hearing-impaired, or overwhelmed by other sounds.
WARNING
Risk of pe rsonal injur y
• Prolonged exp osure to Alarm siren may cause perman ent hearing los s
Battery Warning
• Remove ba tteries befo re storing the Alarm for ex tended perio ds
• Batte ries may leak har mful liquids or ignitable mater ials or explod e causing
injury and product damage
• Do not mix old an d new or oth er battery types
• Replace all batt eries at the same time
• Replace f ully discharged batteries immediately
For indoor/outdoor use; do not use in wet locations.
This Ja sco product c omes with a 90 d ay limited war ranty. Please c ontact
Custo mer Service a t 800-654- 8483 betwe en 7:30AM—5:00PM C ST or via our
websi te (www.jas coproduct s.com) if the u nit should pr ove defectiv e within the
warranty period.
Page 19

19
FCC Warning
Funct ional range ma y be adversely a ffected by o ne or more of the fol lowing
factors: weather, radio frequency interference, low transmitter
battery an d obstruct ions betwee n the transmit ter and receiver.
This de vice complies w ith part 15 of the FCC rul es. Operati on is subject
to the following two conditions:
(1) this de vice may not caus e harmful interfere nce, and (2) this device
must accept any interference received, including interference that
may cause undesired operation.
FCC NOTE: The manu facturer is not respon sible for any rad io or TV
interference caused by unauthorized modifications to this equipment.
Such mod ifications co uld void the use r’s authori ty to operate th e
equipment.
NOTE: This equi pment has been t ested and foun d to comply with t he
Limit s for a Class B digital device, pu rsuant to Part 15 of the FCC Rules.
These l imits are designed to provid e reasonable protec tion agains t
Harmful interference in a residential installation. This equipment
generates, uses and can radiate radio frequency energy and, if not
insta lled and used in a ccordance wit h the instructio ns may cause
harmful interference to radio communications. However, there is no
guaran tee that inter ference will not occur in a p articular insta llation. If
this eq uipment does cause ha rmful interference t o radio or televi sion
reception, wh ich can be determ ined by turnin g the equipmen t off and
on, the u ser is encourag e to try to correct the interference b y one or
more of th e following me asures:
• Reori ent or relocate t he receiving antenna.
• Increa se the separat ion between the equ ipment and rece iver.
• Consul t the dealer or a n experience d radio/TV technician for help.
GE is a trad emark of the Gen eral Electr ic Company and is used un der
licens e to Jasco Products Co mpany LLC, 10 E. Mem orial Road, Oklaho ma
City, OK 73114.
452 42-1
1/04/13
 Loading...