

Page 1
Note: SurePowr actuators can be supplied for clockwise or counter-clockwise spring driven rotation (viewed from the top of the actuator).
The spring drive rotation is noted on the actuator name tag and wiring diagram. Ensure that the actuator has been supplied with the proper
spring drive operation for the application prior to installation on the driven device.
1. The actuator is shipped in the power off (fail) position. Ensure that the driven device is oriented to its
fail position prior to installation of the actuator.
2. Care should be taken to maintain proper alignment between the actuator and the device shaft.
If the actuator is not in the correct alignment with the device shaft, repeat the procedure in Step 1.
3. Mount the actuator to the device. Ensure the actuator is centered properly with the device shaft, and
then tighten all bolts and nuts evenly.
4. Remove the cover bolts located around the actuator motor and control cover flange.
5. Terminate field wiring per the appropriate RCS wiring diagram, supplied with the actuator. Use a
minimum of #18 AWG stranded wire.
Switch adjustments for clockwise spring fail operation (viewed from the top of the actuator)
a. Ensure actuator is de-energized and positioned in the clockwise (fail) position. Loosen the setscrews on Cams 1 and 3. Rotate both
counter-clockwise until they clear the switch arm rollers of Switches 1 and 3.
b. Rotate Cam 1 clockwise until it comes in contact with Switch 1’s arm roller and the switch “breaks”. A light “click” can be heard.
Tighten the set-screws on Cam 1.
c. Rotate Cam 3 clockwise until it comes in contact with Switch 3’s arm roller and the switch just “breaks”. A light “click” can be heard.
d. Rotate Cam 3 slightly further in the clockwise direction. (This ensures that Switch 3 will “break” just prior to the actuator reaching the
full fail position.) Tighten the setscrews on Cam 3. Energize the actuator. This will move the actuator to the opposite end of travel.
e. Upon reaching the opposite end of travel, Cam 2 should just engage the roller on Switch 2 so that the switch just “breaks”.
This action will stop the actuator. Check that the actuator has properly positioned the driven equipment.
f. If actuator travel is insufficient, rotate Cam 2 slightly clockwise until the cam just clears the roller of Switch 2. As soon as the
cam clears the roller, the actuator will “bump” electrically towards the end of travel. Continue until the actuator reaches the full
end of travel.
SUREPOWRTMSERIES - SURE 49
FIELD INSTALLATION INSTRUCTIONS
In the maintenance and operation of mechanical equipment, SAFETY
is the basic factor which must be considered at all times. Through
the use of the proper clothes, tools and methods of handling, serious accidents causing injury to you or your fellow workers can be prevented.
Throughout this manual are listed a number of safety precautions. Study them carefully and follow them; also insist that those working
for you do the same. Remember, an accident is usually caused by someone’s carelessness, neglect or oversight.
Safety First
Installation
To prevent ignition of hazardous atmospheres,
do not remove actuator cover while circuits are live.
Loaded spring inside actuator. Do not attempt to repair actuator
below top gear plate, unless properly trained on repair methods.
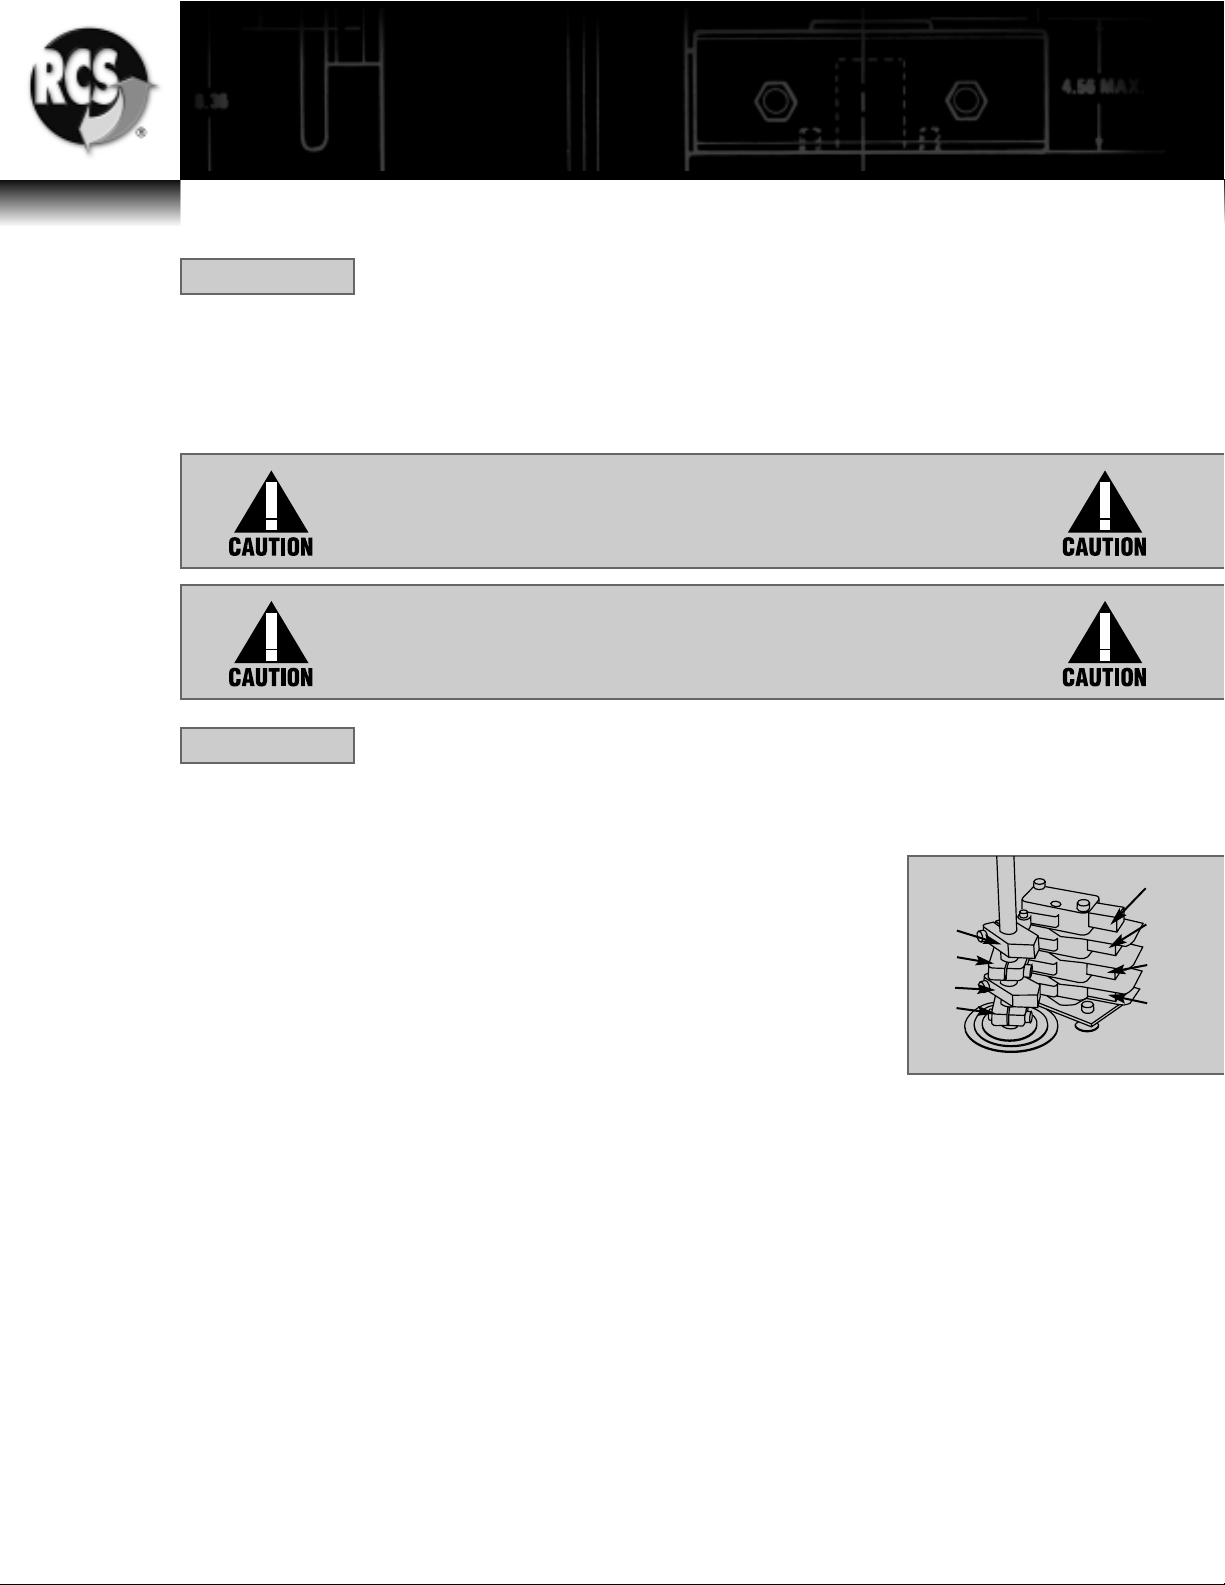
Cam 1
Cam 2
Cam 3
Cam 4
Switch 4
Switch 3
Switch 2
Switch 1
Figure 1
1
Page 2

g. If the actuator has over-traveled, rotate Cam 2 slightly counter-clockwise, then move the actuator towards the fail
position electrically. Stop and electrically reverse the direction of travel. Move the actuator until Cam 2 operates
Switch 2 and the actuator stops. Repeat this procedure until the actuator is properly positioned.
h. Rotate Cam 4 until it comes in contact with Switch 4’s arm roller and the switch just “breaks”. A light “click” can be
heard. Rotate the cam slightly counter-clockwise. (This ensures that Switch 4 will “break” just prior to the actuator
reaching the extreme opposite end of travel.) Tighten the setscrews on Cams 2 and 4.
Switch adjustments for counter-clockwise spring fail operation (viewed from the top of the actuator)
a. Ensure the actuator is de-energized and positioned in the counter-clockwise (fail) position. Loosen the setscrews on
Cams 2 and 4. Rotate both clockwise until they clear the switch arm rollers of switches 2 and 4.
b. Rotate Cam 2 counter-clockwise until it comes in contact with Switch 2’s roller arm and the switch “breaks”. A light
“click” can be heard. Tighten the setscrews on Cam 2.
c. Rotate Cam 4 counter-clockwise until it comes in contact with Switch 4’s arm roller and the switch just “breaks”. A
light “click” can be heard.
d. Rotate Cam 4 slightly further in the counter-clockwise direction. (This ensures that Switch 4 will ”break” just prior to
the actuator reaching the full fail position.) Tighten the setscrews on Cam 4. Energize the actuator. This will move
the actuator to the opposite end of travel.
e. Upon reaching the opposite end of travel, Cam 1 should just engage the roller on Switch 1 so that the switch just
“breaks”. This action will stop the actuator. Check that the actuator has properly positioned the driven equipment.
f. If actuator travel is insufficient, rotate Cam 1 slightly counter-clockwise until the cam just clears the roller of Switch 1.
As soon as the cam clears the roller, the actuator will “bump” electrically towards the end of travel. Continue until
the actuator reaches the full end of travel.If the actuator has over-traveled, rotate Cam 1 slightly counter-clockwise,
then move the actuator towards the fail position electrically. Stop and electrically reverse the direction of travel.
Move the actuator until Cam 1 operates switch 1 and the actuator stops. Repeat this procedure until the actuator is
properly positioned.
g. If the actuator has over-traveled, rotate Cam 1 slightly clockwise, then move the actuator towards the fail position
electrically. Stop and electrically reverse the direction of travel. Move the actuator until Cam 1 operates switch 1 and
the actuator stops. Repeat this procedure until the actuator is properly positioned.
h. Rotate Cam 3 until it comes in contact with Switch 3’s arm roller and the switch just “breaks”. A light “click” can be
heard. Rotate the cam slightly further in the clockwise direction. (This ensures that Switch 3 will “break” just prior to
the actuator reaching the extreme opposite end of travel.) Tighten the setscrews on Cams 1 and 3.
6. Operate the actuator electrically several times to ensure proper operation and to verify that travel limits and stops are
correctly set.
7. De-energize the actuator to verify proper spring failure operation. Ensure the driven device is properly positioned in the
spring failure position.
8. If the actuator is supplied with an optional feedback potentiometer and/or position controller, verify proper calibration
of input and output signals after making cam adjustments.
9. Replace the actuator cover and cover screws.
10. The actuator is now ready for electrical operation.
2
Closely monitor the electrical stroke, as the travel limit switches
are not yet properly adjusted. Ensure the actuator does not
over-travel and damage the driven equipment.
Closely monitor the electrical stroke, as the travel limit switches
are not yet properly adjusted. Ensure the actuator does not
over-travel and damage the driven equipment.
SURE 49
Page 3

CCW Spring Return Rotation As Viewed From Top of Actuator
CW Spring Return Rotation As Viewed From Top of Actuator
3
WIRING DIAGRAMS
Figure 2 (For Illustration Purposes only)
Figure 3 (For Illustration Purposes only)
SURE 49
Motor drive both CCW & CW
intermediate stop capability
spring drive CW on loss of power.
Operation Notes:
A. Power to terminal 1 & 2 will
motor drive and brake hold
actuator in CCW most position.
B. Power to terminal 1 & 3 will
motor drive and spring hold
actuator in CW most position.
C. Loss of power will spring drive
and spring hold actuator in CW
most position.
Motor drive both CCW & CW
intermediate stop capability spring
drive CCW on loss of power.
Operation Notes:
A. Power to terminal 1 & 3 will
motor drive and brake hold
actuator in CW most position.
B. Power to terminal 1 & 2 will
motor drive and spring hold
actuator in CCW most position.
C. Loss of power will spring drive
and spring hold actuator in CCW
most position.
SP-3 Position
Snap Action
Switch
Stop
CCW
CW
FIELD WIRING
ACTUATOR WIRING
Capacitor
Thermal Overload
Automatic Reset
M1
M2
M3
Heater
11
12
9
7
8
Switch 3
NC
NO
3
2
5
4
NC
NC
NO
NO
NC
10
Switch 4
NO
Switch 2
Switch 1
L1
A.C. Line
(Neutral)
L2
(Opt.)
1
+t°
Bridge
Rectifier
COM
COM
COM
COM
6
Red
Red
Clutch
Coil
Brake
Blue
Blue
TB
M
Counterclockwise
Electric Motor
Operation
Looking At
Actuator Cover
Clockwise Spring
Return Operation
SP-3 Position
Snap Action
Switch
(See Note 1)
Stop
CCW
CW
Heater
11
12
9
7
8
Switch 3
NC
NO
3
2
5
4
NC
NC
NO
NO
NC
10
Switch 4
NO
M
Capacitor
Automatic Reset
Thermal Overload
Switch 2
Switch 1
L1
A.C. Line
(Neutral)
L2
(Opt.)
1
+t˚
Bridge
Rectifier
COM
COM
COM
COM
M1
M2
M3
6
Red
Red
Clutch
Coil
Brake
Blue
Blue
TB
FIELD WIRING
ACTUATOR WIRING
Counterclockwise
Spring Return
Operation
Clockwise Electric
Motor Operation
Looking at
Actuator Cover
Page 4

SURE 49
NEMA 4, 6, AND 7 DIMENSIONAL INFORMATION
Figure 4
4
Operational Information:
Standard unit is viewed from the top looking thru the actuator.
Output shaft is motorized in a counter-clockwise direction and
is returned to its original position by a spring in a clockwise
direction. Unit designation is spring clockwise.
Optional unit: The output shaft is motorized in a clockwise
direction and returned counter-clockwise to the original position.
Unit designation is spring counter-clockwise.
Allow 5" Clearance
For Cover Removal
5.11
3/4-14
N.P.T.
18.18
Ref.
Control
Cover
Spring
Housing
Shock
Absorber
.334
7.125
3.56
.875
Dia.
1.998
Pilot Dia.
10.09
Ref.
Spring CCW
2.250
Sq.Ref.
Spring CW
5/16-18 UNC-2B x .63 Dp.
4 Places Typ.
2.50
.86
1.02
1.145
.312
.621
.625
10.22
Top
Page 5

To prevent ignition of hazardous atmospheres,
do not remove actuator cover while circuits are live.
SURE 49
5
Operation
Power On: The electric motor drives the gear train, which in turn winds the spring and turns the device. An internal limit
switch de-energizes the motor and the brake, which holds the return spring and device in position.
Power Off: When the current is interrupted by either a control signal or a power failure, the return spring drives the device to its
original position.
Note: It is recommended that the actuator be driven electrically in both directions for normal operation to prolong cycle life.
Maintenance
Gear train is permanently lubricated at the factory for the average life of the actuator. Brake gap is set at the factory. No further
attention is required.
Thermal Overload
The internal thermal overload switch de-energizes the motor and prevents overheating of the motor windings due to
excessive operation, stalling or high ambient temperatures.
Duty Cycle
The maximum duty-cycle to be expected without interruption by thermal cut-off at an ambient temperature of 65C˚ is 25%
(3 “OFF” times for every 1 “ON” time) for the 5 and 10 second design, and 50% (1 “OFF” time for every 1 “ON” time) for
the 30 second design.
Storage
The Surepowr actuator must be stored in a clean, dry, temperature controlled building which is protected from the weather.
Precautions shall be taken to prevent condensation inside or outside the actuator. If there is insufficient external
temperature and humidity control, internal heaters must be installed and energized to protect the unit against condensation
from extreme temperature variations. The actuators shall be stored off the floor on suitable pallets and must be covered
with an unsealed dust protector allowing side and bottom ventilation.
Troubleshooting (New Unit)
Note: Most actuator problems occur due to incorrect cam/travel limit switch setting, or the use of an external travel stop on the
device that the actuator is operating.
Problem 1: Actuator is receiving electric power but the motor does not respond.
Instructions: 1a.Check actuator nameplate to insure correct model, voltage type and spring return direction.
1b.Check all wiring against installation wiring diagram.
1c.
Actuator with clockwise fail position: Using a volt meter, check that power is available between
terminals 1 and 2. Then check the voltage between terminal 1 (common) and the two legs of the
motor and capacitor. The meter should indicate a value = to or greater than the supply voltage
indicated on the actuator nametag.
Actuator with counter-clockwise fail position: Using a volt meter, check that power is available
between terminals 1 and 3. Then check the voltage between terminal 1 (common) and the two legs of
the motor and capacitor. The meter should indicate a value = to or greater than the supply voltage
indicated on the actuator nametag.
If power is not present at the motor or capacitor leads:
•
Cam adjustments are required
•
Switch malfunction
•
Improper wiring
SURE 49
Page 6

1020 Rankin Rd., Houston, TX 77073
P.O. Box 60706, Houston, TX 77205
Tel: (281) 443-7000
Fax: (281) 443-6308
Fax: (281) 443-4802
Copyright© 2001 by Texsteam Operations.
All rights reserved. Printed in U.S.A.
Reproduction in whole or in part is prohibited by law.
Bulletin No. 6005
1M 7/01 SPI
SUREPOWRTMSERIES - SURE 49
Problem 2: Actuator is receiving electric power but the motor only hums.
Instructions: 2a. Perform steps 1a through 1c listed above.
2b.Check to insure brake is completely disengaged when power is applied.
Problem 3: Actuator runs but operation is erratic.
Instructions: 3a. Perform steps 1a through 1c listed above.
3b. Check ambient temperature. Standard Surepowr actuators have a maximum ambient operating temperature rating of 65˚C.
3c. Check duty cycle (frequency of operation). See above for details.
3d.Ensure that actuator is not continuously stalled.
Problem 4: Motor runs continuously in spring return direction after actuator output shaft has stopped.
Instructions: 4a. Adjust spring return side travel cam/switch so that the cam trips the switch before shaft stops motion.
Problem 5: Motor runs continuously but output shaft does not turn.
Instructions: 5a. Check for power to the bridge rectifier and clutch solenoid.
Note: Standard Surepowr actuators are manufactured with thermal overload protectors in series with the motor
common. Should any of the above problems cause the protector to open, it will automatically reset when the motor
temperature is lowered to a safe level.
Locating and Ordering Parts
For ease and accuracy in identifying and ordering spare or replacement parts, submit the following information from unit nameplate.
1. Serial Number
2. Model Number
3. Voltage
 Loading...