

Page 1

Ver.1.0
(1) Safety precautions
Please pay attention on following terms when using the product.
Do not focibly bend the power
plug or cord, nor put any heavy
object on them which may
cause damage.
▶ It may cause electric
Do not connect on socket with
many extensions nor by
connecting the power plugs.
▶ It may cause fire.
Please pay attention on following terms when using the product.
Avoid too cold or hot place
and do not dispose the
product near candles, mosqui
to coil, cigarette fire or any
heating equipment.
Do not use any other part than
assigned ones.
▶ It may cause breakdown or
failure of incubation.
Do not overturn the product.
▶ The water within the
main body may pour onto
electronics or the sight glass
may be damaged.
Do not let a child assemble
the product. Must be
assembled by a competent
adult.
Do not block the ventilation
hole with cover.
▶ Lack of ventilation may
cause an increase in internal
temperature and result in
breakdown or fire.
Do not have any heating
device near the power cord.
▶ When the cord sheath is
melted it may cause fire or
electric shock.
Do not place on a moving
shelf, inclinated place, unstable
place or any place with severe
vibration.
▶ Product may fall resulting
in breakdown or damage.
The vibration may reduce the
Do not install the product in
dusty or unclean places.
▶ If the dust or any alien
substance is introduced to the
interior they may cause electric
Do not install the product
under direct sunlight.
▶ It may cause electric
shock or fire.
Do not install the product in
wet or moist places.
▶ If the water is introduced
to the interior it may cause
electric shock or fire.
Power-related precautions
Precautions on installation and use
5. PRODUCT INFORMATION
(1) FAQ / (2) Trouble shooting and measures / (3) Product data / Product warranty / (4) Guide on customers' damage compensation
The success of incubation may vary according to different factors.
The manufacturer and distributor are not responsible for failure of incubation of costly eggs, loss of life, property damage due to negligence of user,
remodeling, painting, modification of purpose of use or power failure. When incubating parrot or costly birds please verify the internal temperature
(adjust) before use. Please read carefully the instruction manual before use to avoid failures.
Explanation on Signs
ATTENTION: Means the errors which may produce failure of incubation, trouble or damage that
require attention.
Means Do not contact. Means the earthing to prevent electric shock.
Means the helpful information or reference
for using the product.
Means the possibility of injury or material loss of equipment when the
designated instruction is not observed.
Means Forbidden. Means the matters to obligatorily observe.
Means Do not disassemble.
Direct access to LIST (Please click on the orange boxes below.)
1. COMPOSITION
(1) Safety precautions / (2) Introduction on Rcom 10 / (3) Name of each part and basic composition /
(4) Name and function of operational parts
2. BEFORE USE
(1) What is incubation room? / (2) Preparation of incubation / Start incubation / (3) APS (Assembly / Speed control /
Tube replacing / How to maintain and clean)
3. INCUBATION /
FUNCTION SETUP
(1) function setup (2) Moist and ventilation during incubation / (3) Management after incubation / Dew condensation
4. HOW TO CLEAN
(1) How to disassemble and clean
Means Please disconnect the power plug from the power source.
Do not use damaged power
cord, plug or loose socket.
▶ It may cause electric
shock or fire.
Do not pull the power cord to
disconnect nor touch the plug
with wet hands.
▶ It may cause electric
shock or fire.
Do not disconnect the plug
during incubation.
▶ The egg may die due to
suspension of incubation.
1. COMPOSITION
North America Sales & Service www.RcomCo.com
Rcom Bird Egg Incubator Eco Pro Plus 10 User Manual
Page 2

When not using the device for
long time, please disconnect
the power plug, clean, dry and
maintain it properly.
▶ The accumulated dust may
produce electric shock, power
leakage or fire due to heating,
ignition or deterioration of
When dropped or damaged
the product case, disconnect
the power plug and contact to
the service center.
▶ When used in that condition,
it may cause electric shock or
fire.
Please pay attention on following terms when using the product.
When cleaning please
disconnect the power cord
and polish the device with a
smooth, clean cloth.
▶ Do not use any chemical
product as wax, benzene,
thinner, mosquitocide, air
freshener, lubricant, detergent,
Please contact the service or
customer consultation center
at least once a year for device
check-up.
▶ The dust accumulated for
long time in the interior of the
product may produce fire or
breakdown.
(2) Introduction on Rcom 10
[MAIN FUNCTIONS]
[CONVENIENT FUNCTIONS]
* Automatic temperature adjustment and setup functions.
※ The ECO model is for manual egg rotation method. By installing the additional automatic egg rotating unit (sold seperately) the
eggs are automatically rotated once every hour.
※ The PRO model does not include the APS. By installing the additional APS (sold seperately) it can be used as PRO PLUS model.
1. COMPOSITION
(3) Name of each part and basic composition
* Incorporated LED internal lighting.
* Large LCD display which enables the easy view of the diverse information on the device.
* Function of switching Celsius and Fahrenheit degrees.
* Alarm and sign which notices the abnormal temperature (high and low) for suddent change of external temperature.
* Applied Water Nipple for easy supply of water for moisturing.
* Convenient method of manual egg rotating function
* Automatic temperature, humidity adjustment and setup functions.
* Manual temperature, humidity adjustment and setup functions.
* Clamped structure which prevents the leakage of water drops inside the view-window (dew condensation) out of the device.
* Egg Tray which can simultaneously store different types of eggs.
* One touch separation of upper part (main controller) for convenient cleaning after incubation and reparation.
* External water input hole and moisturizing device for easy supply of water for moisturizing.
* Air control lever which induces the fresh exterior air minimizing the effects on the insulation.
* Integrated candling facility.
* Automatic egg rotating function (rotating disk method) with adjustable egg rotation timing.(i.e 1h, 2h, 3h)
* Ability to adjust the egg rotation angle.
* Improved reliability based on the application of 3rd Generation Temperature-Humidity Sensor of Sensirion Co. Ltd. (Switzerland).
* Convenient humidification device based on the Automatic Pumping System(A.P.S) for humidification
the opportunity for bacterial propogation.
* Variable air control lever which enables the interior air volume of the device, to be altered.
* Artificial intelligence based electronics with the state-of-the-art controlling technology designed by Rcom.
* Capacity of simultaneous hatching of 10~15 standard size eggs.
* Rotational Heater Support which enables the easy adjustment of heater tension.
First of all thanks to every customer who purchased our Rcom 10.
The Rcom 10 automatically creates and maintains an optimal incubation environment using state-of-the-art technology digital control methods and has been
designed for easy and simple use. The Rcom 10 provides the optimal environment, however the user needs to carefully observe and adjust environmental
factors such as temperature, humidity, installation location and other conditions necessary for the incubation of different kind of birds Even though the Rcom
10 is designed to provide the optimal setting for every kind of environment necessary for the incubation of eggs, we sincerely suggest you carefully read the
instructions before use to allow for the successful incubation and proper use of the device.
Dominant advantages of Rcom 10
* Special mechanism without egg rotation noise.
* Streamlined high quality design in the shape of an egg.
* Clean and transparent large view-window
* One-touch separation of electronic controller assembly allows convenient cleaning.
1. COMPOSITION
Rcom 10
Do not arbitrarily disassemble,
repair nor modify/remodel.
▶ It may cause electric shock
or fire. When you need repairs
please contact to the service
center.
Supervise children near product.
Do not to introduce any metal
object, nail, clip or egg shell to
the external hole of the device.
▶ It may cause electric shock,
fire or injury.
If the device produces any
abnormal sound or smoke
please immediately disconnect
the power plug and contact to
the service center.
▶ It may produce electric
shock or fire.
* Design incorporates principles to reduce germ reproduction such as minimizing interior mechanisms which reduced
Precautions on cleaning
Do not spray the detergent
directly to the exterior part of
the device.
▶ It may increase the
possibility of discoloration,
peeling of printed part, etc
when directly sprayed.
Please wipe the product with
smooth cloth and neutral
detergent.
If there is any dust in the pin
or accessing part of the power
plug, please clean it with dry
patch.
▶ If not, it may cause
electric shock or fire.
North America Sales & Service www.RcomCo.com
Rcom Bird Egg Incubator Eco Pro Plus 10 User Manual
Page 3

PRO PLUS 10
* The Serial No. of the product is noted on the left side of the main controller. Please do not damage it. (Ex:RCM0000000)
* The air filter (1 set: 5 units) and humidity pad are sold seperately.
PRO 10
* The Serial No. of the product is noted on the left side of the main controller. Please do not damage it. (Ex:RCM0000000)
* The air filter (1 set: 5 units) and humidity pad are sold seperately.
Composition of Automatic Pumping System (APS)
See video on how to assemble
and operate Automatic
pumping system(APS).
1. COMPOSITION
(4) N
ame and function of operational parts
Name and function of operational parts
Name of each part
Basic Composition
North America Sales & Service www.RcomCo.com
Rcom Bird Egg Incubator Eco Pro Plus 10 User Manual
Page 4
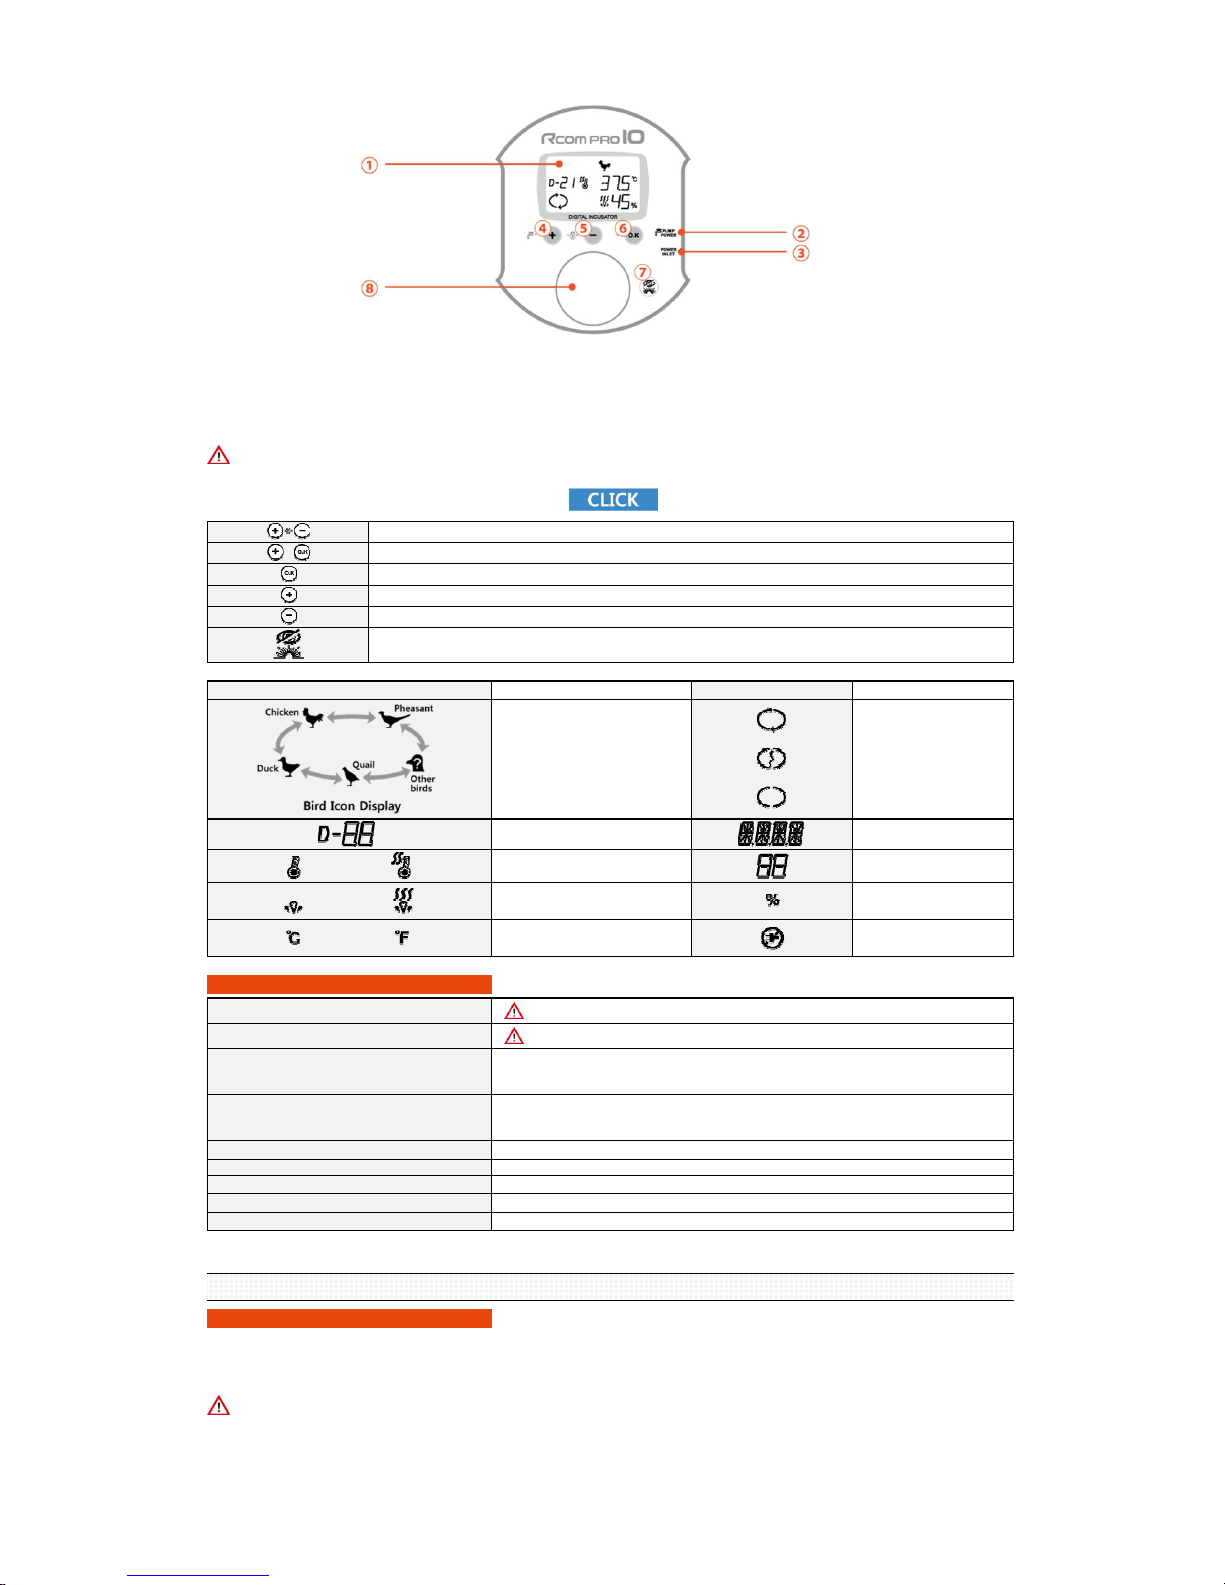
① Display (LCD) : Shows the incubation environment. ② Automatic Pumping System (APS) connection socket :
③ Power adaptor connection socket :This socket allows power into to the device.
It is the socket which connects the APS to the device.
⑤ Down button : Used to select menu or to decrease value. ④ Up button : Used to select menu or to increase value.
⑥ Menu selection button : Button to save setup values.
⑧ Candling zone : Used as candling device by pressing the Candling button.
ICON Name and function
Shows operating Egg
rotation
Shows Egg rotation suspended
Shows Terminated Egg
rotation
Show Temperature /
Optional function
Shows humidity units
Shows humidity value
Shows blackout notification
2. BEFORE USE
(1) What is incubation room?
What is Hatching room?
What is a hatching room? This is the location where the incubator is installed and operated. As the environment affects the hatching rate the place of
installation must be a place with low nearby noise or vibration, and nearby temperature must be 22~25℃ (71.6~77℉) with low temperature difference.
Especially in night time the temperature is lowered than daytime therefore it surely must be verified, and in daytime the device must never be exposed
If the temperature of hatching room is lower than setup value there might be misted or dripping water inside due to dew condensation.
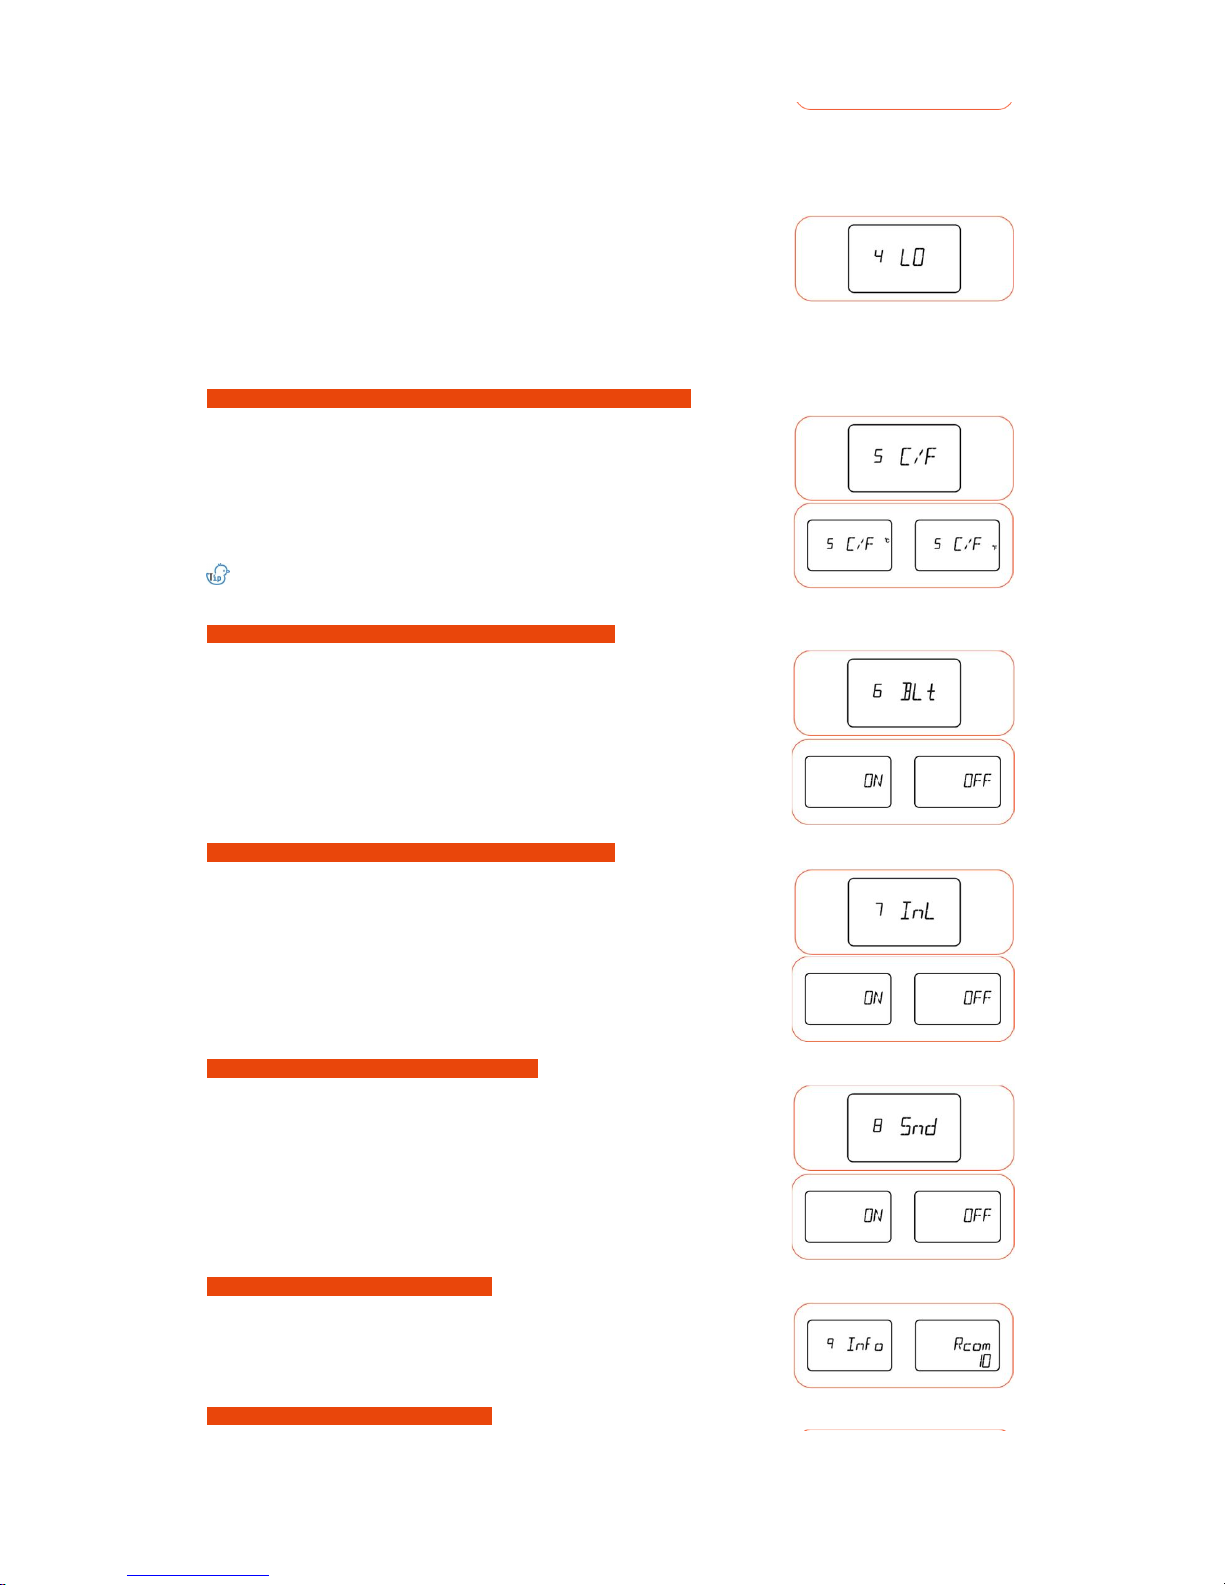
7. In.L (Interior lighting setup) Device's interior lighting ON/OFF setup [Default value : ON]
8. Snd (Sound) Device's button sound ON/OFF setup [Default value : ON]
9. Info (Basic information) Shows the basic information of this device. (Shows version information)
4. LO (Abnormal low temperature alarm)
Sounds alarm when the incubator temperature is lower than setup value due to external
environmental change or other anomaly.
0.0℃ ~ -5.0℃ [Default value : -3.0℃] modified by 1 degree unit.
5. C/F (Celsius/Fahrenheit modification) Modification of Celsius (℃), Fahrenheit (℉) degrees [Default value : Celsius (℃)]
6. B.Lt (Back light setup)
LCD back light ON/OFF/EVENT ON setup
[Default value : ON]
Explanation on Optional Functions
1. T.CAL (Temperature calibration) It is not recommendable direct adjustment by user. Please contact agent or supplier.
2. H.CAL (Humidity calibration) It is not recommendable direct adjustment by user. Please contact agent or supplier.
3. HI (Abnormal high temperature alarm)
Sounds alarm when the incubator temperature is higher than setup value, due to external
environmental change or other anomaly.
0.0℃ ~ 5.0℃ [Default value : 2.0℃] modified by 1 degree unit.
/
Shows Heater OFF/ON
/
Shows Humidification OFF/ON
/
Shows unit of Celsius / Fahrenheit
While the button is pressed the candling function is turned on.
When setup menu : moves to previous step.
ICON Name and function
Chicken ↔
Pheasant ↔
Other birds ↔
Quail ↔
Duck
(according to above order)
Days until hatching
See Video on Icon's, Name's of buttons and Performance of function's
Factory Defautlt Reset : The reset can be done by pressing 2 buttons at the same time for 1 seconds (only during incubation)
Option setup : The option can be setup by pressing 2 buttons at the same time for 3 seconds.
Menu selection / Egg rotation test / Setup value verification during incubation.
Increase value / 5 seconds : forcible pump operation / 10 seconds : forced pump operation for 2 minutes.
Decrease value / Termination of incubation.
⑦ Candling button / Back button : Used to turn ON/OFF the candling function
or to go back to previous step in setup selections.
Do not look directly into the LED light.
North America Sales & Service www.RcomCo.com
Rcom Bird Egg Incubator Eco Pro Plus 10 User Manual
Page 5

▶ Please insert the nipple into the nipple groove as shown in
the image.
▶ Cut the humidity pad in 2 pieces of 10 x 150mm size and fix
them to the outer groove of each side of the view-window.
Fix them in each side with the nipple as the center.
This allows the water to easily infiltrate the pad.
The maximum/minimum humidification capacity varies according to the size of the
humidification pad.
※ The life of humidification pad is 4~6 months under normal usage conditions but if the
water
quality is improper the life might be reduced. (Please use distilled or purified water for
moisturizing.)
※ The humidification pad can be purchased separately.
Preparation / Start of Incubation
▶ Separate each part for assembly and verify if there is any missing or damaged
parts.(Please do not discard the product box, use it to store the product safely.)
▶ There are 3 hooks connected to the main controller in the inner side of the view-window.
Squeeze the 3 hooks in and separate the main controller and the view-window.
2. BEFORE USE
(2) Preparation of incubation / Start incubation
North America Sales & Service www.RcomCo.com
Rcom Bird Egg Incubator Eco Pro Plus 10 User Manual
Page 6

[Image 1-2] [Image 1-3][Image 1-0] *Unnecessary in initial purchase [Image 1-1]
2. BEFORE USE
(3) APS (How to assemble / control speed / replace tube / store and clean)
How to assemble APS (Automatic Pumping System)
Turn the device on before placing the eggs thus verifying all the functions are performing
normally, then start the incubation once verified.
▶ Insert the power cord and pump power* jack to the upper side of the product.
(*Pump pack and/or Rcom PRO PLUS 10 model sold seperately.)
Please pay special attention and do not to switch the location of power cord and pump
power jack.
[In case of PRO PLUS 10 model]
▶ Connect the OUT side silicone tube of the automatic pumping system (APS) to the nipple
of
the device, and put the silicone tube of IN side to the PET water bottle.
In case of PRO PLUS 10 model do not pour water to the water hole in the lower part
of the main body as it includes automatic pumping system (APS).
If the silicone tube is not exactly inserted the pumping may not work properly.
Never shake or reverse the main body of the device after filling the water.
Any spilled or leaked water may cause device breakdown.
[In case of PRO 10 model]
▶ Pour the water into the water hole of the lower part of the main body. The silicone hose
will
supply water to the interior of the incubator. Pay special attention to prevent overflow.
During incubation please verify daily if there is water in the water hole and when
insufficient
please supply water.
(Reference 3. Incubation/Function setup → (1) Function setup)
In the PRO 10 model, the APS is sold seperately. It can be purchased and installed as
the PRO PLUS 10 model. When the APS is installed, do not pour water to the water
hole in the lower part of the main body.
▶ Please insert air filer into the lower groove of egg turning disk as shown in the picture
3day before hatching.
Please wash the air filter before use, as dust in the air filter during use this may disrupt
proper air circulation.
▶ Assemble in this order : view-window, egg rotation disk,
main controller and fix the view window and main controller
with 3 hooks.
(In the PRO 10 model the nipple and APS are sold
separately.)
When assembled,the grooves of air control lever and view window should line up.
▶ It is recommended to sterilize both the eggs and the incubator interior before loading the
eggs. [Reference Rcom Antiseptic Solution] Assemble the main body (lower part) and tray
and place the eggs in, adjusting the location according to egg size.
It is recommended to locate the sharper point of the egg to the inner side of the device.
▶ Place the eggs and close the view-window.
If the view-window is not completely closed the temperature will not increase.
North America Sales & Service www.RcomCo.com
Rcom Bird Egg Incubator Eco Pro Plus 10 User Manual
Page 7

[Image 1-6]
▶ When connecting the power plug to socket the LCD display turns on and the device starts
to
work.
It may smell a little in first operation however this is normal.
▶ The silicone tubes may adhere and block the tube hole. In this case, separate the tube from the device, eliminate water and furnish the tube preventing it
from
▶ The water pump can be dismantled. In case of reassembly due to blocked tube, please pull the blocked part of the silicone tube or open the interior of the
tube
3. INCUBATION / FUNCTION
(1) Function setup
▶ When pressed Candling Sign (Button) during the Menu Setup the user may go back to the previous step.
▶ Damage silicone tubing will reduce the pumping volume or pumping may cease. In this case, please replace the silicone tubing.
The silicone tube sent with the initial product should be used in the product, also you may purchase it through Rcom or the place where you purchased
the
product. (Ø2.6 × 3.5)
If the pumping motor works but it does not produces water, or if there is louder noise than usual, the silicone tube may be aged, bent or blocked.
※ If the pump is not performing recheck the IN and OUT, verify if the motor rotates to the left [Image 1-5], and the silicone tube was cut exactly as 35mm
and
How to maintain and clean APS
▶ Do not wash with water, please wipe with clean fabric material.
⑥ Avoiding twisting the silicone tube, open the IN and OUT side, locate it in the hole and close the case. Verify if the silicone tube or cable is not stuck in the
case and tighten up the 2 bolts. Reference [Image 1-6].
How to control APS speed
▶ Easily control the volume of water through the APS.
▶ If you rotate adjustment to the right with a (+) shape driver the motor speed and pumping
volume are increased and when rotated reverse they're reduced. If forcibly rotated the
adjustment VR may be damaged.
▶ If the pumping volume is excessive the water may pour or leak from the moisture pad onto
the floor, therefore adjust as 1 drop of water for each 3 seconds from the moisture pad for
the best absorbency.
As the device controls the internal temperature checking the external environment due to
artificial intelligence, therefore it may raise the temperature very slowly at the beginning.
How to replace APS tube
① Cut the silicone tube exactly in 35mm and insert each of them to the nipple as shown in [Image 1-2].
(The initial product is assembled as ⓐ-1.)
② Cut the 1.5m silicone tube in two as stated in [Image 1-1] and insert each of them to the assembled nipple (ⓐ).
③ Assemble as [Image1-3] normal. If the silicone tube is not inserted onto the nipple correctly [Image 1-4] pumping performance is reduced.
④ As in Image [1-0] loose the 2 bolts in lower part of APS case and insert the [Image 1-3] to [Image 1-5] ⓑ.
⑤ Grab the side ⓒ of [Image 1-5] and pull the silicone tube and insert it to ⓓ. (The silicone tube must be firm but not too taut.)
[Image 1-4] [Image 1-5]
Automatic Pumping System
(APS), See the video on how
to assemble and operate.
Start of Automatic Incubation
1 drop every
3 seconds.
North America Sales & Service www.RcomCo.com
Rcom Bird Egg Incubator Eco Pro Plus 10 User Manual
Page 8

[Temperature setup]
[Humidity setup]
[Egg rotation angle setup]
[Egg rotation cycle setup]
▶ INTV(Egg rotation cycle) is briefly shown and the 60m(minutes) sign flickers.
Setup the desired cycle with + and - button and press OK to move to cooling control cycle
setup phase.
[Adjustment scope : 10 ~ 360m(minutes) by scale of 10 minutes]
[Default value : 60m(minutes)]
The egg rotation is suspended 3 days before hatch.
This is automatically programmed to help hatching and not a fault of the device.
▶ If Candling sign(button) was pressed during setup you can go back to previous step.
▶ ANGL(Egg rotation angle) is briefly shown and 10s(seconds) sign flickers.
Setup the desired egg rotation time with + and - button and press OK to move to egg
rotation cycle setup phase.
[Adjustment scope : 0 ~ 60s(seconds) in 1 second as a unit, when setup as RND it shall be
operated randomly]
[Default value : 10s(seconds)]
▶ If Candling sign(button) was pressed during setup you can go back to previous step.
▶
TEMP (temperature) is briefly shown and 37.5℃ sign flickers.
Setup the desired temperature with + and - button and press OK to move to humidity
setup phase.
[Adjustment scope : 20 ~ 42℃ (68 ~ 107.6℉)]
[Default value : 37.5℃ (99.5℉)]
▶ If Candling sign (button) was pressed during setup you can go back to previous step.
▶ HUMI(humidity) sign is briefly shown and 45% sign flickers.
Setup the humidity with + and - button and press OK to move to egg rotation angle setup
phase.
[Adjustment scope : RH 20 ~ 70%]
[Default value : RH 45%]
▶ When the humidity is setup below RH 20% the OFF sign indicates humidification function is
turned off.
▶ If Candling sign (button) was pressed during setup you can go back to previous step.
The setup humidity turns to RH 65% from 3 days before hatch. This is automatically programmed feature to help hatching and not a fault of the device.
The temperature and humidity are optimally adjusted according to international standards when launched from factory.
When necessary it can be reset but it is not recommendable to be directly adjusted by the user. When reset is necessary please contact the place
where you purchased the product.
The low price thermometer and hygrometer easily procurable in markets can be inaccurate in measurement value and may need frequent calibration,
therefore please use the exclusive thermo-hygrometer for birds. [Thermo-hygrometer exclusive for birds at www.RcomCo.com]
※ As the device controls the internal temperature checking the external environment due to artificial intelligence, therefore it may raise the temperature very
slowly in some sections.
▶ This is a function where the temperature, humidity and egg rotation can be arbitrarily setup
by professionals skilled in incubation.
▶ In the initial display choose Other birds by pressing + or - button and press OK to enter to
the setup mode.
▶ The temperature setup, humidity, egg rotating angle, rotation cycle can be setup with
+ and - buttons and the setup values are saved by pressing the OK button.
▶ The Bird icon on the LCD display flickers and it switches to different types of bird by
pressing
+ or - button. Select the type of bird to incubate.
▶ After choosing the type of bird to incubate, keep pressing the OK button approximately 2
seconds when the icon flickers, then the internal lighting of the incubator turns on with a
Beep~ and the devices starts the operation.
▶ Incubator conditions are automatically and optimally adjusted.
Choosing the type of bird will set the proper incubation conditions as temperature, humidity
and rotation are automatically controlled and the user may modify the incubation condition
when necessary.
Starting Manual (Other birds) Incubation
North America Sales & Service www.RcomCo.com
Rcom Bird Egg Incubator Eco Pro Plus 10 User Manual
Page 9

[Cooling control cycle setup]
[Setup of number of incubation days (D-Day)]
What are Abnormal High/Low Temperature Alarm functions?
It is an Alarm Function which notifies the user when the device's interior temperature is abnormally high or low.
▶ Pour water into water hole of the main body (lower part). The connected silicone hose will
supply water to the interior.
▶ Verify daily if there is water in the water hole during incubation and supply when
insufficient.
▶ When desiring to incubate on low humidity only fill the internal water chamber A
connected
to the water hole. [RH 45% or less]
▶ When desiring to incubate with high humidity, please fill all the A and B water chambers
with
water. [RH 45% or over]
Adjust humidity 3 days before hatch.
If the humidity is lower than setup value please close the air control lever.
(Reference the humidity and ventilation control during incubation)
(Reference the 3. Incubation/Function setup → (3) Humidity and ventilation control during
incubation)
▶ During incubation '-' press the *which button?* button for 3 seconds and the incubation is terminated and moves to initial step/status.
▶ The alarm sounds in case of abnormal temperature and the display shows the current
temperature and consequently whether it is high or low according to the setup value.
The alarm sounds for 1 minute and automatically stopped, and the alarm sign is consequently shown until the OK button is pressed.
Ex : In case of alarm for 2℃ HI it consequently shows the current temperature and +2.0 / In case of '-3℃ LO alarm it consequently shows current
temperature and -3.0.
[How to setup Abnormal High Temperature Alarm] : It is an alarm function which notifies when the device's interior tem perature is higher than setup value.
▶ Setup scope : 0.0 ~ 5.0℃ (0 ~5℉), Default setup value : 2℃
▶ By pressing the + and OK buttons for 3 seconds at the same time the OPTN(option) sign
appears.
Resetting incubation environment during incubation
High/Low temperature Alarm function (optional function)
▶ DAY(number of hatching days) and D-25 are shown.
Setup the desired number of days with + and - button and press OK to save setup value
and
initiate incubation.
[Adjustment scope : 1 ~ 50 days]
▶ If Candling sign(button) was pressed during setup you can go back to previous step.
▶ How to setup continuous incubation function : In D-Day(number of hatching days) setup
use the + button and increase until D-50Days and press + again and "--" sign is shown,
and by pressing OK button it is setup as continuous incubation function.
What is Continuous Incubation Function Setup?
It is a function which enables the continued operation of the device with the currently setup incubation conditions regardless of number of incubation
days.
How to manually Humidify and Supply Water in Rcom PRO 10
▶COOL(cooling control) is briefly shown and 0h(hour) sign flickers.
Setup the desired cooling control cycle with + and - button and press OK to move to
number of hatching days setup phase.
[Adjustment scope : 0 ~ 6h(hours) in 1 hour as a unit]
[Default value : 0h(hour)]
What is COOL(cooling control) Function? It is a function which cools during the setup
time
among the 24 hours of a day. The periodic cooling is helpful for successful hatching but
you might need preliminary knowledge to perform the cooling control process.
▶ Press the + and - buttons at the same time during incubation to Reset incubation
environment and the temperature sign flickers.
▶ When modifying the temperature readjust the value with + and - buttons, press OK button
and the setup value is saved and it moves to next step (temperature, humidity, egg
rotation,
egg rotation cycle, order of hatching days).
▶ If Candling sign(button) is pressed during setup you can go back to previous step.
Also the display switches to incubation display if a button is not pressed during 10
Termination of incubation
North America Sales & Service www.RcomCo.com
Rcom Bird Egg Incubator Eco Pro Plus 10 User Manual
Page 10
▶ By pressing the + and OK buttons for 3 seconds at the same time the OPTN(option) sign
appears.
▶
Select the 9.I.nfo by pressing + or - button and press OK to display basic information of
the
device.
▶ By pressing the + and OK buttons for 3 seconds at the same time the OPTN(option) sign
appears.
▶ By pressing + or - button select 8.Snd and press OK to go back to Sound setup.
▶ By selecting the ON or OFF with + or - button and pressing OK, the setup values are saved.
[Default value : ON]
▶ If pressed Candling sign(button) during setup you can go back to previous step.
▶ By selecting ON, OFF or EVENT ON with + or - button and pressing OK the setup values
are
saved. When setup as EVENT ON the back light is only turned on for 30 seconds when the
button is pressed or the alarm is produced.
[Default value : ON]
▶ By pressing the + and OK buttons for 3 seconds at the same time the OPTN(option) sign
appears.
▶ By pressing + or - button select 7.I.nL and press OK to go back to Interior Lighting setup.
▶ By selecting the ON or OFF with + or - button and pressing OK, the setup values are saved.
[Default value : ON]
▶ If pressed Candling sign(button) during setup you can go back to previous step.
▶ By pressing + or - button select 3.HI and press OK to go back to Abrnormal High Temperature Alarm setup.
How to switch between Celsius ↔ Fahrenheit degrees (optional function)
Back light ON↔OFF↔EVENT ON method (optional function)
How to ON↔OFF Interior Lighting (optional function)
How to ON↔OFF SOUND (optional function)
Information display (optional function)
How to leave Optional Function
▶ By selecting the alarm value with + or - button and pressing OK, the setup values are saved.
▶ If pressed Candling sign(button) during setup you can go back to previous step.
[How to setup Abnormal Low Temperature Alarm] : It is an alarm function which notifies when the device's interior temperature is lower t han setup value.
▶ Setup scope : 0.0 ~ -5.0℃ (0 ~ -5℉), Default setup value : -3℃
▶ By pressing the + and OK buttons for 3 seconds at the same time the OPTN(option) sign
appears.
▶ When pressed OK after selecting ℃ = Modified to Fahrenheit degree.
When pressed OK after selecting ℉ = Modified to Celsius degree..
[Default value : ℃]
℃ = 5/9 (℉ - 32)
▶ If pressed Candling sign(button) during setup you can go back to previous step.
▶ By pressing the + and OK buttons for 3 seconds at the same time the OPTN(option) sign
appears.
▶ By pressing + or - button, select 6.B.Lt and press OK to go back to Back Light setup.
▶ By pressing + or - button select 4.LO and press OK to go back to Abnormal Low Temperature alarm setup.
▶ By selecting the alarm value with + or - button and pressing OK, the setup values are saved.
▶ If pressed Candling sign(button) during setup you can go back to previous step.
▶ By pressing the + and OK buttons for 3 seconds at the same time the OPTN(option) sign
appears.
▶ By pressing + or - button select 5.C/F and press OK to go back to Celsius/Fahrenheit
modification mode.
North America Sales & Service www.RcomCo.com
Rcom Bird Egg Incubator Eco Pro Plus 10 User Manual
Page 11

PRO PLUS 10 : How to forcibly operate humidifying pump
Humidity and ventilation control during incubation
▶ Humidity must be maintained before hatching to prevent drying of egg shell or non hatch.
▶ It is not recommended to open the cover frequently in the hatching period.
If the cover is frequently opened the humidity is rapidly reduced and it may take long time
to recover the humidity again.
※ If the internal temperature of the device is 37℃ (98.6℉) or over, and the temperature of
hatching room is lower then humidity may not reach RH 65%. There might be ±5% of
tolerance in humidity and there is no significant problem for hatching.
3. INCUBATION / FUNCTION SETUP
(3) Moist and ventilation during incubation /
(4) Management after incubation / Dew condensation
The candling can be verified by naked eye from 5~7 days after initiation of incubation,
and if the blood vessel or embryo (chick) is not observed the egg may be unfertilized
therefore remove it from the incubator.
If the egg shell is thick or dark it may be difficult to verify with naked eye.
White eggs as duck eggs are easier to observe.
It is not recommended to candle over 10 minutes within a warm indoor environment.
Please pay special attention not to apply any impact on the egg.
The egg may die due to stress caused by severe shaking or turning.
Too frequent candling may cause failure to hatch.
▶ The pump motor may be tested by pressing the + button for 5 seconds during operation.
▶ The pump motor may be tested for 2 mins by pressing the + button for 10 seconds during operation. In this moment the pump motor works even the
button
is not pressed directly.
after
▶ The environment for candling must be dark for easier observation.
▶ Pull up carefully the main controller and the handle of main body (upper part) and take the
egg to examine/candle.
▶ Place the wide, round part of the egg onto the candling zone of the main body (upper
part),
press the Candling button and observe the interior of the egg (embryo or blood vessel).
If you press any button during the consecutive 2 minutes operation, the pump operation is immediately suspended.
Candling function
Candling allows observation of the fertilized, unfertilized, suspended hatching or development of embryo, and if there is any minute fissure on the egg
introducing to the incubator the germs penetrate into it therefore the decomposition starts. As the decomposed egg may contaminate other eggs,
it is recommendable to perform candling in dark environment to select the proper ones.
Do not directly look into the LED light except in case of candling (egg examination).
▶ When the input values are incorrect, use factory default function to initialize the device to
the
initial status launched from the factory.
▶ When inserted the power by pressing the OK button at the same time, the RST sign is
▶ During the incubation the power sign in display flickers and sounds the alarm for
10 seconds.
When pressed OK button it is suspended and the power sign is immediately disappears.
▶ By pressing the + and OK buttons for 3 seconds at the same time the OPTN(option) sign
appears.
▶ Press + or - button, select 0.ESC and press OK and you can exit from the optional function
setup.
Blackout Notification Function
How to do Factory Initialization
North America Sales & Service www.RcomCo.com
Rcom Bird Egg Incubator Eco Pro Plus 10 User Manual
Page 12

▶ There are 3 hooks connected with the main controller in the
inner part of the view-window. Push the 3 hooks to the inner
side and separate the main controller and the view-window.
▶ Eliminate carefully with brush the dust on the separated main
controller. At this point, do not apply any strength on the
sensor or heater.
▶ The humidity and temperature sensor units are connected
with the connector to be easily replace in case of breakdown.
▶ Wipe the view-window, egg rotation disk, tray, air filter and
the
main body (lower part) down properly with lukewarm water.
▶ Do not was the Automatic Pumping System (APS) with water
but wipe with clean fabric.
▶ Wipe the exterior with smooth fabric, dry in a fresh place with proper ventilation and
assemble in order reverse to the disassembly and store properly.
Do not clean the product with organic solvents as benzene and thinner.
It may deform or discolor the product.
▶ When operating the device, if the difference between exterior and interior temperature of the device is high, the dew condensation is naturally occurred
therefore there is no operational problem due to this phenomena.
4. HOW TO CLEAN
(1) How to disassemble and clean
How to separate and clean
Please separate the power cord from the socket.
▶ When immediately turned off the device in high humidity
incubation and left with the cover closed, the humidity
remaining inside the device may evaporate, adhere to the
device and product breakdown. Always open the view-
window and eliminate the inner humidity to use the
device in the most safe manner. Incubator must be
completely dried out before storage.
※ The humidity pad is consumable and it can be purchased.
Management after hatching
▶
Hatching within the incubator can cause a build up of germs with possible cross contamination of bacteria, and the dust, feather dander, egg shells and
excrement may produce a breakdown of the incubator which is not covered under warranty. Please consider the Rcom Suro eco hatcher specifically for
hatching. We recommend to use the KINGSURO Brooder of our company for brooding.
Do not brood the chick within the incubator. Have a radiant heat brooder for chicks that are dry and fluffy.
As it can be the cause of breakdown and produce paid repair (A/S) cost even within warranty period. (Please move the chick to the brooding chamber
after hatching
Generating chamber: It is a space for hatching (egg breaking) used 1~3 days before hatching. (RCOM KINGSUR BROODER)
Developing (brooder) chamber: It is a space (device) which adapts the just born chick to the environment by maintaining proper temperature and
humidity.
(Rcom KINGSUR BROODER/Rcom BIRD BROODER&ICU)
▶ As the feed for little birds may vary by type, it is recommendable to acquire prior understanding on the bird before hatching.
(Please use the information on birds in the Rcom web site.)
▶ The humidity control is important in 1-2 days before hatching than in the beginning and in the middle of incubation, the moisture must be maintained
from
1-2 days before hatching. In case of water bird the humidity during incubation must be RH 45~55% / in case of poultry RH 40~45% / parrots RH 35~45%
generally and for every type of bird the humidity for a day before hatching must be RH 65% or over.
※ Air control lever (Air Vent) : It may induce the fresh exterior air minimizing the effects on the insulation.
Please open all the air control levers (Air Vent) when the egg breaking begins.
Verify once every 3 days during the incubation if the water is low, then supply water, and it is recommended to use distilled or purified water than water
from water purifier, softener or underground water to maintain performance.
Dew Condensation
North America Sales & Service www.RcomCo.com
Rcom Bird Egg Incubator Eco Pro Plus 10 User Manual
Page 13

For more detailed self-troubleshooting, verify the "Troubleshooting" category in the Rcom web site.
It produces noise.
* There is certain level of noise due
to the fan for air circulation within
the device.
▶ Verify if there is any object on the device.
▶ Verify if there is any vibration on the floor or the device
was
installed on a table.
▶ Verify if there is any alien substance around the FAN after
▶ Remove all the objects from the top of the device.
▶ Install the device in other stable place.
▶ Disconnect the power plug from the socket, separate the
main body and brush/clean the FAN for air circulation.
When dews are formed
within the device
* When maintained in high
humidity there may be formed
dews.
▶ Verify if the surrounding temperature of the installed place
is too low.
▶ Please install in a place within the conditions of an
incubator.
If the temperature is
too high / low
▶ Verify the setup temperature.
▶ Verify if the air circulation FAN does not rotate.
▶ Adjust the temperature setup to desired temperature.
▶ Disconnect the power plug from the socket, separate the
main body and brush or clean the air circulation FAN.
If the humidity is too high
/ low
▶ Verify if there is enough water.
▶ Verify the setup humidity.
<If it's too low>
▶ Verify if the moisturizing pad is correctly installed.
(In case of PRO PLUS, PRO models when appled APS
option.)
▶ Verify if the silicone tube of APS is not blocked.
(In case of PRO PLUS, PRO models when appled APS
option.)
▶ Verify if the water is insufficient or not.
(PRO model)
▶ Verify if the view-window is correctly closed.
<If it's too high>
▶ Verify the nearby environment.
▶ Supply enough water.
▶ Adjust the desired humidity in setup.
▶ Try the factory initialization.
<If it's too low>
▶ If the moisturizing pad is not installed the moisturizer does
not work properly. (In case of PRO PLUS, PRO models when
appled APS option.)
▶ Rub the confined part of the silicone tube to pass the
water.
▶ Supply water. (PRO models)
▶ Verify if there is any alien substance and close again.
<If it's too high>
▶ Adjust the environment of the incubator.
▶ Eliminate the water inside the tray.
▶ If the egg is unfertilized
▶ Germ infection
▶ Incorrect incubation setup
▶ Health condition of the mother bird
▶ Improper egg rotation
▶ When the vibration or noise is severe near the device
▶ When the air filter's cleaning condition is improper
▶ Improper egg storage status, when passed over 1 week
after
spawning
▶ Candle the egg to verify if it's alive
▶ Sterilize the device
▶ Check all the setup process of the device. Especially on the
temperature.
▶ Care the mother bird's health.
▶ Verify if the egg rotation is normally performed.
▶ Move the device to a place without noise or vibration.
▶ Clean the air filter.
▶ Store the egg under low temperature of 20~25°C or less
and use eggs within 1 week after spawning.
Troubleshooting and measures
Symptom Estimated cause (possibility) Measures
If the power is not on
▶ Verify if the power cord is correctly inserted.
▶ Verify if there is no power failure/blackout.
▶ Verify if the plug is faulty or not.
▶ Verify if the power cord and pump power cord locations
are
▶ Insert correctly the power cord again.
▶ Verify other nearby electronic and electric devices.
▶ Verify and try other power socket.
▶ Insert after verifying the correct location.
When desiring to hatch
different types of eggs at
the same time
▶ The hatching rate is lowered as the days to hatch are
different
▶ Mark the hatching date on the egg and move to other
device (generator) according to the estimated hatching
date.
▶ It is convenient if you have other additional devices which
can be used as generator chamber when different eggs are
5. PRODUCT INFORMATION
(1) FAQ / (2) Troubleshooting and measures
FAQ
The Rcom products are manufactured under strict quality management with precise equipments, but there may be some defects in the product during the
distribution. If there is any problem please contact to the Service center or Distributor of RCOM. We will do our best to resolve the problem as soon as
possible. The product is designed in module methods which is easily replaceable by any qualified person.
If the hatching date of the
eggs are too varied
(when they're not hatched
at the same time but
differently during long
term)
▶ Difference of hatchery egg storage time.
▶ Occurred from the diversity of hatching temperature.
▶ When possible, minimize the egg storage period/time.
▶ Check the temperature difference within the device.
(sunlight and temperature of hatching room, etc)
Symptom Estimated cause (possibility) Solutions
If the chick is born earlier
than the estimated date
or when is malformed
▶ If the setup temperature is too high.
▶ If the egg rotation is not performed.
▶ In case of unhealthy hatchery egg.
▶ Slightly decrease the temperature of the device. [0.5°C (1°
F)]
Ex) 37.5°C → 37.0°C
▶ Initiate egg rotation test verifying if the egg rotation
function
If the chick is born later
than the estimated date
▶ If the setup temperature is too low.
▶ Slightly increase the temperature of the device. [0.5°C (1°F)]
Ex) 37.0°C → 37.5°C
If the average hatching
rate is low
North America Sales & Service www.RcomCo.com
Rcom Bird Egg Incubator Eco Pro Plus 10 User Manual
Page 14
Within guarantee perior
After expiring guarantee period
Free repair Paid repair
Size of product (w)259 x (L)236.5 x (H) 172 [mm]
Rcom will never renounce our philosophy regarding design, class, price, value, and technology focus.
● In case of naturally occurred failure in function or performance in normal condition of use.
● Failure in function or performance due to intention or error of the customer.
Paid repair
● In case of failure due to natural disaster (fire, sea wind, gas, earthquake, storm and flood).
● When replacing expendable part normally abrased during the use.
● Breakdown due to abnormal power source or faulty connection device.
● Breakdown due to repair or remodelling by person any other than the service engineer of
headquarters or the service center.
● External factors which are not defect of the product.
● Breakdown due to use of different rating voltage.
● Breakdown due to use of consumable, optional product not designated by the company.
● Breakdown or loss due to drop during the transportation.
● Breakdown for not cleaning the product /
Breakdown due to use of other liquid than distilled or purified water /
Breakdown due to use of the incubator as brooder device (developer) / Breakdown due to
incorrect device control / Breakdown due to manner of use not mentioned in the
North America Sales & Service
Guide on Customers' Damage Compensation
Types of damages of customers
Details on compensation
Humidity adjustment scope 20 ~ 70 [%] (May vary according to surrounding environment)
Capacity In case of egg 10[units], in case of quail egg 30[units]
Weight of product N.W. 1.5[Kg], G.W 2.5[kg]
Specification
Rated voltage DC 12[V] 3[A]
Power consumption Max 36[W] Average 21[W]
Temperature adjustment scope
20 ~ 42 [℃] / 68 ~ 107.6 [℉]
If the APS pumping is
slow
▶ Verify if the silicone tube is not blocked.
▶ Turn to the right the adjustment hole with a small (+)
shape
driver to adjust.
(In case of PRO PLUS,PRO model, when applied APS
Please verify if every function of the device is performed properly by operating sufficiently the device before locating the eggs.
In case of incubation of costly eggs you might need check-up or adjustment of internal temperature to prevent failure of incubation. In the
checkup or examination please use a high-reliability thermo-hygrometer. (RCOM Digilog3 model or higher)
5. PRODUCT INFORMATION
(3) Product data / Product warranty
(4) Guide on Customers' Damage Compensation
www.RcomCo.com
North America Sales & Service www.RcomCo.com
Rcom Bird Egg Incubator Eco Pro Plus 10 User Manual
Page 15

Ver.1.0
(1) Safety precautions
Please pay attention on following terms when using the product.
Do not focibly bend the power
plug or cord, nor put any heavy
object on them which may
cause damage.
▶ It may cause electric
Do not connect on socket with
many extensions nor by
connecting the power plugs.
▶ It may cause fire.
Please pay attention on following terms when using the product.
Avoid too cold or hot place
and do not dispose the
product near candles, mosqui
to coil, cigarette fire or any
heating equipment.
Do not use any other part than
assigned ones.
▶ It may cause breakdown or
failure of incubation.
Do not overturn the product.
▶ The water within the
main body may pour onto
electronics or the sight glass
may be damaged.
Do not let a child assemble
the product. Must be
assembled by a competent
adult.
Direct access to LIST (Please click on the orange boxes below.)
1. COMPOSITION
(1) Safety precautions / (2) Introduction on Rcom 10 / (3) Name of each part and basic composition /
(4) Name and function of operational parts
5. PRODUCT INFORMATION
(1) FAQ / (2) Trouble shooting and measures / (3) Product data / Product warranty / (4) Guide on customers' damage compensation
The success of incubation may vary according to different factors.
The manufacturer and distributor are not responsible for failure of incubation of costly eggs, loss of life, property damage due to negligence of user,
remodeling, painting, modification of purpose of use or power failure. When incubating parrot or costly birds please verify the internal temperature
(adjust) before use. Please read carefully the instruction manual before use to avoid failures.
Explanation on Signs
ATTENTION: Means the errors which may produce failure of incubation, trouble or damage that
require attention.
2. BEFORE USE
(1) What is incubation room? / (2) Preparation of incubation / Start incubation
3. INCUBATION /
FUNCTION SETUP
(1) function setup (2) Moist and ventilation during incubation / (3) Management after incubation / Dew condensation
4. HOW TO CLEAN
(1) How to disassemble and clean
Means Do not contact. Means the earthing to prevent electric shock.
Means the helpful information or reference
for using the product.
Means the possibility of injury or material loss of equipment when the
designated instruction is not observed.
Means Forbidden. Means the matters to obligatorily observe.
Means Do not disassemble. Means Please disconnect the power plug from the power source.
Do not use damaged power
cord, plug or loose socket.
▶ It may cause electric
shock or fire.
Do not pull the power cord to
disconnect nor touch the plug
with wet hands.
▶ It may cause electric
shock or fire.
Do not disconnect the plug
during incubation.
▶ The egg may die due to
suspension of incubation.
1. COMPOSITION
Power-related precautions
Precautions on installation and use
Do not install the product in
dusty or unclean places.
▶ If the dust or any alien
substance is introduced to the
interior they may cause electric
Do not install the product
under direct sunlight.
▶ It may cause electric
shock or fire.
Do not install the product in
wet or moist places.
▶ If the water is introduced
to the interior it may cause
electric shock or fire.
Do not block the ventilation
hole with cover.
▶ Lack of ventilation may
cause an increase in internal
temperature and result in
breakdown or fire.
Do not have any heating
device near the power cord.
▶ When the cord sheath is
melted it may cause fire or
electric shock.
Do not place on a moving
shelf, inclinated place, unstable
place or any place with severe
vibration.
▶ Product may fall resulting
in breakdown or damage.
The vibration may reduce the
North America Sales & Service www.RcomCo.com
Rcom Bird Egg Incubator Eco Pro Plus 10 User Manual
Page 16

When not using the device for
long time, please disconnect
the power plug, clean, dry and
maintain it properly.
▶ The accumulated dust may
produce electric shock, power
leakage or fire due to heating,
ignition or deterioration of
When dropped or damaged
the product case, disconnect
the power plug and contact to
the service center.
▶ When used in that condition,
it may cause electric shock or
fire.
Please pay attention on following terms when using the product.
When cleaning please
disconnect the power cord
and polish the device with a
smooth, clean cloth.
▶ Do not use any chemical
product as wax, benzene,
thinner, mosquitocide, air
freshener, lubricant, detergent,
Please contact the service or
customer consultation center
at least once a year for device
check-up.
▶ The dust accumulated for
long time in the interior of the
product may produce fire or
breakdown.
(2) Introduction on Rcom 10
[MAIN FUNCTIONS]
[CONVENIENT FUNCTIONS]
Precautions on cleaning
Do not spray the detergent
directly to the exterior part of
the device.
▶ It may increase the
possibility of discoloration,
peeling of printed part, etc
when directly sprayed.
Please wipe the product with
smooth cloth and neutral
detergent.
If there is any dust in the pin
or accessing part of the power
plug, please clean it with dry
patch.
▶ If not, it may cause
electric shock or fire.
1. COMPOSITION
Rcom 10
Do not arbitrarily disassemble,
repair nor modify/remodel.
▶ It may cause electric shock
or fire. When you need repairs
please contact to the service
center.
Supervise children near product.
Do not to introduce any metal
object, nail, clip or egg shell to
the external hole of the device.
▶ It may cause electric shock,
fire or injury.
If the device produces any
abnormal sound or smoke
please immediately disconnect
the power plug and contact to
the service center.
▶ It may produce electric
shock or fire.
* Design incorporates principles to reduce germ reproduction such as minimizing interior mechanisms which reduced
the opportunity for bacterial propogation.
* Variable air control lever which enables the interior air volume of the device, to be altered.
* Artificial intelligence based electronics with the state-of-the-art controlling technology designed by Rcom.
* Capacity of simultaneous hatching of 10~15 standard size eggs.
* Rotational Heater Support which enables the easy adjustment of heater tension.
First of all thanks to every customer who purchased our Rcom 10.
The Rcom 10 automatically creates and maintains an optimal incubation environment using state-of-the-art technology digital control methods and has been
designed for easy and simple use. The Rcom 10 provides the optimal environment, however the user needs to carefully observe and adjust environmental
factors such as temperature, humidity, installation location and other conditions necessary for the incubation of different kind of birds Even though the Rcom
10 is designed to provide the optimal setting for every kind of environment necessary for the incubation of eggs, we sincerely suggest you carefully read the
instructions before use to allow for the successful incubation and proper use of the device.
Dominant advantages of Rcom 10
* Special mechanism without egg rotation noise.
* Streamlined high quality design in the shape of an egg.
* Clean and transparent large view-window
* One-touch separation of electronic controller assembly allows convenient cleaning.
* Automatic temperature, humidity adjustment and setup functions.
* Automatic temperature adjustment and setup functions.
* Manual temperature, humidity adjustment and setup functions.
* Clamped structure which prevents the leakage of water drops inside the view-window (dew condensation) out of the device.
* One touch separation of upper part (main controller) for convenient cleaning after incubation and reparation.
* External water input hole and moisturizing device for easy supply of water for moisturizing.
* Air control lever which induces the fresh exterior air minimizing the effects on the insulation.
* Integrated candling facility.
* Automatic egg rotating function (rotating disk method) with adjustable egg rotation timing.(i.e 1h, 2h, 3h)
* Ability to adjust the egg rotation angle.
* Improved reliability based on the application of 3rd Generation Temperature-Humidity Sensor of Sensirion Co. Ltd. (Switzerland).
* Convenient humidification device based on the Automatic Pumping System(A.P.S) for humidification
* Convenient method of manual egg rotating function
※ The ECO model is for manual egg rotation method. By installing the additional automatic egg rotating unit (sold seperately) the
eggs are automatically rotated once every hour.
※ The PRO model does not include the APS. By installing the additional APS (sold seperately) it can be used as PRO PLUS model.
1. COMPOSITION
(3) Name of each part and basic composition
Name of each part
* Egg Tray which can simultaneously store different types of eggs.
* Incorporated LED internal lighting.
* Large LCD display which enables the easy view of the diverse information on the device.
* Function of switching Celsius and Fahrenheit degrees.
* Alarm and sign which notices the abnormal temperature (high and low) for suddent change of external temperature.
* Applied Water Nipple for easy supply of water for moisturing.
North America Sales & Service www.RcomCo.com
Rcom Bird Egg Incubator Eco Pro Plus 10 User Manual
Page 17

ECO PLUS 10
* The Serial No. of the product is noted on the left side of the main controller. Please do not damage it. (Ex:RCM0000000)
* The air filter (1 set: 5 units) and humidity pad are sold seperately.
See video on how to assemble
and operate automatic egg
rotation unit.
ECO 10
* The Serial No. of the product is noted on the left side of the main controller. Please do not damage it. (Ex:RCM0000000)
* The air filter (1 set: 5 units) and humidity pad are sold seperately.
See video on how to assemble
and operate automatic egg
rotation unit.
① Heater operation lamp : When heating is on, the lamp glows on. ② Temperature adjustment dial : use this to adjust set temperature.
2. BEFORE USE
(1) What is incubation room?
What is Hatching room?
Basic Composition
1. COMPOSITION
(4) Name and function of operational parts
Name and function of operational parts
North America Sales & Service www.RcomCo.com
Rcom Bird Egg Incubator Eco Pro Plus 10 User Manual
Page 18
If the temperature of hatching room is lower than setup value there might be misted or dripping water inside due to dew condensation.
2. BEFORE USE
(2) Preparation of incubation / Start incubation
Preparation / Start of Incubation
What is a hatching room? This is the location where the incubator is installed and operated. As the environment affects the hatching rate the place of
installation must be a place with low nearby noise or vibration, and nearby temperature must be 22~25℃ (71.6~77℉) with low temperature difference.
Especially in night time the temperature is lowered than daytime therefore it surely must be verified, and in daytime the device must never be exposed
directly under the sunlight. Also the place must not have direct ventilation as air conditioner to the device.
▶ There are 3 hooks connected to the main controller in the
inner side of the view-window. Squeeze the 3 hooks in and
separate the main controller and the view-window.
▶ The view-windows and turning disk to be fixed by utilizing
the two bolts.
▶ Please insert air filer into the lower groove of egg turning disk as shown in the picture
3 day before hatching.
(Turning disk, egg tray and air filter are optional for ECO 10.)
Please wash the air filter before use, as dust in the air filter during use this may disrupt
proper air circulation.
▶ Please assemble in reverse order of disassembly.
▶ Separate the parts for assembly and verify all parts are present and not damaged. Please
do not discard the product box and use it to safely store the product furthermore.
(Turning disk, egg tray and air filter are optional for ECO 10.)
▶ Register the Serial No. of the left side of the main controller's handle.
The free guarantee term will be extended to 2 years.
Reference the details in the Rcom home page.
▶ Fix the thermometer to the inner side of view-window as shown in the image.
Use the thermometer holder and screwdriver to affix the thermometer.
Carefully install thermometer as force or impact will cause damage. Check thermometer
spirit is intact. Install according to the directions shown in the image.
When the spirit thermometer from ECO has an inaccurate reading
(separations look like blue dots) caused by transit, please dip the thermometer in very
warm water. When the thermometer spirit reaches maximum, please take the
thermometer out of the warm water. Please check the spirit has joined together.
The dipping method may need to be repeated to remove separations in spirit.
[In case of ECO PLUS 10 model]
▶ Insert the adaptor to the proper located in the upper part of the product.
Please pay special attention not to insert into the temperature adjustment volume plug.
▶ Attain correct temperature before placing eggs into incubator. If you want to adjust to
specific temperature, use the provided + shape driver to turn the temperature adjustment
volume and so adjust the temperature.
North America Sales & Service www.RcomCo.com
Rcom Bird Egg Incubator Eco Pro Plus 10 User Manual
Page 19

3. INCUBATION / FUNCTION SETUP
(1) Function setup
▶ Pour the water to the water hole in lower part of the main body. The silicone hose supplies
water to the interior of the device. Please fill but do not overflow. During incubation verify
the water is empty before refilling.
(Reference 3. Incubation/Function setup → (2) ECO 10 Function setup)
It takes a little time until the water reaches the internal part of the device.
Please wait before continuing to pour.
Never shake, move or reverse the main body of the device after filling the water.
The leaked water may cause damage and invalidate warranty.
▶ Connect the power cord to the power socket.
▶ Adjust the location according to the size of the egg and close the view-window.
Locate the sharp or pointy end of the egg to the inner side.
If the temperature does not increase, check that the view-window is completely closed.
ECO PLUS 10 : How to rotate egg
▶ The egg rotation cycle may vary by types of birds but 1 hour is recommended and the
eggs
must be rotated at maximum 3 hours cycle.
▶ After holding top body with your hands, slowly turn bottom body with your hands after
holding water whole. Please check graduations marked on bottom body for turning angle.
▶ It is not recommended to rotate the egg from 3 days before hatching.
The ECO PLUS 10 model can apply particularly purchased APS unit for automatic rotation.
▶ When installed the particularly purchased rotation unit, if the user wants to suspend rotation, the user needs to remove the egg rotation disk or tray.
Please pay special attention not to open the cover during egg rotation and not to drop the eggs.
▶ The egg rotation cycle may vary by types of birds but 1 hour is recommended and
the eggs
must be rotated at maximum 3 hours cycle.
▶ Slowly rotate each egg (with hand) as shown in the image.
▶ It is not recommended to rotate the egg from 3 days before hatching.
The ECO model can apply particularly purchased APS unit for automatic rotation.
▶ When installed the particularly purchased rotation unit, if the user wants to
suspend rotation,
the user needs to remove the egg rotation disk or tray.
ECO 10 : How to rotate egg
How to manually moisturize & supply water
North America Sales & Service www.RcomCo.com
Rcom Bird Egg Incubator Eco Pro Plus 10 User Manual
Page 20

▶ Do not overfill the water hole of the main body (lower part). The connected silicone hose
will
supply water to the interior.
▶ Verify daily if there is water in the water hole during incubation and supply when low.
▶ When desiring to incubate with low humidity only fill the internal water chamber A
connected
to the water hole. [RH 45% or less]
If the humidity of hatching chamber is high please open the air control lever slightly.
▶ When desiring to incubate with high humidity, please fill all the A and B water chambers
with
water. [RH 45% or over]
Adjust as high humidity from 3 days before hatch.
If the humidity of hatching chamber is low please close the air control lever.
(Reference the humidity and ventilation control during incubation)
As the automatic humidity adjustment is unavailable in ECO model, the humidity may not
▶ There is no power switch in this device.
The device is turned OFF when power disconnected after hatching all the eggs.
3. INCUBATION / FUNCTION SETUP
(2) Moist and ventilation during incubation /
(3) Management after incubation / Dew condensation
Humidity and ventilation control during incubation
▶
▶
Humidity must be maintained before hatching to prevent drying of egg shell or non hatch.
It is not recommended to open the cover frequently in the hatching period.
If the cover is frequently opened the humidity is rapidly reduced and it may take long time
to
recover the humidity again.
※ If the internal temperature of the device is 37℃ (98.6℉) or over, and the temperature of
hatching room is lower then humidity may not reach RH 65%. There might be ±5% of
tolerance in humidity and there is no significant problem for hatching.
▶ When adjusting to desired temperature, use the screwdriver included in the product by
turni
ng the temperature adjustment volume to control the internal temperature.
[Recommended incubation temperature : 37.5℃ (99.5℉)]
low
Using a non designated screwdriver may forcibly turn the temperature adjustment volume which may damage adjustment feature. Warranty is invalid.
The temperature adjustment is sensitive, please turn it slightly. (Please read the scale of the thermometer 10 minutes after one adjustment.)
Do not put eggs into incubator, until temperature is stabilized for 1~2 hours and then perform the temperature adjustment by increasing slightly from
temperature.
Termination of hatching
▶ The humidity control is important in 1-2 days before hatching than in the beginning and in the middle of incubation, the moisture must be maintained
from
1-2 days before hatching. In case of water bird the humidity during incubation must be RH 45~55% / in case of poultry RH 40~45% / parrots RH 35~45%
generally and for every type of bird the humidity for a day before hatching must be RH 65% or over.
※ Air control lever (Air Vent) : It may induce the fresh exterior air minimizing the effects on the insulation.
Please open all the air control levers (Air Vent) when the egg breaking begins.
Verify once every 3 days during the incubation if the water is low, then supply water, and it is recommended to use distilled or purified water than water
from water purifier, softener or underground water to maintain performance.
※ The humidity pad is consumable and it can be purchased.
Management after hatching
▶ Hatching within the incubator can cause a build up of germs with possible cross contamination of bacteria, and the dust, feather dander, egg shells and
excrement may produce a breakdown of the incubator which is not covered under warranty. Please consider the Rcom Suro eco hatcher specifically for
hatching. We recommend to use the KINGSURO Brooder of our company.
How to setup temperature
North America Sales & Service www.RcomCo.com
Rcom Bird Egg Incubator Eco Pro Plus 10 User Manual
Page 21

How to separate and clean
Do not brood the chick within the incubator. Have a radiant heat brooder for chicks that are dry and fluffy.
As it can be the cause of breakdown and produce paid repair (A/S) cost even within warranty period. (Please move the chick to the brooding after
hatching
Generating chamber: It is a space for hatching (egg breaking) used 1~3 days before hatching. (RCOM KINGSURO BROODER)
Developing (brooder) chamber: It is a space (device) which adapts the just born chick to the environment by maintaining proper temperature and
humidity.
(Rcom KINGSURO BROODER/Rcom BIRD BROODER&ICU)
▶ As the feed for little birds may vary by type, it is recommendable to acquire prior understanding on the bird before hatching.
(Please use the information on birds in the Rcom web site.)
Dew Condensation
▶ When operating the device, if the difference between exterior and interior temperature of the device is high, the dew condensation is naturally occurred
therefore there is no operational problem due to this phenomena.
4. HOW TO CLEAN
(1) How to disassemble and clean
▶ Carefully remove the dust on the separated main controller
with a brush. At this point, do not apply any force on the
sensor or heater.
▶ The humidity and temperature sensor units are connected
with the connector are easily replace in case of breakdown.
▶ Wipe the view-window, egg rotation disk, tray, air filter and
the
main body (lower part) down properly with lukewarm water.
(Turning disk, egg tray and air filter are optional for ECO 10.)
▶ Polish the exterior with smooth fabric, dry in a fresh place with proper ventilation and
assemble in order reverse to the disassembly and store properly.
Do not clean the product with organic solvents as benzene and thinner.
It may deform or discolor the product.
5. PRODUCT INFORMATION
(1) FAQ / (2) Troubleshooting and measures
Please separate the power cord from the socket.
▶ When immediately turned off the device in high humidity
incubation and left with the cover closed, the humidity
remaining inside the device may evaporate, adhere to the
device and produce breakdown. Always open the view-
window
and eliminate the inner humidity to use the device in the
most
safe manner.
▶ Thoroughly clean and dry before storage.
▶ Use the screwdriver and separate the thermometer from the
thermometer holder.
▶ There are 3 hooks connected with the main controller in the
inner part of the view-window. Push the 3 hooks to the inner
side and separate the main controller and the view-window.
If the average hatching
rate is low
▶ If the egg is unfertilized
▶ Germ infection
▶ Incorrect incubation setup
▶ Health condition of the mother bird
▶ Improper egg rotation
▶ When the vibration or noise is severe near the device
▶ When the air filter's cleaning condition is improper
▶ Improper egg storage status, when passed over 1 week
after
spawning
▶ Candle the egg to verify if it's alive
▶ Sterilize the device
▶ Check all the setup process of the device. Especially on the
temperature.
▶ Care the mother bird's health.
▶ Verify if the egg rotation is normally performed.
▶ Move the device to a place without noise or vibration.
▶ Clean the air filter.
▶ Store the egg under low temperature of 20~25°C or less
and use eggs within 1 week after spawning.
FAQ
The Rcom products are manufactured under strict quality management with precise equipments, but there may be some defects in the product during the
distribution. If there is any problem please contact to the Service center or Distributor of RCOM. We will do our best to resolve the problem as soon as
possible. The product is designed in module methods which is easily replaceable by any qualified person.
Symptom Estimated cause (possibility) Solutions
North America Sales & Service www.RcomCo.com
Rcom Bird Egg Incubator Eco Pro Plus 10 User Manual
Page 22

For more detailed self-troubleshooting, verify the "Troubleshooting" category in the Rcom web site.
If the chick is born earlier
than the estimated date
or when is malformed
▶ If the setup temperature is too high.
▶ If the egg rotation is not performed.
▶ In case of unhealthy hatchery egg.
▶ Slightly decrease the temperature of the device. [0.5°C (1°
F)]
Ex) 37.5°C → 37.0°C
▶ Initiate egg rotation test verifying if the egg rotation
function
is not OFF.
When desiring to hatch
different types of eggs at
the same time
▶ The hatching rate is lowered as the days to hatch are
different
▶ Mark the hatching date on the egg and move to other
device (generator) according to the estimated hatching
date.
▶ It is convenient if you have other additional devices which
can be used as generator chamber when different eggs are
placed together at the same time.
Troubleshooting and measures
Symptom Estimated cause (possibility) Measures
If the chick is born later
than the estimated date
▶ If the setup temperature is too low.
▶ Slightly increase the temperature of the device. [0.5°C (1°F)]
Ex) 37.0°C → 37.5°C
If the hatching date of the
eggs are too varied
(when they're not hatched
at the same time but
differently during long
term)
▶ Difference of hatchery egg storage time.
▶ Occurred from the diversity of hatching temperature.
▶ When possible, minimize the egg storage period/time.
▶ Check the temperature difference within the device.
(sunlight and temperature of hatching room, etc)
If the humidity is too high
/ low
▶ Verify if there is enough water.
▶ Verify the setup humidity.
<If it's too low>
▶ Verify if the water is insufficient or not.
▶ Verify if the view-window is correctly closed.
<If it's too high>
▶ Verify the nearby environment.
▶ Verify if there is any water inside the tray or in the bottom
body.
▶ Supply enough water.
▶ Adjust the desired humidity in setup.
▶ Try the factory initialization.
<If it's too low>
▶ Supply water.
▶ Verify if there is any alien substance and close again.
<If it's too high>
▶ Adjust the environment of the incubator.
▶ Eliminate the water inside the tray.
It produces noise.
* There is certain level of noise due
to the fan for air circulation within
the device.
▶ Verify if there is any object on the device.
▶ Verify if there is any vibration on the floor or the device
was
installed on a table.
▶ Verify if there is any alien substance around the FAN after
▶ Remove all the objects from the top of the device.
▶ Install the device in other stable place.
▶ Disconnect the power plug from the socket, separate the
main body and brush/clean the FAN for air circulation.
If the power is not on
▶ Verify if the power cord is correctly inserted.
▶ Verify if there is no power failure/blackout.
▶ Verify if the plug is faulty or not.
▶ Verify if the power cord and pump power cord locations
are
▶ Insert correctly the power cord again.
▶ Verify other nearby electronic and electric devices.
▶ Verify and try other power socket.
▶ Insert after verifying the correct location.
If the temperature is
too high / low
▶ Verify the setup temperature.
▶ Verify if the air circulation FAN does not rotate.
▶ Adjust the temperature setup to desired temperature.
▶ Disconnect the power plug from the socket, separate the
main body and brush or clean the air circulation FAN.
Max 36[W] Average 21[W]
Temperature adjustment scope
33 ~ 39 [℃] / 91.4 ~ 102.2 [℉] (May vary according to surrounding environment)
Please verify if every function of the device is performed properly by operating sufficiently the device before locating the eggs.
In case of incubation of costly eggs you might need check-up or adjustment of internal temperature to prevent failure of incubation. In the
checkup or examination please use a high-reliability thermo-hygrometer. (RCOM Digilog3 model or higher)
5. PRODUCT INFORMATION
(3) Product data / Product warranty
(4) Guide on Customers' Damage Compensation
Specification
When dews are formed
within the device
* When maintained in high
humidity there may be formed
dews.
▶ Verify if the surrounding temperature of the installed place
is too low.
▶ Please install in a place within the conditions of an
incubator.
Capacity In case of egg 10 ~ 15[units], in case of quail egg 30 ~ 48[units]
Weight of product N.W. 1.3[Kg], G.W 2.3[kg]
Size of product (w)259 x (L)236.5 x (H) 172 [mm]
Rated voltage DC 12[V] 3[A]
Power consumption
North America Sales & Service www.RcomCo.com
Rcom Bird Egg Incubator Eco Pro Plus 10 User Manual
Page 23

Within guarantee perior
After expiring guarantee period
Free repair Paid repair
North America Sales & Service
Guide on Customers' Damage Compensation
Types of damages of customers
Details on compensation
● In case of naturally occurred failure in function or performance in normal condition of use.
● Failure in function or performance due to intention or error of the customer.
Paid repair
● In case of failure due to natural disaster (fire, sea wind, gas, earthquake, storm and flood).
● When replacing expendable part normally abrased during the use.
● Breakdown due to abnormal power source or faulty connection device.
● Breakdown due to repair or remodelling by person any other than the service engineer of
headquarters or the service center.
● External factors which are not defect of the product.
● Breakdown due to use of different rating voltage.
● Breakdown due to use of consumable, optional product not designated by the company.
● Breakdown or loss due to drop during the transportation.
● Breakdown for not cleaning the product /
Breakdown due to use of other liquid than distilled or purified water /
Breakdown due to use of the incubator as brooder device (developer) / Breakdown due to
incorrect device control / Breakdown due to manner of use not mentioned in the
instruction manual / If the customers' fault is clear.
www.RcomCo.com
North America Sales & Service www.RcomCo.com
Rcom Bird Egg Incubator Eco Pro Plus 10 User Manual
 Loading...