

Page 1

USER MANUAL
UP 9501
UP 9502
UP 9504
- DXT 9000
SYSTEM AMPLIFIERS
Page 2

Page 3

SAFETY PRECAUTIONS
NOTES ABOUT AUDIO SIGNAL CABLES
DXT 9000 SYSTEM DESCRIPTION
UP 9500 SERIES AMPLIFIER MAIN FEATURES
INSTALLATION INTO A 19” RACK CABINET
FRONT PANEL
REAR PANEL
LOUDSPEAKER CONNECTION
OPERATING AS DXT 9000 SYSTEM COMPONENTS
USE AS GENERIC AMPLIFIER
AUDIO SET MENU
CALIBRAT MENU
ROUTING MENU
SYSTEM MENU
INFO MENU
DISPLAY TEXT MESSAGES
INTERNAL JUMPER SETTINGS
CONNECTION EXAMPLE
SPARE AMPLIFIER (UP 9501) CONNECTION EXAMPLE
GUIDANCE ON THE MEASUREMENT OF THE SPEAKER LINE IMPEDANCE
SPECIFICATIONS
APPENDIX
4
5
6
10
11
12
16
20
21
21
22
25
25
25
25
26
27
28
29
30
34
35
TABLE OF CONTENTS
Page 4

4
ENGLISH
IMPORTANT
WARNING
SAFETY PRECAUTIONS
IMPORTANT
Before connecting and using this product, please read this instruction manual carefully and keep it
on hand for future reference.
The manual is to be considered an integral part of this product and must accompany it when it
changes ownership as a reference for correct installation and use as well as for the safety precautions.
RCF S.p.A. will not assume any responsibility for the incorrect installation and / or use of this product.
WARNING: To prevent the risk of re or electric shock, never expose this product to rain or humidity.
This device is intended for indoor use only.
SAFETY PRECAUTIONS
1. All the precautions, in particular the safety ones, must be read with special attention, as they
provide important information.
2.1 PRIMARY POWER SUPPLY FROM MAINS
- The mains voltage is sufciently high to involve a risk of electrocution: never install or connect this
product when its power cord is plugged in.
- Before powering up, make sure that all the connections have been made correctly and the voltage
of your mains corresponds to the voltage shown on the rating plate on the unit, if not, please
contact your RCF dealer.
- This apparatus can be connected to either TT or TN earthing arrangements only.
- The metallic parts of the unit are earthed by means of the power cord. An apparatus with CLASS
I construction shall be connected to a mains socket outlet with a protective earthing connection.
- This apparatus shall be connected to a facility equipped device to protect against earth faults,
appropriately sized for the type and power of the installed line (RCD).
- Protect the power cord from damage. Make sure it is positioned in a way that it cannot be stepped
on or crushed by objects.
- To prevent the risk of electric shock, never open this product: there are no parts inside that the
user needs to access.
- The mains plug is used to disconnect the device and it shall remain readily operable.
2.2 SECONDARY (/ EMERGENCY) POWER SUPPLY THROUGH BATTERIES
- The apparatus operating voltage is 48 V dc (therefore, it is necessary to connect in series several
batteries having a lower nominal voltage, example: 4 x 12 V, 2 x 24 V).
- Always use rechargeable batteries, which need to be chosen according to the maximum possible
load.
- Verify the polarity of batteries is correct.
- Do NOT short-circuit batteries (i.e. connecting the 2 opposite poles together with metallic wires).
- The 48 V dc plug is used to disconnect the device and it shall remain readily operable.
- The 48 V dc power supply does not go beyond the fact that there are dangerous voltages inside
the unit.
- Throw empty batteries away according to your country laws about ecology and environment
protection.
3. Make sure that no objects or liquids can get into this product, as this may cause a short circuit.
This apparatus shall not be exposed to dripping or splashing. No objects lled with liquid (such as
vases) and no naked sources (such as lighted candles) shall be placed on this apparatus.
4. Never attempt to carry out any operations, modications or repairs that are not expressly described
in this manual.
Contact your authorized service centre or qualied personnel should any of the following occur:
- The product does not function (or functions in an anomalous way).
- The power cord has been damaged.
- Objects or liquids have got into the product.
- The product has been subject to a heavy impact.
5. If this product is not used for a long period, disconnect its power cord and batteries.
6. If this product begins emitting any strange odours or smoke, switch it off immediately and
disconnect its power cord and batteries.
Page 5
5
ENGLISH
NOTES ABOUT AUDIO SIGNAL CABLES
7. The terminals marked with the symbol are HAZARDOUS LIVE and their connection is to be
made by an INSTRUCTED PERSON or the use of ready-made cables is required.
8. Do not connect this product to any equipment or accessories not foreseen.
For suspended installation, only use the dedicated anchoring points and do not try to hang this
product by using elements that are unsuitable or not specic for this purpose.
Also check the suitability of the support surface to which the product is anchored (wall, ceiling,
structure, etc.), and the components used for attachment (screw anchors, screws, brackets not
supplied by RCF etc.), which must guarantee the security of the system / installation over time, also
considering, for example, the mechanical vibrations normally generated by transducers.
To prevent the risk of falling equipment, do not stack multiple units of this product unless this
possibility is specied in this user manual.
9. RCF S.p.A. strongly recommends this product is only installed by professional
qualied installers (or specialised rms) who can ensure correct installation and certify
it according to the regulations in force.
The entire audio system must comply with the current standards and regulations
regarding electrical systems.
10. Supports and trolleys
The equipment should be only used on trolleys or supports, where necessary, that are recommended
by the manufacturer. The equipment / support / trolley assembly must be moved with extreme caution.
Sudden stops, excessive pushing force and uneven oors may cause the assembly to overturn.
11. Mechanical and electrical factors need to be considered when installing a professional audio
system (in addition to those which are strictly acoustic, such as sound pressure, angles of coverage,
frequency response, etc.).
12. Hearing loss
Exposure to high sound levels can cause permanent hearing loss. The acoustic pressure level that
leads to hearing loss is different from person to person and depends on the duration of exposure. To
prevent potentially dangerous exposure to high levels of acoustic pressure, anyone who is exposed
to these levels should use adequate protection devices.
When a transducer capable of producing high sound levels is being used, it is therefore necessary to
wear ear plugs or protective earphones.
See the technical specications in loudspeaker instruction manuals to know their maximum sound
pressure levels.
13. Do not obstruct the ventilation grilles of the unit. Situate this product far from any heat sources
and always ensure adequate air circulation around the ventilation grilles.
14. Do not overload ampliers. Check that amplier outputs are not shorted.
15. Never force the control elements (keys, knobs, etc. ).
16. Do not use solvents, alcohol, benzene or other volatile substances for cleaning the external parts
of this product.
Use a dry cloth.
To prevent the occurrence of noise on microphone / line signal cables, use screened cables only and
avoid putting them close to:
- Equipment that produces high-intensity electromagnetic elds.
- Mains cables.
- Loudspeaker lines.
WARNING:
Any change made by unauthorized
personnel to the product and / or the
system (in which it is installed and
congured, including rack cabinet and
wiring) may invalidate the CE marking
(certication EN54-16: 2008) and also
the product warranty.
Page 6

6
ENGLISH
RCF S.P.A. THANKS YOU FOR PURCHASING THIS PRODUCT, WHICH HAS BEEN
MADE TO GUARANTEE RELIABILITY AND HIGH PERFORMANCE.
DXT 9000 is a monitored digital paging / evacuation system in compliance with EN 54-16
and ISO 7240-19 that allows a completely scalable and versatile range of congurations
and solutions.
It features a double-ring topology approach: a rst simple ring for the small and medium
size systems and a second larger ring supported by main units with router (MU 9186/R) for
large and extra-large applications, always plug & play and easy-congurable.
For instance, a small system can be designed by using only one MX 9502 / MX 9504
main unit, which already includes all the necessary controls and two 250 W (MX 9502)
/ four 125 W (MX 9504) class D power ampliers (having 100 V / 70 V constant voltage
loudspeaker lines).
A system that requires a higher output power or a larger number of zones can be obtained
by adding one or more system ampliers model UP 9501 (1 x 500 W), UP 9502 (2 x 250
W) or UP 9504 (4 x 125 W) to the MX 9502 / MX 9504, connected through the dedicated
RCF FLEXCOM data-link port.
MU 9186 is another main unit model similar to MX 9502 / MX 9504, but without internal
power ampliers.
Since data wiring may have critical connections, for instance due to cable type and length,
RCF FLEXCOM bus can adapt the data communication speed to the wiring characteristics
and available data band.
Only a few devices are necessary to design the simplest and the most complex projects,
centralized or distributed: no matter if a supermarket or a theatre, an airport or a shopping
centre, a fast-food or an underground, a school or a hospital.
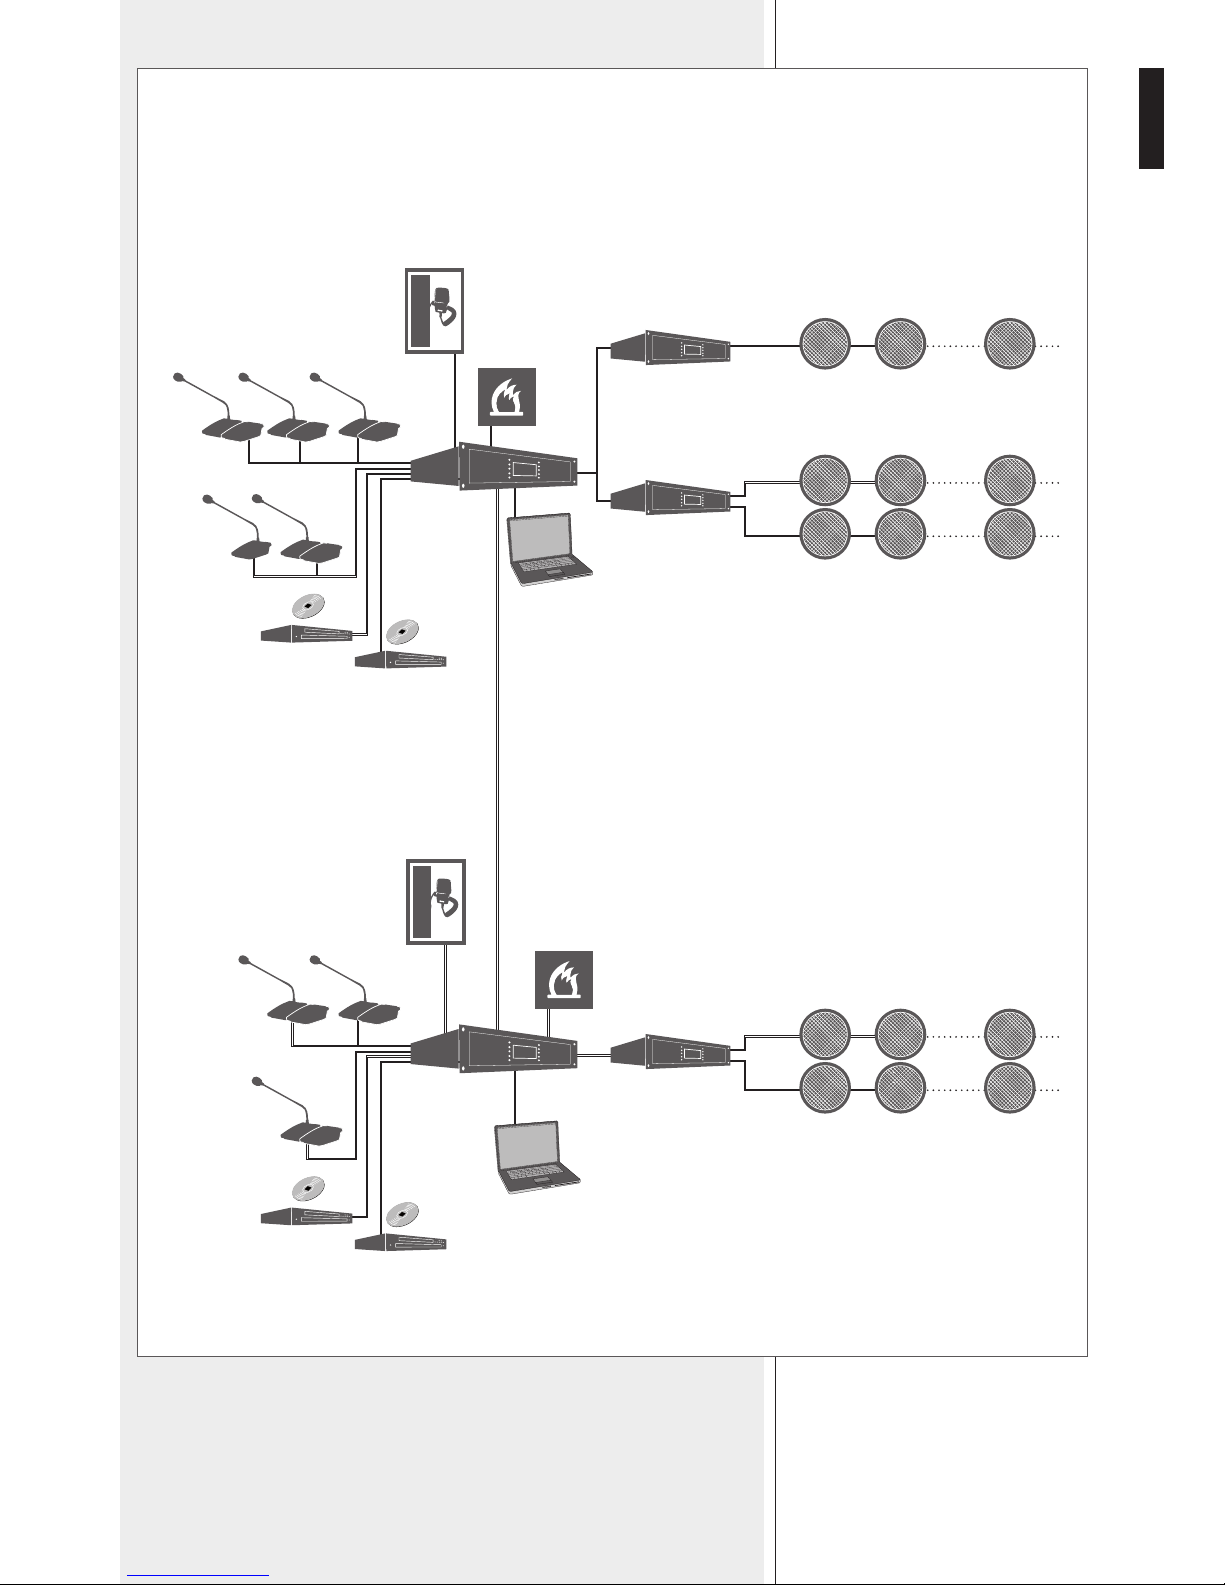
DXT 9000 SYSTEM DESCRIPTION
100 V / 70 V LINES
100 V / 70 V LOUDSPEAKERS
MX 9504
100 V / 70 V LINES
100 V / 70 V LOUDSPEAKERS
100 V / 70 V LOUDSPEAKERS
MX 9504
UP 9501
100 V / 70 V LINES
Page 7

7
ENGLISH
Diagnostic functions and fault reporting meet all evacuation system requirements.
Wiring is limited to a twin pair J-type re-rated cable for most of connections and to a fourpair J-type re-rated cable to link paging microphones.
The system conguration can be edited on the main unit front panel (for small systems),
but it can also be made through a local or remote PC, by using a dedicated graphic user
interface software.
The dual power supply allows both AC and DC operation.
The ‘RCF D+ Class’ power amplier technology and recover-fall-back built-in facility make
the DXT 9000 a highly secure, reliable and safe system.
Each DXT 9000 unit is equipped with an RS 485 serial port to be used for the dedicated
system programmable remote controls. Noise detection devices work on RS 485 port as
well.
Two pre-recorded messages can be simultaneously played and sent to the DXT 9000
network from main units, which can store both emergency messages (to a checked
dedicated memory) and routine messages (on separated SD cards).
Another SD/USB support is used as MP3 player (to play background music).
The Ethernet port (on main units) allows to get the complete remote control of the entire
system.
The Ethernet port (on main units) allows to get the complete remote control of the entire
system.
DXT 9000 devices have programmable logic inputs and outputs, checked by the system
itself or by the connected security/emergency devices, such as re alarm systems.
Each component has its own digital address.
DXT 9000 includes high quality digital components already in use for RCF professional
audio systems, obtaining high performances and qualifying the DXT 9000 system for
installations in places that require a very good sound reproduction, such as theatres and
auditoriums.
DXT 9000 SYSTEM COMPONENTS
- MX 9502 Main unit including two 250 W class D ampliers inside
- MX 9504 Main unit including four 125 W class D ampliers inside
- MU 9186 Main unit (no power ampliers inside)
- MU 9186/R Main unit with router (no power ampliers inside)
- UP 9501 Unit with a single 500 W class D amplier
- UP 9502 Unit with two 250 W class D ampliers
- UP 9504 Unit with four 125 W 500 W class D ampliers
- BM 9804 Paging microphone with zone selection
- BM 9802 Paging microphone with zone selection through numeric keyboard
- BE 9808 Additional 8-zone keyboard for paging microphones
- TS 9918 Remote level control and programme selector
Page 8

8
ENGLISH
100 V / 70 V LOUDSPEAKERS LINES
EXAMPLE: SYSTEM WITH MX 9504 MAIN UNIT
EXAMPLE: SYSTEM WITH MU 9186 MAIN UNIT
FALLBACK
EMERGENCY
MIC.
PAGING MIC.
BM 9802
BM 9804
+ BE 9808
MUSIC SOURCES
FIRE ALARM
SYSTEM
MX 9504
PC
FALLBACK
EMERGENCY MIC.
PAGING MIC.
BM 9802
BM 9804
+ BE 9808
MUSIC SOURCES
FIRE ALARM
SYSTEM
MU 9186
PC
100 V / 70 V LOUDSPEAKERS LINES
UP 9501
UP 9502
UP 9504
Page 9
9
ENGLISH
100 V / 70 V LOUDSPEAKER LINES
UP 9502
UP 9501
EXAMPLE: SYSTEM WITH NETWORK
100 V / 70 V LOUDSPEAKERS LINES
UP 9502
FALLBACK
EMERGENCY MIC.
PAGING MIC.
BM 9802
BM 9804
+ BE 9808
MUSIC SOURCES
FIRE ALARM
SYSTEM
MU 9186/R
PC
FALLBACK
EMERGENCY
MIC.
PAGING MIC.
BM 9802
BM 9804
+ BE 9808
MUSIC SOURCES
FIRE ALARM
SYSTEM
MU 9186/R
PC
Page 10

10
ENGLISH
UP 9500 series ampliers are based on RCF ‘Class D+’ technology and have a FALL BACK
emergency audio input, making the DXT 9000 system highly safe and reliable.
These can operate as either DXT 9000 system components (linked to MU 9186 / MX 9502
/ MX 9504 main units) or generic ampliers (with limited functionality) for other audio
systems.
The three models differ in the number of channels, the power per channel and the number
of amplied outputs.
UP 9501 has a single 500 W internal amplier, UP 9502 has two 250 W internal ampliers,
UP 9504 has four 125 W internal ampliers.
The UP 9501 model has 2 amplied outputs (1 channel only), the UP 9502 model has 2
amplied outputs for both channels, the UP 9504 model has a single amplied output per
each channel.
Every amplied output is a monitored 100 V / 70 V loudspeaker line.
The only model UP 9501 (1 x 500 W) can be set as the spare amplier (for one or more
ampliers) that automatically replaces the faulty one.
The spare amplier (of a system / system part) shall be necessarily installed into the same
rack cabinet where ampliers to be replaced (in case of fault) are already placed.
A local FALL BACK input is available to link a dedicated and independent paging microphone
(or another audio source) for emergency announcements.
Another local input is available to link a device for background music (e.g. CD / MP3
player).
Diagnosis is in compliance with EN 54-16 and ISO 7240-19.
Front panel control with LCD display.
RCF-FLEXCOM digital audio bus.
12 GPI logic inputs (8 monitored and 4 optical) and 8 GPO logic outputs (relays).
RS 485 serial port (screw terminals) for interfacing and monitoring.
AC and DC power supply.
UP 9500 SERIES AMPLIFIER MAIN FEATURES
Page 11

11
ENGLISH
INSTALLATION INTO A 19” RACK CABINET
BLOCK DIAGRAM
Fix every amplier to the front side of a 19” rack cabinet through 4 screws.
UP 9500 series ampliers have forced ventilation controlled by a thermostat and can be
stacked without spaces or ventilation panels.
Air ventilation is horizontal, so it is necessary to keep open the lateral sides.
Rack cabinets shall have:
- At least an IP 30 rating.
- A door with glass (or a thin metal mesh), through which the warning and emergency
light indications are clearly visible (according to regulations).
Page 12

12
ENGLISH
FRONT PANEL
1
SYSTEM ON button: press and hold to turn amplier on (when off).
This button also works as fault acknowledge: press it to remove the displayed fault
indication.
The
SYSTEM ON
buTTon does noT Turn The uniT off. To swiTch The uniT off, make sure The 48 V
dc power supply (baTTeries) is noT presenT and use eiTher The proper sofTware funcTion or The main
power 41 swiTch on The rear panel.
2
ESC (‘Escape’) button: press to quit the displayed menu.
3
Six buttons to select the respective functions shown on the display.
4
CONTROL / SELECTION: rotary encoder and push-button to select.
Turn the control clockwise to scroll the displayed downwards or increase the selected
parameter value.
Turn it counterclockwise to scroll the menu upwards or decrease the selected parameter
value.
Press to select.
5
Display (LCD)
1 2
11 19
13 21
16 24
12 20
15 23
14 22
17 25
18 26
33
33
5
4
33
7 8 9 106
28
a
28
b
27
Page 13

13
ENGLISH
6
÷ 26 LEDs
Nr. SILK SCREEN COLOUR
iT works as
Generic
amplifier
INDICATION (WHEN LIT) FURTHER INFORMATION
6
AC PWR Green Yes
The mains power (AC) is present
and the respective fuse is intact.
If the LED is off, the mains power is
not available (or out of range).
7
DC PWR Green Yes
48 V dc power supply is present
and the respective fuse is intact.
If the LED is off, 48 V dc is not
available (or out of range).
8
AUX PSU Green Yes
The main unit is turned on and
its stand-by power supply unit
operates properly.
9
SYSTEM OK Green Yes
No detected faults:
the entire system is operating
properly.
The LED is lit when no faults are
detected on any system device.
10
GENERAL
FAULT
Yellow No
One or more faults have been
detected, including problems
on power supply, so it can be lit
even if the AC PWR
6
and DC
PWR
7
green LEDs are off.
The LED gets lit even in case of
failure of any peripheral unit.
If a logic input (GPI) is set to obtain
a fault remote indication of an
external device, a possible problem
is indicated by the GENERAL FAULT
LED.
11
FALL BACK
EVENT
Red No
An emergency announcement
(with highest priority) is in
progress through the FALL BACK
INPUT
29
.
12
ALARM Red No
The evacuation message is
currently played. This LED also
indicates the play of a message
from a microphone or an external
source activated as EMERGENCY
(e.g. GPI set to EMERG).
Page 14

14
ENGLISH
Nr. SILK SCREEN COLOUR
It works as
GENErIC
amplIfIEr
INDICATION (WHEN LIT) FURTHER INFORMATION
13
ALERT Yellow No
The alert message is currently
played. This LED also indicates
the play of a message from a
microphone or an external source
activated as ALERT (GPI set to
ALERT).
14
QUIESCENT Green No
The device is switched on but not
playing any audio signal.
It simply indicates an idle state, as
there is no audio signal.
15
DISABLEMENT Yellow Yes
One or more device inputs, outputs
or peripherals are disabled.
This LED is lit only in case of one or
more circuits and/or devices used for
evacuation/emergency are disabled.
In the case, for example, of a nonmonitored paging microphone, its
disabling will not make the LED get
lit.
16
MESSAGE
FAULT
Yellow No
Main unit emergency message
player fault.
Faulty memory or problems on the
audio path (the internal message
player is not properly linked to the
system audio outputs).
17
SYSTEM FAULT Yellow No Internal microprocessor reset.
After rebooting, the LED will be off,
but the reset event will remain in
the SYSTEM / FAULT LOG.
18
PWR SUPPLY
FAULT
Yellow Yes
Power supply fault (internal power
supply, internal boards or external
power supply).
A logic input (GPI) needs to be
linked to the logic output of the
external power supply unit and set
to EXTERNAL EVENT FAULT.
A possible external power supply
unit fault is displayed as EXTERNAL
PSU FAULT.
19
LOCAL FAULT Yellow Yes
Amplier fault. This LED gets lit even
in case of mains power fault.
This LED is lit in the fault device
only.
For instance, if an amplier is faulty
and the MASTER unit is properly
operating, this LED is lit on the
amplier only, while the SYSTEM
FAULT
17
LED is lit on both
MASTER and ampliers.
If a logic input (GPI) is set to signal
a possible fault of an external
system, this will be indicated by
the LOCAL FAULT LED (only in the
unit where the logic input has been
activated).
20
MICROPHONE
FAULT
Yellow No
An emergency paging microphone
(among those connected to the FALL
BACK INPUT
29
is faulty.
21
AMPLIFIERs
FAULT
Yellow Ye s One or more ampliers are faulty.
22
SPKR
CIRCUITs
FAULT
Yellow Ye s
One or more loudspeaker lines are
faulty.
23
EARTH FAULT Yellow Ye s Loudspeaker line earth leakage.
Page 15

15
ENGLISH
27
MONITOR: 6.3 mm jack input (TRS) for headphones.
28
a
Internal loudspeaker (monitor).
28
b
Internal buzzer for fault alert (or evacuation message in progress).
It can be muted by pressing the SYSTEM ON
1
button.
when used as Generic amplifiers (noT linked To a dXT 9000 sysTem main uniT), only a few leds
are enabled.
Nr. SILK SCREEN COLOUR
It works as
GENErIC
amplIfIEr
INDICATION (WHEN LIT) FURTHER INFORMATION
24
COMM. PORT
FAULT
Yellow No
Hardware / RS 485 serial port (for
linking to a re alarm system) fault.
This indication depends on either a
broken / short-circuited cable or no
data transmission (for example, due
to a damaged serial port) or remote
device unavailable.
25
LOGIC INPUT
FAULT
Yellow No
GPI fault. The LED gets lit when
the logic input is monitored and its
respective line is open or shorted.
A logic input (GPI) needs to be
monitored when linked to a re
alarm system (to activate prerecorded messages remotely).
26
LOGIC
OUTPUT
FAULT
Yellow No
GPO fault. The LED gets lit when the
logic output is monitored and its
respective line is open or shorted.
A logic output (GPO) needs to be
monitored when linked to a re
alarm system (for example, to signal
an audio system fault to the re
alarm system).
Page 16

16
ENGLISH
REAR PANEL
29
FALL BACK INPUT: monitored audio input (balanced, ‘line’ level, for removable
connector) to be used for emergency announcements. This input can be used even in case
of software crash.
AUDIO
– Audio signal (cold)
+ Audio signal (hot)
GND Audio signal ground
CMD
–
Activation and monitoring contacts
of the FALL BACK audio input.
+
UP 9502
UP 9501
36 34
383739
35404142
3233
a
33
b
31 30 29
UP 9504
MAX OUTPUT POWER 500 W RMS
MINIMUM LOAD IMPEDANCE
70 V (20 Ω) - 100 V (40 Ω)
UP
4x125W CLASS D+ POWER AMPLIFIER
AC VOLTAGE SELECTOR
AND FUSE INSIDE,REFER
TO INSTRUCTION MANUAL
WARNING
TO REDUCE THE RISK
OF FIRE OR ELECTRIC SHOCK, DO NOT
EXPOSE THIS EQUIPMENT TO RAIN OR
MOISTURE. DO NOT REMOVE COVER.
NO USER SERVICEABLE PARTS INSIDE.
REFER SERVICING TO QUALIFIED PERSONNEL.
WARNING
RISK OF ELECTRIC SHOCK DO NOT OPEN
CAUTION
SERIAL NUMBER
GENERAL PURPOSE OUTPUTS
1 2 3 4 5 6 7 8
RELAY OUTPUTS (contact load 0,3A - 24V DC)
BGM 3AUX INPUT
GND
FALL BACK INPUT
CMD
GND
AUDIO
GENERAL PURPOSE INPUTS
Max 100 mA
1 2 3 4 5 6 7 8 9 10 11 12
PHOTO-COUPLED INPUTSMONITORED INPUTS
24V DC
MADE IN ITALY
POWER 115/230V ~ 50-60Hz - 800 W max48 V 15 A max
EN54-16
COMPLIANCE STICKER
Series
SPEAKER LINE OUT
LINE A LINE B
- + - + - +
- +
LINE C LINE D
SPARE AMP BUS
INPUT
- + - +
OUTPUT
GND
28V
GND
BUS OUT
BUS IN
FLEXCOM BUS C TRL RS485
1 2 3 4 1 2 3 4
36 34
383739
b
35404142
3233
a
33
b
31 30 29
36 34
3837
35404142
3233
a
33
b
31 30 29
39
a
39a39
c
39b39
d
Page 17

17
ENGLISH
30
BGM 3 audio input (dual RCA connector) for a ‘line’ level signal (i.e. CD / MP3
player, tuner).
The Two channels (lefT / riGhT) of The
BGM 3
sTereo siGnal are miXed in mono inside The deVice.
31
AUX INPUT balanced audio input (removable connector).
32
CTRL RS485: RS 485 serial port (removable connector).
33
a
FLEXCOM BUS IN: data bus input (removable connector).
33
b
FLEXCOM BUS OUT: data bus output (removable connector).
34
GENERAL PURPOSE INPUTS
12 logic inputs (removable connectors), of which the rst 8 are monitored and the last 4
with opto-isolators.
The loGic inpuTs are enabled only if The deVice is linked To a dXT 9000 sysTem main uniT.
T
he loGical inpuTs 9 To 12 can be acTiVaTed by connecTinG The 24 V dc
35 ouTpuT To each loGic
inpuT. possible loGic sTaTes: inacTiVe / acTiVe.
+ Hot
– Cold
GND Ground
For monitoring purposes, the two CMD contacts should normally be powered by 24 V dc
(voltage available from the 24 V DC
35
. FALL BACK input state depends on presence
and polarity of the voltage at the two CMD contacts.
STATE VOLTAGE AT THE CMD CONTACTS DESCRIPTION
COMMAND KO No voltage The FALL BACK INPUT is not connected
IDLE 24 V dc, direct polarity The FALL BACK INPUT is connected, but inactive
ACTIVE 24 V dc, reverse polarity The FALL BACK INPUT is activated
+ RS 485 B (non-inverting)
– RS 485 A (inverting)
GND RS 485 (reference ground)
28V Power supply + 28 V dc
GND Power supply ground
Page 18

18
ENGLISH
A B
470 Ω 10 kΩ
LOGIC INPUT 1 ÷ 8 STATES:
STATE DETECTED RESISTANCE VALUE (R)
OPEN Open line or too high resistance R > 15 kΩ
SHORT Short-circuit or too low resistance R < 390 Ω
IDLE Used logic input, but inactive 3.4 kΩ < R < 15 kΩ
ACTIVE Activated logic input 390 Ω < R < 1.17 kΩ
SUGGESTED RESISTORS TO BE ADDED TO GET LINE MONITORING:
A B
GPI
(1-8)
35
24 V DC: 24 V dc output, max. 100 mA.
36
GENERAL PURPOSE OUTPUTS
8 logic outputs (relay dry contacts, removable connectors).
Each logic output has two resistors that can be inserted by setting the respective jumper
(JP1 to JP8) to the AB position. These two resistors are necessary when the logic output
(GPO) is linked to a logic input (GPI) of another device and the line monitoring is
required.
The rst resistor (470 Ω) is used to get the ACTIVE state, the second (10 kΩ) to get the
IDLE state.
If a jumper is set to the BC position, the two resistors are overridden (the internal relay
contact is directly connected).
The loGic ouTpuTs are enabled only if The deVice is linked To a dXT 9000 sysTem main uniT.
inTernal jumper seTTinG needs To be carried ouT direcTly by eiTher rcf or an auThorised serVice
cenTre.
warNING:
do noT direcTly power a loGic ouTpuT (
GPO
) when The respecTiVe inTernal jumper
is seT To The
AB
posiTion (inserTed resisTors), as The maX. currenT is only 25 ma. if The jumper is
seT To The
BC
posiTion, The maX. currenT is 1 a.
GPO
B
C
JP 1 ÷ 8
10k
470
A
Page 19

19
ENGLISH
37
SPARE AMP BUS – INPUT
Input to link the spare amplier 100 V / 70 V output.
38
SPARE AMP BUS – OUTPUT
If the amplier is not faulty (and so the spare amplier is not inserted), this 100 V / 70 V output
is directly linked to the SPARE AMP BUS – INPUT
37
and can be used to connect a dummy
load.
39
(UP 9501) SPEAKER LINE OUT
Two 100 V / 70 V loudspeaker line outputs (LINE A1 and LINE A2) of the internal 500 W
amplier.
PAGING IN 2 PAGING IN 1
ROUTINE MESSAGES ETHERNET
MAIN IN
BGM 2 BGM 1
GND
GND
28V
GND
BUS IN
BUS OUT
FLEXCOM BUS
CTRL RS485
1234 1234
MX
2x250W MASTER UNIT
EN54-16
COMPLIANCE STICKER
Series
SPARE AMP BUS
INPUT
- + - +
OUTPUT
39
a
(UP 9502) SPEAKER LINE OUT
Two 100 V / 70 V loudspeaker line outputs (LINE A1 and LINE A2) of the internal
amplier channel A (250 W).
39
b
(UP 9502) SPEAKER LINE OUT
Two 100 V / 70 V loudspeaker line outputs (LINE B1 and LINE B2) of the internal
amplier channel B (250 W).
39
a
(UP 9504) SPEAKER LINE OUT
100 V / 70 V loudspeaker LINE A output of the internal amplier channel A (125 W).
39
b
(UP 9504) SPEAKER LINE OUT
100 V / 70 V loudspeaker LINE B output of the internal amplier channel B (125 W).
39
c
(UP 9504) SPEAKER LINE OUT
100 V / 70 V loudspeaker LINE C output of the internal amplier channel C (125 W).
39
d
(UP 9504) SPEAKER LINE OUT
100 V / 70 V loudspeaker LINE D output of the internal amplier channel D (125 W).
40
Power cord input (to be connected to a mains earthed socket only).
41
POWER switch (0 = OFF, I = ON).
42
Input for 48 V dc power supply (removable screw terminals) through batteries.
noTe: accordinG To en 54-16 sTandard, The backup power supply uniT shall be insTalled inTo The
same rack cabineT where There is The audio sysTem wiTh emerGency purposes (or a sysTem parT) To
which iT is connecTed.
The deTecTion of 48 V dc power supply inVolVes The impliciT condiTion ThaT The sysTem is
always
Turned on, Thus noT allowinG shuTdown of The main uniT ThrouGh The respecTiVe funcTion in
The menu, nor ThrouGh The
POWER
swiTch
41
.
PAGING IN 2 PAGING IN 1
ROUTINE MESSAGES ETHERNET
GND
28V
GND
BUS IN
BUS OUT
FLEXCOM BUS
CTRL RS485
1234 1234
MX
2x250W MASTER UNIT
EN54-16
COMPLIANCE STICKER
MAX OUTPUT POWER 500 W RMS
MINIMUM LOAD IMPEDANCE
70 V (20 ) - 100 V (40 )
Series
SPEAKER LINE OUT
LINE A1 LINE A2
- + - + - + - +
LINE B1 LINE B2
SPARE AMP BUS
INPUT
- + - +
OUTPUT
PAGING IN 2 PAGING IN 1
ROUTINE MESSAGES ETHERNET
GND
28V
GND
BUS IN
BUS OUT
FLEXCOM BUS
CTRL RS485
1234 1234
MX
1x125W MASTER UNIT
EN54-16
COMPLIANCE STICKER
MAX OUTPUT POWER 500 W RMS
MINIMUM LOAD IMPEDANCE
70 V (20 ) - 100 V (40 )
Series
SPEAKER LINE OUT
LINE ALINE B
- + - + - + - +
LINE C LINE D
SPARE AMP BUS
INPUT
- + - +
OUTPUT
Page 20

20
ENGLISH
LOUDSPEAKER CONNECTION
Connect all loudspeaker respecting the phase.
Every loudspeaker shall have a matching transformer, which input is suitable for the line
voltage (70 / 100 V).
The output voltage setting (either 100 V or 70 V) can only be made by an authorised RCF
service centre.
UP 9501
Connect the positive wire of the loudspeaker line to the ‘+’ contact to one of the two amplier
outputs (either LINE A1 or LINE A2)
39
and the negative wire to the respective ‘–’ contact.
The total power of all connected loudspeakers shall not exceed (500 W).
UP 9502
This model has 2 independent channels (A and B), each with 2 outputs (1 and 2):
LINE A1 and LINE A2
39
a
;
LINE B1 and LINE B2
39
b
].
The total power of all connected loudspeakers of a single channel shall not exceed 250 W.
See the UP 9501 model for loudspeaker connection.
UP 9504
This model has 4 independent
channels (A, B, C, D):
LINE A
39
a
;
LINE B
39
b
;
LINE C
39
c
;
LINE D
39
d
.
The total power of all connected loudspeakers of a single channel shall not exceed 125 W.
See the UP 9501 model for loudspeaker connection (note: only one output per channel).
70/
100 v0
70/
100 v0
70/
100 v0
LOUDSPEAKER LOOPED LINE ('RING MODE')
If ampliers are linked to a DXT 9000 system main unit (i.e. MU 9186, MX 9502, MX
9504), in the (only) UP 9501 and UP 9502 models the loudspeaker line can wired as
a loop (by using both channel outputs, to ensure continuity of service even in case of
interruption of the line in a point).
In the DXT 9000 system main unit DXT 9000 (MU 9186, MX 9502, MX 9504), the
SET RING parameter (DISABL-SURV > CALIBRAT > amplier > SET RING) of every
amplier with looped loudspeaker lines shall be set to 'A Ring B Out'.
Page 21

21
ENGLISH
If used as DXT 9000 system components, UP 9501, UP 9502 and UP 9504 ampliers
are controlled by the main unit (MU 9186, MX 9502, MX 9504) to which they are
linked and their displays indicate REMOTE CONTROLLED.
All settings regarding their use as generic independent ampliers (see the next manual
section) are disabled.
OPERATING AS DXT 9000 SYSTEM
COMPONENTS
USE AS GENERIC AMPLIFIER
(NOT LINKED TO DXT 9000 SYSTEM)
Beside the display, there are 6 buttons
3
(3 on the left, 3 on the right) to select the
correspondent displayed options.
The ESC
2
button (below the display, on the right) allows to quit the displayed menu.
Turn and press the CONTROL SELECTION
4
encoder to select parameters and change
their values.
The software initial main menu is shown as MAIN in the top left-hand corner of the
display.
The complete menu path is indicated in the top of the display.
up 9501 model: The selecTions
oUt 2, oUt 3
and
oUt 4
are disabled.
up 9502 model: The selecTions
oUt 3
and
oUt 4
are disabled.
1 4
2 5
3 6
70/
100 v0
70/
100 v0
70/
100 v0
– + – +
LINE A1 LINE A2
Page 22

22
ENGLISH
AUDIO SET > INPUT SUBMENU
The INPUT submenu allows to edit audio inputs.
Select either BGM 3 or AUX IN to access audio input parameters.
AUDIO SET > INPUT
SUBMENU
HPL/LPF 3-BAND EQ LO CUT 5-BAND EQ COMPRESSOR LEVEL
BGM 3 √ √ √
AUX IN √ √ √ √
HPF / LPF (hi-pass lter, low-pass lter)
The hi-pass lter (HPF) cuts low frequencies (below its cutoff frequency), the low-pass
lter (LPF) cuts high frequencies (above its cutoff frequency).
PARAMETERS
FREQ HPF Setting of the hi-pass lter cutoff frequency.
FREQ LPF Setting of the low-pass lter cutoff frequency.
BYPASS Select either ON (lters bypassed) or OFF (lter inserted).
3-BAND EQ
The three bands are semi-parametric equalizers that allow to choose the centre frequency
and adjust its level.
AUDIO SET MENU
SOTTOMENU DESCRIPTION
1 INPUT Audio input settings.
2 OUTPUT Audio output settings.
3 MONITOR Audio monitoring level.
Menu that allows to set input / output parameters and audio monitoring.
MENU DESCRIPTION
1 AUDIO SET Input / output / monitor settings.
2 CALIBRAT Amplier calibration.
3 --- ------
4 ROUTING Audio matrix.
5 SYSTEM LED test, system reset and shutting down.
6 INFO
Information about the device, its internal ampliers and its
rmware.
Functions managed by each menu are briey described in the following table:
Page 23

23
ENGLISH
BAND n
(I, II, III)
FREQ Centre frequency setting.
GAIN Gain setting.
BYPASS EQ Select either ON (equalizer bypassed) or OFF (equalizer inserted).
BAND n
(I, II, III, IV, V)
FREQ Centre frequency setting.
GAIN Gain setting.
BYPASS EQ Select either ON (equalizer bypassed) or OFF (equalizer inserted).
LO CUT (hi-pass lter)
Filter that cuts low frequencies below the cutoff frequency.
It has a single parameter: the cutoff frequency.
5-BAND EQ
The ve bands are semi-parametric equalizers that allow to choose the centre frequency
and adjust its level.
PARAMETERS
COMPRESSOR
The compressor does not modify a signal having a level lower than the predetermined
threshold and compresses a signal (ratio 3:1) with a higher level.
The threshold can be set to three different levels:
–30 dBu (curve 1), –20 dBu (curve 2), –10 dBu (curve 3).
CURVE 2CURVE 1 CURVE 3
PARAMETERS
ATTACK Adjusts the compressor attack time.
POST GAIN
Adjusts the output gain (useful to minimize the signal
attenuation due to compression).
HOLD
Adjust how long the compression is held after the audio
signal returns below the predetermined threshold.
DECAY Adjusts the compressor release rate.
CURVE
Curve selection:
- Curve 1
- Curve 2
- Curve 3
BYPASS
Select either On (compressor bypassed) or Off (compressor
inserted).
PARAMETERS
Page 24

24
ENGLISH
LIMITER
The limiter limits a signal having a higher level than the predetermined threshold.
It is in fact a compressor having a high compression ratio.
It can be really useful to avoid signal distortion due to too high levels.
PARAMETERS
DECAY Adjusts the limiter release rate.
BYPASS Select either ON (limiter bypassed) or OFF (limiter inserted).
DELAY (OUT 1 only)
Audio output delay time setting.
LEVEL
Audio output level setting.
AUDIO SET > MONITOR SUBMENU
LEVEL setting of the internal loudspeaker (MONITOR)
28
a
, which allows to listen to
the audio channel (chosen by the MONITOR parameter in the ROUTING menu) among:
OUT 1/2/3/4 (audio outputs), INT.SINE (internal sine wave), BUS 1/2/3/4 (internal
buses), BGM3 or AUX IN (audio inputs), ZERO (no selection).
AUDIO SET > MONITOR
SUBMENU
AUDIO SET > OUTPUT
SUBMENU
BAND n
(I, II, III, IV, V)
FREQ Centre frequency setting.
GAIN Gain setting.
BYPASS EQ Select either ON (equalizer bypassed) or OFF (equalizer inserted).
LEVEL
Audio input level setting.
AUDIO SET > OUTPUT SUBMENU
Audio output parameter settings.
Select an audio output among OUT 1, 2, 3, 4, to access its parameter list.
Select MUTE ALL to mute or UNMUTE ALL to unmute all audio outputs.
5-BAND EQ
The ve bands are semi-parametric equalizers that allow to choose the centre frequency
and adjust its level.
PARAMETERS
Page 25

25
ENGLISH
FUNCTION DESCRIPTION
1 LED TEST
Check of all LEDs, which light up for a few seconds (a text
message will be displayed).
2 SYSTEM RESET Reset / re-initialization of the device.
3 SYSTEM OFF Device shut-down command.
FUNCTION DESCRIPTION
1 BOARD Hardware notes.
2 AMPL Information about the proper operation of internal ampliers.
3 ACCESSORY
Information about the A, B ports for accessories (i.e. TS 9918
remote controls).
4 ABOUT Firmware notes.
SYSTEM MENU
INFO MENU
ROUTING MENU
Calibration of each audio output (necessary for detecting line faults).
Select one of the audio output OUT 1/2/3/4 (that correspond to its respective internal
amplier) to carry out its calibration.
Menu concerning the audio matrix, where to match sources and destinations.
After selecting an audio output (OUT 1, OUT 2, OUT 3, OUT 4), use the CONTROL
SELECTION
4
encoder to choose an audio channel (to be sent to the selected output)
among: BGM 3, AUX IN, BUS 1, BUS 2, BUS 3, BUS 4 or ZERO (no selection).
Choose MONITOR to select (by using the CONTROL SELECTION
4
encoder) the
audio channel sent to the internal loudspeaker
28
a
(MONITOR).
The choice is made among: OUT 1/2/3/4 (audio outputs), INT.SINE (internal sine wave),
BUS 1/2/3/4 (internal buses), BGM3 or AUX IN (audio inputs), ZERO (no selection).
LED test, system reset and shutting down.
Information about the device.
CALIBRAT MENU
Page 26

26
ENGLISH
DISPLAY TEXT MESSAGES
DISPLAY TEXT MESSAGES DESCRIPTION
REMOTE CONTROLLED Device controlled by a DXT 9000 system main unit.
AC NOT AVAILABLE Mains AC power supply not available.
AC HIGH Mains AC power supply: too high voltage.
AC LOW Mains AC power supply: too low voltage.
AC FUSE FLT Mains AC power supply: blown or not present fuse.
DC NOT PRESENT 48 V DC (batteries) power supply not available.
DC HIGH 48 V DC (batteries) power supply: too high voltage.
DC LOW 48 V DC (batteries) power supply: too low voltage.
DC FUSE FLT 48 V DC (batteries) power supply: blown or not present fuse.
STND-BY PSU VOLTAGE NOT
AVAILABLE
Faulty internal ‘stand-by’ power supply unit.
STND-BY PSU VOLTAGE HIGH Internal ‘stand-by’ power supply unit: too high voltage.
STND-BY PSU VOLTAGE LOW Internal ‘stand-by’ power supply unit: too low voltage.
STND-BY PSU VOLTAGE FUSE FLT Internal ‘stand-by’ power supply unit: blown or not present fuse.
SYS OK System operating properly.
SPEAKER LINE xx DISABLED Loudspeaker line disabled.
AMPLIFIER xx DISABLED Amplier disabled.
MICROPROCESSOR xx FLT Microprocessor fault.
MAIN POWER SUPPLY FAULT Internal main power supply unit fault.
MAIN POWER SUPPLY OVERHEAT Internal main power supply unit overheat.
MAIN POWER SUPPLY OVERLOAD Internal main power supply unit overload.
LOCAL FAULT Local fault.
AMPLIFIER xx OVERLOAD Amplier overload.
AMPLIFIER xx OVERHEAT Amplier overheat.
FANs FLT Amplier cooling fan failure.
IMPEDANCE HIGH Loudspeaker line: too high impedance.
IMPEDANCE LOW Loudspeaker line: too low impedance.
LINE OPEN Loudspeaker line: open circuit.
LINE SHORTED Loudspeaker line: short circuit.
SPKR LINE GND LEAKAGE Loudspeaker line: earth leakage.
all displayed TeXTs (buT remoTe conTrolled) are possible only when amplifiers are noT linked
To a dXT 9000 sysTem main uniT.
Page 27

27
ENGLISH
JP1 to JP8
AB position: the two resistors for monitoring are
inserted in the respective logic output (GPO).
BC position: the two resistors for monitoring are not
inserted (‘dry contact’) in the respective logic output
(GPO).
JP 9
Jumper inserted (ON): normal operation of the rst
logic input (GPI 1), which can be connected to a dry
closing contact.
Jumper removed (OFF): the rst logic input (GPI 1) can
be linked to an external device having its own output
voltage.
JP 10
Jumper inserted (ON): normal operation of the second
logic input (GPI 2), which can be connected to a dry
closing contact.
Jumper removed (OFF): the second logic input (GPI 2)
can be linked to an external device having its own output
voltage.
ImportaNt:
inTernal jumper seTTinG shall be carried ouT only by eiTher rcf or an auThorised
serVice cenTre.
Remove the lid and look at the back GPI / GPO board (in this drawing, the 10 jumpers
are marked in grey inside the rectangle):
INTERNAL JUMPER SETTINGS
ZOOM:
Page 28

28
ENGLISH
MP3
+ –
MU 9186
MU 9186/R
MX 950x
UP 950x
BUS IN
BUS OUT
A1 B2
A2 B1
CONNECTION EXAMPLE
Page 29

29
ENGLISH
SPARE AMPLIFIER (UP 9501) CONNECTION EXAMPLE
UP 9501
/ 9502
/ 9504
UP 9501
/ 9502
/ 9504
SPARE UP 9501
Page 30

30
ENGLISH
GUIDANCE ON THE MEASUREMENT
OF THE SPEAKER LINE IMPEDANCE
In the DXT 9000 system, monitoring of the integrity of speaker lines is made through
impedance measurement at subsonic frequency (20 Hz).
This method was chosen because of its good stability and accuracy of calculated values,
which avoids false line fault reports that often occur with impedance measurements
faster at supersonic frequencies, but more prone to interferences and errors.
To use the DXT 9000 line monitoring properly, so that it fully complies with the European
Safety Standard EN 54-16, it is strictly necessary to consider the functional limitations of
all devices.
The two main limitations are:
- Measurable impedance range.
- The minimum / maximum tolerance compared to the calibration value of the
measurement for the line fault detection.
Let us now analyse in detail these two limitations.
MEASURABLE IMPEDANCE RANGE
There are three amplier models that differ in their power, so each has its own
measurable impedance range:
- Single channel amplier (max. power: 500 W).
- Dual channel amplier (max. power: 250 W per channel).
- Four-channel amplier (max. power: 125 W per channel).
In a 100 V (or 70 V) constant voltage line, the minimum measurable impedance Zmin
can be estimated (in all the three cases) considering a load having double the maximum
output power Pmax on a single line (and ignoring the efciency of speakers and
approximating the impedance at 20 Hz with the real one; the phasor impedance at 20 Hz
is only 9 degrees out of phase with the real axis ).
MEASURABLE
IMPEDANCE RANGE
The results are:
1 x 500 W → Zmin = 10 Ω (at 100 V), Zmin = 5 Ω (at 70 V)
2 x 250 W → Zmin = 20 Ω (at 100 V), Zmin = 10 Ω (at 70 V)
4 x 125 W → Zmin = 40 Ω (at 100 V), Zmin = 20 Ω (at 70 V)
The maximum measurable impedance Zmax can be estimated considering lines loaded
to a quarter of the maximum output power Pmax.
The results are:
1 x 500W → Zmax = 80 Ω (at 100 V), Zmax = 40 Ω (at 70 V)
2 x 250W → Zmax = 160 Ω (at 100 V), Zmax = 80 Ω (at 70 V)
4 x 125W → Zmax = 320 Ω (at 100 V), Zmax = 160 Ω (at 70 V)
Zmin =
100V
(100 V)
2
2 Pmax
Zmin =
100V
(100 V)
2
0.25 Pmax
Zmin =
70V
(70.7 V)
2
2 Pmax
Zmin =
70V
(70.7 V)
2
0.25 Pmax
or
or
Page 31

31
ENGLISH
TOLERANCE COMPARED
TO THE CALIBRATION VALUE
Ampliers are protected and designed to operate at their maximum rated power.
The best impedance range (Zmon), in which its measurement is more stable,
immune to errors and repeatable, is from 50% to 100% of the load corresponding
to the maximum power of the channel.
With 100 V lines:
1 x 500 W → 20 Ω ≤ Zmon ≤ 40 Ω
2 x 250 W → 40 Ω ≤ Zmon ≤ 80 Ω
4 x 125 W → 80 Ω ≤ Zmon ≤ 160 Ω
With 70 V lines:
1 x 500 W → 10 Ω ≤ Zmon ≤ 20 Ω
2 x 250 W → 20 Ω ≤ Zmon ≤ 40 Ω
4 x 125 W → 40 Ω ≤ Zmon ≤ 80 Ω
Note that (depending on ampliers and tolerances of sensors) measures higher or
lower than the indicated limits can be similarly accurate and valid. These values shall be
considered as ‘condence thresholds’ of the line control.
In fact, sensors could measure impedances (at 20 Hz) in the 5 ÷ 400 Ω range.
Measuring of impedances out of that range may be prone to errors and interferences.
TOLERANCE COMPARED TO THE CALIBRATION VALUE
The choice of the speaker line impedance tolerance is important in order to avoid these
two cases:
- Too low tolerance: every little interference will cause a false line fault.
- Too high tolerance: the system will not report any fault even with a line damage that
excludes most speakers.
EN54-16 standard requires the system to indicate speaker line faults (short or open
circuits) and not a single speaker fault. Therefore, a single speaker fault is tolerable, but
not the loss of a line section.
In a 100 / 70 V line all speakers are linked in parallel, so a short circuit (total impedance
tends to zero) leads to the opening of the entire speaker line.
The choice of the tolerance (ve options: 5%, 10%, 15%, 20%, 25%) is important to get
a proper speaker line monitoring.
Consider the following general rule:
“The recommended tolerance value is the highest of the available options,
but lower than the weight of the smallest percentage change in impedance,
usually due to the disconnection of the speaker having the highest
impedance and installed at the end of a line branch.”
A COUPLE OF EXAMPLES:
1. Two speaker lines are linked in parallel and connected to a 250 W amplier output.
The total impedance is 40 Ω (Ztot).
The line 1 ends with a speaker having an impedance 600 Ω (Zmaxend).
The line 2 ends with a speaker having an impedance 200 Ω.
Since all speakers are linked in parallel, in case of disconnection of the 600 Ω
speaker, the line total impedance will change from 40 Ω (Ztot) to 42.8 Ω (Znoend).
Page 32

32
ENGLISH
The following formula is basically the calculation of the impedances in parallel:
NotE
: The line im pedance here is cons idered aT The frequenc y of 20 hz (wh ich is noT equal To
The one mea sured b y an impedance meTer aT 1 khz)!
The percentage difference between the two impedances is 7.14%, so it is necessary
to set the tolerance to the 5% option.
2. Three speaker lines are linked in parallel and connected to a 500 W amplier output.
The total impedance is 50 Ω (Ztot).
The line 1 ends with a speaker having an impedance 140 Ω.
The line 2 ends with a speaker having an impedance 220 Ω.
The line 3 ends with a speaker having an impedance 350 Ω.
Since all speakers are linked in parallel, in case of disconnection of the 350 Ω
speaker, the line total impedance will change from 50 Ω to 58.3 Ω.
The percentage difference between the two impedances is 16.6%, so it is necessary to
set the tolerance to the 15% option.
However, there are many cases where the weight percentage of the last speaker is less
than 5%, often making impossible to detect any damage to the line.
Moreover, there are speakers (e.g. horns) that are virtually open circuits at the frequency
of 20 Hz, making it impossible to measure the line impedance.
In these cases, it is strictly necessary to connect (at the end of lines) devices having an
impedance (at 20 Hz) that allows the calibration (in the proper range of each channel)
and low enough to make it possible to detect the opening of the last line segment.
These devices are just named ‘End Of Line’, hereafter abbreviated as EOL.
EOL (‘END OF LINE’): FEATURES AND USE GUIDELINES
EOL are reactive loads having an impedance 200 Ω at the resonance frequency (20 Hz).
Absorbing reactive power only, EOL can be added to a speaker line without affecting
the rated power of its amplier. However, this is valid if considering the dynamic of the
impedance meter, which can properly measure up to a maximum load of twice the rated
amplier power.
To ensure proper line monitoring when the constrain of the last speaker of various line
branches (explained in the previous paragraph) is not respected, it will be necessary to
add an EOL at the end of each line branch.
For each amplier model, there is a maximum number of EOL (and line branches) that
can be added to a single line. This is due to problems of dynamics of the impedance
measuring circuit and the amplier (eddy currents need to be considered, as these can
overload the amplier).
- Max. 5 EOL for each line linked to a 500 W amplier output.
- Max. 4 EOL for each line linked to a 250 W amplier output.
- Max. 2 EOL for each line linked to a 125 W amplier output.
Znoend =
Zmaxend
Ztot
Zmaxend – Ztot
EOL (‘END OF LINE’):
FEATURES AND USE
GUIDELINES
Page 33

33
ENGLISH
Within the system operation limits, the result is equal to 1 in almost all cases.
The only exception is given by a line with two branches including horn speakers only and
connected to a 500 W amplier. In this case, it is advisable to add two EOL (in parallel) to
the end of each line branch (to fall within the correct measurement range).
Anyway, to know how many EOL are needed in a line, it is necessary to calculate the total
impedance (Ztot) by applying the following formula (parallel impedances), adjusted with
the EOL number (Neol):
NotE:
The line im pedance (
Zline
) he re is c onsider ed aT Th e frequ ency of 20 hz (which is noT
equal To The o ne meas ured by an im pedance meTer aT 1 khz )!
The total impedance must respect the constraints about EOL.
EOL number shall not exceed the maximum amount (as indicated previously).
NotE:
The line im pedance (
Zline
) he re is c onsider ed aT Th e frequ ency of 20 hz (which is noT
equal To The o ne meas ured by an im pedance meTer aT 1 khz )!
In case of a single line having a particularly low impedance load or lines including
horn speakers (open circuits at 20 Hz), it will be necessary to add more EOL in
parallel.
In case the line is divided into more branches, in each branch the EOL number
needs to be the same, in order to guarantee a proper monitoring and respect
the following formula:
Ztot =
Zline
Zeol
Zline – Zeol
Neol > =
200 Ω
Ztot (21 – Nbranch)
Ztot = total impedance
Nbranch = line branch number
Neol = EOL number
Ztot =
Zline
Zline +
200 Ω
Neol
200 Ω
Neol
The total impedance (Ztot) resulting from the parallel between the load impedance
already present in the line (Zline) and EOL (Zeol = 200 Ω) is easily obtainable by the
following formula:
Page 34

34
ENGLISH
–50 ÷ +6 dBu
20 Hz ÷ 20 kHz
25 kΩ
104 dB
24 V dc
–50 ÷ +6 dBu
20 Hz ÷ 20 kHz
25 kΩ
94 dB
–50 ÷ +6 dBu
20 Hz ÷ 20 kHz
25 kΩ
100 V / 70 V (selectable by RCF only)
1 (UP 9501), 2 (UP 9502), 4 (UP 9504)
500 W (UP 9501), 250 W (UP 9502), 125 W (UP 9504)
[100 V] 20 Ω (UP 9501), 40 Ω (UP 9502), 80 Ω (UP 9504)
[ 70 V] 10 Ω (UP 9501), 20 Ω (UP 9502), 40 Ω (UP 9504)
A1 - A2 (UP 9501)
A1 - A2 - B1 - B2 (UP 9502)
A - B - C - D (UP 9504)
20 Hz ÷ 20 kHz
≤ 0.1%
8
4
24 V dc
0.3 A
4
24 bits
44.1 kHz
100 mA
FALL BACK INPUT audio input
- Input sensitivity:
- Frequency response (±3 dB):
- Input impedance (1 kHz):
- Signal / noise ratio:
- FALL BACK command voltage:
AUX INPUT
- Input sensitivity:
- Frequency response (±3 dB):
- Input impedance (1 kHz):
- Signal / noise ratio:
BGM 3 audio input
- Input sensitivity:
- Frequency response (±3 dB):
- Input impedance (1 kHz):
Loudspeaker line outputs
- Output voltage:
- Number of internal ampliers:
- Max. power of each amplier:
- Load minimum impedance for each amplier:
- Loudspeaker line outputs:
- Frequency response (±3 dB):
- Distortion (THD+N @1W, 1kHz):
GPI (logic inputs)
- Monitored GPI number:
- Photo-coupled GPI number:
GPO (logic outputs)
- Max. applicable voltage:
- Max. current:
RCF FLEXCOM BUS
- Channels:
- Resolution:
- Sampling frequency:
24 V DC output
- Max. output current:
SPECIFICATIONS
Page 35

35
ENGLISH
DATA LINK
- 1 RS485 EUROBLOCK connector
- 2 RCF FLEXCOM BUS EUROBLOCK connectors
ELECTRICAL SPECS.
- Operating voltage:
- Max. consumption (power):
- Operating temperature:
- Relative humidity:
MECHANICAL SPECS.
- Dimensions (w, h, d):
- Net weight:
115/230 V ac (50-60 Hz), 48 V dc
800 W
–5 ÷ +50 °C (23 ÷ 122 °F)
20 ÷ 90% (non-condensing)
485 mm, 88 mm, 365 mm (19” rack - 2 units)
7.8 kg (UP 9501), 8.0 kg (UP 9502), 8.3 kg (UP 9504)
APPENDIX
DXT 9000 - COMPLIANCE OPTION LIST WITH EN 54-16 REQUIREMENTS
7.3 Audible warning
7.6.2 Manual silencing of the voice alarm condition
7.7.2 Manual reset of the voice alarm condition
7.8 Output to re alarm devices
8.3 Indication of faults related to the transmission path to CIE
9. Disablement condition
10. Voice alarm manual control
11. Interface to external control device(s)
12. Emergency microphone(s)
13.14 Redundant power ampliers
Page 36

0068
RCF S.p.A. - Via Raffaello 13, 42124 Reggio Emilia, ITALY
14
0068-CPR-002/2014
EN 54-16:2008
Voice alarm control and indicating equipment for fire detection and
fire alarm systems for buildings
DXT 9000
Provided options:
Other technical data: see DXT 9000 operational manuals.
7.3
7.6.2
7.7.2
7.8
7.9
8.3
9
10
11
12
13, 14
Audible warnings
Manual silencing of the voice alarm condition
Manual reset of the voice alarm condition
Output to fire alarm devices
Voice alarm condition output
Indication of faults related to the transmission path to the CIE
Disablement condition
Voice alarm manual control
Interface to external control device(s)
Emergency microphone(s)
Redundant power amplifiers
Page 37

Page 38

Page 39

Page 40

10307285 revD_EN 2014 / 07
www.rcfaudio.com
HEADQUARTERS:
RCF S.p.A. Italy
tel. +39 0522 274 411
e-mail: info@rcf.it
RCF UK
tel. 0844 745 1234
Int. +44 870 626 3142
e-mail: info@rcfaudio.co.uk
RCF France
tel. +33 1 49 01 02 31
e-mail: france@rcf.it
RCF Germany
tel. +49 2203 925370
e-mail: germany@rcf.it
RCF Spain
tel. +34 91 817 42 66
e-mail: info@rcfaudio.es
RCF Belgium
tel. +32 (0) 3 - 3268104
e-mail: belgium@rcf.it
RCF USA Inc.
tel. +1 (603) 926-4604
e-mail: info@rcf-usa.com
Except possible errors and omissions.
RCF S.p.A. reserves the right to make modications without prior notice.
 Loading...