

Page 1

OWNER MANUAL
MANUALE UTENTE
F 12XR
HIGH PERFORMANCE PROFESSIONAL
COMPACT LIVE MIXER
MIXER PROFESSIONALE LIVE
COMPATTO AD ALTE PRESTAZIONI
Page 2

2
Page 3

LANGUAGE
ENGLISH
ITALIANO414
3
Page 4

ENGLISH
SAFETY PRECAUTIONS
Before connecting and using this product, read the instructions provided in this manual carefully and keep it for future reference.
This manual is an integral part of the product and it must accompany it even in the case of changes of ownership, so that the new
owner is aware of the method of installation and use and all safety warnings. Incorrect installation and use of the product shall relieve
RCF S.p.A. of any and all liability.
CAUTION: to prevent the risk of flames or electric shock, do not ever expose this product to the rain or humidity.
1. All warnings, in particular those relating to safety, must be read with special attention, as they contain important information.
2. MAIN SUPPLY FROM THE MAINS
- The supply voltage of the device is sufficiently high to constitute a risk of electric shock to persons: never
install or connect the device with the power supply cable plugged into the mains.
- Before powering this product, make sure that all connections are correct and that the voltage of your mains
supply matches the value on the device data plate; if this is not the case, please contact an RCF dealer.
- The metal parts of the device are earthed via the power supply cable.
- A device with CLASS I construction must be connected to the mains socket with a protective earthing
connection.
- Make sure that the power supply cable of the device cannot be stepped on or crushed by objects, to make
sure it remains intact and in perfect working order.
- To avoid the risk of electric shock, never open the device: there are no parts that can be used by the user
inside.
3. Do not allow objects or liquids to penetrate the product, as this may cause a short circuit. The device must not be exposed to
dripping or splashing water; no naked flame sources (e.g. lighted candles) and no objects filled with liquid (e.g. vases) must be
placed on top of the device.
4. Do not perform any work / modifications / repairs except for those expressly described in this manual. Contact an authorised
service centre or highly qualified personnel when:
- the device is not working (or is working abnormally);
- the power supply cable has been seriously damaged;
- objects or liquids have penetrated the device;
- the device has undergone major knocks.
5. If this product is not used for long periods of time, unplug the power supply cable from the mains.
6. If the product releases abnormal odours or smoke, turn off the power immediately and unplug the power supply cable.
7. Do not connect this product to other devices and accessories not envisaged. Do not try to hang this product using elements
that are not designed or suitable for this purpose. To avoid the risk of falling, do not stack multiple units of this product, unless
this option is expressly specified in the instruction manual.
8. RCF S.p.A. strongly recommends that the installation of this product be carried out only by professional
qualified installers (or specialised installation companies) able to do it properly and to certify installation in
accordance with the applicable regulations in force. The entire audio system must comply with the applicable
rules and regulations regarding electrical systems.
9. Stands and Carts
Where envisaged, the product should only be used on carts or stands recommended by the manufacturer. The device-stand /
device-cart assembly should be moved with the utmost care. Sudden stops, excessive pushing force and uneven or tilted floors
could cause the assembly to overturn.
10. Hearing loss
Exposure to high sound levels can cause permanent hearing loss. The sound pressure level dangerous to one’s hearing varies
greatly from one person to another and depends on the duration of exposure. To avoid potentially dangerous exposure to high
sound pressure levels, anyone who is exposed to these levels must use adequate protection; when a transducer capable of
producing high sound levels is in use, ear plugs or protective headsets must be worn. See the technical instruction data to find
out the maximum sound pressure levels that the speakers are capable of producing.
11. Place the product away from heat sources and ensure adequate air circulation all around.
12. Do not overload this product for extended periods of time.
13. Never force the controls (buttons, knobs, etc.).
14. Do not use solvents, alcohol, petrol or other volatile substances to clean the external parts of the unit; use a dry cloth.
15. Do not point microphones near and in front of the speakers, so as to avoid any feedback (“Larsen effect”).
WARNINGS
IMPORTANT
NOTE ON CABLES FOR AUDIO SIGNALS
To prevent the occurrence of noise on the cables that carry signals from the microphones or on the line (for example 0 dB), use only
screened cables and avoid laying them in the vicinity of:
- equipment that produces strong electromagnetic fields;
- cables from the power mains;
4
- speaker lines.
RCF S.p.A. thank you for buying this product, which was made in order to ensure reliability and high performance.
Page 5

INFORMATION ON THE DEVICE
Thank you for purchasing an RCF mixing console.
F 12XR is a versatile audio mixer equipped with all the tools needed for accurately processing multiple audio signals from a variety of sources.
CLEAR SOUND
RCF mixing consoles devices combine RCF’s professional “sound culture” heritage with innovative design and dedicated manufacturing. RCF mixing
consoles produce clear sound, accurate sound dynamics and extreme versatility of use by passionate audio professionals. RCF mixing consoles are designed
to match perfectly with RCF active speakers.
RELIABILITY
All RCF mixing consoles undergo four extensive instrumental quality tests during construction. A listening test is carried out at the end of production
followed by a final quality control inspection to locate any visible defects, such as scratches or dents. The process guarantees outstanding reliability making
sure that the device you have purchased is of the highest quality.
DESIGN
The unique design of RCF mixing consoles is an example of typically Italian RCF flair and creativity. RCF mixing consoles combine modern, excellent
ergonomic design. In addition to their striking appearance, the original side profiles of the mixers makes them easy to grasp securely.
DESCRIPTION AND MAIN CHARACTERISTICS
F 12XR is a versatile analogue audio mixer, equipped with all the tools required for accurate processing of multiple audio signals from different sources.
F 12XR provides an internal PRO DSP FX: the DSP unit offers 16 predefined effects presets: 10 reverbs, 3 delays and 3 modulation effects.
F 12XR AUDIO INPUTS
- CHANNELS 1 to 6: Microphone or Line inputs with separate XLR and TRS jack connectors, three-band EQ.
- CHANNELS 5/6 and 7/8: STEREO inputs for LINE level stereo signals (double TRS jack) with three-band equalizer.
- CHANNELS 9/10 and 11/12: STEREO inputs for LINE level stereo signals (RCA or double TRS jack) with two-band equalizer.
ENGLISH
F 12XR AUDIO OUTPUTS
- MAIN MIX main stereo output with XLR male connectors (balanced) and TRS jack.
- CONTROL ROOM OUTPUT with TRS balanced jack out connectors.
- 2 AUX OUTPUT (Balanced TRS jack).
- 1 FOOTSWITCH jack socket (TS jack) for foot control for the activation or deactivation of effects.
- 1 PHONES headphone outputs (1/4” stereo jack)
- USB audio port for stereo recording and playback to/from dedicated computer.
- Internal PSU 100 V-240 V, 50-60 Hz, 40 W
PHYSICAL SPECIFICATIONS
- Dimensions: L = 372 mm, W = 355 mm, H = 90 mm
- Weight: 4,5 Kg
5
Page 6

ENGLISH
ROTATE
ON
OFF
ON
OFF
FRONT PANEL
2 3 4
12
18
32 33 34 35 36
1
13 14
19 20
23 24
5
31
6 7
15
2729 30
10
8
9
11
17
16
21
22
25
26
28
REAR PANEL
37 38
POWER ON/OFF
USB AUDIO
39
6
Page 7

FRONT PANEL FUNCTIONS
[1] MIC INPUTS
RCF F 12XR provides 6 mono Mic inputs via XLR connectors. The Balanced XLR Microphone
preamp input supports sources with a gain range from 0 dB to -50 dB (see section [12] and
[13] of this manual).All the F 12XR’s MIC-LINE inputs are supplied with an 80 Hz Hi-pass filter.
Enable the 80 Hz Hi-Pass filter when using voice microphone to reduce low frequency pop,
bump and rumble noises (see section [12] and [13] of this manual). +48 V Phantom Power
is provided for the Mic inputs 1 to 6. Enable the Phantom power in presence of Condenser
and Electret Microphones or in the event of D.I. box usage (see section [16] of this manual).
[2] LINE INPUTS
Line inputs TRS jack from 1 to 6 support line signals with a gain of +20 dB to -30 dB.
[3] LINE INPUT 4
Line Input 4 adds the selectable Hi-Z input feature. The Hi-Z input is very useful when connecting low
level musical instruments like Electric or Acoustic Guitars or Bass Guitars with passive pick-up.
[4] STEREO INPUTS 5/6 AND 7/8
TRS jacks 5/6 and 7/8 provide stereo inputs for line sources. Note that MONO sources can be connected
to jack inputs 5 and 7.
[5] STEREO INPUTS 9/10 AND 11/12
RCA and TRS jacks 9/10 and 11/12 provide stereo inputs for line sources. Note that MONO sources can
be connected to jack inputs 9 and 10.
ENGLISH
ON
OFF
[6] FOOTSWITCH
This TS jack connector allows the use of MOMENTARY switches or foot pedals to MUTE and UN-MUTE
the audio coming from the internal FX return. When the FX is muted via footswitch the red LED near
the MUTE button of FX RET fader lights up (see the section [34] of this manual). In this state, the effect
can be unmuted either by pressing the FX RET MUTE button or the FOOTSWITCH again.
[7] PHONES OUTPUT
Connect headphones here to listen to the MAIN MIX or PFL signals. To avoid hearing loss set the
PHONES LEVEL control ([28]) to minimum (-∞) before connection, and wear headphones.
[8] AUX OUTPUTS
These TRS jack connectors provide +4 dB balanced audio output coming from auxiliaries sends.
Connect your stage monitors or external effect input here.
[9] BUS OUTPUTS
These two balanced TRS jacks perform +4 dB audio out coming from BUSSES 1 and 2. The audio level
of BUSSES 1 and 2 is controlled by the dedicated BUS 1/2 fader located on the front panel (see section
[35] of this manual).
[10] MAIN OUTPUTS
These XLR male connectors provide +4 dB balanced audio output coming from MAIN MIX.Connect
your main speaker system to XLRs, named L and R. The audio level of MAIN MIX OUT L and R is
controlled by the dedicated MAIN MIX fader (see section [36] of this manual). L and R XLR MAIN MIX
outputs are replicated with L and R TRS jack.
7
Page 8
FRONT PANEL FUNCTIONS
ENGLISH
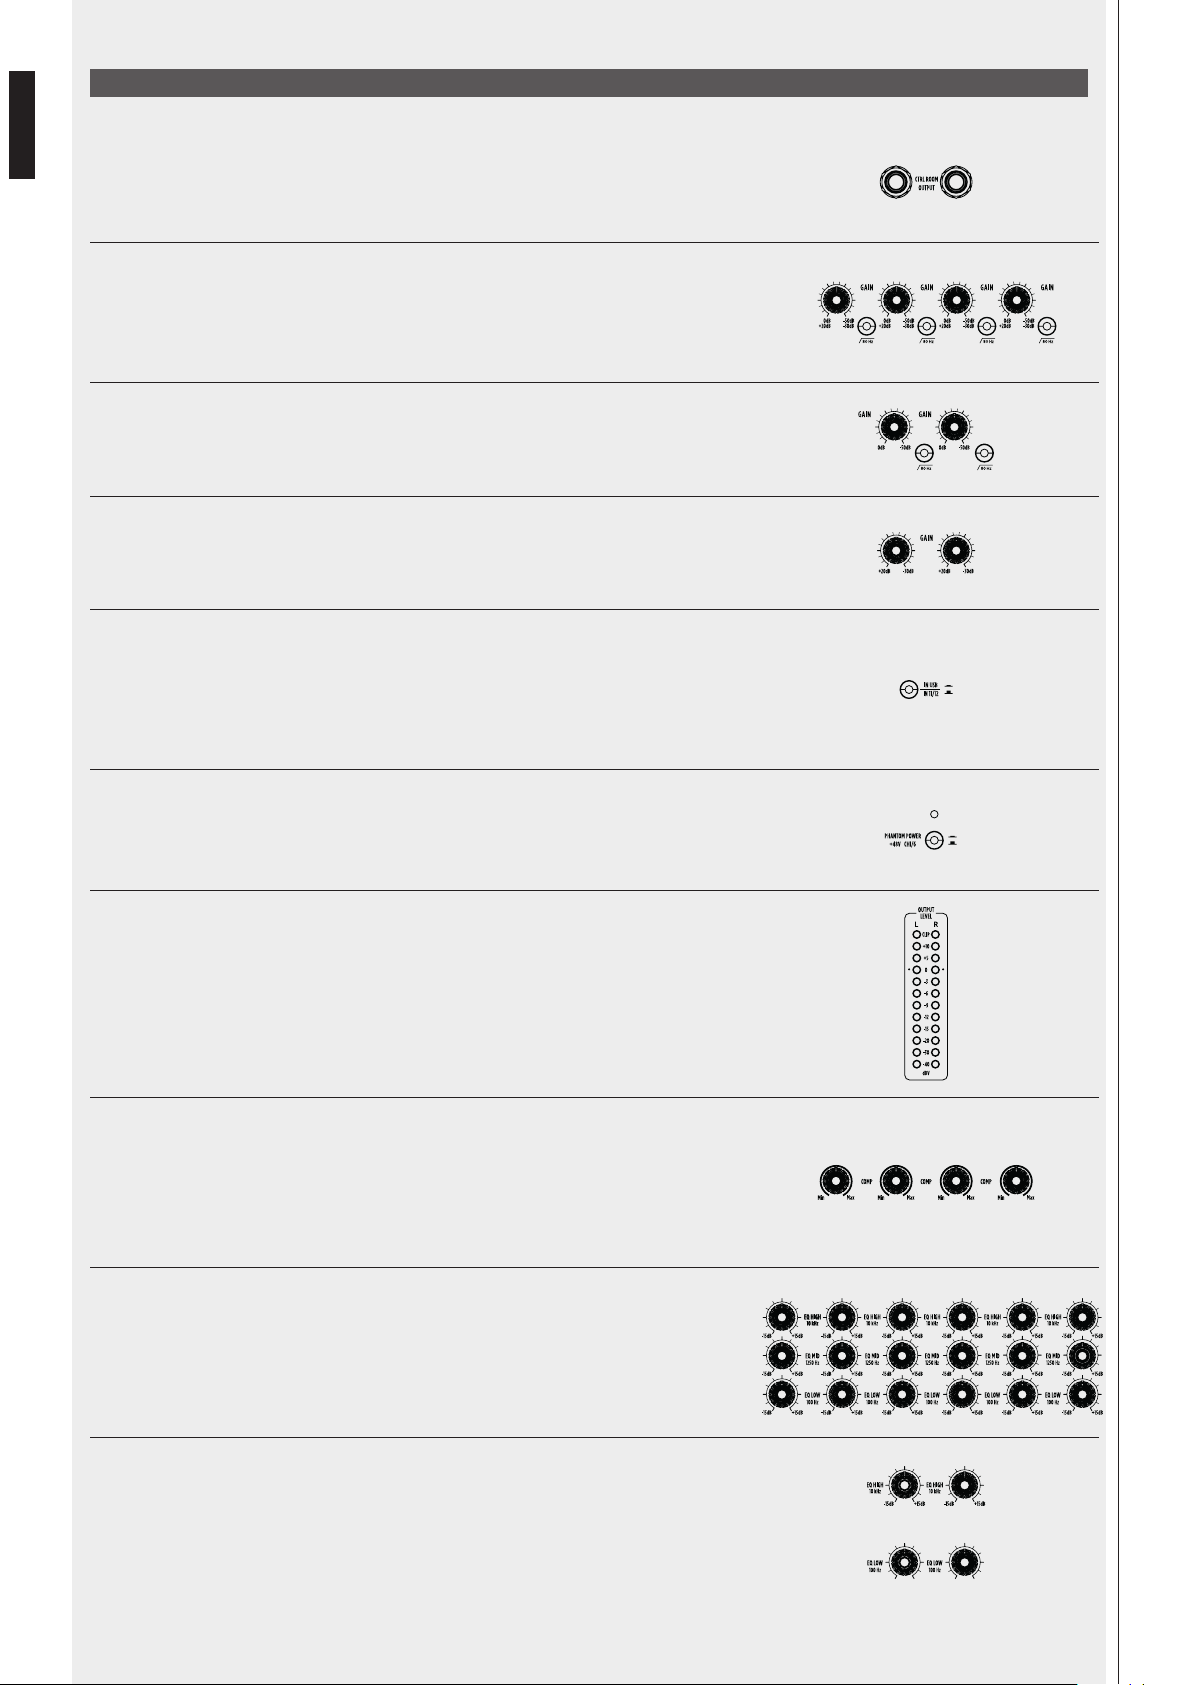
[11] CTRL ROOM OUTPUT
Connect to the Control Room Output Balanced jacks a pair of studio monitors as local listening
system. The audio level of the CTRL ROOM output is controlled by the dedicated CONTROL ROOM
potentiometer on the front panel (see section [26] of this manual).
[12] CHANNEL 1 TO 4 GAIN
MIC input (XLR). These controls permit the gain for MIC input to be set with a range from 0 dB to -50 dB;
connect your microphones here. If the LINE INPUT (TRS jack) are in use the gain range permitted is from
+20 dB to -30 dB. All the F 12XR’s MIC-LINE inputs are supplied with an 80 Hz Hi-pass filter. Enable the 80
Hz Hi-Pass filter when using microphone for voice to reduce low frequency pop, bump and rumble noises.
[13] CHANNEL 5/6 AND 7/8 GAIN
MIC input (XLR). These controls permit the gain for MIC input to be set with a range from 0 dB to -50 dB.
Corresponding LINE INPUT (TRS jack) have a fixed input level gain.
[14] CHANNEL 9/10 AND 11/12 GAIN
STEREO LINE INPUT (TRS jack). The controls allow a gain range control from +20 dB to -30 dB.
[15] IN USB - IN 11/12 BUTTON
When the button is in upper position (not pressed) the audio coming from LINE INPUT 11/12 is routed
to MAIN MIX; when USB IN - IN 11/12 button is pressed, the stereo audio channels played from an
external computer connected to the USB port is routed to the stereo channel 11/12. In this instance the
USB audio substitutes the analog audio input and takes advantage of all the features provided by the
stereo channel such as EQs, AUX send, BAL and fader control.
[16] PHANTOM POWER +48 V CH1/6 SWITCH
Dedicated to the Mic input, this switch allows the +48 V Phantom Power to the Mic input 1 to 6 to
be enabled. The enabling of the Phantom power is necessary in presence of Condenser and Electret
Microphones or in case of D.I. box usage.
[17] LEVEL METER
This 12 LED elements level meter allows to control the Main Mix output level. Keep the output level
below the “CLIP” indication to avoid overloaded signals that can cause distortion.
[18] COMPRESSORS
Input channels 1 to 4 are provided with intuitive and powerful single control dynamic compressors.
With thresholds and ratio parameters properly designed, the F 12XR’s compressors allow even the most
dynamically demanding signals to be controlled.
[19] EQ (MONO CHANNELS)
All the F 12XR’s mono channels and stereo channel 5/6 and 7/8 are provided with a sophisticated and
precise 3-band EQ. Low frequency control sets in at 100 Hz with a gain of +/-15 dB and shelving curve.
High frequency control sets in at 10 kHz with a gain of +/-15 dB and shelving curve. Mid frequency
control sets in at 1250 Hz with a gain of +/-15 dB and bell curve.
ON
OFF
[20] EQ (STEREO CHANNELS)
Stereo channels 9/10 and 11/12 are provided with shelving HIGH and LOW EQ bands. Hi frequency
control sets in at 10 kHz with a gain of +/-15 dB and shelving curve. Low frequency control sets in at
100 Hz with a gain of +/-15 dB and shelving curve.
8
Page 9

FRONT PANEL FUNCTIONS
[21] PRO DSP FX
F 12XR is equipped with an internal 16 preset PRO DSP FX board. Rotating the encoder allows selection
between 16 great sounding effects:
01. SMALL HALL
02. LARGE HALL
03. SMALL ROOM
04. BRIGHT ROOM
Select one of these effect presets to enrich your sound.
05. THIN PLATE
06. PLATE
07. SPRING REVERB
08. MULTITAP DELAY
09. ANALOG DELAY
10. CHORUS VERB
11. STEREO CHORUS
12. FLANGER
13. PHASER
14. GATED REVERB
15. FLANGER REVERB
16. VOCAL ECHO
[22] PFL ACTIVE LED
This LED lights up when one or more PFL buttons are pressed.
[23] AUX1- AUX2/FX
Each channel of the F 12XR mixer is provided with 2 auxiliary sends; AUX1 is
a PRE fader send. AUX2/FX send feed the internal PRO DSP FX board. AUX2/
FX is a POST or PRE fader send depending on the position of the AUX2 PRE/
POST button ([27]). When the selection is pre-fader AUX2/FX takes the signal
from the channel independently from the fader position; when the selection is
post-fader the AUX2/FX takes the signal subjected to the fader position. The
signal present in the AUX2/FX send is also routed to the AUX OUTPUT jack
present on the top panel (see section [5] of this manual).
ENGLISH
ROTATE
[24] FX TO AUX
This send allow routing the signal present in the FX return channel to the AUX1 sends.
[25] AUX1 AND AUX2/FX MASTER KNOBS
These potentiometers control the master level of the auxiliary sends AUX1 and AUX2/FX. The PFL
button when pressed allows listening the signal present in the aux out, through speakers connected
to the CTRL ROOM OUTPUT (see section [11] of this manual) or through headphones connected to
PHONES OUTPUT (see section [7]).
[26] CTRL ROOM LEVEL KNOB
This is the level control of the signal routed to CTRL ROOM OUTPUT. During the mixer’s normal use,
the MAIN MIX signal is routed to this output; when one or more PFL buttons are pressed the PFL bus
signal is routed to CTRL ROOM OUTPUT and PHONES OUTPUT.
[27] AUX2 PRE/POST BUTTON
This button allows selection of the AUX2/FX position, pre-fader or post-fader. See section [23] of this
manual.
[28] PHONES LEVEL
This knob controls the level of the PHONES OUTPUT [7]. Set the PHONES LEVEL control to minimum
(-∞) before connect and wear headphones to avoid hearing loss.
[29] PAN
These controls allow positioning of the signal present in the mono channel in the stereo image of the
MAIN MIX.
[30] PAN/BAL
The control works as PAN if the channel is used in MONO configuration (XLR MIC INPUT) defining the
position of the signal into the stereo image of the MAIN MIX. BAL (Balance) control allows balancing of
the position of the stereo channel (TRS jack line stereo input) into the stereo image of the MAIN MIX.
[31] BAL
These controls, characteristic of stereo channels, allow balancing of the position of a stereo channel
into the stereo image of the MAIN MIX.
9
Page 10

FRONT PANEL FUNCTIONS
ENGLISH
[32] MONO CHANNELS FADERS SECTION
This section allows the levels of the input channels from 1 to 4 to be controlled, and their routing to
the output. Each one of the faders has several control buttons. MUTE button, when pressed, inhibits
the signal to flow to the output bus or main mix paths. The PFL button allows listening to the signal
present on the channel through speakers connected to the CTRL ROOM OUTPUT (see section [11] of
this manual) or through headphones connected to HEADPHONES OUTPUT (see section [7]). MAIN and
BUS 1/2 buttons positioned on the right side of each fader allow the signal to be routed respectively
to MAIN MIX and/or STEREO BUS 1/2.
[33] STEREO CHANNELS FADER SECTION
This section allows the levels of the stereo input channels from 5/6 to 11/12 to be controlled, and their
routing to the output. The PFL button allows listening to the signal present on the channel through
speakers connected to the CTRL ROOM OUTPUT (see section [11] of the panel description) or through
headphones connected to HEADPHONES OUTPUT (see section [7]). MAIN and BUS 1/2 buttons
positioned on the right side of the fader allow the signal to be routed respectively to MAIN MIX and/
or STEREO BUS 1/2.
[34] FX RET FADER
This fader controls the level of the signal coming from the internal PRO DSP FX. MUTE button, when
pressed, inhibits the signal to flow to the output bus or main mix paths. The PFL button allows listening
to the signal present on the channel through speakers connected to the CTRL ROOM OUTPUT (see
section [11] of the panel description) or through headphones connected to PHONES OUTPUT (see
section [7]). MAIN and BUS 1/2 buttons positioned on the right side of the fader allow the signal to be
routed respectively to MAIN MIX and/or STEREO BUS 1/2.
[35] BUS 1-2 FADER
The BUS 1-2 fader controls the level of this stereo bus out. BUS 1-2 can be fed with each one of the
input channels to create a stereo audio group routed to the physical BUS OUTPUTS (see section [9]).
The MUTE button, when pressed, inhibits the signal flow to the BUS output or MAIN MIX paths if BUS
1-2 is routed to it. The MAIN button positioned near to the BUS fader routes the BUS to the MAIN
MIX. The PFL button, when pressed, allows listening to the signal present into BUS through speakers
connected to the CTRL ROOM OUTPUT (see section [11] of this manual) or through headphones
connected to PHONES OUTPUT (see section [7]).
[36] MAIN MIX FADER
The MAIN MIX Fader controls the level of the MAIN MIX.
10
Page 11

REAR PANEL FUNCTIONS
[37] POWER SWITCH
Use this switch to turn on and off your F 12X mixer.
[38] POWER SUPPLY INLET
Connect here the power cord provided. The internal power supply accepts power from 100 V to 240 V
AC 50-60 Hz.
[39] USB TYPE B PORT
Use this to connect your computer for audio stereo recording of the MAIN MIX signal and audio
stereo playback. The computer connection does not require any driver and allows the recording and
reproduction of PCM audio at 44.1/48.0 kHz - 16 Bit. The audio signal coming from a computer
connected to the USB port could be reproduced through Channel 11/12 audio path (see section [15]
of this manual).
CONNECTORS
1/4” JACK CONNECTOR
BALANCED (TRS)
Tip = Hot
Ring = Cold
Sleeve = Ground
UNBALANCED (TS)
Tip = Hot
Sleeve = Ground
ENGLISH
POWER ON/OFF
USB AUDIO
PHONES (TRS)
Tip=Left Channel
Ring = Right Channel
Sleeve = Ground
Tip
Ring
Sleeve
SleeveTip
XLR CONNECTOR
Connector pinout:
1 = earth
2 = audio signal (+ or “hot“)
3 = audio signal (– or “cold“)XLR Connector (F) XLR Connector (M)
Tip
Ring
Sleeve
11
Page 12

ROTATE
ON
OFF
ON
OFF
ENGLISH
SUGGESTED CONFIGURATION
MICROPHONE
AC. DRUM
EL. BASS
SYNTH
EL. GUITAR
MAIN SPEAKERS
STAGE MONITORS
12
Page 13

ROTATE
ON
OFF
ON
OFF
SUGGESTED CONFIGURATION
ENGLISH
EL. GUITAR
MICROPHONES
EL. BASS
SYNTH
DRUM
MACHINE
MAIN
SPEAKERS
POWER ON/OFF
STUDIO MONITORS
STAGE MONITORS
USB AUDIO
COMPUTER - DAW
13
Page 14

AVVERTENZE PER LA SICUREZZA
Prima di collegare ed utilizzare questo prodotto, leggere attentamente le istruzioni contenute in questo manuale, il quale è da
conservare per riferimenti futuri.
ITALIANO
Il presente manuale costituisce parte integrante del prodotto e deve accompagnare quest’ultimo anche nei passaggi di proprietà, per
permettere al nuovo proprietario di conoscere le modalità d’installazione e d’utilizzo e le avvertenze per la sicurezza. L’installazione
e l’utilizzo errati del prodotto esimono la RCF S.p.A. da ogni responsabilità.
ATTENZIONE: per prevenire i rischi di fiamme o scosse elettriche, non esporre mai questo prodotto alla pioggia o
all’umidità.
1. Tutte le avvertenze, in particolare quelle relative alla sicurezza, devono essere lette con particolare attenzione, in quanto
contengono importanti informazioni.
2. ALIMENTAZIONE PRINCIPALE DA RETE ELETTRICA
- La tensione di alimentazione dell’apparecchio ha un valore sufficientemente alto da costituire un rischio
di folgorazione per le persone: non procedere mai all’installazione od alla connessione dell’apparecchio
con il cavo dell’alimentazione collegato alla rete elettrica.
- Prima di alimentare questo prodotto, assicurarsi che tutte le connessioni siano corrette e che la tensione
della vostra rete di alimentazione corrisponda quella di targa dell’apparecchio, in caso contrario
rivolgetevi ad un rivenditore RCF.
- Le parti metalliche dell’apparecchio sono collegate a terra tramite il cavo di alimentazione. Un apparecchio
avente costruzione di CLASSE I deve essere connesso alla presa di rete con un collegamento alla terra di
protezione.
- Accertarsi che il cavo di alimentazione dell’apparecchio non possa essere calpestato o schiacciato da
oggetti, al fine di salvaguardarne la perfetta integrità.
- Per evitare il rischio di shock elettrici, non aprire mai l’apparecchio: all’interno non vi sono parti che
possono essere utilizzate dall’utente.
3. Impedire che oggetti o liquidi entrino all’interno del prodotto, perché potrebbero causare un corto circuito. L’apparecchio
non deve essere esposto a stillicidio o a spruzzi d’acqua; nessuna sorgente di fiamma nuda (es. candele accese) e nessun
oggetto pieno di liquido (es. vasi) deve essere posto sull’apparecchio.
4. Non eseguire sul prodotto interventi / modifiche / riparazioni se non quelle espressamente descritte sul manuale istruzioni.
Contattare centri di assistenza autorizzati o personale altamente qualificato quando:
- l’apparecchio non funziona (o funziona in modo anomalo);
- il cavo di alimentazione ha subito gravi danni;
- oggetti o liquidi sono entrati nell’apparecchio;
- l’apparecchio ha subito forti urti.
5. Qualora questo prodotto non sia utilizzato per lunghi periodi, scollegare il cavo d’alimentazione dalla rete.
6. Nel caso che dal prodotto provengano odori anomali o fumo, spegnerlo immediatamente e scollegare il cavo
d’alimentazione.
7. Non collegare a questo prodotto altri apparecchi e accessori non previsti. Non cercare di appendere questo prodotto tramite
elementi non idonei o previsti allo scopo. Per evitare il pericolo di cadute, non sovrapporre fra loro più unità di questo
prodotto, quando questa possibilità non è espressamente contemplata dal manuale istruzioni.
8. RCF S.p.A. raccomanda vivamente che l’installazione di questo prodotto sia eseguita solamente da installatori professionali
qualificati (oppure da ditte specializzate) in grado di farla correttamente e certificarla in accordo con le normative vigenti.
Tutto il sistema audio dovrà essere in conformità con le norme e le leggi vigenti in materia di impianti elettrici.
9. Sostegni e Carrelli
Se previsto, il prodotto va utilizzato solo su carrelli o sostegni consigliati dal produttore. L’insieme apparecchio-sostegno /
carrello va mosso con estrema cura. Arresti improvvisi, spinte eccessive e superfici irregolari o inclinate possono provocare il
ribaltamento dell’assieme.
10. Perdita dell’udito
L’esposizione ad elevati livelli sonori può provocare la perdita permanente dell’udito. Il livello di pressione acustica pericolosa
per l’udito varia sensibilmente da persona a persona e dipende dalla durata dell’esposizione. Per evitare un’esposizione
potenzialmente pericolosa ad elevati livelli di pressione acustica, è necessario che chiunque sia sottoposto a tali livelli utilizzi
delle adeguate protezioni; quando si fa funzionare un trasduttore in grado di produrre elevati livelli sonori è necessario
indossare dei tappi per orecchie o delle cuffie protettive. Consultare i dati tecnici istruzioni per conoscere le massime
pressioni sonore che i diffusori acustici sono in grado di produrre.
11. Collocare il prodotto lontano da fonti di calore e garantire la circolazione dell’aria intorno.
12. Non sovraccaricare questo prodotto per lunghi periodi.
13. Non forzare mai gli organi di comando (tasti, manopole ecc.).
14. Non usare solventi, alcool, benzina o altre sostanze volatili per la pulitura delle parti esterne dell’unità; usare un panno
asciutto.
15. Non puntare microfoni vicino ed in fronte ai diffusori acustici, in modo da evitare qualsiasi retroazione (“effetto Larsen”).
ATTENZIONE
IMPORTANTE
14
Page 15

NOTA SUI CAVI PER SEGNALI AUDIO
Per evitare fenomeni di rumorosità indotta sui cavi che trasportano segnali dai microfoni o di linea (per esempio 0 dB), usare solo
cavi schermati ed evitare di posarli nelle vicinanze di:
- apparecchiature che producono campi elettromagnetici di forte intensità;
- cavi della rete elettrica;
- linee altoparlanti.
RCF S.p.A. Vi ringrazia per l’acquisto di questo prodotto, realizzato in modo da garantirne l’affidabilità e prestazioni elevate.
INFORMAZIONI SUL DISPOSITIVO
Grazie per l’acquisto di un mixer RCF.
F 12XR è un mixer audio di grande versatilità dotato di tutte le funzioni necessarie per il trattamento dei più vari segnali audio provenienti da differenti
sorgenti sonore.
TRASPARENZA SONORA
I mixer RCF combinano l’eredità della caratteristica “sound culture“ RCF con un design innovativo e una innata cura nella fase produttiva. I mixer RCF
assicurano all’appassionato utilizzatore professionale RCF un suono trasparente, una accurata dinamica sonora e una versatilità estrema. Le console audio
RCF sono progettate per un perfetto utilizzo abbinate agli speakers attivi RCF.
AFFIDABILITÀ
Tutte le mixing console RCF durante la costruzione sono sottoposte a quattro test di qualità strumentali. Alla fine della produzione viene eseguita una prova
di ascolto, seguita da un’ispezione finale di controllo di qualità per individuare eventuali difetti di aspetto, quali graffi o ammaccature. Il processo garantisce
un’elevata affidabilità assicurando che il dispositivo acquistato sia di altissima qualità.
ITALIANO
DESIGN
Il design unico delle mixing console RCF è un’espressione della creatività tipicamente italiana. I mixer RCF combinano un design ergonomico moderno ed
eccellente. Oltre al loro aspetto accattivante, gli originali profili laterali rendono i mixer RCF facili da afferrare, spostare agevolmente e in maniera sicura.
DESCRIZIONE E CARATTERISTICHE PRINCIPALI
F 12XR è un versatile mixer audio analogico, dotato di una porta seriale USB per la connessione a un computer; dispone inoltre di tutti gli strumenti
necessari per una corretta elaborazione di segnali audio provenienti dalle più diverse fonti sonore. Al suo interno F 12XR dispone di una board PRO DSP
FX: l’unità DSP offre 16 preset di effetti audio: 10 riverberi, 3 delays e 3 effetti di modulazione.
F 12XR INGRESSI AUDIO
- INGRESSI da 1 a 6: Ingressi microfonici o di linea con connettori XLR e TRS jack separati, EQ a tre bande.
- INGRESSI 5/6 e 7/8 sono ingressi STEREO per segnali di linea (doppio TRS jack), EQ a tre bande.
- INGRESSI 9/10 and 11/12 sono ingressi STEREO per segnali di linea (RCA o doppio TRS jack), EQ a due bande.
F 12XR USCITE AUDIO
- USCITA MAIN MIX: uscita stereo principale con connettori XLR (bilanciati) e jack TRS.
- USCITA CONTROL ROOM provvista di connettori jack TRS bilanciati.
- 2 USCITE AUX (TRS jack Bilanciato).
- 1 FOOTSWITCH: presa jack (TS jack) per un pedale di controllo per la disattivazione e attivazione del ritorno effetti.
- 1 USCITA CUFFIE: (1/4” stereo jack)
- Porta audio USB per la registrazione e la riproduzione di audio stereo 44.1- 48 kHz - 16 Bit da e per un computer dedicato.
- PSU Interno:100 V-240 V, 50-60 Hz, 40 W
DIMENSIONI FISICHE
- Dimensioni: L = 372 mm, W = 355 mm, H = 90 mm
- Peso: 4,5 Kg
15
Page 16

PANNELLO FRONTALE
ROTATE
ON
OFF
ON
OFF
ITALIANO
2 3 4
12
18
32 33 34 35 36
1
13 14
19 20
23 24
5
31
6 7
15
2729 30
10
8
9
11
17
16
21
22
25
26
28
PANNELLO POSTERIORE
37 38
POWER ON/OFF
USB AUDIO
39
16
Page 17

DESCRIZIONE DEL PANNELLO FRONTALE
[1] INGRESSI MICROFONICI
RCF F 12XR fornisce 6 ingressi microfonici mono tramite connettori XLR. L’ingresso del
preamplificatore microfonico XLR bilanciato supporta sorgenti con un range di guadagno da 0
dB a -50 dB (vedere la sezione [12] e [13] di questo manuale). Tutti gli ingressi MIC-LINE dell’F
12XR dispongono di un filtro Hi-Pass a 80 Hz. Abilitare il filtro Hi-Pass a 80 Hz quando si utilizza
un microfono per la voce per ridurre i rumori di “bump” e rumori a bassa frequenza (vedere la
sezione [12] e [13] di questo manuale). Gli ingressi microfonici da 1 a 6 sono forniti di Phantom
Power a + 48 V. Abilitare l’alimentazione Phantom in presenza di microfoni a condensatore e
electret o in caso di utilizzo di D.I. Box (vedere la sezione [16] di questo manuale).
[2] INGRESSI LINEA
Gli ingressi linea jack TRS da 1 a 6 sono segnali di linea che supportano un range di guadagno da + 20 dB
a -30 dB.
[3] INGRESSO LINEA 4
L’ingresso di linea 4 aggiunge la funzione di input Hi-Z (alta impedenza) selezionabile. L’ingresso Hi-Z è
molto utile quando si collegano strumenti musicali di basso livello come Chitarre elettriche o acustiche
o Chitarre basso con pick-ups passivi.
[4] INGRESSI STEREO 5/6 E 7/8
I jack TRS 5/6 e 7/8 forniscono ingressi stereo per sorgenti di linea. Notare che sorgenti MONO possono
essere collegate agli ingressi jack 5 e 7.
[5] INGRESSI STEREO 9/10 E 11/12
I connettori RCA e jack TRS 9/10 e 11/12 forniscono ingressi per linee stereo. Si noti che sorgenti
MONO possono essere collegate agli ingressi jack 9 e 11.
ITALIANO
ON
OFF
[6] CONTROLLO A PEDALE
Questo connettore jack TS consente l’uso di interruttori MOMENTARY o pedali per MUTE (disattivare)
e UN-MUTE (riattivare) l’audio proveniente dal ritorno dell’FX interno. Quando l’FX è disattivato
tramite l’interruttore a pedale, il LED rosso vicino al pulsante MUTE del fader FX RET si illumina (vedere
la sezione [34] di questo manuale). In questa condizione, l’effetto può essere riattivato premendo
nuovamente il tasto FX RET MUTE o tramite FOOTSWITCH.
[7] USCITA CUFFIE
Collega qui le cuffie per ascoltare i segnali MAIN MIX o PFL. Per evitare danni all’udito, impostare il
comando PHONES LEVEL ([28]) sul minimo (-∞) prima di collegare e indossare le cuffie.
[8] USCITE AUX
Questi connettori jack TRS forniscono un’uscita audio bilanciata di + 4 dB proveniente dalle mandate
ausiliarie. Collega qui i tuoi monitor da palco o gli input di effetti esterni.
[9] USCITE BUS
Questi due jack TRS bilanciati provvedono all’uscita audio + 4 dB proveniente dai BUS 1 e 2. Il livello
audio dei BUS 1 e 2 è controllato dal fader BUS 1/2 dedicato situato sul pannello anteriore (vedere la
sezione [35] di questo manuale).
[10] USCITE MAIN
Questi connettori XLR maschio forniscono un’uscita audio bilanciata di + 4 dB proveniente dal MAIN
MIX. Collega agli XLR chiamati L e R il tuo sistema di altoparlanti principale. Il livello audio di MAIN
MIX OUT L/R è controllato dal fader MAIN MIX dedicato (vedi la sezione [36] di questo manuale). Le
uscite L/R XLR MAIN MIX sono replicate con jack TRS L/R.
17
Page 18

DESCRIZIONE DEL PANNELLO FRONTALE
[11] USCITA CTRL ROOM
ITALIANO
Collega all’uscita Control Room (jack Bilanciati) una coppia di monitor da studio come sistema di
ascolto locale. Il livello audio dell’uscita CTRL ROOM è controllato dal potenziometro CONTROL ROOM
dedicato sul pannello anteriore (vedere la sezione [26] di questo manuale).
[12] GAIN DEGLI INGRESSI DA 1 A 4
Questi controlli consentono di impostare il guadagno per l’ingresso microfonico con un intervallo da 0 dB
a -50 dB; collega i tuoi microfoni qui. Se il LINE INPUT (jack TRS) è in uso, il range di guadagno consentito
va da + 20 dB a -30 dB. Tutti gli ingressi MIC-LINE dell’F 12XR sono forniti con un filtro Hi-Pass ad 80 Hz.
Abilita il filtro Hi-Pass ad 80 Hz quando si utilizza un microfono per la voce per ridurre i rumori di bump e
rumble a bassa frequenza.
[13] GAIN DEGLI INGRESSI 5/6 E 7/8
Ingresso MIC (XLR). Questi controlli consentono di impostare il guadagno per l’ingresso microfonico
con un intervallo da 0 dB a -50 dB. Il corrispondente INGRESSO LINE stereo (jack TRS) ha un guadagno
di ingresso fisso.
[14] GAIN DEGLI INGRESSI 9/10 E 11/12
INGRESSO STEREO LINE (jack TRS). I controlli consentono un controllo del range di guadagno da +20 dB a -30 dB.
[15] PULSANTE IN USB - IN 11/12
Quando il pulsante è in posizione alzata (non premuto), l’audio proveniente da LINE INPUT 11/12 viene
indirizzato al MAIN MIX; quando viene premuto il pulsante USB IN - IN 11/12, i canali audio stereo
riprodotti da un computer esterno collegato alla porta USB vengono indirizzati al canale stereo 11/12.
In questo caso, l’audio USB sostituisce l’ingresso audio analogico e sfrutta tutte le funzionalità fornite
dal canale stereo come EQ, AUX send, BAL e fader di controllo livello.
[16] INTERRUTTORE PHANTOM POWER +48 V CH1/6
Dedicato agli ingressi microfonici, questo interruttore consente di abilitare l’alimentazione Phantom +
48 V agli ingressi Mic da 1 a 6. L’abilitazione dell’alimentazione Phantom è necessaria in presenza di
microfoni a condensatore ed electret o in caso di utilizzo di D.I. box.
[17] MISURATORE DI LIVELLO
Questo misuratore di livello a 12 elementi LED, consente di controllare il livello di uscita del MAIN MIX.
Mantenere il livello di uscita sotto l’indicazione “CLIP“ per evitare segnali sovraccaricati che possono
causare distorsione.
[18] COMPRESSORI
I canali di input da 1 a 4 sono dotati di compressori dinamici a controllo singolo intuitivi e potenti. Con
parametri di soglia e rapporto di compressione appositamente progettati, i compressori dell’F 12XR
consentono di controllare anche i segnali più dinamicamente complessi.
[19] EQ (CANALI MONO)
Tutti i canali mono e i canali stereo 5/6 e 7/8 di F 12XR sono dotati di un sofisticato e preciso
equalizzatore a 3 bande. Il controllo a bassa frequenza è impostato a 100 Hz con un guadagno di
+/- 15 dB e una curva shelving. Il controllo ad alta frequenza è impostato a 10 kHz con un guadagno
di +/- 15 dB e una curva shelving. Il controllo della frequenza media si imposta a 1250 Hz con un
guadagno di +/- 15 dB e una curva a campana.
ON
OFF
18
Page 19

DESCRIZIONE DEL PANNELLO FRONTALE
[20] EQ (CANALI STEREO)
I canali stereo 9/10 e 11/12 sono dotati di EQ a due bande HIGH e LOW. Il controllo di frequenza High
è impostato su 10 kHz con un guadagno di +/- 15 dB e una curva di shelving. Il controllo a bassa
frequenza si imposta a 100 Hz con un guadagno di +/- 15 dB e una curva shelving.
[21] PRO DSP FX
F 12XR è dotato di una scheda PRO DSP FX interna che dispone di 16 preset. Ruotare l’encoder
consente di selezionare tra 16 interessanti effetti sonori:
ITALIANO
01. SMALL HALL
02. LARGE HALL
03. SMALL ROOM
04. BRIGHT ROOM
Seleziona uno di questi preset di effetto per arricchire il tuo suono.
05. THIN PLATE
06. PLATE
07. SPRING REVERB
08. MULTITAP DELAY
09. ANALOG DELAY
10. CHORUS VERB
11. STEREO CHORUS
12. FLANGER
13. PHASER
14. GATED REVERB
15. FLANGER REVERB
16. VOCAL ECHO
[22] LED “PFL ACTIVE”
Questo led si accende quando vengono premuti uno o più tasti PFL.
[23] AUX1- AUX2/FX
Ogni canale del mixer F 12XR è dotato di 2 mandate ausiliarie; AUX1 è una
mandata PRE fader. AUX2 / FX è anche la mandata alla scheda PRO DSP FX
interna. AUX2 / FX è una mandata POST o PRE fader a seconda della posizione
del pulsante AUX2 PRE / POST ([27]). Quando la selezione è pre-fader, AUX2
/ FX estrae il segnale dal canale indipendentemente dalla posizione del fader;
quando la selezione è post-fader, AUX2 / FX acquisisce il segnale soggetto
alla posizione del fader. Il segnale presente nella mandata AUX2 / FX è anche
indirizzato alla presa AUX OUTPUT 2 presente sul pannello superiore (vedere
la sezione [8] di questo manuale).
[24] FUNZIONE FX TO AUX
Questa potenziometro consente di inviare il segnale presente nel canale di ritorno FX alla mandata AUX1.
ROTATE
[25] POTENZIOMETRI AUX1 E AUX2/FX MASTER
Questi potenziometri controllano il livello master delle mandate ausiliarie AUX1 e AUX2 / FX. Il pulsante
PFL quando premuto consente di ascoltare il segnale presente nell’uscita AUX selezionata, attraverso gli
altoparlanti collegati all’USCITA CTRL ROOM (vedere la sezione [11] di questo manuale) o attraverso le
cuffie collegate a PHONES OUTPUT (vedere la sezione [7]).
[26] POTENZIOMETRO CTRL ROOM LEVEL
È il controllo di livello del segnale indirizzato a CTRL ROOM OUTPUT. Durante l’uso normale del mixer,
il segnale MAIN MIX viene indirizzato a questa uscita; quando vengono premuti uno o più pulsanti PFL,
il segnale del bus PFL viene indirizzato a CTRL ROOM OUTPUT e PHONES OUTPUT.
[27] PULSANTE AUX2 PRE/POST
Questo pulsante consente la selezione della posizione pre-fader o post-fader dell’AUX2 / FX. Quando il
pulsante è in posizione alta (non premuto) l’AUX2/FX preleva il segnale post-fader; quando il pulsante
è premuto AU2/FX preleva il segnale indipendentemente dalla posizione del fader (pre-fader). Vedere
la sezione [23] di questo manuale.
[28] LIVELLO CUFFIA
Questo potenziometro controlla il livello della PHONES OUTPUT [7]. Per evitare danni all’udito
impostare il comando PHONES LEVEL su minimo (-∞) prima di collegare e indossare le cuffie.
[29] PAN
Questi controlli consentono di posizionare il segnale presente nel canale mono nell’immagine stereo
del MAIN MIX.
19
Page 20

DESCRIZIONE DEL PANNELLO FRONTALE
[30] PAN/BAL
ITALIANO
Il controllo funziona come PAN se il canale viene utilizzato nella configurazione MONO (XLR MIC
INPUT) e definisce la posizione del segnale nell’immagine stereo del MAIN MIX. Il controllo BAL
(Balance) consente di bilanciare la posizione del canale stereo (ingresso stereo della linea jack TRS)
nell’immagine stereo del MAIN MIX.
[31] BAL
Questi controlli caratteristici dei canali stereo consentono il bilanciamento della posizione di un canale
stereo nell’immagine stereo del MAIN MIX.
[32] SEZIONE FADERS DEI CANALI MONO
Questa sezione consente di controllare i livelli dei canali di ingresso da 1 a 4 e il loro routing verso le
uscite. Ciascuno dei fader ha diversi pulsanti di controllo. Il pulsante MUTE quando premuto inibisce il
flusso del segnale verso i bus di uscita e il MAIN MIX. Il pulsante PFL consente di ascoltare il segnale
presente sul canale attraverso gli altoparlanti collegati all’USCITA CTRL ROOM (vedere la sezione [11]
di questo manuale) o tramite cuffie collegate all’uscita PHONES (vedere la sezione [7]). I pulsanti
MAIN e BUS 1/2 posizionati sul lato destro di ciascun fader consentono di indirizzare il segnale
rispettivamente a MAIN MIX e / o STEREO BUS 1/2.
[33] SEZIONE FADERS DEI CANALI STEREO
Questa sezione consente di controllare i livelli dei canali di input stereo dal 5/6 all’11/12 e il loro
routing verso le uscite. Il pulsante PFL consente di ascoltare il segnale presente sul canale attraverso
gli altoparlanti collegati all’USCITA CTRL ROOM (vedere la sezione [11] della descrizione del pannello)
o le cuffie collegate all’USCITA DELLE CUFFIE (vedere la sezione [7]). I pulsanti MAIN e BUS 1/2
posizionati sul lato destro del fader consentono di indirizzare il segnale rispettivamente a MAIN MIX
e / o STEREO BUS 1/2.
[34] FADER DI FX RET
Questo fader controlla il livello del segnale proveniente dal PRO DSP FX interno. Il pulsante MUTE
quando premuto inibisce il flusso del segnale verso il bus di uscita o il MAIN MIX. Il pulsante PFL
consente di ascoltare il segnale presente sul canale attraverso gli altoparlanti collegati all’USCITA CTRL
ROOM (vedere la sezione [11] di questo manuale) o le cuffie collegate a PHONES OUTPUT (vedere la
sezione [7]). I pulsanti MAIN e BUS 1/2 posizionati sul lato destro del fader consentono di indirizzare
il segnale rispettivamente a MAIN MIX e / o STEREO BUS 1/2.
[35] FADER BUS 1-2
Il fader BUS 1-2 controlla il livello di questo bus stereo. Il BUS 1-2 può essere alimentato con ciascuno
dei canali di ingresso per creare un gruppo audio stereo indirizzato alle USCITE BUS fisiche (vedere la
sezione [9]). Il pulsante MAIN posizionato vicino al fader BUS indirizza il BUS al MAIN MIX. Il pulsante
MUTE quando premuto inibisce il flusso del segnale all’uscita BUS e al MAIN MIX se il BUS 1-2 viene
indirizzato su di esso. Il pulsante PFL quando premuto consente di ascoltare il segnale presente nel BUS
attraverso gli altoparlanti collegati all’USCITA CTRL ROOM (vedere la sezione [11] di questo manuale)
o le cuffie collegate alla PHONES OUTPUT (vedere la sezione [7]).
[36] FADER MAIN MIX
Il fader MAIN MIX controlla il livello in uscita del MAIN MIX.
20
Page 21

DESCRIZIONE DEL PANNELLO POSTERIORE
[37] INTERRUTTORE DI ACCENSIONE
Utilizzare questo interruttore per accendere e spegnere il mixer F 12XR.
[38] INGRESSO DI ALIMENTAZIONE
Collegare qui il cavo di alimentazione fornito a corredo. L’alimentatore interno accetta tensioni da 100 V
a 240 V CA. 50-60 Hz.
[39] PORTA USB TIPO B
Utilizzabile per collegare un computer per la registrazione audio stereo del segnale MAIN MIX e per
la riproduzione audio stereo. La connessione al computer non richiede alcun driver e consente la
registrazione e la riproduzione di audio PCM a 44.1 / 48.0 kHz - 16 Bit. Il segnale audio proveniente
dal computer collegato alla porta USB può essere riprodotto attraverso il canale audio 11/12 (vedere
la sezione [15] di questo manuale).
CONNETTORI
CONNETTORE JACK 1/4”
ITALIANO
POWER ON/OFF
USB AUDIO
BILANCIATO (TRS) SBILANCIATO (TS)
Punta = Caldo
Anello = Freddo
Schermo = Massa Schermo = Massa
Punta Punta
Schermo Schermo
Anello
Punta = Caldo
Schermo = Massa
CONNETTORE XLR
Piedinatura connettore XLR:
1 = massa
2 = segnale audio (+ o “caldo”)
3 = segnale audio (– o “freddo”)Connettore XLR (F) Connettore XLR (M)
CUFFIE (TRS)
Punta = Canale Sinistro
Punta
Anello
Anello = Canale Destro
Schermo
21
Page 22

ROTATE
ON
OFF
ON
OFF
CONFIGURAZIONE SUGGERITA
MICROFONO
BATTERIA ACUSTICA
CHITARRA
ELETTRICA
BASSO
ELETTRICO
TASTIERA
IMPIANTO
AUDIO
22
ALTOPARLANTI
DA PALCO
Page 23

ROTATE
ON
OFF
ON
OFF
CONFIGURAZIONE SUGGERITA
CHITARRA
ELETTRICA
MICROFONI
BASSO
ELETTRICO
BATTERIA
ELETTRONICA
TASTIERA
IMPIANTO
AUDIO
POWER ON/OFF
STUDIO MONITORS
ALTOPARLANTI
DA PALCO
USB AUDIO
COMPUTER - DAW
23
Page 24

F12XR BLOCK DIAGRAM / SCHEMA A BLOCCHI
LINE
LINE
2
121
CHANNEL 11/12
GAIN
USB AUDIO
INPUT
10KHZ
100HZ
3
524
6
1
2 BAND EQ
STEREO
PEAK
2
2
3
1
MUTE
2
2
3
1
3
1
3
1
PFL
LINE
LINE
2
121
LINE
CHANNEL 5/6 - 7/8
LINE
CHANNEL 9/10
A M P
A M P
GAIN
2 BAND EQ
10KHZ
STEREO
100HZ
PEAK
2
3
1
MUTE
2
2
2
3
3
1
3
1
PFL
10KHZ
1.25KHZ
100HZ
1
MIC
LINE
CHANNEL 4
PHANTOM POWER
G AI N
HPF 80HZ
3
1
2
3 BAND EQ
STEREO
THRESHOLD
PEAK
2
2
2
2
3
1
3
1
3
1
3
1
MUTE
PFL
1.25KHZ
MIC
3
1
H i Z
2
PHANTOM POWER
CHANNEL 1-3
LINE
MIC
48V SWITCH+48V
12
PHANTOM POWER
GAIN
HPF 80HZ
3
1
2
COMPRESSORS
THRESHOLD
10KHZ
100HZ
3 BAND EQ
PEAK
MUTE
2
3
1
1.25KHZ
GAIN
HPF 80HZ
3
1
2
COMPRESSORS
10KHZ
100HZ
3 BAND EQ
PEAK
MUTE
2
3
1
LEVELFADER
A U X 2 P R E
A U X P O S T/FX
B A L
MAIN
BUS
2
2
3
123
1
3
1
3
A U X 1
2
1
MASTER FADER
B A L
BUS
2
1
3
1
PFL
1
3
524
6
6
MAIN
A U X 2 P R E
A U X P O S T/FX
A U X 1
MAIN
2
2
3
1
3
123
MASTER FADER
3
524
1
LEVELFADERLEVELFADER
A U X 2 P O S T / FX
A U X 2 P R E
A U X 1
B A L
MAIN
BUS
2
2
3
123
1
3
1
A U X 1
2
3
1
USB
PHONES LEVEL
METERS
LEVELFADER
P A N
MAIN
BUS
2
2
2
3
1
2
3
1
3
1
3
1
3
2
3
1
PFL
A U X 2 P O S T / FX
A U X 2 P R E
A U X 1
1
3
123
1
1
BUS
PFL
2
2
CTRL ROOM LEVEL
LEVELFADER
PAN
A U X 2 P O S T / FX
MAIN
BUS
2
2
3
3
123
3
MAIN
2
2
3
123
1
3
1
2
1
POST
PRE
3
1
PRE/POST
2
FX TO AUX1
1
AUX2 LEVEL
FX LEVEL
2
3
1
PFL
A U X 2 P R E
A U X 1
MAIN_L
MAIN_R
AUX1
AUX2_PRE
AUX2_POST
BUS1
BUS2
PFL_L
PFL_R
2
3
1
PFL
AUX1 LEVEL
2
3
1
PFL
24
BUS 1
BUS 2
MAIN OUT R
MAIN OUT L
HEADPHONES
CTRL ROOM -R
CTRL ROOM - L
ENCODER
AUX2 SEND
DISPLAY
AUX1 SEND
Page 25

SPECIFICATIONS / SPECIFICHE
SPECIFICATIONS
Mono input Channels
Microphone inputs
Frequency response
Distortion (THD+N)
Sensitivity range
Max input
Mic input impedance
Phantom Power
Low cut:
Line input
Frequency response
Distortion (THD+N)
Sensitivity range
Max input
Line input impedance
Stereo Input Channels
Line input
Frequency response
Distortion (THD+N)
Sensitivity range
Line input impedance
RCF F 12XR
6 XLR Balanced
20 Hz - 20 kHz, +/-1 dB
<0,003% at +0 dB, 20 Hz-20 kHz
0 dB to -50 dB
+20 dBu
14 kΩ unbalanced
+48 V
80 Hz
4 TRS jack balanced
20 Hz - 20 kHz, +/- 1dB
<0,003% at +0 dB, 20 Hz-20 kHz
20 dB to -30 dB
+40 dBu
21 kΩ unbalanced
4 pairs TRS jack balanced and 2 pairs RCA unbalanced
20 Hz - 20 kHz, +/- 1 dB
<0,003% at +0 dB, 20 Hz-20 kHz
20 dB to -30 dB
15 kΩ
Mono Channels EQ
High
Mid
Low
Stereo Channels EQ
High
Low
DSP Section
DSP Processing
A/D and D/A converters
Type of effects
Footswitch
Outputs
Main Output
Max Main Mix Output level
Aux Output
Max Aux Output level
Stereo Bus 1/2 Output
Max Bus Output Level
Ctrl Room
Phones Output
+/-15 dB @ 10 kHz Shelving
+/-15 dB @ 1,250 kHz Bell
+/-15 dB @ 100 Hz Shelving
+/-15 dB @ 10 kHz Shelving
+/-15 dB @ 100 Hz Shelving
20/27 bit digital signal
24 bit
4 algorithms: reverb, chorus, delay, flanger - 16 presets
TS jack (for effect return mute and unmute)
1 pair of XLR male and 1 pair of TRS jacks
+28 dBu
2 TRS jack
+28 dBu
2 TRS jack
+28 dBu
1 pair of TRS jacks
1 Stereo jack
Power Supply
Internal Universal Power
Main Voltage
Power Consumption
Weight
Dimensions
100 V - 240 V AC, 50-60 Hz
24 W
4.5 kg
L 372 mm, W 355 mm, H 90 mm
25
Page 26

F 12XR REAR VIEW / VISTA POSTERIORE
ROTATE
ON
OFF
ON
OFF
POWER ON/OFF
F 12XR TOP VIEW / VISTA FRONTALE
USB AUDIO
26
Page 27

27
Page 28

www.rcf.it
RCF SpA: Via Raffaello, 13 - 42124 Reggio Emilia - Italy
tel. +39 0522 274411 - fax +39 0522 274484 - e-mail: rcfservice@rcf.it
10307624
 Loading...