

Page 1
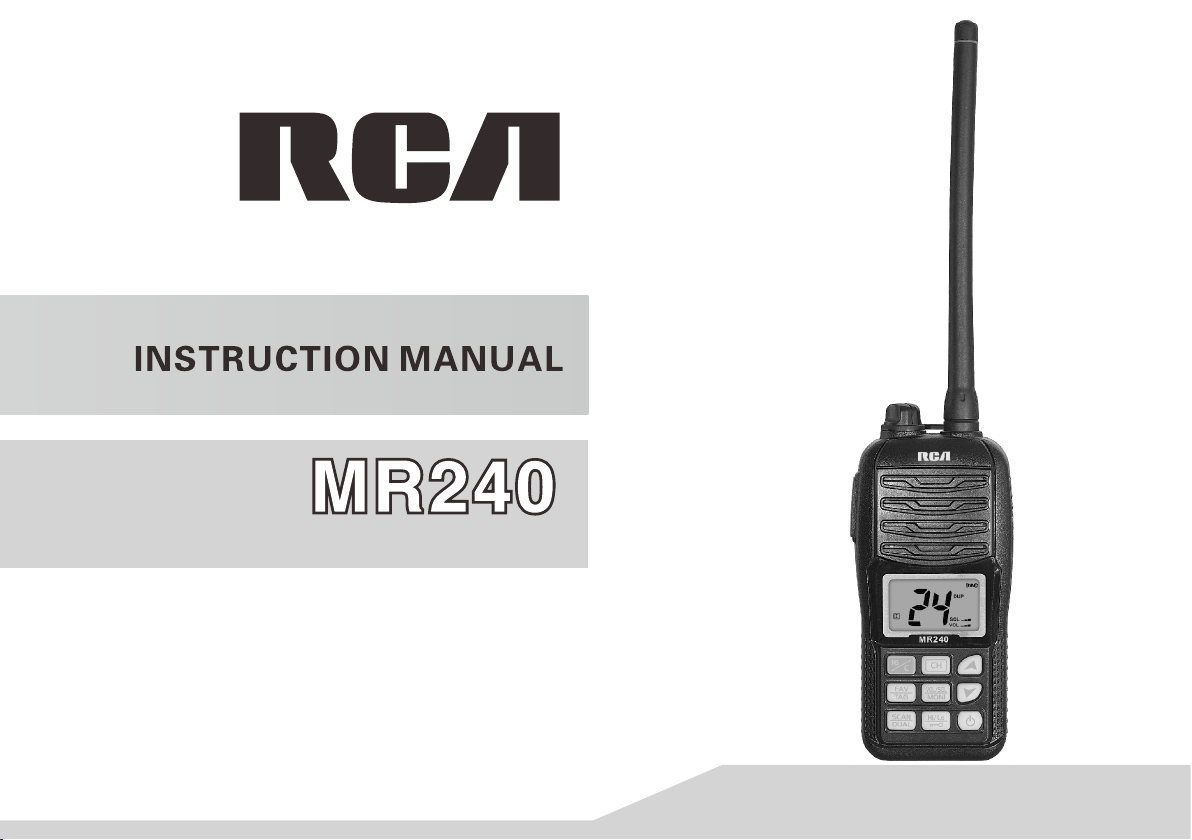
VHF Marine T
wo-Way Radio
RCA Communications Systems
Page 2

Foreword
Thank you for purchasing this company marine transceiver, you will find the
professional and human oriented design of the transceiver during u
all instructions carefully and completely before using the transcei
It is an abundant
(International Maritime Organization) resolution.
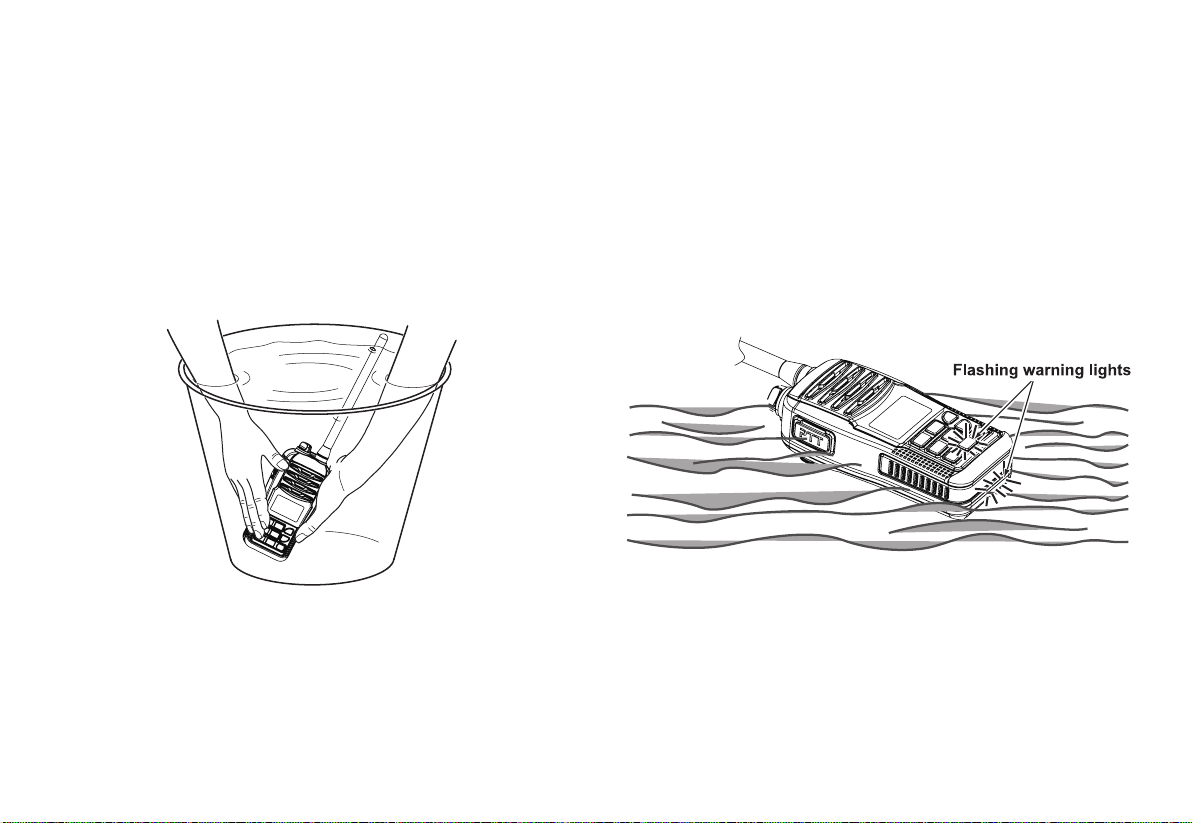
As adopting advance waterproof technology, the transceiver is with good
waterproof, floating and flash functions.
is a powerful marine radio, it id designed on IMO
se. Read
ver.
CAUTION
NEVER connect the transceiver to an AC outlet, this may
pose a fire hazard or result in an electric shock.
DO NOT use or place the transceiver in direct sunlight or
in areas with temperatures below -15℃ or above +55℃.
KEEP the transceiver at least 1meter away from your ves-
sel's nagentic navigation compass.
BE CAREFUL, the transceiver meats IP-X7 requirements
for waterproof protection.However,once the transceiver
has been dropped,waterproof protection cannot be guaranteed because of possible damage to the transceiver's
case or the waterproof seal.
◎MAKE SURE the flexible antenna and battery cover are
securely attached to the transceiver,and that antenna and
battery cover are dry before attachment. Exposing the inside of the transceiver to water will result in serious damage to the transceiver.
Page 3
Recommendation
Clean the transceiver thoroughly with fresh water after exposure to saltwater,
and dry it before operating. Otherwise, the transceiver's key, switches and
controllers may become unusable due to salt crystallization.
NOTE:DO NOT submerge the transceiver in water if there is any reason to
suspect the waterproof protection may not be effective. for example, in cases
where the battery cover or DC Jack cap rubber seal is damaged,the transceiver/battery cover/DC Jack cap is cracked or broken , or the transceiver
has been dropped, or when the battery cover, antenna or DC Jack cap are
detached from the transceiver.
Features
Floats on Water
The transceiver floats in fresh or salt water even when the supplied accessories are attached.
When a third-party battery pack, strap, antenna, etc. is used , it may sink.
Floats and Flashes
An LED sends out intermittent light from a transparent section on the bottom
of the radios, while floating in the water. As the LED light stands out in the
dark ( like a flashing fishing float), the radio can be easily retrieved from the
water. This function works even when the radios is turned OFF.
Page 4

CONTENTS
PREPARATION
Preparation ............................................................................... 1
Supplied Accessories ......................................................... 1
Charging the Battery Pack .................................................. 1
Battery Pack ....................................................................... 2
Flexible antenna ................................................................. 2
Belt clip ............................................................................... 2
PANEL DESCRIPTION
Pannel Description .................................................................... 3
Display ...................................................................................... 4
Turn ON/OFF ............................................................................ 5
Adjusting the Volume Level ........................................................ 5
Adjusting the Squelch Level ....................................................... 5
Receiving and Transmitting ....................................................... 5
Receiving ........................................................................... 5
Transmitting........................................................................ 5
Channel Group Selective ........................................................... 5
Channel Selection ..................................................................... 6
Channel 16 ......................................................................... 6
Call Channel ....................................................................... 6
Weather Channels .............................................................. 6
Call Channel Programming ........................................................ 6
Monitor Function ........................................................................ 7
Volume Loud Function ............................................................... 7
Volume Mute Function ............................................................... 7
Automatic Backlight ................................................................... 7
Lock Function ............................................................................ 7
AquaQuake Water Draining Function ......................................... 7
SCAN OPERATION
Scan Types ............................................................................... 8
Setting TAG Channels ............................................................... 8
Setting (or clearing) a TAG channel .................................... 8
Setting (or clearing) all tagged channels .............................. 8
Starting a Scan .......................................................................... 8
DUALWATCH/TRI-WATCH
Description ................................................................................ 9
Operation .................................................................................. 9
SET MODE
Set Mode Programming ............................................................ 10
Set Mode Operation .......................................................... 10
Set Mode Items ........................................................................ 10
Beep Tone Function .......................................................... 10
Weather Alert .................................................................... 10
Priority Scan Function ........................................................ 10
Scan Resume Time ........................................................... 10
Auto Scan Function ........................................................... 10
Dual/Tri-watch Function .................................................... 11
Monitor Key Action ............................................................. 11
Automatic Backlighting ....................................................... 11
LCD Contrast Setting ......................................................... 11
Power Save Function ......................................................... 11
VHF Marine Channel List .......................................................... 12
Specification ............................................................................. 13
Troubleshooting........................................................................ 14
Page 5
PREPARATION
Preparation
Supplied Accessories
Carefully unpack the transceiver. We recommend that you identify items llisted in the following table before discarding the packing materials. If any item
are missing or have been damaged, please contact dealer immediately.
Items Qty
Antenna 1
Battery Pack 1
Adaptor 1
Belt Clip 1
Handstrap 1
User's Manual 1
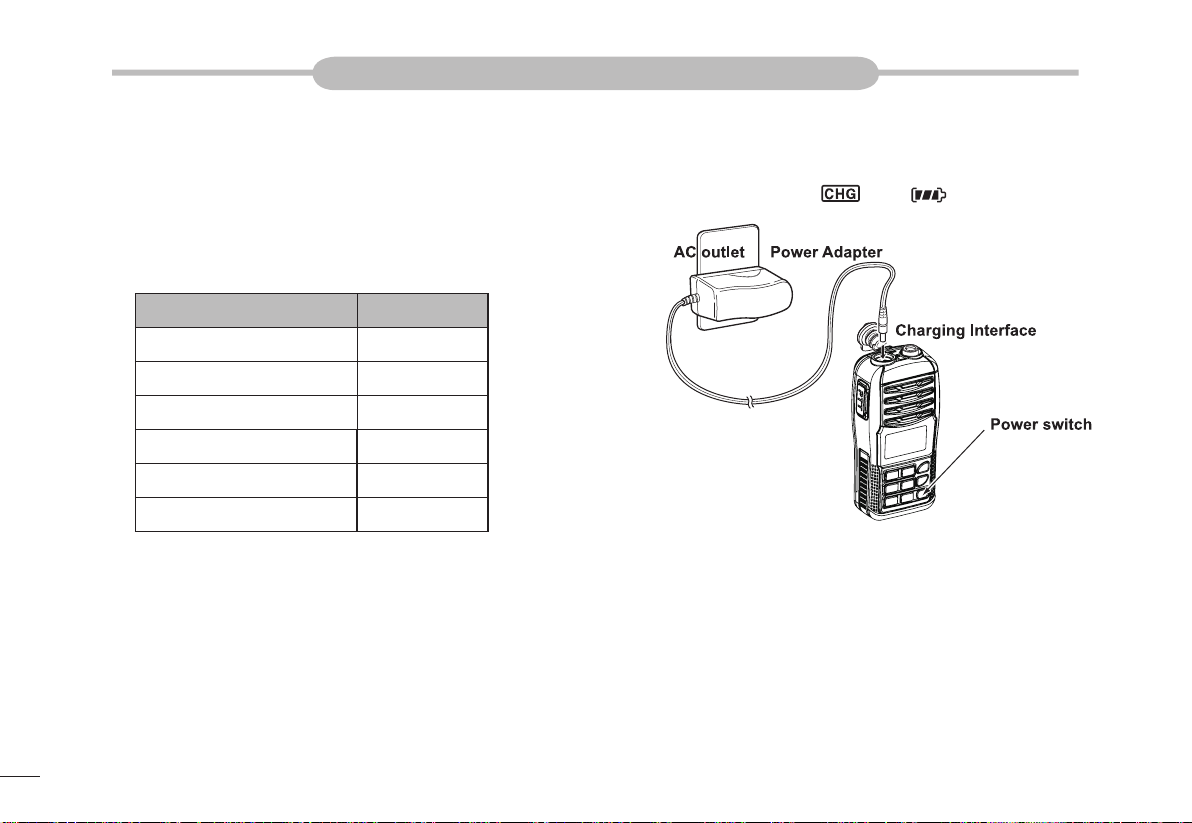
Charging the Battery Pack
Connect the adaptor to the AC Power.1.
Rotate the jack in top of transceiver, connect it to the adaptor start to 2.
charge, LCD appears "
If battery charging is full , LCD appears“FL”,you should pull the 3.
adaptor out .
NOTE: if transceiver didn't insert battery pack, LCD will
appears“Er”.
" and " " to indicate charging.
1
Page 6
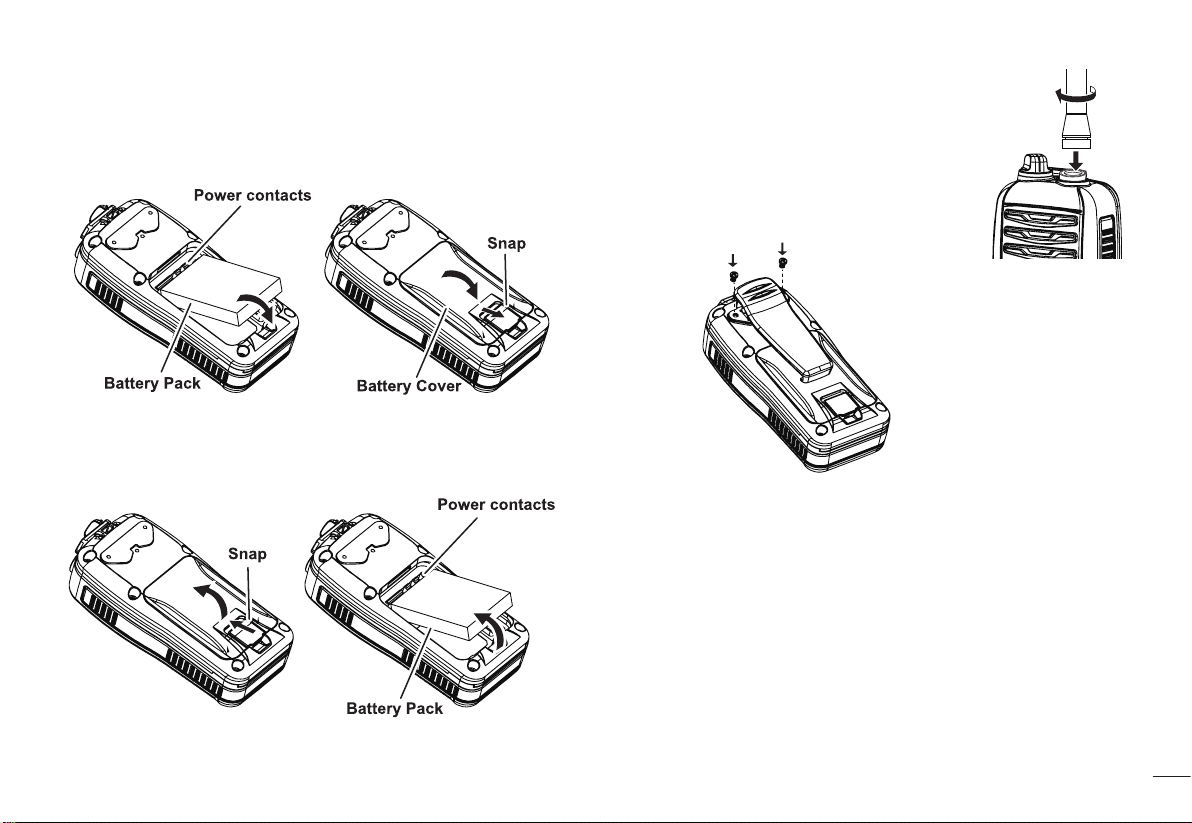
Battery Pack
To insert the battery pack:
Place the battery into the transceiver so it fits flat, and the securely attach
the battery cover, as shown. Push the cover until the latch comes back to
the locked position.
To remove the battery pack
Slide the latch and then lift the battery cover to remove it , then remove the
battery pack , as shown.
Flexible Antenna
Connect the supplied fixable antenna to the 1.
antenna connector, rotate it clockwise.
To remove it, rotate it counter-clockwise.2.
Belt Clip
Attach the belt clip to, or detach the belt clop from
the transceiver.
2
Page 7
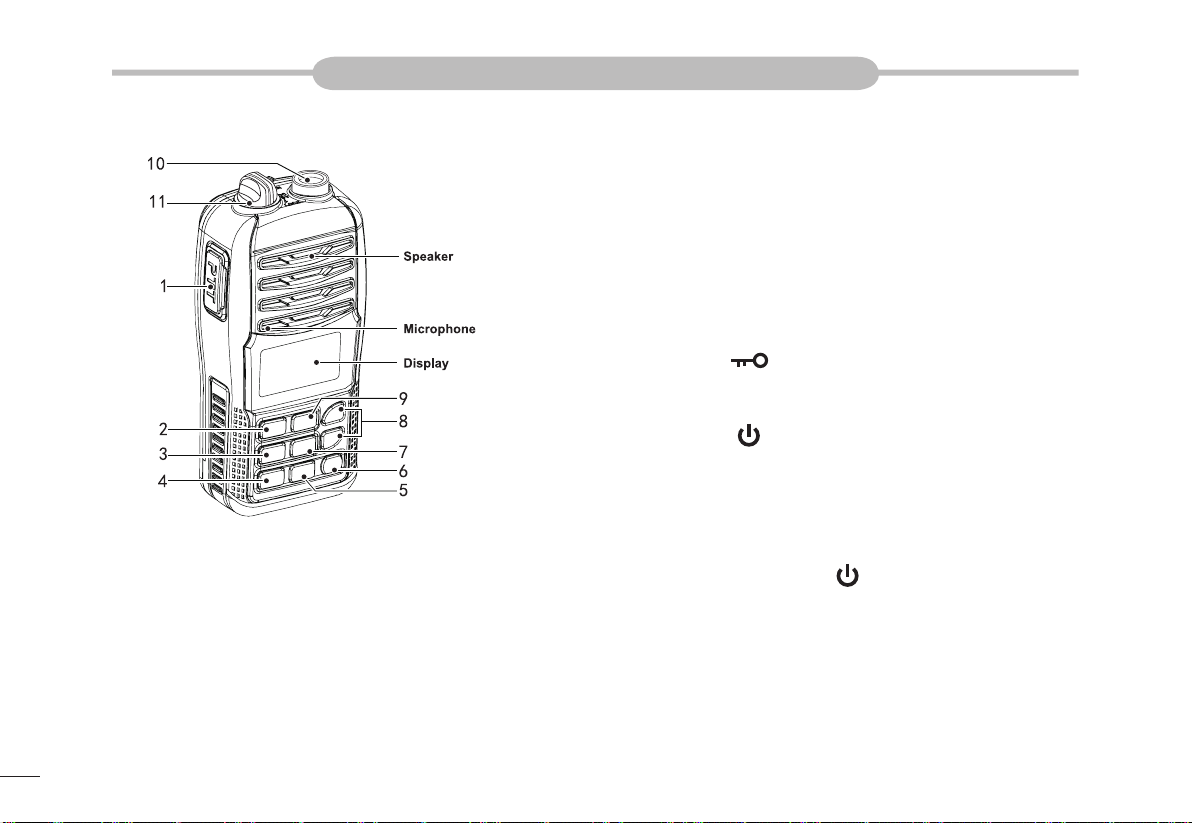
PANEL DESCRIPTION
Pannel Description
PTT1.
Hold down to transmit; release to receive.
CH 16/Call CH2.
Push to select channel 16.
Hold for 1 second to select the call channel.(factory default: channel 9 )
When the call channel is selected, hold for 3 seconds to enter the call
channel programming mode.
While in the set mode, push to return to the normal operation mode.
FAV/TAG3.
PUSH to sequentially select to the favorite channels, while ignoring un-
3
tagged channel, in a channel group.
Hold for 1 second to set or clear the TAG for the display channel.
While hold , turn ON the power to clear or set all TAG channels in the
seteced channel group.
SCAN/DUAL4.
Push to start or stop a normal or priority scan.
Hold for 1 second to enter the Dual/Tri-watch mode.
Push to exit the watch mode
Hold this key and HI/LO key for 1 second, to activate the AquaQuake
Function.
[HI/LO]/[ 5. ]
Push to select the high or low output power.
Hold for 1 second to turn the Lock function ON or OFF.
POWER[ 6. ]
Hold to turn power ON or OFF.
VOL./SQL/MONI7.
Push to enter the volume adjustment mode or the squelch adjustment
mode.
Hold for 1 second to active the Monitor function.
While hold this key , hold [ ] key to turn ON the power and enter the
set mode.
While in the Set mode, push to select an item,
While holding this key , push [▼]to turn ON the Volume Mute function .
Do the same steps again to turn OFF the function.
While hold down this key, push [▲]to turn ON the Volume Loud function.
Do the same steps again to turn OFF the function.
[8. ▲]/[▼]UP/DOWN
Push to select an operation channel.
Page 8

While in the Set mode, push to select the setting or value of an item.
Push to check TAG channels or change scanning direction during a
scan.
[CH]9.
Hold for 1 second, one or more times, to select a channel group from
USA, International, and Canada.
Push to return to the previous channel before selecting Channel 16 or
the Calling channel.
ANTENA CONNECTOR10.
Connect the supplied antenna here.
[DC 6V]11.
Connect the adaptor or optional cable her.
NOTE: Attached the [DC] jack cap when the adaptor is not connect-
ed. Otherwise , water will get into the transceiver.
Dispaly
Icon Description
Transmit Indicator , Appears while transmitting
Low Power indicator
1) "LOW" appears when low power is selected
2) "LOW" blinks when switching forced low power mode
because of a high temperature arrow or low voltage
Appears while working in ATIS Channel
Appears when U.S.A
Appears when international
Appears when Canadian channel group is selected
Appears when receiving a signal or when the squelch
opens
Blinks while monitoring
Appears when a TAG channel is selected
Appears when the call channel is selected
Appears when the radio is charging
Battery Indicator, remaining battery power
Blinks while scanning
Appears while the lock function is activated
Appears when a duplex channel is selected
Appears when dual watch
Appears when tri-band watch
Channel number readout
Indicates the selected operating channel number
In set mode, indicates the selected condition
In dual watch/tri-watch,appears CH16 during priority scan
Appears while volume selecting
Appears while SQL selecting
Appears while mode selecting
Show the squelch level
Show the volume level
Blinks when the volume mute is activated
4
Page 9

BASIC OPERATION
Turn ON/OFF
Press1. [ ] for 1 second to turn ON.
Press again2. [
Adjusting the Volume Level
The volume level can be adjusted using [VOL/SQL] and [▼] or [▲].
Push 1. [VOL/SQL] once to enter the volume adjustment mode. Then
press [▼] or [▲] to adjust the volume level.
The"VOL" icon starts blinking.
The transceiver has 31 volume levels and OFF.
When no key operation is performed for 5 seconds, then transceiver
returns to the normal mode.
Push2. [VOL/SQL]twice to exit the volume adjustment model.
Adjusting the Squelch Level
The squelch level can be adjusted using [VOL/SQL] and [▼] or [▲] . in the
order to properly receive signals. As well as for the scan to effectively func-
tion, the squelch must be adjusted to the proper level.
Push 1. [VOL/SQL] twice to enter the squelch adjustment mode, then
push [▼] or [▲] to adjust the squelch level.
The"SQL" icon starts blinking.
The transceiver has 11 squelch levels: OP is completely open;10 is
tight squelch; 1 is loose squelch
When no key operation is performed for 5 seconds, the transceiver
returns to the normal mode.
push 2. [VOL/SQL]again to exit the squelch adjustment mode.
]for 1 second to turn OFF.
Receiving and Transmitting
Receiving
set the volume levels by push 1. [VOL/SQL] , [▼] or [▲].
set the squelch levels by2. [▼] or [▲].
when receiving a signal, "
the speaker.
The conserve battery power, the transceiver's power save function
automatically activates when no signal is received for 5 seconds.
" appears and audio is heard from
Transmitting
Push 1. [Hi/Lo] to select output power.
"LOW"appears when low power is selected.
Choose low power for short range communications; choose high
power for longer distance communications.
Some channels are for only low power communication.
Hold down 2. [PTT] to transmit, then speak into the microphone.
"TX"appearks.
Channel 70 cannot be used for transmission
Release 3. [PTT] to receive.
NOTE:
Transmitting without an antenna can damage the transceiver.
To maximize the readability of your transmitted signal, pause for a
second after pushing 【PTT】hold the microphone 5-10cm from your
mouth and speak into the microphone at a normal voice level.
Channel Group Selective
This transceiver is pre-programmed with USA.International,Canadian chan-
nels.Choose the appropriate channel groups for your operating area.
5
Page 10

Push 1. [CH] to select a regular channel.
Hold down 2. [CH] for 1 second, one or more times,to select the desired
channel group.
The selectable channel groups are different, depending on the ver-
sion.
Push 3. [▲] or [▼] to select a channel.
"A" appears when a simplex channel is selected.
Channel Selection
Important: Prior to using the transceiver for the first time, the battery pack
must be fully charged for optimum life and operation. To avoid damage to
the transceiver, turn the power OFF while charging.
Channel 16
Channel 16 is the distress and safety channel, It used for establishing initial contact with a station and for emergency communications. Channel 16
is monitored during both dual watch and Tri-watch while standing by, you
must monitor Channel 16.
Push 1. [16/C] momentarily to select Channel 16.
Push 2. [CH] to return to the channel used before Channel 16, or push [▼]
or [▲] to select a channel.
Call Channel
Each regular channel group has separate leisure-use call channels. The
call channel is monitored during Tri-watch. The call channels can be programmed and are used to store your most often used channel in each
channel group for quick recall.
Push and hold 1. [16/c] for 1.5 second to select the call channel of the
selected channel group. "CALL" and call channel number appears.
Push 2. [CH] to return to the channel used before call channel, or push
[▼] or [▲] to select a channe.
Weather Channels
RS-36M has 10 pre-programmed weather channels. There are used for
monitoring broadcasts.
Push 1. [CH] to select weather channel or normal channel.
Appears "WX" when weather channel selected.
Appears "WX ALT" when turn on weather alert function.
Push 2. [▼] or [▲] to select channel.
Call Channel Programming
Call channel is used to access Channel 16 (default : Channel 9), You can
program the call channel with you most often-used channel in each channel
group for quick recall.
Push 1. [CH] to select a desired channel group to be programmed
Push 2. [16/C] for 1sec.to select a call channel.
Push 3. [16/C] for 3sec.till it sounds "BEEP" tone and "DUDU" tone to
enter call channel programming mode.
Channel number blinks.
6
Page 11

Push 4. [▼] or [▲] to select desired call channel
Push 5. [16/C] confirmed and save it , Push [CH] cancel and exit.
Monitor Function
The monitor function opens the squelch.
Push [MONI] to active monitor function.
"BUSY" will blinks and sound while monitor function actives.
Volume Loud Function
The volume loud function temporarily maximizes the volume loud level , it has
no effect when the volume level is 31.
Push 1. [VOL/SQL] and [▲] to turn ON the function
Push 2. [VOL/SQL] and [▲] to turn it OFF.
Volume Mute Function
The volume mute function can be activated temporarily.
Push 1. [VOL/SQL] and [▲] to active .
The audio is muted
The volume level indicator start blinking
Push 2. [VOL/SQL] and [▲] to turn the volume mute function off.
7
Automatic Backlight
This function is convenient for night time operation. The automatic backlighting can be activated in set mode.
Push any key except for [PTT] to turn the backlighting ON.
The backlighting is automatically turned OFF after 5 seconds.of in-
activity.
Lock Function
This function electronically lock all keys (except for [PTT][▼][▲][VOL/
SQL][
access.
RS-36M uses a new technology to clear water away from the speaker
grill:AquaQuake. AquaQuake helps drain water away from the speaker housing (water that might otherwise muffle the sound coming from the speaker).
RS-36M emits a vibrating beep when this function is activated.
]to prevent accidental changing of the channel and function
Push and hold [
]for 1 seconds.to turn the function ON and OFF.
AquaQuake Water Draining Function
Push and hold [SCAN]and [HI/LO]
A low beep tone sounds for 9 seconds to drain water, regardless of
volume level setting
The transceiver does not perform key operations while the Aqua-
Quake function is activated. The AquaQuake function can not be activated when an optional speaker-microphone is connected.
Page 12

SCAN OPERATION
Scan Types
Scanning is an efficient way to locate signals quickly over a wide frequency
range. The transceiver has priority scan and normal scan.
In addition, the weather alert and auto scan functions are available for standby convenience. These functions can be activated simultaneously, depending on the setting in set mode.
NormalScan
It searches through all TAG channels in sequence.However, unlike priority
scan, Channel 16 is not checked unless channel 16 is set as a TAG channel.
Priority Scan
A priority scan sequentially searches through all TAG channels while monitoring Channel 16. when a signal is detected on Channel16, the scan pauses
until the signal disappears; when a signal is detected on a channel other than
Channel 16, the scan switches to Dualwatch, until the signal disappears.
Setting TAG Channels
For more efficient scanning, set the desired channels as TAG channels or
clear the TAG setting from unwanted channels. Channels that are not tagged
will be skipped during scanning.
Setting (or clearing) a TAG channel
Push 1. [CH] to select desired channel group.
Push 2. [▼] or [▲] to select the desired channels to be set as a TAG
Channel.
Push and hold " 3.
a TAG Channel.
" appears in the function display.
"
To cancel the TAG channel setting, push and hold " 4.
"
" disappears.
" for 1 second. to set the displayed channel as
" for 1sec.
Setting (or clearing) all tagged channels
While pushing and holding 1. [TAG], turn power [ ] ON to clear all
TAG channels in the selected channel group.
Repeat above procedure to set all channels as TAG channels.2.
Starting a Scan
Set the priority scan function, scan resume timer and auto scan function is
advance, in the set mode.
Push 1. [SCAN] to start normal scan or priority scan.
"SCAN" Blinks.
"16" appears on the sub channelreadout during a priority scan.
When a signal is received, the scan pauses until the signal disap-
pears, or resumes after pausing 5 seconds, depeneding on the set
mode setting.
Push [▼]or[▲] to sequentially select TAG channels, change the
scanning direction or manually resume the scan.
Pus2. [SCAN]to stop the scan, or push [PTT],[16/C], [CH]or[FAV]also
can strops the scan.
8
Page 13

DUALWATCH/TRI-WATCH
Description
Dualwatch monitors Channel 16 while you are receiving on another channel;
Tri-watich monitors Channel 16 and the call channel while receiving another
channel. Dualwatch/Tri-watch is convenient for monitoring channel 16 when
you are operating on another channel.
Operation
Push 1. [SCAN/DUAL]for 1 second to start dual watch or tri-watch.
"DW" blinks during dual watch;”TW” blinks during Tri-watch.
A beep tone sounds when a signal is received on Channel 16.
Tri-watch switches to dualwatch when receiving a signal on the call
channel.
Push 2. [SCAN/DUAL]to cancel dualwatch/tri-watch.
Dual-band duty Tri-band duty
9
Page 14

SET MODE
Set Mode Programming
The set mode is used to channel the settings of transceiver's functions: beep
tone function, priority scan function, scan resume timer, auto scan function,
dual/tri-watch function , monitor key action, automatic backlighting, LCD
contrast setting and power save function .
Set Mode Operation
Turn OFF the power.1.
While holding down 2. [VOL/SQL],turn ON the power to enter the set
mode
Release 3. [VOL/SQL], appears " Bp "
Push 4. [VOL/SQL]to select a desired option of the item.
Push 5. [▲][▼]to select a desired option of the item.
To exit the set mode, push 6. [16/C]
No. Show Set Project
1 bP Beep of /on on
2 AL Weather Warning of /on of
3 Pr Priority Scan of /on of
4 St Scan Resume Timer of /on of
5 AS Automatic Scanning of /on of
6 dt Dual-band / Tri-band Duty d-/t- d7 Sq Monitor key Functions Pu / Ho Pu
8 bL Automatic Backlight of /on on
9 LC LCD Contrast Hi / Lo Hi
10 PS Automatic Power of / on on
Set parameter
options
The default
value
Set Mode Items
Beep Tone Function
Turn the key touch beep sound ON or OFF.
Weather Alert
When there are significant weather information , the U.S. NOAA broadcast
stations will transmit an alarm weather . When the weather alert function is
turned on, walkie-talkies will sound the alarm at the same time "WXALT"
symbol flashes. During the scan , the current weather channel in use will
be scanned .
With this function enabled , when you select the Weather Channel ,
the screen displays "WX ALT" symbol.
Priority Scan Function
The transceiver has 2 scan types—normal (OFF)and priority (ON )scan,
A normal scan searches all TAG channels in the selected channel group.
A priority scan sequentially searches all TAG channels while monitoring
Channel 16.
Scan Resume Time
The scan resume timer can be set as a pause (OFF) or timer scan (ON).
OFF: when a signal is detected, the scan pauses on the channel until
the signal disappears, and then resumes.
ON: When a signal is detected, the scan pauses on the channel for 5
seconds. and then resumes.
Auto Scan Function
The auto scan function automatically starts a normal or priority scan when
10
Page 15

no signal is received, and no operation is performed for 30 seconds.
Dual/Tri-watch Function
Set the watch type to Dualwatch or Tri-watch.
Monitor Key Action
The monitor key temporarily opens the squelch. This item sets the key
action.
Pu(PUSH): The monitor function is activated by holding down [MONI].
The squelch open while holding down the key.
Ho(Hold): The monitor function is activated by holding down [MONI]
for 1 second, the squelch stays open until any key is pushed.
Automatic Backlighting
This function is convenient for night-time operation. The backlight can be
selected from ON and OFF.
The backlighting is automatically turned OFF after 5 seconds. of in-
activity.
LCD Contrast Setting
Set the LCD contrast level to high contrast or Low contrast.
The LCD contrast level has little effect during indoor use.
Power Save Function
The power save function reduces current drain by turning OFF the re-
ceiver circuit for preset intervals.
OFF: Function is turned OFF
ON: Function is turned ON and will be activated when no signal is
received, and no operation is preformed for 5seconds.
11
Page 16

VHF Marine Channel List
Channel number Frequency(MHz) Channel number Frequency(MHz) Channel number Frequency(MHz) Channel number Frequency(MHz)
USA INT CAN Transmit Receive USA INT CAN Transmit Receive USA INT CAN Transmit Receive USA INT CAN Transmit Receive
01 01 156.050 160.650 21 21 157.050 161.650 68 68 68 156.425 156.425 86A 157.325 157.325
01A 156.050 156.050 21A 21A 157.050 157.050 69 69 69 156.475 156.475 87 87 87 157.375 161.975
02 02 156.100 160.700 21b
RX only
161.650 70 70 70
RX only
156.525 87A 87A 87A 157.375 157.375
03 03 156.150 160.750 22 157.100 161.700 71 71 71 156.575 156.575 88 88 88 157.425 162.025
03A 156.150 156.150 22A 22A 157.100 157.100 72 72 72 156.625 156.625 88A 88A 88A 157.425 157.425
04 156.200 160.800 23 23 157.150 161.750 73 73 73 156.675 156.675
04A 156.200 156.200 23A 157.150 157.150 74 74 74 156.725 156.725
05 156.250 160.850 24 24 24 157.200 161.800 75*1 75*1 75*1 156.775 156.775
05A 05A 156.250 156.250 25 25 25 157.250 161.850 76*1 76*1 76*1 156.825 156.825
06 06 06 156.300 156.300 25b
RX only
161.850 77*1 77 77*1 156.875 156.875
07 156.350 160.950 26 26 26 157.300 161.900 78 156.925 161.525
07A 07A 156.350 156.350 27 27 27 157.350 161.950 78A 78A 156.925 156.925
08 08 08 156.400 156.400 28 28 28 157.400 162.000 79 156.975 161.575
09 09 09 156.450 156.450 28b
RX only
162.000 79A 79A 156.975 156.975
10 10 10 156.500 156.500 60 60 156.025 160.625 80 157.025 161.625
11 11 11 156.550 156.550 61 156.075 160.675 80A 80A 157.025 157.025
12 12 12 156.600 156.600 61A 61A 156.075 156.075 81 157.075 161.675
*1
13
13 13*1156.650 156.650 62 156.125 160.725 81A 81A 157.075 157.075 Transmit Receive
Weather Channel
14 14 14 156.700 156.700 62A 156.125 156.125 82 157.125 161.725 1
*115*115*1
15
156.750 156.750 63 156.175 160.775 82A 82A 157.125 157.125 2
16 16 16 156.800 156.800 63A 156.175 156.175 83 83 157.175 161.775 3
*1
17
17 17*1156.850 156.850 64 64 156.225 160.825 83A 83A 157.175 157.175 4
18 156.900 161.500 64A 64A 156.225 156.225 83b
RX only
161.775 5
18A 18A 156.900 156.900 65 156.275 160.875 84 84 84 157.225 161.825 6
19 156.950 161.550 65A 65A 65A 156.275 156.275 84A 157.225 157.225 7
19A 19A 156.950 156.950 66 156.325 160.925 85 85 85 157.275 161.875 8
20 20 20
20A 157.000 157.000 67
*1
157.000 161.600 66A 66A 66A*1156.325 156.325 85A 157.275 157.275 9
*1
67 67 156.375 156.375 86 86 86 157.325 161.925 10
Frequency(MHz)
RX only
RX only
RX only
RX only
RX only
RX only
RX only
RX only
RX only
RX only
162.550
162.400
162.475
162.425
162.450
162.500
162.525
161.650
161.775
163.275
*Only a low power.
12
Page 17

SPEC I F I C ATION
General
Frequency Range
Type of emission FM(16K0G3E)
Battery Pack 1500mAh Li-ion (DC 3.7V)
Frequency Stability ±10 PPM
Operating Temperature Range -15℃~+55℃
Antenna Impedance 50
Dimensions (H × W × D) 140mm×65mm×41mm
Output Power 4W/1W
Maximum Frequency Deviation ±5kHz
Spurious Emissions 0.25uW
Adjacent Channel Power ≥70dB
Audio Harmonic Distortion ≤10%
Current Drain
TX:156.05MHz-157.425MHz
RX:156.05MHz-162.025MHz
g742 thgieW
Transmitter
≤1.5A(High power)
≤0.9A (Low power)
≤0.35A (Max audio output)
Receiver
Receive Sensitivity ≤0.22μV
Squelch Sensitivity ≤0.22μV
HUM and Noise ≥40dB
Adjacent Channel Selectivity ≥70dB
Spurious Response ≥70dB
Intermodulation ≥68dB
Audio Output Power ≥0.6W (10%)
Issues described in the following table are some common operational failure .
13
Page 18

TR
OUBLESHOO
TING
These types
ming . These problems are usually not caused by circuit failure . Before suspect intercom failure, please refer to the relevant section of this manual .
The
turn ON.
No sound from speaker.
Transmitting is
sible, or high power can
not be selected.
The displayed
cannot be changed.
Scan does not start
No beep sounds.
of errors are generally due to improperly connected , the operation caused by incorrect settings , or operator error caused due to incomplete program-
PROBLEM
transceiver does not
impos-
channel
POSSIBLE CAUSE SOLUTION REF.
The battery is exhausted.
The battery
serted.
The squelch level is too high.
Volume level is too low.
Speaker has
ter.
Some channels
power
or only receive.
The output power is set to low.
The battery is exhausted.
The Lock function is activated.
"TAG"channels are
grammed.
Beep Tone function is turned OFF. Turn ON the Beep Tone in the set mode. 11
pack is not correctly in-
been exposed to wa-
are limited to low
not pro-
Recharge the battery pack.
Correctly insert the battery pack.
Set the squelch level to the threshold level.
Adjust the audio level to a suitable level.
Remove water from the speaker grill.
Change the channel.
Push [Hi/Lo] to select high power.
Recharge the battery pack.
down [
Hold
function.
Set desired channels as "TAG" channels.
] (Hi/Lo)
for 1 second to turn OFF the
1
2
5、6
1
5
6
7
9
6
6
14
Page 19

Important Information
RF Energy Expo sure Informatio n
RF Energy Ex pos ure Aw are nes s And Control
Informat ion F or Fc c Occ upa tio nal U se Requirements
Ibefore using the two-way portable radio, review the following important RF energy awareness and control information and operational
instructions. Comply with this information and instructions in order to ensure compliance with RF exposure guidelines.e the capability to
access information in that form.
This radio is intended for use in occupational/controlled conditions, where users have full knowledge of their exposure
and can exercise control over their exposure to remain below RF exposure limits. This radio is NOT authorized for
general population, consumer, or any other use.
WAR
!
NIN G
!
CAUTIO N
This two-way radio uses electromagnetic energy in the radio frequency (RF) spectrum to provide communications between two or more
users over a distance. It uses RF energy or radio waves to send and receive calls. RF energy is one form of electromagnetic energy. Other
forms include, but are not limited to, electric power, sunlight, and x-rays. RF energy, however, should not be confused with these other
forms of electromagnetic energy, which, when used improperly, can cause biological damage. Very high levels of x-rays, for example, can
damage tissues and genetic material.
Experts in science, engineering, medicine, health, and industry work with organizations to develop standards for exposure to RF energy.
These standards provide recommended levels of RF exposure for both workers and the general public. These recommended RF exposure
levels include substantial margins of protection. All two-way radios marketed in North America are designed, manufactured, and tested to
ensure they meet government-established RF exposure levels. In addition, manufacturers also recommend specific operating instructions
to users of two-way radios. These instructions are important because they inform users about RF energy exposure and provide simple
procedures on how to control it. Refer to the following websites for more information on what RF energy exposure is and how to control
exposure to assure compliance with established RF exposure limits:
http://www.fcc.gov/oet/rfsafety/rf-faqs.html
http://www.osha.gov./SLTC/radiofrequencyradiati on/index.html
Changes or modifications not expressly approved by RCA Communications Systems could void the user's
authority to operate the equipment.
Page 20

Important Information
Federal Co mmu nic ati ons C omm ission Regulations
Before it was marketed in the United States, the Digital portable radio was tested to ensure compliance with FCC RF energy exposure
limits for two-way portable radios. When two-way radios are used as a consequence of employment, the FCC requires users to be fully
aware of and able to control their exposure to meet occupational requirements. Exposure awareness can be facilitated by the use of a
label directing users to specific user awareness information. The radio has an RF exposure product label.
Also, the Product Safety Manual and this Operator’s Manual include information and operating instructions required to control RF exposure
and to satisfy compliance requirements.
Operation Sa fety Re commenda tions
Occupati ona l Saf ety G uid eli nes And Safety Trai nin g Inf orm ati on
To ensure bodily exposure to RF electromagnetic energy is within the FCC allowable limits for occupational use. Always adhere to the
following basic guidelines:
• The push-to-talk button should only be depressed when intending to send a voice message.
• The radio should only be used for necessary work-related communications.
• The radio should only be used by authorized and trained personnel. It should never be operated by children.
• Do not attempt any unauthorized modification to the radio. Changes or modifications to the radio may cause harmful interference and/or
cause it to exceed FCC RF exposure limits. Only qualified personnel should service the radio.
• Always use only authorized accessories (antennas, control heads, speakers/mics, etc.). Use of unauthorized accessories can cause the
FCC RF exposure compliance requirements to be exceeded.
The information listed above provides the user with information needed to make him or her aware of a RF
exposure, and what to do to assure that this radio operates within the FCC exposure limits of this radio.
Page 21

 Loading...