

Page 1

BR250TM Professional Two-Way Radio Instruction Manual
THANK YOU!
Thank you for purchasing the BR250TM Professional Two-Way Radio by RCA Communications
Systems. With its exquisite, ergonomic design, the BR250TM is customized for logistics, warehousing,
construction, property management and service industries. It meets Class IP54 requirements for
dust and water and is equipped with a large speaker.
This easy-to-use, push-to-talk radio will deliver you secure, instant and reliable communications
at peak efciency. Please carefully read this manual before use in order to achieve maximum
performance from your radio.
MODELS COVERED IN THIS MANUAL:
• BR250 VHF Two-Way Radio
• BR250 UHF Two-Way Radio
Copyright © 2009 Discount Two-Way Radio - North American Distributor
1
Page 2

2
BR250TM Professional Two-Way Radio Instruction Manual
Safety and General Information.....................4
Product Inspection.........................................5
RCA BR250TM Overview.................................7
Battery Information.....................................10
Initial Use.............................................10
Applicable Battery Packs.......................10
Battery Tips..........................................10
Tips to Prolong Battery Life...................11
Battery Storage.....................................11
Charging the Battery.............................11
Steps for Setting Up Your Charger...............13
Troubleshooting...................................14
No LED Indication............................14
Red LED Flashes Rapidly...................14
Antenna Information...................................15
Assembly and Disassembly...........................15
Attaching the Battery...........................15
Removing the Battery...........................16
Attaching the Antenna........................17
Copyright © 2009 Discount Two-Way Radio - North American Distributor
CONTENTS:
Removing the Antenna........................17
Attaching / Removing the Belt Clip......18
Attaching the Earpiece / Microphone...19
Removing the Earpiece / Microphone...19
General Radio Operations and Functions.....20
Radio Operations.................................20
Turn the Radio On/Off......................20
Adjust the Volume............................20
Select a Channel...............................21
Transmitting......................................21
Receiving..........................................21
Radio Functions....................................21
Time-out Timer (TOT).......................21
Battery Save Mode...........................21
Battery Strength Indicator.................22
Low Battery Alert.............................23
Busy Channel Lockout (BCL).............23
Voice Operated Transmit (VOX)........23
Troubleshooting..........................................25
Page 3

BR250TM Professional Two-Way Radio Instruction Manual
3
CONTENTS
Care and Cleaning......................................26
Optional Accessories...................................27
Glossary......................................................32
Warranty Statement....................................33
Copyright © 2009 Discount Two-Way Radio - North American Distributor
continued
Page 4

4
SAFETY AND GENERAL INFORMATION
Please observe the following general safety
precautions during all phases of operation,
service and repair of this equipment.
» Turn radio off prior entering any area with
a potentially explosive atmosphere, such
as gas, petroleum, chemicals, blasting
caps, etc.
» Do not charge the battery in a potentially
explosive atmosphere.
» Do not use any portable radio that has a
damaged antenna, as it can burn skin.
» This equipment is to be serviced only by
authorized RCA Communications Systems
technicians. Any service performed by
unauthorized technicians will void the
warranty.
» Turn radio off when near electrical blasting
caps to avoid possible interference with
blasting operations. Obey posted signs
such as those in hospitals or blasting areas
advising people to turn off all two-way
BR250TM Professional Two-Way Radio Instruction Manual
Copyright © 2009 Discount Two-Way Radio - North American Distributor
radios. Obey pilots and ight attendants
instructions to turn off radios on airplanes.
» Do not place a radio over an air bag or in
an air bag’s deployment area, as the force
with which an air bag is inated could
propel the radio and may cause serious
injury.
Do not place the radio close to a heat
»
source or expose the radio to direct
sunlight for a prolonged time.
» Hold the radio while in use in a vertical
position with the microphone one to two
inches away from your lips.
» While wearing a transmitting radio, keep
the radio and its antenna at least one inch
away from your body.
»
The highest reported SAR value at 50%
duty factor are- Face Held:5.60W/Kg, Body
-worn: 5.60W/Kg
Page 5
BR250TM Professional Two-Way Radio Instruction Manual
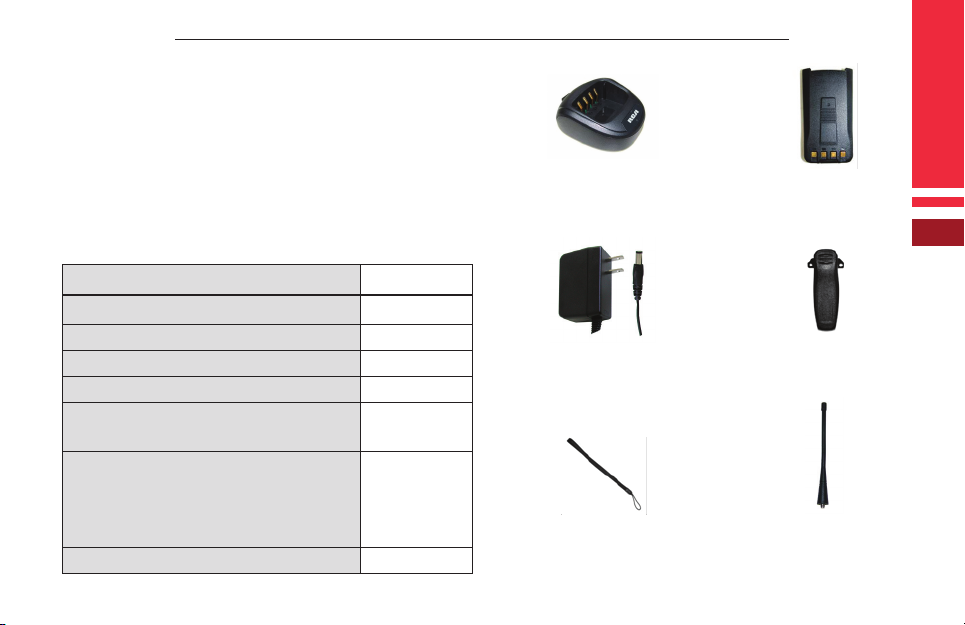
PRODUCT INSPECTION
Prior to unpacking the BR250TM portable
radio, please inspect the packaging for
signs of damage and report any damage or
missing components immediately to your RCA
Communications Systems Sales and Service
Outlet. Every BR250TM portable radio comes
with the following items:
Item Qty.(PCS)
CH250R - Desktop Rapid Charger 1
B250LI - Li-Ion Battery (1700mAh) 1
PS250R - Power Supply 1
BC250 - Belt Clip 1
STR250 - Handy Carry Strap
(prevents dropping the BR250)
AN250U - Antenna for UHF
Models
AN250V - Antenna for VHF
Models
Instruction Manual 1
Copyright © 2009 Discount Two-Way Radio - North American Distributor
1
1
CH250R
Desktop
Rapid Charger
PS250R
Power Supply
STR250
Handy Carry Strap
5
B250LI
Li-Ion Battery (2000mAh)
BC250
Belt Clip
Antenna
AN250U - UHF models
AN250V - VHF models
Page 6

6
Notes:
The frequency band of the BR250TM is marked
on the radio label. If it is not visible, identify
the frequency band according to the color
circle on the antenna: red indicates UHF and
green indicates VHF.
BR250TM Professional Two-Way Radio Instruction Manual
Copyright © 2009 Discount Two-Way Radio - North American Distributor
Page 7
BR250TM Professional Two-Way Radio Instruction Manual
7
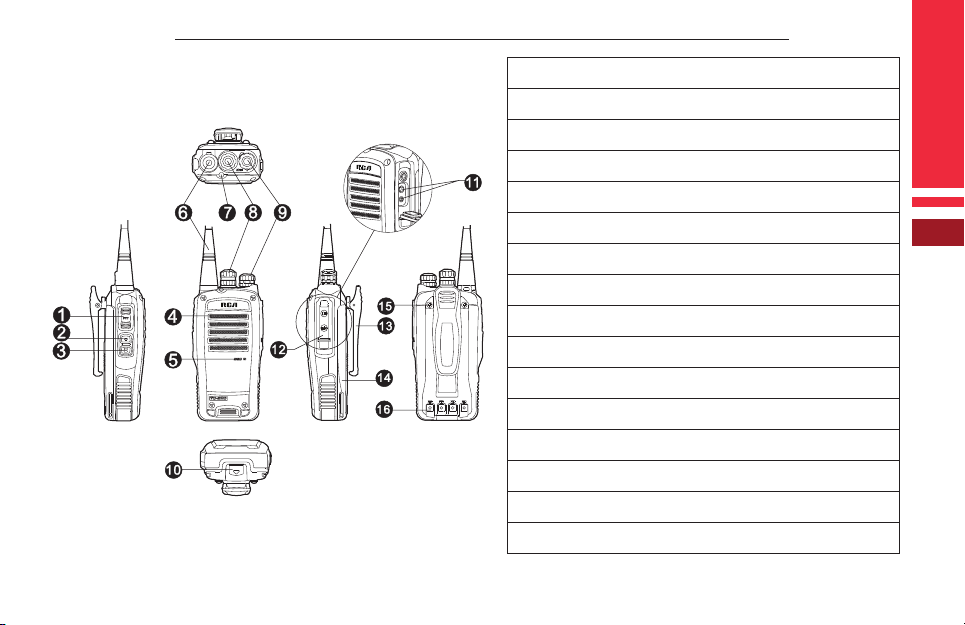
RCA BR250 Overview
Copyright © 2009 Discount Two-Way Radio - North American Distributor
(1) PTT (Push-to-Talk) key
(2) SK1 (Side Key 1) (programmable)
(3) SK2 (Side Key 2) (programmable)
(4) Speaker
(5) Microphone
(6) Antenna
(7) LED Indicator
(8) Channel Selector Knob
(9) Radio On-Off/ Volume Control Knob
(10) Battery Latch
(11) Accessory Jack
(12) Accessory Cover
(13) Belt Clip
(14) Battery
(15) Screw
(16) Electrode Piece
Page 8

8
BR250TM Professional Two-Way Radio Instruction Manual
PTT (Push-to-Talk) Key
Press and hold down the PTT key to transmit,
release it to receive.
SK1 (Side Key 1)
Side Key 1 is the programmable key to which
your dealer can assign long and short press
function. (See Glossary for denitions of long
and short press.)
SK2 (Side Key 2)
Side Key 2 is the programmable key to which
your dealer can assign long and short press
function. (See Glossary for denitions of long
and short press.)
LED Indicator
For information on status of LED Indicator and
alert tone, see table on pg. 9 (See Functions
and Settings for the detailed operations.)
Channel Selector Knob
Turn the knob to select channels 1 to 16.
Copyright © 2009 Discount Two-Way Radio - North American Distributor
Radio On-Off/Volume Control Knob
Turn the knob clockwise to turn the radio on,
and turn the knob fully counter-clockwise until
it clicks to turn the radio off.
Turn the knob clockwise to increase the
volume, or counter-clockwise to decrease the
volume. WARNING!! Make sure the BR250
is at low volume prior to using any earpiece
accessory, and then adjust the volume to a
comfortable level. Failing to do so may cause
ear damage.
Battery Latch
Use to remove the battery.
Accessory Jack
The jack is used to connect speaker,
microphone, external PTT, earpiece, headset,
programming cable and cloning cable.
Page 9

BR250TM Professional Two-Way Radio Instruction Manual
Power Up in User Mode
Low Battery Alert
Transmitting
Receiving
Scanning
Power Adjust
VOX
Copyright © 2009 Discount Two-Way Radio - North American Distributor
9
LED Indicator and Alert Tones
When the radio is turned on, the power up alert tone will sound.
When the current channel is a blank channel, the radio continuously
beeps.
LED ashes red and a low-pitched tone sounds at ten second
intervals.
LED glows red when transmitting. When TOT timer expires, the radio
continuously beeps. TOT pre-alert causes radio to beep.
LED glows green when carrier is present.
Green LED ashes every second while scanning is in progress.
Scan Start Alert Tone (programmable by your dealer): radio beeps.
Scan Exit Alert Tone (programmable by your dealer): radio beeps.
Priority Channel Scan Alert Tone (programmable by your dealer): if
the current channel is the priority channel when scanning, the radio
beeps.
A low-pitched tone sounds when transmit power is adjusted from
high to low. A high-pitched tone sounds when transmit power is
adjusted from low to high.
A high-pitched tone sounds when the VOX feature is activated. A
low-pitched tone sounds when the VOX feature is disabled.
Page 10

10
BR250TM Professional Two-Way Radio Instruction Manual
BATTERY INFORMATION
Initial Use
New batteries are shipped from the
factory uncharged. Charge a new battery
approximately 12 hours prior to initial use
(applies to Ni-CD, Ni-MH and Li-Ion batteries
charged with slow or rapid rate charger).
NOTE: The Indicator Light will turn GREEN
approximately one hour after battery is
placed in a Rapid Rate Charger; however, it is
strongly recommended the battery charge for
12 hours. This initializes it and allows for the
best performance. Maximum battery capacity
is normally achieved after two or three full
charge / discharge cycles. If battery power
runs low, recharge the battery. Batteries that
are brand new or that have been stored for an
extended period of time (several weeks), may
require more time to fully charge.
Copyright © 2009 Discount Two-Way Radio - North American Distributor
Applicable Battery Packs
To reduce the risk of injury, use only batteries
specied by RCA Communications Systems.
Caution:
1. To avoid risk of personal injury, do not
dispose of batteries in a re.
2. Dispose of batteries according to local
recycling regulations. Do not dispose as
household waste.
3. Never attempt to disassemble the battery.
Battery Tips:
1. When charging a battery, keep it at a
temperature between 41°F ~ 104°F (5°C ~
40°C) to ensure a full charge. Temperatures
outside this range signicantly reduce
battery life.
2. Before charging a battery attached to a
radio, turn the radio off to ensure a full
charge. Never leave a radio on while it is
Page 11

BR250TM Professional Two-Way Radio Instruction Manual
11
in the charger, as it can damage both the
battery and the radio; the charger is not a
radio stand.
3. Do not cut off the power supply or remove
battery while charging.
4. Never charge a battery that is wet. Dry it
with soft cloth prior charging.
5. The battery will eventually weaken. When
the operating time (talk-time and standby
time) is noticeably shorter than normal,
replace the battery.
Tips To Prolong Battery Life:
1. Battery performance greatly decreases at
temperatures below -4°F (-20°C).Having
a spare battery is always necessary in
extremely cold environments. A cold
battery may work again when it returns to
room temperature,so keep it for later use.
2. Dust on the battery contact may cause the
battery not to work or charge properly. Use
Copyright © 2009 Discount Two-Way Radio - North American Distributor
a clean dry cloth to wipe it before attaching
the battery to the radio.
3. Batteries with damaged contacts can be
extremely dangerous. Any battery with
damage to one or more contacts should be
replaced immediately and not used under
any circumstances.
Battery Storage
1. Fully charge a battery before storing it for
an extended period of time to avoid battery
damage due to over-discharge.
2. Recharge a battery after three months
storage to avoid reduced battery capacity
due to over-discharge.
3. When storing a battery, keep it in a dry
place at room temperature.
Charging the Battery
1. When the battery level is very low, recharge
it. It is never recommended to completely
drain the battery, which may cause your
Page 12

12
battery to malfunction and no longer
accept a charge.
2. Use only chargers specied by RCA
Communications Systems. When the
charger’s LED illuminates red, it is an
indication that the battery is being correctly
charged. When the LED illuminates green,
the battery charge is complete.
BR250TM Professional Two-Way Radio Instruction Manual
Status Charged LED
Standby (no-load)
Battery is charging
Battery is fully charged
Error
Copyright © 2009 Discount Two-Way Radio - North American Distributor
Red LED slowly ashes
(0.2s on/3s off )
Red LED solidly glows
Green LED solidly glows
Red LED rapidly ashes
(0.2s on/0.2s off)
Page 13

BR250TM Professional Two-Way Radio Instruction Manual
13
Steps for setting up your charger:
1. Plug the adapter’s AC connector into the
AC outlet socket.
2. Plug the adapter’s DC connector into the
DC socket on the back of the charger.
3. Place the radio with the battery attached,
or the battery alone, in the charger.
Copyright © 2009 Discount Two-Way Radio - North American Distributor
4. Make sure the battery contact is touching
the charging terminals. The charging
process begins when the red LED light
illuminates.
5. The green LED light will illuminate
approximately one hour later, indicating
the battery is fully charged.
Page 14

14
BR250TM Professional Two-Way Radio Instruction Manual
Troubleshooting:
When troubleshooting, always observe the
color of the LED:
No LED Indication
1. Make sure that the power cord is plugged
into an appropriate AC outlet.
Red LED ashes rapidly (0.2s on/0.2s off)
Remove the battery from the charger, and:
1. Make sure that you are using an original
RCA Communications Systems battery.
Remove power from the battery charger.
Clean the charger and the battery’s
charging contacts using a clean, dry cloth.
2. Make sure the battery temperature isn’t
above 113°F. (45°C)
3. Power up the charger and place the
battery back into the charging cup. If the
LED indicator continues to ash red, most
likely, the battery can no longer be charged
and must be replaced. To determine if the
Copyright © 2009 Discount Two-Way Radio - North American Distributor
battery requires replacement, place the
battery pack into another charger that
you know is working properly. If the LED
continually ashes red, battery replacement
is necessary.
Notes:
• When the battery charger detects the
proper battery conditions, rapid charging
begins automatically (steady red LED).
• If the battery temperature is above 113°F
(45°C), the charger will report the fault by
flashing the red LED rapidly (0.2s on/0.2s
off), and will not charge until the battery
temperature is below 113°F (45°C) with
the red LED changing to solid illumination.
Page 15

BR250TM Professional Two-Way Radio Instruction Manual
15
ANTENNA INFORMATION
• Stubby (3”) antennas are ideal for
communication within limited range, and
standard (6”) antennas optimize coverage;
the longer the antenna, the better the
coverage is. If you use a stubby antenna for
convenience instead of a standard length
antenna, you can expect approximately a
30% reduction in coverage. When using a
two-way radio outdoors, heavy rain, snow,
buildings or thick forest can dramatically
reduce radio coverage.
ASSEMBLY AND DISASSEMBLY
Attaching the Battery
1. Hold the battery and attach it close to the
top of aluminum chassis. (Note: Insert tab
on top of the battery into the top of battery
slot.) See Figure 1.
2. Lightly press the bottom of the battery until
Copyright © 2009 Discount Two-Way Radio - North American Distributor
Figure 1
it clicks. This signies that the battery latch
is locked to the main unit and assembly is
nished. See Figure 2.
Note: If the battery is not securely locked,
remove it and reattach it.
Figure 2
Page 16

16
Removing the Battery
1. First, turn off the radio. Hold the top of
radio and press the belt clip to make its
tail turn up. Lift the battery latch in the
direction of the arrow. See Figure 3.
BR250TM Professional Two-Way Radio Instruction Manual
Figure 3
2. When the bottom of the battery is turned
up, release the battery latch and remove
the battery. (Note: When the battery is
turned up, keep the angle between the
battery and main unit small so the battery
doesn’t get scratched.) See Figure 4.
Copyright © 2009 Discount Two-Way Radio - North American Distributor
Figure 4
Page 17

BR250TM Professional Two-Way Radio Instruction Manual
17
Attaching the Antenna
1. Insert the antenna into the big screw thread
hole on top of the main unit.
2. Turn the antenna clockwise until it is
screwed down as shown in Figure 5 below.
Figure 5
Copyright © 2009 Discount Two-Way Radio - North American Distributor
Removing the Antenna
To remove the antenna, turn it counterclockwise as shown in Figure 6 below.
Figure 6
Page 18

18
Attaching/Removing the Belt Clip
1. Using a small screwdriver, remove the
screws from the back of the radio’s chassis.
2. Align the belt clip’s screw holes to the
radio’s chassis. Turn the screw clockwise
into the belt clip’s screw holes. See Figure
7 below.
BR250TM Professional Two-Way Radio Instruction Manual
3. To remove the belt clip, turn the screwdriver
counter-clockwise to loosen the screw. See
Figure 8 below.
Figure 7Attaching the Belt Clip
Copyright © 2009 Discount Two-Way Radio - North American Distributor
Figure 8Removing the Belt Clip
Page 19

BR250TM Professional Two-Way Radio Instruction Manual
Attaching/Removing the Earpiece/
Microphone
1. Open the accessory cover without removing
it, as shown in Figure 9.
Figure 9
Copyright © 2009 Discount Two-Way Radio - North American Distributor
19
2. Firmly plug the audio accessory into the
accessory jack and secure the screw. See
Figure 10. Warning!! Over-tightening
accessories may cause damage to the radio
that is not covered under warranty.
Figure 10
3. To remove the audio accessory from the
jack, turn the screw counter-clockwise and
remove the accessory.
Page 20

20
BR250TM Professional Two-Way Radio Instruction Manual
GENERAL RADIO OPERATIONS AND
FUNCTIONS
Radio Operations
Turn the Radio On/Off
Turn the radio on-off /volume control knob
clockwise to turn on the radio, and an alert
tone will be heard. Turn the radio on-off /
volume control knob counter-clockwise until
it clicks to turn off the radio. See Figure 1.
Figure 1
Copyright © 2009 Discount Two-Way Radio - North American Distributor
Adjust the Volume
Turn the volume control knob clockwise/
counter-clockwise to increase/decrease the
volume. See Figure 2.
Figure 2
Page 21

BR250TM Professional Two-Way Radio Instruction Manual
21
Select a Channel
Turn the channel selector knob to select a
channel. See Figure 3.
Figure 3
Transmitting
To transmit, press and hold down PTT key and
speak into the microphone. Hold the radio between one and two inches away from your lips
(2.5 to 5 centimeters).
Receiving
To receive signal, release the PTT key.
Copyright © 2009 Discount Two-Way Radio - North American Distributor
Radio Functions
Note: To simplify operation and ensure
maximum performance, the following
functions are disabled by default. They
can be acivated by your authorized RCA
Communications Systems dealer for an
additional charge.
Time-out Timer (TOT)
This limits the amount of time the radio user
can continuously transmit on a channel. If
the user holds down the PTT longer than the
preprogrammed limit, the radio automatically
stops transmitting and generates a warning
tone until the PTT is released.
A dealer may program the alert tone that
sounds before the TOT timer nearly expires.
See Glossary for the denition of Time-out
Timer.
Battery Save Mode
This feature can be enabled by your dealer. The
Page 22

22
BR250TM Professional Two-Way Radio Instruction Manual
Battery Save feature is automatically activated
when no activities or operations have been
performed (no key press and no knob selection)
for an extended period of time.
Pressing any key or receiving a signal will end
the Battery Save mode and restore the radio
to normal operation. See Glossary for the
denition of Battery Save Mode.
Battery Strength LED Indication
70% - 100%
50% - 70%
30% - 50%
10% - 30%
Less than 10%
Green
Orange
Red
LED is unlit when the programmed key is pressed and ashes red while
the radio is operating.
LED is unlit when the programmed key is pressed. While the radio is on
standby, LED ashes red and a low-pitched tone sounds at ten second
intervals. Pressing the PTT then activates the talk prohibit tone.
Copyright © 2009 Discount Two-Way Radio - North American Distributor
Battery Strength Indicator
The LED light on top of the radio allows you
to check the battery status by illuminating
lights with different colors. This feature is
programmed by your RCA Communications
Systems dealer upon request. Please refer to
the table below:
Page 23

BR250TM Professional Two-Way Radio Instruction Manual
23
Low Battery Alert
For extra convenience, when the battery level
is low, the LED ashes red and a low-pitched
tone sounds every ten seconds to alert users to
recharge the battery.
Busy Channel Lockout (BCL)
Avoid interference with other users on the
same channel by preventing transmission if
another talkgroup is currently speaking over
the air. The radio will generate a continuous
tone when the PTT is pressed and will not
allow a second transmission to “step-on”the
current conversation. Releasing the PTT will
cancel the tone.
Voice Operated Transmit (VOX)
You can transmit hands-free with the use
of optional accessories. The quality of the
transmission and performance of the radio
Copyright © 2009 Discount Two-Way Radio - North American Distributor
may be degraded. The radio will automatically
begin transmitting when you speak and stop
transmitting when you stop. For optimum
performance, this feature is not recommended
in high noise environments. See Glossary for
denition of VOX.
Press the programmed VOX key to activate
or turn off the VOX feature and an alert tone
sounds accordingly.
Your dealer can enable/disable the VOX
feature and set the VOX sensitivity. When the
VOX feature is enabled, the user can transmit
hands-free with VOX accessories. Note: Usage
of non RCA Communicatios Systems VOX
accessories is not recommended!
1. Press the programmed VOX key to activate
the VOX feature.
2. Select VOX on the PTT/VOX earpiece
switch.
3. Plug the earpiece into the accessory jack.
Page 24

24
4. Speak into the earpiece microphone, and
BR250TM Professional Two-Way Radio Instruction Manual
your voice will be transmitted.
When transmitting with VOX accessories, you
may faintly hear your own voice from the VOX
earpiece. Press the PTT of your radio to disable
the VOX feature. Turn the radio off and on
again or plug the earpiece into the accessory
jack again to restore the VOX feature.
Note: Regardless of whether or not the VOX
feature is enabled, if you select PTT on the
PTT/VOX earpiece switch, you can transmit
by pressing the external PTT. Do not push
the switch from PTT to VOX or the radio will
continuously transmit. When continuous
transmission occurs, push the PTT/VOX switch
from VOX to PTT, or activate the radio again to
restore the radio to operation use.
Users should always transmit no more than
50% of the using time in VOX and PTT mode.
The maximum duty factor supported by hard
-ware is 100%.
Copyright © 2009 Discount Two-Way Radio - North American Distributor
Note: For more information on the accessories
that are available for the BR250
TM
, please see
the Optional Accessories available on page 26,
contact your dealer or visit:
www.dtwr.com/rca
Page 25

BR250TM Professional Two-Way Radio Instruction Manual
TROUBLESHOOTING
Symptom Solution
a. The battery needs charging. Recharge the battery or replace
Cannot power on the radio
The operating time is
noticeably shorter than
normal even though the
battery is properly charged.
Cannot talk to or hear
group members
Hear non-group members
No voice or low voice while
transmitting
Copyright © 2009 Discount Two-Way Radio - North American Distributor
it with a fresh one.
b. The battery is not properly installed. Remove the battery and
reattach it.
a. The battery has worn out; it is time to buy a new battery.
b. The battery is not fully charged. Make sure that the battery is
removed after LED indicator has turned green.
a. Make sure that your radio operates on the same frequency
and has the same CTCSS/CDCSS settings as your group
members.
b. Make sure you are within their communication range.
Please change your CTCSS/CDCSS settings and have your group
members do so, also.
a. Turn the volume control knob to its maximum volume.
b. Return the radio to your dealer to check for microphone
damage.
25
Page 26

26
CARE AND CLEANING
• Do not directly handle the radio by its
antenna or external microphone.
• Do not place the radio in a dusty or dirty
environment.
• Clean the radio with a lint-free cloth
moistened with clean water and/or a mild
dishwashing liquid to remove dirt, grease,
and dust.
• Avoid subjecting the radio to corrosives,
solvents or spirits.
BR250TM Professional Two-Way Radio Instruction Manual
Copyright © 2009 Discount Two-Way Radio - North American Distributor
Page 27

BR250TM Professional Two-Way Radio Instruction Manual
Optional Accessories
Copyright © 2009 Discount Two-Way Radio - North American Distributor
27
Stubby Antenna
AN250SU – UHF
AN250SV - VHF
More compact and convenient than the standard antenna, but
reduces coverage by approximately 30%.
Multi-Unit Rapid-Rate Charger
CH250R6
More convenient and saves space by using one power outlet for
6 radios.
Heavy Duty, Remote Speaker Microphone
SM250L
No need to remove the radio from your waist, which prevents
radio damage or loss.
Page 28

28
Optional Accessories continued
Copyright © 2009 Discount Two-Way Radio - North American Distributor
BR250TM Professional Two-Way Radio Instruction Manual
Light Duty, Remote Speaker Microphone
HMN250M
Lighter and more compact than the heavy duty microphone but
with the same benets.
Professional Receive-Only Earpiece w/ Transparent
Acoustic Tube (for use with remote speaker microphones)
LOE250SC
Lightweight earpiece for use with speaker mics and when
transmitting is not necessary.
Economy Receive-Only Earpiece
(for use with remote speaker microphones)
LOE250EH
Same functions as the professional earpiece but at economical
price.
Page 29

BR250TM Professional Two-Way Radio Instruction Manual
Optional Accessories continued
Ear-Hook Style Earpiece with Microphone PTT
BDN6105EH
Serves the same function as the professional surveillance kit at
an economical price.
Surveillance Kit with Palm Mic and In-Line PTT
BDN7203A
Professional, high quality earpiece ideal for radio users requiring
discreet communication.
Lightweight Over-The-Head Headset with In-line PTT
HS250LWH
Durable and inexpensive. Perfect for retail stores, restaurants and
bars.
Copyright © 2009 Discount Two-Way Radio - North American Distributor
29
Page 30

30
Optional Accessories continued
Copyright © 2009 Discount Two-Way Radio - North American Distributor
BR250TM Professional Two-Way Radio Instruction Manual
Heavy Duty, Over-The-Head Headset
H0500D
For use in high noise environments such as airports, race tracks
and manufacturing plants (-24dB noise reduction).
Heavy Duty, Behind-the-Head Headset
H4500D
When a hard hat is necessary in high noise environments.
Leather Holster (xed or swivel clip)
HL250C
More durable and stronger than Nylon. Offers the best
protection for your BR250TM radio.
Page 31

BR250TM Professional Two-Way Radio Instruction Manual
Optional Accessories continued
Nylon Holster (xed or swivel clip)
HN250C
Prevents loss and prolongs your radio life by preventing
unnecessary drops and abuse.
Waterproof Bag
HNWPBG
Protect your BR250TM radio when working around water.
Chest Pack
CHEST-A
For those applications when securing the BR250
waist is not possible.
Copyright © 2009 Discount Two-Way Radio - North American Distributor
TM
radio to your
31
Page 32

32
GLOSSARY
Short Press - Key press shorter than 1.5 seconds
Long Press - Key press longer than 1.5 seconds
Standby Status - In normal mode, no key operation is made on the radio and the radio is in
receiving status.
CTCSS/CDCSS - The setting of CTCSS/CDCSS code in transmitting party must match that in the
receiving party for the receiver to unmute its output audio.
Battery Save - The function is to save battery power and prolong the operation time. Once no
activity or operations are occurring on the channel, the radio will be on and off alternately.
Time-out Timer (TOT) - The time-out timer feature stops someone from talking too long and tying
up the channel.
Squelch - The purpose of squelch is to mute audio output from the speaker when no signals are
present. Open the squelch to unmute radio speaker.
Squelch Off - Always unmute speaker to receive audio as well as background noise.
Monitor - Carrier condition must be satised for the radio to unmute to an incoming call, regardless
of CTCSS/CDCSS condition.
BR250TM Professional Two-Way Radio Instruction Manual
continued >
Copyright © 2009 Discount Two-Way Radio - North American Distributor
Page 33

BR250TM Professional Two-Way Radio Instruction Manual
GLOSSARY continued
Momentary - Hold down the Function key to activate the status, and release it to turn it off.
Scan - The scan feature enables the radio to continuously scan each channel for activity.
Busy Channel Lockout - Avoid interference with users on same channel by preventing transmission
if another talkgroup is already on the air.
VOX - The radio will automatically begin transmitting when you speak.
WARRANTY STATEMENT
RCA Communications Systems warrants each new radio product it supplies to be free from defects in
material and workmanship under normal use and service for the time period listed below, provided
that the user has complied with the requirements stated herein.
The warranty period begins on the date of purchase from an Authorized RCA Communications
Systems Sales and Service Outlet. This warranty is offered to the original end user and is not assignable
or transferable. RCA Communications Systems is not responsible for any ancillary equipment which
is attached to or used in conjunction with RCA Communications Systems products.
Copyright © 2009 Discount Two-Way Radio - North American Distributor
33
Page 34

34
RCA Communications Systems offers to the original end user a Two (2) Year Limited Warranty on
the RCA BR250TM Radio Handset. The BR250TM Antenna, BR250TM Battery and the BR250TM Battery
Charger are covered under a One (1) Year Limited Warranty. The BR250TM Belt Clip is not covered
under the warranty.
During this period, if the product fails to function under normal use because of manufacturing
defect(s) or workmanship, it should be returned to the Authorized RCA Communications Systems
Sales and Service Outlet from which it was purchased. The Sales and Service Outlet will repair the
product to full operating specications or replace the product with a new product of the same
make and model. The user is responsible for all charges incurred in returning the product to the
Authorized RCA Communications Systems Sales and Service Outlet. RCA Communications Systems
will be responsible for all charges in returning the product to the end user via standard ground
shipping service.
RCA Communications Systems shall have no obligation to repair or replace the product, if there
is damage as a result of normal wear and tear or if the damage is caused in whole or in part by
catastrophe, fault or negligence of the user, improper or unauthorized alterations or repairs to the
product, incorrect wiring, use of the product in a manner for which it was not designed, or by
causes external to the product. This warranty is void if the product serial number is altered, defaced
or removed.
THE EXPRESS WARRANTIES CONTAINED HEREIN ARE IN LIEU OF ALL OTHER WARRANTIES, EITHER
EXPRESSED OR IMPLIED OR STATUTORY, INCLUDING, WITHOUT LIMITATION, ANY WARRANTY OF
MERCHANTABILITY OR FITNESS FOR A PARTICULAR PURPOSE.
BR250TM Professional Two-Way Radio Instruction Manual
Copyright © 2009 Discount Two-Way Radio - North American Distributor
Page 35

BR250TM Professional Two-Way Radio Instruction Manual
FOR ANY PRODUCT WHICH DOES NOT COMPLY WITH THE WARRANTY SPECIFIED, THE SOLE
REMEDY WILL BE REPAIR OR REPLACEMENT. IN NO EVENT WILL RCA COMMUNICATIONS SYSTEMS
BE LIABLE TO THE BUYER OR ITS CUSTOMERS FOR ANY DAMAGES, INLCUDING ANY SPECIAL,
INCIDENTAL, INDIRECT OR CONSEQUENTIAL DAMAGES, OR THE LOSS OF PROFIT, REVENUE OR
DATA ARISING OUT OF THE USE OR THE INABILITY TO USE THE PRODUCT.
RCA Communications Systems endeavors to achieve the accuracy and completeness of this manual,
but is not liable for any possible omission and printing mistakes.
All the above specications and design are subject to change without prior notice.
All the reproduction and translation of this manual without authorization is prohibited.
In this manual, we strive to achieve accuracy and completeness, but provide no warranty of accuracy
or reliability. All the above specications and design are subject to change without notice due to
continuous development.
No part of this manual may be copied, reproduced, translated, stored in a retrieval system, distributed,
or transmitted in any form or by any means, electronic or mechanical, for any purpose without the
expressed, written permission from RCA Communications Systems.
The end-user of any two-way radio is solely responsible for obtaining any license or other
authorizations required by the Federal Communications Commission (FCC). For further information
visit www.fcc.gov or call 1-888-CALL-FCC (1-888-225-5322).
Copyright © 2009 Discount Two-Way Radio - North American Distributor
35
Page 36

36
BR250TM Professional Two-Way Radio Instruction Manual
For Sales, Warranty and Customer Support please contact:
Discount Two-Way Radio Corporation – North American Distributor
1430 240th Street
Harbor City, CA 90710
Phone: 310-224-5100 / Fax: 310-224-5101
www.discounttwo-wayradio.com
Copyright © 2009 Discount Two-Way Radio - North American Distributor
 Loading...