

USER'S
GUIDE
VIDEO
CASSETTE
Important Information
WARNING
To reduce the risk of
fire or shock hazard,
do not expose this VCR
to rain or moisture.
Cautions
(2ALr_ON: To reduce the risk of electric shock, match wide blade of plug to wide slot, fully insert.
ATTENTION: Pour _viter les chocs _lectriques, introduire la lame la plus large de la fiche dans la
borne correspondante de la prise et pousser jusq6 au fond.
Refer to the identification/rating label on the back of the product for the proper operating voltage.
FCC Regulations state that unauthorized changes or modifications to this equipment may void the
user's authority to operate it.
Note To Cable "rv Insta_ller
_ELE-CI"_CSI'IOC:K]
_NOTOPEN /
TO REDUCE THE RISK OF ELECTRIC SHOCK, DO NOT REMOVE
COVER (OR BACK). NO USER SERVICEABLE PARTS INSIDE.
REFER SERVICING TO QUALIFIED SERVICE PERSONNEL.
This symbol indicates "dangerous
voltage" inside the product that
presents a risk of electric shock or
personal injury.
instructions accompanying the
This symbol indicates important
product.
Product Registration
This reminder is provided to call your attention to Article 820-40 of the National
Electrical Code (Section 54 of the Canadian Electrical Code, Part 1) which provides
guidelines for proper grounding and, in particular, specifies that the cable ground
shall be connected to the grounding system of the building as close to the point of
cable entry as practical.
Please fill out the product registration card and return it immediately. Returning this card
allows us to contact you if needed.
Keep your sales receipt to obtain warranty parts and service and for proof of purchase.
Attach it here and record the serial and model numbers in case you need them. The numbers
are located on the back of the VCR.
Model No. VR33g
Serial No.
Purchase Date:
Dealer/Address/Phone:
Table of Contents
Important Information
Warnings . i
Cautions i
Note to Cable TV Installer i
Product Registration i
Hooking Up the VCR
Choosing a Hookup 2
Antenna or Cable System Without a
Cable Box 3
Cable System With Cable Box to
Unscramble All Channels 4
Cable System With Cable Box to
Unscramble Pay Channels Only__ 5
Connecting Two VCRs for Copying
Tapes 6
Setting Up the VCR
Startup
Check Accessories With VCR 7
Insert Batteries in Remote 7
Turn on the TV 8
Turn on the VCR 8
Place Channels in VCR's Memory __ 8
Add or Remove Channels from
VCR's Memory 9
Select a Language/Choisissez une
Langue 9
Set the Time and Date 9
Use TV,VCR Button 10
Set Auto TV/VCR Feature 10
Using the Remote Control
VCR Function Buttons 11
Playing a Tape
Operating Instructions
Using the Playback Features
Auto Play Feature
Pause for Stop-Action
Picture Search ........ 13
Automatic Tracking 13
Manual Tracking 13
DISPLAY Button 14
Time Counter 14
Commercial Scan 15
Index Search 15
Zero Search 16
Recording a Program
Types of Recordings
Recording Speeds
Recording Pause
Basic Recording -
Operating Instructions
Watch a TV Channel While VCR
is Recording a Different Channel __
Express Recording (XPR).
Recording While You're Away
Timer Recording
Checking or Clearing
Timer Recordings
Timer Recording From the
VCR's Line Input
Using Two VCRs for Copying
and Editing Tapes
17
17
17
18
18
19
2O
21
21
22
References
Location of Controls
Front Panel
Back Panel
Display Panel
Specifications
Cleaning the VCR
12
12
13
Trouble Checks
Limited Warranty
Index
23
24
24
25
25
26-27
28
29
Choosing a Hookup
The hookups on pages 3 through 6 are divided into two hookup types: Basic (A) and
Advanced (B).
The basic hookups show the backs of TVs that have only an antenna/cable connection. It is
the easier of the two and additional accessories may not be needed.
The advanced hookups show the VCR hooked up to a monitor/receiver
(TV with audio and video jacks). This connection may improve the picture quality as well
as convenience of operation.
Answer the questions to choose the hookup for your VCR.
1. How do you receive your TV signals?
Choose one answer from below.
A. Outside antenna - Turn to page 3.
B. Rabbit ears (set-top) and/or bow tie antenna - Turn to page 3.
C. Cable System - Go to question 2.
2. What type of cable.TV system* do you have?
Choose one answer from below.
A. Cable without a box - Turn to page 3.
B. Cable box to unscramble all the channels - Turn to page 4.
G. Cable box to unscramble only pay channels, such as HBO, Showtime,
Cinemax, etc. - Turn to page 5.
*You may need to contact your local cable company for assistance.
Optional Hookups
How to hook up two VCRs for copying tapes?
A. Select a hookup by answering the questions above.
B. Then modify the connections as shown on page 6.
2
Antenna or Cable System Without a Cable Box
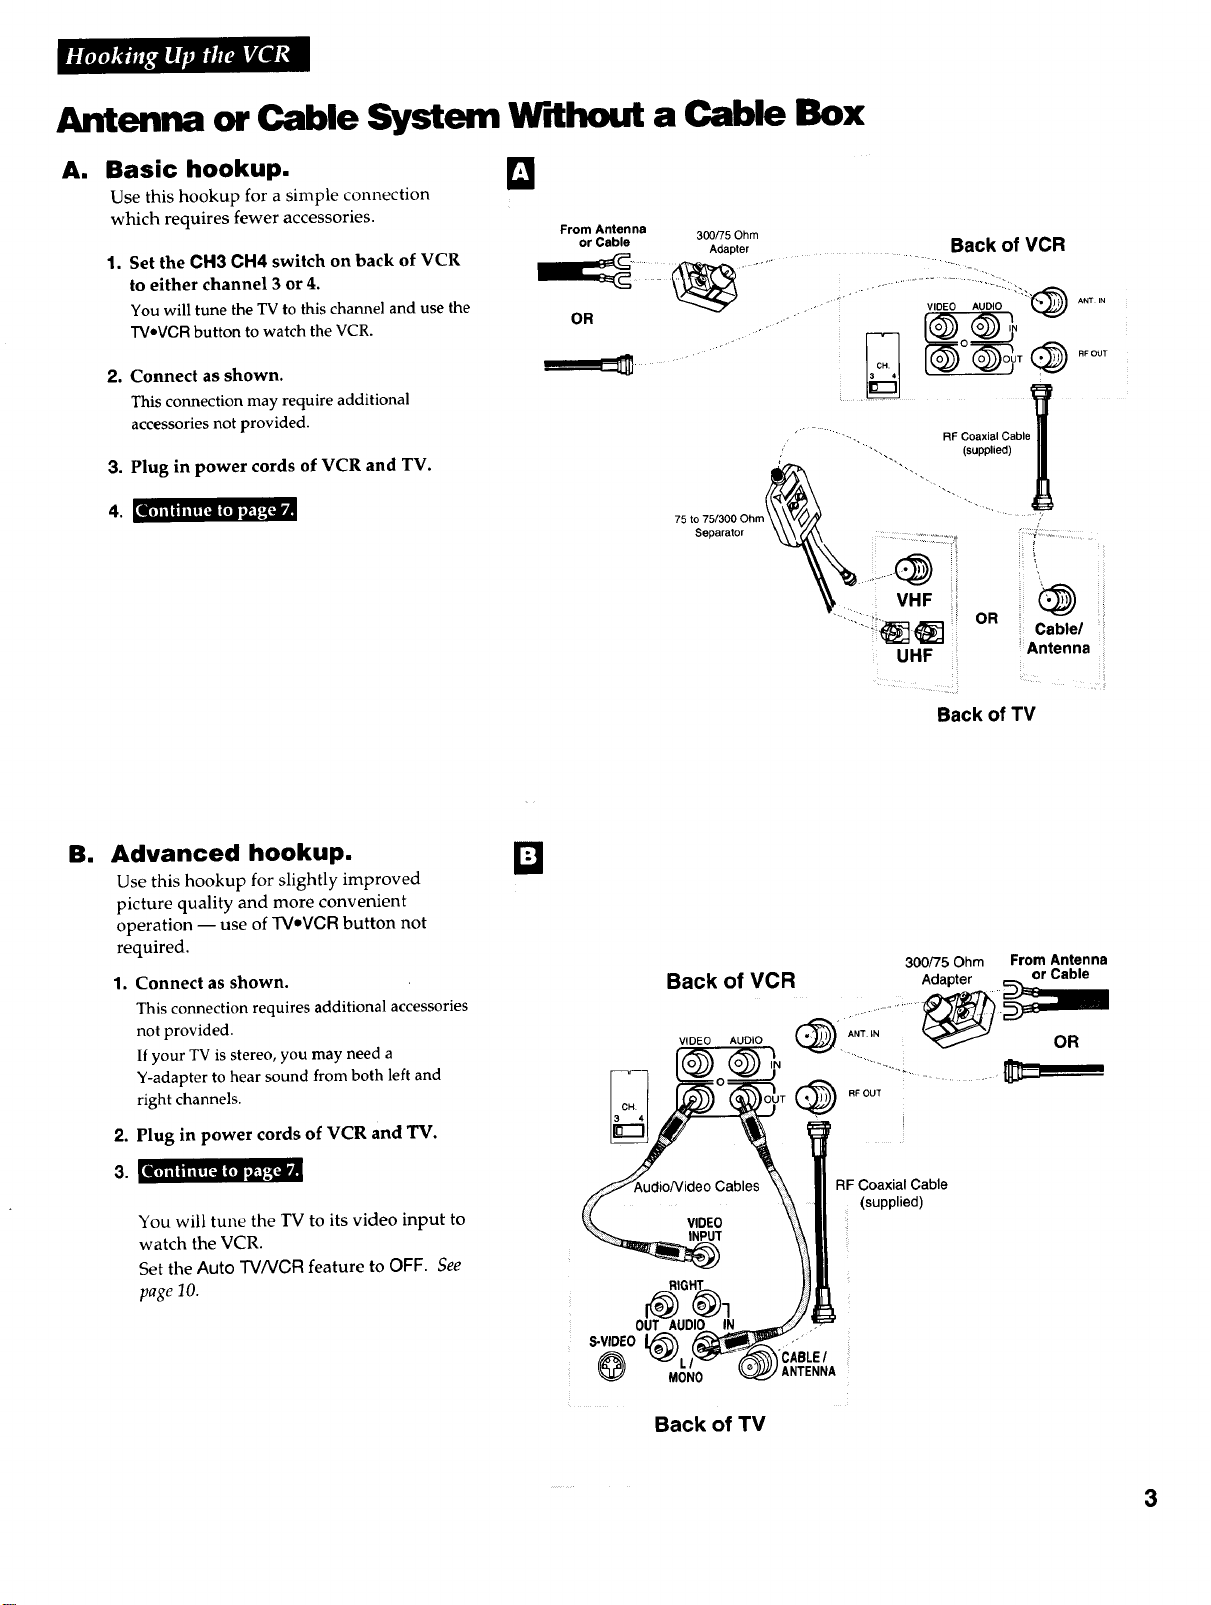
A. Basic hookup. [_
Use this hookup for a simple connection
which requires fewer accessories.
1, Set the CH3 CH4 switch on back of VCR
to either channel 3 or 4.
You will tune the TVto this channel and use the
TVoVGRbutton to watch the VCR.
2, Connect as shown.
This connection may require additional
accessories not provided.
3. Plug in power cords of VCR and TV.
From Antenna
or Cable 300/75 Ohm
Adapter Back of VCR
• ........... "-,., RF Coaxial Cable
,,. (supplied)
4. LImm, -, [_a(,=*dIpx_'R
B. Advanced hookup.
Use this hookup for slightly improved
picture quality and more convenient
operation -- use of TV,VGR button not
required.
1, Connect as shown.
This connection requires additional accessories
not provided.
If your TV is stereo, you may need a
Y-adapter to hear sound from both left and
right channels.
2. Plug in power cords of VCR and TV.
Q
75 to 75/300 Ohm"
Separator
(
Back of VCR
VIDEO AUDIO
(_ RF OUT
VHF
or ,i_<_
UHF
Back of TV
300/75 Ohm From Antenna
"'4.
' Cable/
iAntenna
i ii
•[
3. 11[,]ill I,I, [_ (,",,r,,l_l'x
You will tune the TV to its video input to
watch the VCR.
Set the Auto TV/VCR feature to OFF. See
page 10.
S-VIDEO
0
RF Coaxial Cable
(supplied)
AUDIO
MON0
Back of TV
3
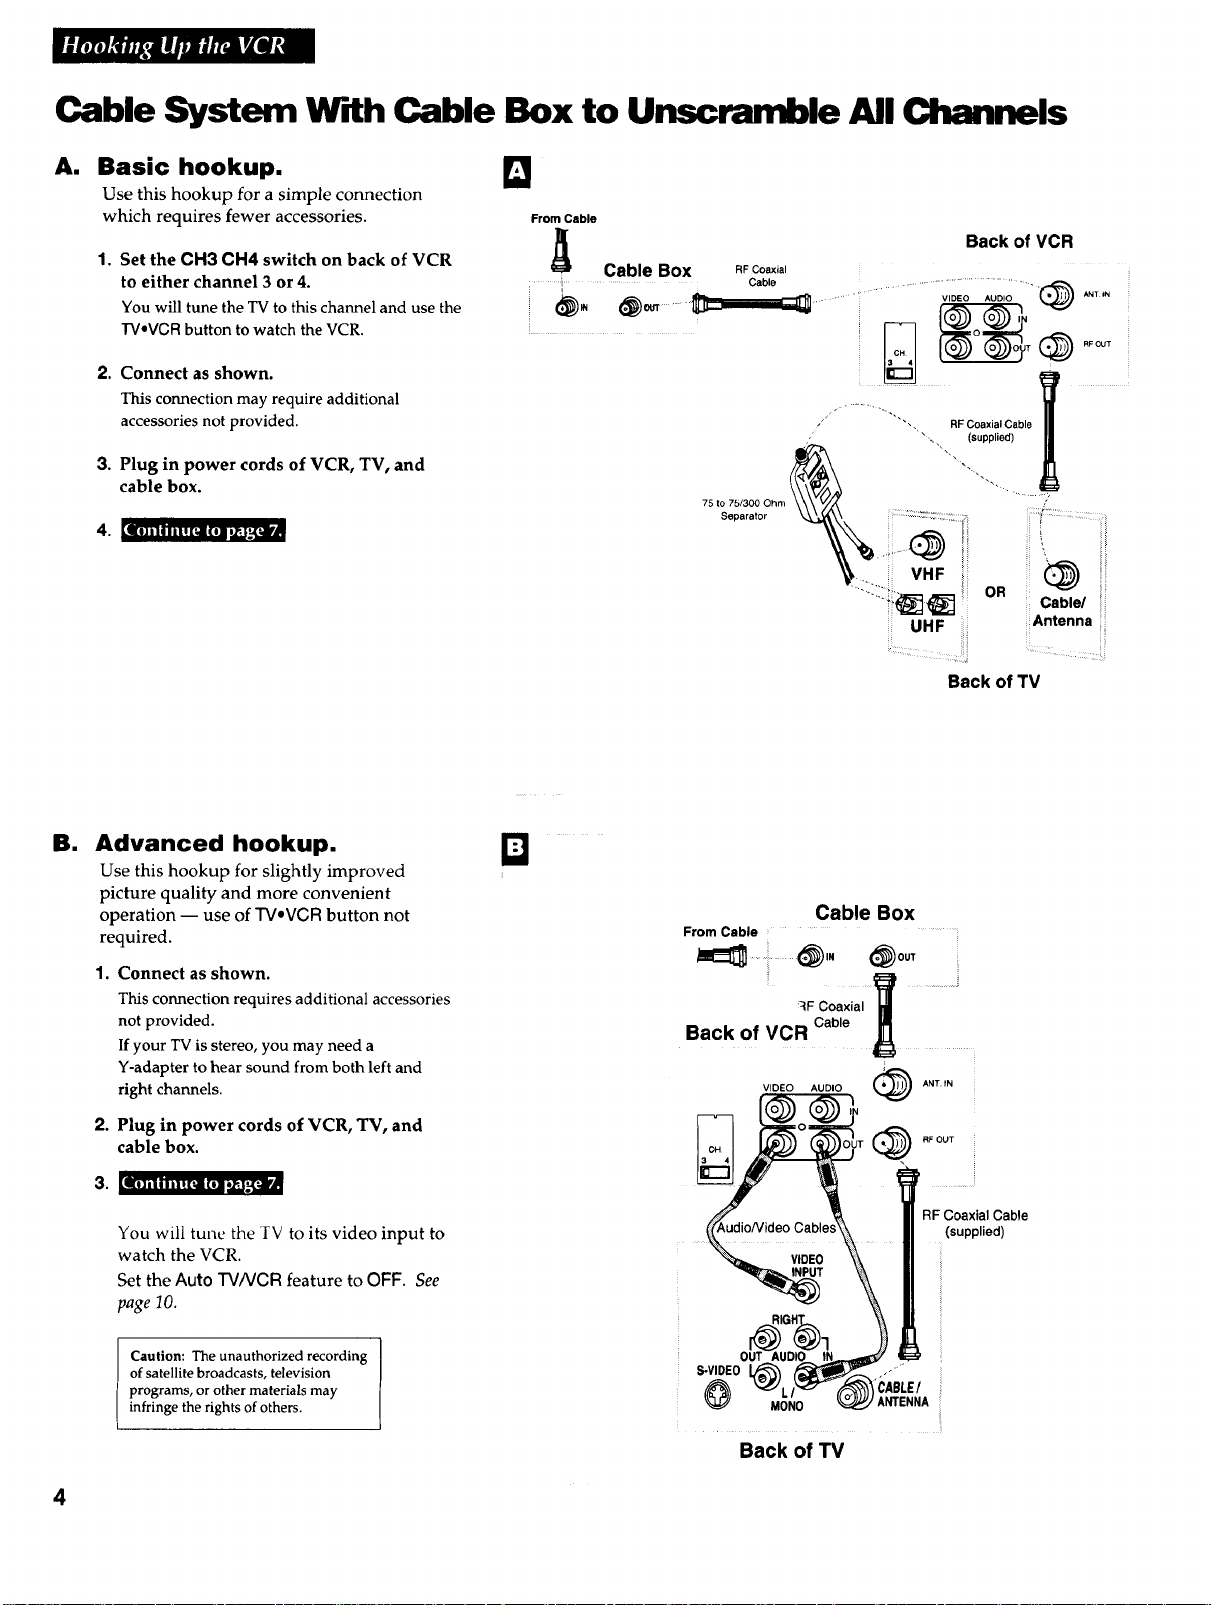
Cable System Cable Box to Unscramble All Channels
A. Basic hookup. I_
Use this hookup for a simple connection
which requires fewer accessories.
From Cable
1o Set the CH3 CH4 switch on back of VCR
to either channel 3 or 4.
You will tune the TV to this channel and use the
TVaVCRbutton to watch theVCR.
2.
Connect as shown.
This connection may require additional
accessories not provided.
3,
Plug in power cords of VCR, TV, and
cable box.
4. [llll] | 111 II ! [_1 (I1 i/_-/;IF/I
Cable Box RFCoax_a,
: .... i......... _ob'r Cable
iS. ................
[....... RFOUT
-_IiiI_ " .........................................v DEO AUD 0 "'_)
Back of VCR
Back of TV
El
Advanced hookup.
Use this hookup for slightly improved
picture quality and more convenient
operation -- use of TVeVCR button not
required.
1. Connect as shown.
This connection requires additional accessories
not provided.
If your TV is stereo, you may need a
Y-adapter to hear sound from both left and
right channels.
2. Plug in power cords of VCR, TV, and
cable box.
kolillli!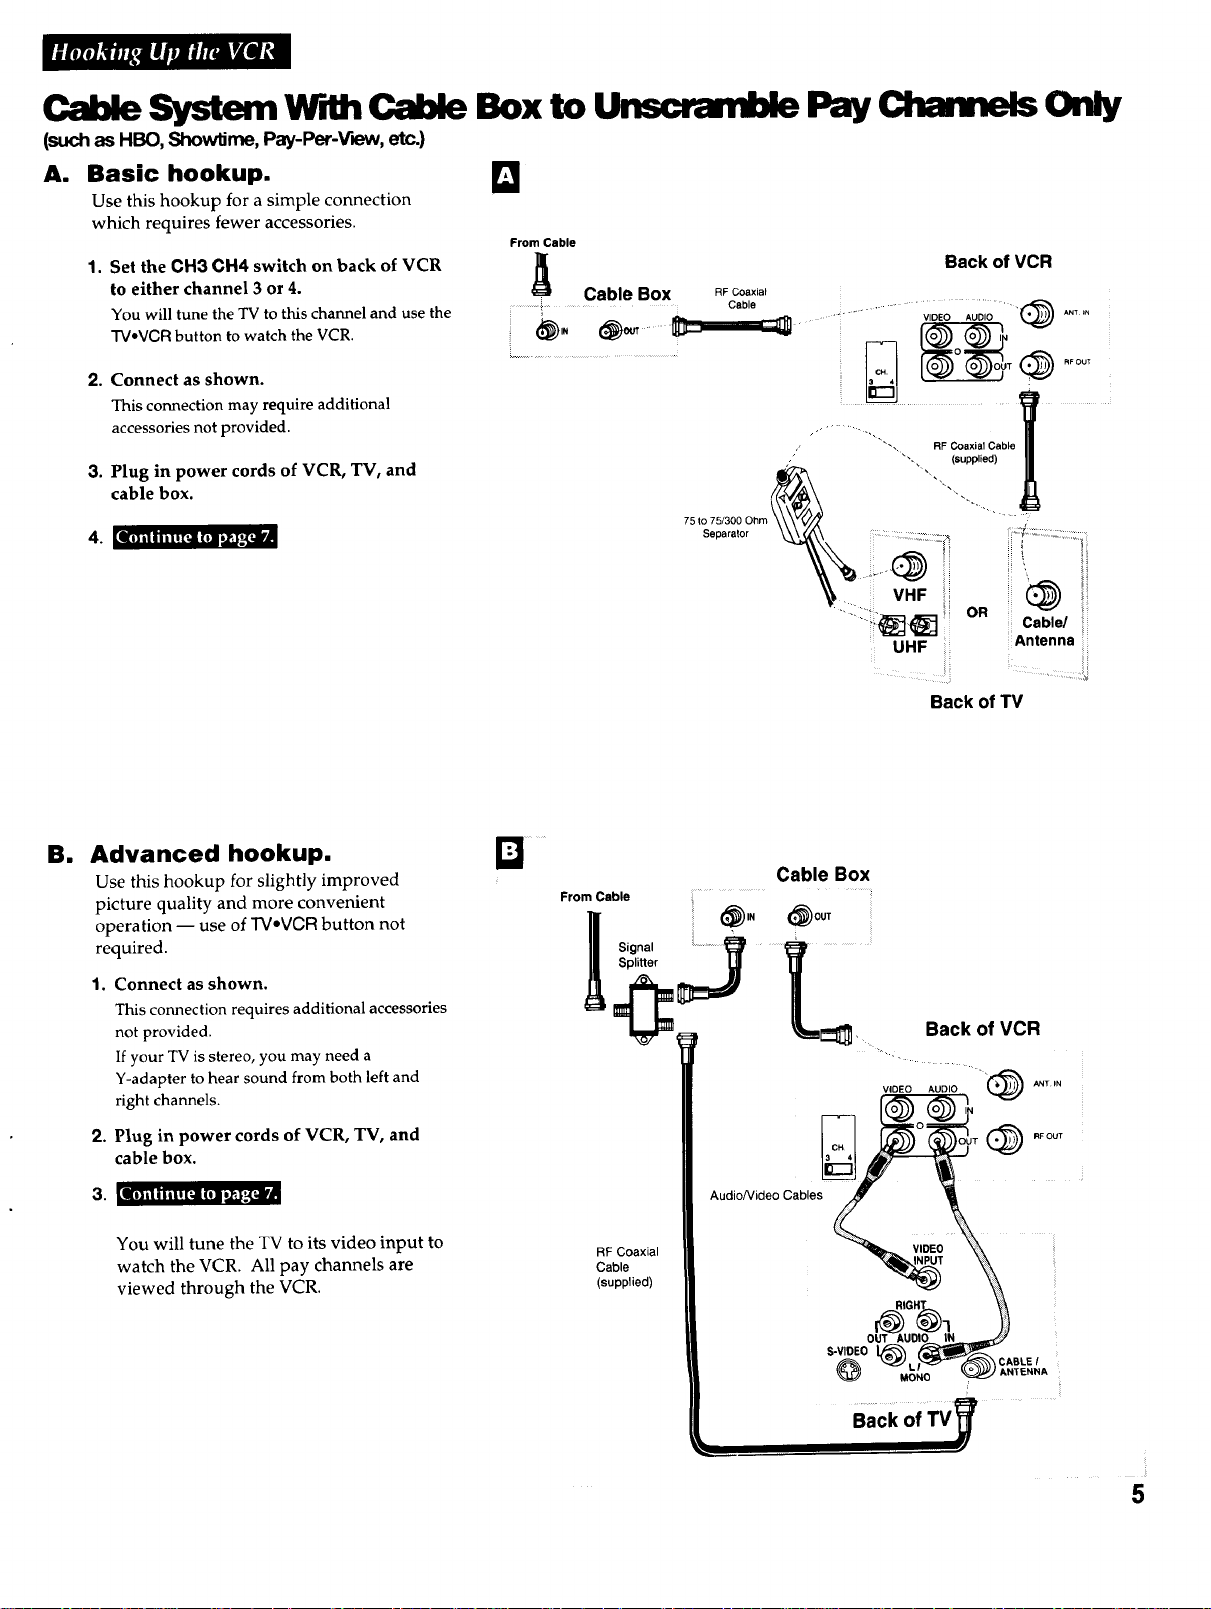
S cem Boxto PayOhEmnels
(such as HBO, ShowlJme,Pay-Per-V'_N, etc.)
A. Basic hookup.
Use this hookup for a simple connection
which requires fewer accessories.
Set the CH3 CH4 switch on back of VCR
1.
to either channel 3 or 4.
You will tune the TVto this channel and use the
"I'VoVCRbutton to watch the VCR.
2. Connect as shown.
This connection may require additional
accessories not provided.
3,
Plug in power cords of VCR, TV, and
cable box.
II] il I i i I ![I Ill i_,],_-,(|
D
am
Advanced hookup.
Use this hookup for slightly improved
picture quality and more convenient
operation -- use of TVeVCR button not
required.
1. Connect as shown.
This connection requires additional accessories
not provided.
If your TV is stereo, you may need a
Y-adapter to hear sound from both left and
right channels.
2. Plug in power cords of VCR, TV, and
cable box.
[I1 iIi Ili! [_ii 11: I ill_ '4 _.IF_
You will tune the TV to its video input to
watch the VCR. All pay channels are
viewed through the VCR.
El
Cable Box
,,omCeb,e <_.. _ou,
. .... ;
Audio/Video Cables
RF Coaxial
Cable
(supplied)
Back of TV
Back of VCR
VIDEO AUDIO ANT IN
_T VIDEO
RIGH(_ 1
OUT
S-VIDEO
MONO ) ANTENNA
(}_)
RF OUT
_CABLE I
,aCkofTv_
,i
5
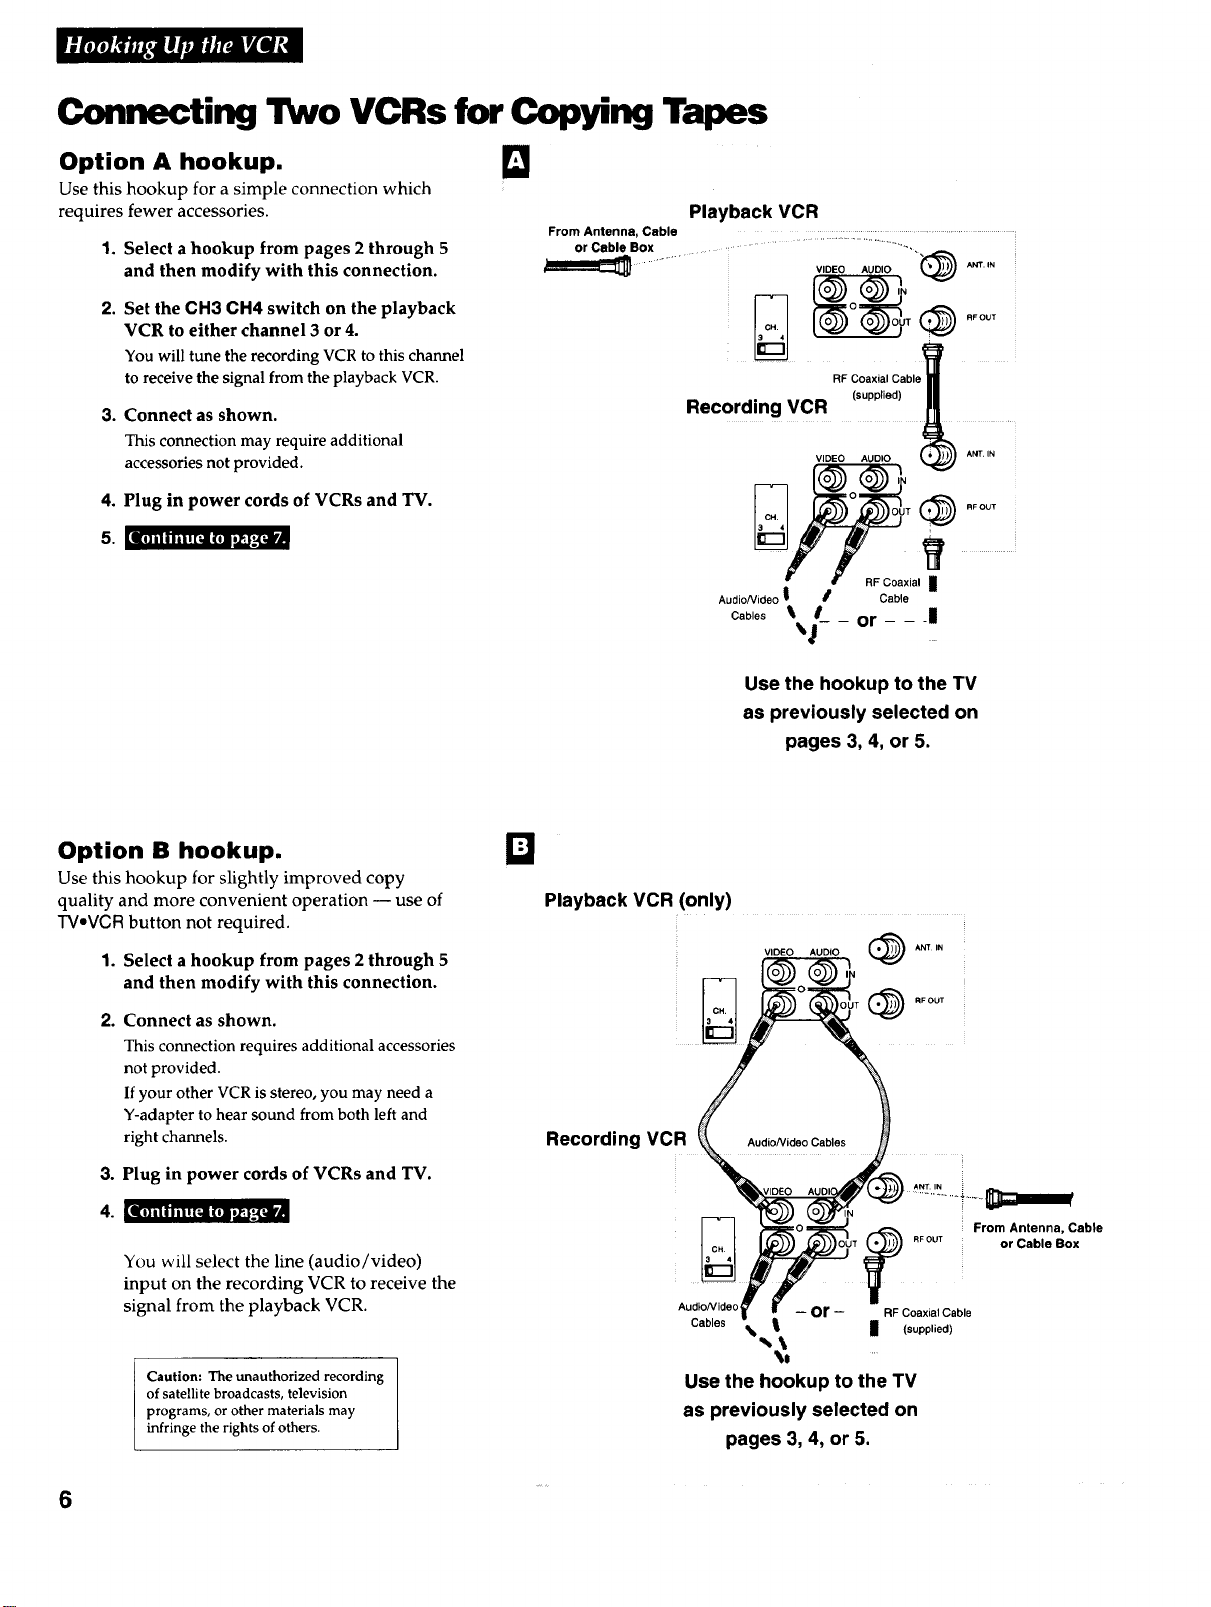
Connecting Two VCRs for Copying Tapes
Option A hookup.
Use this hookup for a simple connection which
requires fewer accessories.
1. Select a hookup from pages 2 through 5
and then modify with this connection.
2.
Set the CH3 CH4 switch on the playback
VCR to either channel 3 or 4.
You will tune the recording VCR to this channel
to receive the signal from the playback VCR.
3. Connect as shown.
This connection may require additional
accessories not provided.
4. Plug in power cords of VCRs and TV.
lO] i I I I il ! [ii (Ol o_-,[iiP
D
From Antenna, Cable ....................................
or Cable Box
Playback VCR
..................... VIDEO AUDIO "_) ....
RF Coaxial Cable
Recording VCR
Use the hookup to the TV
as previously selected on
pages 3, 4, or 5.
(supplied)
Option B hookup.
Use this hookup for slightly improved copy
quality and more convenient operation -- use of
TVeVCR button not required.
1. Select a hookup from pages 2 through 5
and then modify with this connection.
2, Connect as shown.
This connection requires additional accessories
not provided.
If your other VCR is stereo, you may need a
Y-adapter to hear sound from both left and
right channels.
3. Plug in power cords of VCRs and TV.
4. [_--*--[_a-]=,ip, a:_[_J
You will select the line (audio/video)
input on the recording VCR to receive the
signal from the playback VCR.
Caution: The unauthorized recording
of satellite broadcasts, television
programs, or other materials may
infringe the rights of others.
Q
Playback VCR (only)
Recording VCR
VIDEO AUDIO _
AudioNideo -- or - RF Coaxial Cable
Cables II (supplied)
ANT IN
RFOUT
Use the hookup to the TV
as previously selected on
pages 3, 4, or 5.
From Antenna, Cable
or Cable Box
6
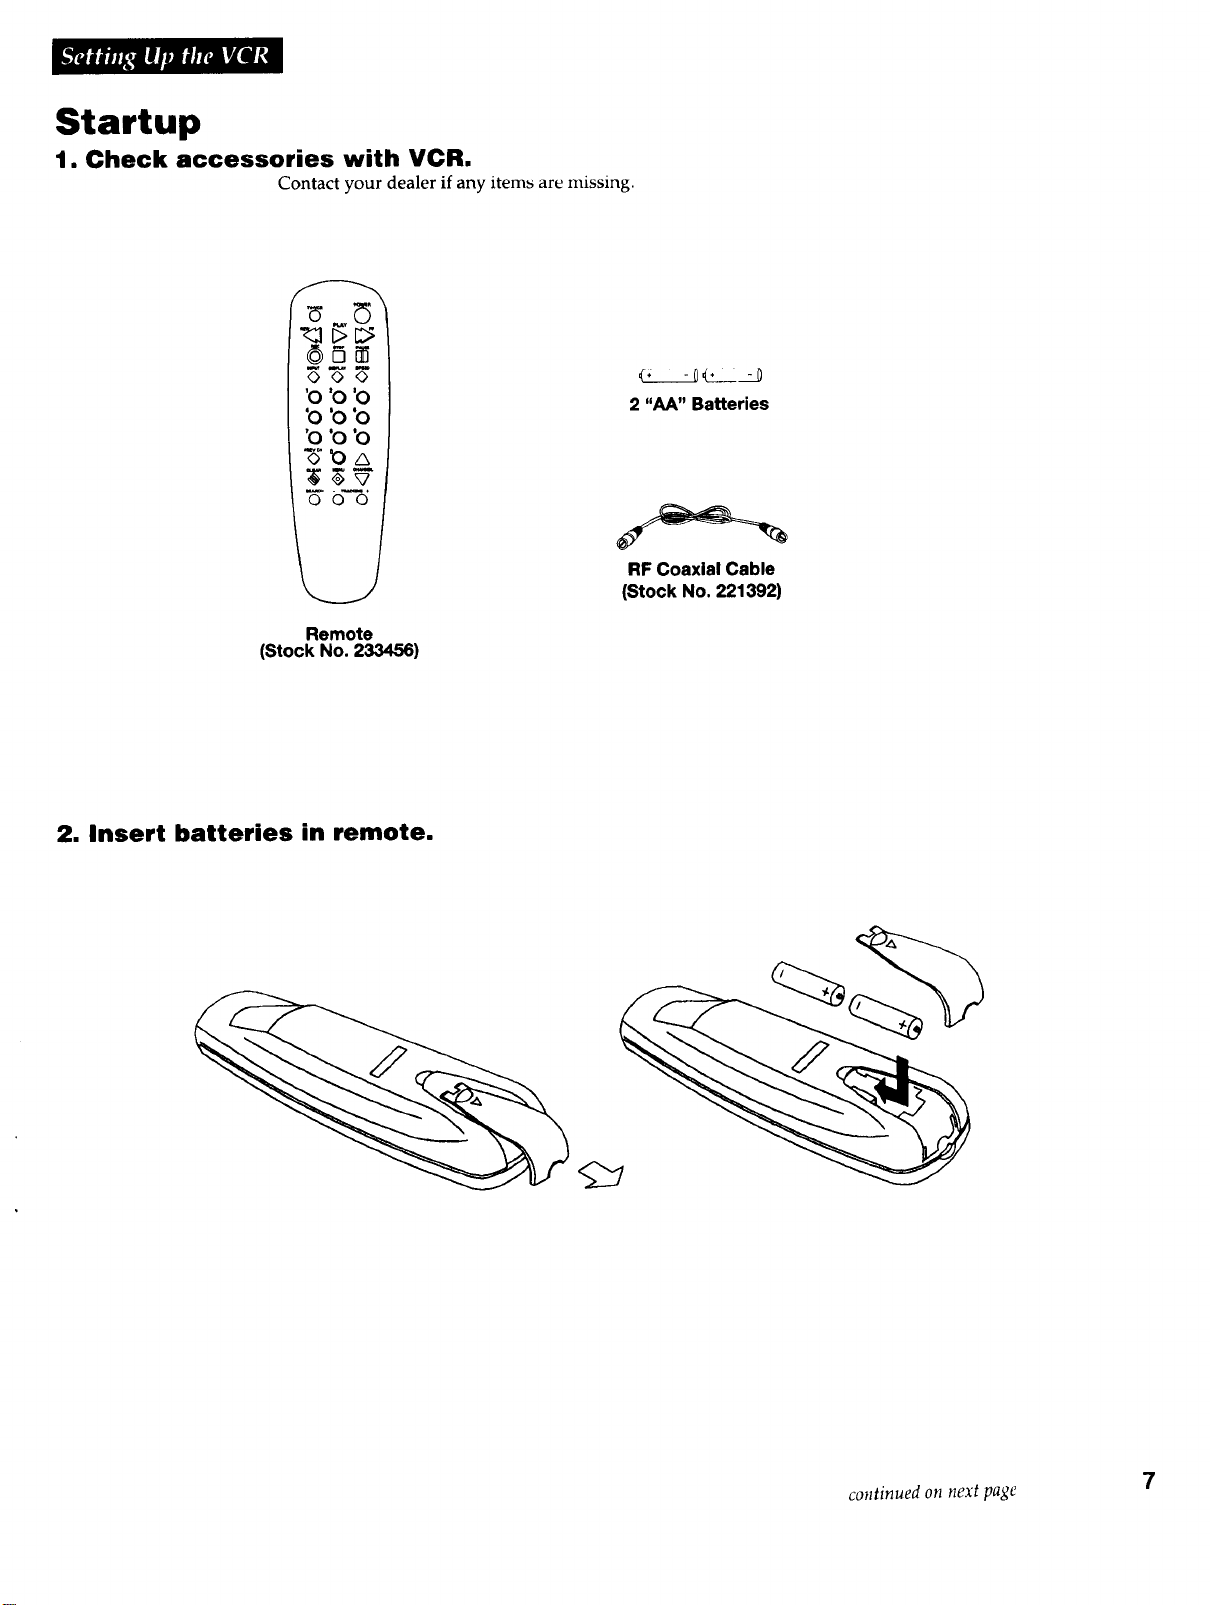
Startup
1. Check accessories with VCR.
Contact your dealer if any items are missing.
'o 'o'o
'o 'o'o
'o 'o 'o
ooo
Remote
(Stock No. 233456)
2. Insert batteries in remote.
2 "AA" Batteries
RF Coaxial Cable
(Stock No. 221392)
continued on next page
7
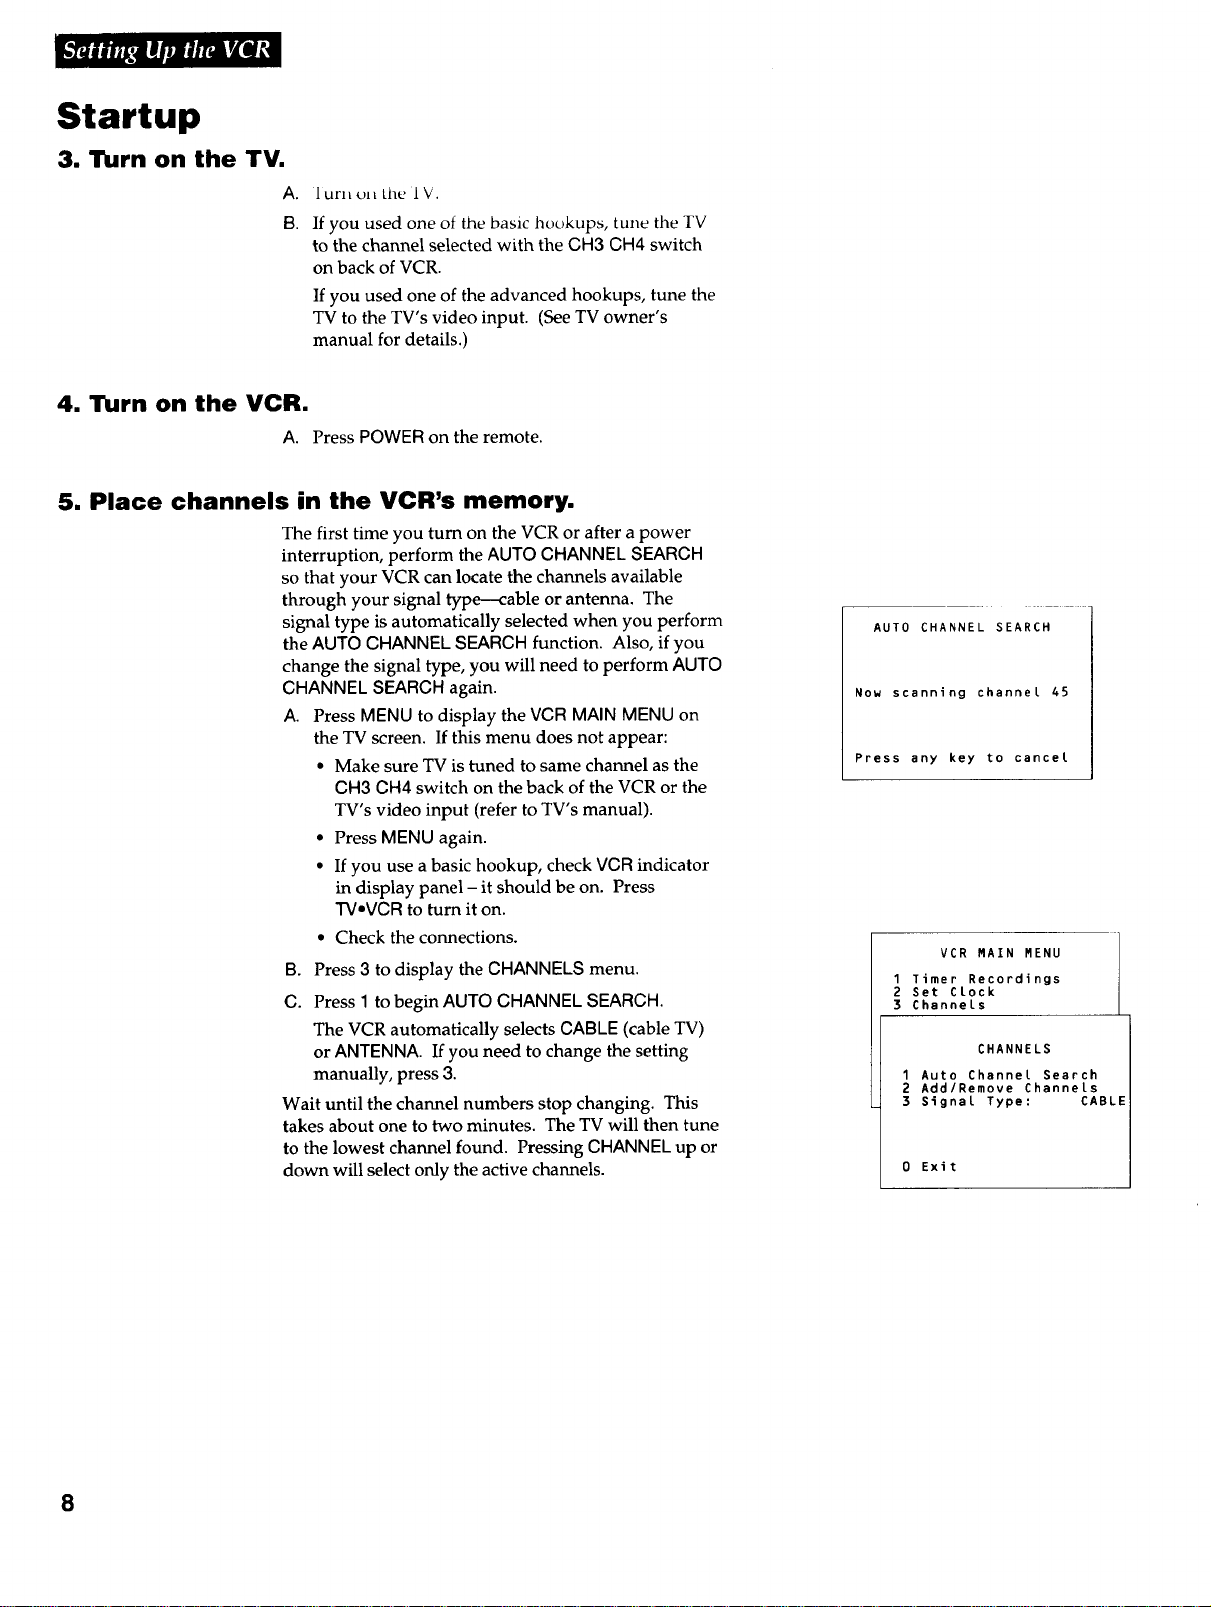
Startup
3. Turn on the TV.
A.BI urn on the 1 V.
If you used one of the basic hookups, tune the TV
to the channel selected with the CH3 CH4 switch
on back of VCR.
If you used one of the advanced hookups, tune the
TV to the TV's video input. (See TV owner's
manual for details.)
4. Turn on the VCR.
A. Press POWER on the remote.
5. Place channels in the VCR's memory.
The first time you turn on the VCR or after a power
interruption, perform the AUTO CHANNEL SEARCH
so that your VCR can locate the channels available
through your signal type-cable or antenna. The
signal type is automatically selected when you perform
the AUTO CHANNEL SEARCH function. Also, if you
change the signal type, you will need to perform AUTO
CHANNEL SEARCH again.
A. Press MENU to display the VCR MAIN MENU on
the TV screen. If this menu does not appear:
• Make sure TV is tuned to same channel as the
CH3 CH4 switch on the back of the VCR or the
TV's video input (refer to TV's manual).
• Press MENU again.
• If you use abasic hookup, check VCR indicator
in display panel - it should be on. Press
TV•VCR to turn it on.
• Check the connections.
B. Press 3 to display the CHANNELS menu.
C. Press 1 to begin AUTO CHANNEL SEARCH.
The VCR automatically selects CABLE (cable TV)
or ANTENNA. If you need to change the setting
manually, press 3.
Wait until the channel numbers stop changing. This
takes about one to two minutes. The TV will then tune
to the lowest channel found. Pressing CHANNEL up or
down will select only the active channels.
AUTO CHANNEL SEARCH
Now scanning channel 45
Press any key to cancel
VCR MAIN MENU
1 Timer Recordings
2 Set CLock
3 Channels
CHANNELS
1 Auto Channet Search
2 AddlRemove Channels
3 Signal Type: CABLE
0 Exit
8
 Loading...