

Page 1

VideoCas sette
Recorder
Owner’s Manual
Page 2
Wahanty Registration
No other RCA Video Cassette Recorder has the same serial number as yours. It is important that you
record the number and other vital information here, in case your VCR is stolen or in case you need a
complete description for any other reason. You will find the model and serial numbers on the back of
the VCR. You will also find both numbers recorded on your registration form.
Purchase Date_________________________________________________________
Dealer
_________________________
^_______________________________________________________________________
____________________________________________
Model:
VCR registration is very important so that you can be contacted should there be a safety inspection,
modification, or product recall under applicable laws or regulations or otherwise. The dealer who sold
you the VCR should have registered it and given you a copy of the registration form.
If your dealer did not give you a copy of the registration, contact him promptly and ask for it. You
must be able to show your registration or evidence of purchase date to any RCA Authorized VCR
Servicenter or the RCA Service Company to receive warranty parts and service. We suggest you attach
your sales slip and warranty registration to this booklet and keep them in a safe place for future
reference.
Serial Number
Safety Precautions
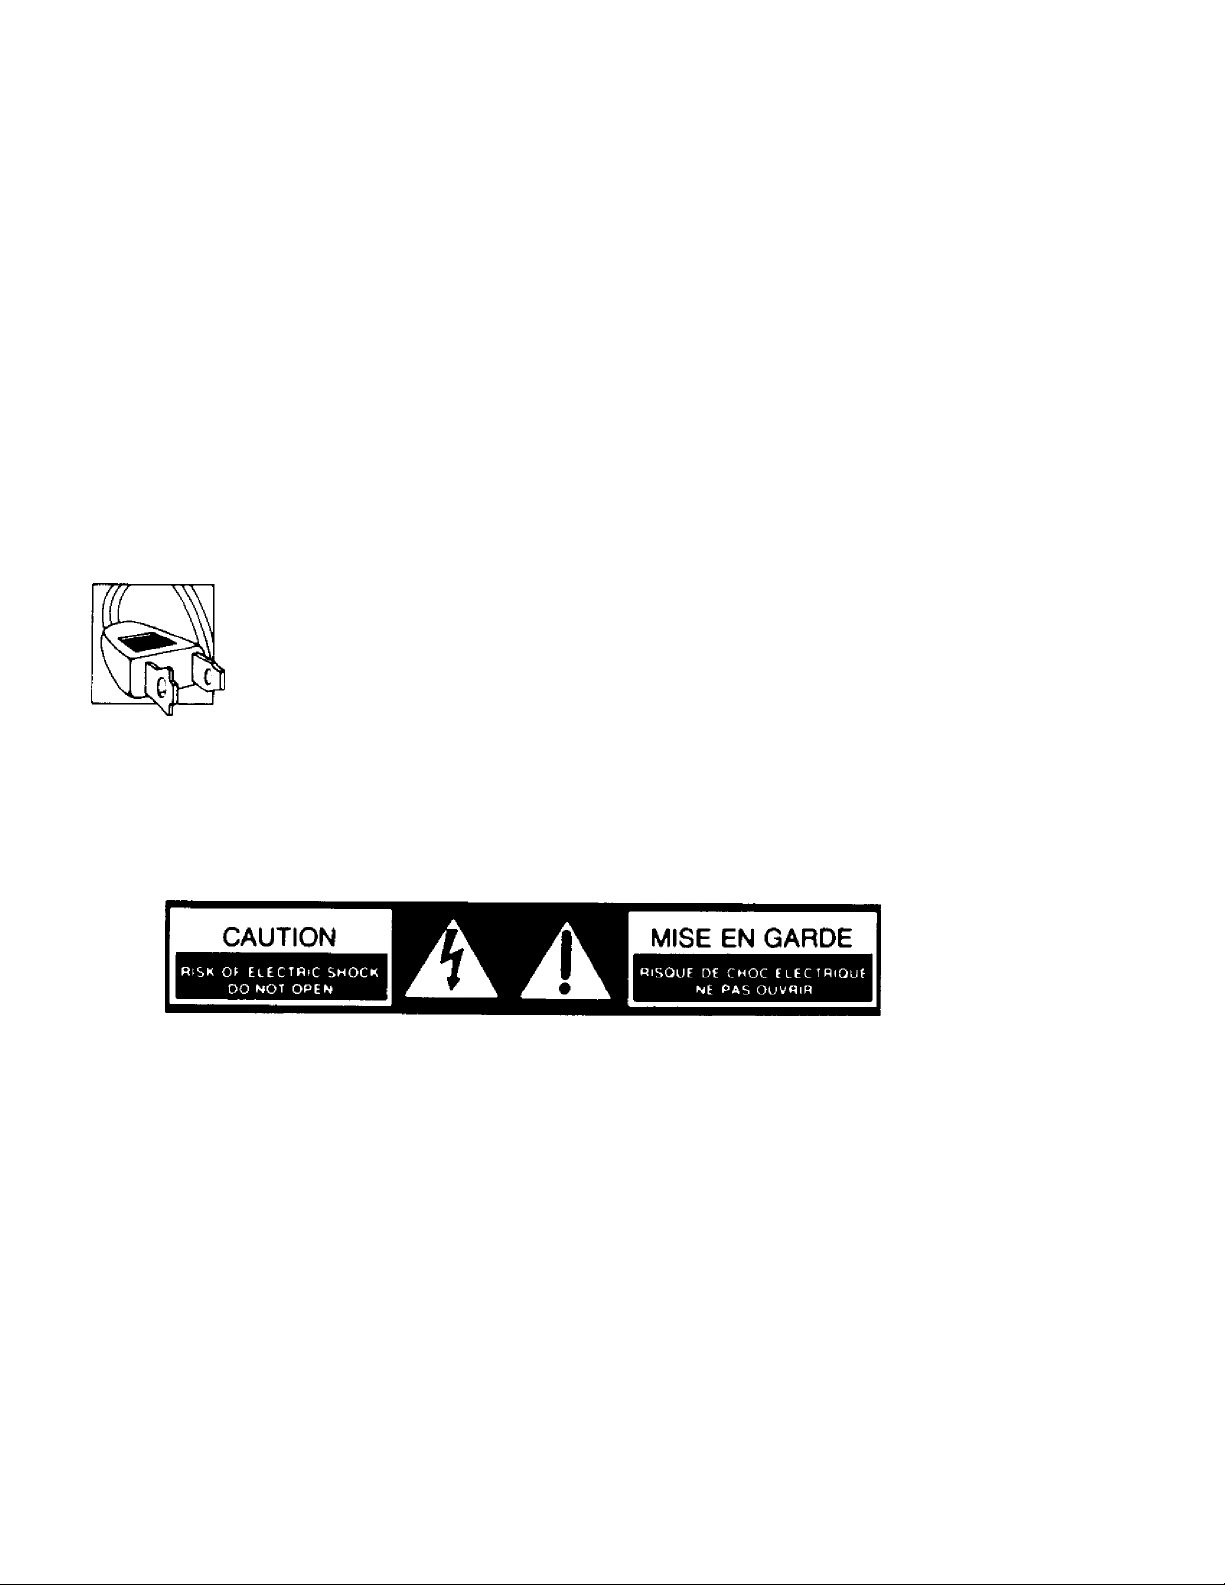
Your VCR operates on 120 volts, 60 Hz (normal household current) and has a
polarized plug. Because one blade of the plug is wider than the other, the plug fits in
the wall socket only one way. Do not defeat the safety feature of this plug. If you
need an extension, use a polarized cord.
Caution: To prevent electric shock do not use the polarized plug on this Video
Cassette Recorder with an extension cord, receptacle, or other outlet unless the
blades can be fully inserted to prevent blade exposure.
Mise en garde: Pour prévenir les chocs électriques, ne pas utiliser la fiche polarisée de
cet appareil avec une rallonge, une prise de courant ou une autre sortie, à moins que
les lames puissent être insérées à fond sans qu’aucune partie soit laissée à découvert.
WARNING: To prevent fire or shock hazard, do not expose this VCR to rain or moisture.
Illustrated below is the label on the back of your Video Cassette Recorder.
11«, ajiiiuui tji a iigiiiuing iidsii wuiuji a iiiangic is inicnueu lo aieri me user lo me presence oi
uninsulated “dangerous voltage” within the product’s enclosure that may be of sufficient
magnitude to constitute a risk of electric shock.
An exclamation point within a triangle is intended to alert the user to the presence of importan
, operating and maintenance (service) instructions in the literature accompanying the product.
Caution: To reduce the risk of electric shock, do not remove the cover or back. No user-serviceable
parts are inside. If you spill liquid on the VCR, disconnect the power cord to prevent possible fire or
shock hazard and consult authorized service personnel. Moisture can damage internal parts. Refer all
service to RCA VCR Authorized Servicenter personnel or the RCA Service Company only.
Caution: Maintain electrical safety. Powerline-operated equipment or accessories connected to this
unit should bear the UL listing mark or CSA certification mark on the accessory itself and should not
have been modified so as to defeat the safety features. This will help avoid any potential hazard from
electric shock or fire. If in doubt, contact qualified service personnel.
Note to Cable TV Installer:
This reminder is provided to call your attention to Article 820-22 of the National Electrical Code
(Section 54 of Canadian Electrical Code, Part I), that provides guidelines for proper grounding and, in
particular, specifies that the cable ground shall be connected to the grounding system of the building
as close to the point of cable entry as practical.
Caution:
the rights of others.
The unauthorized recording of television programs and other materials may infringe
Page 3

Contents
Using This Manual
Congralulalions on your choice of an RCA VCR. You
have selected a high-quality, precision-engineered
instrument designed to give you years of video and
audio enjoyment.
To get the best performance from your new VCR, it is
important that you carefully read and follow the
operating instructions in this manual in the sequence in
which they are presented.
Should you experience a problem, please follow the
“Trouble Checks” near the end of this manual. The
warranty on the back cover describes what RCA will do
for you should your new VCR need service during the
warranty period. It also tells you how and from whom
you should request service.
Warranty Registration
Safety Precautions
Installation
• Unpacking, Choosing Location
• General Installation Information.............................................................. 2
• Antenna Connections............................................................................ 3.4
• Cable-TV Connections.......................................................................... 5-6
• TV Monitor/Receiver Connections
What Your VCR Will Do.............................................................................. 8
Video Cassettes
Basic Operation
• Basic Operating Controls and Displays................................................ 10
• Inserting/Removing Cassettes............................................................... 10
• Turning on Your VCR for the First Time
• Programming Active Channels into VCR’s
Tuner........................................................................................................ 11
• Deleting Channels from the Scan List................................................. 11
• Adding Channels to the Scan List........................................................ 11
• Setting TV to VCR Channel
• Setting the UCTi/rK Switch .................................................................. 12
• Simplified Installation Checklist
Remote Control
• Battery Installation.................................................................................. 13
Setting the Clock.......................................................................................... 14
First Recording and Playback .................................................................... 15
Operating Controls (Detailed)............................................................... 16-17
Special Effects and Features
• Pause During Recording
• Pause for Stop-Action Playback............................................................ 17
• Frame Advance
• Slow Motion............................................................................................. 18
• Picture Search.......................................................................................... 18
• Tape Counter............................................................................................ 18
• Memory Stop........................................................................................... 18
• Tracking Control..................................................................................... 18
Quick Reference Operating Guides
• Normal TV Viewing
• Recording with TV Off
• Recording and Viewing the Same Program
• Recording and Viewing Different Programs...................................... 20
• Basic Playback......................................................................................... 20
• Recording from Another VCR.............................................................. 21
• Camera Recording .................................................................................. 22
Express Recording........................................................................................ 23
Programming the Timer......................................................................... 24-25
Timer Recording........................................................................................... 26
Alternate Remote Control Units................................................................. 27
Cabinet Cleaning.......................................................................................... 28
Trouble Checks............................................................................................. 28
Index (Alphabetical) ................................................................................... 29
Specifications......................................................................... Back Cover
Warrantj’................................................................................. Back Cover
..........................................
................................................
..............................................................
.............................................................................................
..................................................................
...........................................................
...........................................................................................
........................................................................
.......................................................................................
...............................................................................
..........................................................................
Inside Front Cover
Inside Front Cover
.........................................................
...........................................
.......................................
11
12
12
13
17
17
19
19
19
2
7
9
Page 4
Instàllation
Unpacking
When you unpack your new VCR, be sure you have
removed all the accessories and information sheets. We
recommend that you save the packing materials and box
in case you ever need to ship or store your VCR.
The accessories supplied for connecting your antenna,
VCR. and TV set are shown here. The remote control
unit and its batteries are also packed in with the VCR.
5 300-ohm fiat lead-tn (twin-lead)
aioog
oSSSi
OE
©01
VCR Coaxial RF Cable
(RCA Accessory Mo. RT023)
n
O
S
300/75-Ohm Transformer
(RCA Accessory No. AH018)
Remote Control Batteries
(Size "AA" 1.5 volt )
Location
• Choose a location that is convenient, but away from
sources of heat such as direct sunlight and heating
units.
3
OSes
©-©
O'
0 © 0
© 0 ©
© 0 0
L
nc/i
Remote Control
• If the VCR is to be installed in an equipment rack or
cabinet with other devices, be sure that there is
adequate ventilation at the back and around the sides
of the components. The VCR should not be placed on
or directly above a stereo amplifier because of the
heat that rises from the amplifier.
• Choose a flat surface at least as large as the VCR so
that it rests on its mounting feet. It is important that
air can pass through the ventilation holes in the
bottom of the unit to prevent it from overheating. Do
not operate the VCR on a rug or carpet because the
pile will obstruct these holes.
Some TV sets may cause interference in home VCR’s.
To avoid interference and get the best performance from
your VCR. follow these guidelines:
• When placing the VCR under a TV, keep at least 18
inches between the bottom of the TV and the top of
the VCR.
• If interference is present when the VCR is used on top
of the TV or at the 18-inch distance below the set.
move the VCR to a position beside the TV.
• If moving the VCR does not solve the interference
problem, try plugging the VCR into a different wall
socket.
• If interference continues after all the above, call your
dealer or service representative.
You may find the following booklet prepared by the
Federal Communications Commission helpful;
¡nte rfe re nc e H a nd bo ok
This booklet is available from the Superintendent of
Documents, U.S. Government Printing Office,
Washington, DC 20402
General Installation Information
IMPORTANT
There are two basic steps for connecting your new
VCR to your present TV and antenna(s) or cable-TV.
The first step is to disconnect the antenna(s) or cableTV from the TV and reconnect it to the VCR. The
second step is to connect the VCR to the TV. Be sure
you do both steps.
Since there are many different types of antennas and
TV's, there are several ways to make the above
connections. Therefore, the instructions have been
divided into two sets, one set for connections to your
own antenna(s) on pages 3 and 4, and another set for
connections to a cable-TV system on pages 5 and 6. If
you have a TV monitor/receiver, you may want to
make the additional connections described on page 1.
The antenna is the “signal receiver” that picks up TV
broadcasts. Some modern antennas receive both VHF
(Very High Frequency) channels 2 through 13, and
UHF (Ultra High Frequency) channels 14 through 83.
Some antennas are designed only for VHF reception and
others are designed only for UHF reception.
TYPICAL
OUTDOOR ANTENNA
.w,
TYPICAL
INDOOR ANTENNA
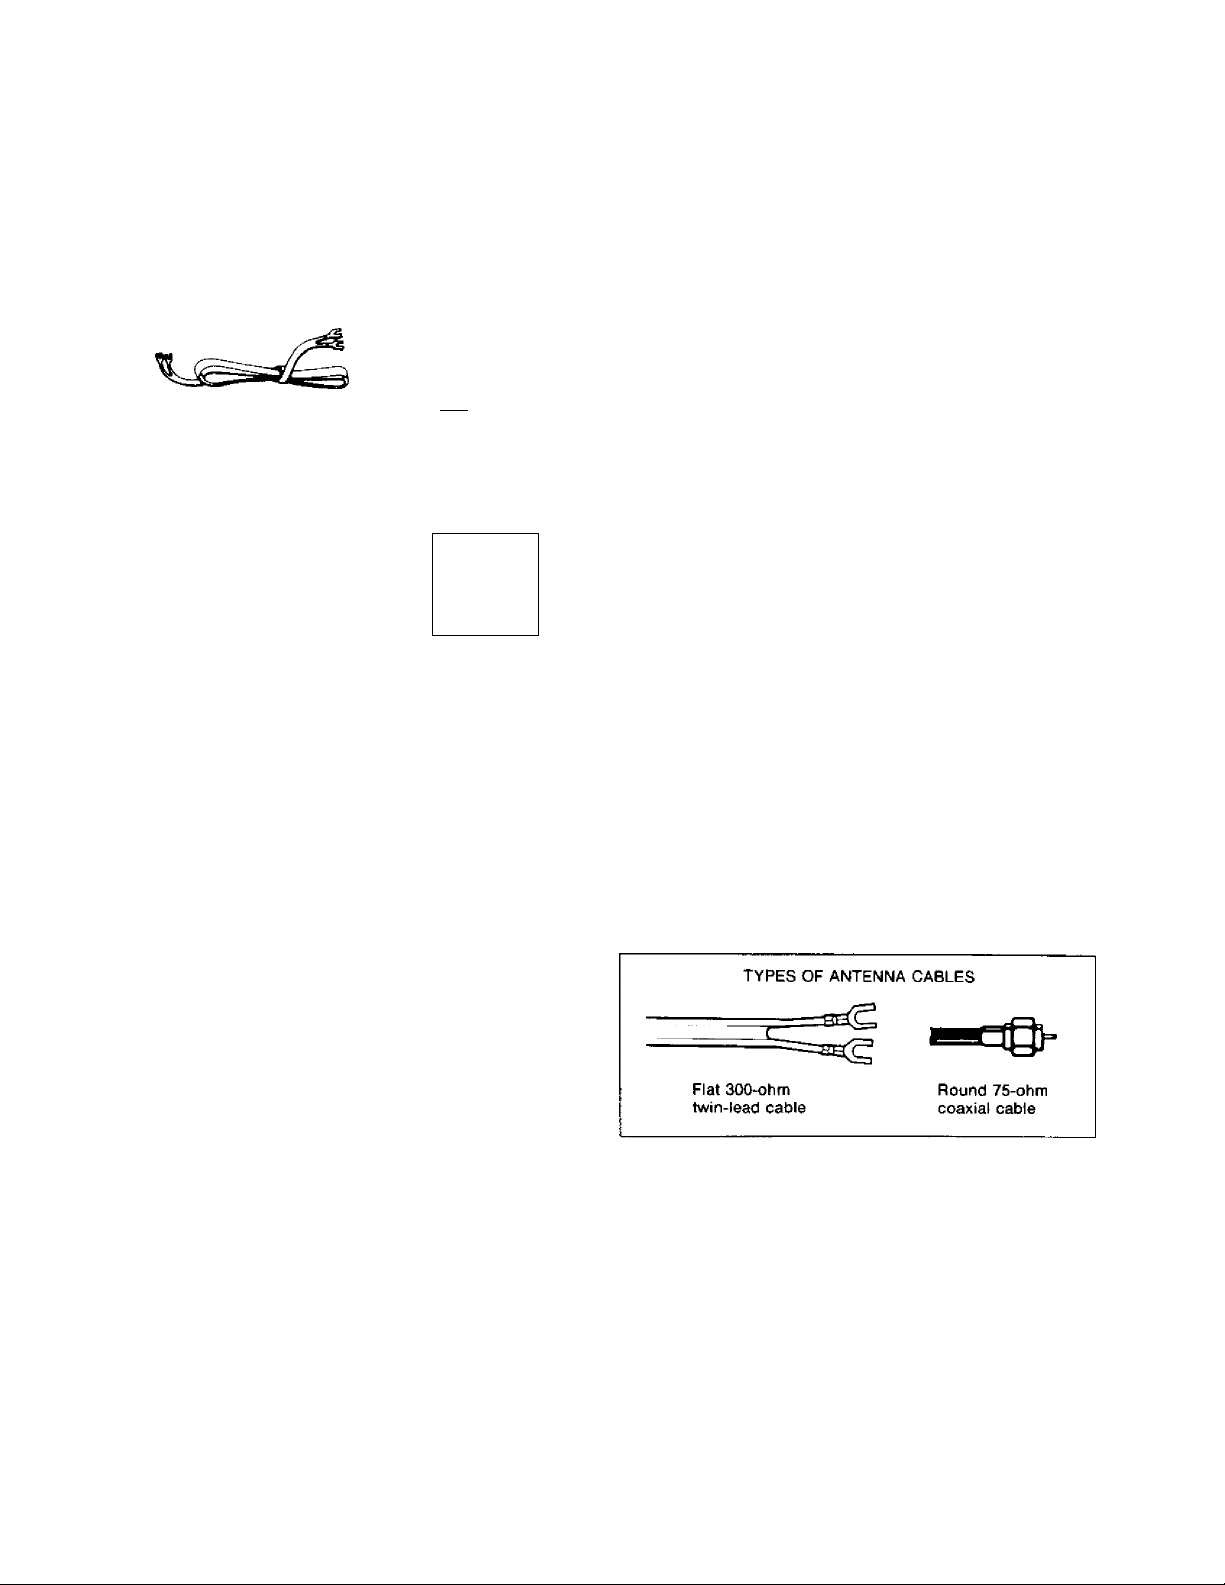
Signals from your antenna are conducted through flat
“twin-lead" cable, or through round “coaxial” cable.
Cable-TV (CATV) supplies television signals directly by
round cable without the need for a home antenna.
Cable-TV delivers both VHF and UHF channels and
programs not available from a home antenna.
In most situations you will get better picture quality if
you use an outdoor antenna or connect your TV and
VCR to a cable-TV system. If this is not possible, use a
good quality indoor antenna. Your indoor antenna
should have separate leads for VHF and UHF if you are
in an area with both VHF and UHF stations - or you
may use separate VHF and UHF indoor antennas.
Page 5
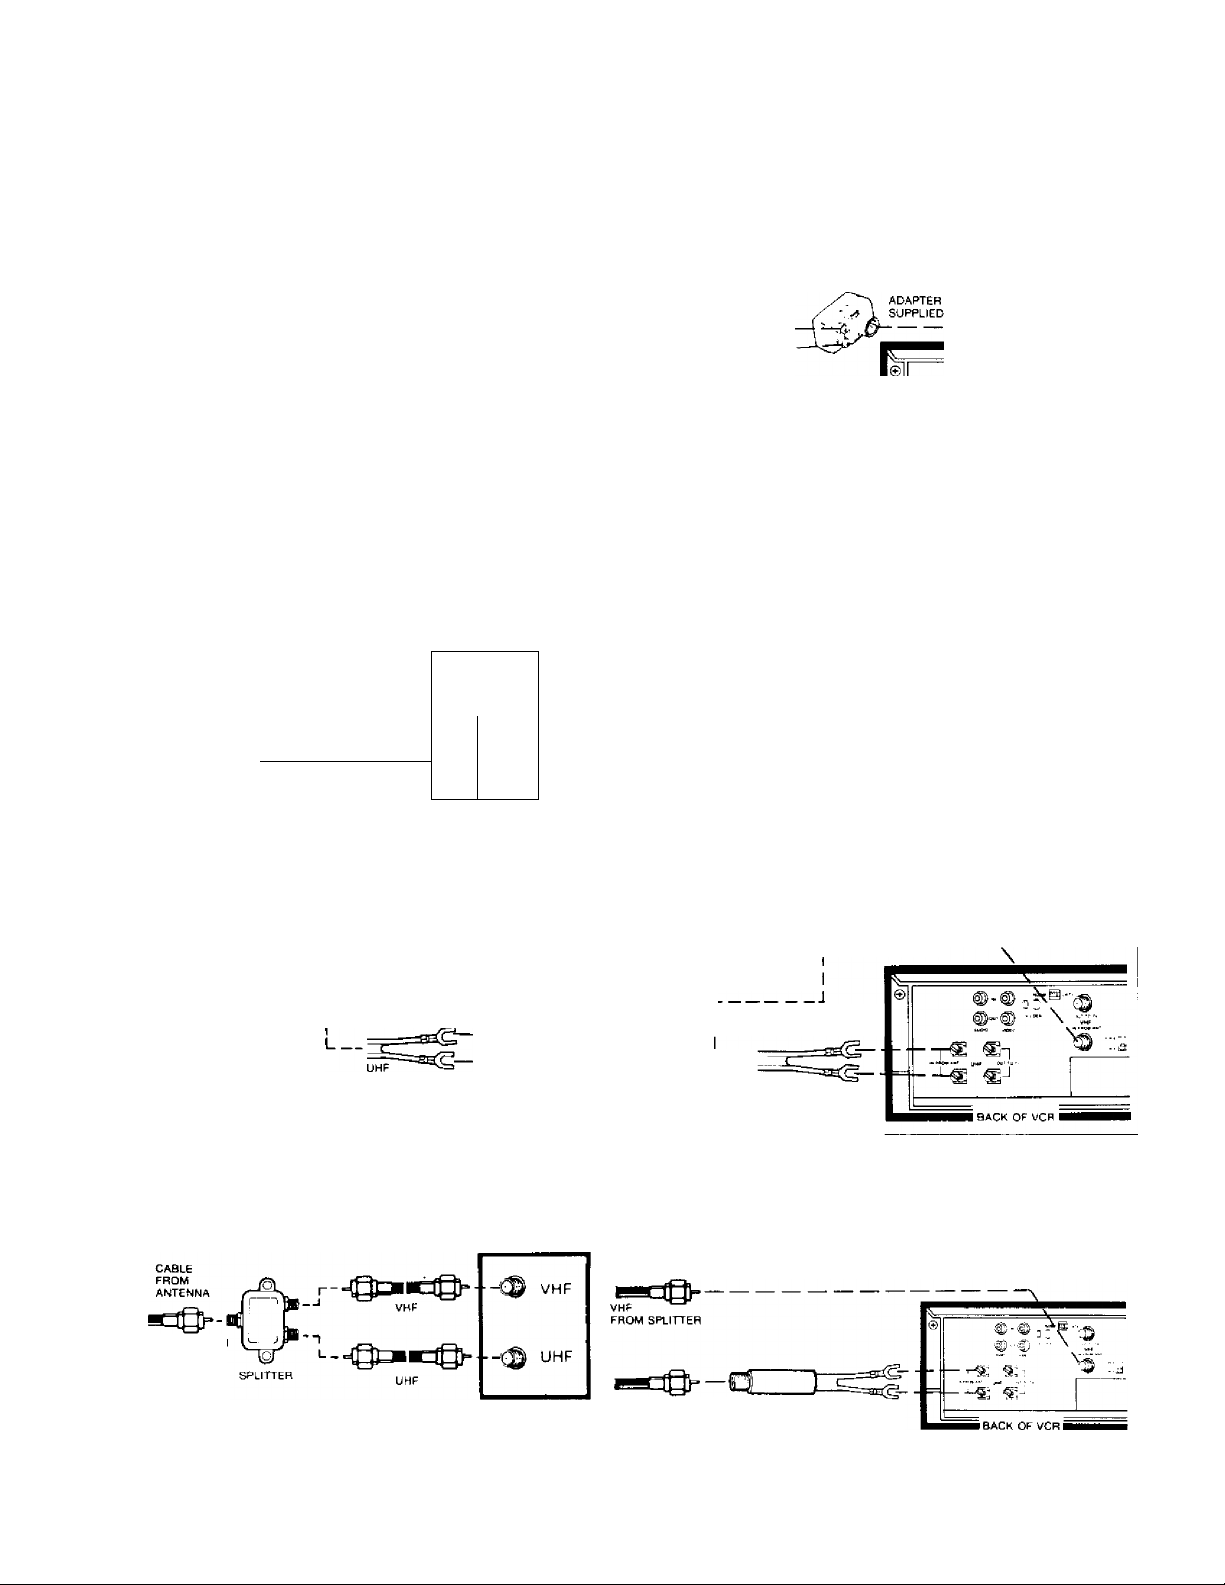
Antenna Connections
Disconnect Existing Antenna from TV and Connect it to VCR.
(Your antenna connections will probably resemble those in one of the diagrams on this page.)
—
. * 1. If your existing antenna is connected
to your TV like this:
CABLE(S)
FROM
ANTENMA
----
B.
c.
1. If your existing antenna is connected
to your TV like this:
CABLE(S)
FROM
ANTENNA
VHF
-------------------------------------------UHF
---------------
- f- -^=33^
1. If your existing antenna is connected
to your TV like this:
CABLE
FROM
ANTENNA
r--i r(Qh-
----
BACK
OF TV
VHF
UHF
BACK
OF TV
VHF
UHF
BACK
OF TV
VHF
2. Disconnect the antenna from your TV and
connect it to your VCR like this:
=3aS
-------------
VHF
FROM ANTENNA
UHF
FROM ANTENNA
-or-
2. Disconnect the antenna from your TV and
connect it to your VCR like this:
VHF
FROM ANTENNA
UHF
FROM ANTENNA
-or-
2. Disconnect the antenna from your TV and
connect it to your VCR like this:
VHF
FROM ANTENNA
-I nQh
:;.d
I BACK OF VCR I
W :;:d
sJ'
I BACK OF VCR I
COMBINATION
D.
SEPARATOR
1. If your existing antenna is connected
to your TV like this:
UHF
BACK
OF TV
COMBINATION
VHF UHF
•Optional accessory available from your RCA dealer or electronic supply store.
Q-n-
BAND
SEPARATOR I
_________
UHF
FROM ANTENNA
-or-
2. Disconnect the antenna from your TV and
connect it to your VCR like this: (or replace
splitter with a band separator and connect
as shown above in step C2.)
UHF
FROM
SPLITTER
Transformer*
(Such as RCA #AH011)
Page 6
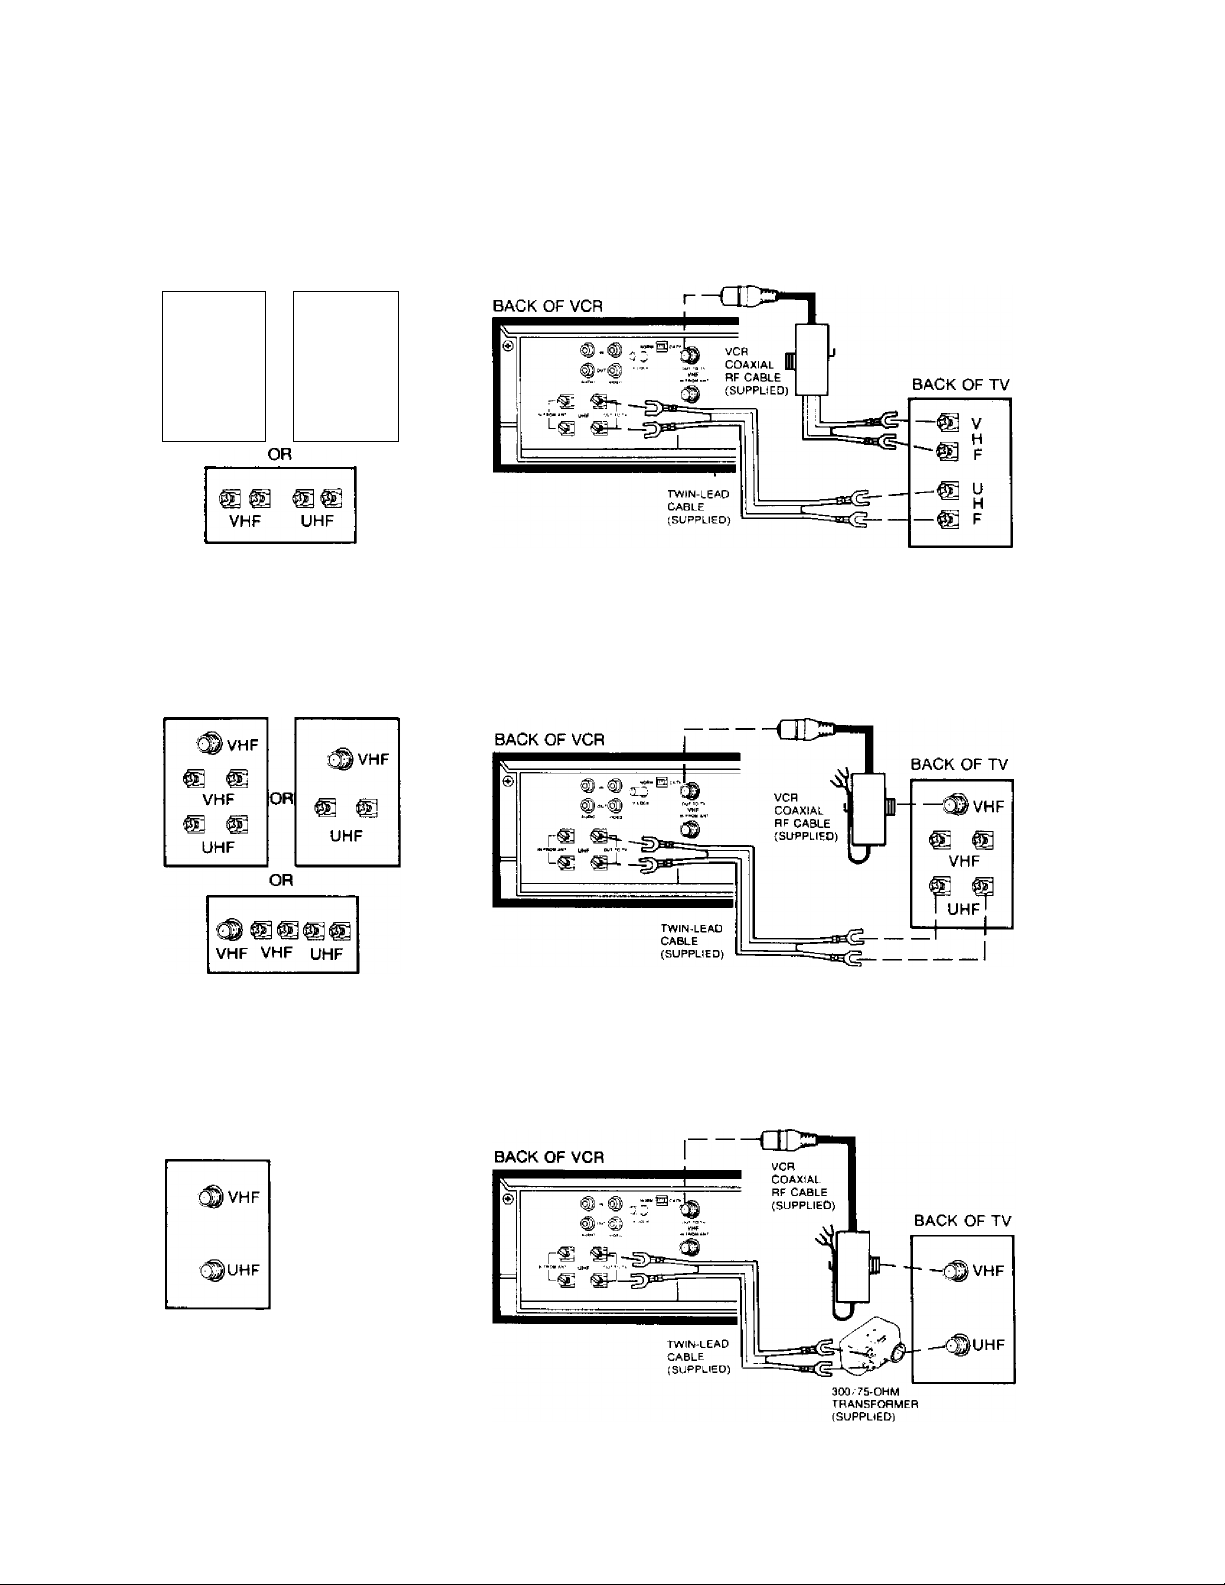
Antenna Connections (Continued)
Connect VCR to back of TV.
2.
(The antenna connections on the back of your TV will probably resemble those in one of the diagrams below.)
A.
1. If the antenna connection on the
back of your TV looks like this:
H
VHF
OR
UHF
BACK OF TV
® F
® u
2. Connect the VCR to your TV like this:
VHF
TV
SCREWS
UHF TV
SCREWS
r>
1. If the antenna connection on the
back of your TV looks like this;
2. Connect the VCR to your TV like this:
VMF
ROUND
TV JACK
VHF TV
SCREWS
UHF TV
SCREWS
BACK OF TV
1. If the antenna connection on the
back of your TV looks like this:
2. Connect the VCR to your TV like this:
BACK OF TV
VHF
ROUND
TV JACK
UHF
ROUND
TV JACK
Page 7
Cable-TV Connections
Your VCR is designed to receive unscrambled cable
channels 1 through 48 plus 98 and 99 without a
“converter box”. (These channels are sometimes
designated 2 through 13. A through W, W+1 through
W+ 12, A-2, A-1 and A-8.)
IF YOUR AND YOUR CABLE-TV THEN USE
TV IS; SYSTEM HAS: DIAGRAM(S):
cable-compatible
not
cable-compatible
no scrambled channels A
some or ail channels
scrambled
no scrambled channels
some or all channels
scrambled
B or C
D
D
The manner in which you interconnect your VCR and
TV with a cable-TV system is dependent primarily on
(a) whether your TV is cable-compatible and (b) whether
any channels on your cable-TV system are scrambled.
Use the Selection Chart at the left to determine which
one of the following four Cable-TV connection diagrams
(A-D) you should use.
Note: If you wish to also record one or more local UHF
channels that your Cable-TV system does not offer, first
follow the appropriate cable-TV connection instructions
described below, then connect your UHF antenna to
your VCR as described in the section titled “Antenna
Connections".
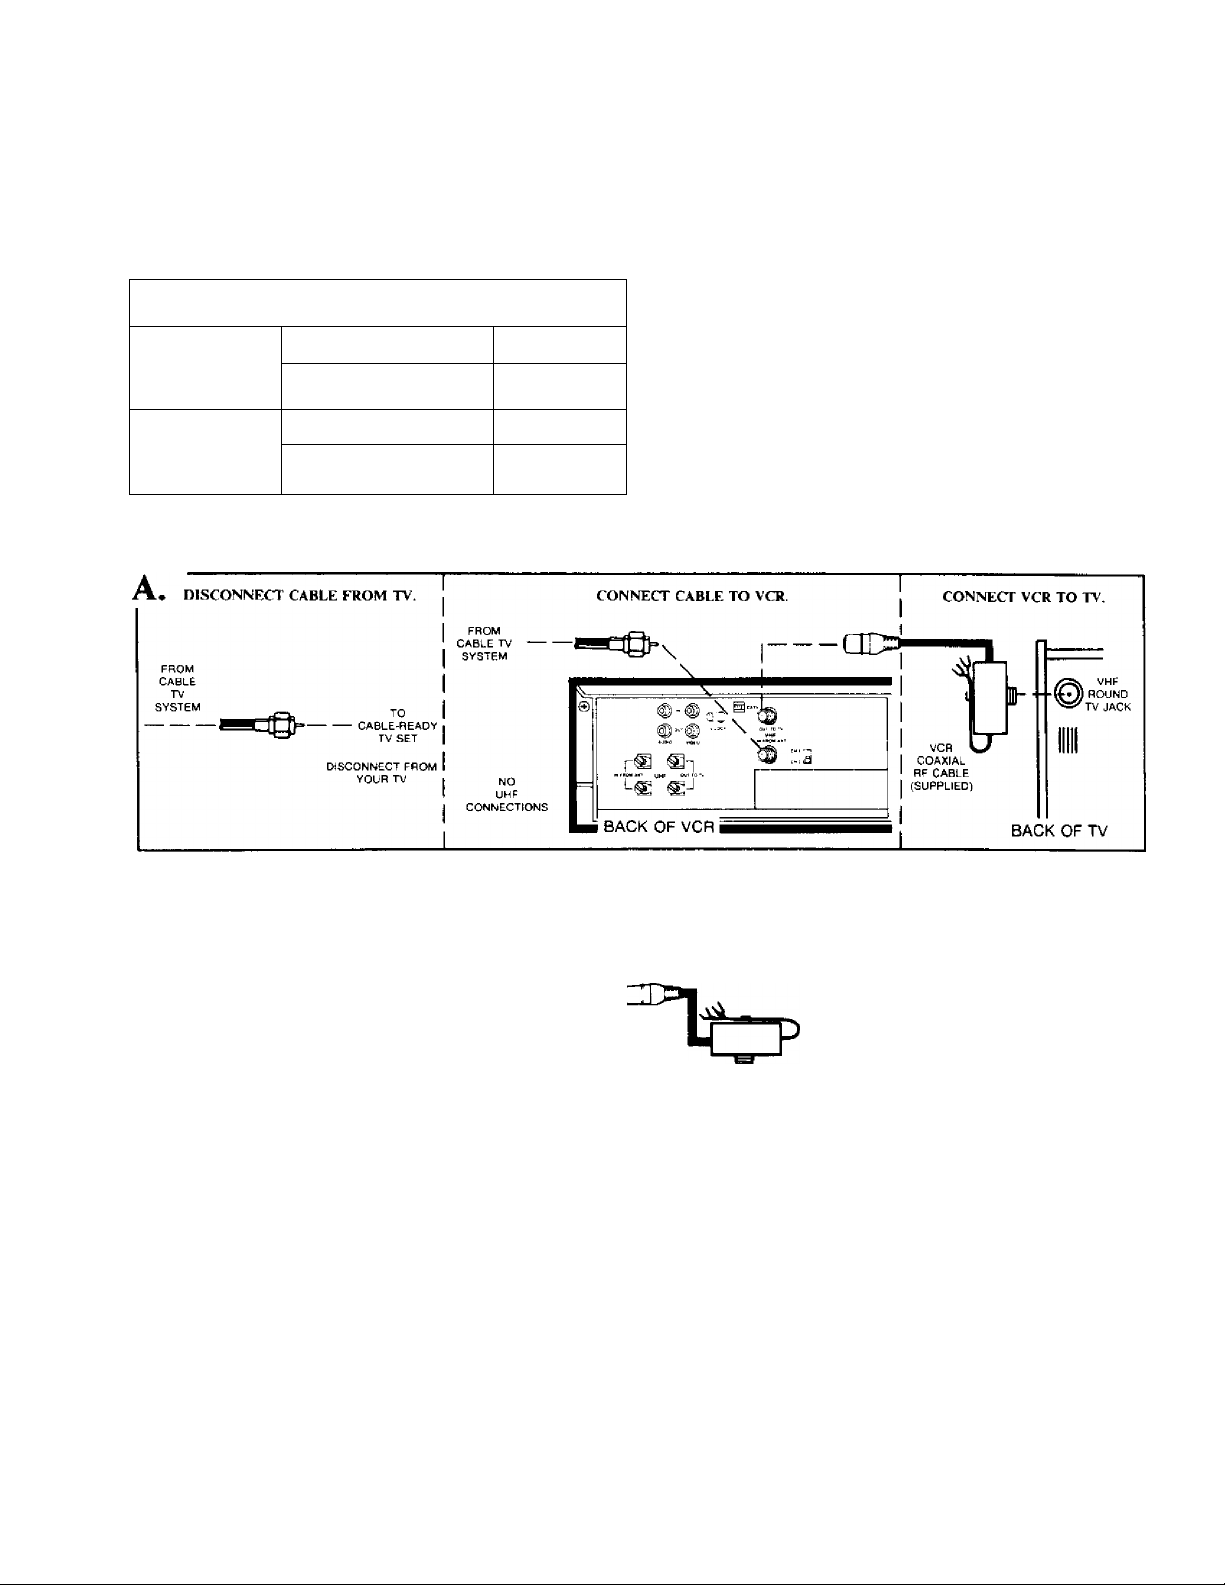
• DISCONNECT CABLE TV
B
FROM CONVERTER
FROM
CABLE
TV
SYSTEM
TO
CONVERTER
CONNECT CABLE TV TO VCR
FROM
CABLE TV
SYSTEM
------
DISCONNECT
FROM
YOUR
CONVERTER
NO
UHF __
CONNECTIONS
i BACK OF VCRi
When you use this set of connections, keep your TV
tuned to the channel you have been using (usually
channel 3 or 4) and use the converter box as you
always have for normal TV viewing and for viewing
some other channel while you are reeording.
CONNECT VCR TO CONVERTER. DO NOT CHANGE
I ORIGINAL CONNECTION
I FROM CONVERTER TO TV
r'
VHP
VCR
COAXIAL I
RF CABLE I
(SUPPLIED) I
DISCONNECT
CONVERTER BOX
DO NOT
BACK OF TV
ROUND
TV JACK
When you want to view the channel you are
recording, or when you play the VCR, tune the
“converter box” to the same channel that you have
set the channel switch on the back of the VCR, either
channel 3 or 4. (This is called the “VCR channel”
throughout the operating instructions in this manual.)
(Continued on next page)
Page 8
Cable-TV Connections (continued)
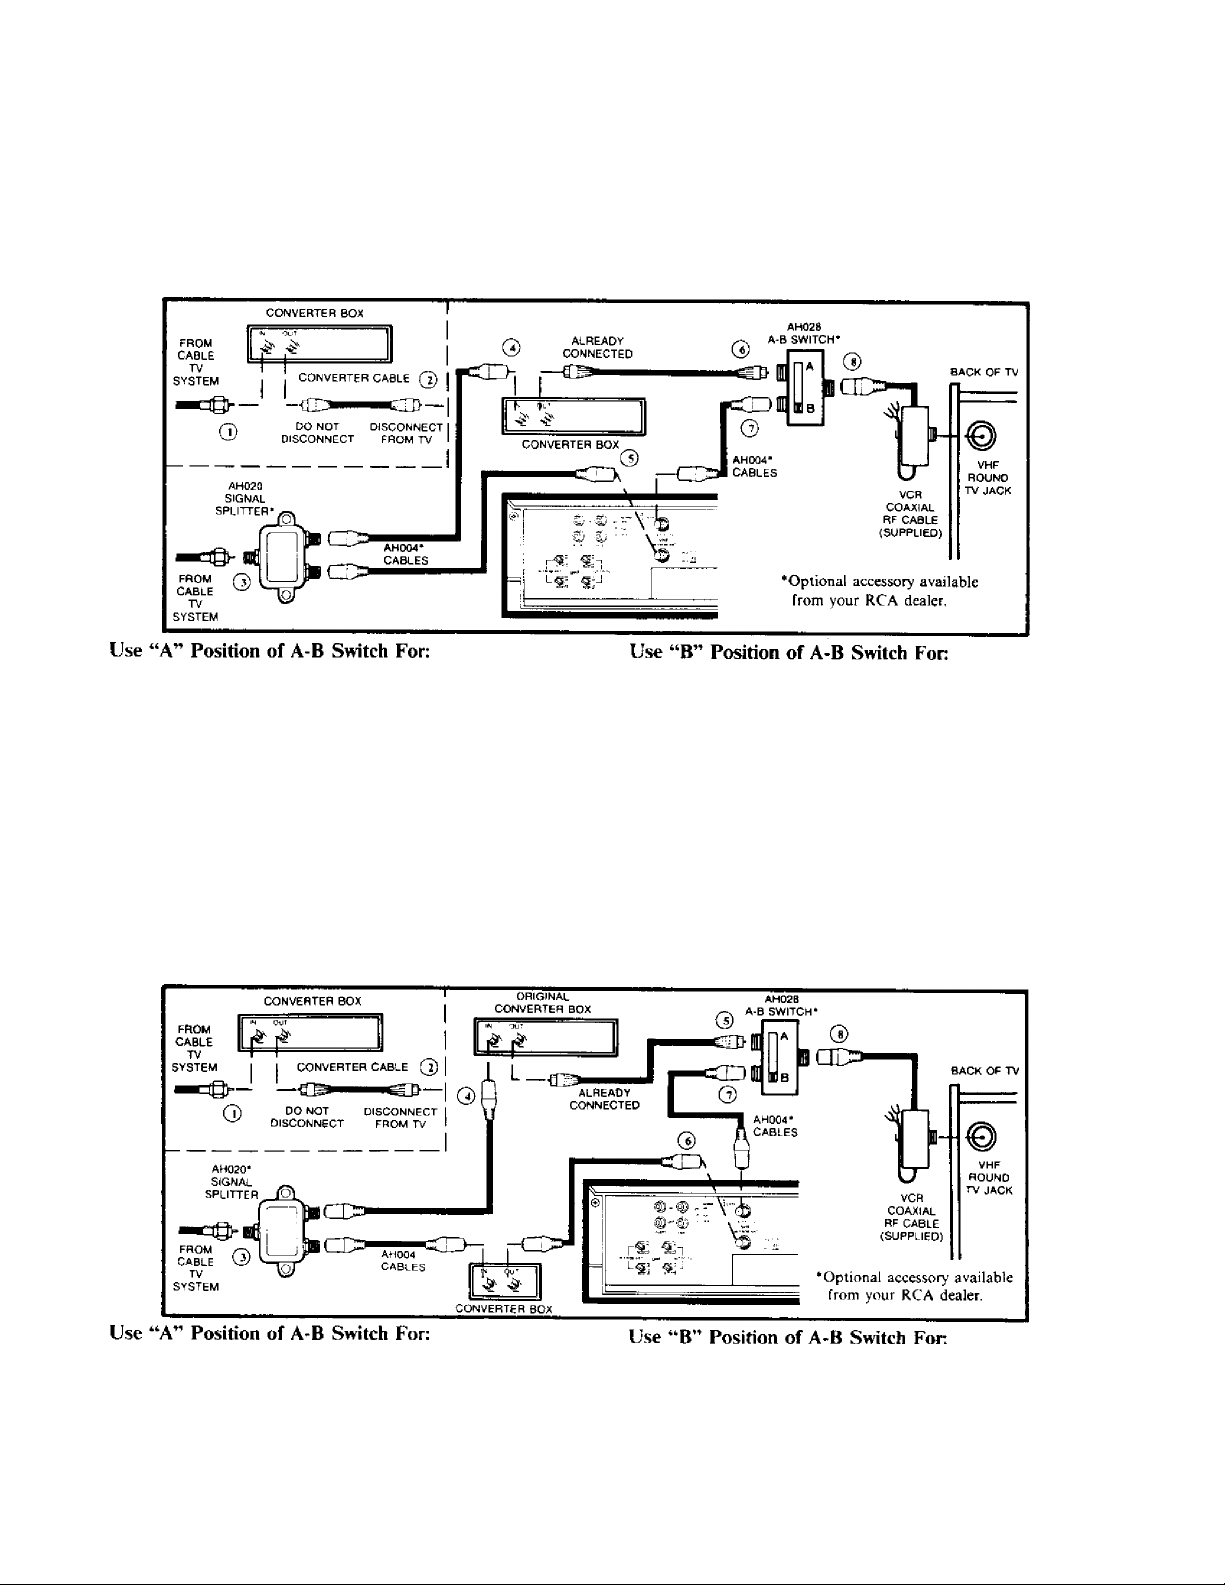
C. When you use these connections the A-B switch is
used to select either the converter output or the VCR
output. This arrangement will let you use your VCR
G) Disconnect Cable-TV from converter. Q) Connect splitter to converter.
G) Disconnect TV from converter cable. ® Connect splitter to VCR.
Q) Connect Cable-TV to input of splitter. Q) Connect converter to A-B switch.
Viewing any cable-TV channel while you record some
other channel with the VCR.
Viewing all scrambled channels.
Viewing cable channels when the VCR is turned off.
(Cable channels 2 through 13 can also be viewed with the
VCR turned off and the A-B switch set to position “B.”)
as a “remote-controlled converter box” when you are
not recording, as explained below the diagram.
0 Connect VCR to A-B switch.
® Connect A-B switch to TV.
• Playing a recording,
• Viewing a nonscrambled chaimel at the same time you
are recording it (channel selected with the VCR tuner).
Note: When you set the A-B switch to “B,” tune your TV to
the same channel that you have selected on the back of your
VCR (3 or 4). This is called the “VCR channel” throughout
this manual.
D, This
• Viewing any cable-TV channel while you record some
• Viewing any cable-TV channel when your VCR is turned
Note: When you set the A-B switch to “B," tune your TV to
VCR (3 or 4). This is called the “VCR channel” throughout
system requires two “converter boxes” from
your cable-TV company, and there may be an
additional charge. All channels must be selected with
(3 Disconnect Cable-TV from converter. (*) Connect splitter to each of the converters.© Connect VCR to A-B switch.
0 Disconnect TV from converter cable. (D Connect one converter to A-B switch. (i) Connect A-B switch to TV.
0 Connect Cable-TV to input of splitter. (J) Connect other converter to VCR.
other channel with the VCR.
off.
the converter boxes, both for recording and norma!
TV viewing.
• Playing a recording.
• Viewing any channel at the same time you are recording
it. Select the channel with the converter that is connected
to the VCR, and tune the VCR to the output channel of
the converter (usually 3 or 4).
the same channel that you have selected on the back of your
this manual.
Page 9
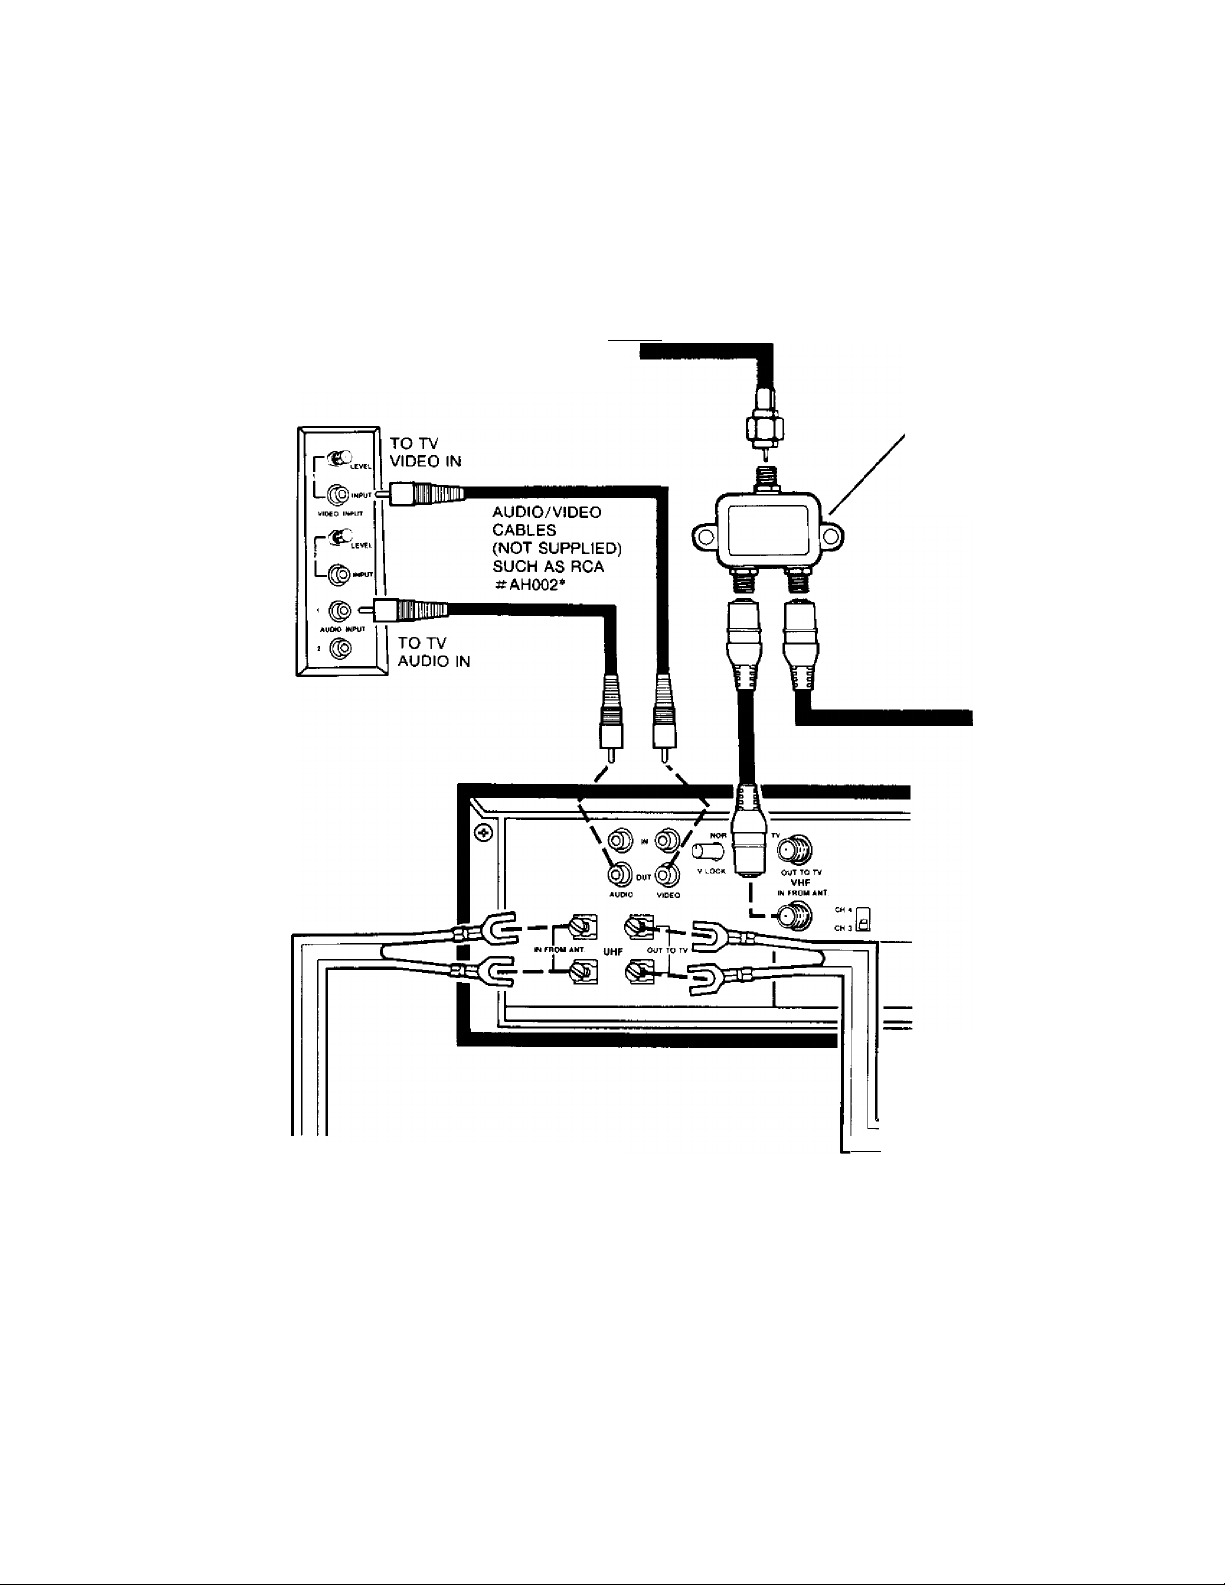
TV Monitor/Receiver Connections
I— Direct Video and Audio Connections
Connecting the video output and audio output jacks of
your VCR to the corresponding video and audio input
jacks of your TV monitor/receiver may produce a
slightly better picture during playback. This “direct”
signal connection bypasses the TV tuner during
playback.
FROM HOME VHF ANTENNA
OR CABLE-TV
SYSTEM
TYPICAL
MONITOR/
RECEIVER
INPUTS
SIGNAL
SPLITTER
(NOT SUPPLIED)
SUCH AS RCA
= AH020*
UHF
FROM HOME
ANTENNA SYSTEM
(USED ONLY IF YOU
HAVE HOME UHF ANTENNA)
TO VHF
ANTENNA
CONNECTIONS
ON TV
TO UHF ANTENNA
CONNECTIONS ON TV
------
(USED ONLY IF YOU
HAVE HOME UHF ANTENNA)
‘Optional accessory available from your RCA dealer.
Operating Instructions:
• F or n or ma l VH F o r c ab le -TV v ie wi ng in de pe nd en t o f
VCR , place TV Monitor/Receiver in TU NE R
mode and select channels with TV Monitor/
Receiver tuner.
• For view in g of cha nn el bein g re co rd ed , place TV
Monitor/Receiver in V ID EO IN PU T mode. Use
VCR tuner to select channel.
For reco rd in g one cha nn el wh ile view in g ano th er,
place TV Monitor/Receiver in TUN E R mode. Use
VCR tuner to select channel to be recorded. Use
TV Monitor/Receiver tuner to select channel to be
viewed.
For pl ay ba ck of r eco rd ed pr og ra m, place TV
Monitor/Receiver in VID E O IN PU T mode.
Page 10

What Your VCR Will Do
Broadcast/Cable Frequency-Synthesis Tuner
Provides accurate selection of VHF/UHF or up to 50
unscrambled cable channels.* Quartz-controlled
electronics automatically lock the system onto the
signal, eliminating the need for fine tuning. Bright, easyto-read channel display.
*Local systems may vary; check your cable company’s
compatibility requirements.
Infrared Remote Control
Provides wireless VCR control from the comfort of an
easy chair. It controls the major functions of the VCR,
plus Slow Motion, Frame Advance, Slow-Motion
Tracking, Memory Stop, and Clock/Timer
Programming, This VCR can also be operated with an
RCA Distal Command remote control and integrated
into a unified RCA audio/video system.
Remote Programming
With RCA’s advanced remote control, all VCR timer
programming can be done using the remote control. At
the touch of a button, simple easy-to-follow prompts
appear on the VCR’s display to guide the viewer through
each programming sequence. Built-in computer memory
can be preset up to a year in advance to record as many
as four programs automatically. Backup circuitry retains
programming instructions to prevent VCR memory loss
in case of brief power interruptions.
Express Recording
{XP R)
XPR lets you record for up to four hours without
programming the timer. Simply select the channel and
the starting time (immediately or up to 24 hours delayed
start) and select the length of time you wish to record.
The rest is automatic.
Conventional Playback
Your VCR uses the standard VHS recording system so
that pre-recorded VHS tapes and tapes recorded on any
other VHS-type VCR can also be played. Your VCR
will play VHS cassettes recorded at any of the three
standard speeds. It automatically selects the same speed
for playback that was used for recording the cassette. By
using the electronic tape counter and the F A ST
FO RW A RD and R E WI ND controls, you can “cue” to
any starting point on the tape before you begin
playback. ,
Auto Programming
Preset available channels into VCR’s electronic scan
memory at the touch of a single button. Eliminates
cumbersome manual programming steps. After
automatic programming, channels can be selected by
remote control scanning — either up or down, AD D and
ERA SE buttons also are included for tailoring memory
scan list to personal preference.
Picture Search
The FA ST -F O RW A RD and R E WI ND buttons can be
used for “Picture Search” when you play a tape. When
you press and hold one of these buttons the playing
speed is increased so that you can quickly locate the
picture you want to view. Normal playing speed resumes
and sound is restored when you release the button. A
picture is displayed when you search a tape reeorded at
any speed, but quality is best for tapes recorded at SLP.
Pause - Stop Action - Frame Advance
Pressing the PA U S E button stops the tape’s forward
motion for “stop-action” viewing during playback, or to
eliminate unwanted material when you are recording.
After you have stopped the action during playback, the
FRA M E A DV A NC E
you advance the tape one frame at a time so that you can
see all the motion details. Stop-action and frame
advance are designed for use at the SLP speed. They
may be used on tapes recorded at other speeds, but the
picture quality will not be as good as that at SLP.
button on the remote control lets
Slow Motion
Press SL OW on the remote unit or press P L A Y during
play/pause to change from normal playing speed to slow
motion. The PLA Y button will restore normal playing
speed. Slow Motion is designed for use at the SLP speed.
It may be used on tapes recorded at other speeds, but
the picture quality will not be as good as that at SLP.
Memory Stop
When the tape counter is displayed instead of time, fast
forward and rewind will stop when the counter reads
0000. By resetting the counter to 0000 at the desired
point on the tape, you can stop at this point for repeated
viewing of a certain scene.
Automatic Rewind
Your VCR automatically rewinds and then stops when it
comes to the end of the tape. To avoid accidental erasure
during Unattended Recording and Express Recording,
the VCR stops at the end of the tape but does not
rewind.
Power Off from Rewind
You can turn off the power during rewind, and the VCR
will finish rewinding and turn off automatically.
Automatic Play/Power On
If the VCR is off, it will turn on automatically when you
insert a cassette.
When you insert a cassette with the safety tab removed,
the VCR will automatically turn on and start playing the
tape.
VHS HQ Picture Quality
This VCR incorporates VHS HQ (High Quality)
circuitry for improved picture quality. It is fully
compatible with earlier VHS VCRs.
Fluorescent Function Displays
Vivid, easy-to-read graphic displays show when VCR is
in “Play,” “Record,” “Fast Forward” or “Rewind”
modes. Includes readouts for channel and tape speed, as
well as time/day (or tape counter to indicate relative
position of programs on cassette). Counter memory
automatically stops tape at desired point during rewind
or fast forward.
8
Page 11

Video Cassettes
RCA recommends that RCA cassettes be used with this
unit. The tape in RCA cassettes is of high-quality
formulation, intended for use with multi-speed VHS
video cassette recorders. It has been manufactured to
RCA’s critical specifications for excellent performance
with RCA VCR’s. Use of tape not meeting these
specifications could considerably reduce the
performance of your VCR.
Use of poor quality tapes or tape« that have been
damaged or mishandled can contaminate the VCR
heads. This can cause a snowy picture or a missing
picture during playback. Because RCA has no control
over the type of tape purchased or rented by consumers,
head cleaning is not covered by RCA’s warranty. It is
considered normal maintenance.
Playing a new RCA tape for approximately 30 minutes
often will clean the VCR heads and improve your
picture. If a snowy picture or missing picture condition
persists, consider the use of a chemical non-abrasive
head cleaning tape (RCA Stock No. AV009). It is
available from your dealer and many electronic supply
stores. Be sure to follow the directions with the head
cleaning kit carefully. Improper use of a head cleaner
may damage your VCR.
Erase Protection
To prevent erasing a recording you want to keep, remove
the safety tab from the back of the cassette as shown in
the illustration. Recording is impossible when this tab is
removed. To record again on a cassette that has the tab
removed, simply cover the hole with vinyl tape.
tape
Cassette Playing Times and Speeds
The playing times and counter readings below are
approximate. Also, it is assumed the counter is set to
0000 at the start of the tape.
T-60 CASSETTE (VK125)
SPEED
Time Reading Reading
1 hour 2080 (end) П20
2 hours 2080 (end)
3 hours
SPEED
Time Reading Reading
1 hour 3520
2 hours
3 hours
4 hours
5 hours
6 hours
SPEED
Time
1 hour 3740 2160
2 hours 6120 3740
3 hours 5020
4 hours
5 hours
6 hours 6120
7 hours
8 hours
SP LP SLP
Counter Counter
T-120 CASSETTE (VK250)
SP LP
Counter
5680 (end) 3520
T-160 CASSETTE (VK330)
SP LP SLP
Counter
Reading
Counter
2100
4660
5680 (end) 4300
Counter Counter
Reading Reading
6120 4640
Counter
Reading
760
1460
2080 (end)
SLP
Counter
Reading
1520
2600
3520
5000
5680 (end)
1560
2740
3740
5400
6760
7420 (end)
Recording Speed
This information will help you decide which tape speed
to use when recording.
• SP: Standard Play uses the most tape. Video recorded
at this speed has the least “picture noise” (snow) in
normal playback. Pre-recorded tapes use SP for this
reason and also because all VHS recorders have this
speed.
• LP; Long Play uses one-half as much tape as SP. This
speed is provided primarily for playing tapes recorded
on older machines that do not have SLP.
• SLP: Super Long Play uses one-third as much tape as
SP. SLP has slightly more “picture noise” than LP in
normal playback (which may not be noticeable). Your
VCR ’s sp ec ia l e ffe cts (s ea rch , s to p a ct ion , s lo w m o tio n,
and fr am e adv an ce ) a re d esi gn ed fo r o pti mu m
per for ma nc e at the S LP sp ee d.
Cassette Care and Storage
Follow these directions for continued high-quality
performance from your cassettes.
• When you are finished with a cassette, rewind it and
remove it from the VCR.
• Never attempt to force open the cassette door.
• Store cassettes vertically in their protective boxes at
normal room temperatures. Avoid extreme heat and
humidity. Extreme heat can warp the cassette or cause
the tape to stretch excessively.
• Be especially careful to keep dust from entering the
cassette and the VCR mechanism. Ail dust is abrasive
and it will cause excessive wear of both the tape and
the VCR’s recording/playback heads.
Page 12
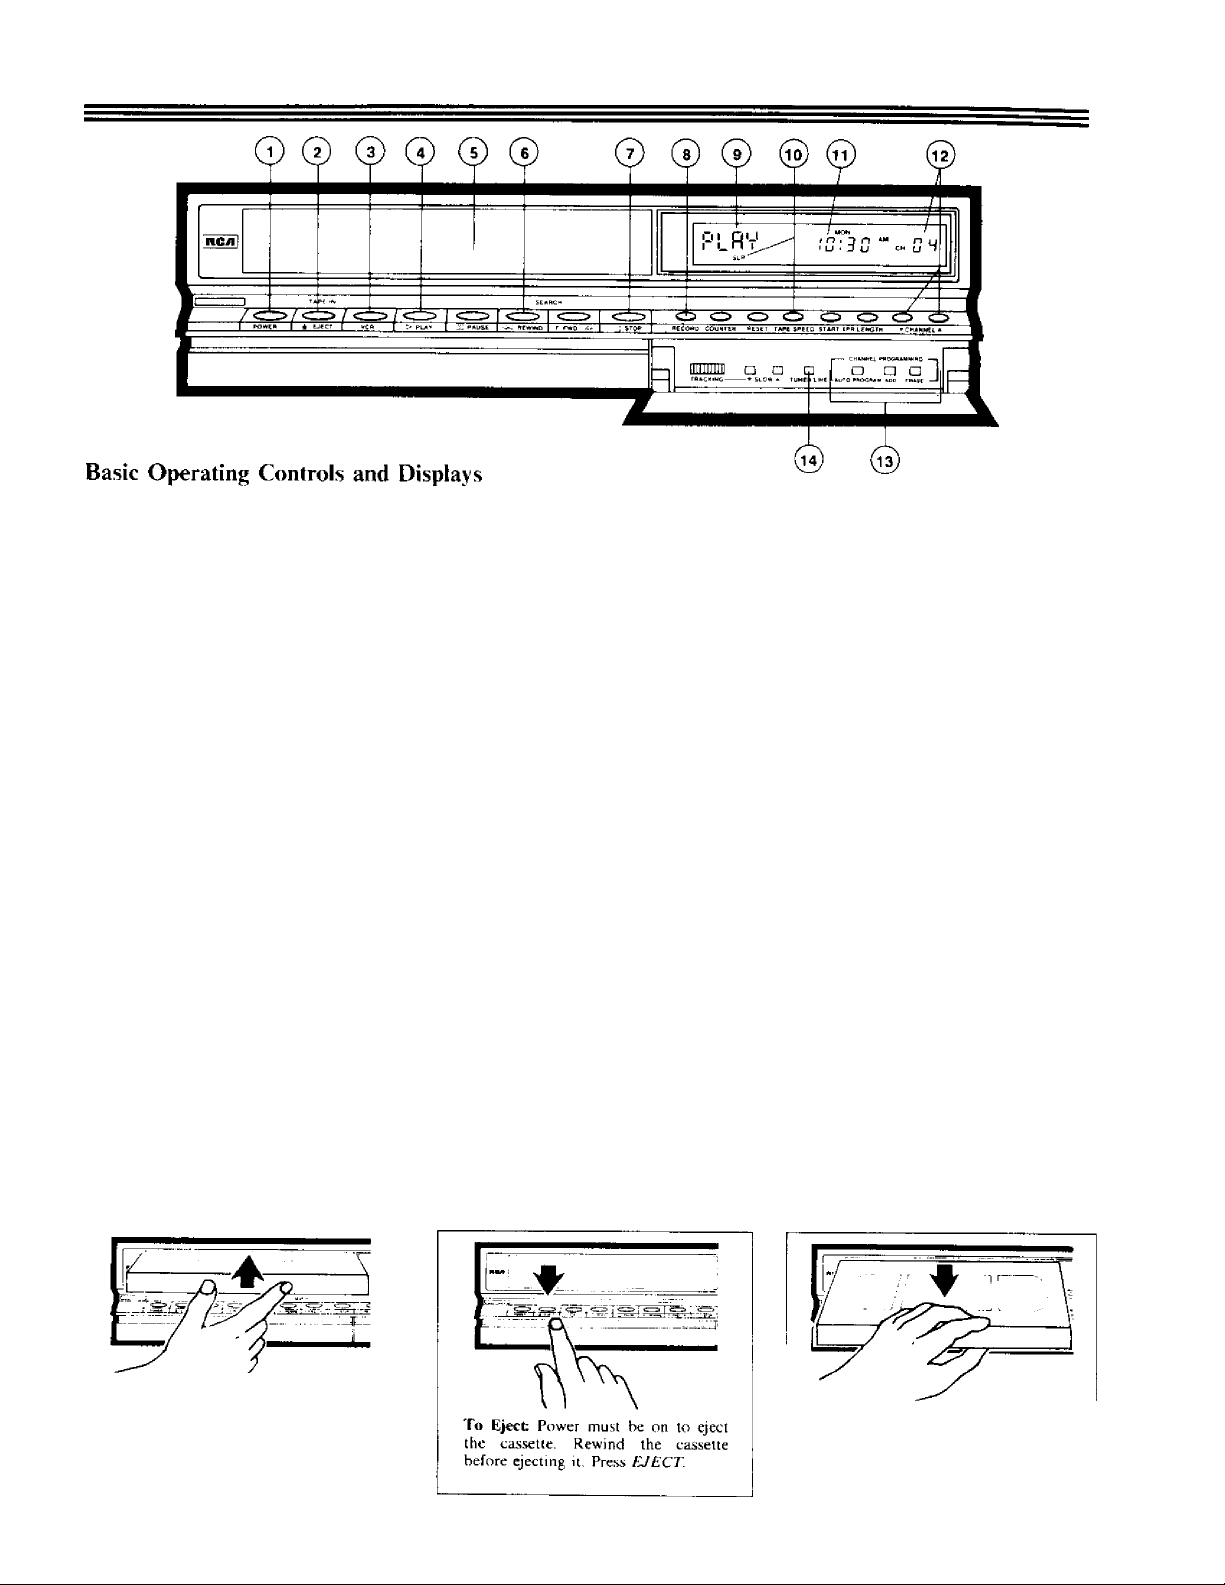
Basic Operation
Now that you have connected your VCR to your TV and
antenna or cable-TV system, you are ready to turn it on.
You don’t need to know all the details about the
controls and display before you begin using your new
VCR, so only those you w'ill u.se for basic recording and
playback are discu,ssed here. (Additional information
about the controls is on page 16.)
After you have read about the basic control functions on
this page, turn on your VCR and check the installation.
(T) POW E R: Turns the VCR on and off.
(If the VCR is off, inserting a cassette will
automatically turn it on).
(T) EJ EC T : Ejects the cassette from the VCR. The light
above the £i/£Cr button is on when a cassette is in
place.
(T) VC R : (VC R /TV Sw itc h) Selects the signal source
that is fed to your TV. When the light above the
button is off, your TV receives signals from your
VHP antenna or from the Cable-TV system as they
did before you hooked up your VCR. When the
light is on, signals come only from the VCR tuner
or the tape that is playing. (This switch is called the
‘^V CR /T V switch” in this manual to avoid
confusion with the VCR itself.)
PEA Y : Starts playback. If you insert a cassette with
the tab removed, the tape will automatically play.
0 C AS SE TT E CO M P AR TM E NT : Push the cassette
through the door to load it. The light above the
EJE C T button will light when tape is inserted.
Inserting and Removing Cassettes
-------------------------------
^—
(0 R EW I ND : Rewinds the tape when the VCR is
stopped.
0) ST OP : Stops whatever the VCR is doing (record,
playback, rewind, or fast forward).
(0 R EC O RD : Press R E CO R D to begin recording.
0 STA TVS DI SP LA Y: Tells what the VCR is doing:
PLA Y for playback. Search or Slow Motion; REC
for record; REW for rewind; FF for fast forward;
blinking PL A Y for Play/Pause or Frame Advance;
blinking R EC for Record/Pause. This area is blank
at other times.
(0 T A PE S PE E D and i nd ica to rs: Press the button to
change recording speed. The lighted indicator tells
the tape speed. (Use “SLP” for normal recording.)
(0 TI ME D ISP L A Y : The time is normally shown
here. If the clock has stopped, due to a power
interruption, you will see “—:—” in this area,
(0 CH A NN E L se lec tor but ton s an d di spl ay : After
channels are programmed, T selects the next lower
channel and A selects the next higher channel. The
channel number appears in the display.
(0 C HA N NE L P R OG R AM M IN G : Explained on
page 11,
(0 TU NE R /LI NE : Be sure it is set to T U NE R for
recording TV programs. LIN E is for recording
from a camera or another VCR. The L IN E light is
off when the switch is set to TUN E R.
To Insert: Push the cassette through
the door until the VCR mechanism
pulls it into the compartment. VCR
power automatically turns on and the
cassette-in indicator turns on when the
cassette is in place.
10
To Remove; The cassette will come
partially out of the compartment so
you can pull it out. Put the cassette in
its ho\ and store it upright.
Page 13

Basic Operation (continued)
Turning on Your VCR for the First Time—
When you have finished connecting the cables to your
antenna and TV, plug in the VCR’s power cord and
press PO W E R. The light above the STO P button
should come on. If it flashes, too much moisture has
collected inside the unit for it to operate. Leave the
VCR turned on until the internal heat dries it and the
light stops flashing. Proceed below when the light
above the S TO P button is on and not flashing.
Programming Active Channels into VCR’s — Tuner
The AU T O PR O GR A M (Automatic Programming)
button makes it easy and convenient to program TV
stations into the VCR’s scan list. The scan list is the
list of channels that your VCR tuner stops on when
you press the CHA NN E L ▲ or CHA N NE L ▼
buttons. The scan list is empty, however, until you
program active channels as described below.
Note: You must program the tuner as described
below before you can use CH A NN EL A/T buttons.
Automatic programming is usually a “one-time”
procedure, but you will need to repeat it if you move
to a location that has different channels, or if power is
interrupted for an extended period.
To program active channels:
1. Turn on VCR by pressing the PO W ER button.
Deleting Channels from the Scan List
You may want to have only a few favorite channels in
the scan list so you can select them more quickly with
the CH A NN E L A and ▼ buttons. (Use the numbered
buttons on the remote control to select channels you
deleted from the scan list.) Occasionally Automatic
Programming may include a vacant channel in the
scan list if there happened to be some sort of “noise"
or “stray signal” on the channel when the tuner was
programmed. This procedure explains how to delete
any unwanted channels from the scan list.
1. Use the CH AN N EL A or ▼ button to select the
channel that you want to remove from the scan
list.
2. Press ER AS E.
3. Repeat the procedure for each channel you want
to delete from the scan list.
Adding Channels to the Scan List-
You may have deleted a channel from the scan list
and want to put it back. Occasionally Automatic
Programming may “miss" an active channel because
the signal is very weak or because the channel
happened to be “off the air” when the tuner was
programmed. Use this procedure to put any channel
in the scan list.
2. Set the N O RM /C A TV switch on the back of the
VCR to the NO R M position if your VCR is
connected to a home antenna system. Set the
switch to the CA TV position if your VCR is
connected to a cable-TV system.
Note; Your VCR was shipped from the factory
with this switch set to N OR M .
CHANNEL PROGRAMMING .
□ □
AUTO PROGRAM ADD
3. Press and release the A UTO PRO G RA M button.
• The tuner will automatically cycle through all
available channels in the area and place them
in the scan list. This takes about a minute.
The channel numbers will stop changing
when the tuner is finished cycling.
Programming is now' complete and you can
use the
channels.
4. if you want to delete or add individual channels
from the scan list, refer to the instructions at the
right.
CH AN NE L A/V buttons to select
ERASE
1. Use the digit (0-9) buttons on the hand unit to
select the channel you want to add to the scan
list.
2. Press AD D .
3. Repeat the procedure for each channel you want
to add to the scan list.
Note: You can add the VCR’s video input to the scan
list, if you so desire. Press “91” on the remote, then
press AD D on the VCR. This can be convenient if
you use the VCR’s video input for another device
such as a satellite receiver.
(Continued on next page)
Page 14

Basic Operation (continued)
Setting Your TV to the VCR Channel
The “VCR Channel” is the TV channel you use for
viewing what the VCR is recording or playing, and
for viewing the signal from the VCR tuner when it is
stopped. Your TV must be set to this channel, and the
light above the V CR /T V switch on your VCR must
be on.
Selecting the VCR channel is normally a one-time
procedure, since there is little reason ever to change
it. Proceed as follows:
1. Be sure the TU N ER /L IN E switch behind the
auxiliary control door is set to TU N ER .
2. Decide whether you want to view your VCR on
Channel 3 or Channel 4 of the TV. If one of
these channels is vacant in your area, you should
use it. Otherwise, pick the channel you view less.
3. Set the channel switch on the back of the VCR
to whichever channel you have chosen, and then
turn on your TV and tune it to the same
channel. This is the “VCR channel.”
Simplified IhstaiJalion Checklist
This simplified checklist will: help you quickly
deterrnine if you have completed all the basic
installation steps.
[ 1 Make sure your VCR is connected properly as
explained on pages i-7.
[ ] Press PO W ER to turp on VCR.
[ ] Set NO R M /C AT V switch on the back of the
VCR to the N OR M position if you have a honie
antenna system;. Set the switch to the CAT V
position if you have c^lc-TV. i >
1 Prograrn active: channels: into VCR’s scan list
(press A U T O P R OG R AM and wait about one
minute). ^ 'Y:-
I I Delete or add individual channels; into scari list
as desired. (Detailed mltructiopson;^ II.);
i;"J: :Select >‘Vdk Chhraiel’»; Ту “ ; V:. ; V' ^
First set the С И З/С Н 4 switch on the back of the
VCR to either channel 3 or 4 and then tune your
TV to the same channel. This is called the “VCR
. . Charmer‘ у у:, ^ У' ‘ | ' ' t,
Setting the
2. Push the VCR /T V switch again so that the
The V CR /T V switch allows you to record one
program with the VCR while you watch another
program on your TV. To do this, first put the VCR in
the “VCR mode” (light on) and start recording the
program. Then press the V C R/ TV switch to the “TV
mode” (light out) and tune your TV to the other
channel you want to watch.
Note: Your VCR automatically switches to the “VCR
mode” (VCR light on) when you turn it on with the
PO WE R
VCR! TV
1. Push the VC R /T V switch so that the indicator
light above the switch is on. When the light is
on, the VCR is in the “VCR mode” and your TV
must be tuned to the VCR Channel (channel 3
or 4). Your TV will then display whatever tape
the VCR is playing or whatever channel the
VCR is tuned to.
indicator above the switch is out. When the light
is out, the VCR is in the “TV mode” and your
TV will work like it did before you connected
the VCR.
button, and when you start playing a tape.
Switch
( 1 Learn how to use the VCR ./ TV switch.
• When you press the VC R /T V switch and the
indicator above the switch turns on, the VCR
is in the “VCR mode” and your TV must be
tuned to the VCR Channel (channel 3 or 4).
Then your TV will display whatever tape the
VCR is playing or whatever channel the VCR
;; is tuned to.
• When the indicator light above the VC R/T V
switch is out, the VCR is in the “TV mode”
i and your TV will work like it did before you
connected the VCR. ;: .. ■
12
Page 15

Remote Control
Before you use the remote control unit supplied with
your VCR, install the batteries (instructions below).
Several of the remote’s buttons do the same things as
buttons with the same names on the front of your VCR,
and you can use whichever one is more convenient at the
moment.
The remote control has additional buttons for
controlling some of the VCR’s Special Effects and
Features, and it is also used for setting the clock and
programming the timer.
Since the remote control operates the VCR by infrared
light, it is immune to electrical and sound interference.
However, you must aim the remote unit directly at the
VCR. There cannot be anv obstructions between them.
[ Battery Installation
The batteries supplied with your remote control are
packed separately. To install them in the hand unit:
1. Turn the hand unit over and remove the cover of
the battery compartment.
2. Insert the batteries so that their positive ( + )
ends contact the positive terminals in the battery
compartment. These are marked (+) in the
bottom of the compartment.
3. Replace the cover.
Replace the batteries when your VCR fails to respond
to the remote control. Replacement batteries are
widely available. Use size “AA” 1.5 volt cells.
Alkaline type batteries are preferred. Good batteries
should last about a year in normal service.
Avoid laying the remote control upside down or
placing things on top of it. This could depress the
buttons and discharge the batteries. If you are not
going to use the hand unit for a month or more, it is
wise to remove the batteries to avoid leakage.
------------------------------------------------
TV V CR : Same as the V CR /T V switch on the
®
VCR.
PO WE R : Same as P O W ER on the VCR.
(D
STO P : Same as S TO P on the VCR.
®
PRO G RA M ; Used for setting the clock and
®
programming the timer.
CLE A R: Used for setting the clock and
®
programming the timer. Also resets the tape
counter to 0000 when the counter is displayed.
SLO W : Used to switch from normal playback to
Slow-Motion play. VCR must be in P L A Y when
SLO W is pressed. Press P LA Y to resume normal
playing speed.
ME MO R Y: Changes VCR display from clock to
tape counter or from tape counter to clock.
NU MB E RE D B U TT O NS : Select any channel
(whether or not it is in the Tuner Scan List) by
pressing two buttons. (Press 0 and then 8 for
channel 8.) The numbered buttons are also used for
setting the clock and programming the timer.
CH AN NE L ▲ and ▼: Same as the CHA N NE L
buttons on the VCR.
IND IC A TO R : Blinks when the remote sends a
command to the VCR.
F. AD V: (Frame Advance) Advances the picture
from frame to frame during stop-action viewing.
This is explained on page 17.
REC : Same as R EC O RD on the VCR. (Press
®
REC O RD to begin recording.)
O“*©™0
© © ©
■© © ©
© © ®
RCA
PLA Y : Same as PLA Y on the VCR.
PA US E: Same as P A U SE on the VCR.
SLO W TRA CK IN G ▼ and A; If horizontal
streaks (“noise bars”) appear in the picture during
Slow-Motion Playback, press one or the other of
these buttons to move the “noise bar” up or down
and out of the picture.
F. FW D /SE A RC H : ►► Same as F. FWD !
®
SEA RC H ►► on the VCR. REW I ND /S EA R CH « :
®
SEA RC H ◄◄ on the VCR.
Note: Selected models of RCA color TV receivers and
monilor/receivers feature hand units that will also
remotely control your VCR. See page 27 for details.
Same as RE W/
13
Page 16

Setting the Clock
■
Here are some things you should know before you set the clock;
When you first plug in your VCR, the clock will read
The buttons for setting the clock are on the remote
hand unit.
While you are setting the clock, the display on the
VCR will prompt you through the procedure.
If you press a wrong digit, press CLE A R repeatedly
until the incorrect digit flashes, and then enter the
correct digit.
HI
Press PR OG R AM on the remote hand unit.
This “menu" will appear on the status
display.
Press “1” to set the clock
The display prompts you to set the time.
12]
CLK
x'/
■
AM
PM
If you enter an illogical time or date (13th month for
example), it is just rejected. Re-enter the correct digit.
The clock must be set to the correct time before you
can program the timer for unattended recordings or
use Express Recording (XPR).
If pdwer is interrupted for an extended period, you
will have to reset the clock and re-enter your
programs in the timer.
Set the time by pressing two digit buttons on
the remote for the current hour and two
more for the minute.
(For example, press 0 2 1 5 for 2:15.)
The display prompts you to select AM or PM.
|3)
|4]
|-| The day of the week will appear when you
' ' have entered all six digits for the date.
The display prompts you to set the date.
I
----------------------------
DATE
^-------------------
nZi nc
UUI uu
CLK M D
FRI
O"?
U i
Press “1” for AM or press “2” for PM.
Set the date by pressing six digits in order for
the month, day, and year, (For example,
press 0 3 0 6 8 7 for March 6, 1987.)
Always press “0” before single-digit months
and days.
Press P RO G RA M to start the clock.
Press PRO GR A M again to return
the display to normal.
Y
14
Page 17

First Recording and Playback
This page gives the basic steps for recording and
playback. You should practice them until you can do
them without referring to the manual. To save time, we
suggest you record for only two or three minutes.
Makirii» a Recordinji
The first drawing shows how to make a recording and
the second one shows how to play it back and turn off
the VCR. The operating notes at the bottom of the page
are keyed to the step numbers for quick reference if you
have a problem or need more information.
Operating; Notes
The channel switch on the back of the VCR and the
channel selector on your TV must be set to the
.same channel in order to see the picture from the
VCR.
(3) The VCR is automatically turned on when the
cas.settc is inserted. If the light above the S TO P
button flashes, wait until it lights continuously.
(This is not a problem with the VCR). A flashing
light indicates too much internal moisture is
present. The VCR automatically enters playback
mode when a cassette without a tab is inserted. Be
sure to check its tab before inserting a cassette.
(7) Normally record at SLP. Recording speed.s are
compared on page 9.
® It may be necessary to fine tune the TV for best
picture and sound. If there is no picture on the TV
and no channel numbers in the VCR display, check
that the TUN E R/L IN E switch is set to TU NE R .
(T) if the cassette without a tab is inserted, the VCR
ejects the cassette when the R EC O RD button is
pressed.
If you don’t want to play back the tape, skip to Step
12 in the second drawing.
{1^ R E W appears in the display during rewind. When
rewinding is finished this display goes off and the
light above the stop button turns on again.
15
Page 18

Operating Controls (Detailed Descriptions)
The uses of the controls for basic operation are given on
page 10. Now that you are familiar with the basic
procedure for recording a TV program and playing it
back, you are ready to learn the rest of the control
functions.
The controls of your VCR are designed so that;
• Accidentally pressing a wrong button will not damage
the VCR or the cas.sette.
• Non-es.sentia! buttons are disabled during recording
to help you avoid accidental interruptions.
Operation of the VCR is automatic whenever this is
feasible.
Automatic recording functions (Timer and XPR) will
not disturb normal TV viewing.
If you run out of tape during playback or normal
recording, the VCR rewinds it and stops
automatically. If tape runs out during Timer or
Express Recording, the VCR stops without rewinding.
Because of these features, the functions of some
control buttons depend on the condition of the VCR
at the time they are used.
PO WE R : When the VCR is turned off, the timer is
automatically turned on if it has been programmed.
When the VCR is turned on, the timer is
automatically turned off. Your VCR will not make a
timer recording if it is already turned on at the time
the recording is to start.
The POW ER button operates differently during
Timer and Express recording. Press PO W ER ,
STO P in that order to slop the VCR when a timer
recording is in progress.
The VCR will stop and turn off if you press the
PO WE R button during non-timer Recording,
Piaybaek, or Fast Forward. If you press it during
rewind, the VCR will continue rewinding until it is
finished and then turn off.
EJE C T: The EJE C T button will not operate when
the VCR is recording. It will eject the cassette in
any other mode of operation.
VCR : Complete information is on pages 10 and 12.
PLA У; The PLA Y button is normally used to begin
playback when the VCR is stopped. It is also used
to switch to slow-motion operation when the VCR
is paused during playback for stop-action viewing.
Slow Motion and Stop Action are explained on
pages 17 and 18. The PL A У button is inactive when
the VCR is recording.
0 PA U SE : Pausing during a recording stops the tape
so that nothing will be recorded. When you press
the PA USE button a .second lime, recording
resumes immediately.
Pausing during playback produces a Stop-Action
picture and pressing it again resumes normal
playback. REC or PL A Y in the display unit flashes
during a pause. Additional information about
Recording Pause and Stop Action is on the next
page.
0 REWI ND /S EA R CH This is the REWI ND
button when the VCR is stopped. Once you have
pressed it, the VCR will rewind to the beginning of
the tape (or to a counter reading of 0000 if the
counter is displayed) unless you press the ST O P
button.
This same button becomes the SEA R CH «
button when the VCR is playing. Picture Search is
explained on page 18.
The REW IN D !S EA RC H button is inactive during
recording.
0 F .FW D /S EA R CH This is the F A ST
FO RW A RD button when the VCR is stopped.
Once you have pressed it, the tape will continue to
“fast forward" until you press the ST OP button (or
to a counter reading of 0000 if the counter is
displayed). If you do not pre.ss the ST OP button,
the VCR will “fast forward” to the end of the tape
and then automatically rewind to the beginning of
the tape and stop. Refer to “Memory Stop” on
page 18 for more information.
The F AS T FOR WA R D button is inactive during
recording.
This same button becomes the SE A RC H ►►
16
Page 19

button when the VCR is playing. Picture Search is
explained on the next page.
STO P : The STO P button will stop the normal
functions of Record, Play, Rewind and Fast
Forward and the Speical-Effects functions
described below and next page.
REC O RD : Press the REC OR D button to start
recording when the VCR is stopped.
CO UN TE R : Press this button once to turn on the
tape counter and press it again to restore the
normal clock, display. Refer to “Tape Counter" and
“Memory Stop” on the next page.
RES ET : Resets the “Tape Counter to 0000 when it
is displayed.
(j^ TA PE SPE ED : Push to change tape speed for
recording. Tape speed for playback is
automatically selected by the VCR. The tape speed
is displayed in the status display.
The Special Effects features of your VCR (Stop
Action, Picture Search, Frame Advance, and Slow
Motion) work best on tapes recorded at the lowest
tape speed - Super Long Play (or SLP). Since this
speed also uses the least tape, it is generally
preferred for alt the recording you do.
XPR: Complete information is on page 23.
®
(l4
CH AN NE L : Complete information is on pages 11
and 12.
DIS PL A Y R ES ET : Push the switeh within the
©
hole located on the bottom of VCR if the indication
or operation of the display appears abnormal.
TRA C KI NG : Refer to “Tracking Control” on the
next page.
SLO W T RA CK IN G : Refer to “Slow Motion” on
the next page.
TUN E R/ LIN E : Selects the program .source to be
recorded. The TUN E R position is used for
recording from the VCR’s built-in tuner. The LIN E
position is for recording video and audio connected
to the input jacks on the back of the recorder.
When the switch is in the L IN E position, the
indicator light comes on in the display unit and the
channel indicator is turned off. Always check that
this switch is set to T UN E R when you are going to
make a timer recording.
You can also select the Line input by remote
control, just enter “91.” To switeh back to Tuner,
enter the desired channel.
CH AN NE L PR OG R AM M IN G : Refer to pages 11
and 12.
Special Effects and Features
Pause During Recording
• Press the P A U SE button when you are recording to
prevent recording short passages of unwanted
material.
• Press the P A US E button again when you are ready to
resume recording.
• Avoid pausing for more than three or four minutes,
because the spinning heads that do the recording are
still in contact with the tape and will eventually wear
off the active material. This can cause streaks or spots
in the picture when you play the worn part of the tape
(called dropouts).
Pause for Stop-Action Playback
Press the P A U S E button during playback to stop the
action. This lets you examine all the details of the scene,
similar to looking at a single frame of a movie film.
When you are ready to resume normal playback, press
the PAU SE button again.
The following suggestions will help you get the most out
of this feature:
• Your VCR is designed to give the best picture when
you use stop-action on tapes recorded at SLP. If
you expect to use stop-action frequently during
playback, a sports event, for in.stanee, be sure to
record at SLP speed.
• The stop-action picture may tend to jump up and
down slightly. Adjust the control marked V LO C K on
the back of the VCR to reduce this jitter. Once you
have made this adjustment, you probably won’t have
to do it again unless you use stop-action on a tape
that was recorded on a different VCR. (A small
amount of vertical jitter is normal.)
If a “noise bar” appears in the stop action picture,
you may need to adjust the "Slow Tracking” control
to remove it. This will not normally need
readjustment unless you play back a tape recorded on
another VCR.
• Using stop-action on a single frame of the picture for
a long time can wear the tape, as explained in "Pause
During Recording” above. Use STO P instead of
PAU S E to interrupt playback for an extended time.
The VCR will automatically switch from Pause to
Stop after about five minutes.
Frame Advance
• Frame Advance is a special feature that lets you view
one Stop-Action “frame” after another. Press P A US E
to begin stop-action viewing. Then press E. ADV on
the remote control each time you want to go on to the
next “frame” of the scene. Press PAU S E to resume
playback at normal speed.
(Continued on ne.vt page)
17
Page 20

Spécial Effects and Features (continued)
• Frame Advance is designed for use at the SLP speed.
It may be used on tapes recorded at other speeds, but
the picture quality will not be as good as that at SLP.
Slow Motion
• If a tape is playing, press SLO W on the remote
control to begin slow-motion viewing. When you are
using Stop-Action viewing (Pause during Play), you
can also press PLA Y to begin Slow Motion. Sound is
turned off during slow motion.
• The VCR will automatically switch from Slow Motion
to normal play after about five minutes.
• To return to normal viewing speed, press PL A Y.
• It is normal to occasionally see some streaks in the
picture during slow motion. Use the SLO W
TRA C KI NG buttons on the remote control to move
them up or down and out of the picture.
• Slow Motion is designed for use at the SLP speed. It
may be used on tapes recorded at other speeds, but
the picture quality will not be as good as that at SLP.
Picture Search
• The buttons for Rewind and Fast Forward become
the Picture-Search buttons when you are playing a
tape.
• When you press SE A RC H ►► while playing a tape,
the VCR plays at a higher speed until you release the
button.
• When you press SE A RC H the VCR reverses
from the normal direction and plays the tape
backward at high speed until you release the button.
The sound is turned off during picture search because
it would not be understandable at the high speed.
• Expect to see some horizontal lines in the picture
when you are searching. The picture will be best for
tapes recorded at SLP speed, although it can be
viewed from tapes recorded at the other speeds.
the VCR will continue to the end of the tape, switch
to Rewind, and then stop when the counter reads
0000.
• Since you can reset the counter to 0000 at any point
on the tape. Memory Stop is convenient for finding
the beginning of a recording, or the beginning of a
particular segment you want to repeat.
• This is the procedure to use when you are going to
start recording somewhere beyond the start of the
tape.
1. Turn on the VCR and press CO U NT ER to obtain
the counter reading. (Pressing it again returns the
clock display).
2. Use FA S T F OR W AR D and STO P to locate the
point where you will begin recording. Then press
RES ET before you begin recording.
3. Press ST O P when you are finished recording and
then press RE W IN D. The cassette will rewind to
counter reading 0000 and stop.
4. Press PL A Y to view the segment you have selected,
or press REWIN D to rewind the cassette
completely.
• Use this procedure during playback to mark a point
to be repeated.
1. Press CO U NT E R to display the counter.
2. When you see the beginning of the part you want to
view .several times, use SE A RC H « to locate a
point slightly before the desired scene.
3. Release the SEA R CH button to resume normal
playback, and press R£5£Tjust before the desired
scene appears.
4. When you have played to the end of the scene in
question, press S TO P and then RE WI ND . The
tape will rewind to the beginning of the scene and
stop.
5. Press PL A Y to view the scene again.
6. Repeat Steps 4 and 5 as many times as you like.
Tape Counter
If you always reset the tape counter when you insert a
tape, you can note the counter reading at the beginning
of each program you record for future reference. The
label kit provided with RCA tapes can be used to list
programs and counter readings.
1. Press COU N TE R to display the tape counter in
place of the time.
2. Press RE SE T to set the counter to 0000.
Memory Stop
• When you press CO U NT E R to turn on the counter
display, you automatically turn on the “Memory
Stop” feature. When the counter is displayed, the
VCR will stop automatically at 0000 whenever vou
use REW IN D or FA ST F O RW A RD . If you are
rewinding, simply press the R EW I ND button again to
continue to the end of the tape.
• If you press FA ST FOR WAR D and the counter never
reads 0000 between that point and the end of the tape.
18
Tracking Control
• When you play tapes that were not recorded on the
same VCR, streaks may appear in the picture. Adjust
the T R AC K IN G C O NT R OL , located behind the
auxiliary control door, in either direction to remove
them,
• Return it to its center position when the tape has
finished playing.
• The TR AC KI NG C O N TR OL only affects tape
playback. It has no effect during recordings.
Page 21

Quick Reference Guides
Norma! TV Viewing--------------------------------------------------
Follow the two steps in the drawing for normal TV
viewing. To view UHF stations, just tune your TV to
the channel, regardless of what the VCR is doing. If
you have a TV Monitor/Receiver and the VCR’s
Recording With TV Off
It is not necessary to have your TV on when you record.
audio and video outputs are connected to it, switch
the TV to “Tuner Input” and select the channel you
want, regardless of what the VCR is doing.
Recording and Viewing the Same Program-
Note: If vou want to view another VHF or Cable-TV
channel after you start recording, press the VC R^ TV
switch so the tight above it goes off. Then select the
channel on the TV. If you w'ant to view a UHF
channel after you start recording, simply tune the TV
to the channel. The recording will not be affected.
(Continued on next page)
19
Page 22

Quick Reference Guides (continued)
Recording and Viewing Different Programs
Note: If you want to viewf w'hat is being recorded, press
the VCR/TV switch to turn on the light and then tune
your TV to the VCR channel (3 or 4).
Basic Play back
Note; The VCR light automatically comes on when you *if the tape has the record protect tab removed, it w'ill
start playback so you do not need to press the VCR/TV automatically go into play. It is not necessary to press
switch. the PLA Y button.
20
Page 23

Recording from Another VCR
To copy (dub) lapes, connect the two VCR’s as shown
below. Use shielded audio/video cables (such as RCA
^AH002 or ::iAH005).
The connections from the recording VCR to your TV are
the ones you normally use. It is preferable to play the
original tape on the same machine that was used to
record it.
'Optional accessory available from your RCA dealer.
CAUTION: The unauthorized recording of television
programs and other materials may infringe the rights
of others.
AH 002”
CABLES'
To audio and video inputs
To VHF antenna terminal
on conventional TV
IT
on TV Monitor/Receiver
Simplified Operatiitg InsMiGtioDs to Dub Tapes
T. Connect the VCR’s as shown above. (Use
shielded audio/video cables such as RCA
#AH(X)2 or #AH005.)
2. Tam on TV.
3. Tune TV to VCR Channel (channel 3 or 4).
4. Tam on both VCR’s. ,
5. Insert recorded cassette into PLAYBACK VCK.
6. Insert blank cassette into RECOiWlNG VCR.
7. Press VCR/TV switch on RECORDING t^CR
so VGR light is on, (This allows you to watch the
recording while it’s in progress.)
Note: If you want to watch another TV channel
on the TV w'hile you’re dubbing the tape, first
press the VCR/TV switch so the VCR light is
out and then use the TV’s channel selector to
sel^t the channel you want to watch oft the TV,
8. Make sore the TUNER/MNE svntch on
recording VCR is in the LINE position.
9. Select the desired tape speed on the
RECORDING VCR (SP, LP or SLP).
10. Rewind cassettes to the beginning if necessary.
IT Place the RECORDING VCR into the record
mode-
12, Press PLAY on the PLAYBACK VCR to start
playing the prerecorded cassette.
1-3, Adjust TRACKING control on PLAYBACK
VCR if necessary.
Note: If the prerecorded cassette is not beiil
played on t VCR that originally
recorded it, streaks may appear in the TV
! . picture. Simply adjust the tracking control on
the PlJlYBACK VCR to eliminate the streaks.
14. If you want to edit out unwanted material, press
PAUSE on the RECORDING VCR while it is
recording. Press P>li7.S’£ again to resume
recording. : :
Notes Use the button only for brief
pau^.Tf you want to pause for more than three
or four minutes, stop the VCR by pressing
STOP, when you are ready to resume, place the
VCR back into the record mode.
15. The TV does not have to be turned on to dub a
tape. You may turn off the TV if desired after
the recording has started.
16. Stop both VCR’s when the recording is finished.
21
Page 24

Camera Recording
In addition to the camera itself, you will need a Camera
AC Power Supply (such as RCA Model CPS03 for use
with RCA cameras). Plug the camera cable into the
power supply and then connect the cables from the
power supply to the VCR as the drawing shows. The
connections from the VCR to your TV are the same ones
you normally use.
To start recording press RECORD on the VCR. Use the
PA USE button on the VCR to start and stop recording.
If you want to pause for more than three or four
minutes, stop the VCR by pressing STOP. When you
are ready to resume, press RECORD.
22
Page 25

Express Recording
Express Recording {XPR) lets you record up to four
hours without programming the timer. It also allows you
to start (or continue) recording immediately or to delay
recording up to 24 hours. When the recording is finished,
the VCR will turn off automatically.
Note; Although you do not have to program the timer,
the clock must be set before you can Express Record.
SilitpUfled lostructioos
“ Immediate Stmt
1. Press LENGTH (at least tvrice) to sete
desired recording time {0:30 (30 inihutes) to
4:00 (4 hours)].
Only two buttons are used to Express Record:
START KPR length
IMMEDIATE START---------------------------------------------
If you want the VCR to start recording immediately
or to continue a recording you’ve already started,
follow the simplified instructions at the right labeled
“Immediate Start”.
DELAYED START-------------------------------------------------
If you want the VCR to delay recording, follow the
simplified instructions at the right labeled “Delayed
Start”.
Detailed Instructions
1 ) INSERT CASSETTE
REWIND IF NECESSARY.
(¿}sET TO TUNER.
—-------
1. Press START (Clock will skip to next half
hour),
2. Keep pressing START until desired start time
appears in display.
3. Press LENGTH to select desired recording
time [0:30 (30 rhinutes) to 4:00 (4 hours)].
4. Press POWER to turn off VCR.
Delayed Start ^
---------------
--
-——To Cancel Etekyed-Stairt XPfe^—
(Before Recording Begiias)
•»Press LENGTH until the display shows 0:00.
To Stop XPR
(After Recording Starts)
• Press LENGTH until display shows 0:00.
-or- .. ' ,
• Press POWER and then STOP within ten
’seconds. ■ . , ' . : , :
Q) PRESS START for DELAYED XPR,
SET SPEED. ( Omil for Immedlale Start (See note below).
^ TURN OFF VCR FOR DELAYED START XPR.
(Leave on for immediate recording)
Note for Step(5)
• The first time you press the START button, XPR
will appear in the display and the clock will skip to
the next half-hour. Examples: If you press the
button at 9:35 AM the clock will skip to 10:00
AM; if vou press it at 8:15 PM the clock will skip
to 8:30 PM.
• Each additional time you press START, the clock
will advance another 30 minutes. The lime that is
displayed is the time when the recording will start.
• After you have set the starting time, you must set
LENGTH within 8 seconds. Otherwise, XPR will
disappear and the clock will return to the actual
time. Then you must reset the start time. (See note
©for setting LENGTH.)
SELECT CHANNEL,
SET LENGTH OF
RECORDING.
(See note below)
LIGHT ON TO VIEW WHILE RECORDING.
Note for Step(6)
• Press the LENGTH button at least twice. The first
keypress only starts the XPR recording; it does not
advance the recording length.
• Increase the recording time by pressing the
LENGTH button additional times. The clock
display shows the amount of recording time you
have set. [from Oi.'iO (30 minutes) to 4:00 (4 hours))
• The time remaining is constantly displayed during
XPR. You can extend the lime whenever you want
by pressing LENGTH.
• When the recording time has expired, the VCR
turns off and the clock display returns to current
time.
23
Page 26

Programming the Timer
The programmable clock/timer permits unattended
recording of up to four different TV programs. The
timer is actually a small computer which will turn on the
VCR at the time you select, record for a selected length
of time, and then turn off the VCR ... all automatically
without you being there.
You can program the timer to do the
following:
» Record a program on a single day up to one year
away. [NORMAL PROGRAM]
» Record a program at the same time Monday
through Friday. [DAILY PROGRAM]
* Record a program on one certain day of every
week. [WEEKLY PROGRAM]
Things to know before you start: ■
You can program the timer up to one year before
the TV program is to be recorded.
You can correct an error in the program any time
before the last step by pressing CLEAR repeatedly
until the digit to be corrected is flashing. Then
enter the correct digit and continue the
programming sequence.
--------------------------------
Simplilied Plrt^ju^ittg
1. Press PROGRAM on remote hand unit.
PBOGSAM
2. Watch the status display--it will prompt you
through the rest of the prc^rarnming steps,
3. Turn off the VCR.
il] Make sure the VCR’s clock is set to the correct
time. The timer cannot record at the right time if
the clock is set incorrectly. Reset the clock if
necessary.
Press PROGRAM on the remote hand unit.
The programming “menu” appears on the status
display.
[2| The display will prompt you to select a Program
Number.
Four program numbers are available and you can
enter different programming instructions in each
one. All four program numbers will be flashing
because none of them have been used. If the timer
has been programmed, the number that was used
will stay on instead of flashing. You must clear a
program number before the same number can be
used again. See “Clearing a Timer Program” on
the next page.
j3| The display will prompt you to select a channel
number.
Press “2” to enter a Normal Program, “3” to enter
a Daily Program, or “4” to enter a Weekly
Program.
Press a digit from 1 to 4 on the remote to select the
program number you want to program.
Program numbers can be selected in any order.
14] display will prompt you to enter the
recording start time.
Press two digits for the channel to be recorded, (for
example, press 0 4 for channel 4).
24
Press four digits, two for the hour and two more
for the minute. For example, press 0 6 0 0 for 6:00
(Always press “0” before a single-digit hour or
minute. The “0” will not appear in the display.)
Page 27

Programming the Timer (continued)
|5|
|61
|7|
i8!
The display will prompt you to select either
AM or PM,
™ C-nnL' nu
/ I
DATE SUN
NORM
NORM
opp O ■ nc nu
0
The display will prompt you to select the
stopping time.
OFF —
o
The display will prompt you to select either
AM or PM.
m NORM
The di.splay will show “START DATE”
follow'ed by the current date and day.
!
i
nm nj
u ( i-i u (
rn M NORM D Y
U-UU>"nCHIJ r
, AM
nij
PM
CHU i
U-U_i7~,CHU“
Press “1” for AM or “2” for PM.
Press four digits, two for the hour and two more
for the minute. For example, press 0 8 0 5 for 8;05.
(Always press “0" before a single-digit hour or
minute. The “0" will not appear in the display.)
Press “1" for AM or "2” for PM.
If you want to start recording on the current
day. skip to Step 9,
If you want to start recording on a future
date, press four digits (two for the month and
two for the day). Press “0” first for a single
digit month or day. For example, press 0 7 0
9 to begin recording on July 9.
|9| Press PROGRAM to enter your program and
return to the clock display. Additional programs
may be entered by repeating steps 2-9.
-Checking the Tinier Programs
Programs can be checked whenever the VCR is turned
on.
1. Press PROGRAM on the remote hand unit to
display the programming menu.
2. Press 5 (Program Review).
The display will show the START TIME,
STOP TIME and START DATE you entered
for the lowest program number at four-second
intervals. Then the display changes to the next
higher program number, and so on until all
program information has been displayed.
3. Press 5 again if you want to view the next infor
mation without waiting four .second.s,
4. When you are finished, press PROGRAM to
return to the clock di.splay.
-------------------------------------
The year and day of the week are displayed
automatically w'hen you finish.
1101 Turn off the VCR. (See “Programming Reminders”
' on page 26.)
Clearing a Timer Program-
1
.
Press PROGRAM on the remote hand unit to
display the programming menu.
Press 5 (Program Review).
2,
The display will show the START TIME,
STOP TIME and START DATE you entered
for the lowest program number at four-second
intervals. Then the display changes to the next
higher program number, and so on until all
program information has been displayed.
Press 5 again if you want to view the next infor
3.
mation without waiting four seconds.
4.
Press CLEAR when the program information
you want to clear is displayed.
Notes:
• Normal timer programs clear automatically when
the recording is finished, but daily and weekly
programs remain in the timer indefinitely.
• All programs are erased if power is interrupted for
more than approximately ten minutes.
25
Page 28

Timer Recording
The information on this page tells you how to set up
your VCR for Timer Recording after you have
programmed the timer. (The programming instructions
are on pages 24-25.) When you have finished
programming the timer, follow the steps in the drawing
to prepare for timer recording. We suggest that you
make one or more short timer recordings for practice so
you won’t be disappointed later on.
If you have a Daily or Weekly program in the VCR
timer, you should check the steps in the drawing
sometime before the recording time to be sure that your
VCR is ready to record.
Timer Recording Checklist
Before your VCR timer can record a TV broadcast, all
the conditions listed here must be fulfilled. They are
presented as a checklist you can use until you are
familiar with your VCR,
□ Cassette inserted in the VCR. {TIMER flashes if not.)
□ Cassette has its safety tab in place. (If not, the
cassette is ejected.) (See “Erase Protection” on page
9.)
□ Cassette length and recording speed are adequate for
program(s) to be recorded.
□ Cassette rewound to beginning or to place desired on
tape,
□ Clock set to correct time and date.
□ Timer has been programmed. (“PROG” will be
displayed.)
□ POWER has been turned off. “TIMER” appears
only if the timer is programmed and the VCR is off.
Programming Reminders
• The timer light will flash when you turn off the VCR
if you have programmed the timer but forgotten to
insert a cassette.
• If the cassette, in the VCR has its safety tab removed
(page 9), the VCR will eject it after you have
programmed the timer and turned off the VCR. This
•
is to remind you to insert a new cassette or cover the
safety tab.
XPR and Timer
The timer cannot begin recording if the VCR is already
recording with XPR, and vice versa. You can use XPR
along with Timer Recording, but be careful that the
XPR recording will end before the first timer recording
begins.
TV Viewing During a Timer Recording
When the VCR turns on automatically to make a timer
recording, it does not disturb whatever program you
may be watching at the time. Press the VCR/TV switch
to turn on the VCR light if you want to monitor the
recording.
Stopping a Timer Recording in Progress
Press POWER and then press STOP within 10 seconds.
(Press POWER once more to turn off the VCR). This
erases a Norma! program from the timer’s memory, but
a Daily or Weekly program will record on the next
scheduled day.
Timer Recording From the Line Input
It is also possible to timer record from the VCR’s Line
input. Just enter “91” for the channel. This is
particularly convenient if you have a satellite receiver or
similar device attached to the VCR’s Line input.
26
Page 29

Alternate Remote Control Units
Selected models of RCA color TV receivers and
monitor/receivers feature infrared hand units that will
also remotely control your VCR. Only the buttons that
are used for controlling your VCR are described here.
These buttons have generally the same functions as the
ones with the same names on the front panel of the
VCR, but there are some differences,
• Any VCR tuner channel may be selected by pressing
two of the Digit buttons on the hand unit. Press 0 first
to select tuner channels 1 through 9.
PrMt this button to turn on VCR and
put remote In "VCR Mode”. Other
buttons on remote will not control the
VCR until this button Is pressed.
Press to record.
Press to play forward
Press to rewind
when VCR is stopped
or reverse scan when in Play.
Press for fast forward
when VCR is stopped
or forward scan when in Play.
Same as “SLOW" on the VCR's
hand unit.
Press to search backward
when VCR is playing.
Same as VCR's remote.
Press to search forward
when VCR is playing.
Digital command centeg
H I
[*«»»«| I I TAn I [ CD j
WtOOWAM I
--------
□ BSBoiiri □ ® n
Same as SLOW TRACKING AT on hand unit.
Separate buttons turn the VCR on and off.
Simply press the Record button to record. It is not
necessary to press the Play button at the same time.
Note: When you use CHANNEL UP or DOWN on the
Digital Command Center hand unit, the VCR uses its
internal scan list of channels, not the scan list that you
programmed into the hand unit for controlling the TV.
RCil
pi;:
m
:Pt
S
ip;;;
[*]■
.tIIIS.[S
Two buttons select any channel.
Same as "Stop" on front panel.
Same as "Pause” on front panel.
Same as "F. ADV" on the VCR's
hand unit.
Select next higher or lower
channel In VCR's scan list.
Turns power off.
Press to switch antenna between
TV and VCR. {Same as
TV/VCR Switch on VCR)
Press this button to turn on VCR and
put remote In “VCR Mode". Other
buttons on remote will not control the
VCR until this button Is pressed.
Two buttons select
any channel.
Same as "Pause"
on front panel.
Press to record.
Press to search backward
when VCR is playing.
Same as VCR’s remote.
Press to rewind
when VCR is stopped.
Press to reverse search
if VCR is playing.
Turns off power.
Select next higher or lower channel
in VCR’s scan list.
Same as "Stop” on front panel.
Press to play.
Press to search forward when VCR
is playing.
Press for fast forward when VCR
is stopped. Press for forward search
when VCR is playing.
Press to switch antenna between
TV and VCR.
no/i
27
Page 30

Cabinet Cleaning
Cleaning
Dust exposed surfaces as required, using a soft cloth or Some of the plastic surfaces are easily scratched and
the dusting attachment of your vacuum cleaner. they can be marred by alcohol and various solvents.
Occasionally use the vacuum cleaner to remove dust Avoid excessive use of oil-based furniture polishes since
from the ventilation holes on the top, back, sides, and the materials used in the cabinet are non-porous and the
bottom of the cabinet. residue will accumulate more dust.
Trouble Checks
Sometimes problems can be easily solved by checking a and money. If service should be necessary, RCA
few basic things. Check below before you call for help or Authorized VCR Servicenters and the RCA Service
take your unit to an RCA Authorized VCR Servicenter Company are trained and equipped to furnish it.
or the RCA Service Company. It could save you time
•
No Power (indicator won't come on)
Does Not Respond to Remote Control
Poor/No Picture for Normal TV Viewing
Snowy/No Picture During Playback
Streaks in Picture During Normal
Playback
Will Not Record or Play
Will Not Record
Timer Recording Not Made
Tape Stops Before Complete Rewind
Rewind does not operate
Clock Shows Incorrect Time or Date
Check to see if the VCR is plugged into an operating outlet.
•
Weak battery in hand unit.
•
Hand unit not aimed at the VCR or there is an obstruction between them.
•
The VCR/TV switch may be set to VCR. Switch the VCR to TV or turn it off.
•
TV monitor/receiver set to “Video Input.” Switch to an active channel.
•
Carefully check antenna connections.
•
VCR/TV switch set for TV viewing.
•
Make sure the TV channel selector matches the channel you have selected on
the back of the VCR (3 or 4).
•
Make sure the TV is fine tuned.
•
Check the video cable connections between the VCR and a TV monitor/
receiver.
•
Make sure the TV monitor/receiver is set for “Video In.”
•
Try another tape.
•
Very dirty tape has left deposits on VCR heads. See page 9 for head cleaning.
•
Some snow and streaks are normal during Search and Stop-Action play.
•
Adjust the TRACKING CONTROL.
•
Tape stretched (poor quality or worn out).
•
Stop light blinks if there is moisture in the VCR. Leave the power on and wait
until the light is on continuously. If liquid entered the VCR, unplug it and have
it inspected by a qualified Servicenter.
•
No cassette in VCR.
•
Eject and reinsert cassette.
•
Broken tape — try another cassette.
•
VCR is in the pause mode.
•
Safety tab removed from cassette.
•
Program entered incorrectly (wrong channel or times).
•
Power interruption. (Clock on the VCR’s front panel will show “—:—
•
Clock was not set accurately (including AM/PM).
•
Program exceeded cassette length or tape was not rewound beforehand.
•
TUNER/LINE switch set to wrong position.
•
No tape in VCR or cassette safety tab broken off.
•
Turn off COUNTER or press REWIND again. Tape rewinds only to 0000 when
the counter is on.
•
Tape already rewound. Check counter reading.
• Power interruption. (Clock on the front panel shows “—:—".)
• Clock was not set accurately (especially AM and PM).
• Clock display shows recording time remaining during XPR recording.
”.)
28
Page 31

Index
A/B Switch ......................................................... 6
Accessories (Included) ...................................... 2
/4 DZ) Button
Adding Channels to Scan List .... 11
Alternate Remote Controls
Antenna Connection
..................................................
............................
...................................
11
27
2,3,4
AUTO PROG 11
Basic Operation
Basic Playback (Quick Guide) .... 20
Battery Installation (Remote)
Cabinet Cleaning ............................................. 28
Cable-TV Connections
Cables (Types of Antenna Cables) . 2
Camera Recording............................................ 22
Care and Storage (Cassettes)
Cassette Compartment .................................... 10
Cassettes ........................................................ 9,10
Cassettes (Inserting/Removing) ... 10
...............................................
........................
..................................
...........................
10
13
5,6
CATV/NORM SWiich. ................................. II
C//J/C//4 Switch
..............................................
12
CHANNEL ^yMons. ......................... 10,11,12
C/L4/VAEL Buttons (Remote) .... 13
CHANNEL PROGRAMMING
Buttons ........................................................ 11
Checklist (Timer Recording)
Choosing Location
Cleaning (Cabinet) .......................................... 28
............................................
.........................
26
CLEAR Button (Remote) ... 13,14,25
Clock (Setting) ................................................. 14
Connections
• Another VCR .............................................. 21
• Antenna ....................................................... 3,4
• Cable-TV .................................................... 5,6
• Camera ......................................................... 22
• Converter Box ............................................ 5,6
• TV Monitor/Receiver
Controls (Detailed) .................................... 16,17
Copying Tapes
...................................
................................................
21
COUNTER Button (Tape
Counter)
..................................................
Deleting Channels from Scan List . 11
Dubbing Tapes ................................................ 21
Effects (Special)
........................................
17,18
17,18
EJECT Button ........................................... 10,16
Ejects Tape (Programming
Timer) .......................................................... 26
ERASE Button
Erase Protection (Cassettes)
Express Recording .......................................... 23
F..4DK Button (Remote)
...............................................
............................
...............................
F.FWD Button........................................... 16,18
F.FWD Button (Remote) .............................. 13
FCC Interference Handbook
Features .............................................................. 8
Features (Special)
......................................
17,18
11
13
First Recording & Playback ............................ 15
Frame Advance ................................................. 17
General Installation Information ... 2
Indicator Light (Remote) ................................. 13
Inserting Cassettes............................................. 10
Installation
Installation Checklist
Interference ........................................................ 2
Jitter (Reducing)
Line Input (Timer Recording)
LINE/TUNER Switch
Location (Choosing) ......................................... 2
Af£MO/f y Button (Remote)
Memory Stop
9
NORM/CATVSWiXfAi
Numbered Buttons (Remote)
Operating Controls (Detailed) .. 16,17
Operation (Basic) ............................................ 10
PA USE Button (Remote)
Pause for Stop-Action Playback ... 17
Pausing ............................................................. 17
Picture Search
PL4y Button ............................................... 10,16
PZ«4 y Button (Remote) ................................ 13
2
Playback (Quick Guide).................................. 20
Playing Times & Speeds
POWER Button
.........................................................
.......................................
...............................................
..................................
....................................................
................................
Button ............................................. 16
............................
.................................................
(Cassettes)
.....................................................
........................................
POWER Button (Remote)............................. 13
Power Supply (Camera) ................................. 22
PROGRAM Button (Remote) ... 13,14
Programining Channels
Programming Reminders ............................... 26
Programming Scan List
7
Programming the Timer
Quick Reference Guides . 19,20,21,22
REC Button (Remote)
RECORD Button
Recording & Viewing Different
Programs
Recording & Viewing Same
Program ....................................................... 19
Recording (Camera)
Recording (Express) ....................................... 23
Recording (First-Time)
Recording From Another VCR ... 21
9
Recording Speed (Cassettes)
Recording With TV Off (Quick
Guide) .......................................................... 19
Red Indicator Light (Remote) .... 13
Registration Card
.
2
Remote Control
Remote Controls (Alternate)
.....................................................
.................................
.................................
......................
...................................
..............................
.......................................
...................................
.....................................
..............................................
___________
........................
..........................
24,25,26
10,17
...........................
Front Cover
..........................
2
12
17
26
12
13
18
11
13
13
18
10,16
11
11
13
20
22
15
Inside
13
27
Removing Cassettes
RESET Button (Counter)
REWIND Button
REWT/VE) Button (Remote)
Safety Precautions
Safety Tab (Cassettes) ...................................... 9
Scan List ........................................................... II
SEARCH Buttons
........................................
.........................
.................................
....................................
....................................
SEARCH Buttons (Remote)
Setting the Clock
Signal Splitter
Simphfied Installation Checklist ,. 12
SEOIF Button (Remote)
Slow Motion
SEO IF TR4CA:/iVG Buttons ... 13,18
Special Effects & Features
Special Features
Specifications
Sputter (Signal Splitter) ................................ 6,7
Status Display
Stop-Action Playback
STOP Button .............................................. 10,17
STOP Button (Remote)
Stopping Timer Recording ............................ 26
Streaks in Picture............................................. 18
Tape Counter
9
Tape Ejects (Programming
Timer)
TAPE SPEED Button
Time Display ................................................... 10
Timer Light (Flashing)
Timer Recording .................................. 24,25,26
Timer Recording Checklist
Timer Recording from Line Input . 26
TRACKING CoviXxo\
Trouble Checks ............................................... 28
............................................
................................................
................................
...................................................
.......................
........................................
..............................
.................................................
....................................
................................
.............................................
.........................................................
............................
..................................
................................
TUNER/LINE 12,17
Turning On VCR ............................................ 11
TV Monitor/Receiver Connections . 7
TV Viewing (Quick Guide) ........................... 19
TF/FCR Button (Remote)
Types of Antenna Cables ................................. 2
Unpacking
F LOCE: Control
.........................................................
VCR (VCR/TV) Switch
VCR Channel .................................................. 12
9
Video Cassettes
Warranty
Warranty Registration .............................. Inside
What Your VCR Will Do
...........................................
......................................
.............................
...........................................
.....................
................................
XPR Button (Express Recording) . 23
17,18
10,16,18
.......................
Inside
Front Cover
16,18
........................
17,18
Back Cover
.......
10,12,26
Back Cover
Front Cover
10
13
13
14
6,7
13
18
17,18
10
17
13
17,18
26
10,17
26
26
18
13
2
17
9,10
8
29
Page 32

Specifications
Format
Record/Playback System:
Video Signal:
Antenna
Tuner
Type
Broadcast Channels;
VHS
3-Head: 2 video record/
playback heads, 1
special effects head
EIA standard: NTSC color
75-ohm external VHP antenna
terminal
300-ohm external UHF antenna
120-channel
Frequency synthesis
VHF 2 - 13, UHF 14 - 83
RCA Limited Warranty
Video Cassette Recorder
What does your warranty coven
• Any defect in material or workmanship.
For how long after purchase:
• Ninety days for labor charges.
• One year for parts.
The warranty period for rental VCR’s begins with the
first rental.
What will RCA do;
• Pay any RCA Authorized VCR Servicenter the labor
charges to repair your VCR.
• Provide new or, at our option, rebuilt replacement
parts for the RCA Authorized VCR Servicenter to
make the repairs. .
How do you get service:
• Take your VCR to any RCA Authorized VCR
Servicenter or to the RCA Service Company. For their
names and locations, ask your dealer or RCA
Distributor, or look in the Yellow Pages.
• Show the service technician your Warranty
Registration or evidence of purchase date.
• Pick up your VCR when repairs are completed.
Cable-TV Channels:
Midband A-1 and A-2 (99, 98);
A-8 (01)
Midband A through I (14-22)
Superband J through W (23-36)
Hyperband W -H 1 - W -i-12 (37-48)
Power Requirements 120V AC, 60Hz
Power Consumption
Weight
Dimensions
38 watts
14.3 lbs.
3-3/4" High
14-9/16" Wide
13-13/16" Deep
Note: Specifications subject to change without notice.
What does your warranty not cover
• Transportation to and from the Servicenter.
• Customer instruction. Your Owner’s Manual provides
information regarding operating instructions and user
controls. For additional information ask your dealer.
• Installation and set-up service adjustments,
• Signal reception problems caused by external antenna
or cable systems.
• Damage from misuse or neglect.
• Cleaning of video/audio heads, which is normal
maintenance.
• Remote control batteries.
• VCR’s which have been modified or incorporated into
other products.
• VCR’s purchased or serviced outside the USA.
How does state law relate to this warranty;
• This warranty gives you specific legal rights, and you
may also have other rights which vary from state to
state.
What if you purchased your set in Canada:
• Refer to the Canadian W arranty.
Si un livret d'instructions en français n'est pas inclus avec votre
appareil, vous pouvez en obtenir un (INDIQUER LE NUMÉRO DE
MODÈLE, VOTRE NOM ET VOTRE ADRESSE) en vous adressant à;
RCA Inc.
Service des données techniques
5575 av. Royalmount
Ville Mont-Royal, Québec, Canada
H4P 1J8
RCA Corporation
Consumer Electronics Division
600 N Sherman Or, PO Box 1976
Indianapolis, Indiana 46206
©1987 RCA Corporation
Trademark(s)® Registered
Marca(s) Registrada(s)
Part Number 2826 740-1
Printed in Japan
Job A-43972
4653521
E72118
 Loading...