

RCA TruFlat F27TF12 User Manual

Television
User’s Guide
Changing Entertainment. Again.
F27TF12.00.Cover 7/19/01, 3:37 PM1

This symbol indicates
"dangerous voltage" inside
the product that presents a
risk of electric shock or
personal injury.
WARNING
To reduce the risk of fire or
electric shock, do not expose
this product to rain or moisture.
This symbol indicates
important instructions
accompanying the product.
Caution: To prevent electric shock, match wide blade of
plug to wide slot, fully insert.
Attention: Pour éviter les chocs électriques, introduire la
lame la plus large de la fiche dans la borne correspondante
de la prise et pousser jusqú au fond.
Refer to the identification/rating label located on the back panel of your
product for its proper operating voltage.
FCC Regulations state that unauthorized changes or modifications to this
equipment may void the user’s authority to operate it.
If fixed (non-moving) images are left on the screen for long periods,
they may be permanently imprinted on the picture tube. Such
images include network logos, phone numbers, and video games.
This damage is not covered by your warranty. Extended viewing of
channels displaying these images should be avoided.
Cable TV Installer: This reminder is provided to call your attention to
Article 820-40 of the National Electrical Code (Section 54 of the Canadian
Electrical Code, Part 1) which provides guidelines for proper grounding and,
in particular, specifies that the cable ground shall be connected to the
grounding system of the building as close to the point of cable entry as
practical.
Product Registration
Please fill out the product registration card (packed separately) and return it immediately. Returning this card
allows us to contact you if needed.
Product Information
Keep your sales receipt to obtain warranty parts and service and for proof of purchase. Attach it here and record
the serial and model numbers in case you need them. The numbers are located on your product.
Model No.__________________________________________________________________________________________
Serial No. __________________________________________________________________________________________
Purchase Date:______________________________________________________________________________________
Dealer/Address/Phone: ______________________________________________________________________________
Important Information
CAUTION
CAUTION: TO REDUCE THE RISK OF ELECTRIC
SHOCK, DO NOT REMOVE COVER (OR BACK). NO
USER SERVICEABLE PARTS INSIDE. REFER
SERVICING TO QUALIFIED SERVICE PERSONNEL.
RISK OF ELECTRIC SHOCK
DO NOT OPEN
F27TF12.00.Cover 7/19/01, 3:37 PM2
Introduction
1
Key Features Overview
Your TV is equipped with features that will add to your viewing experience. The following
information summarizes these features. Chapter 3 provides more information about the rest of the
TV’s features and how to use them.
V-Chip: Parental Controls
Description: You can block programs and movies by content, age-based
ratings, and/or movie ratings.
Requirements:
• Set up the TV GUIDELINES and MPAA menus in the TV’s main MENU
(Chapter 3 has details).
• The broadcasters must use the rating system when they send the program to
your TV in order for your TV to block the program.
Component Input Jacks
Description: The jacks on the back of your TV labeled COMPONENT-IN can
be used to connect a component with Component Output jacks (like a DVD
player). Component video connections provide a higher quality picture
because the video signal is divided into three parts instead of being compressed
into one.
Requirements: A component with Component Output jacks, and three video
grade cables that you’ll use to connect the component to your TV.
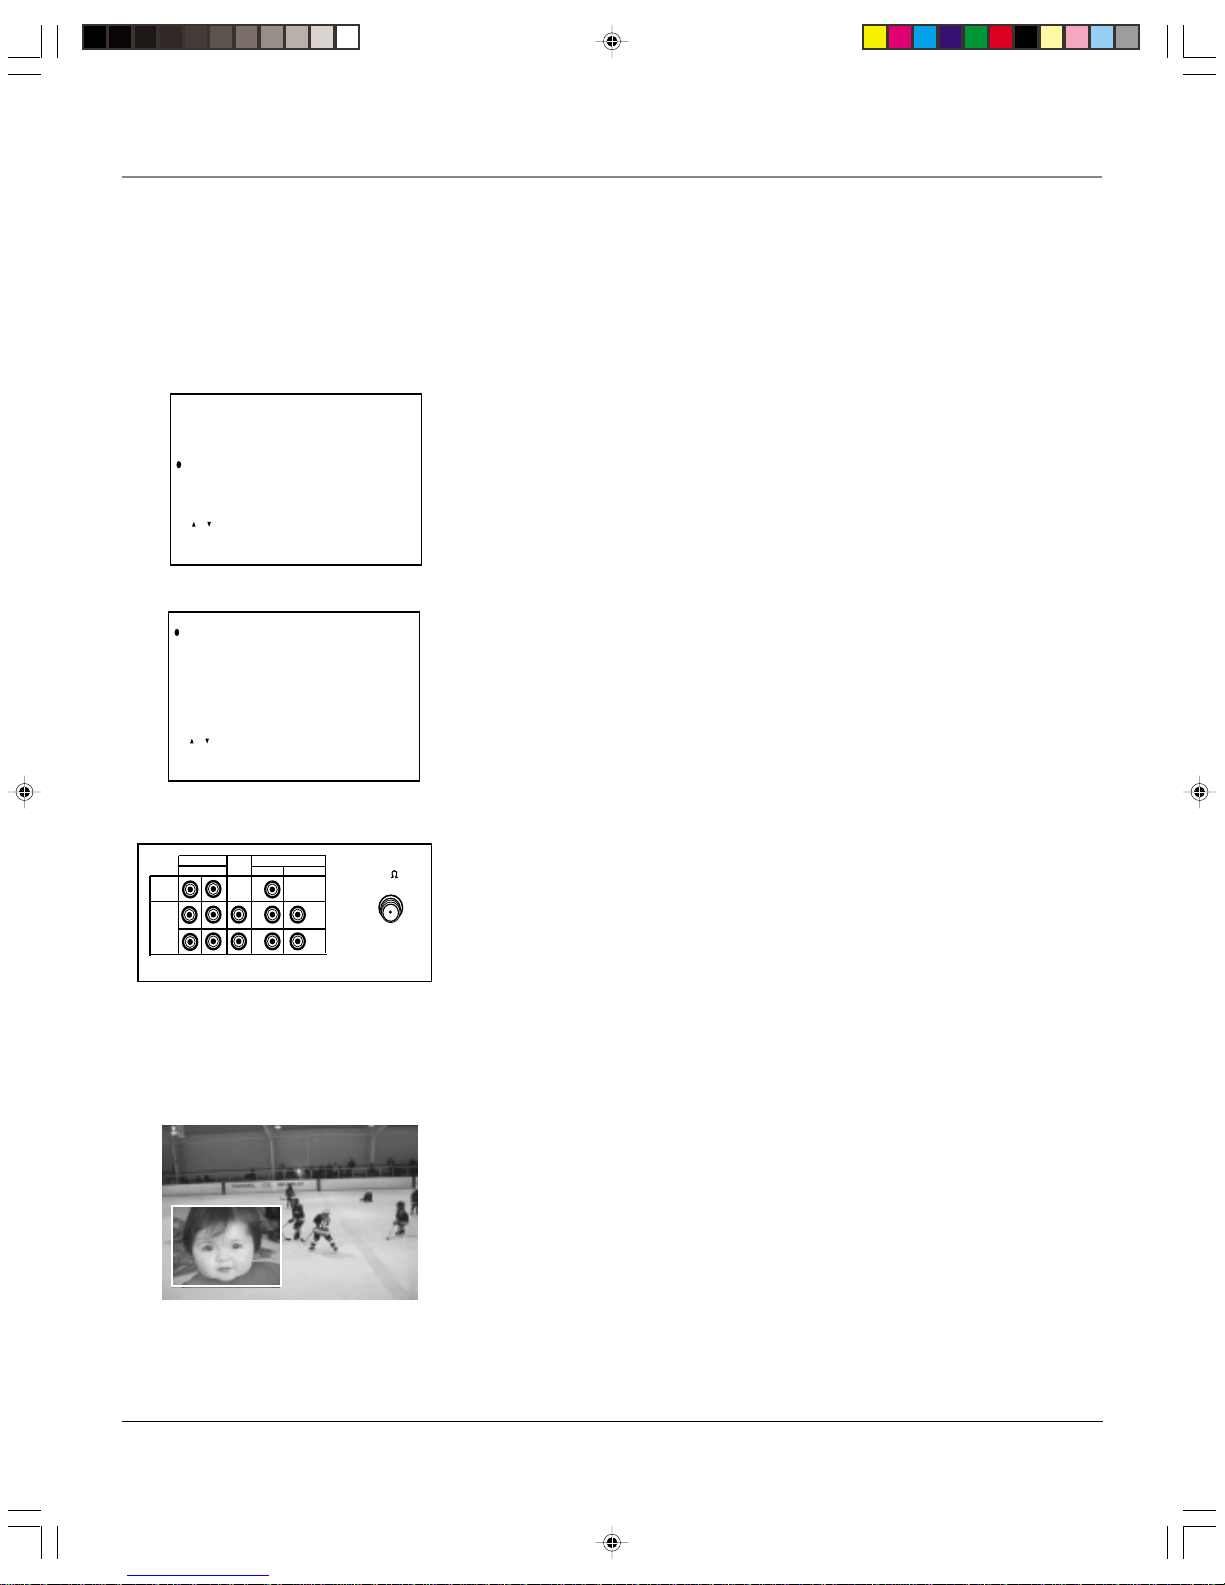
PIP (Picture-In-Picture)
Description: PIP lets you watch two channels at one time — one channel on
the main screen and the other in a smaller window.
Requirements: Press the PIP button on the remote control. Go to page X for
more information about PIP.
VIDEO
LINE IN
ANT/CABLE
75
LINE COMPONENT-IN
IN 3
L
R
L
R
P
R
(CR)
P
B
(CB)
OUT
AUDIO
VIDEO AUDIO
TV back panel
Y
IN 1
•[ , ] to move cursor
•[OK] to set
MAIN MENU
TIMER
VIDEO ADJUST
COMPONENT ADJ.
AUDIO ADJUST
CLOSED CAPTION
PARENT CONTROL
LANGUAGE
ENERGY SAVE
SET UP
PARENT CONTROL
• V-CHIP BLOCK
RETURN
• [ , ] to move cursor
• [OK] to set
F27TF12.00.Intro 7/19/01, 3:37 PM1

(This page intentionally left blank)
F27TF12.00.Intro 7/19/01, 3:37 PM2

3
Table of Contents
Introduction:
Key Features Overview ....................................................................................................1
V-Chip: Parental Controls...........................................................................................1
Component Input Jacks .............................................................................................1
PIP (Picture-In-Picture) ...............................................................................................1
Chapter 1: Setup and Connections
Things to Consider Before You Connect .........................................................................6
Protect Against Power Surges ...................................................................................6
Protect Components from Overheating ...................................................................6
Position Cables Properly to Avoid Audio Interference ............................................6
Important Stand and Base Safety Information ........................................................6
Use Indirect Light .......................................................................................................6
Choose Your Connection..................................................................................................7
Cables Needed to Connect Components to Your TV ...............................................7
Connection: TV + VCR.......................................................................................................8
Connection: TV + VCR + DVD Player ...............................................................................9
Connection: TV + VCR + Satellite Receiver ...................................................................11
Plug in the TV..................................................................................................................12
Put Batteries in the Remote...........................................................................................12
How to Use the Remote Control to Complete the Initial Setup ................................. 12
Turn on the TV ................................................................................................................12
Initial Setup.....................................................................................................................13
Select a Language ....................................................................................................13
Auto Preset (Automatically Searching for Channels).............................................13
Add or Erase Channels .............................................................................................14
Chapter 2: The Remote Control
The Buttons on the Remote Control .............................................................................16
Programming the Remote to Operate Other Components .........................................18
Find Out If You Need to Program the Remote....................................................... 18
How to Program the Remote ..................................................................................18
How to Use the Remote After You’ve Programmed It ................................................19
How to Order A New Remote Control.......................................................................... 19
Table of contents
F27TF12.00.TOC 7/19/01, 3:37 PM3

Table of Contents
4
Chapter 3: Using the TV’s Features
The PIP (Picture-In-Picture) Feature ...............................................................................22
How V-Chip Works ...................................................................................................23
New Rating Systems .................................................................................................23
Parent Controls and V-Chip............................................................................................23
Set the MPAA Rating Limits.....................................................................................24
Set the TV GUIDELINES Rating Limits......................................................................25
Entering Your Secret Number..................................................................................27
Download New Rating System ................................................................................ 27
Turning V-Chip Block On and Off............................................................................28
Chapter 4: Using the TV’s Menu System
How to Use Your TV’s Menu System............................................................................. 30
TIMER Menu .............................................................................................................30
To set the clock. .................................................................................................30
Accessing Menus ......................................................................................................30
Exiting from a menu ................................................................................................30
To set the on timer or sleep timer.....................................................................31
VIDEO ADJUST Menu ...............................................................................................32
COMPONENT ADJUST Menu ...................................................................................32
AUDIO ADJUST Menu ..............................................................................................33
CLOSED CAPTION Menu ..........................................................................................34
PARENT CONTROL — go to Chapter 3....................................................................34
LANGUAGE Menu ....................................................................................................34
Additional Settings in the SETUP Menu .................................................................35
The ENERGY SAVE Menu .........................................................................................35
Chapter 5: Additional Information
Troubleshooting..............................................................................................................38
Back Panel (listed left to right) ......................................................................................40
Front Panel (listed alphabetically)................................................................................. 40
Limited Warranty............................................................................................................41
Care and Cleaning .......................................................................................................... 43
Finding the TV’s Video Line Input Channel...................................................................43
Accessories ......................................................................................................................45
Index................................................................................................................................ 47
F27TF12.00.TOC 7/19/01, 3:37 PM4
Connections & Setup
Chapter Overview:
• Things to Consider Before You Connect
• Choose Your Connection
• Connections
• Plug in the TV
• Put Batteries in the Remote Control
• Turn on the TV
• Initial Setup
5
Chapter 1
Changing Entertainment. Again.
Graphics used within this publication are for representation only.
F27TF12.01 Setup 7/19/01, 3:38 PM5

6 Chapter 1
Connections & Setup
Things to Consider Before You Connect
Protect Against Power Surges
• Connect all components before you plug any of their power cords into the wall outlet.
• Turn off the TV and/or component before you connect or disconnect any cables.
• Make sure all antennas and cables are properly grounded. Refer to the Important
Safeguards sheet packed with your TV.
Protect Components from Overheating
• Don’t block ventilation holes on any of the components. Arrange the components so that
air can circulate freely.
• Don’t stack components.
• When you place components in a stand, make sure you allow adequate ventilation.
• If you connect an audio receiver or amplifier, place it on the top shelf so the heated air
from it won’t flow around other components.
Position Cables Properly to Avoid Audio Interference
• Insert each cable firmly into the designated jack.
• If you place components above the TV, route all cables down the side of the back of the
TV instead of straight down the middle of the back of the TV.
• If your antenna uses 300-ohm twin lead cables, do not coil the cables. Also, keep the twin
lead cables away from audio/video cables.
Important Stand and Base Safety Information
Choose the location for your TV carefully. Place the TV on a stand or base that is of adequate
size and strength to prevent the TV from being accidentally tipped over, pushed off, or pulled
off. This could cause personal injury and/or damage to the TV. Refer to the Important
Safeguards sheet packed with your TV.
Use Indirect Light
Don’t place the TV where sunlight or room lighting will be directed toward the screen. Use soft
or indirect lighting.
F27TF12.01 Setup 7/19/01, 3:38 PM6
Chapter 1 7
Connections & Setup
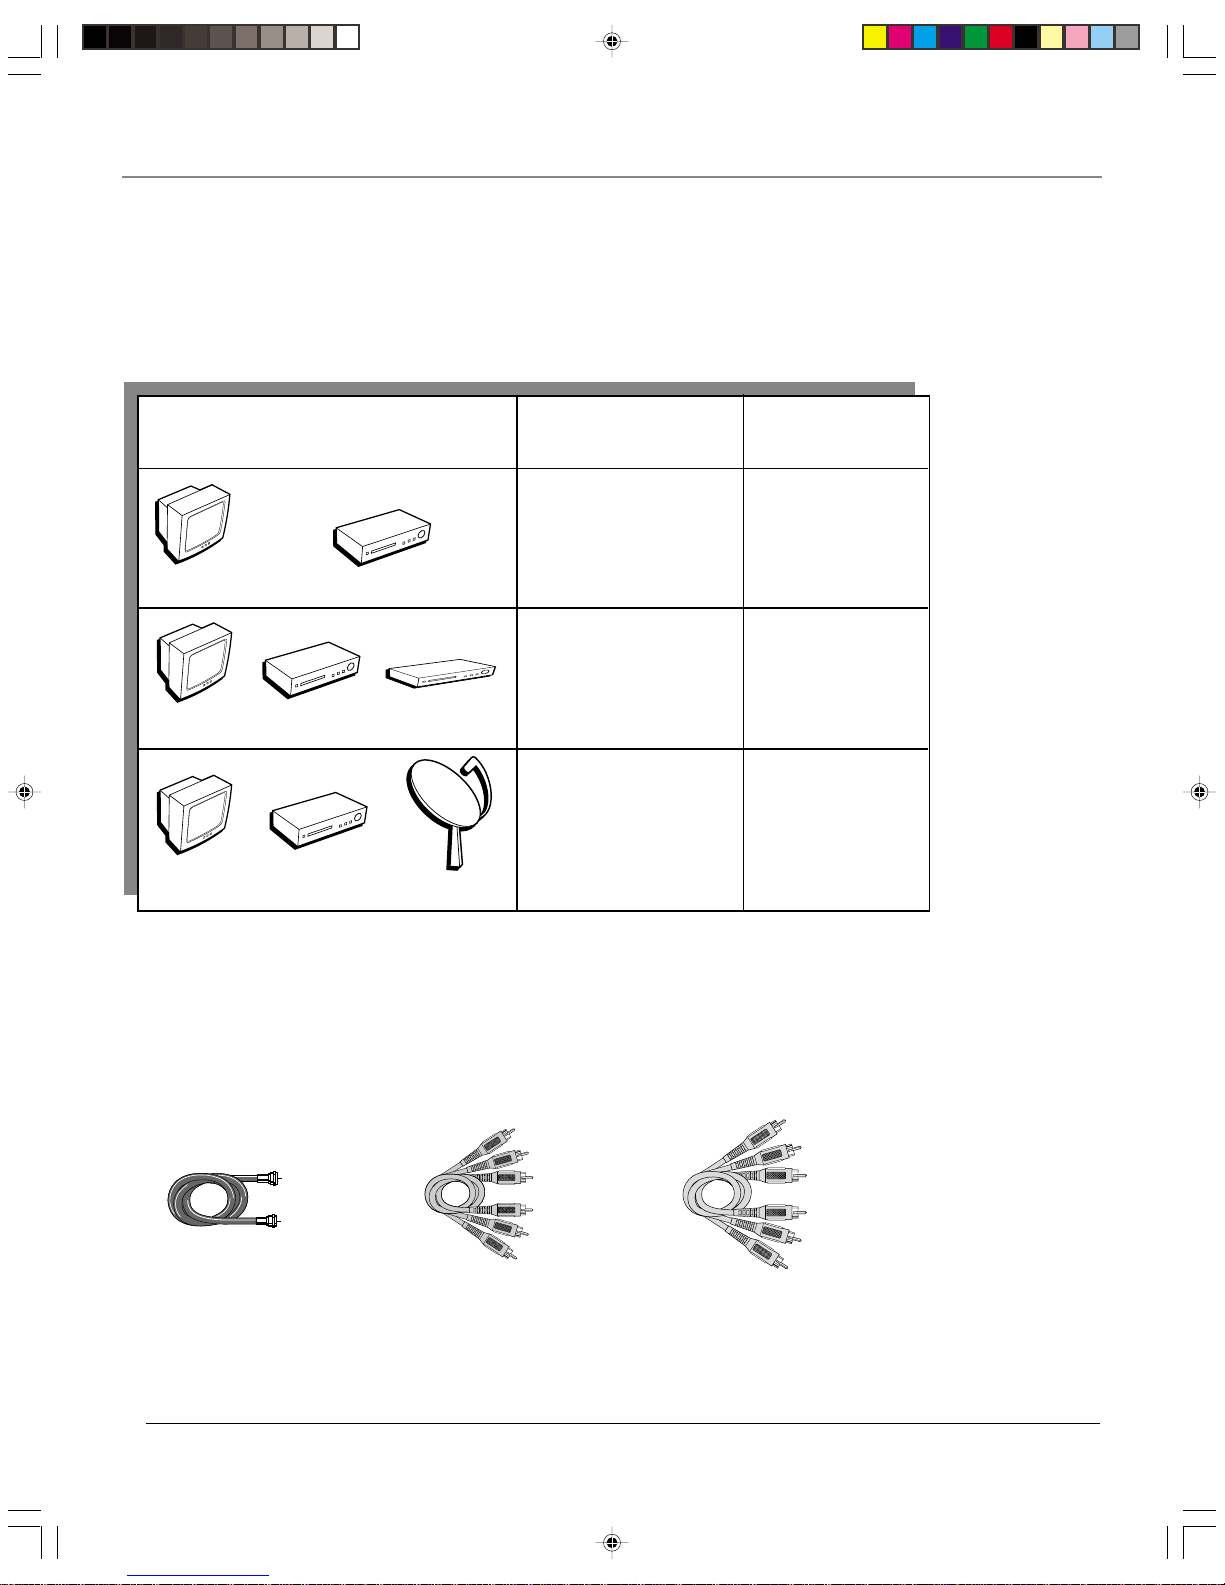
Choose Your Connection
There are several ways to connect your TV. Please use the following chart to determine which
connection is best for you. Proceed to the appropriate page, and connect your TV.
TV
Components
TV
TV
Connection Go To
Title
TV +VCR page 8
TV + VCR +
DVD Player page 9
Satellite
Cables Needed to Connect Components to Your TV
The pictures below show the cables needed for the connections represented in this book.
Note: Audio/Video cables (A/V cables for short) are usually sold as a bundled set, but the
connection picture in this book shows each cable separately for better visibility.
TV + VCR +
Satellite Receiver page 10
VCR
VCR
DVD
VCR
RF Coaxial cable Audio/video cables
Video grade cables
F27TF12.01 Setup 7/19/01, 3:38 PM7
8 Chapter 1
Connections & Setup
TV back panel
VIDEO
LINE IN COMPONENT-IN
IN 1
L
R
L
R
P
R
(CR)
P
B
(CB)
AUDIO
AUDIO
VIDEO
Y
IN 3
LINE
OUT
VCR
IN FROM ANT
OUT TO TV
VIDEO OUT
L
R
CH3
VIDEO IN
L
R
AUDIO OUT
AUDIO IN
CH4
ANT/CABLE
75 Ω
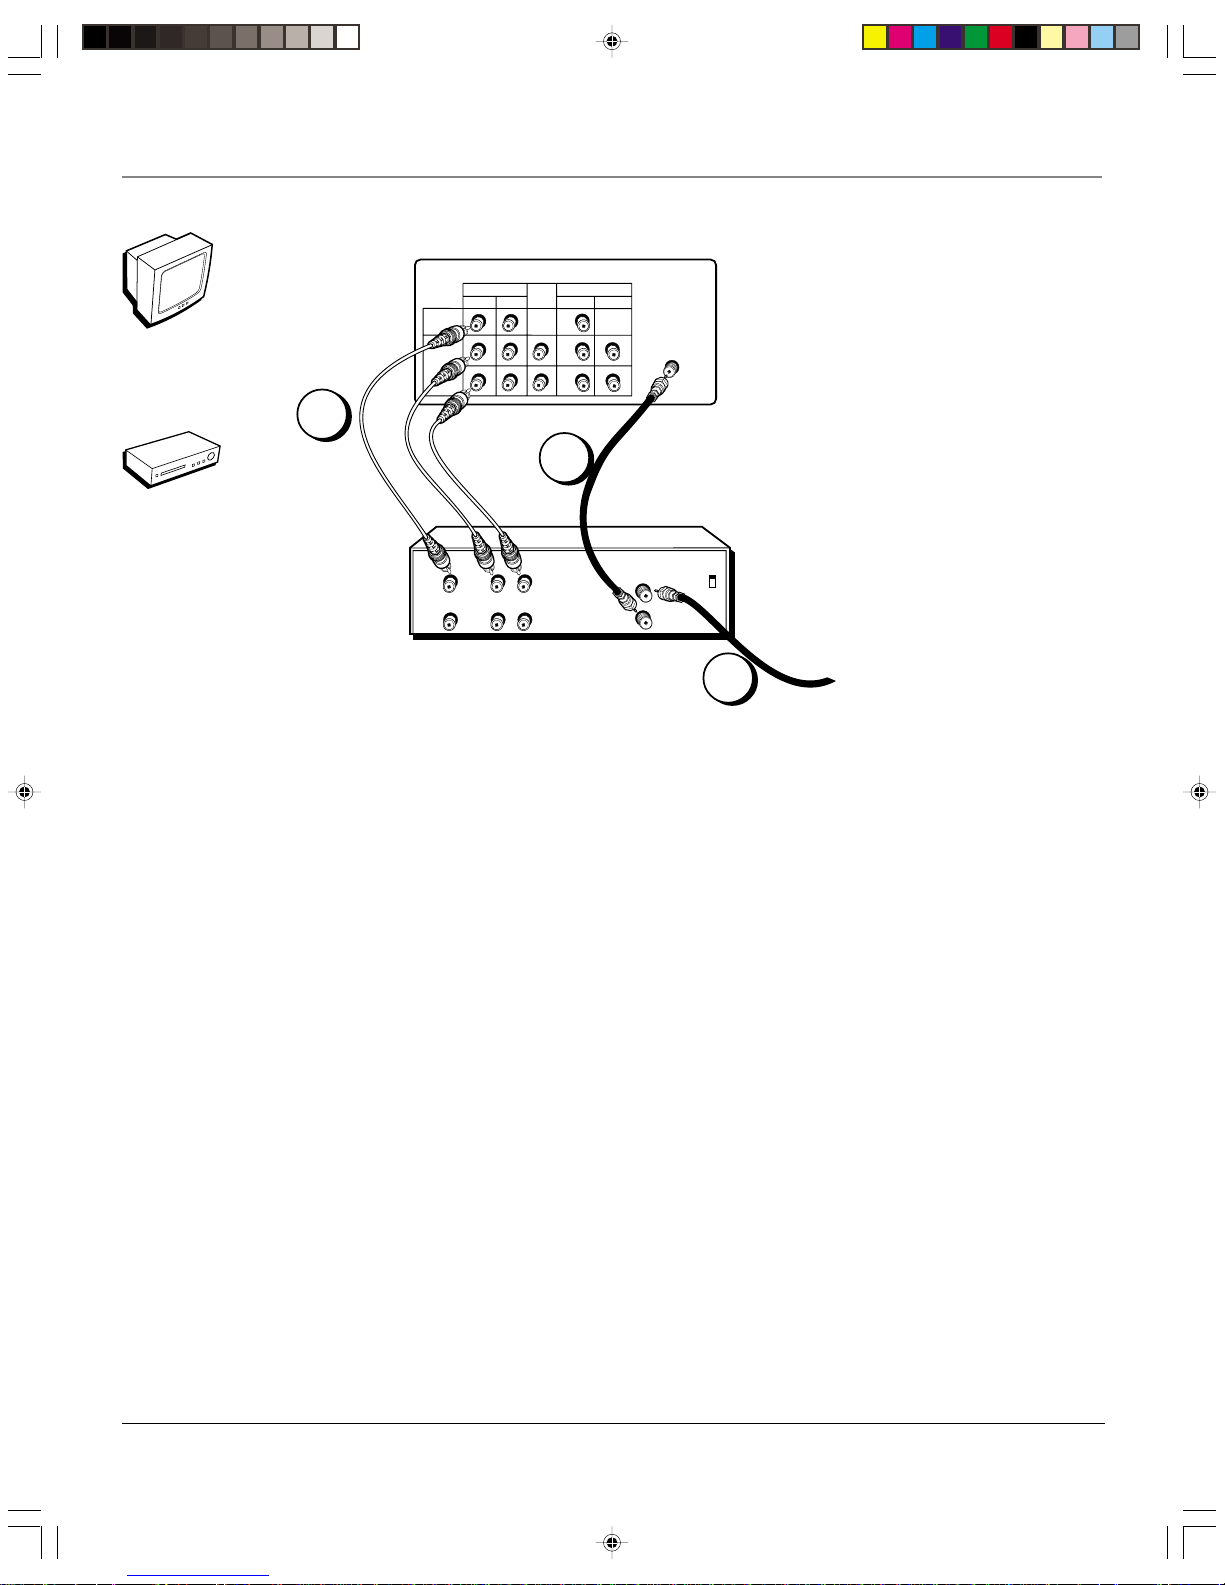
Connection: TV + VCR
1. Connect your cable or antenna to your VCR
Connect the RF coaxial cable from your cable feed, cable box, or off-air antenna to the IN FROM ANTENNA jack on
your VCR (sometimes labeled IN FROM ANT).
2. Connect your VCR to your TV
A. Connect a coaxial cable to the OUT TO TV jack on your VCR (sometimes labeled OUT TO TV), and to the
ANT/CABLE jack on the back of the TV.
B. Connect audio/video cables. Connect the video cable (yellow) to the IN 1 VIDEO jack on the back of the TV and to
the Video Output jack on the VCR (sometimes labeled VIDEO OUT). Connect the audio cables (white and red) to
the IN 1 AUDIO L and R jacks on the TV, and to the corresponding Output jacks on the VCR (sometimes labeled
AUDIO OUT L and R).
Go to page 12
TV
VCR
Note: The back of your VCR might not look
exactly like the one shown here.
1
From cable or antenna
2A
2B
F27TF12.01 Setup 7/19/01, 3:38 PM8
Chapter 1 9
Connections & Setup
TV back panel
VIDEO
LINE IN COMPONENT-IN
IN 1
L
R
L
R
P
R
(CR)
P
B
(CB)
AUDIO
AUDIO
VIDEO
Y
IN 3
LINE
OUT
ANT/CABLE
75 Ω
VCR
IN FROM ANT
OUT TO TV
VIDEO OUT
L
R
CH3
VIDEO IN
L
R
AUDIO OUT
AUDIO IN
CH4
AUDIO OUT
L
R
YPBP
R
COMPONENT
VIDEO OUTPUT
VIDEO
S-VIDEO
DVD Player
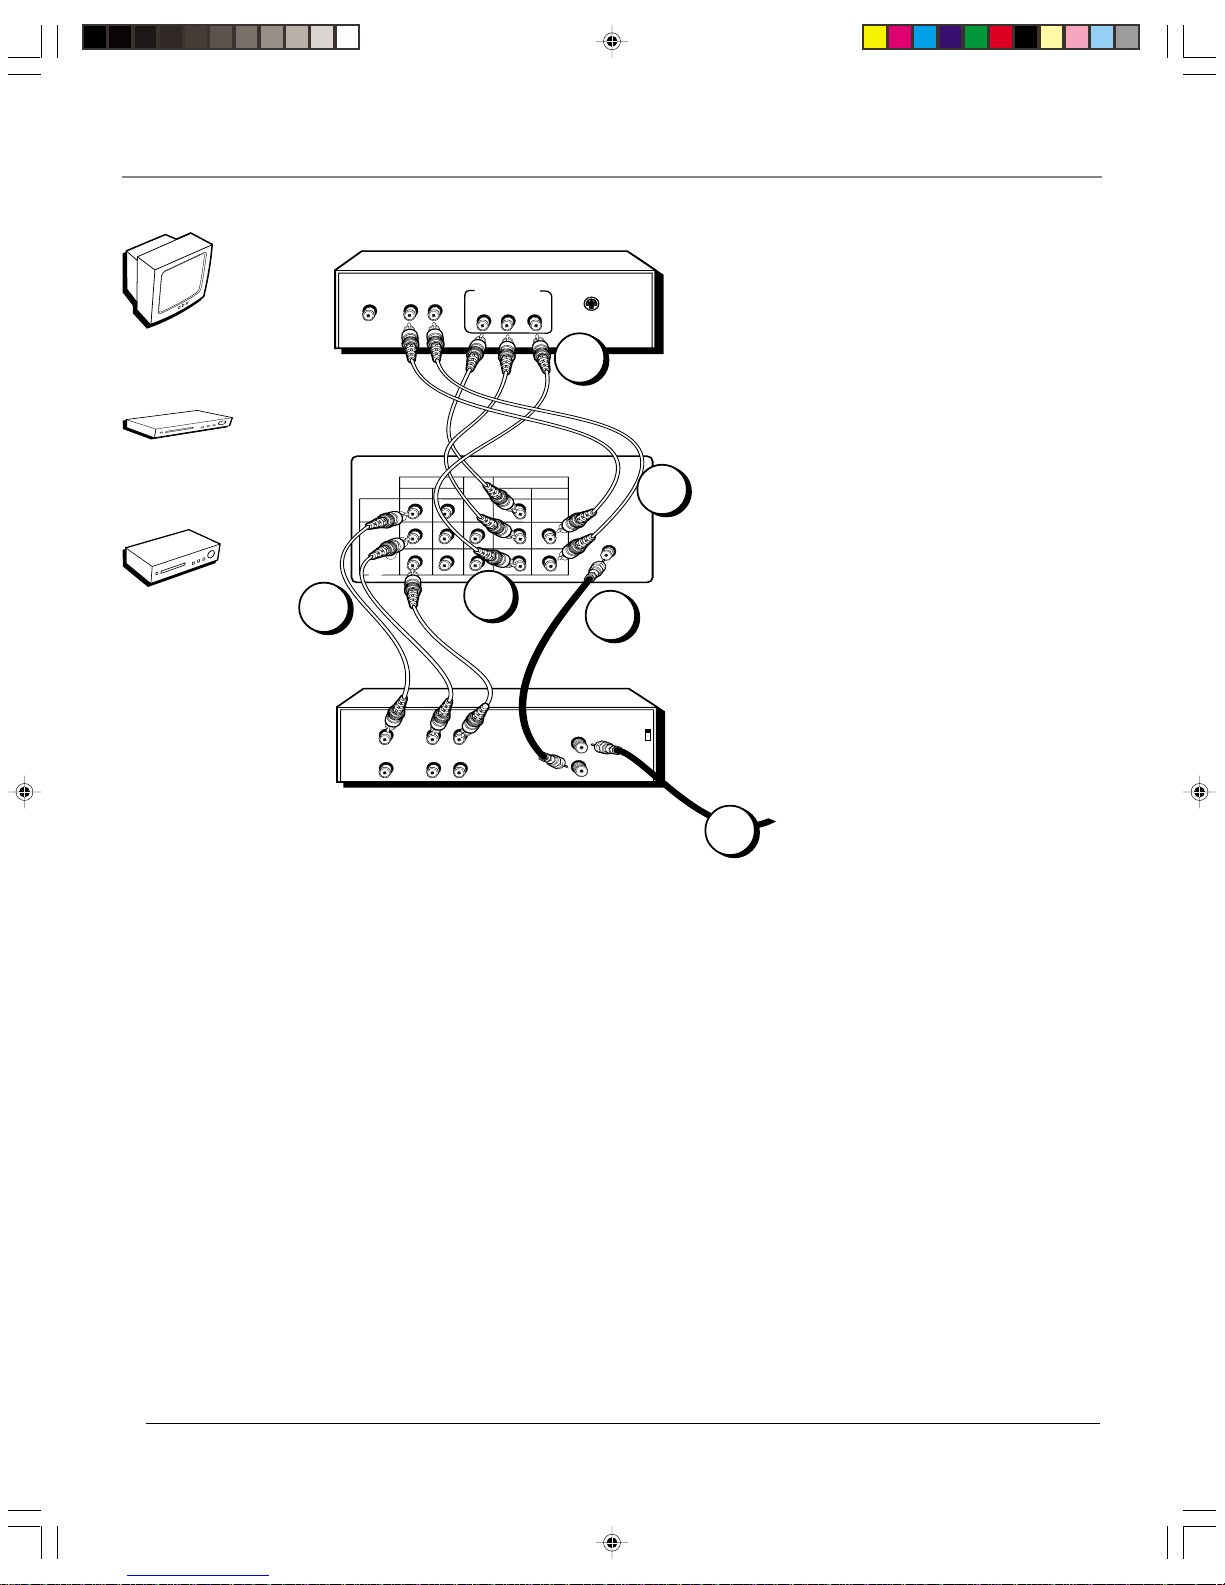
Connection: TV + VCR + DVD Player
1. Connect your DVD Player to your TV
Note: if your DVD Player doesn’t have Component jacks, use audio/video cables to connect the DVD Player to the TV’s
AUDIO L and R and VIDEO jacks.
A. Connect three video grade cables to the COMPONENT-IN VIDEO jacks on the back of the TV– labeled
Y, PB (CB), PR (CR).
B. Connect the other ends of the video cables to the corresponding Component Output Jacks on your DVD Player
(sometimes labeled Y, Pb, Pr).
C. Connect audio cables to the COMPONENT-IN jacks labeled AUDIO L and R and to the Audio Output jacks on the
DVD Player (sometimes labeled AUDIO OUT L and R).
2. Connect your VCR to your TV
A. Connect a coaxial cable to the OUT TO TV jack on your VCR (sometimes labeled OUT TO TV), and to the
ANT/CABLE jack on the back of the TV.
B. Connect audio/video cables. Connect the video cable (yellow) to the IN 1 VIDEO jack on the back of the TV and to
the Video Output jack on the VCR (sometimes labeled VIDEO OUT). Connect the audio cables (white and red) to the
IN 1 AUDIO L and R jacks on the TV, and to the corresponding Output jacks on the VCR (sometimes labeled AUDIO
OUT L and R).
3. Connect your cable or antenna to your VCR
Connect the RF coaxial cable from your cable feed, cable box, or off-air antenna to the IN FROM ANTENNA jack on
your VCR (sometimes labeled IN FROM ANT).
Go to page 12
2A
TV
VCR
DVD
Note: The back of your DVD
player might not look exactly
like the one shown here.
From cable or antenna
Note: The back of your VCR
might not look exactly like the
one shown here.
2B
1A
1B
1C
3
F27TF12.01 Setup 7/19/01, 3:38 PM9
10 Chapter 1
Connections & Setup
Note: The back of your VCR and satellite receiver might not
look exactly like the ones shown here.
VCR
ANT. IN
RF OUT
CH
VIDEO
AUDIO
OUT
IN
R
L
3 4
TV back panel
VIDEO
LINE IN
ANT/CABLE
75 Ω
COMPONENT-IN
IN 1
L
R
L
R
P
R
(CR)
P
B
(CB)
AUDIO
AUDIO
VIDEO
Y
IN 3
LINE
OUT
CH3
CH4
S-VIDEO
L
R
VIDEO
OUT
IN FROM ANT
OUT TO TV
SATELLITE
IN
Satellite receiver
back panel
From satellite
From antenna or cable
TV
Satellite
VCR
1A
1B
1C
2A
2B
3A
3B
F27TF12.01 Setup 7/19/01, 3:38 PM10

Chapter 1 11
Connections & Setup
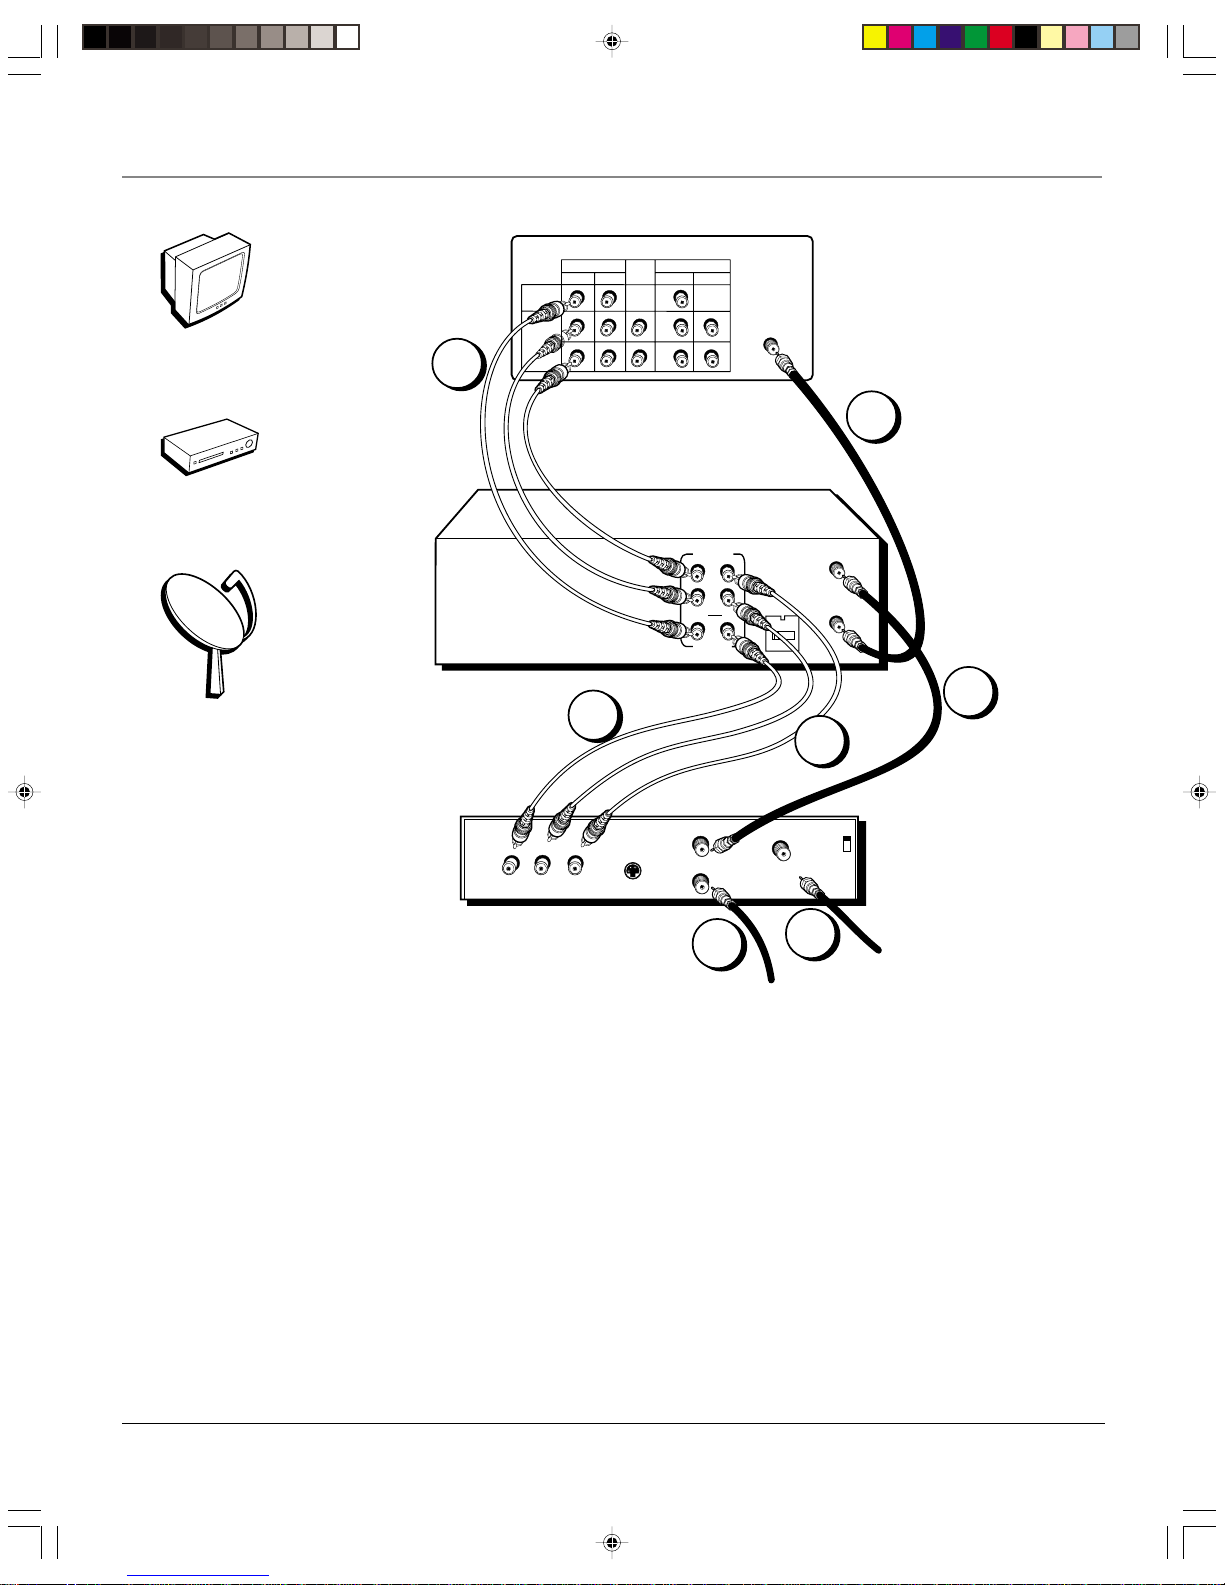
Connection: TV + VCR + Satellite Receiver
1. Connect your satellite receiver to your VCR
A. Connect the audio/video cables. Connect the audio cables (white and red) to the Audio Input
jacks on the VCR (sometimes labeled AUDIO IN L and R) and to the Audio Output Jacks on
the satellite receiver (sometimes labeled OUT L and R).
B. Connect the video cable (yellow) to the Video Input jack on the VCR (sometimes labeled
VIDEO IN) and to the Video Output Jack on the satellite receiver (sometimes labeled VIDEO
OUT).
C. Connect a coaxial cable from the satellite receiver’s OUT TO TV jack and to the Antenna Input
jack on the VCR (sometimes labeled ANT IN).
2. Connect coaxial cables to the satellite receiver
A. Connect the coaxial cable from your cable feed or antenna to the Input Jack on your satellite
receiver (sometimes labeled IN FROM ANT).
B. If it’s not already connected, make sure you connect the coaxial cable from your satellite dish
antenna to the Input Jack on your satellite receiver (sometimes labeled SATELLITE IN).
3. Connect your VCR to your TV
A. Connect a coaxial cable to the Output Jack (sometimes labeled RF OUT) on the VCR and to
ANT/CABLE jack on the TV.
B. Connect audio/video cables. Connect audio cables to the Audio Output jacks on the VCR, and
to the IN 1 AUDIO L and R jacks on the TV. Connect the video cable (yellow) to the Video
Output jack on the VCR, and to the IN 1 VIDEO jack on the TV.
Go to page 12
F27TF12.01 Setup 7/19/01, 3:38 PM11

12 Chapter 1
Connections & Setup
Plug in the TV
Plug the end of the power cord into the wall outlet. Match the wide blade of the plug with the
wide slot in the outlet. Insert the plug completely into the outlet.
Put Batteries in the Remote
1. Remove the battery compartment cover on the remote.
2. Insert new batteries. Match the polarities (+ and -) on the batteries with the
diagram on the remote.
3. Put the battery compartment cover back on the remote.
123
456
789
0
ON•OFF
TVVCR1
DVD
MUTE SKIP
GO BACKSOUND
GUIDE INFO
MENU CLEAR
INPUT
REVERSE PLAY FORWARD
RECORD
PIP SWAP CH CTRL RESET
STOP PAUSE
ANTENNA
AUX
SAT•CABLE
OK
CH
+
CH
VOL
VOL
VCR2
ON•OFF button
Arrow buttons
(up, down, left,
right), and the
OK button
How to Use the Remote Control to
Complete the Interactive Setup
The technical term is called “navigation” – how you move through the on-screen
menus. The theory is the same throughout the menu screens: highlight your
choice and select it.
To highlight or point to an item on the screen, press the arrow buttons on the
remote (you’ll notice the circle moves). Use the up or down arrow button to
move up or down respectively. Use the left or right arrow buttons to move left
or right respectively.
To select an item you’ve highlighted (i.e., it has the circle next to it), press the
OK button.
Turn on the TV
To turn on the TV, press the ON•OFF button on the remote or the
POWER on the front of the TV (the POWER indicator on the front of the TV
lights).
F27TF12.01 Setup 7/19/01, 3:38 PM12
Chapter 1 13
Connections & Setup
Initial Setup
The first time you turn on your TV, you’ll be asked to set a few menu screens so that your TV will set up correctly.
Complete the following steps to set up your TV. The other options in the SET UP menu are explained in Chapter 4.
SELECT LANGUAGE
ENGLISH
ESPAÑ OL
FRANÇ AIS
NEXT
• [ , ] to move cursor
• [OK] to set
Select a Language
The first time you turn on the TV, the SELECT LANGUAGE menu appears on the
screen. If you want the on-screen menus to appear in English, press the OK
button on the remote control. If you want the on-screen menus to appear in a
different language, follow these steps.
1. Press the down arrow on the remote to highlight ESPANOL (Spanish) or
FRANCAIS (French).
2. Press OK to select the language.
3. Press the down arrow button to highlight NEXT, and press OK (a menu
appears asking you if you want to START AUTO PRESET?)
Note: If you need to change the language later, you can access this menu
from the Main menu - go to page 34 for instructions.
SELECT LANGUAGE
ENGLISH
ESPAÑ OL
FRANÇ AIS
NEXT
• [ , ] to move cursor
• [OK] to set
Auto Preset (Automatically Searching for Channels)
Auto Preset enables the TV to search for all of the channels that are viewable
through your cable TV connection or off-air antenna.
1. If you’ve connected your antenna or cable, press the OK button on the
remote (auto programming starts).
Note: If you want to stop the auto programming, press MENU.
When the search is complete the TV will automatically tune to the first channel
in the channel list.
PLEASE WAIT
AUTO PROGRAMMING
69
STOP:MENU
CONNECT ANTENNA OR CABLE
START AUTO PRESET?
NO :MENU
YES:OK
F27TF12.01 Setup 7/19/01, 3:38 PM13

14 Chapter 1
Connections & Setup
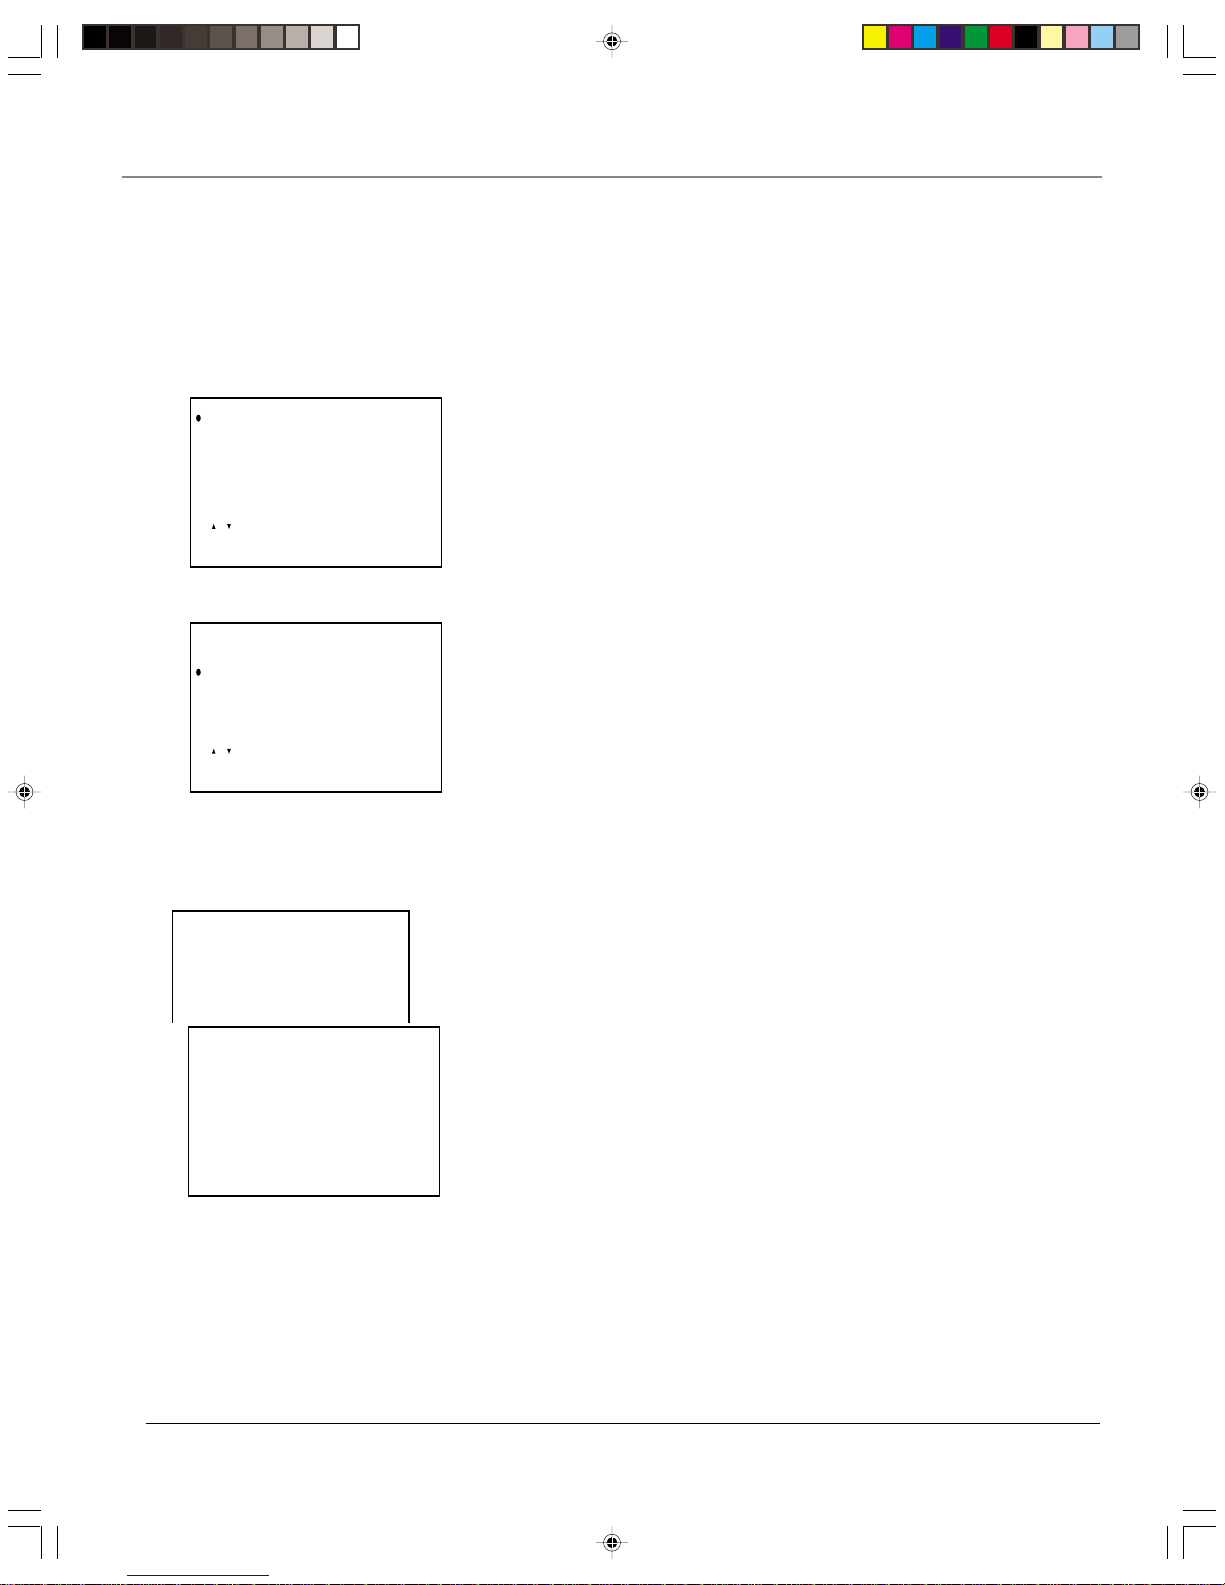
Add or Erase Channels
You might want to add or erase some channels if they’re inactive, have weak
signals, or you don’t want them in your channel list. The channel list is the list
of channels that the TV tunes to when you press the channel up and/or channel
down buttons.
Note: Even if you erase a channel, you can still tune to it by pressing the
number buttons on the remote control.
1. Press MENU on the remote (the main MENU appears).
2. Press down arrow button to highlight SET UP.
3. Press OK (the SET UP menu appears).
4. Press the down arrow button to highlight CH MEMORY.
5. Press OK (the CH MEMORY menu appears).
CH MEMORY
AIR 12
• [CH +/– ,0~9]to select
• [ ] to ADD
CH MEMORY
AIR 12
• [CH +/– ,0~9]to select
• [ ] to ERASE
• [ , ] to move cursor
• [OK] to set
SET UP
UNIVERSAL PLUS
BLUE SCREEN
AUTO PRESET
CABLE
CH SEARCH
CH MEMORY
RETURN
• [ , ] to move cursor
• [OK] to set
MAIN MENU
TIMER
VIDEO ADJUST
COMPONENT ADJ.
AUDIO ADJUST
CLOSED CAPTION
PARENT CONTROL
LANGUAGE
ENERGY SAVE
SET UP
6. Follow the on-screen directions to ADD or ERASE a channel (press CH+
and/or CH -, or the number buttons to make different channel numbers
appear).
• To add the channel that’s shown on the screen to the TV’s channel
memory, press the right arrow button.
• To erase the channel listed on the screen, press the left arrow button.
7. To exit, press MENU.
F27TF12.01 Setup 7/19/01, 3:38 PM14
 Loading...