

RCA TH17 Series, TH1702 Quick Start Manual
TH17 series
www.rcaaudiovideo.com
Congratulations on purchasing your new RCA Player.
Please read these instructions for quick tips on using the player.
Getting started
1. Install the battery into the player:
• Apply thumb pressure to slide the battery compartment cover
in the direction of the arrow, then remove the cover.
• Insert the supplied AAA battery, following the polarity marks
in the battery compartment.
• Replace the cover.
2. Rotate the USB plug out of the player
body and connect the player to your PC as
shown.
3. The RCA easyRip™ Media Software installer (stored in the player*) will launch automatically.
Click NEXT to begin the installation and follow the instructions to install the software on
your PC.
• RCA easyRip is currently not compatible with DRM les and Audiobooks.
• If the installer does not auto-launch, go to MyComputer in the Start menu, nd and
open the drive letter associated with the player (i.e. PEARL) and then double-click the
rcaeasyrip_setup le to launch the installer.
4. Transfer audio les to your player using either of the two methods below:
a) RC A easyRip: Helps to rip CD’s, create playlists, load content and manage your library with
an intuitive and modular design. Click the easyRip icon (
) on your PC desktop to launch
the software.
• For details in using RCA easyRip, click the Help icon (
) on the module dock.
Press and hold MENU.
In the Home menu, press
or to go back or
advance in the player menu and press + or – to
scroll up or down to the desired le
b) Windows Explorer: Simply drag and drop media les onto
the drive letter associated with the player.
• Your RCA Player is also compatible with most PC music
management softwares.
5. Disconnect the player from your PC by clicking the Safely Remove Hardware icon (
) in the system tray (located in the lower right corner of your screen) and selecting the
player from the list of devices, then unplug the player from the PC.
v2.0 (EN/E)
General controls
Audiovox Electronics Corp.,
150 Marcus Blvd., Hauppauge, NY 11788
© 2009 Audiovox Electronics Corp.
Trademark Registered
www.rcaaudiovideo.com
Printed in China
QuickStartGuide
Turn the player on/o
Navigate to an audio le
Press or
Press
at the playback (Now playing) screen,
press again to resume
Press + or – at the playback (Now playing) screen
Press
Press
within the rst 4 seconds of the current
audio le
Press and hold
or during playback
Press MENU
Slide “Lock/unlock” towards the ( ) icon
Refer to page 14-18 of the user manual
Remove and replace the battery
Play an audio le
Pause playback and show the Option menu
Adjust the volume
Skip to the next le (or section of
audiobooks*)
Skip to the previous le (or section of
audiobooks*)
Reverse or fast forward an audio le
Go to the Home menu (to access Music,
Audiobooks, Radio, Voice Memo, Favorites
and Settings)
Lock the keys
Delete les from the player
Reset the player
* Refer to the user manual for information on section skipping for audiobooks.
For information on new and upcoming products and to register your new player,
visit www.rcaaudiovideo.com.
Windows is a registered trademark of Microsoft Corporation in the United States and other countries.
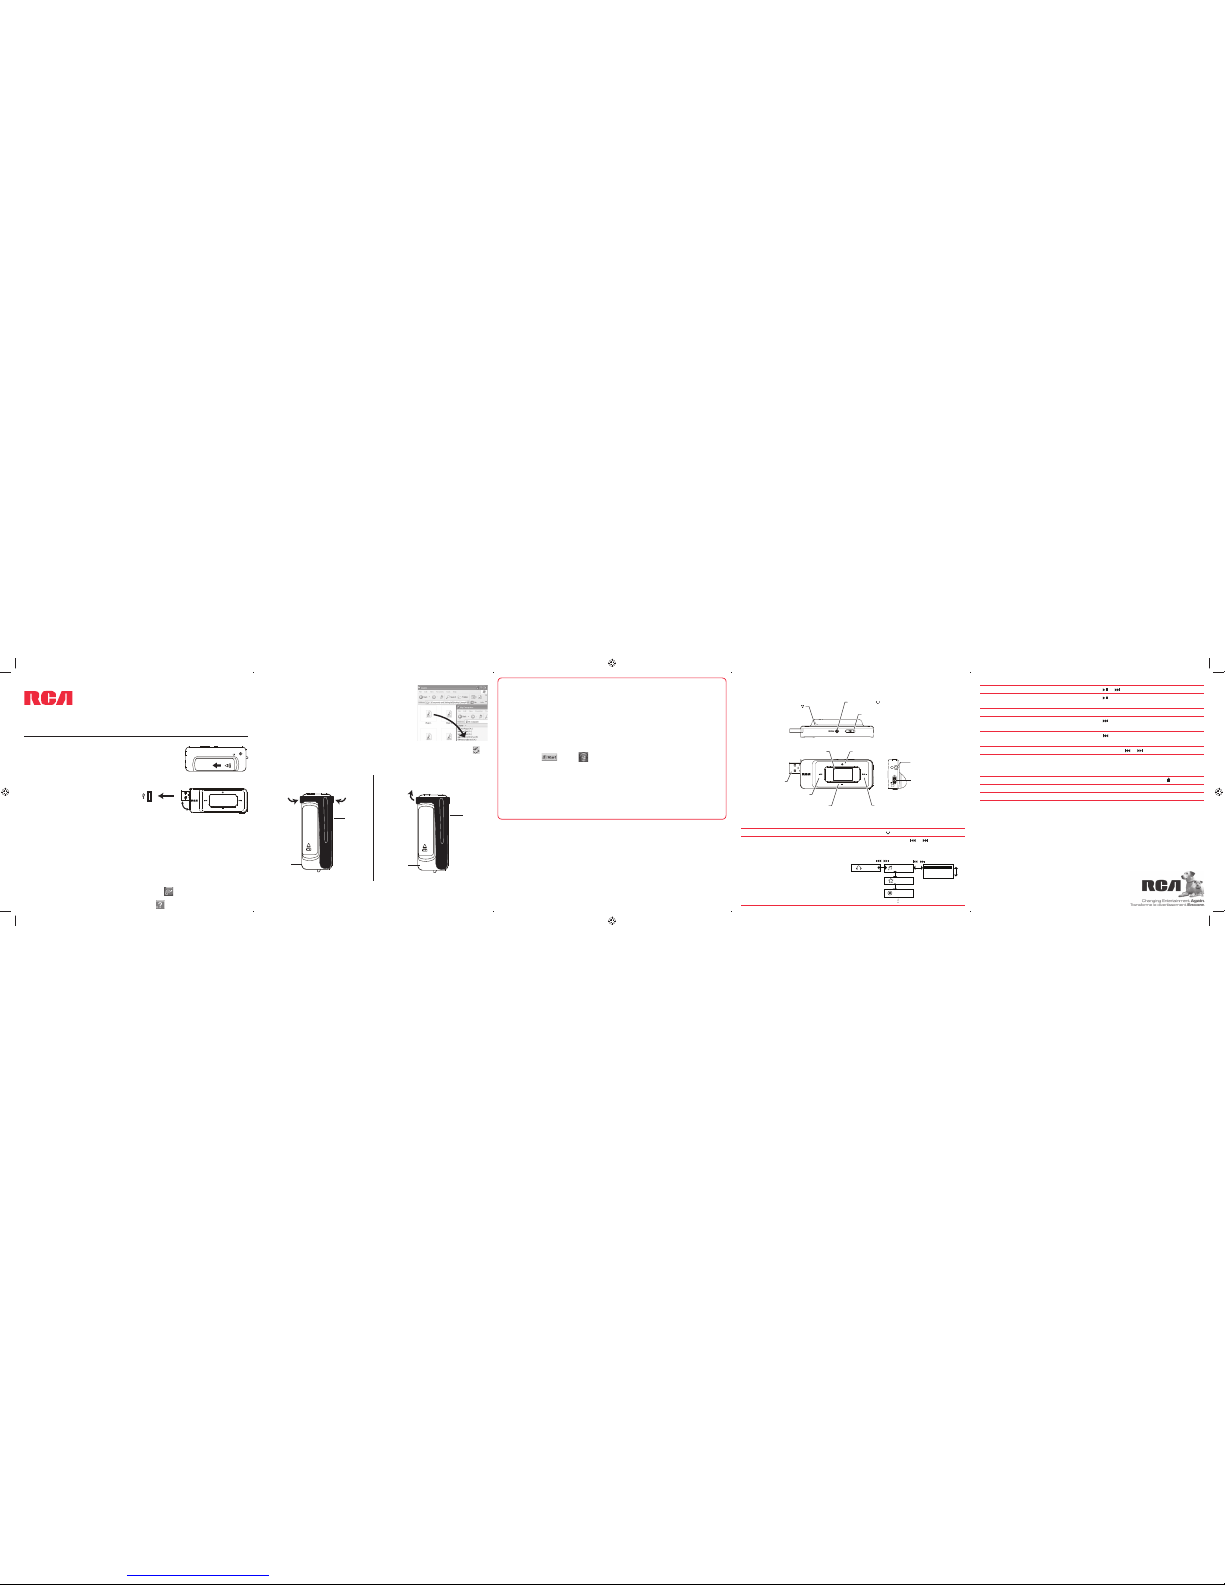
USB plug
Earphone jack
Lock/unlock
Power on/o ( )/display player menu
Microphone
Display
Play/pause (and show the Option menu)/
select menu option
Scroll up/increase volume
Scroll down/decrease volume
Skip back/reverse/menu back
Skip forward/fast forward/menu advance
USB port
on your PC
Music
Artists
Title 2
Title 3
Title 1
Albums
Titles
+/–
+/–
+/–
/
/
* The latest software can be downloaded from www.rcaaudiovideo.com.
Learn more about the player
• To view the user manual directly from the player:
Step 1: Click Start.
Step 2: Click My Computer (XP users) / Click Computer (Vista users).
Step 3: Righ-click the associated drive letter (i.e. PEARL) to show the option menu.
Step 4: From the option menu, select the user manual in your preferred language for
more information on the player’s features, safety and warranty information, and answers
to Frequently Asked Questions (FAQ’s).
•
To view the user manual on your PC:
If opted-in during installation, the user manual will also be available by clicking on the
Start menu (
in XP or in Vista ), clicking on All Programs, clicking on the RCA
directory, and then clicking on the appropriate manual.
• Keep player out of direct sunlight. Exposure to direct sunlight or extreme heat
(such as inside a parked car) may cause damage or malfunction.
Need more help? Do not return this product to the store.
Visit www.rcaaudiovideo.com for the latest rmware, RCA easyRip Media Software, user
manual and FAQ’s.
Installing the belt clip Removing the belt clip
Belt clip
Player
Lift up the
clip here
Belt clip
Player
Step 2:
Push here
until the
belt clip
completely
locks in
place
Step1:
Place the
belt clip
here
4. Trans era archivos de audio a su reproductor usando alguno de los dos métodos
siguientes:
a) RC A easyRip: ayuda a extraer CD’s, crear listas de reproducción, cargar contenido y
administrar su librería con un diseño intuitivo y modular. Haga click en el icono easyRip
(
) en el escritorio de su PC para lanzar el software.
• Haga click en el ícono Help (
) en el acoplador de módulo para aprender más acerca del
uso de RCA easyRip.
b) Windows Explorer: simplemente arrastre y suelte los archivos
de medios a la letra de la unidad asociada con el reproductor.
• Su reproductor RCA es compatible también con la mayoría del
software de administración de música de PC.
5. Desconecte al reproductor de su PC haciendo clic en el icono
Safely Remove Hardware
(
) en la bandeja de sistema (ubicada en la esquina inferior derecha de su pantalla) y
seleccione el reproductor de la lista de dispositivos, luego desconecte el reproductor de la PC.
v2.0 (EN/E)
Controles generales
Audiovox Electronics Corp.,
150 Marcus Blvd., Hauppauge, NY 11788
© 2009 Audiovox Electronics Corp.
Marca Registrada
www.rcaaudiovideo.com
Impreso en China
Guía de InicioRápido
Series TH17
www.rcaaudiovideo.com
Felicitaciones por la compra de su nuevo reproductor RCA.
Por favor lea estas instrucciones sobre tips rápidos para usar el reproductor.
Para comenzar
1. Instale la batería en el reproductor:
• Aplique la presión del dedo para deslizar la cubierta del
compartimiento de baterías en la dirección de la echa, luego
remueva la cubierta.
• Inserte la batería AAA suministrada, siguiendo las marcas de
polaridad en el compartimiento de la batería.
• Vuelva a colocar la cubierta.
2. Gire el conector USB fuera del cuerpo del
reproductor y conecte el reproductor a su PC
como se muestra.
3. El instalador del Software de Medios RCA easyRip™ (almacenado en el reproductor*) será
lanzado en forma automática.
Haga clic en NEXT para comenzar la instalación y siga las instrucciones para instalar el
software en su PC.
• RCA easyRip actualmente no es compatible con archivos DRM y Audiolibros.
• Si el instalador no inicia en forma automática, vaya a MyComputer en el menú de Inicio,
encuentre y abra la unidad con la letra asociada con el reproductor (por ejemplo, PEARL) y
luego haga doble click en el archivo rcaeasyrip_setup para lanzar el instalador.
Windows es una marca registrada de Microsoft Corporation en los Estados Unidos y otros países.
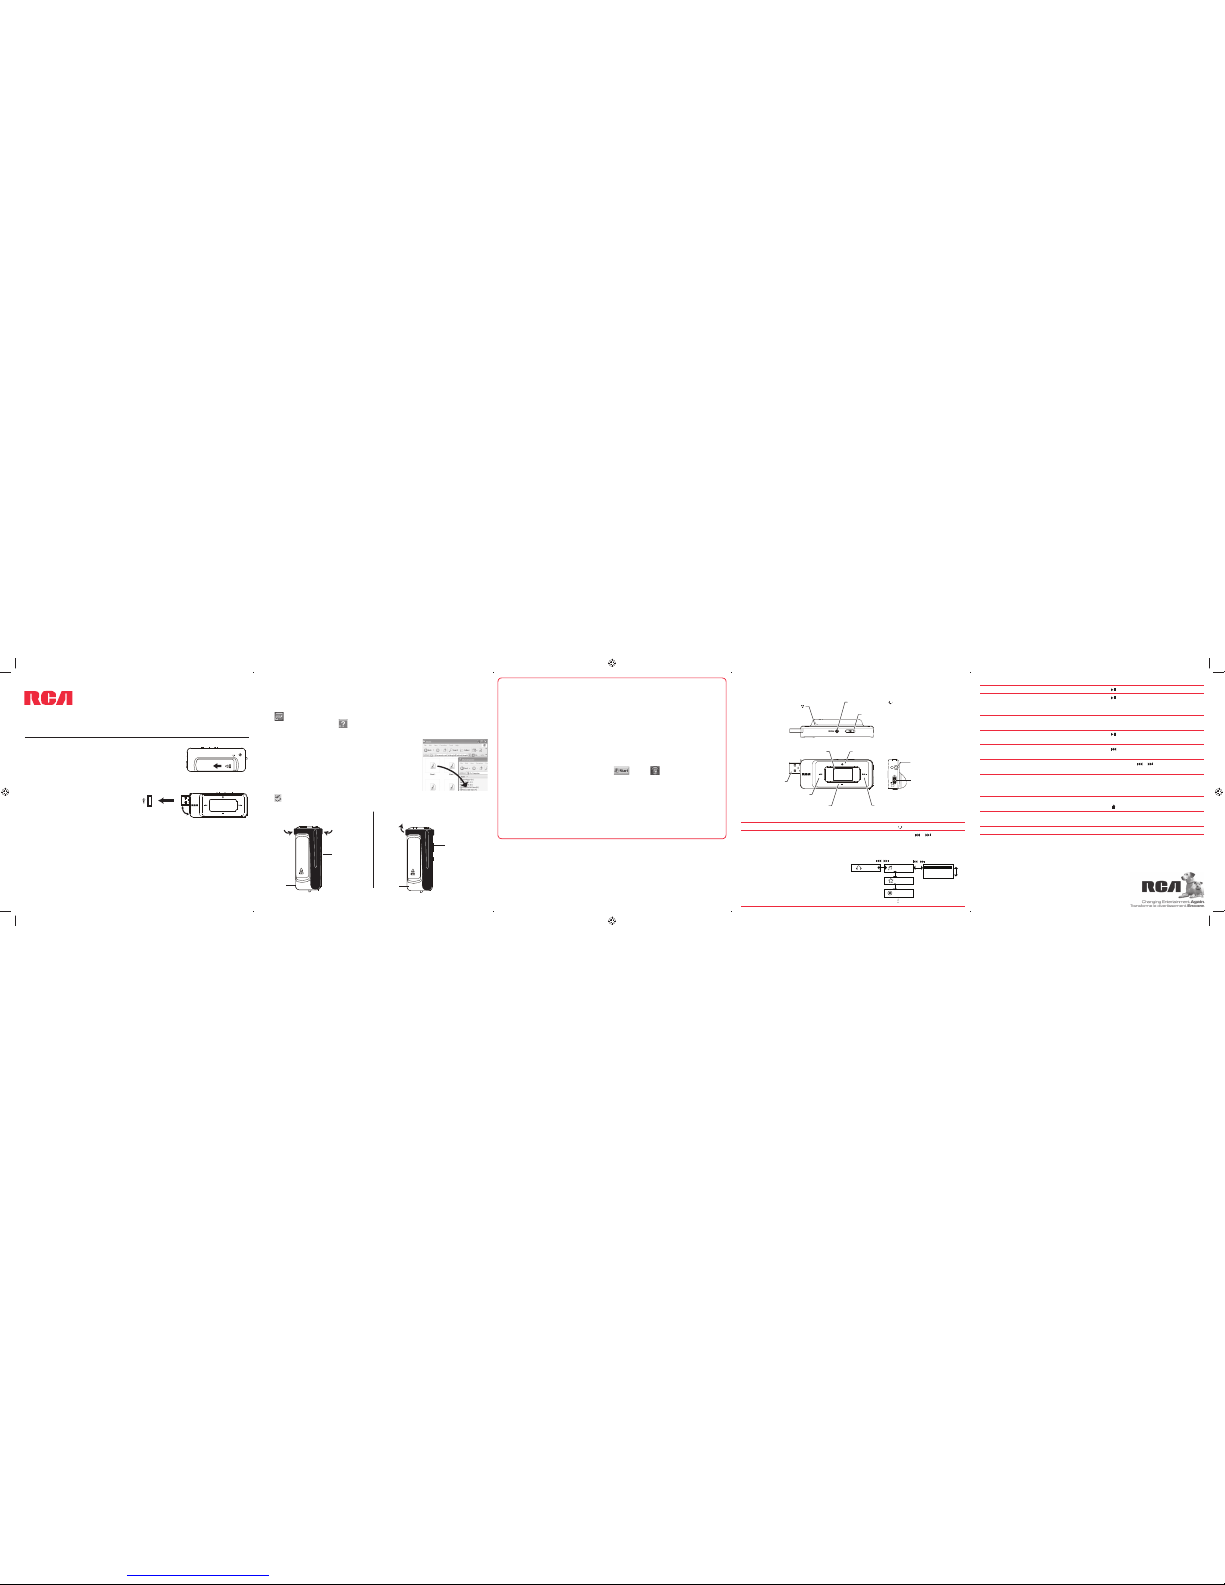
Conector USB
Micrófono
Pantalla
puerto USB
en su PC
Music
Artists
Title 2
Title 3
Title 1
Albums
Titles
+/–
+/–
+/–
/
/
* El software más reciente puede ser descargado desde www.rcaaudiovideo.com.
Aprenda más sobre reproductor
• Para ver el manual del usuario directamente desde el reproductor:
Paso 1: Inicio Rápido.
Paso 2: Haga click en Mi PC (usuarios de XP) / Haga click en Computadora (usuarios de
Vista).
Paso 3: haga click derecho en la letra de la unidad asociada (por ejemplo, PEARL) para
mostrar el menú de opciones.
Paso 4: desde el menú de opciones, seleccione el manual del usuario en su idioma
preferido, con el propósito de obtener más información sobre las características del
reproductor, sobre la garantía y seguridad, y respuestas a Preguntas Frecuentes (FAQ’s).
•
Para ver el manual del usuario en su:
Si en la instalación tuvo la opción para ello, el manual del usuario estará también
disponible haciendo click en el menú Inicio (
en XP o en Vista), haciendo click
en Todos los Programas, directorio RCA, o haciendo click en el manual apropiado.
• Mantenga el reproductor fuera de la luz directa del sol. La exposición a la luz solar
directa o calor extremo (tal como dentro de un automóvil estacionado) pueden
causar daño o mal funcionamiento.
¿Necesita más ayuda? No regrese este producto a la tienda.
Visite www.rcaaudiovideo.com/downloads para el rmware más reciente, Software de
Medios RCA easyRip, manual del usuario y Preguntas Frecuentes.
Receptáculo para
audífonos
Bloqueo/desbloqueo
Encendido/apagado (
) / visualiza el menú
del reproductor
Reproducir/pausar (y muestra la opción menú) /
seleccionar opción de menú
Desplazamiento hacia abajo/
decremento de volumen
Saltar atrás / reversa /
regresar a menú
Salto hacia adelante/avance rápido/
avance de menú
Desplaza hacia arriba/
incremento de volumen
Presione y sostenga MENU
En el menú Inicio, presione
ó para regresar
o avanzar en el menú reproductor y presione +
ó – para desplazarse arriba o abajo al archivo
Enciende / apaga el reproductor
Navegue a un archivos de audio
* Para información sobre la sección salto de audiolibros re érase al manual del usuario.
Para información sobre nuevos productos y para registrar su nuevo reproductor,
visite www.rcaaudiovideo.com.
Presione
Presione
en la pantalla de reproducción
(Reproduciendo ahora), presione otra vez para
reanudar
Presione + ó – en la pantalla de reproducción
(Reproduciendo ahora)
Presione
Presione
dentro de los primeros 4 segundos
del archivo de audio actual
Presione y sostenga
ó durante la
reproducción
Presione MENU
Deslice “Bloquear/Desbloquear” hacia
el ícono ( )
Re érase a la página 14-18 del manual del
usuario
Retire y reemplace la batería
Reproduce de un archivo de audio
Pausa la reproducción y muestra el menú
Opción
Ajusta el volumen
Salta al siguiente archivo (o sección de
audiolibros*)
Salta al siguiente previo (o sección de
audiolibros*)
Reversa o avance rápido de un archivo de
audio
Va al menú de Inicio (para accesar Música,
Audiolibros, Radio, Memo de Voz, Favoritos y
Con guraciones)
Bloquea las teclas
Elimina activos del reproductor
Reinicia el reproductor
Instalación del clip para cintura Para retirar el clip para cinturón
Clip para
cintura
Reproductor
Levante el
clip aquí
Clip para
cintura
Paso 2:
Empuje
aquí hasta
que el clip
quede
asegurado
por
completo
en su lugar
Paso1:
Coloque
aquí el clip
para
cinturón
Reproductor
 Loading...