

Page 1

user manual
TC1401
TC1402
It is important to read this instruction book prior to using your new product for the first time.
Page 2

Table of Contents
Important Information ............................................................................................................................... 4
End User License Agreement ..................................................................................................................... 6
Before You Begin ........................................................................................................................................ 8
Unpacking your player ..................................................................................................................... 8
Things to consider before you get started... .................................................................................. 9
Computer system requirements ............................................................................................ 9
Warning .................................................................................................................................. 9
Caution ................................................................................................................................... 9
Caution while driving ............................................................................................................ 9
Back up your data .................................................................................................................. 9
Getting Started ......................................................................................................................................... 10
Inserting the battery ...................................................................................................................... 10
Connecting to a computer .............................................................................................................10
Removing the player from your computer ................................................................................... 11
Powering on/off ............................................................................................................................. 12
Controls and Display ................................................................................................................................ 13
Controls ...........................................................................................................................................13
Display ............................................................................................................................................. 14
Transferring Music.................................................................................................................................... 15
Install WIndows Media Player ....................................................................................................... 15
Adding Audio Files to your Library ............................................................................................... 16
Converting CD Tracks to mp3 ........................................................................................................ 17
Converting CD Tracks to wma ....................................................................................................... 19
Transferring Audio Files to your Player.........................................................................................20
Editing Lyrics ...................................................................................................................................21
Deleting files from the player ....................................................................................................... 21
Using the Player as a Mass Storage Device ............................................................................................ 22
Performing a Backup ..................................................................................................................... 23
2
Page 3

Table of Contents
Creating Playlist Folders........................................................................................................................... 24
Playback .................................................................................................................................................... 25
Listening to your mp3/wma files ................................................................................................... 25
Volume ............................................................................................................................................ 25
Locking your Player ........................................................................................................................ 25
Synchronizing Lyrics Display .......................................................................................................... 26
File Browsing ............................................................................................................................................ 27
Menu Structure .............................................................................................................................. 27
Navigation ...................................................................................................................................... 27
Recording .................................................................................................................................................. 29
Recording from the Built-in Microphone ..................................................................................... 29
Adjusting Recording Settings ........................................................................................................ 29
Playback of Voice Recording ......................................................................................................... 30
Settings ..................................................................................................................................................... 31
Adjusting Settings .......................................................................................................................... 31
Equalizer ......................................................................................................................................... 31
Repeat Mode .................................................................................................................................. 31
Contrast .......................................................................................................................................... 32
Backlight ......................................................................................................................................... 32
Power Saving .................................................................................................................................. 32
Default Settings .............................................................................................................................. 33
Language ........................................................................................................................................ 33
Information about the Player ........................................................................................................ 33
Advanced Features ................................................................................................................................... 34
Upgrading your Player ................................................................................................................... 34
Formatting the player .................................................................................................................... 35
Additional Information ............................................................................................................................ 36
Troubleshooting ............................................................................................................................. 36
Specifications .................................................................................................................................. 37
Limited warranty ............................................................................................................................ 39
3
Page 4
Important Information
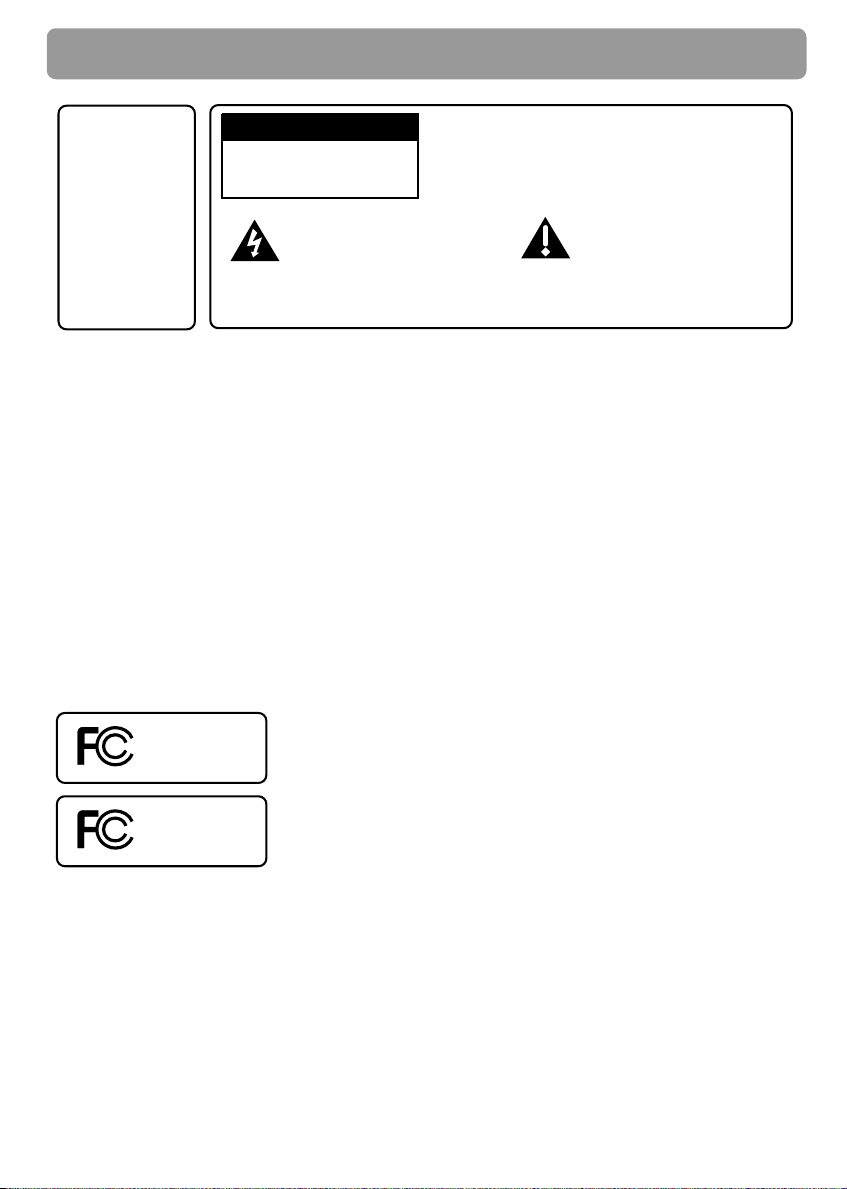
WARNING
To reduce the
risk of fire or
electric shock,
do not expose
this product to
rain or
moisture.
To reduce risk of injury, charge only rechargeable batteries recommended by the manufacturer
for this player. Other types of batteries may burst causing damage and personal injury.
CAUTION
RISK OF ELECTRIC SHOCK
DO NOT OPEN
This symbol indicates
"dangerous voltage" inside
the product that presents a
risk of electric shock or
personal injury.
To reduce the risk of electric shock, do not
remove cover (or back). No user serviceable
parts inside. Refer servicing to qualified
service personnel.
This symbol indicates
important instructions
accompanying the
product.
Technical specification
Product: RCA player
Brand: RCA
Model: TC1401/TC1402
Electrical rating
DC : 1.5V AAA/LR03 battery
ESD Remark:
In case of misfunction due to electrostatic discharge just reset the product (disconnect and
reconnect of the power source may be required) to resume normal operation.
4
RCA
TC1401
RCA
TC1402
Page 5

Important Information
FCC Regulations state that unauthorized
changes or modifications to this equipment
may void the user’s authority to operate it.
FEDERAL COMMUNICATIONS COMMISSION
INFORMATION
This device complies with Part 15 of the FCC
Rules. Operation is subject to the following two
conditions: (1) This device may not cause
harmful interference, and (2) this device must
accept any interference received, including
interference that may cause undesired
operation.
This equipment has been tested and found to
comply with the limits for a Class B digital
device, pursuant to Part 15 of FCC Rules. These
limits are designed to provide reasonable
protection against harmful interference in a
residential installation. This equipment
generates, uses, and can radiate radio
frequency energy and, if not installed and used
in accordance with the instructions, may cause
harmful interference to radio communications.
However, there is no guarantee that
interference will not occur in a particular
installation. If this equipment does cause
harmful interference to radio or television
reception, which can be determined by turning
the equipment off and on, the user is
encouraged to try to correct the interference
by one or more of the following measures
• Reorient or relocate the receiving antenna.
• Increase the separation between the
equipment and receiver.
• Connect the equipment into an outlet on a
circuit different from that to which the
receiver is connected.
• Consult the dealer or an experienced radio/
TV technician for help.
This Class B digital apparatus complies with
Canadian ICES-003.
Cet appareil numérique de la class B est
conforme à la norme du NMB-003 du Canada
Manufacturer/Responsible Party
Thomson, Inc.
P.O. Box 1976
Indianapolis, IN 46206-1976
(317) 587-3001
In accordance with FCC requirements, changes
or modifications not expressly approved by
Thomson Inc. could void the user’s authority to
operate this product.
5
Page 6

End User License Agreement
IMPORTANT: READ CAREFULLY BEFORE DOWNLOADING
OR INSTALLING THIS SOFTWARE!
THIS END USER LICENSE AGREEMENT (THIS “EULA”) IS A LEGAL
AGREEMENT BETWEEN YOU AND THOMSON INC., OR ANY
THOMSON GROUP ENTITY, AS DEFINED BELOW (COLLECTIVELY
“THOMSON ENTITY”), FOR THE RCA OR THOMSON BRANDED
PORTABLE DIGITAL AUDIO/VIDEO DEVICE APPLICATION/DRIVER
SOFTWARE PROGRAM AND ASSOCIATED DOCUMENTATION, IF
ANY (COLLECTIVELY, THE “PROGRAM”). THIS EULA CONTAINS
IMPORTANT LEGAL LIMITATIONS, RESTRICTIONS AND
DISCLAIMERS, AND ALSO SPECIFIES THE DURATION OF YOUR
LICENSE.
BY INSTALLING THE PROGRAM OR CLICKING ON THE
ACCEPTANCE BUTTON OF THE PROGRAM, COPYING OR
OTHERWISE USING THE PROGRAM, YOU ACKNOWLEDGE AND
AGREE THAT YOU HAVE READ THIS EULA, UNDERSTAND IT,
AND AGREE TO BE BOUND BY ITS TERMS AND CONDITIONS.
YOU MAY USE THE PROGRAM ONLY IN ACCORDANCE WITH
THIS EULA, AND ANY SUCH USE IS HEREBY UNDERSTOOD TO
BE CONDITIONAL UPON YOUR SPECIFIC AGREEMENT TO THE
UNMODIFIED TERMS SET FORTH HEREIN. IF YOU DO NOT
AGREE WITH ALL OF THE TERMS OF THIS EULA, CLICK ON THE
REJECTION BUTTON AND/OR DO NOT INSTALL THE PROGRAM
AND/OR DO NOT USE THE PROGRAM.
1. LICENSE
(a) Under this EULA, you are granted a license (i) to use the
Program on a single workstation, and (ii) to make one (1) copy
of the Program into any machine-readable form for backup of
the Program, provided the copy contains all of the original
Program's proprietary notices.
(b) You may transfer the Program and license to another party
only as a part of the Thomson/RCA branded Portable Digital
Audio/Video Device (“A/V Device”), and only if the other party
agrees to accept the terms and conditions of this EULA. If you
transfer the Program, you must at the same time either
transfer all copies to the same party or destroy any copies not
transferred.
(c) The terms of this EULA will govern any software upgrades
or updates provided by THOMSON Entity that replace and/or
supplement the original Program, unless such upgrade or
update is accompanied by separate license terms and
conditions in which case the terms of that separate license will
govern. You acknowledge and agree that THOMSON Entity
may automatically download upgrades or updates to the
Program software to your computer in order to update,
enhance, and/or further develop the Program.
2. LICENSE RESTRICTIONS
(a) Except for the licenses expressly granted to you in this
EULA, no other licenses or rights are granted or implied.
(b) You may not (i) make the Program available over a network
where it could be used by multiple computers at the same
time; (ii) modify, translate, reverse engineer, decompile,
disassemble (except to the extent that this restriction is
expressly prohibited by law), or create derivative works based
upon the Program; or (iii) copy the Program, except as
expressly permitted herein. You agree that you shall only use
the Program in a manner that complies with all applicable laws
in the jurisdictions in which you use the Program, including,
but not limited to, applicable restrictions concerning copyright
and other intellectual property rights.
(c) The Program may contain pre-release code that does not
perform at the level of a final code release. In such case, the
6
Program may not operate properly. Updated versions of the
Program may be downloaded from www.rcaaudiovideo.com/
digitalaudiosupport.
(d) THOMSON Entity is not obligated to provide support
services for the Program.
(e) The Program is provided with “RESTRICTED RIGHTS”. Use,
duplication, or disclosure by the U.S. Government is subject to
restrictions as set forth in subparagraph (c)(1)(ii) of DFARS
252.227-7013, or FAR 52.227-19, or in FAR 52.227-14 Alt. III, as
applicable.
3. TERM AND TERMINATION
(a) Your license is effective on the date you accept this EULA
and remains in effect until this EULA is terminated by either
party.
(b) You may terminate this EULA and the associated license,
without any notice or delay, by destroying or permanently
erasing the Program and all copies thereof.
(c) If you fail to comply with any of the terms of this EULA, in
whole or part, your license will automatically terminate
without notice from THOMSON Entity.
(d) Upon termination of this EULA and your associated license,
you shall cease all use of the Program and destroy or
permanently erase the Program and all full or partial copies
thereof.
4. WARRANTY DISCLAIMER
THE PROGRAM IS PROVIDED “AS IS” WITHOUT WARRANTY OF
ANY KIND, EITHER EXPRESSED OR IMPLIED, INCLUDING, BUT
NOT LIMITED TO THE IMPLIED WARRANTIES OF
MERCHANTABILITY, FITNESS FOR A PARTICULAR PURPOSE,
TITLE OR NON-INFRINGEMENT. THE ENTIRE RISK AS TO THE
QUALITY AND PERFORMANCE OF THE PROGRAM IS WITH YOU.
SHOULD THE PROGRAM PROVE DEFECTIVE, YOU (AND NOT
THOMSON ENTITY, ITS SUPPLIERS, OR ITS DEALERS) ASSUME
THE ENTIRE COST FOR ALL NECESSARY REPAIR OR
CORRECTION.
This exclusion of warranty may not be allowed under some
applicable laws. As a result, the above exclusion may not apply
to you, and you may have other rights depending on the law
that applies to you.
5. OWNERSHIP RIGHTS
All title and intellectual property rights in and to the Program
and any copies thereof are owned by THOMSON Entity or its
suppliers. All title and intellectual property rights in and to the
content which may be accessed through use of the Program is
the property of the respective content owner and may be
protected by applicable copyright or other intellectual property
laws and treaties. This license grants you no rights to use such
content.
6. LIMITATION OF LIABILITY
(a) TO THE MAXIMUM EXTENT PERMITTED BY APPLICABLE
LAW, IN NO EVENT SHALL THOMSON ENTITY, OR ITS DEALERS
BE LIABLE FOR ANY SPECIAL, INCIDENTAL, INDIRECT, OR
CONSEQUENTIAL DAMAGES WHATSOEVER (INCLUDING,
WITHOUT LIMITATION, DAMAGES FOR LOSS OF PROFITS,
BUSINESS INTERRUPTION, CORRUPTION OF FILES, LOSS OF
BUSINESS INFORMATION, OR ANY OTHER PECUNIARY LOSS)
REGARDLESS OF CAUSE OR FORM OF ACTION, INCLUDING
CONTRACT, TORT, OR NEGLIGENCE, ARISING OUT OF YOUR USE
OF OR INABILITY TO USE THE PROGRAM, EVEN IF THOMSON
ENTITY HAS BEEN ADVISED OF THE POSSIBILITY OF SUCH
DAMAGES. BECAUSE SOME STATES AND JURISDICTIONS DO
Page 7

End User License Agreement
NOT ALLOW THE EXCLUSION OR LIMITATION OF LIABILITY OF
CONSEQUENTIAL OR INCIDENTAL DAMAGES, THE ABOVE
LIMITATION MAY NOT APPLY TO YOU.
(b) YOU ASSUME RESPONSIBILITY FOR THE SELECTION OF THE
APPROPRIATE PROGRAM TO ACHIEVE YOUR INTENDED
RESULTS, AND FOR THE INSTALLATION, USE, AND RESULTS
OBTAINED.
7. WINDOWS MEDIA
The software embedded within your A/V Device (the “Device
Firmware”) contains software licensed from Microsoft that
enables you to play Windows Media Audio (WMA) files (“WMA
Software”). The WMA Software is licensed to you for use with
your A/V Device under the following conditions. By installing
and using this version of the Device Firmware, you are
agreeing to these conditions. IF YOU DO NOT AGREE TO THE
END USER CONDITIONS OF THIS SECTION 7, DO NOT INSTALL
OR USE THIS VERSION OF THE DEVICE FIRMWARE.
The WMA Software is protected by copyright and other
intellectual property laws. This protection also extends to
documentation for the WMA Software, whether in written or
electronic form.
GRANT OF LICENSE. The WMA Software is only licensed to you
as follows:
You may use this version of the Device Firmware containing
the WMA Software only as such use relates to your A/V Device.
You may not reverse engineer, decompile, or disassemble the
WMA Software, except and only to the extent that such
activity is expressly permitted by applicable law.
You may transfer your right to use the Device Firmware only as
part of a sale or transfer of your A/V Device, on the condition
that the recipient agrees to the conditions set forth herein. If
the version of the Device Firmware that you are transferring is
an upgrade, you must also transfer all prior versions of the
Device Firmware that you have which include the WMA
Software.
MICROSOFT IS NOT PROVIDING ANY WARRANTY OF ANY KIND
TO YOU FOR THE WMA SOFTWARE, AND MICROSOFT MAKES
NO REPRESENTATION CONCERNING THE OPERABILITY OF THE
WMA SOFTWARE.
The WMA Software is of U.S. origin. Any export of this version
of the Device Firmware must comply with all applicable
international and national laws, including the U.S. Export
Administration Regulations, that apply to the WMA Software
incorporated in the Device Firmware.
Content providers are using the digital rights management
technology for Windows Media contained in your A/V Device
(“WM-DRM”) to protect the integrity of their content (“Secure
Content”) so that their intellectual property, including
copyrights, in such content is not misappropriated. Your A/V
Device uses WM-DRM software to play Secure Content (“WMDRM Software”). If the security of the WM-DRM Software in
your A/V Device has been compromised, owners of Secure
Content (“Secure Content Owners”) may request that
Microsoft revoke the WM-DRM Software’s right to acquire new
licenses to copy, display, and/or play Secure Content.
Revocation does not alter the WM-DRM Software's ability to
play unprotected content. A list of revoked WM-DRM
Software is sent to your A/V Device whenever you download a
license for Secure Content from the Internet or from a
computer. Microsoft may, in conjunction with such license, also
download revocation lists onto your A/V Device on behalf of
Secure Content Owners.
8. THIRD PARTY SOFTWARE
ANY THIRD PARTY SOFTWARE THAT MAY BE PROVIDED WITH
THE PROGRAM IS INCLUDED FOR USE AT YOUR OPTION. IF
YOU CHOOSE TO USE SUCH THIRD PARTY SOFTWARE, THEN
SUCH USE SHALL BE GOVERNED BY SUCH THIRD PARTY'S
LICENSE AGREEMENT, AN ELECTRONIC COPY OF WHICH WILL
BE INSTALLED IN THE APPROPRIATE FOLDER ON YOUR
COMPUTER UPON INSTALLATION OF THE SOFTWARE.
THOMSON ENTITY IS NOT RESPONSIBLE FOR ANY THIRD
PARTY’S SOFTWARE AND SHALL HAVE NO LIABILITY FOR
YOUR USE OF THIRD PARTY SOFTWARE.
9. GOVERNING LAW
If you acquired this A/V Device in the United States, this EULA
shall be governed and construed in accordance with the laws
of the State of Indiana, U.S.A. without regard to its conflict of
laws principles. If you acquired this A/V Device outside the
United States or the European Union, then local law may
apply.
10. GENERAL TERMS
This EULA can only be modified by a written agreement signed
by you and THOMSON Entity, and changes from the terms and
conditions of this EULA made in any other manner will be of
no effect. If any portion of this EULA shall be held invalid,
illegal, or unenforceable, the validity, legality, and
enforceability of the remainder of the Agreement shall not in
any way be affected or impaired thereby. This EULA is the
complete and exclusive statement of the agreement between
you and THOMSON Entity, which supersedes all proposals or
prior agreements, oral or written, and all other
communications between you and THOMSON Entity, relating
to the subject matter of this hereof. “THOMSON Group
Entity” when used in this EULA shall mean any person,
corporation, or other organization, domestic or foreign,
including but not limited to subsidiaries, that is directly or
indirectly controlled by Thomson S.A. For purposes of this
definition only, the term “control” means the possession of
the power to direct or cause the direction of the management
and policies of an entity, whether by ownership of voting stock
or partnership interest, by contract, or otherwise, including
direct or indirect ownership of more than fifty percent (50%)
of the voting interest in the entity in question.
7
Page 8
Before You Begin
Dear RCA Customer,
Thank you for purchasing the RCA Player. This player will play open mp3 and Windows Media™
audio (WMA) content as well as content purchased from most online music download services.
After purchasing and downloading music to your PC, you are now ready to move content to your
player. To transfer the music to your player, you may use Windows Media Player or the application
recommended by the online music download service.
(Note: Services and applications must be Windows Media audio-compliant and support Digital
Rights Management. Windows XP (SP1 or higher) required.)
Unpacking your player
Your player came with everything you need to make music portable — all of the items shown
below should have been packed in the box with your player.
• RCA Player
•1 x AAA battery
• Quick Start Guide
• Earphones
• User Manual Softcopy
This document is stored inside the player and can be downloaded at
http://www.rcaaudiovideo.com/downloads
Explore a world of accessories! Jump on the Internet and go to
discover the additional accessories that are available for your player.
Illustrations contained within this publication are for representation only and subject to change.
8
www.rcaaudiovideo.com to
Page 9

Before You Begin
Things to consider before you get started...
Computer system requirements
• Pentium III 500MHz or higher recommended
• Microsoft Windows® XP or Windows® 2000
• Internet Explorer 6.0 or higher
• Internet access (broadband recommended)
• 250MB free hard disk space for the software
• 128MB RAM (256MB recommended)
• CD drive capable of digital audio extraction
• USB port (2.0 recommended)
• Sound card
Warning
Use of this player is for your personal use only. Unauthorized recording or duplication of
copyrighted material may infringe upon the rights of third parties and may be contrary to
copyright laws.
Caution
• Keep player out of direct sunlight. Exposure to direct sunlight or extreme heat (such as inside a
parked car) may cause damage or malfunction.
• Do not expose to rain or moisture.
Caution while driving
Use of headphones while operating an automobile or moving vehicle is not recommended and is
unlawful in some states and areas. Be careful and attentive on the road. Stop operation of the
player if you find it disruptive or distracting while driving.
Back up your data
As with any portable device with internal memory or storage, you must back up the data
regularly. RCA and Thomson are not responsible for lost data.
Windows is a registered trademark of Microsoft Corporation in the United States and other
countries.
9
Page 10
Getting Started
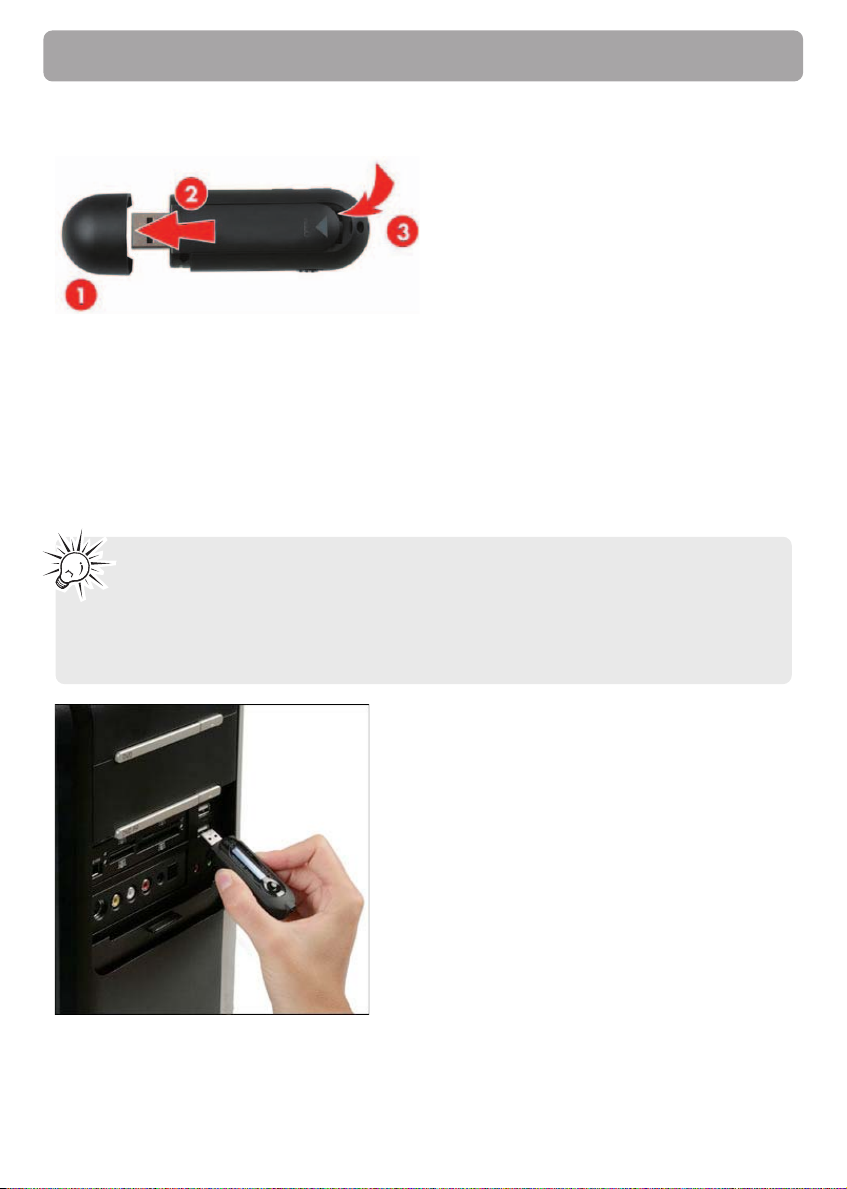
Installing the Battery
1. Remove the USB port cover.
2. Push and slide out the battery compartment cover.
3. Install the battery. Match the + and - signs on the battery to the signs on the battery
compartment.
4. Re-install the battery compartment cover.
Connecting to the Computer
Caution: BEFORE YOU START
• Make sure that the player is off and disconnect the earphones.
• Make sure the player is not locked. If the player is locked while you power it on, the
screen displays “Locked” and the player will automatically power off after a few
seconds.
10
Page 11
Getting Started
1. Remove the USB port cover and disconnect the earphones.
2. Connect the player to one of your computer’s USB ports.
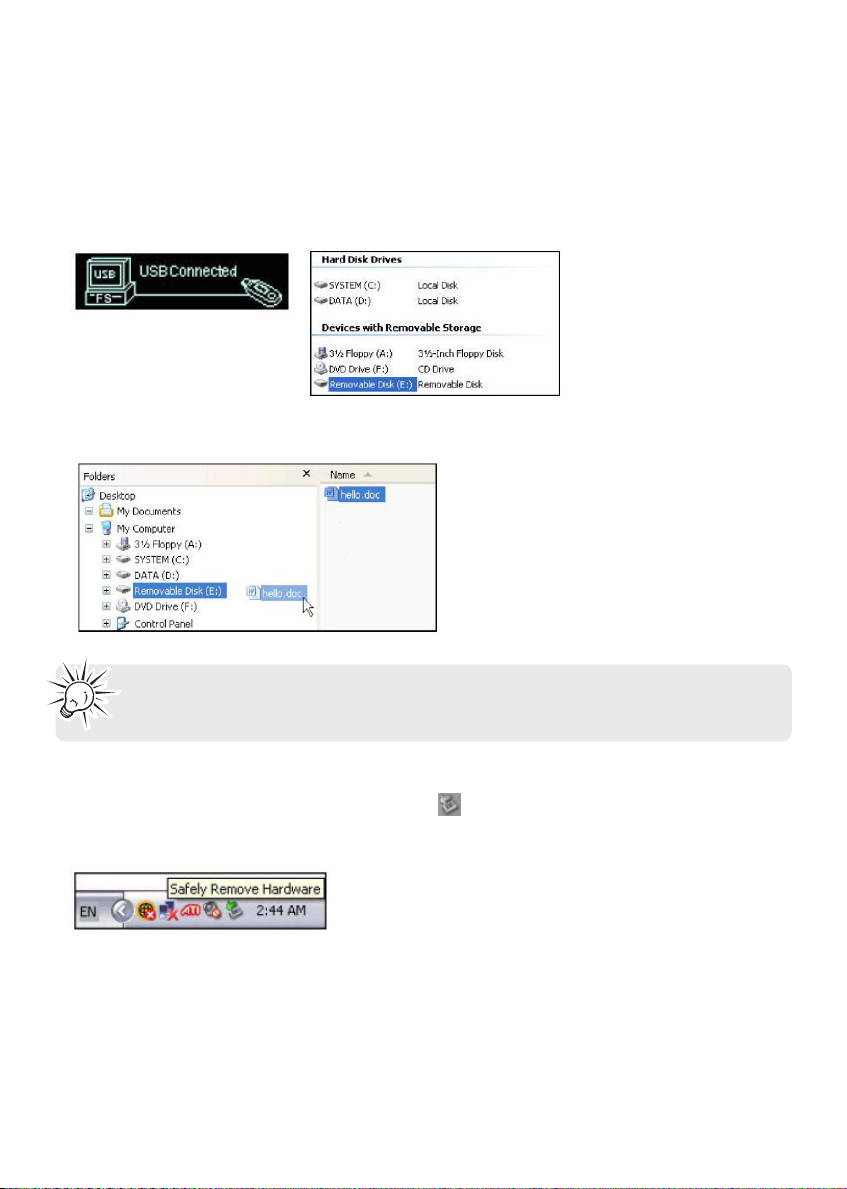
3. The screen displays “USB Connected”, indicating that the player is in USB mode.
4. On your computer’s desktop, right-click on the My Computer icon and select Explore. The
player will be automatically recognized as a removable media device (Microsoft® Windows®
2000 and XP).
5. Transfer files to or from the player using Windows Explorer. To do so, drag and drop your files
to the player as shown below:
Note: You can also organize your music files into folders before transferring them to
your player. – refer to page 24.
Removing the player from your computer
1. Right-click on the Safely Remove Hardware icon in the taskbar (next to the clock).
2. Click on Safely Remove USB Mass Storage Device.
3. Wait until a Safe to Remove Hardware message is displayed.
4. Remove the player.
11
Page 12

Getting Started
Powering ON/OFF
Caution: Before turning on the player, make sure the player is not locked. If your
player is locked when you power it on, the screen displays “Locked” and your player
automatically turns off after a few seconds. To unlock it, simply slide the hold switch
backwards.
•To power on your player, press
•To power off, press and hold until the progress bar is full and the screen turns black.
briefly .
Caution
• When storing the unit, be sure to remove the battery because it may leak and
damage the unit.
• Batteries may leak electrolyte if inserted incorrectly, if disposed of in fire, or if an
attempt is made to charge a battery not intended to be recharged.
• Discard leaky batteries immediately. Leaking batteries may cause skin burns or other
personal injury.
• Do not charge batteries which are not intended to be recharged.
• Dispose of batteries, according to federal, state and local regulations.
Caution:
• Risk of explosion if battery is replaced by an incorrect type.
• Dispose of used batteries according to the instructions.
12
Page 13

Controls and Display
Controls
3
1
4
5
2
12
6
9
7
10
8
13
11
1. HOLD (hold switch)
• Slide to lock the controls and prevent any accidental operation while recording or playing.
• Slide backward to unlock.
2. MIC Microphone
3. Play / Pause / Power On
• Press to turn the player on.
• In playback mode, press to play a track. During playback, press to pause and again to resume
playback.
• In browsing mode, slide up/down/right/left to scroll.
4. + Volume up
• Slide the button to + to increase the volume level.
5.
Skip backward / Fast rewind
• Slide the button to to go to the previous file/menu item; slide and hold to fast-rewind a
file.
6.
Skip Next / Fast Forward
• Slide the
button to to go to the next file/menu item; slide and hold to fast-forward a file.
13
Page 14

Controls and Display
7. – Volume down
• Slide the button to – to decrease the volume level.
8. USB Port Cover
9. M Menu button
• Press to access the Main Menu (Music, Record, Voice, Navigation, Settings).
10.
Stop / Power Off
• Press to stop playback. Press and hold to turn the player off.
11.Battery compartment
12.Headphone jack
13.Neck strap hole
Display
1. Play/Pause/Stop/Rec status
2. File number / Total files
3. Repeat mode
4. Equalizer mode
5. Synchronous lyric display
6. Battery indicator
7. Elapsed time / Total file time
8. ID3 Tag (track name/lyrics) display
9. Music type
10.Music mode/Voice mode
11.Hold icon
12.Volume
14
Page 15

Transferring Music
Installing Windows Media Player
It is recommended that you install Windows Media Player to enjoy all the features of your player:
Download the appropriate version from Microsoft’s website:
1. In “Select Download”, choose Windows Media Player.
2. In “Select Version”, select the appropriate version:
Player 10 (for Windows XP)
Player 9 Series (for 2000)
3. Follow the instructions to finish the download.
4. Once the download is completed, double-click on the “exe” file to start the installation.
Windows Media Player 10 Overview
1. Now Playing Watch/listen to currently playing media.
2. Library Create playlists and manage your media files.
3. Rip Copy CD Audio tracks to WMA format.
4. Burn Copy MP3/WMA tracks to a recordable CD.
5. Sync Copy MP3 or WMA tracks to your player.
6. Guide Search for media (music, movies, etc.) online.
15
Page 16

Transferring Music
Note: The instructions below apply to Windows Media Player 10. If you are using
another version, please refer to the Help section on your program.
Adding Audio Files to your Media Library
Windows Media Player will automatically gather all mp3 and/or wma files on your computer into a
media library, where they can be played, edited, burned to CD, or copied to your digital audio
player.
1. On your computer, open Windows Media Player 10 and click on the small triangle in the upper
right corner. Select Tools and then click on Search for Media Files. Alternatively, press the F3 key
on your keyboard.
2. In the “Look in:” dialog box, browse to the drive and folder where your music files are stored.
3. Click on Search.
4. Windows Media Player will automatically add all files in the selected folder(s) to your library.
5. When searching is complete, click on Close.
16
Page 17

Transferring Music
Converting CD tracks to MP3
Converting CD tracks to mp3 is often called “ripping a CD”. Use Windows Media Player to build
your music library by encoding your audio CDs to music files.
1. On your computer, open Windows Media Player 10 and click on the small triangle in the upper
right corner. From this menu, select Tools and then Options....
2. In the Options dialogue box, click on the Rip Music tab.
Under Rip settings, set the Format to mp3.
Under Audio quality, you can set the recording quality by dragging the slider. By default, it is
set to smallest size. This quality will be sufficient for your mp3 player. You can set the quality to
a higher setting, but then you can store fewer songs on your player.
3. Click on OK to confirm.
17
Page 18

Transferring Music
Note: WMP10 is now properly set up to convert audio tracks from CD to mp3 files.
WMP10 can also retrieve the album, title, artist name and track names from the
Internet. This kind of information, also called ID3 tag, will automatically be added if you
have an active Internet connection, or you can add it manually. This information, which will
be embedded in the mp3 or wma files, will be used to store the files in their own folders with
clear names.
4. To start ripping your CD to mp3 audio files, insert an Audio CD into the CD or DVD drive on
your computer. The following window should appear, allowing you to choose among several
options:
5. Select Rip music from CD using Windows Media Player. WMP will automatically start ripping all
audio tracks from the CD to your My Music folder. Inside this folder, it will automatically create
a sub-folder for the artist name and a second folder with the album title.
6. In case you do not get this screen, perform the following steps to start the process:
• Start Windows Media Player 10 and click on the Rip tab in the top button bar. The contents of
the CD will be displayed. By default, all tracks are checked. Uncheck any track you do not want
to encode into a music file.
• Click on the Rip Music button to begin encoding the selected tracks.
18
Page 19

Transferring Music
7. Once all the tracks are “Ripped to library”, the CD can safely be taken out from your drive.
8. When finished, Windows Media Player will automatically add the new tracks to your library.
You can change your track encoding options by selecting Tools > Options > Rip Music.
Converting CD tracks to WMA
By default, Windows Media Player 10 will convert your audio tracks to WMA file format (Windows
Media Audio).
WMA is very similar to MP3 and the MP3 player described here supports WMA-playback.
The process to convert an audio CD to WMA tracks is almost identical to Windows Media Player
10, except for the names used. The option “Rip Music” is called “Copy from CD”. The option to
start ripping directly after inserting a CD is not available on Windows 2000.
If you encounter problems to playback WMA files on the player, try the following setting and then
transfer the WMA files to the player again.
1. Connect the player to your computer.
2. In the Windows Media Player, select Tools and then Options.
3. Select the Device tab.
4. Highlight this player “RCA_MPCF2488_US” in the device list and then click Properties.
5. Select the Quality tab.
6. Uncheck the option “Convert music, pictures, videos and TV shows as required by this device
(recommended)”.
7. Click Apply.
19
Page 20

Transferring Music
Transfer Audio Files to your Player
Caution: BEFORE YOU START:
• Make sure that your player is off and disconnect the earphones.
• Make sure the player is not locked.
If the player is locked when you power it on, the screen displays “locked” and the player
will automatically power off after a few seconds.
Note: Your player does not support copy-protected (DRM) files. Make sure that the music
you transfer to your player is not copy-protected.
1. Connect the player to one of your computer’s USB ports.
2. The screen displays “USB Connected”, indicating that the player is in USB mode.
3. On your computer, open Windows Media Player 10 and click on the Sync tab in the top button
bar.
4. Click on Edit Playlist to add the tracks to be transferred to your player. Click on OK once all the
desired tracks have been added.
5. You should now see the tracks you wish to transfer to your player listed and checked on the left
side of the Windows Media Player screen under “Sync List”. If you wish not to transfer any of
the listed tracks, uncheck them.
6. Click on Start Sync. The selected track(s) are copied to the player.
7. After the files have been copied, unplug the player from your computer using the “Safely
remove hardware” icon in the Notification Area (next to the clock). You can now listen to your
music or transfer your data to another computer.
20
Page 21

Transferring Music
Lyrics Edit
The player supports lyric files in LRC format.
1. Prepare the mp3 or wma music file you want to edit, for example “happymusic.mp3”.
2. Download the corresponding lyric file from the Internet. The file must be in the LRC format, for
example “happymusic-2004.lrc”.
3. Rename the lyric file in its original mp3 name (“happymusic.lrc”) and copy both files and lyrics
to the player.
4. When lyrics are available for music files, the lyrics display synchronously on the screen while the
music is playing.
Caution: Make sure the music and lyric files are saved in the same directory and under
the same file name. If not, the player will not recognize the lyric file and only the ID3
tag information such as Artist, Album or Track name will be displayed.
Note: Your player only supports *.lrc files. If the lyrics do not synchronize with the music,
please download another music file from the Internet and try again.
Deleting files from the player
For any files you have transferred to the player, you may delete them while you have connected
the player with your computer. Highlight the unwanted file in the player’s file directory on your
computer and press the delete key on your computer to delete the file.
Alternatively, you may also delete the file from player, refer to the section Navigation on page 27
for details.
21
Page 22

Using your Player as Mass Storage Device
Instead of using Windows Media Player, you can simply drag and drop files to the player, which
appears as a removable hard drive on your computer. Using this method, any type of file
(homework, presentations, pictures, etc.) can be placed on the player as if it were a portable drive.
However, only mp3 and wma files will playback while stored on the player.
1. Connect the player to your computer.
2. Double-click on the My Computer icon on your Windows desktop. Windows XP users may need
to click on the Start button and select My Computer from the menu.
3. Your player has been recognized as a Mass Storage Device and automatically displays as a new
device letter in the My Computer window.
4. You can now drag and drop your files from your computer to the player. You can also copy and
paste files to the player using any standard Windows method.
5. After the files have been copied, unplug the player from your computer.
22
Page 23

Using your Player as Mass Storage Device
Performing a backup
It is recommended that you regularly backup your player’s contents to a different location (on
your computer, CDs, DVDs...). In that way, you will be able to use the backup copies of your files if
you loose them accidentally, format your player or perform a firmware upgrade.
1. Repeat steps 1 to 3 in the previous section.
2. Drag and drop the files stored on your player to the disk or drive where you want to store the
duplicate copy.
3. After the files have been copied, unplug your player from your computer.
4. If you accidentally loose or damage the files stored on your player, you will then be able to
copy them back to your player.
23
Page 24

Creating Playlist Folders
Before transferring your music files to your player you can organize them into folders and create
your own playlists.
1. In My Computer, click on File. Point to New and click on Folder.
You can also create a new folder by clicking a blank area in the window, pointing to New, and
then clicking Folder.
2. Type a folder name and press Enter.
3. Copy your music files to the folder. Repeat these steps to create folders and sub-folders.
4. After the files have been copied, unplug the player.
5. You can now use the Navigation folder to browse your music on your player.
Note: You can create up to 50 directories organized in up to 19 sub-folders, and store
up to 300 music files on your player. If you create or store more files and folders, the
extra items will be ignored.
You can store up to 254 files in one directory. If you store more than 254 files in one
directory, you will only be able to view the first 254 in navigation mode. However, you
will still be able to play the extra files in Music mode.
24
Page 25

Playback
Listening to your mp3/wma Music Files
1. Follow the instructions for the transfer of data to and from the player to copy your music files
to your player.
2. Install the supplied battery into the battery compartment and connect the supplied earphone(s)
to the earphone jack.
3. Press
to power on the player and press again to start the playback.
4. Slide to
rewind or forward a file. Slide to within the beginning 5 seconds of the current file to skip
to previous file. Otherwise, you will return to the beginning of the current file.
5. Press
or to skip to the previous or next file. Slide and hold during playback to fast
to stop the playback.
Volume
During playback, simply slide to + or – to increase or decrease the volume. The volume indicator
on the screen changes accordingly.
Locking your player
To ensure no button is pressed accidently while recording or playing, you can use the Hold
function to lock your player:
•To activate the hold function and lock your player, slide the Hold Switch. The hold indicator will
appear on the screen.
•To unlock it, simply slide it backwards.
Note: If the player is locked when you power it on, the screen displays “Locked” and the
player will automatically power off after a few seconds.
25
Page 26

Playback
Synchronizing Lyrics Display
The player supports lyric files in LRC format. Refer to page 21 for more information.
When lyrics are available for music files, the LRC icon displays and the lyrics display synchronously
on the screen while the music is playing.
Note: Make sure the music and lyric files are saved in the same directory and under
the same file name. If not, the player will not recognize the lyric file and only the
ID3 tag information such as Artist, Album or Track name will be displayed.
26
Page 27

File Browsing
•To enter the Menu, press M.
•To browse the menu items, slide to or .
•To enter a menu or apply a choice, press
• Press and hold M for a while and release it to return to the normal playback screen.
Menu Structure
Menu Screen display For details:
Music page 24
Record page 28
Voice page 30
Navigation page 27
Settings page 31-33
Navigation
The navigation menu allows you to browse and manage the folders and files stored in your player.
1. Press M and select Navigation from the Menu.
2. Slide to
3. In navigation mode, press to go back to the previous screen.
or to select a file or folder and press to play the music or enter the folder.
.
2
1
5
When a folder is selected in navigation mode, press M. A sub-menu will show:
•To enter the folder, select Enter.
•To play the music stored in the folder, select Play.
•To erase the selected file, select Delete. Slide to
press to confirm.
3
4
1. Return to the previous level
2. Selected folder
3. Music files
4. More files for selection
5. Selected folder name
or to select between Ye s and No and
27
Page 28

File Browsing
Warning: Erased files cannot be recovered. Make sure you have a backup before you
proceed.
Note: You can create up to 50 directories organized in up to 19 sub-folders, and store up
to 300 music files on your player. If you create or store more files and folders, the extra
items will be ignored.
You can store up to 254 files in one directory. If you store more than 254 files in one
directory, you will only be able to view the first 254 in navigation mode. However, you will
still be able to play the extra files in Music mode.
28
Page 29

Recording
2
1
5
6
3
4
1. Recording status
2. Elapsed time
3. Total time
4. Remaining time
5. Folder name
6. File name
Recording from the Built-in Microphone
The player allows you to record from the built-in microphone. Note the location of the built-in
microphone.
1. Press M and select Record from the Menu.
2. Slide to
3. Press
automatically renamed as a Vxxx.wav file and stored in the Voice folder.
or to highlight Yes and press to confirm. The recording starts automatically.
or M to stop recording and enter the voice mode. Your voice recording will be
Note: The display will show “MEMORY FULL” when all available memory has been
used.
Adjusting Recording Settings
This option allows you to adjust the settings for the recordings.
1. Select Record from the settings menu and press M.
2. Select the file format of your recording.
Note: The recording formats are only slightly different. It is not recommended
to change this setting.
29
Page 30

Recording
3. Select the sampling frequency of your recording. A higher recording sampling frequency brings
better recording quality but will use more storage space.
Sampling Frequency
8000 Hz
11025 Hz
16000 Hz
22050 Hz
32000 Hz
Maximum recording time
TC1401
64 hours
46.4 hours
32 hours
23.2 hours
16 hours
Maximum recording time
TC1402
128 hours
92.8 hours
64 hours
46.4 hours
32 hours
Playback of Microphone Recordings
1. Select Navigation from the menu and browse for the VOICE folder. Press to enter.
2. Slide to
3. Press
or to find the Vxxx.WAV file you want to listen to.
to play the recording.
30
Page 31

Settings
Adjust Settings
To navigate in the Settings menu:
1. Press M to enter the menu.
2. Select settings from the menu and press .
3. Slide to or to select the setting you wish to adjust and press to confirm.
4. Press and hold M for a while and release it to return to the normal playback screen.
Equalizer
The Equalizer (EQ) setting is used to adjust the music playback effect.
1. To change the equalizer setting, select Equalizer from the settings menu. To navigate, follow
the steps described above.
2. Slide to
XBass, Rock, Jazz, Classical and Pop.
3. Press
or to choose among the six EQ presets available: Normal (no logo displayed),
to apply.
Repeat Mode
Five repeat modes are available: Normal, Repeat One, Repeat All, Random, Random All.
1. Select Repeat from the settings menu. To navigate, follow the steps described above.
2. Slide to
• Random and Random All modes are available for music playback only.
or to select one of the repeat modes and press to apply.
31
Page 32

Settings
Contrast
To adjust the display contrast:
1. Select Contrast from the settings menu. To navigate, follow the steps described above.
2. Slide to
or to adjust the level. Press to apply and return to the settings menu.
Backlight - Timer Adjustment
After being idle for a few seconds, the device can automatically turn off the backlight to save
power. To wake the backlight up, just press any button.
1. Select Backlight from the settings menu. To navigate, follow the steps described on page 31.
2. Select Timer from the Backlight menu.
3. Slide to
options: 3, 5, 10, 15 seconds and Always on (backlight will always be turned on).
4. Press to apply.
or to adjust the delay before backlight is switched off. Choose among the
Power Savings
You can use the power savings function to automatically turn off the player after a predetermined
period of inactivity.
1. Select PowerSavings from the settings menu. To navigate, follow the steps on page 31.
2. Slide to
apply.
Note: If you choose “Off”, the player will not power off until the battery is completely
exhausted.
32
or to select amongst the options (Off, 1, 2, 5, 10, 15 minutes) and press to
Page 33

Settings
Default Settings
You can reset all settings to factory default settings.
1. Select Default from the settings menu. To navigate, follow the steps described on page 31.
2. Press
or M to load the default settings to your player.
Language
You can display the interface of your player in several languages.
1. Select Language from the settings menu. To navigate, follow the steps described on page 31.
2. Slide to
(Spanish), Deutsch (German), Italiano (Italian) and Nederlands (Dutch) and press
or to select among the options: English (default), Français (French), Español
to apply.
Information About your Player
Information is available regarding the firmware version, built-in memory size and free memory
size.
1. Select About from the settings menu. To navigate, follow the steps described on page 31.
2. The firmware version and the total memory capacity display. Slide to or to view the free
memory space
3. Press M to exit this screen and return to the settings menu.
Note: To learn more information on your player, check out the Specifications
section in this user manual.
33
Page 34

Advanced Features
Upgrading your Player (Firmware update)
Should you encounter problems with your player, you may be able to repair it yourself by updating
its firmware. Firmware updates can fix bugs in the player and improve its performance. You should
regularly check the RCA Website www.rcaaudiovideo.com for the latest Firmware updates
available. Downloading the upgrade and installing it on your player is easy and will only take a
few minutes.
Caution: Installation of the drivers is required if you wish to update the firmware of
the player.
Note: The ‘firmware’ is an embedded program that displays the interface and responds to
instructions. Firmware updates may be available to improve performance or add features.
You can download the firmware from http://www.rcaaudiovideo.com/downloads.
For best performance, we recommend that you select the Format Data Area option to
format both the firmware and the storage space. When not selected, only the firmware
will be updated. When finished, please format the player.
If you upgrade your firmware, some of the instructions in the supplied documentation
may no longer be applicable.
Warning: Formatting will erase all files on your player. Make sure you have a backup before
you proceed.
34
Page 35

Advanced Features
Formatting the Player
1. Connect the player to the computer.
2. Right-click on the player icon in My Computer and select Format.
3. Click on Start in the format window, and then click on OK to start formatting the mp3
flash memory.
Warning: Formatting will erase all files on your player. Make sure you have a backup
before you proceed.
Make sure “NTFS” under File System drop-down menu is not selected! If you select this
option the “RCA player” will display an error message before powering off and you will
have to format it again. Check out the Troubleshooting section for more details.
35
Page 36

Additional Information
Troubleshooting
• The display shows nothing after turning on the player.
– Check to see if the battery has been inserted.
– Check to see if the battery needs replacement: Try reinserting the battery correctly or replace
it.If it still does not work, put the player in recovery mode:
1. Take out the battery from the battery compartment.
2. Press and hold . Do not release it until step 4.
3. Plug the player into the USB port of your computer.
4. Hold for 5 seconds and release once the computer has detected the player.
5. Leave the player in the USB port for the next step (Upgrading the Firmware + Formatting the
player).
Note: If the Firmware Upgrade utility does not recognise your player after searching
for several minutes, click on Cancel and repeat steps 1 to 5 to make sure the player is in
recovery mode.
• The player displays an error message before powering off.
– If you have formatted your player to NTFS format, the above message will display and your
player will power off automatically. You must reformat it to FAT or FAT32 format.
• Why can’t I play DRM protected files?
– WMA (Windows Media Audio) supports Digital Right Management (DRM) to prevent audio
files to be copied, written to CD etc. Your player does not support WMA-DRM files. Use
Windows Media Player to check if a file is protected or not. To do so, right-click on the file in
Windows Media Player and select Properties. Then check the License tab to get more
information on the license type. If the file is protected, you will not be able to play it on your
player.
• Problem: Cannot delete files on the player.
– Refer to page 27 (Navigation) for details.
• Why can’t I play WMA files in the player?
–You may need to refine your settings in the Windows Media Player, please refer to page 19 for
details.
36
Page 37

Additional Information
Specifications
Hardware
• Dimensions: 82mm H, 27 mm W, 20 mm D / 3.3 (H), 1.1 (W), 0.8 (D) inches
• Unit Weight: 24 g / 0.85 oz
• Battery Operated: 1 x AAA battery.
Flash
• TC1401: 1024MB, TC1402: 2048MB (6 MB reserved for firmware and system management)
Power
•1 x AAA battery
• Battery continuous playing time: up to 15 hours
Equalizer
• Normal, XBass, Rock, Jazz, Classical, Pop
Display
• 128 x 32 Dot-matrix OLED
• ID3 Tag display (album, artist, title)
• Synchronous lyric display
Controls
• Power On / Play / Pause / Select
• Stop / Power Off
• Skip Next / Fast Forward
• Skip Previous / Fast Rewind
• Menu button
•Volume +
•Volume –
• Hold Switch
Audio Playback
• Windows Media Audio (WMA)
• MPEG Audio Layer 3 (MP3)
•WAV
Voice Recording
•8 KHz to 32 KHz sampling rate
• about 64 hours recording (at default setting, i.e. 8 KHz)
• Recording via on-board microphone
37
Page 38

Additional Information
Signal to Noise Ratio
• >85 dB, A-weighted
Frequency Response
• 20 Hz ~ 20 kHz
Total Harmonic Distortion Output
• => THD (<0.1%)
Check for updates
Visit http://www.rcaaudiovideo.com for the latest news and firmware upgrades for our digital
media player.
38
Page 39

Additional Information
Limited Warranty (For Canada)
Thomson multimedia Ltd. warrants to the purchaser or gift recipient that if any manufacturing
defect becomes apparent in this product within 1 year from the original date of purchase, it will
be replaced free of charge, including return transportation.
This warranty does not include damage to the product resulting from accidents, misuse or leaking
batteries.
Should your product not perform properly during the warranty period, either:
1. Return it to the selling dealer with proof of purchase for replacement,
OR
2. Call 1-800-522-0338 (English) or 1-800-522-0445 (French) for instructions concerning where to
mail the product
The provisions of this written warranty are in addition to and not a modification of or subtraction
from the statutory warranties and other rights and remedies contained in any applicable
legislation, and to the extent that any such provisions purport to disclaim, exclude or limit any
such statutory warranties and other rights and remedies, such provisions shall be deemed to be
amended to the extent necessary to comply therewith.
39
Page 40

Thomson Inc.
P.O. Box 1976
Indianapolis, IN 46206-1976
© 2007 Thomson Inc.
Trademark(s) ® Registered
Marca(s) ® Registrada(s)
Marque(s) ® Deposée(s)
www.rcaaudiovideo.com
v4.0
40
 Loading...