

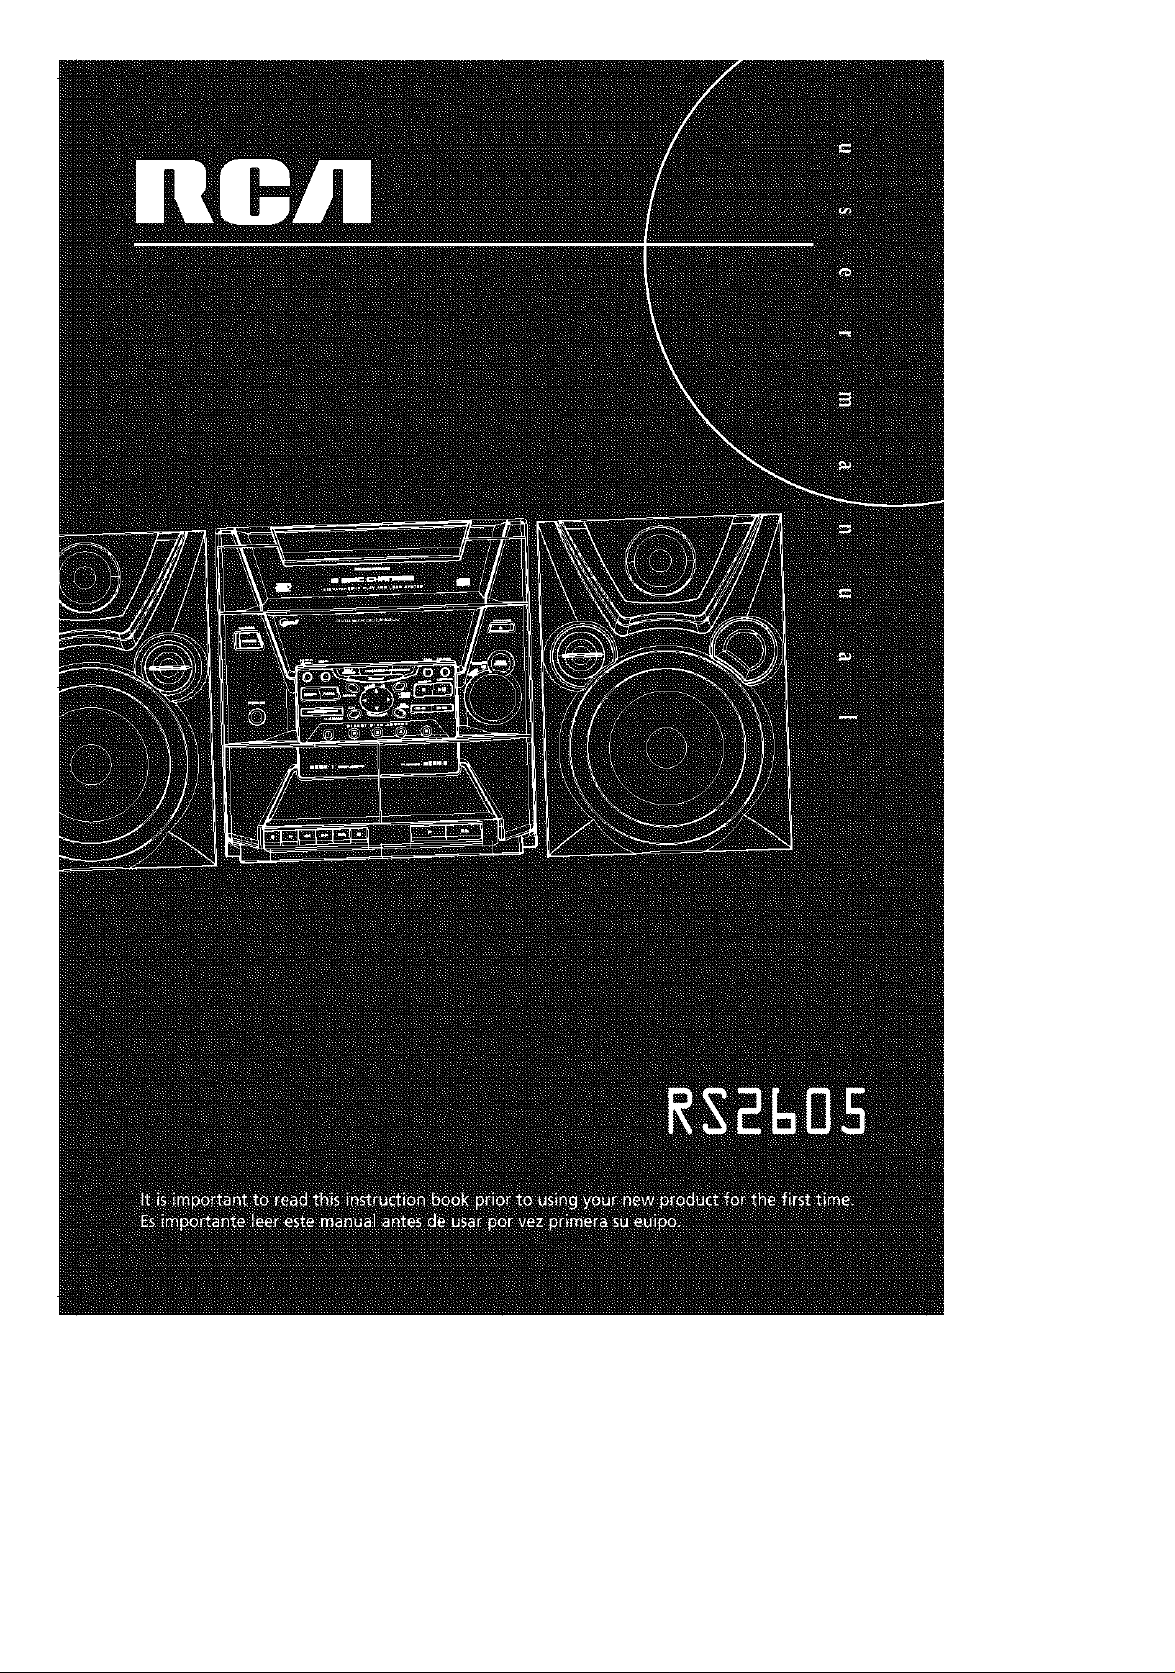
Page 1
Page 2

FCCInformation
This device complies with Part 15 of the FCCRules.
Operation issubject to the following two conditions:
(I) This device may not causeharmful interference,
and (2) this device must accept any interference
received, including interference that may cause unde-
sired operation.
In accordance with FCCrequirements, changes or
modifications not expressly approved by Thomson
multimedia Inc. could void the user'sauthority to
operate this product.
This device generates and uses radio frequency (RF)
energy, and if not installed and used properly, this
equipment may causeinterference to radio and televi-
sion reception.
If this equipment does causeinterference to radio or
television reception (which you can determine by
unplugging the unit), try to correct the interference
by one or more of the following measures:
• Re-orient the receiving antenna (that is,the anten-
nafor the radio or television that is "receiving" the
interference).
• Move the unit away from the equipment that is
receiving interference.
• Plug the unit into a different war outlet sothat the
unit and the equipment receiving interference are on
different branch circuits.
If these measures do not eliminate the interference,
pleaseconsult your dealer or an experienced radio/tel-
evision technician for additional suggestions. Also, the
Federal Communications Commission has prepared a
helpfuJ booklet, "How To Identify and ResolveRadio
TV Interference Problems." Thisbooklet isavailable
from the U.S.Government Printing Office,
Washington, DC20402. Pleasespecify stock number
004-000-00345-4 when ordering copies.
This product complies with DHHSRules21 CPR
Subchapter J.Applicable at the date of manu-
facture.
Have a Blast- Just Not in Your
Eardrums
Make sure you turn down
the volume on the unit
before you put on head-
phones. Increasethe volume
to the desired level only after
headphones are in place_
THE LIGHTNING
FLASH AND ARROW-
HEAD WITHIN THE
TNIANGLE IS A
WANNING SIGN
ALERTING YOU OF
_NANGEaOUS
VOLTAGE" INSINE
THE PRODUCT,
Technicalspecification
Product: 5CDMP3 Audio System
Brand: RCA
Model: R52605
Electrical Consumption:
PowerSupply:120V
60Hz
Powerconsumption:230 Watts
IMPORTER
Comerciatizadora Thomsonde M6xico, S.A.de C.V.
Miguet de Cervantes Saavedra57
CoLAmpliacibn Granada
C.R 11529Mexico D.E
Telefono: (55)2581 53 20
RFC:CTM-gS0723-KS5
ForYourSafety
(one blade iswider than the other)
and only fits into ACpower outlets
The ACpower plug ispolarized _ _
one way. If the plug won't go into
the outlet completely, turn the
plug over and try to insert it the
other way. If it still won't fit, contact a qualified elec-
trician to change the outlet, or usea different one. Do
not attempt to bypassthis safety feature.
CAUTION: TO PREVENTELECTRICSHOCK,
MATCH WIDE BLADEOF PLUGTO WIDE
SLOT,FULLYINSERT.
A
CAUTION: TO REDUCE THE
RISK OF ELECTRIC SHOCK
DO NOT REMOVE COVER
(ON BACK), NO USER-
SERVICEABLE PARTS IN*
SIDE. REFER SENVICING
TO QUALIFIED SERVICE
PENSONNEL
SEE MARKING ON BOTTOM/ BACK OF PRODUCT
THE EXCLAMATION
POINT WITHIN THE
TNIANGLE IS A
WARNING SiGN
ALERTING YOU OF
IMPORTANT
INSTRUCTIONS
ACCOMPANYING
THE PRODUCT,
Page 3
ForYour Records
Inthe event that service should be required, you may
need both the model number and the serial number.
Inthe space below, record the date and place of pur-
chase,and the serial number:
Model No.
Remote Control No.
Date of Purchase
Placeof Purchase
SerialNo.
Service Information
This product should be serviced only by those special-
lytrained in appropriate servicing techniques. For
instructions on how to obtain service,refer to the
warranty included in this Guide.
FCCInformation
Safety Information
Getting Started ....... 3
Unpackingthe system........ 3
BackView .................. 3
Installation ................. 3
General Controls ...... 4
MainUnit .................. 4
RemoteControl ............ 5
DisplaySettings
Showing the Demonstration • .6
Setting ClockI Timer ......... 6
Setting the Clock .......... 6
Setting the Timer ......... 6
Activating the Timer ....... 6
Sleep Mode .............. 6
Sound Features ....... 7
Using Preset Equalizer Curves .7
BassBoost .................. 7
Muting Audio .............. 7
X-Surround ................. 7
CD Player
Notes on CD-RIRWDisc ....... 7
Loading Discs ............... 7
Playing Discs................ 8
Playand Load
Simultaneously ........... 8
Skipping a Disc ........... 8
Searching Through a CD •..8
Shuffling the Play Order •, .8
Sampling Tracks ........... 8
Repeat .................. 8
CDDisplay ................. 8
MP3 Player ........... 9
The MusicMatch Jukebox ..... 9
File Navigation .............. 9
Playing a MP3 disc ........... 9
File Search ................ 10
Playlist .................... 10
Adding Songsto a Playlist •. •10
Playing a Playlist ........... 10
Deleting Files in a Playlist.,. ,I0
Thumb Up Playlist .......... 10
Thumb Down Playlist ....... 10
Radio .............. 11
Selecting Tuner Band ....... 11
Tuning to a Station ......... 11
Using Presets .............. 11
Auto Preset Programming .,I I
Manually Setting Presets .... 11
Suppressing Stereo Signal •. •I I
TapePlayer
Playing aTape ............. 12
Recording ................. 12
Prom Tuner ............. 12
From CD ................ 12
TapetoTape ............ 12
From an Auxiliary Input,. ,12
TroubleshootingTips..13
Maintenance ........ 14
Cleaning ................. 14
CD Player ................. 14
Tape Player ................ 14
Handling CDs .............. 14
Cleaning CDs .............. 14
CD LensCare .............. 14
Important Information 15
Safety Precautions ......... 15
Important Battery
Information ............... 15
Headset Safety ............. 15
Don't Infringe ............. 15
Technical Specification ...... 15
Limited Warranty
(U.S,) .............. 16
Limited Warranty
(Canada) ........... 18
Page 4
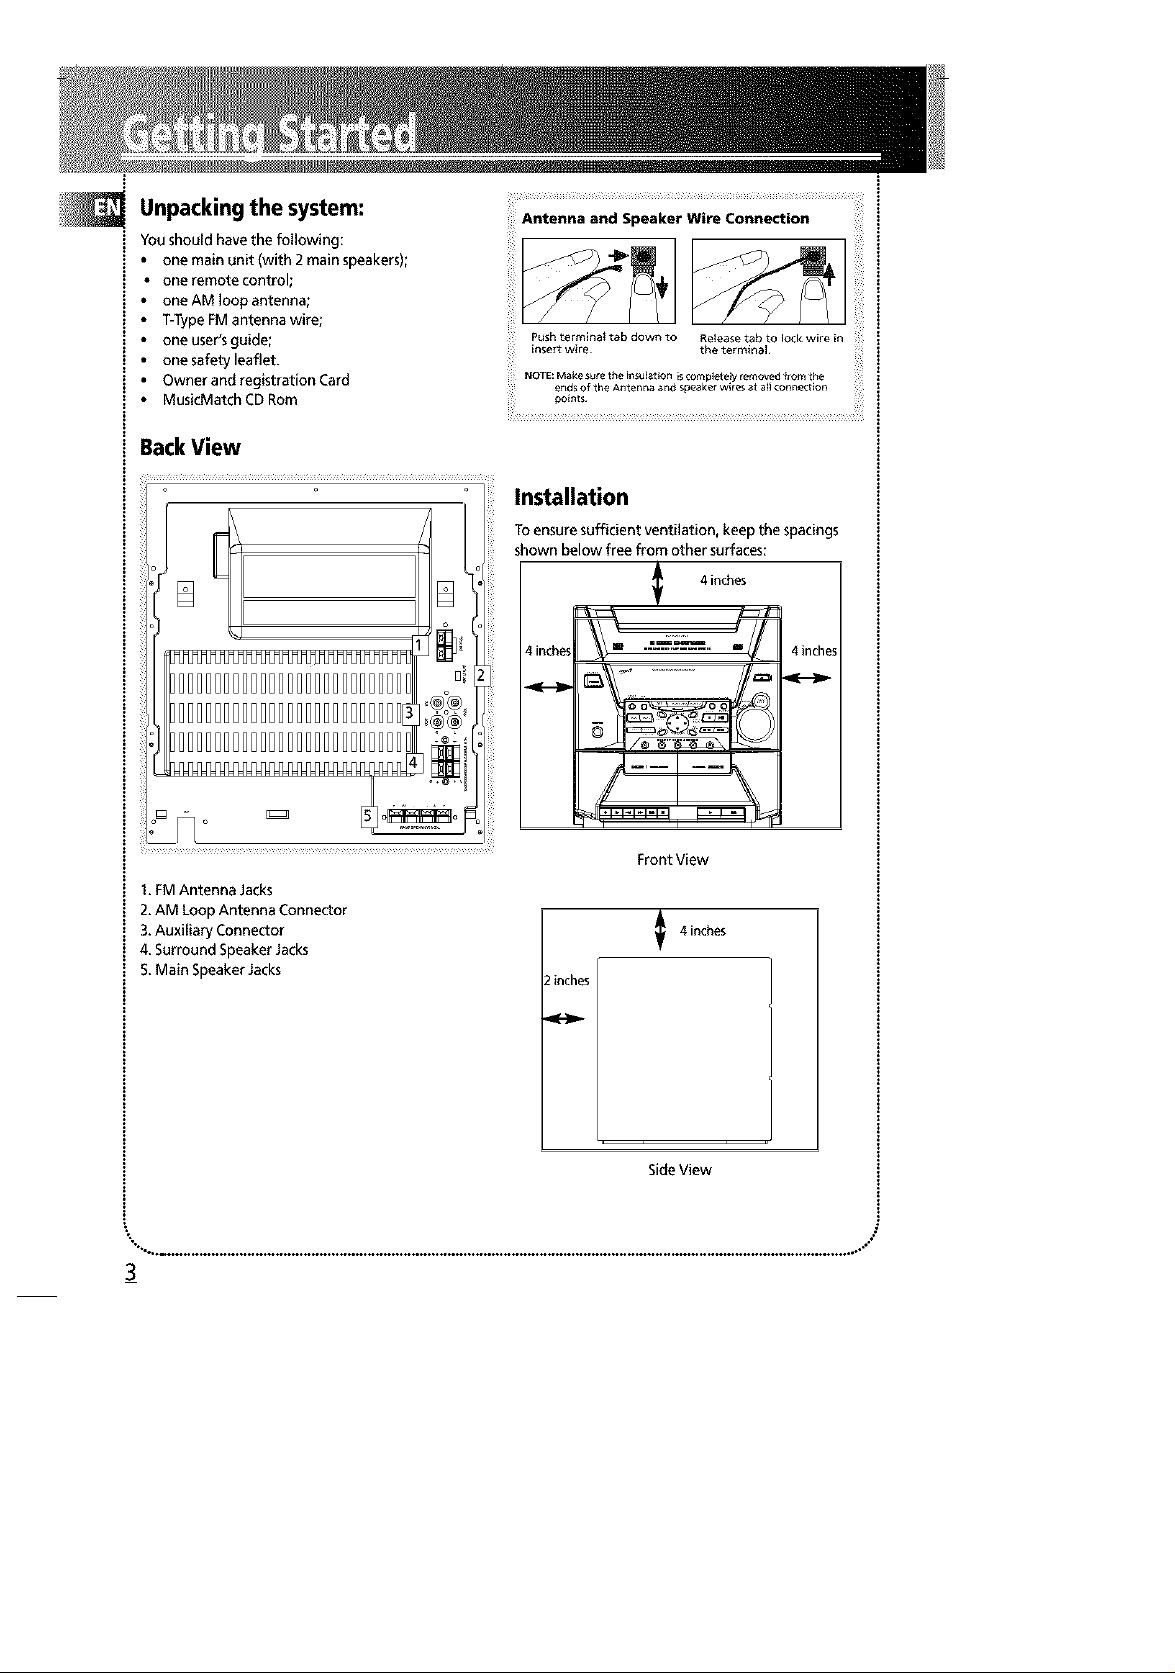
Unpacking the system:
You should have the following:
one main unit (with 2 main speakers);
one remote control;
one AM loop antenna;
T-TypeFMantenna wire;
one user's guide;
one safety leaflet.
Owner and registration Card
MusicMatch CD Rom
BackView
[
Di
Antenna and Speaker Wire Connection
Push terminal tab down to Release tab to lock wire in
insert wire the terminal
NOTE: Make sure the iflsulation is cornplelely removed from the
ends of the Antenna and speak_ wires at all connection
points¸
Installation
Toensure sufficient ventilation, keep the spacings
shown below free from other surfaces:
4inches
4 inches "--_ .... 4inche!
i
I. FM Antenna Jacks
2.AM Loop Antenna Connector
3.Auxiliary Connector
4. Surround SpeakerJacks
5.Main Speaker Jacks
3_
o_o
Front View
4 inches
! inches
SideView
Page 5
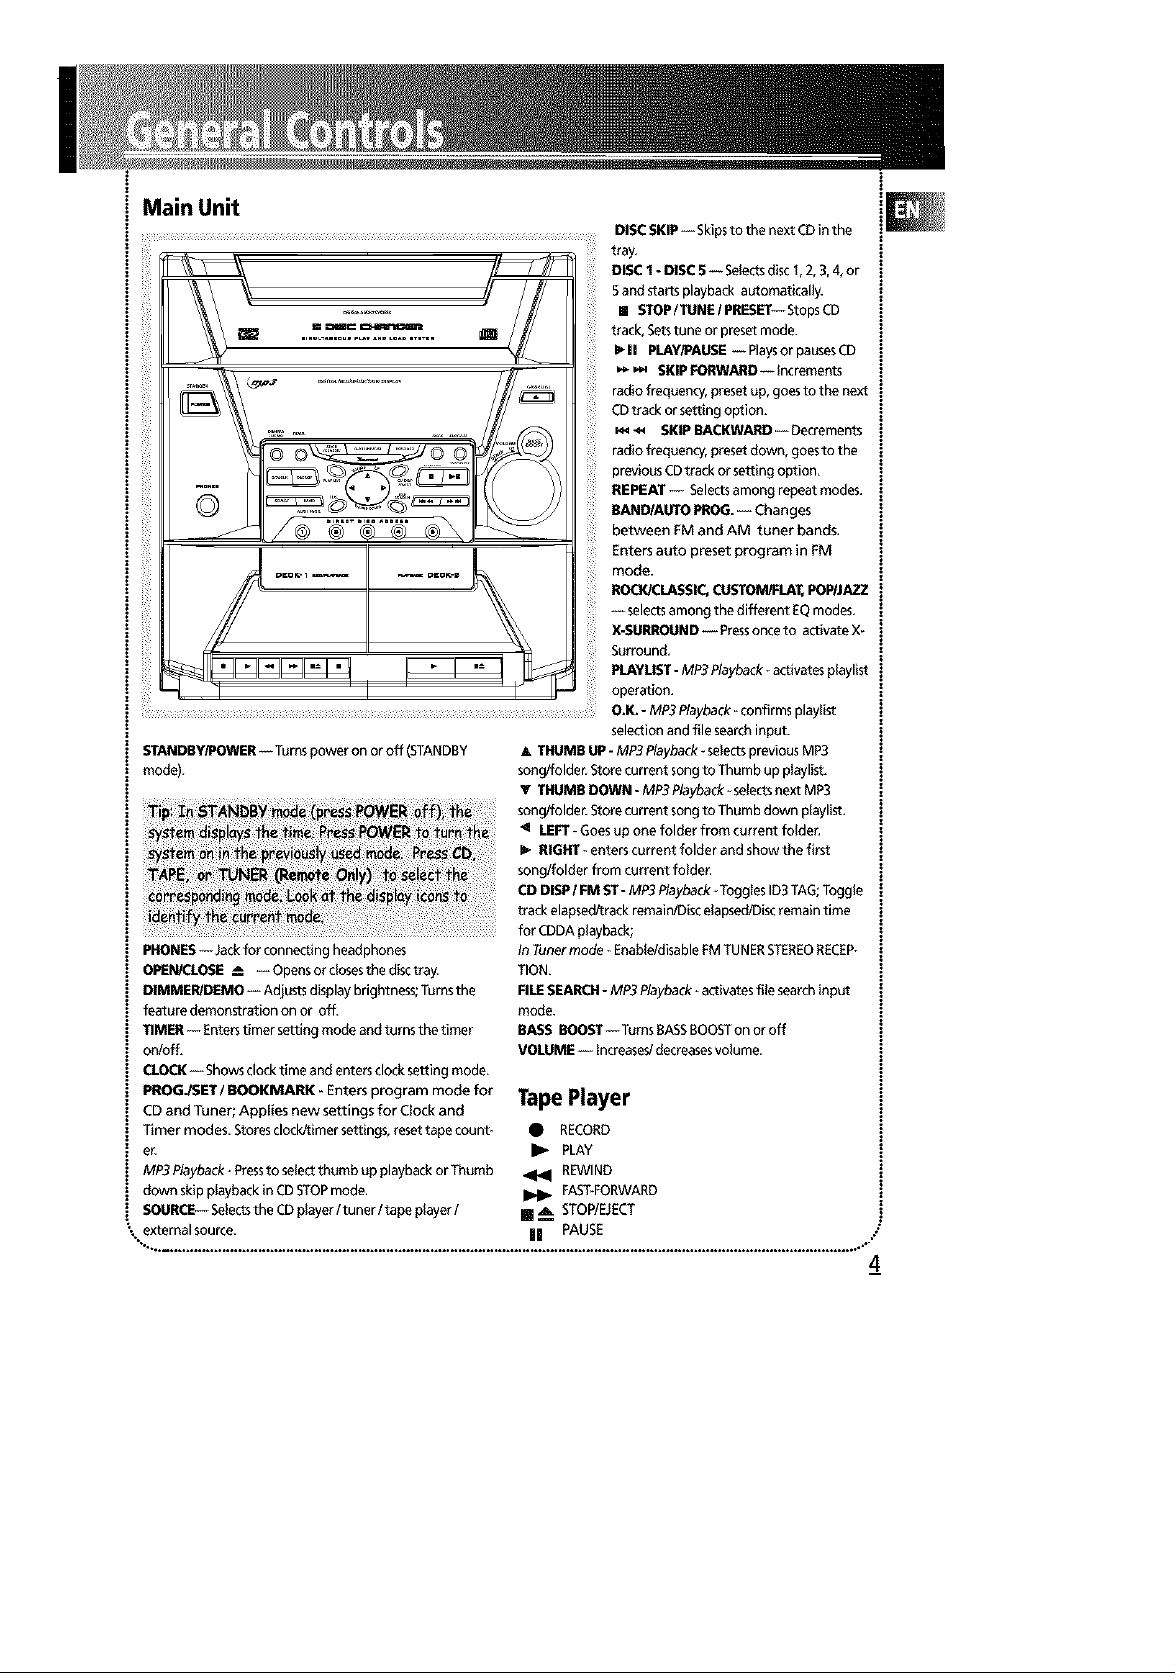
Main Unit
l_ ii!ii!ilil
STANDBY/POWER-- Turnspoweron oroff (STANDBY
mode).
PHONES -- Jack for connecting headphones
OPEN/CLOSE _ -- Opens or closesthe disc tray.
DIMMER/_MO -- Adjusts display brightness; Turns the
feature demonstration on or off.
TIMER -- Enters timer setting mode and turns the timer
on!off,
(:lOCI( --Shows clock time and enters clock setting mode,
PRICEY / BOOKMARK _ Enters program mode for
CD and Tuner; Applies new settings for Clock and
Timer modes, Stores clock/timer settings, reset tape count*
el.
MP3 Playback _Pressto select thumb up playback or Thumb
down skip playback in CD STOPmode.
SOURCE-- Selects the CD player / tuner / tape player /
external source. || PAUSE
THUMB UP - MP3 Playback *selects previous MP3
song/folder. Store current song to Thumb up playlist.
THUMB DO_l - MP3 Playback_selects next MP 3
song/folder. Store current song to Thumb down playlist.
LEF[ _Goes up one folder from current folder,
RIGHT - enters current folder and show the first
song/folder from current folder,
CD DISP / FM ST - MP3 Playback _Toggles ID3 TAG; Toggle
track elapsed/track remain/Disc elapsed!Disc remain time
for CDDA playback;
In Tuner mode * Enable/disable FM TUNERST£R_OR_C_P-
TION.
PILESEARCH - MP3 Playback ÷activates file search input
mode.
BASS BOOST -- Turns BASS BOOST on or off
VOLUME -- Increases/decreases volume.
TapePlayer
• RECORD
I1_ PLAY
REWIND
FAST-FORWARD
[] _ STOP/EJECT
DISC SI(IP -- Skips to the next CD in the
tray,
DISC 1 - DISC 5 -- Selects disc _, 2, 3, 4, or
5 and starts playback automatically.
[] STOP / TUNE / PRESET-- Stops CD
track, Setstune or preset mode.
i_II PLAY/PAUS_ -- Plays or pauses CD
_ SKIP FORWARD -- Increments
radio frequency, preset up, goes to the next
CDtrack or setting option.
•_ SI(IP BACKWARD -- Decrements
radio frequency, preset down, goes to the
previous CD track or setting option.
REPEAT -- Selectsamong repeat modes,
I(AND/AUTO PROG. -- Changes
between FM and AM tuner bands,
Enters auto preset program in FM
mode.
RO_CLASSIQ CUSTOM/FIAT, POPIJAZZ
--selects among the different _Q modes,
X-SURROUND -- Pressonce to activate X-
Surround,
PI.AYLI_T - MP2 Playback ÷activates playlist
operation,
O.K. - MP3 Playback _confirms playlist
selection and file search input.
4
Page 6
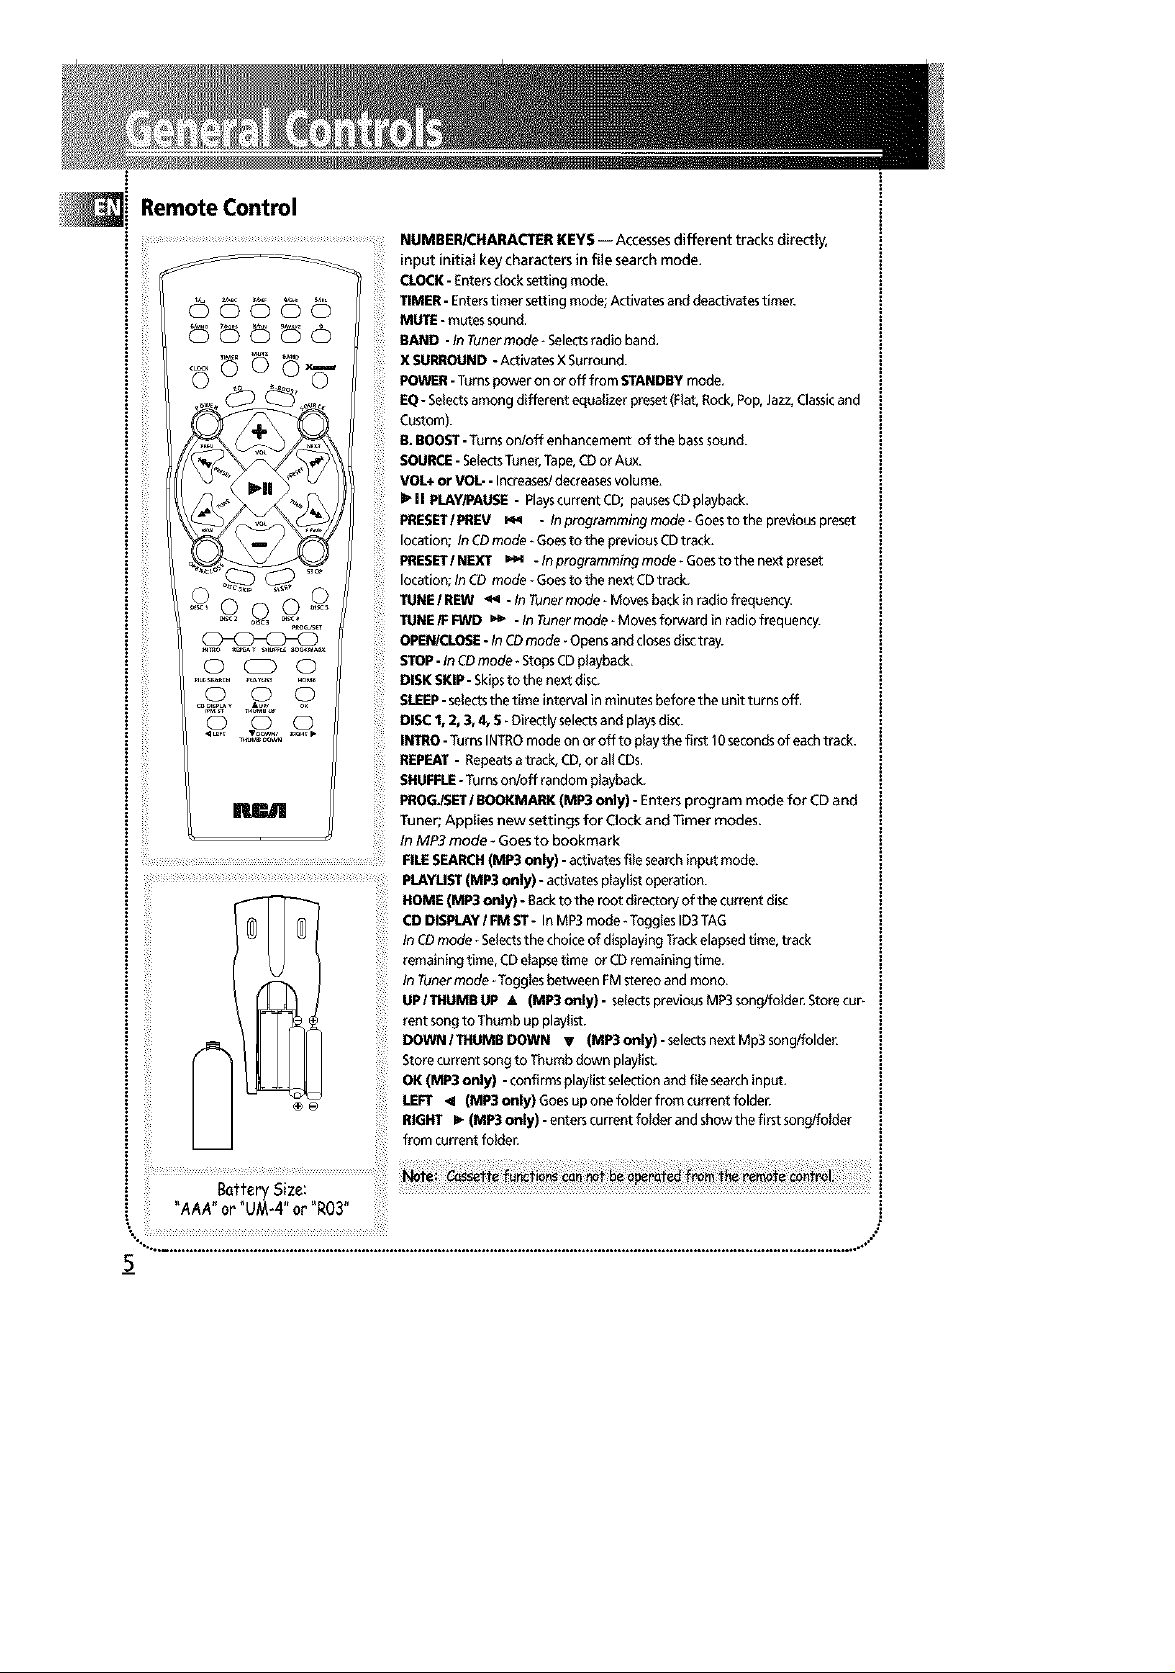
Remote Control
NUMBER/CHARACI_R KEYS-- Accessesdifferent tracks directly,
-- _ ii_!i_i'i_il_
O _ Q
! iiii,i,i iii ii!!i! i
input initial keycharacters in file search mode.
CLOCK-Entersclocksetting mode.
TIMER- Enterstimer settingmode;Activatesanddeactivatestimer.
MUTE- mutessound,
BAND -In Tunermode_Selectsradioband,
XSURROUND- ActivatesXSurround.
POWER-Turnspower onor off from STANDBYmode,
EQ- Selectsamong different equalizerpreset(Flat,Rock,Pop,Jazz,Classicand
Custom).
13.BOOST-Turnson/off enhancement of the basssound.
SOURCE- SelectsTuner,Tape,CDor Aux.
VOL+or VOL-- Increases/decreasesvolume.
_ll PLAY/PAUSE- PlayscurrentCD;pausesCDplayback.
PRESET/PREV _._ - Inprogrammingmode_Goestothepreviouspresat
location; In CDmode*Goesto the previousCDtrack.
PRESET/NEXT _-Inprogrammingmode_Goestothenextpresat
location;InCD mode_Goesto the nextCDtrack.
TUNE/ REIN _ - In Tunermode_Movesbackinradio frequency.
TUNEIF FWD _ - In Tunermode_Movesforward in radio frequency.
OPEN/CLOSE- In CDmode - Opensandclosesdisctray.
STOP-InCDmode*StopsCDplayback.
DISKSKIP- Skipsto the nextdisc.
SLEEP-selectsthetime interval in minutesbefore the unit turnsoff.
DISC1, 2, 3, 4, 5 -Directlyselectsandplaysdisc.
INTRO- TurnsINTROmode onor off to playthe first I 0secondsof eachtrack.
REPEAT- Repeatsatrack,CD,or allCDs.
SHUFFLE-Turnson!off randomplayback.
PROG_SETl BOOKMARK(MP3 only) - Enters program mode for CDand
iii'i!ili !i i
Tuher; Applies new settings for Clock and Timer modes.
In MP3 mode- Goes to bookmark
FILESEARCH(MP3only) -activatesfilesearchinput mode.
PLAYUST(MP3 only) - activatesplaylistoperation.
HOME(MP3only) - Sackto the root directoryof the currentdisc
CDDISPLAYIFMST- InMP3mode- TogglesID3TAG
InCDmode _Selectsthechoiceof displayingTrackelapsedtime,track
remainingtime, CDelapsetime or CDremaining time.
In Tunermode- TogglesbetweenFMstereoandmono.
UPITHUMBUP A (MP3only)- selectspreviousMP3songlfoldenStorecur-
iiiii!i!!!i !,!
rent songto Thumb upplaylist.
DOWN/THUMBDOWN _ (MP3only)-selectsnextMp3song/folder.
Storecurrent songto Thumbdown playlist.
OK (MP3 only) - confirmsplaylistselectionand file searchinput.
fill !_
LEFT _I (MP3only)Goesuponefolderfromcurrentfolder.
RIGHT I_ (MP3only)- enterscurrentfolder andshowthe first songlfolder
from currentfolden
! . tt ry size:
] AAA" or UM-4"or R03"
5
........................................................................................................................."
Page 7

PLAYLIST _ _ I _'_ MiX
BASSB00STGENRE I_lISL£EP _ TIMER REPEAT1ALLDIS_
Showing the Demonstration
Not operational inCD mode. PressDIMMER/DEMO
to turn on/off demonstration mode. The demonstra-
tion scrollsthrough all display operations.
9. Rotate the VOLUME knob on the main unit or
pressVOL + or VOL- on the remote control to set
desired volume level.
10. PressPROG.ISETto confirm and save settings.
PressSTOPto quit setting.
Setting Clock / Timer
Settingthe Clock
1,Pressand hold CLOCKuntil the hour flasheson
the display,
2,PressSKIP BACKWARD -- ._ or SKIP FOR-
WARD ,_ onthemainunitorPRESETIPREV
orPRESETI NEXT _ on the remote control
to select the hour.
3,Press CLOCK to shift to minute digits.
4, Follow step 2 to set the minute digits.
5,PressPROGJSETto confirm and savesettings,
PressSTOPto quit setting,
Settingthe Timer
I. Pressand hold TIMER until AM 12 : 0[3 ON
appears with the hour flashing (ON - timer on time)
2.PressSKIP BACKWARD _., orSKIP
FORWARD _ onthemain unitorPRESETI
PREV _ orPRESET/NEXT _ on the remote
control to select the hour.
3.PressTIMER to shift to minute digits.
4. Repeat step 2 to select minute digits.
5.PressTIMER to shift to timer off time setting.
&AM 12:00 0F(timecofftime)willshowonthe
display with hour flashing. Repeat steps 2 - 4 for
timer off time setting.
7.PressTIMER to selectsource. PressSKIP BACK-
WARD _ /SKIPFORWARD _ onthe
mainunitorPRESET/PREV _orPRESET/ NEXT
=.M on the remote control to select between CD
/TUNER/TAPE)
8. PressTIMER to set volume.
Activating the Timer
Pressand release TIMER to activate and deactivate
the timer. TTMERwill lit when the alarm isactive.
Adjusting the Display Brightness
1.Pressand hold DIMMER/DEMO for more than 2
seconds.
2.While the DTMMEI_isdisplayed, press and release
DIMMER/DEMO to select the desired display
brightness level (DIMMER 0 - 3),
Sleep Mode
You can select the time interval in minutes before
the unit turns off automatically. PressSLEEPon the
remote to select among 120, 90,60, 45, 30, 15, 5
minutes and OFF. (Remote Only)
6_
Page 8

Using Preset Equalizer Curves
PressROCK/CLASSIC,CUSTOM/FLATor POPIJAZZ
on the main unit or EQ on the remote to toggle
among FLAT,ROCK,JAZZ, POP,CLASSICAL& CUS-
TOM. The display briefly shows the selection.
Creatinga CustomCurve
1.PressCUSTOM/FLATon the main unit or EQ on the
remote control to select CUSTOM mode.
2. While CUSTOM isdisplayed, press SKiP BACK.
WARD _ /SKIPFORWARD --_ onthe
mainunitorTUNEIREW _ orTUNEIFFWD
on the remote control to cycleamong displayed bass
(BAS 00)andtreble (TRE 00)rangelevels.
3. While BAS, or TRE isdisplayed, pressVOLUME to
set the associated gain between -I 0- +I 0.
coRwIcoRd,scsforpoy
back,
i Notes on CD-R/RWDisc:
i ' DOnot affix any type of labels to either side
:! (recordable or labeled side) of a CD-R/RWdisc
BassBoost
PressBASS BOOST on the main unit or B. BOOSTon
the remote control to turn on/off boosting the bass
frequency.
Muting Audio
PressMUTE on the remote to cut the sound, (Remote
Only)
X-Surround
PressX-SURROUND to enjoy enriched sound quality.
Thisfeature gives you:
I. Better width and depth for vocal and instrumental
sound.
2. More powerful presence for studio recording.
3. Enhanced surround effects with greater flexibility
in positioning speakers.
Loading Discs
I. PressSOURCErepeatedly to select CDmode.
2. PressOPENICLOSE -_ on the main unit to open
the drawer.
3. Insert up to five discswith label face up. (PressDISC
SKIP to rotate the disc carrier.)
4. PressOPENICLOSE -_ again to close the drawer.
Loaded discposition icon lights.
astbismayreso,tintbeon,tma,functionin0
• , TOavoid damages to the CD-R/RWdisc,do not
open the disc compartment door while the
unit istrying to read the table of contents.
Do not load an unrecorded CD-R/RWdiscinto
theunit.Thismoytakealongert_metoread
the disc.
Playback capability for CD-RWdiscs may
vary due to variations in the quality of
C RW a.dthe. o ar.s to
create the disc.
Page 9

Playing Discs
• PressPLAYIPAUSE I_II to begin or pause play,
and STOP to stop play.
• Select a specific disc by pressingDISC I - DISC 5.
• PressSKIP BACKWARD _ _ / SKIP FORWARD
_ onthemainunitorPRESET/PREV _ or
PRESETI NEXT _ on the remote control to
select a specific track,
Playandloadsimultaneouslyby:
I.PressOPEN/CLOSE • toopenthetraywhilea
CDisplaying
2. Loadlchange discsfor available trays by pressing
DISC SKIP.
3, PressOPEN/CLOSE -_ toclosetbetray.
Skipping a Disc
PressDISCSKIP.
SearchingThrougha CD
PressandboldSKIPRACKWARD _,_, /SKIP
FORWARD _ ,_ on the main unit or TUNE I REW
orTUNEIFFWD _ ontberemotecontrolto
searchthrough a CDwhile it is playing.
Shuffling the Play Order
PressSHUFFLEto turnon/offtheplayingof tracksin
randomorder,(RemoteOnly)
SamplingTracks
PressINTRO to play the first 1Oseconds of each track
on the current disc, all discsin the tray, or turn INTRO
mode off, (Remote Only)
Repeat
PressREPEATto repeat the current track, current disc,
all discs,or turn REPEATmode off,
CD Display
PressCD DISP I FM ST to select among different CD
display options: Trackremaining time, Track elapsed
time, disc remaining time or disc elapsed time,
_8
Page 10

The MusicMatch Jukebox
i This music management software, to be installed on
i your PC,allows you to compress music files recorded
from your audio CDsinto MP3 format and stores
them on your PC.
; * It makes the search and download of Internet
music easier,
, * It allows for the management of compressed music
! and the creation of your own playlist,
• The Jukebox is a true audio player installed on your
PC,
; * Itgivesaccesstothousandsof net radios available
on the web today.
You can download music files encoded in MP3from
several Intemet sites like www.mp3.com.
File Navigation
LEFT _1 - Goesup one folder from current folder.
RIGHT I_ - Enters current folder and shows the first
song/folder from current folder.
A UP/THUMB UP - Selects previous file/folder; press
and hold the key to save current song to Thumb up
playlist.
T DOWN/THUMB DOWN - Selectsnext file/folder;
pressand hold the key to save current song to Thumb
down playlist.
OK- confirms playlist operation and file search input.
HOME (available by remote control only) - Sackto
the first folder( or root directory) of the current
disc(MP3 disc stop only)
FILESEARCH- activates file searchinput mode.
PLAYLIST- activates playlist operation.
CD DISP/FMST- Toggles ID3TAG when playing MP3
i Note for playing MP3 Disc music.Presstov_ewamongthefollowing:
• * Use.mp3 asthe extension when converting
audio files into MP3 for saving onto CD-R(W)or
i CD-ROM e.g. Rocky08.mp3. Do not use anyother
i extension e.g..doe, .pdf.
i , Do not use the .rap3 extension for other text or
i non-audio data files as this may result in serious
malfunction and harmful noise interference.
For better quality in MP3 discplayback, the CD
quality should be recorded 128kbpsor above.
i * For UDF format (e.g. disc by Direct CD),please
enable CDROM accessafter burning the disc when
i usingCDR.
• Discdata size> 650MB is not recommended.
i • Total files and folders in the discshould not
i exceed 250, it also depends on the length of the
i file/folder names.
i • Playback capability for CD-RWdiscsmay vary
due to variations in the quality of the CD-RWdisc
i and the recorder usedto create the disc.
i • For mixed mode discs,only one mode will be
selected for playback depending on the recording
format.
• To ensure good performance, wait until the disc
changer completely reads the disc before pro-
_ ceeding.
! • MP3 files in CD ROM EXTRAformat disc cannot
be recognized.
File Name,Album, Artist, Genre, Year and Bit Rate.
Playing a MP3 disc
I. Insert a MP3 CD into the CDtray, you will see the
name of the first folder (or root directory) displayed
on the screen.
2. Pressthe A UP/THUMB UP button to select
previousfile/folder, and T DOWN/IHUMBDOWN
button to select next MP3 song/folder.
3.PressRIGHT i_ to go into a folder.
4. PressPLAY/PAUSE I_11button to play all the
songs in the folder, or use A UP/ T DOWN to select
songs.
5.Press PLAY I_II to play from the song selected.
Page 11

File Search
It isdifficult to find asong in adisc with hundreds of
them The unit provides a tool for the userto look for
a desired song by specifying up to first three
characters of the song name
1.PressFILE SEARCHand usenumber/character keys
(if using the front panel, pressUP _-/ DOWN v /
LEFT _ I RIGHT !_ buttons instead) to select
character.
2. PressRIGHT I_ to specify the second character and
then the third one. You may go back to the previous
one whenever you want to make a change.
3. PressOK button to start searching. After searching,
a list in alphanumeric order will be generated with
the first one of those songsstarting with the specified
characters displayed.
4 PressUP A/DOWN V to check through the list
And pressOK to start playing
Playlist
Addingsongstoa playlist
I PressPLAYUST to enter the Playlist menu
2 Select "ADD SONG?" using the DOWN T button,
pressthe OK button to confirm
3 Selectthe Playlist you want(a total of 20 playlists
available), pressthe OK button to confirm
4 Select your desired song by using file navigation
procedure, pressOK button to confirm selection
5 PressSTOP [] key to exit the Playlist menu
Playinga playlist
1 Pressthe PLAYLISTkeyagain and selectthe "SEL
PLYLST?"item Pressthe OK button to confirm
2 Selectany Playlist you want to play, all the songs in
the Playlist will be played if you pressthe
PLAY/PAUSE !_11 button,
3,You canpressthe OK button to get into the
Playlist, playlist will beplayed starting from the dis-
played song.
Deleting files in a playlist
I When showing a file, pressand hold STOP []
key 'DELETE?'will appear on the display
2 PressOK to confirm
Deleting a playlist
I When showing a playlist, pressand hold the STOP [] i
key,the 'DELPYLST?'will appear on the display Press
and hold STOP again and 'DELALL'will appear on
the display Continue to pressand hold the key to
toggle among the two option
2.Once the correct one isselected, pressOK to
confirm.
Thumb Up Playlist
This is aspecial Playlist, which you can easily store
songsinto
I Pressand hold the THUMB UP A key to store the
song into it, no matter if it isbeing played or not
2 To activate, pressBOOKMARK, pressTHUMB UP A
to select THUMB UPplaylist and pressOK to begin
playback
The unit will play the tracks in the order that they
were entered into the THUMB UP playlist
Thumb Down Playlist
It isa song list inwhich all the songswill be skipped
while the disc isbeing played
I pressand hold the THUMB DOWN V button to
storethe song into it, no matter if it isbeing played
or not,
2 TOactivate, pressBOOKMARK, pressTHUMB
DOWN T toselectTHUMBDOWNplaylistand
pressOK to begin playback
The unit will play existing disc and skip all the tracks
inside Thumb down playlist (Normal playback only)
"%.. ............................................................................................................................................................................... .*."
1o
Page 12

Selecting Tuner Band
1.PressSOURCEto select TUNER.
2. PressBAND to select between AM or FM radio
band.
Tuning to a Station
PressSKIPRACKWARD _ /FORWARD _
onthemainunitorTUNEREW _ /IUNEFFWD
on the remote control to select frequencies.
Using Presets
The tuner can be in either TUNE or PRESETmode.
When in PRESETmode, the PROGlight ison.
• PressTUNE/PRESETon the main unit to toggle
TUNEand PRESETmode.
• PressSKIP BACKWARD _ orSKIP
FORWARD _ _ on the main system or
PRESETPREV _ or PRESETNEXT _ on the
remote control to accessthe previous or next
preset station. The display first shows the preset
program number and after a few seconds,the
frequency will be displayed. (FMPR:01is FM
preset I)
AutoPresetProgramming(forFMonly)
Pressand hold RANDIAUTO PROG. button for 2sec-
onds to scan stations in FM band. Thestations will
then be stored as preset channels. A maximum 32 sta-
tions can be stored. Beware of your preset channels
being erased accidentally becausethe scanning and
storing processisautomatic upon pressing and hold-
ing the button. Youcan stop the automatic scan by
pressingany button, but the erased stations cannot be
recovered.
ManuallySettingPresets
1.PressTUNE/PRESETbutton to enter TUNE mode.
¸II II¸II; I;I¸ii;i!!!ii i
2. PressSKIP RACKWARD _ /SKIPFORWARD
•_ to accessthe desired frequency.
3. Pressthe PROG/SETbutton once.
4.The most recently accessedprogram location will
be displayed.
5. If adifferent program location is preferred, press
SKIPRACKWARD _ ISKIPFORWARD _
to move to the desired preset number (I-32).
6. PressPR_ET to store the selected frequency at
that preset.
Suppressing Stereo Signal
PressCD DISPLAY/FM STto toggle between FM
mono and stereo for stereo FMstations.
Page 13

. •
i
Playing a Tape
Tip: You can play a tape from either deck.
1. PressSOURCErepeatedly to setectTAPE.
2. PressSTOPIEJECT• _-_ to open cassette door.
3. Insert a tape into the door and push the door
closed.
4. PressREW_I /F.FWD _ to position the tape
to the desired starting position. (Deck 1Only)
5. PressPLAY _ to start playback.
Continuous Play
1. Insert a tape into deck 2and start playback.
2. Insert a tape into deck I and pressPLAY _ and
PAUSE 11 together.
3.When the tape in deck 2 finishes playback, PAUSE
at deck 1wiII be released automatically and start
playback.
Recording
FromTuner
1. Insert a tape into deck I.
2. PressSOURCErepeatedly to setectTUNER and
pressBAND to accessthe desired radio band.
3.Tuneto the station to be recorded.
4. PressRECORD • to begin recording.
5. PressSTOP/EJECT• m. to end recording.
From CD
1.Insert atape into deck 1.
2. PressSOURCE repeatedly to select CD.
3. Insert the disc(s)to be recorded.
4. Selectthe track, CD,or program to berecorded.
5.PressRECORD • to begin recording when CD
begins to play.
6. PressSTOP/EJECT • _ to end recording.
Tapeto Tape
1.Insert the destination tape in deck 1.
2. Insert the source tape into deck 2.
3. PressPAUSE || andthen RECORD • on deck 1.
4. PressPLAY I_ on deck 2. The playback and
recording start simuttaneousIy.
From an Auxiliary Input
1.Insert the cassettein deck 1.
2. Check that the auxiliary device has been connect-
ed correctly to the AUX connector on the back of the
audio system.
3. Start ptayback on the auxiliary device.
4. PressRECORD• on deck I to begin recording.
5.PressSTOP/I_ECT • _Ato end recording.
12
Page 14

Solution
• Check power cord for asecure
connection.
• Unplug the unit for a moment, and
then plug into power source again.
• Checkthe outlet by plugging in
another device.
• Increasethe volume setting.
• Checkconnection to speakers.
• Checkthat you haveselected the
appropriate function: CD,TAPE,Tuner.
• Make sure mute isoff.
• Checkantenna connection.
• Move antenna.
• Turnoff nearby electrical appliances,
suchashair dryer, vacuum deaner,
microwave, fluorescent lights.
• Checkthat CDisin the tray.
• Checkthat CDlabel isfacing up.
• Checkthat PAUSEmode isnot on.
• Checkthat CDfunction is selected.
• UseCD lens cleaner.
• Clean the disc.
• Clean the disc.
• Checkdisc for warping, scratches, or
other damage.
• Check if something is causing the
systemto vibrate. If so,move the
system.
• Make surethe speakers are at least 3
feet away or on a different surface
from the main unit.
13
Page 15

Disconnect the audio system from the power source
before performing any maintenance.
Cleaning
Clean the exterior of the system using a soft dust
cloth.
Handling CDs
• DOnot touch the signal surfaces. Hold CDs by the
edges, or by one edge and the hole. Do not affix
labels or adhesive tapes to the label surfaces. Do not
scratch or damage the label. CDsrotate at high
speeds inside the player. Do not use damaged
(cracked or warped) CDs
CD Player
CAUTION! This systemoperates with a laser.It must
be opened by only aqualified technician.
Tape Player
To prevent deterioration of sound quality, periodical-
ly open the door of each deck and clean the magnetic
heads,pinch roller, and capstan with a cotton bud
dipped in alcohol. Also, demagnetize the head by
playing ademagnetizing
cassette (available through
an audio equipment store).
To protect recordings one or both sidesof a tape,
remove the corresponding tab. If you later want to
record on the tape, affix a piece ....
of adhesive tape over the hole.
Quit Slacking- A little bit of slack
in your tapes can causescratches
on the tape, or worse yet, the
tape could break. If you notice some slackin the tape,
usea pencil to tighten it up before you insert it.
Cleaning CDs
• Dirty CDscan cause poor sound quality. Always
keep CDsclean by wiping them gently with a soft
cloth from the inner edge toward the outer perime-
te_
• If a CD becomesdirty, wet a soft cloth in water,
wring it out well, wipe the dirt away gently, and
then remove any water drops with a dry cloth.
• Do not use record cleaning sprays or antistatic
agents on CDs.Also, never clean CDswith benzene,
thinner, or other volatile solvents which may cause
damage to disc surface
CD LensCare
When your CD lens gets dirty it can also cause the
system to output poor sound quality. To clean the
lens you will need to purchase a CD lens cleaner
which can maintain the output sound quality of
your system. For instructions on cleaning the CD
lens, refer to the ones accompanying the lens clean-
er.
14
Page 16

Safety Precautions
• Never open the cabinet under any circumstances.
Any repairs or internal adjustments should be made
only by atrained technician.
• Never operate this product with the cabinet
removed.
•Do not useyour Systemimmediately after transport-
ing it from a cold place to awarm place, ascondensa-
tion may causethe system to malfunction.
• Keepyour unit away from humid areasand abnor-
mally hot places.
• Do not touch the player with wet hands. If any liq-
uid enters the player cabinet, take the player to a
trained technician for inspection.
• This compact disc player usesa laser to read the
music on the disc. The laser mechanism corresponds
to the cartridge and stylus of a record player.
Although this product incorporates a laser pick-up
lens,it is completely safe when operated according to
directions.
• Discsrotate at high speed inside the player. Do not
use damaged, warped, or cracked discs.
• Do not touch the pick-up lens which islocated
inside the disc compartment. To keep dust from col-
lecting on the pick-up lens,do not leave the compart-
ment door open for an extended period of time. If
the lens becomes dirty, clean it with a soft brush, or
use an air blower brush designed for camera lenses.
• The apparatus shall not be exposed to dripping and
splashing.
HeadsetSafety
• Do not play your headset at high volume.
Hearing experts warn against extended high-vol-
ume play.
• If you experience ringing in your ears, reduce vol-
ume or discontinue use.
• Youshould use with extreme caution or temporar-
ily discontinue use in potentially hazardous situa-
tions.
Evenif your headset is an open-air designed to let
you to hear outside sounds, do not turn up the vol-
ume so high that you are unable to hear what is
around you.
Important Battery Information
• Remove the batteries to avoid leakage if you do not
use your remote control for more than one month.
• Discard leaky batteries immediately asleaking bat-
teries may causeskin burns or other personal injuries.
Dispose of batteries in the proper manner, according
to provincial and local regulations.
• Any battery may leak electrolyte under the follow-
ing circumstances:
- if mixed with adifferent battery type,
- if inserted incorrectly,
- if all batteries are not replaced at the sametime,
- if disposed of in fire, or
- if an attempt ismade to charge a battery not
intended to be recharged.
Don't Infringe
This product should only be used for the purposes
for which it is sold, that is, entertainment, violating
no copyright law. Any attempts to use this product
for which it is not intended isunlawful and there-
fore not condoned by Thomson multimedia.
TechnicalSpecification
Power supply: 120V~6OHz
Dimensions ( Hx W x D inches):
Unit size - 13x 12x 15.4inches
Speaker - 13 x 9.4 x9.3 inches
Tape deck: Responsecurve: 125Hz-8kHz (-5dB)
CD player: Response curve (+/- 2dB): 6OHzto 20 kHz
Rating Plate: Look for it at the back of the set.
15
Page 17

i What your warranty covers:
: • Defects in materials or workmanship.
!
For how long after your purchase:
:
• One year from date of purchase for labor and parts
• Warranty period for rental units begins with the first rental or 45 days from date of shipment to the rental
i firm, whichever comesfirst.
! What we will do:
• Payany Authorized RCAAudio ServiceCenter the labor chargesto repair your unit.
:
• Payany Authorized RCAAudio ServiceCenter for the new or, at our option, refurbished replacement parts
i required to repair your unit.
i
How you get service:
• Take your unit to any Authorized RCAAudio Service Center. To identify your nearest Authorized RCAAudio
i ServiceCenter, ask dealer, look in the Yellow call 1-800-336-1900.
: • Show the Authorized ServiceCenter Representative your evidence of purchase date or first rental.
: • Pickup your unit when repairs are completed.
! • Proof of purchase in the form of a bill of sale or receipted invoice which is evidence that the product iswithin
! the warranty period must be presented to obtain warranty service. For rental firms, proof of first rental is also
i required.
your
i
i What your warranty not cover:
:
: • Customer instruction. (Your Owner's Manual describeshow to install, adjust, and operate your unit. Any
i additional information should be obtained from your dealer.)
: • Installation and related adiustments.
: • Signal reception problems not caused by your unit.
= • Damage from misuseor neglect.
: • Cleaning of audio heads.
: • 8arteries.
: • A unit that hasbeen modified or incorporated into other products or isused for institutional or other com-
i mercial purposes.
: • A unit purchased or serviced outside the U.S.A.
: • Acts of nature, such asbut not limited to lightning damage.
does
Pages
or
Product Registration:
: • Pleasecomplete and mail the Product Registration Card packed with your product. It will make it easier to
contact you should it ever be necessary. The return of the card isnot required for warranty coverage.
16
Page 18

Limitation of Warranty:
• THE WARRANTY STATEDABOVE IS THEONLY WARRANTY APPLICABLETO THISPRODUCT. ALLOTHER
WARRANTIES, EXPRESSORIMPLIED (INCLUDING ALL IMPLIED WARRANTIES OF MERCHANTABILITY OR
FITNESSFOR A PARTICULARPURPOSE)ARE HEREBYDISCLAIMED. NOVERBAL OR WRITTEN INFORMA-
TION GIVEN BY THOMSON MULTIMEDIA INC., ITS AGENTS OREMPLOYEES SHALL CREATEA GUARANTY
OR IN ANY WAY INCREASE THESCOPEOFTHIS WARRANTY.
• REPAIROR REPLACEMENT AS PROVIDED UNDER THISWARRANTY IS THE EXCLUSIVE REMEDY OF THE
CONSUMER. THOMSON MULTIMEDIA INC. SHALL NOT BELIABLE FORINCIDENTAL OR CONSEQUENTIAL
DAMAGES RESULTINGFROM THEUSEOF THIS PRODUCTOR ARISING OUT OF ANY BREACHOF ANY
EXPRESSOR IMPLIED WARRANTY ON THIS PRODUCT. THISDISCLAIMER OFWARRANTIES AND LIMITED
WARRANTY ARE GOVERNED BY THE LAWS OF THE STATEOF INDIANA. EXCEPTTOTHE EXTENT PROHIB*
ITED BY APPLICABLE LAW, ANY IMPLIED WARRANTY OF MERCHANTABILITY OR FITNESSFORA PARTIC-
ULAR PURPOSEON THIS PRODUCT IS LIMITED TOTHE APPLICABLEWARRANTY PERIOD SETFORTH
ABOVE.
How State Law relates to warranty:
• Some states do not allow the exc{usion nor Jimitation of inddental or consequential damages, or limitations
on how long an implied warranty lasts,sothe above limitations or exclusions may not apply to you.
• This warranty gives you specific legal rights, and you alsomay have other rights that vary from state to state.
If you purchased your unit outside the United States:
• Thiswarrantydoesnotapply.Contactyourdealerforwarranty information,
Service calls which do not involve defective materials or workmanship are not covered by this war-
ranty. Costs of such service calls are the sole responsibility of the purchaser.
%".... .............................................................................................................................................................................. .÷,"
Page 19

What your warranty covers:
• Defectsin materialsor workmanship.
For how long after your purchase:
• One year from date of purchase for labor and parts
• The warranty period for rental units begins with the first rental or 45 days from date of shipment to the rental
firm, whichever comes first.
What we will do:
• Payany Authorized RCAAudio Service Center the labor charges to repair your unit.
• Payany Authorized RCAAudio Service Center for the new or, at our option, refurbished replacement parts
required to repair your unit.
How you get service:
• Take your unit to any Authorized RCAAudio ServiceCenter. To identify your nearest Authorized RCAAudio
ServiceCenter, askyour dealer, look in the Yellow Pages,or call 1-800-336-1900.
• Show the Authorized Service Center Representative your evidence of purchase date or first rental
• Pick up your unit when repairs are completed.
• Proof of purchase in the form of a bill of saleor receipted invoice which isevidence that the product iswithin
the warranty period must be presented to obtain warranty service. For rental firms, proof of first rental isalso
required.
What your warranty does not cover:
• Customer instruction. (Your Owner's Manual describeshow to install, adjust, and operate your unit. Any
additional information should be obtained from your dealer.)
• Installation and related adjustments.
• Signal reception problems not caused by your unit.
• Damage from misuseor neglect.
• Cleaning of audio heads.
• Batteries.
• A unit that has been modified or incorporated into other products or is usedfor institutional or other com-
mercial purposes.
• A unit purchased or serviced outside Canada.
• Acts of nature, such asbut not limited to lightning damage.
Product Registration:
• Pleasecomplete and mail the Product Registration Card packed witb your product. It will make it easier to
contact you should it ever be necessary. The return of the card isnot required for warranty coverage.
Page 20

Limitation of Warranty:
• THE WARRANTY STATEDABOVE IS THEONLY WARRANTY APPLICABLETO THISPRODUCT.NO VERBAL
OR WRITTEN INFORMATION GIVEN BY THOMSON MULTIMEDIA LTD., ITSAGENTS OR EMPLOYEESSHALL
CREATEA GUARANTY OR IN ANY WAY INCREASETHESCOPEOFTHIS WARRANTY.
• REPAIROR REPLACEMENT AS PROVIDED UNDER THISWARRANTY IS THE EXCLUSIVE REMEDY OF THE
CONSUMER. THOMSON MULTIMEDIA LTD.SHALL NOT BELIABLE FOR INCIDENTAL OR CONSEQUENTIAL
DAMAGES RESULTINGFROM THEUSEOF THIS PRODUCT.EXCEPTTO THE EXTENT PROHIBITED BY
APPLICABLEPROVINCIAL LAW, ANY IMPLIED WARRANTY OF MERCHANTABILITY OR FITNESSFORA
PARTICULARPURPOSEON THIS PRODUCT ISLIMITED TO THEAPPLICABLE WARRANTY PERIODSET
FORTHABOVE.
How Provincial Laws relates to warranty:
• This warranty gives you specific legal rights which are in addition to statutory warranties that may vary from
Province to Province_
If you purchased your unit outside Canada:
• Thiswarrantydoesnotapply.Contactyourdealerforwarranty information,
Service calls which do not involve defective materials or workmanship are not covered by this war-
ranty, Costs of such service calls are the sole responsibility of the purchaser.
%".... .............................................................................................................................................................................. .÷,"
 Loading...