

Page 1
RCA
Models: RS2518
RS2519
Page 2
RS2518/19-EN 3/29/01 9:43 AM Page 4
FCCInformation
This device generates and usesradio frequency (RF)
energy, and if not installed and used properly, this
equipment may cause interference to radio and tele-
vision reception.
This equipment hasbeen type tested and found to
comply with the specifications in Subpart Jof Part 15
of FCCRules.These rules are designed to provide rea-
sonable protection against radio and television inter-
ference in aresidential installation. However, there is
no guarantee that interference will not occur in par-
ticular installations.
If this equipment does causeinterference to radio or
television reception (which you can determine by
turning the equipment off and on), try to correct the
interference by one or more of the following meas-
ures:
• Reorient the receiving antenna (that is,
the antenna for the radio or television
that is"receiving" the interference).
• Move the unit away from the equipment
that isreceiving interference.
• Plugthe unit into a different wall outlet
so that the unit and the equipment
receiving interference are on different
branch circuits.
If these measures do not eliminate the interference,
please consult your dealer or an experienced
radio/television technician for additional sugges-
tions.
Also,the Federal Communications Commission has
prepared a helpful booklet, "How To Identify and
Resolve Radio TV Interference Problems." This book-
let isavailable from the U.S. Government Printing
Office, Washington, DC20402. Pleasespecifystock
number 004-000-00345-4 when ordering copies.
This product complies with DHHS Rules21CFR
Subchapter J.Applicable at the date of manufacture.
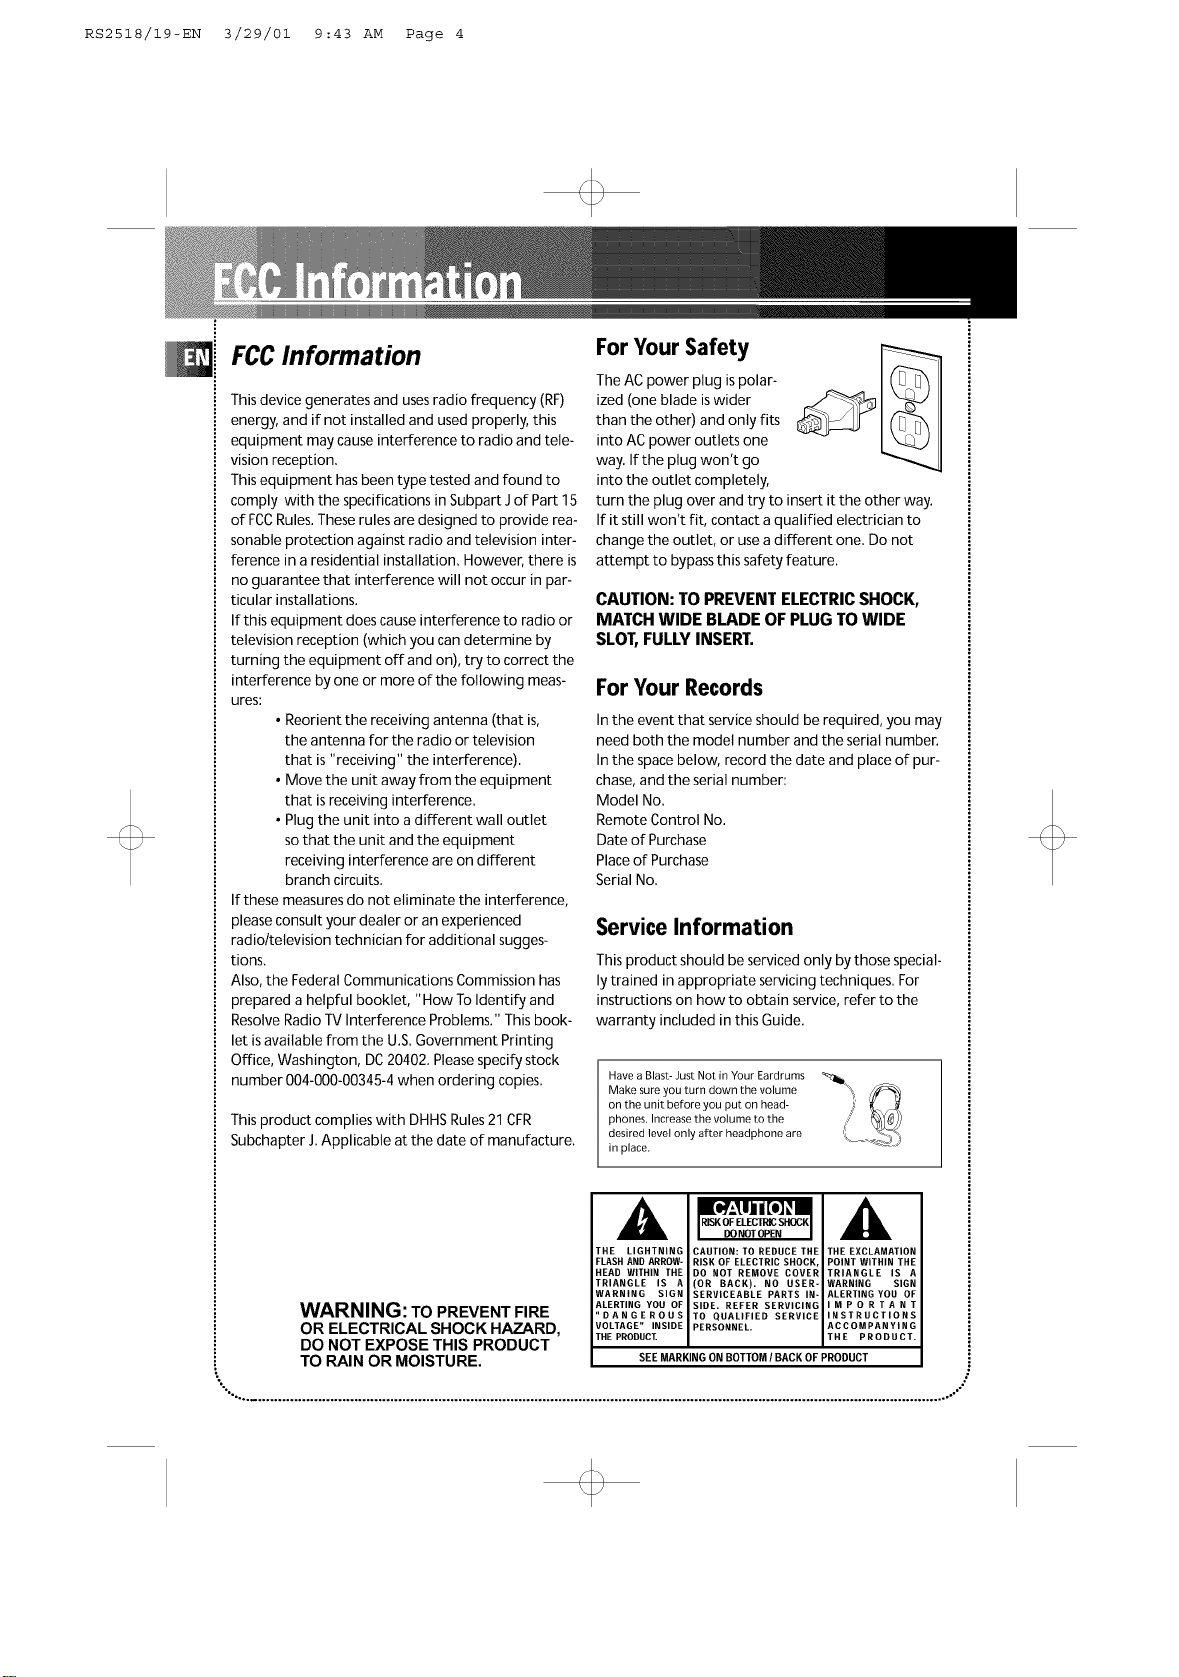
For Your Safety
The ACpower plug ispolar-
ized (one blade iswider
than the other) and only fits
into ACpower outlets one
way. Ifthe plug won't go
into the outlet completely,
turn the plug over and try to insert it the other way.
If it still won't fit, contact a qualified electrician to
change the outlet, or usea different one. Do not
attempt to bypassthis safety feature.
CAUTION: TO PREVENTELECTRICSHOCK,
MATCH WIDE BLADE OF PLUGTO WIDE
SLOT,FULLYINSERT.
For Your Records
In the event that service should be required, you may
need both the model number and the serial number.
In the spacebelow, record the date and place of pur-
chase,and the serial number:
Model No.
Remote Control No.
Date of Purchase
Placeof Purchase
Serial No.
Service Information
Thisproduct should be serviced only by those special-
ly trained in appropriate servicing techniques. For
instructions on how to obtain service, refer to the
warranty included in this Guide.
Have a Blast- Just Not in Your Eardrums
Make sure you turn down the volume
on the unit before you put on head-
phones. Increase the volume to the
desired level only after headphone are
in place.
,&
THE LIGHTNING
FLASH AND ARROW-
HEAD WITHIN THE
TRIANGLE IS A
WARNING SIGN
WARNING: TO PREVENT FIRE
OR ELECTRICAL SHOCK HAZARD,
DO NOT EXPOSE THIS PRODUCT
ALERTING YOU OF
DANGEROUS
VOLTAGE" INSIDE
THE PRODUCT.
TO RAIN OR MOISTURE.
"°-... .............................................................................................................................................................................. ..-°"
CAUTION: TO REDUCE THE
RISK OF ELECTRIC SHOCK,
DO NOT REMOVE COVER
(OR BACK). NO USER-
SERVICEABLE PARTS IN-
SIDE. REFER SERVICING
TO QUALIFIED SERVICE
PERSONNEL.
BEEMARKINGON BOTTOM/ BACKOF PRODUCT
THE EXCLAMATION
POINT WITHIN THE
TRIANGLE IS A
WARNING SIGN
ALERTING YOU OF
MPORTANT
INSTRUCTIONS
ACCOMPANYING
THE PRODUCT.
Page 3
RS2518/19-EN 3/29/01 9:43 AM Page 5
FCC/SafetyInformation
Installation .......... 2
Controls& Indicators
Main Unit ............... 3
Tape Player .............. 3
Remote Control .......... 4
Display
Showing the Demonstration
........................ 5
Display Alarm/Clock ....... 5
Setting the Time ......... 5
Setting the Timer ......... 5
Activating the Timer .... 5
Adjusting the Display
Brightness ............. 5
SleepMode ............ 5
Sound Features
Using Preset Equalizer Curves
........................ 6
Creating a Custom Curve
........................ 6
BBoost ................. 6
Muting Audio ............ 6
CD Player
Loading Discs .......... 6
Playing Discs ........... 6
Shuffling the Play Order .6
Sampling Tracks ........ 6
Repeating the Play Order . .7
CDdisplay ............... 7
Setting Up a CDprogram . .7
Playing a Program List ..... 7
Displaying the Program list
........................ 7
Deleting a Trackfrom a
Program List ............. 7
Skipping a Disk ........... 7
Searching through aCD ...7
Tuner
Tuning to aStation ....... 8
Using Presets ............ 8
Auto Preset Program (for FM
only) .................... 8
Setting Presets ........... 8
Suppressing Stereo Signal
........................ 8
TapePlayer
Playing a Tape ........... 9
Continuous Play .......... 9
Recording ............... 9
From Tuner ............. 9
From CD ............... 9
Tape to Tape ........... 9
From an Auxiliary Input . .9
TroubleshootingTips
................... 10
Maintenance
Cleaning ............... 10
CDPlayer ............... 10
Tape Player ............. 10
More Information .... 11
RS2518/RS2519
"°..., .............................................................................................................................................................................. .°-"
!
Page 4
RS2518/19-EN 3/29/01 9:43 AM Page 6
IIIIIIIIIIIIIIIIIIIIIIIIIII
IIIIIIIIIIIIIIIIIIIIIIIIIII
IIIIIIIIIIIIIIIIIIIIIII11
iiiiiiiiiiiiiiiiiiiiiiiiii__ _R_/_ !!!iiiiiiiiiiiiiiiiiii!!!!!!ii
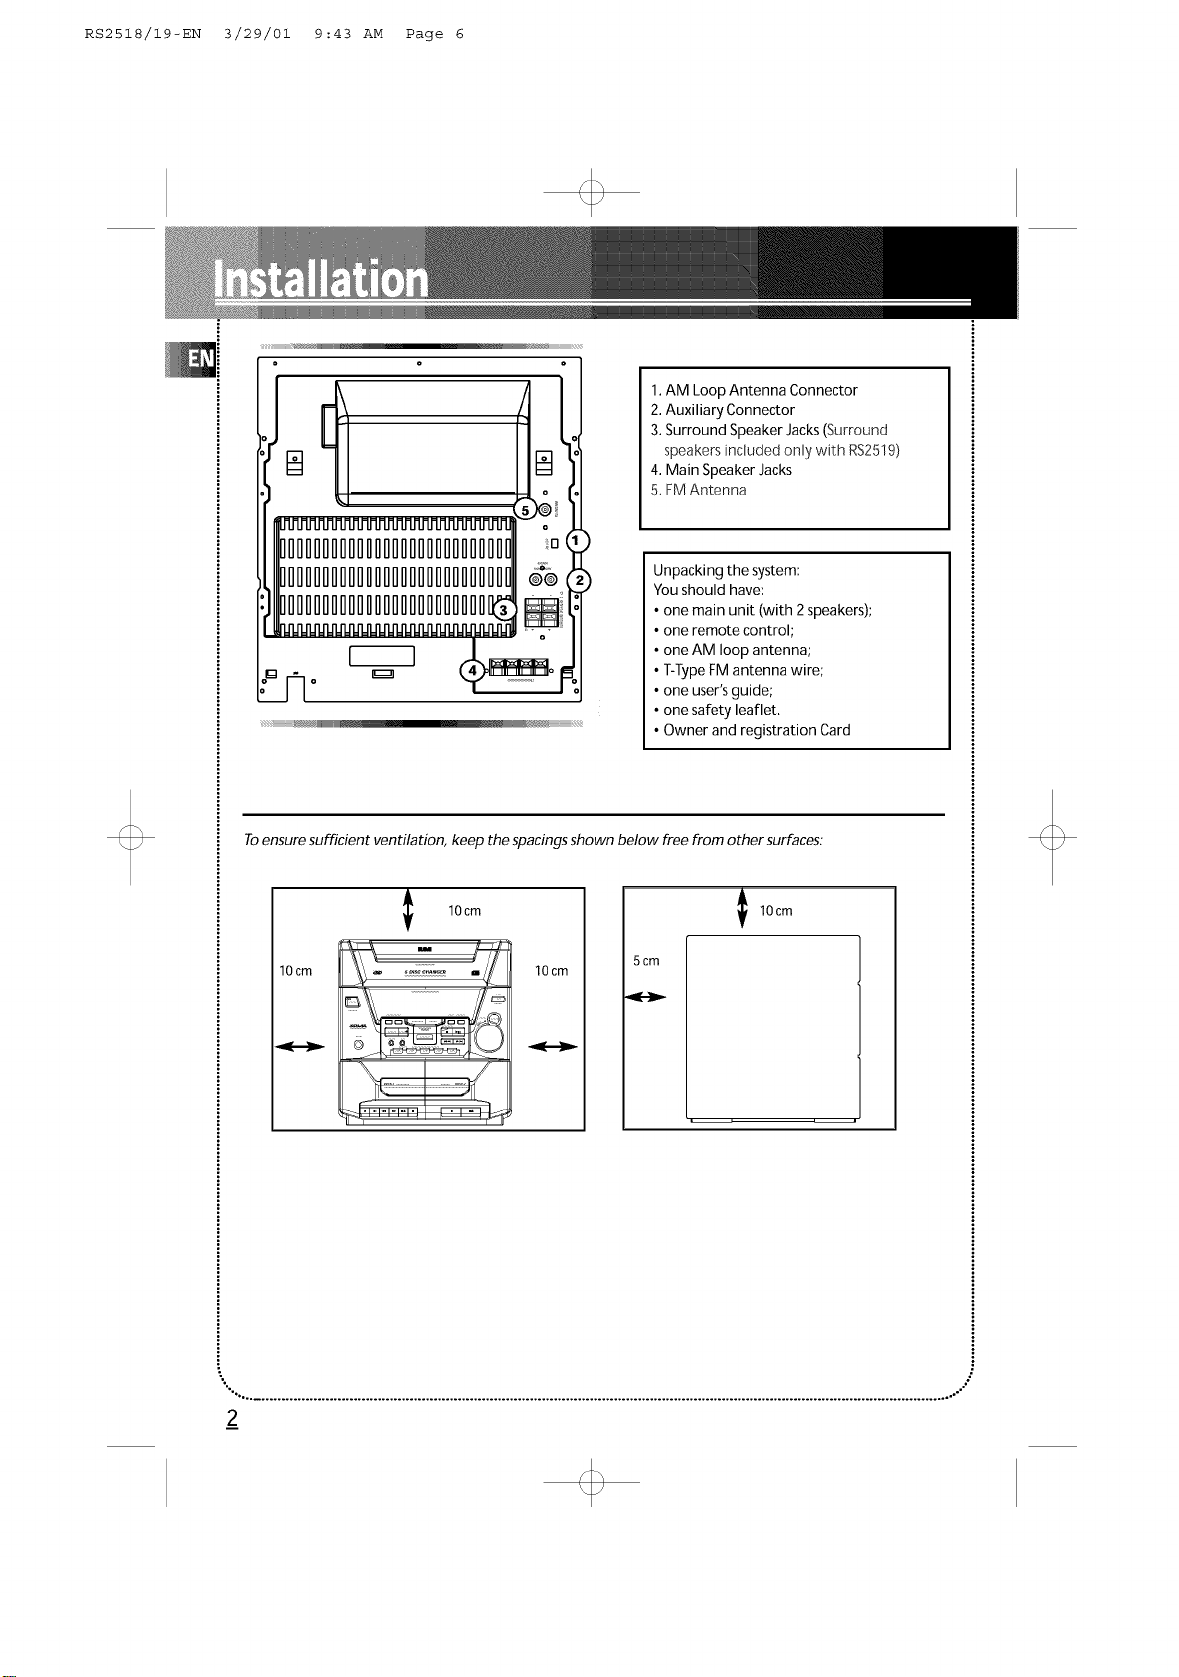
1.AM Loop Antenna Connector
2.Auxiliary Connector
3. Surround Speaker Jacks(Surround
speakers inciuded only with RS2519)
4. Main Speaker Jacks
5. FMAntenna
Unpacking the system:
You should have:
• one main unit (with 2speakers);
• one remote control;
• one AM loop antenna;
• T-TypeFM antenna wire;
• one user's guide;
• one safety leaflet.
• Owner and registration Card
Toensure sufficient ventilation, keep the spacings shown below free from other surfaces:
I 10cm
10cm
"°'.°° ............................................................................................................................................................................... .°-";
10 cm
5 cm
_2
Page 5
RS2518/19-EN 3/29/01 9:43 AM Page 7
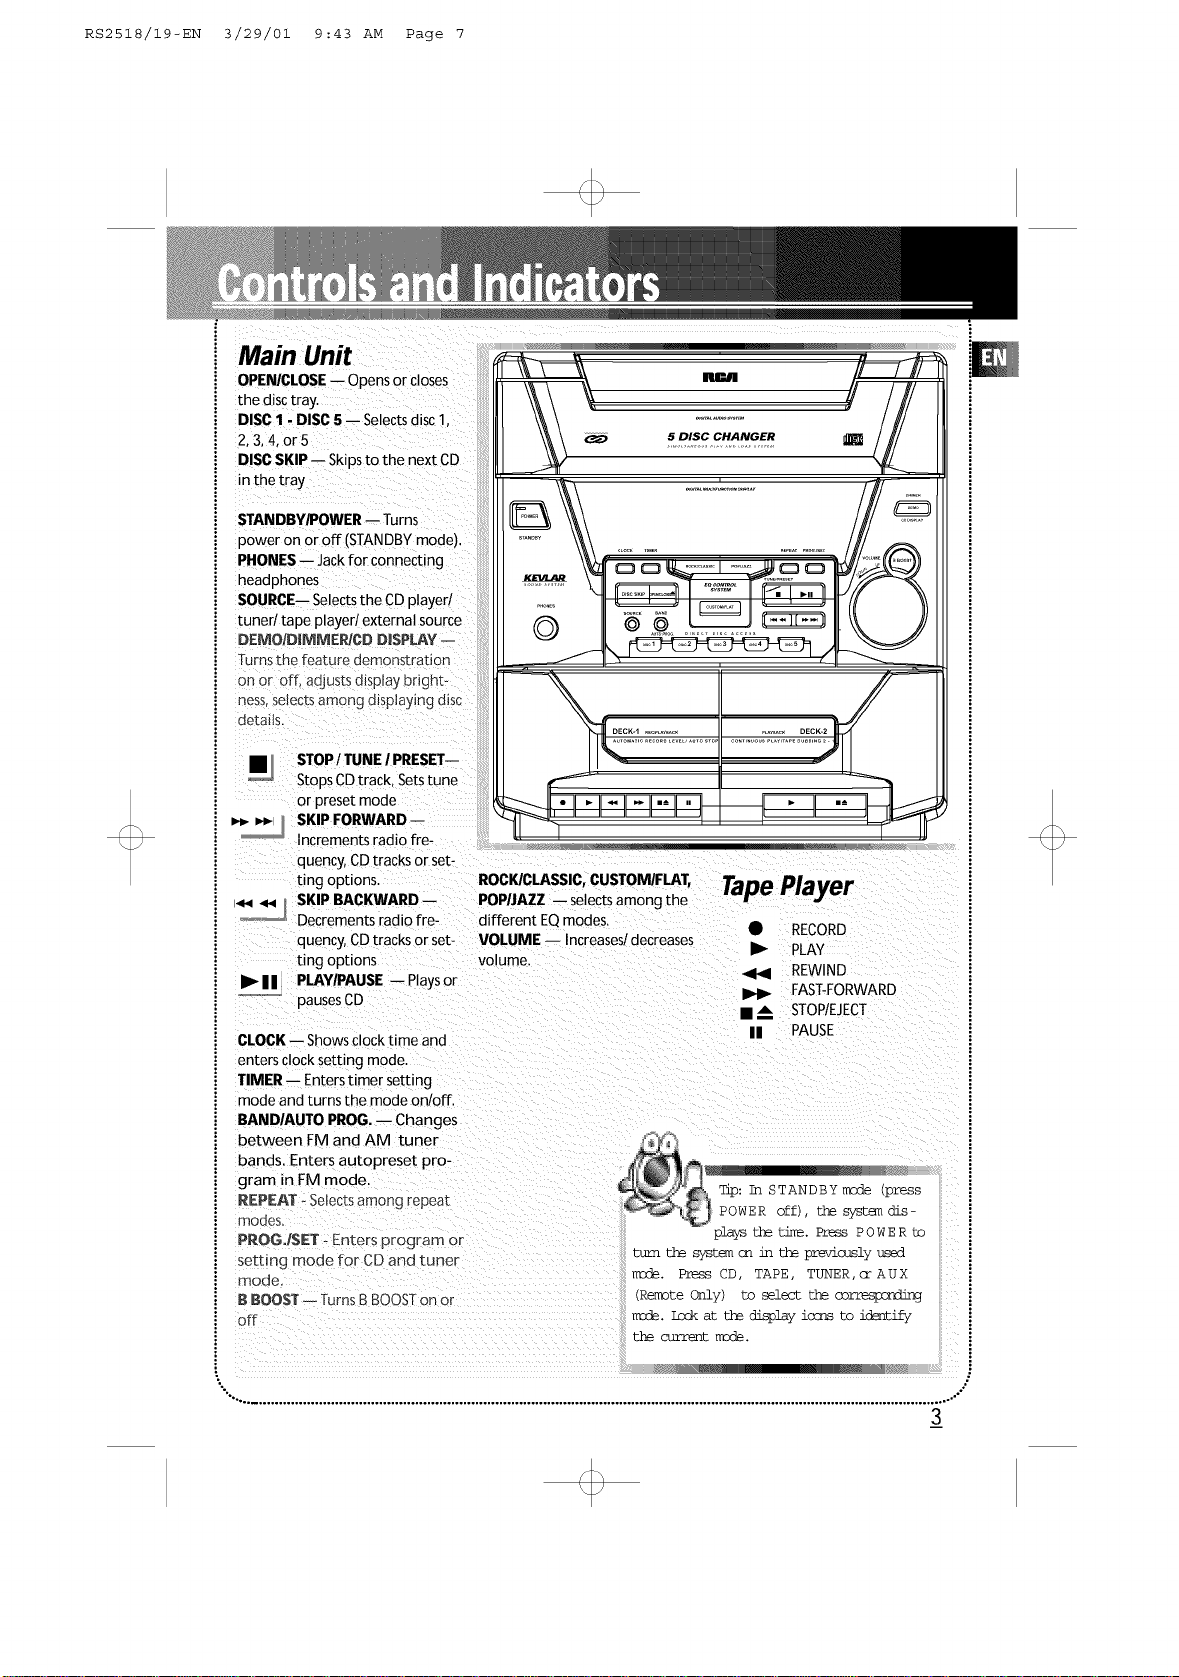
Main Unit
OPE_CLOSE i Opensor closes
the disc tray.
DISC 1 -DISC5 -- Selectsdisc 1.
2.3,4, or5
DISCSKIP -- Skipsto the next CD
in the tra)
STANDBY/POWER-- Turns
power on or off (STANDBYmode).
PHONES-- Jack for connecting
headphones
SOURCE-- Selectsthe CD player/
tuner/tape player/external source
D.EMO/DJMME_CD DISPLAY --
Turnsthe feature demonstrahon
on or off, adjusts display bright-
ness selects among displaying disc
details.
t ,f
STOP/ TUNE / PRESET--
Stops CDtrack, Setstune
or preset mode
SKIP FORWARD --
Increments radio fre-
quency,CDtracks or set-
ting options. ROCK/CLASSIC,CUSTOM/FLAT,
SKIP BACKWARD -- POP/JAZZ i selectsamong the
Decrements radio fre- different EQmodes.
quency,CDtracks or set- VOLUME i Increases/decreases
ting options volume.
I1_| | PLAY/PAUSE -- Playsor
...... pausesCD
CLOCK-- Showsclock time and
enters clock setting mode.
TIMER i Enters timer setting
mode and turns the mode on/off.
BANDIAUTO PROG.i Changes
between FM and AM tuner
bands. Enters autopreset pro-
gram in FM mode,
REPEAT - Selectsamonq repea_
modes.
PROGJSET - Enters program or
setting mode for CD and tuner
mode,
BBOOST -- TurnsB BOOSTon or
off ....
_l _. _DECK-1 ................. DECK-2
Tape Player
• RECORD
REWIND
I1_ PLAY i
FAST-FORWARD
• m. STOP/EJECT i
II PAUSE i
Tip: In STANDBY mode tpress
POWER off thesyszemdis
playsthetim_.PrsesPOWER to
mum thesysu_ ca intheprevicmslyused
mode. Press3D TAPE, TUNER coAUX
(RemoteOnly co selectthecorresponding
mode.LockamthedisplayicrmsEo iclEntify
the _E mode.
i
"°,................................................................................................................................................................................°."
3
Page 6
RS2518/19-EN 3/29/01 9:43 AM Page 8
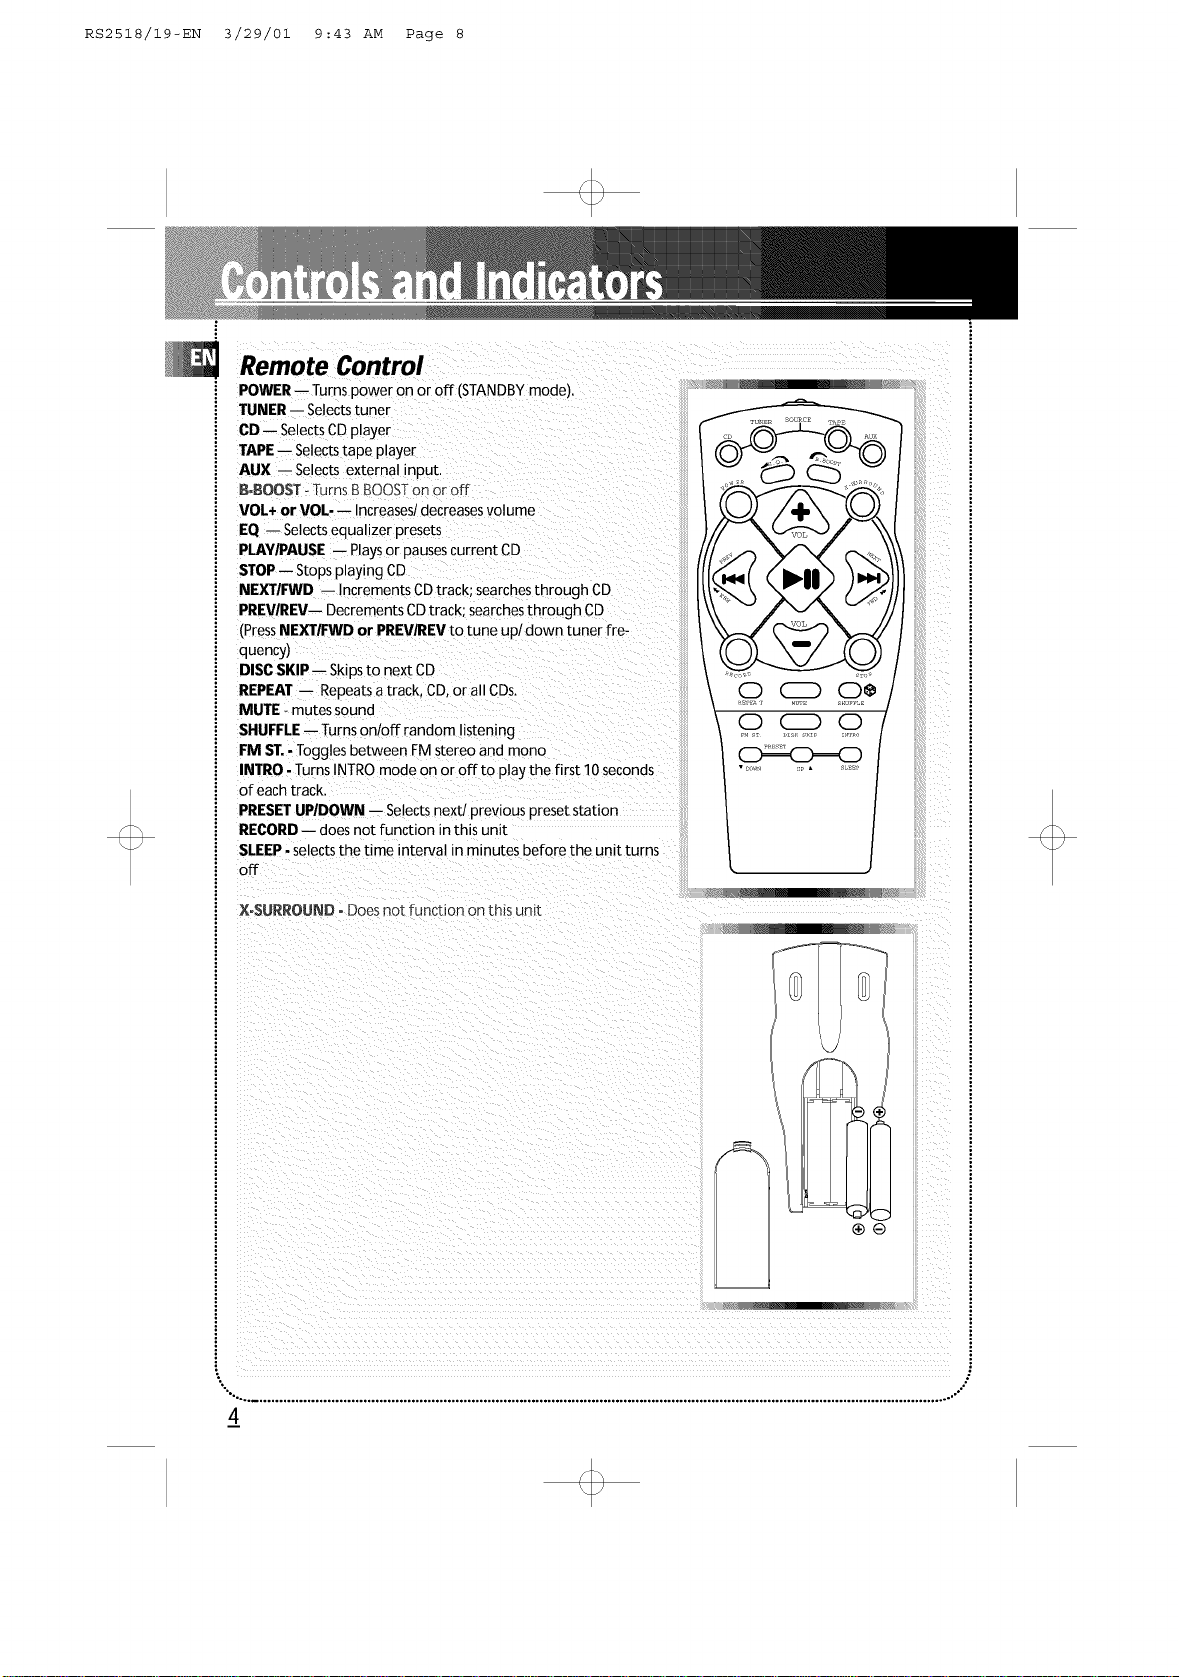
Remote Control
POWER -- Turns power on or off (STANDBYmode),
TUNER-- Selectstuner
CD -- SelectsCD player
TAPEi Selectstape player
AUX i Selects external input.
B_BOOST - TurnsB BOOSTon or off
VOL+ or VOL--- Increases/decreasesvolume
EQ i Selectsequalizer presets
PLAY/PAUSE -- Playsor pausescurrent CD
STOP-- Stopsplaying CD
NEXTIFWD i Increments CDtrack: searchesthrough CD
PREVIREVi Decrements ODtrack: searchesthrough CD
(PressNEXTIFWD or PREV/REVto tune up/down tuner fre-
quency)
DISCSKIP i Skipsto next CD
REPEAT i Repeatsa track, CD,or all ODs.
MUTE - mutes sound
SHUFFLE-- Turns on/off random listening
FM ST.-Toggles between FM stereo and mono
INTRO- Turns INTROmode on or off to play the first 10seconds
of each track.
PRESETUPIDOWN i Selectsnext/previous preset station
RECORDi does not function in this unit
SLEEP- selectsthe time interval in minutes before the unit turns
off
\o o
L
XoSURROUND oDoesnot function on this unr_
i
"°... ............................................................................................................................................................................... .,,°"
4
Page 7

RS2518/19-EN 3/29/01 9:43 AM Page 9
Showing the Demonstration
Not operational inCDmode. PressDEMO/DIMMER
to turn on/off demonstration mode. The demonstra-
tion scrollsthrough all display operations.
Activating the Timer
Pressand releaseTIMER to turn on/off
the alarm The alarm isactive when the
clock icon indicator is lit
(9
DISPLAY ALARM/CLOCK
Setting the Time
1.Pressand hold CLOCKuntil the hour flashes on
the display,
2. PressSKIPBACKWARD or SKIP FORWARD to set
the hour and then press CLOCKto shift to minute
digits.
3. PressSKIPBACKWARD or SKIP FORWARD to set
the minute.
4. PressSETto savesettings and STOPto quit set-
ting.
Note: When system isON, you can pressCLOCKto
display the current time for about 2 seconds.
Setting the Timer
1.Pressand hold TIMER until the ON appear with
the hour flashing (ON - timer on time )
2. For setting time, pressSKIP FORWARDI BACK-
WARD to set the hour and then pressTIMER to shift
to minute digits.
3. PressSKIPFORWARD I BACKWARD to set the
minute
4 PressTIMER to change to OF (timer offtime) with
hour flashing Repeatsteps 2& 3for timer offtime
setting
5 PressTIMER to select source PressSKIP FOR-
WARD I BACKWARD to select between CD/TUNER/
AUX / TAPE)
6 PressTIMER to set volume Rotate the VOLUME
knob to set desired volume level
7. PressSETto save settings or STOPto quit setting,
AdJusting the Display Brightness
1. Pressand hold DEMO/DIMMER for more than 2
seconds.
2.While the dimmer is dis-
played, press and release
DIMMER to select the desired level (DIMM 0 -3).
Sleep Mode
You can selectthe time interval inminutes before
the unit turn off automatically PressSLEEPon the
remote to select among 120, 90, 60, 45,30, 15& 5
minutes (Remote Only)
"°-,.. ................................................................................................................................................................................. °,"
5_
Page 8

RS2518/19-EN 3/29/01 9:43 AM Page i0
UsingPreset Equalizer Curves
PressROCK/CLASSIC,CUSTOM/FLAT,POP/JAZZon the
main unit or EQ on the remote to toggle among
FLAT,ROCK,JAZZ,POP,CLASSICAL& CUSTOM. The
display shows briefly the selection.
Creating a Custom Curve
1. PressCUSTOM/FLATto select CUSTOM mode.
2.While "CUSTOM" isdisplayed, pressSKIP FOR-
WARD I BACKWARD to cycle among displayed bass-,
mid-, and treble -range levels.
3.While BAS, MID, or TRE isdisplayed, adjust VOL-
UME to set the associated gain
between -10- +10.
iiiiiiiiiiiiiiiiiiiiii _ ==============================
B Boost
PressB BOOST to turn on/off boosting the bassfre_
quency.
Muting Audio
PressMUTE on the remote to cut
the sound. (Remote Only)
Playand load simultaneously by:
1. PressOPENICLOSEto open the tray while aCD is
playing
2. Load/change discsfor available trays by pressing
DISCSKIP.
3. PressOPENICLOSEto closethe tray.
li][l]lll
Shuffling the Play Order
PressSHUFFLEto turn on!off the playing of tracks in
Loading Discs
1. PressSOURCErepeatedly to select CD mode.
2. PressOPEN/CLOSEto open the drawer.
3. Insert upto five discswith label face up. (PressDISC
SKIPto rotate the disccarrier.)
4. PressOPEN/CLOSEto closethe drawer. Loaded disc
position icon lights.
random order. (Remote Only)
SamplingTracks
PressINTROto play the first 10 secondsof each track
on the current disc, all discsin the tray, or turn INTRO
mode off. (Remote Only)
(Note: You may alsopressREPEATto select 1disc or
Playing Discs all discsbefore activating INTRO &SHUFFLEfunc-
PressPLAYIPAUSEto begin or pause play, and STOP
to stop play.
Select aspecific disc bypressing DISC 1 - DISC 5. _;7"\/-' F _)
PressSKIP FORWARD/BACKWARD to select a specif- .'_ ' : ' ' '
ictrack. _,_ andholdSKI P-FORWARD c_
tions)
_ Tip Nhileplay_ a (33press
ACKWARD formorethan2 sec-
:. to search _ the (I).
"°.... .............................................................................................................................................................................. ..,°"
Page 9

RS2518/19-EN 3/29/01 9:43 AM Page ii
Repeating the Play Order
PressREPEATto repeat the current track, current disc,
all discs,or turn REPEATmode off.
CD
PressDEMO/DIMM[RJCD DISPLAY to select among
different display options: Trackremain time/Track
elapsed time or Discremain time.
Setting Up a CDProgram
You can program the CDplayer to play up to any 32
tracks on the CDsin the
tray.
1. While the CD player is
stopped, pressPROGISET
to enter
program mode. The system displays the next avail-
able program number: "- - P:01," with "- -" flashing,
prompts you for the first track inthe program list.
2. PressSKIPFORWARD / BACKWARD to select a
track(press DISC SKIP or DISK 1- DISK 5 to select a
trackfrom adifferent disc).
3. Immediately pressSETto assign the selectedtrack
to the program number. After 3 seconds,you are
prompted for the next track inthe program list.
(In CD program mode, PROG iconwill be lit.)
Displaying the Program List
1.While the CD player isstopped,pressSETto enter
PROGRAM mode.
2. PressSETrepeatedly to listeachtrack assignment
in the program list.
Deleting Program List
While in PROGRAM mode, pressand hold STOPfor 5
seconds. They system displays the messageCLEAR.
Skipping a Disk
PressDISC SKIP.
Searching Through a CD
Pressand hold SKIP FORWARD/BACKWARD to
searchthrough a CDas it isplaying.
Playing a Program List
While in PROGRAM mode, pressPLAY
Ti_s:Youcan createa pro-
gramof up to 32 t_.
Pre_ CD DISPLAY repeatedlytoview
elapsedtracktim_,trackntmher,track
mmmln tim_ and disc mmmin time.
Cauticm:Do Notz_shto forceclosingof thetray
<D playbackor traycp_nlz_
".° ............................................................................................................................................................................... .°."
Z
Page 10

RS2518/19-EN 3/29/01 9:43 AM Page 12
1.PressSOURCEto select TUNER.
2.PressBAND to select between AM or FM radio
band.
Tip:Youraudiosystemhas32presetstaticss.
Setting Presets
1. PressSKIPFORWARD/BACKWARD to accessthe
desired frequency.
2. Pressthe SETbutton once.
3.The most recentlyaccessedprogram location will
bedisplayed.
4. If a different program location ispreferred, press
SKIP BACKWARD I FORWARD to move to the
desired preset number (1-32).
5. PressSETto store the selected frequency at that
preset.
Tuning to a Station
PressSKIP FORWARD/BACKWARD to select fre-
quencies.
Using Presets
The tuner can be either
TUNEor PRESETmode.
When in PRESETmode, the PROGlight ison.
PressSKIP BACKWARD or SKIP FORWARD on the
main systemor PRESETUPor DOWN on the remote
control to accessthe previous or next preset station.
The display first shows the preset program number
and after a few seconds, the frequency and preset
program number will be displayed. (FMPR:01isFM
preset 1)
Auto Preset
Programming
(for FM only)
Pressand hold BAND
button for 2secondsto scanstations in FM band. The
stations wilt then be stored as preset channels. A maxi-
mum 32 stations can be stored. Beware of your preset
channels being erased accidentally becausethe scan-
ning and storing processisautomatic upon pressing
the button. You can stop the automatic scanby press-
ing any button, but the erased stations cannot be
recovered.
Suppressing Stereo Signal
PressFM STto toggle between FM mono and stereo
for stereo FM stations, (Remote Only)
"°.... .............................................................................................................................................................................. .°.°"
_8
Page 11

RS2518/19-EN 3/29/01 9:43 AM Page 13
Playing a Tape
Tip"You csn playa tapefrcmeithercL=ck.
1. PressSOURCErepeatedly to selectTAPE.
2. PressSTOPIEJECTto open the cassette door.
3. Insert,a tape into the door and push the door
closed.
4. PressREWIND/FAST FORWARD to position the
tape to the desired starting position, (Deck 1 Only)
5. PressPLAY.
Continuous Play
1. Insert a tape into deck 2and start playback,
2. Insert a tape into deck 1and pressPLAYand
PAUSEtogether,
3.When the tape in deck 2 finishes playback, PAUSE
at deck 1will be released automatically and start
playback,
Recording
From Tuner
1. Insert a tape into deck 1.
2. PressSOURCErepeatedly to selectTUNER and
pressBAND to accessthe desired radio band
3.Tune to the station to be recorded.
4. PressRECORDto begin recording.
5. PressSTOPto end recording,
From CD
1.Insert a tape into deck 1.
2.PressSOURCErepeatedly to select CD.
3.Insert the disc(s)to be recorded.
4.Select the track, CD,or program to be recorded.
5.PressRECORDto begin recording,
6. CD beginsto play.
7.PressSTOPto end recording.
Tape to Tape
1.Insert the destination tape in deck 1.
2.Insert the source tape into deck 2.
3.PressPAUSEand then RECORDon deck 1.
4.PressPLAYon deck 2.The playback and recording
start simultaneously.
From an Auxiliary Input
1.Insert the cassettein deck 1.
2,Check that the auxiliary devicehas been connect-
edcorrectly to the AUX connector on the back of the
audio system.
3.Start playback on the auxiliary device.
4.PressRECORDon deck 1to begin recording.
5..PressSTOPto end recording.
°,.. ............................................................................................................................................................................... ...'°
9
Page 12

RS2518/19-EN 3/29/01 9:43 AM Page 14
Solution
Check power cord for a secure connection.
Unplug the unit for a moment, and then plug
into power source again.
Check the outlet by plugging in another device.
Increase the volume setting.
Check connection to speakers.
Check that you have selected the appropriate
function: CD, TAPE, Tuner.
Make sure mute isoff.
Check antenna connection.
Move antenna.
Turn off nearby electrical appliances, such as
hair dryer, vacuum cleaner, microwave, fluores-
cent lights.
Check that CD is in the tray,
Check that CD label is facing up.
Check that PAUSE mode is not on,
Check that CD function is selected,
Use CD lens cleaner,
Clean the disc,
Clean the disc.
Check disc for warping, scratches, or other
damage.
Solution
Check if something is causing the system to
vibrate. If so, move the system.
Make sure the speakers are at least 3 feet away
or on a different surface from the main unit.
Switch to another function (TAPE, Tuner) and
then back to CD.
Inspect the tape heads and clean and demag-
netize.
Check that the batteries are properly installed.
Replace weak batteries.
Check the system isplugged into power source.
Point the remote directly at the system's front
panel.
Move closer to the system.
Remove any obstacles between the remote and
the system.
Disconnect the audio system from the power source
before performing any maintenance.
icheads, pinch roller, and capstan with a cotton bud
dipped in alcohol. Also, demagnetize the head by
playing ademagnetizing cassette (available through
Cleaning
Clean the exterior of the system using asoft dust
cloth.
an audio equipment store).
To protect recordings one or
both sidesof atape, remove _
the corresponding tab. If you ..........................
CDPlayer
later want to record on the tape, affix apiece of i
adhesive tape over the hole. !
CAUTION! Thissystem operates with a laser,tt must
be opened by only a qualified technician,
Quit Slacking - A little bit of slack in
your tapes cancause scratcheson
TapePlayer
To prevent deterioration of sound quality, periodical-
ly open the door of each deck and clean the magnet-
"°.................................................................................................................................................................................. .°.°"
the tape, or worse yet, the tape
could break. If you notice some slack
in the tape, usea pencil to tighten it up before you
insert it.
lO
Page 13

RS2518/19-EN 3/29/01 9:43 AM Page 15
Safety Precautions
• Never open the cabinet under any circumstances Any
repairs or internal adjustments should be made only by a
trained technician
• Never operate this product with the cabinet removed
• Do not touch the player with wet hands If any liquid
enters the player cabinet, take the player to a trained
technician for inspection
• This compact disc player usesa laser to read the music
on the disc The laser mechanism corresponds to the car
tridge and stylus of a record player Although this prod
uct incorporates a laser pickup lens, it is completely safe
when operated according to directions
• Discs rotate at high speed inside the player Do not use
damaged, warped, or cracked discs
Prevent damage to this product, set switch for proper
voltage
• Do not touch the pickup lens which is located inside
the disccompartment To keep dust from collecting on
the pick up lens, do not leave the compartment door
open for an extended period of time If the lens
becomes dirty, clean it with a soft brush, or use an air
blower brush designed for camera lenses
. The apparatus shall not be exposed to dripping and
splashing
Important Battery Information
• Remove the batteries to avoid leakage if you do not
use your remote control for more than one month
Discard leaky batteries immediately as leaking batteries
may cause skin burns or other personal injuries Dispose
of batteries in the proper manner, according to provin
cial and local regulations Any battery may leak elec
trolyte if mixed with a different battery type, if inserted
incorrectly, if all batteries are not replaced at the same
time, if disposed of in fire, or if an attempt is made to
charge a battery not intended to be recharged
Headset Safety
• Do not playyour headset at high volume Hearing
experts warn against extended highvolume play
• If you experience ringing in your ears, reduce volume
or discontinue use
• You should use with extreme caution or temporarily
discontinue use in potentially hazardous situations
Even if your headset isan openair designed to let you
to hear outside sounds, do not turn up the volume so
high that you are unable to hear what isaround you
Handling CDs
• Do not touch the signal surfaces Hold CDs bythe
edges, or by one edge and the hole Do not affix labels or
adhesive tapes to the label surfaces Do not scratch or
damage the label CDsrotate at high speeds inside the
player Do not use damaged (cracked or warped) CDs
Cleaning CDs
•Dirty CDscan cause poor sound quality Always keep
CDs clean by wiping them gently with a soft cloth from
the inner edge toward the outer perimeter
• If a CD becomes dirty, wet a soft cloth in water, wring it
out well, wipe the dirt away gently, and then remove any
water drops with a dry cloth
• Do not use record cleaning sprays or antistatic agents
on CDs Also, never clean CDs with benzene, thinner, or
other volatile solvents which may cause damage to disc
surface
CD Lens Care
When your CD lens gets dirty it can also cause the system
to output poor sound quality To clean the lens you will
need to purchase a CD lens cleaner which can maintain
the output sound quality of your system For instructions
on cleaning the CD lens, refer to the ones accompanying
the lens cleaner
Don't Infringe
This product should only be used for the purposes for
which it is sold, that is, entertainment, violating no copy
right law Any attempts to use this product for which it is
not intended is unlawful and therefore not condoned by
Thomson multimedia
Technical Specification
Power supply: 120V-60Hz for RCAmodels
Dimensions ( H x W x D mm):
Unit size - 329 x 306 x 400 ([or all)
Speaker (for all) 329 x 240 x 207
Surround Speaker (for RS2519) !80 x 96 x 86
]ape deck: Response curve: ! 25Hz 8kHz (5dB)
CD player: Response curve (+/2dB): 20Hz to 20 kHz
Rating Plate: Look for it at the back of the set
"°..., .............................................................................................................................................................................. .°-°°
11
Page 14

RS2518/19-EN 3/29/01 9:43 AM Page 16
RCA AUDIO SYSTEMS
What your warranty covers:
• Defectsin materialsorworkmanship,
For how long after your purchase:
• Oneyear from date of purchase for labor and parts
• Warranty period for rental units begins with the first rental or 45 days from date of shipment to the rental
firm, whichever comes first.
What we will do:
• Payany Authorized RCAAudio ServiceCenter the labor charges to repair your unit.
• Payany Authorized RCAAudio ServiceCenter for the new or, at our option, refurbished replacement parts
required to repair your unit.
How you get service:
• Takeyour unit to any Authorized RCAAudio ServiceCenter. Toidentify your nearest Authorized RCAAudio
ServiceCenter, askyour dealer, look in the Yellow Pages,or call 1-800-336-1900.
• Show the Authorized Service Center Representative your evidence of purchasedate or first rental.
• Pick up your unit when repairs are completed.
• Proof of purchase inthe form of a bill of saleor receipted invoice which is evidence that the product iswithin
the warranty period must be presented to obtain warranty service. For rental firms, proof of first rental isalso
required.
What your warranty does not cover:
• Customer instruction. (Your Owner's Manual describes how to install, adjust, and operate your unit. Any
additional information should be obtained from your dealer.)
• Installation and related adjustments,
• Signal reception problems not caused by your unit.
• Damage from misuseor neglect.
• Cleaning of audio heads.
• Batteries.
• A unit that has been modified or incorporated into other products or isused for institutional or other com-
mercial purposes,
• A unit purchased or serviced outside the U.S.A.
• Acts of nature, suchasbut not limited to lightning damage.
Product Registration:
• Pleasecomplete and mail the Product Registration Card packed with your product. It will make it easier to
contact you should it ever be necessary.The return of the card is not required for warranty coverage.
"-.. .............................................................................................................................................................................. .o,*"
Page 15

RS2518/19-EN 3/29/01 9:43 AM Page 17
Limitation of Warranty:
• THE WARRANTY STATEDABOVE ISTHE ONLY WARRANTY APPLICABLETO THIS PRODUCT. ALLOTHER
WARRANTIES, EXPRESSORIMPLIED (INCLUDING ALL IMPLIED WARRANTIES OF MERCHANTABILITY OR
FITNESS FORA PARTICULARPURPOSE)ARE HEREBYDISCLAIMED. NO VERBAL OR WRITTEN INFORMA-
TION GIVEN BYTHOMSON MULTIMEDIA INC., ITSAGENTSOR EMPLOYEES SHALLCREATEA GUARANTY
OR IN ANY WAY INCREASETHESCOPE OF THISWARRANTY.
• REPAIROR REPLACEMENTAS PROVIDED UNDER THIS WARRANTY IS THEEXCLUSIVE REMEDY OFTHE
CONSUMER. THOMSON MULTIMEDIA INC. SHALLNOT BE LIABLE FORINCIDENTAL OR CONSEQUENTIAL
DAMAGES RESULTINGFROM THE USEOF THIS PRODUCT ORARISING OUT OF ANY BREACHOF ANY
EXPRESSOR IMPLIED WARRANTY ON THISPRODUCT. THIS DISCLAIMER OFWARRANTIES AND LIMITED
WARRANTY ARE GOVERNED BYTHE LAWS OF THE STATEOFINDIANA. EXCEPTTO THEEXTENT PROHIB-
ITED BY APPLICABLELAW, ANY IMPLIED WARRANTY OF MERCHANTABILITY OR FITNESSFOR A PARTIC-
ULAR PURPOSEON THIS PRODUCT IS LIMITED TO THE APPLICABLEWARRANTY PERIOD SETFORTH
ABOVE.
How State Law relates to warranty:
• Some states do not allow the exclusion nor limitation of incidental or consequential damages, or limitations
on how long an implied warranty lasts,so the above limitations or exclusions may not apply to you.
• This warranty gives you specific legal rights, and you also may have other rights that vary from state to state.
If you purchased your unit outside the United States:
• Thiswarrantydoesnot apply. Contactyourdealerfor warrantyinformation,
Service calls which do not involve defective materials or workmanship are not covered by this war-
ranty. Costs of such service calls are the sole responsibility of the purchaser.
"°..., .............................................................................................................................................................................. .°-°°
1__3
Page 16

RS2518/19-EN 3/29/01 9:43 AM Page 18
RCA AUDIO SYSTEMS
What your warranty covers:
• Defectsin materialsor workmanship.
For how long after your purchase:
• One year from date of purchase for labor and parts
• The warranty period for rental units begins with the first rental or 45days from date of shipment to the rental
firm, whichever comes first.
What we will do:
• Payany Authorized RCAAudio ServiceCenter the labor chargesto repair your unit.
• Payany Authorized RCAAudio ServiceCenter for the new or, at our option, refurbished replacement parts
required to repair your unit.
How you get service:
• Takeyour unit to any Authorized RCAAudio Service Center. To identify your nearest Authorized RCAAudio
ServiceCenter, askyour dealer, look in the Yellow Pages,or call 1-800-336-1900.
• Showthe Authorized ServiceCenter Representative your evidence of purchase date or first rental.
• Pickup your unit when repairs are completed.
• Proof of purchase in the form of a bill of sale or receipted invoice which is evidence that the product is within
the warranty period must be presented to obtain warranty service. For rental firms, proof of first rental isalso
required.
What your warranty does not cover:
• Customer instruction. (Your Owner's Manual describeshow to install, adjust, and operate your unit. Any
additional information should be obtained from your dealer.)
• Installation and related adjustments.
• Signalreception problems not caused by your unit.
• Damage from misuseor neglect.
• Cleaning of audio heads.
• Batteries.
• A unit that hasbeen modified or incorporated into other products or is usedfor institutional or other com-
mercial purposes.
• A unit purchased or serviced outside Canada.
• Acts of nature, such asbut not limited to lightning damage.
Product Registration:
• Pleasecomplete and mail the Product Registration Card packed with your product. It will make it easier to
contact you should it ever be necessary. The return of the card isnot required for warranty coverage.
"-.. .............................................................................................................................................................................. .o,"
14
Page 17

RS2518/19-EN 3/29/01 9:43 AM Page 19
Limitation of Warranty:
• THE WARRANTY STATED ABOVE IS THE ONLY WARRANTY APPLICABLETO THIS PRODUCT.NO VERBAL
OR WRITTEN INFORMATION GIVEN BY THOMSON MULTIMEDIA LTD.,ITS AGENTS OREMPLOYEES SHALL
CREATEA GUARANTY OR IN ANY WAY INCREASETHE SCOPEOF THISWARRANTY.
• REPAIROR REPLACEMENTAS PROVIDED UNDER THIS WARRANTY ISTHE EXCLUSIVE REMEDY OF THE
CONSUMER. THOMSON MULTIMEDIA LTD.SHALL NOTBE LIABLEFORINCIDENTAL OR CONSEQUENTIAL
DAMAGES RESULTINGFROM THEUSE OF THISPRODUCT. EXCEPTTOTHE EXTENTPROHIBITED BY
APPLICABLEPROVINCIAL LAW, ANY IMPLIED WARRANTY OF MERCHANTABILITY OR FITNESSFOR A
PARTICULARPURPOSEON THIS PRODUCT IS LIMITED TO THE APPLICABLEWARRANTY PERIOD SET
FORTHABOVE.
How Provincial Laws relates to warranty:
• Thiswarranty givesyou specific legal rights which are in addition to statutory warranties that may vary from
Province to Province.
If you purchased your unit outside Canada:
•Thiswarrantydoesnot apply.Contactyourdealerfor warranty information.
Service calls which do not involve defective materials or workmanship are not covered by this war-
ranty Costs of such service calls are the sole responsibility of the purchaser
"...° .............................................................................................................................................................................. .°-"
 Loading...