

Page 1

EN
Rev.1
added “Attention” sentence to pg 10
RS2010 EN rev.1 9/2/02 9:40 AM Page 1
Page 2
EXPORTER
Thomson multimedia Inc.
P.O. Box 1976
Indianapolis, IN 46206-1976
© 2002 Thomson multimedia Inc.
Trademark(s) ® Registered
Marca(s) ® Registrada(s)
Marque(s) ® Deposée(s)
55305530 (EN/F/E)
www.rca.com
www.rca.com/LatinAmerica
Printed In China / Impreso en China
IMPORT ADOR
Comercializadora Thomson de México, S.A. de C.V.
Miguel de Cervantes Saavedra 57
Col. Ampliación Granada
C.P. 11529 Mexico D.F.
Telefono: (55)25 81 53 20
RFC: CTM-980723-KS5
0151
RS2010 EN rev.1 9/2/02 9:40 AM Page 2
Page 3
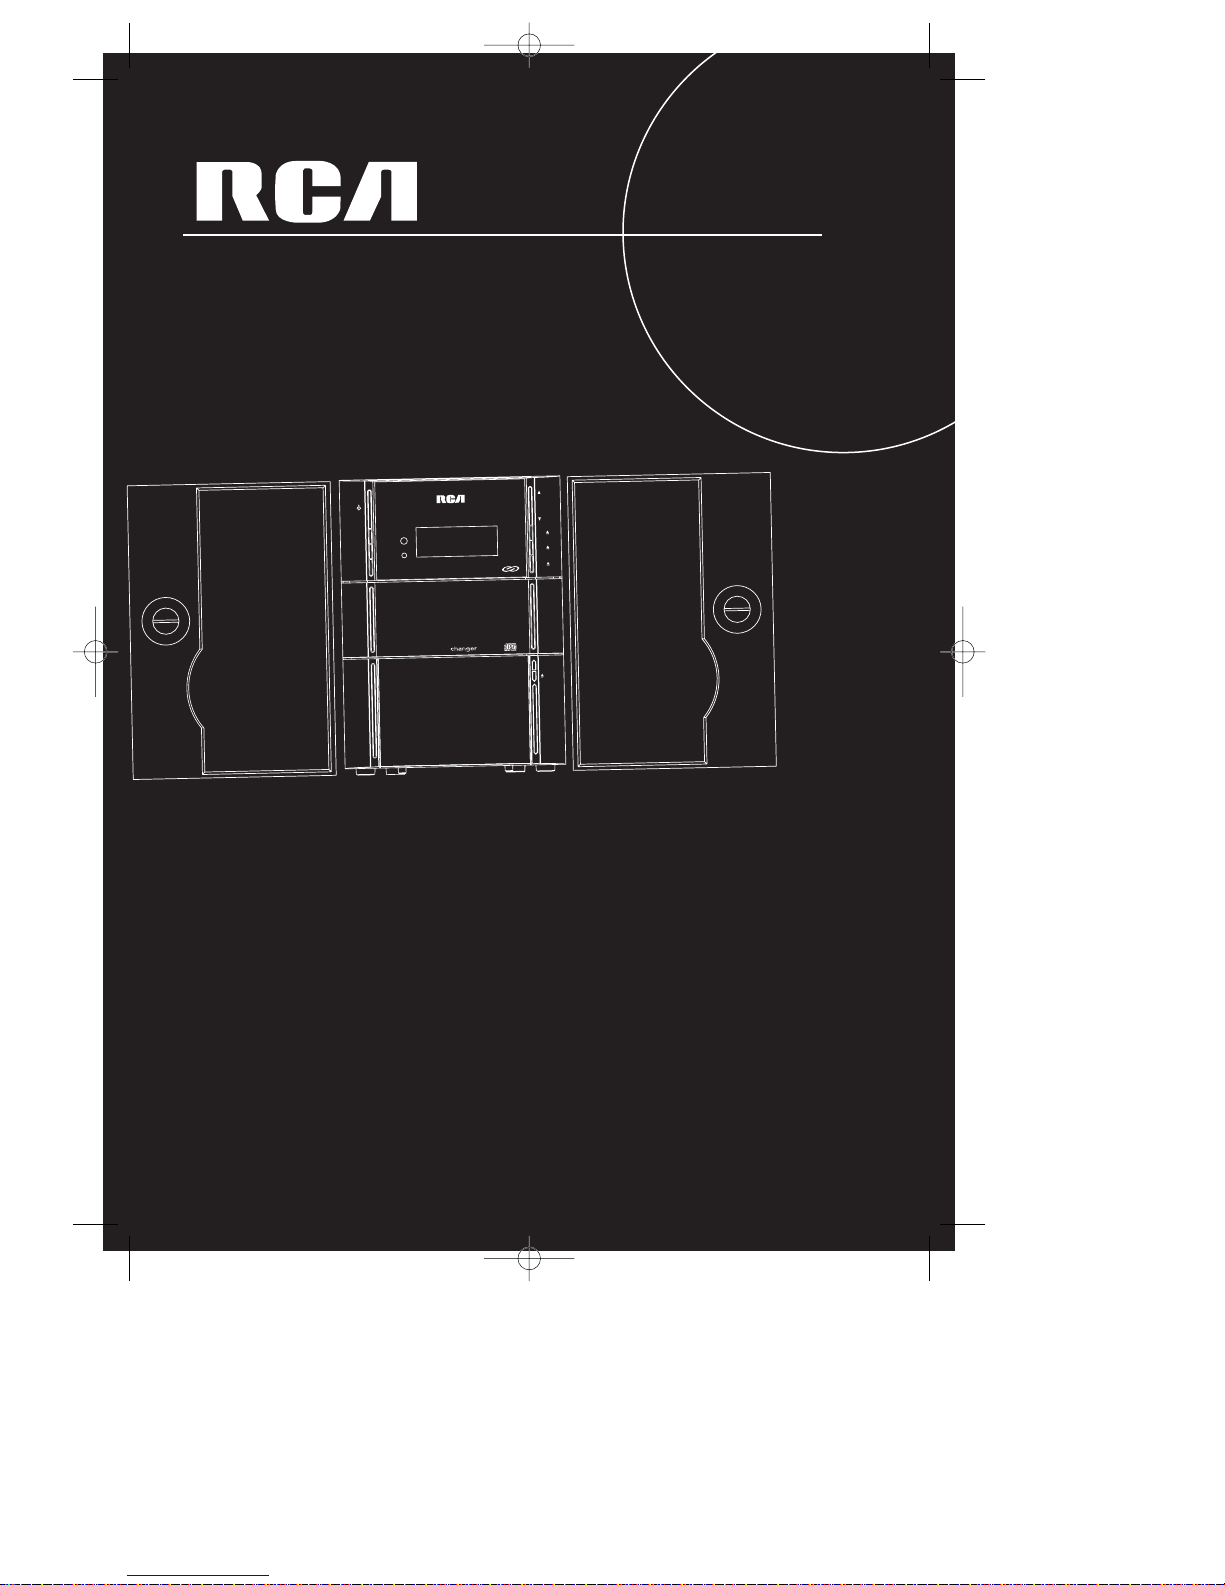
RS2010
usermanual
TOUCH SENSOR
VOL
DISC1 /
DISC2 /
DISC3 /
TIMER
DIM/
DEMO
SOURCE
ON /
STANDBY
COMPACT DISC AUDIO
CD-RW COMPATIBLE
Motorized panel
CD
3
IR
STANDBY
It is important to read this instruction book prior to using your new product for the first time.
Es importante leer este manual antes de usar por vez primera su euipo.
RS2010 EN rev.1 9/2/02 9:40 AM Page 3
Page 4
FCC Information
This device complies with Part 15 of the FCC Rules.
Operation is subject to the following two conditions:
(1) This device may not cause harmful interference,
and (2) this device must accept any interference
received, including interference that may cause undesired operation.
In accordance with FCC requirements, changes or
modifications not expressly approved by Thomson
multimedia Inc. could void the user’s authority to
operate this product.
This device generates and uses radio frequency (RF)
energy, and if not installed and used properly, this
equipment may cause interference to radio and television reception.
If this equipment does cause interference to radio or
television reception (which you can determine by
unplugging the unit), try to correct the interference
by one or more of the following measures:
• Re-orient the receiving antenna (that is, the antenna for the radio or television that is "receiving" the
interference).
• Move the unit away from the equipment that is
receiving interference.
• Plug the unit into a different wall outlet so that
the unit and the equipment receiving interference
are on different branch circuits.
If these measures do not eliminate the interference,
please consult your dealer or an experienced
radio/television technician for additional suggestions.
Also, the Federal Communications Commission has
prepared a helpful booklet, "How To Identify and
Resolve Radio TV Interference Problems." This booklet is available from the U.S. Government Printing
Office, Washington, DC 20402. Please specify stock
number 004-000-00345-4 when ordering copies.
This product complies with DHHS Rules 21
CFR Subchapter J. Applicable at the date of
manufacture.
Technical specification
Product: Compact Audio System
Brand: RCA
Model: RS2010
Electrical Consumption:
Power Supply: 120V ~ 60 Hz
Power consumption: 50 Watts
IMPORTER
Comercializadora Thomson de México, S.A. de C.V.
Miguel de Cervantes Saavedra 57
Col. Ampliación Granada
C.P. 11529 Mexico D.F.
Telefono: (55)25 81 53 20
RFC: CTM-980723-KS5
For Your Safety
The AC power plug is polarized (one blade is wider
than the other) and only fits into
AC power outlets one way. If the
plug won’t go into the outlet
completely, turn the plug over
and try to insert it the other way.
If it still won’t fit, contact a qualified electrician to change the outlet, or use a different one. Do not attempt to bypass this safety feature.
CAUTION: TO PREVENT ELECTRIC SHOCK,
MATCH WIDE BLADE OF PLUG TO WIDE
SLOT, FULLY INSERT.
EN
FCC Information
WARNING: TO PREVENT FIRE
OR ELECTRICAL
SHOCK HAZARD,
DO NOT EXPOSE THIS PRODUCT
TO RAIN OR MOISTURE.
SEE MARKING ON BOTTOM / BACK OF PRODUCT
CAUTION
RISK OF ELECTRIC SHOCK
DO NOT OPEN
THE EXCLAMATION
POINT WITHIN THE
TRIANGLE IS A
WARNING SIGN
ALERTING YOU OF
IMPORTANT
INSTRUCTIONS
ACCOMPANYING
THE PRODUCT.
THE LIGHTNING
FLASH AND ARROWHEAD WITHIN THE
TRIANGLE IS A
WARNING SIGN
ALERTING YOU OF
"DANGEROUS
VOLTAGE" INSIDE
THE PRODUCT.
CAUTION: TO REDUCE THE
RISK OF ELECTRIC SHOCK,
DO NOT REMOVE COVER
(OR BACK). NO USERSERVICEABLE PARTS INSIDE. REFER SERVICING
TO QUALIFIED SERVICE
PERSONNEL.
Have a Blast- Just Not in Your
Eardrums
Make sure you turn down
the volume on the unit
before you put on headphones. Increase the volume
to the desired level only after
headphones are in place.
RS2010 EN rev.1 9/2/02 9:40 AM Page 4
Page 5
EN
Safety Information
For Your Records
In the event that service should be required, you may
need both the model number and the serial number.
In the space below, record the date and place of purchase, and the serial number:
Model No.
Remote Control No.
Date of Purchase
Place of Purchase
Serial No.
Service Information
This product should be serviced only by those specially trained in appropriate servicing techniques. For
instructions on how to obtain service, refer to the
warranty included in this Guide.
FCC Information /
Safety Information
Getting Started . . . . . . .2
Unpacking the system . . . . . . . .2
Back View . . . . . . . . . . . . . . . . . .2
Connecting the Speakers . . . . .2
Using the Antenna . . . . . . . . . .2
Installation . . . . . . . . . . . . . . . . .2
General Controls . . . . . .3
Main Unit . . . . . . . . . . . . . . . . . .3
Remote Control . . . . . . . . . . . .4
Installing Batteries . . . . . . . . . .4
Display Settings
Display . . . . . . . . . . . . . . . . . . . .5
Showing Demonstration . . . . .5
Display Clock / Timer . . . . . . . . .5
Setting the Clock . . . . . . . . . .5
Setting the Timer . . . . . . . . .5
Activating the Timer . . . . . . .5
Adjusting Display Brightness5
Sleep Mode . . . . . . . . . . . . . .5
Sound Features . . . . . . .6
Using Preset Equalizer Curves .6
X-Bass . . . . . . . . . . . . . . . . . . . . .6
Volume Control . . . . . . . . . . . . .6
Muting Audio . . . . . . . . . . . . . .6
CD Player
Notes on CD-R/RW Disc . . . . . . .6
Loading Discs . . . . . . . . . . . . . . .6
Playing Discs . . . . . . . . . . . . . . . .6
Play and Load
Simultaneously . . . . . . . . . . .6
Skipping a Disc . . . . . . . . . . .6
Searching Through a CD . . .6
Random Playback . . . . . . . . .7
Sampling Tracks . . . . . . . . . . .7
Repeat . . . . . . . . . . . . . . . . . .7
Setting Up a CD Program . . .7
Playing a Program List . . . . .7
Display and Edit the Program
List . . . . . . . . . . . . . . . . . . . . . .7
Deleting Program List . . . . . .7
Radio . . . . . . . . . . . . . . .8
Selecting Tuner Band . . . . . . . .8
Tuning to a Station . . . . . . . . . .8
Using Presets . . . . . . . . . . . . . . .8
Manually Setting Presets . . . . .8
Clearing Presets . . . . . . . . . . . . .8
Suppressing Stereo Signal . . . .8
Tape Player
Playing a Tape . . . . . . . . . . . . . .9
Auto Reverse . . . . . . . . . . . . . . .9
Recording . . . . . . . . . . . . . . . . . .9
From Tuner . . . . . . . . . . . . . . .9
From CD . . . . . . . . . . . . . . . . .9
From Aux . . . . . . . . . . . . . . . .9
Troubleshooting Tips . .10
Maintenance . . . . . . . .11
Cleaning . . . . . . . . . . . . . . . . .11
CD Player . . . . . . . . . . . . . . . . .11
Tape Player . . . . . . . . . . . . . . . .11
Handling CDs . . . . . . . . . . . . . .11
Cleaning CDs . . . . . . . . . . . . . .11
CD Lens Care . . . . . . . . . . . . . .11
Important Information 12
Safety Precautions . . . . . . . . .12
Important Battery
Information . . . . . . . . . . . . . . .12
Headset Safety . . . . . . . . . . . . .12
Don’t Infringe . . . . . . . . . . . . .12
Technical Specification . . . . . .12
Limited Warranty (U.S.)13
Limited Warranty
(Canada) . . . . . . . . . . .15
Table of Contents
1
RS2010 EN rev.1 9/2/02 9:40 AM Page 5
Page 6
2
EN
Getting Started
Unpacking the system:
You should have the following:
• one main unit (with 2 main speakers);
• one remote control;
• one user’s guide;
• AM loop antenna;
•FM antenna;
• one safety leaflet;
• Owner registration card
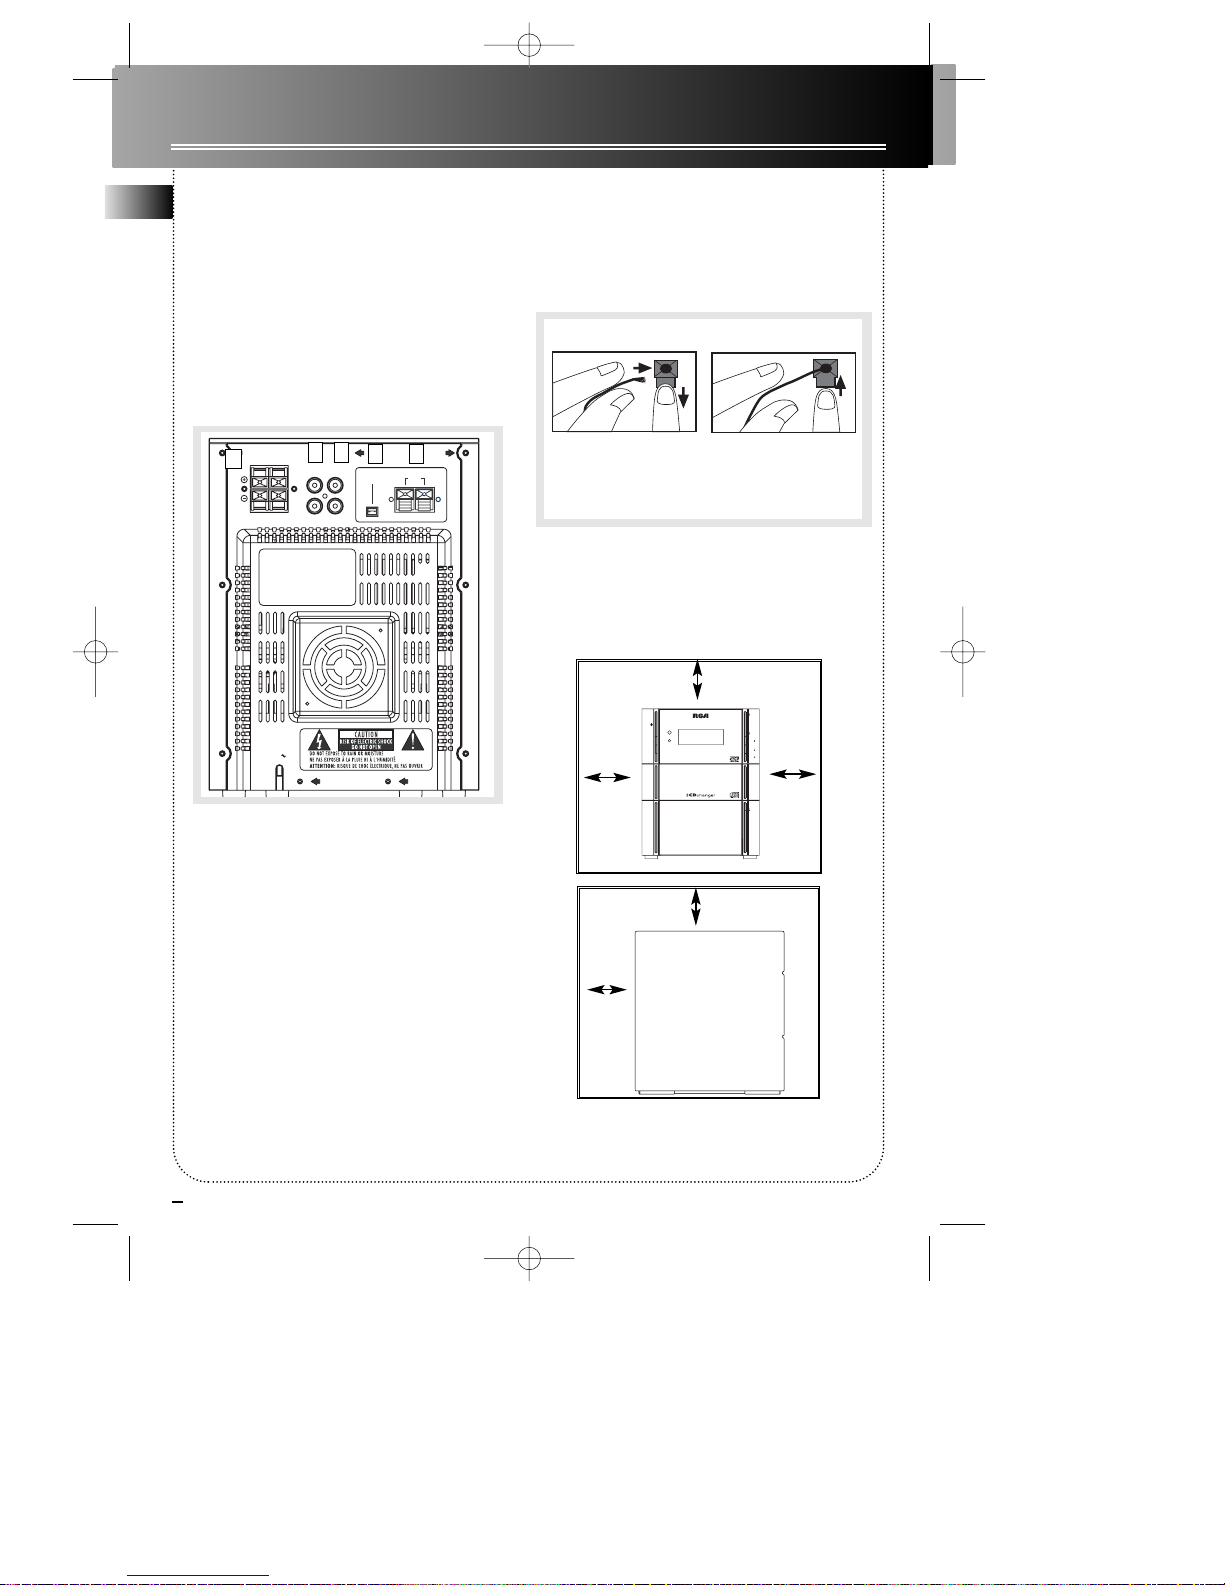
Back View
1. Main Speaker Jacks
2. Line Out Connector
3. Aux In Connector
4. AM Antenna Jack
5. FM Antenna Jack
Using the Antenna
Before you use your audio system, you’ll want to
make sure the FM antenna is positioned properly.
Connect the FM antenna to FM ANT jack on the back
of the unit. Uncoil it, making sure it is fully extended
(you may even want to tape it to the wall behind the
unit, if possible. The higher, the better.)
For AM reception, you need to connect the AM loop
antenna. Rotate the AM loop antenna for better
reception.
Connecting the Speakers
Each speaker has a black (negative) and a red
(positive) jack. When connecting the speakers, match
the red wires to the red jacks and the black wires to
the black jacks.
Installation
To ensure sufficient ventilation, keep the spacings
shown below free from other surfaces:
4 inches
4 inches
Front View
4 inches
4 inches
2 inches
Side View
LINEOUT
R
L
R
L
AUXIN
MAIN
SPEAKER
RL
AC
AM
ANT
FM
ANT
Release tab to lock wire in
the terminal.
NOTE: Make sure the insulation
is completely removed from the
ends of the Antenna and
speaker wires at all connection
points.
Antenna and Speaker
Wire Connection
Push terminal tab down to
insert wire.
1
2
4 5
3
IR
STANDBY
ON
STANDBY
SOURCE
DIM/
DEMO
TIMER
DISC 1
DISC 2
DISC 3
VOL
Motorized panel
TOUCH SENSOR
RS2010 EN rev.1 9/2/02 9:40 AM Page 6
Page 7
3
EN
General Controls
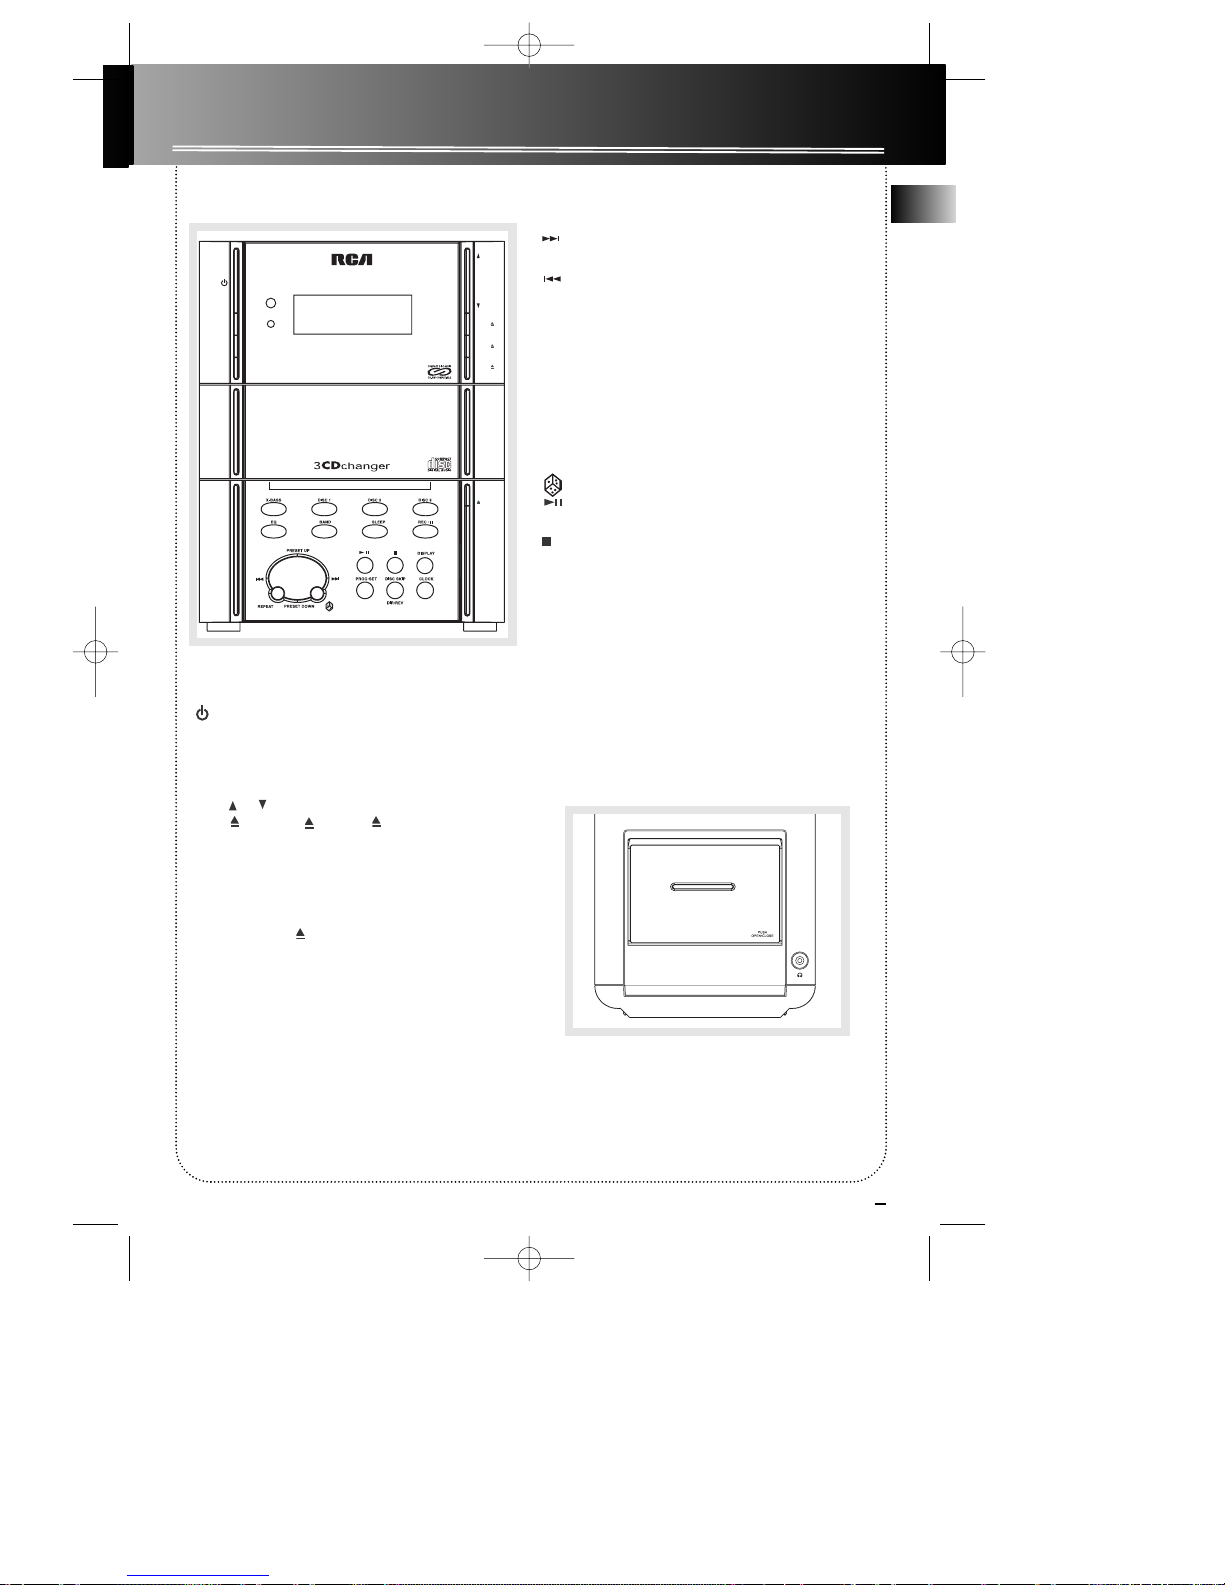
Main Unit
Front Panel
ON/STANDBY — Tu rns the unit on and off
(Standby Mode)
SOURCE - Selects tuner / CD player / aux / tape.
DIM/DEMO - Turns the feature demonstration on or off;
adjusts display contrast.
VOL / - Increases / decreases volume.
DISC1 , DISC2 , DISC3 - Opens and closes
the corresponding disc tray.
TIMER - Enters Timer setting mode; activates and
deactivates timer.
Control Panel
TOUCH SENSOR - Opens and closes the motorized
control panel.
X-BASS - Turns X-Bass on/off.
EQ - Selects among the different preset EQ options.
(Rock / Jazz / Flat / Pop / Classic)
DISC1 / DISC2 / DISC 3 - selects and begins disc
playback.
BAND - Selects radio band.
SLEEP - Selects and views sleep time.
REC•II - Starts and pauses tape recording.
SKIP FORWARD - Increments radio frequency, goes
to the next CD track; fast forward in tape mode.
SKIP BACKWARD - Decrements radio frequency,
goes to the previous CD track; rewinds in tape mode.
PRESET UP - In Tuner mode - Selects the next preset
station.
In Clock or Timer mode - Increases hour and minute digit.
PRESET DOWN - In Tuner mode - Selects the previous
preset station.
In Clock or Timer mode - Decreases hour and minute
digit.
REPEAT - In CD mode - selects repeat options (repeat
track, CD or all CDs)
- In CD mode - Selects random playback.
PLAY/PAUSE - Begins and pauses CD and tape
playback.
STOP - Stops CD or tape playback.
In CD Program mode - Clears program.
In Tuner mode - Clears tuner presets.
DISPLAY - In CD mode - selects among display options.
PROG•SET - Enters program mode for CD and Tuner;
Confirms clock and timer settings.
DISC SKIP /DIR./REV. - In CD mode - Skips to the next
CD; In Tape mode - Selects tape playback direction;
selects auto reverse option.
CLOCK - Enters clock setting mode; Shows current time.
Top Panel
PHONES —Jack for connecting headphones.
IR
STANDBY
ON
STANDBY
SOURCE
DIM/
DEMO
TIMER
DISC 1
DISC 2
DISC 3
VOL
Motorized panel
TOUCH SENSOR
DIGITAL LOGIC DECK
PHONES
AUTO REVERSE
RS2010 EN rev.1 9/2/02 9:40 AM Page 7
Page 8
4
EN
General Controls
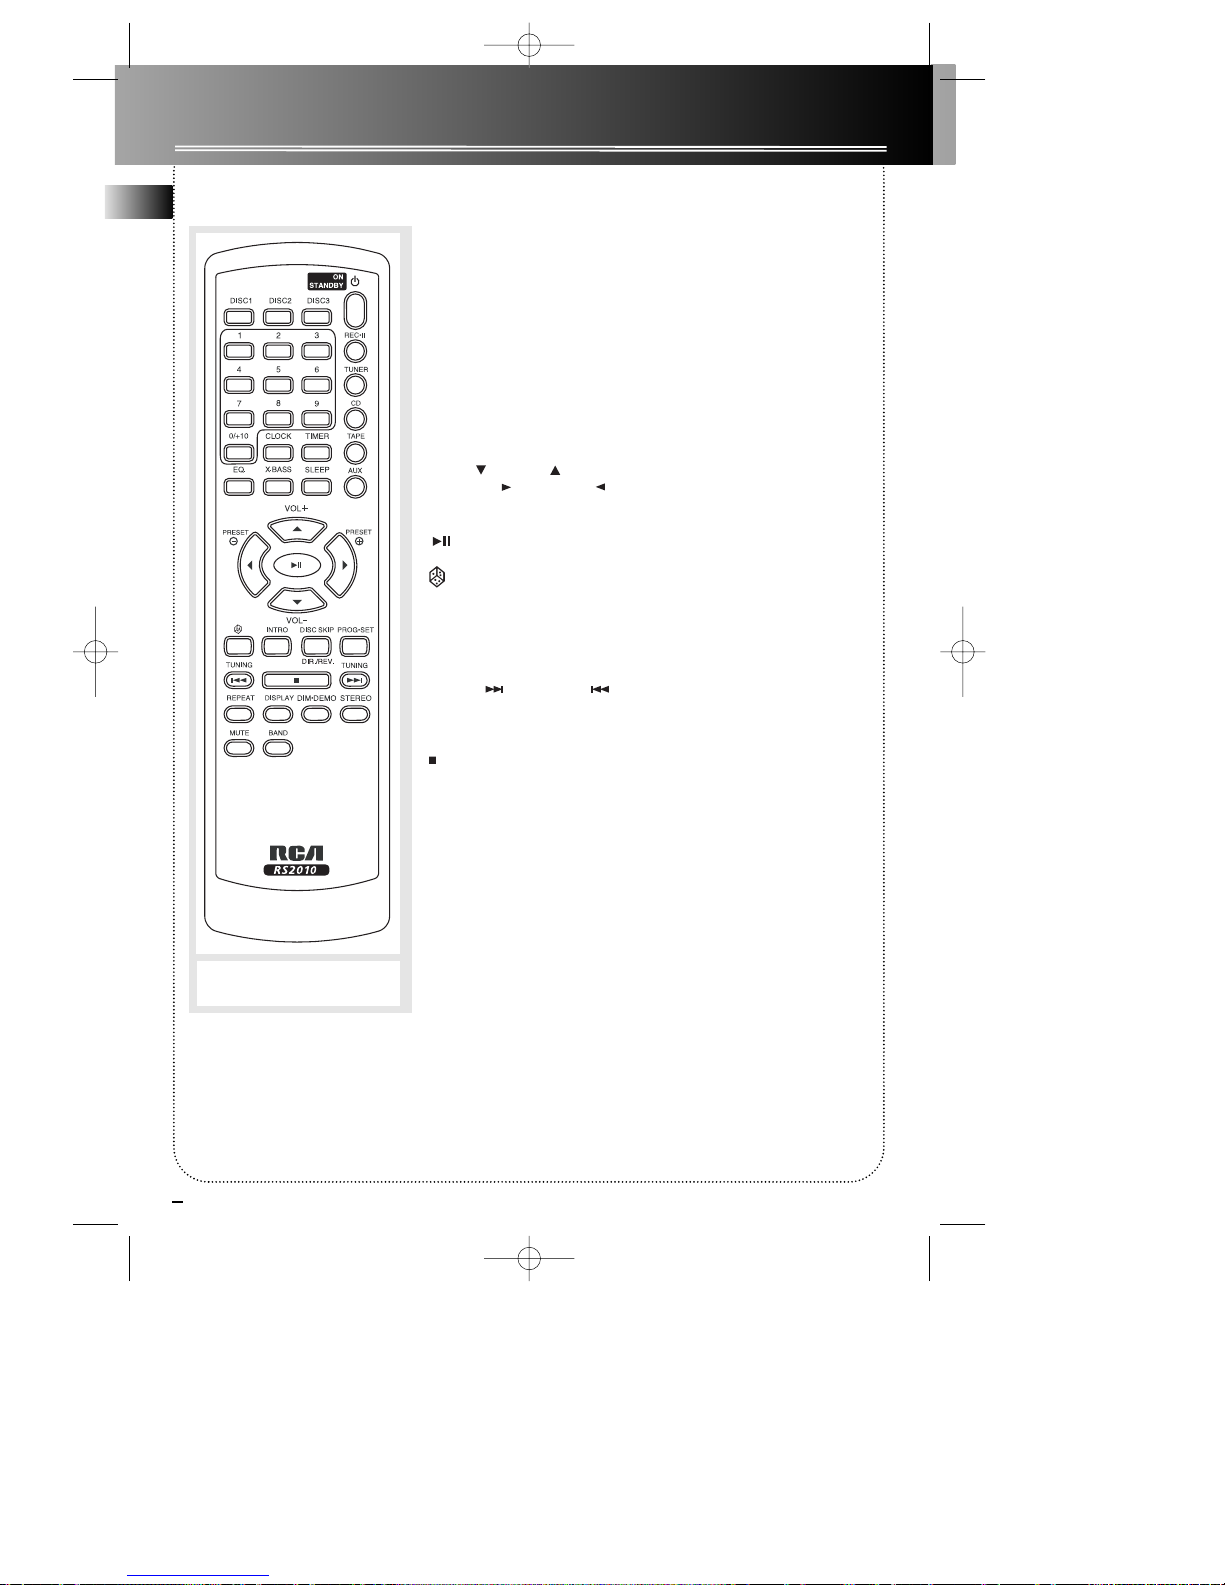
Remote Control
ON/STANDBY - Turns power on and off (Standby mode).
DISC1 / DISC2 / DISC3 - Selects disc 1, 2 or 3 playback.
NUMBER/CHARACTER KEYS — Accesses different tracks in CD mode
and tuner presets in tuner mode directly;
REC•II - Starts and pauses a tape recording.
TUNER - Selects radio tuner mode.
CD - Selects CD mode.
TAPE - Selects tape player.
AUX - Selects external input.
CLOCK - Shows clock time; enters clock setting mode.
TIMER - Turns timer on or off; enters timer setting mode.
EQ - Selects among the different preset EQ options.
X-BASS - Enable and disables X-Bass.
SLEEP - Selects the time interval in minutes before the unit turns off.
VOL - / VOL + - Decreases or Increases volume level.
PRESET + / PRESET - - Selects next/previous preset station in
tuner mode; In Clock or Timer mode - Increases / decreases the hour or
minute digit.
PLAY/PAUSE - In CD mode - Plays and pauses CD; In Tape mode -
Plays and pauses tape playback.
- In CD mode - Selects random playback.
INTRO - Selects intro playback in CD mode.
DISC SKIP / DIR. / REV. - In CD mode - Skips to the next CD; In Tape
mode - Selects tape playback direction; selects auto reverse option.
PROG•SET - Enters program mode for CD and Tuner mode; enters
clock setting mode; applies new settings for Clock and Timer modes.
TUNING / TUNING - In CD mode - Skips forward to the
next track or skips backward to the previous track; In Tuner mode Tunes up or down radio frequency.
In Tape mode - Rewinds or fast forwards tape.
STOP - In CD mode - Stops CD playback; In Tuner mode - clears tuner
presets; In Tape mode - Stops tape playback; In CD program mode -
Clears program.
REPEAT - In CD mode - Selects among repeat options.
DISPLAY - In CD mode - Selects among display options.
DIM/DEMO - Adjusts display contrast; turns feature demonstration on
or off (DEMO only available in standby mode).
STEREO - Selects among FM stereo and mono in tuner mode.
MUTE - Mutes volume.
BAND - selects tuner band.
Installing Batteries
The remote control must be inserted with 2 “AA” or “R6” or “UM 3”
batteries prior to use. Follow the steps below to ensure correct installa-
tion.
1. Open the battery compartment door (located at the back of the
remote control) by lifting up the cover at the edge.
2. Before inserting the batteries, observe the polarities (that is, + and -)
of the battery then relate the polarities to the engraved diagram inside
the battery compartment. Now insert the batteries.
3. After installation of the batteries, close the lit to cover the batteries.
Lightly push it closed with a snap.
Battery Size:
“AA” or “R6” or “UM 3”
RS2010 EN rev.1 9/2/02 9:40 AM Page 8
Page 9
EN
5
Display Settings
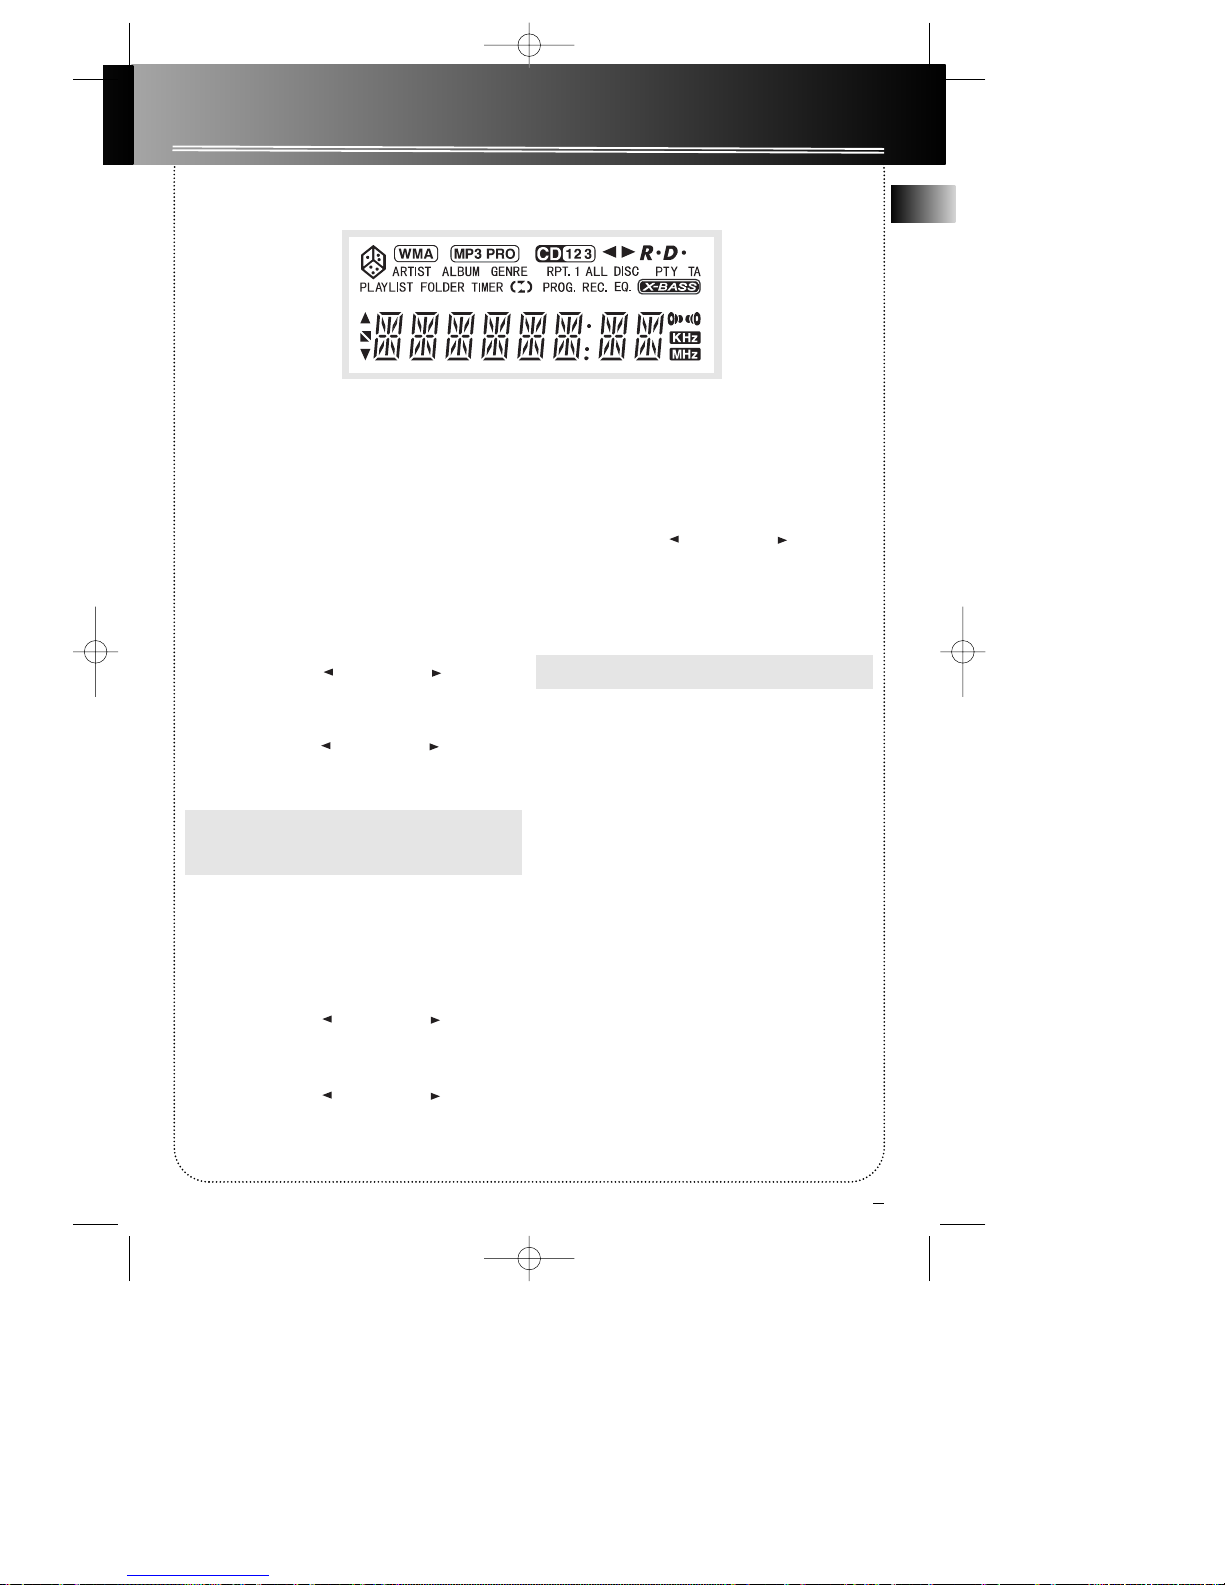
Display
Showing the Demonstration
Operational in standby mode only. Press DEMO on
the main unit to turn on/off demonstration mode.
The demonstration scrolls through all display
operations.
Display Clock / Timer
Setting the Clock
1. Press and hold CLOCK to enter clock setting
mode. The hour flashes on the display.
2. Press PRESET DOWN or PRESET UP on the main
unit or PRESET - or PRESET + on the
remote control to set the hour . Press CLOCK to
shift to minute digits.
3. Press PRESET DOWN or PRESET UP on the main
unit or PRESET - or PRESET + on the
remote control to set the minute .
4. Press PROG/SET to save settings.
Note:
• Press CLOCK once to display the current time for
about 8 seconds.
Setting the Timer
1. Press and hold TIMER to enter timer setting
mode. ON TIME will should briefly, then the
hour digit will flash on the display.
2. Press PRESET DOWN or PRESET UP on the main
unit or PRESET - or PRESET + on the
remote control to set the hour . Press TIMER to
shift to minute digits.
3. Press PRESET DOWN or PRESET UP on the main
unit or PRESET - or PRESET + on the
remote control to set the minute .
4. Press TIMER to shift to set timer off time.
5. OFF TIME will show briefly then the hour digit
will flash. Repeat steps 2 and 3 to set the hour
and minute.
6. Press TIMER to move on to source selection.
7. Press PRESET DOWN or PRESET UP on the main
unit or PRESET - or PRESET + on the
remote control to select source (CD / Tuner / Tape
/ Rec TU)
8. Press TIMER to move back to timer on time
setting.
9. Press PROG/SET to save settings.
Note: Timer will turn on at the last volume level.
Activating the Timer
Press and release TIMER to turn on/off the timer. The
TIMER indicator will lit.
Adjusting Display Brightness
Press and hold DIM/DEMO to adjust display
brightness.
Sleep Mode
You can select the time interval in minutes before the
unit turns off automatically.
1. Press SLEEP to enter sleep setting mode.
SLEEP 00 will show on the display.
2. Press and hold SLEEP to select the desired sleep
time (00, 90, 80, 70, 60, 50, 40, 30, 20, 10, 00).
Press SLEEP to check the remaining sleep time.
S
RS2010 EN rev.1 9/2/02 9:40 AM Page 9
Page 10
EN
6
Sound Features
Using Preset Equalizer Curves
Press EQ to toggle among ROCK, JAZZ, FLAT , POP
and CLASSIC . The display shows briefly the selection.
X-BASS
Press X-BASS to turn on/off boosting the bass
frequency.
Volume Control
Press VOL or to adjust volume level.
Muting Audio
Press MUTE on the remote to cut the sound. (Remote
Only)
CD Player
Loading Discs
1. Press SOURCE repeatedly on the main unit or one
of the disc numbers (DISC1 / DISC2 / DISC3) to
select CD mode.
2. Press DISC1 or DISC2 or DISC3
to open the corresponding disc drawer.
3. Insert up to 3 discs with label face up.
4. Press the corresponding disc location on the main
unit again to close the drawer.
Loaded disc position icon lights.
Playing Discs
•Press DISC1, DISC2 or DISC3 on the control panel
to directly begin playback of the disc selected.
•Press PLAY/PAUSE to begin or pause play,
and STOP to stop playback.
Play and Load Simultaneously
1. Press DISC1 , DISC2 ,DISC3 to
select and open one of the available disc trays
other than the one that is playing.
2. Press again to close the tray.
Skipping a Disc
Press DISC SKIP.
Searching Through a CD
• Press SKIP FORWARD / SKIP BACKWARD
on the main unit or TUNING or
on the remote control to skip to the next or
previous track.
•Press and hold SKIP FORWARD / SKIP
BACKWARD on the main unit or TUNING
or on the remote control to search
through a CD while it is playing.
This unit is compatible with
CD-RW/ CD-R discs for playback.
Notes on CD-R/RW Disc:
• Do not affix any type of labels to either side
(recordable or labeled side) of a CD-R/RW disc
as this may result in the unit malfunctioning.
• To avoid damages to the CD-R/RW disc, do not
open the disc compartment door while the
disc is being read.
• Do not load an unrecorded CD-R/RW disc into
the unit. This may take a longer time to read
the disc.
• Playback capability for CD-RW discs may
vary due to variations in the quality of
the CD-RW disc and the recorder used to
create the disc.
CD-R / RW
RS2010 EN rev.1 9/2/02 9:40 AM Page 10
Page 11
EN
7
CD Player
Random Playback
Press to turn on/off the playing of tracks in
random order. The shuffle icon will show on the
display.
Sampling Tracks
Press INTRO to play the first 10 seconds of each track
on the current disc, all discs in the tray, or turn INTRO
mode off. (Remote only)
Repeat
Press REPEAT to repeat the current track, current
disc, all discs, or turn REPEAT mode off.
Setting Up a CD Program
You can program the CD player to play up to any 60
tracks on the CDs in the tray.
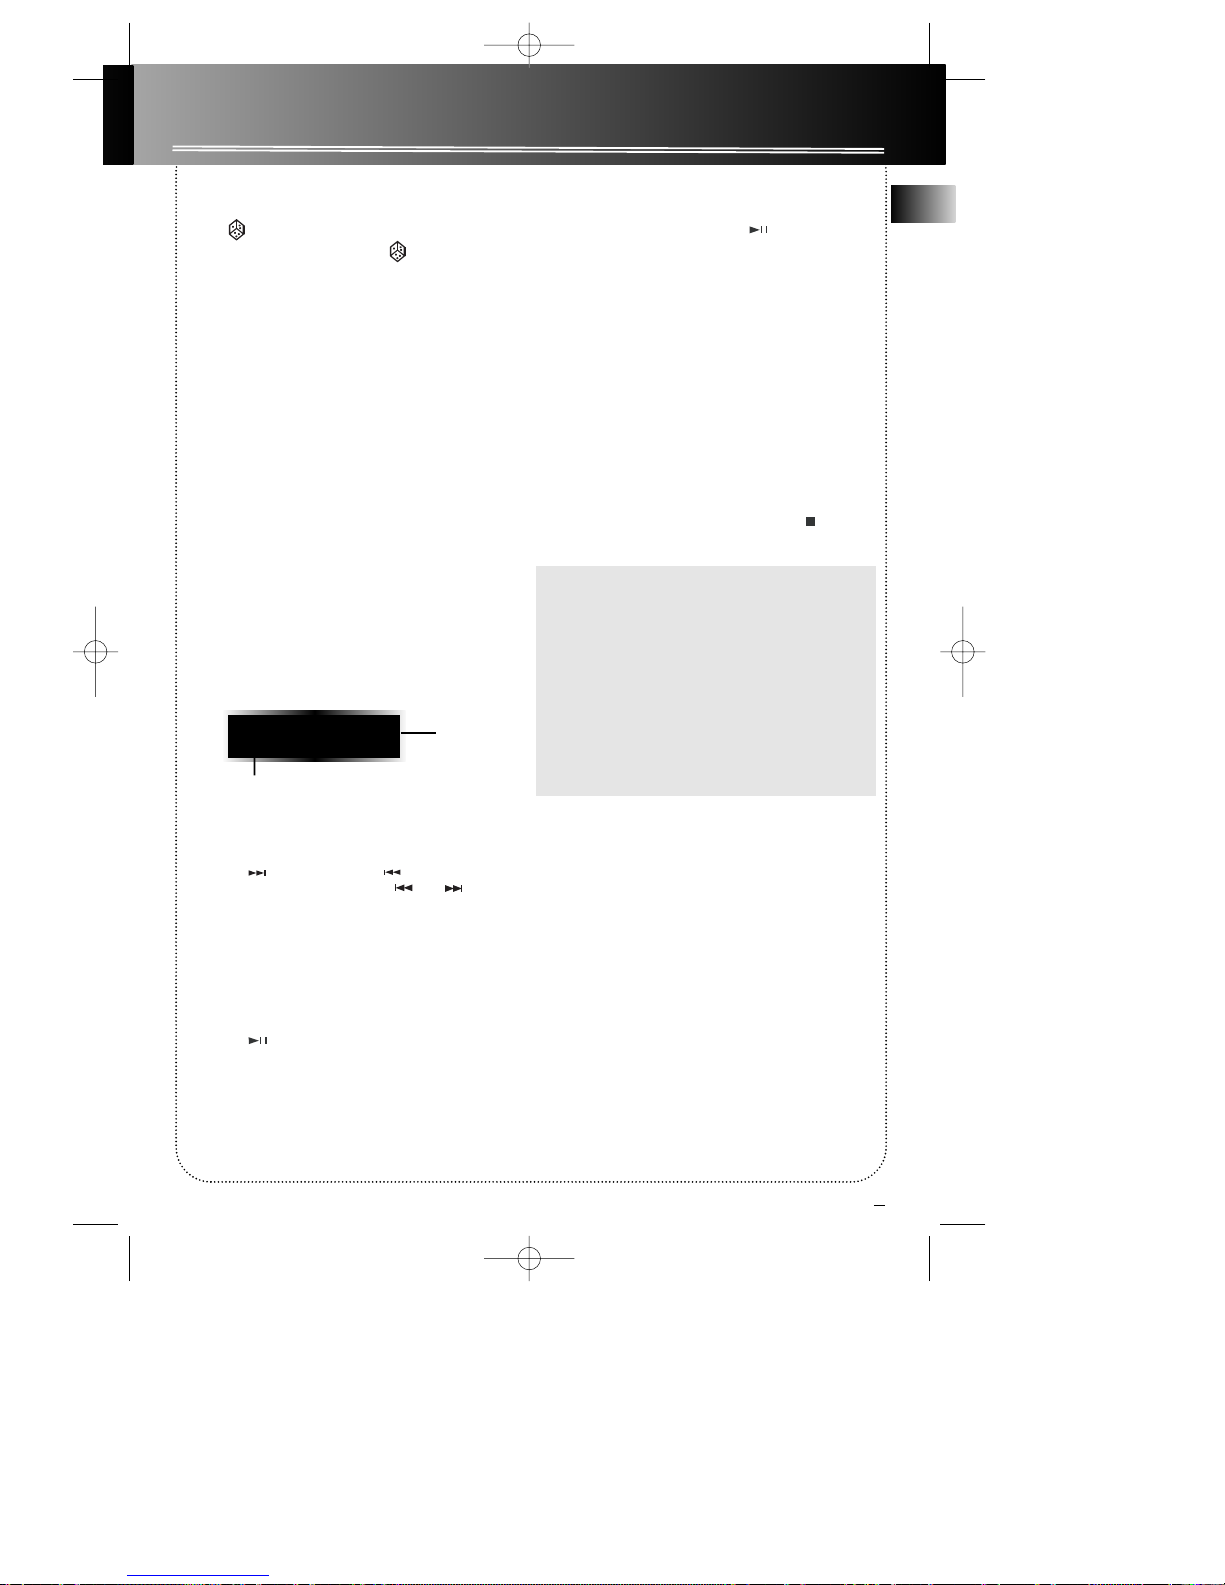
1. While the CD player is stopped, press
PROG•SET to enter program mode. The
system displays the next available program
number: “00 P--01”. The PROG. icon flashes on
the display.
2. Press DISC SKIP or the disc number (DISC1 /
DISC2 / DISC3) to select disc.
3. Press SKIP FORWARD / SKIP BACKWARD
on the main unit or TUNING or on the
remote control to select track to enter into
memory.
4. Press PROG•SET to store selected track into
program memory and the next available memory
location will be displayed.
5. Repeat steps 2 to 3 to store more tracks into
program memory.
6. Press PLAY/PAUSE to play CD program.
Playing a Program List
While in PROGRAM mode, press PLAY/PAUSE to
begin CD program playback. The PROG. icon turns
on.
Display and Edit Program List
1. While the CD player is stopped in PROGRAM
mode, press PROG•SET repeatedly to list
each track assignment in the program list.
2. Repeat steps 2 and 3 under “Setting Up a CD
Program “ to edit the track to store into memory.
Deleting Program List
While in PROGRAM mode, press and hold STOP in
stop mode to exit program.
Note: Once you have exited PROGRAM mode, the
CD program list will be erased.
Tips:
• You can create a program of up to 60 tracks.
• Press DISPLAY repeatedly to view elapsed track
time, track number, track remain time and disc
remain time.
Caution: Do not push to force closing of the tray
during CD playback or tray opening.
00 P-- 01
Track number
program
location
RS2010 EN rev.1 9/2/02 9:40 AM Page 11
Page 12
EN
8
Radio
Selecting Tuner Band
1. Press SOURCE on the main unit or TUNER on the
remote control to enter Tuner mode.
2. Press BAND to select between FM or AM.
Tip: Your audio system has 40 preset stations.
Tuning to a Station
Press SKIP FORWARD / SKIP BACKWARD
on the main unit or TUNING or on the
remote control to select frequency.
Using Presets
• Press PRESET DOWN or PRESET UP on the main
system or PRESET - or + on the remote
control to access the previous or next preset
station.
Manually Setting Presets
1. Press SKIP FORWARD / SKIP BACKWARD
on the main unit or TUNING or on
the remote control to access the desired
frequency.
2. Press the PROG/SET button once.
3. Press PRESET DOWN or PRESET UP on the main
unit or PRESET - or + on the remote
control to move to the desired preset number
(1-40).
4. Press PROG/SET to store the selected frequency at
that preset.
Clearing Presets
Press and hold STOP for 3 seconds to clear
presets.
Suppressing Stereo Signal
Press STEREO on the remote control to toggle
between FM mono and stereo for stereo FM stations.
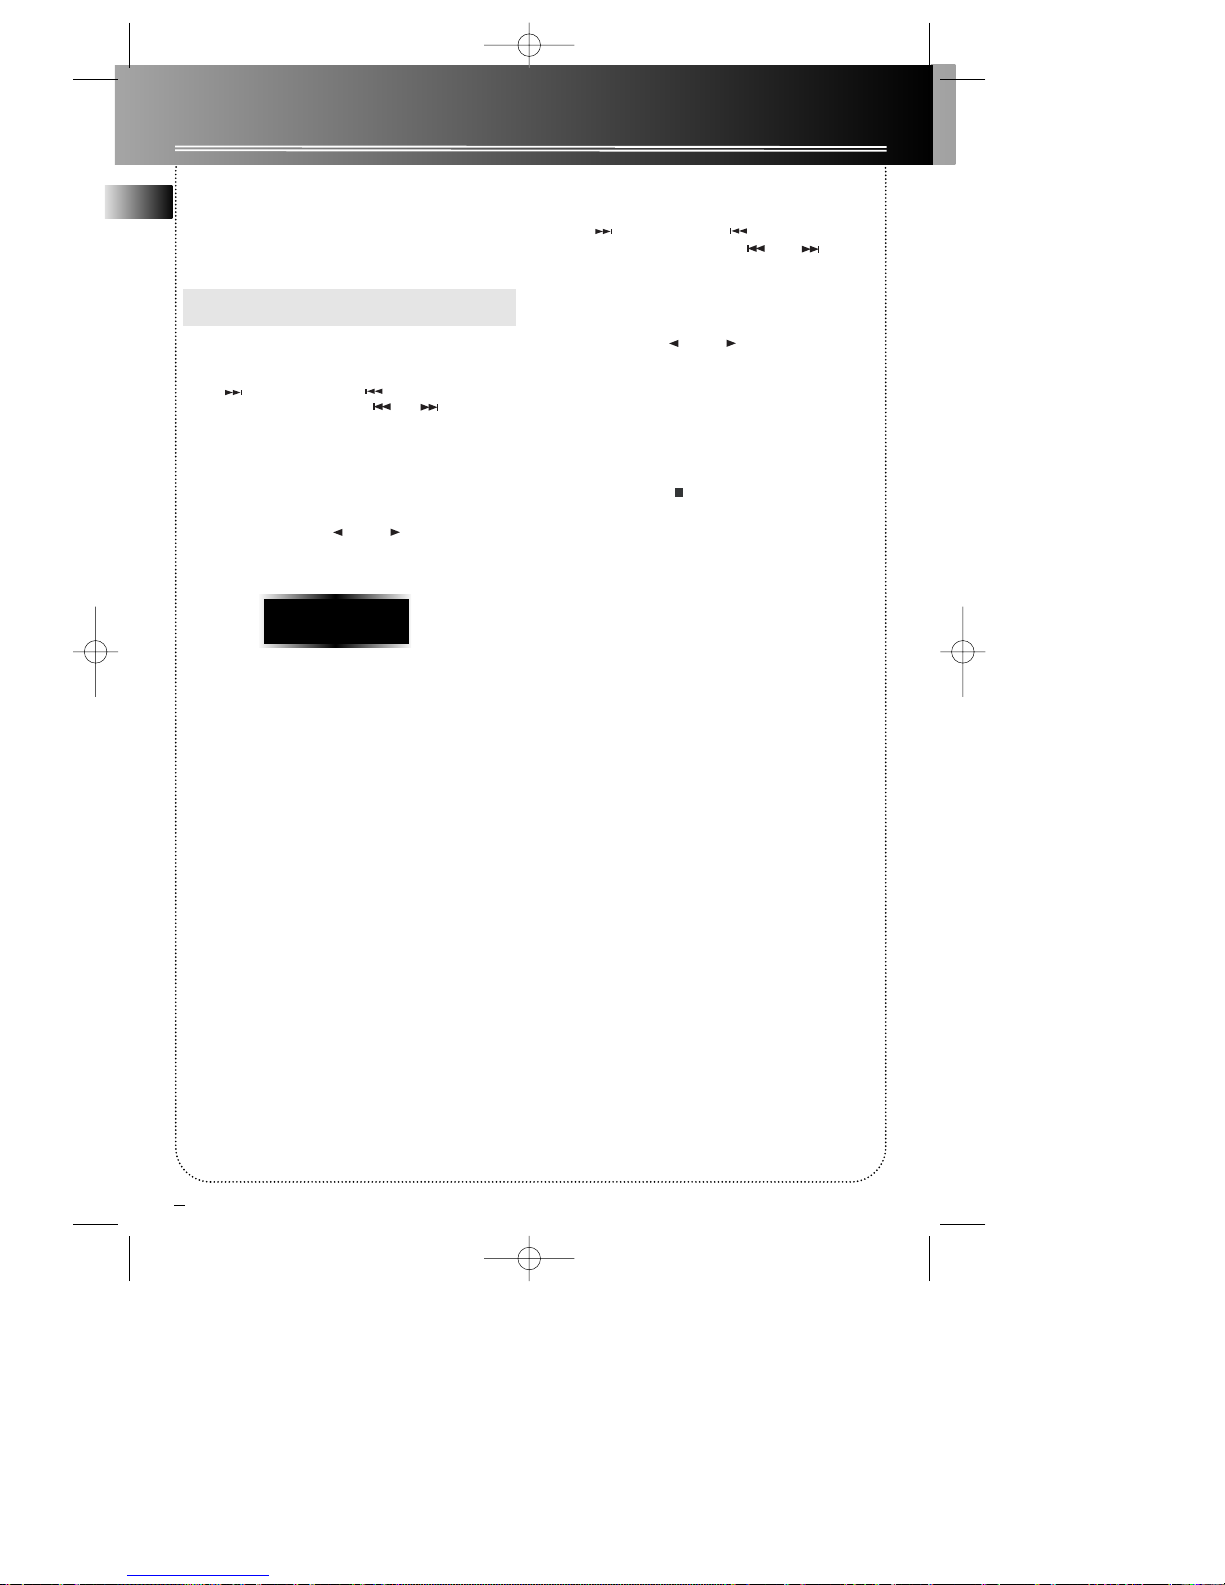
07 87.90
MHz
RS2010 EN rev.1 9/2/02 9:40 AM Page 12
Page 13
EN
9
Tape Player
Playing a Tape
1. Press SOURCE on the main unit repeatedly or
TAPE on the remote to enter Tape mode.
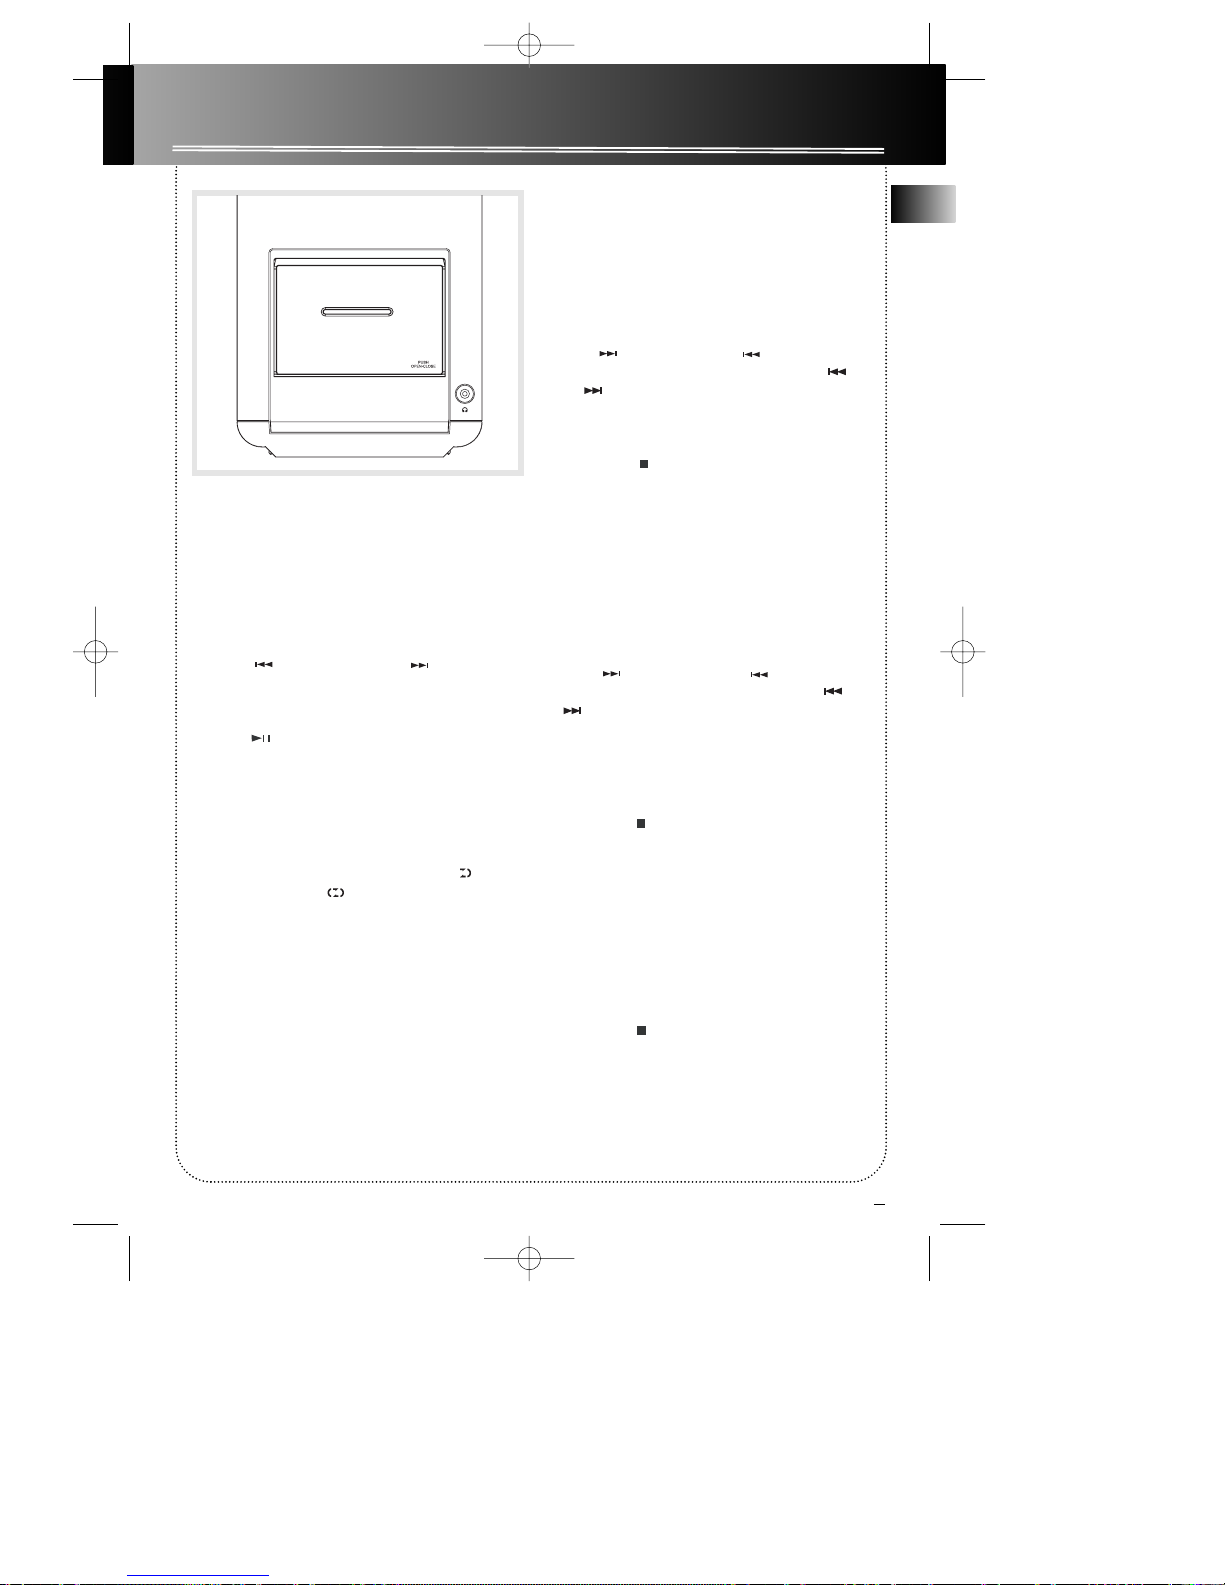
2. Press on the PUSH OPEN• CLOSE area of the
cassette door to open it.
3. Insert a tape into the door and push the door
closed.
4. Press SKIP BACKWARD or SKIP
FORWARD on the main unit to rewind and fast
forward tape to position the tape to the
desired starting position.
5. Press PLAY/PAUSE to begin playback.
Press again to pause playback.
6. Press and hold DISC SKIP/DIR/REV. to select tape
playback direction.
Auto Reverse
You can select auto reverse tape playback or
continuous playback .
Press DISC SKIP/DIR/REV. repeatedly to toggle
normal playback, auto reverse, and continous
playback.
Recording
From Tuner
1. Insert a tape into deck.
2. Press SOURCE repeatedly on the main unit or
TUNER on the remote control to select
Tuner
3. Press BAND to access the desired radio band.
4.. Press SKIP FORWARD or SKIP
BACKWARD on the main unit or TUNING
or on the remote control to tune to the
station to be recorded.
5. Press REC•II to enter Record standby. Press
again to begin recording.
6. press STOP to end recording.
From CD
1. Insert a tape into deck .
2. Press SOURCE repeatedly on the main unit to
select CD then press DISC SKIP to select the disc
to be recorded.
or
Press DISC1 / DISC2 / DISC3 on the remote to
select the disc to be recorded directly
3. Press SKIP FORWARD or SKIP
BACKWARD on the main unit or TUNING or
on the remote control to select the track to
be recorded.
or
Press PROG/SET to enter program mode.
4. Press REC•II to enter Record standby. Press
again to begin recording.
5. press STOP to end recording.
From AUX
1. Insert a tape into tape deck.
2. Check that the auxiliary device has been
connected correctly to the AUX connector on the
back of the system.
3. Start playback on the auxiliary device.
4. Press REC•II to enter Record standby. Press
again to begin recording.
5. Press STOP to end recording.
DIGITAL LOGIC DECK
PHONES
AUTO REVERSE
RS2010 EN rev.1 9/2/02 9:40 AM Page 13
Page 14
EN
10
Troubleshooting Tips
Solution
• Check power cord for a secure
connection.
• Unplug the unit for a moment, and
then plug into power source again.
• Check the outlet by plugging in
another device.
• Increase the volume setting.
• Check connection to speakers.
• Check that you have selected the
appropriate function: CD, TAPE, Tuner.
• Make sure mute is off.
• Check antenna connection.
• Move antenna.
• Turn off nearby electrical appliances,
such as hair dryer, vacuum cleaner,
microwave, fluorescent lights.
• Check that CD is in the tray.
• Check that CD label is facing up.
• Check that PAUSE mode is not on.
• Check that CD function is selected.
• Use CD lens cleaner.
• Clean the disc.
• Clean the disc.
• Check disc for warping, scratches, or
other damage.
• Check if something is causing the
system to vibrate. If so, move the
system.
• Make sure the speakers are at least 3
feet away or on a different surface
from the main unit.
Problem
System will
not turn on
No sound
Poor radio
reception
CD does not
play
CD sound
skips
Problem
CD button
will not
respond, or
does not
change
discs when
you press
DISC SKIP
Distorted or
noisy tape
recordings
Remote
control
does not
work
Solution
• Switch to another function (TAPE,
Tuner) and then back to CD.
• Inspect the tape head, clean it if
necessary.
• Check that the batteries are properly
installed.
• Replace weak batteries.
• Check the system is plugged into
power source.
• Point the remote directly at the
system’s front panel.
• Move closer to the system.
• Remove any obstacles between the
remote and the system.
Attention!
Do not press on the motorized door until it is completely in the stop position.
RS2010 EN rev.1 9/2/02 9:40 AM Page 14
Page 15
EN
11
Maintenance
Disconnect the audio system from the power source
before performing any maintenance.
Cleaning
Clean the exterior of the system using a soft dust
cloth.
CD Player
CAUTION! This system operates with a laser. It must
be opened by only a qualified technician.
Tape Player
To prevent deterioration of sound quality, periodically open the door of each deck and clean the magnetic
heads, pinch roller, and capstan with a cotton bud
dipped in alcohol. Also, demagnetize the head by
playing a demagnetizing cassette (available through
an audio equipment store).
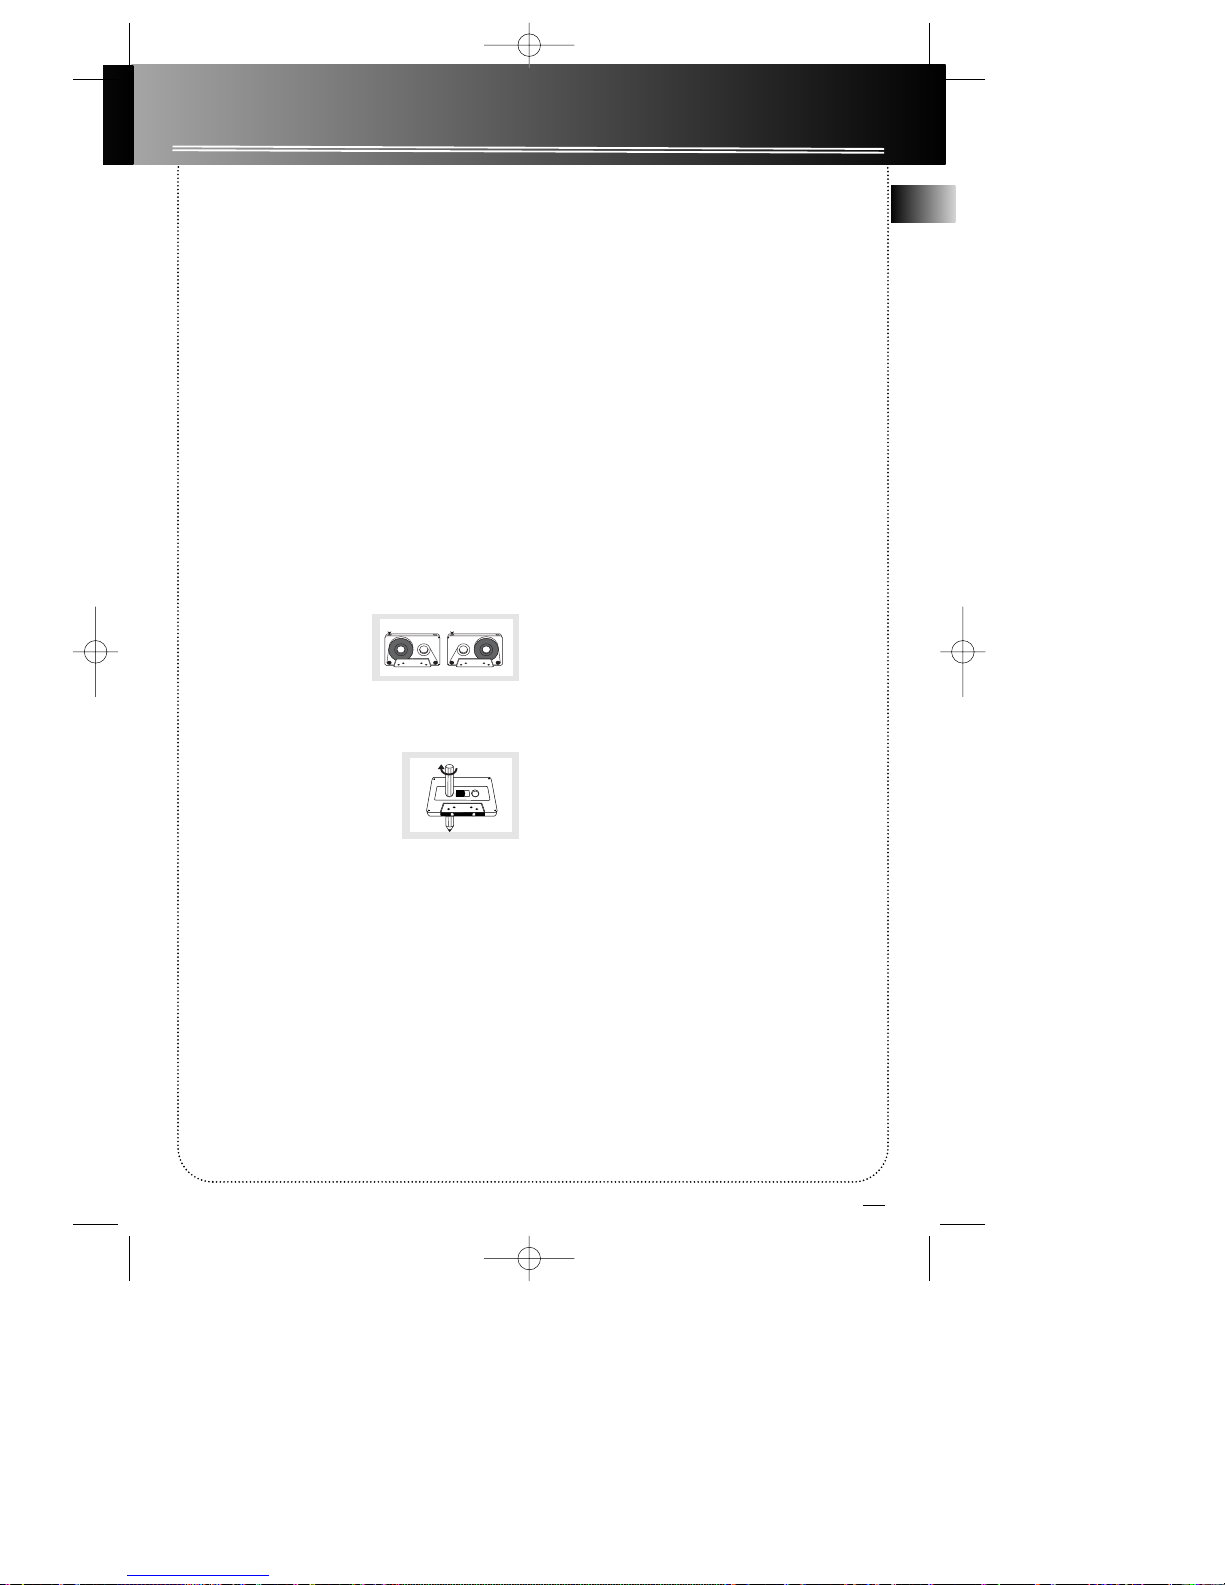
To protect recordings on
one or both sides of a tape,
remove the corresponding
tab. If you later want to
record on the tape, affix a
piece of adhesive tape over the hole.
Quit Slacking - A little bit of slack
in your tapes can cause scratches
on the tape, or worse yet, the
tape could break. If you notice
some slack in the tape, use a
pencil to tighten it up before
you insert it.
Handling CDs
• Do not touch the signal surfaces. Hold CDs by the
edges, or by one edge and the hole. Do not affix
labels or adhesive tapes to the label surfaces. Do not
scratch or damage the label. CDs rotate at high
speeds inside the player. Do not use damaged
(cracked or warped) CDs
Cleaning CDs
• Dirty CDs can cause poor sound quality. Always
keep CDs clean by wiping them gently with a soft
cloth from the inner edge toward the outer perimeter.
• If a CD becomes dirty, wet a soft cloth in water,
wring it out well, wipe the dirt away gently, and
then remove any water drops with a dry cloth.
• Do not use record cleaning sprays or antistatic
agents on CDs. Also, never clean CDs with benzene,
thinner, or other volatile solvents which may cause
damage to disc surface
CD Lens Care
When your CD lens gets dirty it can also cause the
system to output poor sound quality. To clean the
lens you will need to purchase a CD lens cleaner
which can maintain the output sound quality of
your system. For instructions on cleaning the CD
lens, refer to the ones accompanying the lens
cleaner.
A
Side A ProtectionBSide B Protection
A
RS2010 EN rev.1 9/2/02 9:40 AM Page 15
Page 16
EN
12
Safety Precautions
• Never open the cabinet under any circumstances.
Any repairs or internal adjustments should be made
only by a trained technician.
• Never operate this product with the cabinet
removed.
•Do not use your System immediately after transporting it from a cold place to a warm place, as condensation may cause the system to malfunction.
• Keep your unit away from humid areas and abnormally hot places.
• Do not touch the player with wet hands. If any liquid enters the player cabinet, take the player to a
trained technician for inspection.
• This compact disc player uses a laser to read the
music on the disc. The laser mechanism corresponds
to the cartridge and stylus of a record player.
Although this product incorporates a laser pick-up
lens, it is completely safe when operated according to
directions.
• Discs rotate at high speed inside the player. Do not
use damaged, warped, or cracked discs.
• Do not touch the pick-up lens which is located
inside the disc compartment. To keep dust from
collecting on the pick-up lens, do not leave the compartment door open for an extended period of time.
If the lens becomes dirty, clean it with a soft brush, or
use an air blower brush designed for camera lenses.
• The apparatus shall not be exposed to dripping or
splashing and that no objects filled with liquids, such
as vases, shall be placed on the apparatus.
Important Battery Information
• Remove the batteries to avoid leakage if you do not
use your remote control for more than one month.
• Discard leaky batteries immediately as leaking batteries may cause skin burns or other personal injuries.
Dispose of batteries in the proper manner, according
to provincial and local regulations.
• Any battery may leak electrolyte under the following circumstances:
- if mixed with a different battery type,
- if inserted incorrectly,
- if all batteries are not replaced at the same time,
- if disposed of in fire, or
- if an attempt is made to charge a battery not
intended to be recharged.
Headset Safety
• Do not play your headset at high volume.
Hearing experts warn against extended high-volume play.
• If you experience ringing in your ears, reduce volume or discontinue use.
• You should use with extreme caution or temporarily discontinue use in potentially hazardous situations.
Even if your headset is an open-air designed to let
you to hear outside sounds, do not turn up the volume so high that you are unable to hear what is
around you.
Don’t Infringe
This product should only be used for the purposes
for which it is sold, that is, entertainment, violating
no copyright law. Any attempts to use this product
for which it is not intended is unlawful and therefore not condoned by Thomson multimedia.
Technical Specification
Power supply: 120V~60Hz
Dimensions ( H x W x D inches):
Unit size - 9.6 x 7.2 x 13
Main Speaker - 9.6 x 6.7 x 7.2
Tape deck: Response curve: 125Hz-10kHz (-5dB)
CD player: Response curve (+/- 2dB): 60Hz to 20kHz
Rating Plate: Look for it at the back of the set.
The descriptions and characteristics given in this document are given
as a general indication and not as a guarantee. In order to provide
the highest quality product possible, we reserve the right to make any
improvement or modification without prior notice. The English
version serves as the final reference on all products and operational
details should any discrepancies arise in other languages.
Important Information
RS2010 EN rev.1 9/2/02 9:40 AM Page 16
Page 17
13
EN
Limited Warranty (U.S.)
What your warranty covers:
• Defects in materials or workmanship.
For how long after your purchase:
• One year from date of purchase for labor and parts
• Warranty period for rental units begins with the first rental or 45 days from date of shipment to the rental
firm, whichever comes first.
What we will do:
• Pay any Authorized RCA Audio Service Center the labor charges to repair your unit.
• Pay any Authorized RCA Audio Service Center for the new or, at our option, refurbished replacement parts
required to repair your unit.
How you get service:
• Take your unit to any Authorized RCA Audio Service Center. To identify your nearest Authorized RCA Audio
Service Center, ask your dealer, look in the Yellow Pages, or call 1-800-336-1900.
• Show the Authorized Service Center Representative your evidence of purchase date or first rental.
• Pick up your unit when repairs are completed.
• Proof of purchase in the form of a bill of sale or receipted invoice which is evidence that the product is within
the warranty period must be presented to obtain warranty service. For rental firms, proof of first rental is also
required.
What your warranty does not cover:
• Customer instruction. (Your Owner’s Manual describes how to install, adjust, and operate your unit. Any
additional information should be obtained from your dealer.)
• Installation and related adjustments.
• Signal reception problems not caused by your unit.
• Damage from misuse or neglect.
• Cleaning of audio heads.
• Batteries.
• A unit that has been modified or incorporated into other products or is used for institutional or other commercial purposes.
• A unit purchased or serviced outside the U.S.A.
• Acts of nature, such as but not limited to lightning damage.
Product Registration:
• Please complete and mail the Product Registration Card packed with your product. It will make it easier to
contact you should it ever be necessary. The return of the card is not required for warranty coverage.
RS2010 EN rev.1 9/2/02 9:40 AM Page 17
Page 18
14
EN
Limited Warranty (U.S.)
Limitation of Warranty:
• THE WARRANTY STATED ABOVE IS THE ONLY WARRANTY APPLICABLE TO THIS PRODUCT. ALL OTHER
WARRANTIES, EXPRESS OR IMPLIED (INCLUDING ALL IMPLIED WARRANTIES OF MERCHANTABILITY OR
FITNESS FOR A PARTICULAR PURPOSE) ARE HEREBY DISCLAIMED. NO VERBAL OR WRITTEN INFORMATION GIVEN BY THOMSON MULTIMEDIA INC., ITS AGENTS OR EMPLOYEES SHALL CREATE A GUARANTY
OR IN ANY WAY INCREASE THE SCOPE OF THIS WARRANTY.
• REPAIR OR REPLACEMENT AS PROVIDED UNDER THIS WARRANTY IS THE EXCLUSIVE REMEDY OF THE
CONSUMER. THOMSON MULTIMEDIA INC. SHALL NOT BE LIABLE FOR INCIDENTAL OR CONSEQUENTIAL
DAMAGES RESULTING FROM THE USE OF THIS PRODUCT OR ARISING OUT OF ANY BREACH OF ANY
EXPRESS OR IMPLIED WARRANTY ON THIS PRODUCT. THIS DISCLAIMER OF WARRANTIES AND LIMITED
WARRANTY ARE GOVERNED BY THE LAWS OF THE STATE OF INDIANA. EXCEPT TO THE EXTENT PROHIBITED BY APPLICABLE LAW, ANY IMPLIED WARRANTY OF MERCHANTABILITY OR FITNESS FOR A PARTICULAR PURPOSE ON THIS PRODUCT IS LIMITED TO THE APPLICABLE WARRANTY PERIOD SET FORTH
ABOVE.
How State Law relates to warranty:
• Some states do not allow the exclusion nor limitation of incidental or consequential damages, or limitations
on how long an implied warranty lasts, so the above limitations or exclusions may not apply to you.
• This warranty gives you specific legal rights, and you also may have other rights that vary from state to state.
If you purchased your unit outside the United States:
• This warranty does not apply. Contact your dealer for warranty information.
Service calls which do not involve defective materials or workmanship are not covered by this warranty. Costs of such service calls are the sole responsibility of the purchaser.
RS2010 EN rev.1 9/2/02 9:40 AM Page 18
Page 19
15
EN
Limited Warranty (Canada)
What your warranty covers:
• Defects in materials or workmanship.
For how long after your purchase:
• One year from date of purchase for labor and parts
• The warranty period for rental units begins with the first rental or 45 days from date of shipment to the rental
firm, whichever comes first.
What we will do:
• Pay any Authorized RCA Audio Service Center the labor charges to repair your unit.
• Pay any Authorized RCA Audio Service Center for the new or, at our option, refurbished replacement parts
required to repair your unit.
How you get service:
• Take your unit to any Authorized RCA Audio Service Center. To identify your nearest Authorized RCA Audio
Service Center, ask your dealer, look in the Yellow Pages, or call 1-800-336-1900.
• Show the Authorized Service Center Representative your evidence of purchase date or first rental.
• Pick up your unit when repairs are completed.
• Proof of purchase in the form of a bill of sale or receipted invoice which is evidence that the product is within
the warranty period must be presented to obtain warranty service. For rental firms, proof of first rental is also
required.
What your warranty does not cover:
• Customer instruction. (Your Owner’s Manual describes how to install, adjust, and operate your unit. Any
additional information should be obtained from your dealer.)
• Installation and related adjustments.
• Signal reception problems not caused by your unit.
• Damage from misuse or neglect.
• Cleaning of audio heads.
• Batteries.
• A unit that has been modified or incorporated into other products or is used for institutional or other commercial purposes.
• A unit purchased or serviced outside Canada.
• Acts of nature, such as but not limited to lightning damage.
Product Registration:
• Please complete and mail the Product Registration Card packed with your product. It will make it easier to
contact you should it ever be necessary. The return of the card is not required for warranty coverage.
RS2010 EN rev.1 9/2/02 9:40 AM Page 19
Page 20
16
EN
Limited Warranty (Canada)
Limitation of Warranty:
• THE WARRANTY STATED ABOVE IS THE ONLY WARRANTY APPLICABLE TO THIS PRODUCT. NO VERBAL
OR WRITTEN INFORMATION GIVEN BY THOMSON MULTIMEDIA LTD., ITS AGENTS OR EMPLOYEES SHALL
CREATE A GUARANTY OR IN ANY WAY INCREASE THE SCOPE OF THIS WARRANTY.
• REPAIR OR REPLACEMENT AS PROVIDED UNDER THIS WARRANTY IS THE EXCLUSIVE REMEDY OF THE
CONSUMER. THOMSON MULTIMEDIA LTD. SHALL NOT BE LIABLE FOR INCIDENTAL OR CONSEQUENTIAL
DAMAGES RESULTING FROM THE USE OF THIS PRODUCT. EXCEPT TO THE EXTENT PROHIBITED BY
APPLICABLE PROVINCIAL LAW, ANY IMPLIED WARRANTY OF MERCHANTABILITY OR FITNESS FOR A
PAR TICULAR PURPOSE ON THIS PRODUCT IS LIMITED TO THE APPLICABLE WARRANTY PERIOD SET
FORTH ABOVE.
How Provincial Laws relates to warranty:
• This warranty gives you specific legal rights which are in addition to statutory warranties that may vary from
Province to Province.
If you purchased your unit outside Canada:
• This warranty does not apply. Contact your dealer for warranty information.
Service calls which do not involve defective materials or workmanship are not covered by this warranty. Costs of such service calls are the sole responsibility of the purchaser.
RS2010 EN rev.1 9/2/02 9:40 AM Page 20
 Loading...