

RCA RS2001 User Manual
EN
RS2001 EN 7/23/02, 3:48 PM1
EXPORTER
Thomson multimedia Inc.
P.O. Box 1976
Indianapolis, IN 46206 -1976
© 2002 Thomson multimedia Inc.
Trademark(s) ® Registered
Marca(s) ® Registrada(s)
Marque(s) ® Deposée(s)
55305520 (EN/F/E)
www.rca.com
www.rca.com/LatinAmerica
Printed In China / Impreso en China
IMPORTADOR
Comercializadora Thomson de México, S.A. de C.V.
Miguel de Cervantes Saavedra 57
Col. Ampliación Granada
C.P. 11529 Mexico D.F.
Telefono: (55)25 81 53 20
RFC: CTM-980723-KS5
0151
RS2001 EN 7/23/02, 3:48 PM2
u s e r m a n u a l
It is important to read this instruction book prior to using your new product for the first time.
Es importante leer este manual antes de usar por vez primera su euipo.
D
IG
IT
A
L
L
O
G
IC
D
E
C
K
POW
ER
STAND-BY
DIGITAL PLL SYNTHESIZED
TUNER
M
UL
TI FUNCTION LCD DISPLA
Y
TU
N
IN
G
CLOCK/
TIMER
BAND•APP
ST•MONO
REC•
II
IR SENSOR
PROG/
SET/CLEAR
E
Q
X-BASS
P
R
E
S
E
T
V
O
L
U
M
E
C
O
N
T
R
O
L
T
U
N
E
R
TA
P
E
CD
TIMER
P
L
A
Y
B
A
C
K
/
R
E
C
O
R
D
OPEN/
CLOSE
RS2001
RS2001 EN 7/23/02, 3:48 PM3
EN
FCC Information
This device complies with Part 15 of the FCC
Rules. Operation is subject to the following
two conditions: (1) This device may not cause
harmful interference, and (2) this device must
accept any interference received, including
interference that may cause undesired
operation.
In accordance with FCC requirements, changes
or modifications not expressly approved by
Thomson multimedia could void the user’s
authority to operate this product.
This device generates and uses radio frequency
(RF) energy, and if not installed and used
properly, this equipment may cause interference
to radio and television reception.
If this equipment does cause interference to
radio or television reception (which you can
determine by
turning the equipment off and on), try to
correct the interference by one or more of the
following measures:
• Reorient the receiving antenna (that is, the
antenna for the radio or television that is
"receiving" the interference).
• Move the unit away from the equipment that
is receiving interference.
• Plug the unit into a different wall outlet so
that the unit and the equipment receiving
interference are on different branch circuits.
If these measures do not eliminate the
interference, please consult your dealer or an
experienced
radio/television technician for additional
suggestions.
Also, the Federal Communications Commission
has prepared a helpful booklet, "How To
Identify and Resolve Radio TV Interference
Problems." This booklet is available from the
U.S. Government Printing Office,
Washington, DC 20402. Please specify
stock number 004-000-00345-4
when ordering copies.
This product complies with DHHS
Rules 21 CFR Subchapter J.
Applicable at the date of manufacture.
For Your Safety
The AC power plug is polarized
(one blade is wider than the
other) and only fits into AC
power outlets one way. If the
plug won’t go into the outlet
completely, turn the plug over
and try to insert it the other way.
If it still won’t fit, contact a qualified electrician
to change the outlet, or use a different one. Do
not attempt to bypass this safety feature.
CAUTION: TO PREVENT ELECTRIC SHOCK, MATCH
WIDE BLADE OF PLUG TO WIDE SLOT, FULLY
INSERT.
Technical Specification
Product: Ultra Mini System
Brand: RCA
Model: RS2001
Electrical Consumption
Power Supply: 120V~60Hz
Power Consumption: 38 Watts
IMPORTER
Comercializadora Thomson de México, S.A. de C.V.
Miguel de Cervantes Saavedra 57
Col. Ampliación Granada
C.P. 11529 Mexico D.F.
Telefono: (55)25 81 53 20
RFC: CTM-980723-KS5
WARNING:
TO PREVENT FIRE
OR ELECTRICAL
SHOCK HAZARD,
DO NOT EXPOSE THIS PRODUCT
TO RAIN OR MOISTURE.
SEE MARKING ON BOTTOM / BACK OF PRODUCT
CAUTION
RISK OF ELECTRIC SHOCK
DO NOT OPEN
THE EXCLAMATION
POINT WITHIN THE
TRIANGLE IS A
WARNING SIGN
ALERTING YOU OF
IMPORTANT
INSTRUCTIONS
ACCOMPANYING
THE PRODUCT.
THE LIGHTNING
FLASH AND ARROWHEAD WITHIN THE
TRIANGLE IS A
WARNING SIGN
ALERTING YOU OF
"DANGEROUS
VOLTAGE" INSIDE
THE PRODUCT.
CAUTION: TO REDUCE THE
RISK OF ELECTRIC SHOCK,
DO NOT REMOVE COVER
(OR BACK). NO USERSERVICEABLE PARTS INSIDE. REFER SERVICING
TO QUALIFIED SERVICE
PERSONNEL.
RS2001 EN 7/23/02, 3:48 PM4
EN
Safety Information
FCC Information
Getting Started ..................1
CD Micro System ................ 2
Remote Control ..................3
Settings ...............................4
Tuner .................................... 5
Tape Deck ............................6
CD Player ............................. 7
Troubleshooting Tips ......... 8
Maintenance .......................9
More Information ..............10
Limited Warranty ............... 11
Content
The descriptions and characteristics in this owner’s manual are for the purpose of general reference only and not as a
guarantee. In order to provide you with the highest quality product, we may make changes or modifications without prior
notice. The English version serves as the final reference on all product and operational details should any discrepancies arise
in other languages.
For Your Records
In the event that service should be required, you
may need both the model number and the serial
number. In the space below, record the date and
place of purchase, and the serial number:
Model No.
Date of Purchase
Place of Purchase
Serial No.
Service Information
This product should be serviced only by those
specially trained in appropriate servicing techniques.
For instructions on how to obtain service, refer to
the warranty included in this Guide
RS2001 EN 7/23/02, 3:48 PM5
EN
Unpacking Your System
You should have:
• One main unit (with 2 speakers);
• One remote control;
• One user’s guide;
• Safety Leaflet
•Owner Registration Card
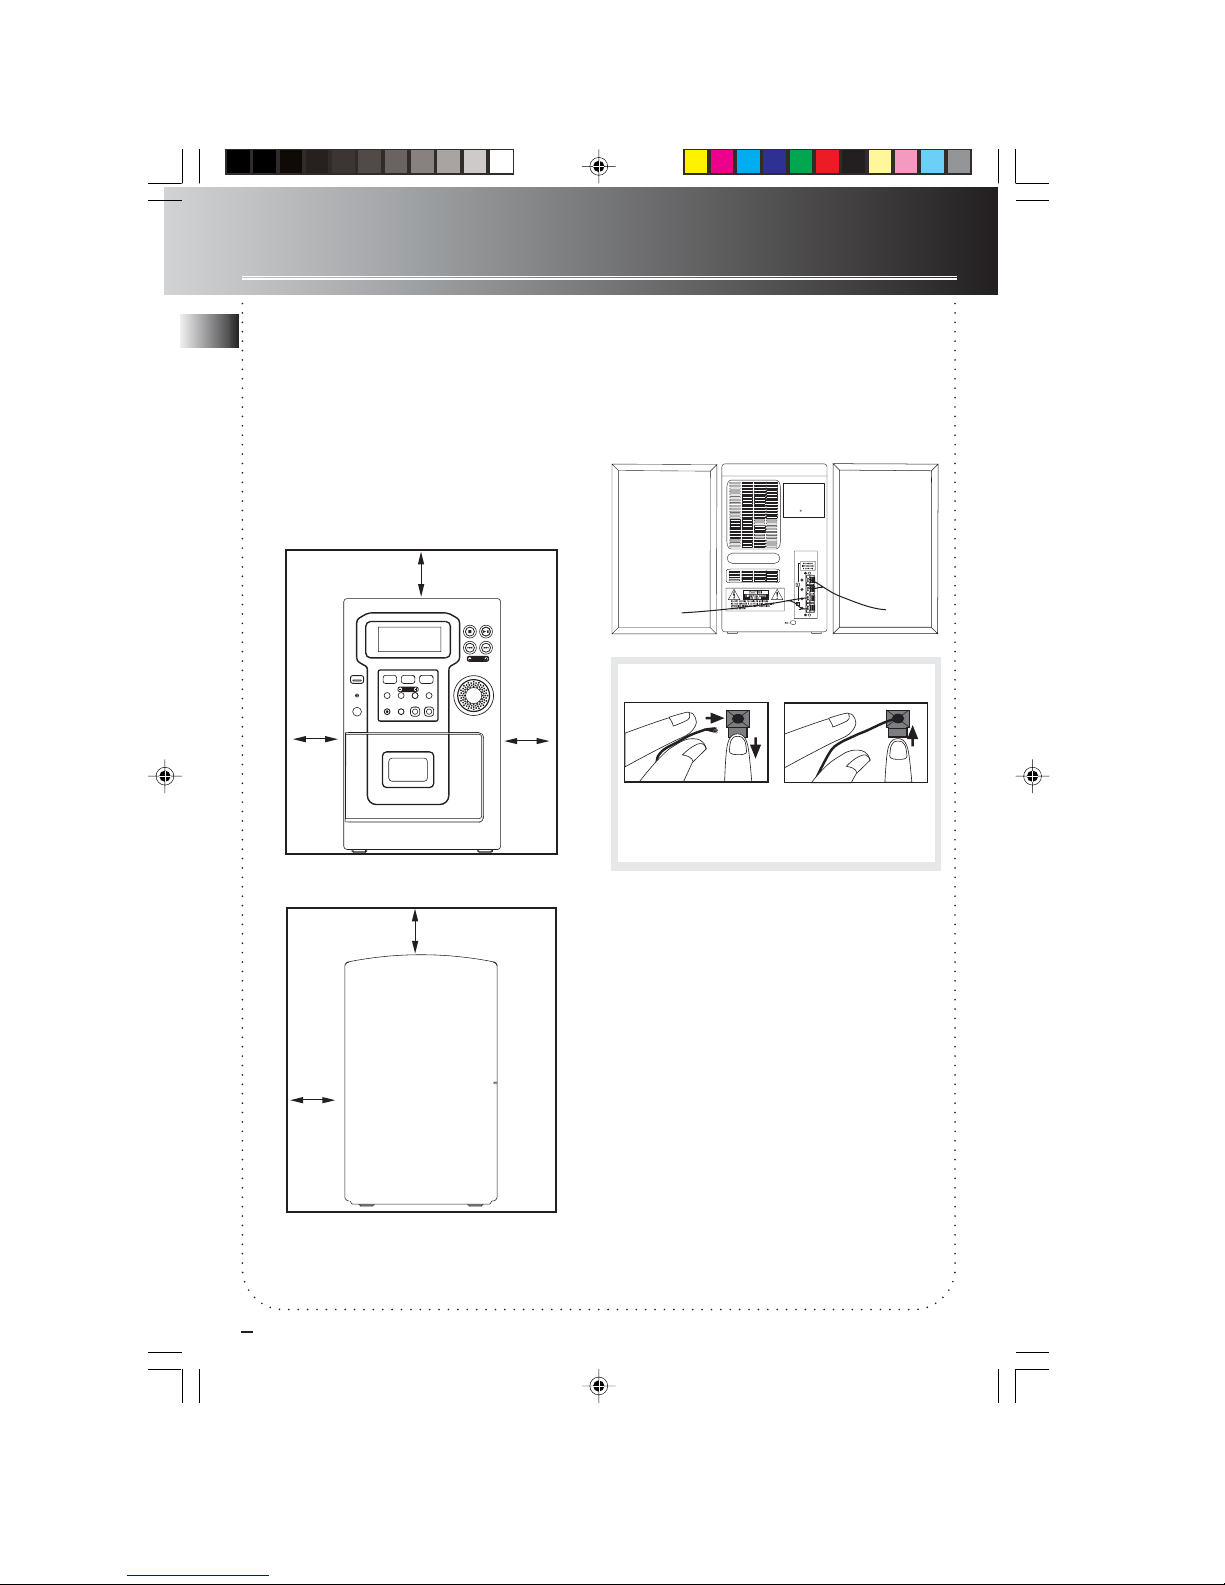
Installation
To ensure sufficient ventilation, keep the spacing
shown as below:
Front View
Side View
Getting Started
1
4 inches
2 inches
Using the Antenna
Before you use your audio system, you’ll want to
make sure the FM antenna is positioned properly.
The FM antenna is the coiled wire connected to
the back of the unit. Uncoil it, making sure it is
fully extended (you may even want to tape it to
the wall behind the unit, if possible. The higher,
the better.)
For better AM reception, move or rotate the unit.
Connecting the Speakers
When connecting the speakers, match the red
wires to the red jacks and the black wires to the
black jacks. Each speaker has a black and a red
jack, one for positive and one for negative. The
top two jacks are for the left speaker, while the
bottom two jacks are for the right speaker.
Release tab to lock wire in
the terminal.
NOTE: Make sure the insulation
is completely removed from the
ends of the
speaker wires at all connection
points.
Speaker
Wire Connection
Push Speaker terminal tab
down to insert wire.
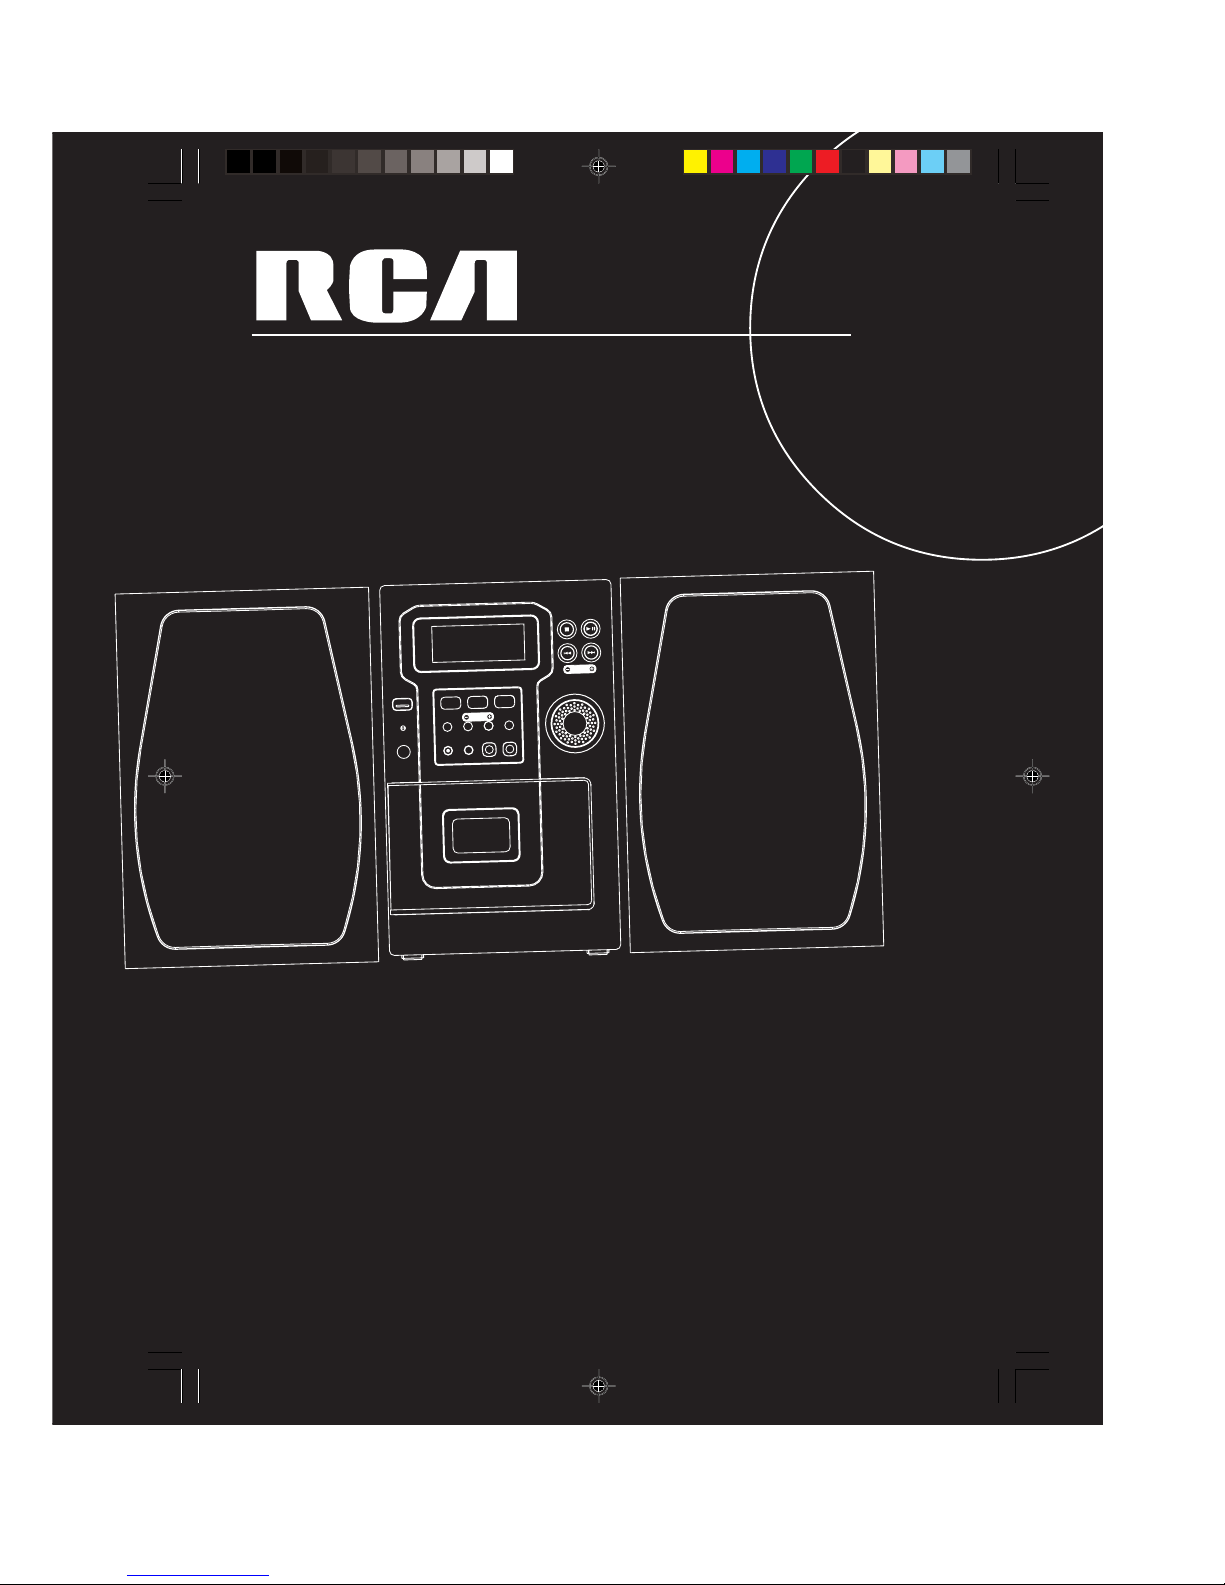
DIGITAL LOGIC DECK
POWER/
STAND-BY
DIGITAL PLL SYNTHESIZED TUNER
MULTI FUNCTION LCD DISPLAY
TUNING
CLOCK/
TIMER
BAND•APP
ST•MONO
REC•II
IR SENSOR
PROG/
SET/CLEAR
EQ
X-BASS
PRESET
V
O
L
U
M
E
C
O
N
T
R
O
L
TUNER TAPE
CD
TIMER
PLAYBACK/ RECORD
OPEN/
CLOSE
R
L
FM ANT
4 inches
4 inches
4 inches
RS2001 EN 7/23/02, 3:48 PM6
 Loading...