

Page 1
FCC IINFORMATION
This device complies with Part 15 of the FCC Rules. Operation is subject to the following two conditions: (1) This device
may not cause harmful interference, and (2) this device must accept any interference received, including interference
that may cause undesired operation.
In accordance with FCC requirements, changes or modifications not expressly approved by Thomson Consumer Electronics
could void the user’s authority to operate this product.
This product complies with DHHS Rules 21 CFR Subchapter J. Applicable at the date of manufacture.
This device generates and uses radio frequency (RF) energy, and if not installed and used properly, this equipment may
cause interference to radio and television reception.
This equipment has been type tested and found to comply with the limits for a Class B Computing Device in accordance
with the specifications of FCC Rules. These rules are designed to provide reasonable protection against radio and television
interference in a residential installation. However, there is no guarantee that interference will not occur in a particular
installation.
If this equipment does cause interference to radio or television reception (which you can determine by turning the
equipment off and on), try to correct the interference by one or more of the following measures:
• Reorient the receiving antenna (that is, the antenna for the radio or television that is “receiving” the interference).
• Change the position of the unit with respect to the radio or television equipment that is receiving interference.
• Move the unit away from the equipment that is receiving interference.
• Plug the unit into a different wall outlet so that the unit and the equipment receiving interference are on different
branch circuits.
If these measures do not eliminate the interference, please consult your dealer or an experienced radio/television technician
for additional suggestions. Also, the Federal Communications Commission has prepared a helpful booklet, “How To Identify
and Resolve Radio TV Interference Problems.” This booklet is available from the U.S. Government Printing Office,
Washington, DC 20402. Please specify stock number 004-000-00345-4 when ordering copies.
SAFETY PRECAUTIONS
• Never open the cabinet under any circumstances. Any repairs or internal adjustments should be made only by a trained
technician.
• Warning: Never operate this product with the cabinet removed.
• Do not touch the player with wet hands. If any liquid enters the player cabinet, take the player to a trained technician
for inspection.
• This compact disc player uses a laser to read the music on the disc. The laser mechanism corresponds to the cartridge
and stylus of a record player . Although this product incorporates a laser pick-up lens, it is completely safe when operated
according to directions.
• Discs rotate at high speed inside the player. Do not use damaged, warped, or cracked discs.
FOR YOUR SAFETY
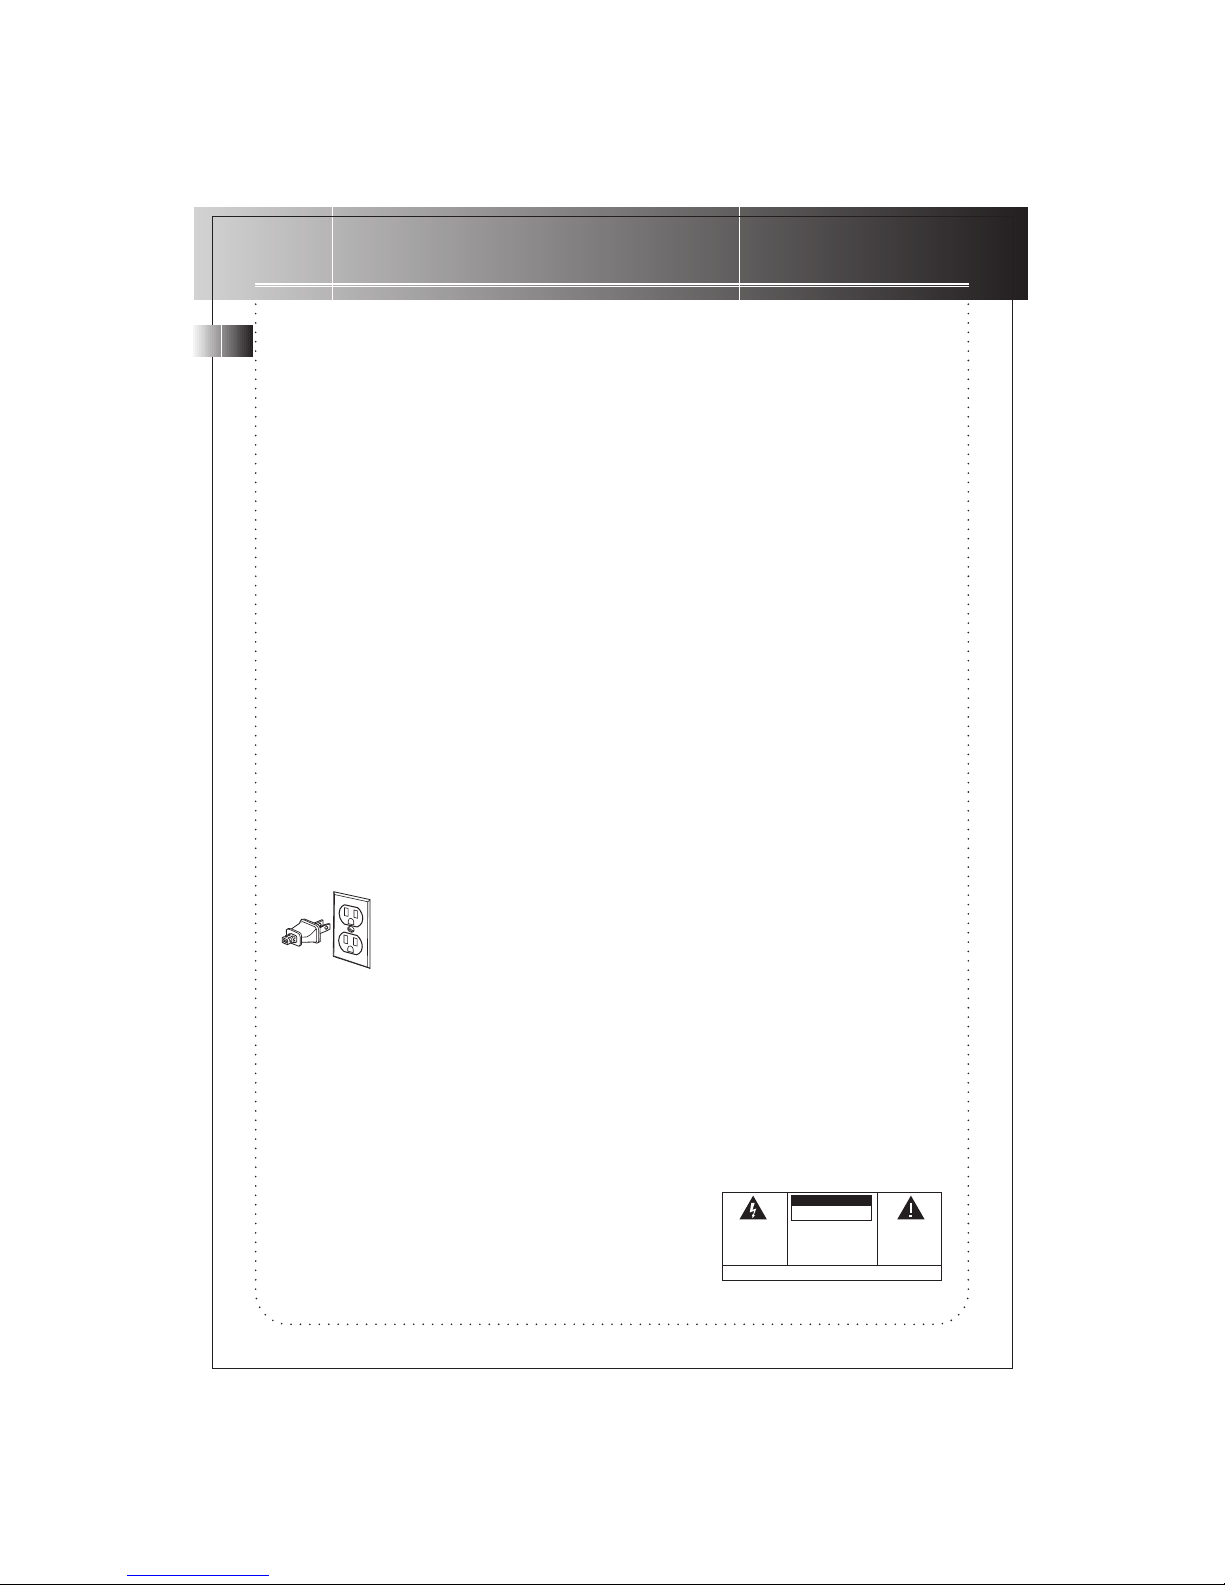
The AC power plug is polarized (one blade is wider than the other) and only fits into AC power outlets
one way. If the plug won’t go into the outlet completely, turn the plug over and try to insert it the
other way. If it still won’t fit, contact a qualified electrician to change the outlet, or use a different
one. Do not attempt to bypass this safety feature.
SERVICE INFORMATION
This product should be serviced only by those specially trained in appropriate servicing techniques. For instructions on
how to obtain service, refer to the warranty included in this Guide.
FOR YOUR RECORDS
According to some state laws, and in the event that service should be required, you may need both the model number
and the serial number. In the space below, record the date and place of purchase, and the serial number:
WARNING : TO PREVENT
FIRE OR ELECTRICAL
SHOCK HAZARD, DO NOT
EXPOSE THIS PRODUCT TO
RAIN OR MOISTURE.
CAUTION
RISK OF ELECTRIC SHOCK
DO NOT OPEN
THE LIGHTNING FLASH
ANDARROW HEAD WITHIN
THE TRIANGLE IS A
WARNINGSIGN ALERTING
YOU OF "DANGEROUS
VOLTAGE" INSIDE THE
PRODUCT.
CAUTION: TO REDUCE THE RISK OF
ELECTRIC SHOCK, DO NOT REMOVE
COVER (OR BACK). NO USER
SERVICEABLE PARTS INSIDE. REFER
SERVICING TO QUALIFIED SERVICE
PERSONNEL.
THE EXCLAMATION POINT
WITHINTHE TRIANGLE IS A
WARNINGSIGN ALERTING
YOU OF IMPORTANT
INSTRUCTIONS
ACCOMPANYING THE
PRODUCT.
SEE MARKING ON BOTTOM/BACK OF PRODUCT
Model No. RS1249/1251
Remote Control No. CRK292B1
Date of Purchase .....................................................
Place of Purchase ....................................................
Serial No...................................................................
GB
RS 1249 /1251 9/2/99, 4:22 PM1
Page 2
CONTENTS
GB
1
FIRST THING FIRST ................................................................ 2
Unpack the System ................................................................................................................................ 2
Check for Moisture ............................................................................................................................... 2
Choosing System Location .................................................................................................................... 2
CONNECTIONS ...................................................................... 3
Speakers ................................................................................................................................................. 3
Antennas ................................................................................................................................................ 3
Power Supply ......................................................................................................................................... 3
PANEL CONTROLS................................................................. 4
USING THE TURNER .............................................................. 7
USING THE CD PLAYER ......................................................... 8
Loading Disc ........................................................................................................................................... 8
Basic Operations .................................................................................................................................... 8
USING THE CD PLAYER ......................................................... 9
Programming Play Order ...................................................................................................................... 9
Recalling and Editing Programmed Play Order .................................................................................. 9
USING THE CD PLAYER ......................................................... 10
Playing and Loading Discs Simultaneously ......................................................................................... 10
Shuffle Play ............................................................................................................................................ 10
USING THE CD PLAYER ......................................................... 11
Repeat Play ............................................................................................................................................ 11
USING THE CASSETTE PLAYER ............................................. 13
Loading Cassette Tapes ......................................................................................................................... 13
Basic Operations .................................................................................................................................... 13
USING THE CASSETTE PLAYER ............................................. 14
Automatic Tape Stop ............................................................................................................................ 14
Dual Decks Tape Play............................................................................................................................ 14
Recordings .............................................................................................................................................. 14
USING THE REMOTE CONTROL ............................................. 16
Installing Batteries ................................................................................................................................. 16
Remote Control Operations ................................................................................................................. 16
DISPLAY MESSAGE IN CD MODE......................................... 18
CARE & MAINTENANCE........................................................ 19
TROUBLESHOOTING TIPS ...................................................... 21
INDEX.................................................................................... 23
US WARRANTY ..................................................................... 24
CANADIAN WARRANTY ....................................................... 25
RS 1249 /1251 9/2/99, 4:22 PM2
Page 3

FIRST THINGS FIRST
UNPACK THE SYSTEM
Unpack your new RS-1249 SL audio system and locate all the accessories. You should have:
• one RS-1249/ RS-1251 main unit;
• one RCA Remote Control ( CRK291B1 );
• one pair of speaker ( different style for different models );
• one external AM loop antenna;
• one RS-1249 / RS-1251 user’s guide;
• and one safety leaflet.
SHUFFLE PLAY / PAUSESTOP REPEAT
POWER
STANDBY
FUNCTION
FM STEREO
BAND SELECTOR
RECORD PLAY REW F.FWD STOP / EJECT PAUSE PLAY STOP / EJECT
MUTLI FUNCTION FLUORESCENT DISPLAY
PLAYBACK/ RECORD
PHONES
PLAYBACK
1-2-3 DISC
OPEN / CLOSE
MEMORY
TUNE
TUNING
PRESET
STATION
1
TAPE
2
DEMO
SUPER
BASS
DIGITAL PLL
SYNTHESIZED TUNER
DISC CHANGER
AUDIO SYSTEM
TAPE
A
UTO
M
A
T
I
C
R
E
C
O
RD
L
E
V
E
L
A
U
TO
S
T
O
P
M
E
C
H
A
NISM
C
O
N
T
IN
UO
U
S
P
L
A
Y
2
>1
ONE
T
O
U
C
H
R
E
C
O
R
D
I
N
G
T
A
P
E
D
U
B
B
I
N
G
2
>1
V
O
L
U
M
E
C
O
N
T
R
O
L
PRESET
EQ
FM
STEREO
POWER
VIDEO 1•2
TAPE
CD
TUNING
SEEK
PRESET
TUNER
SHUFFLE
DISC SKIPREPEAT
M
U
T
E
PLAY REV PAUSE PLAY FWD
E
Q
P
R
E
S
E
T
V
O
L
V
O
L
TRACK REV STOP TRACK FWD
RECORD
SRS
AM loop
antenna
CHECK FOR MOISTURE
Just as moisture can form on the inside of windows on a cold day, it can also form on the inside of
your audio sustem causing it to malfunction.
If the moisture forms inside the system, it may not operate properly. In this case the best thing to do is
to disconnect power to the unit and wait about 30 minutes for the moisture to evaporate.
CHOOSING SYSTEM LOCATION
It is recommended to follow these guidelines when setting up your system:
• Choose a solid, level surface. Don’t place on surfaces like carpet or foam rubber.
• Choose a location away from direct sunlight, radiation, air ducts and sources of heat.
• Avoid locations subject to moisture, mechanical vibration, shock or excessive dust.
• Ensure that the location is adequately ventilated, as it is essential to protect the unit from internal
heat build-up.
RS-1249/ RS-1251
main unit
Remote
control
GB
2
RS 1249 /1251 9/2/99, 4:22 PM3
Page 4
CONNECTIONS
SPEAKERS
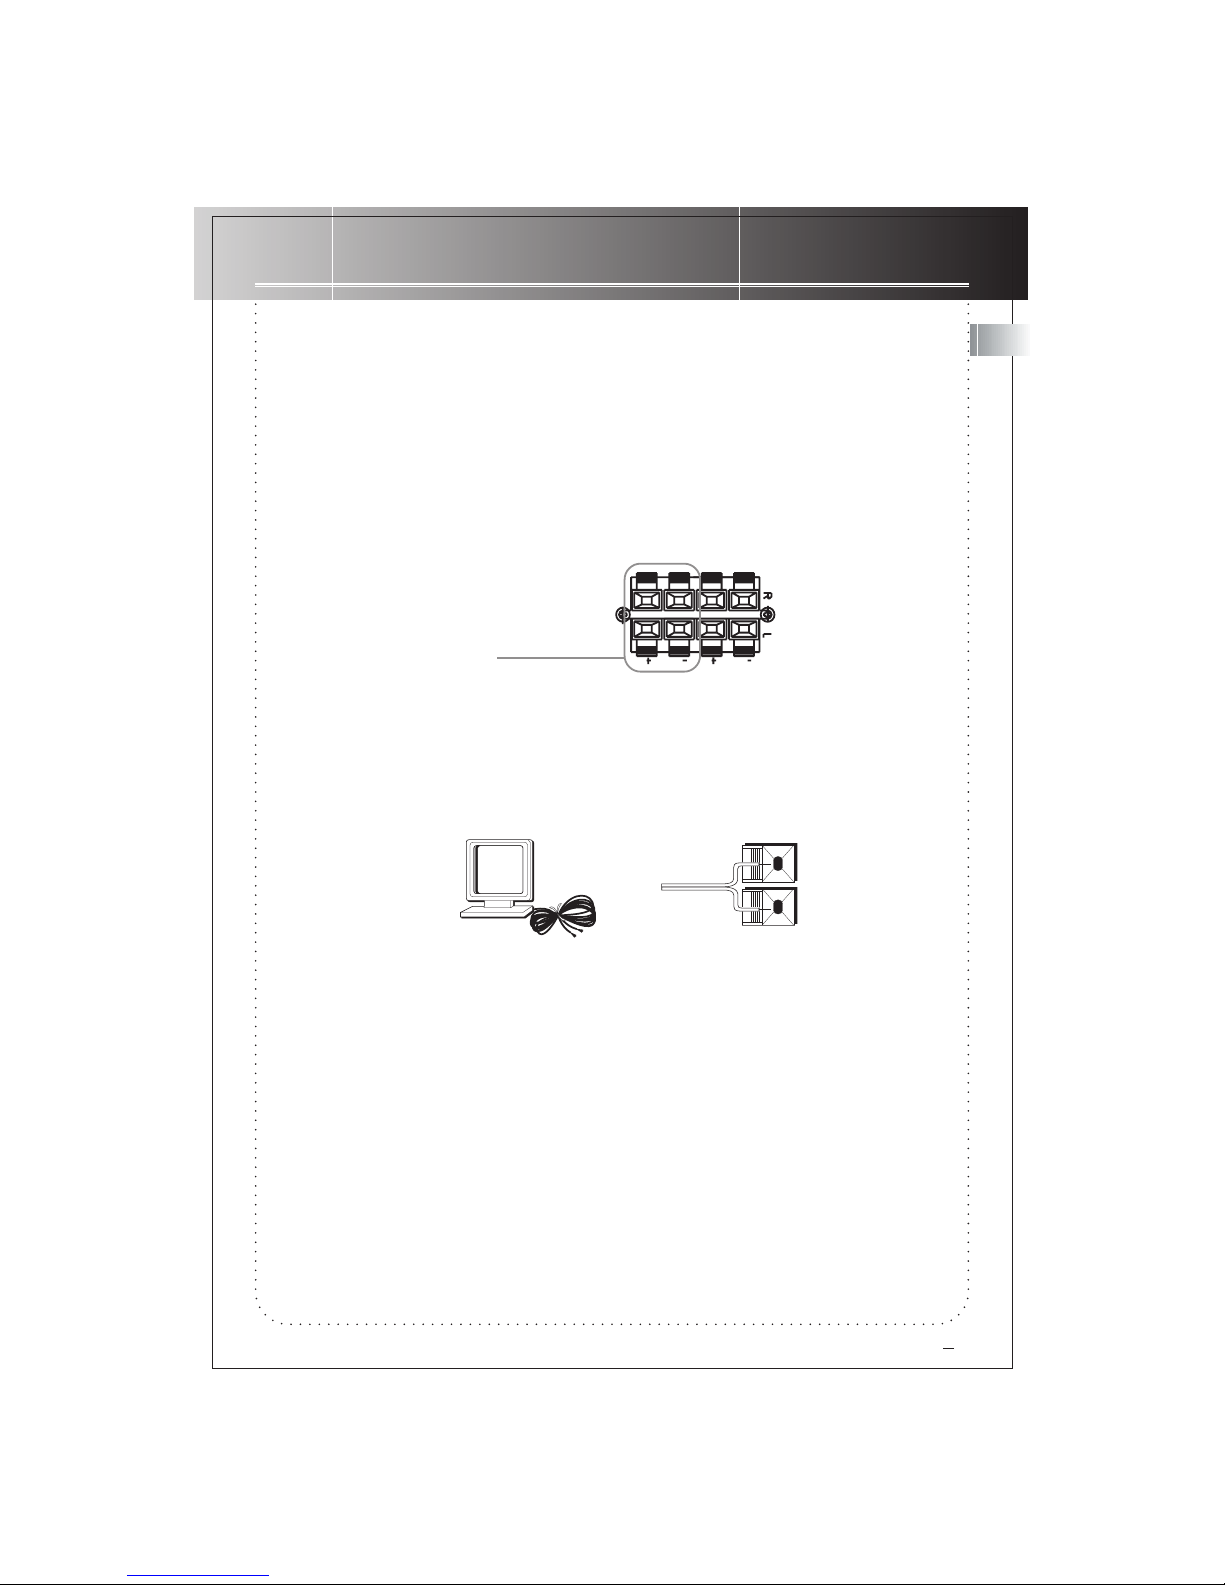
To connect a speaker wire either to the terminals of a speaker or the unit, follow these steps:
1. At the back of a speaker or the unit, press and hold the black tab to open the (-) terminal, fit in
the black speaker wire, release tab.
2. Press and hold the red tab to open the (+) terminal, fit in the red speaker wire, release tab.
3. Repeat steps 1 & 2 above for connecting to the speakers and the unit.
surround
speakers
Connection for surround
speakers ( not provided with
the unit )
ANTENNAS
This unit comes with two antennas: an AM loop antenna and a FM T-type antenna. Use the same
method of connecting speaker wires to hook the AM loop antenna. To get better reception, try
placing it at various locations.
AM Loop Antenna
As for the FM T-type antenna, it’s already attached to the unit, simply extend it to the full length,
then place it at various locations to get clearer reception.
POWER SUPPLY
Plug the power cord into an AC power outlet, be sure to match the wide blade of the plug to the
wide slot of the outlet. If the plug does not fit in, try plugging it the other way, be sure to plug it in
completely.
When the unit is off, the STANDBY light comes on showing that the unit is still plugged to power. To
disconnect power completely, unplug the power cord at the AC power outlet, the STANDBY light
goes off.
3
GB
RS 1249 /1251 9/2/99, 4:22 PM4
Page 5
PANEL CONTROLS
SHUFFLE PLAY / PAUSESTOP REPEAT
POWER
STANDBY
FUNCTION
FM STEREO
BAND SELECTOR
RECORD PLAY REW F.FWD STOP / EJECT PAUSE PLAY STOP / EJECT
MUTLI FUNCTION FLUORESCENT DISPLAY
PLAYBACK/ RECORD
PHONES
PLAYBACK
1-2-3 DISC
OPEN / CLOSE
MEMORY
TUNE
TUNING
PRESET
STATION
1
TAPE
2
SUPER
BASS
DIGITAL PLL
SYNTHESIZED TUNER
DISC CHANGER
AUDIO SYSTEM
TAPE
A
UTO
M
A
T
I
C
R
E
C
O
RD
L
E
V
E
L
A
U
TO
S
T
O
P
M
E
C
H
A
NISM
C
O
N
T
IN
UO
U
S
P
L
A
Y
2
>1
ONE
T
O
U
C
H
R
E
C
O
R
D
I
N
G
T
A
P
E
D
U
B
B
I
N
G
2
>1
V
O
L
U
M
E
C
O
N
T
R
O
L
PRESET
EQ
FM
STEREO
DEMO
OPEN/CLOSE1-2-3 DISC
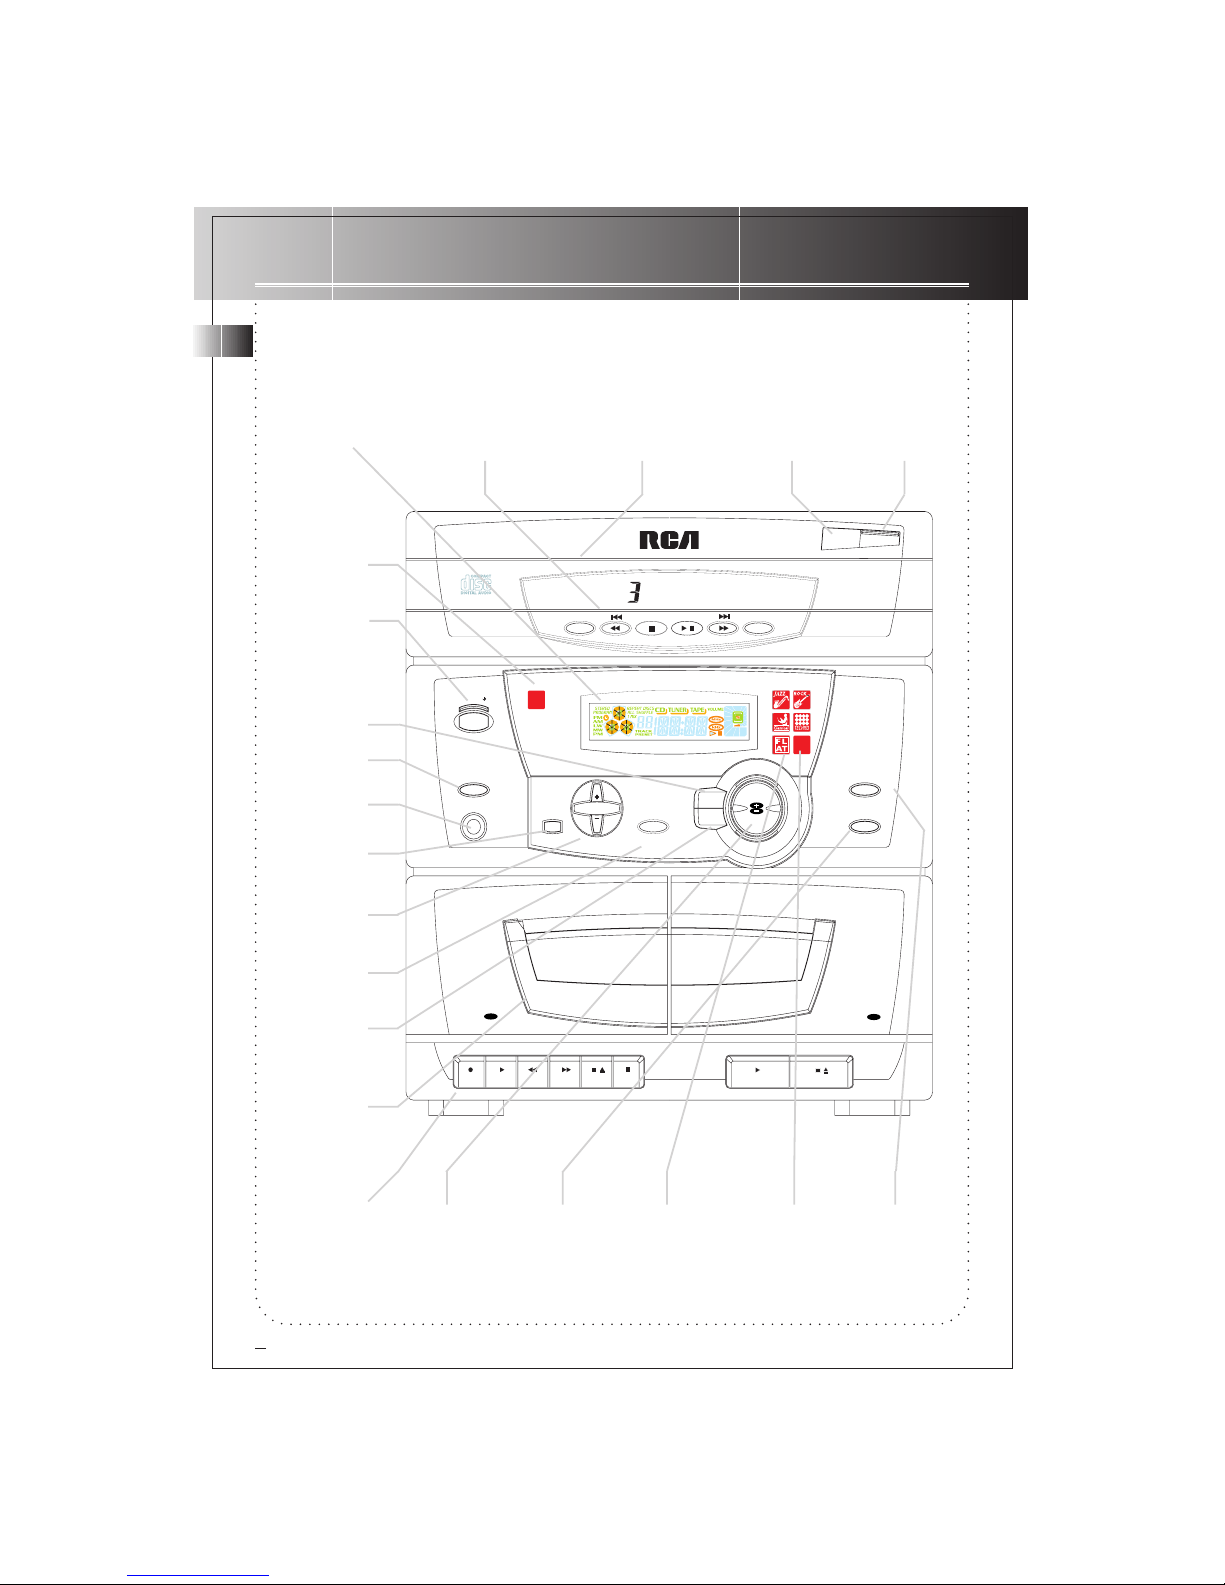
CD COMPARTMENT
TRAY
CD PLAYER CONTROL
BUTTONS
VACUUM
FLUORESCENT
DISPLAY
FM STEREO
INDICATOR
POWER
PRESET EQ
FUNCTION
PHONES
MEMORY/
DEMO
TUNING
BUTTONS
TUNE/
PRESET
STATIONS
SUPER BASS
CASSETTE
TAPE DECKS
CASSETTE
PLAYER
CONTROL
BUTTONS
VOLUME
CONTROL
FM STEREO
BUTTON
SOUND
EFFECT
(PRESET EQ)
INDICATORS
REMOTE
SENSOR
BAND
SELECTOR
4
GB
RS 1249 /1251 9/2/99, 4:22 PM5
Page 6
PANEL CONTROLS
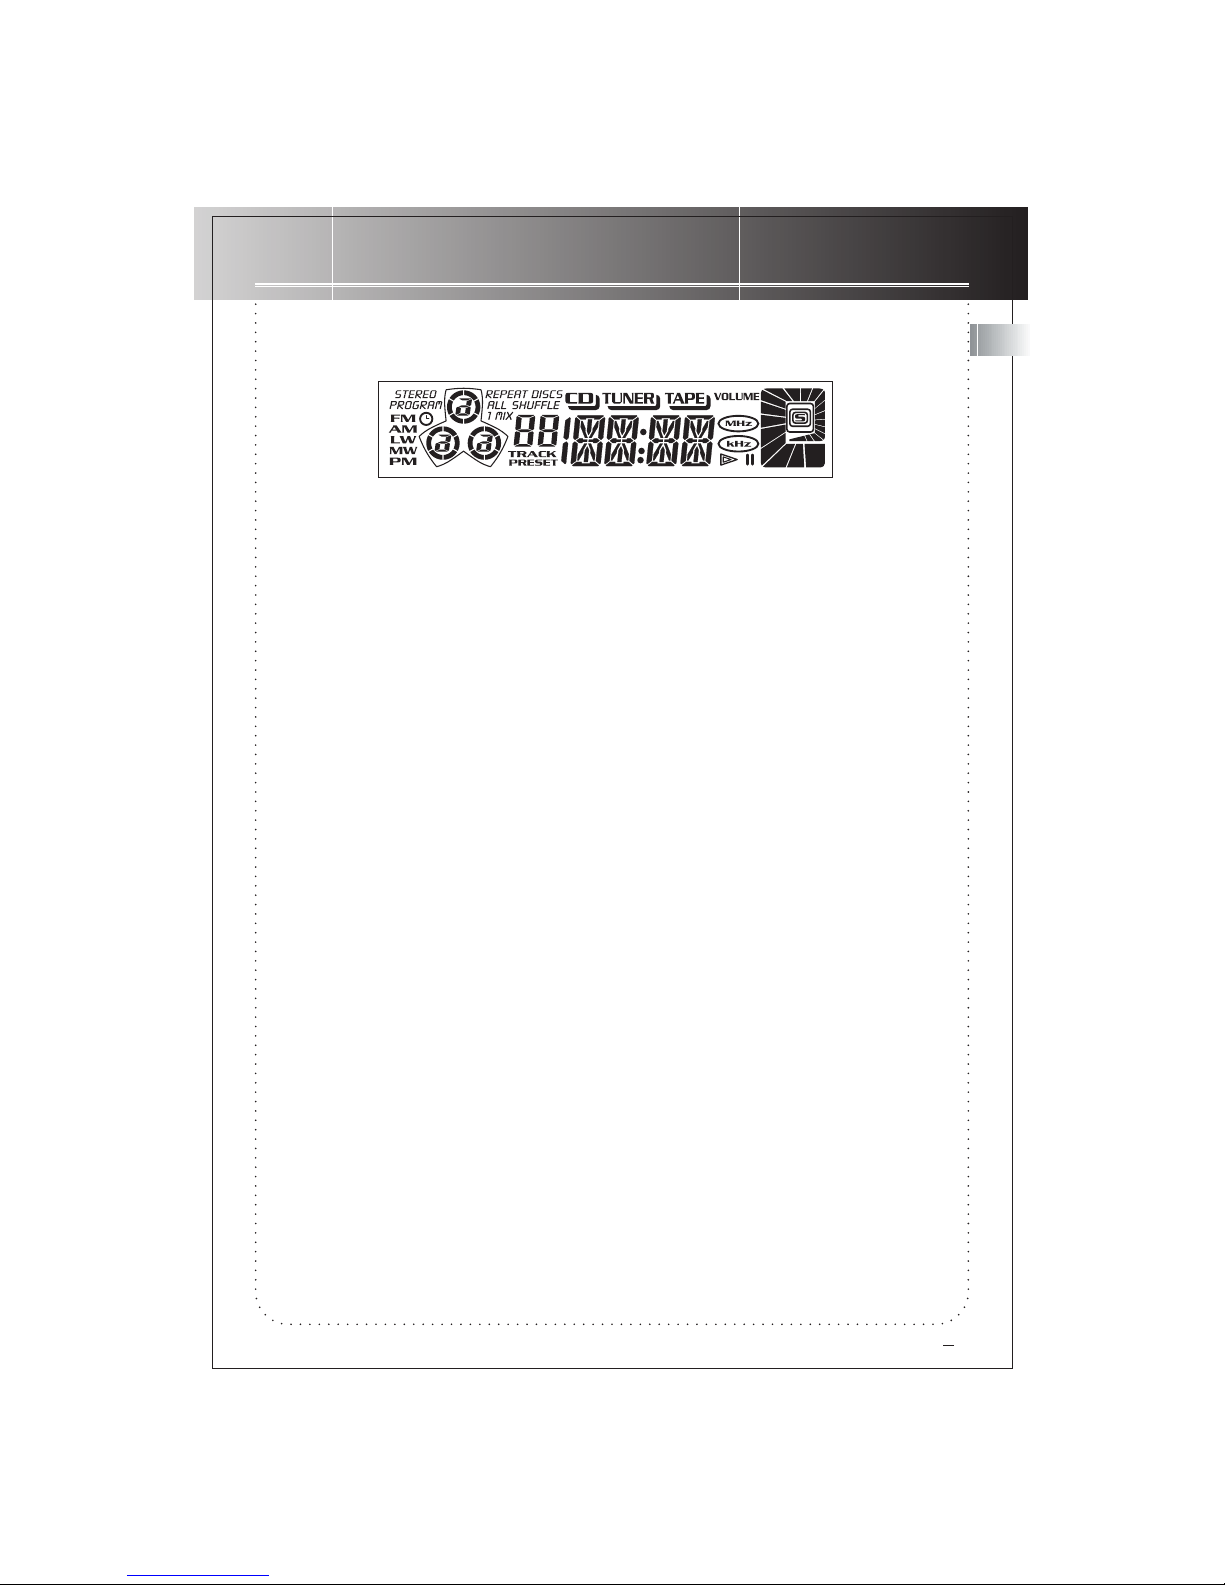
VACCUM FLUORESCENT DISPLAY
The vacuum fluorescent display (VFD) shows the current status of the unit such as volume level,
playing disc number, playing track number, selected play mode, radio frequency, selected Preset EQ,
etc.
Further explanation of the display messages will accompany the operational procedures of each
function.
CD PLAYER CONTROL BUTTONS
These control buttons are for CD player, they function only in CD mode.
CD COMPARTMENT TRAY
This tray can store 3 CDs at any one time.
1-2-3 DISC
This button’s function is for rotating the disc tray to change discs with/ without opening the CD
Compartment Discs Tray.
OPEN/CLOSE
This button is used for opening and closing the CD Compartment Tray.
FM STEREO INDICATOR
This indicator lights when receiving FM radio in stereo mode.
POWER
To turn on your RS-1249/ RS-1251, press this button. To switch your system to STANDBY mode, press
again, the STANDBY indicator light comes on with display showing STBY.
PRESET EQ
You can press this button to toggle between 5 preset styles of sound effect ( preset equalizers )
modes. You have a selection between Jazz, Rock, Classical, Techno, and Flat.
FUNCTION
Press this button to select the 3 functions: Cassette Player, CD Player, and Tuner.
GB
5
RS 1249 /1251 9/2/99, 4:22 PM6
Page 7
PANEL CONTROL
PHONES
You can listen to your audio system through a set of headphones ( not included ). Take note, when a
set of headphones is plugged into the system, sound output will divert from the speakers to your set
of headphones.
MEMORY/ DEMO
In Tuner mode, use MEMORY to store up to 32 preset radio frequency. In CD mode, use MEMORY to
store up to 32 tracks. In Standby mode, press this button to enter display Demonstration mode.
TUNING BUTTONS
The TUNING + and TUNING - buttons can be used to change radio frequency, select preset stations
or select memory locations during station preset.
TUNE/ PRESET STATIONS
In Tuner mode, you can store up to 32 preset station frequencies in memory.
SUPER BASS
Select this function to enhance the bass sound effect of heavy-based sound.
CASSETTE TAPE DECKS
Your RS-1249/ RS-1251 is equipped with dual cassette tape decks: one for playback only and one for
playback plus recording.
CASSETTE PLAYER CONTROL BUTTONS
All cassette player operations such as Tape Play, Stop, Rewind, Fast Forward, Record, and Tape Eject
are at the front panel of the system.
VOLUME CONTROL
Press + to increase sound level, press - to decrease sound level.
FM STEREO BUTTON
When the system is in Tuner mode and FM band, you can press this button and listen to FM radio in
stereo mode.
PRESET EQ ( SOUND EFFECT ) INDICATORS
When you press on the PRESET EQ button repeatedly, the indicators light up one by one indicating
your choice of the type of sound effect.
BAND SELECTOR
To choose either FM or AM radio band, press on this button to toggle between the two bands (
make sure that the system is in Tuner mode ).
6
GB
RS 1249 /1251 9/2/99, 4:22 PM7
Page 8
USING THE TUNER
POWER
STANDBY
FUNCTION
FM STEREO
BAND SELECTOR
MUTLI FUNCTION FLUORESCENT DISPLAY
PHONES
MEMORY
TUNE
TUNING
PRESET
STATION
DEMO
SUPER
BASS
DIGITAL PLL
SYNTHESIZED TUNER
V
O
L
U
M
E
C
O
N
T
R
O
L
PRESET
EQ
FM
STEREO
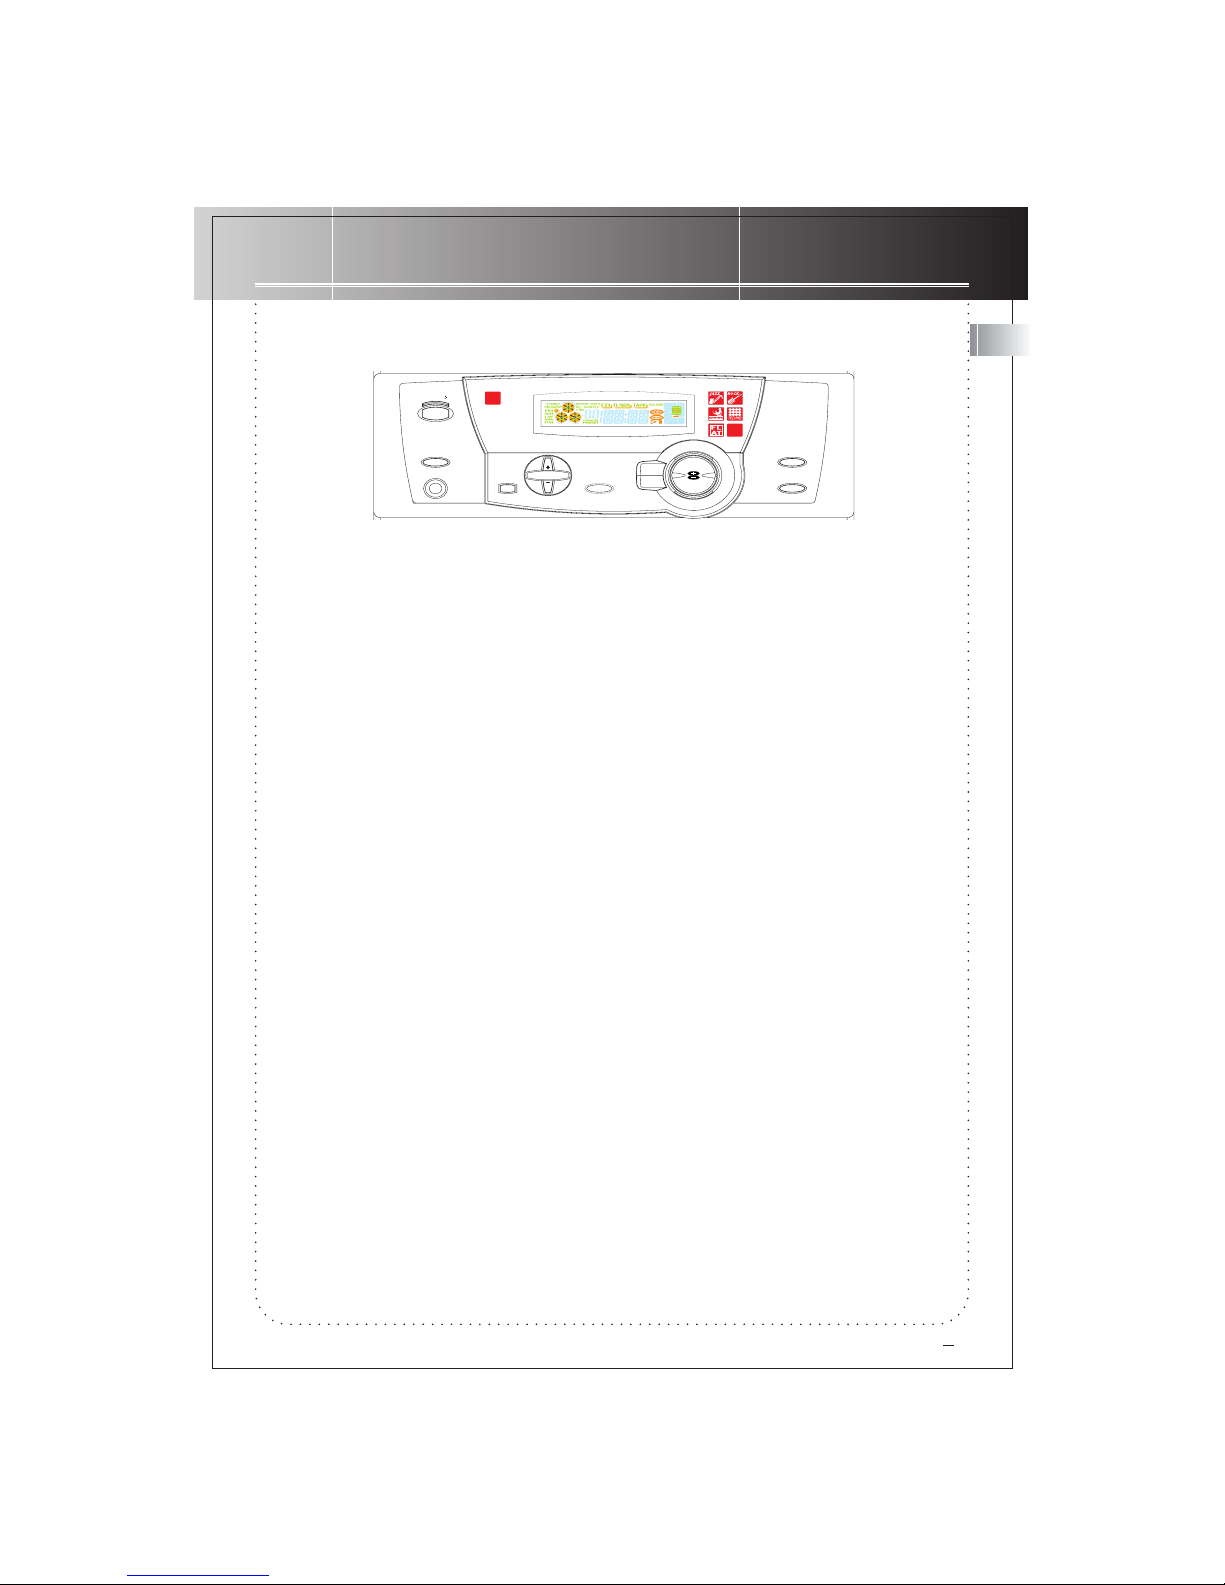
Your system’s tuner is very much similar to the usual ones that you’d find in other audio systems. It
also has tuning buttons, band selector for choosing between AM and FM radio stations, FM stereo
button for stereo effects when listening to FM radio broadcast, plus a Memory button for storing
your preset radio frequencies.
TUNER OPERATIONS
1. If the system has not been turned on yet, press POWER to turn system on.
2. Press FUNCTION repeatedly until the display shows Tuner.
3. Press BAND SELECTOR to choose your desired radio band: AM or FM.
4. For tuning to stations manually, press TUNE PRESET STATION once or twice so the display does
not show PRESET.
5. Now press either TUNING + or TUNING - to select a radio frequency.
6. When listening to FM radio stations, press FM STEREO for receiving stereo broadcast.
PRESETING STATIONS
1. Press BAND SELECTOR to choose your desired radio band: AM or FM.
2. If the display shows PRESET, press TUNE PRESET STATION once so that the display no longer shows
PRESET.
3. Press either TUNING+ or TUNING - to choose a radio frequency.
4. Press MEMORY to enter program mode, then press either TUNING + or TUNING - to select a
memory location. The display flashes PRESET, press MEMORY within 5 seconds to set that frequency
into the memory location.
5. Repeat steps 1 to 4 in this section to set up to 32 stations into memory.
RECALLING PRESETING STATIONS
1. Press TUNE PRESET STATION once or twice so the display shows PRESET.
2. Press either TUNING + or TUNING - to choose one of the preset stations.
GB
7
RS 1249 /1251 9/2/99, 4:22 PM8
Page 9
USING THE CD PLAYER
SHUFFLE PLAY / PAUSESTOP REPEAT
1-2-3 DISC
OPEN / CLOSE
DISC CHANGER
AUDIO SYSTEM
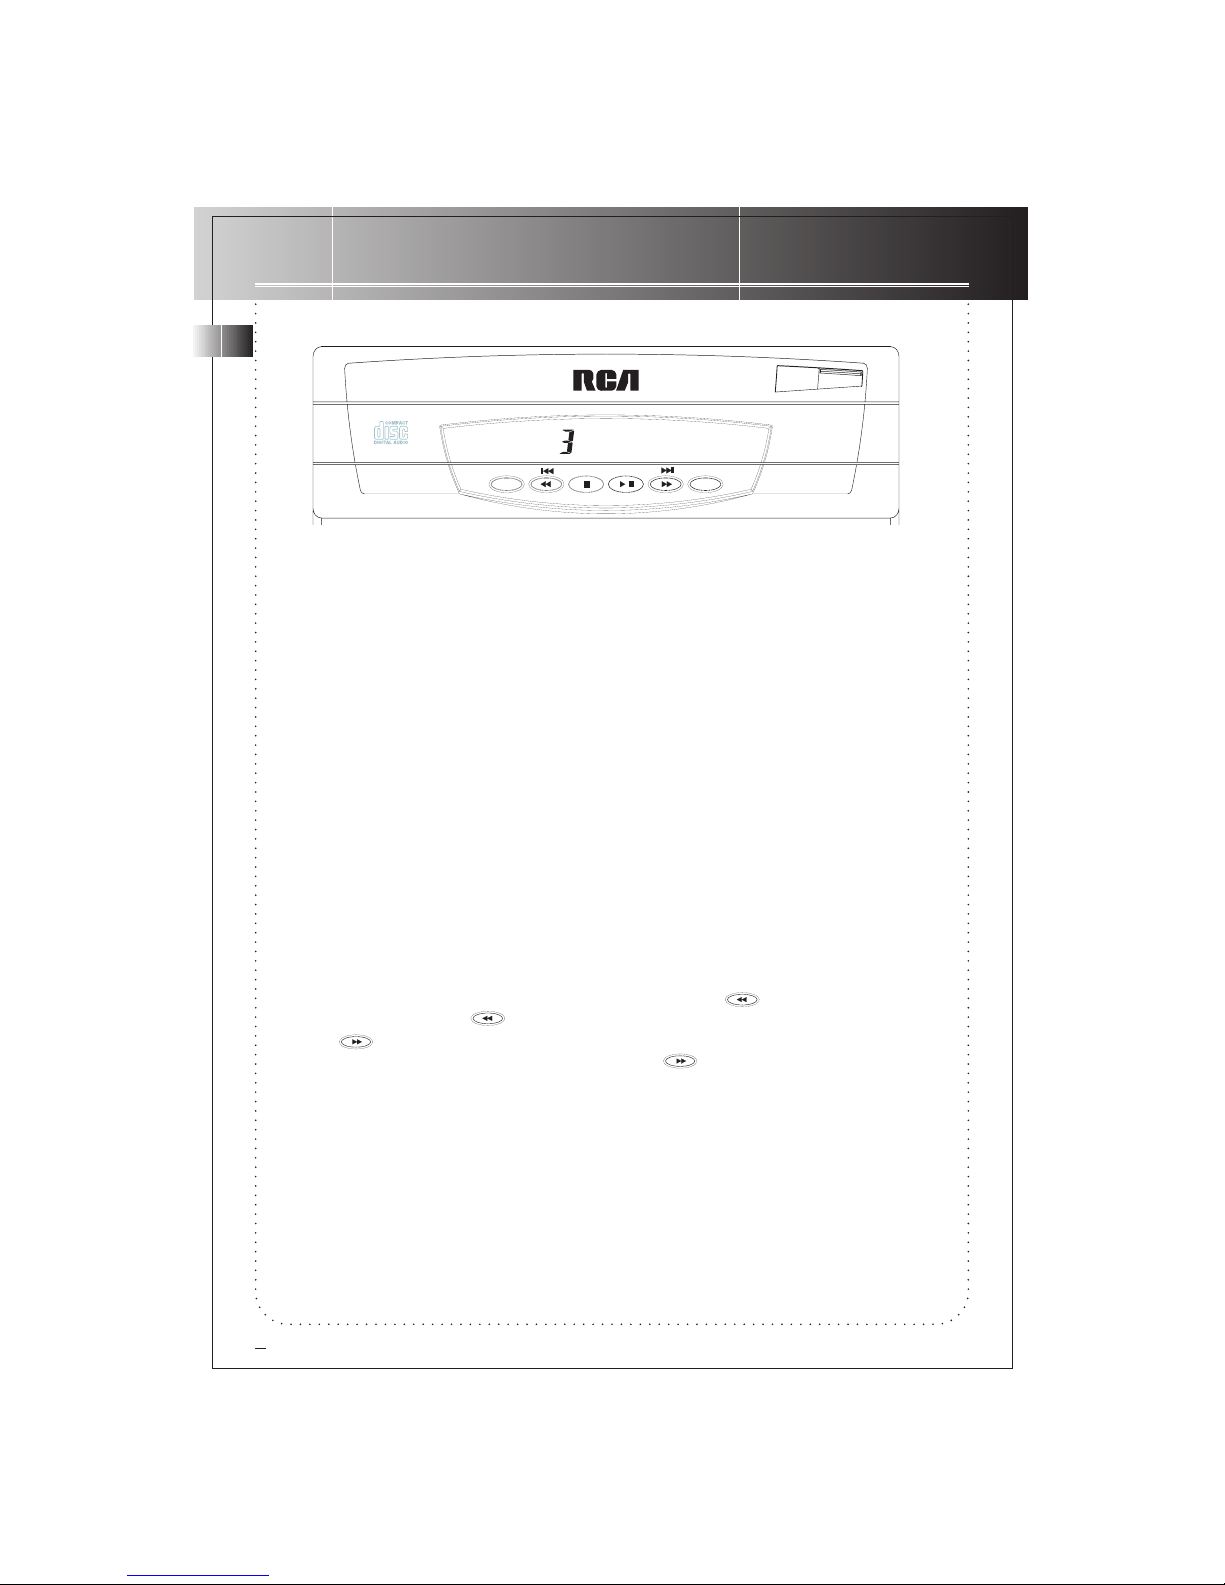
LOADING DISCS
1. Press POWER to turn on your RS-1249/ RS-1251.
2. Press FUNCTION to select CD mode, the display shows “CD”.
3. Press OPEN/CLOSE to slide out the CD Compartment Tray,
4. Load one to three CD(s) onto the CD Compartment Tray.
5. Press 1-2-3 DISC to rotate the tray and place the third disc onto the last vacant position, if so
desired.
6. Press OPEN/CLOSE to slide the tray back into the unit..
7. Press 1-2-3 DISC to select a disc to be played.
8. The display shows “DSC 1”, “DSC 2” or “DSC 3” momentarily. When you have finished your disc
selection the display shows “READ”. After the system has finished reading the selected disc the
display then shows the disc number, total number of tracks on that disc, and total track time of the
disc.
BASIC OPERATIONS
1. If discs have not been loaded yet, follow the above section LOADING DISCS.
2. To begin CD play mode, press PLAY/PAUSE.
3. To pause disc play momentarily, press PLAY/PAUSE again. You can resume to normal disc play by
pressing PLAY/PAUSE a third time.
4. Return to the beginning of the current playing track by pressing . To skip backwards to
other previous tracks press repeatedly.
5. Press for skipping forward to the beginning of the next track. To skip forward to the
beginning of other tracks ahead of the current one, press .
6. To stop disc play completely, press STOP.
8
GB
RS 1249 /1251 9/2/99, 4:22 PM9
Page 10
USING THE CD PLAYER
PROGRAMMING PLAY ORDER
Be sure that the system is in Stop mode prior to setting program play order.
1. If discs have not been loaded yet, follow the section on LOADING DISCS.
2. Press MEMORY to enter program mode.
3. Press 1-2-3 DISC to select a disc.
4. Press or to select a track to be placed in memory location 1 ( next memory
location number for continual programming).
5. Press MEMORY to enter selection.
6. Repeat steps 3 to 5 above to program into the other memory locations. You can program up to 32
tracks. After you have programmed 32 tracks, you will see the display showing “FULL”. ( For display
messages, please refer to the DISPLAY MESSAGES section on page 20, nine pages ahead in this
manual. )
7. Press PLAY/PAUSE to start program play.
8. To exit program mode, press STOP
RECALLING AND EDITING PROGRAMMED PLAY ORDER
Again, be sure that the system is in Stop mode prior to recalling or editing programmed play order.
To Recall A Pregram
1. Press MEMORY to enter program mode.
2. To scroll through and check the programmed sequence of tracks, press MEMORY repeatedly.
3. To start program play, press PLAY/ PAUSE.
4. To exit program mode, press STOP.
To Edit A Program
1. Press MEMORY to enter program mode.
2. Find the memory location by pressing MEMORY repeatedly for scrolling to the desired location.
3. Press or to select another track for replacing the existing one.
4. Press MEMORY to enter selection.
5. To replace other tracks, repeat steps 2 to 4.
6. To start program play, press PLAY/PAUSE.
7. To exit program mode, press STOP.
GB
9
RS 1249 /1251 9/2/99, 4:22 PM10
Page 11
USING THE CD PLAYER
PLAYING AND LOADING DISCS SIMULTANEOUSLY
Your 3 Disc Changer Audio System has one other feature that you simply cannot resist; while the
system is playing a disc, you can open the CD compartment tray to unload the other 2 discs and reload 2 new ones without interrupting the playing music.
Let’s say if you are playing disc 2 and you want to replace discs 1 and 3 with two other discs. All you
have to do is press OPEN/CLOSE once to slide out the CD compartment tray, unload and replace
them, then press OPEN/CLOSE again to slide the tray back in, and it is done! Now you can listen to
the newly loaded discs 1 or 3, just press 1-2-3 DISC for rotating the tray to different discs.
SHUFFLE PLAY
With this function the system plays the tracks out of its original recorded sequence and you have
quite a few choices of how the tracks can be shuffled. You can:
• Repeatedly shuffle play one disc,
• Repeatedly shuffle play all loaded discs,
• Shuffle play the tracks of all discs ( playing each track once only ) or,
• Shuffle play the tracks of one disc ( playing each track onlce only ).
Take your pick and follow the steps to set the system playing the way you like.
Repeatedly Shuffle Play Within One Disc
1. If discs have not been loaded or selected yet, follow the section on LOADING DISCS.
2. Press REPEAT repeatedly until the display shows “REPEAT 1 DISC”.
3. Press SHUFFLE and the display shows “SHUFFLE” and begins CD play automatically.
Repeatedly Shuffle Play All Discs
1. If discs have not beenloaded or selected yet, follow the section on LOADING DISCS.
2. Press REPEAT repeatedly until the display shows “REPEAT ALL DISCS”.
3. Press SHUFFLE and the display shows “SHUFFLE” and begins CD play automatically.
10
GB
RS 1249 /1251 9/2/99, 4:22 PM11
Page 12
USING THE CD PLAYER
Shuffle Play The Tracks of All Discs
The differnce between this mode and the previous one is that with the previous mode, the system
continues playing the tracks of all loaded discs repeatedly and CD play mode will not end unless you
press STOP. With this mode, it plays each track once for all loaded discs, after all tracks have been
played, the system stops CD play mode. Follow the steps below to select this mode:
1. If discs have not been loaded or selected yet, follow the section on LOADING DISCS.
2. Press REPEAT repeatedly until the display shows “ALL DISCS”.
3. Press SHUFFLE and the display shows “SHUFFLE” and CD play begins automatically.
Shuffle Play the Tracks of One Disc
To shuffle play within one disc only, make sure to load only one disc, otherwise the system will
shuffle play all discs. To select this mode, follow the steps below:
1. If discs have not been loaded or selected yet, follow the section on LOADING DISCS.
2. Press REPEAT repeatedly until the display shows “REPEAT 1 DISC”.
3. Press SHUFFLE and the display shows “SHUFFLE” and CD play begins automatically.
REPEAT PLAY
With this function you can set the system playing one or more tracks over and over. You have the
following choices:
• Repeat play- one track,
• Repeat play- one disc,
• Repeat play- all discs,
• Repeat play- program or,
• Repeat function off.
Take your pick and follow the steps on the next page to set the system playing the way you like.
USING THE CD PLAYER
GB
11
RS 1249 /1251 9/2/99, 4:22 PM12
Page 13
USING THE CD PLAYER
Repeat Play- One Track
To repeat playing one particular track, follow step 5 in BASIC OPERATIONS page 10 to skip forward
or backwards to that particular track, press PLAY/PAUSE, then press REPEAT repeatedly until the
display shows “REPEAT 1”. The system will play that track over and over until you press Stop to end
CD play.
Repeat Play- One Disc
To repeat playing a particular disc, press 1-2-3 DISC for skipping to that particular disc, press PLAY/
PAUSE, then press REPEAT repeatedly until the display shows “REPEAT 1 DISC”. The system will play
that disc over and over until you press Stop to end CD play.
Repeat Play- All Discs
To repeat playing all loaded discs, press PLAY/PAUSE to start CD play, then press REPEAT repeatedly
until the display shows “REPEAT ALL DISCS”. The system will play all loaded disc(s) over and over until
you press Stop to end the CD play.
Repeat Play- Program
To repeat play a stored program, press MEMORY for entering program mode, press PLAY/PAUSE,
then press REPEAT repeatedly until the display shows “REPEAT ALL DISCS”. The system will play that
program over and over until you press Stop to end CD play.
Repeat Function Off
You can turn the repeat function off by pressing REPEAT repeatedly until the display shows “ALL
DISCS”.
12
GB
RS 1249 /1251 9/2/99, 4:22 PM13
Page 14
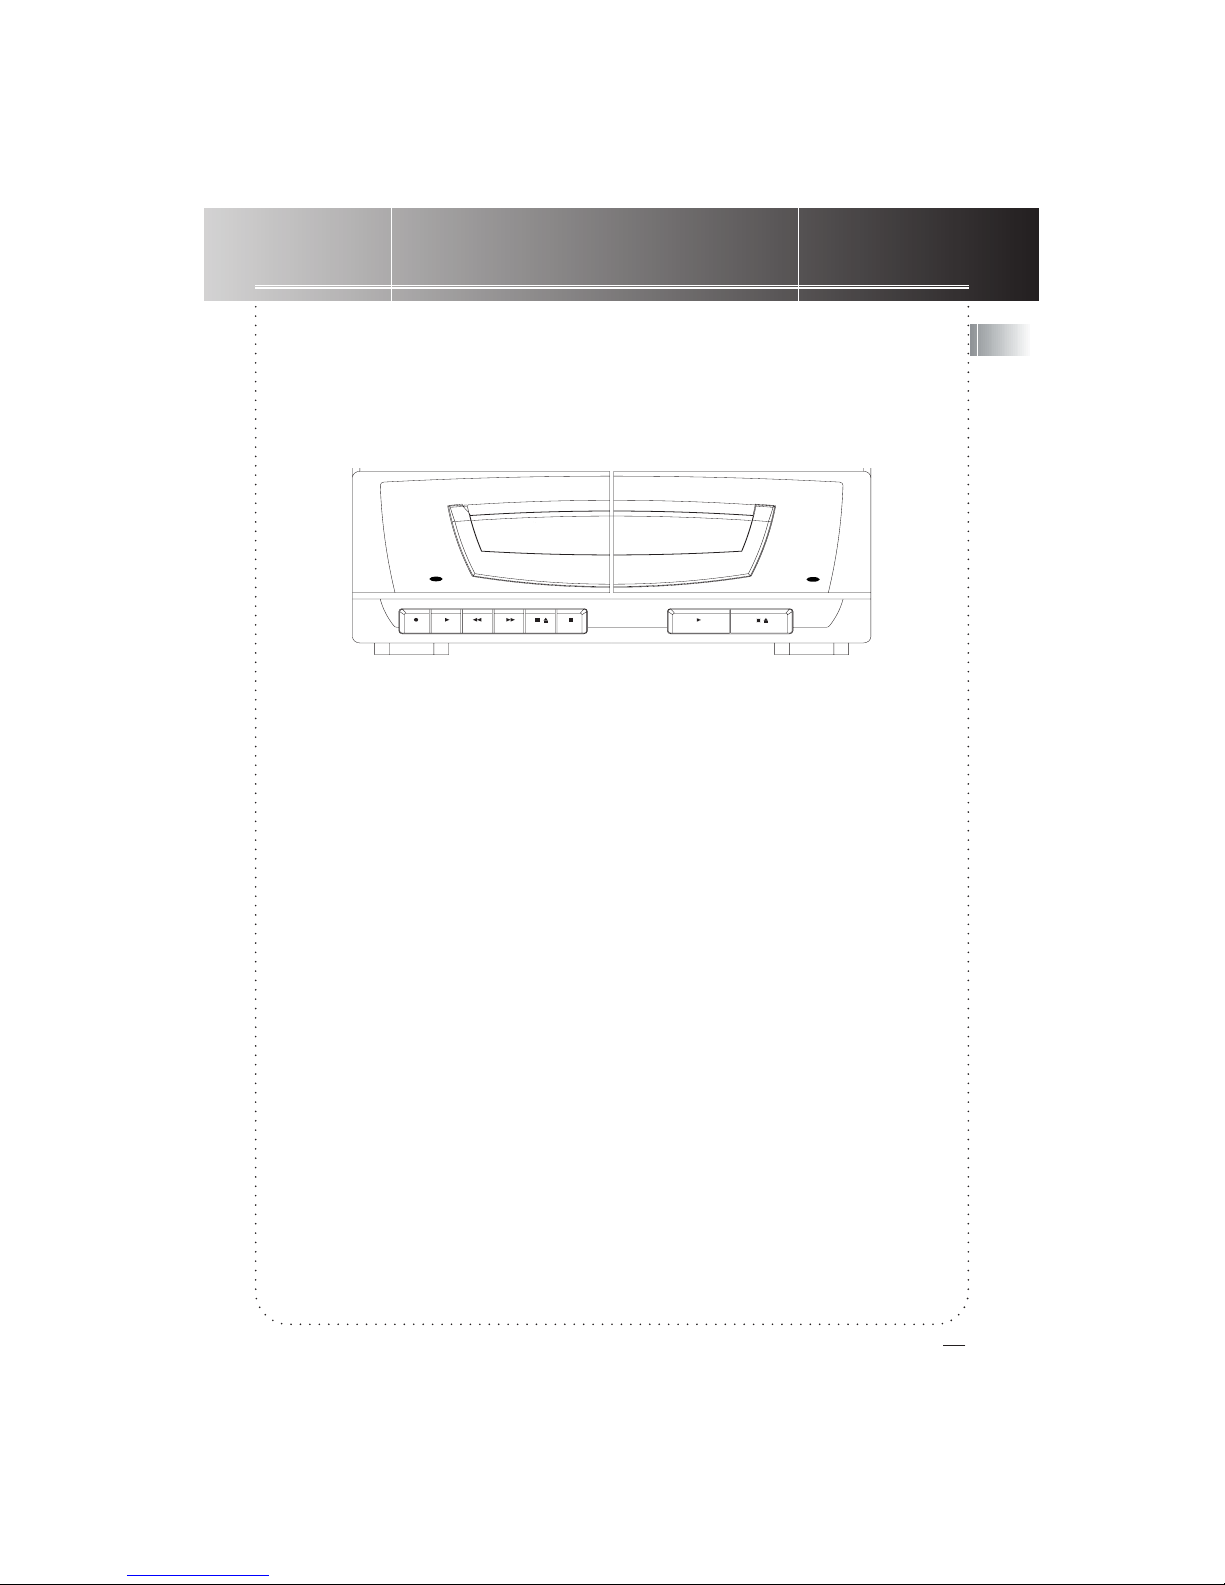
USING THE CASSETTE DECKS
Your RS-1249 SL audio system comes with dual cassette decks. With dual cassette decks you can play
cassette tapes one after another. Tape deck 1 can record and playback tapes, while tape deck 2 has
only a playback function.
When using cassette tape decks be sure to use the Function button for selecting Tape mode.
RECORD PLAY REW F.FWD STOP / EJECT PAUSE PLAY STOP / EJECT
PLAYBACK/ RECORD PLAYBACK
1
TAPE
2
TAPE
A
UTO
M
A
T
I
C
R
E
C
O
RD
L
E
V
E
L
A
U
TO
S
T
O
P
M
E
C
H
A
NISM
C
O
N
T
IN
UO
U
S
P
L
A
Y
2
>1
ONE
T
O
U
C
H
R
E
C
O
R
D
I
N
G
T
A
P
E
D
U
B
B
I
N
G
2
>1
LOADING CASSETTE TAPES
1. Press POWER to turn on your RS-1249/ RS-1251.
2. Press FUNCTION to select Tape mode, the display shows “TAPE”.
3. Press STOP/EJECT at either one or both decks to open one or both doors.
4. Insert a tape with its open edge facing downwards.
5. To close a deck door, ( for deck 1 ) push lightly on the top left corner of deck 1’s door; ( for deck
2) push lightly on the top right corner of deck 2’s door.
BASIC OPERATIONS
1. Check that your system is loaded with cassette tape(s) in deck 1 and/or deck 2. If tapes have not
been loaded yet, follow the above section on LOADING CASSETTE TAPES.
2. To begin tape play at deck 1, press PLAY at deck 1. For tape play at deck 2, press PLAY at deck 2.
3. For deck 1, you can rewind or forward wind the tape to the desired position. To rewind, press
REW. To wind forward, press F. FWD.
4. For deck 1 you can also pause tape play temporarily by pressing PAUSE. Resume to normal tape
play by pressing PAUSE again. Since deck 2 has no pause function, use the tape stop function instead
of pressing STOP.
5. For deck 1, stop tape play completely by pressing STOP.
GB
13
RS 1249 /1251 9/2/99, 4:22 PM14
Page 15
USING THE CASSETTE DECKS
AUTOMATIC TAPE STOP
When a cassette tape is engaged in a particular mode ( except Pause mode ) and reaches the end of
the tape, the tape deck buttons automatically resume to the Off position.
DUAL DECKS TAPE PLAY
Your system can be set to playing deck 2 then deck 1 without ( prolonged ) playback discontinuance.
1. Check that your system is loaded with cassette tapes in both deck 1 and deck 2. If tapes have not
been loaded yet, follow the section on LOADING CASSETTE TAPES.
2. Press PLAY to start tape play at deck 2.
3. Press PAUSE then PLAY at deck 1.
4. At this point, deck 2 should be playing. Once deck 2 finishes, it automatically stops, then the
system releases pause on deck 1 and starts playing the tape inside deck 1.
RECORDINGS
You have a choice of recording from various sources:
• Recording from radio;
• Recording from the CD player;
• Recording from a cassette tape.
Recording From Radio
1. Follow the steps on LOADING CASSETTE TAPES to load a completely blank or partially blank tape
into deck 1.
2. For partially blank tapes, use Rewind or F.Fwd ( forward wind ) for winding the tape to the desired
starting point.
3. Select Tuner mode by pressing FUNCTION repeatedly until the display shows “TUNER”.
4. Choose a radio station. Refer to page 9 on USING THE TUNER.
5. Press RECORD to begin recording from radio.
6. To pause temporarily, press PAUSE. Resume recording by pressing PAUSE again.
7. To stop recording completely, press STOP/EJECT.
14
GB
RS 1249 /1251 9/2/99, 4:22 PM15
Page 16
Recording From The CD Player
1. Follow steps 1 and 2 of the previous section on RECORDING FROM RADIO.
2. Select CD Player mode by pressing FUNCTION repeatedly until the display shows “CD”.
3. Load one to three CDs into the CD compartment tray, press 1-2-3 DISC to select the desired disc,
then press or to select the desired first track you want to record.
4. Quickly press PLAY/PAUSE twice to pause CD, avoid immediate CD play.
5. At deck 1, press PAUSE then press RECORD.
6. Now...get ready to release both pauses! Put a finger of one hand on the CD player’s PLAY/PAUSE
and put a finger of the other hand on the deck 1’s PAUSE. Press on both simultaneously to begin
recording.
Recording From A Cassette Tape
1. Follow steps 1 and 2 of the previous section on RECORDING FROM RADIO.
2. Load the pre-recorded tape into deck 2 ( this should be the tape that you want to record from ).
3. Select Tape mode by pressing FUNCTION repeatedly until the display shows “TAPE”.
4. At deck 1, press PAUSE then press RECORD.
5. To begin recording, press PLAY at deck 2, the system automatically releases the Pause on deck 1
6. To put a pause in the recording, press PAUSE at deck 1. To resume recoding, press PAUSE again.
USING THE CASSETTE DECKS
DON’T INFRINGE !
This product should only be used for the purposes for which it is sold,
that is, entertainment, violating no copyright law. Any attempts to use
this product for which it is not intended is unlawful and therefore not
condoned by Thomson Consumer Electronics.
GB
15
RS 1249 /1251 9/2/99, 4:22 PM16
Page 17
USING THE REMOTE CONTROL
A
B
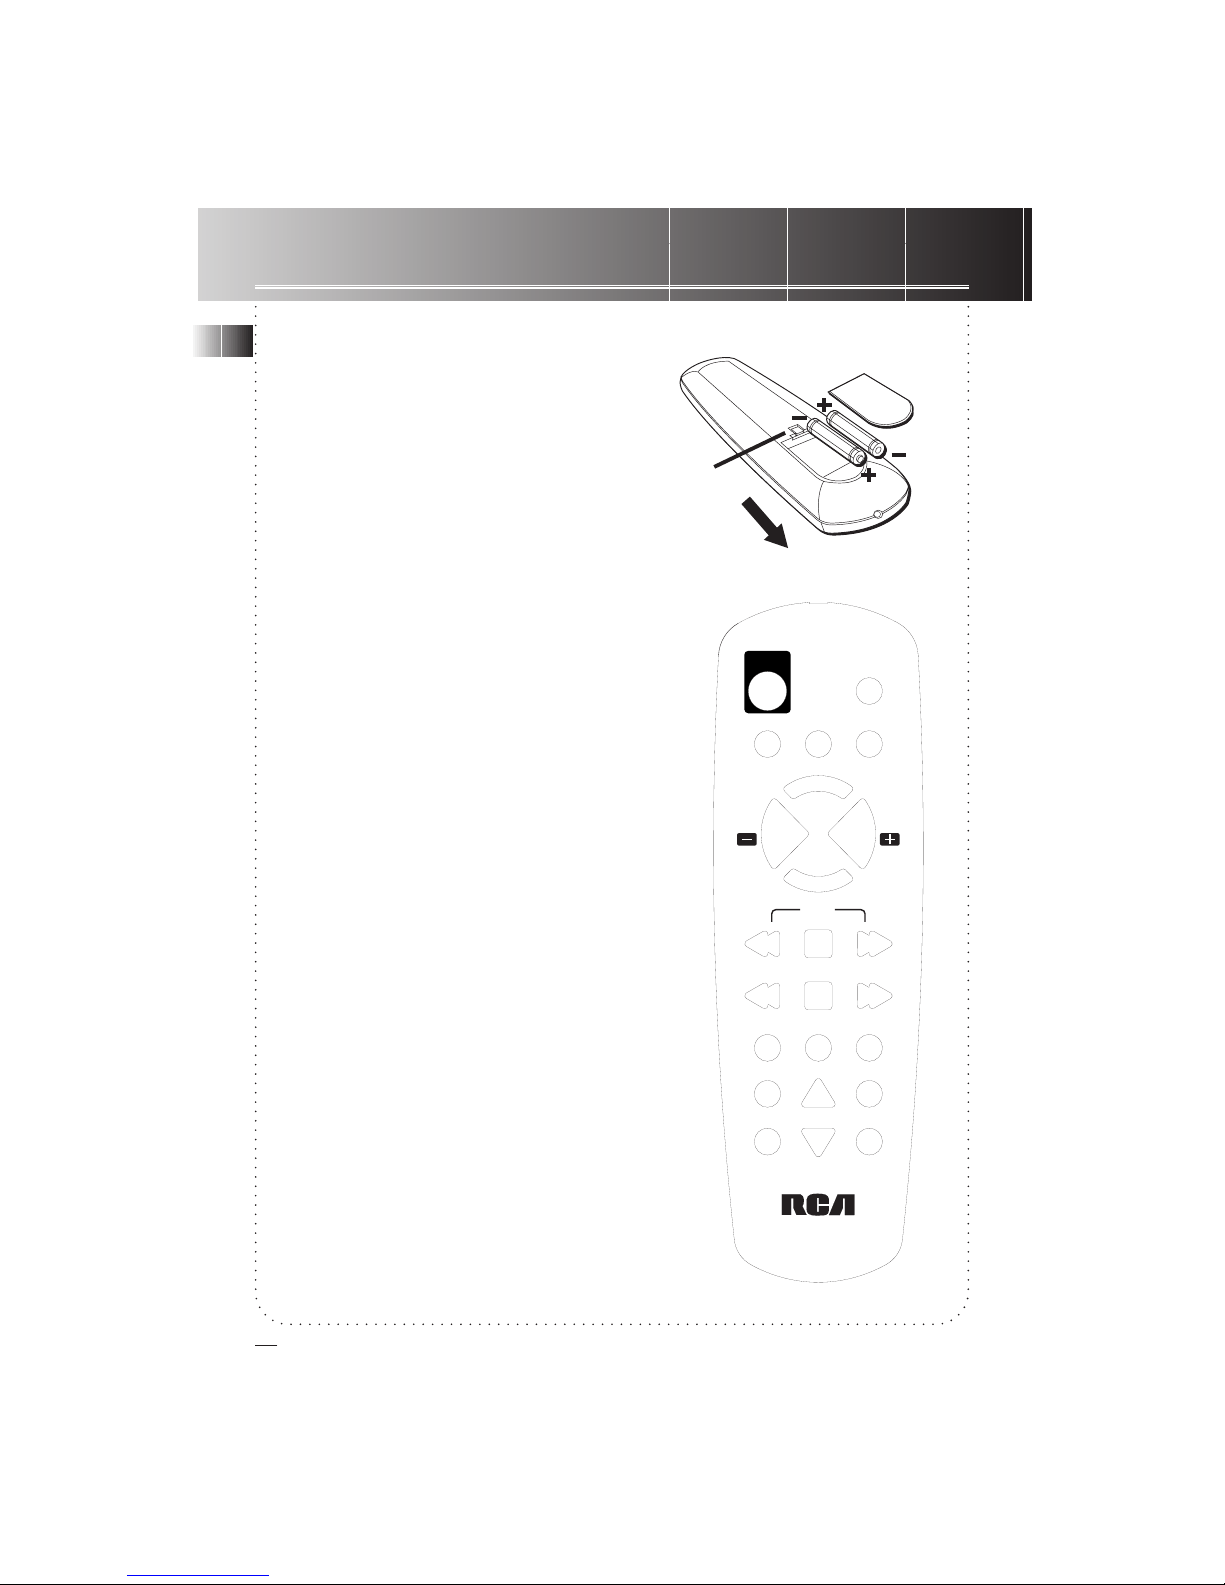
INSTALLING BATTERIES
The remote control must be inserted with 2 AAA batteries
prior to use. Follow the steps below to ensure correct
installation.
1. Fit the tip of your index finger into A, slightly push the
tab of the battery compartment lid towards direction B,
lightly lift upwards to detach the lid.
2. Before inserting the batteries, observe the polarities (
that is, + and - ) of the batteries, then relate the
polarities to the engraved diagram inside the battery
compartment. Now insert the batteries.
3. After installation of the batteries, replace and fit the
lid to cover the batteries. Lightly push it close. You should
hear a small “CLICK” sound from the closing of the tab.
REMOTE CONTROL OPERATIONS
1. Press POWER to turn on system.
2. To select one of the available modes: Tuner, CD or
Tape, press TUNER, CD or TAPE.
NOTE: The RECORD button on the remote control is
inactive for this model.
3. To see a display demonstration of the system, press
DEMO.
4. To turn off system, press POWER again.
For Sound Effect And Volume Adjustment
1. Press SUPER BASS to enhance heavy-based sound.
2. To select one of the five preset sound effects, press
PRESET EQ repeatedly to toggle between the five Preset
EQ ( Preset Equalizers ): Jazz, Rock, Classical, Techno, Flat.
3. Press MUTE to silence the sound output. Resume to
normal by pressing MUTE again.
4. Adjust the sound output level by pressing VOL+ to
increase or VOL- to decrease.
POWER
TUNER
CD
TAPE
PAUSE
TRACK TRACKSTOP
REPEAT DISC SKIP SHUFFLE
RECORD
TUNING
DEMO
VOLVOL
PLAY
PRESET SEEK
SUPER
BASS
M
U
T
E
P
R
E
S
E
T
E
Q
16
GB
RS 1249 /1251 9/2/99, 4:23 PM17
Page 18
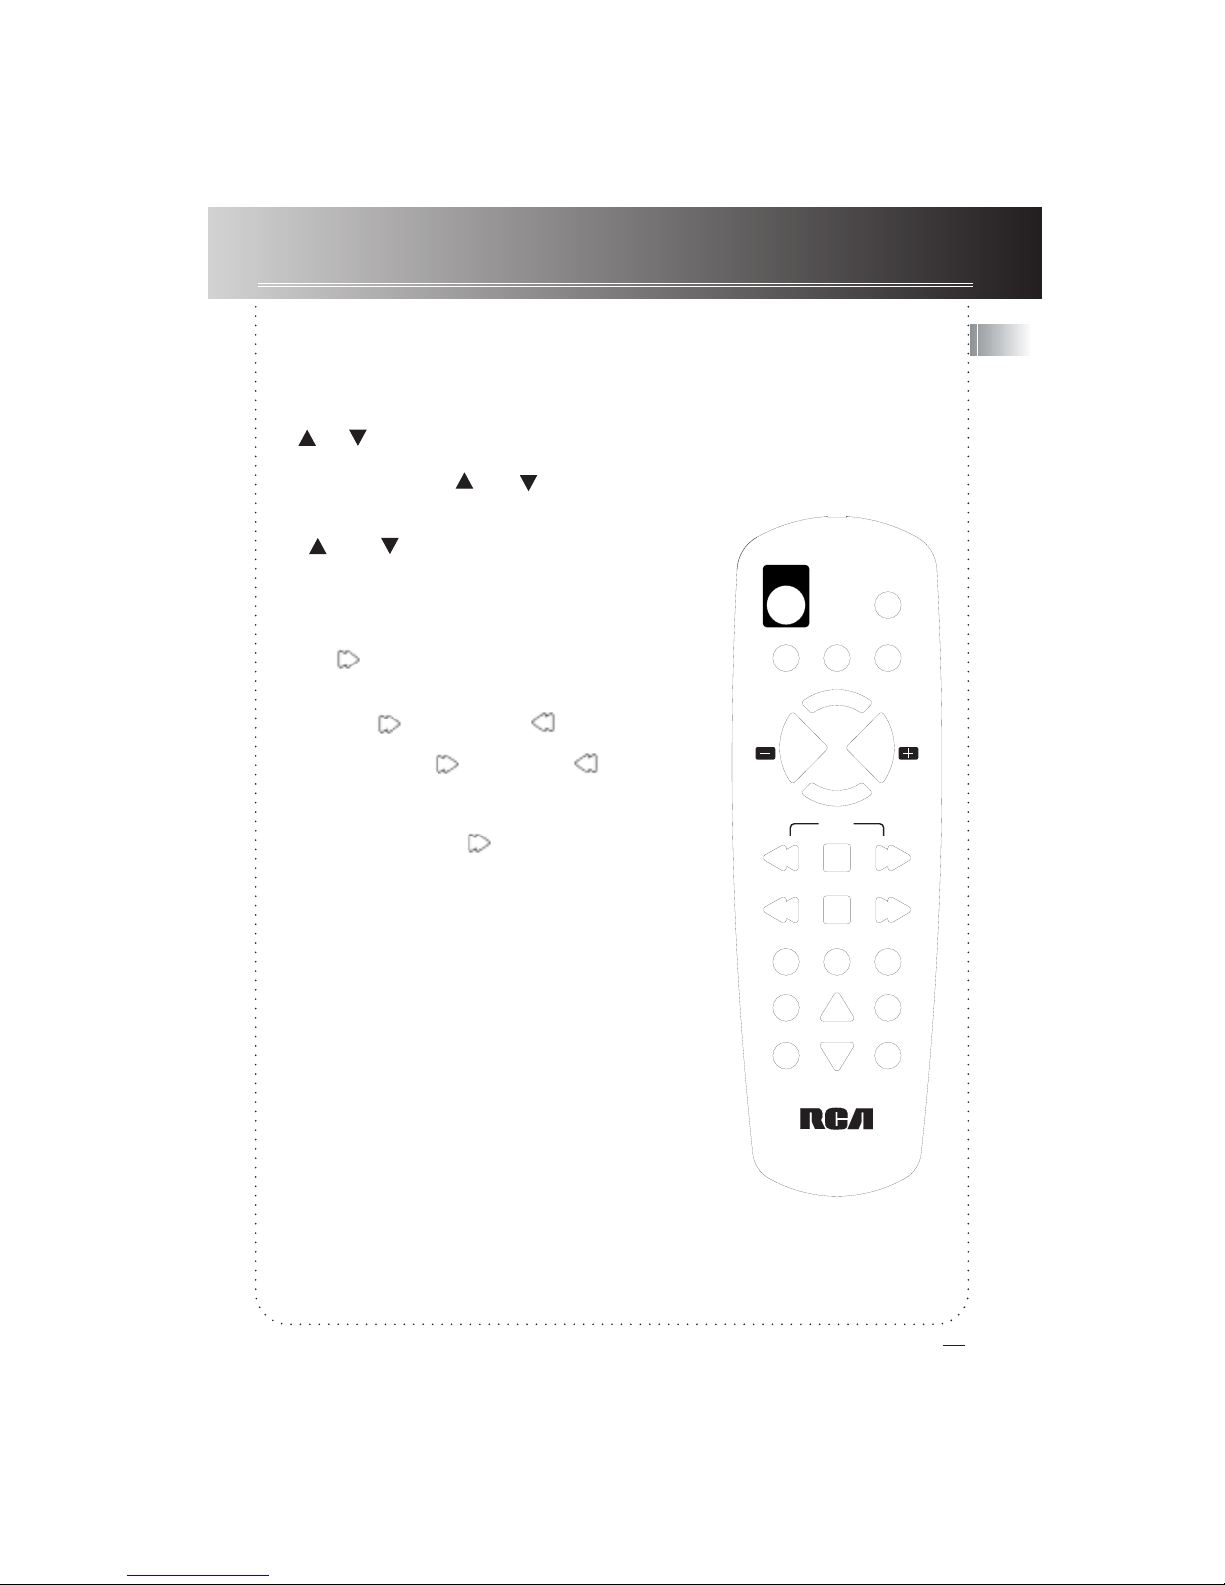
IF YOU SELECT TUNER:
1. Search for a radio station automatically by pressing SEEK
and the system seaches for the next frequency with enough
signal strength.
2. To stop auto Seek, press either one of the TUNING arrows
( or ).
3. Search for a radio station manually by pressing either one
of the TUNING arrows ( or ).
4. Select a preset radio station frequency by pressing PRESET
to enter Preset mode, press either one of the TUNING arrows
( or ) to choose a preset memory location.
IF YOU SELECT CD:
1. Select a CD by pressing DISC SKIP repeatedly to toggle
between and choose one of the loaded discs.
2. Press ( PLAY ) to start disc play from the beginning of
track 1 of selected disc.
3. To skip forward or backward to the beginning of other
tracks, press ( TRACK ) or ( TRACK ).
4. For fast search forward or backward within a playing track,
press and hold either ( TRACK ) or ( TRACK ).
Release hold on button when the fast search reaches your
desired search place.
5. You can pause disc play at any one point, just press PAUSE.
Release pause by pressing ( PLAY ).
6. To stop disc play, press STOP.
7. The Repeat function is for repeating disc or track play. Press
REPEAT repeatedly to toggle between and select one of the
mode: repeat one track, repeat one disc, repeat all loaded
disc(s). During selection, be sure to look at the display to see
the changing of modes, stop pressing when the display shows
your desired mode.
8. Choosing the Shuffle function will set the sysytem playing
tracks in a shuffled sequence. Press SHUFFLE once and the
display shows SHUFFLE. Press SHUFFLE again for resuming to
normal disc play. The functionality of Shuffle is also dependent
on the selected Repeat mode. If the Repeat One Disc mode is
selected, then tracks will be shuffled-played within that one
disc, repeatedly. If the Repeat All Discs mode is selected, tracks
of all discs will be shuffle-played, repeatedly. If the mode All
Discs is selected, the system will shuffle-play all discs, play each
track once, and returns to Stop mode.
IF YOU SELECT TAPE:
You will need to perform all Tape mode related operations at
the front panel of the systems. Remote control of Tape mode
functions is not possible since the decks are not Logic Decks
USING THE REMOTE CONTROL
POWER
TUNER
CD
TAPE
PAUSE
TRACK TRACKSTOP
REPEAT DISC SKIP SHUFFLE
RECORD
TUNING
DEMO
VOLVOL
PLAY
PRESET SEEK
SUPER
BASS
M
U
T
E
P
R
E
S
E
T
E
Q
GB
17
RS 1249 /1251 9/2/99, 4:23 PM18
Page 19
DISPLAY MESSAGES IN CD MODE
The followings are some of the messages you may see when the system is in CD mode. Refer to the
descriptions below when you see a message on display.
This message is displayed when:
STBY the system is in Standby mode.
OPEN the CD compartment tray is opening.
CL the CD compartment tray is closing.
READ the system is reading the content of a disc.
MUTE the Mute function is activated. Also refer to page 18, step 3 of section
For Sound Effect and Volume Adjustments for a more detailed
functional explanation.
ERR the CD compartment tray is obstructed as it opens or closes. Press
OPEN/CLOSEto re-open or re-close the CD compartment tray. This
cancels the error.
FULL the system’s (CD mode ) track memory has reached its limit and
cannot store any more tracks.
CLR you have cleared a stored program. In program mode, press and hold
STOP for about 1 second, the display shows this message to indicate
that the program is being cleared.
EMP you have tried to select program play while no program has been
stored in memory.
18
GB
RS 1249 /1251 9/2/99, 4:23 PM19
Page 20
CARE & MAINTENANCE
Clearing The Exterior
Prior to cleaning the exterior, be sure to unplug the power cord from the AC power outlet. Wipe the
exterior with a soft, clean, and slightly water-dampened cloth.
CD Care
Handling CDs:
• Always handle CDs by their edges or hold it with your index finger in the hole and a thumb at one
edge. Do not put your finger pads onto the signal ( shiny ) side of a disc.
• The label side of a disc should be left as it is; you should not affix any adhesive tapes or labels nor
should there be any scratching or damage done to it.
• Never use any damaged ( such as cracked or warped ) discs as the sysem spins CDs at very high
speed.
Cleaning CDs:
• CDs need to be cleaned regularly because any dust or foreign particles may cause the system to
output poor sound quality. To clean a CD, use a soft clean cloth to wipe the CD from the hole ( at
the center of the disc ) outwards to the disc’s edge.
• If a CD is particularly dirty, wet a soft cloth in clean water, wring it out to rid the cloth of excess
water, gently wipe away the dirt. Use another dry cloth to soak up remaining water droplets.
• Cleaning liquids other than clean water can damage a CD. Never use cleaning sprays, antistatic
agents, benzene, thinner, nor any other volatile solvents to clean CDs.
CD Lens Care
When your CD lens gets dirty it can also cause the system to output poor sound quality. To clean the
lens you will need to purchase a CD lens cleaner which can maintain the output sound quality of
your system. For instructions on cleaning the CD lens, refer to the ones accompanying the lens
cleaner.
GB
19
RS 1249 /1251 9/2/99, 4:23 PM20
Page 21
CARE & MAINTENANCE
Tape Type Selection
In today’s hypermarkets and stores there are 3 types of cassette tape available for sale: Type I, Type II
and Type III. When you purchase new cassette tapes, be sure to select Type I because both Type II and
Type III are not suitable for use with this system and may cause poor sound quality.
Tape Care
Storing Tapes:
• High temperatures such as exposure to sunlight or storage in hot places may warp the tape’s case
or damage the tape itself.
• Always keep a cassette tape in its box when not in use.
• Keep cassette tapes away from magnets to avoid erasure by magnetic fields. For example, electric
motors and electrical transformers are some of the objects that can erase the content of a cassette
tape.
Cleaning Heads:
• The tape head is the part that plays the music on your tape. Since the tape head comes into
contact with magnetic tapes the most, iron oxide particles from the tape builds up on the tape head.
This build-up can cause muffled playback sound, incomplete recordings, and may prevent automatic
tape stop.
• You will need to clean the heads regularly, after every 25 hours of use.
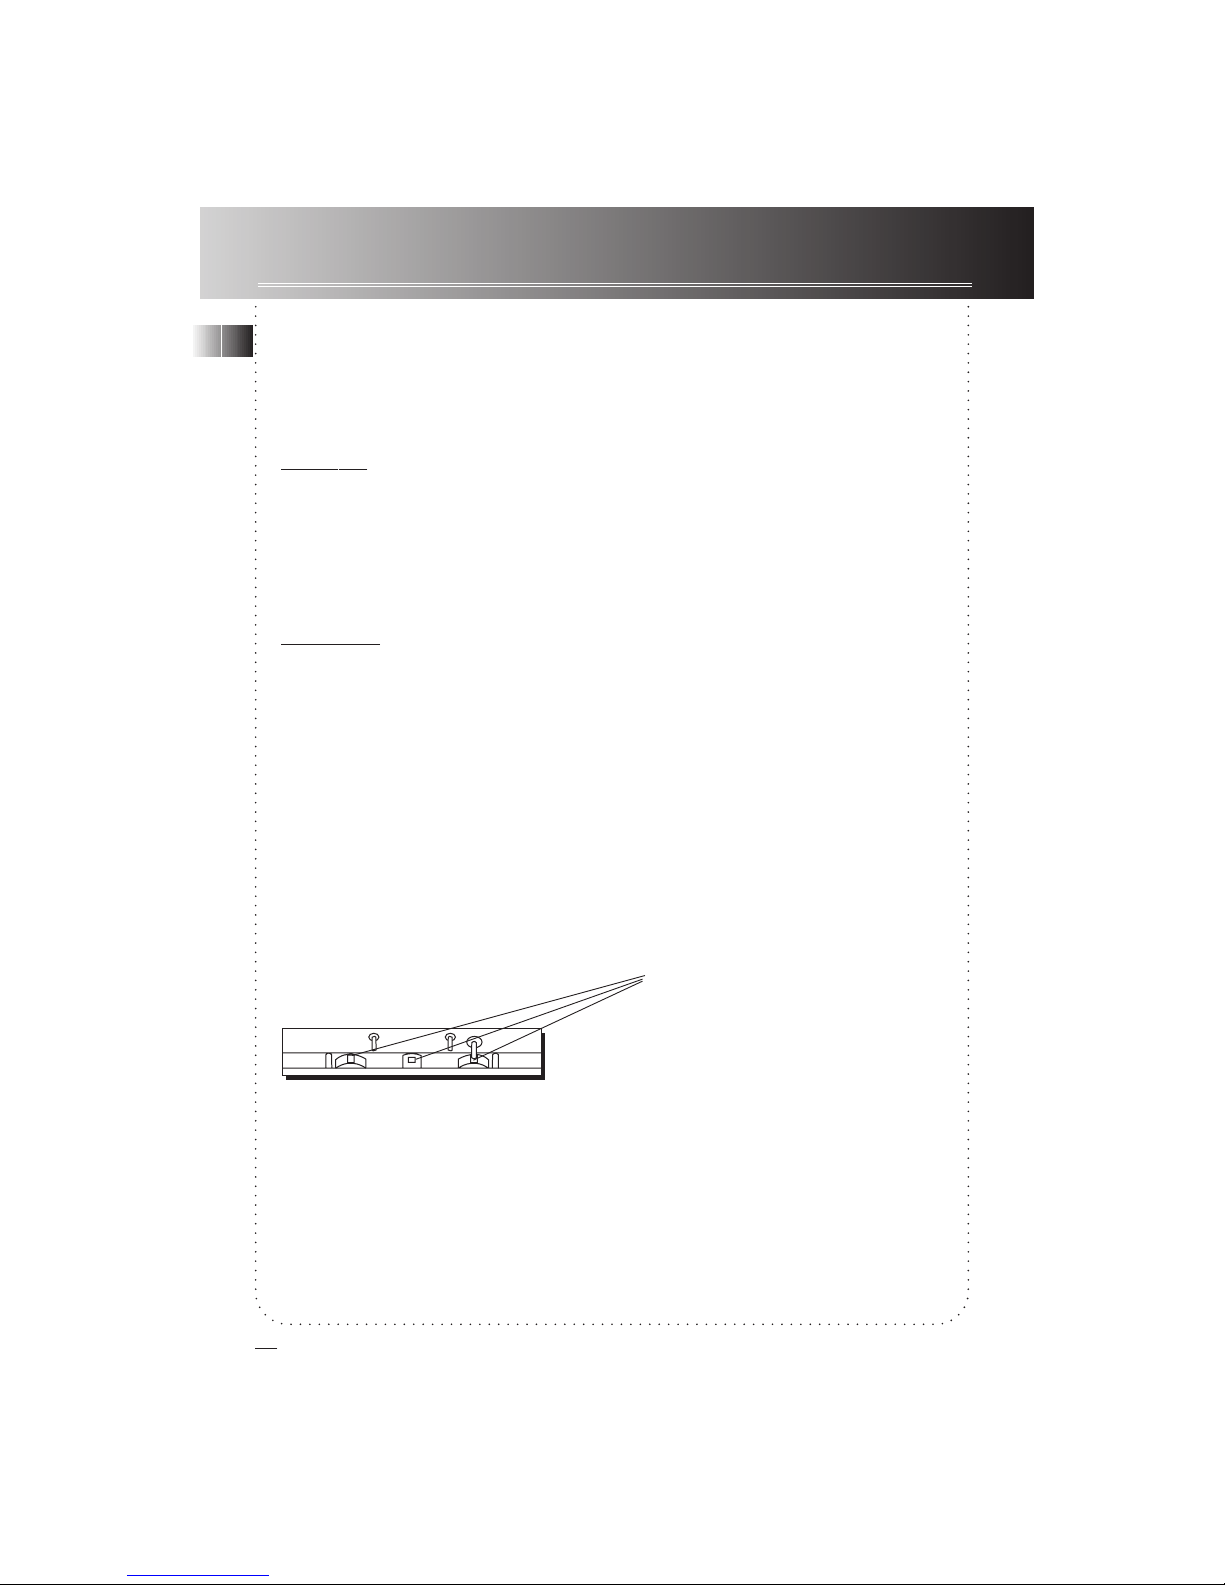
• To clean the heads, unplug the power cord from the power outlet, open the deck door, push down
the PLAY button to expose the heads. Then use a head cleaner to clean the heads, capstan, and
pinch wheel. After cleaning, allow about 30 minutes for the heads to dry before use.
• From time to time, use a head demagnetizing cassette to demagnetize the head ( available from
most audio equipment stores ).
• Never use any metal objects on or near the tape heads.
• Make sure no cleaning material is allowed to fall into the tape assembly.
Clean these parts
20
GB
RS 1249 /1251 9/2/99, 4:23 PM21
Page 22
TROUBLESHOOTING TIPS
System Doesn’t Turn On
• Check your power source, is the power plug fitted and plugged into the power outlet properly, are
the batteries in the remote control fresh? If not, do make sure that the power plug is properly
plugged in and that the batteries are replaced with fresh ones.
• Unplug the power cord from the power outlet for a moment, then plug it back in again.
• Is there power at that particular power outlet? Try plugging the system to another power outlet.
No Sound
• Try adjusting the volume level.
• Are the speaker wires properly connected? If not, re-connect the speaker wires properly.
• Is the Mute function activated? If it is, try de-activating the Mute function.
• Make sure you have selected the correct mode: Tape, CD or Tuner.
No Sound From One Channel
• Is the connection of that channel’s ( Left or Right ) speaker wire proper? If it is not or you are not
certain whether if it is or not, do reconnect it.
Poor Radio Reception
• Poor AM or FM reception? For AM, adjust the AM loop antenna. For FM, adjust the FM T-type
antenna.
• Are there electrical appliances near the system ( applicances such as hair dryers, vacuum cleaners, or
fluorescent light )? If there are, try turning them off.
CD Doesn’t Play
• Is there a disc loaded on the tray? If not, do load one.
• Is the disc’s label facing up? If it is not, turn the disc over and try disc play again.
• Is the Pause mode activated? If yes, de-activate the mode.
• Is the CD function selected? If not, press FUNCTION repeatedly until “CD” is displayed.
GB
21
RS 1249 /1251 9/2/99, 4:23 PM22
Page 23
TROUBLESHOOTING TIPS
CD Sound Skips
• Is the CD dirty? If it is, clean it by following the instruction on page 19.
• Is the disc warped, scratched or cracked? If the disc is damaged in any way, do not attempt to play
that disc as it may cause damage to the CD lens.
• Is there shock or vibration affecting the system? If so, you should re-locate the system to some
other firm, level and stable surface.
Distorted Or Noisy Recordings
• Are the tape heads dirty? If they are ( or if you’re not sure ), follow the instructios on page 22 to
clean the tape heads.
• Have the tape heads been magnetized? If yes ( or if you’re not sure ), purchase a Head
Demagnetizing Cassette which should be available from most audio equipment stores.
Remote Control Won’t Work
• Is the system plugged into a working AC outlet? Try plugging it into one that you know will work.
• Is the system on? Press POWER to turn system on.
• Have you selected the correct function when pressing on the buttons? For example, if the system is
in CD mode and you try tuning to a particular radio frequency, the remote control is not going to
look like as it is working. In such cases, press FUNCTION to select the correct function first, then
press on the buttons
• Are the batteries weak? Try replacing old batteries with some fresh ones. ( refer to page 16 for
instruction on replacing batteries. )
• Are you pointing the remote control directly at the system while pressing the buttons? You should
do so because the remote control sensor is right next to the preset EQ indicators at the right corner
of the display.
• Are you too far from the system when using the remote control? The remote control sensor can
only sense signals ( from the remote control ) within a limited distance. So move closer towards the
system.
• Are there any obstacles between the remote control and the system? If there are, move all objects
standing in the way between the remote control and the system.
22
GB
RS 1249 /1251 9/2/99, 4:23 PM23
Page 24

INDEX
A
Antenna 3
Automatic Tape Stop 14
B
Band Selector 6
C
Care & Maintenance 19, 20
Cassette Player Control Buttons 6
Cassette Tape Decks 7
CD Care 19
CD Compartment Tray 5
CD Lens Care 19
CD Player Control Buttons 5
Check for Moisture 2
Choosing System Location 2
Connection 3
D
Display Messages in CD Mode 18
Dual Decks Tape Play 14
F
FM Stereo Button6
FM Stereo Indicator 5
Function 5
I
Installing Batteries ( Remote Control ) 16
L
Loading Discs ( CDs ) 8
M
Memo6
O
Open/ Close 5
P
Panel Controls 4,5,6
Phones ( jack ) 6
Playing and Loading CDs Simultaneously 10
Power 5
Power Supply 3
Preset EQ 5
Programming Player Order 9
R
Recalling/ Editing Programmed Play Order 9
Recordings 14
Remote Control Operations 16
Repeat Play 11
S
Shuffle Play 10
Sound Effect ( Preset EQ ) Indicators 6
Speakers 3
Super Bass 6
T
Tape Care 20
Tape Type Selection 20
Troubleshooting Tips 22, 23
Tune/ Preset Stations 6
Tuner Operations 7
Tuning Buttons 6
U
Unpack the System 2
Using the Cassette Decks 13, 14
Using the CD Player 8, 9, 10 ,11, 12
Using the Remote Control 16, 17
Using the Tuner 7
V
Vacuum Fluorescent Display 5
Volume Control 6
GB
23
RS 1249 /1251 9/2/99, 4:23 PM24
Page 25
US WARRANTY
What your warranty covers:
• Any defect in materials or workmanship.
For how long after your purchase:
• One year. (The warranty period for rental units begins with the first rental or 45 days from date of
shipment to the rental firm, whichever comes first.)
What we will do:
• Provide you with a new, or at our option, a refurbished unit.
• The exchange unit is under warranty for the remainder of the original product’s warranty period.
How to make a warranty claim:
• Properly pack your unit. Include any cables, etc., which were originally provided with the product.
We recommend using the original carton and packing materials.
• Remove cassette tapes or CDs from unit before shipping as there will not be returned.
• Include in the package evidence of purchase date such as the bill of sale. Also print your name and
address and a description of the defect. Send standard UPS or its equivalent to:
Thomson Consumer Electronics, Inc.
Product Exchange Center
11721B Alameda Ave,
Socorro, Texas 79927
• Pay any charges billed to you by the Exchange Center for service not covered by the warranty.
• Insure your shipment in case of loss of damage. Thomson accepts no liability in case of damage or
loss.
• A new or refurbished unit will be shipped to you prepaid freight.
What your warranty does not cover:
• Customer instruction. (Your Owner’s Manual provides information regarding operating instructions
and user controls. For additional information, ask your dealer.)
• Installation and set-up service adjustments.
• Batteries.
• Damage from misuse or neglect.
• Products which have been modified or incorporated into other products.
• Products purchased or serviced outside the USA.
• Acts of God, such as but not limited to lightning damage.
Product Registration:
• Please complete and mail the Product Registration Card packed with your unit. It will make it easier
to contact you should it ever be necessary. The return of the card is not required for warranty
coverage.
How state law relates to this warranty:
• This warranty gives you specific legal rights, and you may have other rights which vary from state
to state.
If you purchased your product outside the USA:
• This warranty does not apply. Contact your dealer for warranty information.
24
GB
RS 1249 /1251 9/2/99, 4:23 PM25
Page 26
Thomas Consumer Electronics Canada, Inc. warrants to the purchaser or gift recipient that if any
manufacturing defect becomes apparent in this product within 1 year from the original date of
purchase, it will be replaced free of charge, including return transportation.
This warranty does not include damage to the product resulting from accidents, misuse or leaking
batteries.
Should your product not perform properly during the warranty period, either:
1. Return it to the selling dealer with proof of purchase for repalcement,
OR
2. Remove the batteries ( where applicable ), and pack product complete with accessories in the
original carton ( or equivalent ).
Mail prepaid ( with proof of purchase ) and insured to:
Thomson Consumer Electronics Canada, Inc.
Distribution Centre
7400 A Bramalea Road
Mississauga, Ontario L5S 1X1
The Provisions of this written warranty are in addition to and not a modification of or subtraction
from the statutory warranties and other rights and remedies contained in any applicable legislation,
and to the extent that any such provisions purport to disclaim, exclude or limit any such statutory
warranties and other rights and remedies, such provisions shall be deemed to be amended to the
extent necessary to comply therewith.
If you are unable to find a qualified servicer for out of warranty service, you may write to:
Thomson Consumer Electronics Canada, Inc.
P.O. Box 0944
Indianapolis, Indiana, USA., 46206-0944
Attach your sales receipt to this booklet for future reference. This information is required if service is
needed during the warranty period.
PURCHASE DATE
NAME OF STORE
CANADIAN WARRANTY
©1999 Thomson Consumer Electronics, Inc.
T rademark(s)® Registered
Mage(s) Registrada(s)
Marque(s)® déposée(s)
Model RS-1249/ RS-1251
55000270 ( Rev. 0 )
99-05 TAHK dn
Printed in Hong Kong
GB
25
RS 1249 /1251 9/2/99, 4:23 PM26
 Loading...