

Page 1

owner’s manual
Compact Disc Changer
Page 2

INTRODUCTION
Your Compact Disc Changer has these great features.
301 CD Giga Changer — the new roulette-type mechanism allows for a capacity of 301 CDs.
Single Loader Slot One-disc Jump-in Playback — lets you easily play a disc that is not loaded in the rack.
Priority Key — provides excellent operability of the jump-in play function.
Plays regular, CD-R and CD-RW Compact Discs — lets you play recordable as well as regular CDs
CD TEXT Compatible — displays disc titles while playing CD TEXT discs.
Three Listening Modes (ALL, SINGLE and CUSTOM) with 5 custom files — provide listening versatility.
Jog Dial — makes it even easier to select.
Disc Detection — automatically detects a loaded disc when the hood is closed.
CONTENTS
Preparation ..............................................................................................................................4
Cautions Regarding Handling ..................................................................................................4
Connections ............................................................................................................................. 6
Names of Parts.........................................................................................................................7
How to Load The Discs ............................................................................................................9
Operations
To listen in order from the first track.........................................................................................10
To select the disc and track .......................................................................................................10
To select a play mode................................................................................................................10
Playing a disc that is not loaded in the rack ..............................................................................11
To play a track ..........................................................................................................................11
To start playback from a specific disc........................................................................................11
Opening or closing the hood during playback ..........................................................................11
To program and play only the discs you want to hear (CUSTOM play).....................................12
To repeat playback (REPEAT play)...........................................................................................13
To store your favorite tracks (BEST play) ..................................................................................13
To find out which discs you’ve listened to recently (PREVIOUS scan).......................................14
To playback tracks/discs at random (RANDOM play)................................................................14
To program tracks/discs in a desired order (PROGRAM play)....................................................15
To scan quickly through tracks on a disc (HI-LITE scan) .......................................................... 16
To use DISPLAY ........................................................................................................................ 17
Troubleshooting ..................................................................................................................... 18
Specifications .........................................................................................................................19
2
©1999 Tandy Corporation.
All Rights Reserved.
Page 3

IMPORTANT SAFETY INSTRUCTIONS
This CD Changer is made and tested to
meet exacting safety standards. It meets
both UL and FCC requirements and
complies with safety performance
standards of the US Department of Health
and Human Services.
WARNING: TO REDUCE THE RISK
OF FIRE OR ELECTRIC SHOCK,
DO NOT EXPOSE THIS APPLIANCE
TO RAIN OR MOISTURE.
CAUTION
RISK OF ELECTRIC SHOCK.
DO NOT OPEN.
CAUTION: TO REDUCE THE RISK
OF ELECTRIC SHOCK, DO NOT
REMOVE COVER OR BACK. NO
USER-SERVICEABLE PARTS INSIDE. REFER SERVICING TO
QUALIFIED SERVICE PERSONNEL.
This symbol is intended to
alert you to the presence
of uninsulated dangerous
voltage inside the product
that can cause shock. Do
not open the product’s
case.
This symbol is intended to
alert you to important operating and maintenance
instructions in this
owner’smanual.
Warnings:
• This CD Changer uses a laser.
Because of possible eye injury, only a
qualified service person should
remove the cover or attempt to
service this device.
• The use of controls or adjustments,
or the performance of procedures
other than specified herein, can
result in hazardous exposure to laser
light.
Careful attention is devoted to quality standards in the manufacture of your CD changer, and safety is a
major factor in its design. However, safety is also your responsibility.
This section lists important information that will help you properly use and enjoy your CD changer and
accessories. Read all the included safety and operating instructions before using your CD changer, follow
them closely, and retain them for future reference.
Heed Warnings — Follow all warnings on the product and in the operating instructions.
Cleaning — Unplug this product from the wall outlet before cleaning. Use only a damp cloth for cleaning.
Do not use liquid or aerosol cleaners.
Attachments — Do not use attachments/accessories not recommended by the product manufacturer, as
they might create a hazard.
Water and Moisture — Do not use this product near water (for example, near a bathtub, washbowl,
kitchen sink, or laundry tub; in a wet basement; or near a swimming pool).
Accessories — Do not place this product on an unstable cart, stand, tripod, bracket, or table. The
product may fall, causing serious injury to a child or adult, and serious damage to the product. Use only
with a cart, stand, tripod, bracket, or table recommended by the manufacturer or sold with the product.
Follow the manufacturer’s instructions for mounting, and use a recommended mounting accessory.
Carts — Move the product on a cart carefully. Quick stops, excessive force, and
uneven surfaces may cause the product/cart to overturn.
Ventilation — Slots and openings in the cabinet provide ventilation, ensure
reliable operation, and protect from overheating. Do not block or cover these
openings, and do not place the product on a bed, sofa, rug, or other similar
surface. Do not place the product in a built-in bookcase or rack unless it provides
proper ventilation as specified by the manufacturer.
Power Sources — Operate this product using only the power source indicated on its marking label. If
you are not sure of your home’s power type, consult your product dealer or local power company.
Polarization — This product is equipped with a polarized AC line plug (a plug having one blade wider
than the other). This plug will fit in the power outlet only one way. This is a safety feature. If you cannot
insert the plug fully into the outlet, try reversing the plug. If the plug still doesn’t fit, contact your
electrician to replace your obsolete outlet. Do not defeat the safety purpose of the polarized plug. If you
need an extension, use a polarized cord.
Power-Cord Protection — Route power-supply cords so they are not likely to be walked on or pinched
by items placed on or against them, paying particular attention to cords at plugs, convenience receptacles,
and the point where they exit from the product.
Lightning — For added protection for this product during a lightning storm, or when it is left unattended
and unused for long periods of time, unplug it from the wall outlet and disconnect the antenna or cable
system. This will prevent damage to the product due to lightning and power-line surges.
Overloading — Do not overload wall outlets, extension cords, or integral convenience receptacles, as this
can result in a risk of fire or electric shock.
Objects and Liquids — Never push objects of any kind into this product through openings, as they may
touch dangerous voltage points or short out parts that could result in a fire or electric shock. Never spill
liquid of any kind on the product.
Servicing — Do not attempt to service this product yourself, as opening or removing covers may expose
you to dangerous voltage or other hazards. Refer all servicing to qualified service personnel.
Damage Requiring Service — Unplug this product from the wall outlet and refer servicing to qualified
service personnel under the following conditions:
• When the power-supply cord or plug is damaged.
• If liquid has been spilled or objects have fallen into the product.
• If the product has been exposed to rain or water.
• If the product does not operate normally by following the operating instructions. Adjust only those
controls that are covered by the operating instructions, as an improper adjustment of other controls
may result in damage and will often require extensive work by a qualified technician to restore the
product to normal operation.
• If the product has been dropped or damaged in any way.
• When the product exhibits a distinct change in performance.
Replacement Parts — When replacement parts are required, be sure the service technician uses
replacement parts specified by the manufacturer or having the same characteristics as the original part.
Unauthorized substitutions may result in fire, electric shock, or other hazards.
Safety Check — Upon completion of service or repairs to this product, ask the service technician to
perform safety checks to determine that the product is in proper operating condition.
Wall or Ceiling Mount — The product should be mounted to a wall or ceiling only as recommended by
the manufacturer.
Heat — The product should be situated away from heat sources such as radiators, heat registers, stoves, or
other products (including amplifiers) that produce heat.
3
Page 4

PREP ARA TION
SUPPLIED ACCESSORIES
1 Remote Control
POWER
HI-LITE
BESTPREVIOUS
MODE CLEARPROGRAMREPEAT
12
DISPLAY
3
45
6
78
9
DISC
TRACK
0
SET
SET
DISC
2
3
1
SEARCH
¡4
ASMS
¢
RANDOM
783
COMPACT DISC CHANGER
OSR
SYSTEM REMOTE
1 Audio Cable
REMOTE CONTROL UNIT BATTERY INSTALLATION
Dry Cell Batteries
(not included)
(AA size x 2)
Open the battery compartment on the back of the remote
control, and insert the batteries, taking care to align the ª
and · polarities.
1 Control Cable
Incorrect use of batteries may cause leakage or
rupture.
Always follow these guidelines:
A. Insert batteries into the battery compartment
correctly matching the positive ª and negative ·
polarities, as indicated inside the compartment.
B. Never mix new and used batteries.
C. Do not mix different brands of batteries.
Notes:
• To prevent battery leakage, remove the batteries when
not using the remote control for more than one month.
If leakage occurs, carefully wipe away any battery fluid
inside the compartment, and replace the batteries with
new ones.
• Do not allow books or other objects to rest on top of the
remote control, since the buttons may be depressed,
causing faster battery depletion.
CAUTIONS REGARDING THE CD CHANGER
• Avoid placing the changer on heat-generating sources
such as amplifiers as doing so might affect performance.
• Install this compact disc changer as far away as possible
from tuners and TV sets as close proximity to such
equipment might cause noise or picture degradation.
Such noise may be particularly noticeable when an
indoor antenna is used. Use an outdoor antenna, or turn
off power to the compact disc changer.
• Place the changer on a level surface.
CLEANING THE CHANGER
To clean the changer, wipe with a soft, dry cloth. For
stubborn dirt, wipe the changer with a soft cloth with a
solution of one part detergent to 5 or 6 parts water, wring
well, then wipe off the dirt. Use a dry cloth to dry the
surface. Do not use volatile liquids such as benzene or
thinner which might harm the changer.
STORING DISCS
• Store discs in their cases vertically, avoiding locations
with high heat or humidity, or extremely low temperatures,
such as inside a vehicle or in direct sunlight.
• Follow precautionary notes listed on disc labels.
4
Page 5

CD LENS CLEANER
The changer’s pickup lens should not become dirty in
normal use. RadioShack offers cleaning kits for CD lens.
CLEANING AND HANDLING COMPACT DISCS
• Fingerprints or smudges on a CD’s surface might not
directly affect the recorded signals, but might cause
degradation of sound quality. Keep your discs clean by
wiping them gently with a soft cloth from the inner edge
toward the outer periphery. RadioShack offers a variety
of cleaning kits for CDs.
• If a disc becomes very dirty, wipe the dirt away gently
with a soft cloth moistened in water, removing any water
drops with another soft, dry cloth.
• When holding discs, do not touch their signal surfaces.
Hold by the edges, or by one edge and the center hole.
• Do not affix gummed labels or tape to the label surfaces.
Do not scratch or damage the label.
• Discs rotate at high speed inside the changer. Do not use
damaged, cracked, or warped discs.
• Do not play a CD with other than a circular shape as
malfunction might occur.
• Do not use CD accessories such as stabilizer protection
sheets, or protection rings as they might cause
malfunction.
• Do not use record cleaning sprays or anti-static agents on
discs. Do not clean discs with benzene, thinner, or other
volatile solvents, which might damage the disc.
Record
cleaning
sprays
Thinner
Benzene
Your changer can play discs which display these
marks.
'
Notes: It may not be possible to play unfinalized discs
which have very little recording time left on them.
Finalizing a CD-R or CD-RW disc means making a recorded
disc playable on an ordinary CD changer. To play CD-RWs,
the changer must be specifically compatible with CD-RW
discs.
When transporting your changer, remove all discs from the
rack. Turn off POWER, wait for OFF to disappear from the
display, then unplug the power cord.
5
Page 6

CONNECTIONS
Before making or changing the connections, switch off the power and disconnect the power cord from the AC outlet.
Stereo Amplifier
CD-DECK
SYNCHRO
Control Cable
To the CONTROL IN Jack of the
Component Bearing the OSR Mark.
CD-DECK
SYNCHRO
C
Your CD Changer
A Making connections
1 Connect the LINE OUT jacks of the changer to the input
jacks (CD or AUX) of the amplifier. Make sure the white
plugs are connected to the left (L) jacks and the red
plugs to the right (R) jacks.
• Do not connect the changer to the amplifier’s PHONO
jacks, as sound will be distorted and normal playback
will not be possible.
2 Connect the power cord to an AC wall outlet, making
sure the plug is inserted fully.
Note: If you connect the power cord to a “SWITCHED” AC
outlet on an amplifier, you will not be able to use the
changer’s memory function.
B Connecting the Optical Fiber Cable
Cautions:
• Insert the optical fiber cable plugs all the way into the
jacks.
• Do not to fold or crimp the cable. When coiling an
optical fiber cable for storage, make sure the diameter of
the coil is 5-7/8 inches (15 cm) or larger.
• Use an optical fiber cable with a length of 10 feet (3 m)
or less.
• Protect the optical fiber cable plugs
from scratches and dust.
• When the changer is not connected
using an optical fiber cable, be sure
to keep the protective dust cap
plugged into the optical digital
output jack at all times.
6
C
IN OUT
CONTROL
More than
5-7/8 inches
(15 cm)
CONTROL
OUT
OPTICAL
DIGITAL OUT
DIGITAL
OPTICAL IN
Optical Fiber
Fable
B
IN OUT
OPTICAL
DIGITAL OUT
CONTROL
C D
R L
R
LINE OUT
LR
WhiteRed
Audio Cable
R
LINE OUT
L
A-1
WhiteRed
LR
L
Power Cord
A-2
Connect the changer to an amplifier equipped with an
optical digital jack.
1. Remove the protective dust cap from the changer’s
OPTICAL DIGITAL OUT jack.
2. Use an optical fiber cable (not supplied, available at
your local RadioShack store) to connect the changer’s
OPTICAL DIGITAL OUT to the amplifier’s optical input
jack.
• Align the optical fiber cable plug with the optical digital
jack and fully insert the plug.
C System remote control with a stereo amplifier that
has the OSR mark
With a stereo amplifier bearing the OSR mark, connect the
CONTROL IN jack on the CD changer’s rear panel to the
amplifier’s CONTROL OUT jack. This lets you control the
CD changer’s Play, Stop, Pause, Track/Disc Search and Disc
Change functions using the amplifier’s remote control.
Notes:
• For instructions regarding connections and operation,
refer to the operating instructions provided with your
stereo amplifier.
• When a control cable is connected to the changer’s
CONTROL IN jack, direct control of the changer with the
remote control is not possible. Operate the changer with
the remote control by aiming it at the amplifier.
• Be sure to connect both of the control cable’s plugs
securely to the CONTROL IN and CONTROL OUT jacks.
• Be sure to turn off the power of the amplifier before
connecting the power cord and output cable.
• When only the digital output is connected, the remote
sensor of the amplifier does not function. To operate it,
connect the output cable to the stereo amplifier as well
as connecting the digital output.
Page 7

NAMES OF PARTS
FRONT PANEL
DISPLAY
&
PROGRAM
CLEAR
MODE
0@
STAND BY
Indicator
POWER
90
Remote Sensor
REPEAT
@^
%
8
#
CD-9500 COMPACT DISC CHANGER
DISC TRACK MIN SEC
MODE
CLEAR PROGRAM
STAND BY
POWER
OSR
D/A CONVERTER • OPTICAL OUTPUT
1Bit
Hood
REPEAT DISPLAY
CD-FILE
SINGLE PLAY
ACCESS PLAY
301-DISC
LABEL SIDE 3
DISC
SINGLE LOADER PLAY
SINGLE LOADER ACCESS
9
0%
!
!
OPEN/
CLOSE
Number buttons
CD TEXT
DISC PUSH
321
654
987
ASMS/SEARCH
TRACKDISC
0
PLAY/PAUSE STOP
UNLOAD
6
SYSTEM REMOTE CONTROL
UNLOAD
OPEN/CLOSE
ENTER
RANDOM
7
0@
Jog Dial
ENTER
9!
!
Track/Manual
Search Button
(reverse direction)
(41)
Track/Manual
Search Button
(forward direction)
(¡¢)
RANDOM
TRACK
STOP
PlAY/PAUSE
0!
0!
$
0%
0$
0$%&
9
9!
DISPLAY
Lights when you
choose the play mode.
Lights when PROGRAM (PGM)
Lights during repeat play.
Lights during random play.
DISC TRACK MIN SEC
SINGLE ALL RDM RPT 1 CD TEXT
CUSTOM PGM PREVIOUS DISC SCAN BEST
Lights during custom
programming and play.
is pressed.
Lights when a CD is playing.
Lights when a
CD TEXT is playing.
Lights when BEST
is pressed.
Blinks during DISC SCAN or
TRACK SCAN.
Blinks when PREVIOUS is pressed.
Lights during pause mode.
7
Page 8

REMOTE CONTROL
1
2
3
4
5
6
7
8
9
p
POWER
HI-LITE
MODE CLEARPROGRAMREPEAT
1 2
4 5
7 8
DISC
SET
1
SEARCH
7 8 3
COMPACT DISC CHANGER
SYSTEM REMOTE
TRACK
0
¡ 4
3
6
9
SET
2
DISC
ASMS
RANDOM
BESTPREVIOUS
DISPLAY
3
¢
OSR
q
w
e
r
t
y
u
i
o
;
a
1 HI-LITE
2 POWER
3 MODE
4 REPEAT
5 Number Buttons
6 DISC SET
7 Fast Forward (¡)
8 Fast Reverse (1)
9 Stop (7)
p Pause (8)
q PREVIOUS
w BEST
e PROGRAM
r CLEAR
t DISPLAY
y TRACK SET
u DISC (2/3)
i Skip (reverse) (4)
o Skip (forward) (¢)
; RANDOM
a Play (3)
^
90
0@
#
0@
0%
0
0$
0
$
#
%
@^
&
0%
9@
$
0$%&
0
0!
0!
When operating the remote control, point the remote
control’s infrared signal transmitter at the remote control
receiver (remote sensor) on the front panel of the changer.
The remote control has a range of about 23 feet from the
remote sensor, and within angles of up to about 30 degrees.
23 feet
30°
30°
8
Note: If the remote control sensor window is in a position
where it receives strong light such as sunlight or fluorescent
light, control may not be possible.
Page 9

HOW TO LOAD THE DISCS
301–DISC
CDF
ILE
Note: Read this before using the CD changer.
LOADING DISCS INTO THE RACK
• You can load up to 300 discs in the rack.
The numbers marked on the rack are used as the disc
numbers. These are marked in a clockwise order from 1
to 300.
• To load discs beginning from disc Number 1:
1
2
STAND BY
POWER
1 2
4 5
7 8
DISC
0
SET
TRACK
DISPLAY
3
6
9
SET
Note: You must perform Step 3 within 5 seconds.
3
UNLOAD
4
Note: Inserting more than one disc into the slot will damage
the discs and cause the changer to malfunction.
5
6
DISC PUSH
ENTER
Load other discs into the rack by repeating Steps
and 5 .
Press POWER.
POWER
Ensure that the disc Number.
shown on the display is 1.
If disc Number 1 is not displayed, press number 1 on the
remote control or the front
panel.
Press UNLOAD.
«
DISC TRACK MIN SEC
The hood opens to the disc
corresponding to the disc
number displayed on the front
panel.
Load the disc into the rack with
the label side (printed surface)
facing to the right.
Turn the jog dial clockwise to
rotate the rack in the direction
in which the disc number
increases (1, 2, 3 ...).
Turn the jog dial counterclockwise, to rotate the rack in the
opposite direction.
4
7
OPEN/
CLOSE
Press OPEN/CLOSE to close the
hood.
Tip:
OPEN/CLOSE: The hood simply opens or closes.
UNLOAD:
The slot corresponding to the disc number being
displayed rotates to the center position then the hood opens.
Notes:
• Do not attempt to open the hood with your hand.
• Be careful not to pinch your fingers when opening and
closing the hood.
• If PLAY operation (PLAY, BEST, Hi-LITE, PREVIOUS) is
carried out before disc detection finishes, PLAY operation
proceeds without detection. Detection operates after PLAY
is finished. Detection may not function properly
depending on the color or shape of the disc.
WARNING:
To avoid possible injury or
damage, do not put your hand
or any other object inside the
rack.
• While changing or inserting discs, do not to press any
buttons on the changer or the remote control. The rack
may move suddenly, and could catch your fingers between
discs and the side of the door.
• When changing or inserting discs, make sure the rack is
stopped. Do not attempt to load or remove a disc when
the rack is moving.
• Do not put anything other than CDs inside the rack.
• Load only one disc into each disc slot.
• Do not apply force to the rack.
• You must use an adapter to play 3-inch discs.
• Never start playback by placing the 3-inch disc adapter
alone, without attaching it to a disc.
• The changer will not operate if the hood is opened during
playback.
• To load or remove a disc in or from the slot which is seen
through the hood, press OPEN/CLOSE. The hood opens,
HOLD is displayed. The disc can then be loaded or
removed from the slot. seen through the hood. The rack
22
can be rotated by pressing DISC(
33
2/
3), even while HOLD
22
33
is being displayed.
To remove the discs:
1
Press UNLOAD.
2
Select the number of the disc you want to unload by
22
turning the jog dial or pressing DISC(
33
2/
3) on the
22
33
remote control.
• The rack rotates until the selected disc comes to the
front of the changer.
3
Remove the disc from the rack.
4
Press OPEN/CLOSE.
• The hood closes.
9
Page 10

OPERATIONS
0
7 8
9
4 5
6
1 2
3
DISC
SET
TRACK
SET
Note: You can also use the remote control.
DISC TRACK MIN SEC
MODE
STAND BY
MODE
CLEAR PROGRAM
REPEAT DISPLAY
STAND BY
SINGLE PLAY
POWER
OSR
ACCESS PLAY
CD-FILE
Indicator
1
DISC
To listen in order from the first track
1
2
• If you choose a play mode beforehand, the tracks/discs
play according to the respective play mode.
Tips:
• If you play a CD TEXT disc, the title of the disc being
played shows on the display.
• During CD TEXT disc playback, the display can be
changed by pressing DISPLAY.
10
STAND BY
POWER
PLAY/PAUSE
STOP
PLAY/PAUSE
ASMS/SEARCH
ASMS/SEARCH
Press POWER.
Press 6 (or 3).
The tracks play in order
starting from the first track on
the disc with the lowest disc
number.
To stop play,
Press 7.
To pause play,
Press 6 (or 8).
To start playback again,
press 6.
To skip to another track,
tap 41/¡¢ (or
4/¢ on the remote
control).
To fast forward or reverse,
hold down 41/
¡¢ (or 1/¡ on
the remote control).
Number Buttons
321
DISC PUSH
321
ENTER
654
654
987
987
ASMS/SEARCH
TRACKDISC
0
TRACKDISC
0
OPEN/
CLOSE
RANDOM
PLAY/PAUSE STOP
UNLOAD
6
7
TRACK
HI-LITEPOWER BESTPREVIOUS
MODE CLEARPROGRAMREPEAT
1 2
4 5
7 8
DISC
SET
1 SEARCH ¡ 4 ASMS ¢
7 8 3
DISPLAY
3
6
9
TRACK
0
SET
DISC
2 3
RANDOM
MODE
TRACK SET
4/¢
2
3
Number Buttons
41/¡¢
7
2
6
1
DISC SET
1/¡
7
8
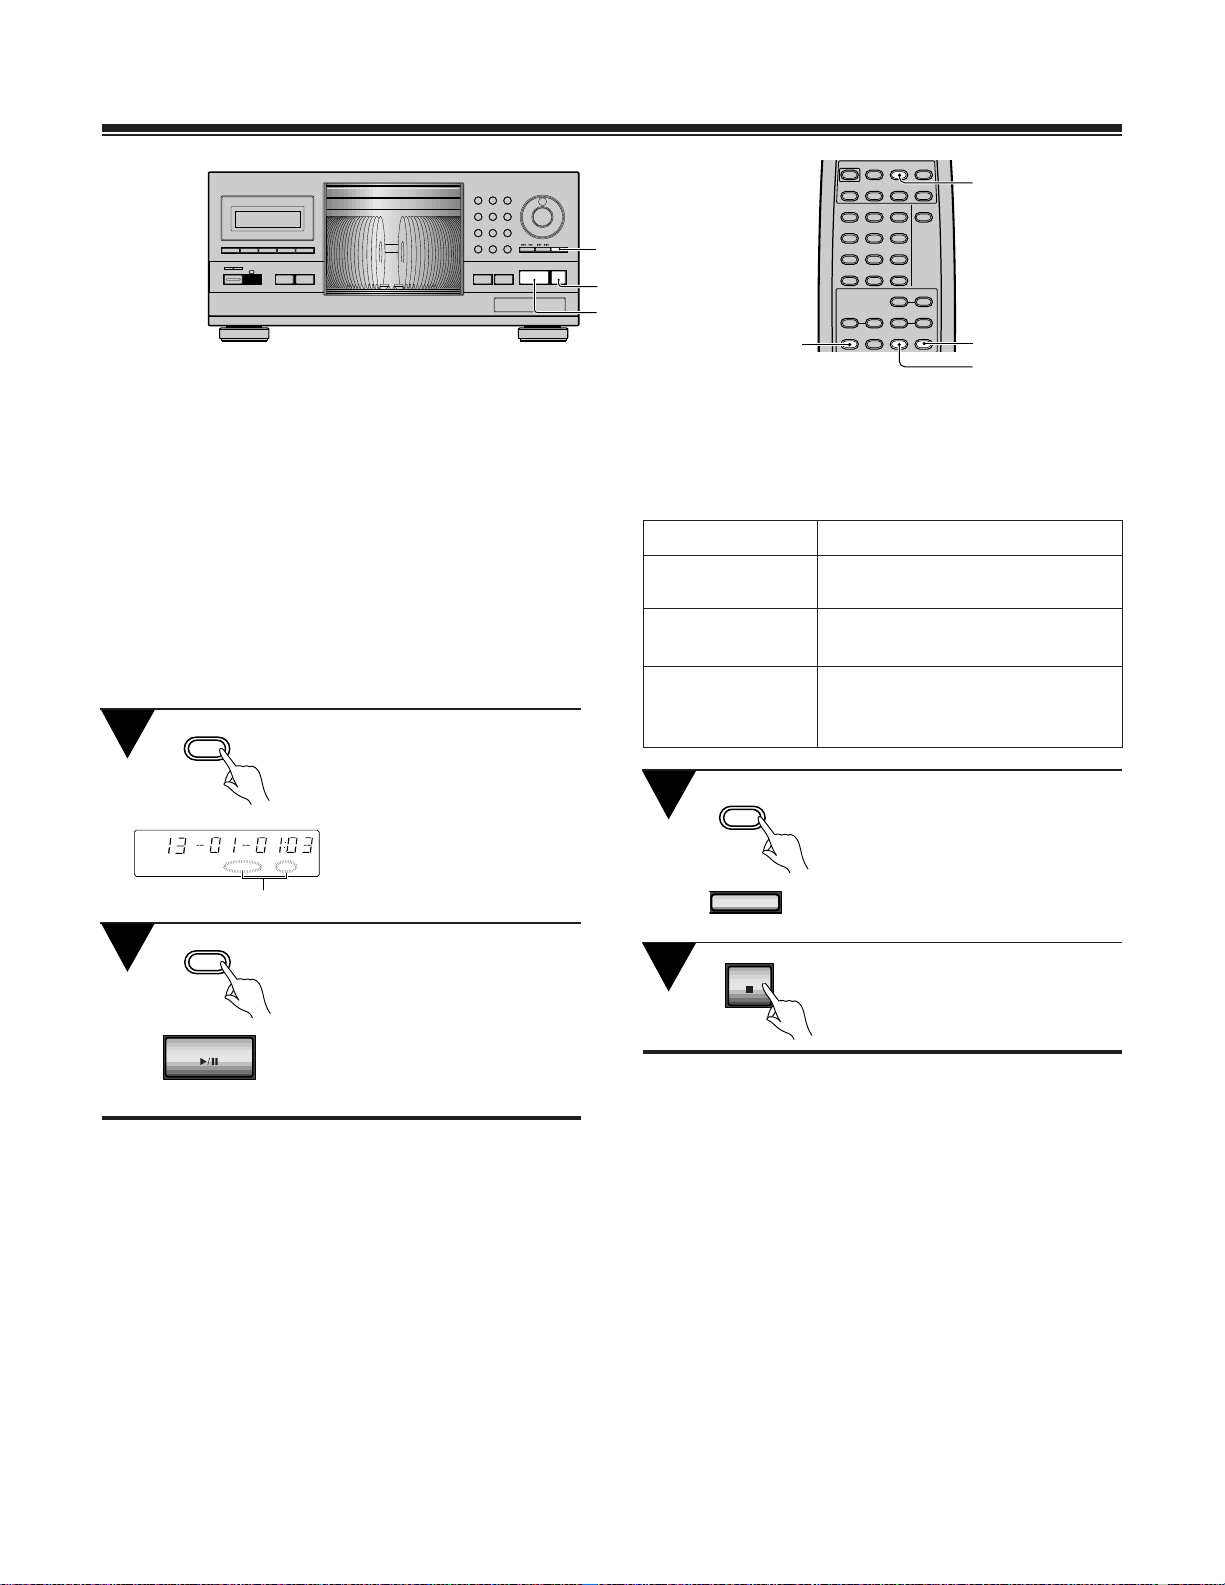
To select the disc and track
Use the number buttons to
select the disc, then press
DISC SET.
Use the number buttons to
select the track, and press
TRACK SET.
To select a play mode
MODE
ALL : All discs play.
SINGLE :One disc plays.
CUSTOM :
(1 to 5)
Only discs stored in the CUSTOM file play (see
“CUSTOM Play”
in stop mode:
during playback:
• When you select SINGLE during playback, only the
current disc plays.
• If you press MODE during program mode, the program
contents will be erased.
Notes:
• When you turn the power ON, playback starts according
to the last selected play mode.
• If you did not select a play mode, playback starts in ALL.
• SINGLE is selected automatically when playing the disc
loaded in the single loader slot.
<Last disc memory>
When you press 7 or turn the power OFF, the changer
memorizes the disc being played. The next time you press
6, playback will start from that same disc. (This feature
is not available in the PROGRAM play, BEST play, PREVIOUS scan, HI-LITE scan and RANDOM play modes.)
Press MODE repeatedly during
play or stop mode to select a
mode.
Playback occurs according to
the selected mode.
on page 12).
3
ALL SINGLE
ALL SINGLE
3
CUSTOM
33
2
Page 11

2
DISC TRACK MIN SEC
MODE
CLEAR PROGRAM
1
REPEAT DISPLAY
STAND BY
SINGLE PLAY
POWER
OSR
ACCESS PLAY
CD-FILE
OPEN/
CLOSE
321
654
987
TRACKDISC
0
UNLOAD
Jog Dial
DISC PUSH
ENTER
ASMS/SEARCH
RANDOM
PLAY/PAUSE STOP
6
7
ENTER
41/¡¢
7
6
1 2
4 5
7 8
DISC
SET
1
SEARCH
7
7 8 3
0
¡ 4
3
6
9
TRACK
SET
2 3
ASMS
DISPLAY
¢
DISC (2/3)
4/¢
DISC
RANDOM
3
3
OPEN/CLOSE
Single Loader Slot
Playing a disc that is not loaded in the rack
Use the single loader slot to play discs that are not loaded
in the rack .
1
SINGLE
ACCESS
2
3
Tips:
• The disc in the single loader slot can also be selected
• If a disc has been loaded in the single loader slot,
• To play the disc in the single loader slot using the remote
PLAY
PLAY
with the jog dial.
Use the jog dial to select the slot after disc number 300
and before disc number 0 (where P0 is displayed).
pressing SINGLE LOADER PLAY allows you to play it
anytime, even during playback of a disc stored in the
rack.
control, press 0 and DISC SET.
Press SINGLE LOADER
ACCESS
.
• The hood opens with the
single loader slot located in
the front of the changer.
Load the disc in the single
loader slot with the label side
(printed surface) facing to the
right.
Press SINGLE LOADER PLAY.
• The play mode is set to
SINGLE.
To start playback from a specific disc
DISC PUSH
During pause, turn the jog dial to
ENTER
select the disc number.
During pause, press 6 or
ENTER ( 3 on the remote
control) after choosing the disc.
(To perform this operation from
the remote control, use the DISC
(2/3)
to select the disc number.)
• Playback starts from the first
track of the chosen disc.
Opening or closing the hood during
playback
To open the hood during playback
OPEN/
CLOSE
• HOLD is displayed.
• The rack does not rotate.
• When playback of the current disc has completed, the
changer enters stop mode. The next disc is played after
the hood has been closed.
OPEN/
CLOSE
Press OPEN/CLOSE and hold
it in for about 2 seconds.
To close the hood, press
OPEN/CLOSE.
To play a track
ASMS/SEARCH
Press 41/¡¢ during
play or pause to choose the track
number (or press 4/¢ on the
remote control).
During pause, press 6 after
choosing the track.
Note: If the hood is opened during play, UNLOAD and
SINGLE LOADER ACCESS functions are defeated.
11
Page 12

Number Buttons
CD-FILE
DISC PUSH
321
321
654
654
987
987
987
ASMS/SEARCH
TRACKDISC
0
0
PLAY/PAUSE STOP
OPEN/
UNLOAD
6
CLOSE
CLEAR
MODE
DISC TRACK MIN SEC
MODE
CLEAR PROGRAM
STAND BY
POWER
OSR
DISPLAY
REPEAT DISPLAY
SINGLE PLAY
ACCESS PLAY
DISC
(CUSTOM play)
The changer lets you program up to 300 of your favorite
discs.
You can even add other discs later on.
There are 5 programmable custom files in which you can
program any discs you like.
Here is an example of how CUSTOM works: Programming
discs 3 and 12 in custom file 5
1
2
• If a disc number appears, press CLEAR.
MODE
MODE
(
5
( 5 )
In the stop mode, press MODE
several times to set the custom
mode.
)
Select the custom number with
the number buttons.
DISC TRACK MIN SEC
CUSTOM
Light
¢
CLEAR
DISPLAY
DISC (2/3)
ENTER
RANDOM
7
Number Buttons
MODE
DISC SET
MODE CLEARPROGRAMREPEAT
1 2
1 2
4 5
4 5
7 8
7 8
DISC
SET
1
SEARCH
7 8 3
0
0
¡ 4
3
3
6
6
9
9
TRACK
SET
2 3
DISPLAY
DISC
ASMS
RANDOM
3
To start playback
321
654
987
0
Follow Steps 1 and 2 then
press 3.
Playback starts from the lowest
disc number.
To check the numbers of the stored discs, after
completing Steps and , press DISPLAY 3
1
2
times. You should see a display like that shown
below.
Pressing DISC (2/3) repeatedly displays, a disc
number stored in the CUSTOM file. When all the
disc numbers have been displayed, the disc
number changes to a blank. (To perform this
operation on the changer, turn the jog dial
clockwise.)
DISC TRACK MIN SEC
CUSTOM
3
Select the disc number with
the remote control number
buttons.
DISC TRACK MIN SEC
( 3 )
CUSTOM
• The disc number can also be selected with DISC (2/3)
or the changer’s jog dial. In this case, because custom
registration will function after approx. 2 seconds, Step
is not necessary.
4
5
Press DISC SET.
DISC
(
)
Repeat Steps 3 and 4 to
store other discs.
DISC TRACK MIN SEC
CUSTOM
12
Pressing CLEAR on the front panel during the
custom mode cancels the displayed disc number
from the custom file.
• When using the jog dial during custom playback, only
the discs stored in the custom file can be selected.
4
• If you use the number buttons and DISC SET during
CUSTOM playback to choose a disc not stored in the
CUSTOM file, NO DISC displays for about 3 seconds.
• When a disc assigned to the CUSTOM file is not loaded
in the rack, NO DISC displays for about 3 seconds, the
disc is erased from memory, and CUSTOM searches for
the next disc.
• The discs stored in the CUSTOM file are not erased
when you turn off the power.
Page 13

REPEAT
DISC PUSH
DISC TRACK MIN SEC
MODE
CLEAR PROGRAM
STAND BY
POWER
REPEAT DISPLAY
SINGLE PLAY
OSR
ACCESS PLAY
CD-FILE
321
654
987
ASMS/SEARCH
TRACKDISC
0
PLAY/PAUSE STOP
OPEN/
UNLOAD
6
CLOSE
(REPEAT play)
This operation is available only from the remote control.
Press REPEAT repeatedly
during playback. The repeat
mode changes as follows.
33
One track repeat ALL repeat
(One track repeat)
Repeats the current or a selected track during play operations other than HI-LITE scan and PREVIOUS scan.
(ALL/SINGLE/CUSTOM)
2
OFF
ENTER
REPEAT
RANDOM
7
HI-LITEPOWER BESTPREVIOUS
MODE CLEARPROGRAMREPEAT
1 2
4 5
7 8
DISC
SET
1 SEARCH ¡ 4 ASMS ¢
DISPLAY
3
6
9
TRACK
0
SET
DISC
2 3
BEST
(BEST play)
To use the one-touch memory to store your favorite tracks,
press BEST while playing a track. You can store up to 20
tracks.
• The operation is available only from the remote control.
• These operations cannot be performed on the CD
inserted into the SINGLE LOADER SLOT.
BEST
DISC TRACK MIN SEC
ALL
Press BEST while playing a
track you like.
The BEST indicator blinks and
the disc and track number are
stored in memory.
BEST
Blink
(ALL repeat)
Repeats in one of the following 3 ways according to the
play mode:
ALL :Repeats all the tracks on all the discs (1-300).
SINGLE :Repeats all the tracks on the selected disc.
CUSTOM :All of the discs classified under one of the 5
CUSTOM banks are played repeatedly.
(OFF)
Cancels repeat play and returns the changer to normal play
mode.
• To stop repeat playback, press 7.
• During ALL repeat mode, if the ALL, SINGLE or
CUSTOM play mode is not displayed, the currently
playing program mode (PROGRAM play, BEST play,
PREVIOUS scan or HI-LITE scan) will be repeated.
<To listen to the memorized tracks>
BEST
Press BEST during stop mode.
The BEST indicator lights and
playback starts from the most
recently memorized track.
• If you press CLEAR during Best playback, the current
track is erased and the next track starts to play.
• You cannot memorize a track twice by pressing BEST
during Best playback.
• If you press BEST to memorize a track when 20 tracks
are already memorized, the oldest track is erased from
memory and the new track is memorized.
• The memorized contents are stored, even when the
power is turned off.
13
Page 14
2 3
DISC TRACK MIN SEC
MODE
CLEAR PROGRAM
STAND BY
POWER
HI-LITEPOWER BESTPREVIOUS
DISC PUSH
321
ENTER
654
987
ASMS/SEARCH
TRACKDISC
REPEAT DISPLAY
SINGLE PLAY
OSR
ACCESS PLAY
CD-FILE
0
OPEN/
CLOSE
RANDOM
7
RANDOM
7
PLAY/PAUSE STOP
UNLOAD
6
6
7
MODE CLEARPROGRAMREPEAT
1 2
4 5
7 8
DISC
SET
1
SEARCH
7 8 3
0
¡ 4
TRACK
DISPLAY
3
6
9
SET
DISC
ASMS
RANDOM
PREVIOUS
¢
RANDOM
3
(PREVIOUS scan)
• This function scans the discs in reverse order, starting
from the last disc played.
• It can remember up to 20 discs. If the total number of
discs exceeds 20, the oldest disc will be erased to make
room for the new disc.
• The operation is available only from the remote control.
• This operation cannot be performed on the CD inserted
into the SINGLE LOADER SLOT.
For example: If you played discs 1, 2, 9, 12 and 13 in
order:
PREVIOUS
DISC TRACK MIN SEC
PREVIOUS SCAN
Blink
3
PLAY/PAUSE
(
)
• To cancel the scanning, press 7.
• Discs played during random, program, HI-LITE scan,
Best and Single Loader playback are not included in the
PREVIOUS scan.
• If the first track is less than 1 minute long, the first 10
seconds of the track plays. If the first track is less than
10 seconds long, the entire track plays.
Press PREVIOUS.
• The changer plays a 10
second portion located one
minute into the first track of
each disc, starting from the
last disc you played: 13, 12,
9, 2, 1.
Press 3 ( 6 ) when you
reach the disc you want to
hear.
• Previous disc scan is
canceled and normal play
resumes.
(RANDOM play)
RANDOM selects tracks at random from the disc(s) in the
current play mode and plays each track once. The selected
play mode (see below) stops after its contents have played.
Play mode selected
ALL
Plays all tracks in all discs in a
random order.
SINGLE
Plays all the tracks from a single
disc at random.
CUSTOM
Plays all tracks in the discs stored
in the CUSTOM file in a random
order.
RANDOM
RAMDOM
(
)
STOP
Notes:
• Random play cannot be activated during the program
mode. (If you press RANDOM during program play or
best play, the program contents are erased and the
changer plays tracks at random from all the discs.)
• If you press REPEAT during random play, the contents
of the random mode are repeated. (RANDOM REPEAT)
• If you press MODE during random play, random play is
switched to the ALL or SINGLE play.
• If all discs contain no more than 16 tracks, random play
plays every track in the discs once.
If any of the discs contain more than 16 tracks, random
play plays the same number of tracks as the total
number of tracks in the discs, but the tracks with track
number 17 or more are not always played once.
• Random play begins after disc detection is completed.
Play contents
Press RANDOM during either
play or stop mode.
• The RANDOM indicator
lights and random play
begins (according to the
current play mode).
To stop random play, press 7.
14
Page 15

DISC
SET
0
7 8
9
4 5
6
1 2
3
CLEAR
5 DISC
DISC TRACK MIN SEC
MODE
CLEAR PROGRAM
STAND BY
POWER
1
REPEAT DISPLAY
SINGLE PLAY
OSR
ACCESS PLAY
2
CD-FILE
OPEN/
CLOSE
3
2
DISC PUSH
321
321
ENTER
654
654
987
987
ASMS/SEARCH
0
TRACKDISC
0
RANDOM
PLAY/PAUSE STOP
UNLOAD
6
3
7
3
2
2
7
7
5
6
MODE CLEARPROGRAMREPEAT
1 2
4 5
7 8
0
1
SEARCH
¡ 4
7 8 3
8
1
3
6
9
TRACK
SET
2 3
ASMS
DISPLAY
DISC
RANDOM
CLEAR
3
¢
5
(PROGRAM play)
• The remote control is the most convenient way to
perform this operation. You can also press the button
between parentheses as indicated below.
• You can program up to 36 steps.
Operation example : Programming disc 2, track 7 as step
1, and disc 5, track 3 as step 2.
PROGRAM
1
(
2
2 DISC
(
3
7 TRACK
(
PROGRAM
)
Press PROGRAM during stop
mode.
DISC TRACK MIN SEC
PGM
Use the number buttons to
select the disc, then press
DISC SET.
DISC TRACK MIN SEC
)
PGM
The PGM indicator starts
to blinks.
Use the number buttons to
select the track, and press
TRACK SET.
DISC TRACK MIN SEC
PGM
)
DISC TRACK MIN SEC
PGM
4
Repeat Steps 2 and 3 to
program additional discs and
tracks.
Once the track times have
(
been added, the PGM indicator
)
stops blinking and the following display appears (Total
Time).
DISC TRACK MIN SEC
PGM
(
5
3 TRACK
3
)
Press 3.
The program play starts from
the track that was programmed
first.
PLAY/PAUSE
(
)
The following operations can only be performed
during normal play, HI-LITE scan or PREVIOUS scan.
<Programming tracks during normal play>
(Direct program)
1. Press PROGRAM to activate program mode.
2. Press PROGRAM during playback to program the
current track.
<Programming during normal playback>
(Preprogramming)
You can program during normal playback.
(\Operation example )
1
23
4
• The changer changes to program play when the current
track finishes playing.
• To change to program mode directly, press 3.
The following operations can only be performed
during stop mode.
<Programming an entire disc as one step>
(Disc all program)
If you skip Step of the operation example, disc 2 is
programmed as Step .
3
1
15
Page 16

HI-LITE
HI-LITEPOWER BESTPREVIOUS
MODE CLEARPROGRAMREPEAT
1 2
4 5
7 8
DISC
SET
1
SEARCH
7 8 3
0
¡ 4
3
6
9
TRACK
SET
2 3
ASMS
DISPLAY
DISC
¢
RANDOM
3
<Programming a pause (remote control only)>
(Pause program)
If you press 8 at Step , you can program a pause. When
4
you press 8, PA appears in the display instead of the disc
number.
• For example, when making a program for recording both
sides of a cassette tape, press 8 to insert a pause after
programming the tracks for one side. After turning the
tape over, press 8 to resume recording.
Notes:
• You cannot program a pause as the first step, nor
program two pauses in a row.
• When you program a pause, it counts as one step and
reduces the total number of tracks you can program.
• To erase a program...
Press 7 twice during playback (or once in stop mode).
You can also erase the program by pressing MODE,
RANDOM, PREVIOUS, or SINGLE LOADER PLAY in
either play or stop mode (or by pressing BEST in stop
mode).
• To cancel a program step
In stop mode, each time you press CLEAR, the last step
in the program is erased.
• If a programmed disc is missing or inserted backwards
during program play, NO DISC appears in the
display, the step is automatically erased, and playback
proceeds to the next step.
• Program contents are stored in memory even when
the power is turned off.
• Press DISPLAY twice to check the number of steps that
have been programmed.
DISC TRACK MIN SEC
(HI-LITE scan)
• The operation is available only from the remote control.
This function plays a 10 second portion located 1 minute
from the start of each track on all the discs in the current
play mode.
<Disc scan> Press HI-LITE during either
HI-LITE
Press once
<Track scan> Press HI-LITE twice during
HI-LITE
Press twice
<Program scan> Press HI-LITE during program
HI-LITE
Press once
play or stop mode.
• The changer plays a 10
second portion located 1
minute into the first track of
each CD, starting from the
first CD.
The DISC and SCAN indicator
blinks.
either play or stop mode.
• The changer plays a 10
second portion located 1
minute into each track of
each CD, starting from the
first CD.
The SCAN indicator blinks.
mode.
• The changer plays a 10
second portion located 1
minute into each track in the
program.
The SCAN indicator blinks.
PGM
This Indicates the Number of
Programmed Steps.
Notes:
• If Step is carried out before the accumulated time is
5
displayed, the program play starts and the time is not
displayed.
• When UNLOAD is pressed while a program has been
entered, the disc for the 1st program step comes on the
center position and the hood opens.
• The display is not shown if the total time of the program
is 100 minutes or more.
16
<Best selection memory scan>
HI-LITE
Press HI-LITE during best
selection memory playback.
• The changer plays a 10
second portion located 1
Press once
minute into each track in the
best selection memory.
The SCAN indicator blinks.
Page 17

DISPLAY
DISC TRACK MIN SEC
ALL
DISC TRACK MIN SEC
ALL
DISC TRACK MIN SEC
ALL
DISC TRACK MIN SEC
MODE
CLEAR PROGRAM
STAND BY
POWER
OSR
REPEAT DISPLAY
SINGLE PLAY
ACCESS PLAY
HI-LITEPOWER BESTPREVIOUS
MODE CLEARPROGRAMREPEAT
DISC PUSH
321
ENTER
654
987
ASMS/SEARCH
TRACKDISC
CD-FILE
0
OPEN/
CLOSE
RANDOM
PLAY/PAUSE STOP
UNLOAD
6
7
1 2
4 5
7 8
DISC
SET
1
SEARCH
7 8 3
0
¡ 4
3
6
9
TRACK
SET
2 3
DISC
ASMS
DISPLAY
RANDOM
DISPLAY
¢
<To return to normal playback>
3
Press 3 (or 6) when you
reach the track you want to
hear.
HI-LITE scan is canceled and
normal play resumes.
• To cancel HI-LITE scan,
press 7.
Notes:
• You can use 4/¢ to skip to another track during
track scan.
• If the changer is in ALL REPEAT mode, the HI-LITE scan
repeats.
• If the track is less than 1 minute long, the first 10
seconds of the track plays. If the track is less than 10
seconds long, the entire track plays.
To use DISPLAY
DISPLAY
Press DISPLAY during
playback.
Each time you press DISPLAY,
the display changes as follows.
Disc number, Track number
=
and Elapsed Time.
*
«
Remaining time (TRACK)
«
Remaining time (DISC)
«
Total time (TOTAL)
• During PROGRAM play • During BEST play
Disc number, Track
Disc number, Track
=
number and Elapsed
Time.
*
«
Remaining time (TRACK)
«
Total program time and
number of steps (TOTAL)
=
number and Elapsed
Time.
*
«
Remaining time (TRACK)
«
Total number of steps
memorized in BEST
(TOTAL)
When playing a disc containing CD TEXT, the disc title
*
appears after the elapsed time display.
(Example: BEETHOVEN
SYMPHONY)
When the CD TEXT disc
plays, the disc title scrolls on
the display.
(The scrolled title can consist
up to 60 characters.)
• The top 8 characters of the
title are shown in stop mode.
Characters that can be shown in the title display
• Alphabet (lowercase letters are converted into
uppercase.)
A B C D E F G H I J K L M N O P Q R
S T U V W X Y Z
• Numerals and symbols
0 1 2 3 4 5 6 7 8 9 – + / \ | X
_ (Space)
Other symbols than the above are shown as (Space).
Notes:
• Time remaining on the track for tracks numbered greater
than 24 might not be displayed.
• Time remaining on the disc is not displayed during
RANDOM, PROGRAM or BEST play.
17
Page 18
TROUBLESHOOTING
This CD changer has been manufactured to the specifications of RadioShack and is covered by a limited warranty from
RadioShack. If your CD changer is not operating as it should, take it to your local RadioShack store or call 1-800-THE-SHACK
for assistance.
Your CD changer should give you years of trouble-free service. However, if you do have problems, these suggestions might
help.
Symptom
No sound
When playback is started, it
stops immediately.
Pauses or stops during
playback.
Remote control will not
function.
• Output cables are connected incorrectly or
loosely.
• Incorrect operation of stereo amplifier.
• Pin plugs and/or amplifier terminals are
dirty.
• Changer is in pause mode.
• The disc is loaded with the label side facing
left.
• Disc is inserted incorrectly.
• Smudges or debris on the disc.
• Dead batteries.
• Obstruction between the changer and the
remote control.
Cause
Remedy
• Connect properly.
• Check the settings of the amplifier
switches and sound volume controls.
• Clean away dirt.
• Press 3 or 8.
• Reload the disc with the label side facing
right.
• Insert the disc correctly with the label
side facing right.
• Clean the disc.
• Replace the batteries.
• Relocate the remote control or remove
the obstruction.
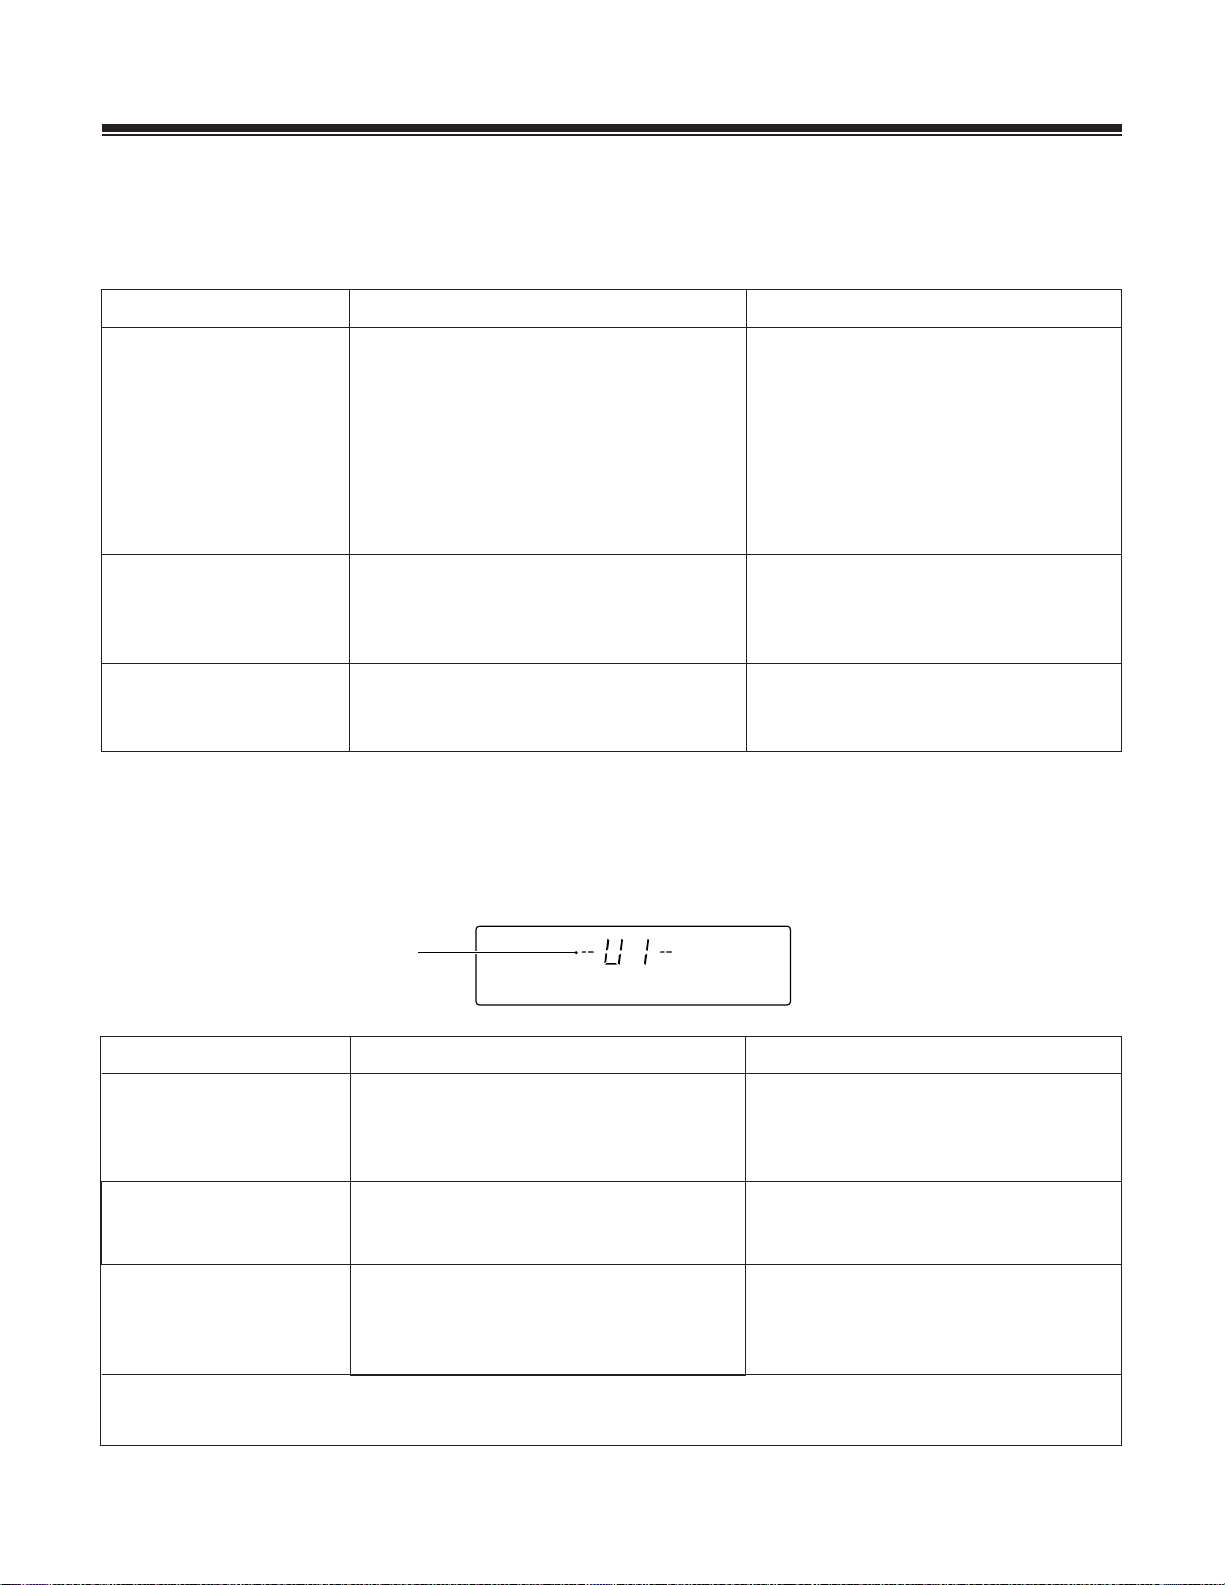
SELF-DIAGNOSTICS FUNCTION
Your CD changer has a self-diagnostic function. When the CD changer detects an abnormal condition, it displays an error
number on the display. If this happens, try the suggestion indicated. If the error number still appears, take the CD changer to
your local RadioShack store for assistance.
Display on the changer
DISC TRACK MIN SEC
18
Service No.
Service No.
U1
U2
U3
If the same display reappears, there might be an error in the mechanical section. When requesting servicing, please note
the service number displayed on the changer.
The disc may not be loaded properly in the
rack.
There is an operation error in the mechanical
section.
There is an error related to the hood.
Unit Status
Suggestions
• Reload the discs properly.
(Insert only one disc in a slot.)
• Check for foreign matter on the disc.
• Check for foreign matter in the rack.
• Check for foreign matter in the rack.
• Unplug the power cord then plug it in
again.
• Check the hood for clearance and
obstructions.
• Unplug the power cord then plug it in
again.
Page 19

SPECIFICATIONS
General
Type .............................Compact disc digital audio system
Power requirements ................................ AC 120 V, 60 Hz
Power consumption .................................................. 12 W
Power consumption in standby mode ......................... 1 W
Operating temperature................................ +41°F – +95°F
(+5°C – +35°C)
Weight ( without package ).................. 16 lb 9 oz. (7.5 kg)
External dimensions
.......................... 16-9/16(W) X 17-1/16(D) X 7-5/8(H) In.
(420(W) X 433(D) X 193(H) mm)
Audio section
Frequency response ..................................... 2 Hz - 20 kHz
S/N ratio ........................................... 98 dB or more (EIAJ)
Dynamic range.................................. 96 dB or more (EIAJ)
Harmonic distortion.........................0.003 % or less (EIAJ)
Level difference between channels ......1.0 dB or less (EIAJ)
Output voltage............................................. 2 Vrms (EIAJ)
Wow and flutter less than ±0.001 % (W.PEAK)
(below measurable level) (EIAJ)
Channels................................................ 2-channel (stereo)
Input/Output terminal
Audio line output
Control input/output jacks
Optical digital output jack
Accessories
• Remote control............................................................. 1
• Audio cable .................................................................. 1
• Control cable ............................................................... 1
Note:
Specifications and design subject to possible modification
without notice, due to improvements.
FCC Information
This equipment complies with the limits for a Class B digital device as specified in Part 15 of FCC Rules. These limits provide
reasonable protection against radio and TV interference in a residential area. However, your CD changer might cause TV or
radio interference even when it is operating properly. To eliminate the interference, try one or more of the following corrective
measures:
• Reorient or relocate the receiving antenna.
• Increase the distance between the CD changer and the radio or TV.
• Use outlets on different electrical circuits for the CD changer and the radio or TV.
Consult your local RadioShack store or an experienced radio/TV technician if the problem still exists.
19
Page 20

This product is warranted by RadioShack against manufacturing defects in material and workmanship
under normal use for one (1) year from the date of purchase from RadioShack company-owned stores
and authorized RadioShack franchisees and dealers. EXCEPT AS PROVIDED HEREIN, RadioShack
MAKES NO EXPRESS WARRANTIES AND ANY IMPLIED WARRANTIES, INCLUDING THOSE OF
MERCHANTABILITY AND FITNESS FOR A PARTICULAR PURPOSE, ARE LIMITED IN DURATION
TO THE DURATION OF THE WRITTEN LIMITED WARRANTIES CONTAINED HEREIN. EXCEPT AS
PROVIDED HEREIN, RadioShack SHALL HAVE NO LIABILITY OR RESPONSIBILITY TO CUSTOMER
OR ANY OTHER PERSON OR ENTITY WITH RE-SPECT TO ANY LIABILITY, LOSS OR DAMAGE
CAUSED DIRECTLY OR INDIRECTLY BY USE OR PERFORMANCE OF THE PRODUCT OR ARISING OUT OF ANY BREACH OF THIS WARRANTY, INCLUDING, BUT NOT LIMITED TO, ANY DAMAGES RESULTING FROM INCONVENIENCE, LOSS OF TIME, DATA, PROPERTY, REVENUE, OR
PROFIT OR ANY INDIRECT, SPECIAL, INCIDENTAL, OR CONSEQUENTIAL DAMAGES, EVEN IF
RadioShack HAS BEEN ADVISED OF THE POSSIBILITY OF SUCH DAMAGES.
Some states do not allow the limitations on how long an implied warranty lasts or the exclusion of
incidental or consequential damages, so the above limitations or exclusions may not apply to you. In the
event of a product defect during the warranty period, take the product and the RadioShack sales receipt
as proof of purchase date to any RadioShack store. RadioShack will, at its option, unless otherwise
provided by law: (a) correct the defect by product repair without charge for parts and labor; (b) replace
the product with one of the same or similar design; or (c) refund the purchase price. All replaced parts
and products, and products on which a refund is made, become the property of RadioShack. New or
reconditioned parts and products may be used in the performance of warranty service. Repaired or
replaced parts and products are warranted for the remainder of the original warranty period. You will be
charged for repair or replacement of the product made after the expiration of the warranty period.
This warranty does not cover: (a) damage or failure caused by or attributable to acts of God, abuse,
accident, misuse, improper or abnormal usage, failure to follow instructions, improper installation or
maintenance, alteration, lightning or other incidence of excess voltage or current; (b) any repairs other
than those provided by a RadioShack Authorized Service Facility; (c) consumables such as fuses or
batteries; (d) cosmetic damage; (e) transportation, shipping or insurance costs; or (f) costs of product
removal, installation, set-up service adjustment or reinstallation.
This warranty gives you specific legal rights, and you may also have other rights which vary from state
to state.
RadioShack Customer Relations, Dept. W, 200 Taylor, 6th Floor, Fort Worth, TX 76102
Limited One-Year Warranty
We Service What We Sell
10/99
RadioShack
A Division of Tandy Corporation
Fort Worth, Texas 76102
42-7005
<RRB1302-A>
11A99 Printed in Japan
 Loading...